

Skyrocket Toys 01736RX24G Users manual
STREAMING DRONE WITH AUTO PILOT
FLYING GUIDE
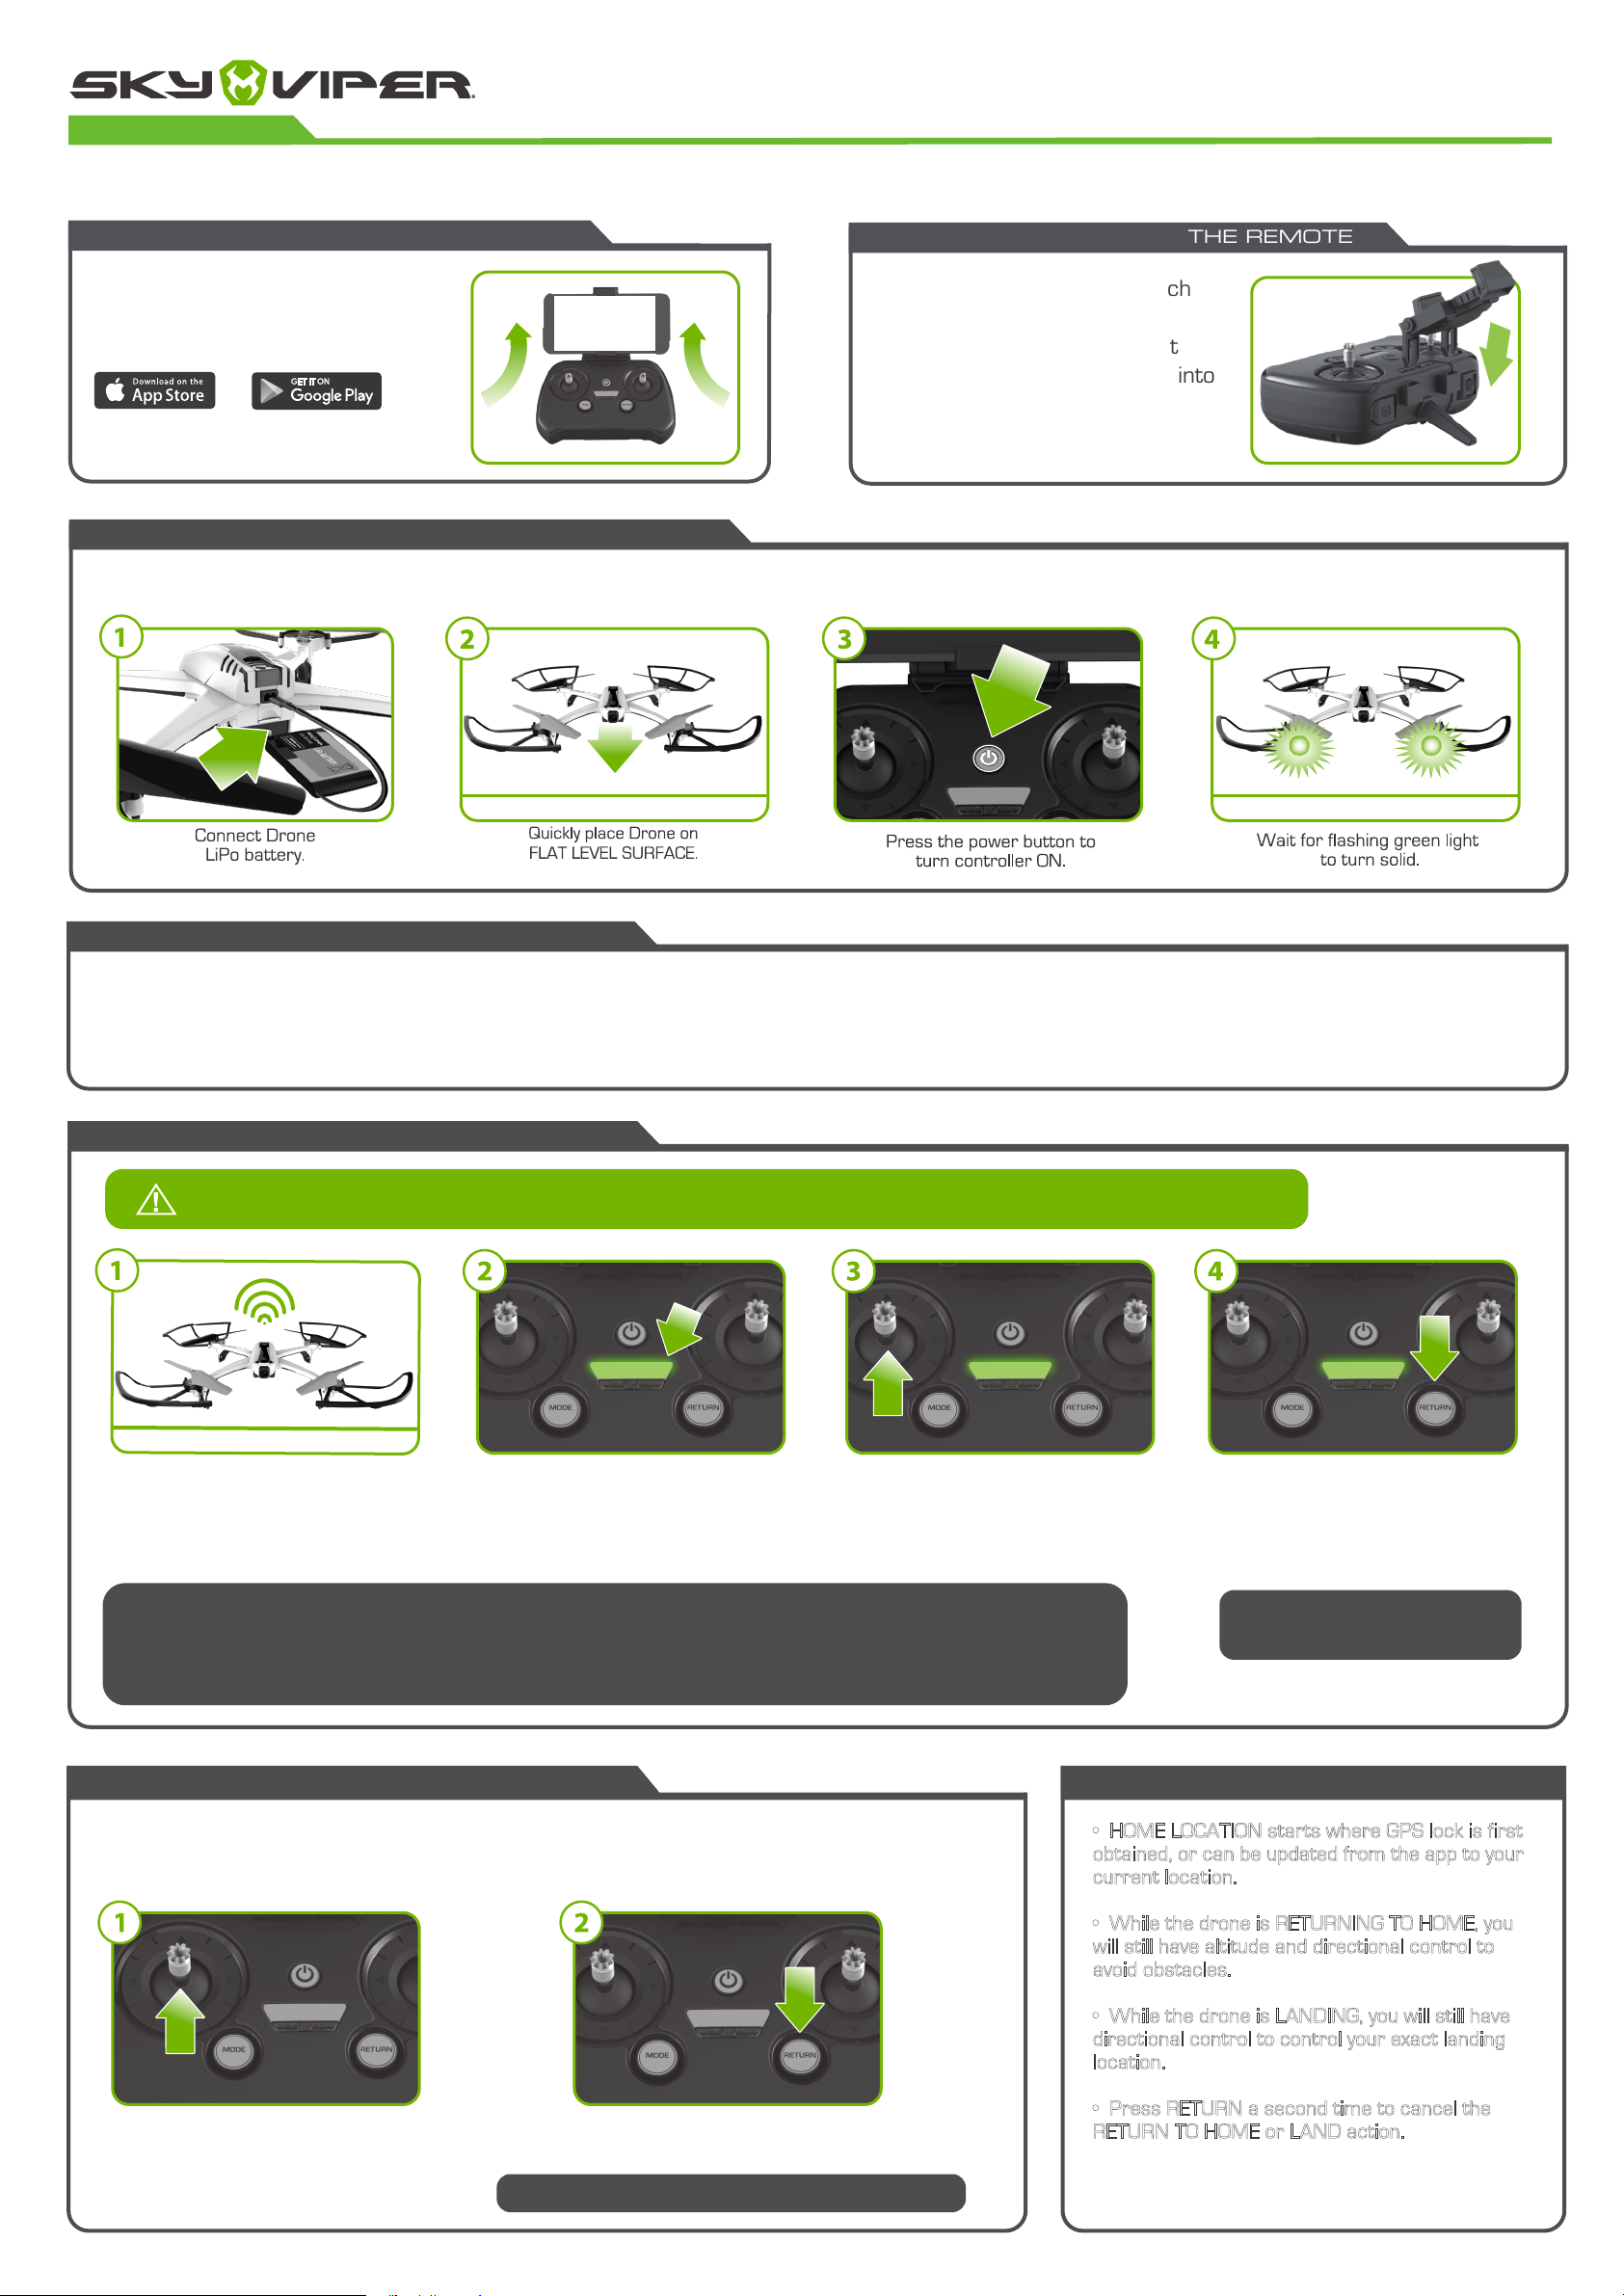
INSTALL THE SKY VIPER VIEWER APP
Dowload and install free
Sky Viper Video Viewer
app onto your smart phone.
v2450
GPS
ATTACH YOUR PHONE TO THE REMOTE
If not already assembled, attach
phone mount to remote.
Push upper lip of phone mount
upward and insert your phone into
mount as shown.
POWERING UP AND PAIRING DRONE TO REMOTE
Charge LiPo battery and insert into drone. Install 3 fresh 1.5V AA (LR6) batteries into remote.
with an unobstructed view to the sky
CONNECTING DRONE TO SMART PHONE
1. Go to the Wi-Fi settings on your device and select SKYVIPERGPS_XXXXXX to connect.
(Name of Sky Viper network may vary). Connection may take up to 30 seconds.
2. Enter the Wi-Fi password: vipergps
3. Open the Sky Viper Video Viewer App on your device
ACQUIRING GPS LOCK
WARNING: GPS MODE SHOULD ONLY BE USED OUTDOORS
The frame will start to acquire
GPS satellites. During this time,
the GPS LOCK LED will blink.
If GPS mode is taking too long to lock, you can still launch the frame while the system continues to lock. Simply raise the
throttle stick while the device continues to lock on to the GPS signal. Indoor LED will blink while you are flying without GPS
lock, and will turn off once GPS lock is established.
When enough satellites are locked
on, the GPS LOCK will illuminate a
solid GREEN. The frame is now
ready to fly in GPS mode.
CAUTION: In this case, your HOME LOCATION will start
Raise the throttle stick to arm the
frame. The motors will spin, indicating
the frame is armed. Increase throttle
to lift off of the ground.
When flying in GPS mode, press the
RETURN button to RETURN HOME.
The frame will fly back to the home
location and land. RETURN HOME will
ONLY work if GPS LOCK is active.
Press RETURN a second time to
CANCEL the RETURN HOME action.
where the GPS LOCK is obtained. This may not be near your launch location.
INDOOR MODE RET URN TO HOME / L AND
If an open sky is not possible, the frame can be flown in INDOOR mode.
To activate this mode, a tap of the MODE button will enable INDOOR MODE.
The INDOOR LED will illuminate solid red to indicate this mode is active.
• HOME LOCATION starts where GPS lock is first
obtained, or can be updated from the app to your
current location.
• While the drone is RETURNING TO HOME, you
will still have altitude and directional control to
avoid obstacles.
• While the drone is LANDING, you will still have
directional control to control your exact landing
location.
Raise the throttle stick to arm the
frame. The motors will spin, indicating
the frame is armed. Increase throttle
to lift off of the ground.
When flying in INDOOR mode, the RETURN button will
cause the drone to LAND at its current location.
Press RETURN a second time to CANCEL the LAND action.
• Press RETURN a second time to cancel the
RETURN TO HOME or LAND action.
BASIC FLIGHT MA NEUVERS
(IN GPS OR INDOOR MODE)
This drone is designed to automatically maintain a hover so basic flight is easy and intuitive.
TAKE OFF
When GPS LOCK is solid,
or in INDOOR mode,
move the left Throttle
Thumbstick up to arm
the frame, and then
launch the drone.
DIRECTIONAL CONTROL
Move the Directional
Thumbstick in the
direction you want to fly.
STRE AMING AND RECORDING VIDEO
Move the left Throttle
Thumbstick up and
down to fly higher or
lower.
Press RETURN button
to return home in GPS
Mode or land in INDOOR
Mode. You can also land
the drone manually by
holding the left
thumbstick down.
ADJUST ALTITUDE
RETURN
/
LAND
• Stream live video from your drone’s point of view as you fly. Simply follow the in-app
instructions for streaming video.
• Record video or take pictures during your flight using the on-screen recording buttons
or the Photo or Video buttons located on your flight controller. See app for details.
• Higher quality video and pictures can be recorded directly to the micro SD memory
card located inside the drone. Once video has been recorded and you have completed your
flight, the video files can be downloaded to your smart device through the drone’s
Wi-Fi connection. Videos can also be downloaded directly by removing the Micro SD card
from the drone and inserting into a personal computer. See app for details regarding
recording and Micro SD card.
FLIGH T CONT ROLS
• Push throttle stick up to arm the drone. Motors will slowly spin. • Move the direction stick forward to fly forward in the direction
• Once armed, push the throttle stick up to make the drone lift.
• The further you push the throttle stick, the faster you lift.
Micro SD slot is located
on the back of drone.
Insert card pin side up.
of the green front blades. Move backwards to fly backward. The
further you push, the faster the drone will fly in that direction.
• Push the direction stick left to fly left. Push right to fly right.
The further you push the faster the drone will fly sideways.
Video Record Button
THROTTLE/
ROTATION STICK
Power On/
Off Switch
SAFETY SHUT-OFF INDOOR MODE: LANDGPS MODE: RETURN TO HOME
If you press the power button, the
motors will shut off. To reactivate,
turn off remote and unplug battery
from drone, then restart both as
instructed in Powering Up and Pairing.
SWITCH BETWEEN
GPS MODE /
INDOOR MODE
*GPS Mode should ONLY
be used outdoors
When in GPS Mode, pressing the RETURN button
will instruct the drone to return to the home location.
HOME LOCATION starts where GPS lock is first
obtained or can be updated from the app to your
current location.
Phone Mounts
Photo Button
DIRECTION STICK
When in INDOOR Mode, pressing the
RETURN button will instruct the drone
to land immediately at its current
location.
FLYING TIPS
• Pulling the throttle backwards will reduce power
and the drone will descend.
• When launching the drone, face the same direction
as the drone faces. Green blades face forward.
• Practice launching, hovering and landing before
attempting to learn other moves.
• Flying 2 to 3 feet above the ground will reduce ground
turbulence and make flying easier.
• When first attempting to fly in different directions, start
by tapping the direction stick until you have a feel for it.
Always move controls slowly until you become comfortable
operating the drone.
• Once you’ve mastered flying in directions, practice
rotational controls. Spin and keep drone facing the same
direction as flying becomes easier and more intuitive.
• If propeller blades come in contact with another object or you crash,
throttle down or land immediately to prevent possible or further damage.
• If anything prevents drone’s blades from spinning or they become
jammed, throttle down or land immediately. Do not attempt to fly until
obstruction has been removed and damage fixed.
• Should soemthing prevent drone’s blades from spinning, drone may
auto shutdown. LiPo battery will need to be unplugged then reconnected
to restore flying power.
• If the drone flies too far away, beyond the control range of the remote,
the drone will return to home or land to prevent the drone from flying
away out of control.

STREAMING DRONE WITH AUTO PILOT
CONTENTS REMOTE BATTERIES
NOT INCLUDED
(
)
• Drone
• Controller/Transmitter
• 1200 mAh 3.7V LiPo Battery
• 4 Blade Guards
• Phone Holder
•4 Replacement Blades
•Operator Manual
• USB Charger
• 2 Pro-Style thumb sticks
• 2 Game-Style thumb sticks
CHARGING THE DRONE
Loosen the screw in the
Remote Control battery
compartment door with
a Phillips screwdriver
and insert batteries as
shown. Replace door
and tighten screw.
3
• After use, allow the battery to cool down to room
temperature before charging again.
• Charge battery in an isolated area, away from
excessive heat or moisture.
R E M O VA B L E
BLADE GUARDS
Use the screwdriver to unscrew the propeller, then pull up on propeller to
Blade guards are recommended
for inexperienced users of all ages.
To attach blade guards, insert the
detach. Match A propellers to A legs and B propellers to B legs. Replace screws
and tighten. For proper installation, tighten the screws until it is all the way down
completely. See image below.
guards to the end of each arm,
under the blade.
• If you suspect that the battery is damaged or swelling, turn off the drone immediately.
• Do not modify, heat, or wet the battery in any way.
• Only recharge with provided charger.
REPL ACING DAMAGED BLADES
Front
FAILSAFE GUIDE
When the drone
turns upside down,
the motors will stop
spinning.
When the drone goes of range of the controller,
it will automatically return home/land. If the
controller comes back into range before the
THIS DRONE IS NOT INTENDED FOR USERS UNDER 12 YEARS OF AGE. ADULT SUPERVISION IS REQUIRED.
drone lands, it is possible to cancel this
automatic landing by pressing return.
When the drone’s battery is
depleted, the drone will automatically
land itself in its current position. This
automatic landing cannot be
interrupted with the controller.
When the transmitter battery is at
a critical level, it will alert with
audible warning.
 Loading...