

Page 1
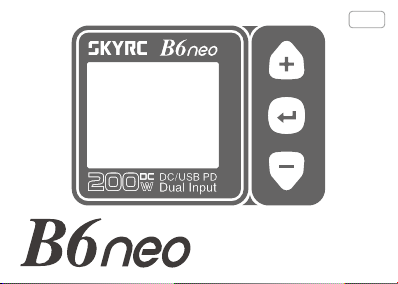
Smart Charger
Instruction Manual
- 1 -
V1.0
Page 2

Introduction
Chart
Specification
Warning
Standard Battery Parameters
Explanation of Buttons
Power and Battery Connection
Operation Description
Lithium Battery Program(LiPo/LiFe/Lilon/LiHV)
NiMH/NiCd Battery Program
Pb Lead-Acid Battery Program
DC Power
Voltage Calibration
Errors and Warnings
System Setting
Conformity Declaration
Warranty and Service
- 2 -
01
02
04
06
07
08
09
11
13
16
20
23
25
26
27
28
29
Page 3

Introduction
Congratulations on your choice of SkyRC B6neo smart charger.
B6neo features a stylish and ultra-compact design. It may be simple to use, but the
operation requires some knowledge. And the purpose of these operating instructions
is to help you quickly become familiar with its functions. Therefore, it is extremely
important that you read the Operating Instructions, Warnings and Safety Notes
thoroughly before using B6neo. It is our hope that B6neo will give you many years of
pleasure and success.
B6neo is a DC smart charger with a maximum output of 200W. It is capable of
charging batteries of varying chemistries (LiPo/LiFe/Lilon/LiHV/NiMH/NiCd/Pb) and
operating as a power supply, making it useful for hobbyists who need to power their
DC equipment. With its unprecedented function of voltage measurement without
power on, it becomes easy to measure battery voltage without hurdles.
Please BE SURE to read these INSTRUCTIONS, WARNINGS, and SAFETY NOTES
prior to using for the first time.
It can be dangerous to mishandle batteries and battery chargers, as batteries always
risk catching fire and exploding.
Mishandling batteries and battery chargers are hazardous and may cause fire and
explosion.
- 1 -
Page 4
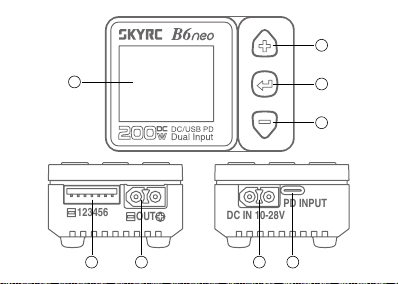
Chart
123456
OUT
DC IN 10-28V
PD INPUT
2
1
5 6 7 8
- 2 -
3
4
Page 5

1
LCD Display
scroll up, increase the
2
current, etc.
confirm the choice, terminate the
3
current program, enter into the
setting, etc.
4
scroll down, decrease the
current, etc.
Package
1*SkyRC B6neo Charger
1*Quick Start Guide
Balance port
5
6
main port, DC output
port, etc.
DC Input, 10.0-28.0V/12A
7
8
PD Input, must comply with
PD3.0 specification
- 3 -
Page 6

Specifications
Item Option Specs
Input voltage
Input current
Max. output power
Working mode
DC 10.0-28.0V
PD3.0/QC 12.0-20.0V
DC 12A
PD 5A
DC 200W
PD 80W
LiPo/LiFe/LiIon/LiHV Balance CHG, Charge, Storage, Discharge
NiMH/NiCd
Pb Normal, AGM Charge, Cold Charge, Discharge
DC power supply 5.0-27.0V, 1.0-10.0A
Charge, Re-Peak, CYCLE_C_D, CYCLE_D_C,
Discharge
- 4 -
Page 7

Battery type/cells NiMH/NiCd 1S-15S
Charge current NiMH/NiCd 0.2A-10.0A
Discharge current Current 0.1A-2A
Balance current LiPo/LiFe/LiIon/LiHV Max.500mA
Size 70x50x32mm
Weight 82g
LiPo/LiFe/LiIon/LiHV 1S-6S
Pb 3S/6S
LiPo/LiFe/LiIon/LiHV 0.2A-10.0A
Pb 0.2A-10.0A
Power Max. 24W (±10%) based on 6S(4.2V/cell)
- 5 -
Page 8

!
Warning
B6neo is not intended for use by persons with reduced physical, sensory or
mental capabilities,
or lack of experience and knowledge, unless they have been given supervision
or instruction concerning the use of the charger by a person responsible for their
safety.
Failure to exercise caution while using this product and comply with the following
warnings could result in a product malfunction, electrical issues, excessive heat,
FIRE, and ultimately injury and property damage.
!
Never leave charging batteries unattended during use.
!
Never charge batteries overnight.
!
Never attempt to charge dead, damaged, or wet battery packs.
!
Never attempt to charge a battery pack containing different types of batteries.
!
Never charge batteries in extremely hot or cold places or place in direct sunlight.
!
Never charge a battery if the cable has been pinched or shorted.
!
Never connect the charger if the power cord has been pinched or shorted.
!
Never attempt to dismantle the charger or use a damaged charger.
!
Always use the charger with the correct charging and discharging program.
- 6 -
Page 9

!
Always use only rechargeable batteries designed for use with this type of charger.
!
Never use the charger on car seats, carpets, or similar surfaces.
!
Always operate the charger away from flammable and explosive materials.
Standard Battery Parameters
Nominal
voltage
Max. charge
voltage
Storage
voltage
Allowable fast
charge current
Min. discharge
voltage
Select the correct operating procedure in accordance with the battery parameters.
Incorrect settings may cause the battery to burn or even explode.
LiPo Lilon LiFe LiHV MiMH NiCd Pb
3.7V/cell 3.6V/cell 3.3V/cell 3.8V/cell 1.2V/cell 1.2V/cell 2.0V/cell
4.2V/cell 4.1V/cell 3.6V/cell 4.35V/cell 1.5V/cell 1.5V/cell 2.4V/cell
3.8V/cell 3.7V/cell 3.3V/cell 3.85V/cell N/A N/A N/A
≤1C ≤1C ≤4C ≤1C 1C-2C 1C-2C ≤0.4C
3.0-3.3V/
2.9-3.2V/
2.6-2.9V/
3.1-3.4V/
0.1-
0.1-
cell
cell
cell
cell
1.1V/cell
- 7 -
1.1V/cell
1.8V~2.0V/
cell
Page 10

Standard Battery Parameters
Go through the menus and increase the parameter value.
Enter the setting, confirm the choice, terminate the progress,
or go back to the previous screen.
Go through the menus and decrease the parameter value.
- 8 -
Page 11

Standard Battery Parameters
1. Connecting to a power source
There are two options of inputs for SkyRC B6neo, DC 10.0-28.0V and PD3.0
12.0-20.0V
PD INPUT
DC 10.0-28.0V
power source
connection.
2. Connecting the battery
TO AVOID SHORT CIRCUITS, ALWAYS CONNECT THE CHARGE
LEADS TO THE CHARGER FIRST, AND THEN TO THE BATTERY.
REVERSE THE SEQUENCE WHEN DISCONNECTING THE PACK
DC IN 10-28V
- 9 -
PD3.0 12.0-20.0V
power supply
connection.
Page 12

1) Lithium Battery Connection with Balance Adapter
For safety reasons, it is highly recommended to charge Lithium batteries
(LiPo, Lilon, LiFe and LiHV) using Balance CHG mode, unless the battery
comes without a balance wire.
The balance wire attached to the battery must be connected to the charger
with the black wire aligned with the negative marking. Ensure correct polarity!
- 10 -
Page 13

2) NiMH/NiCd or Pb Battery Connection
Specifications
Battery Type Working Mode Description
LiPo
Lilon
LiFe
LiHV
Balance CHG
Charge To charge the lithium battery without a balance lead connected.
Storage
Discharge
To charge the lithium battery in balance mode so that the voltages
of each cell can be well balanced.
The balance lead must be connected.
By charging or discharging the battery, a specic storage value
can be achieved. LiPo: 3.8V, LiFe: 3.3V, LiIon: 3.70V, LiHV: 3.85V
To discharge the lithium battery to a specic value, which can be
set before discharging.
- 11 -
Page 14

Charge To charge the NiMH/NiCd battery according to user preferences.
NiMH
NiCd
Pb
In this chart, you can see which operations B6neo is capable of performing based
on the type of battery.
Re-Peak
Cycle_C_D
Cycle_D_C
Discharge
Normal To charge the Pb battery according to user preferences.
AGM Charge To charge the AGM battery according to user preferences.
Cold Charge
Discharge
To charge the battery twice in a row automatically, which is
useful for ensuring the battery is fully charged.
A 1 to 5 cycle charge-discharge process is eective in refreshing
NiMH/NiCd batteries and restoring their performance.
A 1 to 5 cycle discharge-charge process is eective in refreshing
NiMH/NiCd batteries and restoring their performance.
To discharge NiMH/NiCd battery to a specic value, which can
be set before discharging.
To charge the Pb battery at a low temperature according to user
preferences.
To discharge the Pb battery to a specific value, which can be
set before discharging.
- 12 -
Page 15

Lithium Battery Program(LiPo/Lilo/LiFe/LiHV)
Here is a flowchart to guide you to set up the program.
LiPo/6S/Balance CHG
0.00
0.00
0
mAh
Charge Setting
Battery Type: LiPo
Battery Cell: 6S(22.2V)
Task: Balance CHG
Condition: 4.20V
Enter charge setting
V
0
W
A
Press ENTER to enter Charge Setting;
0.0Wh
00:00:00
LiPo
Battery type select
Lilo
Press ENTER to call out the Battery Type menu, and
LiFe
select your preferred lithium battery type.
LiHV
NiMH
- 13 -
Page 16

Charge Setting
1S
Battery Type: LiPo
2S
Battery Cell: 6S(22.2V)
3S
Task: Balance CHG
4S
Condition: 4.20V
5S
Charge Setting
Banlance CHG
Battery Type: LiPo
Charge
Battery Cell: 6S(22.2V)
Storage
Task: Balance CHG
Discharge
Condition: 4.20V
Charge Setting
4.18V
Condition: 4.20V
4.19V
Charge Current: 10.0A
4.20V
Start
4.21V
4.22V
Back
Battery cell select
Call out the Battery Cell menu, and select the battery
cells correspondingly.
Task select
Call out the Task menu, and select your desired working
mode.
Condition select
Call out the Condition menu, and adapt the cut-off
voltage to the demand.
- 14 -
Page 17

Charge Setting
9.6A
Condition: 4.20V
9.7A
Charge Current: 10.0A
9.8A
Start
9.9A
10.0A
Back
Charge/Discharge current select
Call out the Charge/Discharge Current menu, and adapt
the charge/discharge current to the demand.
Charge Setting
Condition: 4.20V
Charge Current: 10.0A
Start
Back
Charge Setting
Condition: 4.20V
Charge Current: 10.0A
Start
Back
Start
Confirm to initiate the program.
Back
Confirm to step back to the main interface.
- 15 -
Page 18

LiPo/6S/Balance CHG
22.96
8.73
2235
mAh
Stop
V
200
W
To terminate the current program, press ENTER
A
button once.
50Wh
00:15:08
Do not connect the battery before turning on the charger!
NiMH/NiCd Battery Program
Here is a flowchart to guide you to set up the program.
LiPo/6S/Balance CHG
0.00
0.00
0
mAh
Enter charge setting
V
0
W
A
Press ENTER to enter Charge Setting;
0.0Wh
00:00:00
- 16 -
Page 19

Charge Setting
LiFe
Battery Type: LiPo
LiHV
Battery Cell: 6S(22.2V)
NiMH
Task: Balance CHG
NiCd
Condition: 4.20V
PB
Charge Setting
1S
Battery Type: LiPo
2S
Battery Cell: 6S(22.2V)
3S
Task: Balance CHG
4S
Condition: 4.20V
5S
Charge Setting
Charge
Battery Type: LiPo
Re-Peak
Battery Cell: 6S(22.2V)
CYCLE_C_D
Task: Balance CHG
CYCLE_D_C
Condition:4 .20V
Discharge
Battery type select
Press ENTER to call out the Battery Type menu, and
select NiMH or NiCd.
Battery cell select
Call out the Battery Cell menu, and select the battery
cells correspondingly.
Task select
Call out the Task menu, and select your desired working
mode.
- 17 -
Page 20

Charge Setting
-4 mV
Condition:
-5 mV
Charge Current:
-6 mV
Start
-7 mV
-8 mV
Back
Charge Setting
9.6A
Condition: 4.20V
9.7A
Charge Current: 10.0A
9.8A
Start
9.9A
10.0A
Back
Charge Setting
Condition: 4.20V
Charge Current: 10.0A
Start
Back
Condition select
Call out the Condition menu, and adapt the cut-off
voltage to the demand.
Charge/Discharge current select
Call out the Charge/Discharge Current menu, and adapt
the working current to the demand.
For Re-Peak, Cycle_C_D, and Cycle_D_C, you must set
the cycles and rest times appropriately.
Start
Confirm to initiate the program.
- 18 -
Page 21

Charge Setting
Condition: 4.20V
Charge Current: 10.0A
Start
Back
LiPo/6S/Balance CHG
22.96
8.73
2235
mAh
Back
Confirm to initiate the program.
Stop
V
200
W
To terminate the current program, press ENTER
A
button once.
50Wh
00:15:08
Do not connect the battery before turning on the charger!
- 19 -
Page 22

Pb Lead-Acid Battery Program
Here is a flowchart to guide you to set up the program.
LiPo/6S/Balance CHG
0.00
0.00
0
mAh
Charge Setting
Battery Type: LiPo
Battery Cell: 6S(22.2V)
Task: Balance CHG
Condition: 4.20V
Enter charge setting
V
0
W
A
Press ENTER to enter Charge Setting;
0.0Wh
00:00:00
Battery type select
LiFe
LiHV
Press ENTER to call out the Battery Type menu, and
NiMH
select Pb.
NiCd
PB
- 20 -
Page 23

Charge Setting
Battery Type: LiPo
Battery Cell: 6S(22.2V)
3S
6S
Task: Balance CHG
Condition: 4.20V
Charge Setting
Normal
Battery Type: LiPo
AGM Charge
Battery Cell: 6S(22.2V)
Cold Charge
Task: Balance CHG
Discharge
Condition: 4.20V
Battery cell select
Call out the Battery Cell menu, and select the battery
cells correspondingly.
Task select
Scroll to Task, call out the menu and scroll to select the
working mode.
Charge Setting
Condition:
Charge Current:
Start
Back
Condition select
1.80V
Discharge mode is the only mode that can allow you to
1.90V
edit in the Condition.
2.00V
There is no option to change it for other working modes.
- 21 -
Page 24

Charge Setting
9.6A
Condition: 4.20V
9.7A
Charge Current: 10.0A
9.8A
Start
9.9A
10.0A
Back
Charge/Discharge current select
Call out the Charge/Discharge Current menu, and adapt
the working current to the demand.
Charge Setting
Condition: 4.20V
Charge Current: 10.0A
Start
Back
Charge Setting
Condition: 4.20V
Charge Current: 10.0A
Start
Back
Start
Confirm to initiate the program.
Back
Confirm to initiate the program.
- 22 -
Page 25

LiPo/6S/Balance CHG
22.96
8.73
2235
mAh
Stop
V
200
W
To terminate the current program, press ENTER
A
button once.
50Wh
00:15:08
Do not connect the battery before turning on the charger!
DC Power
LiPo/6S/Balance CHG
V
0.00
0
On the main interface, hold the ENTER button for
W
0.00
A
seconds to enter the system setting.
0.0Wh
0
mAh
00:00:00
Long Press
- 23 -
Page 26

Charge Setting
Task Parameters
System Setting
DC Power
Battery Meter
*Connect your desired
DC equipment.
>DC Power
Voltage:
Current:
Start
Back
DC Power
11.86
4.89
Set: 12.00V 5.00A
Select the option
12.0V
of DC Power, then
4.2V
adjust the output
voltage and current.
Start to activate the power function after setting up.
A
46
W
V
- 24 -
Page 27

Voltage Calibration
1. On the main interface, press + twice to enter the interface of battery resistance.
2. Connect the 6S battery to B6neo.
3. Hold the ENTER and + buttons together to enter the calibration interface.
4. Press + button to go through the voltage of each cell.
5. Press ENTER button to choose the voltage, the value of which will turn blue.
6. Press + or - to adjust the values.
After the adjustment completes, press + to go to the confirmation option.
Hold the ENTER button to save the updated values.
Batt IR
1 4
000
2
000
3 6
000
:00mΩ
Σ
Long Press
>Calibration
Set Vref
1 4
3.152
2
3.325
3 6
3.317
- 25 -
mΩ
000
5
000
000
< Stop >
V
3.328
5
3.330
3.388
Scan the QR code
to learn more
Page 28

Battery Voltage Meter
B6neo measures the lithium battery voltage in an easy and convenient manner.
Use the balance port to connect the lithium battery directly to B6neo.
B6neo lights up and displays battery voltage without power on.
- 26 -
Page 29

Battery Resistance Meter
Power on B6neo, and hold the button for
seconds to enter the system setting.
Scroll to Battery Meter and connect the
battery to B6neo.
Press to measure the battery voltage and
resistance.
Press to check the resistance value.
>Battery Meter
4
0461027
5
0262025
6
0243030
Σ
- 27 -
LiPo/6S/Balance CHG
V
0.00
0
W
0.00
A
0.0Wh
0
mAh
00:00:00
Charge Setting
DC Power
Battery Meter
Factory Settings
System Info
4
4.0514.05
5
4.0524.05
6
4.0534.05
:25.2V End
V
>Battery Meter
End
Σ
Page 30

Firmware Upgrade
1. Connect B6neo to your computer via a USB C cable;
2. Launch the Charger Master, which will detect the connection automatically;
3. After successful detection, click to check the new version of the firmware;
4. When there is a new version, the option of Update will be available.
5. Click to upgrade till the process finishes.
PC Interface
DC IN 10-28V
PD INPUT
Scan the QR code
to learn more
about firmware
upgrades.
- 28 -
Page 31

Errors and Warnings
In the event of a fault, B6neo will display an error message.
Error Message Explanation
DC In Too Low! DC input voltage is lower than preset!
DC In Too High! DC input voltage is higher than preset!
Connection Break! The battery may be broken!
Cell Error The cells do not match.
Battery Type! The battery type is wrong!
Overcharge Capacity Limit! The charged capacity reaches the preset capacity limit.
Over Time Limit! The program is timed out!
Int.Temp.Too High! The internal temperature is high!
Over Load! The charger is overloaded!
Reversed Polarity The battery connection is reversed.
Fully Charged The battery is fully charged already!
Outlet Volt. Too Low! The DC output voltage is too low.
Outlet Overload! The DC output is overloaded.
Balance Connection Error! The balance connection is interrupted.
Cell Volt Diff. The voltage difference between each cell is high.
Set Power Error There is an error in setting the DC power.
- 29 -
Page 32

System Setting
On the main interface, hold the Start button for seconds to enter the system setting.
Menu Option Denition
Task
Parameters
System Settings
Safety Timer Customize a period for program protection.
Max.Capacity Customize the protection of capacity.
Trickle Charge Enable/disable trickle charge.
Holding Voltage
Back Back to the previous interface.
Language Select your desired system language.
Min.Input Voltage Set the minimum voltage for input protection.
LCD BackLight Adjust the brightness of the screen.
Volume Adjust the volume of the key and beep.
Completion Signal
Back Back to the previous interface.
Choose the way you'd like to be reminded when the
program completes.
- 30 -
Page 33

Voltage Set the output voltage. (5.0-27.0V)
DC Power
Battery Meter N/A
Factory Settings N/A Restore to the factory settings.
System Info N/A
System
Upgrade
Back N/A Back to the previous interface.
Current Set the output current. (1.0-15.0A)
Start
Back Back to the previous interface.
N/A Upgrade the charger.
Enable DC power output and return to the main
interface.
Measure the battery voltage and internal resistance.
Press - to return to the system setting.
Check the current system information
Press ENTER to return to the system setting.
Conformity Declaration
SkyRC B6neo satisfies all relevant and mandatory CE directives and FCC Part 15
Subpart B.
- 31 -
Page 34

Warranty and Service
Liability Exclusion
This charger is designed and approved exclusively for use with the types of battery stated in this Instruction
Manual. SkyRC accepts no liability of any kind if the charger is used for any purpose other than that stated. We
are unable to ensure that you follow the instructions supplied with the charger, and we have no control over the
methods you employ for using, operating, and maintaining the device. For this reason, we are obliged to deny
all liability for loss, damage, or costs that are incurred due to the incompetent or incorrect use and operation of
our products, or which are connected with such operation in any way. Unless otherwise prescribed by law, our
obligation to pay compensation, regardless of the legal argument employed, is limited to the invoice value of those
SkyRC products which were immediately and directly involved in the event in which the damage occurred.
Warranty and Service
We guarantee this product to be free of manufacturing and assembly defects for a period of one year from the
time of purchase. The warranty only applies to material or operational defects, which are present at the time of
purchase. During that period, we
will repair or replace free of service charge for products deemed defective due to those causes.
This warranty is not valid for any damage or subsequent damage arising as a result of misuse, modification, or as
a result of failure to observe the procedures outlined in this manual.
Note:
1.
The warranty service is valid in China only.
2.
If you need warranty service overseas, please contact your dealer in the first instance, who is responsible
for processing guarantee claims overseas. Due to high shipping costs, and complicated custom clearance
procedures to send back to China, please understand that SkyRC can't provide warranty service to
overseas end users directly.
3.
If you have any questions which are not mentioned in the manual, please feel free to send an email to
info@skyrc.com
- 32 -
Page 35

Smart Charger DC/USB PD
Dual Input
Manufactured by
SKYRC TECHNOLOGY CO., LTD.
The manual is subject to change without notice;
please refer to our website for the latest version!
- 33 -
www.skyrc.com
2023.05
 Loading...