

SKY PARAGLIDERS CIMA PWR Series, CIMA PWR L, CIMA PWR XS, CIMA PWR S, CIMA PWR M User Manual
CIMA PWR
USER MANUAL for CIMA PWR XS, S, M, L
HANDBUCH für den CIMA PWR XS, S, M, L
MANUEL CIMA PWR XS, S, M, L
NÁVOD K OBSLUZE pro CIMA PWR XS, S, M, L
2017

Thank you for ying Sky Paragliders products. Thank you for buying CIMA PWR.
We hope you will be satised with this product and wish you a lot of awesome ights. It is strongly recommended to consult the
manual before the rst ight. This manual might help you to familiarize yourself with the product faster.
Danke, dass Sie sich für ein Produkt von Sky Paragliders entschieden haben. Danke für den Kauf des CIMA PWR.
Wir hoen, dass Sie mit diesem Produkt zufrieden sein werden und wünschen Ihnen viele glückliche Flüge. Wir empfehlen drin
gend, das Handbuch vor dem ersten Flug sorgfältig zu lesen. Dieses Handbuch kann Ihnen helfen, sich schneller mit dem Produkt
vertraut zu machen.
Merci d‘avoir choisi un produit Sky Paragliders. Merci d’avoir choisi l'CIMA PWR.
Nous espérons que vous serez satisfaits de votre Zorro et vous souhaitons beaucoup de très beaux vols. Il est fortement conseillé
de lire attentivement ce manuel avant votre premier vol. Vous pourrez ainsi vous familiariser avec le produit plus rapidement.
Děkujeme
Doufáme, že budete s tímto výrobkem spokojeni. Přejeme Vám krásné lety. Důrazně Vám doporučujeme, abyste si manuál velmi
důkladně přečetli. Pomůže Vám k rychlejšímu seznámení s výrobkem.
, že používáte produkty Sky Paragliders. Děkujeme Vám za zakoupení padákového kluzáku CIMA PWR.
Team Sky Paragliders
-
2
Contents 5
CIMA PWR
ENG / DE / FR / CZ
Inhalt 17
Index 29
Obsah 41
Version 1. 06/05/2016
3

CIMA PWR
EN
INTRODUCTION
Congratulations on becoming part of the Sky family. We are
very pleased to welcome you to the world of Sky and hope that
you will enjoy many hours of fantastic ying aboard your Sky
Paragliders glider.
Sky Paragliders is based in the heart of Europe and we pride
ourselves on our own, purpose built, state of the art production
facilities in the Czech Republic.
Our management and development teams are located just 25
steps above the glider production facility. This close contact is
incredibly important to us and helps to ensure that our products
are of the highest quality possible and with minimal air miles on
our raw materials.
DISCLAIMER
Please read this Manual carefully and note the following details:
The purpose of this Manual is to oer guidelines to the pilot
using the paraglider and it is by no means intended to be used
as a training manual for this or any other paraglider. We advise
that you only y a paraglider when qualied to do so or when
undergoing training at an accredited School or with a qualied
Instructor. Pilots are personally responsible for their own safety
and their paraglider's airworthiness. The use of this paraglider is
solely at the user's own risk! Neither the manufacturer nor dealer
accept any liability connected with this activity. This paraglider
on delivery meets all the requirements of the EN 926-1
and DGAC regulations and has an airworthiness certicate
issued by Sky Paragliders. Any alterations to the paraglider will
render its certication invalid.
4
User manual / Handbuch / Manuel / Návod k obsluze
CIMA Pwr
Contents
INTRODUCTION 4
DISCLAIMER 4
1. GENERAL INFORMATION 6
1.1 Operating limits
1.2 PilotProle
1.3 Certication
1.4 Scopeofdelivery
1.5 Characteristics
2. TECHNICAL DETAILS 7
2.1 Risers diagram
2.2 Line Plan
2.3 WingCrossSection
2.4 Tech.Spec.
3. SET UP 10
3.1 Hang point
3.2 Trimmers
3.3 SpeedBarAccelerator
3.4 WingPre-ightChecks
4. BASIC FLIGHT TECHNIQUES 10
4.1 Ination:Forward
4.2 ReverseLaunch
4.3 Operation Of Trimmer System
4.4 Operation of Speed Bar
4.5 TheClimbOut
4.6 NormalFlight
4.7 Turning
4.8 ActiveFlying
4.9 Landing
5. RAPID DESCENT TECHNIQUES 12
5.1 Big Ears
5.2 SpiralDrive
5.3 B-line Stall
6. INCIDENTS 12
6.1 AsymmetricorFrontal(Symmetric)Collapses
6.2 Stalls
6.3 Brakelinemalfunction
7. MAINTENANCE & CHECKS 13
7.1 AdviceonMaintenance
7.2 Storage and transport
7.3 Checkups
7.4 PeriodicChecks&Repairs
7.5 Spare parts
8. GUARANTEE 14
9. DISPOSAL 14
User manual / Handbuch / Manuel / Návod k obsluze
CIMA Pwr
5

1. GENERAL INFORMATION
1.1 Operating limits
Cima PWR is a very strong paraglider and ying all the usual
SIV manoeuvres will not normally pose a structural problem.
However, frequent extreme manoeuvres training can accelerate
the ageing process dramatically, and Sky recommends having
wings that are often used for SIV-type manoeuvres subjected to
check-ups at shorter intervals than normally stipulated
1.3 Certication
Cima PWR has passed the certication according to EN 9261:2015 & LTF NFL II-91/09 chapter 3.
This test was carried out in the Swiss Air-Turquoise
laboratories in Switzerland. Load test passed at 1360 kg.
It also passed the DGAC certication as ULM class 1 and, the
manufacturer’s certication. Any alteration of the paraglider can
invalidate all the aforementioned certications.
Correct behaviour in relation to the environment
It is important that we as pilots behave in a responsible way
towards both the environment and the people sharing it with
us. We encourage you to treat nature with respect, to avoid
unnecessary noise, to never litter and to observe all local
regulations. Please also make sure to comply with legislation
regarding protected areas, privately owned property or hunting
areas – this ensures the least possible friction in relation to other
users of the great outdoors, to the benet of both yourself and
the sport as a whole.
1.2 PilotProle
Cima PWR is suitable for beginner to intermediate pilots.
The predictable characteristics of CIMA PWR suit the
beginner. It oers simple ination characteristics, whereby the
wing rises smoothly and steadily. CIMA PWR‘s high lift prole
allows for slow, short take os with good climb rates. A smooth
and progressive, yet responsive are, makes landing easily
controlable and manageable.
Cima PWR has a high level of passive safety.
1.4 Scopeofdelivery
Your CIMA PWR is delivered with
• Carry All bag Moto
• Inner bag
• Repair kit
• T shirt
1.5 Characteristics
Cima PWR is suitable for beginners and intermediates. It has a
high level of passive safety. We know that for the PPG pilot, the
take-o and landing phase are crucial and CIMA PWR’s design
is such that launching and landing are both straight forward
and predictable. CIMA PWR’s good sink/climb rate allow for
low take-o and landing speeds with good air characteristics
and short take o distances.
Cima PWR is damped in both roll and pitch with a good
speed range making it ideal for relaxed cruising ights.
Skytex 38 fabric is used for both top and bottom surfaces.
Skytex was chosen for its excellent moisture repellent properties as well as for durability. Being moisture repellent means
that the gliders launch and ight characteristics are improved if
launching from dew laden grass as is so often the case for early
morning or late evening ights.
6
User manual / Handbuch / Manuel / Návod k obsluze
CIMA Pwr

1.6 Features
Cima PWR features a composite leading edge (Mylar & Nylon
rods) to assist ination by presenting the open leading edge to
the airow even in nil winds.
• Trimmer risers are standard to allow for a faster trim setting
for higher speed cruising.
• Speed bar accelerator system.
• Optional upper or lower hang point loop to best suit your
paramotor hang point system.
• The brake lines can be extended by 10cm if required and
the brake pulley can be moved down to the next setting to
match.
2. TECHNICAL DETAILS
2.1 Risers diagram
Basic setting (trimmer closed)
A
B
C
D
500 mm
500 mm
500 mm
500 mm
Accelerated
A
B
C
D
400 mm
420 mm
460 mm
520 mm
Trimmer opened
A
B
C
D
Measured from bottom attachment loop.
500 mm
500 mm
545 mm
590 mm
User manual / Handbuch / Manuel / Návod k obsluze
CIMA Pwr
Distance between upper and bottom attachment loop 60 mm
Length of the speed system
100 mm
7
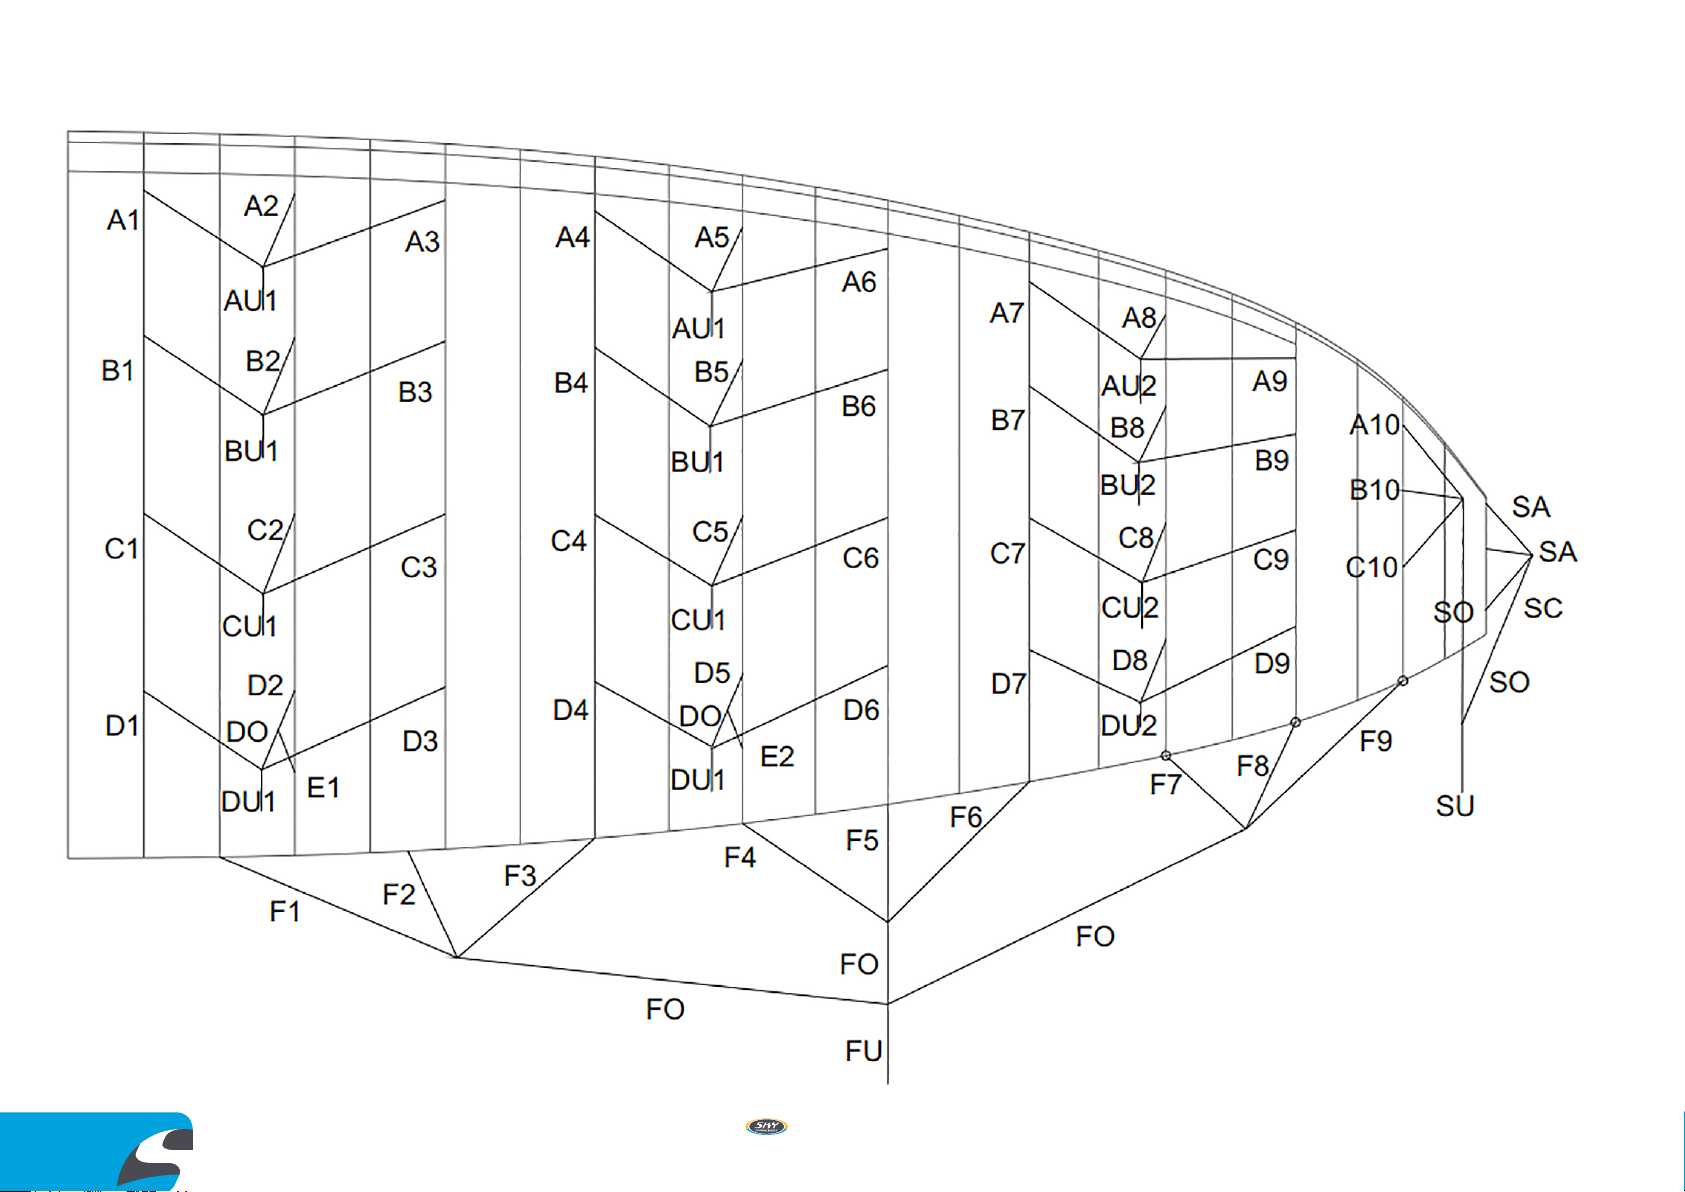
2.2 Line Plan
8
User manual / Handbuch / Manuel / Návod k obsluze
CIMA Pwr
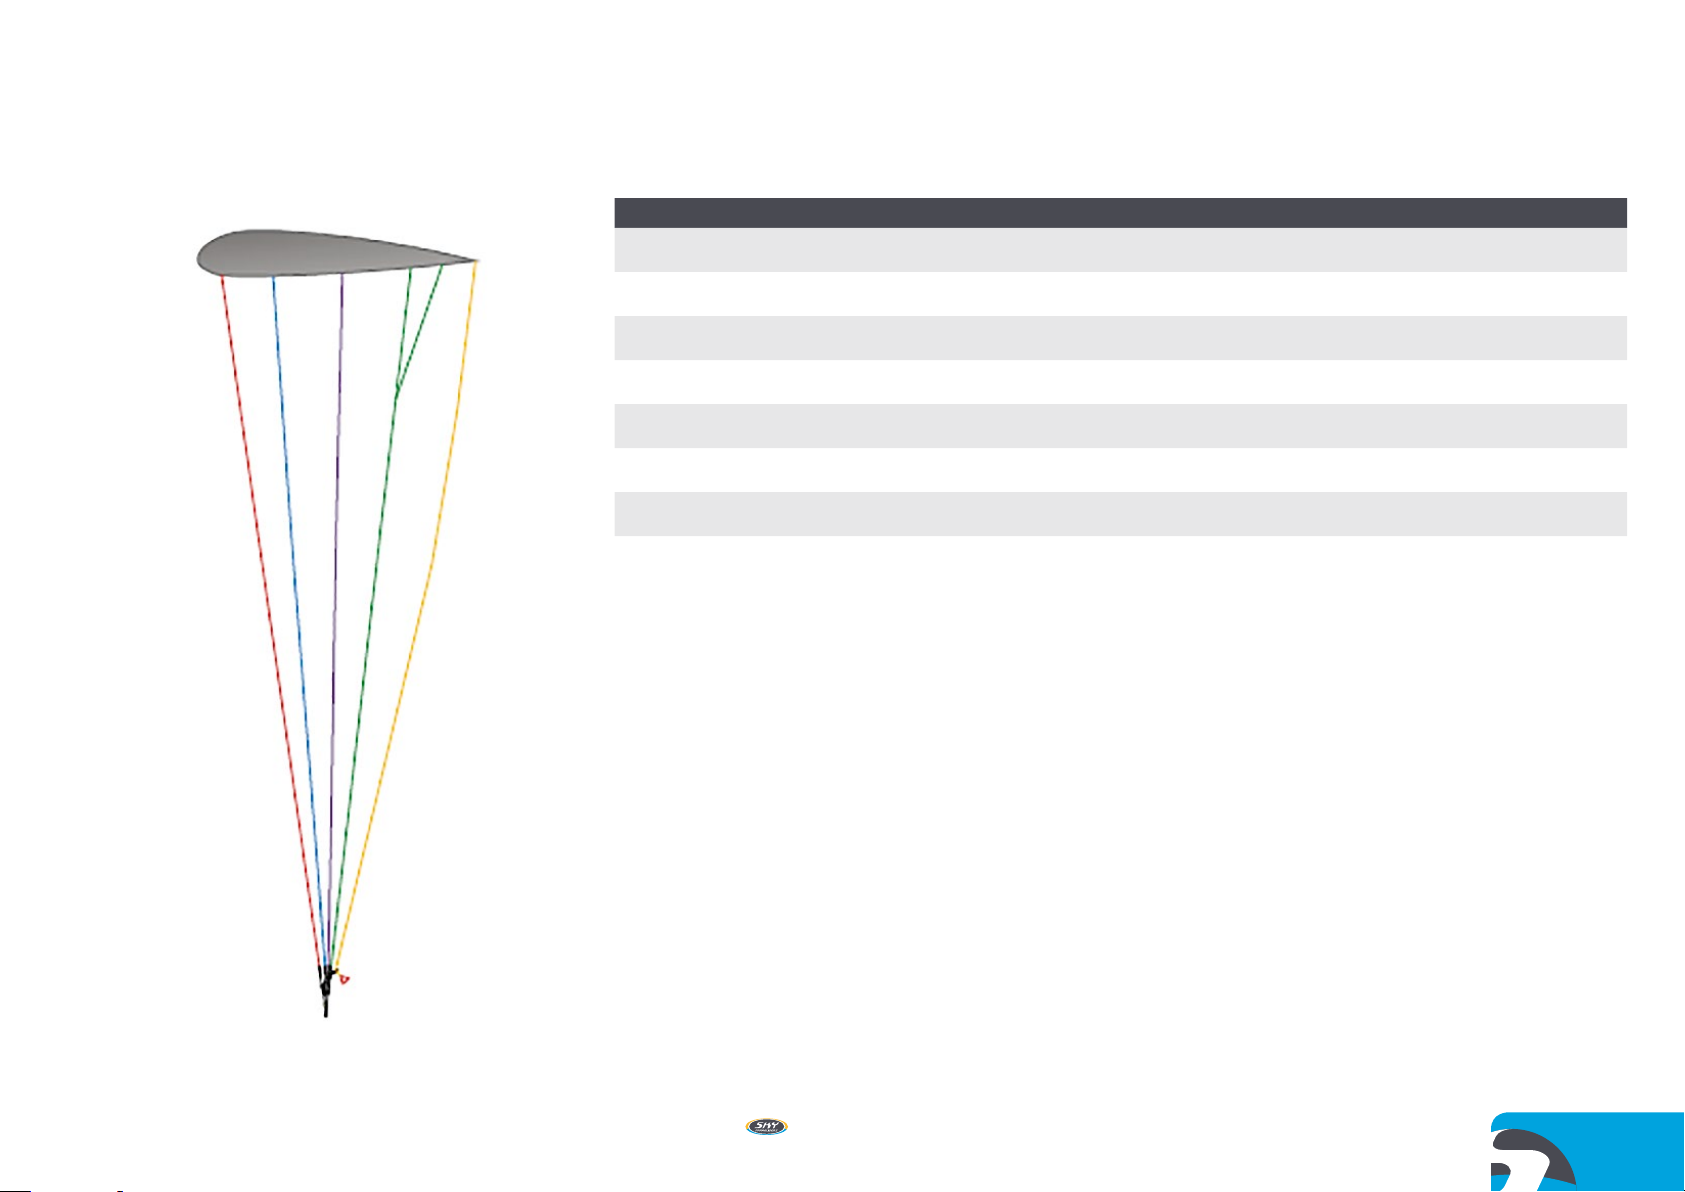
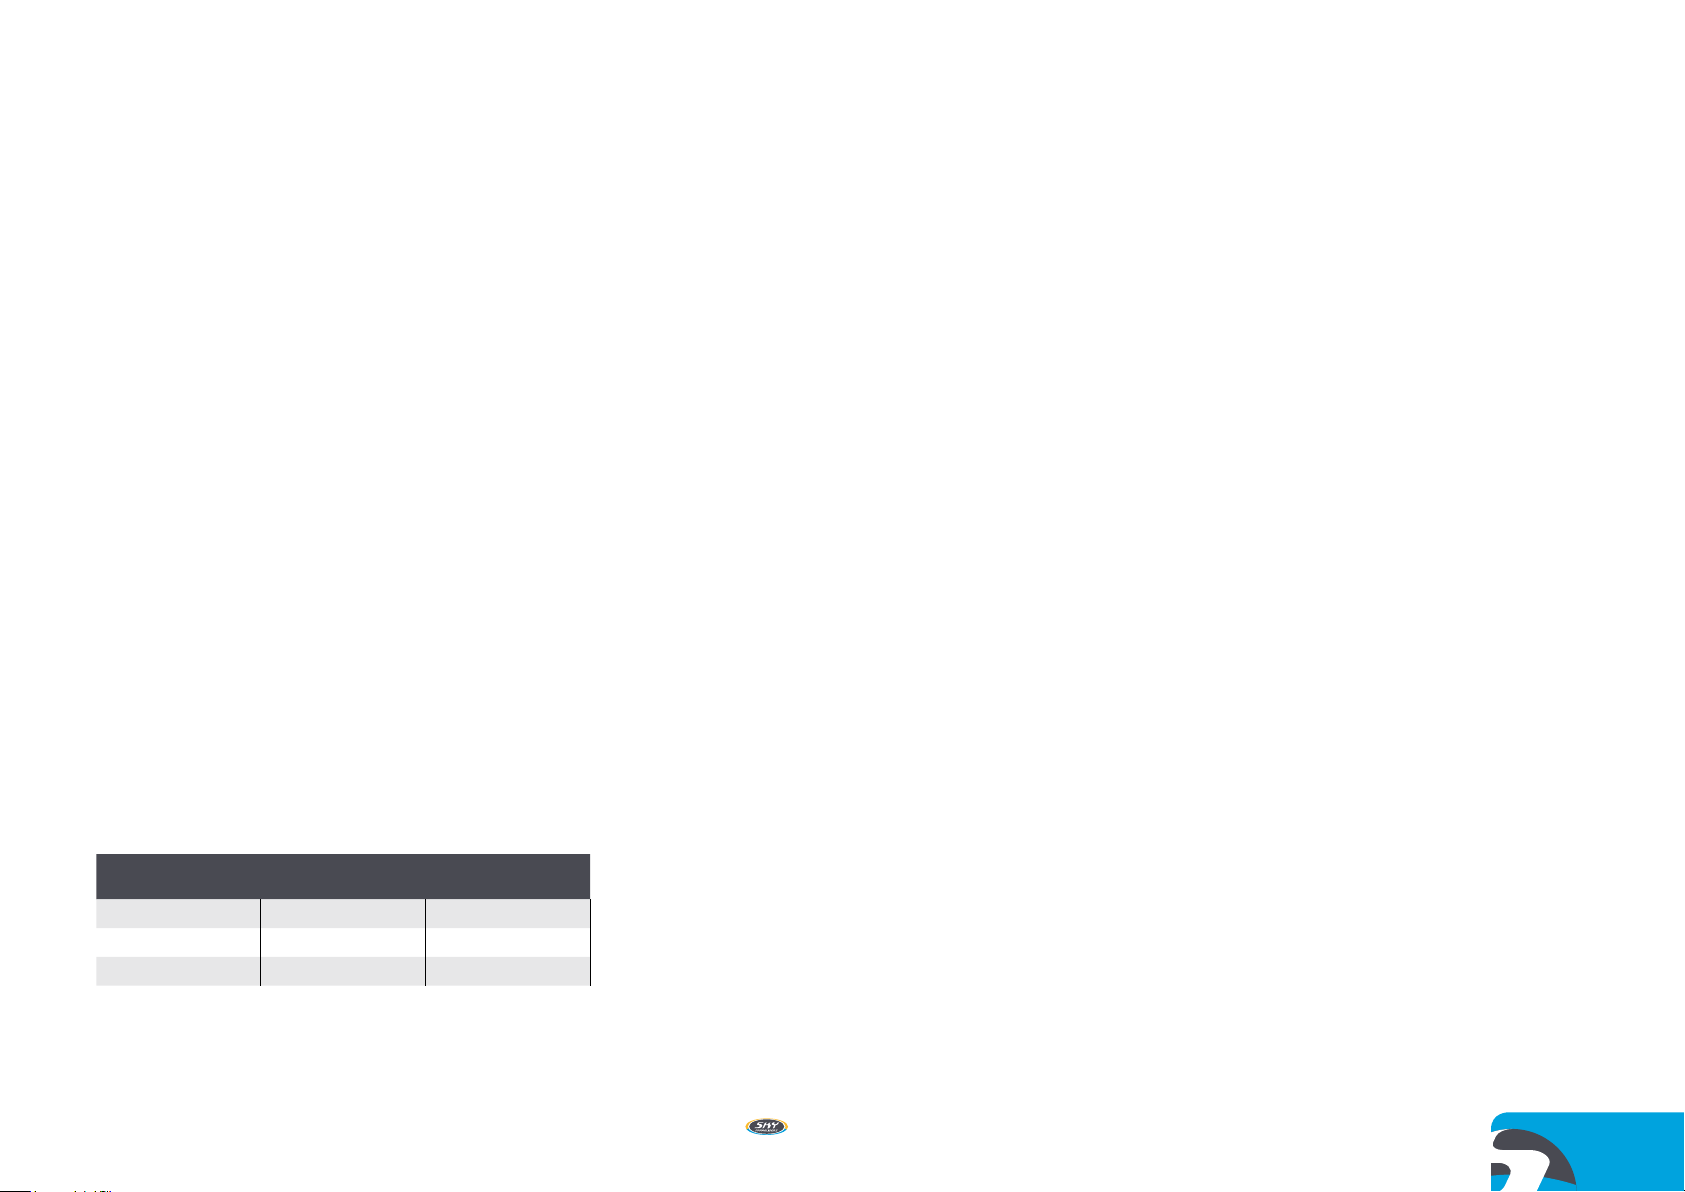
2.3 WingCrossSection 2.4 Tech.Spec.
CIMA Pwr XS S M L
A B C D
Layout surface (m2)
Layout span
Layout aspect ratio
Projected surface (m
Projected span (m)
Projected aspect ratio
Cell count
PPG weight range (kg)
21.37 23.12 25.00 27.13
9.77 10.17 10.57 11.01
4.47 4.47 4.47 4.47
2
)
18.21 19.70 21.30 23.12
8.34 8.67 9.02 9.40
3.82 3.82 3.82 3.82
42 42 42 42
60-100 70-120 80-140 95-160
A Riser - Red
BRiser-Blue
CRiser-purple
D Riser – Green
Brakes–Yellow
User manual / Handbuch / Manuel / Návod k obsluze
CIMA Pwr
9

3. SET UP
3.1 Hang point
Select the appropriate hang point (upper or lower) according
to your harness/power unit system, connect to your power
unit and adjust the brake line length accordingly (Standard or
+10cm from standard).
3.2 Trimmers
Set the trimmer system to standard trim (closed).
Ensure that the speed bar is routed correctly according to
the harness manual and that there is no danger of it swinging
back into the propeller.
Before each take-o check that the entire accelerator system
works freely and that the lines are long enough to prevent the
speed bar from being activated involuntarily in ight (lines too
short). If the harness is tted with a front mounted reserve, the
speed bar lines must pass under the reserve container and the
reserve bridle so that it can be deployed correctly. Use of the
speed bar increases the maximum speed of the paraglider by
up to 30% of the trim speed.
3.3 SpeedBarAccelerator
are pulled symmetrically during operation. Fine-tuning can be
completed when you are back on the ground.
3.4 WingPre-ightChecks
• Check the sail for damage to both surfaces, the internal
structure (ribs, diagonals) and seams.
• Check that the lines are not damaged or tangled.
• Check that the quick-links which connect the lines to the
risers are undamaged and correctly tightened.
• Check that the risers are not damaged or twisted.
• Check that the speed system works freely and that the
lines are long enough to ensure that the speed system is
not permanently activated whilst in ight.
• Lastly, check that the brake handles are correctly attached
and that each line runs freely through its pulley
4. BASIC FLIGHT
TECHNIQUES
forward or down as this could cause a collapse of the leading
edge. Simply follow them with your arms until the glider reaches
its angle of ight above your head.
A controlled ination avoids excessive need of the brakes
and allows you to visually check the wing and lines during the
last phase of the launch, before acceleration to take-o speed.
4.2 ReverseLaunch
Light to strong wind
Pass the risers over your head and turn to face the wing. From
here the reverse launch can be performed. When the wing is
under control and above your head, turn to face the wind and
the take-o run can commence.
We recommend rst practicing your launch techniques with
out the power unit and then with the power unit whilst the motor
is not running, so as to fully familiarise yourself with the sensations, skills and procedures for safe live take-os.
IMPORTANT: Never attempt to take o with a glider that is
not fully inated, directly overhead or if you are not fully in control of the pitch/roll of the wing.
4.3 Operation Of Trimmer System
-
To set up a speed bar on the ground, ask a friend to pull your
risers into their in-ight position while you sit in your harness.
Now adjust the length of the line so that the bar sits just beneath your seat. You should now be able to hook your heel in to
the secondary loop of the accelerator. The accelerator must be
slack enough to ensure that the speed system is not activated
(pulled down) in normal ight, but not so long that it is impossible to use the full range of the speed system or so as to pose
a risk to the propellor. Once set up, test the full range of the
speed system in calm ying conditions: ensure that both risers
10
4.1 Ination:Forward
Nil to light wind
Lay out the paraglider with the leading edge in a horseshoe
shape. Holding the A risers close to the quick links move forward until the lines are tight. You should now be perfectly centered in your wing. In nil wind or a light headwind, with lines
tight take several positive strides. CIMA PWR will rapidly inate
and rise over your head. Do not pull the risers too hard, either
User manual / Handbuch / Manuel / Návod k obsluze
CIMA Pwr
The CIMA PWR is supplied with a trimmer riser set
The trimmers are a system to modify glider prole, altering
the angle of attack of the wing to set a desired trim speed.
The ‘neutral’ or standard position is when the trimmers are
pulled all the way down. The standard trim setting is ideal for
climbing under power, whilst thermalling and when the air is
turbulent. Brake pressure is lighter and the handling at its best
on the standard trim setting. To increase cruise speed you can
use the speed system or release the trimmers, or both. In tur
-
bulent air the wing is most stable on its slowest setting, i.e. with
trimmers in the standard position and no accelerator applied.
To activate them the pilot should gently push the “trimmers”
cam lock to allow the straps to slide, lowering the angle of
attack. Release the cam lock to lock the straps at the desired
setting. To tighten the trimmers, to increase the angle of attack,
the pilot should pull the straps down vertically until the desired
setting is achieved. Trimmers must be activated and deactivated symmetrically .
4.4 Operation of Speed Bar
Use of the speed bar increases the maximum speed of the
paraglider by up to 30% of the trim speed by lowering the angle
of attack.
The speed bar is a foot operated system. Pushing the bar
with your feet will activate the system. Releasing the bar will
deactivate the system.
Use of the speed system does reduce the angle of attack
and therefore there is an increased risk of a frontal (or asymmetric) collapse. For this reason we do not advise use of the speed
bar near to the ground or in turbulent air.
Permissible in-Flight speed setting/steering
of combined controls
Accelerator Trimmers Brakes
YES YES NO
YES NO YES
NO YES YES
4.5 TheClimbOut
Once in the air you should continue ying into wind whilst gaining height. By setting the trimmers to the standard position you
will achieve the best climb rate. Do not attempt to climb too
steeply or too quickly by using the brakes. The wing already has
a high angle of attitude, coupled with a higher angle of attack
(if you use the brakes) plus the engine’s full thrust acting on the
pilot, this could contribute to make the glider more prone to
stall. Furthermore, in the event of an engine failure, the resulting
backward pendulum motion of the pilot and the forward dive
of the wing can result in a momentary dive until the wing and
pilot reach pendulum stability once again, possibly resulting in
ground impact if there is insucient altitude.
Do not initiate turns until you have sucient height and air
speed. Avoid low turns downwind with insucient airspeed.
The CIMA PWR is well damped in roll but under certain cir
cumstances it is possible for the pilot to induce oscillations.
This is caused by a combination of the engine/propeller torque
and pilot weight-shift and/or brake inputs. To stop oscillations
it is best to reduce the power slightly and ensure that you re
main static with weight-shift and brake inputs. Once settled you
can once again apply full power. Under full power the torque
eect will attempt to gently turn the wing, using weight-shift
or adjusting the trimmers asymmetrically is the best method
to correct this.
NOTE: Using the trimmers asymmetrically will invalidate
certication.
4.6 NormalFlight
Once at a safe altitude you can select your cruising speed. The
faster you trim the wing, the more fuel your motor will consume
to maintain level ight. For better penetration into headwinds
and improved glide performance in sinking air or crosswinds,
you should y faster than trim speed by using the accelerator
system, and or the trimmers.
For maximum eciency whilst ying downwind, set the trimmers to the standard setting and do not use the speed bar.
With trimmers set to the standard position and applying the
brakes approximately 15%, the CIMA PWR will achieve its best
minimum-sink rate.
4.7 Turning
Cima PWR is designed to turn eciently and will turn without
the need for weight-shift piloting if you choose. Your wing is
not only designed to turn rapidly (with approx. 30% brake) but
also to y slowly in order to help identify areas of lift (for ecient
climb rates) and to maintain a atter turn to minimize sink rate
during the turn (with 15% brake).
-
-
4.8 ActiveFlying
Cima PWR has been designed with a stable prole. It will resist reasonable levels of turbulence without pilot input. However
-
in stronger turbulence we recommend that you return the trimmers to the standard position and do not use the speed bar.
Fly the glider actively.
The key elements of eective active ying are pitch control
and pressure control:
In turbulent air, if the glider pitches in front of you, use the
brakes to arrest the pitch. Equally, if the glider pitches behind
you, release the brakes to allow it to speed up and return above
you head. In severe turbulence, ying with a small amount of
brake applied (approx. 20cm) will give you tension in the brakes
and feedback from the wing. In turbulent conditions the internal
pressure of the wing can change and you can feel this through
the brakes. The aim is to maintain a constant pressure through
the brakes. If you feel a loss in pressure apply the brakes until
normal pressure is resumed then raise your hands swiftly back
User manual / Handbuch / Manuel / Návod k obsluze
CIMA Pwr
11

to their original position. Avoid ying with continuous amounts
of brake in rough air as you could inadvertently stall the wing.
Always consider your airspeed.
IMPORTANT: No pilot and no glider are immune to collaps
es. In severe turbulence active ying will help to eliminate any
tendency
be more active and anticipate the movements of your wing.
Always be aware of your altitude and do not over-react. We
advise you to keep hold of your brakes at all times and not to
y in turbulent conditions.
to collapse. When the conditions are very turbulent,
5. RAPID DESCENT
-
TECHNIQUES
As a general rule, in order to descend, y away from areas of
lift. If, for whatever reason, you are taken unawares by the development of conditions, you may consider using the following
techniques to incr
ease your sink rate.
or increased by releasing or depressing the brake by several
centimetres respectively. Once mastered the spiral dive allows
you to descend at rates greater than 10 m/s. Extremely abrupt
or badly synchronised brake inputs or too-rapid initiation of
the spiral may result in an asymmetrical collapse and/or a spin.
CAUTION: A deep spiral is a radical manoeuvre. The kinetic
energy generated must be dissipated by slowly releasing the
inside brake throughout, at least, one whole revolution.
5.3 B-line Stall
4.9 Landing
A slow approach speed and the ight to end with the perfect
landing , large areas and long runs are no longer required.
It must be remember that in wind nil conditions the forward
ground speed encountered may be signicantly higher and
during landing that speed must be decreased as safely as possible. This can be achieved by fully closing the trimmers and
proportionately applying the brakes. If necessary as the pilot
reaches the ground a longer run o should also be carried out.
When landing in moderate wind conditions, the ground speed
is reduced so simple and progressive application of the brakes
will be enough for a perfect landing. Landing with open or half
open trimmers is possible, but it will be necessary to balance
the application of the brakes to the position of the trimmers and
the forward ground speed being experienced. Of course open
trimmers and an increase in forward ground speed when landing may require a larger landing area as opposed to when the
trimmers are closed. The CIMA PWR very eciently transforms
forward speed into lift allows for an ecient air.
5.1 Big Ears
Grasp the outside big ears A line on both sides as high up the
line as possible.
Pull the line outwards and downwards whilst allowing your
hands to slightly slide down the line until the wingtips fold back
under the leading edge. We recommended that you perform
each “ear“successively and not both simultaneously. Keep the
lines taut to stop the wingtips from reopening until the manoeuvre is nished. Depending on the size of the big ears that have
been initiated, the sink rate can increase by up to 3–4 m/s. If
necessary, it is possible to initiate small alterations in direction
by weight shift control. As soon as the lines are released, the
paraglider should spontaneously reopen. However, you can
speed reopening by „pumping“ the brakes in a single sweeping movement approximately 30%. When pumping the brakes
it is recommended that one side of the paraglider be opened
after the other. Pulling both brakes simultaneously to reopen
ears may result in a stall.
5.2 SpiralDrive
Cima PWR is a manoeuvrable wing that responds to pilot input precisely and progressively. To initiate a tight spiral apply
one brake progressively to about 35% and hold it in this position. The speed of rotation and the brake pressure will increase
progressively and the centrifugal force on the pilot will also
increase. The angle and speed of rotation can be decreased
Grasp the B risers near the quick links, hands on the Yellow
sections, and ease them down symmetrically. Do not snatch
them down. The paraglider will enter a B-line stall and feel to
drop backwards before the pilot stabilises underneath the wing.
The descent rate increases to 6 - 8 m/s. To exit the B-line stall
raise both hands together in a single, positive movement so that
the risers are at normal full extension again. On releasing the
B-risers, your CIMA PWR should return immediately to normal
ight. An adjustment error, control error or certain aerological
conditions may lead to a prolonged deep stall phase. A push
on the speed bar should initiate rapid exit from the B-line stall
state. If the speed bar is not connected, pulling on the A-risers
by 4 – 5 cm will have the same result.
CAUTION: Unlike big ears and spiral dives (see above) a glid-
er in a B-line stall is in a true stalled position. For this reason,
a B-line stall should never be performed close to the ground.
6. INCIDENTS
6.1 AsymmetricorFrontal(Symmetric)
Collapses
Despite tests showing that CIMA PWR recovers spontaneously
after collapses, active piloting is recommended in the event of
12
User manual / Handbuch / Manuel / Návod k obsluze
CIMA Pwr

an asymmetric or frontal collapse. Active piloting will reduce the
loss of altitude and a change of direction.
In the event of a frontal (symmetric) collapse:
• Before automatic reopening occurs, bring both brakes
down swiftly & symmetrically to speed up reopening of the
leading edge, then immediately bring your hands back up
to normal ying position.
In the event of an asymmetric collapse:
• Keep the paraglider ying as straight as possible by leaning away fr
(just enough, not too much) brake to maintain course.
• Speed up the reopening of the closed side by a single,
positive input on the collapsed side & repeat if necessary.
om the collapsed side and applying sucient
6.2 Stalls
Certain pilot behaviour or weather conditions can cause a full
stall. This is a serious deviation from normal ight and can be
dicult to manage. If a stall occurs at less than 100 m above
the ground, throw your reserve parachute.
Main Causes of a Full Stall:
• Poorly timed or excessive use of the brakes when the air
speed of the wing is reduced (e. g. when coming out of a
spiral or speeding up after a B-line stall).
Rain-induced deep or Full stall:
• A soaked or heavily drenched leading edge (from rain or a
cloud) can result in a full stall or Deep stall due to uneven
airow over the leading edge as a result of rain drops and
an increase of weight to the wing. Reported cases of this
phenomenon are linked to high levels of porosity in the
glider‘s fabric. Whatever the cause, a stall can be either
symmetrical or asymmetric (a spin). In both cases the
brake line travel becomes very short and even small input
may suddenly induce an airow separation; in some cases
even a gust or a sudden thermal may change the angle
of incidence enough to cause the deep stall. If you nd
yourself ying in unavoidable rain we strongly recommend
that you avoid any sudden movements or radical brake line
input, that you do not pull Big Ears or B-stall, and that you
steer clear of turbulence and avoid a deep are on landing.
In both cases the pilot has two possible courses of action:
•
If the full stall happens above 100 m it is strongly recommended to initiate standard stall r
pilot is familiar with the process (i.e. a complete execution
of the full stall, stabilization of the wing and progressive
lifting of the hands to resume normal ight).
• If the full stall happens below 100 m or if the pilot is unfa
miliar with stall recovery the r
deployed immediately
ecovery assuming the
-
eserve parachute should be
6.3 Brakelinemalfunction
If a brake line or pulley breaks it is possible to y CIMA PWR
using the D risers (rear risers). The movements should be nely
controlled as the deformation of the wing due to the traction on
the D risers is greater than that produced by using the brakes.
Tip: Practice this method of steering to be prepared before
a real brake failure!
7. MAINTENANCE &
CHECKS
7.1 AdviceonMaintenance
• Avoid dropping the canopy on its top surface or on its
leading edge during ination or landing. Do not drag it
across the ground when moving it.
• Do not expose it unnecessarily to sunlight.
• Choose a folding technique that doesn‘t damage the
leading edge strips and that doesn‘t crease the internal
structure excessively. To maximize the life of your glider we
do not recommend the use of stu sacks: the abrasion of
the material will decrease the life expectancy of the fabric –
in particular its internal structure.
• Never store your paraglider when it is damp. If immersed in
sea water, rinse it thoroughly in fresh water. Do not use any
detergents.
• If you do most of your ying near the sea, where the air is
humid and salty, the wing may age faster. In this case we
suggest you have it checked more often than prescribed in
this manual.
• Empty any foreign bodies from your paraglider regularly, for
example sand, stones or animal or vegetable matter which
may eventually decay. Twigs, sand, pebbles, etc. damage
tissue in successive folds, and organic debris of vegeta
ble or animal origin (insects) can promote mould gr
CIMA PWR is tted with debris release slots at the wing
tips. Debris can be shaken from the closed cells through
to the wing tip and the release slot opened to remove parti
cles. Check that you reseal the debris r
completed.
elease slot when
7.2 Storage and transport
Store your loosely packed glider in a cool (10-25°C) and dry (<
70% humidity) place. Hot car boots or damp basements lead
to damaging of the cloth. A paraglider should always be dry
when packed, but this is particularly important after the last
ight of the season. But even a completely dry wing should
still be stored open in a dry, clean and dark place. If you do not
have room for such winter storage we recommend you open
all compression straps on the bag as much as possible and
leave the bag open so that air can circulate around the packed
canopy. Make sure no vermin make their sleeping quarters in
your wing, and keep it well distant from solvents and acids.
Petrol and other petrochemicals are especially abrasive for nylon and will dissolve the cloth if allowed near. High temperatures
in combination with moisture are a particularly volatile mix that
will accelerate the hydrolysis process where the bres and the
coating are decomposed.
-
owth.
-
User manual / Handbuch / Manuel / Návod k obsluze
CIMA Pwr
13

7.3 Checkups
The wing has undergone a series of tests during the production
process and consequent ight tests before the delivery. It is
delivered with a standard brake setting, the same as the one
used during the testing.
7.4 PeriodicChecks&Repairs
For safety reasons it is recommended that the wing be checked
at least once a year, or after 100 ights, whichever is sooner
and anytime there is a noticeable change in its behaviour. The
check must be done by the manufacturer or an authorized representative. Before sending the paraglider for an inspection,
contact your importer or your dealer.
CAUTION: Have your wing additionally checked if you notice
damages or a change in ight behaviour.
7.5 Spare parts
Your SKY wing consists of many high quality long-life components. When replacing parts, (lines, risers, fabric panels, etc.),
only original parts may be used. In addition to the continued
airworthiness of your paraglider this is important for your safety
as well.
8. GUARANTEE
Cima PWR is guaranteed for two years against any production
fault since the date of purchase. The guarantee does not cover:
• Damage caused by misuse, by neglecting the regular
maintenance, or if the glider is overloaded or misused.
• Damage caused by inappropriate landings.
9. DISPOSAL
Even the best products have a limited service life, and once
your glider reaches this point, it must be disposed of properly.
Please make sure your paraglider is disposed of in the correct
environmental manner or send it back to Sky Paragliders for
correct disposal. In case of any doubts regarding the information in the manual, contact your SKY dealer.
Sky Paragliders a.s.
Okružní 39, 739 11 Frýdlant nad Ostravicí, Czech Republic
Tel.: +420 558 676 088, info@sky-cz.com,
www.sky-cz.com
14
User manual / Handbuch / Manuel / Návod k obsluze
CIMA Pwr
Sky Paragliders a.s.
Okružní 39, 739 11 Frýdlant nad Ostravicí, Czech Republic
Tel. +420 558 676 088, info@sky-cz.com, www.sky-cz.com
User manual / Handbuch / Manuel / Návod k obsluze
CIMA Pwr
15
CIMA PWR
EINFÜHRUNG
HAFTUNGSAUS-
DE
Gratuliere zu Ihrer Entscheidung, ein Teil der Sky Family zu warden. Wir freuen uns, Sie zur Welt von Sky begrüßen zu können
und hoen, dass Sie unter ihrem Sky Paragliders Schirm viele
schöne Stunden mit fantastischen Flügen genießen werden.
Die Basis von Sky Paragliders liegt im Herzen von Europa und
wir sind stolz auf unsere auf dem neuesten Stand der Technik
ausgestatte Produktion in der Tschechischen Republik.
Management und Entwicklungsteams sitzen nur 19 Stufen
oberhalb des Produktionsbetriebes. Dieser enge Kontakt ist für
uns unglaublich wichtig und hilft uns dabei, Produkte höchster
Qualität mit minimaler Umweltbelastung und minimiertem
Verbrauch von Material anbieten zu können.
SCHLUSS
Bitte lesen Sie dieses Handbuch aufmerksam und beachten
Sie die folgenden Details: Der Zweck dieses Handbuchs
ist es, dem Piloten Richtlinien für den Gebrauch dieses
Gleitschirms zu vermitteln. Auf keinen Fall darf das Handbuch
als Trainingsanleitung für diesen oder einen anderen Schirm
genutzt werden. Wir raten Ihnen dringend, einen Gleitschirm
nur als qualizierter Pilot oder im Rahmen der Ausbildung an
einer akkreditierten Flugschule mit einem geeigneten Fluglehrer
zu verwenden. Piloten sind persönlich für ihre eigene Sicherheit
und die Flugtauglichkeit ihres Fluggeräts verantwortlich. Der
Gebrauch dieses Gleitschirms erfolgt ausschließlich auf
Risiko des Verwenders! Sowohl der Hersteller als auch die
Händler schließen jegliche Haftung in Verbindung mit dem
Gleitschirmiegen aus. Zum Zeitpunkt der Auslieferung erfüllt
dieser Gleitschirm alle Anforderungen von EN und DGAC und
verfügt über ein von Sky Paragliders ausgestelltes Zertikat
seiner Flugtüchtigkeit. Alle Änderungen an diesem Gleitschirm
machen die Musterzulassung ungültig.
16
User manual / Handbuch / Manuel / Návod k obsluze
CIMA Pwr
 Loading...