

SKY PARAGLIDERS CIMA PWR Series, CIMA PWR L, CIMA PWR XS, CIMA PWR S, CIMA PWR M User Manual
CIMA PWR
USER MANUAL for CIMA PWR XS, S, M, L
HANDBUCH für den CIMA PWR XS, S, M, L
MANUEL CIMA PWR XS, S, M, L
NÁVOD K OBSLUZE pro CIMA PWR XS, S, M, L
2017

Thank you for ying Sky Paragliders products. Thank you for buying CIMA PWR.
We hope you will be satised with this product and wish you a lot of awesome ights. It is strongly recommended to consult the
manual before the rst ight. This manual might help you to familiarize yourself with the product faster.
Danke, dass Sie sich für ein Produkt von Sky Paragliders entschieden haben. Danke für den Kauf des CIMA PWR.
Wir hoen, dass Sie mit diesem Produkt zufrieden sein werden und wünschen Ihnen viele glückliche Flüge. Wir empfehlen drin
gend, das Handbuch vor dem ersten Flug sorgfältig zu lesen. Dieses Handbuch kann Ihnen helfen, sich schneller mit dem Produkt
vertraut zu machen.
Merci d‘avoir choisi un produit Sky Paragliders. Merci d’avoir choisi l'CIMA PWR.
Nous espérons que vous serez satisfaits de votre Zorro et vous souhaitons beaucoup de très beaux vols. Il est fortement conseillé
de lire attentivement ce manuel avant votre premier vol. Vous pourrez ainsi vous familiariser avec le produit plus rapidement.
Děkujeme
Doufáme, že budete s tímto výrobkem spokojeni. Přejeme Vám krásné lety. Důrazně Vám doporučujeme, abyste si manuál velmi
důkladně přečetli. Pomůže Vám k rychlejšímu seznámení s výrobkem.
, že používáte produkty Sky Paragliders. Děkujeme Vám za zakoupení padákového kluzáku CIMA PWR.
Team Sky Paragliders
-
2
Contents 5
CIMA PWR
ENG / DE / FR / CZ
Inhalt 17
Index 29
Obsah 41
Version 1. 06/05/2016
3

CIMA PWR
EN
INTRODUCTION
Congratulations on becoming part of the Sky family. We are
very pleased to welcome you to the world of Sky and hope that
you will enjoy many hours of fantastic ying aboard your Sky
Paragliders glider.
Sky Paragliders is based in the heart of Europe and we pride
ourselves on our own, purpose built, state of the art production
facilities in the Czech Republic.
Our management and development teams are located just 25
steps above the glider production facility. This close contact is
incredibly important to us and helps to ensure that our products
are of the highest quality possible and with minimal air miles on
our raw materials.
DISCLAIMER
Please read this Manual carefully and note the following details:
The purpose of this Manual is to oer guidelines to the pilot
using the paraglider and it is by no means intended to be used
as a training manual for this or any other paraglider. We advise
that you only y a paraglider when qualied to do so or when
undergoing training at an accredited School or with a qualied
Instructor. Pilots are personally responsible for their own safety
and their paraglider's airworthiness. The use of this paraglider is
solely at the user's own risk! Neither the manufacturer nor dealer
accept any liability connected with this activity. This paraglider
on delivery meets all the requirements of the EN 926-1
and DGAC regulations and has an airworthiness certicate
issued by Sky Paragliders. Any alterations to the paraglider will
render its certication invalid.
4
User manual / Handbuch / Manuel / Návod k obsluze
CIMA Pwr
Contents
INTRODUCTION 4
DISCLAIMER 4
1. GENERAL INFORMATION 6
1.1 Operating limits
1.2 PilotProle
1.3 Certication
1.4 Scopeofdelivery
1.5 Characteristics
2. TECHNICAL DETAILS 7
2.1 Risers diagram
2.2 Line Plan
2.3 WingCrossSection
2.4 Tech.Spec.
3. SET UP 10
3.1 Hang point
3.2 Trimmers
3.3 SpeedBarAccelerator
3.4 WingPre-ightChecks
4. BASIC FLIGHT TECHNIQUES 10
4.1 Ination:Forward
4.2 ReverseLaunch
4.3 Operation Of Trimmer System
4.4 Operation of Speed Bar
4.5 TheClimbOut
4.6 NormalFlight
4.7 Turning
4.8 ActiveFlying
4.9 Landing
5. RAPID DESCENT TECHNIQUES 12
5.1 Big Ears
5.2 SpiralDrive
5.3 B-line Stall
6. INCIDENTS 12
6.1 AsymmetricorFrontal(Symmetric)Collapses
6.2 Stalls
6.3 Brakelinemalfunction
7. MAINTENANCE & CHECKS 13
7.1 AdviceonMaintenance
7.2 Storage and transport
7.3 Checkups
7.4 PeriodicChecks&Repairs
7.5 Spare parts
8. GUARANTEE 14
9. DISPOSAL 14
User manual / Handbuch / Manuel / Návod k obsluze
CIMA Pwr
5

1. GENERAL INFORMATION
1.1 Operating limits
Cima PWR is a very strong paraglider and ying all the usual
SIV manoeuvres will not normally pose a structural problem.
However, frequent extreme manoeuvres training can accelerate
the ageing process dramatically, and Sky recommends having
wings that are often used for SIV-type manoeuvres subjected to
check-ups at shorter intervals than normally stipulated
1.3 Certication
Cima PWR has passed the certication according to EN 9261:2015 & LTF NFL II-91/09 chapter 3.
This test was carried out in the Swiss Air-Turquoise
laboratories in Switzerland. Load test passed at 1360 kg.
It also passed the DGAC certication as ULM class 1 and, the
manufacturer’s certication. Any alteration of the paraglider can
invalidate all the aforementioned certications.
Correct behaviour in relation to the environment
It is important that we as pilots behave in a responsible way
towards both the environment and the people sharing it with
us. We encourage you to treat nature with respect, to avoid
unnecessary noise, to never litter and to observe all local
regulations. Please also make sure to comply with legislation
regarding protected areas, privately owned property or hunting
areas – this ensures the least possible friction in relation to other
users of the great outdoors, to the benet of both yourself and
the sport as a whole.
1.2 PilotProle
Cima PWR is suitable for beginner to intermediate pilots.
The predictable characteristics of CIMA PWR suit the
beginner. It oers simple ination characteristics, whereby the
wing rises smoothly and steadily. CIMA PWR‘s high lift prole
allows for slow, short take os with good climb rates. A smooth
and progressive, yet responsive are, makes landing easily
controlable and manageable.
Cima PWR has a high level of passive safety.
1.4 Scopeofdelivery
Your CIMA PWR is delivered with
• Carry All bag Moto
• Inner bag
• Repair kit
• T shirt
1.5 Characteristics
Cima PWR is suitable for beginners and intermediates. It has a
high level of passive safety. We know that for the PPG pilot, the
take-o and landing phase are crucial and CIMA PWR’s design
is such that launching and landing are both straight forward
and predictable. CIMA PWR’s good sink/climb rate allow for
low take-o and landing speeds with good air characteristics
and short take o distances.
Cima PWR is damped in both roll and pitch with a good
speed range making it ideal for relaxed cruising ights.
Skytex 38 fabric is used for both top and bottom surfaces.
Skytex was chosen for its excellent moisture repellent properties as well as for durability. Being moisture repellent means
that the gliders launch and ight characteristics are improved if
launching from dew laden grass as is so often the case for early
morning or late evening ights.
6
User manual / Handbuch / Manuel / Návod k obsluze
CIMA Pwr

1.6 Features
Cima PWR features a composite leading edge (Mylar & Nylon
rods) to assist ination by presenting the open leading edge to
the airow even in nil winds.
• Trimmer risers are standard to allow for a faster trim setting
for higher speed cruising.
• Speed bar accelerator system.
• Optional upper or lower hang point loop to best suit your
paramotor hang point system.
• The brake lines can be extended by 10cm if required and
the brake pulley can be moved down to the next setting to
match.
2. TECHNICAL DETAILS
2.1 Risers diagram
Basic setting (trimmer closed)
A
B
C
D
500 mm
500 mm
500 mm
500 mm
Accelerated
A
B
C
D
400 mm
420 mm
460 mm
520 mm
Trimmer opened
A
B
C
D
Measured from bottom attachment loop.
500 mm
500 mm
545 mm
590 mm
User manual / Handbuch / Manuel / Návod k obsluze
CIMA Pwr
Distance between upper and bottom attachment loop 60 mm
Length of the speed system
100 mm
7
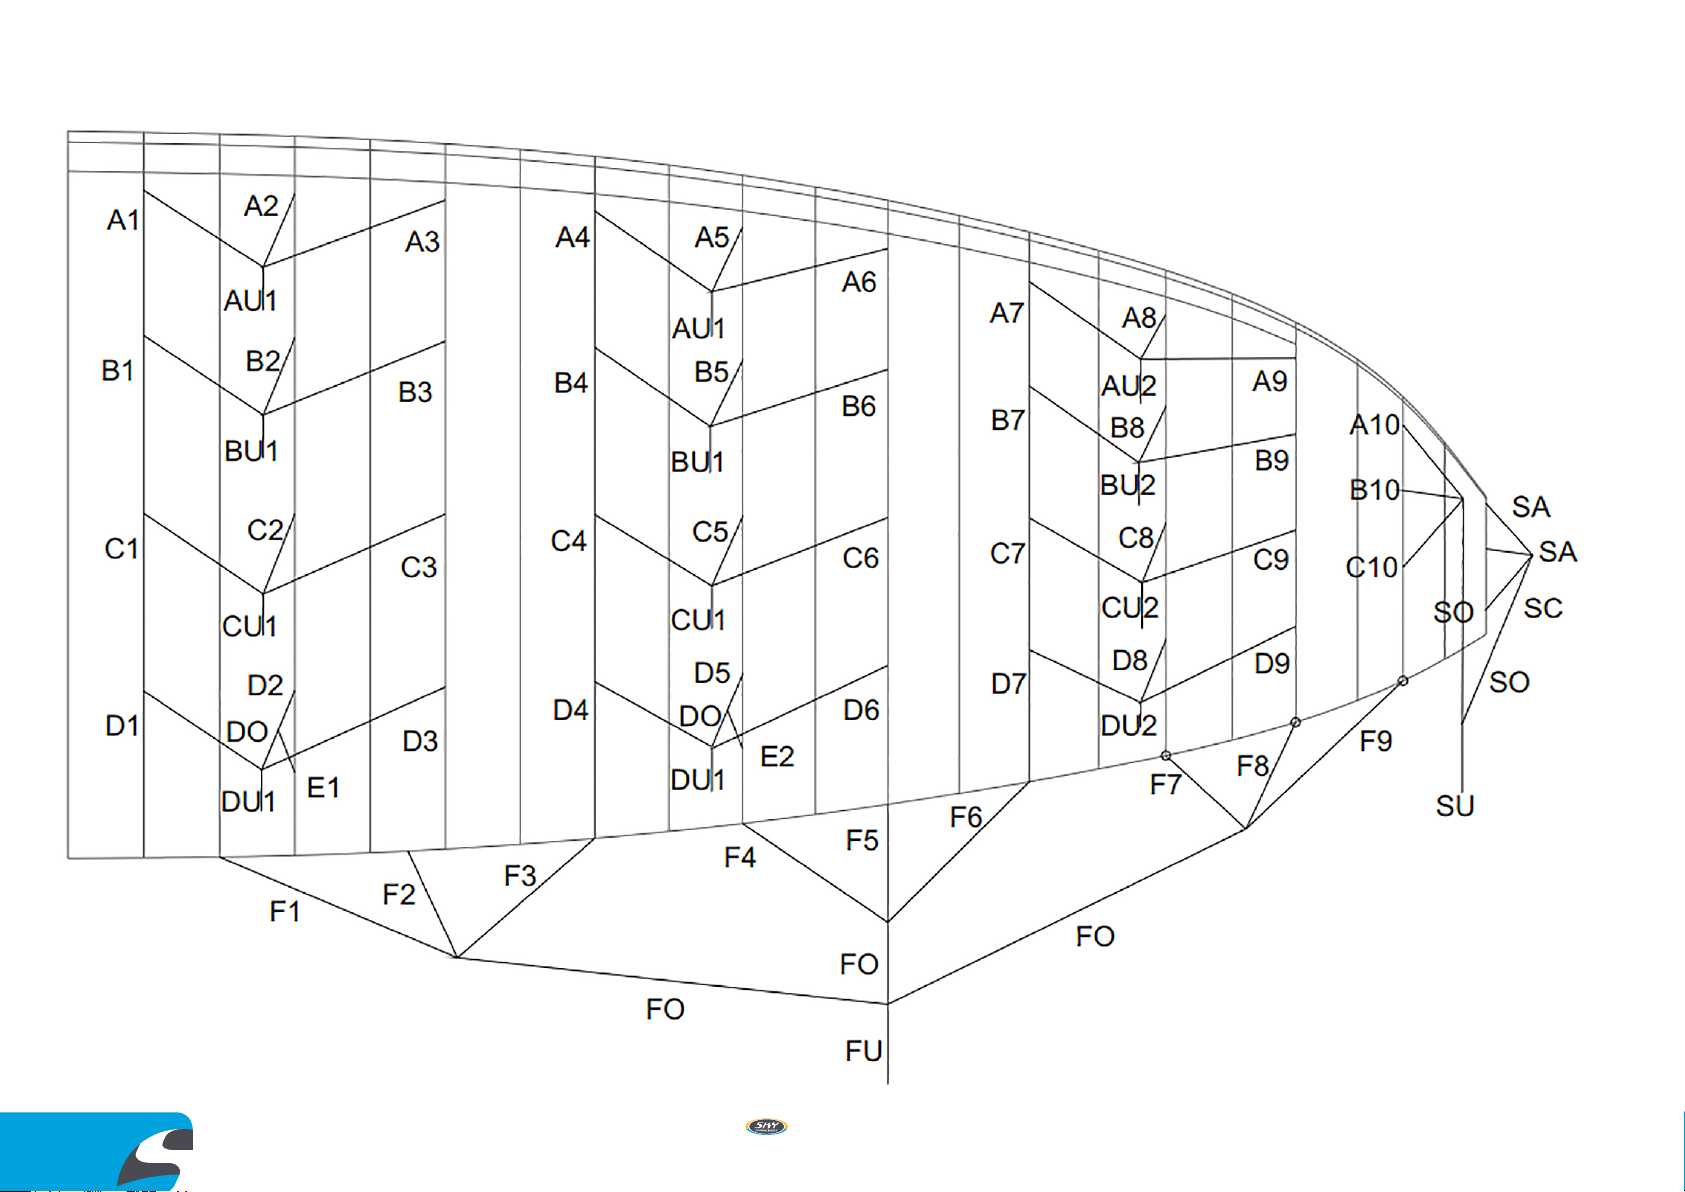
2.2 Line Plan
8
User manual / Handbuch / Manuel / Návod k obsluze
CIMA Pwr
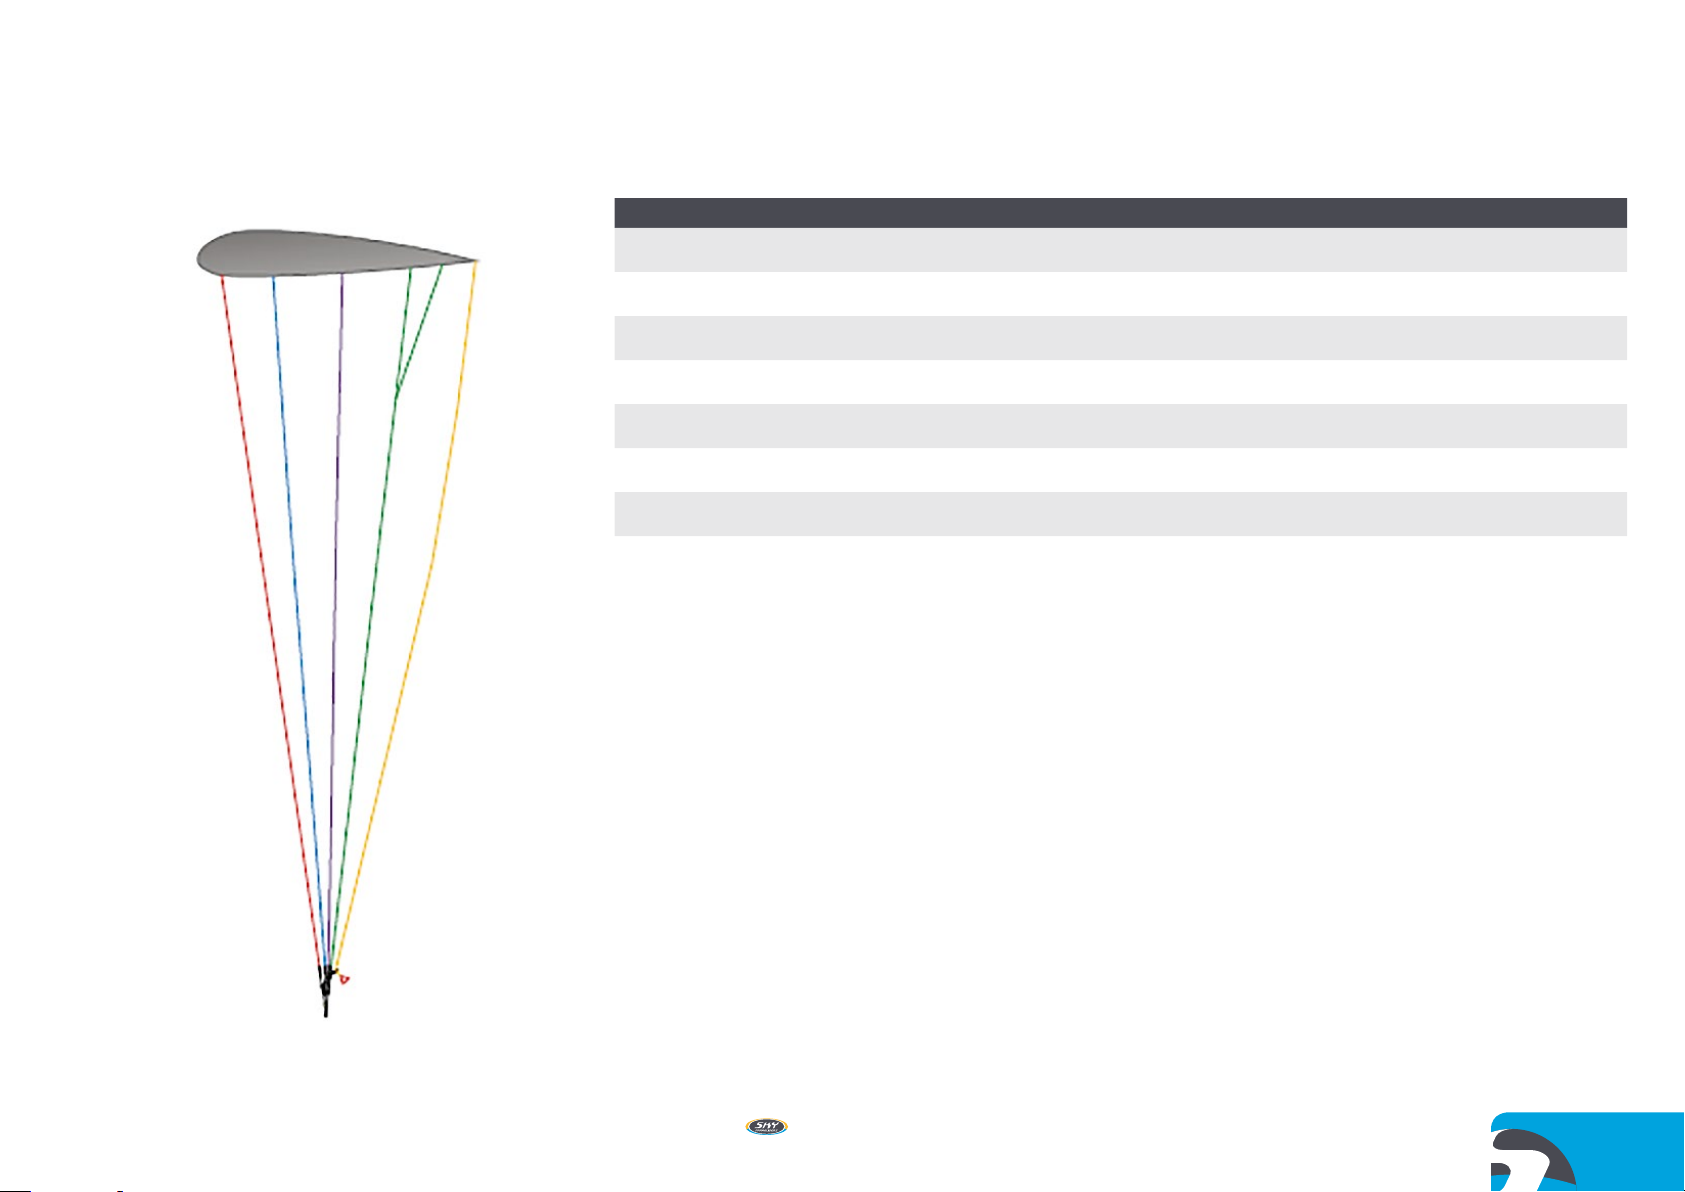
2.3 WingCrossSection 2.4 Tech.Spec.
CIMA Pwr XS S M L
A B C D
Layout surface (m2)
Layout span
Layout aspect ratio
Projected surface (m
Projected span (m)
Projected aspect ratio
Cell count
PPG weight range (kg)
21.37 23.12 25.00 27.13
9.77 10.17 10.57 11.01
4.47 4.47 4.47 4.47
2
)
18.21 19.70 21.30 23.12
8.34 8.67 9.02 9.40
3.82 3.82 3.82 3.82
42 42 42 42
60-100 70-120 80-140 95-160
A Riser - Red
BRiser-Blue
CRiser-purple
D Riser – Green
Brakes–Yellow
User manual / Handbuch / Manuel / Návod k obsluze
CIMA Pwr
9

3. SET UP
3.1 Hang point
Select the appropriate hang point (upper or lower) according
to your harness/power unit system, connect to your power
unit and adjust the brake line length accordingly (Standard or
+10cm from standard).
3.2 Trimmers
Set the trimmer system to standard trim (closed).
Ensure that the speed bar is routed correctly according to
the harness manual and that there is no danger of it swinging
back into the propeller.
Before each take-o check that the entire accelerator system
works freely and that the lines are long enough to prevent the
speed bar from being activated involuntarily in ight (lines too
short). If the harness is tted with a front mounted reserve, the
speed bar lines must pass under the reserve container and the
reserve bridle so that it can be deployed correctly. Use of the
speed bar increases the maximum speed of the paraglider by
up to 30% of the trim speed.
3.3 SpeedBarAccelerator
are pulled symmetrically during operation. Fine-tuning can be
completed when you are back on the ground.
3.4 WingPre-ightChecks
• Check the sail for damage to both surfaces, the internal
structure (ribs, diagonals) and seams.
• Check that the lines are not damaged or tangled.
• Check that the quick-links which connect the lines to the
risers are undamaged and correctly tightened.
• Check that the risers are not damaged or twisted.
• Check that the speed system works freely and that the
lines are long enough to ensure that the speed system is
not permanently activated whilst in ight.
• Lastly, check that the brake handles are correctly attached
and that each line runs freely through its pulley
4. BASIC FLIGHT
TECHNIQUES
forward or down as this could cause a collapse of the leading
edge. Simply follow them with your arms until the glider reaches
its angle of ight above your head.
A controlled ination avoids excessive need of the brakes
and allows you to visually check the wing and lines during the
last phase of the launch, before acceleration to take-o speed.
4.2 ReverseLaunch
Light to strong wind
Pass the risers over your head and turn to face the wing. From
here the reverse launch can be performed. When the wing is
under control and above your head, turn to face the wind and
the take-o run can commence.
We recommend rst practicing your launch techniques with
out the power unit and then with the power unit whilst the motor
is not running, so as to fully familiarise yourself with the sensations, skills and procedures for safe live take-os.
IMPORTANT: Never attempt to take o with a glider that is
not fully inated, directly overhead or if you are not fully in control of the pitch/roll of the wing.
4.3 Operation Of Trimmer System
-
To set up a speed bar on the ground, ask a friend to pull your
risers into their in-ight position while you sit in your harness.
Now adjust the length of the line so that the bar sits just beneath your seat. You should now be able to hook your heel in to
the secondary loop of the accelerator. The accelerator must be
slack enough to ensure that the speed system is not activated
(pulled down) in normal ight, but not so long that it is impossible to use the full range of the speed system or so as to pose
a risk to the propellor. Once set up, test the full range of the
speed system in calm ying conditions: ensure that both risers
10
4.1 Ination:Forward
Nil to light wind
Lay out the paraglider with the leading edge in a horseshoe
shape. Holding the A risers close to the quick links move forward until the lines are tight. You should now be perfectly centered in your wing. In nil wind or a light headwind, with lines
tight take several positive strides. CIMA PWR will rapidly inate
and rise over your head. Do not pull the risers too hard, either
User manual / Handbuch / Manuel / Návod k obsluze
CIMA Pwr
The CIMA PWR is supplied with a trimmer riser set
The trimmers are a system to modify glider prole, altering
the angle of attack of the wing to set a desired trim speed.
The ‘neutral’ or standard position is when the trimmers are
pulled all the way down. The standard trim setting is ideal for
climbing under power, whilst thermalling and when the air is
turbulent. Brake pressure is lighter and the handling at its best
on the standard trim setting. To increase cruise speed you can
use the speed system or release the trimmers, or both. In tur
-
bulent air the wing is most stable on its slowest setting, i.e. with
trimmers in the standard position and no accelerator applied.
To activate them the pilot should gently push the “trimmers”
cam lock to allow the straps to slide, lowering the angle of
attack. Release the cam lock to lock the straps at the desired
setting. To tighten the trimmers, to increase the angle of attack,
the pilot should pull the straps down vertically until the desired
setting is achieved. Trimmers must be activated and deactivated symmetrically .
4.4 Operation of Speed Bar
Use of the speed bar increases the maximum speed of the
paraglider by up to 30% of the trim speed by lowering the angle
of attack.
The speed bar is a foot operated system. Pushing the bar
with your feet will activate the system. Releasing the bar will
deactivate the system.
Use of the speed system does reduce the angle of attack
and therefore there is an increased risk of a frontal (or asymmetric) collapse. For this reason we do not advise use of the speed
bar near to the ground or in turbulent air.
Permissible in-Flight speed setting/steering
of combined controls
Accelerator Trimmers Brakes
YES YES NO
YES NO YES
NO YES YES
4.5 TheClimbOut
Once in the air you should continue ying into wind whilst gaining height. By setting the trimmers to the standard position you
will achieve the best climb rate. Do not attempt to climb too
steeply or too quickly by using the brakes. The wing already has
a high angle of attitude, coupled with a higher angle of attack
(if you use the brakes) plus the engine’s full thrust acting on the
pilot, this could contribute to make the glider more prone to
stall. Furthermore, in the event of an engine failure, the resulting
backward pendulum motion of the pilot and the forward dive
of the wing can result in a momentary dive until the wing and
pilot reach pendulum stability once again, possibly resulting in
ground impact if there is insucient altitude.
Do not initiate turns until you have sucient height and air
speed. Avoid low turns downwind with insucient airspeed.
The CIMA PWR is well damped in roll but under certain cir
cumstances it is possible for the pilot to induce oscillations.
This is caused by a combination of the engine/propeller torque
and pilot weight-shift and/or brake inputs. To stop oscillations
it is best to reduce the power slightly and ensure that you re
main static with weight-shift and brake inputs. Once settled you
can once again apply full power. Under full power the torque
eect will attempt to gently turn the wing, using weight-shift
or adjusting the trimmers asymmetrically is the best method
to correct this.
NOTE: Using the trimmers asymmetrically will invalidate
certication.
4.6 NormalFlight
Once at a safe altitude you can select your cruising speed. The
faster you trim the wing, the more fuel your motor will consume
to maintain level ight. For better penetration into headwinds
and improved glide performance in sinking air or crosswinds,
you should y faster than trim speed by using the accelerator
system, and or the trimmers.
For maximum eciency whilst ying downwind, set the trimmers to the standard setting and do not use the speed bar.
With trimmers set to the standard position and applying the
brakes approximately 15%, the CIMA PWR will achieve its best
minimum-sink rate.
4.7 Turning
Cima PWR is designed to turn eciently and will turn without
the need for weight-shift piloting if you choose. Your wing is
not only designed to turn rapidly (with approx. 30% brake) but
also to y slowly in order to help identify areas of lift (for ecient
climb rates) and to maintain a atter turn to minimize sink rate
during the turn (with 15% brake).
-
-
4.8 ActiveFlying
Cima PWR has been designed with a stable prole. It will resist reasonable levels of turbulence without pilot input. However
-
in stronger turbulence we recommend that you return the trimmers to the standard position and do not use the speed bar.
Fly the glider actively.
The key elements of eective active ying are pitch control
and pressure control:
In turbulent air, if the glider pitches in front of you, use the
brakes to arrest the pitch. Equally, if the glider pitches behind
you, release the brakes to allow it to speed up and return above
you head. In severe turbulence, ying with a small amount of
brake applied (approx. 20cm) will give you tension in the brakes
and feedback from the wing. In turbulent conditions the internal
pressure of the wing can change and you can feel this through
the brakes. The aim is to maintain a constant pressure through
the brakes. If you feel a loss in pressure apply the brakes until
normal pressure is resumed then raise your hands swiftly back
User manual / Handbuch / Manuel / Návod k obsluze
CIMA Pwr
11
to their original position. Avoid ying with continuous amounts
of brake in rough air as you could inadvertently stall the wing.
Always consider your airspeed.
IMPORTANT: No pilot and no glider are immune to collaps
es. In severe turbulence active ying will help to eliminate any
tendency
be more active and anticipate the movements of your wing.
Always be aware of your altitude and do not over-react. We
advise you to keep hold of your brakes at all times and not to
y in turbulent conditions.
to collapse. When the conditions are very turbulent,
5. RAPID DESCENT
-
TECHNIQUES
As a general rule, in order to descend, y away from areas of
lift. If, for whatever reason, you are taken unawares by the development of conditions, you may consider using the following
techniques to incr
ease your sink rate.
or increased by releasing or depressing the brake by several
centimetres respectively. Once mastered the spiral dive allows
you to descend at rates greater than 10 m/s. Extremely abrupt
or badly synchronised brake inputs or too-rapid initiation of
the spiral may result in an asymmetrical collapse and/or a spin.
CAUTION: A deep spiral is a radical manoeuvre. The kinetic
energy generated must be dissipated by slowly releasing the
inside brake throughout, at least, one whole revolution.
5.3 B-line Stall
4.9 Landing
A slow approach speed and the ight to end with the perfect
landing , large areas and long runs are no longer required.
It must be remember that in wind nil conditions the forward
ground speed encountered may be signicantly higher and
during landing that speed must be decreased as safely as possible. This can be achieved by fully closing the trimmers and
proportionately applying the brakes. If necessary as the pilot
reaches the ground a longer run o should also be carried out.
When landing in moderate wind conditions, the ground speed
is reduced so simple and progressive application of the brakes
will be enough for a perfect landing. Landing with open or half
open trimmers is possible, but it will be necessary to balance
the application of the brakes to the position of the trimmers and
the forward ground speed being experienced. Of course open
trimmers and an increase in forward ground speed when landing may require a larger landing area as opposed to when the
trimmers are closed. The CIMA PWR very eciently transforms
forward speed into lift allows for an ecient air.
5.1 Big Ears
Grasp the outside big ears A line on both sides as high up the
line as possible.
Pull the line outwards and downwards whilst allowing your
hands to slightly slide down the line until the wingtips fold back
under the leading edge. We recommended that you perform
each “ear“successively and not both simultaneously. Keep the
lines taut to stop the wingtips from reopening until the manoeuvre is nished. Depending on the size of the big ears that have
been initiated, the sink rate can increase by up to 3–4 m/s. If
necessary, it is possible to initiate small alterations in direction
by weight shift control. As soon as the lines are released, the
paraglider should spontaneously reopen. However, you can
speed reopening by „pumping“ the brakes in a single sweeping movement approximately 30%. When pumping the brakes
it is recommended that one side of the paraglider be opened
after the other. Pulling both brakes simultaneously to reopen
ears may result in a stall.
5.2 SpiralDrive
Cima PWR is a manoeuvrable wing that responds to pilot input precisely and progressively. To initiate a tight spiral apply
one brake progressively to about 35% and hold it in this position. The speed of rotation and the brake pressure will increase
progressively and the centrifugal force on the pilot will also
increase. The angle and speed of rotation can be decreased
Grasp the B risers near the quick links, hands on the Yellow
sections, and ease them down symmetrically. Do not snatch
them down. The paraglider will enter a B-line stall and feel to
drop backwards before the pilot stabilises underneath the wing.
The descent rate increases to 6 - 8 m/s. To exit the B-line stall
raise both hands together in a single, positive movement so that
the risers are at normal full extension again. On releasing the
B-risers, your CIMA PWR should return immediately to normal
ight. An adjustment error, control error or certain aerological
conditions may lead to a prolonged deep stall phase. A push
on the speed bar should initiate rapid exit from the B-line stall
state. If the speed bar is not connected, pulling on the A-risers
by 4 – 5 cm will have the same result.
CAUTION: Unlike big ears and spiral dives (see above) a glid-
er in a B-line stall is in a true stalled position. For this reason,
a B-line stall should never be performed close to the ground.
6. INCIDENTS
6.1 AsymmetricorFrontal(Symmetric)
Collapses
Despite tests showing that CIMA PWR recovers spontaneously
after collapses, active piloting is recommended in the event of
12
User manual / Handbuch / Manuel / Návod k obsluze
CIMA Pwr
an asymmetric or frontal collapse. Active piloting will reduce the
loss of altitude and a change of direction.
In the event of a frontal (symmetric) collapse:
• Before automatic reopening occurs, bring both brakes
down swiftly & symmetrically to speed up reopening of the
leading edge, then immediately bring your hands back up
to normal ying position.
In the event of an asymmetric collapse:
• Keep the paraglider ying as straight as possible by leaning away fr
(just enough, not too much) brake to maintain course.
• Speed up the reopening of the closed side by a single,
positive input on the collapsed side & repeat if necessary.
om the collapsed side and applying sucient
6.2 Stalls
Certain pilot behaviour or weather conditions can cause a full
stall. This is a serious deviation from normal ight and can be
dicult to manage. If a stall occurs at less than 100 m above
the ground, throw your reserve parachute.
Main Causes of a Full Stall:
• Poorly timed or excessive use of the brakes when the air
speed of the wing is reduced (e. g. when coming out of a
spiral or speeding up after a B-line stall).
Rain-induced deep or Full stall:
• A soaked or heavily drenched leading edge (from rain or a
cloud) can result in a full stall or Deep stall due to uneven
airow over the leading edge as a result of rain drops and
an increase of weight to the wing. Reported cases of this
phenomenon are linked to high levels of porosity in the
glider‘s fabric. Whatever the cause, a stall can be either
symmetrical or asymmetric (a spin). In both cases the
brake line travel becomes very short and even small input
may suddenly induce an airow separation; in some cases
even a gust or a sudden thermal may change the angle
of incidence enough to cause the deep stall. If you nd
yourself ying in unavoidable rain we strongly recommend
that you avoid any sudden movements or radical brake line
input, that you do not pull Big Ears or B-stall, and that you
steer clear of turbulence and avoid a deep are on landing.
In both cases the pilot has two possible courses of action:
•
If the full stall happens above 100 m it is strongly recommended to initiate standard stall r
pilot is familiar with the process (i.e. a complete execution
of the full stall, stabilization of the wing and progressive
lifting of the hands to resume normal ight).
• If the full stall happens below 100 m or if the pilot is unfa
miliar with stall recovery the r
deployed immediately
ecovery assuming the
-
eserve parachute should be
6.3 Brakelinemalfunction
If a brake line or pulley breaks it is possible to y CIMA PWR
using the D risers (rear risers). The movements should be nely
controlled as the deformation of the wing due to the traction on
the D risers is greater than that produced by using the brakes.
Tip: Practice this method of steering to be prepared before
a real brake failure!
7. MAINTENANCE &
CHECKS
7.1 AdviceonMaintenance
• Avoid dropping the canopy on its top surface or on its
leading edge during ination or landing. Do not drag it
across the ground when moving it.
• Do not expose it unnecessarily to sunlight.
• Choose a folding technique that doesn‘t damage the
leading edge strips and that doesn‘t crease the internal
structure excessively. To maximize the life of your glider we
do not recommend the use of stu sacks: the abrasion of
the material will decrease the life expectancy of the fabric –
in particular its internal structure.
• Never store your paraglider when it is damp. If immersed in
sea water, rinse it thoroughly in fresh water. Do not use any
detergents.
• If you do most of your ying near the sea, where the air is
humid and salty, the wing may age faster. In this case we
suggest you have it checked more often than prescribed in
this manual.
• Empty any foreign bodies from your paraglider regularly, for
example sand, stones or animal or vegetable matter which
may eventually decay. Twigs, sand, pebbles, etc. damage
tissue in successive folds, and organic debris of vegeta
ble or animal origin (insects) can promote mould gr
CIMA PWR is tted with debris release slots at the wing
tips. Debris can be shaken from the closed cells through
to the wing tip and the release slot opened to remove parti
cles. Check that you reseal the debris r
completed.
elease slot when
7.2 Storage and transport
Store your loosely packed glider in a cool (10-25°C) and dry (<
70% humidity) place. Hot car boots or damp basements lead
to damaging of the cloth. A paraglider should always be dry
when packed, but this is particularly important after the last
ight of the season. But even a completely dry wing should
still be stored open in a dry, clean and dark place. If you do not
have room for such winter storage we recommend you open
all compression straps on the bag as much as possible and
leave the bag open so that air can circulate around the packed
canopy. Make sure no vermin make their sleeping quarters in
your wing, and keep it well distant from solvents and acids.
Petrol and other petrochemicals are especially abrasive for nylon and will dissolve the cloth if allowed near. High temperatures
in combination with moisture are a particularly volatile mix that
will accelerate the hydrolysis process where the bres and the
coating are decomposed.
-
owth.
-
User manual / Handbuch / Manuel / Návod k obsluze
CIMA Pwr
13

7.3 Checkups
The wing has undergone a series of tests during the production
process and consequent ight tests before the delivery. It is
delivered with a standard brake setting, the same as the one
used during the testing.
7.4 PeriodicChecks&Repairs
For safety reasons it is recommended that the wing be checked
at least once a year, or after 100 ights, whichever is sooner
and anytime there is a noticeable change in its behaviour. The
check must be done by the manufacturer or an authorized representative. Before sending the paraglider for an inspection,
contact your importer or your dealer.
CAUTION: Have your wing additionally checked if you notice
damages or a change in ight behaviour.
7.5 Spare parts
Your SKY wing consists of many high quality long-life components. When replacing parts, (lines, risers, fabric panels, etc.),
only original parts may be used. In addition to the continued
airworthiness of your paraglider this is important for your safety
as well.
8. GUARANTEE
Cima PWR is guaranteed for two years against any production
fault since the date of purchase. The guarantee does not cover:
• Damage caused by misuse, by neglecting the regular
maintenance, or if the glider is overloaded or misused.
• Damage caused by inappropriate landings.
9. DISPOSAL
Even the best products have a limited service life, and once
your glider reaches this point, it must be disposed of properly.
Please make sure your paraglider is disposed of in the correct
environmental manner or send it back to Sky Paragliders for
correct disposal. In case of any doubts regarding the information in the manual, contact your SKY dealer.
Sky Paragliders a.s.
Okružní 39, 739 11 Frýdlant nad Ostravicí, Czech Republic
Tel.: +420 558 676 088, info@sky-cz.com,
www.sky-cz.com
14
User manual / Handbuch / Manuel / Návod k obsluze
CIMA Pwr
Sky Paragliders a.s.
Okružní 39, 739 11 Frýdlant nad Ostravicí, Czech Republic
Tel. +420 558 676 088, info@sky-cz.com, www.sky-cz.com
User manual / Handbuch / Manuel / Návod k obsluze
CIMA Pwr
15
CIMA PWR
EINFÜHRUNG
HAFTUNGSAUS-
DE
Gratuliere zu Ihrer Entscheidung, ein Teil der Sky Family zu warden. Wir freuen uns, Sie zur Welt von Sky begrüßen zu können
und hoen, dass Sie unter ihrem Sky Paragliders Schirm viele
schöne Stunden mit fantastischen Flügen genießen werden.
Die Basis von Sky Paragliders liegt im Herzen von Europa und
wir sind stolz auf unsere auf dem neuesten Stand der Technik
ausgestatte Produktion in der Tschechischen Republik.
Management und Entwicklungsteams sitzen nur 19 Stufen
oberhalb des Produktionsbetriebes. Dieser enge Kontakt ist für
uns unglaublich wichtig und hilft uns dabei, Produkte höchster
Qualität mit minimaler Umweltbelastung und minimiertem
Verbrauch von Material anbieten zu können.
SCHLUSS
Bitte lesen Sie dieses Handbuch aufmerksam und beachten
Sie die folgenden Details: Der Zweck dieses Handbuchs
ist es, dem Piloten Richtlinien für den Gebrauch dieses
Gleitschirms zu vermitteln. Auf keinen Fall darf das Handbuch
als Trainingsanleitung für diesen oder einen anderen Schirm
genutzt werden. Wir raten Ihnen dringend, einen Gleitschirm
nur als qualizierter Pilot oder im Rahmen der Ausbildung an
einer akkreditierten Flugschule mit einem geeigneten Fluglehrer
zu verwenden. Piloten sind persönlich für ihre eigene Sicherheit
und die Flugtauglichkeit ihres Fluggeräts verantwortlich. Der
Gebrauch dieses Gleitschirms erfolgt ausschließlich auf
Risiko des Verwenders! Sowohl der Hersteller als auch die
Händler schließen jegliche Haftung in Verbindung mit dem
Gleitschirmiegen aus. Zum Zeitpunkt der Auslieferung erfüllt
dieser Gleitschirm alle Anforderungen von EN und DGAC und
verfügt über ein von Sky Paragliders ausgestelltes Zertikat
seiner Flugtüchtigkeit. Alle Änderungen an diesem Gleitschirm
machen die Musterzulassung ungültig.
16
User manual / Handbuch / Manuel / Návod k obsluze
CIMA Pwr

Inhalt
EINFÜHRUNG 16
HAFTUNGSAUSSCHLUSS 16
1. ALLGEMEINE
INFORMATIONEN 18
1.1GrenzendesGebrauchs
1.2Pilotenprol
1.3Musterprüfung
1.4Lieferumfang
1.5.Eigenschaften
2. 1 TECHNISCHE DETAILS 19
2.1SchemadesTragegurtes
2.2 Leinenplan
2.3Flügelprol
2.4TechnischeDaten
3. EINSTELLUNG 22
3.1Aufhängungspunkte
3.2 Trimmer
3.3 Speedsystem
3.4Vorug-Checks
4. FLUGTECHNIKEN 22
4.1Vorwärtsstart
4.2Rückwärtsstart
4.3.BedienungderTrimmer
4.4BedienungdesSpeedsystems
4.5Steigug
4.6Normalug
4.7Kurvenug
4.8AktivesFliegen
4.9Landung
5. SCHNELLABSTIEGSTECHNIKEN 24
5.1 Ohren anlegen
5.2 Steilspirale
5.3 B-Stall
6 STÖRUNGEN 25
6.1Asymmetrischeoderfrontale(symmetrische)Einklapper
6.2Strömungsabrisse
6.3Bremsversagen
7. INSTANDHALTUNG & CHECKS 25
7.1EmpfehlungenzurInstandhaltung
7.2Aufbewahrung&Transport
7.3Checks
7.4RegelmäßigeÜberprüfungen&Reparaturen
7.5 Ersatzteile
8. GARANTIE 26
9. ENTSORGUNG 26
User manual / Handbuch / Manuel / Návod k obsluze
CIMA Pwr
17

1. ALLGEMEINE INFORMATIONEN
1.1GrenzendesGebrauchs
Der CIMA PWR ist ein sehr robuster Gleitschirm und das
Fliegen der üblichen Manöver eines Sicherheitstrainings stellt
normalerweise kein strukturelles Problem dar. Dennoch kann
das häuge und wiederholte Training extremer Manöver den
Alterungsprozess dramatisch beschleunigen, weshalb Sky
empehlt, solcherart genutzte Schirme in kürzeren als den für
den Normalbetrieb vorgeschriebenen Abständen überprüfen
zu lassen.
Korrektes Verhalten gegenüber der Umwelt
Es ist wichtig, dass wir uns als Piloten verantwortungsvoll
sowohl gegenüber der Umwelt, als auch gegenüber unseren
Mitmenschen verhalten. Bitte behandeln Sie die Natur mit
Respekt, vermeiden Sie unnötigen Lärm sowie Verschmutzung
und beachten Sie die lokalen Vorschriften. Versichern Sie sich
auch, alle Gesetze hinsichtlich Schutzgebiete, Privatgründe
oder Jagdgebiete zu beachten – auf diese Weise vermeiden
Sie unnötigen Ärger mit anderen Nutzern der Natur sowohl für
sich selbst, als auch für unseren Sport.
1.2Pilotenprol
Der CIMA PWR eignet sich für Anfänger und Fortgeschrittene.
Er bietet ein hohes Maß an passiver Sicherheit. Wir wissen, dass für einen PPG-(Motorschirm-)Piloten die Startund
Landephasen entscheidend sind. Deshalb wurde das
Start- und Landeverhalten des CIMA PWR bewusst einfach
und vorhersehbar angelegt. Das geringe Sinken sowie die
gute Steigrate des CIMA PWR erlauben geringe Start- und
Landegeschwindigkeiten, gute Flaireigenschaften sowie kurze
Startstrecken. Der CIMA PWR ist gegen Nicken und Rollen gut
gedämpft; sein großes Geschwindigkeitsfenster macht in ideal
für entspannte Cruising-Flüge.
Für Ober- und Untersegel wird Skytex 38-Gewebe verwendet. Skytex wurde aufgrund seiner exzellenten feuchtigkeitsabweisenden Eigenschaften sowie aufgrund seiner Haltbarkeit
ausgewählt. Feuchtigkeitsabweisendes Tuch verbessert die
Start- und Flugeigenschaften nach Starts aus taufeuchtem
Gras, das für die gerne gemachten Flüge in der Früh oder spät
am Abend typisch ist.
1.3Musterprüfung
Der CIMA PWR wurde nach EN 926-1:2015 und LTF NFL II91/09 Kapitel 3 mustergeprüft. Die Flug- und Lasttests wurden
von Air Turquoise in der Schweiz durchgeführt. Beim Lasttest
widerstand der CIMA PWR einer Last von 1240 kg.
Der CIMA PWR hat außerdem die Zertizierung des DGAC
als ULM Klasse 1 bestanden. Alle Änderungen am Gleitschirm
machen die zuvor genannten Musterprüfungen ungültig.
1.4Lieferumfang
Ihr CIMA PWR wird mit folgendem Zubehör geliefert:
• Carry All bag Moto
• Innenpacksack
• Reparaturkit
• T-Shirt
1.5.Eigenschaften
• Der CIMA PWR besitzt eine Komposit-Eintrittskante (Mylar
& Nylonstäbchen) um die Füllung durch eine zum Luftstrom
hin oene Eintrittskante auch bei Nullwind-Bedingungen zu
unterstützen.
• Für das Fliegen mit höherer Trimgeschwindigkeit ist der
Tragegurt mit Trimmern ausgestattet.
18
User manual / Handbuch / Manuel / Návod k obsluze
CIMA Pwr

2. 1 TECHNISCHE
• Fußbetätigtes Beschleunigungssystem
• Der Tragegurt verfügt über zwei Aufhängungspunkte, einen
oberen und einen unteren, um den Schirm bestmöglich auf
die verwendete Einheit von Sitzgurt und Motor abstimmen
zu können. Bei Bedarf können die Bremsleinen um bis
zu 10 cm verlängert und die Umlenkrolle auf die untere
Position versetzt werden.
DETAILS
2.1SchemadesTragegurtes
Grundeinstellung (geschlossene Trimmer)
A
B
C
D
500 mm
500 mm
500 mm
500 mm
beschleunigt
A
B
C
D
400 mm
420 mm
460 mm
520 mm
mit oenen Trimmern
A
B
C
D
Gemessen vom unteren Ende der Karabinerschlaufe.
500 mm
500 mm
545 mm
590 mm
User manual / Handbuch / Manuel / Návod k obsluze
CIMA Pwr
Distanz zwischen oberen und unterem Ende der
Karabinerschlaufe 60 mm
Länge de Trimmer
100 mm
19

2.2 Leinenplan
20
User manual / Handbuch / Manuel / Návod k obsluze
CIMA Pwr

2.3Flügelprol 2.4TechnischeDaten
CIMA Pwr XS S M L
Schirmäche (m2)
21.37 23.12 25.00 27.13
A B C D
Flügelspannweite (m)
Streckung
Fläche projiziert (m
Spannweite projiziert (m)
Streckung projiziert
Anzahl Zellen
DGAC-PPG Startgewicht (kg)
2
)
9.77 10.17 10.57 11.01
4.47 4.47 4.47 4.47
18.21 19.70 21.30 23.12
8.34 8.67 9.02 9.40
3.82 3.82 3.82 3.82
42 42 42 42
60-100 70-120 80-140 95-160
A-Leinen – rot
B-Leinen–bau
C-Leinen – lila
D-Leinen – grün
Bremsleinen – gelb
User manual / Handbuch / Manuel / Návod k obsluze
CIMA Pwr
21

3. EINSTELLUNG
3.1Aufhängungspunkte
Wählen Sie den zu Ihrer Kombination aus Gurtzeug und Motor
passenden (oberen oder unteren) Aufhängungspunkt, schließen
Sie den Motor an und richten Sie die Länge der Bremsleine ein
(Standard oder bis zu +10 cm länger).
3.2 Trimmer
Bringen Sie die Trimmer in die Grundposition (geschlossen).
Vergewissern Sie sich, dass das Speedsystem nach den
Anweisungen des Gurtzeugherstellers korrekt verlegt ist und
keine Gefahr besteht, dass es sich im Propeller verfangen kann.
Prüfen Sie vor jedem Start das Speedsystem auf freien
Verlauf und ausreichende Leinenlänge, um eine unfreiwillige
Vorbeschleunigung im Flug (Leinen zu kurz) zu vermeiden. Bei
Verwendung eines Frontretters müssen die Beschleunigerleinen
unter dem Rettungscontainer sowie den Verbindungsleinen
verlaufen, damit der Notschirm korrekt ausgelöst werden kann. Die Verwendung des Speedsystems steigert die
Maximalgeschwindigkeit des Gleitschirms um rund 30 Prozent.
3.3 Speedsystem
Um das Speedsystem am Boden einzustellen bitten Sie einen
Freund, ihre Tragegurte in Flugposition (gestreckt) zu bringen, während Sie im Gurtzeug sitzen. Stellen Sie die Länge
der
Beschleunigerleinen so ein, dass die Querstrebe vor
Ihrem Sitzbrett lose endet. Sie sollten nun in der Lage sein,
ihre Ferse in die Hilfsschlaufe einzuhängen. Das Speedsystem
muss dabei lose genug sein, um eine Vorbeschleunigung im
Normalug ausschließen zu können; gleichzeitig darf es nicht
zu lange sein, sodass eine volle Ausnutzung des Speedsystem
unmöglich wird oder Teile davon in den Propeller geraten kön-
nen. Testen Sie die Einstellung des Speedsystems in ruhigen
Flugbedingungen über den gesamten Arbeitsbereich: Stellen
Sie sicher, dass beide Tragegurte symmetrisch verkürzt werden.
Eine Feineinstellung kann nach der Landung erfolgen.
3.4Vorug-Checks
• Überprüfen Sie Ober- und Untersegel, interne Struktur
(Rippen, Diagonale) und Nähte auf Beschädigungen.
• Überprüfen Sie die Leinen auf Beschädigungen und
Verwicklungen.
• Überprüfen Sie die Quick-Links zwischen Tragegurt und
Leinen auf Schadensfreiheit und korrekten Verschluss.
• Überprüfen Sie die Tragegurte auf Schäden oder
Verwicklungen.
• Überprüfen Sie das Speedsystem auf freien Verlauf
und ausreichende Länge, um eine unfreiwillige
Vorbeschleunigung im Normalug ausschließen zu können.
• Überprüfen Sie zuletzt die korrekte Anbringung der
Bremsschlaufen sowie den freien Verlauf der Bremsleine
durch die Umlenkrolle.
4. FLUGTECHNIKEN
4.1Vorwärtsstart
Nullwind bis leichter Gegenwind
Breiten Sie den Gleitschirm mit der Eintrittskante in Hufeisenform
aus. Halten Sie die A-Tragegurte nahe der Quick-Links und gehen Sie vorwärts, bis die Leinen leicht gespannt sind. Sie sollten nun genau mittig vor ihrem Schirm stehen. Machen Sie bei
Nullwind oder leichtem Gegenwind einige Schritte vorwärts. Der
CIMA PWR wird sich rasch füllen und über Ihren Kopf steigen.
Ziehen Sie nicht an den Tragegurten - weder vorwärts noch
abwärts - da dies ein Einklappen der Eintrittskante zur Folge
haben könnte. Folgen Sie den Tragegurten einfach mit Ihren
Armen, bis der Schirm genau über Ihrem Kopf steht. Ein kontrollierter Start vermeidet starke Steuerbewegungen und erlaubt es Ihnen, Schirm und Leinen visuell während der letzten
Phase des Starts zu überprüfen - vor dem Beschleunigen auf
die Startgeschwindigkeit.
4.2Rückwärtsstart
Leichter bis starker Gegenwind
Führen Sie die Tragegurte über Ihren Kopf, bis Sie mit
dem Gesicht zum Schirm stehen. Von hier weg kann der
Rückwärtsstart ausgeführt werden. Sobald der Schirm kontrolliert über Ihrem Kopf steht drehen Sie sich in Flugrichtung und
beginnen Sie den Startlauf.
Wir empfehlen, die ersten Rückwärtsstartversuche anfangs ohne den Motor und danach mit abgestelltem Motor zu
machen, bis Sie völlig mit den Eindrücken, Fertigkeiten und
Prozeduren für einen sicheren Rückwärtsstart vertraut sind.
WICHTIG: Versuchen Sie nie, mit einem Schirm zu starten,
der nicht voll gefüllt ist und über Ihrem Kopf steht oder bevor
Sie Nick- oder Rollbewegungen des Schirmes unter Kontrolle
haben.
4.3.BedienungderTrimmer
Die Tragegurten des CIMA PWR sind mit Trimmern ausgestattet.
Das System der Trimmer verändert das Schirmprol, indem
es den Anstellwinkel für die gewünschte Trimspeed beeinusst.
22
User manual / Handbuch / Manuel / Návod k obsluze
CIMA Pwr

Die neutrale oder Standardposition bendet sich bei völlig geschlossenen Trimmern. Diese ist ideal für das Steigen
unter
Motor, beim Thermikiegen und bei turbulenter Luft.
Der Bremsdruck ist niedriger und das Schirmhandling ist
mit der Standardeinstellung am besten. Zur Steigerung der
Fluggeschwindigkeit können Sie das Speedsystem betätigen,
die Trimmer lösen oder beide Maßnahmen kombinieren. In turbulenter Luft ist der Schirm in seiner langsamsten Einstellung
am stabilsten, das heisst mit geschlossenen Trimmern und
ohne Betätigung des Speedsystems.
Zur Betätigung der Trimmer drückt der Pilot die
Trimmerschnallen und erlaubt es den Gurtbändern, sich zu
verlängern, wodurch der Anstellwinkel verkleinert wird. Lassen
Sie die Schnallen los, sobald die gewünschte Einstellung erreicht ist. Um die Trimmer zu straen, also den Anstellwinkel
zu erhöhen, ziehen Sie die Trimmgurte vertikal herunter bis die
gewünschte Einstellung erreicht ist. Die Trimmer müssen immer
symmetrisch aktiviert und deaktiviert werden.
4.4BedienungdesSpeedsystems
Die Aktivierung des Speedsystems vergrößert durch
eine Verringerung des Anstellwinkels die maximale
Fluggeschwindigkeit des Gleitschirms gegenüber Trimspeed
um rund 30 Prozent. Das Speedsystem wird durch die Füße
aktiviert. Druck auf die Querstrebe aktiviert das System, ein
Auslassen der Querstrebe deaktiviert es. Die Verwendung des
Speedsystems reduziert den Anstellwinkel und vergrößert dadurch das Risiko frontaler oder asymmetrischer Einklapper.
Aus diesem Grund empfehlen wir, den Beschleuniger nicht in
Bodennähe oder in turbulenten Luftmassen zu verwenden.
Abbildung 3. zulässige Kombinationen gleichzeitig im Flug
verwendeter Elemente
Speedsystem Trimmer Bremsen
JA JA NEIN
JA NEIN JA
NEIN JA JA
4.5Steigug
Gleich nach dem Start sollten Sie weiter gegen den Wind iegen,
während Sie Höhe gewinnen. Die Trimmer in Standardposition
bringen die beste Steigrate. Versuchen Sie nicht, zu steil zu
steigen oder durch Einsatz der Bremsen zu schnell steigen
zu wollen. Der Schirm bendet sich bereits in einem hohen
Anstellwinkel und der Schub des Motors wirkt auf den Piloten
- dies könnte den Schirm nahe an einen Strömungsabriss bringen. Bei einem Motorausfall könnten das starke Zurückpendeln
des Piloten und der nach vorne schießende Schirm zu einem
weiten Abtauchen führen, bis wieder Pendelstabilität erreicht
ist. In nicht ausreichender Höhe droht ein harter Bodenkontakt.
Verzichten Sie auf die Einleitung von Kurven, bis Sie ausreichende Höhe und Fluggeschwindigkeit erreicht haben.
Vermeiden Sie Rückenwind-Kurven mit zu geringer Airspeed.
Der CIMA PWR verfügt über eine gute Rolldämpfung, aber
unter bestimmten Bedingungen kann der Pilot Schwingungen
einleiten. Diese werden durch eine Kombination aus
dem Drehmoment von Motor und Propeller und den
Gewichtsverlagerungen und/oder Bremsbetätigungen des
Piloten verursacht. Um diese Schwingungen zu beenden empfehlen wir eine leichte Reduktion des Motorschubs, während
der Pilot mit seinem Körpergewicht und den Bremsen neutral bleibt. Nach dem Abklingen der Schwingungen kann wie-
der Gas gegeben werden. Bei Vollgas wird das Drehmoment
des Motors den Schirm leicht zu einer Seite zu drehen versuchen; durch Gewichtsverlagerung oder einseitigen Einsatz der
T
rimmer kann der Geradeausug wieder hergestellt werden.
ACHTUNG: Der einseitige Einsatz der Trimmer macht die
Musterprüfung ungültig.
4.6Normalug
In sicherer Höhe können Sie Ihre Reisegeschwindigkeit auswählen. Je schneller Sie den Schirm trimmen, desto mehr
Benzin wird Ihr Motor verbrauchen, um die Flughöhe zu halten. Für besseres Vorankommen bei Gegenwind und eine
verbesserte Gleitleistung in sinkenden Luftmassen oder bei
Seitenwind sollten Sie schneller als Trimspeed iegen, indem
Sie das Speedsystem und/oder die Trimmer verwenden. Für
maximale Ezienz beim Fliegen mit Rückenwind setzen Sie die
Trimmer in Standardposition und verzichten Sie auf den Einsatz
des Speedsystems. Mit deaktivierten Trimmern und etwa 15
Prozent Bremse erreicht der CIMA PWR seine beste Sinkrate.
4.7Kurvenug
Der CIMA PWR wurde für ezienten Kurvenug entwickelt
und wird auch ohne Gewichtsverlagerung Kurven einleiten. Der
Schirm ist nicht nur für rasche Kurven (etwa 30 % Bremse),
sondern auch zum Langsamug entwickelt worden, um Ihnen
das Aunden von Steigbereichen zu erleichtern und mit 15 %
Bremse ein minimales Kurvensinken zu erreichen.
4.8AktivesFliegen
Der CIMA PWR wurde mit einem stabilen Prol entwickelt.
Es widersteht auch ohne Piloteneingri einem hohen Maß an
Turbulenz. In starken Turbulenzen empfehlen wir dennoch, die
User manual / Handbuch / Manuel / Návod k obsluze
CIMA Pwr
23

Trimmer wieder in die Standardposition zu bringen und das
Speedsystem nicht zu verwenden. Fliegen Sie den Schirm aktiv.
Die Schlüsselelemente des aktiven Fliegens sind die Kontrolle
von Nickbewegungen sowie des Kappeninnendrucks:
Sollte der Schirm in turbulenter Luft vor Sie schießen, so nutzen Sie die Bremsen um das Vorschießen zu stoppen. Bleibt der
Schirm hinter Ihnen zurück, so lösen Sie die Bremsen um der
Kappe die Rückkehr über Ihren Kopf zu ermöglichen. In starken Turbulenzen vermittelt Ihnen ein geringes Maß an Bremse
(rund 20 cm) die beste Bremsspannung sowie das intensivste
Schirmfeedback. In turbulenten Bedingungen verändert sich
der Innendruck der Kappe rasch, was durch die Bremsen erfühlt
werden kann. Das Ziel ist es, einen konstanten Innendruck über
die Bremsen zu erzielen. Bei nachlassendem Druck betätigen
Sie die Bremse, bis sich der Kappendruck normalisiert und bringen Sie die Bremsen rasch wieder in die vorherige Position.
Vermeiden Sie das Fliegen mit dauerhaft hohen Bremswegen
in rauer Luft, da Sie sonst unabsichtlich den Schirm in den
Strömungsabriss bringen könnten. Achten Sie immer auf
ihre Geschwindigkeit gegenüber der umgebenden Luftmasse
(Airspeed).
WICHTIG: Kein Pilot und kein Schirm ist gegen Einklapper
immun. In schweren Turbulenzen wird Ihnen aktives Fliegen dabei helfen, jede Tendenz von Klappern zu eliminieren. Fliegen
Sie in sehr turbulenten Bedingungen noch aktiver und nehmen
Sie die Bewegungen Ihres Schirms vorweg. Seien Sie sich da
bei immer Ihrer Höhe bewusst und überreagieren Sie nicht. Wir
empfehlen, die Bremsen immer in den Händen zu halten und
turbulente Bedingungen möglichst zu vermeiden.
4.9Landung
Mit einem langsamen Anug und der perfekten Landung am
Ende eines Fluges werden große Landewiesen und lange
Laufstrecken nicht mehr benötigt. Dabei darf nicht vergessen
werden, dass bei Nullwind-Bedingungen mit einer deutlich
größeren Geschwindigkeit gegenüber dem Boden gerechnet
und diese Geschwindigkeit so sicher wie möglich reduziert
werden muss. Dies kann durch völliges Schließen der Trimmer
und angepasste Betätigung der Bremsen erreicht werden.
Bei Bedarf sollte ein längeres Auslaufen ebenfalls ausgeführt
werden. Bei Landungen mit moderatem Gegenwind reduziert
sich die Bodengeschwindigkeit, sodass eine einfache und progressive Anwendung der Bremsen für eine perfekte Landung
ausreichen wird. Ein Landen mit halb oder ganz geöneten
Trimmern ist möglich, erfordert jedoch eine ausgewogene
und zur Trimmerstellung passende Betätigung der Bremsen.
Landungen mit oenen Trimmern erfordern durch die hohe
Bodengeschwindigkeit einen größeren Landeplatz als mit geschlossenen Trimmern. Der CIMA PWR setzt Vorwärtsfahrt sehr
ezient in Steigen um, was ein ezientes Ausairen bei der
Landung ermöglicht.
5. SCHNELLABSTIEGSTECHNIKEN
Als allgemeine Regel für den Abstieg gilt: Fliegen Sie aus
Bereichen des Steigens heraus. Sollten Sie von der Entwicklung
der Flugbedingungen dennoch überrascht werden, so können
Sie die folgenden Abstiegstechniken zur Vergrößerung Ihrer
-
SInkrate anwenden.
5.1 Ohren anlegen
Greifen Sie die äußerste A-Leine beider Flügelseiten so hoch
wie möglich.
Ziehen Sie die Leinen nach außen und unten, während Ihre
Hände an den Leinen entlanggleiten, bis sich die Flügelenden
unter die Eintrittskante falten. Wir empfehlen, die „Ohren“
nacheinander und nicht gleichzeitig anzulegen. Halten Sie die
Leinen gespannt, um die Flügelenden bis zur beabsichtigten
Ausleitung des Manövers von der Wiederönung abzuhalten. In
Abhängigkeit von der Einklapptiefe kann das Sinken auf 3-4 m/
sec. zunehmen. Falls erforderlich können Richtungsänderungen
durch Gewichtsverlagerung eingeleitet werden. Nach dem
Freigeben der Leinen sollte die Schirmkappe spontan wieder
önen. Die Önung kann durch Pumpen der Bremse in einer
ießenden Bewegung auf ca. 30 % unterstützt werden. Auch
hier empfehlen wir, die Flügelenden nach einander önen zu
lassen. Ein gleichzeitiges Ziehen beider Bremsen zur Önung
der Big Ears kann in einem Strömungsabriss enden.
5.2 Steilspirale
Der CIMA PWR ist ein agiler Schirm, der auf Steuermanöver
seines Piloten präzise und progressiv reagiert. Um eine
enge Spirale einzuleiten ziehen Sie eine Bremse progres
siv auf etwa 35 % und halten Sie sie in dieser Position.
Drehgeschwindigkeit und Bremsdruck werden ebenso wie die
Zentrifugalkräfte auf den Piloten zunehmen. Neigungswinkel
und Rotationsgeschwindigkeit können durch weiteres Ziehen
oder Lösen der Bremsen um einige Zentimeter erhöht bzw. verringert werden. Eine gekonnt ausgeführte Steilspirale erlaubt
Sinkraten jenseits von 10 m/sec. Sehr abrupt oder schlecht
synchronisierte Bremsinputs oder eine zu schnelle Einleitung
der Steilspirale können in einem einseitigen Einklapper oder
einer Trudelbewegung enden.
VORSICHT: Eine Steilspirale ist ein radikales Manöver. Die
aufgebaute kinetische Energie muss langsam durch Lösen der
Innenbremse und über zumindest einen Vollkreis abgebaut
werden.
5.3 B-Stall
Greifen Sie die B-Tragegurte nahe der Quick-Links im gelb markierten Bereich und ziehen Sie sie symmetrisch nach unten.
Reissen Sie nicht an den Tragegurten. Der Gleitschirm wird in
einen B-Stall gehen und gefühlsmäßig nach hinten fallen, bevor
sich der Pilot unter der Kappe stabilisiert. Die Sinkrate steigt auf
6-8 m/sec. Um den B-Stall auszuleiten heben Sie beide Hände
in einer einzigen ießenden Bewegung, bis die Tragegurte
wieder ihre volle Länge erreichen - dabei sollte Ihr CIMA PWR
sofort in den Normalug zurückkehren. Fehleinschätzungen,
-
24
User manual / Handbuch / Manuel / Návod k obsluze
CIMA Pwr

Bedienungsfehler sowie bestimmte aerologische Bedingungen
können dafür sorgen, dass der Schirm im Strömungsabriss
verbleibt. Ein kurzer Tritt in das Speedsystem sollte diesen
Zustand rasch beenden. Sollte der Beschleuniger nicht eingehängt sein, so hat ein Ziehen der A-Tragegurte um 4-5 cm die
selbe Wirkung.
VORSICHT: Anders als beim Ohrenanlegen und der
Steilspirale bendet sich der Schirm im B-Stall in einem echten
Strömungsabriss. Aus diesem Grund sollte der B-Stall niemals
knapp über Grund ausgeführt werden.
6 STÖRUNGEN
6.1Asymmetrischeoderfrontale(symmetrische)Einklapper
Obwohl Tests bewiesen haben, dass der CIMA PWR nach
Einklappern spontan wieder önet, ist aktives Fliegen im
Fall von asymmetrischen oder Frontklappern zu empfehlen.
Aktives Fliegen wird den Höhenverlust sowie das Wegdrehen
in Grenzen halten.
Im Fall eines frontalen (symmetrischen) Einklappers:
• Ziehen Sie beide Bremsen noch vor der selbständigen
Wiederönung rasch und symmetrisch nach unten, um die
Önung der Eintrittskante zu beschleunigen; heben Sie die
Hände sofort danach wieder in normale Flugposition.
Im Fall eines einseitigen (asymmetrischen) Einklappers:
• Halten Sie den Schirm bestmöglich im Geradeausug,
indem Sie sich von der geklappten Seite weg lehnen und
soviel bremsen (gerade ausreichend, nicht zu viel), dass
der Schirm auf Kurs bleibt.
• Beschleunigen Sie die Wiederönung der geklappten Seite
durch einen kurzen Bremsimpuls auf der geklappten Seite
und wiederholen Sie dies, falls erforderlich.
6.2Strömungsabrisse
Bestimmte Pilotenverhalten oder Wetterbedingungen können
einen Fullstall auslösen. Dies ist eine ernsthafte Abweichung
vom Normalug und kann schwer zu beherrschen sein. Sollte
ein Strömungsabriss in weniger als 100 m Höhe über Grund
geschehen so werfen Sie Ihren Rettungsschirm.
Hauptursachen eines Strömungsabrisses (Fullstall):
• Schlecht getimter oder exzessiver Einsatz der Bremsen,
während die Geschwindigkeit des Schirms gegenüber der
Luft (Airspeed) reduziert ist (z. B. bei der Ausleitung einer
Steilspirale oder eines B-Stall).
Regenbedingter Sackug oder Fullstall:
• Eine nasse oder völlig durchnässte Eintrittskante (aufgrund von Regen oder Wolkenug) kann einen Sackug
oder Fullstall auslösen, weil Wassertropfen für eine
unregelmäßige Strömung sorgen und das Schirmgewicht
erhöhen. Belegte Fälle dieses Phänomens standen mit
hohen Porositätswerten des Schirmtuches in Verbindung.
Ungeachtet des Auslösers kann ein Strömungsabriss
sowohl symmetrisch als auch asymmetrisch (einsei
tig, Trudeln) sein. In beiden Fällen wird der Bremsweg
sehr kurz und schon kleine Lenkmanöver können die
Strömung vom Schirm abreissen lassen; in manchen
Fällen reicht schon ein Windstoß oder eine thermische
Ablösung, um einen Fullstall zu verursachen. Sollten Sie
sich in unvermeidbarem Regen wiedernden, so empfeh
len wir die Vermeidung abrupter Lenkbewegungen, von
Abstiegsmanövern wie Big Ears und B-Stall und empfeh
len, Turbulenzen zu meiden und auf ein tiefes Anbremsen
bei der Landung zu verzichten.
• In beiden Fällen hat der Pilot die folgenden Möglichkeiten:
• Tritt der Fullstall in einer Höhe von mehr als 100 m
über Grund auf, so empehlt sich das StandardAusleitverfahren, so der Pilot damit vertraut ist (also
vollständige Ausführung eines Fullstalls, Stabilisierung
des Schirms und progressives Heben der Hände für eine
Rückkehr zum Normalug).
-
-
-
• Tritt der Fullstall in weniger als 100 m über Grund oder der
Pilot ist mit dem Standard-Ausleitverfahren nicht vertraut,
so ist der Rettungsschim sofort auszulösen.
6.3Bremsversagen
Wenn eine Bremsleine oder Umlenkrolle bricht ist es möglich,
den CIMA PWR über die D-Tragegurte (hinterste Ebene) zu
steuern. Die Steuerbewegungen sollten dabei fein kontrolliert
ausfallen, da die Deformation der Kappe über die D-Tragegurte
stärker ausfällt als über die Bremsen.
Tip: Üben Sie diese Steuermethode, damit Sie im Fall eines
echten Bremsversagens vorbereitet sind.
7. INSTANDHALTUNG
& CHECKS
7.1EmpfehlungenzurInstandhaltung
• Vermeiden Sie es, die Schirmkappe bei Start oder Landung
auf das Obersegel fallen zu lassen.
• Ziehen Sie den Schirm nicht über den Boden, wenn Sie ihn
bewegen.
• Setzen Sie Ihren Schirm nicht unnötig dem Sonnenlicht
aus.
• Wählen Sie eine Falttechnik, welche die Verstärkungen der
Eintrittskante nicht schädigt und die internen Strukturen
nicht unnötig zerknittert. Für ein langes Schirmleben raten
wir von der Verwendung von Schnellpacksäcken ab: Die
Reibung des Materials wird die Lebenserwartung des
Schirmtuches verringern - besonders jene der internen
Strukturen.
• Packen Sie Ihren Schirm niemals feucht weg. Nach
Kontakt mit Salzwasser spülen Sie den Schirm gründlich in
Süßwasser. Benutzen Sie keine Lösungsmittel.
User manual / Handbuch / Manuel / Návod k obsluze
CIMA Pwr
25

• Sollten Sie häug in Meeresnähe iegen, wo hohe
Luftfeuchtigkeit und ein höherer Salzgehalt herrschen, so
kann Ihr Schirm schneller altern. In diesem Fall empfehlen
wir, den Gleitschirm öfters als vorgeschrieben überprüfen
zu lassen.
• Entfernen Sie regelmäßig Fremdkörper wie Sand, Steine,
Tiere oder Panzenteile, welche verwesen könnten, aus
ihrem Schirm. Zweige, Sand, Kiesel etc. schädigen das
Gewebe auch in benachbarten Falten und organisches
Material kann die Schimmelbildung fördern. Der CIMA
PWR ist mit Önungen an den Flügelspitzen ausgestattet Fremdkörper können von den geschlossenen Zellen durch
die Flügelenden herausgeschüttelt werden. Verschließen
Sie danach die Flügelspitzen wieder.
7.2Aufbewahrung&Transport
Verwahren Sie Ihren lose gepackten Schirm an einem kühlen (10-25°C) und trockenen (<70%) Ort. Heisse Koerräume
oder feuchte Keller schädigen das Schirmtuch. Ein Gleitschirm
sollte beim Packen immer trocken sein; besonders wichtig ist
dies nach dem letzten Flug der Saison. Doch selbst ein völlig
trockener Schirm sollte oen an einem trockenen, sauberen
und dunklen Ort gelagert werden. Sollten Sie keinen solchen
Raum haben so empfehlen wir, die Kompressionsgurte des
Packsacks so weit als möglich zu önen, damit Luft um die
gepackte Schirmkappe zirkulieren kann. Stellen Sie sicher, dass
sich keine Kleintiere in Ihrem Schirm einnisten und verwahren
Sie den Schirm in ausreichendem Abstand zu Lösungsmitteln
und Säuren. Benzin und andere Petrochemikalien sind für Nylon
besonders gefährlich und können den Tuchsto zersetze. Hohe
Temperaturen in Verbindung mit Feuchtigkeit sind eine besonders schädliche Kombination, welche den Hydrolyseprozess
beschleunigt, in welchem Stofasern und Beschichtung getrennt werden.
7.3Checks
Ihr Schirm hat während der Produktion eine Serie von Tests
sowie die Flugerprobung vor Auslieferung bestanden. Er wird
mit einer standardisierten Einstellung der Bremsen ausgeliefert,
welche der Einstellung bei der Musterprüfung entspricht.
ACHTUNG: Lassen Sie Ihren Schirm zusätzlic überprüfen, sobald Sie Schäden oder ein verändertes Flugverhalten
feststellen.
7.5 Ersatzteile
Ihr SKY Schirm besteht aus vielen hochqualitativen
Komponenten mit langer Lebenszeit. Für den Ersatz von Teilen
(Leinen, Tragegurte, Tuchbahnen etc.) dürfen nur Originalteile
verwendet werden. Dies ist nicht nur für die Flugtüchtigkeit des
Schirms, sondern auch für Ihre persönliche Sicherheit wichtig.
8. GARANTIE
Der CIMA PWR unterliegt einer Garantie auf Herstellungsfehler
von zwei Jahren ab Auslieferung. Die Garantie umfasst nicht:
• Schäden aufgrund von Missbrauch, Vernachlässigung oder
Überladung.
• Schäden aufgrund von unsauberen und harten Landungen.
9. ENTSORGUNG
26
7.4RegelmäßigeÜberprüfungen&
Reparaturen
Aus Sicherheitsgründen empfehlen wir einen Check Ihres
Schirmes mindestens einmal jährlich oder nach 100 Flügen (was
zuerst erreicht wird) oder jedes Mal, wenn Sie eine Veränderung
in seinem Flugverhalten bemerken. Diese Checks müssen vom
Hersteller oder einem authorisierten Repräsentanten ausgeführt
werden. Kontaktieren Sie Ihren Importeur oder Händler, bevor
Sie Ihren Schirm zum Check einschicken.
User manual / Handbuch / Manuel / Návod k obsluze
CIMA Pwr
Auch das beste Produkt hat eine begrenzte Nutzungsdauer und
sobald Ihr Schirm diesen Punkt erreicht sollte er richtig entsorgt
werden. Stellen Sie bitte sicher, dass Ihr Schirm umweltgerecht
entsorgt wird oder senden Sie ihn zur Entsorgung zurück an
Sky Paragliders. Bei Zweifeln an Informationen aus diesem
Handbuch kontaktieren Sie ihren Sky-Händler.
Sky Paragliders a.s.
Okružní 39, 739 11 Frýdlant nad Ostravicí,
Tschechische Republik
Tel.: +420 558 676 088, info@sky-cz.com,
www.sky-cz.com

Sky Paragliders a.s.
Okružní 39, 739 11 Frýdlant nad Ostravicí, Tschechische Republik
Tel. +420 558 676 088, info@sky-cz.com, www.sky-cz.com
User manual / Handbuch / Manuel / Návod k obsluze
CIMA Pwr
27

CIMA PWR
FR
INTRODUCTION
Merci d’avoir rejoins la famille Sky! Nous sommes très heureux de vous souhaiter la bienvenue et nous vous souhaitons
de nombreuses heures de plaisir sous votre Sky Paragliders.
Sky Paragliders est localisé au coeur de l’Europe en république Tchèque, nous sommes ers de notre expertise et de
nos savoir-faire.
Nos équipes de management et de conception sont distantes
de 19 marches de l’unité de production de nos ailes! Cette
proximité est un atout extraordinaire qui nous permet de
garantir le plus haut niveau de qualité possible avec une trace
carbone minimale lors de la mise au point de tous nos produits.
ATTENTION
Merci de lire attentivement ce document: l’objectif de ce
manuel est de vous donner des indications quant à l’utilisation
de votre parapente, il ne doit être en aucun cas utilisé comme
un support d’apprentissage du pilotage pour ce parapente ou
tout autre parapente.
Nous vous conseillons de ne voler en parapente que si vous
êtes dûment formé ou encadré par un moniteur qualié. Chaque
pilote est pleinement responsable de sa sécurité. En aucun cas
le fabricant, l’importateur ou les vendeurs ne peuvent être tenus
responsables quant à l’utilisation de ce produit.
A la livraison, ce parapente est conforme à la certication EN
and DGAC et son certicat de navigabilité est garanti par Sky
Paragliders. Toutes modications de ce parapente invalide
cette garantie..
28
User manual / Handbuch / Manuel / Návod k obsluze
CIMA Pwr

Contents
INTRODUCTION 28
ATTENTION 28
1. INFORMATIONS GENERALES 30
1.1 Limitesd’utilisation
1.2 Proldupilote
1.3 Homologation
1.4 Livréeavec
1.5 Caractéristiques
1.6 Propriétés
2.
DETAILS TECHNIQUES 31
2.1 Schémad’unélévateur
2.2 Plan de l´aile
2.3 Plandesectiondel´aile
2.4 Tech.Spec.
3 RÉGLAGES 34
3.1 Pointd’accrochage
3.2 Trims
3.3 Barreaud’accélérateur
3.4 Contrôleprévoldel’aile
4 TECHNIQUES DE VOL DE BASE 34
4.1 Décollagedosvoile
4.2 Décollagefacevoile
4.3 Utilisation des Trims
4.4 Utilisationdubarreaud’accélérateur
4.5 Phasedemontée
4.6 Vol normal
4.7 Virages
4.8 Voleraucontactdevotreaile
4.9 Atterrir
5. TECHNIQUES DE DESCENTES RAPIDES 36
5.1 Grandes oreilles
5.2 Spirale(360°)
5.3 ParachutaleauxB
6. INCIDENTS 36
6.1 Fermeturesfrontales(symétriques)ouasymétriques
6.2 Décrochage
6.3 Rupturedelalignedefrein
7. ENTRETIEN ET CONTRÔLE 37
7.1 Conseils d’entretien
7.2 Stockageettransport
7.3 Contrôle
7.4 Contrôlepériodiqueetréparations
7.5 Piècesdétachées
8. GARANTIE 38
9. DISPOSAL RECYCLAGE 38
User manual / Handbuch / Manuel / Návod k obsluze
CIMA Pwr
29

1. INFORMATIONS GENERALES
1.1 Limitesd’utilisation
La CIMA PWR est très résistante, toutes les manœuvres classiques de SIV n’altéreront pas sa structure. Toutefois, de fréquentes manœuvres extrêmes peuvent fortement accélérer le
vieillissement de votre aile. Sky recommande que des ailes soumises à des SIV fréquents soient contrôlées plus régulièrement.
Comportement en adéquation votre environnement
Il est important que chaque pilote se comporte de façon
responsable vis à vis de son environnement et de ceux qui le
partage avec lui. Nous vous recommandons de respecter la
nature, d’éviter tout bruit inutile, de ne jamais jeter de détritus
et de respecter les règlements locaux.
Merci d’être attentif vis à vis de la législation concernant les
zones protégées, les propriétés privées, ou encore les zones de
chasse. Pour le plus grand bénéce de vous et de l’ensemble
de la communauté du vol libre, adoptez un comportement responsable et respectueux vis à vis des autres usagers du milieu
natur
el.
excellentes propriétés hydrophobes et pour sa durabilité.
Un tissu hydrophobe améliore le gonflage et les
caractéristiques en vol après un décollage sur herbe humide
(vol du matin ou du soir).
1.3 Homologation
La CIMA PWR est conforme à la norme EN 926-1:2015 & LTF
NFL II-91/09. Le test d’homologation a été passé au laboratoire
Air-Turquoise en Suisse. Test en charge 1240 kg.
La CIMA PWR est également conforme à la certication
DGAC dans la classe 1 ULM et à la certication du
constructeur. Attention, toute modication annulera le résultat
de l’homologation.
1.4 Livréeavec
Votre CIMA PWR est livrée avec :
• sac « Carry all bag moto »
• Sous sac interne
• Kit de réparation
• T shirt
30
1.2 Proldupilote
Grâce à une forte sécurité passive, la CIMA PWR est adaptée
pour des pilotes débutants et intermédiaires. Les phases de décollage et d’atterrissage sont cruciales en parapente. La CIMA
PWR est conçue pour que décollage et atterrissage soient évidents et prédictibles. La CIMA PWR a un bon ratio taux de
chute/nesse max lui permettant une vitesse optimale à l’atterrissage, un air ecace et de courtes distances de décollage.
La CIMA PWR combine amortissement en tangage/roulis
avec une bonne plage de vitesse… l’idéal pour une expérience
de vol tranquille ! Nous avons utilisé du Skytex 38 pour
l’intrados et l’extrados. Nous avons choisis le Skytex pour ses
User manual / Handbuch / Manuel / Návod k obsluze
CIMA Pwr
1.5 Caractéristiques
Grâce à une forte sécurité passive, la CIMA PWR est adaptée
pour des pilotes débutants et intermédiaires. Les phases de décollage et d’atterrissage sont cruciales en parapente. La CIMA
PWR est conçue pour que décollage et atterrissage soient
évidentes et prédictibles. La CIMA PWR a un bon ratio taux de
chute/nesse max lui permettant une bonne vitesse à l’atterrissage, un air ecace et de courtes distances de décollage.
La CIMA PWR combine amortissement en tangage/roulis
avec une bonne plage de vitesse… l’idéal pour une expérience
de vol tranquille ! Nous avons utilisé du Skytex 38 pour
l’intrados et l’extrados. Nous avons choisis le Skytex pour ses

excellentes propriétés hydrophobes et pour sa durabilité.
Un tissu hydrophobe améliore le gonflage et les
caractéristiques en vol après un décollage sur herbe humide
(vol du matin ou du soir).
1.6 Propriétés
• Le bord d’attaque de la CIMA PWR est rigidié (Mylar &
joncs Nylon) ce qui facilite le gonage en ouvrant le prol
face aux lets d’air même par vent nul.
• Trim standard sur les élévateurs pour une vitesse de croi
sière supérieure.
•
Barreau d’accélérateur.
• Boucles d’attache supérieures et inférieures optionnelles
pour une parfaite adaptation à votre paramoteur.
• Les freins peuvent être rallongés de 10cm si nécessaire
et les poulies de freins peuvent être descendues en
conséquence.
-
2.
DETAILS TECHNIQUES
2.1 Schémad’unélévateur
Réglages de base (trims fermés)
A
B
C
D
500 mm
500 mm
500 mm
500 mm
Accéléré
A
B
C
D
400 mm
420 mm
460 mm
520 mm
Trims ouverts
A
B
C
D
Distances measurées à partir de la boucle de l'élévateur
500 mm
500 mm
545 mm
590 mm
User manual / Handbuch / Manuel / Návod k obsluze
CIMA Pwr
Distance entre les boucles supérieures et inférieures 60 mm
Débattement de l'accélérateur
Longeur des trims
100 mm
100 mm
31

2.2 Plan de l´aile
32
User manual / Handbuch / Manuel / Návod k obsluze
CIMA Pwr

2.3 Plandesectiondel´aile 2.4 Detailstechniques
Cima Pwr XS S M L
A B C D
Surface à plat (m2)
Envergure à plat (m)
Allongement à plat
2
Surface projetée (m
Envergure projetée (m)
Allongement projeté
Nombre de caissons
PPG weight range (kg)
)
21.37 23.12 25.00 27.13
9.77 10.17 10.57 11.01
4.47 4.47 4.47 4.47
18.21 19.70 21.30 23.12
8.34 8.67 9.02 9.40
3.82 3.82 3.82 3.82
42 42 42 42
60-100 70-120 80-140 95-160
SuspenteA-Rouge
SuspenteB-Bleu
SuspenteC-Violet
SuspenteD–Vert
Frein–Jaune
User manual / Handbuch / Manuel / Návod k obsluze
CIMA Pwr
33

3 RÉGLAGES
3.1 Pointd’accrochage
Choisissez un point d’accrochage adapté à votre harnais/moteur. Connectez à votre moteur et ajustez la longueur de frein
en conséquence (standar
3.2 Trims
Réglez les Trims sur la position standard (Trims fermés).
Assurez vous que le système de barreau l’accélérateur soit
connecté conformément au manuel de votre sellette et qu’il
n’y a pas de danger qu’il pende en arrière vers l’hélice. Avant
chaque décollage, assurez-vous que l’accélérateur coulisse librement et que les drisses soient assez longues pour ne pas
accélérer involontairement en vol.
Si la sellette est équipée d’un secours ventral, assurez-vous
que les drisses d’accélérateur passent sous l’élévateur du se
cours et quelles ne gênent pas son éventuel déploiement.
L’utilisation du barreau d’accélérateur augmente la vitesse
de votre parapente de 30% par rapport à la vitesse bras hauts.
3.3 Barreaud’accélérateur
Pour régler votre accélérateur au sol, demandez à un assistant
de tirer vos élévateurs en position de vol tandis que vous êtes
assis dans votre sellette. Ajustez la longueur des drisses de
façon à ce que le barreau repose juste sous votre sellette. Vous
pouvez maintenant attraper le 1er barreau avec votre talon. Les
drisses doivent être susamment détendues pour ne pas activer l’accélérateur involontairement en vol mais susamment
tendues pour pouvoir utiliser l’intégralité du débattement et
pour éviter que le barreau ne se prenne dans l’hélice.
Une fois réglé, tester l’accélérateur sur l’intégralité de son
débattement en vol en conditions calmes. Vériez que les 2
d ou +10cm).
élévateurs sont tirés symétriquement quand vous poussez sur
le barreau. Anez vos réglages une fois au sol.
3.4 Contrôleprévoldel’aile
• Contrôler que la voilure ne soit pas déchirée, que les
structures internes (prols et diagonales) et les coutures ne
soient pas endommagées
• Contrôler que les suspentes ne soient pas endommagées
et que le suspentage soit correctement démêlé
• Contrôler que les maillons qui relient les suspentes aux
élévateurs soient correctement vissés et verrouillés
• Contrôler que les élévateurs ne soient pas endommagés et
ne soient pas twistés.
• Contrôler que le système d’accélérateur puisse fonctionner
librement, et que les drisses d’accélérateur aient une lon
gueur susante pour ne pas activer l’accélérateur involontair
ement en vol
• Contrôler que les poignées de freins soient correctement
xées et que chaque drisse de frein coulisse librement
dans sa poulie.
-
4 TECHNIQUES DE VOL DE BASE
4.1 Décollagedosvoile
Vent nul ou faible
Etaler votre parapente sur le sol en donnant au bord d’attaque
la forme d’un arc de cercle. Prenez les élévateurs avant à la
hauteur des maillons rapides et avancez jusqu’à ce que les
suspentes avant droites et gauches soient légèrement en tension. Vous êtes ainsi parfaitement centré par rapport à votre
parapente. Par vent nul ou léger vent de face, en partant sus-
pentes tendues, la CIMA PWR se gone rapidement et monte
progressivement au-dessus de votre tête. Nous vous recommandons de ne pas trop tirer les élévateurs vers l’avant ou
vers le bas, ce qui pourrait provoquer une fermeture du bord
d’attaque. Accompagnez simplement les élévateurs jusqu’au
moment où votre parapente atteint son incidence de vol.
Un gonage progressif permet d’eectuer le contrôle visuel
de l’aile et des suspentes pendant la dernière phase de montée
et évite ainsi de devoir freiner excessivement le parapente avant
de « ré-accélérer » à sa vitesse de vol.
4.2 Décollagefacevoile
Vent modéré ou fort
-
Passez sous un élévateur et retournez vous face à la voile.
Lorsque vous contrôlez la voile au dessus de votre tête, retournez-vous face au vent et initiez votre course de décollage.
Nous
vous recommandons de vous entrainer sans le groupe
moteur, puis avec le groupe moteur éteint de façon à acquérir
progressivement des sensations et des gestes adaptés à un
décollage en toute sécurité.
IMPORTANT : ne tentez jamais de décoller avec une voile
partiellement gonée au dessus de votre tête ou si ne contrôlez
pas complétement les mouvements de roulis/tangage de votre
aile.
4.3 Utilisation des Trims
La CIMA PWR est livrée avec des élévateurs équipés de trim.
Les Trims permettent de modier le prol de l’aile en chan-
geant l’incidence.
La position « au neutre » ou « position standard» correspond
au réglage Trims tirés (fermés).
Ce réglage est idéal pour les phases de montée au moteur ou
en thermique quand la masse d’air est turbulente. La pression
des freins est faible et la maniabilité est optimale en position
« au neutre ». Pour augmenter la vitesse de croisière vous pou-
34
User manual / Handbuch / Manuel / Návod k obsluze
CIMA Pwr

vez relâcher les Trims ou actionner le barreau d’accélérateur
ou les deux simultanément. En conditions turbulentes, l’aile est
plus stable en position « au neutre », i.e. avec les Trims fermés,
et sans actionner le barreau d’accélérateur.
Pour utiliser les Trims, le pilote doit appuyer modérément sur
les bloqueurs pour permettre aux sangles de glisser et ainsi de
diminuer l’incidence de l’aile. Réenclenchez le bloqueur pour
bloquer la sangle dans la position voulue.
Pour refermer les Trims, et augmenter ainsi l’incidence, le pi
lote doit tirer verticalement les sangles jusqu’à la position voulue. Les Trims doivent toujours être actionnés symétriquement.
4.4 Utilisationdubarreau
d’accélérateur
L’utilisation du barreau d’accélérateur augmente de 30% maximum la vitesse en diminuant l’incidence de l’aile.
Le barreau d’accélérateur s’actionne au pied. Pousser sur
la barre avec votre talon active le système. Relâcher la barre
désactive le système.
Actionner l’accélérateur réduit l’incidence de l’aile et augmente ainsi les risques de fermetures frontales et/ou asymétriques. Par conséquent, nous recommandons de ne pas utiliser
l’accélérateur prés du sol et/ou en conditions turbulentes.
Table 3: Combinaisons possibles réglages vitesse/pilotage
Accelerator Trimmers Brakes
OUI OUI NON
OUI NON OUI
NON OUI OUI
4.5 Phasedemontée
Une fois décollé, continuer à voler face au vent pendant la
phase de montée. Garder les Trims au neutre pour un meilleur
taux de montée. N’essayez pas de monter trop vite en utilisant
les freins, la voile aurait alors une trop forte incidence qui com
binée à la poussée du moteur sur le pilote vous rapprocherait
du décrochage. De plus, en cas de panne moteur, le mouvement de pendule du pilote et l’abattée de la voile provoqueraient une perte d’altitude transitoire jusqu’au retour à l’équilibre
-
pendulaire. Cette perte d’altitude peut vous faire impacter le sol
si vous êtes à basse altitude.
Ne tournez pas tant que vous n’avez pas une altitude et
une vitesse susante. Evitez les virages vent arrière à basse
altitude.
Même si la CIMA PWR est très amortie en roulis, dans cer
taines conditions le pilote peut induire du roulis. Par exemple, le
couple moteur/hélice combiné a du pilotage sellette et/ou des
mouvements de freins.
Pour arrêter ces oscillations, diminuez la puissance et restez statique dans votre sellette sans action sur les freins. Une
fois stabilisé vous pouvez remettre de la puissance. A pleine
puissance le pas de l’hélice peut provoquer un léger virage.
Utilisez un transfert de poids pour compenser ce phénomène
ou ajustez les Trims de façon dissymétriques.
NOTE: régler les Trims de façon asymétrique annule la
certication
4.6 Vol normal
Une fois atteint une altitude de sécurité, vous pouvez choisir
votre vitesse de croisière. Plus votre aile sera dé-trimée (rapide),
plus vous consommerez de carburant pour maintenir votre altitude. Pour une meilleure nesse sol face au vent, ou vent de
travers, vous devez voler plus vite en actionnant les Trims et/
ou l’accélérateur.
Pour une ecacité maximal vent arrière, réglez les Trims « au
neutre » et n’utilisez pas le barreau d’accélérateur. La CIMA
PWR atteint son taux de chute mini en position Trims « au
neutre » combinée à 15% de frein.
4.7 Virages
La CIMA PWR est conçue pour tourner ecacement sans
transfert de poids du pilote.
A 30% de frein, votre aile tourne rapidement. A 15% de frein,
-
votre aile vole lentement ce qui facilite l’identication des zones
ascendantes et qui minimise les pertes d’altitude en virage (virage « à plat »)
4.8 Voleraucontactdevotreaile
Le prol de la CIMA PWR est conçu pour être stable et amorti. Il
résistera à un niveau modéré de turbulence sans action nécessaire du pilote. Toutefois, en conditions plus turbulentes, nous
vous conseillons de fermer les Trims (« au neutre ») et de ne plus
-
utiliser l’accélérateur. Adoptez un pilotage actif, au contact de
votre aile. Les fondamentaux du pilotage actif sont le contrôle
du tangage et de la pression interne de l’aile. En conditions
turbulentes, si la voile vous passe devant (abattée) utilisez les
freins pour l’arrêter. Si la voile passe derrière vous (ressource),
relâchez les freins pour accélérer son retour à la verticale au
dessus de votre tête. En conditions fortes, voler avec 20% de
freins vous transmettra des informations sur la pression interne
de votre aile via des variations de tension dans les commandes.
Le but est de maintenir une pression constante dans les freins.
Si vous ressentez une perte de tension, appliquez du frein
jusqu’à revenir à la pression normale puis relevez immédiatement vos mains pour revenir à la position initiale. Evitez de
voler en freinant constamment en conditions turbulentes, vous
pourriez involontairement décrocher votre voile. Soyez toujours
attentif à votre vitesse-air.
IMPORTANT : aucun pilote, aucune voile n’est à l’abri des
fermetures. En conditions turbulentes un pilotage actif diminuera la fréquence des fermetures. Si les conditions deviennent encore plus turbulentes, soyez plus actif et anticipez les mouvements de votre aile. Soyez toujours conscient de votre altitude
et ne sur-pilotez pas. Nous vous recommandons de garder vos
freins en main en permanence et de ne pas voler en conditions
turbulentes.
User manual / Handbuch / Manuel / Návod k obsluze
CIMA Pwr
35

4.9 Atterrir
Rappelez-vous que par vent nul vous volez plus vite par rapport
au sol et que la vitesse lors de l’atterrissage doit être réduite
autant que possible. Pour ce faire, réglez les Trims au neutre
et appliquez du frein. Si nécessaire, courrez à l’atterrissage. Par
vent modéré, la vitesse-sol est réduite, freiner progressivement
sura pour assurer un atterrissage en douceur. Il est possible
d’atterrir Trims ouverts ou semi-ouverts mais il faudra davantage ralentir l’aile aux freins. Bien sûr, atterrir Trims ouverts
augmente votre vitesse-sol et nécessite donc un plus grand
terrain d’atterrissage. La CIMA PWR est conçue pour convertir
au freinage une vitesse sol horizontale en vitesse verticale pour
un air ecace.
5. TECHNIQUES DE DESCENTES RAPIDES
D’une façon générale, pour descendre éloignez vous des zones
ascendantes. Si, pour une raison quelconque, vous vous laissez
surprendre par l’évolution des conditions de vol vous pourriez
utiliser les techniques suivantes pour augmenter votre taux de
chute.
5.1 Grandes oreilles
Saisissez le plus haut possible les suspentes A extérieures des
2 côtés.
Tirez les suspentes vers le bas et vers l’extérieur jusqu’à ce
que les bouts d’aile se replient sous le bord d’attaque. Nous
vous conseillons de faire chaque oreille successivement et pas
simultanément. Gardez en main les suspentes jusqu’à la réouverture. Selon la taille des oreilles votre taux de chute augmentera de 3 à 4m/s. Il est possible d’initier des petits virages
grâce à des transferts de poids. Dés que les suspentes sont
relâchées, les oreilles doivent se ré-ouvrir. Si ce n’était pas le
cas, vous pouvez accélérer la réouverture en « pompant » au
frein par un mouvement unique et rapide (30% de débattement). Lorsque vous pompez ainsi nous vous recommandons
de ré-ouvrir une oreille après l’autre. Tirer les deux freins simul
tanément pourrait faire décrocher votre aile.
5.2 Spirale(360°)
La CIMA PWR est maniable, elle répond précisément et progressivement aux sollicitations du pilote.
Pour engager une spirale serrée, abaissez progressivement
un frein jusqu’à environ 35% de sa course et maintenez le frein
dans cette position. La vitesse de rotation augmente progressivement, de même que la tension sur la commande. La force
centrifuge que vous subissez augmente rapidement. Vous pouvez diminuer ou augmenter l’inclinaison et la vitesse de rotation
en relâchant ou en tirant le frein de quelques centimètres.
Bien maitrisée, la spirale serrée vous permet de descendre à
plus de 10 m/s. Des gestes trop brusques et mal synchronisés
ou une mise en spirale trop rapide pourrait cependant entraîner
un décrochage asymétrique.
Attention: Une spirale engagée est une manœuvre exigeante.
L’énergie cinétique accumulée doit être libérée par une sortie
progressive en relâchant le frein intérieur progressivement.
5.3 ParachutaleauxB
Saisir les élévateurs B à la hauteur des maillons rapides (les
mains sur la partie jaune), et les tirer symétriquement vers le
bas. Ne pas relâcher les B. Le parapente va entrer en phase
parachutale et vous ressentirez une sensation de chute avant
de vous stabiliser sous la voile. Le taux de chute augmente
jusqu’à 6 à 8 m/s. Pour sortir de la parachutale, remonter les
deux mains d’un mouvement rapide et symétrique. Une fois
que vous avez relâché les élévateurs B, la CIMA PWR reprend,
en principe, immédiatement le vol. Une erreur de réglage ou de
pilotage ou des conditions aérologiques particulières peuvent
cependant engendrer une phase de parachutale prolongée.
Le simple fait de pousser le barreau d’accélérateur permet de
ressortir rapidement d’une parachutale stable. Si l’accélérateur
n’est pas connecté, une légère traction sur les élévateurs A (4
- 5 cm) permettront de sortir de la parachutale.
Attention : contrairement aux grandes oreilles et la spirale
-
(voir ci-dessus), dans une parachutale aux B, le parapente est
dans une phase de décrochage. Par conséquent, un décrochage aux B ne doit jamais être eectué à proximité du sol.
6. INCIDENTS
6.1 Fermeturesfrontales
(symétriques)ouasymétriques
Même si les tests d’homologation démontrent l’aptitude de
la CIMA PWR à ressortir rapidement et sans intervention du
pilote des fermetures, nous vous recommandons d’intervenir
systématiquement lors de fermetures asymétriques ou frontales. Vous contribuerez ainsi à réduire la perte d’altitude et le
changement de direction de votre parapente.
Fermeture frontale (symétrique):
• baisser les deux freins symétriquement d’un geste ample
et rapide pour accélérer la réouverture et remonter immédiatement les mains pour accélérer la réouverture du bor
d’attaque.
Fermeture asymétrique:
• maintenir le parapente en vol droit par un contre bien dosé
avec le frein du côté opposé à la fermeture (juste assez,
pas trop… )
• accélérer la réouverture du côté fermé en pompant sur le
frein du côté de la fermeture d’un geste ample. Répéter
l’opération si nécessaire.
d
36
User manual / Handbuch / Manuel / Návod k obsluze
CIMA Pwr

6.2 Décrochage
Un pilotage particulier ou des conditions particulières peuvent
engendrer un décrochage de votre parapente. Le décrochage
est un incident de vol grave et dicile à maitriser. Dans le cas
où le décrochage se produit à moins de 100 m au-dessus du
sol, il est recommandé d’utiliser son parachute de secours.
décrochage et remonte les deux mains progressivement et
symétriquement selon la technique apprise.
• Si le décrochage se produit à une hauteur inferieure à 100
m sol ou si le pilote ne maitrise pas le décrochage volon
taire et se tr
cascade d’incidents, il tire immédiatement le parachute de
secours.
ouve par conséquent dans une situation de
7. ENTRETIEN ET CONTRÔLE
-
7.1 Conseils d’entretien
Décrochage induit par le pilote:
• Une action exagérée ou mal synchronisée sur les freins,
en particulier à un moment où la voile a une vitesse air
réduite (par exemple lorsque le parapente se cabre à la
sortie d’une spirale ou lorsque le parapente est en train de
reprendre sa vitesse après un décrochage aux B).
Décrochage induit par la pluie:
• L’accumulation de gouttelettes sur le bord d’attaque (pluie
ou traversée de nuage) peut provoquer un décrochage
prématuré par décollement des lets d’air au niveau de
la couche limite et par alourdissement du tissu. Les cas
répertoriés où ce phénomène s’est eectivement produit
sont aussi liés à une porosité accrue du tissu. Quelle que
soit la cause, le décrochage peut se produire de manière
symétrique (full stall) ou dissymétrique (vrille). Dans les
deux cas, le débattement aux commandes est raccourci,
et même un léger freinage peut induire un décollement des
lets d’air. Dans certains cas, l’entrée dans un thermique
puissant, ou une rafale subite, augmente susamment l’in
cidence pour provoquer un décr
en vol une pluie innatendue, évitez les mouvements et freinages brusques. Pas de parachutale aux B, pas d’or
pas de air important à l’atterrissage… vous marchez sur
des œufs !
ochage. Si vous subissez
eille,
Dans tous les cas, le pilote à deux actions possibles :
• Si le décrochage se produit à une hauteur supérieure à 100
m sol et si le pilote maitrise parfaitement le décrochage
volontaire, il provoque immédiatement un décrochage
symétrique, stabilise sa voilure au-dessus de la tète en
6.3 Rupturedelalignedefrein
La CIMA PWR se pilote à l’aide des élévateurs D (élévateurs
arrières) suite à une rupture de la suspente de frein. Les mouvements de pilotage doivent alors être beaucoup plus mesurés,
car la déformation de la voilure induite par une traction sur un
élévateur D est beaucoup plus importante, à course égale, que
celle produite par la traction sur la commande de frein.
Conseil : Entraînez-vous à ce type de pilotage en cas
d’incident!
-
• Evitez de laisser retomber votre parapente violemment sur
l’extrados ou sur le bord d’attaque lors du gonage ou de
l’atterrissage.
• Ne le trainez pas sur le sol pour le disposer ou pour le
déplacer.
• Ne l’exposez pas inutilement au soleil.
• Choisissez une technique de pliage qui n‘endommage pas
le bord d‘attaque et qui ne froisse pas inutilement la struc
ture interne. An d’optimiser la durée de vie de votr
nous vous déconseillons l’utilisation d’un sac de pliage
rapide ; le froissement du tissu qui en résulte accélère la
détérioration de l’enduction, en particulier celle de la struc
ture interne (pr
• Toujours utiliser le sous sac de protection pour éviter le
contact direct avec les harnais et les boucles et des fric
tions indésirables à l‘intérieur du sac de portage.
• N’entreposez jamais votre parapente mouillé ou même
seulement humide. Si la voile est immergée dans l‘eau de
mer, rincez abondamment à l‘eau douce. N’utilisez ni dis
solvant ni détergent pour nettoyer votr
• Séchez votre parapente à l’abri de la lumière dans un
endroit sec et bien aéré.
• Videz régulièrement votre parapente. Les brindilles, le
sable, les cailloux, etc... endommagent le tissu lors des
pliages successifs et les débris organiques d’origine végé
tale ou animale (insectes) peuvent favoriser le développement de moisissur
de vidage en bout d’aile. Les débris peuvent être amenés
en bout d’aile en secouant l’aile. Vériez que vous avez
bien refermé les orices de vidage un fois terminé.
ols et diagonales).
e parapente.
es. La CIMA PWR est équipée d’orices
e voile,
-
-
-
-
-
User manual / Handbuch / Manuel / Návod k obsluze
CIMA Pwr
37

7.2 Stockageettransport
7.5 Piècesdétachées
Stockez votre aile pliée de façon lâche dans une pièce fraîche
(10 à 25°C) and sèche (<70% d’humidité).
Des cores de voitures surchauées ou des sous sols humides endommagent le tissu. Votre parapente doit toujours
être sec quand vous le pliez, a fortiori après le dernier vol de la
saison. Même complétement sèche, une aile doit être stockée
ouverte, propre, dans une pièce sombre. Si vous n’avez pas
une telle pièce pour stocker votre aile pendant l’hiver, ouvrez au
maximum le sac de portage pour que l’air puisse circuler autour
de votre aile pliée. Assurez vous qu’aucun nuisible n’établisse
ses appartements dans votre aile, stockez la à distance des
solvants et acides. Le pétrole et les dérivés pétrochimiques
sont particulièrement agressifs pour le nylon. Les fortes températures combinées avec l’humidité accélèrent dramatiquement
l’hydrolyse et la décomposition des tissus.
7.3 Contrôle
Avant la livraison votre parapente a été contrôlé minutieusement en usine et testé en vol. Votre parapente est livré avec un
réglage de freins standard qui correspond au réglage utilisé lors
des tests d’homologation.
7.4 Contrôlepériodiqueet
Votre Sky est composée de nombreuses pièces de hautes qualités et à longue durée de vie. Si vous remplacez des pièces
(suspentes, élévateurs, panneaux, etc.), n’utilisez que des
pièces originales ce qui garantira le maintien du certicat de
navigabilité et votre sécurité en vol.
8. GARANTIE
La CIMA PWR est garantie contre tout défaut de fabrication
pendant deux ans à dater du jour de la livraison.
La garantie ne couvre pas :
• les détériorations dues à un entretien insusant, à une
utilisation en surcharge ou inadéquate
• les dommages dus à un atterrissage inadéquat
9. DISPOSAL
RECYCLAGE
réparations
Par mesure de sécurité, nous vous recommandons de faire
vérier votre parapente au moins une fois par année ou tous
les 100 vols et chaque fois que vous constatez ou suspectez
une altération de son comportement. Les contrôles annuels de
nos parapentes doivent être eectués par le fabricant ou un de
ses représentants. Avant d’envoyer votre parapente pour un
contrôle contactez votre importateur ou revendeur.
ATTENTION : si vous constatez des dommages ou un chan-
gement de comportement en vol faites contrôler votre aile.
38
Même les meilleurs produits ont une vie limitée, quand votre aile
arrive en n de vie elle doit être recyclée. Assurez-vous que son
recyclage n’a aucune conséquence environnementale fâcheuse
ou renvoyez là à Sky Paragliders. En cas de doutes concernant
des informations contenues dans ce manuel, contactez votre
revendeur Sky.
Sky Paragliders a.s.
Okružní 39, 739 11 Frýdlant nad Ostravicí, république
Tchèque Tel.: +420 558 676 088, info@sky-cz.com,
www.sky-cz.com
User manual / Handbuch / Manuel / Návod k obsluze
CIMA Pwr

Sky Paragliders a.s.
Okružní 39, 739 11 Frýdlant nad Ostravicí, république Tchèque
Tel. +420 558 676 088, info@sky-cz.com, www.sky-cz.com
User manual / Handbuch / Manuel / Návod k obsluze
CIMA Pwr
39

CIMA Pwr
CZ
ÚVODEM
Děkujeme, že jste se rozhodli pro koupi kluzáku z dílny Sky
Paragliders. Těší nás, že jste vstoupili do světa našich výrobků
a věříme, že vám naše kluzáky poskytnou spousty jedinečných
zážitků.
Sky Paragliders sídlí, vyvíjí a vyrábí v České republice ve
vlastních prostorách speciálně navržených pro paraglidingovou
výrobu.
Technologické a vývojové oddělení sídlí přesně 19 schodů
od výrobních prostor. Díky tomu můžeme udržet vysokou
kvalitu výrobního procesu a postarat se o to, aby všechny naše
nápady byly s výrobou úzce propojeny a výrobky před tím, než
se dostanou k Vám, našim zákazníkům, nenacestovali tisíce mil.
UPOZORNĚNÍ
Pečlivě si přečtěte tuto příručku a dodržujte všechny pokyny
a doporučení. Účelem této příručky je nabídnout informace,
jež pomohou pilotům rychleji se seznámit s kluzákem, a není
možno tuto příručku zaměňovat s výcvikovým manuálem stejně
tak, jak není možno tuto příručku použít pro jiný padákový
kluzák. Doporučujeme Vám, abyste nelétali na tomto kluzáku
pokud za sebou nemáte výcvik v dobré škole s kvalikovaným
instruktorem. Každý pilot je osobně odpovědný za svoji vlastní
bezpečnost a nese i odpovědnost za letovou způsobilost svého
kluzáku. Použití tohoto kluzáku je výhradně na vlastní nebezpečí
uživatele! Výrobce ani prodejce nenese žádnou odpovědnost
za způsob použití kluzáku. Tento padákový kluzák při dodání
splňuje všechny požadavky předpisů EN a DGAC a je letově
způsobilý.Případné změny na padáku vedou ke ztrátě letové
způsobilosti.
40
User manual / Handbuch / Manuel / Návod k obsluze
CIMA Pwr

Obsah
ÚVODEM 40
UPOZORNĚNÍ 40
1. VŠEOBECNÉ INFORMACE 42
1.1 Provozníomezení
1.2 Prolpilota
1.3 Certikace
1.4 Dodávka
1.5 Popis
1.6 Charakteristika
2. TECHNICKÉ ÚDAJE 43
2.1 Volnékonce
2.2 Schémavyvázání
2.3 Půdorys
2.4 Technickéspecikace
3. NASTAVENÍ 46
3.1 Závěsnébody
3.2 Trimy
3.3 Speedsystém
3.4 Předletovákontrola
4. ZÁKLADNÍ LETOVÉ TECHNIKY 46
4.1 Přednístart
4.2 Křížovýstart
4.3 Trimováníkluzáku
4.4 Speedsystém
4.5 Stoupání
4.6 Standardnílet
4.7 Zatáčení
4,8 Aktivnířízení
4.8 Přistání
5. TECHNIKY PRO RYCHLÉ
VYTRACENÍ VÝŠKY 48
5.2 Spirála
5.3 B-linestall(staženíBřadyvolnýchkonců)
6. NEHODY 48
6.1 Asymetrickénebočelní(symetrické)zaklopení
6.2 Přetažení,ztrátavztlaku
6.3 Závadanařídicíchšňůrách
7. ÚDRŽBA A KONTROLY 49
7.1 Poznámkykúdržbě
7.2 Uskladněníadoprava
7.3 Prohlídky
7.4 Pravidelnékontrolyaopravy:
8. ZÁRUKA 50
9. LIKVIDACE 50
User manual / Handbuch / Manuel / Návod k obsluze
CIMA Pwr
41

1. VŠEOBECNÉ INFORMACE
1.1 Provozníomezení
CIMA PWR je konstruován tak, aby jakýkoliv SIV manévr
nepředstavoval jakékoliv riziko.Nicméně, časté extrémní
manévry můžou urychlit proces stárnutí a společnost Sky
Paragliders doporučuje křídla, která se často používají pro
SIV manévry, podrobit prohlídkám v kratších intervalech než je
normálně stanoveno.
Korektní chování s ohledem na životní prostředí
Je důležité, abychom se, my piloti, chovali ohleduplně nejenom
k životnímu prostředí, ale i prostoru, který sdílíme s ostatními.
Prosíme Vás, abyste se ke svému okolí chovali s úctou a
respektem, abyste neobtěžovali hlukem, neznečisťovali okolí
a dbali vždy místních předpisů, nařízení a zvyklostí. {0}Ujistěte
se, že jednáte v souladu s právními předpisy o chráněných
oblastech, o soukromém vlastnictví nebo o loveckých revírech
- předejdete tak koniktům s místními lidmi a prospějete tak
rozvoji našeho sportu.
1.2 Prolpilota
CIMA PWR je kluzák vhodný pro začátečníky a mírně pokročilé.
CIMA PWR je kluzák s vysokou mírou pasivní bezpečnosti.
Pro pilota PPG je start a přistání jedním z klíčových momentů;
vzlet i přistání s CIMA PWR je nezáludné, snadné a chování
kluzáku je v těchto režimech snadno předvídatelné. CIMA PWR
snadno a ochotně stoupá a díky svému prolu startuje a přistává na nízkých rychlostech. Je možno odstartovat na krátké
vzdálenosti a přechodový oblouk při přistání nabízí dostatek
vztlaku pro pohodlné, kontrolované přistání.
CIMA PWR je velmi stabilní po podélné a příčné ose a tato
stabilita řadí kluzák mezi ideální kluzáky pro rekreační a pohodové létání.
Na spodním i horním potahu používáme tkaninu SKYTEX 38.
SKYTEX jsme zvolili pro jeho dlouhodobou životnost a schopnost odolávat vlhkosti.Vodoodpudivost je důležitém detailem,
který zvyšuje hodnotu zážitků při létání ráno nebo večer a při
za velké rosy.
1.3 Certikace
CIMA PWR je certikována dle normy EN 926-1: 2015 & LTF
NFL II-91/09, kapitola 3.
Tento test byl proveden ve Švýcarsku, v laboratoři AirTurquoise. Kluzák prošel i pevnostním testem se zatížením na
1240 kg.
CIMA PWR je rovněž certikována dle standardů DGAC jako
ULM třídy 1. Jakékoliv zásahy do konstrukce kluzáku anulují
všechny certikace.
1.4 Dodávka
Kluzák CIMA PWR je dodáván s:
• CARRY ALL BAGem řady MOTO
• vnitřním obalem
• sadou k rychlým opravám
• tričkem
1.5 Popis
CIMA PWR je kluzák vhodný pro začátečníky a mírně pokročilé.
Jedná se o kluzák s vysokou mírou pasivní bezpečnosti. Pro
pilota PPG je start a přistání jedním z klíčových momentů; vzlet
i přistání s CIMA PWR je nezáludné, snadné a chování kluzáku
je v těchto režimech snadno předvídatelné. CIMA PWR snadno
a ochotně stoupá a díky svému prolu startuje a přistává na nízkých rychlostech. Je možno odstartovat na krátké vzdálenosti
a přechodový oblouk při přistání nabízí dostatek vztlaku pro
pohodlné, kontrolované přistání.
42
User manual / Handbuch / Manuel / Návod k obsluze
CIMA Pwr

CIMA PWR je velmi stabilní po podélné a příčné ose a tato
stabilita řadí kluzák mezi ideální kluzáky pro rekreační a pohodové létání.
Na horním i spodním potahu používáme SKYTEX 38. SKYTEX
jsme zvolili pro jeho dlouhodobou životnost a schopnost odolávat vlhkosti.Vodoodpudivost je důležitém detailem, který zvyšuje hodnotu zážitků při létání ráno nebo večer a při za velké rosy.
1.6 Charakteristika
• CIMA PWR má kombinovanou náběžnou hranu (kombinu-
je se mylar & nylonová výztuha) s cílem usnadnit start za
bezvětří.
• Volné konce jsou standardně vybaveny trimy, díky kterým
se dá zrychlit při přeletech nebo silnějším protivětru.
• Speed systém
• Kluzák je možno připnout do horních nebo spodních zá
věsných bodů na vaší krosně.
• Řízení je možno prodloužit o 10 cm a kladku vedení řídících
šňůr je možno rovněž posunout.
-
2. TECHNICKÉ ÚDAJE
2.1 Volnékonce
Základní (neutrální) nastavení - trimy zataženy
A
B
C
D
500 mm
500 mm
500 mm
500 mm
Akcelerováno (speed systém)
A
B
C
D
400 mm
420 mm
460 mm
520 mm
Trimy vypuštěny
A
B
C
D
Měřeno od spodního závěsného oka.
500 mm
500 mm
545 mm
590 mm
User manual / Handbuch / Manuel / Návod k obsluze
CIMA Pwr
Vzdálenost mezi horním a spodním závěsným okem je 60 mm
Rozsah speed systému je
100 mm
43

2.2 Schémavyvázání
44
User manual / Handbuch / Manuel / Návod k obsluze
CIMA Pwr

2.3 Půdorys 2.4 Technickéspecikace
CIMA Pwr XS S M L
A B C D
Plocha - rozložená (m2)
Rozpětí
Štíhlost
Plocha - projekční (m
Rozpětí - projekční (m)
Štíhlost - projekční
Počet komor
Vzletová váha (PPG)
21.37 23.12 25.00 27.13
9.77 10.17 10.57 11.01
4.47 4.47 4.47 4.47
2
)
18.21 19.70 21.30 23.12
8.34 8.67 9.02 9.40
3.82 3.82 3.82 3.82
42 42 42 42
60-100 70-120 80-140 95-160
Volnékonce-červená
B - modrá
C-alová
D - zelená
Řízení-žlutá
User manual / Handbuch / Manuel / Návod k obsluze
CIMA Pwr
45

3. NASTAVENÍ
3.1 Závěsnébody
Podle své sedačky a motorové krosny zvolte horní nebo spodní závěsné body a upravte podle zavěšení délku řídících šňůr.
(Standar
dní nebo o 10 cm prodloužené.)
3.2 Trimy
Nastavte trimy na volných koncích na standardní hodnotu.
Zkontrolujte, zda je speed systém připevněn dle instrukcí vý-
robce a že nemůže dojít k tomu, aby se dostal do vrtule.
Před každým startem zkontrolujte připojení speed systému
a jeho chod, a zkontrolujte zda jsou šňůry dostatečně dlouhé,
aby se zabránilo nežádoucímu použití speed systému za letu
(příliš krátké šňůry). V případě, že je sedačka vybavena předním
kontejnerem se záložním padákem, je nutné dbát na to, aby byl
speed systém vždy veden pod kontejnerem a vedením volného
konce záložního padáku. Jinak by mohlo dojít k problémům při
použití záložního padáku. Použití speed systému zvyšuje maximální rychlost kluzáku o 30% základní rychlosti (trim speed).
3.3 Speedsystém
podmínek chod speedu a zkontrolujte, zda speed systém zabírá
symetricky. Po přistání je možno doladit nastavení.
3.4 Předletovákontrola
• Zkontrolujte, zda není vrchlík natržen a vnitřní stavba (proly, diagonály) a švy poškozeny.
•
Zkontrolujte, zda nejsou šňůry poškozeny nebo zamotány.
• Zkontrolujte, zda nejsou karabinky u volných konců poško
zeny a jsou řádně utaženy a zajištěny.
• Zkontrolujte, zda nejsou poškozené nebo zamotané volné
konce.
• Zkontrolujte, zda je funkční speed systém a zda jsou spo
jovací šňůry dostatečně dlouhé, aby se zamezilo tomu, že
bude speed systém zkracovat přední popruhy.
• Nakonec zkontrolujte šňůry od řidiček, zda je každá řidička
řádně připevněna a zda každá šňůra vede přes kladku na
správné straně volného konce.
-
4. ZÁKLADNÍ LETOVÉ
TECHNIKY
rychle plnit a zvedat nad hlavu.Při startu je potřeba stále udržovat ruce s karabinami správně orientované k pozici těla, pokud
budou zůstávat příliš vzadu nebo příliš vpředu, nebude start
proveden čistě. Ponechejte ruce ve stejném úhlu a nechejte
kluzák vystoupat nad hlavu.
Pokud vrchlík při stoupání nad hlavu stále korigujete, máte
možnost jej snadno zkontrolovat a vyhnete se brzdění ve chvíli,
kdy budete mít vrchlík přesně nad hlavou.
-
4.2 Křížovýstart
Slabý až silný vítr
Protočte volné konce přes hlavu a postavte se čelem ke kluzáku. Z této polohy můžete provést křížový start. Jakmile máte
křídlo nad hlavou, otočte se čelem ve směru letu a pokračujte
ve startu.
Doporučujeme Vám, abyste vyzkoušeli obě techniky nejprve
na cvičné louce bez vlastního motoru a krosny.
UPOZORNĚNÍ: Nikdy se nepokoušejte vzlétnout s kluzákem,
který není připraven ke startu, vybočuje z osy letu, naklání se a
dostal se již před vás.
4.3 Trimováníkluzáku
Chcete-li si seřídit speed systém před startem, požádejte kolegu, aby Vám přidržel napnuté volné konce a vy zůstaňte na
zemi sedět v sedačce. Nyní nastavte délku šňůr tak, aby byla
hrazda speed systému pod úrovní sedací desky. Při tomto nastavení byste měli být schopni pohodlně dostat nohu do druhé
smyčky (stupně) speed systému. Speed systém je nutno nastavit tak, aby byl dostatečně volný a nedocházelo k jeho samovolnému použití za letu, ale je přitom nutno dávat pozor na to, aby
do něj bylo možno dosáhnout a aby se za letu nemohl připlést
do vrtule. ,Jakmile dokončíte nastavení, vyzkoušejte za klidných
46
4.1 Přednístart
Bezvětří nebo slabý vítr
Rozložte vrchlík tak, aby jeho náběžná hrana opisovala tvar
podkovy. Uchopte řadu A volných konců co nejblíže karabinkách a šňůry mírně napněte. Postavte se přesně proti střední
komoře křídla. Při bezvětří nebo s mírným protivětrem, udělejte
několik jistých kroků s napnutými šňůrami. CIMA PWR se bude
User manual / Handbuch / Manuel / Návod k obsluze
CIMA Pwr
CIMA PWR se dodává s volnými konci opatřenými trimy.
Trimy mění prol kluzáku, mění úhel náběhu a umožňují určovat dopřednou rychlost.
Za neutrální nebo standardní nastavení označujeme pozici,
ve které jsou popruhy v trimu staženy úplně dolů. Standardní
nastavení trimů je vhodné pro stoupání pod plynem, v turbu
lencích nebo při kroužení v termice. Brzdy jsou měkčí a řízení je
v této konguraci nejpříjemnější. Pro zvýšení cestovní rychlosti, můžete použít speed systému nebo uvolnit trimy, případně
obojí. V turbulentním prostředí je křídlo nejstabilnější, pokud
letí pomalu; tedy v nastavení se standardním nastavení trimů.
-

Trimy se dotahují nebo povolují mírným tlakem na zámky.
Uvolněte zámky a nechejte popruhy proklouznout nebo je dotáhněte na požadované nastavení. Při dotahování trimů postupujte obdobně, trimy přitáhněte.Trimy je nutno aktivovat a
deaktivovat symetricky.
4.4 Speedsystém
Použití speed zvyšuje maximální rychlost padáku až o 30% snížením úhlu náběhu.
Speed systém se ovládá nohama. Pokud nohama zatlačíte do
hrazdy seed systému, dojde k aktivaci systému. Jakmile hrazdu
uvolníte, speed systém se vrátí do původní pozice.
Použití speed systému snižuje úhel náběhu a zvyšuje se tak
riziko frontálního (nebo asymetrického) zaklopení. Z tohoto dů
vodu nedoporučujeme používat speed systém v malé výšce
nebo v turbulentním prostředí.
Tabulka 3. Přípustné kongurace a kombinace urychlovacích prvků
Práce se speed
systémem
ANO ANO NE
ANO NE ANO
NE ANO ANO
trimy brzdy
4.5 Stoupání
Po startu je vhodné pokračovat dále proti větru a mírně stoupat.
Při trimech nastavených do standardní pozice dosáhnete nejlepší hodnoty stoupání. Nestoupejte příliš strmě a nepoužívejte
při stoupání nadměrně brzdy. Křídlo v tomto režimu stoupá na
vysokém úhlu náběhu a neopatrný zásah do řízení zvyšuje ná
chylnost na přetažení. V případě, že by došlo k vysazení motoru, mohlo by dojít ke kyvadlovému efektu, který může skončit
při nedostatečné výšce i nehodou.
První zatáčku proveďte až s dostatečnou výškou.
Neprovádějte zatáčku po větru bez dostatečné rychlosti.
CIMA PWR je velmi stabilní a odolná proti rozkývání podél
příčné nebo podélné osy; za jistých okolností je ale možno i toto
křídlo uvézt do kyvadlového pohybu.Může k tomu dojít za přispění klopné síly motoru a vrtule a zásahem do řízení. Jakékoliv
kývání zastavíme tak, že zpomalíme (ubereme) a zkontrolujeme, zda nepřepadáváme v postroji na jednu stranu. Jakmile
se oscilace uklidní, můžete opět přidat plyn. Při plném výkonu
motoru bude docházet vlivem motorového efektu k zatáčení; to
je snadno řešitelné tak, že se posunete v sedačce proti zatáčení
-
nebo budete zatáčení kompenzovat pomocí trimů.
POZNÁMKA: Asymetrické používání trimů zneplatňuje certikaci křídla.
4.6 Standardnílet
Jakmile dosáhnete cestovní hladiny, můžete přejít na cestovní
rychlost. Čím rychleji je křídlo natrimované, tím je v horizontál
ním letu větší spotřeba. Pro lepší postup proti větru a k rychlejšímu prolétávání sestupných proudů je možno použít trim
nebo speed systém, případně kombinaci obou prostředků pro
urychlení letu.
Při letu po větru nastavte trimy do standardní pozice a nepoužívejte speed systém. Při nastavení trimů do standardní pozice
a stažení řidiček asi o 15% chodu poletí CIMA PWR s nejnižším
opadáním.
4.7 Zatáčení
CIMA PWR zatáčí snadno a bez problémů; pilot nemusí přenášet váhu.Křídlo je navrženo tak, aby bylo možno točit ostřejší
-
zatáčky se staženou řidičkou asi o 30% chodu řízení, ale je
možné točit i ploché zatáčky pro efektivní využívání stoupání
(15% dráhy řízení).
4,8 Aktivnířízení
CIMA PWR je navržena se stabilním prolem.Takto navržený
kluzák kompezuje velké množství turbulencí i bez aktivního
zásahu pilota. Nicméně v silnější turbulenci doporučujeme nastavit trimy do standardní pozice a nepoužívat speed systém.
Používejte aktivní pilotáž.
Mezi klíčové prvky účinné aktivní pilotáže je řízení předstřelů
a reakce na poklesy tlaku v řídících šňůrách:
V turbulentním prostředí reagujte na předstřelování pomocí
řidiček. Podobně, pokud se vrchlík dostane za vás, uvolněte
řidičky a počkejte, až se vám vrchlík vrátí nad hlavu. V silné turbulenci doporučujeme stáhnout řidičky asi o 20 cm a sledovat
v nich přesné reakce kluzáku. Při takovém nastavení cítíte v
řidičkách všechny změny ve vnitřním rozložení tlaku v kluzáku a můžete na ně snadno reagovat. Cílem je, abyste udrželi
zhruba stejné napětí v obou řidičkách. Jakmile máte pocit, že
v řidičce ztrácíte napětí (tlak v kluzáku), přitáhněte řidičku do
-
té míry, dokud neucítíte opět tlak a pak rychle vraťte řidičku do
standardní pozice. Nedoporučujeme ale v turbulencích létat se
staženými řidičkami; mohlo by dojít k přetažení kluzáku. Stále
sledujte rychlost.
Důležité: Žádný pilot a žádný kluzák se nevyhne zaklopením.
V silné turbulenci pomůže aktivní pilotáž minimalizovat nebezpečí zaklopení vrchlíku. V silně turbulentních podmínkách se
snažte předvídat chování křídla. Stále sledujte výšku a vyvarujte
se příliš hrubým zásahům do řízení. Doporučujeme nepouštět
řidičky a nelétat v silné turbulenci.
User manual / Handbuch / Manuel / Návod k obsluze
CIMA Pwr
47

4.8 Přistání
Na přistání je možno se přiblížit s minimální rychlostí a vyhnout
se tak dlouhým doběhům po přistání.. Je třeba si uvědomit, že
za bezvětří bude rychlost přistání vyšší a je nutno s tím počítat. Minimální rychlosti je možno dosáhnout za použití brzd. Při
přistání na vyšší rychlosti je nutné, aby pilot mírně po přistání
běžel. Již při mírném protivětru jsou ale přistání přesně řízená
a je možno přistát přesně. Je možno přistávat na vyšší rychlosti s otevřenými trimy, je ale nutné počítat s tím, že rychlost
bude nutno kompenzovat pomocí řidiček. Při přistání na vyšší
rychlosti s otevřenými trimy je třeba počítat s delší přistávací
plochou. CIMA PWR velmi efektivně transformuje dopřednou
rychlost do vztlaku ve výdrži.
5. TECHNIKY PRO RYCHLÉ VYTRACENÍ VÝŠKY
Aby bylo možné vyklesat, musíte odletět mimo stoupavé proudy. V případě jakýchkoliv problémů je možno použít následující
techniky pro rychlé vytracení výšky.
Velké uši (symetrické zaklopení stabilizátorů)
Uchopte vnější šňůry A řady co nejvýš.
Stáhněte šňůry mírně do boku a směrem dolů až dojde k
zaklopení stabilizátorů. Doporučujeme zaklápět každou stranu
zvlášť a ne obě současně.Šňůry zaklopených stabilizátorů držte
v rukou, jinak dojde k znovuotevření stabilizátorů. V závislosti
na velikosti velkých uší, které se začalo se opadání se může
zvýšit až na 3 až 4 m / s. Pokud je to nutné, je možné zahájit
drobné změny ve směru řízení díky posunu váhy. Jakmile jsou
A šňůry uvolněny, vrchlík se spontánně otevře. Znovuotevření je
možno urychlit mírným zapumpování - asi 30 % chodu řidičky.}
Při pumpování pomocí řidiček dávejte pozor, abyste padák nepřetáhli (symetrické přetažení). Můžete tomu předejít tím, že se
naučíte vypouštět každou stranu zvlášť. Symetrické pumpování
oběma řidičkami zároveň může mít za následek uvedení kluzáku
do režimu přetažení.
5.2 Spirála
Cima PWR je snadno ovladatelné křídlo, které na pilotáž reaguje
přesně a progresivně.Chcete-li padák uvést do spirály, postupně stahujte řízení až na asi 35% z celkového rozsahu řízení a v
této poloze řidičku nechejte. Rychlost otáčení se postupně zvyšuje, stejně jako tlak ve stažené řidičce a zvyšuje se odstředivá
síla. Úhel natočení křídla nebo rychlost klesání můžete upravit
tím, že povolíte nebo přitáhnete řidičku o několik centrimetrů.
Pokud manévr zvládnete, můžete jej využít pro klesání více než
10 m/s. Pokud vrchlík uvádíte do spirály prudkými pohyby nebo
uvádění náhle ukončíte, může se kluzák dostat do režimu negativní zatáčky (spin).
UPOZORNĚNÍ: hluboká spirála je náročný manévr.{/0}
Kinetickou energii, kterou získáte při letu v tomto režimu, je
nutno zvládnout a výstup ze spirály musí být plně řízeným
postupem.
5.3 B-linestall(staženíBřadyvolných
konců)
Uchopte popruhy řady B (žlutá řada) volných konců blízko
karabinek, ruce na žlutých sekcích, a symetricky je stáhněte.
Nestahujte je pod sebe. Před vlastní stabilizací v B stallu kluzák mírně uskočí pilotovi za hlavu a teprve poté dojde k jeho
stabilizaci. Klesání dosahuje hodnot 6-8 m/s. Chcete-li ukončit
režim B-stallu, vypusťte popruhy rychlým a plynulým pohybem.
Po uvolnění B-popruhů sej CIMA PWR vrátí spontánně do normálního letu.V případě, že nevypustíte B-stall korektně či při
speciálních meteorologických podmínkách, je možné, že zůstanete v tzv. padákovém režimu (deep stall). V tomto případě sešlápněte speed systém a kluzák se opět rozjede do normálního
letu. Není-li připojen speed systém, postačí, když mírně (o 4 - 5
cm) stáhnete popruhy řady A. Dosáhnete tak stejného výsledku
jako při použití speed systému.
Upozornění: Na rozdíl od velkých uší a spirály (viz výše), v
režimu B-stall je kluzák v neletovém režimu (kluzák je přetaže
ný). Proto není vhodné provádět B-stall nízko nad zemí.
6. NEHODY
6.1 Asymetrickénebočelní(symetrické)zaklopení
Přestože testy prokázaly, že se CIMA PWR spontánně vrací do
normálního režimu, doporučujeme v případech zaklopení oka
mžitou aktivní reakci.Minimalizujete tak ztrátu výšky a výchylka
ze směru letu bude minimální.
V případě čelního (symetrického) zaklopení:
• Krátce symetricky kluzák přibrzděte, znovuotevření se tak
významně zrychlí. Poté ihned vraťte ruce zpět do normální
letové polohy.
V případě asymetrického zaklapnutí:
• Vykloňte se v sedačce na opačnou stranu, než je zaklapnutá část vrchlíku, a stejnou stranu mírně a citlivě přibrzděte.
Předejdete tak změně směru letu.
• Zaklopenou stranu vrchlíku můžete rychleji znovu otevřít,
pokud jedním rázným pohybem řidičky zaklopenou stranu
"vyklepete" a v případě potřeby zopakujete.
6.2 Přetažení,ztrátavztlaku
Za jistých meteorologických podmínek nebo při zvláštním režimu letu může u vrchlíku dojít k symetrickému přetažení (full
-
-
48
User manual / Handbuch / Manuel / Návod k obsluze
CIMA Pwr

stallu). Jedná se o obtížný režim a jeho řízení a vybírání nepatří
k těm jednoduchým. V případě, že k přetažení dojde ve výšce
menší než 100m, doporučujeme okamžitě použít záložní padák.
Hlavní příčiny přetažení:
• Špatně načasované nebo příliš hrubé stahování řízení v
okamžiku, kdy kluzák neletí na dostatečné dopředné rychlosti (např. ve chvíli, kdy křídlo vychází ze spirály neb o ve
chvíli, kdy se teprve rozbíhá po vypuštění B-stallu).
Deštěm vyvolané přetažení.
• Promočená náběžná hrana (při dešti nebo po průletu
mrakem), při které kapky vody znehodnocují prol náběžné hrany a aer
problém může nastat i při neúměrně vysoké porozitě na
tkanině náběžné hrany. Ať už je příčina jakákoliv, může
se přetažení projevit jako symetrické přetažení nebo jako
negativní zatáčka (spin). V obou případech se zkrátí řízení
a i malý impulz může náhle způsobit odtržení proudnic; v
některých případech dokonce poryv nebo náhlá termika
může změnit úhel dopadu natolik, že způsobí přetažení.
Pokud se ocitnete při letu v dešti, důrazně doporučujeme
vyhnout se jakýmkoliv náhlým pohybům nebo radikálním
zásahům do řízení, neprovádějte režim velkých uší (symet
rické zaklopení stabilizátorů) nebo B-stall, a vyhněte se
turbulenci.
odynamické vlastnosti křídla. {0}Podobný
-
V obou případech doporučujeme podobnou reakci:
• V případě, že došlo k tomuto režimu ve výšce vyšší než
je 100 metrů a pilot si je jistý, že dokáže kluzák vyvézt z
tohoto režimu, tedy umí uvést křídlo do úplného přetažení,
stabilizovat jej a pak jej progresivně vypustit, pak je vhodné
zvolit toto řešení.
• V případě, že k tomuto režimu dojde pod 100 metrů výšky
nebo v případě, že si pilot není jistý, že umí pomocí symet
rického přetažení kluzák stabilizovat, pak doporučujeme
bez váhání použít záložní padák.
-
6.3 Závadanařídicíchšňůrách
Přetrhne-li se řidící šňůra, je možno řídit kluzák stahováním
D řady popruhů.Činnost ovládání pomocí D popruhů je třeba
pečlivě sledovat a hlídat, protože vzhledem k umístění poutek
této řady je řízení D popruhy mnohem účinnější a k deformaci
kluzáku může dojít dříve.
Tip: Tento způsob řízení trénujte, abyste byli na případ poškození řidiček připraveni!
7. ÚDRŽBA A KONTROLY
7.1 Poznámkykúdržbě
• Vyhněte se nadměrnému opotřebení při startu nebo přistání a vyhněte se pokládání nebo padání vrchlíku natlakovanou náběžnou hranou přímo do země (například při
nácviku startu a nezvládnutém předstřelu). Při přesouvání
na start netahejte tkaninu vrchlíku po zemi.
• Vyhněte se nadměrnému vystavování vrchlíku na přímé
sluneční světlo.
• Vyberte si techniku skládání, která nepoškozuje výztuhy
náběžné hrany a nepoškozuje nadměrně vnitřní strukturu.
Pokud chcete prodloužit životnost vrchlíku na maximum,
doporučujeme jej nebalit do „quick packu“ nebo jakékoliv
formy „carry all bagu“. Materiál se neúměrně poškozuje
třením a snižuje se jeho životnost.
• Neskladujte padák vlhký. Pokud je kluzák namočen ve
slané vodě, důkladně jej vypláchněte sladkou vodou.
Nepoužívejte žádné chemické čisticí prostředky.
• Pokud létáte převážně v blízkosti moře, kde je vzduch
vlhký a slaný, může křídlo stárnou rychleji. V tomto případě
doporučujeme nechat si křídlo zkontrolovat častěji než je
předepsáno v této příručce.
• Pravidelně z vrchlíku odstraňujte všechny cizí předměty –
písek, kobylky, kamínky... Dokonce i zbytky trávy mohou
ve vrchlíku plesnivět a tkaninu poškodit. Větvičky, písek,
oblázky, atd. poškozují tkaninu ve skladech a organické
nečistoty rostlinného nebo živočišného původu (hmyzu)
mohou podporovat růst plísní. CIMA PWR má na odtokové
hraně u uší otvor na čištění vrchlíku.Nečistoty lze setřást
z uzavřených komor až do uší křídla a poté uvolnit otvor
a nečistoty odstranit. Po dokončení otvor k odstranění
nečistot opět uzavřete.
User manual / Handbuch / Manuel / Návod k obsluze
CIMA Pwr
49

7.2 Uskladněníadoprava
Skladujte volně zabalený kluzák v chladném (10-25 °C) a
suchém (<70% vlhkosti) místě. Vyhřáté kufry aut nebo vlhké
sklepy vedou k poškození tkaniny. Kluzák by měl být vždy
suchý, když je zabalený, což je obzvlášť důležité po posled
ním letu sezóny. Ale i zcela suché křídlo by mělo být uloženo
navolno na suchém, čistém a tmavém místě. Pokud nemáte
pr
ostory pro zimní uskladnění kluzáku, doporučujeme povolit
na maximum všechny kompresní popruhy na obalu a nechat
obal otevřený, aby mohl kolem zabaleného vrchlíku proudit
vzduch. Ujistěte se, že se v křídle neusídlí žádná havěť, a
držte kluzák dostatečně daleko od rozpouštědel a kyselin.
Benzín a další petrochemické látky jsou pro nylon obzvláště
abrazivní a mohou tkaninu poškodit, necháte-li kluzák v jejich
blízkosti. Vysoké teploty spolu s vlhkostí je obzvláště ne
bezpečná kombinace, která urychlí proces hydrolýzy, kde se
vlákna a zátěr r
ozloží.
-
-
7.3 Prohlídky
Kluzák prošel celou řadou kontrol již při samotné výrobě a výrobce jej řádně zkontroloval. Kluzák je dodáván se standardním
nastavením řidiček, stejným, jaké bylo použito při testování.
7.5 Servis
Kluzák se skládá z mnoha vysoce kvalitních komponentů s
dlouhou životností. Při výměně dílů (šňůry, volné konce, panely
vrchlíku, atd), mohou být použity pouze originální díly. Kromě
zachování letové způsobilosti kluzáku je to důležité pro vaši
bezpečnost.
8. ZÁRUKA
FLUX je v záruce po dobu dvou let a záruka kryje jakoukoliv
výrobní vadu od data nákupu.Záruka se nevztahuje na:
• Poškození, které vzniklo v důsledku nesprávného zacházení, nedodržení pravidel pr
nevhodných podmínkách nebo v důsledku přetěžování.
• Záruka se rovněž nevztahuje na opotřebení a na poškození
v důsledku nesprávné techniky pilotáže.
o běžnou údržbu, používání v
9. LIKVIDACE
7.4 Pravidelnékontrolyaopravy:
Z bezpečnostních důvodů doporučujeme pečlivě sledovat stav
kluzáku a pravidelně jej nechat kontrolovat, alespoň jednou ročně nebo po 100 startech, a kdykoliv dojde k sebemenší změně
letových vlastností. Kontrola musí proběhnout u výrobce nebo
u pověřené osoby v rámci pravidelných technických prohlídek.
Před odesláním kluzáku na kontrolu, kontaktujte dovozce nebo
prodejce.
UPOZORNĚNÍ: Nechejte si kluzák dodatečně zkontro-
lovat, pokud zpozorujete poškození nebo změny letové
charakteristiky.
50
I ty nejlepší výrobky mají omezenou životnost, a proto, jakmile
váš kluzák dospěje do tohoto bodu, musí být řádně zlikvidován. Prosím zajistěte, aby byl váš kluzák zlikvidován správným
způsobem vůči životnímu prostředí nebo jej pošlete zpět do
Sky Paragliders a my to uděláme za vás. Pokud máte pocit,
že nerozumíte dostatečně některé části manuálu, kontaktujte
prosím svého prodejce výrobků Sky Paragliders.
Sky Paragliders as
Okružní 39, PSČ 739 11 Frýdlant nad Ostravicí,
Česká republika
Tel .: +420 558 676 088, info@sky-cz.com
www.sky-cz.com
User manual / Handbuch / Manuel / Návod k obsluze
CIMA Pwr

Sky Paragliders a.s.
Okružní 39, 739 11 Frýdlant nad Ostravicí, Czech Republic
Tel. +420 558 676 088, info@sky-cz.com, www.sky-cz.com
User manual / Handbuch / Manuel / Návod k obsluze
CIMA Pwr
51
 Loading...