

Page 1
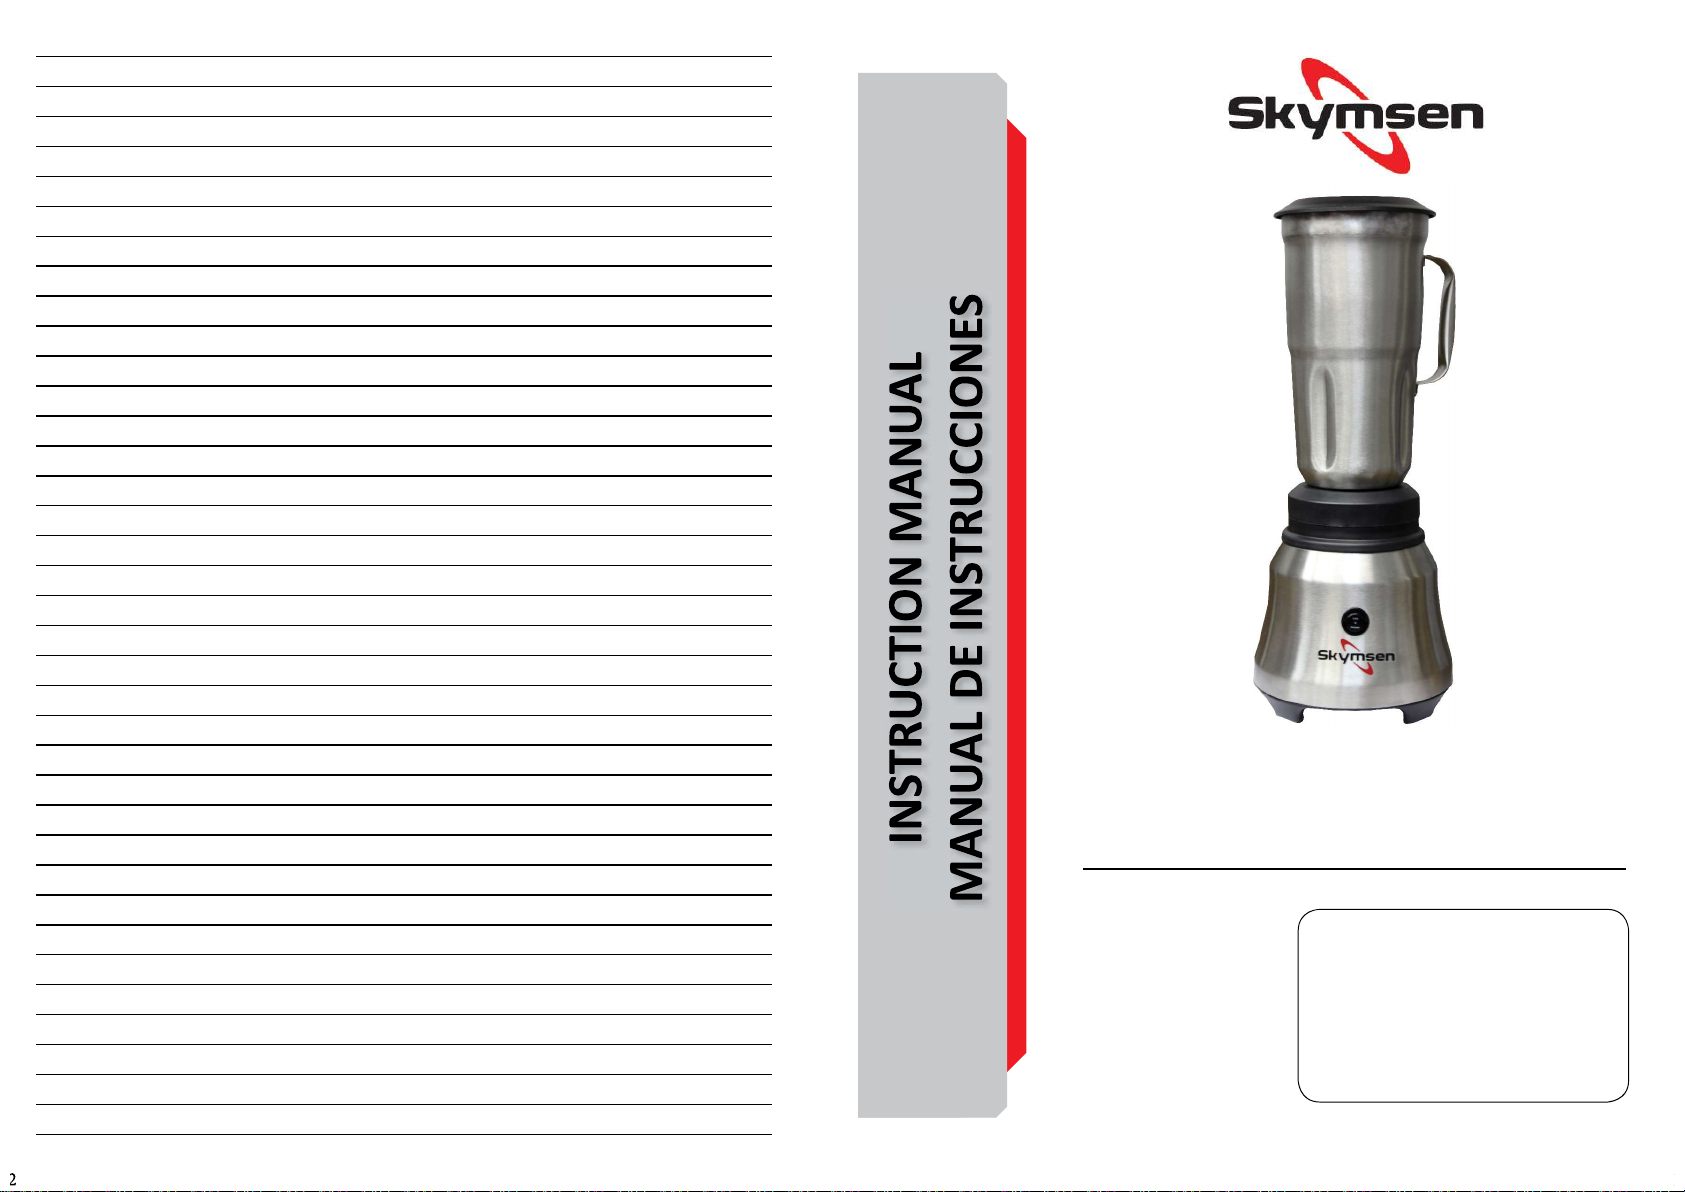
HIGH ROTATION BLENDER, 2 LITERS
LICUADORA DE ALTA VELOCIDAD, 2 LITROS
MODEL/MODELO
TA2
67612.8 - INGLÊS/ESPANHOL
Data de Revisão: 28/10/2019
Metalúrgica Skymsen Ltda.
Rodovia Ivo Silveira 9525
Volta Grande
88355-202 Brusque/SC/Brasil
www.skymsen.com - Fone: +55 47 3211 6000
CNPJ: 82.983.032/0001-19 - IE 250.064.537
DEVIDO À CONSTANTE EVOLUÇÃO DOS NOSSOS PRODUTOS, AS INFORMAÇÕES AQUI CONTIDAS PODEM SER MODIFICADAS SEM AVISO PRÉVIO.
Page 2
SUMMARY (ENGLISH)
1. INTRODUCTION ..........................................................................................................................................................2
1.1 Safety .......................................................................................................................................................................2
2 COMPONENTS AND TECHNICAL FEATURES ...................................................................................................................3
3 INSTALLATION AND PRE OPERATION ............................................................................................................................3
3.1 Placement of the equipment.....................................................................................................................................3
3.2 Electrical Installaon .................................................................................................................................................3
3.3 Pre-operaon ...........................................................................................................................................................3
4. OPERATION.................................................................................................................................................................4
4.1 Starng .....................................................................................................................................................................4
4.2 Feeding Procedure ....................................................................................................................................................4
5. CLEANING ...................................................................................................................................................................4
6. MAINTENANCE ...........................................................................................................................................................5
7. OBSERVED NORMS .....................................................................................................................................................5
8. PROBLEM SOLVING .....................................................................................................................................................6
9. ELECTRICAL DIAGRAM ................................................................................................................................................6
INDICE (ESPAÑOL)
1. INTRODUCCIÓN ..........................................................................................................................................................7
1.1 Seguridad .................................................................................................................................................................7
2 COMPONENTES Y CARACTERÍSTICAS TÉCNICAS ............................................................................................................7
3 INSTALACIÓN Y PRE OPERACIÓN ..................................................................................................................................7
3.1 Posicionamiento .......................................................................................................................................................8
3.2 Instalación Eléctrica ..................................................................................................................................................8
3.3 Pre Operación ...........................................................................................................................................................8
4. OPERACIÓN ................................................................................................................................................................8
4.1 Accionamento...........................................................................................................................................................8
4.2 Procedimiento de alimentación ................................................................................................................................8
5. LIMPIEZA ....................................................................................................................................................................9
6. MANTENIMIENTO .......................................................................................................................................................9
7. NORMAS OBSERVADAS ...............................................................................................................................................9
8. RESOLUCIÓN DE PROBLEMAS ...................................................................................................................................10
9. DIAGRAMA ELÉCTRICO .............................................................................................................................................11
1. INTRODUCTION
This Equipment was designed to be used in household
applicaons, or similar condions, we clarify:
-Household Kitchen spaces in offices, store or similar
spaces;
-Household kitchens located in farms;
-Gourmet Household Kitchen spaces of residenal buildings
or private homes.
1.1 Safety
The instrucons below must be followed to avoid accidents,
non-compliance can cause serious injuries:
1.1.1 Never use this Equipment with wet clothes or wet
feet or on a wet or humid surface, do not immerse it under
water, do not place under any kind of water flow or similar,
do not use water jets of any kind on the equipment.
1.1.2 If the Equipment physically falls down, suffers any
kind of damage or has stopped working for any reason, it is
necessary to call specialized technical assistance.
1.1.3 The use of unauthorized accessories that are not
recommended by the manufacturer can lead to injuries.
1.1.4 Never operate the Equipment while wearing clothes
with long sleeves, especially on the wrists.
1.1.5 Make sure that the voltage of Equipment and of the
local electrical supply where the unit is going to be used
match and are adequate to this kind of equipment. Also
make sure that the equipment is properly grounded.
1.1.6 Be careful with the blade as it has sharp edges when
emptying or washing the Cup.
1.1.7 Always place the Lid #02 (Pic.01) on the cup before to
start the machine.
1.1.8 Always hold the Cup #03 (Pic.01) while the blender is
in operaon. If the Cup #3 (Pic. 01) gets loose, turn off the
equipment immediately.
1.1.9 When mixing hot liquids remove the Cap #01 (Pic.01)
out of the Lid #02 (Pic.01) and keep the hands away from
the Lid hole avoiding possible burns.
1.1.10 Keep hands or any kind of devices, tools, accessories
away from the moving parts of the Equipment while it
is turning on and processing recipes to avoid potenal
damages to the Equipment and injuries to the end user.
1.1.11 Do not use the equipment outdoors.
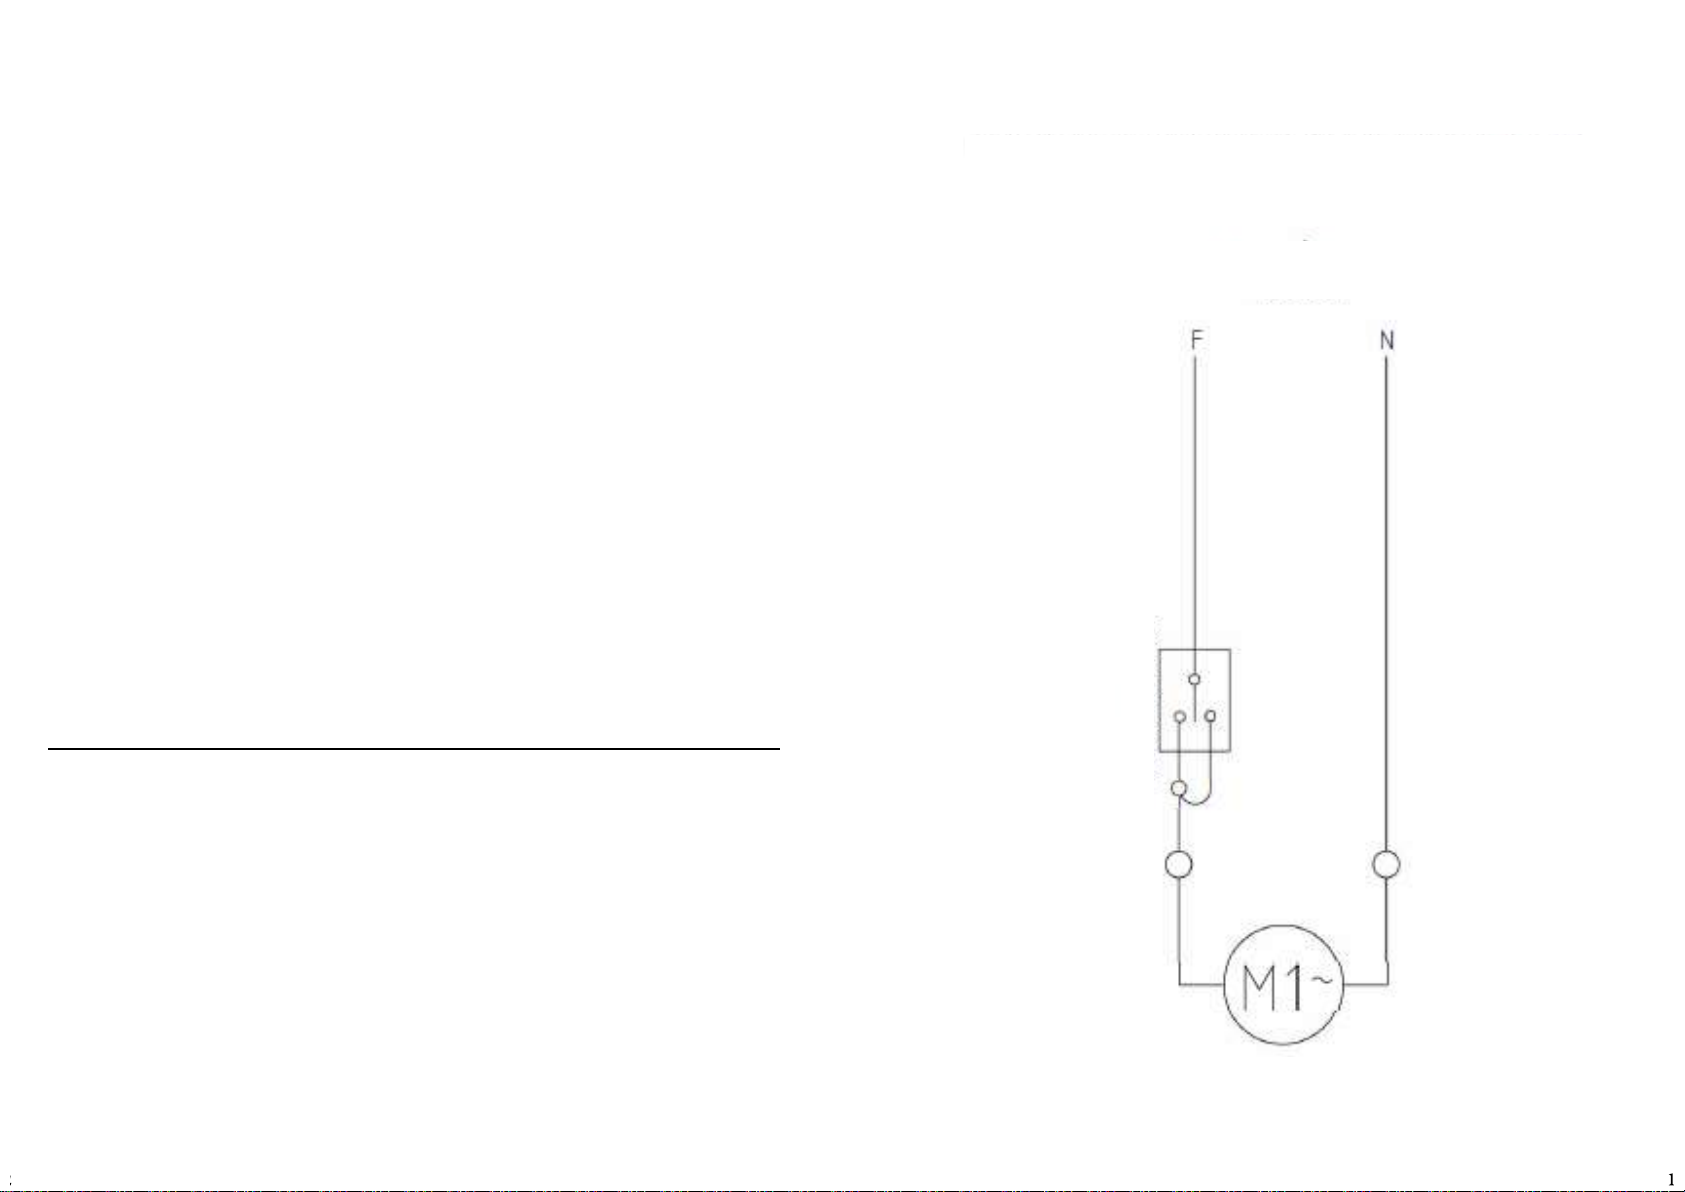
9. DIAGRAMA ELÉCTRICO
NOTAS: 1 - EL SENTIDO ESTANDÁR DE ROTACIÓN ÉS EL SENTIDO
DE LAS AGUJAS DEL RELOJ.
REDE ELÉCTRICA
110/220V
PREDE/APAGA/PULSAR
Page 3
7. NORMAS OBSERVADAS
ABNT NBR NM 60335-1
IEC 60335-2-14
Pase el lector de QR Code para obtener
informaciones sobre seguridad y
mantenimiento.
8. RESOLUCIÓN DE PROBLEMAS
PROBLEMAS CAUSAS SOLUÇÕES
- El equipo no prende.
- Olor a quemado ó humo. - Problema con el circuito eléctrico. - Llame el servicio técnico.
- El equipo se prende pero cuando el
producto es colocado en el vaso, el
equipo para o gira en baja rotación.
- Cable de alimentación damnificado. - Falla en el transporte. - Llame el servicio técnico.
- Ruidos anormales. - Rodamiento dañado. - Llame el servicio técnico.
- El producto no se licua.
- Vaciamiento del vaso.
- Falta de energia eléctrica.
- Problemas con el circuito eléctrico.
- Problema con el motor eléctrico. - Llame el servicio técnico.
- Trozos muy grandes no permiten el
contacto con la cuchilla.
- Cuchilla sin filo.
- Problema con el sistema de
vedamiento.
- Controle la red eléctrica.
- Llame el servicio técnico.
- Corte el producto en trozos menores
de 3,5 cm.
- Llame el servicio técnico.
- Llame el servicio técnico.
1.1.12 Do not expect your blender to replace any other
kitchen appliance. It is not supposed to make mashed
potatoes, it does not blend egg white or any other cream
for covering, it does not grind raw meat, it does not blend
hard pastas and does not extract kernels from fruit and
vegetables.
1.1.13 The blender works in seconds and not in minutes.
Therefore, never let your blender working for more than
one minute. It is beer to switch it off and check the mixing
consistency aer a few seconds to avoid over blending.
1.1.14 Do not overload the motor with big or heavy
porons, once it will decrease the blender’s lifespan. If the
motor stops, immediately switch it off, unplug and remove
part of the load before restarng the operaon.
1.1.15 For your safety the temperature of the product shall
not be above 40 degrees cengrade.
This Equipment cannot be operated by persons
(children included) with reduced mental, sensorial or
physical capacies. Unexperienced persons or persons
without proper training of knowledge on how the
equipment works cannot operate this equipment. Only
apt and trained persons or persons under the supervision
of an apt and trained supervisor must operate the
equipment.
We recommend children to be watched to not allow
them to play with the machine.
Always disconnect the Equipment from the power
supply when: It is not being used, before realizing any
cleaning or maintenance, before you place or take out any
accessories, before you realize any kind of procedure or
service with the unit.
Do not use the Equipment if there is any damage to
the cord or plug. Make sure that the cord does not stay
on the edge of a working table, staon or furniture and
make sure it is not in contact with hot surfaces. If the Cord
is not in good condions of use, to avoid accidents it must
be replaced by the supplier, an authorized technician or
someone qualified for the service.
If any emergency arises disconnect the Equipment
from the power supply, unplug it from the electrical socket
Never spray water directly on to the equipment.
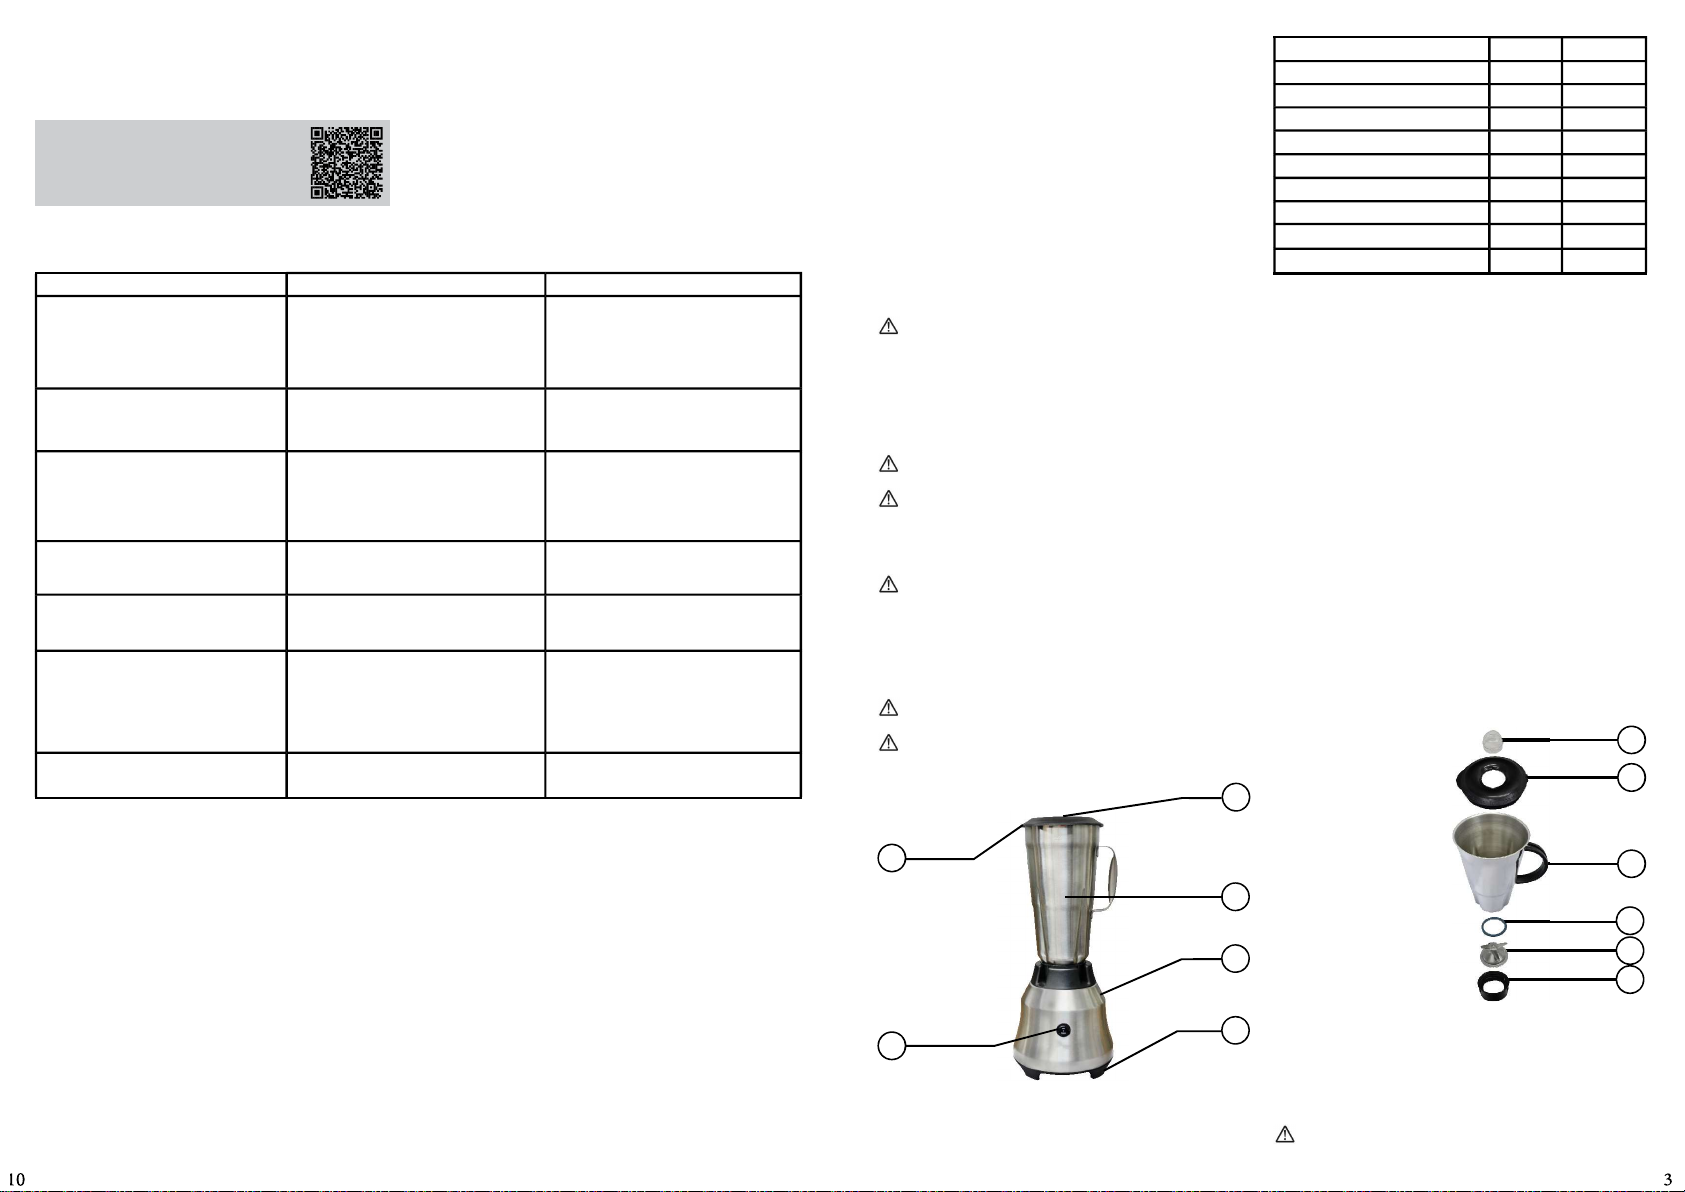
2. COMPONENTS AND TECHNICAL FEATURES
Picture 01
01
02
03
04
05
01 – Cap
02 – Lid
03 – Cup
04 – Housing
05 – ON/OFF/Pulse Switch
06 – Feets
06
FEATURES UNIT TA2
Maximum Cup Capacity L 2
Voltage V 110 or 220
Frequency Hz 50 ~ 60
Height mm 450
Width mm 215
Depth mm 205
Net Weight kg 2,8
Gross Weight kg 3,2
Power Rang W 1000
3. INSTALLATION AND PRE-OPERATION
3.1 Placement of the equipment
The Equipment must be placed and levelled on top of a firm
and dry Surface, preferably with 850mm of height.
3.2 Electrical Installaon
This Equipment was designed to work in the following
voltages and frequencies: 110 or 220 (50 ~ 60Hz). Aer
unpacking the equipment, check the voltage informed on
the tag placed at the electrical cord.
The plug has 2 pins, the central hole is the ground wire. It is
mandatory that all pins be connected to the power supply
before the equipment is turned on.
3.3 Pre-Operaon
• Make sure that the equipment is firm and levelled on
its working place.
• Before using the equipment, all parts that will get in
contact with food must be washed with water and
neutral soap.
3.3.1 Procedure to Assemble the Cup
Picture 02
06
1 - Place the sealing ring
#01 on the central bearing
#02 (Pic. 02).
2 - Fit the central bearing
#02 plus the sealing ring
#01 in the cup’s base #03
(Pic. 02).
3 – Thread the cup #04 in
the cup’s base #03 (Pic. 02)
05
04
01
02
03
3.3.2 Placing the Cup
The Cup #04 (Pic. 02) has a versale fing system allowing
an easy, quick and safe placing.
To remove or to place the Cup #03 (Pic.01) just li it using
the handle. Do always use the handle with a firm hold to
remove or to place the Cup.
Never remove or place the Cup with the equipment
Page 4
switched ON.
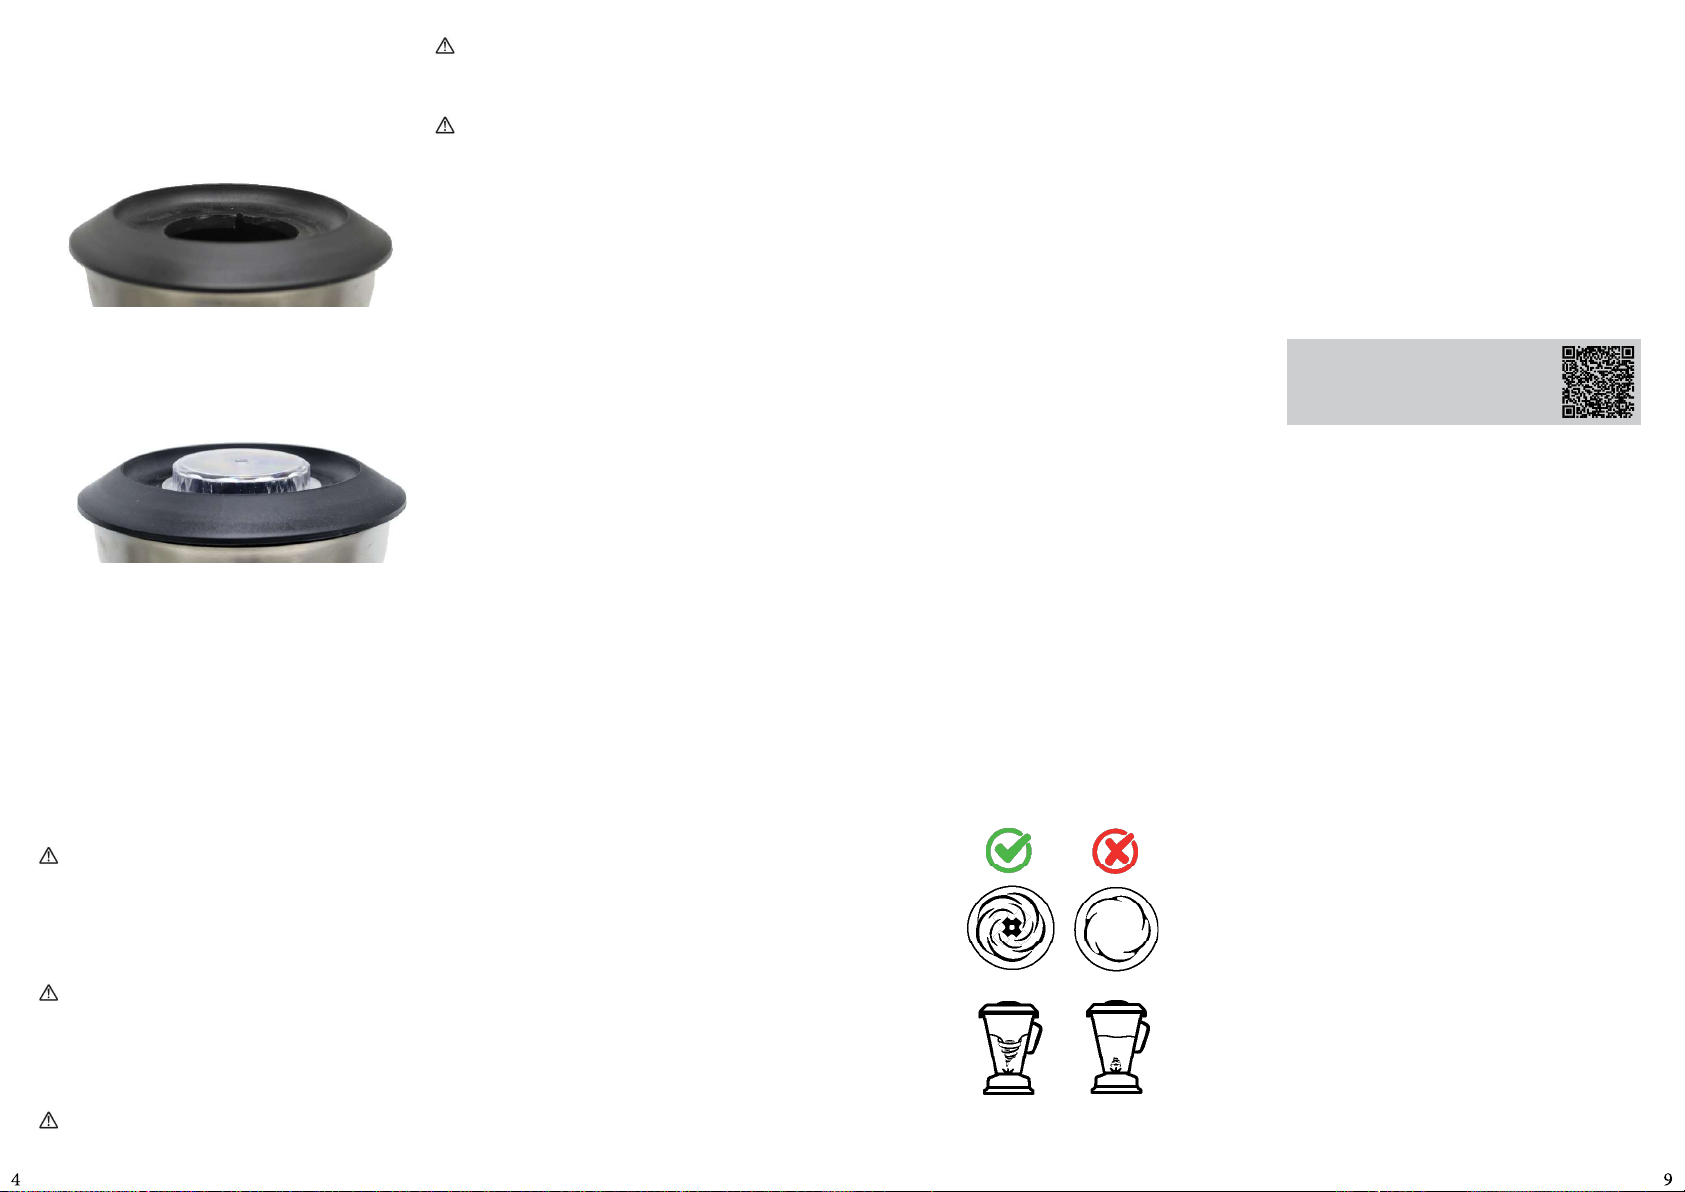
3.3.3 Placing the Lid
The Cup has a lid #05 (Pic. 02) made on a non toxic material,
providing an efficient sealing during operaon. Make sure
the Lid is correctly placed on the Cup as may be seen picture
03 below.
3.3.4 Placing the Cap
The Cap #06 (Pic.02) may be used to watch the process, and
also to add ingredients during operaon.
To remove the Cap just turn it clockwise unl it gets free
then li it, see picture 04 below.
4. OPERATION
4.1 Starng
- Place the Plug into the Socket.
- To start the equipment just press the ON/OFF Switch #05
(Pic.01) to the “I” posion
- To turn the equipment off just press the ON/OFF Switch
#05 (Pic.01) to the “O” posion.
4.2 Feeding Procedure
Remove the Lid along with its cap.
With the equipment switched OFF place inside the cup first
the liquid ingredients of the receipt, then drop the more
consistent products.
This equipment is not recommended for processing
cassava (also known as yuca/manioc), due to its high
starch content, polysaccharides, and soluble dietary
fibers, such as natural gum.
Note: Processing cassava may cause damage to the motor,
couplings, blades, shas, and other components of the
equipment.
Cut the product in small pieces approximately 3.5 cm
wide, it will help to reduce the blending me parcularly
with frozen products. When processing ice, it is obligatory
to add some water.
Place the Lid with the Cap in accordance with item 3.3.3 and
3.3.4, then switch the blender ON.
Do not use this blender to process dense products, like
the dessert known as “acai cream”.
Picture 03
Picture 04
The blending process me changes from product to
product. It is not recommended to blend solid products
without adding some liquid, because overheang may
occur causing damages to the cup sealing.
Never switch the Blender ON without load because it
will cause irreparable damages.
Order for Placing Ingredients in the Blender
To prepare recipes faster and with perfect texture, it's
essenal to know how to organize the ingredients in the
blender. Here is the ideal sequence:
1. Liquids (water, juices, milk, yogurt): Add liquids first. This
helps the blades turn easily and prevents solid ingredients
from geng stuck at the boom.
2. So Ingredients (chopped fruits, cooked vegetables,
leaves): Aer the liquids, add lighter and soer ingredients
like banana or avocado, followed by leaves like spinach or
kale, which are easier to blend.
3. Solid Ingredients (frozen fruits, raw vegetables in pieces):
Firmer ingredients come next. They will be gradually pulled
down and mixed with the already blended ingredients.
4. Heavy Ingredients (ice, nuts, grains): Add ice and heavier
ingredients last. They help push the rest towards the
blades, facilitang the blending process.
5. Final Adjustments (sweeteners, spices, powders):
Add ingredients like honey, sugar, cinnamon, or cocoa
last. To make it easier to control the amount and ensure
even distribuon, these items can be added through the
blender's lid while the appliance is running.
Following this order not only ensures a more
homogeneous and tasty blend but also helps preserve
the blender's lifespan. Placing the ingredients correctly
prevents the motor from being overloaded, allowing the
blades to turn more easily and efficiently. This way, your
equipment works beer and lasts longer, guaranteeing
perfect results for much longer.
Aenon:
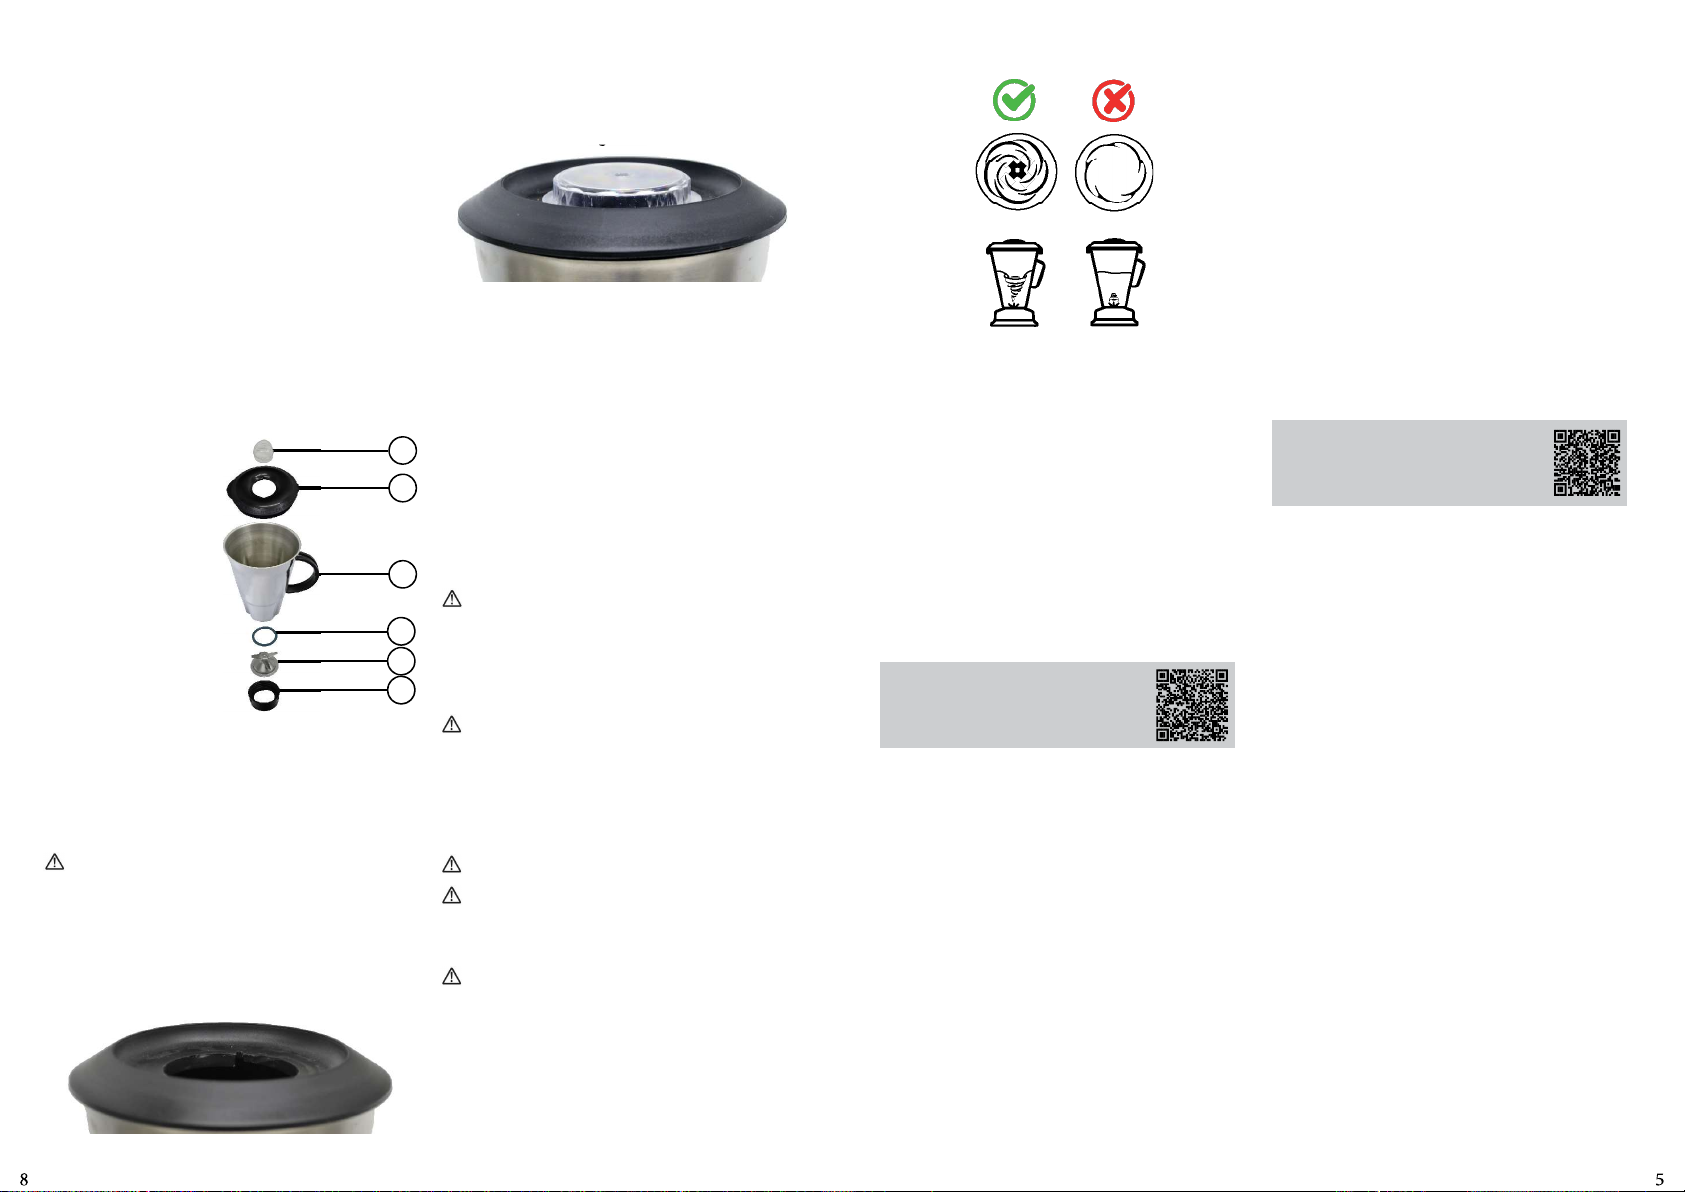
- Seamless cup has a “V” shape that grants the formaon
of a powerful liquid vortex that pulls all ingredients towards
the blade to be processed. That leads to a beer and more
homogenous result, achieved in less me.
- In heavier recipes, such as mayonnaise, açaí or cakes,
the vortex may close. If that happens it means that the
processing is not happening correctly. The ingredients will
stop moving at the upper part of the cup, and a vacuum
bubble will form on the helix, as shown on Pic. 05, damaging
the equipment.
- In those cases it is necessary to adjust the recipe, by
diminishing it, or increasing the liquid poron of it allowing
the vortex to remain acve at all mes.
2. Ingredientes Suaves (frutas cortadas, verduras cocidas,
hojas): Después de los líquidos, añade ingredientes más
ligeros y suaves, como plátano o aguacate, seguido de
hojas como espinaca o col rizada, que son más fáciles de
triturar.
3. Ingredientes Sólidos (frutas congeladas, verduras
crudas en trozos): Los ingredientes más firmes vienen a
connuación. Serán arrastrados hacia abajo y mezclados
gradualmente con los ingredientes ya bados.
4. Ingredientes Pesados (hielo, nueces, granos): Coloca
el hielo y los ingredientes más pesados al final. Ayudan a
empujar el resto hacia las cuchillas, facilitando la mezcla.
5. Ajustes Finales (edulcorantes, especias, polvos): Añade
ingredientes como miel, azúcar, canela o cacao al final.
Para facilitar el control de la candad y garanzar una
distribución uniforme, estos elementos se pueden añadir a
través de la tapa de la licuadora mientras el aparato está en
funcionamiento.
Seguir este orden no solo garanza una mezcla más
homogénea y sabrosa, sino que también ayuda a preservar
la vida úl de la licuadora. Colocar los ingredientes
correctamente evita que el motor se sobrecargue,
permiendo que las cuchillas giren con más facilidad y
eficiencia. De esta manera, tu equipo trabaja mejor y dura
más, garanzando resultados perfectos por mucho más
empo.
Atención:
- El vaso monobloque de inoxidable Skymsen posee diseño
en V para asegurar la formación de un vórce (remolinos)
que direcciona el alimento hacia las cuchillas, triturando
homogéneamente, con mejores resultados y menores
empos de preparación.
- En recetas más pesadas, como la pasta de açaí, mayonesa,
cremas muy densas, el vórce puede cerrar y no procesará
la receta, como lo vemos en la Fig.05, ocasionando daños al
equipamiento.
En dichos casos y alimentos específicos, es necesario reducir
la receta o aumentar la candad de líquido, pues siempre
es necesario que haga el vórce durante todo el empo de
procesamiento de la receta.
Figura 05
5. LIMPIEZA
El equipo debe ser totalmente limpio y higienizado:
- Antes de ser usado por primera vez;
- Después de un día de operación;
- Siempre que no venga a ser usado por un largo periodo
- Antes de ponerlo en operación después de un largo
periodo de inacvidad.
Algunas partes del equipo pueden ser reradas para
limpieza:
- Vaso #03 (Fig.01);
- Tapa #02 (Fig.01);
- Sobre Tapa #01 (Fig.01).
Lave todas las partes con agua y jabón neutro.
Para montar as partes anteriormente removidas, proceda
de maneira inversa a sequência dos itens citados acima.
Pase el lector de QR Code para obtener
informaciones sobre cuidados con los
aceros inoxidables.
6. MANTENIMIENTO
El Mantenimiento debe ser considerado como un conjunto
de procedimientos para ofrecer perfecta condición de
funcionamiento del equipamiento, aumentando la vida úl
y seguridad de uso del mismo.
*Limpieza – Verificar item 5 Limpieza de este manual.
*Cables – Controlar si los cables están en buen estado, sin
ningún daño y si todos los terminales eléctricos están bien
y sin oxidación.
*Verifique Llave ON/OFF, Llave reset, circuitos electrónicos,
para que todos estos componentes estén funcionando
correctamente y que el uso del equipo sea regular sin
inconvenientes.
*Instalación – Verifique la instalación de su equipamientos
el item 2 Instalación y Pre Operación de este manual.
*Vida úl del producto – 2 años, considerando el uso en un
turno normal de trabajo.
1 - Itens a verificar y ejecutar mensualmente:
• Verificar la instalación eléctrica del local;
• Medir a tensión de la toma de corriente eléctrica;
• Medir la corriente de funcionamiento y comparar con la
corriente nominal;
• Verificar las conexiones de los terminales eléctricos del
equipamiento para evitar posibles fallos de contacto;
• Verificar posible desgaste o juego en el eje del motor
eléctrico;
Verificar los hilos de los cables eléctricos en cuanto a
señales de sobrecalentamiento, aislamiento dañado o
avería mecánica.
- Itens a verificar y executar a cada 3 meses:
• Verificar las partes eléctricas como Llave ON/OFF, botón
de emergencia, tecla reset y circuitos electrónicos cuanto
a señales de sobrecalentamiento, aislamiento dañado o
avería mecánica.
• Verificar posible juego en los cojinetes y rodamientos.
• Verificar retenes, o’rings, v’rings y otros sellos.
• -Verifique el apriete de todos los tornillos y tuercas para
evitar posibles daños al equipo.
Page 5
3.1 Posicionamiento
Su equipamiento deberá estar posicionado y nivelado
arriba de una superficie seca, firme y preferentemente con
850mm de altura.
3.2 Instalación Eléctrica
Este equipamiento ha sido desarrollado para trabajar
en los voltajes 110 o 220V (50 ~ 60Hz). Cuando recibir el
equipamiento, verifique la tensión eléctrica informada en la
equeta ubicada en el cable eléctrico.
El enchufe del cable de energía posee 2 clavijas y 1 orificio
central, que es el aterramiento. Es obligatorio que todas
las clavijas estén conectados a la red de energía antes de
prender el equipamiento.
3.3 Pre Operación
• Verifique si el equipamiento está firme en la mesada.
• Antes de usar su equipo se debe lavar todas las partes
que entren en contacto con el producto con agua y
jabón neutro.
3.3.1 Procedimientos para montar el vaso
Figura 02
06
1 - Coloque la goma
de vedamiento No
01 en el cojinete
central #02 (Fig 02).
2 - Encaje el cojinete
central #02 y la goma de
vedamiento #01 en la
base del Vaso #03 (Fig 02).
3 - Rosquee el Vaso #04 en
la base del Vaso #03.
3.3.2 Posicionamiento del Vaso
El Vaso #03 (fig 01) posee un sistema simple permiendo
una fácil y segura colocación.
Para remover y recolocar el Vaso basta rarlo vercalmente
para arriba por el asa. Siempre remueva ó recoloque el vaso
agarrándolo con firmeza por su asa.
Nunca rere ó coloque el Vaso con la licuadora
prendida.
3.3.3 Colocando la Tapa
El Vaso ene una tapa #05 (Fig 02) hecha de material atoxico
que asegura un eficiente vedamiento durante la operación.
Tenga cuidado para que la Tapa esté debidamente colocada
sobre el Vaso según la figura abajo:
Figura 03
05
04
01
02
03
3.3.4 Colocando la Sobre Tapa
La Sobre Tapa #06 (Fig.02) puede ser usada sea para
observar el procesamiento, sea para añadir ingredientes.
Para rerarla gírela en el sendo horario hasta que se
suelte, y después levántela, vea Figura 04
4. OPERACIÓN
4.1 Accionamiento
Introduzca la enchufe en la toma.
Para prender el equipo presione la llave Prender / Apagar
#05 (Fig.01) en la posición “I”.
Para apagar el equipo presione la llave Prender / Apagar
#05 (Fig.01) en la posición “O”.
4.2 Procedimiento para operación
Rere del Vaso la Tapa con su Sobre Tapa
Con el equipo apagado coloque en el Vaso primero los
productos en estado LIQUIDO de la receta, y en seguida
coloque los productos de mayor consistencia.
Este equipo no está recomendado para procesar
mandioca (yuca/casava) debido a su alto contenido de
almidón, polisacáridos y fibras dietécas solubles, como la
goma natural.
Nota: El procesamiento de mandioca puede causar
daños al motor, acoplamientos, cuchillas, ejes y demás
componentes del equipo.
Corte el producto en pedazos pequeños de
aproximadamente 3,5 cm. Este tamaño ayuda reducir
el empo de proceso principalmente con productos
congelados. En el caso de procesar hielo, se recomienda
añadir un poco de agua.
Ponga la Tapa con su Sobre Tapa de acuerdo con las
instrucciones de los ítems 3.3.3 y 3.3.4 y prenda la licuadora.
No usar la licuadora para procesar alimentos con
textura gruesa, como ejemplo “crema de açaí”.
El empo de procesamiento es variable de acuerdo
con el producto. No se recomienda procesar productos
sólidos sin añadir algún liquido pues podría ocurrir un
sobrecalentamiento que puede causar daños al sistema de
vedamiento del Vaso.
Nunca prenda el equipo en vacio.
Orden para Colocar los Ingredientes en la Licuadora
Para preparar recetas más rápido y con una textura
perfecta, es esencial saber cómo organizar los ingredientes
en la licuadora. Aquí está la secuencia ideal:
1. Líquidos (agua, jugos, leche, yogur): Coloca los líquidos
primero. Esto ayuda a que las cuchillas giren con facilidad y
evita que los ingredientes sólidos se queden atascados en
el fondo.
Figura 04
Picture 05
5. CLEANING
The Equipment must be completely cleaned and sanized:
- Before using it for the first me;
- Every day before closing the work shi;
- Always when it has not been in use for a long me;
- Before using aer it has not been in use for a long me.
Some parts of the equipment may be removed to be
cleaned:
-Cup #03 (Pic. 01);
-Lid #02 (Pic. 01);
-Cap #01 (Pic. 01).
Wash all parts with water and neutral soap.
To assemble the parts previously removed, proceed in an
inverse sequence to the items informed above.
Use Your QR Code Reader to access
more informaon regarding the cares
and aenon needed when handling
stainless Steel.
6. MAINTENANCE
It is considered MAINTENANCE the group of acons that
aim to offer and grant the perfect working condion of the
equipment, enlarging its useful life, and general user safety.
* Cleaning – Check item 5 Cleaning of this manual.
* Cords – Check if the cords are in good condion, without
any damage and if all electrical terminals are in good
condion and without oxidaon.
*Check the ON/OFF Switch, Reset Switch, electronic
circuits and make sure that all these components are
working correctly and in good condion, and that the use
of the equipment is occurring in a normal way, without any
inconvenient.
* Installaon – Check the installaon of Your Equipment
as per the item 3 – Installaon and Pre Operaon of this
manual.
* Useful life of the equipment – 2 years for the use in a
normal work shi.
1 - Items to check and execute monthly:
• Check the electrical grid and installaon of the work place;
• Measure the amperage intake of the electric power
supply;
• Measure the working current and compare it to the
nominal current;
• Check the electrical terminal connecons of the
Equipment to avoid contact failures;
• Check for possible wearing or looseness in the electric
motor sha;
• Check the wires of the electric cords for signs of
overheang, damaged insulaon or mechanical damage.
2 – Items to check and execute every 3 months:
• Check the ON/OFF buon, Reset buon, electronic
circuits for signs of overheang, damaged insulaon or
mechanical damage.
• Check for possible looseness in the assemblies and
bearings.
•Check the retainers, o’rings, v’rings and other seals.
• Check that all screws and nuts are ght to avoid possible
damage to the equipment.
Use your QR Code Reader to access
more informaon regarding safety and
maintenance.
7. OBSERVED NORMS
ABNT NBR NM 60335-1
IEC 60335-2-14
Page 6
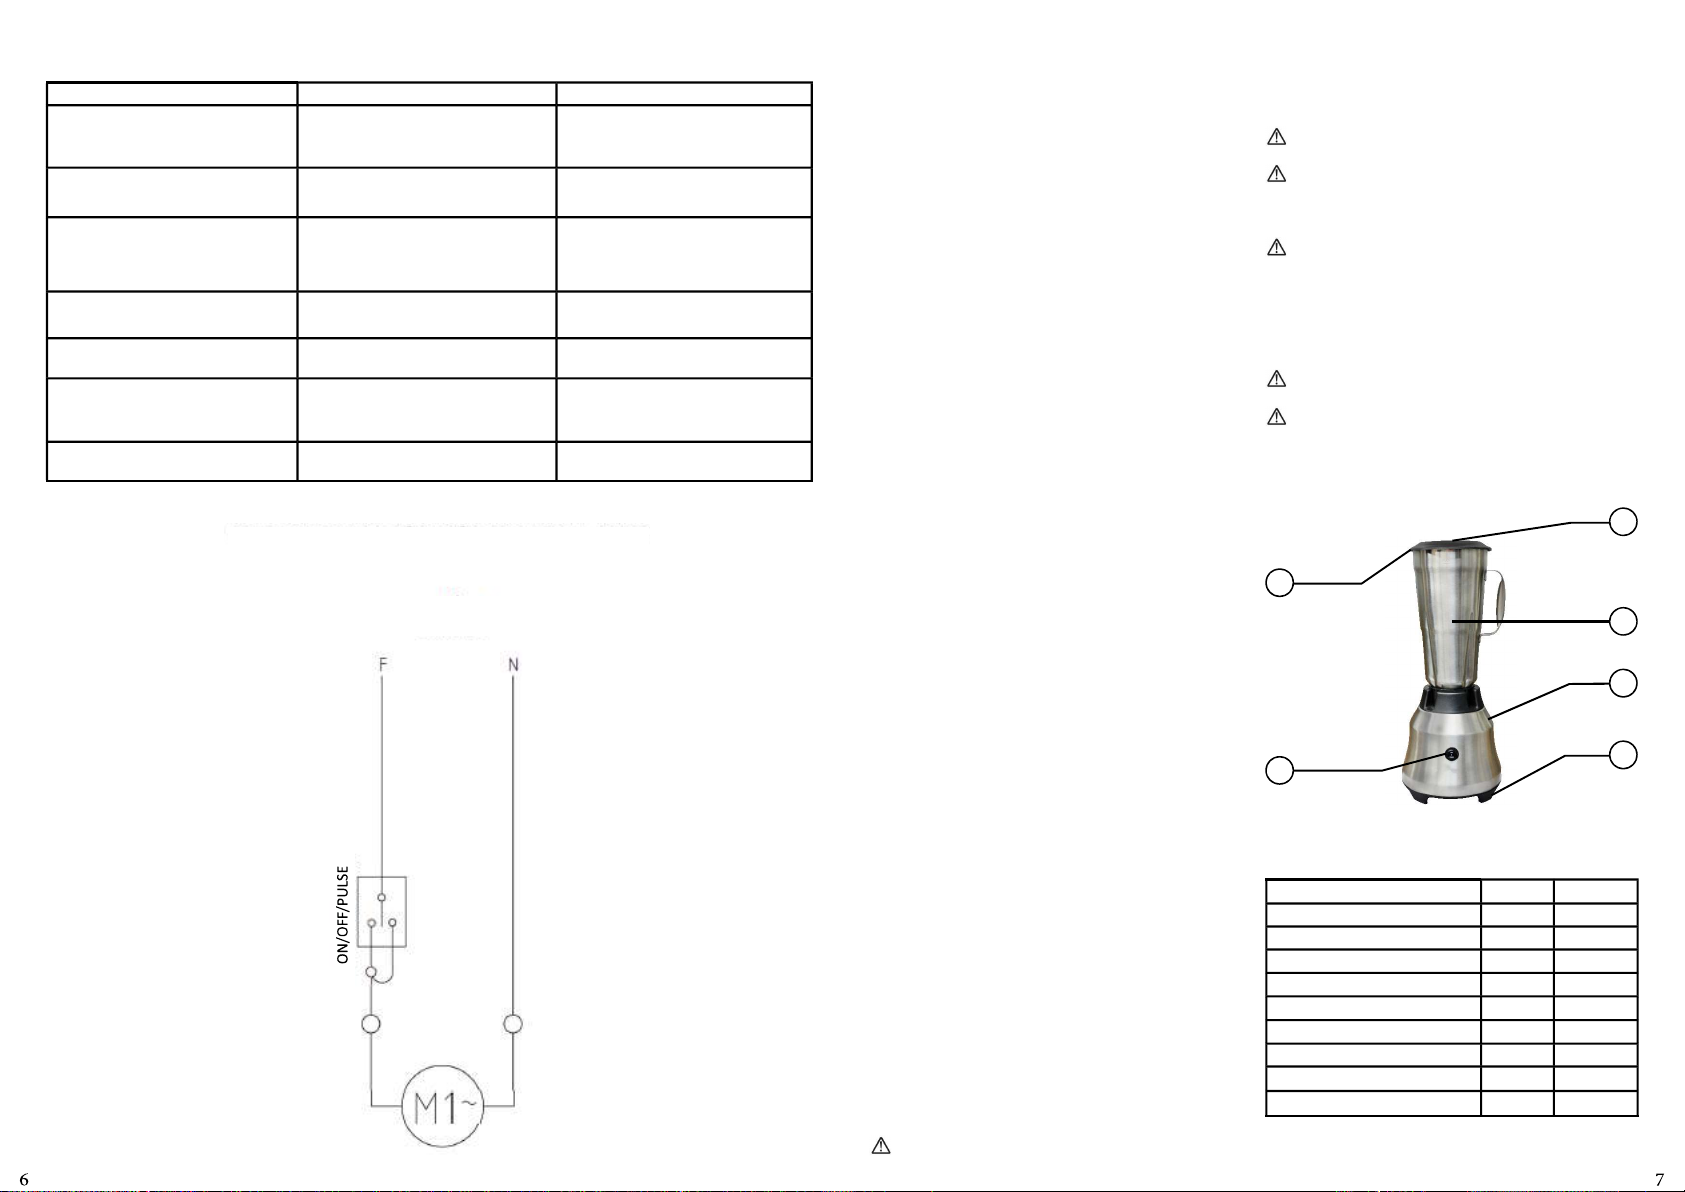
8. PROBLEM SOLVING
PROBLEMS CAUSES SOLUTIONS
- The equipment does not start.
- Burn smell or smoke. - Problem with the electric circuit. - Call Technical Assistance.
- The equipment switches ON but
when the product is placed inside the
cup the knife stops or turns slowly.
- Damaged cord. - Problem during transportaon. - Call Technical Assistance.
- Strange noises. - Damaged bearing. - Call Technical Assistance.
- The product does not blend.
- Cup leaking. - Damaged sealing. - Call Technical Assistance.
- Energy Shortage.
- Problem with the electric circuit.
- Problems with the electric motor. - Call Technical Assistance.
- Product pieces too large.
- Blunt knife.
- Check energy supply.
- Call Technical Assistance.
- Cut product pieces 3,5cm wide.
- Call Technical Assistance.
9. ELECTRIC DIAGRAM
NOTES: 1 - THE DEFAULT DIRECTION OF ROTATION IS CLOCKWISE.
ELECTRIC NETWORK
110/220V
1. INTRODUCCIÓN
Este equipamiento fue proyectado para ser usado en
aplicaciones de uso domésco o similares que aclaramos:
- Espacio de cocinas en las oficinas, endas o ambientes
similares;
- Viviendas en las haciendas o fincas;
- Espacios de cocinas en la reparciones públicas o privadas.
- En espacio gourmet en condominios y viviendas.
1.1 Seguridad
Las instrucciones abajo deberán ser seguidas para evitar
accidentes, el incumplimiento puede causar lesiones
graves:
1.1.1 Nunca ulice este equipamiento con ropas o pies
mojados o en superficie húmeda o mojada, no sumergir
el equipo en agua ni bajo el grifo y no ulice manguera de
agua a presión sobre el equipamiento.
1.1.2 Si el equipamiento sofriera una caída, y se dañe de
alguna forma o dejó de funcionar es necesario Llamar el
servicio técnico especializado.
1.1.3 La ulización de accesorios no recomendados por el
fabricante pueden ocasionar lesiones en el usuario.
1.1.4 Nunca use ropas con mangas anchas, principalmente
cerca de los puños, durante la operación.
1.1.5 Cerquese que el voltaje del equipo y de la red
eléctrica sea igual, y que el equipo esté aterrado.
1.1.6 Las cuchillas son muy afiladas, manéjelas con cuidado.
1.1.7 Siempre ponga la Tapa #02 (Fig.01) sobre el Vaso
antes de prender la licuadora.
1.1.8 Siempre agarre el Vaso #03 (Fig.01) mientras la
licuadora esté en operación. Si el vaso #03 (FIg.01) se suelta
desligue el equipo de inmediato.
1.1.9 Cuando se use la licuadora para procesar líquidos
calientes se rere la Sobre Tapa #01 (Fig.01) y se quede con
las manos lejos del agujero en la Tapa, para evitar posibles
quemaduras.
1.1.10 Nunca toque la cuchilla mientras la licuadora esté en
procesamiento.
1.1.11 No use el equipo al aire libre.
1.1.12 No se debe esperar que su Licuadora sustuya
los artefactos de la cocina. La licuadora no hace puré de
papas, no hace claras en punto de nieve o sustutos para
coberturas de cremas. No pica carne cruda ni mezcla masas
duras y tampoco extrae pepitas, huesos o semillas de frutas
o verduras.
1.1.13 Esta licuadora realiza los procesos en segundos NO
en minutos. Así que el empo de los procesos, debe siempre
ser inferior a un (01) minuto. Sí enen dudas si la mezcla
alcanzó el punto que desean, es mejor apagar la máquina
luego de algunos segundos y verificar su consistencia.
1.1.14 No se debe SOBRECARGAR el motor con porciones
muy pesadas o muy grandes, pues de esta forma será
disminuida la vida úl de la licuadora. Si el motor parar,
apague inmediatamente la máquina, desconectando la
enchufe de la toma de corriente y saque un poco de los
ingredientes, para entonces volver a prender la Licuadora.
1.1.15 Para su seguridad la temperatura de los productos
procesados no debe ser superior a los 40 grados C.
Este equipamiento no se desna a la ulización
por personas (inclusive niños) con capacidad sicas,
sensoriales o mentales reducidas, o por persona con falta
de experiencia y conocimiento, salvo si hubiera recibido
la capacitación adecuada o esté bajo la supervisión del
encargado por su seguridad.
Recomendamos que se vigile a los niños para no
permirles jugar con la máquina.
Desconecte el equipamiento de la red eléctrica
cuando: no esté en uso, antes de limpiarlo, al sacar o
colocar accesorios, antes del servicio de mantenimiento o
antes de cualquier po de servicio.
No use el equipo cuando tenga el cable o el enchufe
damnificado. No deje que el cable de alimentación se
quede en el borde de una mesa, o que toque superficies
calientes. Si el enchufe estuviera damnificado, sustuya el
cable damnificado por otro que respete lasespecificaciones
técnicas y de seguridad. Esta sustución deberá ser hecha
por un profesional calificado.
En caso de emergencia rere el enchufe de la toma de
energía eléctrica.
Nunca use chorros de agua directamente sobre el
equipo.
2. COMPONENTES Y CARACTERÍSTICAS TÉCNICAS
Figura 01
01
02
03
04
05
01 – Sobre Tapa
02 – Tapa
03 – Vaso
CARACTERISTICAS UNIDAD TA2
Capacidad Máxima del Vaso L 2
Voltaje V 110 o 220
Frecuencia Hz 50 ~ 60
Altura mm 420
Ancho mm 200
Profundidad mm 190
Peso Neto kg 2,17
Peso Bruto kg 2,52
Potencia del Motor W 1000
04 – Gabinete
05 – Llave Prende/Apaga/Pulsar
06 – Pies
06
3. INSTALACIÓN Y PRE OPERACION
 Loading...