


Food Processor / Procesadora de Alimentos
Models
MASTER-SS
CAUTION!
HAZARDOUS MOVING PARTS
Disconnect Power Before
Cleaning or Servicing
!ATENCIÓN!
PARTES MOVIBLES PELIGROSAS
Desconecte de la Red Electrica
antes de la Limpieza o Manutención
Instructions Manual / Manual de Instrucciones
Office
Phone: 1-800-503-7534 / 305-868-1603
Fax: 305-866-2704
www.skyfood.us sales@skyfood.us -
TOLL FREE 1-800-503-7534
UG0062 - February / 2014


SUMMARY / INDICE
1. ENGLISH 01
2. ESPAÑOL 24
MASTER-SS

01
SUMMARY
1. Introduction
1.1 Safety
1.2 Main Components
1.3 Technical Characteristcs
1.4 Available Disc
2. Installation and Pre Operation
2.1 Installation
2.2 Pre Operation
2.3 Choosing the Disc
2.4 the Feeding ThroatChoosing
3. Operation
3.1 Starting
3.2 Using a Single Disc
3.3 Using a Disc and a Grid Disc
3.4 Cleaning
4. General Safety Practices
4.1 Basic Operation Practices
4.2 Safety Produceres and notes before Turning the Machine
4.3 Routine Inspection
4.4 Operation
4.5 After Finishinh the Work
4.6 Maintenance
5. Analysis and Problems Solving
5.1 Problems, Causes e Solutions
5.2 Adjust and Components Removal
5.3 Electrical Diagram
02
02
02
04
04
05
05
07
08
08
10
12
14
14
16
16
17
17
18
18
18
21
23
08
05
05
6. General Advices
23

02
1. Introduction
1.1 Safety
When incorrectly used, the Food Processor model MASTER-SS can
be potentially DANGEROUS. Never place your hand on the outlet of
processed products, nor on the feeding throats. The exchange of discs,
cleaning, maintenance or any other service on the machine must only be
made by qualified personnel. The instructions below must be carefully
followed in order to avoid accidents:
1.1.1 – Handle the discs with care, because they have sharp blades;
1.1.2 – Always unplug the machine for changing discs, cleaning,
maintenance or any other service;
1.1.3 – Never make use of any tool or instrument to help feeding the
machine, except for the pusher lever or the round pusher Nº.02 Pic.01;
1.1.4 - Never open the machine lid before the complete stop of the disc;
1.1.5 – Never spray water directly upon the machine.
IMPORTANT
This equipment must not be used by children or any persons with
reduced physical or mental aptness, lack of experience or
knowledge, unless they are under supervision or have received from
the person responsible for safety, proper instructions on how to use
the equipment.
IMPORTANT
If the Power Cord is not in good usage conditions, it must be
replaced by qualified personnel.
1.2 Main Components
The Food Processor model MASTER-SS, is equipped with 2 (two)
safety sensors. When the pusher lever is lifted, the machine stops
automatically, and turns back on only when this lever is lowered.
SKYFOOD sea para l a C ompañía de Servicio. Distancia o t iempo de viaje NO serán
pagados. SKYFOOD ofrece una garantía limitada en s ito para productos que estén
solamente en instalaciones comerciales con peso neto supe rior a setenta (70) libras,
siempre que es tén instalados en una dirección dentro de un rayo de treinta (30) millas de
una Compañía de Servicio. Usuarios finales son resp onsables por tod os los costos
extra de viaje y costo por milla. En este caso servicios de garant ía s erán provenidos
durante las horas de trabajo comerciales.
Este producto sera sustituido o reparado bajo la garantia, por un periodo de un (1)
año desde la fecha d e compra por el comprador original/usuario (“Usuario Final”), ó
diez ocho (18) meses a partir de la fecha de envío desde el almacén de SKYFOOD
cual sea la fecha que expire primero.
Accesorios serán remplazados ó reparados bajo la garantía por u n p eriodo de (30) d ías a
partir de la fecha de c ompra por el comprador/usuario (“Usuario Final”), ó diez ocho (18)
meses a partir de la fecha de envío desde el almacén de SKYFOOD cual sea la fecha que
expire primero.
La garantía no será aplicable has ta que un formulario de REGIST RO DE GARANTÍA sea
recibido por SKYFOOD EQUIPMENT, LLC, dentro de treinta (30) días de la feche de la
compra. El REGISTRO DE GA RANTÍA sea en el Manual de Instrucción de cada producto
ó en el sito de SKYF OOD: www.skyfood.us. El Usuario Final debe llenar el f ormulario de
REGISTRO DE GARANTÍA y mandarlo para SKYFOOD de acuerdo con las instrucciones
indicadas en el referido sito. Sin el cumplimiento de esta condición la garantía NO será
valida.
La garantía no se exti ende para productos de terceros. No existen otras garan tías ó
condiciones expresas o tras que aquellas ofrecidas por cada fabricante de
productos vendidos por SKYFOOD que no sean bajo la marca FLEETWOOD by
SKYMSEN y SKYMSEN.
Para preguntas ó asistencia, no devuelva el producto ó accesorios para la tienda, por favor
llame a Toll Free 1-800-503-7534, ó visite la sección Servicio al Cliente en
www.skyfood.us. Para un servicio mas rápido tenga disponible el nombre del mode lo, el
numero de serie y la prueba de compra para que el operador le asista.
SKYFOOD se reserva el derecho de cambiar los términos d e la Garantía Limitada a
cualquier momento sin previo aviso. También se reserva el derecho de cambiar el
proyecto y las especificaciones de sus equipos ó cualquier otra documentación a
cualquier momento. El usuario final no tendrá derecho a compensaciones
resultantes de éstos cambios.
Actualización :
Estes Terminos y Condiciones fueran por ultimo actualizadas en 14 de Enero 2014.

01 – Lever
02 – Round Pusher
03 – ON/OFF Switch
04 – Round Feeding Throat
05 – Housing
06 – Disc Chamber
07 – Pusher Lever
08 – Oblong Feeding Throat
09 – Lid
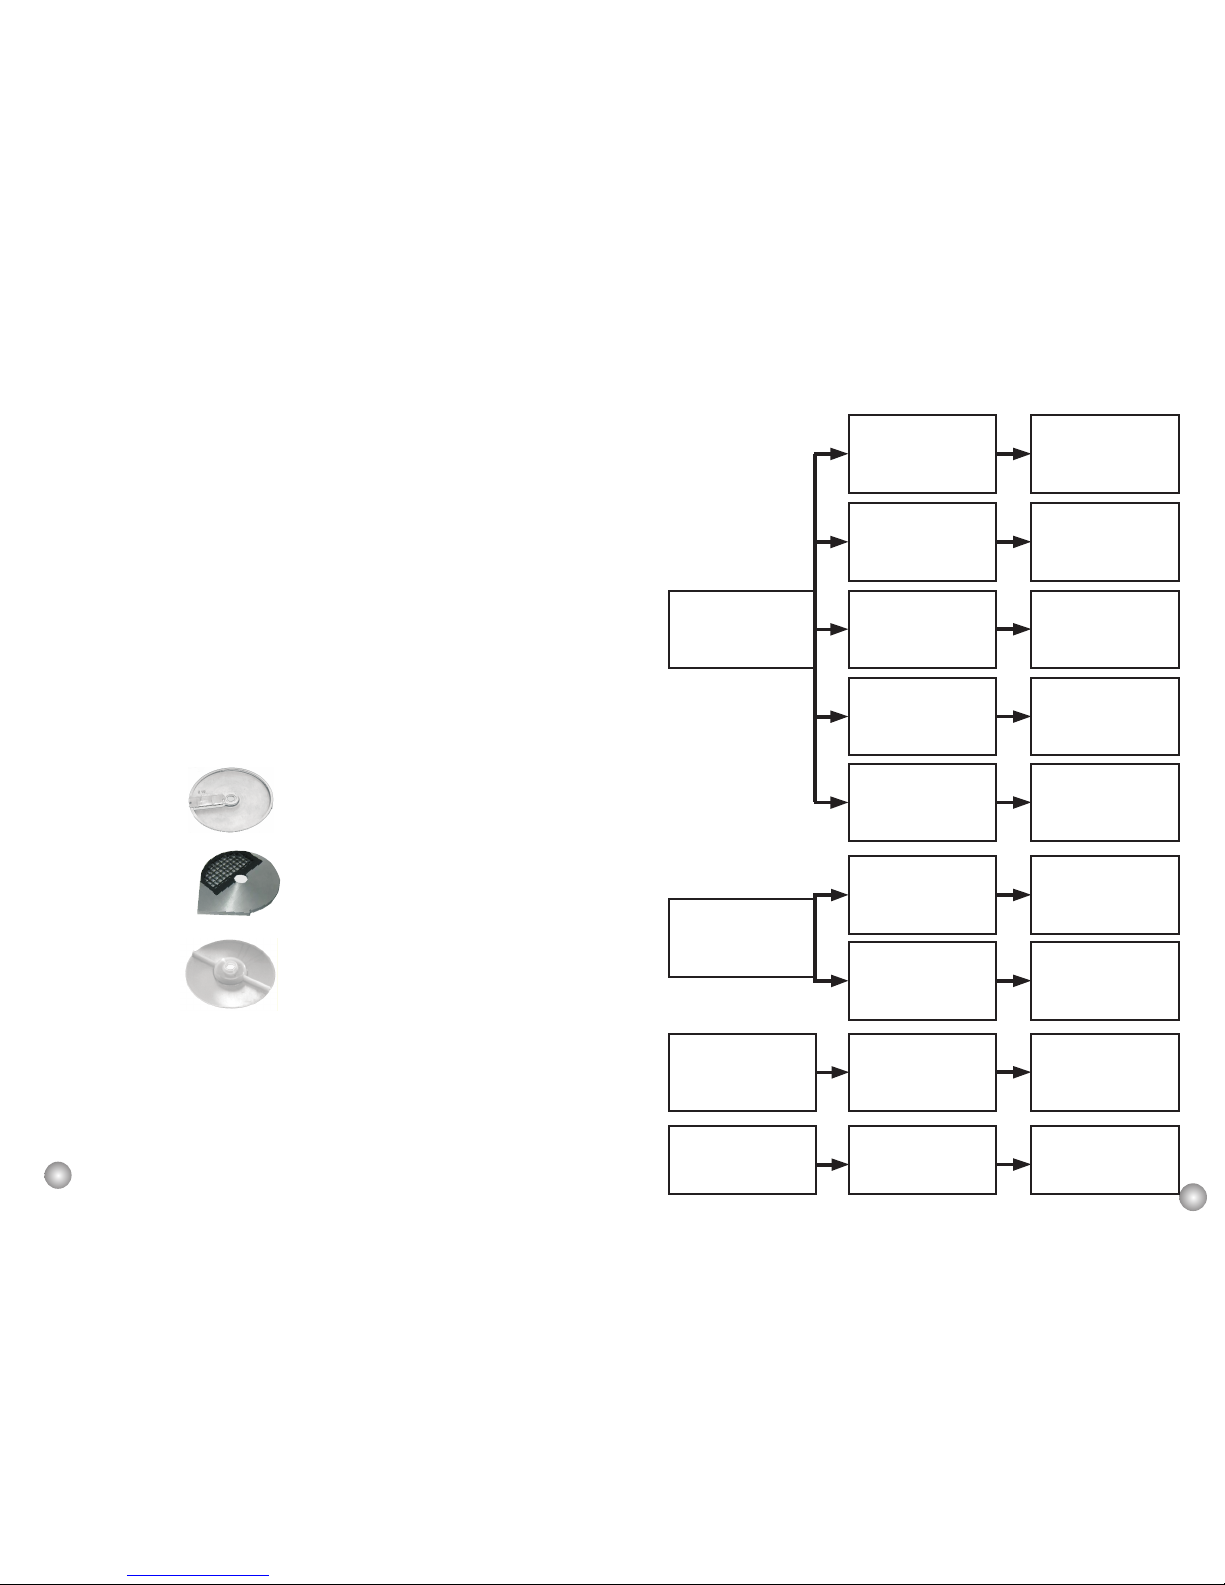
01 – Slicer Disc
02 – Dicing Grid Disc (12x12mm)
03 – Expeller Disc
04 – Shaft
05 – Grid Disc Bearer
01
02
03
03
The same way, when the machine lid is opened, the processor also stops, and
only turns back on when the lid is closed. The Food Processor model PAIE-S is a table top
equipment, capable of performing several types of cuts, such as: roundels, shreds, chips, waves,
dice, sticks and others, being able to process almost all kinds of vegetables, conserving their
nutritious properties, color and avoiding waste.
All the components of this machine were designed and manufactured using carefully
selected materials to their proper functions, according to test standards and experience of
Siemsen.
04
05
SAIDA DE PRODUTO
PROCESSADO
Picture-01
Picture-02
SKYFOOD EQUIPMENT LLC - SERVICIO
Para preguntas o asistencia, llame SKYFOOD EQUIPMENT Toll Free: 1-800-503-7534, o
visite la sección de Servicio al Cliente en www.skyfood.us.
GARANTIA LIMITADA DE SKYFOOD
Salvo especificado diferen temente nuevos productos FLEETWOOD by SKYMSEN y
SKYMSEN, accesorios excluidos, ve ndidos por SKYFOOD EQU IPMENTS, LLC
(“SKYFOOD”), para uso solamente en los Estados Unidos ( colectivamente “Produc tos” ó
singularmente “Producto”) son garantizados de estar libres de defectos en los materiales y
la mano de obra por un periodo de un (1) año desde la fecha de c ompra por el comprador
original/usuario (“Usuario Final”), ó diez ocho (18) meses a partir de la fecha de env ío
desde el a lm acén de SKYFOOD cual sea la f echa que expire primero. Varios productos
nuevos y ac cesorios pueden ser garantizados por un periodo diferente de un (1) año,
mientras o tros podrían estar sujetos a limitaciones de transporte, como especificado en
Manual de Instrucción del producto. Es necesario presentar la Prueba de Compra, caso
contrario la garantía NO SER Á APLICABLE. Ninguna garantía es dada ó implícita pa ra
usuarios secundarios o para terceras partes. Es condición fundamental de la Garantía que
SKYFOOD sea notificada de cualquier defecto en m ateriales ó mano de obra en el plazo
de cinco (5) días del ocurrido, dentro del plazo de la garantía. Si el aviso del reclamo, bajo
esta garantía, es hecho en t iempo por el usuario final, SKYFOOD ó una compañía de
servicio (“Compañía de Se rvicio”) indicada, hará el reparo o la sustitución del Producto, a
criterio de SKYFOOD, bajo las condiciones adicionales escritas abajo.
Esta garantía no se aplica si el daño ocurre de una instalación impropia ó mantenimiento
hecho por una compañía de servicio (“Compañía de Servicio”) no autorizada, tensión
eléctrica errada, ni si los productos ó partes hubieren sido usados f uera de conf ormidad
con las instrucciones de operación y mantenimiento, sujetos a mal uso ó abus o, ó
damnificados por accidentes, caus as de fuerza mayor, uso anormal, tens ión ó cualquier
otra causa que no sea de responsabilidad de SKYFOOD o afuera de su razonable co ntrol.
Esta garantía NO cubre mano de obra de servicio y despensas de viaje para
proceder ajustes en los productos o /y accesorios. Además del d esgaste y rasgue de
algunos ítems, como pero no limitado a; partes de vidrio, hojas de corte, piedras, cuchillas,
platos, cuchillas de corte, discos de corte, vedamientos, ca mbios de óleo, cinta para
vedamiento, cintas de aisla miento, gusanos, rodamientos aut o-lubrica dos, carbone s para
motores eléctricos, y otras partes desgastables por su naturaleza y q ue nec esiten ser
repuestas con f recuencia. Componentes eléctricos están suje tos a desgaste y rasgue
natural y no están cubiertos por esta garantía. ESTA GARANTÍ A ESCLUDE TODAS
GARANTÍAS VERBALES, ESTRUCTURALES, EXPRESA, Ó IMPLICITA QUE PUDIERA
SER APLICABLE A SKYFOOD, INCLUSO, PERO NO LIMITADO A, CUALQUIER
GARANTIA IMPLICITADE COMERCIALIZACIÓN Y ADAPTABILIDAD PARA
FINALIDADES PARTICULARES. Bajo ninguna circuns tancia SKYFOOD será
responsable por perdida de uso , renta o lucros cesantes o por daños incidentes ó
consecuentes. SKYFOOD en ninguna circunstancia será res ponsable por cualquier
perdida, daño, daño oculto, despensa ó atraso de mercaderías, por cualquier motivo
cuando dichas merca derías es tuvieren en custodia, posesión ó c ontrol de terceras partes
seleccionadas por SKYF OOD para despachar, tramitar, libertar, transportar ó otros
servicios relativos a estas mercaderías. El único remedio por la quiebra de cualquier
garantía se limita a lo que es expuesto arriba.

04
1.3 Technical Characteristics
1.4 Available Discs
Table - 01
Table - 02
(*) The machine motor frequency shall be only one, 50 or 60 Hz.
Characterístics
Unit
MASTER-SS
Average Production [Lb/h]
600 to 800
Voltagem [V] 110
Frequency* [Hz] 50 ou 60 (*)
Power rating [CV] 0,33
Consumption [kW/h] 0,24
Height [Inches] 20 7/8”
Width
Depth
[Inches] 10 7/16”
Net Weight
[Inches] 18 ½”
Shipping Weight
[lb] 44
[lb] 68
Name
Cutting Sizes Approximate
Code
Disc Shredder Z3 Diameter de 3 mm 09610.5
Diameter de 5 mm 09612.1
Diameter de 8 mm 09613.0
Juliene
09434.0
Juliene
12529.6
Disc Slicer E1 Thickness 1 mm 09604.0
09605.9
09606.7
39430.0
Disc Scallop Cut W2 12553.9
Disc Scallop Cut W4 09616.4
Disc Grater V X-X-X-X-X-X-X-X-X-X 09609.1
Dicing Grid Disc 8x8 mm 39326.6
39324.0
39325.8
Stick Grid Disc GP Width 10 mm 39327.4
Dish Expeller X-X-X-X-X-X-X-X-X-X 09538.9
19563.4
39431.9
Juliene
Square 2,5 mm
23017.0
Disc Shredder Z5
Disc Shredder Z8
Disc Crimping Slicer H2.5
Disc Crimping Slicer H3
Disc Crimping Slicer H7
Disc Slicer E3
Disc Slicer E5
Disc Slicer E10-S
Disc Dented Slicer Eh3
Disc Dented Slicer Eh7-S
Dicing Grid Disc 12x12 mm
Dicing Grid Disc 16x16 mm
Square 3 mm
Square 7 mm
Thickness 3 mm
Thickness 5 mm
Thickness 10 mm
Thickness 3 mm
Thickness 7 mm
Thickness 2 mm
Thickness 4 mm
Square 8 mm
Square 12 mm
Square 16 mm

05
2. Installation and Pre Operation
2.1 Installation
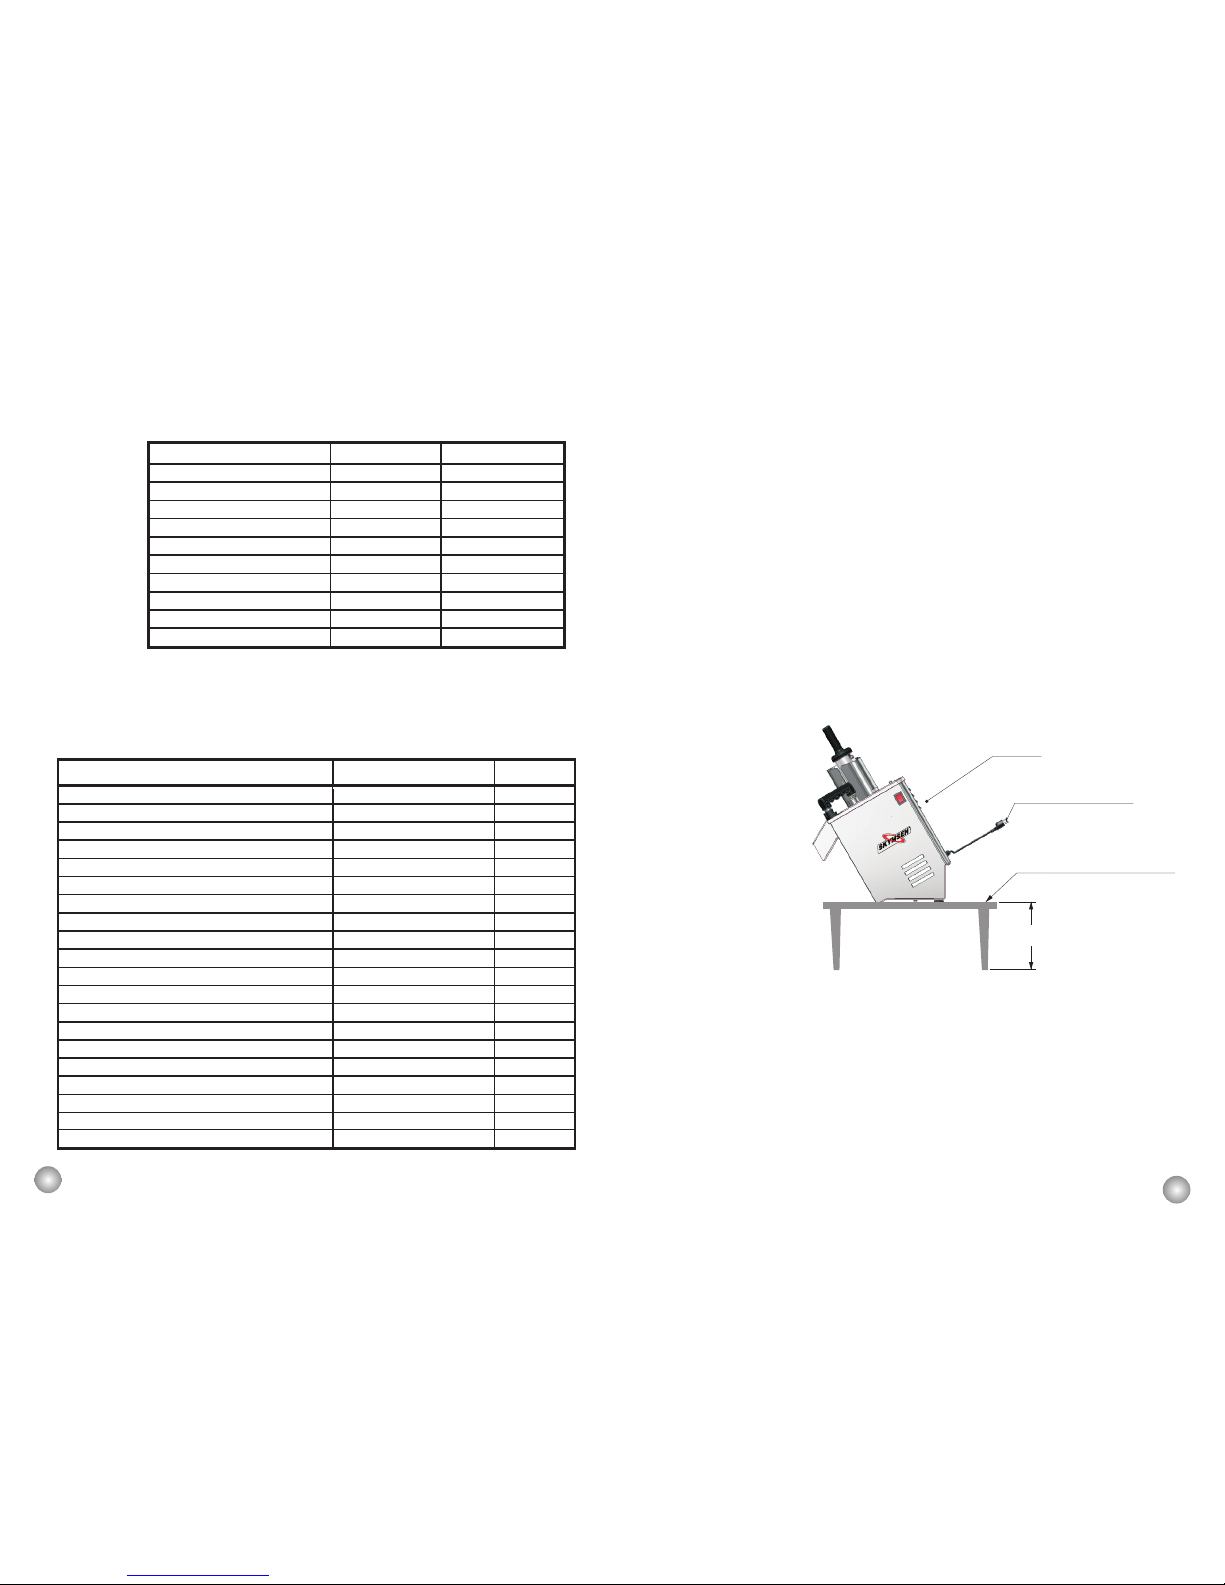
The Food Processor must be placed onto a leveled stable surface
approximately 850mm high, and with the outlet of processed products
turned to a collector recipient, in order to ease the removal of processed
food.
Make sure you are connecting the equipment to the right voltage
(110V or 220V). Check the machine voltage on the attention label,
attached to the machine power cord.
The power cord plug has 2 (two) flat pins and a round pin (ground
wire). All the 3 (three) pins must be properly connected before switching
the equipment on.
Picture - 03
2.2 Pre Operation
First check if the Food Processor is firm on its position. Before using
it, it is mandatory to wash all the discs and grid discs with hot water and
neutral soap, rinse and dry them before placing them on the machine.
2.3 Choosing the discs
As optional parts, there is a complete range of discs and grid discs,
which are used to process a wide variety of vegetables and fruit.
Power cord with ground wire
Stable working surface
Housing
Maximum Height= 850mm

06
On table – 03, Cut Selection Table, we have listed the discs and grid
discs, as well as their possible combinations, bringing also application examples.
IMPORTANT
The Cut Selection Table aims to suggest types of cuts for some products.
The final result of these cuts will depend on the kind, condition and quality
of the products to be processed.
Table - 03
Product Kind of Cut Discs
Beetroot Slices E1, E3, E5 e E10-S
Scallop Cut W2, W4
Dices
E10-S/EH7-S + DICING GRID DISC
Shreds Z3, Z5 e Z8
Juliene Shreds
H2,5, H3, H7
Carrot Slices
E1, E3, E5 , E10-S,EH7-S
Scallop Slices W2, W4
Dice
E10-S/EH7-S + DICING GRID DISC
Shreds Z3, Z5 e Z8
Juliene Shreds H3, H7, EH3, EH7
Grater V
Cabbage Strips E1, E3, E5 e E10-S
Shreds Z3, Z5 e Z8
Mushroom Slices E1, E3, E5
Dices
E10-S/EH7-S + DICING GRID DISC
Onion
E1, E3, E5, E10-S, EH7-S
E10-S/EH7-S + DICING GRID DISC
Red/ green Pepper
E1, E3, E5, E10-S, EH7-S
Radish E1, E3, e E5
Scallop Slices W2, W4
Shreds Z3, Z5 e Z8
Juliene Shreds H3, H7, EH3, EH7-S
Leaves (*) Strips EH3 , EH7-S
Potato Slices - Chip's E1, E3 e E5
Sticks
E10-S/EH7-S + STICK GRID DISC
Dices
E10-S/EH7-S + DICING GRID DISC
Shreds Z3, Z5 e Z8
Juliene Shreds
H3, H7
Scallop Slices W2, W4
Bananas E3 e E5
Oranges
E5 , E10-S e EH7-S
Apples Slices E1, E3 e E5
Papaya Dice
E10-S/EH7-S + DICING GRID DISC
Coconut Sherds Z3, Z5 e Z8
Grater V
Selecting Products Cuts Table
Slices
Slices
Slices
Dices
Slices
Slices
This product will be replaced or repaired under warranty, for a period of (1) year,
beginning from the date of purchase by the original purchaser/user (“End User”), or
eighteen (18) months from the da te of shipment from SKYFOOD’s warehouse,
whichever expires first.
Accessories will be re placed or repaired under wa rranty, for a period of (30) days,
beginning from the da te of purchase by the original purchaser/user (“End User”), or
eighteen (18) months from the date of shipment f rom SKYFOOD’s wa rehouse, whichever
expires first.
This warranty shall not take effect until a properly completed and executed WA RRANTY
REGISTRATION form has been received by SKYFOOD EQUIP MENT , LLC , within thirty
(30) days from the da te of purchase. The WARRANTY REGISTRATION is available either
in the Instruction Manual of every Product or at SKYFOOD’s website www.skyfood.us. The
End User must fill out the WARRANTY REGISTR ATI ON f orm and send it to SK YFOOD
according to the instructions p osted on the referred website. Failure to do so wi ll VOID
the warranty.
No extended warranties for third party products. There are no other express
warranties or co nditions other than the one offered by each manufacturer for
products sold by SKYFOOD, not u nder the F LEETWOOD by SKYMSEN and
SKYMSEN brand.
For questions or assistance, do not return the product or accessories to t he store, please
call Toll Free 1-800-503-7534, or visit the Customer Service s ection at ww w.skyfood.us.
For faster service please have th e items name , serial number, and proof of purchase for
the operator to assist you.
SKYFOOD reserves the right to change the terms of its limited warranty at any time
without any prior noti ce. It also reserves the right to change the design and
specifications of its equipment or any related documentation at any ti me. The end
user is not entitled to upgrades or refunds resulting from these changes.
Updates
These Terms and Conditions were last updated on January 14th, 2014.

07
PICTURE - 04
Expeller Disc
The leaves , after properly sanitized, must be overlapped and tightly rolled up with
a diameter suitable to enter inside the round feeding throat, and then using the round
pusher press the leaves roll until to have contact with the slicing disc. The leaves roll
extremities should be cut to obtain a nicer resulting product .
IMPORTANT
The Expeller Disc must always be used, it does not matter the disc
or grid disc in use.
The expeller disc helps unloading the processed products, pushing
them out through the disc chamber outlet.
2.4 Choosing the feeding throat
IMPORTANT
Never use your hands or any other object to push the product to be
processed into the feeding throats. Always do it by using Pusher
Lever or the Round Pusher Nº. 02 (Pic.01).
- To insert the product to be processed, use the appropriate feeding throat and
respective pusher.
- The lever must be firmly pressed, otherwise the product being processed may
move inside the feeding throat, providing irregular cuts.
- The Processor model MASTER-SS is a machine that works in high speed,
therefore its feeding must be equally fast.
- When processing smaller products such as carrots, you can have more uniform
cuts by using the Round Feeding Throat Nº. 01 (Picture – 05).
- When you use only 1 (one) disc, or when combining it with a grid disc to prepare a
combination of fruit or vegetables, always start with the most tender one and finish
with the hardest one.
- When using the grater disc V, it is possible change the final thickness of the
processed product. If you press pusher slightly, you will have thinner grated
products. When you push it harder, you will have thicker grated products.
SKYFOOD EQUIPMENT LLC - SERVICE
For questions o r assistance, call SKYFOOD EQUIPMENT Toll Free : 1-800-503-7534, or
visit the Customer Service section at www.skyfood.us.
SKYFOOD’S LIMITED WARRANTY
Unless ot herwise specified, new FLEETW OOD by SKYMSEN and SKYMSEN products,
excluding accessories, s old by SKYFOOD EQUIPMENT, LLC . (“SKYFOOD”), for us e only
in the continental United States (collectively, “Products” or singularly, “Product”), are
warranted to be free from defects in materials an d workmanship for a period of one (1)
year from t he date of purc hase by the original purchaser/user (“End User”), or eighteen
(18) months f rom the date of shipment from SKYFOOD’s warehouse, whichever expires
first. Several new products and ac cessories may be warr anted f or a p eriod other than o ne
(1) year while others may be subject to travel li mit ations, as specified on the product s
Instruction Manual. Proof of purchase must be presented; if not this wa rranty wi ll be
VOID. No w arranty is given or implied to a subsequent transferee or any other third party.
This warranty is expressly conditional up on SKYFOOD being not ified of any defects in
materials or workmanship within five (5) days of its occurrence, wi thin the warranted time
period. If a n otice of a claim under this warranty is timely made by the End User,
SKYFOOD or a SK YF OOD’s designated service company (“Service Company”), will repair
or replace the Product, at SKYFOOD’s discretion, subject to the additional conditions
hereinafter described.
This warranty shall not apply if damage occurs from improper installation or maintenance
performed b y an unauthorized service company (“Service Company”), wrong volt age, nor
to the extent that Products or parts have been us ed other than in conformance with
operating and maintenance instructions, subjected to misuse or a bus e or damaged by
accident, acts of God, abnormal use, stress or any other matter unrelate d to SKYFOOD,
and beyond it s reasonable control. This warranty does NOT cover service l abor and
travel to perform adjustments on products and/or accessories. In addition to wear and
tear of certain items, such as, but not limited to; glass parts, blades, stones, chopper
cutting knives, plates, slicing knives, cutting dis c, gaskets, oil c hanges, sealing tape, heat
seal wires, worm gears, s elf-lubricating bushings, carbon brushes for electric m otors, a nd
other parts expendable by nature and that need to be replaced frequently. Electrical
components are subject to na tural wear and tear, and are NOT covered by this
warranty. THIS WARRANTY EXCLUDES ALL ORAL, STATUTORY, EXPRESS OR
IMPLIED WARRANTIES WHICH MAY BE APPLICABLE TO SKYFOOD, INCLUDING,
BUT NOT LIMITED TO, ANY IMPLIED WARRANTY OF MERCHANTABILITY AND
FITNESS FOR PARTICULAR PURPOSE. U nder no c ircumstances shall SKYFOOD be
liable for loss of us e, revenue or profit or for incidental or consequential damages.
SKYFOOD shall un der no c ircumstances be liable for any loss, damage, concealed
damage, expense or d ela y of goods for any reason when said goods are in the custody,
possession or control of third parties selected by SKYFOOD to forward, enter, clear,
transport, or render other s ervices with respect to such goods. The sole and exclusive
remedy for breac h of any w arranty is limited to t he remedies provided in the paragra ph
above.
All products held at non-commercial facilities or domiciles, must be taken or shipped,
shipping charges prepaid, either to SKYFOOD's facilit y or a SKYFOOD's designated
service company ("Service Company"). Products held at commercial facilities and weighing

08
Picture - 05
02
01
01- Round Feeding Throat
02- Oblong Feeding Throat
3. Operation
3.1 Starting
IMPORTANT
Always turn the machine off when you want to change the discs.
Wait until the disc has come to a complete stop before opening the disc
chamber lid.
Make sure that the disc chamber lid is closed and properly locked.
To turn the machine on, use the ON/OFF switch located on the right side of the
equipment.
The Food Processor model MASTER-SS brings two safety devices:
One of them prevents the machine from working while the disc chamber lid is
opened, this way providing more safety to the user. However, do not use it to switch
the machine OFF and ON. When the lid is closed, the machine switches on
automatically.
The other safety device is activated when the feeding bar is lifted, switching the
machine off and on again when the bar is lowed down.
3.2 Using a single disc
IMPORTANT
Always use the plastic expeller disc, it doesn't matter which cut disc is in
use. Before opening the disc chamber lid, make sure the disc has come to
a complete stop.
47
5.3 Diagrama Eléctrico Mod. PAIE-S
110 y 220 Volts
M
CONTACTOR
Llave
Sensor Magnético
Llave Prende/Desliga
F
N
6. CONSEJOS GENERALES
- Do not wear loose fitting clothes while operating the unit. Do not use bracelets or any other
piece of jewelry. Have your hair always shortened and held up (use hair fishnets if necessary)
in a way it cannot reach any part of the machine. Roll up any loose sleeves.
- SKYMSEN is not responsible for any harm or injury caused by the negligent or
inappropriate use of this equipment by any operator. This equipment must be operated only
by persons whose age equals or exceeds 18 years old, in a safe and sound state of mind, free
from the influence of any kind of drugs and alcohol, that received proper training and
instructions regarding the correct operation of this machine, that are wearing correct and
authorized safety clothes. All and any kind of modifications carried on and applied to this
machine immediately nullifies any kind of warranty and may result in harm and injuries to
the individuals operating this machine and to individuals that are located in the machine
surrounding areas while it is being operated.
- Under no circunstances place your hands in the moving parts of the machine while it is
being used. Make sure the machine has come to a complete stop before acessing the
processed ingredients.

All the discs must easily fit to the traction shaft. For such,
simply rotate the disc upon the shaft.
Any contact between the disc and the disc chamber lid indicates
inappropriate positioning of disc.
Find below the instructions for placement and removal of discs:
3.2.1. With the machine switched off and the disc totally still, turn
the Lid Lock Nº.1 (Pic.06) and open the disc chamber lid. Be careful with
the pusher staff, because it must be loosen slowly.
09
Picture - 06
3.2.2. Attach the expeller disc making sure it fits to the shaft facets
properly.
3.2.3. Carefully place the chosen cut disc by slightly rotating it anti-
clockwise upon the shaft until it is perfectly locked.
3.2.4. Close the disc chamber lid and make sure it is locked.
3.2.5. To remove the disc, proceed with the above instructions
inversely.
The placement and removal of discs must be made according to
Picture – 07.
01
46
5.2.3 Remoción del Cuerpo de la Maquina
a) Saque la tapa del Compartimiento de los Discos , bien como los
discos que estuviesen montados en la máquina, para eso, siga las
instrucciones descriptas en el ítem 3.4.1 de este manual.
b) Coloque la maquina con los pies volteados hacia arriba . A seguir,
saque los cuatro pies de la maquina, soltándolos manualmente.
Sáquelos juntamente con la chapa de protección del Cuerpo de la
Maquina
c) Con el auxilio de un destornillador “L” No. 10 , retire totalmente los
3 tornillos que fijan el cuerpo de la maquina .
d) Retire el Cuerpo de la Maquina
5.2.4 Correas de transmisión
Para el buen funcionamiento de la maquina y durabilidad de la correa, ella
debe siempre estar ajustada. Si estuviera suelta, la correa irá patinar
(trabajar en falso) durante la operación . Se debe cuidar para no exagerar
la tensión, pues si eso ocurrir habrá desgaste de los rodamientos.
Para ajustar las correas ,después de remover el cuerpo de la maquina
con el auxilio de llaves fijas de 13 y 10 mm, suelte los dos tornillos que fijan
el motor (A) enseguida con el auxilio de un destornillador grande, haga
presión sobre el motor en el sentido de estirar las correas, y después
vuelva a apretar los tornillos .
5.2.5 Sensores de Seguridad
Para ajustar el dispositivo de seguridad da la asta con el empujador, use
una llave fija de 13mm, suelte la tuerca M 8 , luego ajuste el rollo
accionador de la llave de protección hasta que ella sea accionada ........

10
Picture - 07
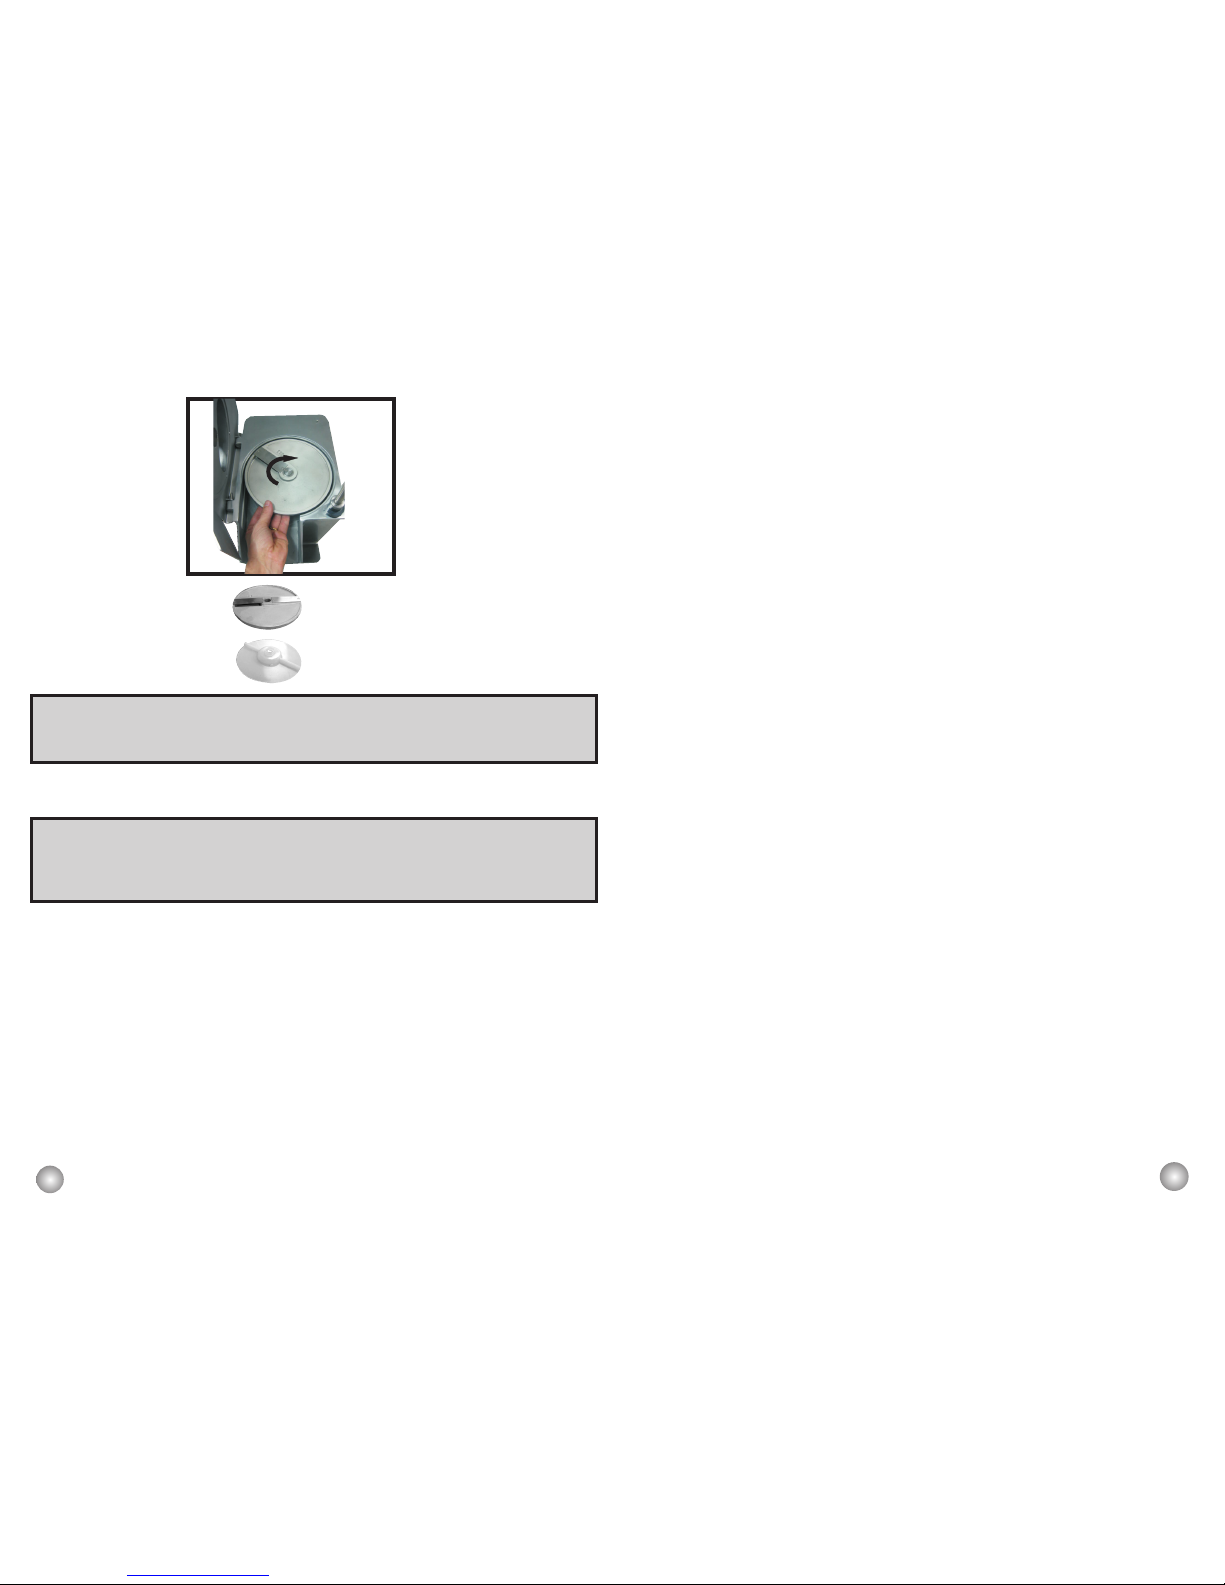
Expeller Disc
Slicer Disc E5
IMPORTANT
The Serrated Slicer Discs EH3 and EH7 are indicated to cut
products with skin and leaves, ex: tomatoes, lettuce, etc.
3.3 Using a disc and a grid disc
IMPORTANT
Always use the plastic expeller disc, it doesn't matter which cut
disc is in use. Before opening the disc chamber lid, make sure the
disc has come to a complete stop.
The grid disc must be placed between the expeller disc and the
disc, which must be totally clean for a perfect attachment.
The grid discs must be used only with slicer discs “E10-S and
EH7-S”.
Find below the instructions for placement and removal of discs and
grid discs:
3.3.1. With the machine switched off and the disc totally still, turn the
Lid Lock Nº.1 (Pic.06) and open the disc chamber lid. Be careful with the
pusher staff, because it must be loosen slowly.
45
Problemas
Causas Soluciones
* .Ruidos raros
* D is c os c o lo c ad o s
incorrectamente.
* Colocar correctamente los
discos.
* Local de apoyo del Disco
corte Reja o Bastones está
sucio.
* Limpiar la cámara de los
discos y recolocar los
discos.
* Fallo en los rodamientos.
* Llam e e l S ervic io
técnico.
5.2 Ajustes y Sustituciones de Componentes
5.2.1 Filo de las cuchillas de los discos
Las cuchillas son amovibles, así que puede darles filo fácilmente, sin
embargo, es necesario especial atención para que sea mantenido o respetado el
ángulo de corte. Las cuchillas de las rejas de los Discos Corte Cubo y Corte
Palillo, deben ser afilados usando una lija fina o piedra de afilar.
5.2.2 Ajuste de la tensión de las Rejas del Disco Corte Bastones
Cuando la maquina empieza a producir bastones irregulares, las laminas
de las rejas del disco Corte Bastones, deben ser tensionadas. Para eso, use un
destornillador para soltar parcialmente los dos tornillos ubicados en la parte de
abajo de la reja de las cuchillas. En seguida apriete los dos tornillos que se
encuentran en la parte frontal del disco hasta que la reja Bastines esté en tensión .
Finalmente , apriete otra vez los dos tornillos que habian sido sueltos
inicialmente .
11
Picture - 08
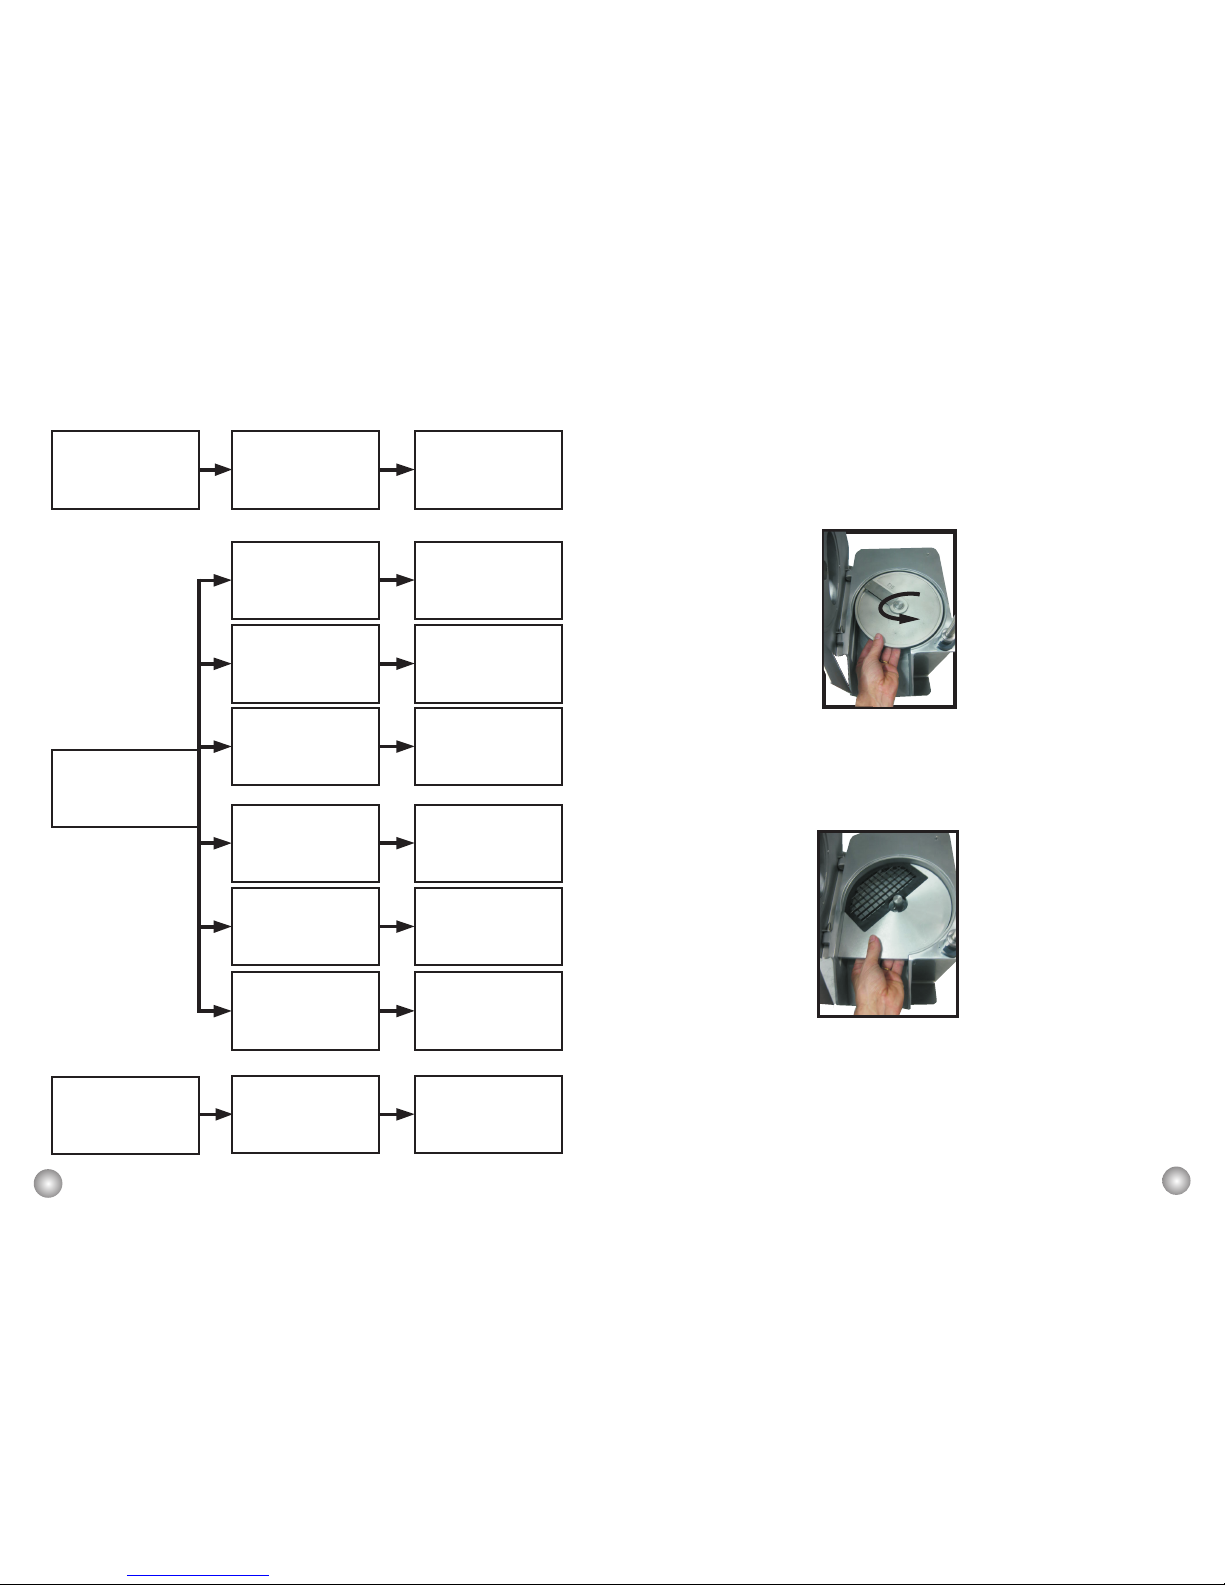
3.3.2. Attach the expeller disc making sure it fits to the shaft facets
properly.
3.3.3. After selecting the grid disc to be used, place it in a way that
the grid itself remains on the left side of the machine. Then push it through
the cavity on the disc chamber.
3.3.4. Carefully place the chosen cut disc by slightly rotating it anticlockwise upon the shaft until it is perfectly locked.
3.3.5. Close the disc chamber lid and make sure it is locked.
3.3.6. To remove the disc, proceed with the above instructions
inversely.
The placement and removal of discs must be made according to
Picture – 08 and 09.
Slicer Disc E10
Dicing Grid Disc
Expeller Disc
44
Problemas Causas Soluciones
* La maquina no prende.
* La maquina está desligada
de la toma de corriente
eléctrica.
*
Verifique si el enchufe está en
la toma de la corriente.
* El sensor de reed swicht de
la tapa (sistema de seguridad)
no está funcionando.
* Llame al Servicio Técnico.
* Llame al Servicio Técnico.
* La tapa de la maquina está
abierta.
* .Cierre la tapa.
*
El sensor (sistema de
seguridad) de la asta del
e m puj ad o r n o e s tá
funcionando.
* .Haga el reglaje del dispositivo de
seguridad de la asta co n el
empujador y controle los contactos
eléctricos , como indicado en el
ítem 5.2.5
* Fallo en la contactora
* Olor a quemado y/o humo
* Problema en el sistema
eléctrico
* Llame al Servicio Técnico.
* Llame al Servicio Técnico.
* Problema en el motor
eléctrico.
* La maquina prende, pero
tarda en comenzar a girar el
disco.
* Fallo en el capacitor de
partida del motor eléctrico
* .Ajuste la tensión de las
correas como indicado en el
ítem 5.2.4
* C a b l e e l é c t r i c o
damnificado.
* Fallo en el transporte del
producto.
* Llame al Servicio Técnico.

3.4 Cleaning
IMPORTANT
Always turn the machine off and disconnect it from the power socket when you
want to clean it. Wait until the disc has come to a complete stop before opening
the disc chamber lid.
Before cleaning the machine, always unplug it from the power point.
All removable parts must be removed and cleaned.
Follow the below instructions for removing removable parts:
3.4.1. With the machine OFF and the disc totally still, turn the Lid Lock Nº.01
(Pic.06) and open the disc chamber lid. Be careful with the pusher staff, because it must be
loosen slowly.
12
Picture - 09
Dicing Grid Disc
43
Problemas Causas Soluciones
* El alimento cortado queda
preso en el interior de la
maquina
* Fa ltó colocar el disco
Expulsor.
* Coloque el disco Expulsor
como indicado en los ítems
3.2 y 3.3.
* El disco para (no gira)
durante la operación
*.Falta de corriente
eléctrica.
* Verifique si el enchufe
está en la toma de la
corriente.
Verifique si hay corriente
eléctrica.
* Las correas del motor están
resbalando.
*.Ajustar la tensión de las
correas, conforme indicado
en el ítem 5.2.5
* El dispositivo de seguridad
de la asta con el empujador
está sin ajuste o con fallo,
mal contacto.
* .Hac er el r eg la je del
dispositivo de seguridad de la
asta con el empujador y
ve rifiq ue lo s c ont actos
eléctricos, conforme indicado
en el ítem 5.2
* El dispositivo de seguridad
de la tapa de la maquina está
con fallo, mal contacto
* Llame al servicio Técnico.
* Mal contacto de la Llave
Prende/Desliga.
* Verifique las conexiones
el éc tr ic as de la l la ve
Liga/Desliga.
* Mal contacto en el enchufe o
su cable de conexión.
* Verifique si el cable de
Conexión no está partido o
roto, así como las fichas
(clavillas) del enchufe.
* La maquina no prende.
* Falta de corriente eléctrica.
* Verifique si hay corriente
eléctrica.

13
3.4.2. Being careful with the blades, hold the disc
turning it anti-clockwise and pulling it up. This way disc will be
removed.
Picture – 10
3.4.3. Hold the lower left side of the grid disc and pull it upwards,
always being careful with the sharp blades.
Picture – 11
Dicing Grid Disc
3.4.4. Remove the disc chamber lid by sliding it backwards until it gets
loose from its place.
42
4.6 Mantenimiento
4.6.1 Peligros
Con la máquina prendida o hasta mismo apagada pero todavía conectada en
la toma de corriente, cualquier operación de mantenimiento es peligroso.
DESLÍGUELA FISICAMENTE DE LA CORRIENTE ELÉCTRICA DURANTE
TODA LA OPERACIÓN DE MANTENIMIENTO.
IMPORTANTE
Siempre retire el enchufe de la toma de corriente eléctrica en cualquier
situación de emergencia.
4.6.2 Avisos
El mantenimiento eléctrico o mecánico, debe ser hecho por personas
calificadas para realizar el trabajo.
La persona encargada por el mantenimiento, debe estar seguro de que la
maquina trabaja bajo condiciones TOTALES DE SEGURIDAD.
5.1 Problemas, Causas y Soluciones
El procesador de Alimentos, Modelo PAIE-S, fue proyectado para necesitar
de mínimo mantenimiento, no obstante, pueden ocurrir algunas irregularidades en
su funcionamiento, debido al desgaste natural, causado por el uso del equipamiento.
Si tuviera algún problema, pedimos antes de cualquier cosa, verificar la
Tabla – 04 a seguir, donde están descritas algunas posibles soluciones
recomendadas.
Problemas Causas Soluciones
Corte Irregular
* El disco utilizado o la forma
de alimentación no están de
acuerdo con las orientaciones
del Capítulo-2.
* .Las cuchillas perdieron el
filo de corte.
* Consulte el Capitulo – 2 de
éste Manual, asegurándose de
que la maquina está siendo
utilizada de la forma correcta.
* Dar filo a las cuchillas o
regular la tensión de las rejas
de corte cubo o bastones,
según está descripto en el
ítem 5.2 de este Manual.
Tabela - 04

14
Picture - 12
3.4.5. Wash all removable parts with hot water and neutral soap,
rinse and dry them afterwards.
3.4.6. Never make use of any objects, such as knifes, forks or
others, to remove pieces of food stuck to the grid discs. Use a potato or a
carrot for such end.
4. General Safety Practices
The following safety instructions are addressed to both the operator of the
machine as well as the person in charge of maintenance. The machine has to be
delivered only in perfect conditions of use by the Distributor to the user. The user shall
operate the machine only after being well acquainted with the safety procedures
described in the present manual. READ THIS MANUAL WITH ATTENTION.
4.1 Basic Operation Practices
4.1.1 Dangerous parts
Some areas of the electric device have parts that are connected or have parts
connected to high voltage. These parts when touched may cause severe electrical
shocks or even be fatal.
Never touch manual commands such as switches, buttons, keys and knobs with
your hands wearing wet clothes and/or wet shoes. By not following these instructions
operator could be exposed to severe electrical shocks or even to a fatal situation.
IMPORTANT
If any item from the GENERAL SAFETY NOTIONS section is not
applicable to your product, please disregard it.
41
4.3.2 Cuidados
Cuando hay ruidos no usuales, verifique el motor, la(s) correa(s),
cadenas, engranaje(s) y partes deslizables de la maquina y girantes de la
máquina.
Verifique la tensión de las correas, cadenas y el estado de los engranajes,
sustituyendo la pieza o conjunto que estas partes presenten desgaste.
Al verificar la tensión de las correas y cadenas, NO coloque los dedos
entre estas partes y tampoco en el(los) engranaje(s).
Verifique las protecciones y los dispositivos de seguridad para que
siempre funcionen adecuadamente.
4.4 Operación
4.4.1 Avisos
No trabaje con cabellos largos que puedan tocar cualquier parte de la
maquina, pues podría causar accidente graves. Recójalos hacia arriba y hacia
atrás, o cúbralos con un pañuelo.
S olamente los operadores entrenados y calificados pueden operar la
máquina. JAMÁS opere la máquina sin los componentes de seguridad.
4.5 Al término del trabajo
4.5.1 Cuidados
Mantenga limpia la maquina, pero antes, esté seguro que la misma ESTÉ
DESCONECTADA DE LA TOMA DE CORRIENTE ELÉCTRICA.
NUNCA inicie la limpieza de la maquina ANTES de su parada total.
Recoloque todos los componentes de la maquina en su debido local, antes
de prender la maquina.
Verifique los niveles de fluidos: aceite, grasas.
Al verificar la tensión de las correas y cadenas, NO coloque los dedos
entre estas partes y tampoco en el(los) engranaje(s).

15
4.1.2 Warnings
The operator has to be well familiar with the position of ON/OFF Switch to
make sure the Switch is easy to be used when necessary. Before any kind of
maintenance, physically remove the plug from its socket .
Provide space for a comfortable operation thus avoiding accidents.
Water or oil spilled on the floor will turn it slippery and dangerous. Make sure the floor
is clean and dry.
Before to give any manual command (switch, buttons, turn keys or lever) be
sure the command is the correct one . Check this manual for further details if
necessary.
Never use a manual command ( switch , buttons , lever ) unadvisedly.
If any work is to be made by two or more persons, coordination signs will have
to be given for each operation step . Every step of the operation shall be taken only if
a sign has been made and responded.
4.1.3 Advices
In case of power shortage, immediately turn the machine OFF.
Use recommended or equivalent lubricants, oils or greases .
Avoid mechanical shocks as they may cause failures or malfunction.
Avoid penetration of water, dirt or dust into mechanical or electrical
components of the machine.
DO NOT MODIFY original characteristics of the machine.
DO NOT REMOVE, TEAR OFF OR MACULATE any safety or identification
labels . If any labels has been removed or is no longer legible contact your nearest
dealer for replacement.
40
4.2 Cuidados y Observaciones Antes de Prender la Maquina .
IMPORTANTE:
Lea con atención y cuidado las INSTRUCCIONES contenidas en este
Manual, antes de prender la maquina. Esté seguro de que entendió
correctamente todas las informaciones. En caso de duda, consulte su
superior o el Vendedor.
4.1.1 Peligro
Cables o hilos eléctricos con aislamiento dañado, pueden provocar choques
eléctricos. Antes de usarlos verifique sus condiciones.
4.1.2 Avisos
Esté seguro que las INSTRUCCIONES contenidas en este Manual, estén
completamente comprendidas. Cada función o procedimiento de operación y de
mantenimiento debe estar perfectamente aclarado.
El accionamiento de un comando manual (botón, llave eléctrica, palanca, etc )
debe ser hecho siempre después que se tenga la certitud de que es el comando
correcto .
4.1.3 Cuidados
El cable de alimentación de energía eléctrica de la maquina, debe tener una
sección suficiente para soportar la potencia eléctrica consumida.
Cables eléctricos que estuvieran en el suelo cerca de la maquina, deben ser
protegidos para evitar corto circuitos.
4.3 Inspección de Rutina
4.2.1 Aviso
Al averiguar la tensión de las correas o de las cadenas, NO coloque los dedos entre
las correas y las poleas, ni entre las cadenas y sus engranajes .

16
IMPORTANT
Carefully read ALL INSTRUCTIONS of this manual before turning the machine ON.
Be sure to be familiar with the set and that you have well understood all
information contained in this manual. If you have any question contact your
supervisor or your nearest Dealer.
4.2.1 Danger
An electric cable or electric wire with damaged insulation could cause electrical
shocks as well as electrical leak. Before use check conditions of all wires and cables.
4.2.2 Advices
Be sure ALL INSTRUCTIONS in this manual have been thoroughly understood.
Every function and operational procedure have to be very clear to the operator.
Any manual command ( switch, button or lever ) shall be given only after to be
sure it is the correct one .
4.2.3 Precautions
The electric cable has to be compatible with the power required by the machine,
Cables touching the floor or close to the machine need to be protected against short
circuits.
Oil reservoirs if any have to be full up to the required level as indicated. Check
level and add oil if necessary.
4.3 Routine Inspection
4.3.1 Advice
When checking the tension of the belts or chains, DO NOT introduce your
fingers between the belts , the chains, nor the gears.
4.2 Safety Procedures and Notes Before Turning Machine ON
39
4.1.2Advertencias
El local de la llave prende/apaga debe ser bien conocido, para que sea
posible accionarla a cualquier momento sin la necesidad de procurarla.
Antes de cualquier manutención desconecte la máquina de la red eléctrica.
Proporcione espacio suficiente para evitar caídas peligrosas.
Agua o aceite podrán hacer resbaloso y peligroso el piso. Para evitar
accidentes, el piso debe estar seco y limpio.
Antes de accionar cualquier comando manual (botones, llaves eléctricas,
palancas, etc.) verifique siempre si el comando es el correcto, o en caso de dudas,
consulte este Manual .
Nunca toque ni accione un comando manual (botones, llaves eléctricas,
palancas etc.) por acaso.
Si un trabajo debe ser hecho por dos o más personas, señales de
coordinación deben ser dados antes de cada operación. La operación siguiente no
debe ser comenzada sin que la respectiva señal sea dada y respondida.
4.1.3Avisos
En el caso de falta de energía eléctrica, desligue inmediatamente la llave
prende / apaga.
Use solamente óleos lubrificantes o grasas recomendadas o equivalentes.
Evite choques mecánicos, ellos pueden causar fallas o malo
funcionamiento.
Evite que agua, suciedad o polvo entren en los componentes mecánicos y
eléctricos de la maquina.
NO ALTERE las características originales de la maquina.
NO SUCIE, RASGUE O RETIRE CUALQUIER ETIQUETA DE
SEGURIDAD O DE IDENTIFICACIÓN. Caso alguna esté ilegible o fuera
perdida, solicite otra al Asistente Técnico más cercano.
LEA ATENTAMENTE Y CON CUIDADO LAS ETIQUETAS DE
SEGURIDAD Y DE IDENTIFICACIÓN CONTENIDAS EN LA MAQUINA,
ASÍ COMO LAS INSTRUCCIONES Y LAS TABLAS TÉCNICAS
CONTENIDAS EN ESTE MANUAL..

17
4.3.2 Precautions
Check if motors, belts, chains or gears and the turning or sliding parts of the
machine produce abnormal noises .
Check the tension of the belts and chains and replace the set when belt,
chain or gears show signs of being worn out.
When checking tensions of belts or chain DO NOT introduce your fingers
between belts and pulleys , nor between the chains and gears.
Check protections and safety devices to make sure they are working properly.
4.4 Operation
4.4.1 Advices
Be sure your hair is not loose in order to avoid getting caught by turning parts
which could lead to a serious accident. Tie your hair up well and/or cover your head
with a scarf.
The operation performed by not trained or skilled personnel shall be
forbidden.
Never touch turning parts with your hands or in any other way.
NEVER operate machine without all original safety devices under perfect
conditions.
4.5 After Finishing The Work
4.5.1 Precautions
Always TURN THE MACHINE OFF by removing the plug from the socket
before cleaning the machine. Never clean the machine unless it has come to a
complete stop. Put all components back to their functional positions before turning it
ON again. Check level of oil, if any . DO NOT place your fingers in between belts
and pulleys nor chains and gears.
38
4 Nociones Generales de Seguridad
Las Nociones Generales de Seguridad fueran preparadas para orientar y
instruir adecuadamente a los operadores de las maquinas, así como aquellos que
serán responsables por su mantenimiento.
La maquina solamente debe ser entregue al operador en buenas
condiciones de uso, al que el operador debe ser orientado cuanto al uso y a la
seguridad de la maquina por el Vendedor. El operador solamente debe usar la
maquina con el conocimiento completo de los cuidados que deben ser tomados,
luego de LEER ATENTAMENTE TODO ESTE MANUAL.
4.1 Practicas Básicas de Operación
4.1.1 Peligros
Algunas partes del accionamiento eléctrico presentan pontos o
terminales con altos voltajes. Cuando tocados pueden ocasionar graves choques
eléctricos, o hasta la muerte de una persona.
Nunca toque un comando manual ( botón, llave eléctrica, palancas etc. )
con las manos, zapatos o ropas mojadas, no obedecer esta recomendación,
también podrá provocar choques eléctricos, o hasta la muerte de una persona.
IMPORTANTE
En el caso de algun item de las NOCIONES GENERALES DE SEGURIDAD no
ser aplicable en su producto, por favor desconsiderar el mismo.
Visto que generalmente poseen CLORO en su composición, tales sustancias atacan el acero
inoxidable, causando puntos de corrosión.
Mismo los detergentes utilizados en la limpieza doméstica, no deben permanecer en
contacto con el acero inoxidable más de lo necesario, debiendo ser también removidos con agua y la
superficie deberá ser completamente seca.
Uso de abrasivos:
Esponjas o estropajos de acero y cepillos de acero en general, además de rallar la superficie
y comprometer la protección del acero inoxidable, dejan partículas que oxidan y reaccionan,
contaminando el acero inoxidable. Por eso, tales productos no deben ser usados en la limpieza e
higienización. Raspados hechos con instrumentos puntiagudos o similares también deberán ser
evitados.
Principales sustancias que causan la corrosión de los aceros inoxidables:
Polvos, engrases y soluciones ácidas como el vinagre, sucos de frutas u otros ácidos, soluciones
salinas (salmuera), sangre, detergentes (excepto los neutros), partículas de aceros, residuos de
esponjas o estropajos de acero común, además de otros tipos de abrasivos.

18
Problems Causes Solutions
Irregular Cut
* The disc in user or the way
to feed the machine is not in
accordance to the instructions
chapter-2
*
.
The blad es have lost
sharpness
* Refer to chapter-2 of this
guide and make sure the
equipment is being used
appropriately.
*
.
Sharpen blades or set the
tension of stick grid disc, as
described on item 5.2 of this
guide.
Table - 04
4.6 Maintenance
4.6.1 Danger
Any maintenance with the machine in working situation is dangerous. TURN IT
OFF BY PULLING THE PLUG OFF THE SOCKET DURING MAINTENANCE.
IMPORTANT
Pull the plug off its socket when any emergency arises .
4.6.2 Advice
Electrical or mechanical maintenance has to be undertaken by qualified
personal. Person in charge has to be sure that the machine is under TOTAL SAFETY
conditions when working .
5 Analysis and Problems Solving
5.1 Problem, causes and solutions
The Food Processor model PAIE-S was designed to operate with
the need of minimum maintenance, but the natural wearing caused by
longer use of the equipment may occasionally cause some malfunctions.
If such problem occurs with your Food Processor, refer to Table 04 in
which the most common situations are listed with recommended solutions.
* Service life – 2 years for regular work shift
37
Figura - 12
3.4.5 Lave todas las partes con agua y jabón, enjuague y séquelas.
3.4.6 Nunca use objetos duros como: cuchillos, tenedores y otros para limpiar
pedazos de alimentos presos a las rejas o cuchillas de todos los modelos de discos.
Utilice una papa o zanahoria para hacer esta remoción o limpieza.
3.4.7 Cuidados con los aceros inoxidables
Los aceros inoxidables pueden presentar puntos de “herrumbre”, que SIEMPRE SON
PROVOCADOS POR AGENTES EXTERNOS, principalmente cuando el cuidado con la limpieza
o higienización no sea constante y adecuado.
La resistencia a la corrosión del acero inoxidable se debe principalmente a la presencia del
cromo que, en contacto con el oxígeno, permite la formación de una finísima camada protectora.
Esta camada protectora se forma sobre toda la superficie del acero, bloqueando la acción de los
agentes externos que provocan la corrosión.
Cuando la camada protectora sufre un rompimiento, el proceso de corrosión es iniciado,
pudiendo ser evitado a través de una limpieza constante y adecuada.
Inmediatamente después de la utilización del equipamiento, es necesario proceder con la
limpieza, utilizando agua, jabón o detergentes neutros, aplicados con un paño suave o esponja de
nylon. A seguir, solamente con agua corriente, se debe enjuagar e, inmediatamente secar, con un
paño suave, evitando la permanencia de humidad en las superficies y principalmente en las grietas.
El enjuague y el secado son extremamente importantes para evitar el aparecimiento de
manchas o corrosiones.
IMPORTANTE
Soluciones ácidas, soluciones salinas, desinfectantes y determinadas soluciones
esterilizantes (hipocloritos, sales de amoníaco tetravalente, compuestos de iodo, acido
nítrico y otros), deben ser EVITADAS por no poder permanecer mucho tiempo en contacto
con el acero inoxidable:
19
Problems Causes Solutions
* The processed product gets
stuck inside the machine.
* .Lack of expeller disc
* .Put the expeller disc, as
indicated on items 3.2 and 3.3
of this guide.
* .The disc stops during the
operation
* .Lack of electricity
* .Check if the plug is
connected to the power
point
* .Motor belt is skidding
*.Adjust the tension of the
belt, as indicated on item 5.2
of this guide
*
.
The safety device of the
pusher lever is not adjusted
o r w i t h s o m e b a d
connection
* Calibrate the safety device
of the pusher lever and check
electrica l connections, as
described on item 5.2 of this
guide.
* The safety device of the disc
chamber lid presents some bad
connection.
* .Call technical assistance
* .Bad connection on the
ON/OFF switch
* .Check ON /OFF switch
connections
* .Bad connection on the plug
or electric cord
* .Check if the cord is broken
and check the plug pins
*
.
The machine does not turn
on
* .Lack of electricity
* .Check if there is electric
power supply
36
Figura - 10
Figura - 11
3.4.2 Con mucho cuidado con las cuchillas, agarre el disco
girándolo en el sentido ante horario y, tirándolo hacia arriba, sáquelo de la cámara
de los discos.
3.4.3 Agarre en la parte izquierda inferior de la reja y tirela hacia
arriba, siempre cuidando las cuchillas cortantes.
Disco Corte Cubo
3.4.4 Remueva la tapa del compartimiento de los discos , para
eso, agarre la tapa empujándola hacia atrás desalojándola totalmente de los
encajes del compartimiento de los discos .

20
Problemas Causas Soluções
* .The machine does not turn
on
* .Lack of electricity
* . Check if there is electric
power supply
* .The plug is not connected to
the power point
* .Call technical assistance
* .Call technical assistance
*
.
The disc chamber lid is
opened
* Close the disc chamber lid
* . The sensor of the pusher
lever is not working
* Calibrate the safety device of
the pusher lever and check
el ec tri c c onnec ti ons , a s
described on item 5.2.5 of this
guide.
* Problem on the contactor.
* Burn smell and/or smoke.
* E l ectrical s y st e m
malfunction.
* .Call technical assistance
* .Call technical assistance
* .Motor malfunction
* The machine turns on but the
disc takes too long to spin.
* Skidding belt.
*
.
Adjust tension of belt, as
described on item 5.2 of this
guide
* .Damaged electric cord
* .Mishandling during
transportation
* Call technical assistance.
3.4 Limpieza
IMPORTANTE
Nunca haga limpieza de la maquina si ella está conectada a la red eléctrica, así que debe
desligarla de la toma de corriente eléctrica.
Antes de abrir la tapa de la maquina, esté seguro de la parada completa del disco.
Para hacer la limpieza de la maquina, primero deslíguela de la red eléctrica.
Todas las partes amovibles deben ser removidas e limpias, como detallamos a seguir:
3.4.1 Con la maquina desligada y el disco totalmente parado, gire la traba de la tapa N°01 (fig.06),
abriéndola enseguida. Con la tapa abierta, tome cuidado con la asta, en la cual está incorporado el
empujador, pues ésta deberá ser suelta lentamente.
35
Figura - 09
Disco Corte Cubo

21
Problems
Causes Solutions
*
.
The machine turns on
but the disc takes too
long to start spinning
*
.
Faulty start capacitor
of motor
*
.
C all t e c hn i cal
assistance
* .Strange noises
* .Disc improperly placed
* .Correct the position of disc
* .Dirty grid disc rest
*
.
Clean the machine and
put back the grid disc
* Faulty ball bearings.
*
.
Cal l t ec hn ic al
assistance
5.2 Adjustments and components replacement
5.2.1 Blades sharpening
The blades are removable. Therefore they can be easily
sharpened. However pay special attention in order to keep the cut angle.
The grid discs (dicing and stick) must be sharpened with thin sandpaper
or a grindstone.
5.2.2 Tension adjustment of the stick grid disc
When the machine starts producing irregular sticks, the blades of
the stick grid must be tensioned. Using a screw driver, partially loosen
the two screws located under the stick grid. Then tighten the two screws
located on the frontal part of the grid disc, until blades are tensioned.
Finally, tighten the two screws under the grid again.
34
Figura - 08
3.3.1 Coloque el plato expulsor, tomando el cuidado para su encaje perfecto en
las facetas existentes en el eje.
3.32.2 Después de seleccionar el Disco Corte Cubo a ser utilizado, posiciónelo
con el marco de las rejas ubicado en el lado izquierdo de la maquina. Enseguida,
encaje el disco corte cubo en la cavidad existente en el compartimiento de los
discos de la maquina ..
3.32.3 Con mucho cuidado con las cuchillas del disco elegido, haga el encaje
del disco en el eje, girándolo rápidamente en el sentido ante horario,
obteniendo así su trabamiento perfecto.
3.3.4 Cierre la tapa del compartimiento de los discos, asegurándose de que el
mismo haya quedado perfectamente trabado.
3.3.5 Para remover el disco, haga el proceso inverso al descrito anteriormente.
La colocación y remoción del disco, debe ser hecha conforme las Figuras-
08 y 09.
Disco Rebanador E10
Disco Corte Cubo
Plato Expulsor
22
5.2.3. Housing Removal
a) Remove the disc chamber lid (10308.0) and also the discs inside it.
For such, follow the instructions on item 3.4.1 of this guide.
b) Place the machine upside down and remove the 4 (four) feet
(03086.4), unscrewing them manually. Remove them along with
the protection plate (08826.9).
c) Using a No. 10 wrench remove the three screws fixing the housing .
d) Remove the housing lifting it .
5.2.4. Transmission Belt
To obtain good performance and durability of the belt, it must be
perfectly adjusted. If the belt is loose, it will skid during the operation.
However, be careful and do not over tension them, because it may cause
premature wearing of ball bearings.
To adjust the belt, after removing the housing , use a 13mm and a
10 mm wrench to loosen the two screws (03793.1) that fix the electric
motor (A). Then use a large screw driver push the motor to tighten the belt.
Then tighten the two screws previously loosen.
5.2.5. Safety Sensor
To adjust the safety device on the pusher lever, proceed as follows.
With the disc chamber lid open, use a 13 mm wrench to loosen the sixsided nut M 8
Then adjust the safety switch until it is activated .
33
Figura - 07
Plato Expulsor
Disco Rebanador E5
IMPORTANTE
Los discos Rebanadores Dentados modelo EH3 y EH7 son indicados para el corte de
productos con piel y hojas como tomates, berenjenas y lechuga romana o americana.
3.3 Usando Dos Discos a la vez
IMPORTANTE
El plato expulsor deberá siempre ser utilizado, independientemente del disco que
estuviera siendo usado.
Antes de abrir la tapa de la maquina, esté seguro de la completa parada del disco.
El Disco Corte Cubo o Corte Bastones, deberá ser encajado entre el plato expulsor y
el disco de corte, y deberá estar absolutamente limpio para un encaje perfecto.
Los discos Corte Cubo o Corte Bastones, deben ser utilizados solamente con los
discos modelos E10-S, EH7-S .
Describimos a seguir el procedimiento para la colocación y remoción de los discos.
3.3.1 Con la maquina desligada y el disco totalmente parado, gire la traba de la tapa
(Fig.06) N°01, abriéndola enseguida. Con la tapa del Compartimiento de los Discos abierta
tome cuidado con la asta con el empujador incorporado, pues la asta deberá ser suelta
lentamente.

23
5.3Electrical Diagram
M
CONTACTOR
SWITCH
MAGNETIC SENSOR
ON/OFF SWITCH
F
N
- Do not wear loose fitting clothes while operating the unit. Do not use bracelets or any other piece of
jewelry. Have your hair always shortened and held up (use hair fishnets if necessary) in a way it
cannot reach any part of the machine. Roll up any loose sleeves.
- SKYMSEN is not responsible for any harm or injury caused by the negligent or inappropriate use of
this equipment by any operator. This equipment must be operated only by persons whose age equals
or exceeds 18 years old, in a safe and sound state of mind, free from the influence of any kind of drugs
and alcohol, that received proper training and instructions regarding the correct operation of this
machine, that are wearing correct and authorized safety clothes. All and any kind of modifications
carried on and applied to this machine immediately nullifies any kind of warranty and may result in
harm and injuries to the individuals operating this machine and to individuals that are located in the
machine surrounding areas while it is being operated.
- Under no circunstances place your hands in the moving parts of the machine while it is being used.
Make sure the machine has come to a complete stop before acessing the processed ingredients.
6. GENERAL ADVICES
Todos los discos deben encajar fácilmente en el eje de tracción, bastando
para eso hacer un pequeño movimiento de giro del mismo.
Cualquier contacto entre el disco y la tapa de la maquina, significa
posicionamiento incorrecto del disco
A seguir, será descrito el procedimiento para colocación y remoción de
los discos:
3.2.1 Con la maquina desligada y el disco parado, gire la traba de la tapa N°01
(Fig.06), abriéndola enseguida. Con la tapa de la maquina abierta, tome el
cuidado con la asta, a la cual está fijo el empujador, pues la misma deberá
ser suelta lentamente.
32
Figura - 06
3.2.1 Coloque el plato expulsor, tomando el cuidado de su perfecto encaje
en las facetas existentes en el eje.
3.2.2 Con mucho cuidado con las cuchillas del disco elegido, haga el encaje
del disco en el eje, girándolo rápidamente en el sentido ante horario,
obteniendo así su trabamiento perfecto.
3.2.3 Cierre la tapa de la maquina, usando la traba que puede ver arriba en la
Figura – 06, N°01, certificándose de que la misma quedó perfectamente
trabada.
3.2.4 Para remover el disco, haga el proceso inverso al descrito
anteriormente.
La colocación y remoción del disco, debe ser hecha conforme la Figura-07.
01

24
1.2 Componentes Principales
1. Introducción
25
1.1 Seguridad
25
25
2. Instalación y Pre-Operación
2.1 Instalación
2.2 Pré Operación
2.3 Selección de los Discos
2.4 Selección de la Boca de Alimentación
28
28
28
28
30
4. Nociones Generales de Seguridad
4.1 Practicas Basicas de Operación
4.4 Operación
4.2 Cuidados y Observaciones Antes de Ligar la Maquina
4.5 Al Termino del Trabajo
4.6 Mantenimiento
4.3 Inspección de Rutina
38
38
40
40
41
41
41
5. Analisis y Resolución de Problemas
5.1 Problemas, Causas y Soluciones
5.2 Ajustes y Sustituciones de Componentes
5.3 Diagrama Electrico
6. Consejos Generales
42
45
46
42
3. Operación
3.1 Accionamiento
3.2 Usando Solamente un Disco
3.3 Usando dos Discos a la Vez
3.4 Limpieza
31
31
31
33
35
SUMARIO
1.3 Características Técnicas
1.4 Discos Disponibles
27
27
47
31
Figura - 05
02
01
01- Boca Redondo
02- Bocl Onblonga
3 Operación
3.1Accionamiento
IMPORTANTE
Desligue la maquina siempre que desear canjear los discos.
Espere la completa parada del disco, antes de abrir la tapa de la maquina.
Antes de prender la máquina a través de la llave Prende/Apaga que está
ubicada en la lateral derecha del equipamiento, esté seguro que la tapa está cerrada y
debidamente trabada.
El procesador de Alimentos, Modelo PAIE-S, posee dos dispositivos de
seguridad:
Uno, sirve para evitar que la maquina se prenda con la tapa abierta, y tiene la
finalidad de garantizar la seguridad del operador, así que no debe ser usado para
desligar el equipamiento, levantando la tapa de la maquina. Cuando la tapa es otra
vez cerrada, la maquina prende automáticamente.
El otro dispositivo de seguridad, es accionado cuando la asta es levantada,
desligando así la maquina y, volviendo a prenderse cuando esta asta es bajada,
colocada en su lugar.
3.2 Usando solamente un disco
IMPORTANTE
El plato expulsor deberá siempre ser utilizado, independiente del disco o
discos que estuvieran siendo usados. Antes de abrir la tapa de la maquina,
esté seguro de la completa parada del disco.

25
1. INTRODUCCIÓN
1.1 Seguridad
Cuando usada incorrectamente, la Procesadora de Alimentos Modelo PAIE-S, es
una máquina potencialmente PELIGROSA. Nunca coloque su mano en la apertura de salida
de los productos procesados, tampoco en las aberturas existentes en la tapa (bocas de
alimentación) por donde son introducidos los alimentos.
El canjeo de los discos, limpieza y mantenimiento o cualquier otro servicio,
solamente deberá ser hecho por personas debidamente entrenadas y capacitadas.
Las instrucciones a seguir, deberán ser siempre seguidas a fin de evitar accidentes:
1.1.1 Manipule los discos con cuidado, pues los mismos poseen cuchillas
cortantes.
1.1.2 Desconecte la máquina de la corriente eléctrica, cuando necesite canjear
los discos o al hacer la limpieza ó mantenimiento.
1.1.3 Nunca utilice cualquier instrumento para auxiliar-lo en la colocación de los
alimentos en las dos bocas de alimentación que hacen parte de la tapa, que no
sea el empujador montado en la asta que están incorporados a la máquina, o el
empujador redondo N°02 Fig.01.
1.1.4 Nunca abra la tapa de la maquina sin que esté seguro de la completa parada
de los discos.
1.1.5 Nunca utilice chorros de agua directamente sobre la máquina.
IMPORTANTE
Esta máquina no debe ser utilizada por personas (inclusive niños) con capacidades
físicas o mentales reducidas, o por falta de experiencia o conocimiento, excepto que
tengan recibido una capacitación supervisada referente al uso de esta máquina y
que sean responsables por la seguridad de ellos.
IMPORTANTE
Si el cable de alimentación no esté en buenas condiciones de uso, deberá ser
sustituido por el fabricante, su servicio autorizado o persona calificada para que
sean evitados accidentes.
1.2 Principales Componentes
La Procesadora de Alimentos, Modelo PAIE-S, es equipada con dos sensores de
seguridad. Cuando la asta con el empujador es levantada , la maquina se desliga
automáticamente y, vuelve a conectarse otra vez cuando la misma asta es bajada.
30
Figura - 04
Prato Expulsor
2.4 Selección de la Boca de Alimentación
IMPORTANTE
Bajo ninguna circunstancia, utilice las manos u otro objeto, que no sea el empujador
incorporado a la maquina o el empujador redondo N°02 (Fig.01), para empujar el
alimento para dentro de las bocas de alimentación redonda y/o oblonga.
Utilice la boca correcta, bien como el empujador correcto para introducir el alimento
hacia las cuchillas de los discos.
La asta que está incorporada a la maquina, debe ser comprimida con una presión firme,
pues del contrario el alimento será desalojado en el interior de la boca, ocasionando cortes
irregulares.
La Procesadora PAIE-S es una maquina que trabaja en alta velocidad, por lo tanto es
necesario que la alimentación sea igualmente rápida.
Para productos largos y angostos, como zanahorias, pepinos, se logrará un corte más
preciso, utilizando la boca de alimentación redonda N°01 (Fig.05).
Independiente si va a trabajar con un o dos discos a la vez, para preparar una determinada
combinación de frutas o vegetales, siempre empiece con los productos más tiernos y termine con
los productos más duros.
Cuando fuera usado el disco rallador modelo V, es posible variar la granulación del
producto procesado, presionándolo levemente, se logrará un producto final de granulometría más
fina y, presionándolo más firmemente, se logrará un producto final d granulometría más gruesa.
Las hojas después de higienizadas deben ser sobrepuestas y arrolladas bien
apretado, hasta obtener un diámetro suficiente para entrar en la boca redonda , en
seguida se presione con cuidado usando el empujador redondo, para que el rollo sea
empujado hasta el disco rebanador .. Después de sobreponer y arrollar las hojas
córtense las dos puntas para obtener un producto con una visual mejor .
IMPORTANTE
El Plato expulsor, siempre deberá ser utilizado, independiente del disco o discos
que usará.
El Plato Expulsor tiene la función de auxiliar la salida de los alimentos procesados,
expulsándolos para fuera de la maquina.

01 – Asta
02 – Empujador redondo
03 – Llave Prende/Desliga
04 – Boca Redonda
05 – Cuerpo de la maquina
06 – Compartimiento de los discos
07 – Empujador Oblongo
08 – Boca Oblonga
09 – Tapa
01 – Disco Rebanador
02 – Disco Reja Cubo (12x12mm)
03 – Disco Expulsor
04 – Eje
05 – Soporte Discos Corte Cubos y
Bastones
01
02
03
26
De la misma manera sucede cuando la tapa del compartimiento de los discos es abierta,
la maquina también se desligará automáticamente, y vuelve a conectarse otra vez cuando la tapa
es cerrada. Esta procesadora de alimentos, es una maquina de bancada, capaz de realizar
diversos tipos de cortes de diversos espesores como: rebanadas, deshilachados, cortes ondulados,
cubos, palitos, corte Juliana y otros más. Puede procesar casi todos los tipos de vegetales,
conservando sus propiedades nutritivas, colores y jugos y, evitando los desperdicios.
Todos los componentes que hacen parte de la maquina, están construidos con
materiales nobles, como el acero inoxidable y el aluminio de grado alimenticio.
02
08
04
01
03
05
06
07
09
04
05
SAIDA DE PRODUTO
PROCESSADO
29
En la Tabla – 03, Tabla de Selección de los Cortes, están listados los discos,
bien como sus combinaciones y ejemplos de aplicaciones.
IMPORTANTE
La Tabla de Selección de Cortes, tiene como objetivo, sugerir tipos de cortes para
algunos productos. El resultado de los cortes, depende del tipo, estado y calidad de
los productos que sean procesados .
Tabla - 03
Producto Tipos de Cortes Discos
Remolacha Rebanadas E1, E3, E5 e E10-S
Rebanadas Onduladas W2, W4
Cubos
E10-S / EH7-S + GRADE CUBO
Deshilachado Z3, Z5 e Z8
Deshilachado Quadradas
H2,5, H3, H7
Zanahoria Rebanadas
E1, E3, E5 , E10-S ,EH7-S e EH3-S
Rebanadas Onduladas W2, W4
Cubos
E10-S / EH7-S + GRADE CUBO
Deshilachado Z3, Z5 e Z8
Deshilachado Quadradas
H3, H7
Rallado
V
Col Fajitas E1, E3, E5 e E10-S
Deshilachado Z3, Z5 e Z8
Champiñones Rebanadas E1, E3, E5
Cubos
E10-S + GRADE CUBO / EH7-S
Cebolla Rebanadas (aros)
E1, E3, E5 , E10-S ,EH7-S e EH3-S
Cubos
Cubos
E10-S + GRADE CUBO / EH7-S / H7
E10-S + GRADE CUBO / EH7-S / H7
Pimientos Rebanadas (aros)
E1, E3, E5, E10-S e EH7-S
Rábano Rebanadas E1, E3, e E5
Rebanadas Onduladas W2, W4
Deshilachado Z3, Z5 e Z8
Deshilachado Quadrados H3, H7, EH3, EH7
Hojas Fatijas EH3 , EH7
Batata Rebanadas - E1, E3 e E5
Bastones
E10-S + GRADE PALITO/ EH7-S
Cubos
E10-S GRADE CUBO/ EH7-S +
Deshilachado Z3, Z5 e Z8
Deshilachado Quadrada -
H3, H7
Rebanadas Onduladas W2, W4
Banana Rebanadas
E3 , E3 , E5 e E10
Naranja Rebanadas
E5 , E10-S e EH7-S
Manzana Rebanadas E1, E3 e E5
Papaya Cubos
E10-S + GRADE CUBO/ EH7-S
Coco Fresco Deshilachado Z3, Z5 e Z8
Rallado V
Tabla de Selección de Cortes
27
1.3 Características Técnicas
1.4 Discos Disponibles
Tabela - 01
Tabla - 02
(*) la frecuencia será única, de acuerdo con el motor que la maquina estuviera
equipada.
Características Unidad PAIE-S
Producción Mediana [kg/h] Hasta 350
Voltaje [V] 110 ou 220
Frecuencia [Hz] 50 ou 60 (*)
Potencia [CV] 0,33
Consumo [kW/h] 0,24
Altura [mm] 530
Ancho [mm] 265
Profundidad [mm] 470
Peso Líquido [kg] 20
Peso Bruto [kg] 21,5
Denominación
Dimenciones aproximadas de los cortes
Código
Disco Deshilachador Z3 Diámetro de 3 mm 09610.5
Disco Z5Deshilachador Diámetro de 5 mm 09612.1
Disco Z8Deshilachador Diámetro de 8 mm 09613.0
Disco H3 - Deshilachador Cuadrado Juliene Cuadrado de 3 mm 09434.0
Disco H7 - Deshilachador Cuadrado Juliene Cuadrado de 7 mm 12529.6
Disco Rebanador E1 Espesor de 1 mm 09604.0
Disco E3Rebanador Espesor de 3 mm 09605.9
Disco E5Rebanador Espesor de 5 mm 09606.7
Disco E10-SRebanador Espesor de 10 mm 39430.0
Disco Corte Ondulado W2 Espesor de 2 mm 12553.9
Disco W4Corte Ondulado Espesor de 4 mm 09616.4
Disco Rallador V X-X-X-X-X-X-X-X-X-X 09609.1
Grade Corte Cubo 8x8 mm Cuadrado de 8 mm 39326.6
Grade Cubo 12x12 mmCorte Cuadrado de 12 mm 39324.0
Grade Cubo 16x16 mmCorte Cuadrado de 16 mm 39325.8
Grade Corte Bastones Ancho de 10 mm 39327.4
Prato Expulsor X-X-X-X-X-X-X-X-X-X 09538.9
Disco Dentado EH3Rebanador Espesor de 3 mm 19563.4
Disco Dentado EH7-S Rebanador Espesor de 7 mm 39431.9
Disco Cuadrado H2,5 - Deshilachador
Juliene
Cuadrado de 2,5 mm 23017.0
28
2. INSTALACIÓN Y PRE OPERACIÓN
2.1 INSTALACIÓN
La Procesadora de Alimentos PAIE-S debe ser instalada en una superficie
nivelada y estable preferentemente a 850mm de altura máxima y con el Bocal de
Salida de los alimentos ubicado sobre una vasija colectora, con el objetivo de
facilitar la coleta de los alimentos procesados.
Verifique la tensión de la red eléctrica a la cual será conectada la
Procesadora de Alimentos, es decir, si es 110V ó 220V. Observe la etiqueta de
Atención que se encuentra pegada al cable eléctrico de la maquina, para verificar
en cual tensión la máquina deberá ser conectada.
El cable de alimentación posee un enchufe con tres pernos , uno de ellos
para puesta a la tierra . Es obligatorio que los tres estén conectados antes de
prender la maquina .
Figura - 03
2.2 PRE OPERACIÓN
Verifique si la maquina esta firme y estable en su posición. Antes de usarla, haga
la limpieza de las partes de la maquina que estarán en contacto con los alimentos: tapa y
cámara de los discos, usando agua y jabón. Secar muy bien.
Luego lavar todos los discos con agua caliente y jabón, enjuagar y secarlos antes de
usarlos en la máquina.
2.3 SELECCIÓN DE LOS DISCOS
Los discos para uso en la Procesadora de Alimentos modelo PAIE-S, son
vendidos por separado y ofrecemos una línea completa de discos para cortes muy
variados de verduras, legumbres, hortalizas o frutas.
Cable de alimentación con
enchufe y aterramiento
Superficie estable de trabajo
Cuerpo de la maquina
Altura Máxima = 850mm
MT
A
LÚR
G
ICASIE S L
TA
.
E
MEN D
 Loading...