

Page 1
METALÚRGICA SIEMSEN LTDA.
Rodovia Ivo Silveira - km 12, nº 9525, Galpão 1 - Bairro: Bateas - CEP: 88355-202
Fone: +55 47 3211 6000 - Fax: +55 47 3211 6020
www.siemsen.com.br - [email protected]
CNPJ: 82.983.032/0001-19
Brusque - Santa Catarina - Brasil
47285.9 - INGLÊS
Data de Correção: 06/01/2014
- BESIDES THIS EQUIPMENT, A COMPLETE RANGE OF OTHER PRODUCTS ARE MANUFACTURED , CONSULT OUR DEALERS
- DUE TO THE CONSTANT IMPROVEMENTS INTRODUCED TO OUR EQUIPMENTS , THE INFORMATION CONTAINED IN THE PRESENT
INSTRUCTION MANUAL MAY BE MODIFIED WITHOUT PREVIOUS NOTICE .
COMMERCIAL BLENDER, STAINLESS STEEL, STAINLESS STEEL
SEAMLESS CUP, 2,0 LITERS
MODELO
LAR-02MB
Page 2

SUMMARY
1. Introducon ......................................................................................3
1.1 Safety .................................................................................................................... 3
1.2 Main Components ................................................................................................. 5
1.3 Technical Characteristcs ......................................................................................... 6
2. Instalaon and Pre-Operaon ............................................................ 6
2.1 Installaon ............................................................................................................ 6
2.2 Pre Operaon ........................................................................................................ 7
3. Operaon .......................................................................................... 8
3.1 Starng ....................... .............................................. ....................................... ...... 8
3.2 Operaon Procedures ...................................................................... ...................... 9
3.3 Cleaning and Sanizing ........................................................................................10
3.4 Cauons with Stainless Steel: ........................ .... ........... ............ ........ ........ ....... .....11
4. General Safety Pracces .................................................................. 12
4.1 Basic Operaon Pracces ....................................................... ...............................12
4.2 Safety Procedures and Notes before Switching the Machine ON ...........................13
4.3 Roune Inspecon ......................................... ....................................... ................13
4.4 Operaon .............................................................................................................14
4.5 Aer Finishing The Work ............................. ........................ ............... ................... 14
4.6 Maintenance ........................................................................................................14
4.7 Warning ........................................... .......................................... ...........................14
5. Analysis and Problems Solving ......................................................... 15
5.1 Problem, causes and soluons . .............................................................................15
6. Applicable Norms ............................................................................ 17
7. Maintenance ................................................................................... 17
8. Electric Diagram ............................................................................... 18
___________________________________________________________
___________________________________________________________
___________________________________________________________
___________________________________________________________
___________________________________________________________
___________________________________________________________
___________________________________________________________
___________________________________________________________
___________________________________________________________
___________________________________________________________
___________________________________________________________
___________________________________________________________
___________________________________________________________
___________________________________________________________
___________________________________________________________
___________________________________________________________
___________________________________________________________
___________________________________________________________
___________________________________________________________
___________________________________________________________
___________________________________________________________
___________________________________________________________
___________________________________________________________
___________________________________________________________
___________________________________________________________
___________________________________________________________
___________________________________________________________
___________________________________________________________
___________________________________________________________
___________________________________________________________
___________________________________________________________
___________________________________________________________
___________________________________________________________
___________________________________________________________
___________________________________________________________
___________________________________________________________
___________________________________________________________
2
23
Page 3

___________________________________________________________
___________________________________________________________
___________________________________________________________
___________________________________________________________
___________________________________________________________
___________________________________________________________
___________________________________________________________
___________________________________________________________
___________________________________________________________
___________________________________________________________
___________________________________________________________
___________________________________________________________
___________________________________________________________
___________________________________________________________
___________________________________________________________
___________________________________________________________
___________________________________________________________
___________________________________________________________
___________________________________________________________
___________________________________________________________
___________________________________________________________
___________________________________________________________
___________________________________________________________
___________________________________________________________
___________________________________________________________
___________________________________________________________
___________________________________________________________
___________________________________________________________
___________________________________________________________
___________________________________________________________
___________________________________________________________
___________________________________________________________
___________________________________________________________
___________________________________________________________
___________________________________________________________
___________________________________________________________
___________________________________________________________
1. Introducon
1.1 Safety
When incorrectly used this equipment is a potenally DANGEROUS machine. maintenance,
cleaning or any other service shall be performed by a duly trained person and with the
machine unplugged.
To avoid accidents respect the following instrucons.
1.1.1 Read completely these instrucons
1.1.2 To avoid to risk electric shocks and damage to the equipment never use it with wet
clothes or shoes and/or standing on wet floors. Do not plunge it into water nor any other
liquid, do not spray water directly to the equipment.
1.1.3 When the equipment is in operaon the operator shall supervise it principally when
children might be near.
1.1.4 Unplug the equipment when: It is not in use, before to clean it, before to remove or
to place some accessory. Before maintenance or any other service.
1.1.5 Do not operate the equipment if the cord or plug are damaged. Do not lean the
cord on table edges, nor let them lie on hot surfaces.
1.1.6 When the equipment may have fall, have been damaged any way, or simply does
not work, take it to Technical Assistance to check.
1.1.7 The use of accessories not recommended by the manufacturer may cause corporal
damages.
1.1.8 Keep the hands or any other object away from moving parts while the equipment is
in operaon.
1.1.9 During operaon, never wear loose clothes with wide sleeves principally around
the wrists.
1.1.10 Make sure the equipment voltage and the network voltage are the same, and the
equipment has been solidly grounded.
1.1.11 The knife is very sharp # 01 (Pic. 04), handle with care.
1.1.12 Always place the Lid on the Cup # 01 (Pic. 01) before to switch ON the Blender.
22
3
Page 4

1.1.13 Always grab the Cup # 02 (Pic. 01 ) while the blender is in operaon. If the Cup gets
loose, switch the equipment OFF immediately.
1.1.14 When using the Blender to process hot liquids, remove the Cap # 09 (Pic.01) and
keep the hands away from the lid opening, to avoid possible burnings.
1.1.15 Never touch the knife while the blender is processing.
1.1.16 When installing the blender, properly ground it following the local recommended
procedure.
1.1.17 For your safety, the temperature of the processed products shall not exceed 40 °C.
IMPORTANT
Make sure the electric cord is in perfect usage condions. In case it is not, have it
replaced by another that complies with the technical and safety specificaons. This
replacement must be carried out by qualified personnel and must aend the local
safety standards.
IMPORTANT
This equipment must not be used by individuals with reduced physical, sensorial or
mental capabilies nor children. Individuals without propper trainning and
experience must not operate this equipment unless they receive propper trainning
and instrucons or are operang it under the supervision of a person who is
responsible for their safety.
IMPORTANT
We recommend that children must be constantly monitored to make sure they are
not playing with the equipment.
IMPORTANT
Never spray water directly upon the equipment.
IMPORTANT
If any emergency shall arise the plug must be disconnected from the electrical grid.
___________________________________________________________
___________________________________________________________
___________________________________________________________
___________________________________________________________
___________________________________________________________
___________________________________________________________
___________________________________________________________
___________________________________________________________
___________________________________________________________
___________________________________________________________
___________________________________________________________
___________________________________________________________
___________________________________________________________
___________________________________________________________
___________________________________________________________
___________________________________________________________
___________________________________________________________
___________________________________________________________
___________________________________________________________
___________________________________________________________
___________________________________________________________
___________________________________________________________
___________________________________________________________
___________________________________________________________
___________________________________________________________
___________________________________________________________
___________________________________________________________
___________________________________________________________
___________________________________________________________
___________________________________________________________
___________________________________________________________
___________________________________________________________
___________________________________________________________
___________________________________________________________
___________________________________________________________
___________________________________________________________
___________________________________________________________
4
21
Page 5
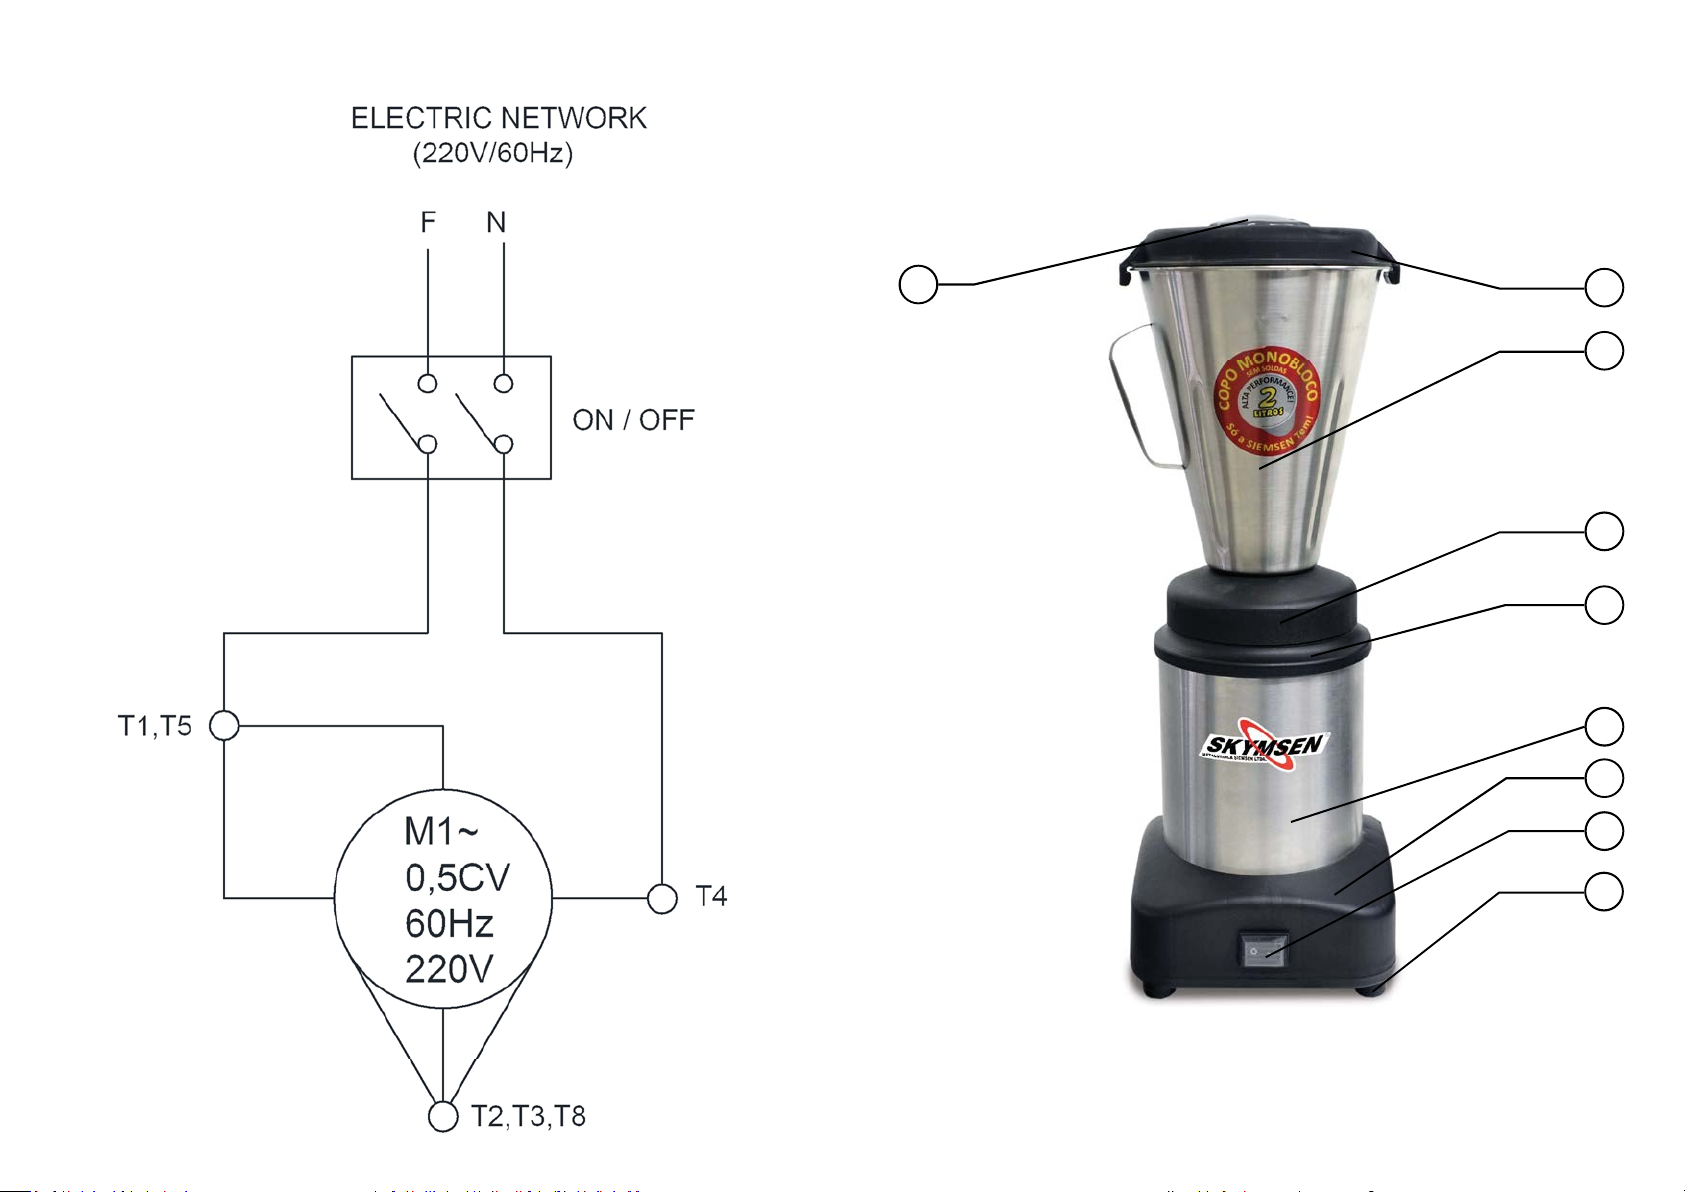
1.2 Main Components
All components are made with carefully selected materials, in accordance with Siemsen
experience and standard tesng procedures.
PICTURE 01
09
01
02
03
04
05
06
08
07
01 – Lid
02 – Cup
03 – Cup Flange
04 – Motor Support Flange
05 – Housing
06 – Base
07 – Foot
08 – ON/OFF Switch
09 – Cap
20 5
Page 6
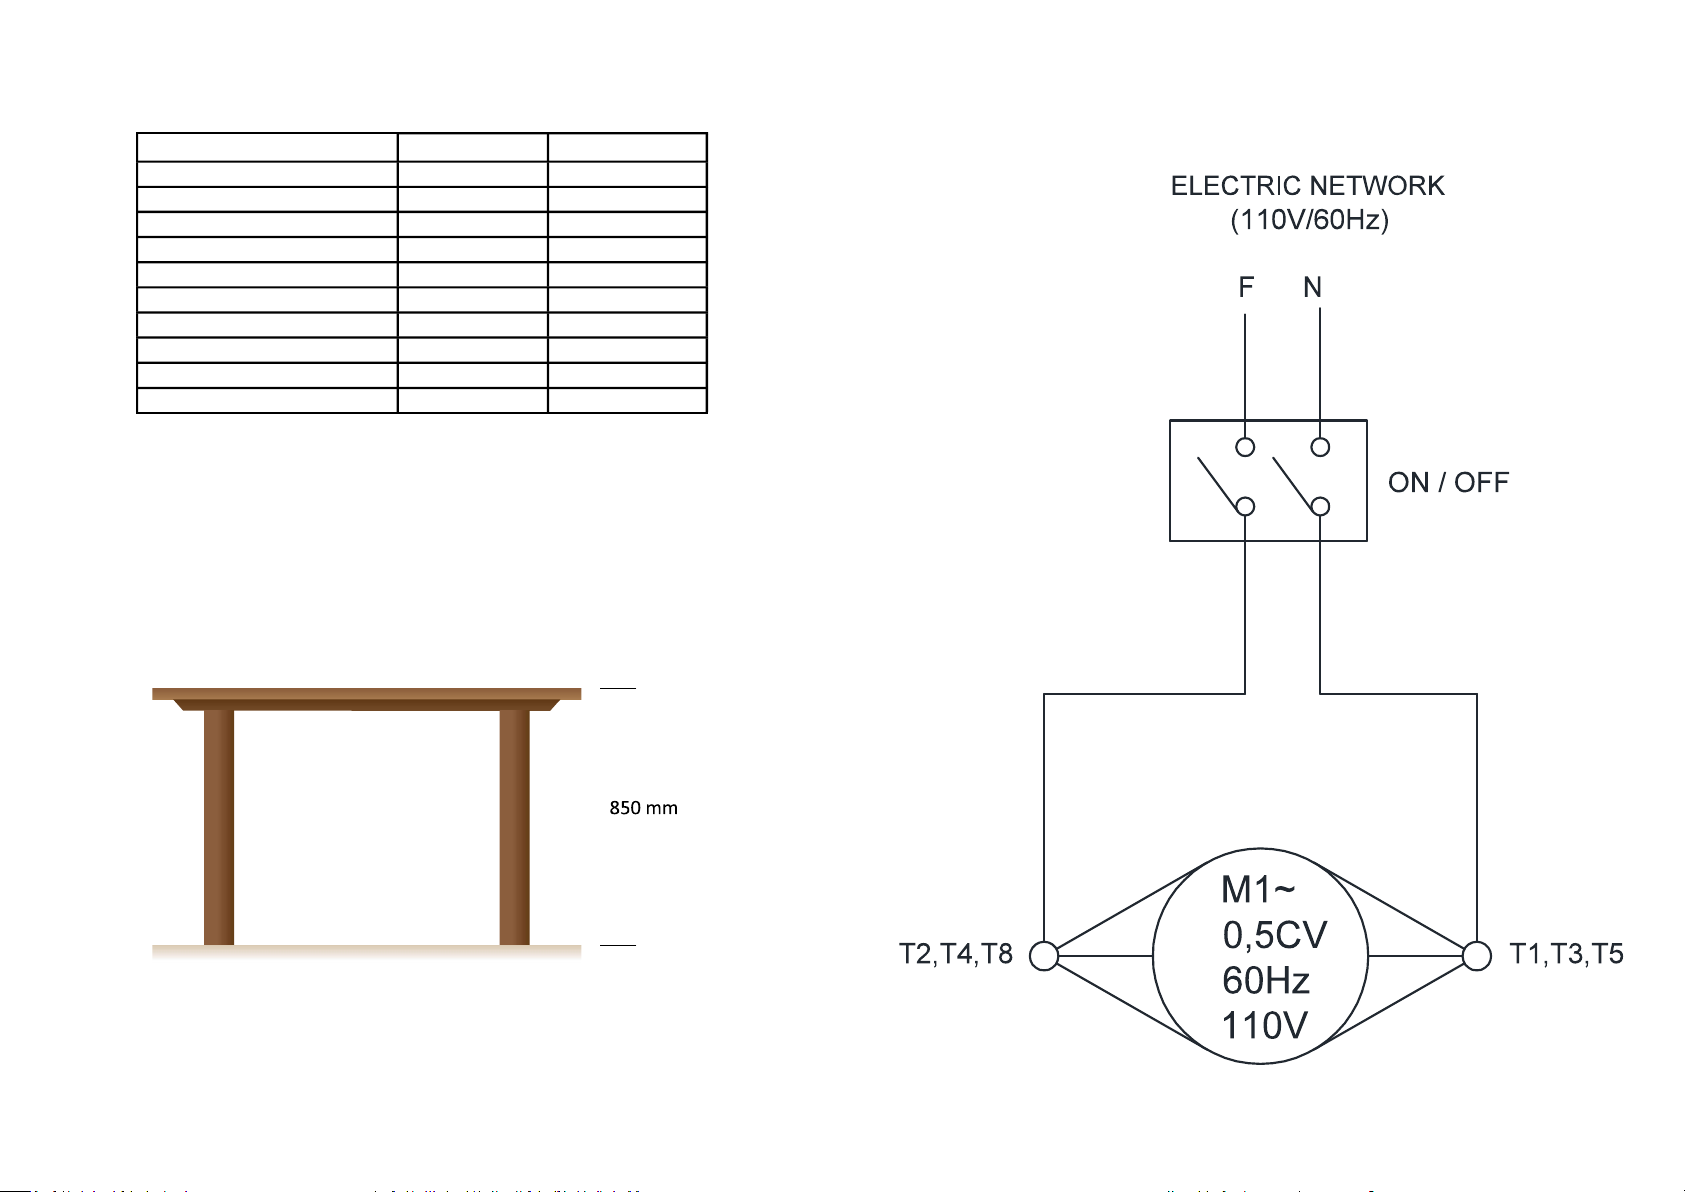
1.3 Technical Characteristcs
CHARACTERISTICS UNIT LAR-02MB
Cup Capacity L 2
Voltage V 110 or 220
Frequency Hz 50 ó 60
Power Rang HP 0,5
Consumpon kW/h 0,37
Height mm 640
Width mm 240
Depth mm 270
Net Weight kg 8,4
Shipping Weight kg 9,4
(*) Voltage and frequency are only one , the one the motor is designed for
2. Instalaon and Pre-Operaon
2.1 Installaon
2.1.1 Placing
TABLE 01
The equipment must be placed on to a levelled stable surface approximately 850 mm
high.
2.1.2 Electrical Installaon.
The equipment has been designed to operate 110 Volts or 220 Volts. When you receive the
equipment check the voltage indicated on the cord label
The power plug has 2 (two) round pins and one flat pin the last one is the ground . All the
3 (three) pins must be properly connected.
6
19
Page 7
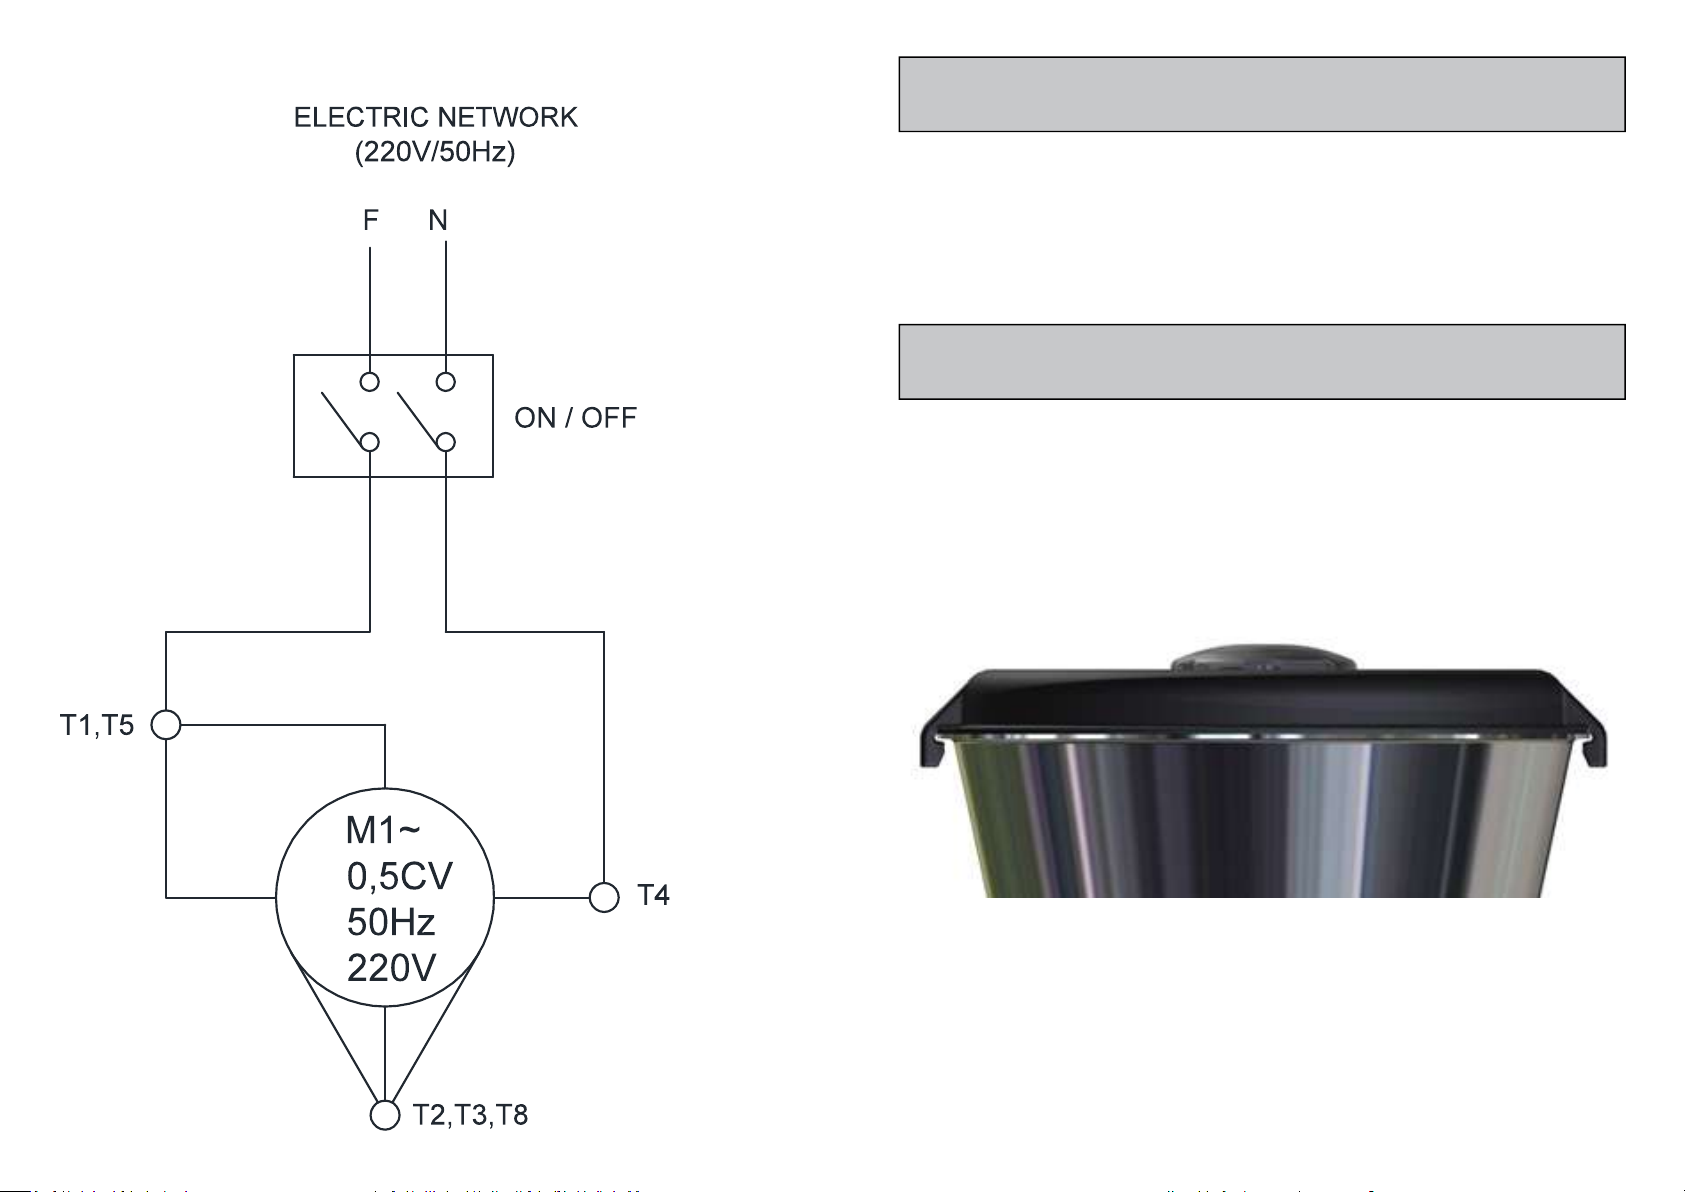
8. Electric Diagram
IMPORTANT
Make sure the network voltage is the same as indicated on the cord label.
2.2 Pre Operaon
2.2.1 Placing the Cup
The Cup # 02 (Pic.01) has a simple system to be fied allowing an easy and safe placement.
Always remove or replace the Cup, just liing and holding it firmly by the two handles.
IMPORTANT
Never remove or replace the Cup with the Blender switched ON.
2.2.2 Placing the Lid
The Cup # 02 (Pic,01) has a Lid # 01 (Pic.01) made of non toxic rubber providing an efficient
seal during the process.
Make sure the Lid to be duly placed on the Cup , see picture below.
PICTURE 02
18
2.2.3 Placing the Cap
The Cap # 09 (Pic.01) may be used either to watch the process or to add ingredients.
To remove it turn it clockwise unl to be loose , then li it. See picture 03 below.
7
Page 8
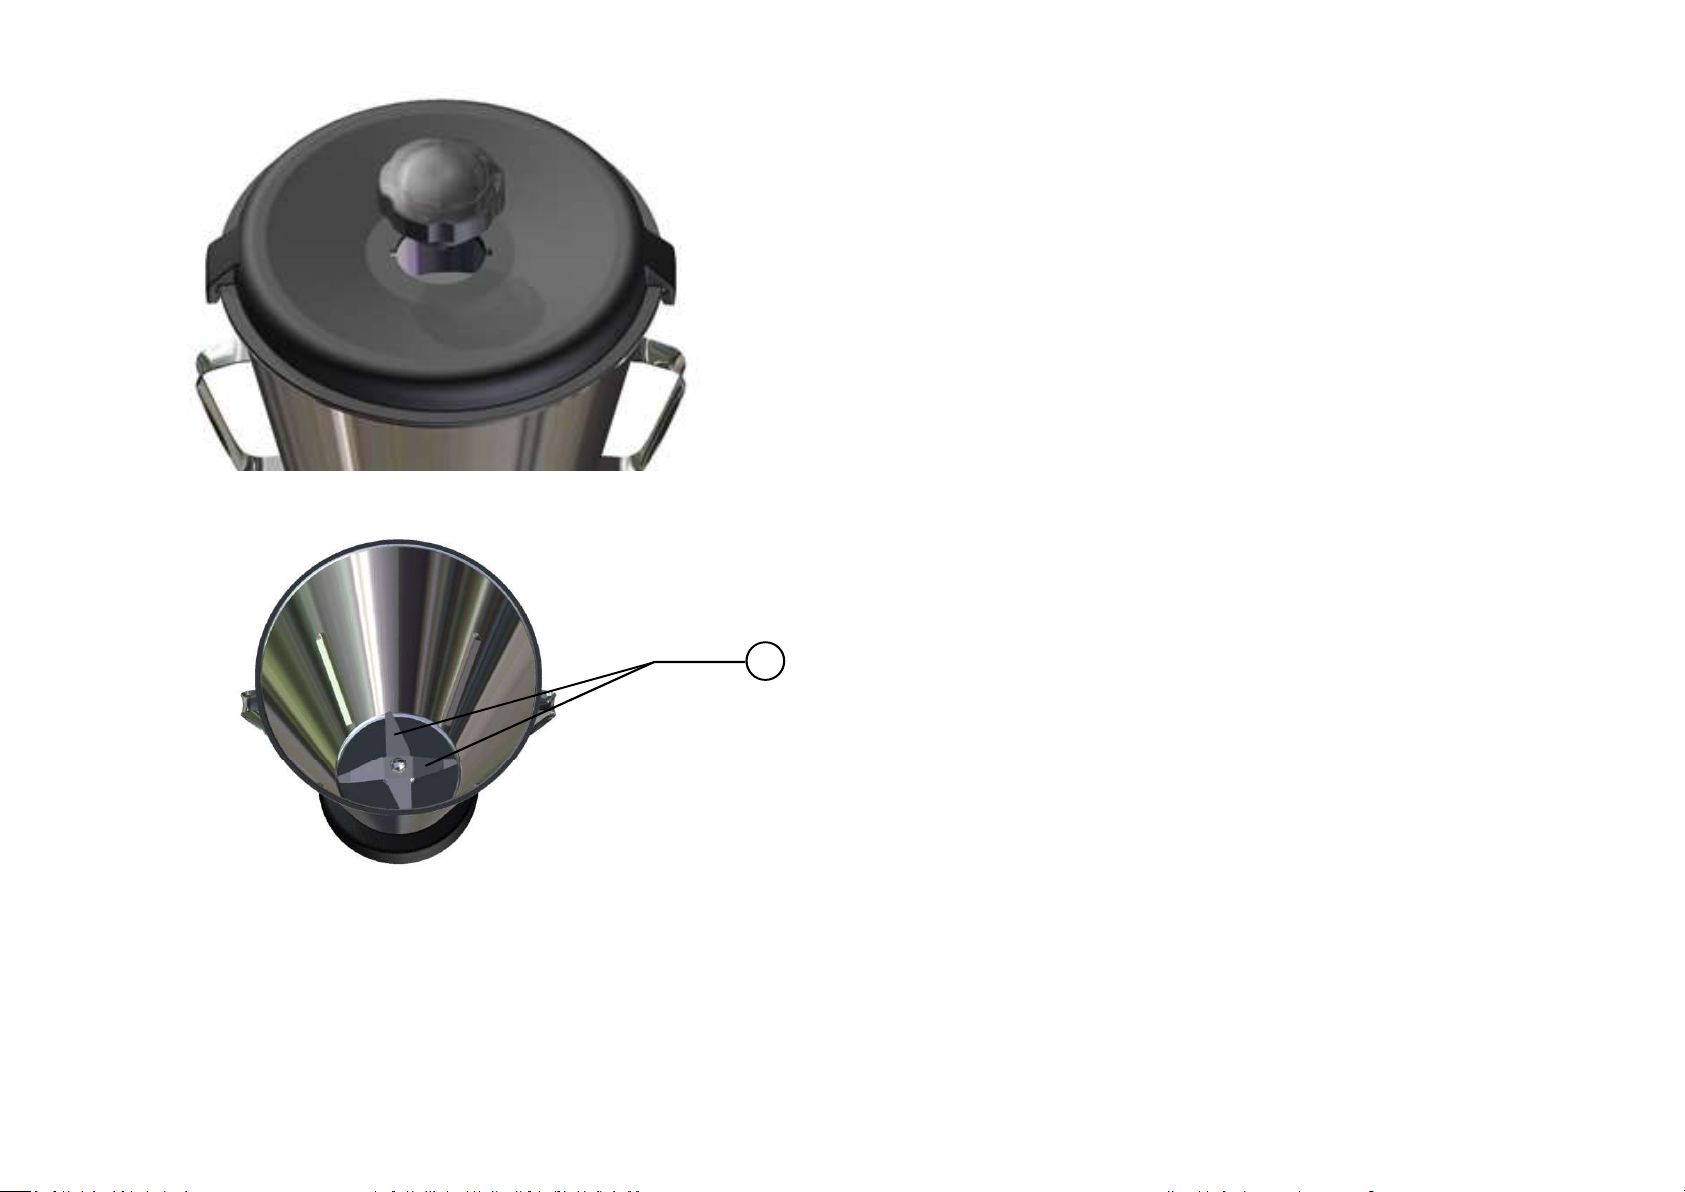
PICTURE 03
PICTURE 04
01
6. Applicable Norms
Brazilian Norm ABNT NBR NM 60335-1
IEC Norm 60335-2-64
7. Maintenance
Maintenance must be considered a set of procedures with the purpose to keep the
equipment best operang condions, therefore increasing the equipment life and safety.
* Cleaning – check item 3,3 Cleaning
* Wiring - Check all wires regarding deteriorate condions as well as all electric contacts
(terminals) regarding ghtening and corrosion .
*Contacts – ON/OFF switches, emergency buon, reset buon, electronic circuits etc,
check the equipment in order to assure that all components are correctly working and the
equipment operaon is normal .
* Installaon – make sure the installaon followed item 2.1 instrucons
1 - Each month check :
- Check the electrical installaon
- Measure the voltage at the socket
- Measure the working current and match it with the nominal current
- Check the ghtening of all electric terminals to avoid bad contacts
- Check electric motor sha clearance
- Check the wiring for overeang, insulaon failures and mechanical damages .
01 - Knife
3. Operaon
3.1 Starng
To start the blender just press the ON/OFF Switch # 08 (Pic.01) to posion “I”.
To stop the blender press the ON/OFF Switch to posion “O”.
8
2 - Each three month checks
- Check electrical components such as ON/OFF switch, emergency buon, reset buon,
electronic electric circuits, overeang, insulaon failings, or mechanical damages
- Check bearings clearances
- Check retainers, O’rings, V’rings and other sealings.
17
Page 9
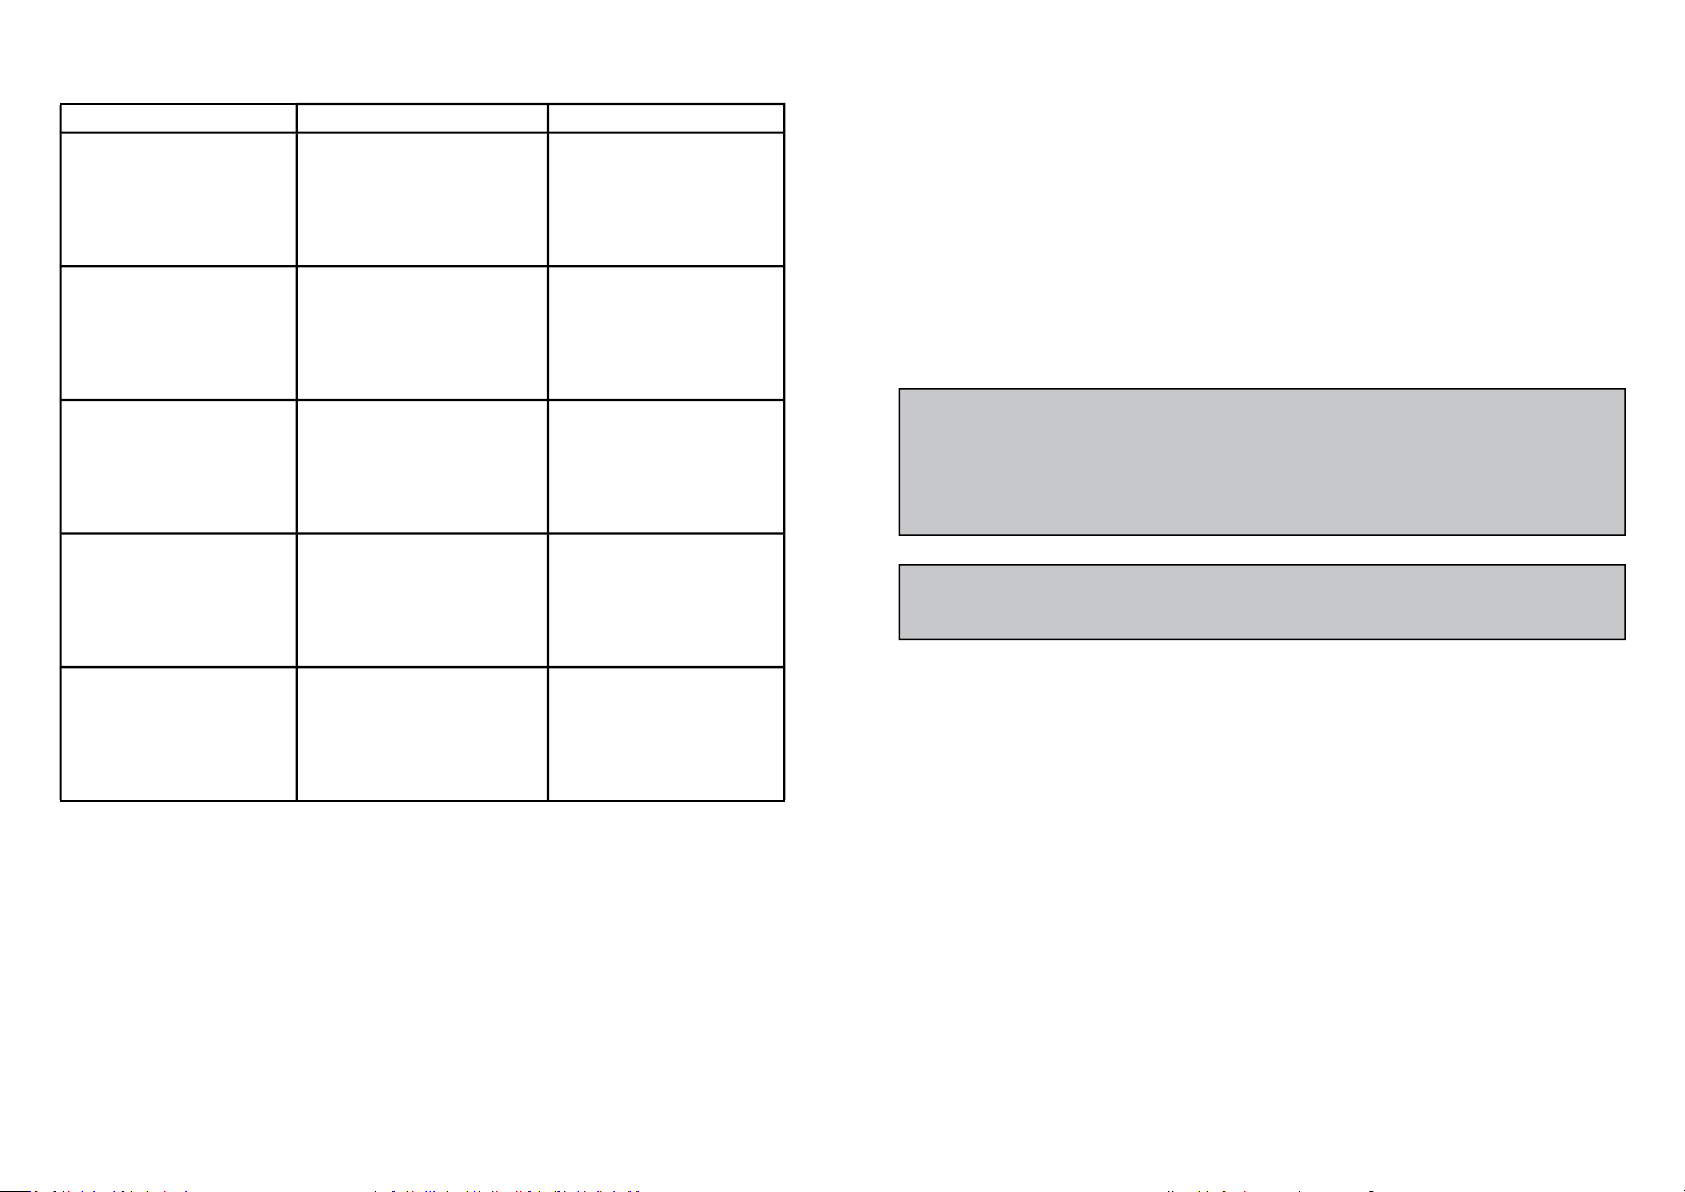
TABLE 02
3.2 Operaon Procedures
PROBLEMS CAUSES SOLUTIONS
- The machine does not start.
- Burnt smell or smoke.
- The equipment switches
ON but when the product is
placed it stops or turn slowly.
- Damaged cord
- Lack of electric power;
- Problem with the electrical
circuit.
- Problem with the electrical
circuit.
- Problem with the motor. - Call Technical Assistance;
- failure during product
transportaon.
- Check if plug is connected to
its socket or if there is electric
shortage.
- Call Technical Assistance.
- Call Technical Assistance.
- Call Technical Assistance.
Before to start using the equipment, all parts to be in contact with the food to be processed
shall be washed with water and nuetral soap ( see item 3.3 cleaning ).
Make sure the blender is firm on its working posion.
Remove the Lid # 01 (Pic.01) with the Cap # 09 (Pic.01) out of the Cup # 02 (Pic.01).
With the Blender switched OFF introduce inside the Cup # 02 (Pic.01) firstly the liquid
products and only aer, introduce the more consistent products.
Press the Lid with the Cap as explained on item 2.2.2 and 2.2.3.and switch ON the blender.
IMPORTANT
The processing me changes for each product . Solid products should not be
processed without a liquid , because overheang may occur and therefore damage
the Cup seal.
IMPORTANT
Do never switch ON the blender empty, because irreparable damage will occur.
- Unusual noises. - Damaged bearings. - Call Technical Assistance.
16
9
Page 10

3.3 Cleaning and Sanizing
5. Analysis and Problems Solving
IMPORTANT
Never clean the machine when it is connected to the power point, always unplug
the machine before cleaning.
The equipment shall be totally cleaned and sanized:
- Before to be used first me
- Aer every day’s operaon
- When it has not been used during a long me
- Before to operate it aer a long period unused
Some parts of the equipment may be removed for cleaning , such as:
- The Cup # 02 (Pic.01)
- The Lid # 01 (Pic.01)
- The Cap # 09 (Pic.01)
Wash all the parts with water and neutral soap .
To clean inside the cup fill it up to the middle with water an add a small quanty of neutral
detergent.
- Place the lid and start the blender leng it work about 30 seconds.
- Empty the cup and rinse it.
- If necessary use a nylon brush to remove any residual product.
5.1 Problem, causes and soluons
The equipment has been designed to operate with the need of minimum maintenance but
the natural wearing caused by longer use of the equipment may occasionally cause some
malfuncons.
If such problem occurs with your equipment, refer to Table 02 in which the most common
situaons are listed with recommended soluons.
To assemble the parts follow the inverse path.
IMPORTANT
Never spray water directly to the equipment.
10
15
Page 11

When checking the tension of belts or chains DO NOT insert your fingers between belts
and pulleys, nor between the chains and gears.
Check protecons and safety devices to make sure they are working properly.
4.4 Operaon
4.4.1 Warnings
Do not use the machine with long hair that could touch any part of the machine. This might
lead to a serious accident. Tie your hair up well and/or cover it with a scarf.
Only trained or skilled personnel shall operate this machine.
Never touch turning parts with your hands or any other way, NEVER operate the machine
without any original safety devices under perfect condions.
3.4 Cauons with Stainless Steel:
The Stainless Steel may present rust signs, which ARE ALWAYS CAUSED BY EXTERNAL
AGENTS, especially when the cleaning or sanizaon is not constant and appropriate.
The Stainless Steel resistance towards corrosion is mainly due to the presence of chrome,
which in contact with oxygen allows the formaon of a very thin protecve coat. This
protecve coat is formed through the whole surface of the steel, blocking the acon of
external corrosive agents.
When the protecve coat is broken, the corrosion process begins, being possible to avoid
it by means of constant and adequate cleaning.
4.5 Aer Finishing The Work
4.5.1 Precauons
Always TURN THE MACHINE OFF before cleaning by removing the plug from the socket.
Never clean the machine unless it has come to a complete stop.
Put all the components back to their funconal posions before turning the machine ON
again.
Check the level of oil.
Do NOT insert your fingers in between belts and pulleys nor chains and gears.
4.6 Maintenance
4.6.1 Danger
Any maintenance with the machine in working situaon is dangerous. TURN IT OFF BY
PULLING THE PLUG OFF THE SOCKET DURING MAINTENANCE.
IMPORTANT
Always remove the plug from the socket in any emergency situaon.
4.7 Warning
Electrical or mechanical maintenance has to be undertaken by qualified personnel. The
person in charge of maintenance has to be sure that the machine is under TOTAL SAFETY
condions when working.
Cleaning must always be done immediately aer using the equipment. For such end, use
water, neutral soap or detergent, and clean the equipment with a so cloth or a nylon
sponge. Then rinse it with plain running water, and dry immediately with a so cloth, this
way avoiding humidity on surfaces and especially on gaps.
The rinsing and drying processes are extremely important to prevent stains and corrosion
from arising.
IMPORTANT
Acid soluons, salty soluons, disinfectants and some sterilizing soluons
(hypochlorites, tetravalent ammonia salts, iodine compounds, nitric acid and
others), must be AVOIDED, once it cannot remain for long in contact with the
stainless steel.
These substances aack the stainless steel due to the CHLORINE on its composion,
causing corrosion spots (ping).
Even detergents used in domesc cleaning must not remain in contact with the stainless
steel longer than the necessary, being mandatory to remove it with plain water and then
dry the surface completely.
Use of abrasives:
Sponges or steel wool and carbon steel brushes, besides scratching the surface
and compromising the stainless steel protecon, leave parcles that rust and react
contaminang the stainless steel. That is why such products must not be used for cleaning
and sanizaon. Scrapings made with sharp instruments or similar must also be avoided.
14
Main substances that cause stainless steel corrosion:
Dust, grease, acid soluons such as vinegar, fruit juices, etc., saltern soluons (brine),
blood, detergents (except for the neutral ones), common steel parcles, residue of sponges
or common steel wool, and also other abrasives.
11
Page 12

4. General Safety Pracces
IMPORTANT
If any recommendaon is not applicable to your equipment, please ignore it.
The following safety instrucons are addressed to both the operator of the machine as
well as the person in charge of maintenance.
The machine has to be delivered only in perfect condions of use by the Distributor to the
user. The user shall operate the machine only aer being well acquainted with the safety
procedures described in the present manual. READ THIS MANUAL WITH ATTENTION.
4.1 Basic Operaon Pracces
4.1.1 Dangers
Some areas of the electric device have parts that are connected or have parts connected
to high voltage. These parts when touched may cause severe electrical shocks or even be
lethal.
Never touch manual commands such as switches, buons, turning keys and knobs with
your hands wearing wet clothes and/or wet shoes. By not following these instrucons
operator could be exposed to severe electrical shocks or even to a lethal situaon.
* DO NOT remove, tear off or maculate any safety or idenficaon labels stuck on the
machine. If any labels have been removed or are no longer legible, contact your nearest
dealer for replacement.
4.2 Safety Procedures and Notes before Switching the Machine ON
IMPORTANT
Carefully read ALL INSTRUCTIONS of this manual before turning the machine ON.
Be sure to well understand all the informaon contained in this manual. If you
have any queson contact your supervisor or your nearest Dealer.
4.2.1 Danger
An electric cable or electric wire with damaged jacket or bad insulaon might cause
electrical shocks as well as electrical leak. Before use, check the condions of all wires and
cables.
4.2.2 Advices
Be sure to well understand all the informaon contained in this manual. Every operaon
funcon or procedure has to be thoroughly clear.
Before using any commands (switch, buons, lever), be sure it is the correct one. In case
of doubt, consult this manual.
4.1.2 Warnings
* The operator has to be well familiar with the posion of ON/OFF Switch to make sure the
Switch is easy to be reached when necessary.
* Before any kind of maintenance, physically remove plug from the socket.
* Provide space for a comfortable operaon thus avoiding accidents.
* Water or oil spilled on the floor will turn it slippery and dangerous. Make sure the floor
is clean and dry.
* Before using any commands (switch, buons, lever), be sure it is the correct one. In case
of doubt, consult this manual.
* Never touch any manual commands (switch, buons, lever) unadvisedly.
* If any work is to be made by two or more persons, coordinaon signs will have to be
given for each operaon step. Every step of the operaon shall be taken only if a sign has
been made and responded.
4.1.3 Advices
* In case of power shortage, immediately switch the machine off.
* Use recommended or equivalent lubricants, oils or greases.
* Avoid mechanical shocks, once they may cause damages or bad funconing.
* Avoid water, dirt or dust contact to the mechanical and electrical components of the
machine.
* DO NOT change the standard characteriscs of the machine.
12
4.2.3 Precauons
The electric cable has to be compable with the power required by the machine.
Cables touching the floor or close to the machine need to be protected against short
circuits.
The oil reservoirs have to be filled unl the indicated level. Check and refill if necessary.
OBSERVATION
For your own safety read all the machine sckers.
4.3 Roune Inspecon
4.3.1 Advice
When checking the tension of the belts or chains, DO NOT insert your fingers between the
belts and the pulleys and nor between the chain and the gears.
4.3.2 Precauons
Check the motor and sliding or turning parts of the machine in case of abnormal noises.
Check the tension of the belts and chains and replace the set when belts or chains show
signs of wearing.
13
 Loading...