

Page 1
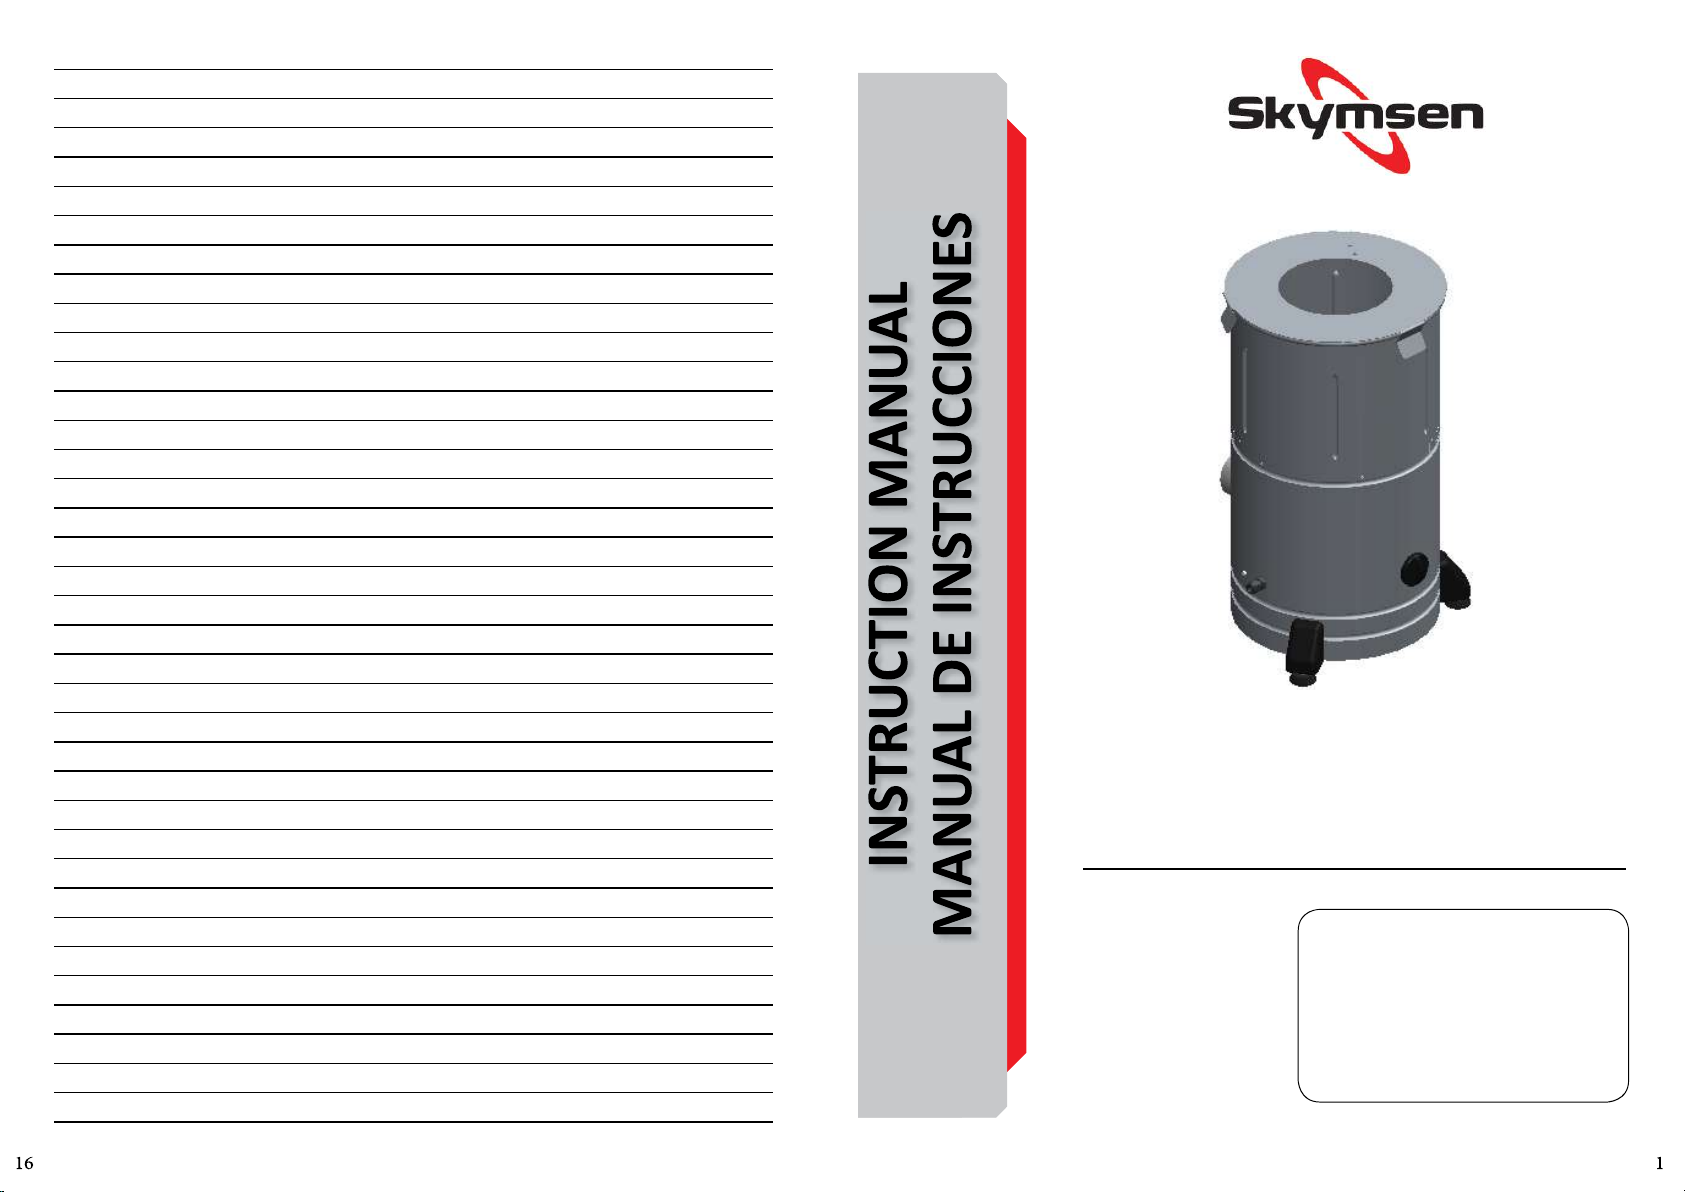
ONION PEELER, 6 kg / PELADORADE CEBOLA, 6 kg
691169 - ENGLISH/ESPAÑOL
Data de Revisão: 24/04/2025
Metalúrgica Skymsen Ltda.
Rodovia Ivo Silveira 9525
Volta Grande
88355-202 Brusque/SC/Brasil
www.skymsen.com - Fone: +55 47 3211 6000
CNPJ: 82.983.032/0001-19 - IE 250.064.537
MODEL/MODELO
DC-06
THE INFORMATION CONTAINED IN THE PRESENT INSTRUCTION MANUAL MAY BE MODIFIED WITHOUT PREVIOUS NOTICE.
- DUE TO THE CONSTANT IMPROVEMENTS INTRODUCED TO OUR EQUIPMENTS,
Page 2
CONTENTS
1. INTRODUCTION ..............................................2
1.1 Safety .................................................................... 2
2. COMPONENTS AND TECHNICAL
CHARACTERISTICS ..............................................2
3. INSTALLATION AND PRE-OPERATION ...............3
3.1 Posioning ............................................................. 3
3.2 Electrical Installaon ..............................................3
3.3 Hydraulic Installaon ............................................. 3
4. OPERATION.....................................................3
4.1 Starng .................................................................. 3
4.2 Operaon Procedure ............................................. 3
5. CLEANING .......................................................3
6. MAINTENANCE ...............................................4
7. PROBLEM SOLVING .........................................5
8. ELECTRICAL DIAGRAM ....................................6
1. INTRODUCTION
This product was developed to be used in commercial
kitchens. It is used, for example, in restaurants, cafeterias,
hospitals, bakeries, etc.
This appliance usage is not recommended when:
- The producon process should be done in a connuous
way in industrial scale;
- The workplace is in an atmosphere of corrosive, explosive,
with dust or gas.
1.1 Safety
To avoid accidents, injuries and harm to the equipment,
follow the instrucons below:
1.1.1 Read all the instrucons.
1.1.2 To avoid the risk of eletric shock and damages to the
appliance, never use it with: wet clothes and feet ou on a
wet surface, don´t patch it in water or any other liquid or
não mergulhe em água ou qualquer outro líquido e não
ulize jato de água diretwaterjet direct to the appliance.
1.1.3 Any appliance ulizaon must always be supervised,
mainly when it is being used near children.
1.1.4 Disconnect the aplliance from the power grid when,
it´s not being used, before cleaning it, removing the
accessories, acessories introducon, maintenance or any
other service.
1.1.5 Don´t use the equipment if the cable or plug is
damaged. Make sure that the power cable isn´t on the edge
of the table/counter or that it touches hot surfaces.
1.1.6 If the Equipment physically falls down, suffers any
kind of damage or has stopped working for any reason, it is
necessary to call specialized technical assistance.
1.1.7 The use of accessories not recommended by the
manufacturer can lead to injuries.
1.1.8 Keep your hands and any utensil far from the parts
in movement of the appliance while in operaon to avoid
body injuries or damage to the appliance.
1.1.9 During operaon never wear loose clothes with wide
sleeves, especially on the wrists.
1.1.10 Make sure that the electrical tension of the appliance
and the power grid are the same and that the appliance is
connected to the grounding grid.
1.1.11 When placing the Disc Nº.07 (Pic.01) make sure its
perfect fing on Central Sha Pin # 02 (Pic. 02), avoiding to
damage the equipment.
This equipment shall not be used by children or
any person with reduced physical or mental capacity,
lack of experience or knowledge, unless they are under
supervision or have received from the person responsible
for safety, proper instrucons on how to use the
equipment.
Make sure the cord is in perfect working condions,
if not, change it for one in accordance to the local safety
standards. Such change shall be made by qualified
professional following the local safety standards.
In case of emergency, unplug the appliance from wall
electrical outlet immediately.
Never wash the appliance with direct intense water
jets.
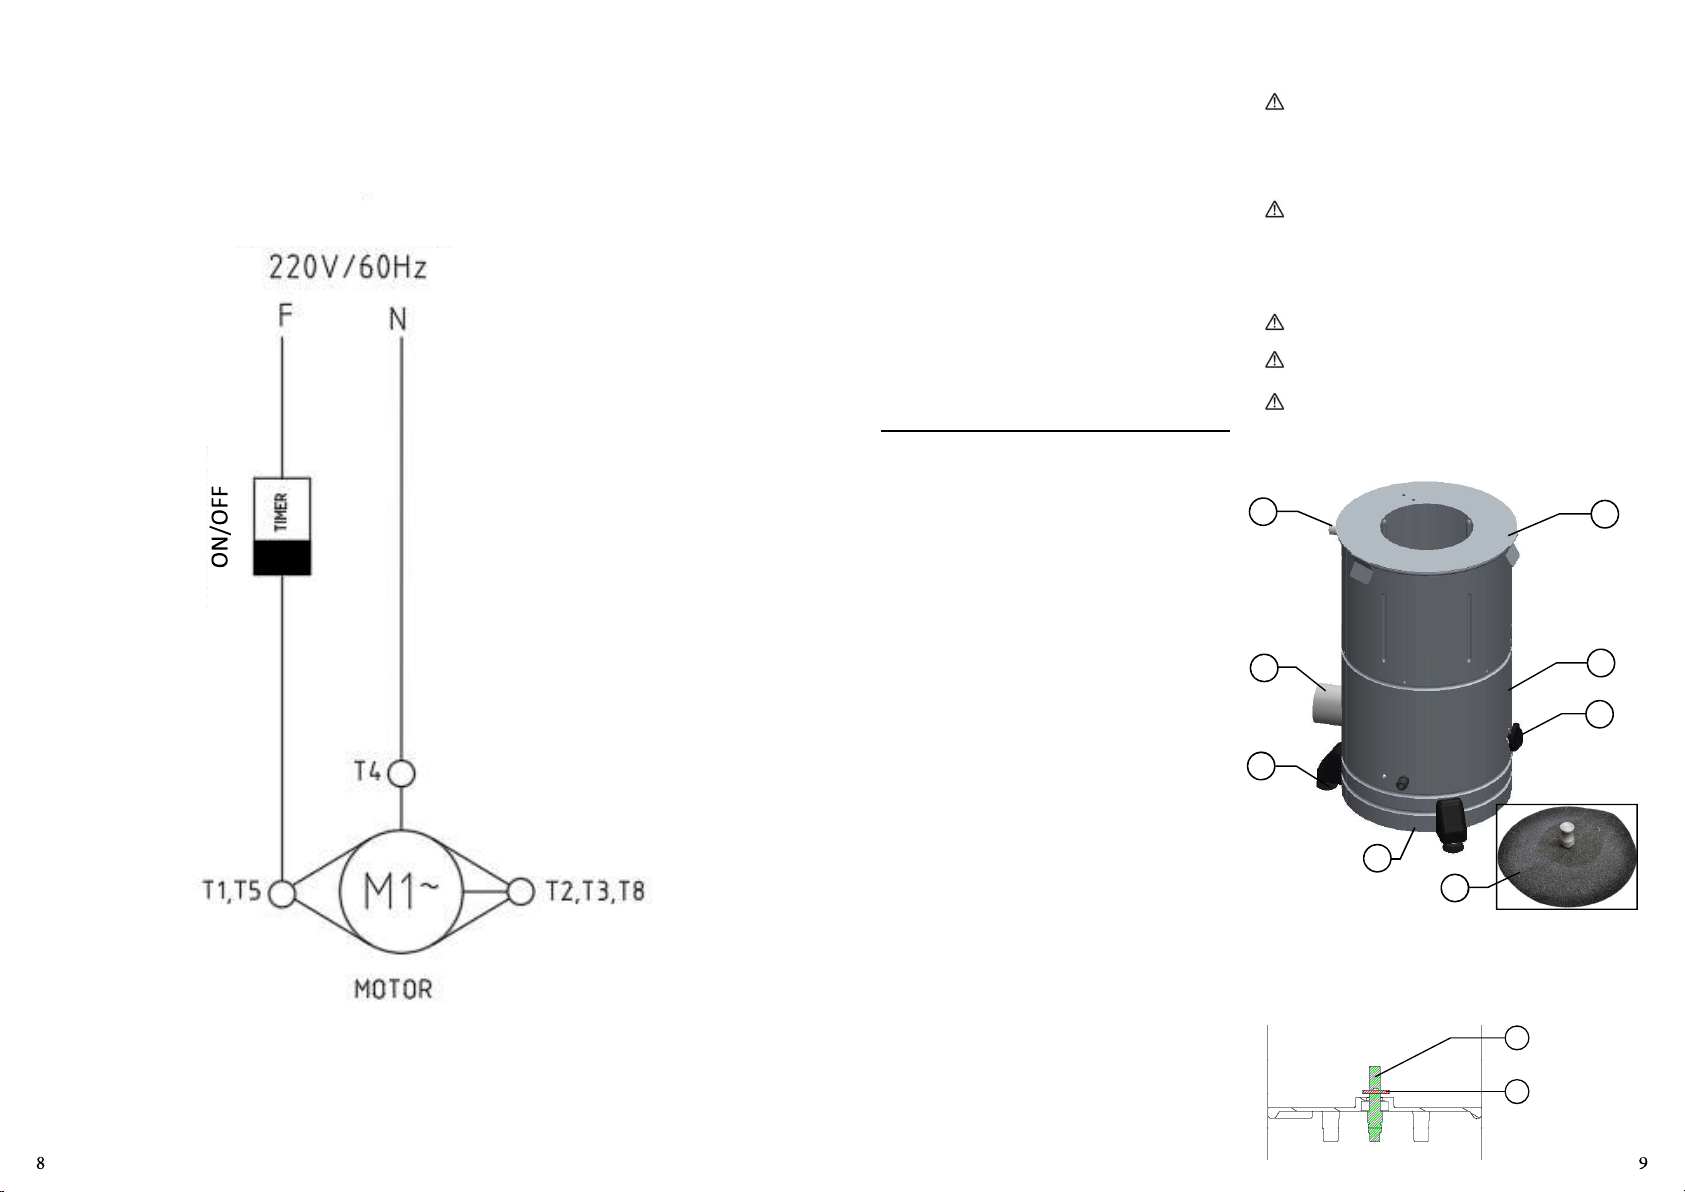
2. COMPONENTS AND TECHNICAL CHARACTERISTICS
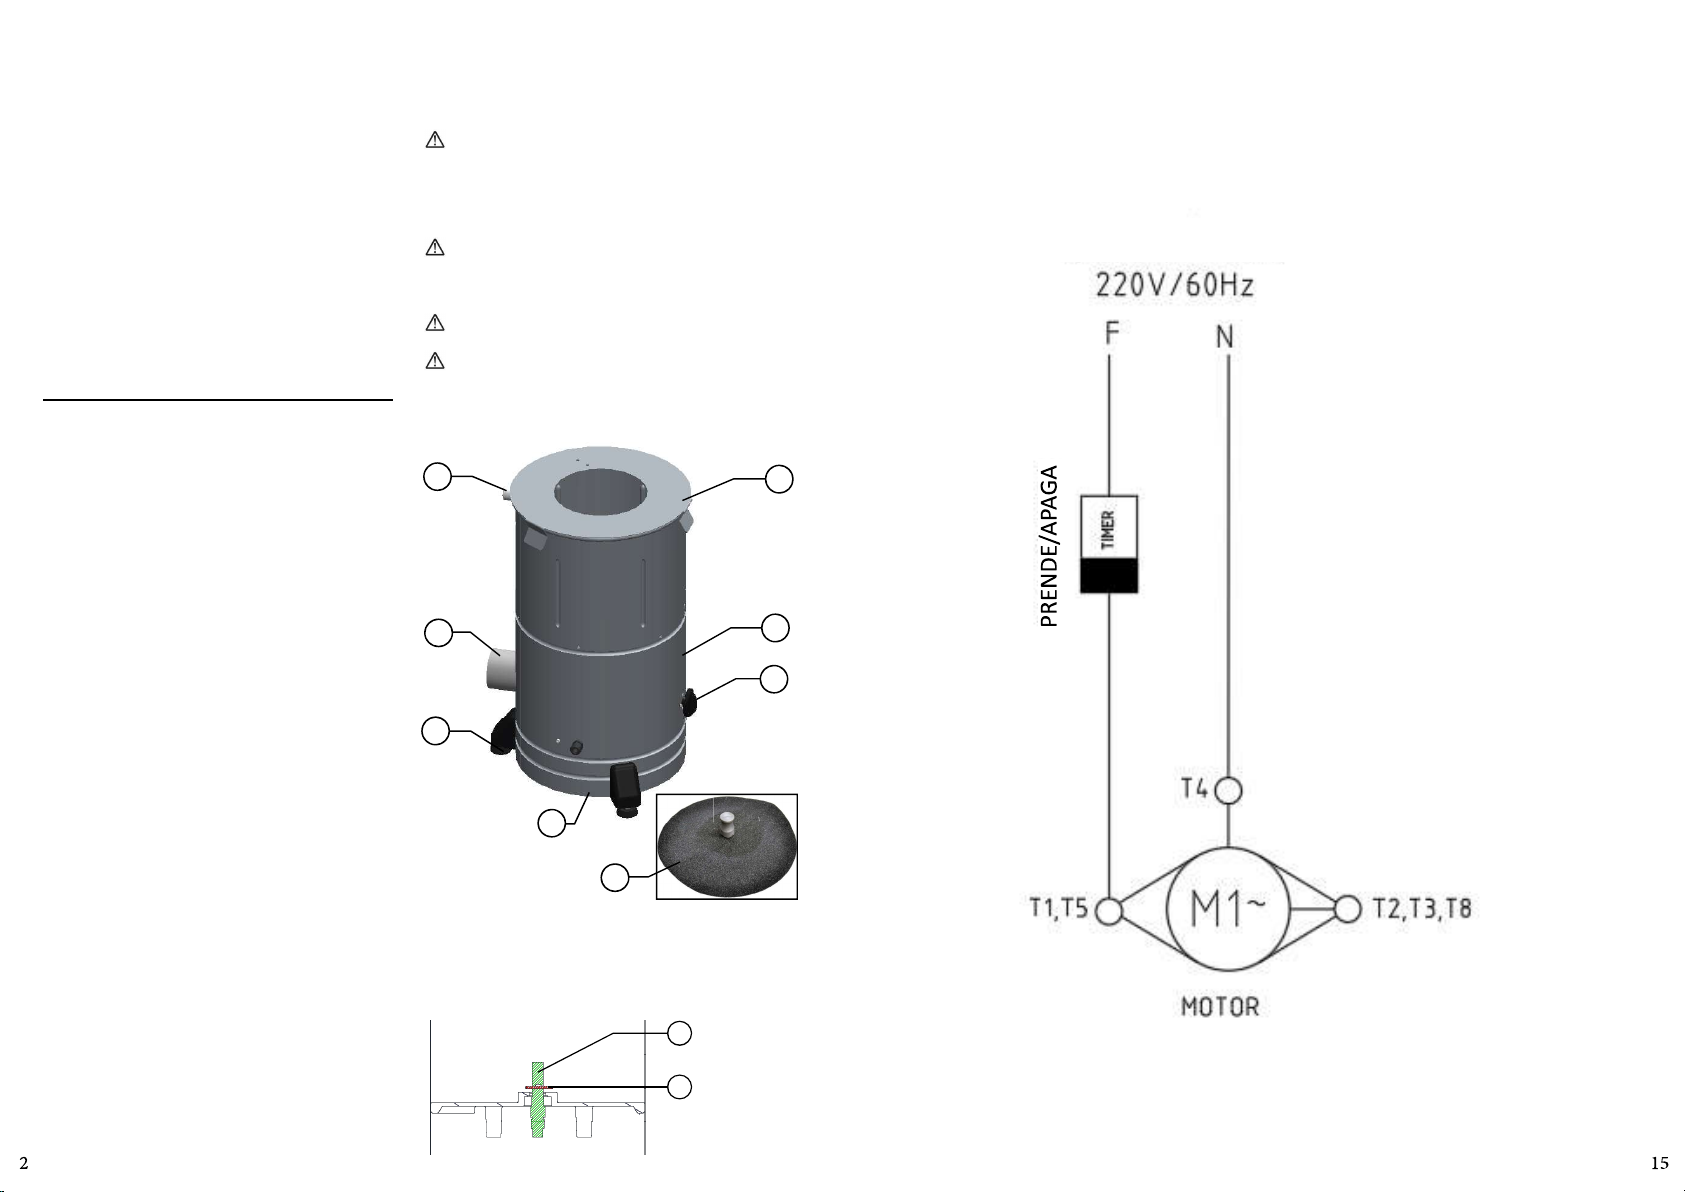
Picture 01
01
02
06
05
04
03
08
07
01 – Niple – Water Inlet
02 – Outlet Waste
03 – Foot
04 – Timer
05 – Housing
PICTURE 02
06 – Lid
07 – Abrasive Disc
08 – Voltage Selector
Switch
01
02
01 – Central Sha
02 – Central Sha Pin
VOLTAGE
NOTA: PARA INVERTIR LA DIRECCIÓN DE ROTACIÓN DEL MOTOR, SUSTITUYA
EL CABLE T5 CON EL CABLE T8.
Page 3
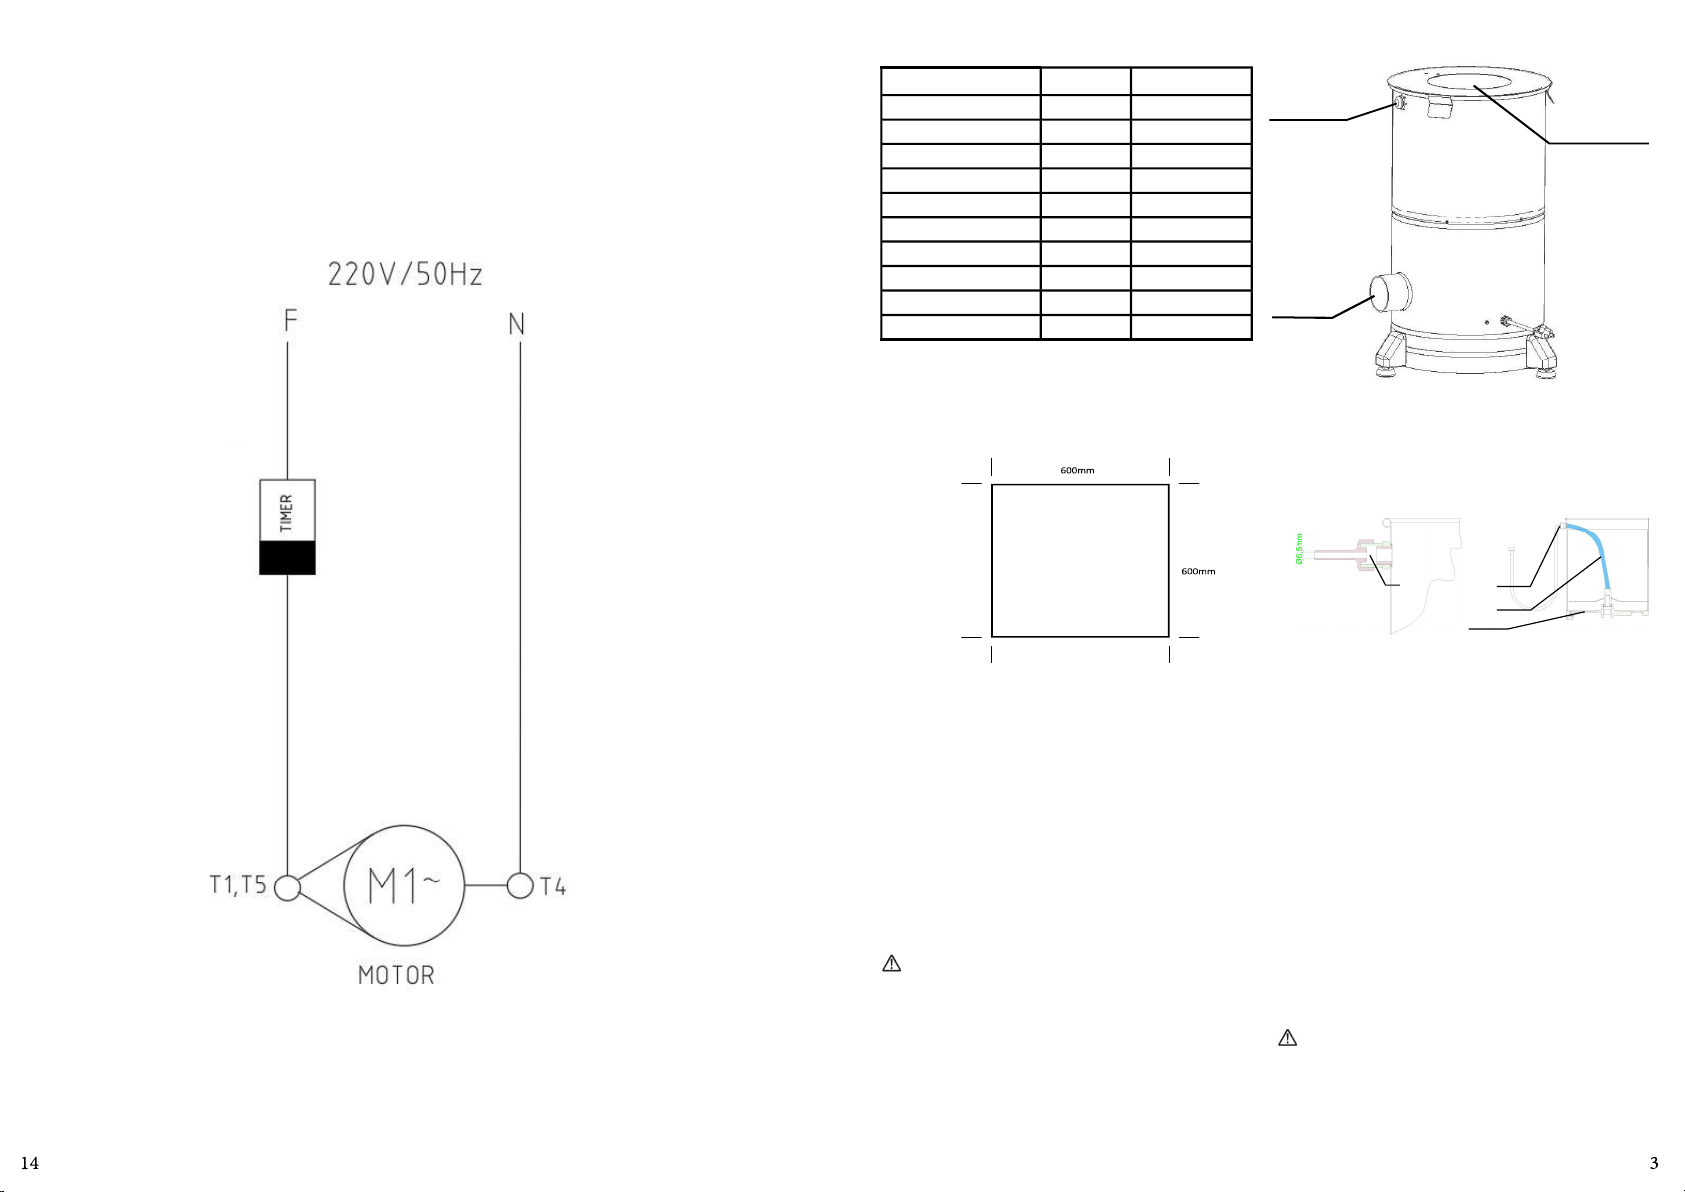
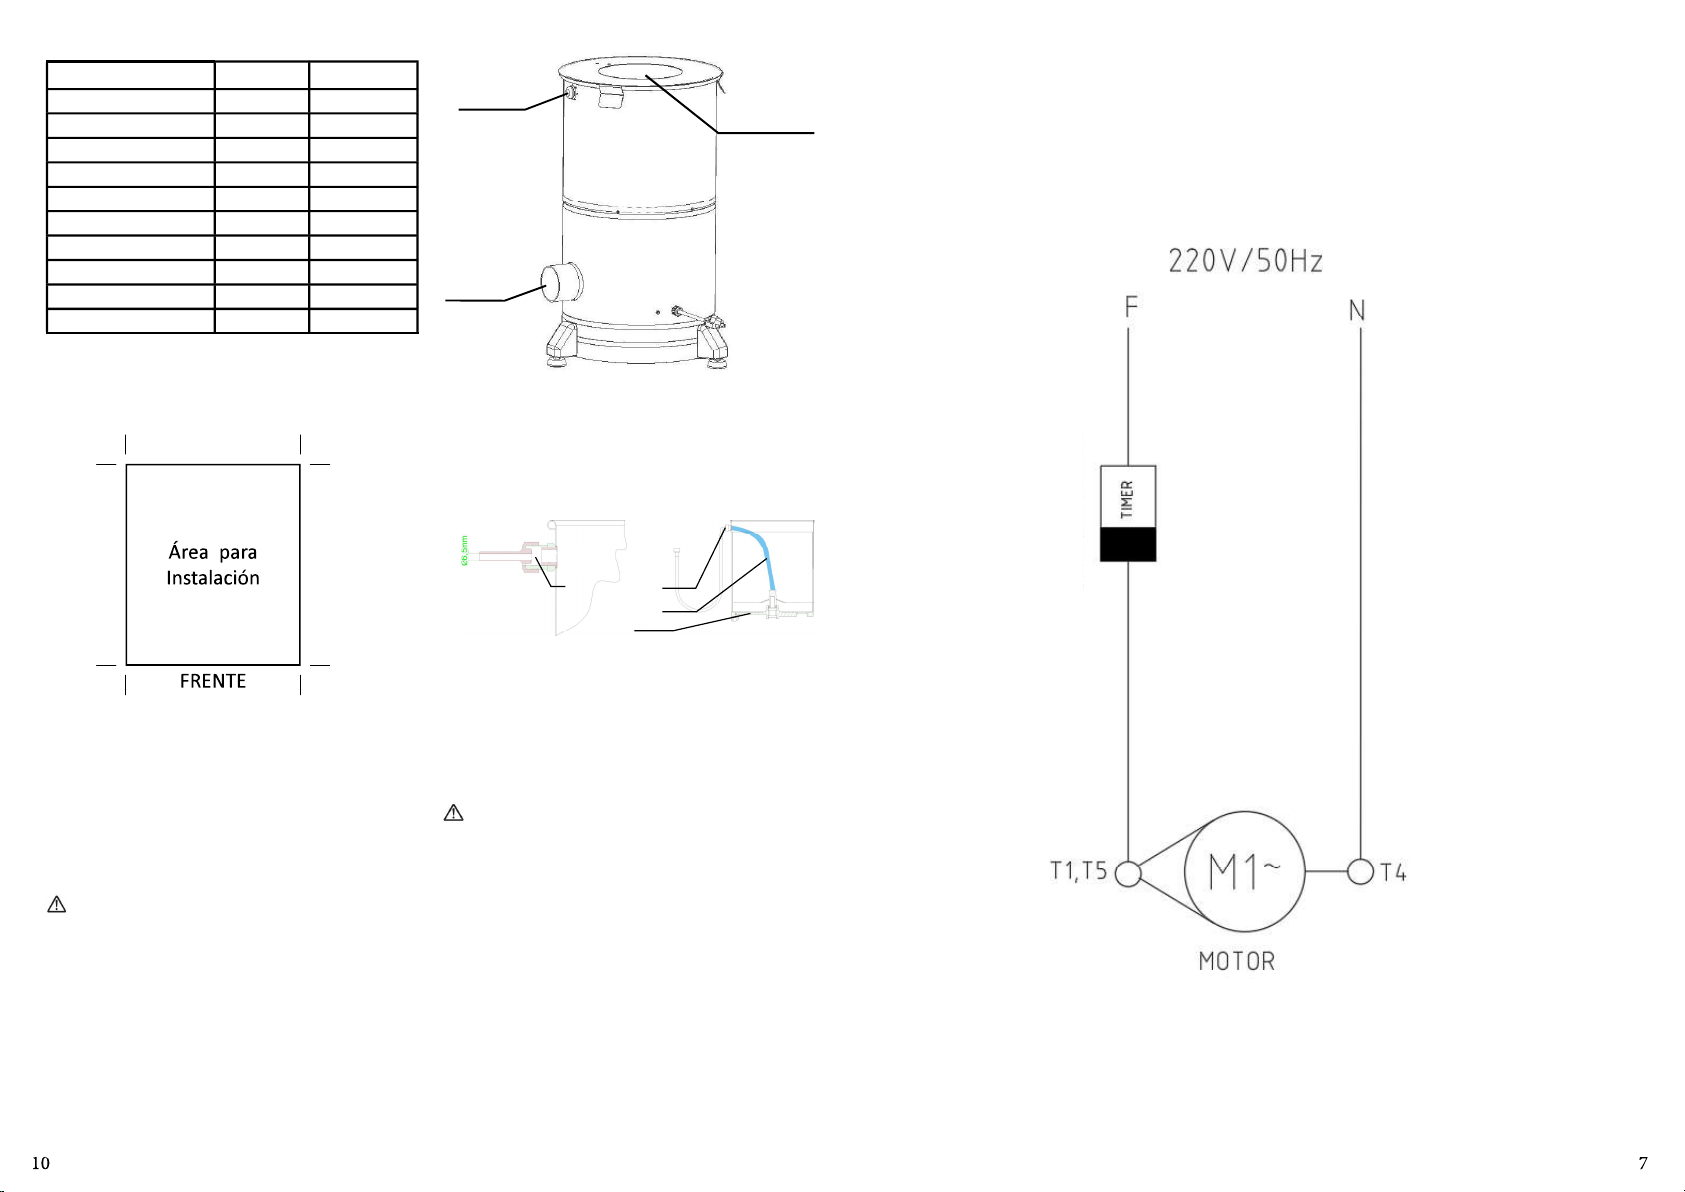
Chart 01
Picture 03
FEATURES UNIT DC-06
VOLTAJE
Average Producon kg/h up to 120
Voltage V 110 or 220
Frequency Hz 60
Power W 300
Height mm 570
Width mm 375
Depth mm 400
Net Weight kg 20,5
Gross Weight kg 22,5
Capacity kg 06
3. INSTALLATION AND PRE-OPERATION
3.1 Posioning
Your appliance must be installed in an aligned, non-slip,
stable surface with 850 mm of height.
NIPPLE
Water
entrance to be
connected to
the Nipple.
WATER EXIT
PIPE
For water and
residues.
Install the
machine near
a water sink.
The water oulow jet shall not drop beyond the disc centre
as shown on Picture 05.
The water oulow shall not exceed 2.5 litres per minute.
Picture 03
PRODUCT
ENTRANCE
It is
mandatory to
let water flow
directly on
the product.
Installaon
area
PRENDE/APAGA
Pre Operaon
WATER ENTRANCE
WATER OUTFLOW JET
DISC
NOTA: PARA INVERTIR LA DIRECCIÓN DE ROTACIÓN DEL MOTOR, SUSTITUYA
EL CABLE T5 CON EL CABLE T8.
3.2 Electrical Installaon
This equipment was developed for 110 or 220 V (60 Hz).
Before plugging the equipment on the power grid, make
sure the network voltage is the same as indicated on the
cord label.
The power plug has 3 (three) pins, the middle one is
designed to grounding – Ground Pin. All the 3 (three)
pins must be properly connected before operang the
equipment.
Make sure the power grid where the appliance is
installed is compable to the tension is compable with
the tension indicated in tag in the feeding cable.
3.3 Hydraulic Installaon
It is recommended to install the machine near a drain or
channel the water outlet. It is also necessary to install a
faucet (diameter ¾) with tap water directly on the product
to be stripped. Alternavely, it is possible to pick up water
from another faucet through the water inlet pipe.
Before to use the equipment all parts to be in contact with
the product shall be washed with water and neutral soap
(see item 5 Cleaning).
Make sure the equipment is firm on its working place.
4. Operaon
4.1 Starng
To turn on your appliance you should follow the direcons
below:
- Plug the equipment to the electric network.
1 - Verify if the Lid No. 06 (Pic.01) is properly posioned.
2 - Press the Timer Switch No. 04 (Pic.01) to posion “I”.
Never place the hand on the Disc while it is on
movement.
Page 4
4.2 Operang Procedures
8. DIAGRAMA ELÉTRICO
- Put the product to be peeled inside the equipment.
- Keep the lid in its correct place.
- The equipment does not work if the Protecon Lid No. 01
(Pic.01) is not fixed in its correct place.
- Let the water flow.
- Switch on the equipment using the ON Switch No. 06
(Pic.01), that is aached to the Housing side No. 02 (Pic. 01)
of the equipment, posioning it in “I”.
- The peeler has the maximum load of 6 kg of onion and the
esmated me for the operaon is 30 to 50 seconds.
- Through the opening on the Protecon Lid no. 01 (Pic.01)
it is possible to observe the product being peeled. Aer the
product is peeled, switch off the equipment and remove
the product manually.
5. CLEANING
Unplug the machine from the electric network, before
to start cleaning.
The equipment shall be totally cleaned and sanized:
- Before using it for the first me;
- Every day before closing the work shi;
- Always when it has not been in use for a long me;
- Before using aer it has not been in use for a long me.
Some parts of the equipment may be removed:
- Disc # 07 (Pic.01)
To achieve a good machine cleaning, follow the instrucons
below:
1. Start the machine empty, and let it work during some
minutes, adding abundant water.
2. Switch Timer the machine and unplug it. Wait for the
Disc No.07 (Pic.01) to stop completely.
3. Clean the outside of the housing with a wet cloth.
4. Remove the Disc No. 07 (Pic.01).
5. Clean the Disc using a nylon brush and abundant water.
6. Replace the Disc inside the machine. Make sure to have
the Disc fing on the central sha pin No. 02 (Pic.02).
All parts shall be washed with water and neutral soap.
Never spray water directly on to the equipment.
Scan the QR Code below to learn more
about stainless steel care.
6. MAINTENANCE
Maintenance should be considered a set of procedures that
aim to keep the equipment in the best operang condions,
providing an increase in its useful life and safety.
* Cleaning – Check item 5 CLEANING.
* Wiring - Check all cables for deterioraon and all electrical
contacts (terminals) for ghtness and corrosion.
* Contacts – On/Off switch, Emergency buon, Reset
buon, electronic circuits, etc. Check the equipment to
ensure that all components are working correctly and that
the device is operang normally.
* Installaon – Check the installaon of your equipment
according to item 3 Installaon and Pre-Operaon of this
manual.
* Useful life: 50,000 cycles according to the test standard.
1 – Items to check and perform monthly:
- Check components;
- Measure the outlet voltage;
- Measure the operang current and compare it with the
nominal current;
- Check the ghtness of all electrical terminals of the device,
to avoid possible bad contacts.
- Check possible clearances in the electric motor sha;
- Check the wiring and electrical cable for signs of
overheang, poor insulaon or mechanical damage.
2 – Items to check or perform every 3 months:
- Check electrical components such as the On/Off Switch,
Emergency Buon, Reset Buon and electronic circuits
for signs of overheang, poor insulaon or mechanical
damage.
- Check possible clearances in the bearings and rollers.
- Check seals, O-rings, V-rings and other sealing systems.
- Check that all screws and nuts are ght to avoid possible
damage to the equipment.
Scan the QR Code on the side to get basic
safety and maintenance informaon.
VOLTAGE
PRENDE/APAGA
NOTA: PARA INVERTIR LA DIRECCIÓN DE ROTACIÓN DEL MOTOR, SUSTITUYA
EL CABLE T5 CON EL CABLE T8.
Page 5
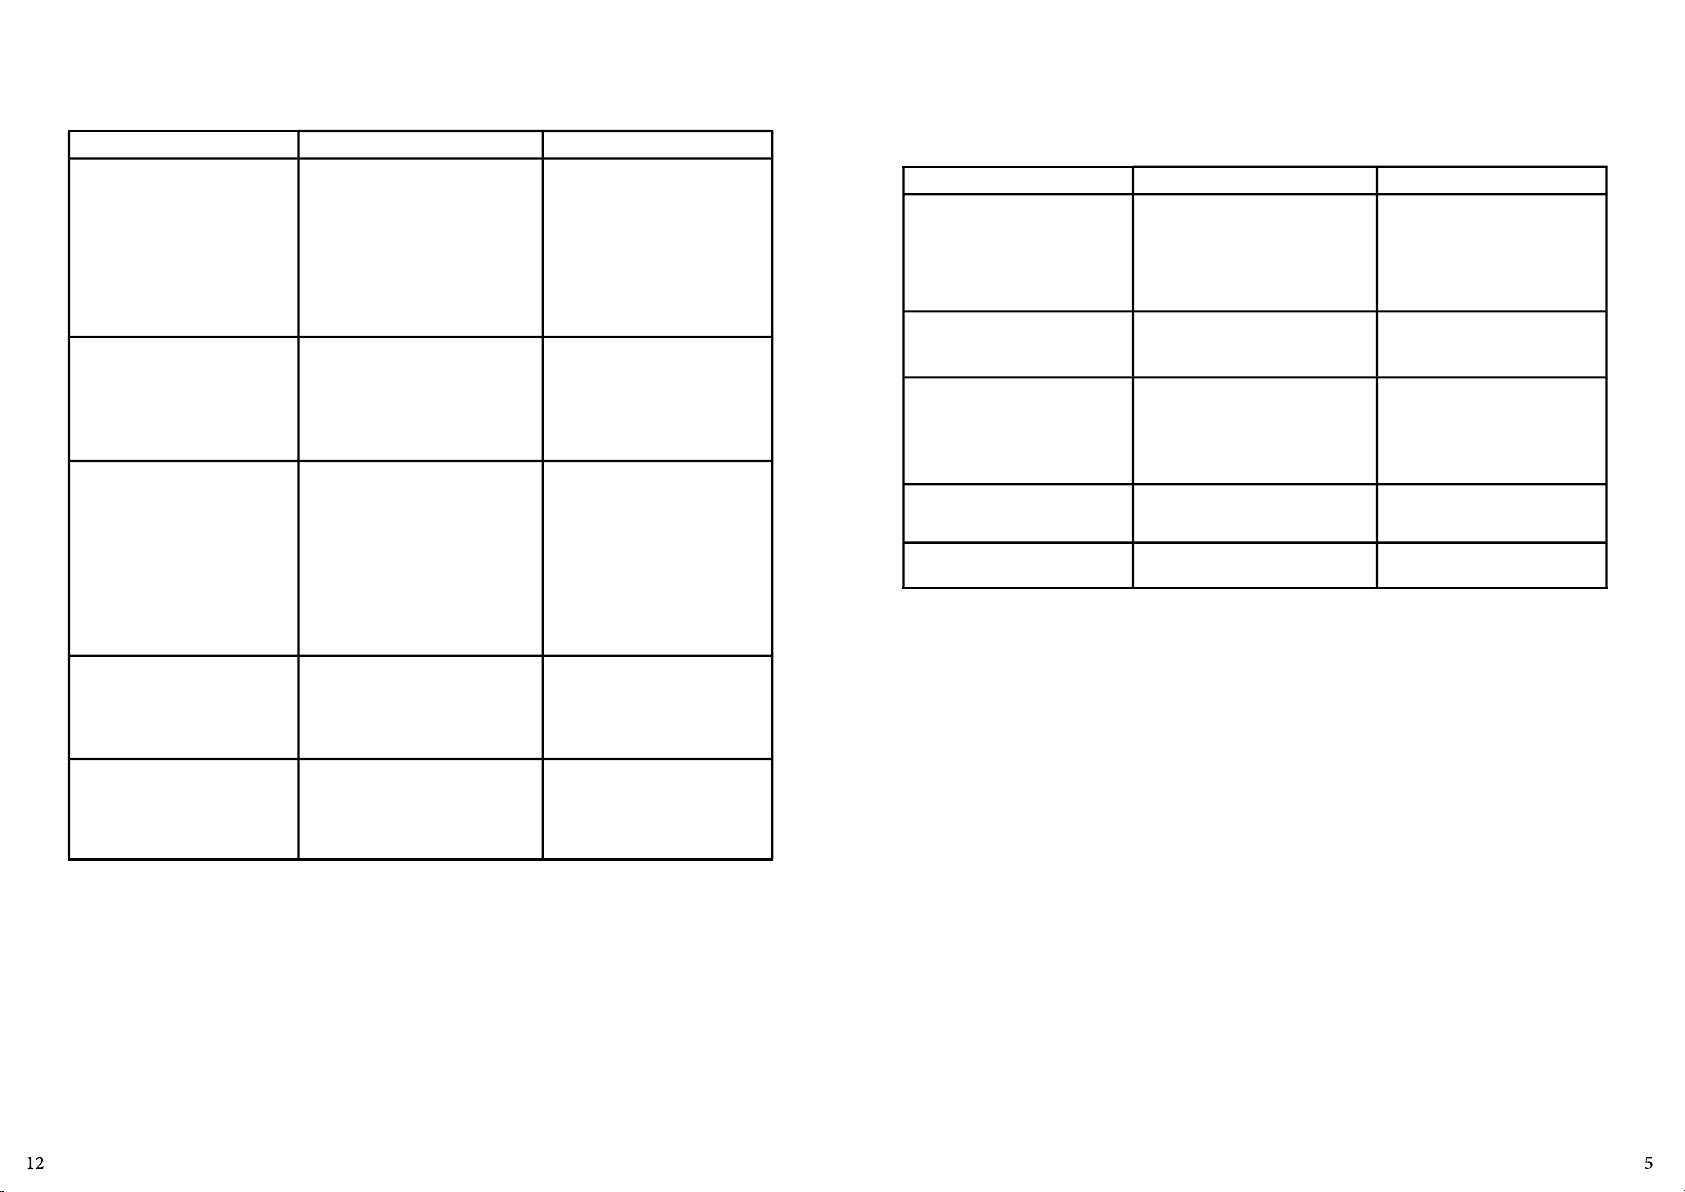
7. SOLUCIÓN DE PROBLEMAS
7. PROBLEM SOLVING
CUADRO 02
PROBLEMAS CAUSAS SOLUCIONES
- Verifique si hay energía eléctrica
en la red.
- Llame la Asistencia Técnica.
- Llame la Asistencia Técnica.
- Llame la Asistencia Técnica.
- La maquina no prende.
- Olor a quemado ó humo.
- La maquina prende, sin embargo
cuando el producto es colocado
sobre el disco, este para o gira en
baja rotación.
- Falta de energía eléctrica en la red.
- Problemas en el circuito eléctrico
interno o externo de la maquina.
- Problemas en el circuito eléctrico
interno ó externo de la maquina.
- Correa desliza.
- Problema en el motor eléctrico.
TABLE 02
PROBLEMS CAUSES SOLUTIONS
- Problem with the internal or
- The machine does not start.
- Burnt smell or smoke.
- The machine starts, but when
the product is placed on the Disc,
the Disc stops or turns slowly.
- Damaged Cord. - Problem during transportaon. - Call Technical Assistance.
- Abnormal Noises. - Problems with the bearings. - Call Technical Assistance.
external wiring.
- Electric energy shortage.
- Problem with the internal or
external wiring.
- Belts sliding.
- Problem with the Electric motor.
- Call Technical Assistance;
- Check Electric Energy source.
- Call Technical Assistance.
- Call Technical Assistance;
- Call Technical Assistance.
- Cable eléctrico damnificado. - Problema durante el transporte. - Llame la Asistencia Técnica.
- Ruidos anormales. - Rodamiento dañado. - Llame la Asistencia Técnica.
Page 6
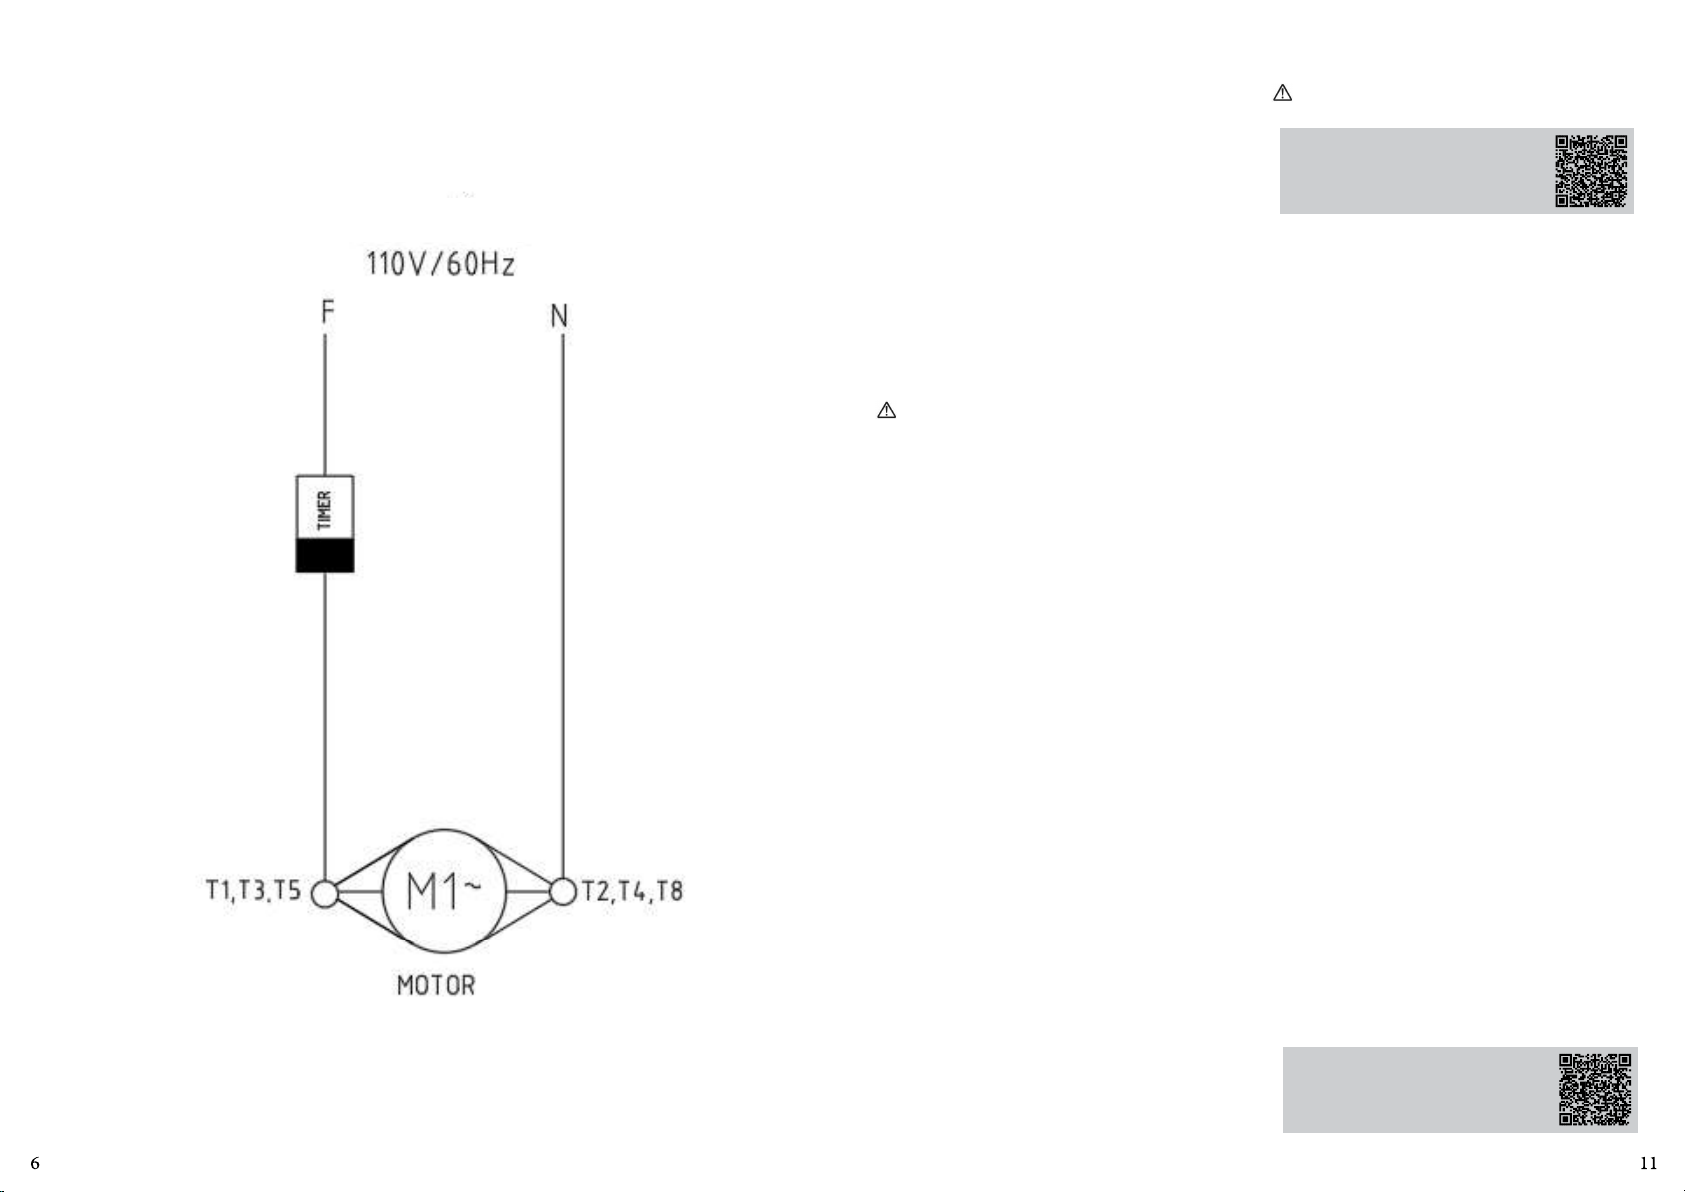
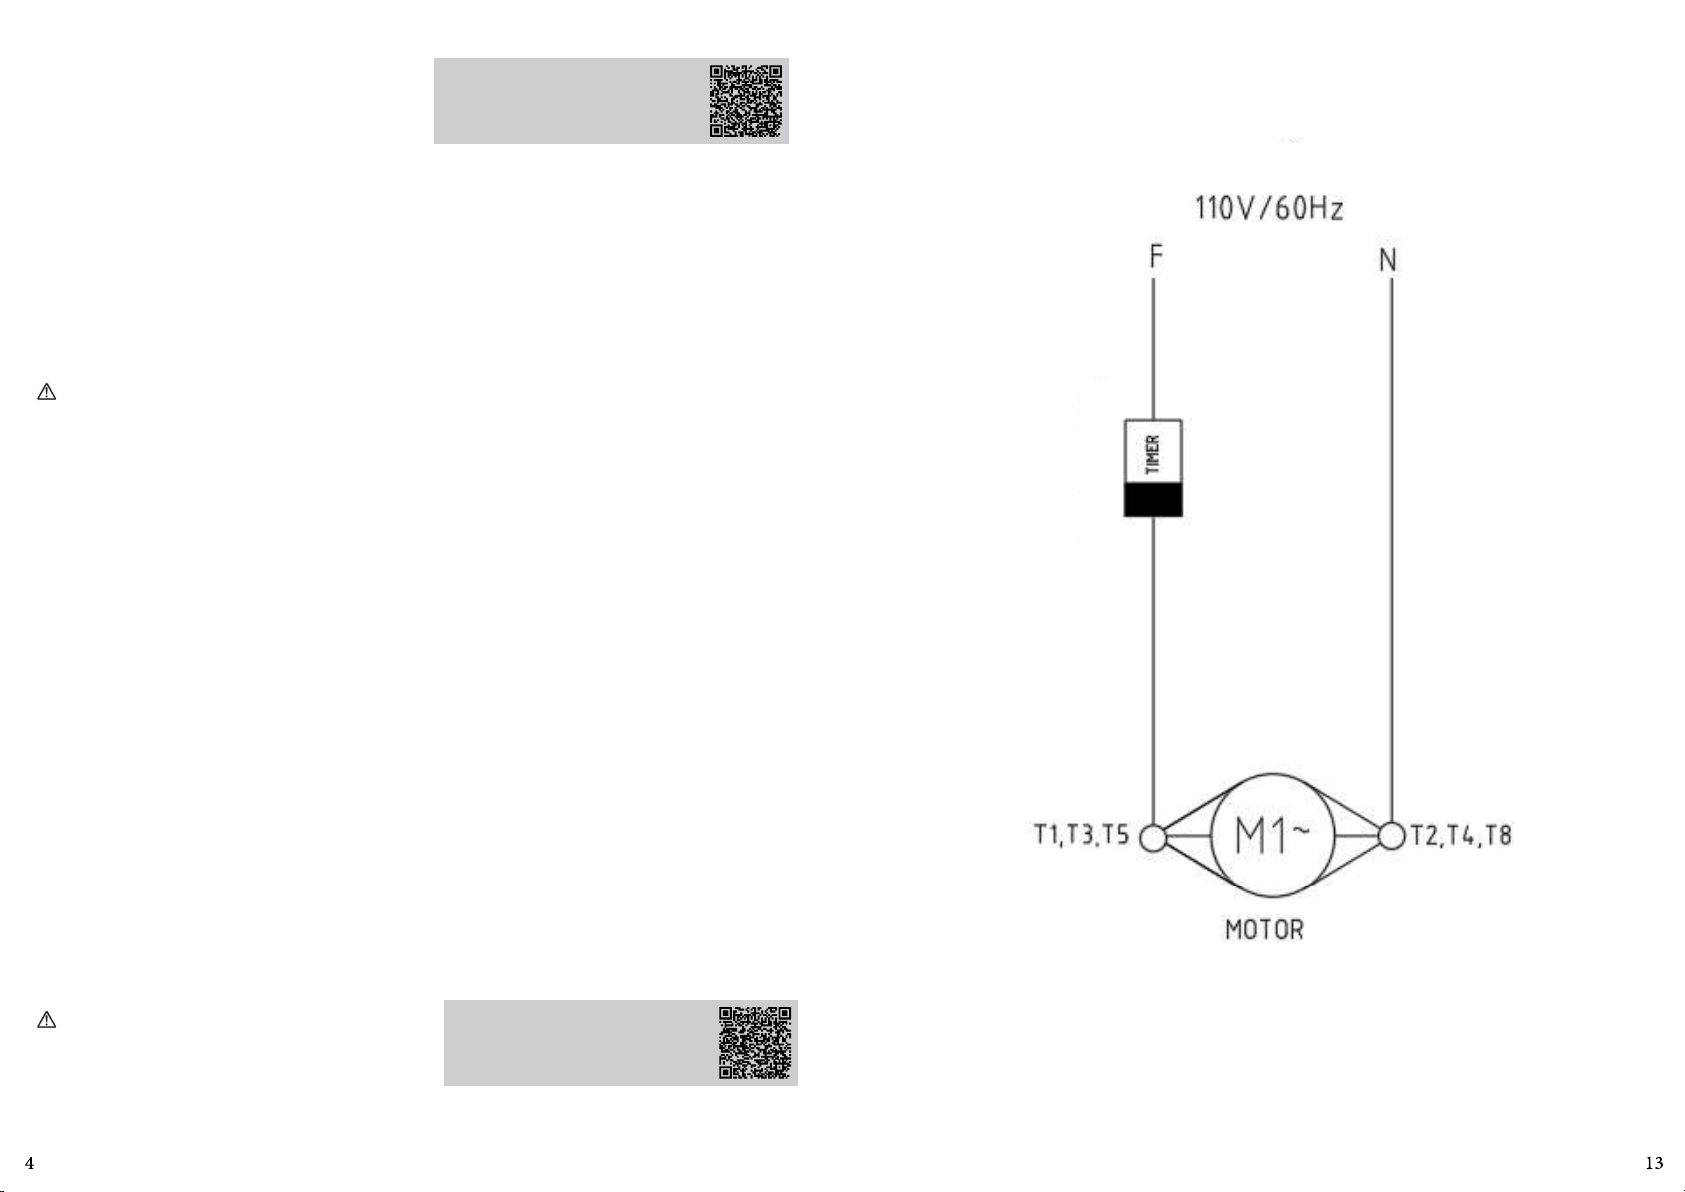
8. ELECTRICAL DIAGRAM
4.2 Procedimiento para la Operación
- Coloque el producto a pelar en el interior de la máquina.
- Coloque la tapa en su debido lugar.
- El equipo no funcionará si la Tapa de Protección N° 01
(Fig.01) no está ubicada en su debido lugar.
- Abra el grifo de agua.
- Encienda el equipo ulizando el interruptor encendido
N°06 (Fig.01), que se encuentra en la lateral del Gabinete
N° 02 (Fig.01).
VOLTAGE
- La peladora ene capacidad máxima para 6 kg de cebola
y el empo esmado para la operación es de 30 a 50
segundos.
- Es posible observar el producto mientras está siendo
pelado a través de la abertura existente en la Tapa de
Protección N° 01 (Fig.01). Una vez terminado el proceso de
pelado, apague la máquina y espere hasta que el disco esté
completamente parado y rere el producto manualmente.
5. LIMPIEZA
Rere el enchufe de su toma antes de iniciar la
limpieza.
El equipo debe ser totalmente limpio y higienizado, cuando:
- Antes de la ulizarlo por la primera vez;
- Todos los días después del turno de trabajo;
- Siempre que no ulizarlo por un largo período de empo;
ON/OFF
- Antes de ponerlo en operación después de un largo período
de empo de inacvidad.
- Algunas partes pueden ser removidas para la limpieza:
- Disco No. 07 (Fig.01)
Para hacer una buena limpieza de la maquina siga las
siguientes instrucciones:
1. Prenda la maquina en vacío y hágala trabajar por algunos
minutos, dejándole escurrir agua en abundancia;
2. Desligue la maquina de la red eléctrica y espere que el
disco No.07 (Fig.01) esté completamente parado.
central No.02 (Fig 02).
Lave todas las partes con agua y jabón neutro.
Nunca use chorros de agua directamente sobre la
maquina.
Escanee el código QR a connuación
para obtener más información sobre el
cuidado del acero inoxidable.
6. MANTENIMIENTO
El mantenimiento debe ser considerado como un conjunto
de procedimientos con el objevo de conservar el equipo
en las mejores condiciones de funcionamiento propiciando
un aumento de su vida úl y de su seguridad.
* Limpieza – Verificar el ítem No.5 de este manual.
* Cableado – Verifique todos los cables cuanto a su
deterioración y todos los terminales cuanto a su aprieto y
corrosión.
* Contactos – Llave prende/desliga, botón de emergencia,
botón rearme, circuitos electrónicos, etc Verifique el
equipo para que todos los componentes estén funcionando
correctamente, y que la operación del equipo sea normal.
* Instalación – Verifique la instalación de su equipo de
acuerdo con el ítem 3.1 de este manual.
1 - Verificaciones a ejecutar mensualmente:
- Verificar la instalación eléctrica;
- Controlar la tensión de la toma eléctrica;
- Medir la corriente eléctrica y compararla con la corriente
nominal;
- Verificar el aprieto de todos los terminales eléctricos para
evitar malos contactos;
- Verificar posibles holguras del eje del motor eléctrico;
- Controlar el cableado eléctrico para idenficar señales
de sobrecalentamiento, aislamiento deficiente o avería
mecánica.
NOTE: TO REVERSE THE DIRECTION OF ROTATION OF THE MOTOR, REPLACE
WIRE T5 WITH WIRE T8.
3. Pase un paño húmedo en la parte externa de la maquina.
4. Rere la Tapa No.06 (Fig.01) y levante el disco No.07
(Fig.01).
5. Use un cepillo con dientes de nylon y agua abundante
para limpiar el disco.
6. Recoloque el disco y la tapa al terminar la limpieza. Tenga
cuidado para que el disco se encaje en el perno del eje
2 - Verificaciones a ejecutar cada tres meses:
- Verificar los componentes eléctricos como la llave
prende/desliga, botón de emergencia, botón rearme, y
circuitos electrónicos con respecto a sobrecalentamiento,
aislamiento deficiente o avería mecánica.
- Verificar posibles holguras en los ejes y rodamientos.
- Verificar retenedores, anillos O’ring , anillos V’ring, y otros
sistemas de vedamiento.
-Verifique el apriete de todos los tornillos y tuercas para
evitar posibles daños al equipo.
Escanee el código QR en el lateral para
obtener información básica de seguridad
y mantenimiento.
Page 7
Quadro 01
CARACTERÍSITCAS UNIDAD DC-06
Producción Promedio kg/h hasta 120
Tensión V 110 ó 220
Frecuencia Hz 60
Potencia W 300
Altura mm 570
Ancho mm 375
Profundidad mm 400
Peso Neto kg 20,5
Peso Bruto kg 22,5
Capacidad kg 06
3. Instalación y Pre Operación
3.1 Posicionamiento
El equipo debe ser colocado y nivelado sobre una superficie
seca y firme.
600 mm
Figura 02
NIPPLE
Entrada
de agua,
atravez de
un tubo.
SALIDADE
AGUA Y
DE LOS
RESIDUOS
Instale la
maquina y
canalize el
agua para un
desaguadero.
El chorro de agua que entra no debe pasar el centro del
disco, como representado en la figura 04.
El flujo de agua debe ser en el máximo de 2,5 l por minuto.
Figura 03
ENTRADA DEL
PRODUTO
Es obligatoria
la entrada
de agua
c o r r i e n t e
directamente
sobre el
producto.
VOLTAGE
600 mm
3.2 Instalação Elétrica
Este aparato fue diseñado para 110 ó 220 V (60Hz). Al
recibirlo, verifique el voltaje registrado en la equeta
existente en el cable eléctrico.
El cable de alimentación posee un enchufe con trés clavillos
(el central es el clavilla de aterramiento), es obligatorio que
los tres estén debidamente conectados antes de usar el
equipo.
Cerquese de que la tensión de la red eléctrica es la
misma de la tensión indicada en la equeta del cable de
alimentación.
3.3 Instalación Hidráulica
Recomiendase instalar la maquina cerca de un desaguadero
o canalizar la salida del agua. Es también necesario instalar
un grifo (diámetro ¾) con agua corriente directamente sobre
el producto que se desee descascarar. Como alternava , es
posible captar el agua por otro grifo a través del tubo de
entrada de agua.
ENTRADA DE ÁGUA
CHORRO DE ÁGUA
DISCO
Pre Operación
Antes de usar el equipo se debe lavar todas las partes
que entren en contacto con el producto con agua y jabón
neutro (vea ítem 5 Limpieza).
Cerquese que la Peladora de Papas esté firme en su lugar
de trabajo.
Antes de iniciar el procesamiento, los productos deben
estar limpios, sin erra y sin arena.
4. Operación
4.1 Accionamiento
Para prender el equipo proceda como abajo:
- Coloque el enchufe en la toma de la red eléctrica.
1 - Verifique si la Tapa No. 06 (Fig.01) esté colocada
correctamente.
2 - Presione la Llave Prende/Desliga No. 04 (Fig.01) en la
posición “I”.
ON/OFF
NOTE: TO REVERSE THE DIRECTION OF ROTATION OF THE MOTOR, REPLACE
WIRE T5 WITH WIRE T8.
Page 8
VOLTAGE
NOTE: TO REVERSE THE DIRECTION OF ROTATION OF THE MOTOR, REPLACE
WIRE T5 WITH WIRE T8.
SUMÁRIO
1. INTRODUÇÃO .................................................9
1.1 Seguridad .............................................................. 9
2. COMPONENTES Y CARACTERÍSTICAS TÉCNICAS
...........................................................................10
3. INSTALACIÓN Y PRE OPERACIÓN .................10
3.1 Posicionamiento ....................................................10
3.2 Instalação Elétrica .................................................. 10
3.3 Instalación Hidráulica ............................................. 10
4. Operación .......................................................10
4.1 Accionamiento .......................................................10
4.2 Procedimiento para la Operación ........................... 11
5. LIMPIEZA ........................................................11
6. MANTENIMIENTO .........................................11
7. SOLUCIÓN DE PROBLEMAS .............................12
8. DIAGRAMA ELÉTRICO .....................................13
1. INTRODUCCIÓN
Este artefacto es potencialmente PELIGROSO cuando se
uliza incorrectamente. Es necesario que la manutención,
limpieza y/o cualquier servicio, sea realizado por una
persona calificada y con el equipamiento desconectado de
la red eléctrica.
1.1 Seguridad
Las instrucciones a connuación deberán ser seguidas para
evitar accidentes:
1.1.1 Lea todas las instrucciones.
1.1.2 Para evitar el riesgo de descarga eléctrica y daños
al artefacto, nunca lo ulice con: ropas o pies mojados e/o
en superficies húmeda o mojadas; no sumerja en agua
o en cualquier otro líquido y no ulice chorro de agua
directamente en el equipamiento.
1.1.3 El uso de cualquier equipamiento debe ser siempre
supervisado, principalmente cuando se ulice próximo de
niños.
1.1.4 Desenchufe el artefacto de la red eléctrica cuando:
no esté en uso, antes de limpiarlo, inserción o extracción de
accesorios, manutención y cualquier otro po de servicio.
1.1.5 No use el equipo cuando tenga el cable o el
enchufe damnificado. No deje que el cable de alimentación
se quede en el borde de una mesa, o que toque superficies
calientes.
1.1.6 Cuando el equipo se haya caído, estuviera
damnificado de alguna manera ó no funcione llévelo hasta
una Asistencia Técnica para revisión y reparo.
1.1.7 Usar accesorios no recomendados por el fabricante
puede proporcionar lesiones corporales.
1.1.8 Mantenga las manos ó cualquier otro objeto lejos
de todas las partes en movimiento mientras el equipo
estuviera funcionando para evitar lesiones corporales y/ó
daños al equipo.
1.1.9 Nunca use ropas con mangas anchas,
principalmente cerca de los puños, durante la operación.
1.1.10 Cerquese que la tensión del equipo y de la red
eléctrica sean iguales , y que el equipo esté aterrado.
1.1.11 Cuando colocar el Disco No. 07 (Fig.01) verifique su
perfecto encaje en el Perno del Eje Central No 02 (Fig.02).
Asegúrese que el cable de alimentación esté en
perfectas condiciones de uso. Si no lo está, reemplácelo
por otro que aenda a las especificaciones técnicas y de
seguridad.
Este reemplazo deberá ser realizado por un profesional
calificado atendiendo las normas de seguridad local.
Este equipo no es para ser ulizado por personas
(inclusive niños) con capacidades sicas o mentales
reducidas, o con falta de experiencia o conocimiento, a no
ser que tengan recibido supervisión o instrucción referente
al uso de este equipo por una persona responsable por la
seguridad del mismo.
Recomendamos que se vigile a los niños para no
permirles jugar con la máquina.
En caso de emergencia, rere el enchufe del
tomacorriente.
Nunca use chorros de agua directamente sobre el
equipo.
2. COMPONENTES Y CARACTERÍSTICAS TÉCNICAS
Figura 01
01
02
06
05
04
03
08
07
01 – Entrada de Agua – Nipple
02 – Caño de Salida
03 – Piés
04 – Timer
05 – Gabinete
FIGURA 02
06 – Tapa
07 – Disco Abrasivo
08 – Interruptor selector
de voltaje
01
02
01 – Eje central
02 – Perno del Eje Central
 Loading...