

Page 1

Merlin 2003
DV and MPEG-2 Recorder and Dual Stream Decoder
Users Manual
The Sky is the Limit
Page 2

Copyright © 2003 by Skymicro, Inc.
All rights reserved. No part of this book shall be reproduced, stored in a retrieval system, or transmitted by any
means, electronic, mechanical, photocopying, recording, or otherwise, without written permission from Skymicro,
Inc.
Windows® is a registered trademark of Microsoft Corp.
All in Wonder is a registered trademark of ATI Corp.
Norton Utilities is a registered trademark of Symantec Corp.
Premiere is a registered trademark of Adobe Corp.
Skymicro, Inc.
2060D Ave. Los Arboles PMB344
Thousand Oaks, CA 91362-1361
(805) 491-8995
www.skymicro.com
Page 3

Merlin 2003 DV and MPEG-2 Recorder and Dual Stream Decoder
Contents
1. Overview
1.0 Introduction 5
1.1 Features 6
1.2 Block Diagram 7
2. Getting Ready
2.0 System Requirements 8
2.1 Package Contents 8
2.2 Preparing Your System 9
3. Installing the Hardware
3.0 Computer Installation 10
4. Installing the Software
4.0 Driver Installation 12
4.1 Application Installation 12
5. Quick Start
5.0 Running the Application Software 15
5.1 Recording to files 16
5.2 Playing from files 17
6. Application Software
6.0 The Player Application Window 19
6.1 The Recorder Application Window 31
6.2 The Play List Editor 37
6.3 The Program Stream Generator 40
6.4 The Program Stream Splitter 41
6.5 The Batch Recorder Utility 42
Page 3
Page 4

Merlin 2003 DV and MPEG-2 Recorder and Dual Stream Decoder
A.0 Video Play List File Format 45
Appendix B. Audio Play List File
B.0 Audio Play List File Format 46
Appendix C. Writing your own Application
C.0 Example Source Code Using Method 1 47
C.1 Command Line Examples using Method 1 48
C.2 Simpleplay Application using Method 2 48
Appendix D. Cable Pinouts
D.0 Cable Pinouts 49
D.1 Merlin2003 Digital Cable 50
D.2 Merlin2003 Analog Cable 51
D.3 Batch Recorder Serial Cable 52
Appendix A. Video Play List File
Page 4
Page 5

Merlin 2003 DV and MPEG-2 Recorder and Dual Stream Decoder
1. Overview
1.0 Introduction
Skymicro’s Merlin 2003 DV and MPEG-2 Recorder and Dual Stream Decoder board is a complete video capture
and playback solution in a single half-sized PCI card. It is ideally suited for applications such as digital video
broadcast, video distribution applications, authoring, and nonlinear editing.
The Merlin 2003 DV and MPEG-2 Recorder and Dual Stream Decoder includes all the software necessary to
record, compress, process and play back audio and video clips in DV and MPEG-2 formats. The audio and video
are treated separately so audio can be added to video at a later time or vice versa. The Merlin board can also play
audio and video at variable speed. Merlin has many elaborate Non Linear Editing features; one of these is to allow
you to play back two streams of video and then transition from one to the other using many selectable transition
effects. By using a highly sophisticated processor all this can be done in Real Time. Moving from any frame to any
other frame in a video clip is a snap with Merlin. All you need to do is enter a frame number or move a slide control
and you are instantly at the desired frame. You can even give Merlin a play list to specify all the clips you wish to
play, and all the transition effects you wish to occur between your clips with starting and ending frame numbers,
and Merlin will do the rest. Merlin can even convert files to and from DV, MPEG-2 and many other picture and
video formats.
Page 5
Page 6

Merlin 2003 DV and MPEG-2 Recorder and Dual Stream Decoder
1.1 Key Features
Real Time DV and DVC-PRO50 Play and Record.
Real Time MPEG-1, MPEG-2 and IMX Play and Record.
Real Time 10 Bit Uncompressed Play and Record.
MPEG-2 (4:2:0) and (4:2:2) Chroma sampling supported.
DV (4:2:0), (4:1:1) and (4:2:2) Chroma sampling supported.
Variable and fixed bitrates from below 1 Mbs to 50 Mbs supported.
I - Frame only, IP, IBBP and IB GOP structures supported.
Variable resolutions supported up to 720x512(NTSC), or 720x608(PAL) including the ability to capture
lines in the blanking interval.
Variable Video Play Speed at resolutions as low as 1% normal speed.
Composite analog, S-video analog, Component (YCrCb and RGB), or SDI Serial Digital video selectable
as video input or genlock source.
Composite analog, S-video analog, Component (YCrCb and RGB), and SDI Serial Digital video
simultaneous outputs.
Supports 32K, 44.1K and 48K audio sample rates that can be locked to the video clock.
Up to 3 AES3 digital audio connections supporting PCM, AC-3, DolbyE, etc. (1 AES3 max without Panel)
Up to 8 channels of embedded audio per SDI video connection.
Up to 4 channels of analog audio. (2 channels max without Panel)
Analog video input is Time Base Corrected allowing Merlin to be used as a TBC when in pass through
mode.
SDI Serial Digital video input has jitter reduction allowing Merlin to be used as a SDI video Jitter reducer
in pass through mode.
Merlin can also be used as an Analog to SDI Serial Digital video converter and vice versa.
Decodes two DV or MPEG-2 video streams with the ability to alpha blend the 2 video streams in Real
Time for doing elaborate scene transitions such as fades, wipes, dissolves, etc.
Two independent SDI video outputs that can play 2 separate video streams at the same time.
Logo Inserter, Video Scalar and Video Color Space Converter built in.
VITC and LTC reader and generator on each input and output. VITC reader and generator can even be
used on pass through video.
Simple Play List format for playing long sequences with many video clips and transitions.
Runs on Windows™ 98/NT/2K/XP, Linux™, IRIX™, Solaris™, and Mac OS™.
Support for multiple boards per system to allow simultaneous Record and Play, including support for video
delay applications.
Conversion to and from DV, MPEG-2 and uncompressed formats at rates faster than Real Time.
Merlin can be used for DVD authoring.
Includes all the software needed to Record, Play and Edit Video and Video Play Lists.
Includes a Batch recording utility with VTR control.
Includes a Software Development Kit and many source code examples for custom application developers.
Includes a lot of field programmable logic that can be reconfigured via software allowing for easy feature
request upgrades.
Half sized PCI card that works in both 3.3V and 5 Volt PCI slots.
64 bit PCI interface that works in both 32 bit and 64 bit PCI slots.
Page 6
Page 7

Merlin 2003 DV and MPEG-2 Recorder and Dual Stream Decoder
1.2 Block Diagram
VIP Headers and
General Purpose
SDI Digital Video
Deserializer
SDI Digital Video
Serializer 1
SDI Digital Video
Serializer 2
Digital Audio
Transceiver
(Used for AES audio or
as a high speed link to
supply up to 10 audio
channels to a Panel Box)
Video D/A:
C-Video
S-Video
Component
Video A/D:
C-Video
S-Video
Component
Video Processing,
Analog Audio A/D
and D/A
64/32 Bit PCI Bus (Host Connection)
Merlin 2003 Block Diagram
I/O Header
FPGA 2
(300K Gates)
TBC,
Audio Embedder,
Video DMA
EEPROM
FPGA 1
(200K Gates)
PCI Bridge,
Audio Crossbar,
Audio DMA
Video
PLL
Audio
PLL
DRAM
16 Megabytes
DRAM
8 Megabytes
SUM
DV and MPEG-2
Video
Encoder/Decoder
32 Bit PCI Bus
(Secondary Bus)
Page 7
Page 8

Merlin 2003 DV and MPEG-2 Recorder and Dual Stream Decoder
2. Getting Started
2.0 System Requirements
Please make sure your system meets the following requirements before using the Merlin 2003 board.
- Pentium 600MHz CPU or a CPU with higher performance.
- Windows XP, Windows 2000, Windows NT 4.0, Windows 98, or Windows Me Operating System.
- One available Bus Mastering PCI slot (two slots if you are installing a two board configuration).
- At least 128 Megabytes of system DRAM.
- A high performance Disk Drive or Disk Array for storing Audio/Video files.
- At least 10 Megabytes of available Disk space for the Merlin Application Software.
- Approximately 10 to 100 Megabytes of Disk space for each minute of video you plan to store.
- An output monitor or overlay graphics card (such as the ATI All in Wonder) to view video output.
2.1 Package Contents
Please make sure your package includes the following items.
- One Merlin 2003 board.
- One 14 pin cable for Analog Input/Output Connections (Composite, S-VHS, Component, Audio).
- One 9 pin cable for Digital Input/Output Connections (D1 Serial Video, AES Audio).
- Installation Software.
- Documentation.
Page 8
Page 9

Merlin 2003 DV and MPEG-2 Recorder and Dual Stream Decoder
2.2 Preparing Your System
Before you install your Merlin 2003 Board there are a few guidelines that will help you achieve optimum video
performance. It is important to make sure that there are no other programs running while recording and playing
back video. You should check your system and make sure there are no screen savers, anti-virus programs or
fax/modem utilities that can use up CPU and memory resources. It is also important to make sure your disk drives
will run efficiently. The best way to do this is to defragment your disk drives frequently. If you do not own any
deframentation software, we recommend that you purchase Norton Utilities for Windows from Symantec. This
software package includes a defragmentation program for the most Windows Operating System. Another way to
optimize your disk performance is to have a dedicated partition for Audio and Video files. Here is a list of
recommendations on how to optimize the performance of the Audio/Video (A/V) partition that you use:
- Try not to store anything other that Audio/Video files on your A/V partitions.
- Defragment your A/V partitions frequently.
- Try to use NTFS (WindowsNT, Windows 2000/XP File System) partitions for A/V files.
- Try to use dedicated drives to store your A/V files.
- If possible use a high performance storage system for your A/V files.
A high performance storage system can mean a variety of things. It can be as simple as using a single high quality
IDE, SCSI or Fibre Channel disk drive to using a high performance Disk Array tunes for optimum video
performance. There are lots of storage system options available and lots of companies to choose from. With
MPEG-2 very high quality video can be achieved with a less than 15 megabit per second video stream. This is
easily sustained on even the cheapest IDE drives available today. However, if it is desirable to play multiple video
streams at fast forward play speeds that were recorded at 50 megabit per second record rate, you may want to
consider looking into a higher performance storage system.
Page 9
Page 10
Merlin 2003 DV and MPEG-2 Recorder and Dual Stream Decoder
3. Installing the Hardware
3.0 Computer Installation
To install the Merlin 2003 Board in you computer follow the directions below:
1. Discharge any electrostatic charge that you may have accumulated by touching the metal case of your
computer.
2. Switch off the computer and disconnect any cables attached to your computer, including the power
cord.
3. Loosen any screws required to remove the computer cover and remove the cover.
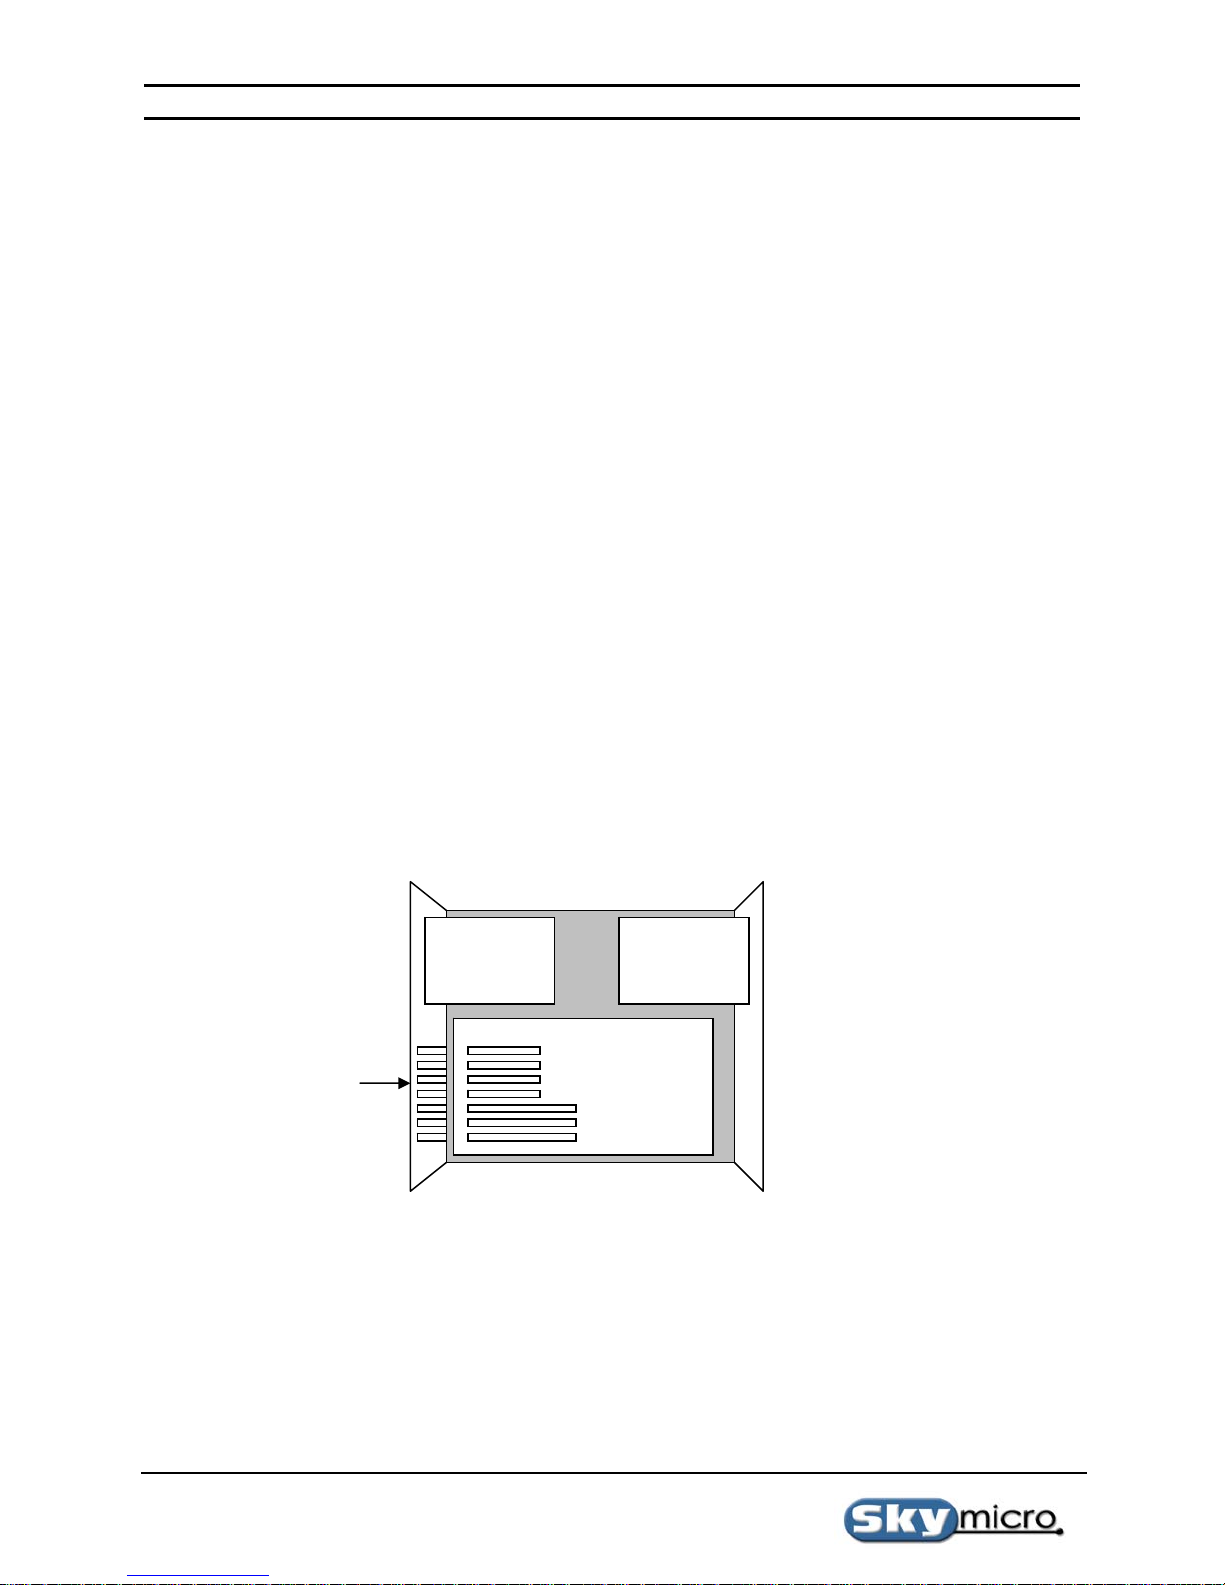
4. Position the computer so that the PCI expansion slots are visible. It should look something like this:
5. Select a Slot to install the Merlin board. It is best to space boards 2 apart at first and then fill the
spaces as you use up the slots. This distributes the heat in your computer better.
6. Remove the Slot Cover corresponding to the slot you wish to use.
Slot
Covers
Power
Supply
Drive
Bays
PCI
Slots
Inside of Computer
Page 10
Page 11
Merlin 2003 DV and MPEG-2 Recorder and Dual Stream Decoder
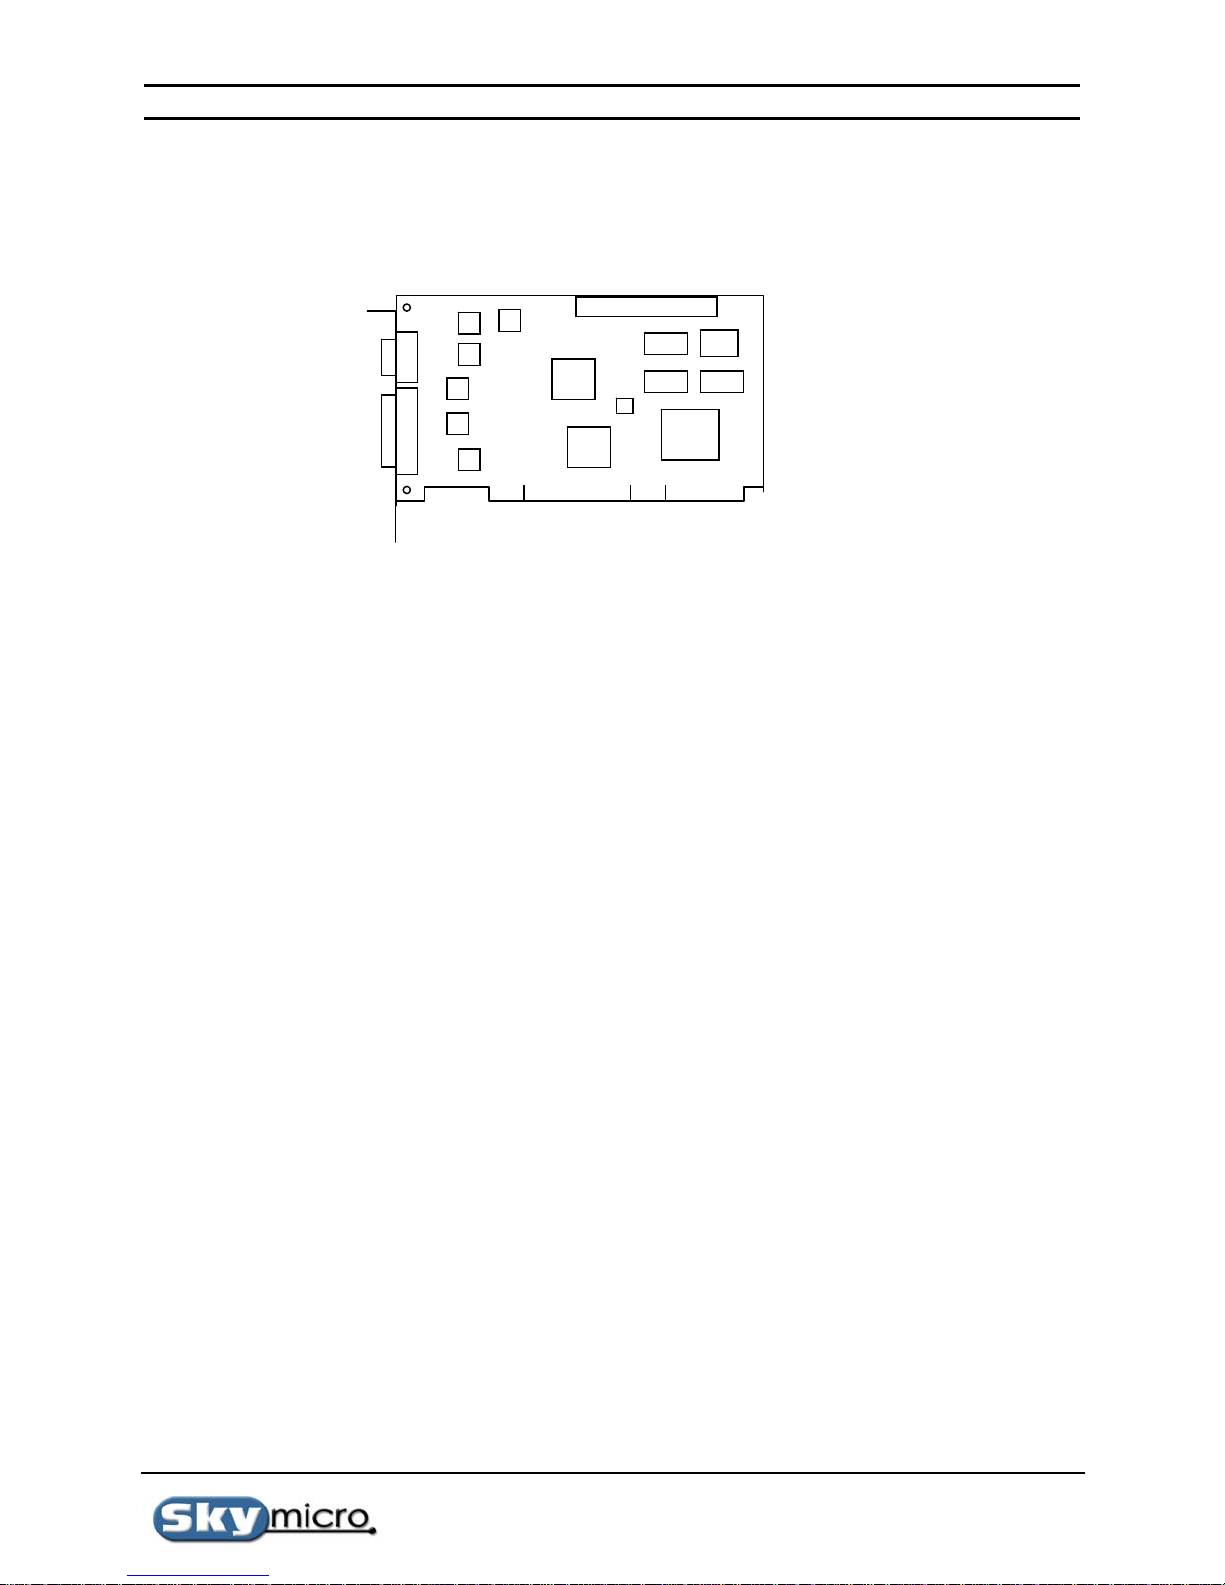
7. Remove the Merlin 2003 board from its protective wrapper and orient the board as shown:
8. Holding the board by the top two corners, carefully slide the board into the desired slot and press on
the top edge of the board until it is firmly seated. If the board does not seat correctly, d o not apply
excessive force. If necessary pull the board out and try installing it again.
9. Tighten the screw over the slot cover to hold the Merlin board in place.
10. Replace the cover and tighten any screws needed to hold the cover in place.
11. Reconnect cables.
12. Connect the 15 pin and 9 pin cable that came in the box with the Merlin board.
13. Connect an Output monitor to one of the video output cable.
14. Connect an input video source to one of the video input cables.
15. Connect input and output audio to the Red and White audio cables.
Merlin 2003 Board
Page 11
Page 12

Merlin 2003 DV and MPEG-2 Recorder and Dual Stream Decoder
4. Installing the Software
4.0 Driver Installation
The first time Windows loads after installing a Merlin board a New Hardware Found dialog box should appear.
When asked for the location of the driver, browse to the location of the Merlin.inf file on the Merlin 2003 CD or on
your hard drive if you downloaded the dr iver from the web. During the installation you will see a message saying
the driver is unsigned by Microsoft. This is expected and you should continue the installation anyway. If for some
reason the New Hardware Found dialog box does not appear you can run the hardware configuration wizard
(Control Panel – Add/Remove Hardware). When running the wizard choose Multimedia device if you are given a
choice. It will usually have a yellow icon next to it indicating it is hardware without a driver loaded. Be sure the
CD is in the CD-ROM drive or the files are on your hard disk. The wizard usually searches the CD-ROM drive for
drivers so if the CD is in the drive it will usually find it automatically.
4.1 Application Installation
To install the Merlin Board Application software follow the directions below:
1. Copy the file Mer2KXP.exe to a convenient location on your hard drive from the Skymicro Web Page
or from the CD that came with your hardware. The software on the Skymicro Web Page will either be
the same revision or newer than the version on the CD. If the version on the Web Page has a higher
revision number than the one on your CD, it is better to use the one from the Web Page.
2. Execute the Mer2KXP.exe program. This will run an installation program that will present you with
the dialog boxes shown below.
3. After reading the information in this dialog box and closing any other programs click on the “Next”
button. This will bring up the next dialog box.
Page 12
Page 13

Merlin 2003 DV and MPEG-2 Recorder and Dual Stream Decoder
4. If you are installing a single board in your system you can click the next button now, or if you are
installing two boards you should click the “Install Two Boards” radio button and then click the “Next”
button. This will bring up the next dialog box.
5. If you want to change the location where the software is installed click the “Browse” button and select
a suitable location. If the default is acceptable click the “Next” button. This will bring up the next
dialog box.
Page 13
Page 14
Merlin 2003 DV and MPEG-2 Recorder and Dual Stream Decoder
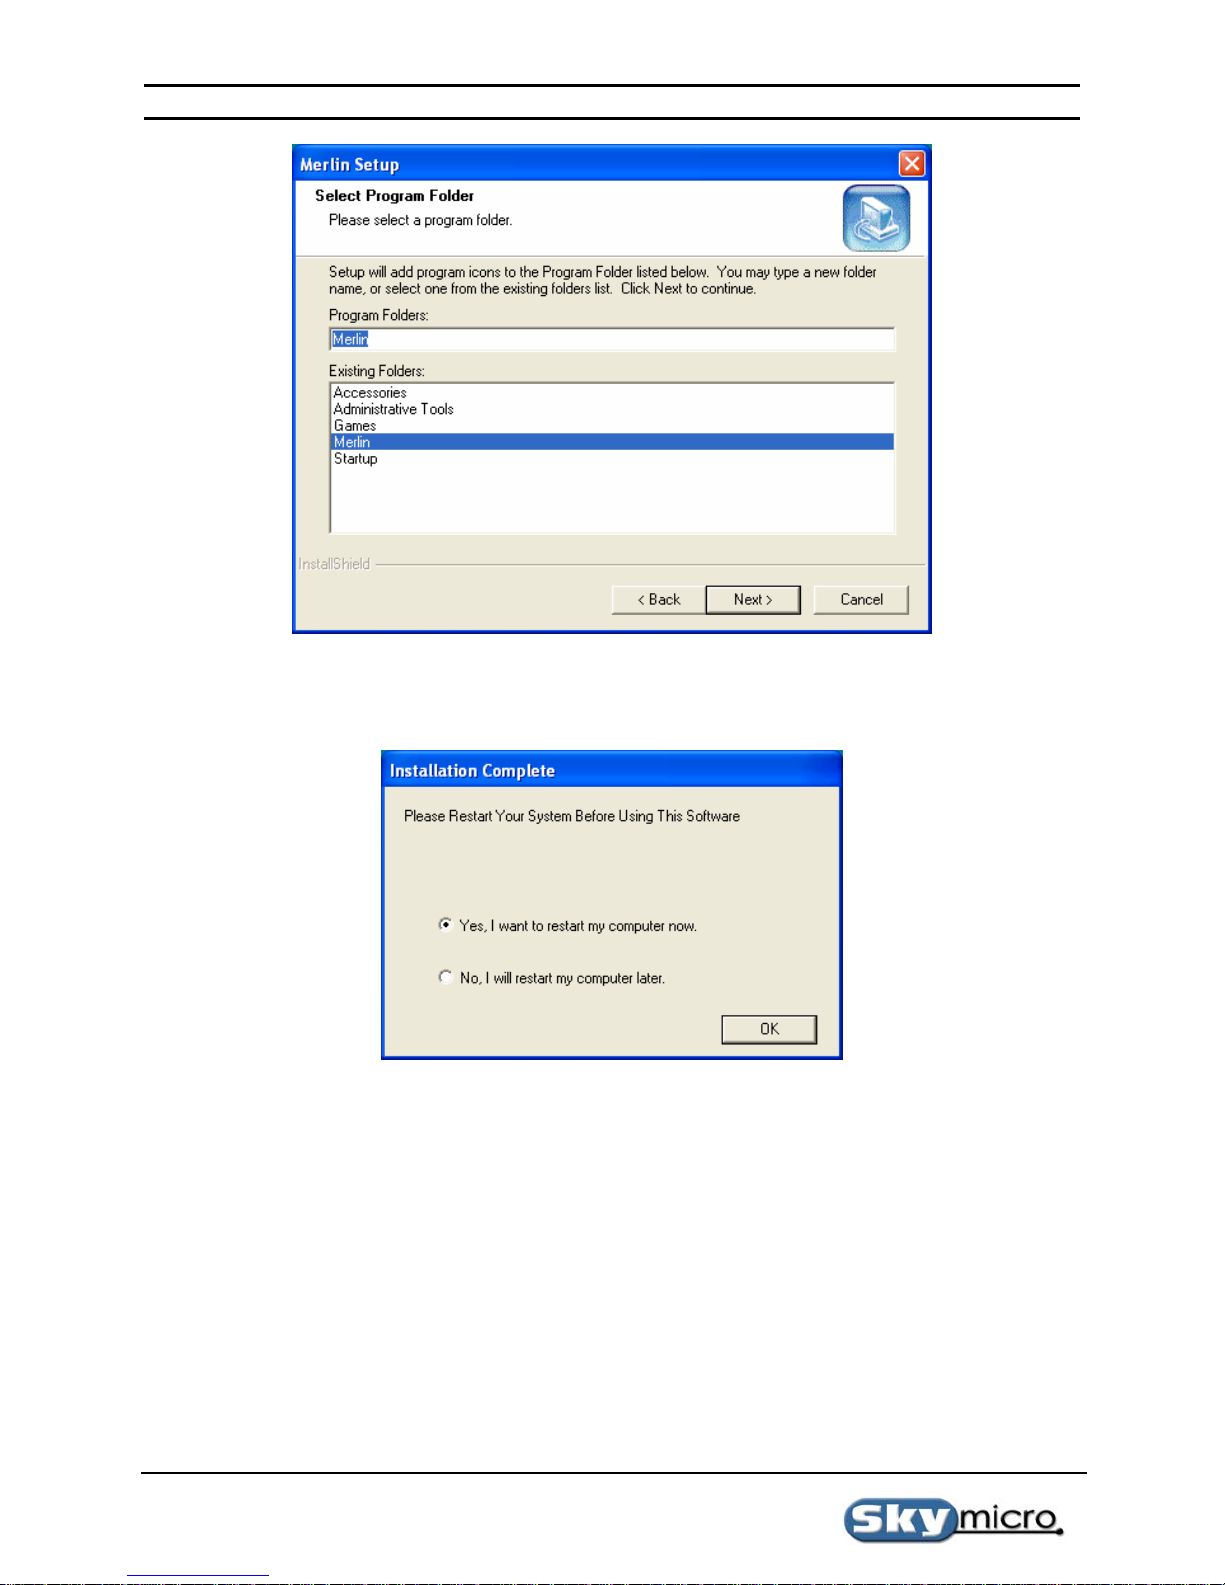
6. If you want to change the location where the program icons are installed select a different folder or if
the default is acceptable click the “Next” button. This will bring up the next dialog box.
7. At this point the installation is co mplete. However so me registry settings are o nly checked when the
computer is restarted so it is best to restart the computer before you use the application. If you would
like to restart click the “OK” button now.
Page 14
Page 15

Merlin 2003 DV and MPEG-2 Recorder and Dual Stream Decoder
5. Quick Start
5.0 Running the Application Software
To Run the Application software follow the directions below:
1. Find the Merlin1 shortcut icon in your start menu and double click on the icon. This should bring up
one of the two application windows shown below. One application window is used for playing audio
and video files and the other is for recording audio and video files. Which ever was last active is the
one that will start first. Since this is the first time you are starting the application either one may start.
You can switch to the play application window by clicking on the “PLAY” button, and you can switch
to the record application window by clicking on the “MPEG-2 (4:2:0)” or “MPEG-2 (4:2:2)” buttons
depending on the quality level you wish to record with. “REC 4:2:0 ” mode lets you record up to 15
Mbs and “REC 4:2:2” mode lets you record up to 50 Mbs. “REC 4:2:2” mode is used for higher
quality recording, but does not let you record using B frames which are useful for obtaining better
quality recordings at lower bitrates.
2. Switch to the “REC 4:2:0” mode now if it is not already active. You should see the application
window shown below.
Page 15
Page 16
Merlin 2003 DV and MPEG-2 Recorder and Dual Stream Decoder
5.1 Recording to files
1. Select a Video Source in the “Video Reference” group box. If “Video Control” has the “Ref.” box
checked you should see the input video on your output video monitor.
2. Click on the “FILE…” button in the “Video” group box. Browse to a location where you would like
to store your video files and then type a file name for a file that you would like to record to.
3. Click on the “FILE…” button in the “Audio” group box. Browse to a location where you would like
to store your audio files and then type a file name for a file that you would like to record to.
4. Make sure the “Link to Video” check box is checked in the “Audio” group box.
5. Map and audio source to the 1st encoder input by selecting an audio source in the “Encoder Inputs”
group box.
6. Select the same audio source in the “Audio Output” group box to monitor the audio source.
7. Click on the “RECORD” button in the “Video” group box. You should now see the “Field Cnt” start
incrementing in the “Video” and “Audio” group boxes. After about a minute click on the “STOP”
button in the video group box.
8. Record a new video clip to a d ifferen t file n ame by repeating th e procedures starting at step 2. We will
need two files to try some of the play features that will be covered next. When you are finished
recording switch to the play mode by clicking on the “PLAY” button. . You should see the application
window shown on the following page.
Page 16
Page 17

Merlin 2003 DV and MPEG-2 Recorder and Dual Stream Decoder
5.2 Playing from files
1. Select a Video Source in the “Video Reference” group box. If “Video Control” has the “Ref.” box
checked you should see the input video on your output video monitor.
2. Click on the “FILE…” button in the “Video A” group box. Browse to the location where you saved
the first video file in the record example above and select that video file.
3. Click on the “FILE…” button in the “Video B” group box. Browse to the location where you saved
the second video file in the record example above and select that video file.
4. Click on the “FILE…” button in the “Audio” group box. Browse to the location where you saved the
first audio file in the record example above and select that audio file.
5. Make sure the “Link to VA/PL” check box is checked in the “Audio” group box.
Page 17
Page 18

Merlin 2003 DV and MPEG-2 Recorder and Dual Stream Decoder
6. In the “Audio Output When Playing” group box map “DEC 0” to an output that can be monitored.
7. Click on the “PLAY” button in the “Video A” group box. You should now see the “Frame Count”
start incrementing in the “Video A” and “Audio” group boxes and you should see and hear output on
your video output equipment.
8. Now Click on the “VAR PLY” button in the “Video A” group box. Now you can move the variable
speed slider in the “Video A” group box and watch the video speed up and slow down. You can also
press the “PAUSE” button and “FL STEP” or “FR STEP” buttons to see the video pause and advance
one field or one frame at a time.
9. Now click on the “STOP” button in the “Video A” group box. Now move the file position slider in the
“Video A” group box away from the left edge and then press “PLAY” in the “Video A” group box.
This will access an index file for the selected file in the “Video A” group box. Now you can move the
slider and the video output will jump to the select frame. Now click the “PAUSE” button and move
the slider. Notice that the video jumps to the selected frame and then pauses. (Note that the index file
is built during recording and has a .mdb ending. If for some reason the Player cannot find this file
during a jump it will build a new one which will bring a progress dialog box and could take some time
to build.)
10. Now click the “STOP” button in the “Video A” group box, move the position slider all the way to the
left, and then click the “PLAY” button in the “Video A” group box.
11. Now click on the “PLAY” button in the “Video B” group box. Now by clicking on the “View Video
B” and “View Video A” radio buttons you should be able to view either video file.
12. Now copy the file “sum.alp” from the CD that came with your hardware to a convenient location on
your hard drive.
13. Click on the “FILE…” button in the “Alpha Mix” group box. Browse to the location where you saved
the “sum.alp” file and select that alpha file.
14. Now while both Video A and Video B are playing click on the “PLAY” button in the “Alpha Mix”
group box. You should now see many transitions happening between the video files. This alpha file is
a sum of all the transition types. Any one of these transitions can be stored in it’s own separate file by
using the alpha file generator that is selected using the tools menu.
15. Now click on “STOP” in the “Video A”, “Video B”, ”Audio” and “Alpha Mix” group boxes. Make
sure the “View Video A” radio button is selected.
16. Now copy the folder called “vpltest” from the CD that came with your hardware to your hard drive.
The path of the folder created on your hard drive must be “C:\vpltest”. You can delete this folder
when this example is finished.
17. Now click on the “FILE…” button in the “Play List” group box. Browse to “C:\vpltest” and select the
file called “test.vpl”.
18. Now click on the “FILE…” button in the “Audio” group box. Browse to “C:\vpltest” and select the
file called “test.apl”.
19. Now click the “PLAY” button in the “Play List” group box. You should now see a sequence of video
clips playing one after another with transitions between them.
20. To make your own Video Play List files refer to the appendix on Video Play List file formats. A
Video Play List File generator that allows you to create sequences on a timeline is also included with
your Merlin board, which will be discussed later.
Page 18
Page 19

Merlin 2003 DV and MPEG-2 Recorder and Dual Stream Decoder
6. Application Software
6.0 The Player Application Window
14
1
3
10
5
7
4
9
6
8
2
11
12
Page 19
13
Page 20

Merlin 2003 DV and MPEG-2 Recorder and Dual Stream Decoder
1
This section of the player application shows that you are in play mode and allows you to switch to the available
record and transcode modes. The only available record modes on the Merlin board are “MPEG-2 (4:2:0)”,
“MPEG-2 (4:2:2)”, and “MPEG-1”. The DV to MPEG transcode modes will be available soon.
“MPEG-2 (4:2:0)” mode lets you record up to 15 Mbs and “MPEG-2 (4:2:2)” mode lets you record up to 50 Mbs.
“MPEG-2 (4:2:2)” mode is used for higher quality recording, but does not let you record u sing back to back B
frames which are useful for obtaining better quality recordings at lower bitrates.
2
This section of the player application shows that you are in NTSC mode and allows you to switch to PAL mode.
3
This section of the player application shows you the currently selected reference input and allows you to switch to
other input references. The input reference will be used as the sync timing for playing video as well as what will be
seen when the video is stopped if viewing reference video is desired.
1. C-Video - Selects the yellow Composite video input connector.
2. SVHS – Selects the Black S-VHS 4 pin mini din video input connector.
3. SDI – Selects the BNC Serial Digital Video(SDI) input connector.
4. VP – Selects the 26 pin internal VIP port connector.
5. Free – Selects Freerun mode. In this mode no reference is used for sync timing.
4
This Section of the player application allows you to turn on or off the TBC (Time Base Corrector), and allows you
to view Reference video when the player is not playing any video.
The TBC is a circuit on the Merlin board that samples incoming video, stores it in a temporary buffer, and then
reads from the temporary buffer using an extremely low jitter clock. This has many benefits in video applications.
The reason it is included on the Merlin board is that it allows analo g video that comes from a jittery source to pass
through the Merlin board and get jitter reduced so that it can be passed out the D1 port and have low enough jitter to
meet the very tight jitter requirements of D1 serial digital video.
Viewing reference video when the player is stopped is useful for switching between a reference and recorded
material much like a typical VCR works. If Reference is turned off, a default color can be selected by using the
color setting dialog box that can be selected in the Settings menu.
Page 20
Page 21

b
g j
k
Merlin 2003 DV and MPEG-2 Recorder and Dual Stream Decoder
5 6
a
c
This section of the player application allows you to control Video motion. Video A and B use similar controls.
a) File button – This button brings up a dialog box allowing you to select a video file.
b) File name – This text box specifies the current video file and also lets you type a file name directly.
c) File position slider control – This is a slider control that lets you jump to any position within the video file.
It also has a progress bar that shows you where the video is playing in relation to the entire file. During
recoding an index file is built that indexes the begin ning of every GOP in the MPEG-2 file. This file will
have the same path name as the MPEG file but will have an .mdb ending. This file is used to find frames
within the video file. If this file is missing when the slider is moved, it will be rebuilt. Therefore you may
sometimes see a message telling you an index file is being built when you use this control. To avoid the
delay caused by building this file it is recommended that any file copies of an MPEG-2 file should include
file copies of the .mdb file as well.
d) File position – This field shows you the time code of the current video frame. Just to the right of this is the
letter I, B or P. This specifies the MPEG frame type of the next frame to be viewed.
e) Total Frames – This field specifies the total number of frames in the video file. Sometime the letter R may
appear to the right of this field. This means the file is an MPEG-2 file with reverse byte ordering. If the
.mdb file is missing the Total Frames will be incorrect. It will normally read 18:32:13:12 when this
happens.
f) Slider position – This text box specifies what frame the slider now points to. It also lets you type a frame
number directly. The format is standard SMPTE time code format without colons. The colons have been
omitted to make it easier to enter time codes quickly.
g) Motion control buttons – These eight buttons are used to control video motion.
1) PLAY – Starts playing video.
2) VAR PLY – (Variable Play) Starts playing video at the rate selected by the speed control.
3) PAUSE – Pauses video and freezes the current frame. If the video is stopped it pauses the video
at the frame specified by the position slider and freezes at that frame number.
4) STOP – Stops the video and switches the output to reference or a solid color (depending on
Reference setting).
5) IP ONLY – Starts playing video but only displays the I and P frames similar to fast forward.
6) I ONLY – Starts playing video but only displays I frames similar to very fast forward.
7) FL STEP – Advances paused video one field. If the video is not paused it pauses the video.
8) FR STEP – Advances paused video one frames. If the video is not paused it pauses the video.
h) View – The View Video A and B radio buttons allow you to switch back and forth between what is being
played by player A and player B.
i) Loop Forever – When this box is checked the video will restart whenever it reaches the end of file during
play.
j) Speed contro l – This is a slider control that lets you control the speed that video is played when VAR PLY
is selected.
k) Speed – This text box specifies the current video speed and also lets you type in a video speed directly.
d
e
f
h
i
Page 21
Page 22

k
b
g j
Merlin 2003 DV and MPEG-2 Recorder and Dual Stream Decoder
7
a
c
d
e
f
h
i
This section of the player application allows you to control Audio motion.
l
a) File button – This button brings up a dialog box allowing you to select an audio file or an Audio Play List
file. Audio files end in .wav and Audio Play List files end in .apl. For a description of Audio Play List
files refer to Appendix B.
b) File name – This text box specifies the current audio file and also lets you type a file name directly.
c) File position slider control – This is a slider control that lets you jump to any position within the audio file.
It also has a progress bar that shows you where the audio is playing in relation to the entire file.
d) File position – This field shows you the time code of the current audio sample.
e) Total Frames – This field specifies the total number of video frames periods in the audio file.
f) Slider position – This text box specifies what frame the slider now points to. It also lets you type a frame
number directly. The format is standard SMPTE time code format without colons. The colons have been
omitted to make it easier to enter time codes quickly.
g) Motion control buttons – These six buttons are used to control video motion.
1) PLAY – Starts playing audio.
2) VAR PLY – (Variable Play) Starts playing audio at the rate selected by the speed control.
3) PAUSE – Pauses audio and freezes at the current audio sample. If the audio is stopped it pauses
the audio at the frame specified by the position slider and freezes at that frame number.
4) STOP – Stops the audio.
5) FL STEP – Advances paused audio one field. If the video is not paused it pauses the video.
6) FR STEP – Advances paused audio one frames. If the video is not paused it pauses the video.
h) Link to VA/PL – When this box is checked any motion control operations that are done on either Video A
or The Play List controls are duplicated on the Audio controls.
i) Loop Forever – When this box is checked the audio will restart whenever it reaches the end of file during
play.
j) Speed contro l – This is a slider control that lets you control the speed that audio is played when VAR PLY
is selected.
k) Speed – This text box specifies the current audio speed and also lets you type in an audio speed directly.
l) Sample Rate – These radio buttons let you select the sample rate that the audio Digital to Analog converter
should use.
Page 22
Page 23

b
g
Merlin 2003 DV and MPEG-2 Recorder and Dual Stream Decoder
8
a
c
d
e
f
h
i
This section of the player application allows you to control Alpha mixing between Video A and Video B.
a) File button – This button brings up a dialog box allowing you to select an alpha file.
b) File name – This text box specifies the current alpha file and also lets you type a file name directly.
c) File position slider control – This is a slider control that lets you jump to any position within the alpha file.
It also has a progress bar that shows you where the alpha is positioned in relation to the entire file.
d) File position – This field shows you the field count of the current alpha field.
e) Total Flds – This field specifies the total number of alpha fields in the alpha file.
f) Slider position – This text box specifies what field the slider now points to. It also lets you type a field
number directly. The format is field number.
g) Motion control buttons – These four buttons are used to control video motion.
h) Loop Forever – When this box is checked the alpha file will restart whenever it reaches the end of file
while playing.
i) Play all Fld delays – These four text boxes allow you to enter delays from when the PLAY ALL button is
pressed to when Video A, Video B, alpha and an audio start playing. This is useful for testing how
transitions will look.
1) PLAY – Starts playing alpha file.
2) PLAY ALL – Starts playing Video A, Video B, an alpha and an audio file (audio is only played if
the audio is linked).
3) PAUSE – Pauses the alpha file and freezes at the current alpha field. If the alpha is stopped it
pauses the alpha at the field specified by the position slider and freezes at that field number.
4) STOP – Stops the alpha file.
Page 23
Page 24

b
g
Merlin 2003 DV and MPEG-2 Recorder and Dual Stream Decoder
9
a
c
This section of the player application allows you to control the motion of Video Play List files.
a) File button – This button brings up a dialog box allowing you to select a Video Play List file. For a
description of Video Play List files refer to Appendix A.
b) File name – This text box specifies the current Video Play List file and also lets you type a file name
directly.
c) File position slider control – This is a slider co ntrol that lets you jump to any position within the Video
Play List file. It also has a progress bar that shows you where the Video Play List is positioned in relation
to the entire file.
d) File position – This field shows you the time code of the current video frame.
e) Total Flds – This field specifies the total number of frames in the Video Play List file.
f) Slider position – This text box specifies what frame the slider now points to. It also lets you type a frame
number directly. The format is standard SMPTE time code format without colons. The colons have been
omitted to make it easier to enter time codes quickly.
g) Motion control buttons – These four buttons are used to control video motion.
1) PLAY – Starts playing a Video Play List file.
2) CHK FILE – Pressing this button updates the Total Frames field. This is useful if the Play List
file has been modified by a different application.
3) PAUSE – Pauses video and freezes the current frame. If the video is stopped it pauses the video
at the frame specified by the position slider and freezes at that frame number.
4) STOP – Stops the Video Play List file.
d
e
f
Page 24
Page 25

b
b
Merlin 2003 DV and MPEG-2 Recorder and Dual Stream Decoder
10
a
This section of the player application allows you to control conversion to uncompressed files.
When Field count is non zero, the next time Play in the Video A control is pressed uncompression begins. The
display will show frames at a slower than normal speed. When the uncompression is complete the vid eo will
continue to play at a normal speed. When the video is stopped the uncompressed file is closed and can then be used
by other programs. The currently supported uncompressed video formats are Adobe Premiere filmstrip format
(.flm), Targa file sequence format (a sequence of files ending in #.tga, where # is a sequence of numbers) and
Quicktime “2vuy” format (.mov).
11
a) File button – This button brings up a dialog box allowing you to select a File name for Uncompressed
Video.
b) File name – This text box specifies the current file name for Uncompressed Video and also lets you type a
file name directly.
c) Field count – This text box allows you to enter the number of fields worth of video that you would like to
uncompress
d) Field/Frame – These radio buttons allow you so select how the uncompressed video should be saved.
Selecting field mode stores the video one field at a time. Selecting frame mode interleaves odd and even
frames and stores the video one frame at a time.
c
d
c
a
d
This section of the player application allows you to control DV Video recoding.
a) File button – This button brings up a dialog box allowing you to select a video file.
b) File name – This text box specifies the current video file and also lets you type a file name directly.
c) File position – This field shows you the time code of the current video frame
d) Motion control buttons – These four buttons are used to control video motion.
1) RECORD – Starts Recording video.
2) PAUSE – Pauses video and freezes at the current frame. If the video is stopped it pauses the
video at the after recording 1 frame.
3) STOP – Stops the recording video.
4) FR STEP – Records one frame of video and then stops. If the video is not paused it pauses the
video. This is useful for recording one frame at a time for animation or stop motion video.
e) From Player / DV Mode – From Player lets you record from Video A and Video B output. DV Mode
allows you to select 25 Mbs or 50 Mbs recording mode.
e
Page 25
Page 26

b
b
Merlin 2003 DV and MPEG-2 Recorder and Dual Stream Decoder
12
c
a
This section of the player application allows you to control audio recording during DV Video recoding.
13
a) File button – This button brings up a dialog box allowing you to select a video file.
b) File name – This text box specifies the current video file and also lets you type a file name directly.
c) Record Audio during DV Record – When this box is checked audio will be recorded to the selected file
when a DV video record is started.
a
a) Encoder Input – These drop down lists let you select which audio sources get mapped to which encoder
inputs during audio recordings as well as letting you select how many channels of audio should be
recorded.
b) Audio Output When Playing/When Stopped – These drop down lists let you select what will be mapped to
all the audio outputs when all the decoders are stopped or when any player is playing.
c) Panel Box Enable - This check box should be checked when the Merlin2003 is connected to a Skymicro
Panel Box. Note AES 1 and 2 are not operational without a panel box connected.
d) Stopped View – This check box switches between Audio Output When Playing and Audio Output When
Stopped. Note when changing this check box all the drop down lists in the Audio Output group box will
change.
14
This is the menu section of the player application.
a) File
1) Disable Logging – Turns off logging of commands sent to the Merlin hardware.
2) Set Log File – Turns on logging of commands sent to the Merlin hardware. This menu option also
brings up a file dialog box so that you can set the file name of the log file.
3) Open Play List File – This is another way of setting the name for the Video Play List File.
4) Exit – Exits the Merlin Application
b) Edit – Edit menu. These options can also be selected by a right click in any text box.
1) Cut – Cuts the currently selected text in a text box.
2) Copy – Copies the currently selected text in a text box.
3) Paste – Pastes the last copied text in a text box at the current cursor position.
c) View
c
d
Page 26
Page 27

Merlin 2003 DV and MPEG-2 Recorder and Dual Stream Decoder
1) Toolbar – Turns on and off the toolbar
2) Status Bar – Turns on and off the Status Bar.
d) Settings
1) Color Setting – Opens a dialog box that lets you set the color that is displayed when video is
stopped and the reference check box is not checked.
2) Video Settings – Opens a dialog box that lets you adjust the Brightness, Contrast, Saturation and
Hue of incoming analog video.
3) Audio Settings – Opens a dialog box that lets you adjust the input audio gain and output audio
level.
Page 27
Page 28

Merlin 2003 DV and MPEG-2 Recorder and Dual Stream Decoder
e) Tools
1) Alpha File generator – Opens a dialog box that allows you to build custom alpha files.
This dialog box lets you pick the type of alpha file and it lets you pick the field count of the alpha,
which translates to how long the transition will last.
2) Byte Swap – Opens a dialog box that allows byte swap files
This is useful for converting video and audio files so that they can be shared between systems that
use big and little endian byte formats.
Page 28
Page 29

Merlin 2003 DV and MPEG-2 Recorder and Dual Stream Decoder
3) File Split – Opens a dialog box that lets you create a new file that is a subsection of a larger file.
File Selection
Text boxes for entering
frame numbers directly
For Video this field shows
the closest GOP frames
Use this button to move the
start time to the same frame
position that is currently
selected in Video A
Move the edges of this box
to change the start and end
time of the selected video.
Total frames in
source file
Total frames
selected
For audio select sample rate
so that frame numbers match
For audio this field shows
distance from an exact audio cut
Use this button to move the
end time to the same frame
position that is currently
selected in Video A
If the file that is created by this dialog box is a video file, the start frame will be the nearest I
frame before the selected start frame, and the end frame will be the frame just before the next I
frame after the selected end frame. The time code of these frames will be shown in the GOP TC
fields. If the file that is created by this dialog box is an audio file the sample rate must be set
correctly so that frame numbers can be calculated based on the audio sample rate. Because there
is not an exact number of audio samples per frame the fraction below the audio sample rate radio
buttons specifies how far from an exact cut the audio lands. This mismatch is usually negligible
but if audio and video are played for many days non-stop, many non-exact cuts merged together
can result in lip sync problems.
Page 29
Page 30

Merlin 2003 DV and MPEG-2 Recorder and Dual Stream Decoder
4) File Merge – Opens a dialog box that lets you merge files together.
File A is appended to file B. So if you want to keep the original file B you should make a copy of
the file before this operation is executed.
5) Update EEPROM – This option is not applicable to the Merlin board.
e) Help – This Menu option displays the Merlin about box.
Occasionally you may see this dialog box. This dialog box is used to report messages without waiting for the any
user input.
Page 30
Page 31

Merlin 2003 DV and MPEG-2 Recorder and Dual Stream Decoder
6.1 The Recorder Application Window
12
1
3
5
6
4
11
7
9
10
2
8
1
This section of the recorder application shows you that you are in record mode and allows you to switch to the
available play, record and transcode modes. The only available record modes on the Merlin board are “MPEG-2
(4:2:0)”, “MPEG-2 (4:2:2)”, and “MPEG-1”. The DV to MPEG transcode modes will be available soon.
“MPEG-2 (4:2:0)” mode lets you record up to 15 Mbs and “MPEG-2 (4:2:2)” mode lets you record up to 50 Mbs.
“MPEG-2 (4:2:2)” mode is used for higher quality recording, but does not let you record u sing back to back B
frames which are useful for obtaining better quality recordings at lower bitrates.
2
This section of the recorder application shows you that you are in NTSC mode and allows you to switch to PAL
mode.
Page 31
Page 32

b
Merlin 2003 DV and MPEG-2 Recorder and Dual Stream Decoder
3
This section of the recorder application shows you the currently selected reference input and allows you to switch to
other input references. The input reference is what will be recorded when the record button is pressed as well as
what will be seen on your output video monitor if viewing reference video is selected.
C-Video - Selects the yellow Composite video input connector.
SVHS – Selects the Black S-VHS 4 pin mini din video input connector.
SDI – Selects the BNC Serial Digital Video(SDI) input connector.
VP – Selects the 26 pin internal VIP port connector (not available on Merlin boards).
Free – Selects Freerun mode. In this mode no reference is used for sync timing.
4
This Section of the recorder application allows you to turn on and off the TBC (Time Base Corrector), and allows
you to view Reference video.
The TBC is a circuit on the Merlin board that samples incoming video, stores it in a temporary buffer, and then
reads from the temporary buffer using an extremely low jitter clock. This has many benefits in video applications.
The reason it was included on the Merlin board is that it allows analo g video that comes from a jittery source to pass
through the Merlin board and get jitter reduced so that it can be passed out the D1 port and have low enough jitter to
meet the very tight jitter requirements of D1 serial digital video.
Viewing reference video lets you see what will be recorded when the record button is p ressed.
5
a
d
This section of the recorder application allows you to control Video recoding.
a) File button – This button brings up a dialog box allowing you to select a video file.
b) File name – This text box specifies the current video file and also lets you type a file name directly.
c) File position – This field shows you the time code of the current video frame. If a source is connected that
generates VITC. The VITC frame number of the source will be displayed by the VITC IN text.
d) Motion control buttons – These four buttons are used to control video motion.
1) RECORD – Starts Recording video.
2) PAUSE – Pauses video and freezes at the current frame. If the video is stopped it pauses the
3) STOP – Stops the recording video.
4) FR STEP – Records one frame of video and then stops. If the video is not paused it pauses the
e) Byte Swap – This allows you to record a byte swapped video files if needed.
c
e
video at the after recording 1 frame.
video. This is useful for recording one frame at a time for animation or stop motion video.
Page 32
Page 33

b
g
Merlin 2003 DV and MPEG-2 Recorder and Dual Stream Decoder
6
a
d
f
This section of the recorder application allows you to control Audio recording.
a) File button – This button brings up a dialog box allowing you to select an audio file or an Audio Play List
file. Audio files end in .wav and Audio Play List files end in .apl. The Audio Play List format is the same
as the Video Play List format without any transition files.
b) File name – This text box specifies the current audio file and also lets you type a file name directly.
c) File position – This field shows you the time code of the current audio sample.
d) Motion control buttons – These six buttons are used to control video motion.
1) RECORD – Starts recording audio.
2) PAUSE – Pauses audio recording.
3) STOP – Stops recording audio.
e) Link to Video – When this box is checked any motion control operations that are done on the Video are
duplicated on the Audio controls.
f) Audio Source – These drop down lists let you select which audio input to map to the encoder inputs as well
as how many channels of audio to capture.
g) Sample Rate – These radio buttons let you select the sample rate that the audio Analog to Digital converter
should use.
h) Panel Box Enable - This check box should be checked when the Merlin2003 is connected to a Skymicro
Panel Box. Note AES 1 and 2 are not operational without a panel box connected.
i) Audio Outputs – These drop down lists let you map audio inputs to any audio output.
c
e
h
i
7
This section of the recorder application allows you to select the resolution at which the video should be recorded.
8
This section of the recorder application allows you to turn on and off temporal filtering in the Luma(black and
white) and chroma (color) space. This helps achieve lower bitrate MPEG-2 files by reducing the amount of motion
that occurs between successive video frames. Although it does reduce the bitrate it also has the effect reducing
video quality. For applications where low bitrate is a must these setting can help reduce b lo ck artifacts in exchange
for motion filtering.
Page 33
Page 34

b
Merlin 2003 DV and MPEG-2 Recorder and Dual Stream Decoder
9
a
This section of the recorder application allows you to control the bitrate of the recorded MPEG-2 file.
a) Max Bitrate – This allows you to set the maximum instantaneous bitrate used during recording.
b) New GOP on Scene Change – When this box is checked if a scene change is detected a new I frame will be
recorded. This improves the quality of the recording by reducing blo ck artifacts that occur when trying to
record lots of changes in a P or B frame. This may not necessarily be desirable if a deterministic IBP
pattern is required throughout the recording.
c) Variable Bit Rate – When this box is checked, variable bitrate recording will be used. Variable bitrate
means that that if during recording less than the Max Bitrate is needed at any one time no extra bits will be
added to the MPEG-2 Stream to maintain a fixed bitrate. This makes the overall size of an MPEG-2 file
smaller but also makes it more difficult to find I frames within an MPEG-2 file.
d) Min Q – This setting gives you another level of control over the bitrate of an MPEG-2 file. Min Q allows
you to set the minimum Q (quality factor) to use during variable bit rate recordings. Every Q value will
generate a different number of bits for different frames depending on the content of the video frame. The
Min Q basically tells Merlin to use a given Q value unless the bits produced for a given frame results in
bitrates higher than the maximum allowable. In this case Merlin will increase the Q (higher Q values
reduce video quality) to force the bitrate below the maximum allowable.
d
c
10
This section of the recorder application allows you to control the GOP structure. A GOP (Group Of Pictures) starts
with an I frame and ends with the frame just before the next I frame. I frames use the greatest number of bits
because they contain information that does not rely on any other frames. P frames use the second greatest number
of bits because they rely somewhat on previous frames in a video sequence. B frames use the least number of bits
because they rely somewhat on previous and future frames in a sequence. Lots of I frames helps in Non-Linear
Editing applications because it is best to jump to I frames and if there are lots of them this allows you to jump to lots
of places. However using a GOP structure with lots of B frames will generate better quality recordings at low
bitrate. This is a trade off that has to be decided on based on your application. A GOP is considered closed when
none of the B frames in the GOP refer to frames in a different GOP. It is best to choose 1 for closed GOP frequency
so that every GOP is closed in a Non-Linear Editing application, but if lower bitrates at higher quality is desired this
number can be increased. For most applications the setting 15,3,1 usually gives good results. What this means is
that the GOP structure will start with an I frame then have 2 B frames then a P frame then 2 B frames and so on for
a total of 15 frames, and that every GOP will be closed.
Page 34
Page 35

Merlin 2003 DV and MPEG-2 Recorder and Dual Stream Decoder
11
This section of the recorder application allows you to specify a script file. Merlin has many commands that can
control the recording process. Rather than have a control for every setting only the most common ones have
controls and the rest can be implemented in a script file. The commands are in the script file are executed whenever
a recording is started.
12
This is the menu section of the recorder application.
a) File
1) Disable Logging – Turns off logging of commands sent to the Merlin hardware.
2) Set Log File – Turns on logging of commands sent to the Merlin hardware. This menu option also
brings up a file dialog box so that you can set the file name of the log file.
3) Exit – Exits the Merlin Application
b) Edit – Edit menu. These options can also be selected by a right click in any text box.
1) Cut – Cuts the currently selected text in a text box.
2) Copy – Copies the currently selected text in a text box.
3) Paste – Pastes the last copied text in a text box at the current cursor position.
c) View
1) Toolbar – Turns on and off the toolbar
2) Status Bar – Turns on and off the Status Bar.
d) Settings
1) Video Settings – Opens a dialog box that lets you adjust the Brightness, Contrast, Saturation and
Hue of incoming analog video.
Page 35
Page 36

Merlin 2003 DV and MPEG-2 Recorder and Dual Stream Decoder
2) Audio Settings – Opens a dialog box that lets you adjust the input audio gain and output audio
level.
e) Tools
f) Help – This Menu option displays the Merlin about box.
Occasionally you may see this dialog box. This dialog box is used to report messages without waiting for the any
user input.
Page 36
Page 37

Merlin 2003 DV and MPEG-2 Recorder and Dual Stream Decoder
6.2 The Play List Editor
7
2
1
3
4
5
6
1) This list box shows all the video and alpha files currently in the play list file. Files can be added
to or deleted from this list box by using the File menu or by right clicking in the list box. Multiple
files can be selected and files can be moved by using the mouse inside the list box.
2) These three scroll bars let you set the start and end of a video file.
3) This scroll bar lets you select where an alpha file should start within a video file.
4) Pressing the Align Alpha button moves the alpha scroll bar to a position in the video file exactly
equal to the size of the alpha file before the selected end time chosen for the video file. This is
usually the most likely place an alpha files start position is adjusted.
5) Pressing these buttons causes the Play List Editor Application to communicate with the Player
Application and adjust the scroll bars to the current position of Video A in the Player Application.
This is useful for find cut points. By using the sliders and frame step feature in the Player
Application exact frames can be located. Pressing these buttons then moves the scroll bars to the
same frame numbers.
6) Pressing these buttons gives useful information about the Video and Alpha files.
7
This is the Play List Editor menu.
a) File
1) Open File – Opens a new Video Play List file or adds a video or alpha file to the list box.
2) Save As – Save all the current Play List settings in a specified file.
3) Delete File – Removes the currently selected video or alpha file from the list box.
4) Enable/Disable File – Disables the currently selected video or alpha file. This results in the Play
List file having an entry with valid information but with a comment on the line that causes the
Play List processor to skip this line.
5) Insert File – Adds a video or alpha file to the list box.
6) Exit – Exits the application.
Page 37
Page 38

Merlin 2003 DV and MPEG-2 Recorder and Dual Stream Decoder
b) Options
1) Hide Toolbar – Turns on and off the toolbar.
2) Show Hints – Turns on and off hints when the mouse passes over a control.
c) Windows
1) Video Play Preview – Opens the Video Play Preview window shown below.
2) Audio Play Preview - Opens the Audio Play Preview window shown below.
d) Help
1) Overview – Opens a help window.
2) About - Opens Play List Editor About Box.
These are the Video and Audio Play Preview windows. These windows show the relationship between all the files
in the play list. By adjusting the slider and pressing the PLAY button the video or audio file can be played from
anywhere within the play list file. The Play List editor does this by saving the play list to a temporary file, adding
the name of the temporary play list to the “Merlin.ini” file in the “windows” directory and then sending a message
to the Player Application. When the player application receives the message, it gets the filename from the
“Merlin.ini” file and starts playing the play list file. The Player Application must be open for this to work.
Page 38
Page 39

Merlin 2003 DV and MPEG-2 Recorder and Dual Stream Decoder
The Audio Play List Editor is very similar to the Video Play List Editor with the exception that there is no alpha file
setting. Refer to the description of the Video Play List Editor for a description of the Audio Play List Editor
controls.
Page 39
Page 40

Merlin 2003 DV and MPEG-2 Recorder and Dual Stream Decoder
6.3 The Program Stream Generator
1
2
5
7
8
9
11
1) File button – This button brings up a dialog box allowing you to select an audio file. This file may be a
WAVE audio file or an MPEG audio file. If a WAVE audio file is selected it will be converted to MPEG
audio during the Stream Generation process. For DV audio/video stream generation the audio file must be
a WAVE 48Khz stereo audio file.
2) File name – This text box specifies the current audio file and also lets you type a file name directly.
3) File button – This button brings up a dialog box allowing you to select an elementary MPEG or DV video
file.
4) File name – This text box specifies the current video file and also lets you type a file name directly.
5) Layer Control - If the audio file is a WAVE audio file this list box allows you to select the MPEG audio
layer to use when the audio is converted to MPEG audio. Layer 2 is the most common used.
6) Bitrate Control - If the audio file is a WAVE audio file this list box allows you to select the Bitrate to use
when the audio is converted to MPEG audio. 128,000 or 256,000 is the most common used. For high
quality audio use 256,000.
7) Output Format – These radio buttons allow you to select the program stream format or allow you to select
MPEG audio from WAVE audio. Most MPEG-1 Program Streams used MPEG-1 elementary video files
and most MPEG-2 Program Streams use MPEG-2 elementary video files.
8) File button – This button brings up a dialog box allowing you to select an Output file name.
9) File name – This text box specifies the current output file and also lets you type a file name directly.
10) Progress Bar – This control will show status during the generatio n process.
11) Multiplex Button – Pressing this button starts the generation process.
12) Stop Button – Pressing this button stops the generation process.
3
4
6
10
12
Page 40
Page 41

Merlin 2003 DV and MPEG-2 Recorder and Dual Stream Decoder
6.4 The Program Stream Splitter
1
2
6
7
1) File button – This button brings up a dialog box allowing you to select an MPEG Program File.
2) File name – This text box specifies the current program file and also lets you type a file name directly.
3) File button – This button brings up a dialog box allowing you to specify the base name for the split
elementary files.
4) File name – This text box specifies the current base name and also lets you type a file name directly.
5) Progress Bar – This control will show status during the splitting process.
6) Message Box – This box will print messages during the splitting process.
7) Demultiplex Button – Pressing this button starts the splitting process.
8) Stop Button – Pressing this button stops the splitting process.
3
4
5
8
6.5 The Batch Recorder
Page 41
Page 42

Merlin 2003 DV and MPEG-2 Recorder and Dual Stream Decoder
The Batch Recorder Utility allows multiple video files to be capture automatically. The utility can control any VTR
that has an RS422 control port. The scheduled recordings can be started and stopped by matching times with VITC,
LTC, 9 PIN (RS422) or TOD (Time of Day).
1
2
3
4
5
6
1) Time Code Source – This setting chooses which time code source to use for matching starting and ending
times. All of the time coded sources are continually updated and displayed next to the radio button
controls that let you select the time code source.
2) VTR Controls – These buttons directly control the VTR that is connected using RS422. The choices are
fast rewind, unity speed rewind, single step reverse, stop, single step forward, unity speed play, fast
forward and eject.
3) Record Control - These buttons start and stop the batch record process.
4) Preroll – This setting sets the number of frames to cue a VTR before each the first frame to be captured.
5) In/Out Mark Buttons – When one of these buttons is pressed it transfers the current timecode to the start or
end timecode of the selected entry in the batch list. Using the VTR controls start and end times can be
Page 42
Page 43

Merlin 2003 DV and MPEG-2 Recorder and Dual Stream Decoder
located. Once a start and end time is located the In or Out button can be used to transfer the timecode to
the batch list.
6) Record Time – These 2 time specify the total amount of time of all the jobs in the list and the time
remaining to complete the batch list. The remaining time updates continuously as the records progress.
This is the menu section of the recorder application.
1) File
A) New
B) Open
C) Save
D) Save As ..
E) Close
2) Port
A) None
B) COM 1
C) COM 2
D) COM 3
E) COM 4
3) Video
A) Input Select – Selection for video input during recording.
1. NTSC - C-Video
2. NTSC - S-Video
3. NTSC - Component
4. NTSC – SDI
5. PAL – C-Video
6. PAL – S-Video
7. PAL – Component
8. PAL - SDI
B) VITC Lines – VITC line selection. The default is 16 and 18.
C) Video Settings – Analog input brightness, contrast, saturation and hue settings.
4) Audio
A) Input select – Selection for audio monitoring during record.
1. MUTE
2. Embedded 1 – 4
3. AES 1-3
B) Audio Settings – Analog audio input gain and output volume settings.
Page 43
Page 44

Merlin 2003 DV and MPEG-2 Recorder and Dual Stream Decoder
This window shows the list of batch job that will be recorded. Each job specifies Filename, In time, Out time,
Duration, File format (Codec to use for record), Type (for MPEG this is VBR or CBR), Video Bitrate, Horizontal
and Vertical resolution, GOP structure, Audio Bitrate, and which audio input to capture. Any of the fields can be
changed by right clicking on them. New jobs can be added by right clicking on an empty section of the window.
This is the Message window. This window will print messages that pertaining to jobs as they are recorded. If an
error occurs for any reason the message will display in this window.
Page 44
Page 45

Merlin 2003 DV and MPEG-2 Recorder and Dual Stream Decoder
Appendix A
Video Play List Files
A.0 Video Play List File Format
The format of a Video Play List File is as follows:
<Video File> <Starting Frame #> <Ending Frame #> <Repeat Count> <Alpha File> <Start Alpha @ Frame #>
<Video File> <Starting Frame #> <Ending Frame #> <Repeat Count> <Alpha File> <Start Alpha @ Frame #>
<Video File> <Starting Frame #> <Ending Frame #> <Repeat Count> <Alpha File> <Start Alpha @ Frame #>
<Video File> <Starting Frame #> <Ending Frame #> <Repeat Count> <Alpha File> <Start Alpha @ Frame #>
.
.
.
<Video File> <Starting Frame #> <Ending Frame #> <Repeat Count> <Alpha File> <Start Alpha @ Frame #>
Any line that starts with a semicolon (“;”) or any line that has no arguments on it is ignored. Alpha files are
optional. So a line may contain either four or six arguments. The “Alpha File” specifies what transition file should
be used when starting the “Video File” specified on the next line. If there is no “Alpha File” the next “Video File”
will start immediately after the last Field of the previous “Video File”. If an “Alpha File” is specified then the next
file will start at “Start Alpha @ Frame #” of the current video file.
Here is an example of a Video Play List File:
;Video File Start End Repeat Alpha File Alpha Frame Start
;========== ====== === ====== ========== =================
<d:\mpeg\clip1.mpg> <50> <500> <0> <d:\mpeg\alpha\crossfade50.alp> <450>
<d:\mpeg\black1.mpg> <0> <250> <250> <d:\mpeg\alpha\rwipe50.alp> <200>
<d:\mpeg\clip2.mpg> <1000> <1500> <0>
<d:\mpeg\clip3.mpg> <100> <600> <0> <d:\mpeg\alpha\dissolve80.alp> <520>
In this example “clip1.mpg” start at field 50 of that file. At field 450 of that file “black1.mpg“ starts and a
crossfade transition is applied for 50 fields. If the fields in a file are less than the “end – start” the file is repeated.
In this example “black1.mpg” is actually a single frame of black video. Therefore it is repeated 250 times. The
Repeat count is ignored by the player application but it is used by the playlist editing application. At field 200 of
black1.mpg (after it has repeated 200 times) “clip2.mpg” starts and a rwipe transition is applied for 50 fields. This
file will start at offset 1000 fields into this clip and play for 500 fields. Since no alpha file was specified here
“clip3.mpg” starts as soon as “clip2.mpg” ends at an offset of 100 fields into that clip. When the Play List file ends,
it starts again from the beginning. Therefore at field 520 of “clip3.mpg”, “clip1.mpg” will start again at an offset of
50 fields and a dissolve transition will be applied for 80 fields.
Page 45
Page 46

Merlin 2003 DV and MPEG-2 Recorder and Dual Stream Decoder
Appendix B
Audio Play List Files
B.0 Audio Play List File Format
The format of an Audio Play List File is as follows:
<Audio File> <Starting Frame #> <Ending Frame #> <Repeat Count>
<Audio File> <Starting Frame #> <Ending Frame #> <Repeat Count>
<Audio File> <Starting Frame #> <Ending Frame #> <Repeat Count>
<Audio File> <Starting Frame #> <Ending Frame #> <Repeat Count>
.
.
.
<Audio File> <Starting Frame #> <Ending Frame #> <Repeat Count>
Any line that starts with a semicolon (“;”) or any line that has no arguments on it is ignored. Each line that has
arguments always contains four arguments. Each “Audio File” will start immediately after the last Field of the
previous “Audio File”.
Here is an example of a Video Play List File:
;Video File Start End Repeat
;========== ====== === ======
<d:\mpeg\clip1.wav> <50> <500> <0>
<d:\mpeg\clip2.wav> <1000> <1500> <0>
<d:\mpeg\clip3.wav> <100> <600> <0>
In this example “clip1.wav” start at field 50 of that file. At field 500 of that file “clip2.wav“ starts. If the fields in a
file are less than the “end – start” the file is repeated. The Repeat count is ignored by the player application but it is
used by the playlist editing application. At field 1500 of “clip2.wav”, “clip3.wav” starts. When “clip3.wav reaches
field number 600 “clip1.wav” will start again at an offset of 50 fields and the whole process will repeat.
Page 46
Page 47

Merlin 2003 DV and MPEG-2 Recorder and Dual Stream Decoder
Appendix C
Writing your own Applications
There are 2 Methods of interfacing to the Merlin2003 hardware. The first is though a high level interface that
handles all file I/O and buffer management. The second method is through a lower level interface. The higher level
interface is good for simple play and capture applications that only need to create files in elementary formats. The
Merlin application was written using this interface. The lower level interface does not handle file I/O or buffer
management but allows for much more control of the data going to and from the Merlin2003 hardware. This is
good for applications that require handling the data as it becomes available from the hardware. The Batch recorder
was written using this interface because it required more control of the data that is stored to files. Another example
of an application that may require the lower level interface are network applications that may not want the data
stored to a file. Example source code using both interfaces will be demonstrated. Source code examples using the
high level interface are in the SDK directory on the install CD under a directory called Windows\ExampleIF1.
Source code examples using the low level interface as well as the source code to the BRec application are under a
directory called Windows\ExampleIF2.
C.0 Example Source Code using Method 1
The first example is a simple MFC 6.0 dialog application with minimal code added. The application has only four
push buttons that selects a video filename, play a file, record to a file, and stop playing or recording a file. There is
Page 47
Page 48

Merlin 2003 DV and MPEG-2 Recorder and Dual Stream Decoder
also a pair of radio buttons for switching between play and record mode. The starting application was generated by
running the MFC App Wizard in MFC 6.0 and selecting a simple dialog application. Only five subroutines have
been added to the application, and a few lines have been added to the OnInitDialog(); subroutine. The five
subroutines are:
1) InitMerlinr(); - Initializes the Merlin hardware for record mode. This routine is called when the Record
radio button is pressed.
2) InitMerlinp(); - Initializes the Merlin hardware for play mode. This routine is called when the play radio
button is pressed.
3) OnFile(); - Opens a file dialog box so you can select a video file. This routine is called when the File
button is pressed.
4) OnRecord(); - Starts recording video. This subroutine is called when the Record button is pressed.
5) OnPlay(); - Starts playing video. This subroutine is called when the Play button is pressed.
6) OnStop(); - Stops playing or Recording video. This subroutine is called when the Stop button is pressed.
To build this application you must have “tools.cpp” and “tools.h” in the application build directory and you must
have “mercmd.lib”, “merddi.lib”, “mercmd.dll”, and “merddi.dll” in the application build directory or in the lib rary
search path. “mercmd.lib” and “merddi.lib” must be added to the link settings in the project settings dialog box. In
this example all the code mentioned was added to the file “exampleDlg.cpp”. There are also several lines that were
added to the “exampleDlg.h” file. Refer to the source file to see what lines were added. For information on Merlin
command strings refer to the cmdline.txt document.
C.1 Command Line Examples using Method 1
The higher level interface can also be tested easily using a command line interface from a DOS shell window. The
SDK directory on the CD includes many examples of batch programs that can control the Merlin2003 hardware
using this method. These example files can be found under the SDK\Windows\cmdlin directory on the install CD.
C.2 Simpleplay application using Method 2
The Simpleplay and Simplerec programs are examples of applications that use the lower level interface. These
programs are simple command line utilities that play and record audio and video. The Simpleplay utility is less than
200 lines of code. To build this application you must have “tools.cpp” and “tools.h” in the application build
directory. No other libraries or DLL are required. The only routines that are needed from tools.ccp are:
1) m2ddWrInt32(); - Writes one of the registers on the Merlin2003 board.
2) m2ddRdInt32(); - Reads one of the registers on the Merlin2003 board.
3) loadf2(); - Loads the second FPGA on the Merlin2003 board.
4) i2cinit(); - Initializes I2C decides on the Merlin2003 board.
5) SetVideoInput(); - Selects the video input source for record or the genlock source for play.
6) mld(); - Loads a microcode file into the Video processor on the Merlin2003 board.
7) Mercmd(); - Queues a command to the Video processor on the Merlin2003 board.
8) Send(); - Transfers the commands in the command queue to the Video processor on the Merlin2003 board.
Using these 8 routines anything that is possible on a Merlin2003 can be achieved.
Page 48
Page 49

Merlin 2003 DV and MPEG-2 Recorder and Dual Stream Decoder
Appendix D
Cable Pinouts
D.0 Cables
1) Digital Cable
2) Analog Cable
3) RS422 Control Cable
Page 49
Page 50

e
Merlin 2003 DV and MPEG-2 Recorder and Dual Stream Decoder
Merlin 2003 Digital Cabl
Blue
SDI VIDEO IN
Femal e B NC
SDI VIDEO OUT1
Femal e B NC
SDI VIDEO OUT2
Femal e B NC
AES AUDIO IN
Femal e R CA
AES AUDIO OUT
Femal e R CA
5
4
3
2
1
Male DB9
Front View
5
9
4
8
9
8
7
6
3
8
2
7
1
6
Signal
Gro un d
Label
Green
Signal
Ground
Label
Red
Signal
Groun d
Label
Gray
Signal
Groun d
Label
Black
Signal
Groun d
Label
Blue
Green
Red
Gray
Black
6.00" +/- .5”
7.50" +/- .5”
Page 50
Page 51

Merlin 2003 DV and MPEG-2 Recorder and Dual Stream Decoder
Merlin 2003 Analog Cable
8
7
6
5
4
3
2
1
15
14
13
12
11
10
9
Male DB15
Front View
14
15
11
10
6
12
2
9
1
9
5
12
4
12
8
15
7
15
3
10
Signal
Gr oun d
Signal
Gr oun d
Signal
Ground
Signal
Groun d
Signal
Groun d
Signal
Ground
Signal
Ground
Signal
Ground
Signal
Ground
Signal
Ground
Black
Labe l
Yel low
Label
White
Label
Red
Labe l
3
4
1
2
4
Fem al e Mi ni D I N
Front View
Black
Label
Yellow
Labe l
White
Labe l
Red
Labe l
23
1
3
4
4
1
Female Mini DIN
2
Front View
S-Video In
Female Mini DIN
C-Video In
Female RCA
Left Au di o In
Female RCA
Right Audio In
Female RCA
23
1
S-Video Out
Female Mini DIN
C-Video Out
Female RCA
Left Audio Out
Female RCA
Ri ght Au dio Out
Female RCA
Black
Yel low
White
Red
9.00" +/- .5”
10.50" +/- .5”
Label
Label
Label
Label
Black
Ye ll ow
White
Red
La bel
La bel
La bel
La bel
Page 51
Page 52

Merlin 2003 DV and MPEG-2 Recorder and Dual Stream Decoder
Batch Recorder Serial Cable
Page 52
Page 53

 Loading...