

Page 1
TM
Thank you for your purchase of a SkylinkHome Lighting Automation,
Snap-On Transmitter, Model TM-318. This transmitter allows you to
TM
wirelessly operate different lighting fixtures with the SkylinkHome
lighting receiver modules.
TM
The Snap-On Transmitter can work with all the SkylinkHome receiver
modules, however, it is specifically designed for mounting onto either
Wireless Wall Switch Dimmer Model WR-001 or Wireless On/Off Wall
Switch WE-001.
TM
All wireless signal communications within the SkylinkHome lighting
system are based on rolling code technology to ensure highest security
is used.
You will find the following in this package:
- Snap-On Transmitter
- Lithium Battery CR-2032
- User's Instructions
1. INTRODUCTION
5. ERASING TM TRANSMITTERS
You may erase a transmitter from the receiver module, but you cannot
erase a specific device, you must erase all the wireless devices, then
program the ones you want to keep. Follow the instructions below to
erase programmed transmitters.
1. Remove the battery from the Snap-On Transmitter.
2. Power off the lighting receiver module.
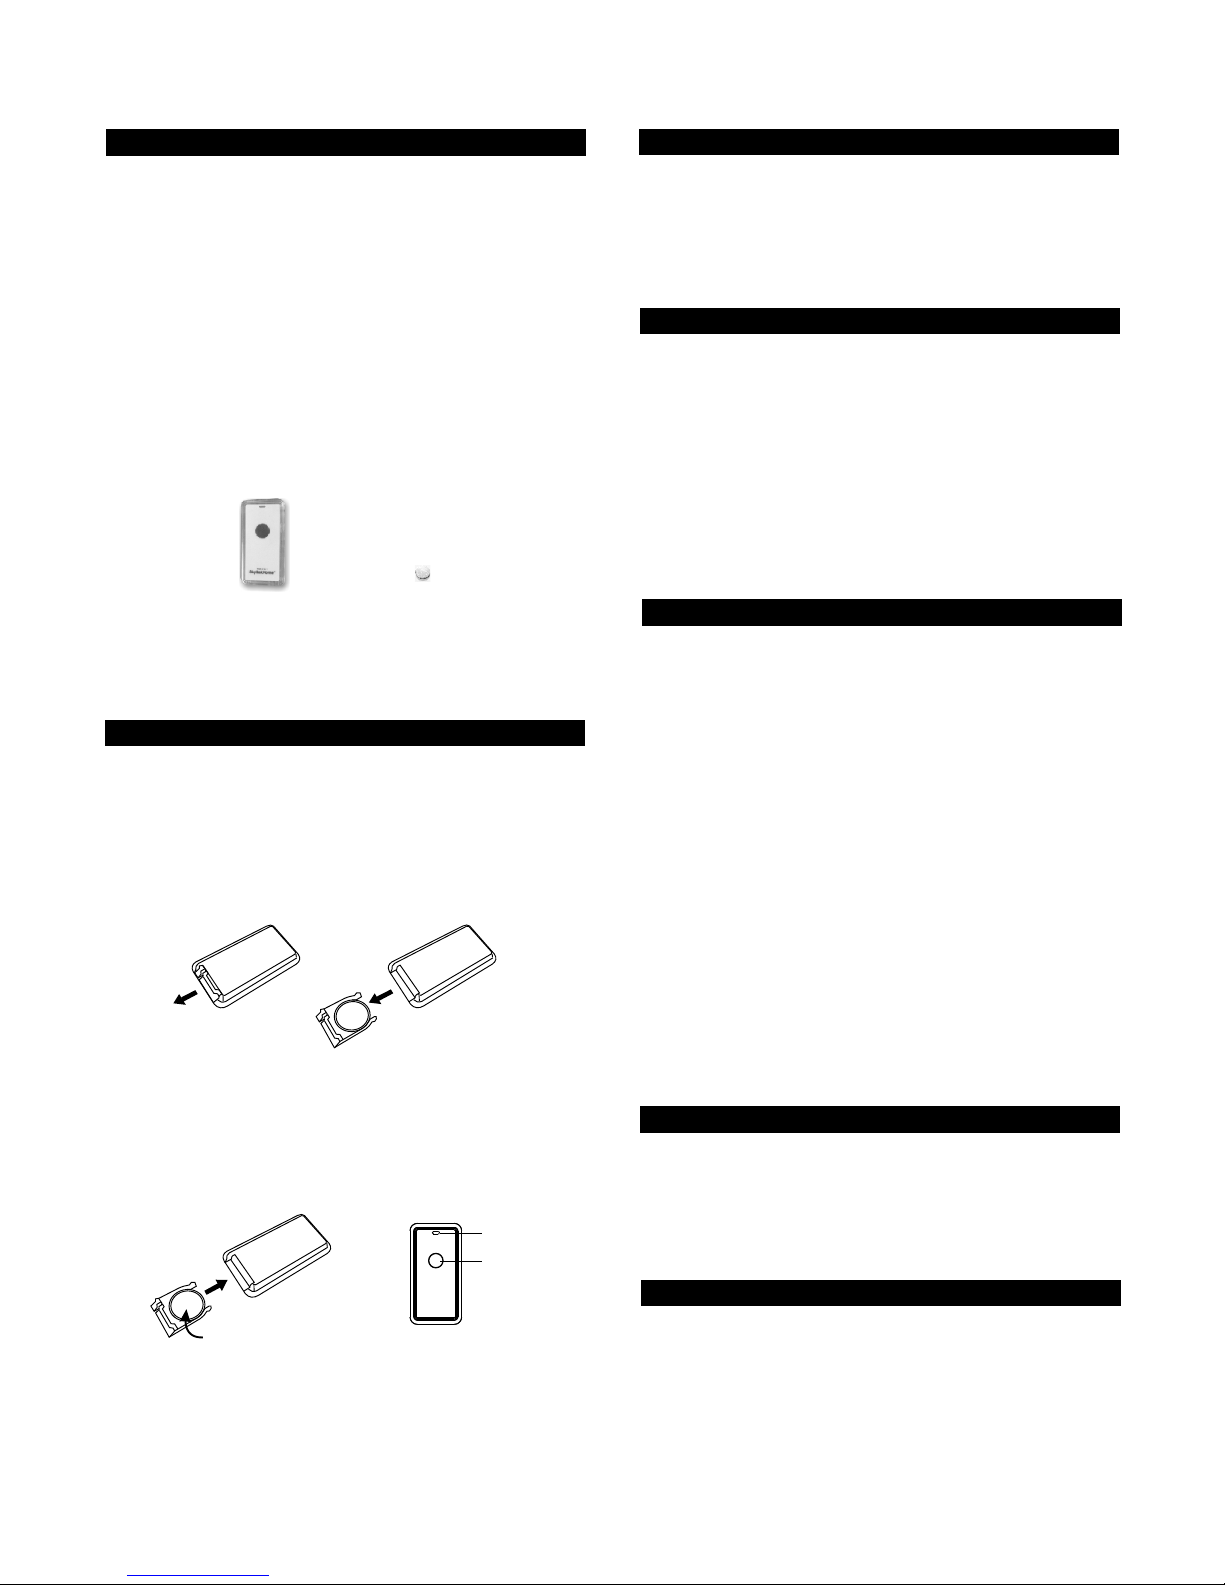
3. Place the battery to the battery holder and insert the holder to the
Snap-On Transmitter as shown. Its red LED will be on steadily.
4. Press and hold the button on the transmitter for at least 2 seconds, do
not release this button until step 6.
5. Power up the lighting receiver module, you will hear beeping and the
light will be on.
6. You may release the button on the transmitter.
7. When the button is release, the light connected to the receiver module
should be off, indicating you have successfully erased all the devices
from the lighting receiver.
Erasing TM transmitters from the Dimmable Receiver
Module model MD-318 or On / Off Receiver Module model MR-318
Lithium battery
Snap-On Transmitter Model TM-318
Snap-On Transmitter
2. PROGRAMMING TRANSMITTERS TO RECEIVER MODULE
In order to operate the receiver module remotely with a transmitter, it
must be programmed to the receiver module.
To program a transmitter into the receiver module, follow the instructions
below.
1. Remove the battery from the Snap-On Transmitter. If the battery is not
already installed, skip to step 2.
2. Put the receiver module that you plan to program into programming
mode. Refer to the User's Instructions of that receiver module.
3. Once the receiver module is in programming mode, you may transmit
the programming signal from the transmitter.
4. To transmit the programming signal, place the battery to the battery
holder and insert the holder to the Snap-On Transmitter as shown. Its
red LED will be on steadily. (Positive side down)
5. Press the button on the transmitter, its red LED will flash then off.
6. Once the transmitter is programmed, the receiver module will quit
from programming mode.
7. You may operate the light with the programmed transmitter.
Remove
battery holder
Insert battery holder
Positive side (with battery
marking) faces down
LED
Button
3. ON / OFF OPERATION
Pressing the button on the remote once will toggle the light that is
connected to the receiver module, i.e. if the light is off, pressing the
button turns on the light, vice versa.
When the number button is pressed, the red LED flashes briefly indicating
signal is transmitting.
Before you can operating lighting with this transmitter, you need to
program its button to a receiver module. Follow the instructions below
to program the transmitter to a receiver module.
If you would like to erase TM transmitter from other receiver modules,
such as WR-318, WE-318, PA-318, PR-318, LS-318 etc., Please refer
to the user’s instructions of that receiver module.
Erasing TM transmitters from other receivers
Besides turning on and off the light, you may also control the brightness
of the light if the receiver module and the light bulb is dimmable, i.e. either
incandescent light and designated dimming compact fluorescent light.
To change the brightness, first turn on the light.
Press and hold the button on the transmitter will change its
brightness. Hold onto the button until the desired brightness is reached,
then release the button.
Press and hold the button again to change the brightness again in the
opposite way (i.e. Dim to brighten or brighten to dim), until the desired
brightness is reached, then release the button.
4. BRIGHTNESS CONTROL OPERATION
6. BATTERY
When the operating range is reduced, or when the red LED does not
flash during operation, it is time to replace the battery. Follow the same
procedure as installing the battery in section 2 of this manual to replace
the battery.
Note: Dispose of old batteries promptly and properly.
7. FCC
The Remote Control is approved by the FCC and it complies with Part 15 of the
FCC Rules. Its operation is subject to the following two conditions :
1. This device may not cause harmful interference.
2. This device must accept any interference that may cause undesired operation.
WARNING:
Changes or modifications to this unit not expressly approved by the party responsible
of compliance could void the user’s authority to operate the equipment.
Page 2

9. CUSTOMER SERVICE
If you would like to order Skylink’s products or have difficulty getting them to work
or download latest information and user manual, please :
1. visit our FAQ section at www.skylinkhome.com, or
2. email us at [email protected], or
3. call our toll free at 1-800-304-1187 from Monday to Friday, 9 am to 5 pm EST.
Fax (800) 286-1320
CUSTOMER SERVICE
17 Sheard Avenue, Brampton, Ontario, Canada L6Y 1J3
Email:[email protected]
http://www.skylinkhome.com
P/N. 101A396
Patent Pending
©2010 SKYLINK GROUP
10. ACCESSORIES
The Skylink Lighting System consists of many other devices from
multiple button transmitters, Motion Sensor, various receivers such as
Wall Switch Receiver, Plug-in Receiver with Repeater, Outdoor Receiver,
Dimmer Module etc. Please visit Skylink website at www.skylinkhome.com
for more information.
TM
Home
 Loading...