

Page 1
7-Button Remote
10-Button Remote
14-Button Remote
Model TC-318-7
Model TC-318-10
Model TC-318-14
1. INTRODUCTION
Thank you for your purchase of a SkylinkHome , Deluxe Remote,
TM
Model TC-318-7 / TC-318-10 / TC-318-14. This transmitter which is also
called remote in this document allows you to wirelessly operate
SkylinkHome receiver modules.
TM
Use this personal remote, you can control almost everything in your home
such as Lighting on / off and dimming in different location, open and close
your gate or garage door, arm and disarm your security system, turn on or
turn off your gas fire place, control radio and music system, operate the
windows curtains, cook your coffee every early morning, open and or close
the swing doors, turn on or turn off the fan or Exhaust fan for your bath room...
All wireless signal communications within the SkylinkHome system are
TM
based on rolling code technology to ensure highest security is used.
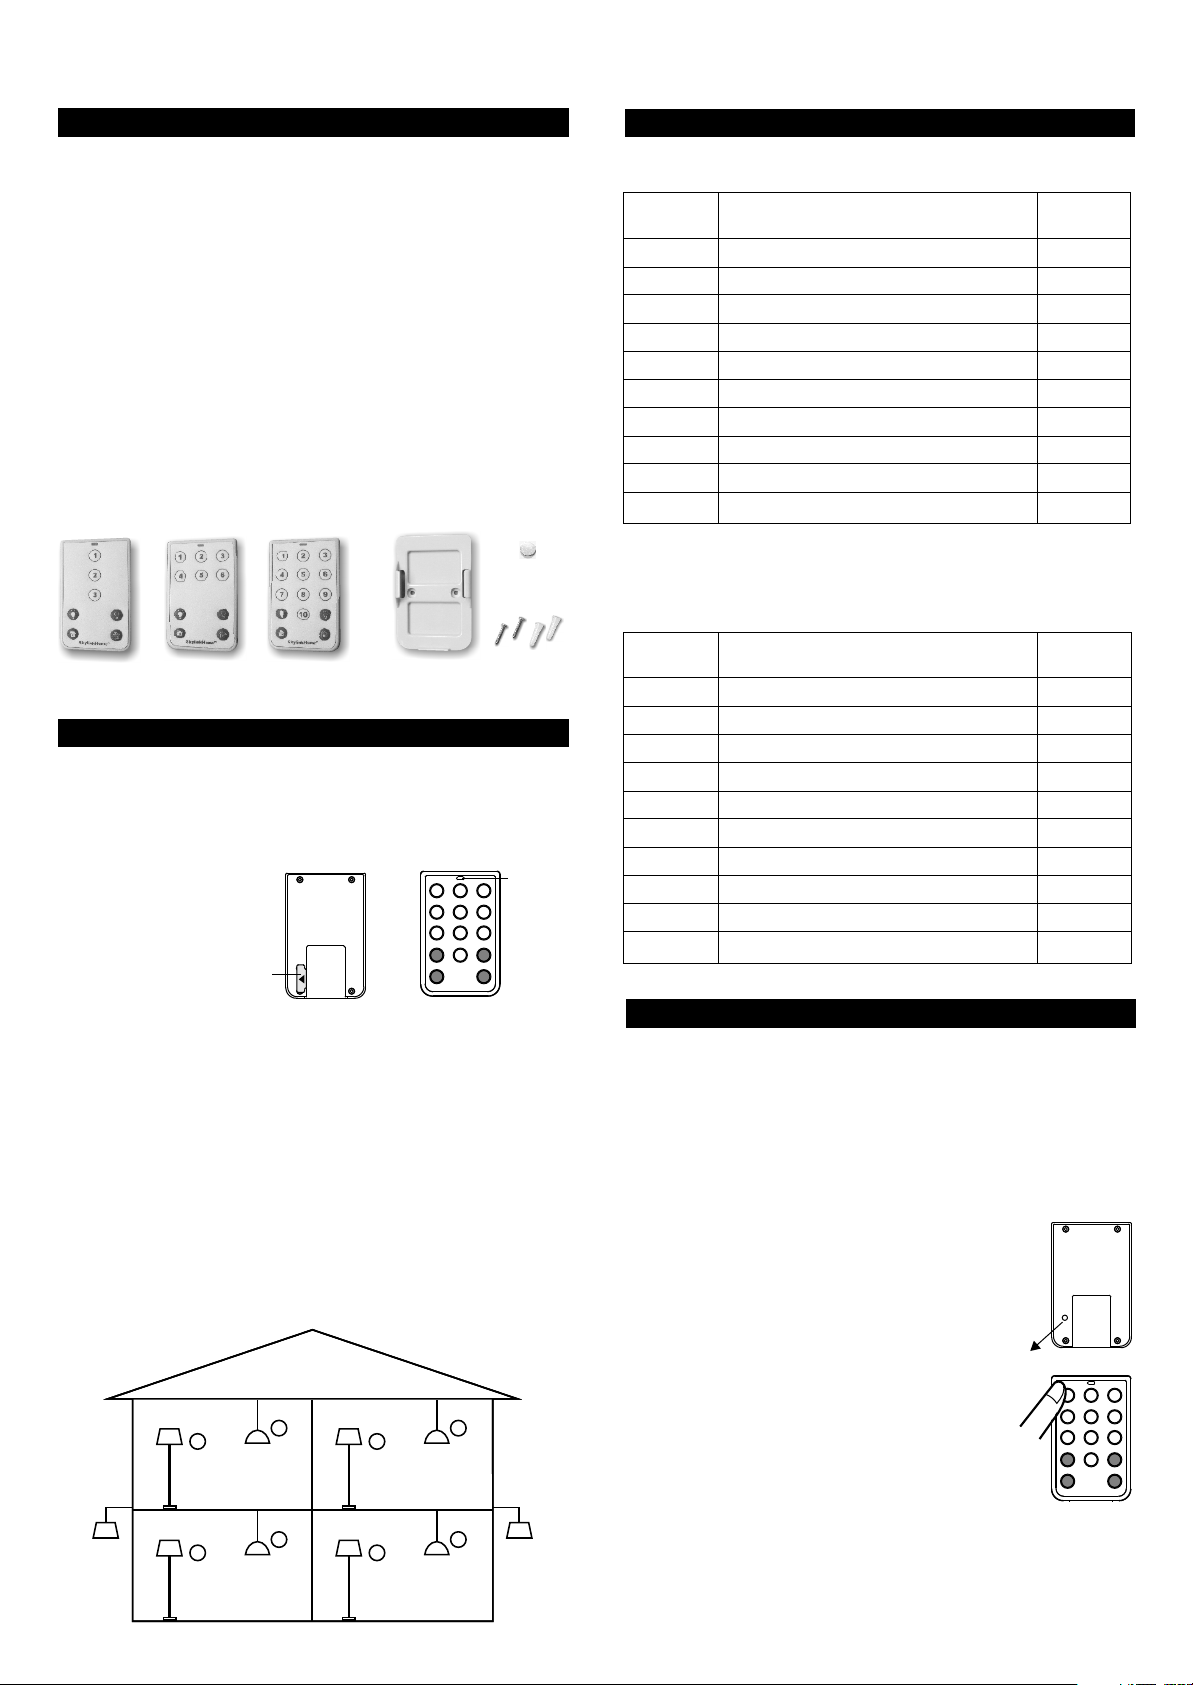
The following items are included in this package:
- One of TC Series Remotes
- Mounting Bracket and Accessories
- Lithium Battery CR-2032
- User's Instructions
2. POWER UP (CONT)
You may assign the buttons to specific lights and zones.
Number
Button
1
2
3
4
5
6
7
8
9
10
Family Room Floor Light
Family Room Ceiling Light
Bedroom Ceiling Light
Master Bedroom Floor Light
Master Bedroom Ceiling Light
Light
Kitchen Floor Light
Kitchen Ceiling Light
Bedroom Floor Light
Front Yard Light
Back Yard Light
Zone
Zone 1
Zone 1
Zone 2
Zone 2
Zone 3
Zone 3
Zone 4
Zone 4
Zone 5
Zone 5
Lithium
battery
7-Button
Remote
TC-318-7
10-Button
Remote
TC-318-10
14-Button
Remote
TC-318-14
Mounting
Bracket
with magnet
Screws and
anchors
2. POWER UP
To power the transmitter, simply remove the battery isolator from the
transmitter, red LED will flash once. Press the button on the transmitter,
the red LED should flash. The transmitter is now powered properly. If
the red LED does not flash when button is pressed, refer to Section 7
“Battery" of this manual.
LED on for
1) Remove isolator,
1 second
2) LED on for 1 second
Remove
isolator
Before you can control the lights (or small appliances, etc.) connected to
the receiver modules with the transmitter, you may need to program
different buttons on the transmitter to various receiver modules. It is a lot
easier if you plan in advance of how to setup your system. For example,
you may list out the lights and their locations with zone grouping that you
plan to include in your lighting system.
The Deluxe Transmitter can transmit 3 types of command:
1) Individual Operation - Controls one light only, i.e. the ceiling light in
the family room
2) Zone Operation - Controls one specific zone or area, which consists
of multiple lights, i.e. all lights in the kitchen
3) All On / All Off - Controls all lights in the premises, i.e. all lights in the
house connected with SkylinkHome lighting modules.
5
Bedroom
Zone 3
Front Yard
Zone 5
1
Family Room
Zone 1
TM
6
7
8
Master Bedroom
Zone 4
Kitchen
4
Back Yard
Zone 5
2
3
Zone 2
You may use the following table to fill in the lights or small appliances
you would like to control and their zone numbers, this will give you a
clear direction during the programming process.
Number
Button
Light
Zone
2. PROGRAMMING TRANSMITTERS TO RECEIVER MODULE
In order to operate the receiver module remotely with a transmitter, it
must be programmed to the receiver module. Follow the instructions
below.
Programming for Individual Operation
To program a remote to the receiver module, a "Learn" code must be
transmitted, follow the instructions below to transmit the "Learn" code
to the receiver.
1. Put the receiver module that you plan to program
into programming mode. Refer to the User's
Instructions of that receiver module.
2. Use a sharp object to press the “PROG”
button on the back of the transmitter. The red
LED on the transmitter will be on for 15 seconds.
3. Press the button on the remote that you plan to
“PROG”
button
use when the LED is steadily on to transmit the
“Learn" code.
4. Once the remote is programmed, the receiver
modules will quit from programming mode and
the programmed transmitter is ready to be
Press the
desired
button
used now.
Learn Code
Follow steps 2 and 3 above to transmit the "Learn" code when
programming the remote to receiver modules.
Page 2
2. PROGRAMMING TRANSMITTERS TO RECEIVER MODULE (CONT)
Programming for Zone Operation
In the above example, both the Family Room Ceiling Lighting and Family
Room Floor Light are in zone 1. You need to assign the zone 1 signal
to both receiver modules in these 2 locations.
That means for Light 1 in the example, you need to program the following
signals:
- Button 1 to Light 1 based on Programming for Individual Operation
- Zone 1 Command to Light 1 based on Programming Zone Operation
For Light 2 in the example, you need to program the following signals:
- Button 2 to Light 2 based on Programming for Individual Operation
- Zone 1 Command to Light 2 based on Programming Zone Operation
To assign a zone to a receiver module, follow the instructions below:
1. Put the receiver module that you plan to program
into programming mode. Refer to the User's
Instructions of that receiver module.
2. Use a sharp object to press the “PROG”
button on the back of the transmitter. The red
LED on the transmitter will be on for 15 seconds.
3. Press and hold the [ ] button until the red LED
flashes three times and keeps on, release the
held button and press the zone number button
on the transmitter. i.e. “1” for zone 1.
Red LED will flash then off.
“PROG” button
3. INDIVIDUAL OPERATION - ON / OFF (DESIGNATED ON/OFF)
(CONT)
Designated On
+
Press Once
Press Once
3. INDIVIDUAL OPERATION - DIMMING (TOGGLE)
You may also control the brightness of the light if the receiver module and
the light bulb is dimmable, i.e. either incandescent light or dimmable
compact fluorescent light.
To change the brightness, first turn on the light.
Press and hold the programmed numeric button, the brightness will
change. Hold the button until the desired brightness is reached, then
release the button.
Press and hold the same button again to change the brightness in the
opposite way.
Light must be On
4. Once the remote is programmed, the receiver
modules will quit from programming mode and
the programmed transmitter is ready to be
used now.
Press & Hold
3 sec.
Learn Code
Follow steps 2 and 3 above to transmit the "Learn"
code when programming the remote to receiver
modules.
Following the same instructions to program the zone number into various
receiver modules to form a zone with multiple lights, i.e. Zone 1 signal
to both Family Room Ceiling Light Module and Family Room Floor Light
Module.
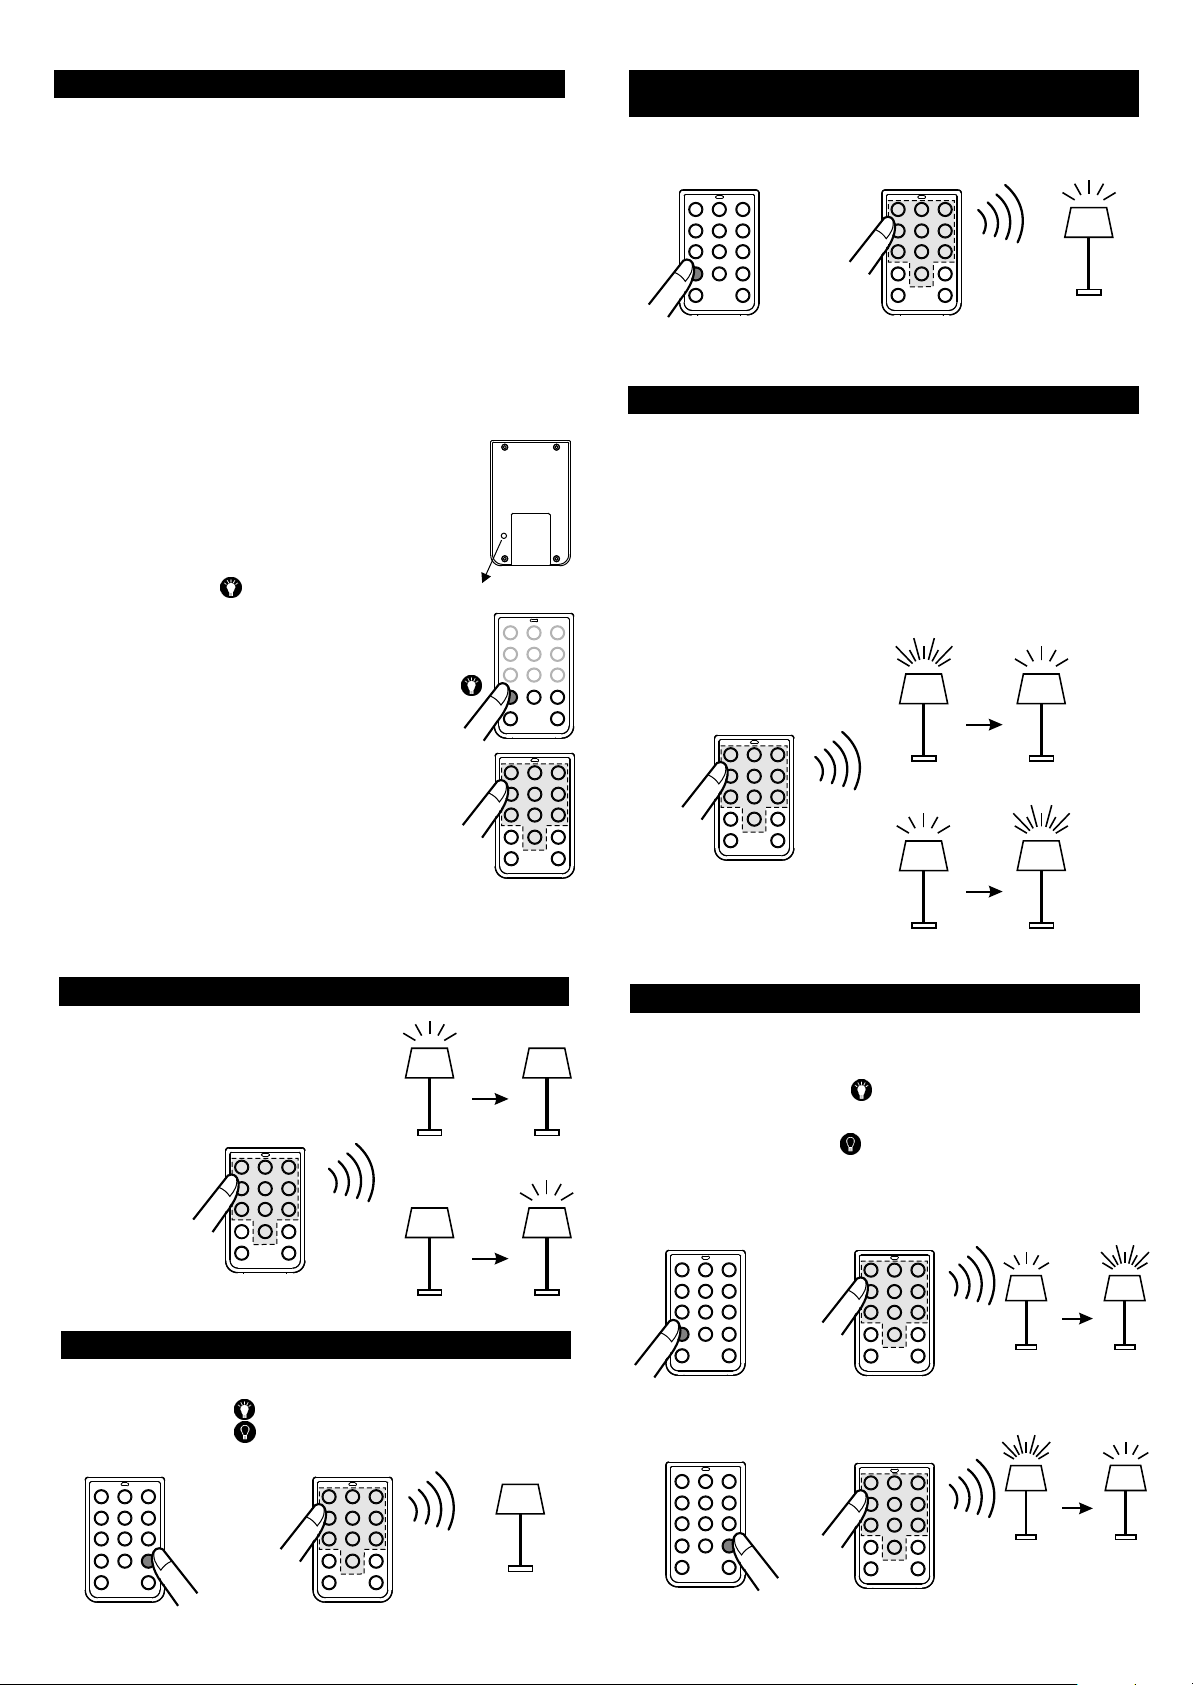
3. INDIVIDUAL OPERATION - ON / OFF (TOGGLE)
To turn on or off a load connected to a
receiver, simply press the programmed
numeric button. The light will be controlled
in a toggle manner, from On to Off, or from
Off to On.
Press Once
Press Once
From On To Off
OR
From Bright To Dim
OR
Press &
Hold
From Dim
3. INDIVIDUAL OPERATION - DESIGNATED DIM / BRIGHTEN
You may control the light specifically to dim down or brighten up, instead
of toggle dimming.
To brighten up the light, press [ ] and then hold the programmed
numeric button until the desired brightness is reached.
To dim down the light, press [ ] and then hold the programmed numeric
button until the desired brightness is reached.
Designated Brighten
To Bright
From Off
3. INDIVIDUAL OPERATION - ON / OFF (DESIGNATED ON/OFF)
Instead of toggle operation, you can send a designated on or off signal to
a load.
To turn on a load, press [ ] and then the programmed numeric button.
To turn off a load, press [ ] and then the programmed numeric button
Designated Off
To On
+
Press Once
Press Once
Light must be off,
regardless previous
status
Press Once
Designated Dim
+
+
Press Once
Press &
Hold
Press &
Hold
Must Dim Up
Must Dim Down
Page 3

4. ZONE OPERATION - ON / OFF
Zone command allows you to operate multiple lights or loads altogether
in the same zone.
To turn on multiple lights / loads in a zone:
1. Press and hold [ ] for 3 seconds, until the red LED flashes 3 times
then stay on.
2. Press the zone number button.
To turn off multiple lights / loads in a zone:
1. Press and hold [ ] for 3 seconds, until the red LED flashes 3 times
then stay on.
5. ALL ON / ALL OFF OPERATION (CONT)
Press the [ ] button to turn off all the items connected to SkylinkHome
system.
Press the [ ] button to turn on all the items connected to SkylinkHome
system.
Note: All On and All Off operations will not activate Model GB-318 Smart
TM
Button Garage Door Control and Skylink Swing Door Opener.
®
6. ERASING TC SERIES TRANSMITTERS
There are 2 types of receivers and erasing transmitter from these 2 types
of receivers are different. Please follow the erase procedure based on the
receiver you have.
TM
TM
2. Press the zone number button.
Zone On
+
Press
Once
Press & Hold 3 sec.
All lights in Zone 1 On
Zone Off
+
Press
Once
Press & Hold 3 sec.
4. ZONE OPERATION - DIMMING
You may control the brightness of lights in a zone.
To brighten up multiple lights in a zone:
1. Press and hold [ ] for 3 seconds, until the red LED flashes 3 times
then stay on.
2. Press and hold the zone number button until the desired brightness is
reached.
To dim down multiple lights in a zone:
1. Press and hold [ ] for 3 seconds, until the red LED flashes 3 times
then stay on.
2. Press and hold the zone number button until the desired brightness is
reached.
All lights in Zone 1 Off
Type A) Self Erase - Model PL-318, PR-318, PA-318, LS-318, WR-001
Self Erase means there is a erase button on the receiver, by pressing this
erase button, all transmitters can be erased.
To erase transmitters from these receivers, simply follow the instructions of
these receivers. The erase procedure does not involve the transmitter.
Type B) Erase by Remote - Model LX-318, MD-318, MR-318, WE-001
Erase by Remote means there is no erase button on the receiver, so a
programmed transmitter is needed in order to erase the memory of the
receiver. You need to transmit a "Erase" code from the Remote. Follow the
instructions below to erase the remote from the receiver.
1. Press the PROG button on the back of the remote.
2. Press and hold a button that is already programmed to the receiver for
at least 2 seconds when the LED is steadily on to transmit the "Erase"
code. Do not release this button until step 4.
3. Put the receiver that you want to erase the transmitter from into
programming mode. Refer to the User's Instructions of that receiver.
4. Once the receiver receives this "Erase" code, the receiver will indicate it
has erased all transmitters, and you may now release the button on the
remote.
Erase Code
Follow steps 2 and 3 above to transmit the "Erase" code when erasing the
remote from Type B receivers.
7. PASSWORD
There is a password function with your TC remote control. You may enable
the password so that the transmitter only functions if a valid password is
entered. This is useful if you would like to have added security so that only
the ones who know the password can operate the receiving devices. If the
password function is disabled, no password is required to operate the
TC remote control.
+
Press &
Hold
Press & Hold 3 sec.
All lights in Zone 1 from Bright to Dim
+
Press &
Hold
Press & Hold 3 sec.
Note: All zone operations will not activate Model GB-318 Smart Button
Garage Door Control and Skylink Swing Door Opener.
®
5. ALL ON / ALL OFF OPERATION
You may turn on all the lights and appliances with one touch of a button,
or turn them all off as well. All Off function is especially useful when you
are leaving home or going to sleep.
All lights in Zone 1 from Dim to Bright
The password function is disabled at the factory. To determine whether
password function is disabled of enabled:
Press [ ] > Red LED flashes > Password Disabled (Factory Default
Setting)
Press [ ] > Red LED does not flashes > Password Enabled
To factory default password depends on the exact model that you have:
TC-318-7: [1212]
TC-318-10: [2525]
TC-318-14: [2525]
You can assign your personal password between 2 digits to 8 digits.
Follow the instructions below to enable / disable the password function.
TM
Note:
1. During password programming, if you press the wrong button,
start over again after you see led flashes 3 times about 10
seconds.
2. Press button only after LED finishes flashing.
3. The interval between two presses should not be more than 3
seconds.
4. Key 10 can be used as digit “0” in the password.
Page 4

7. PASSWORD (CONT)
To enable the password function
1. Hold [ ] button, red LED stays on, continue to hold, then press [ ]
button once, then release both [ ] and [ ] buttons. Red LED flashes
twice quickly.
2. Enter password, i.e. factory default for TC-318-14 is [2525], or the
current password.
3. Press [ ] button, the red LED flashes twice.
You have now enabled the password function.
9. BATTERY
When the operating range is reduced, or when the red LED does not
flash during operation, it is time to replace the battery.
The transmitter is powered by a lithium battery CR-2032. Follow the
instructions below to replace the battery to the transmitter.
1. Slide out the battery door from the unit.
Slide out
battery door
Pressing any single numeric button will not transmit any signal, the red
LED will blink once when a button is pressed, instead of flashing slowing
(signal transmission).
Operation with password function enabled
If the password function is enabled, before each operation, the password
must first be entered, followed by the [ ] button.
Example, to turn on light 1 in Toggle On / Off mode, with password [2525]:
1. Enter [2525]
2. Press [ ], red LED stays on.
3. Press 1 to turn light 1 on.
To disable the password function
1. Hold [ ] button, then press [ ] button once, then release both [ ]
and [ ] buttons. Red LED flashes twice quickly.
2. Enter password, i.e. factory default for TC-318-14 is [2525] or the
current password.
3. Press [ ] button, the red LED flashes twice.
You have now disabled the password function.
To change the password
1. Hold [ ] button, then press [ ] button once, then release both [ ]
and [ ] buttons. Red LED flashes twice quickly.
3. Enter the current password, i.e. factory default for TC-318-14 is [2525].
4. Enter the new password, then press [ ]
5. Enter the new password again, then press [ ], red LED flashes
twice, you have changed the password successfully.
8. RESET REMOTE CONTROL
You may reset the remote control if you forget the password. After the
remote is reset, the unique remote ID will also be changed. Therefore,
it is required to program the remote again to all the receivers that you
have programmed before. Please follow the instructions below to reset
the remote.
1. Slide out the battery door;
2. Hold the "PROG" button on the back and slide back the battery door.
3. When the front LED flashes quickly, release the button.
4. The red LED will then flash 3 times slowly. This indicates the remote
has been reset. The password mode is now disabled and the password
has been reset to the factory default. You should now change the pass word and program the transmitter to all the receivers that you want to
control.
If you lost a remote, to ensure security and safety, you should erase all
remotes from all receivers and reprogram all existing remotes. Please
refer to the erasing method of each receiver.
2. Remove the old battery.
Insert a new CR-2032 lithium battery
to the battery holder. Positive side
facing up.
3. Insert the battery door to the transmitter.
+
+
CR2032
Battery door
with holder
Positive
side up
The red LED on the front of the unit will
be on for 1 second.
LED on for
1 second
Insert battery
door with battery
Note: Dispose of old batteries promptly and properly.
10. FCC
The Remote Control is approved by the FCC and it complies with Part 15 of the
FCC Rules. Its operation is subject to the following two conditions :
1. This device may not cause harmful interference.
2. This device must accept any interference that may cause undesired operation.
WARNING:
Changes or modifications to this unit not expressly approved by the party responsible
of compliance could void the user’s authority to operate the equipment.
11. WARRANTY
If, within one year from date of purchase, this product should become defective
(except battery), due to faulty workmanship or materials, it will be repaired or
replaced, without charge. Proof of purchase and a Return Authorization are required.
12. CUSTOMER SERVICE
If you would like to
- find out the up-to-date specifications
- know more about features and applications
- download documents, i.e. user’s instructions
- order Skylink products
or if you have difficulty getting products to work, please:
1. visit our FAQ section at www.skylinkhome.com, or
2. email us at support@skylinkhome.com, or
3. call our toll free at 1-800-304-1187 from Monday to Friday, 9 am to 5 pm EST.
Fax (800) 286-1320
13. ACCESSORIES
The SkylinkHome System consists of many other devices such as
SkylinkHome Remotes, Motion Sensor, ON/OFF Wall Switch, Wall
TM
TM
Dimmer, Plug-In Dimmer with or without Repeater, Plug-In ON/OFF
Control (Outdoor/Indoor), Screw-In Dimmer, ON/OFF/Dimming Control,
ON/OFF Control, Smart Button Garage Door Control, etc. Please visit
TM
Skylink website at www.skylinkhome.com for more information.
CUSTOMER SERVICE
17 Sheard Avenue, Brampton, Ontario, Canada L6Y 1J3
Email:support@skylinkhome.com
http://www.skylinkhome.com
P/N. 101Z697
Patent Pending
©2010 SKYLINK GROUP
 Loading...