

Page 1
Wireless Motion Sensor Model PS-103
1. INTRODUCTION
The Motion Sensor is designed to monitor movement around / within
your house. Once motion is detected, the control panel will either alert
you or alarm will be triggered.
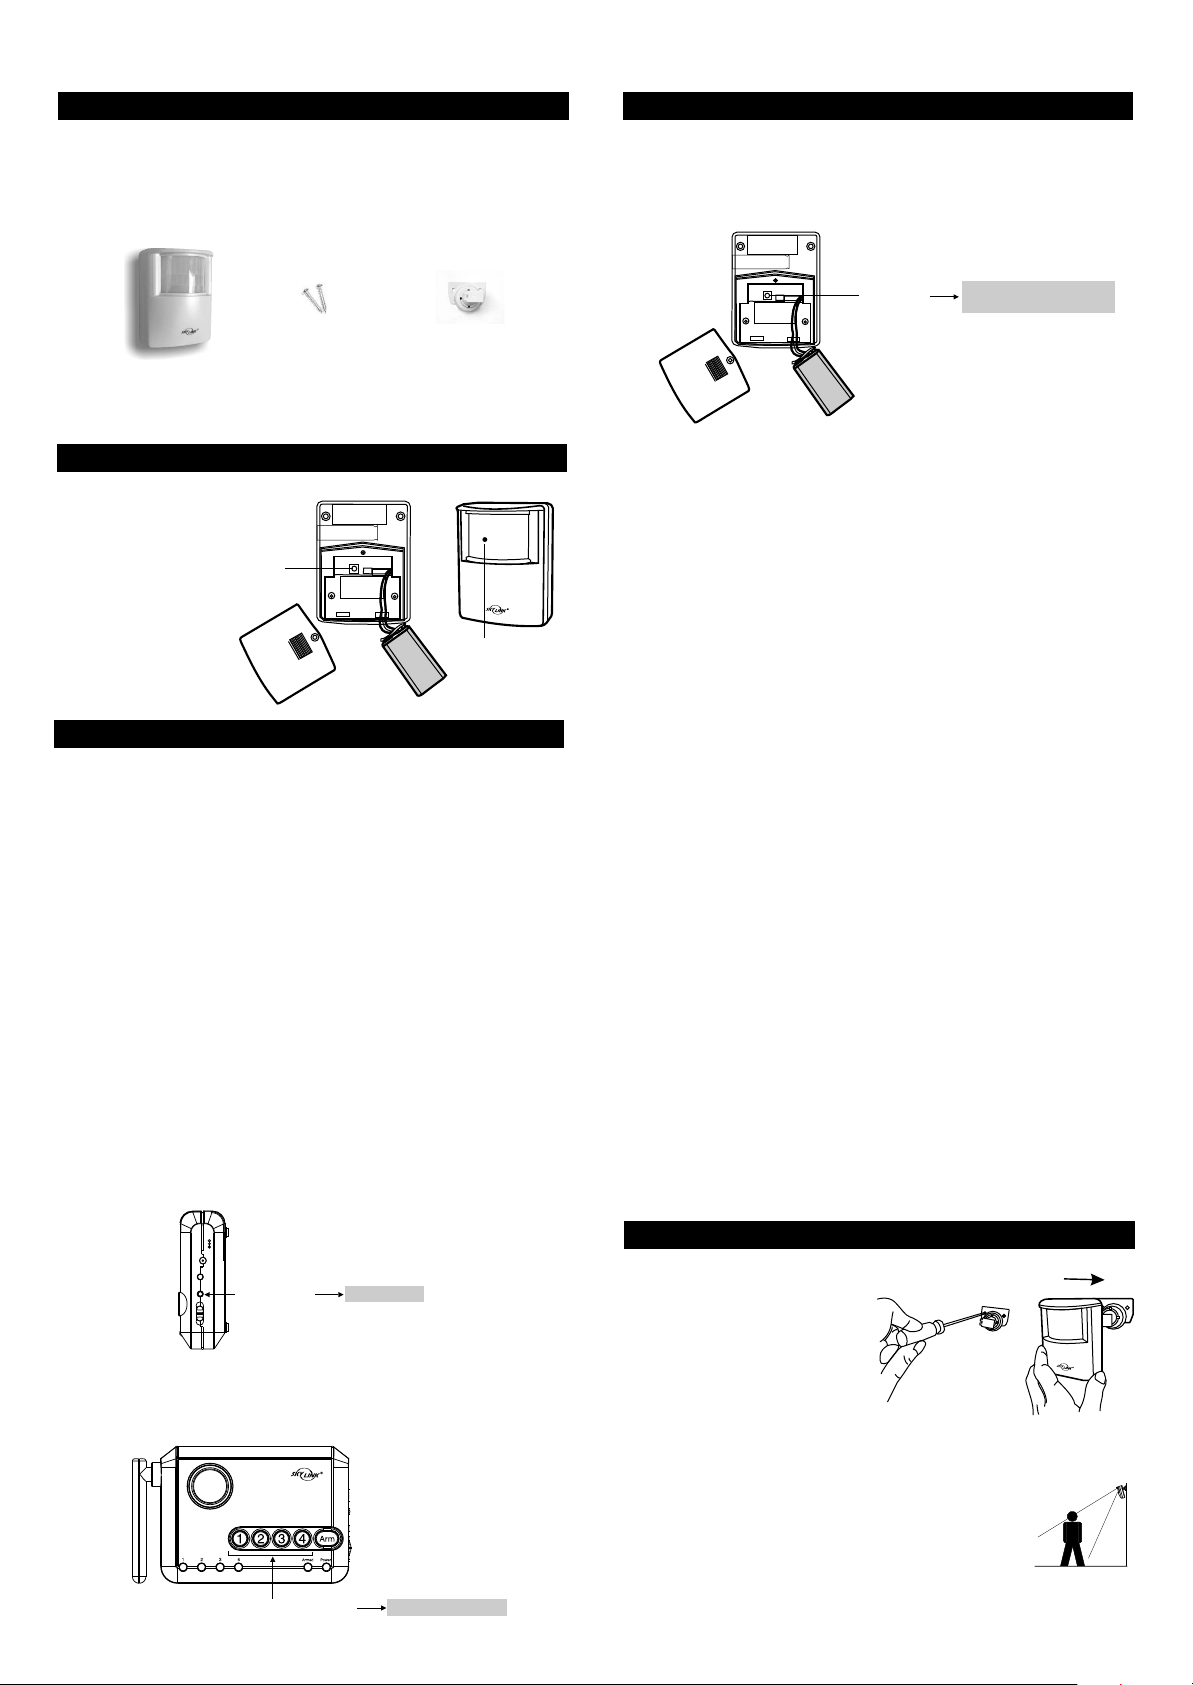
In this package, you should find a motion sensor, ball-head joint, and
screws.
2 pcs 3 x 18 screws
(Included)
Motion Sensor
Please follow the instructions below to set up the motion sensor.
2. POWER UP THE WIRELESS MOTION SENSOR
Insert a 9V alkaline battery
(Not included) to the motion
sensor and its LED will be
on for 2 seconds.
Test
Button
3. LEARN SENSOR TO MA SERIES CONTROL PANEL
Control Panel will not respond to Motion Sensor unless:
1) The Control Panel is armed in Away Mode, it will respond to Motion
Sensors in Zones 1, 2 and 3;
2) Motion Sensor is programmed into Zone 4, which is a dedicated Alert
Zone.
It is important to select which zone you program the motion sensor to.
- If you setup the motion sensor for security purpose where it will cause
an alarm when an intruder break-in, you should program the Motion
Sensor to either Zone 1, 2 or 3. DO NOT program to Zone 4 as it is a
dedicated Alert Zone, sensors in this zone will not cause an alarm.
- If you setup the motion sensor for alert purpose where it does not need
to cause an alarm when motion is detected, you should program the
Motion Sensor to Zone 4. DO NOT program to Zone 1, 2, or 3 as Motion
Sensor in these zones will not provide any alert beeping indication.
Therefore, please select which zone you need to program the Motion
Sensor before proceeding further.
Step 1:
Press and hold the Learn Button on the Control Panel for 3 seconds.
Control Panel beeps once and you may release the Learn Button.
Ball-head joint
LED underneath
the lens
3. LEARN SENSOR TO MA SERIES CONTROL PANEL (CONT)
Step 3:
Activate the Motion Sensor by pressing the test button on the back of the
Motion Sensor.
Press
Test Button
Control Panel long beep
Zone LED flashing OFF
Step 4:
You will hear a long beep and the zone LED stops flashing. The sensor
is now programmed to the Control Panel.
Note:
You may program up to 4 sensors to one zone.
Zone 4 is an alert zone, sensors in this zone is for alert purpose ONLY
and will not trigger the alarm.
Test Sensor
After programming the motion sensor to the Control Panel, you may
place the Control Panel in Test Mode to verify the communication
between the Motion Sensor and the Control Panel.
Step 1:
Remove the adapter and all batteries from the Control Panel.
Step 2:
Press and hold the "Mute" button and plug the AC adapter back into the
Control Panel. All LED indicators will be ON, you may release the "Mute"
button. Control Panel is now in Test Mode, and it will respond to all
Motion Sensors and other sensors.
Step 3:
Place the Alert Notification Switch to "Alert" and you may now activate
the Motion Sensor by pressing the test button on the back of the Motion
Sensor. You may also move in front of the Motion Sensor. Please refer
to "Walk Testing" for detail information on how to walk test the Motion
Sensor.
Step 4:
Control Panel will respond by flashing the zone LED and alert beeping,
according to the zone number. 1 beep for zone 1, 2 beeps for zone 2 etc.
The beeping will last around 15 seconds for each activation.
After testing, unplug the AC adapter and plugs it back into the Control
Panel, it will back to Normal Operating Mode.
INPUT DC 12VINPUT DC 12V
MUTEMUTE
LEARNLEARN
ALERTALERT
CHIMECHIME
OFFOFF
Press 3 sec.
Long Beep
Step 2:
Press the zone button (1, 2, 3, or 4) once, for which you want to program
the sensor to. The selected Zone LED will flash.
Press the zone button
Zone LED flashing
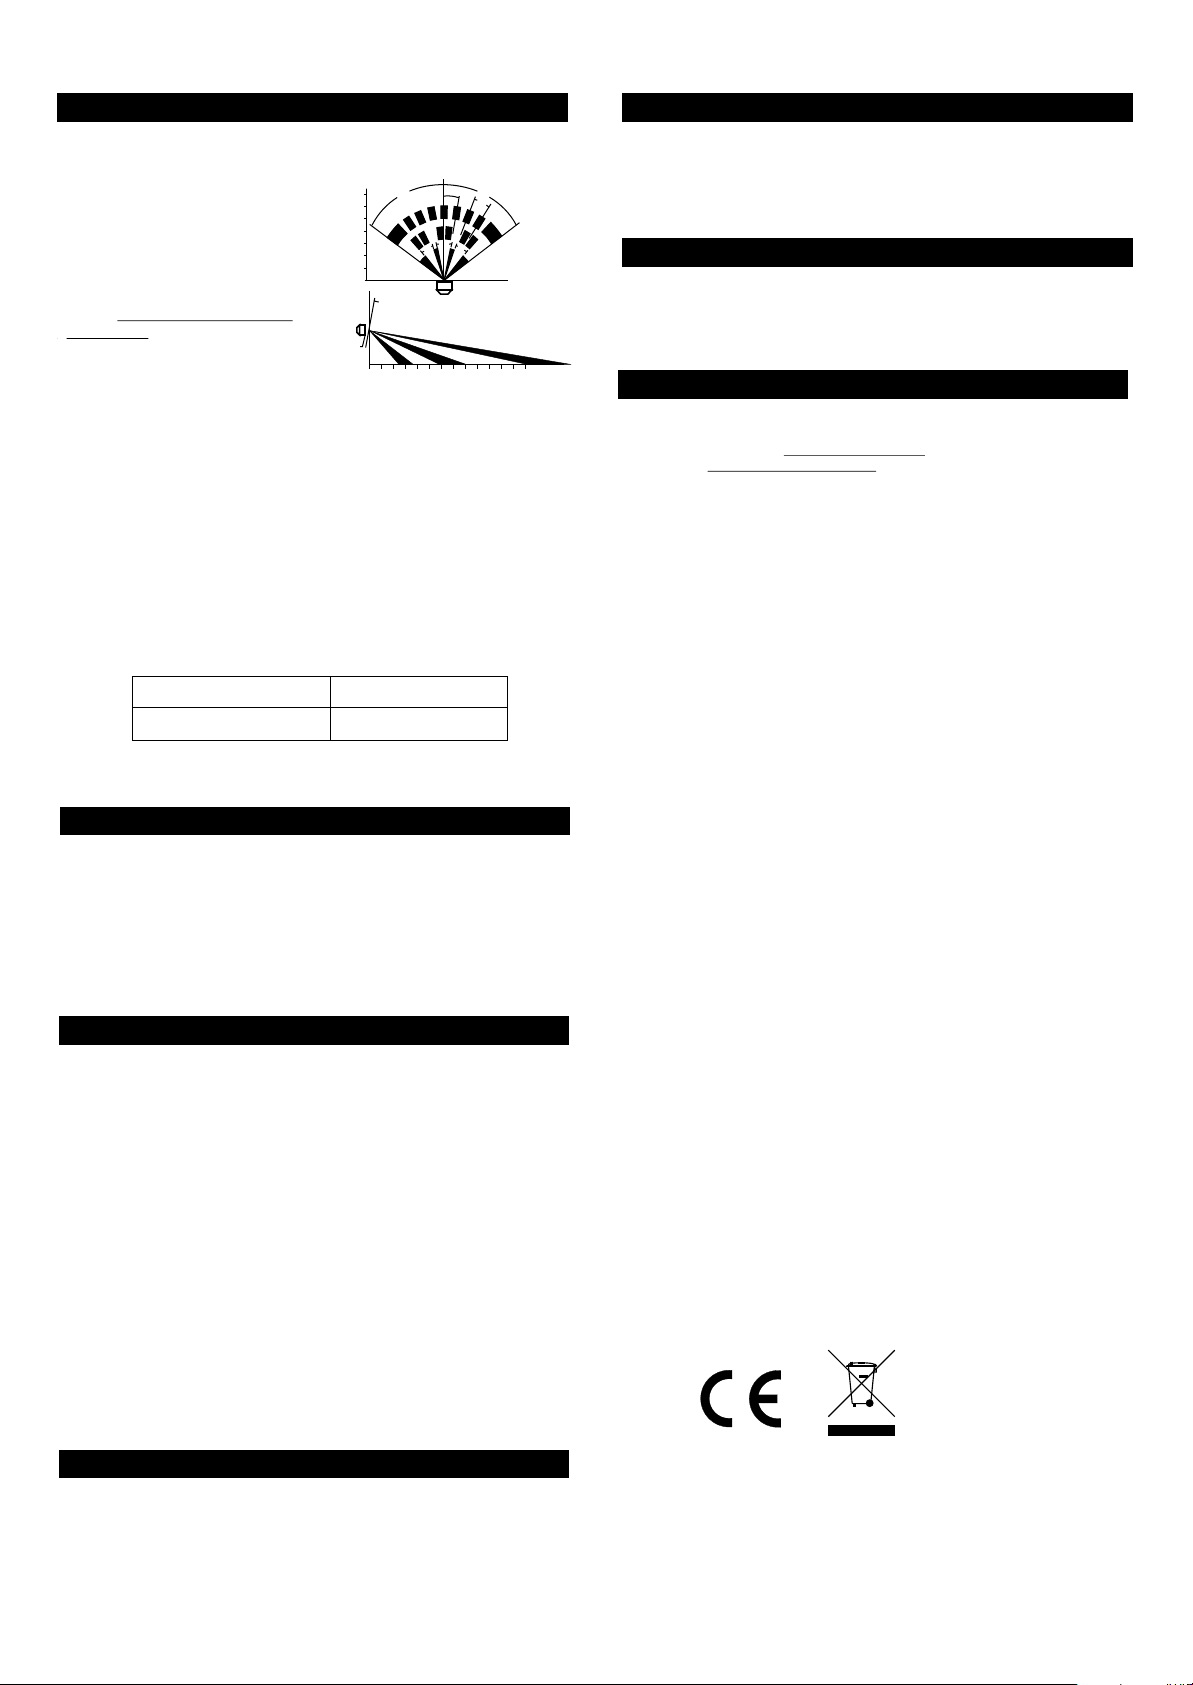
4. INSTALLATION
You may now close the battery
cover and re-insert the screw.
Mount the ball-head joint on
the wall with screws provided.
Slide the back of the sensor into
the ball-head joint. The mounting
angle can be adjusted.
Walk Testing
Walk test should be performed after the motion sensor
is mounted. Walk in the detected area, if motion is
detected, a red light inside the sensor will glow. If the
red light does not glow, motion has not been detected
and you may need to re-position the sensor. Ensure
you walk test all the locations that you would like the
motion sensor to cover.
Page 2
4. INSTALLATION (CONT)
Note:
- Perform the walk test after you
have inserted the battery for more
than 1 minute.
- Before performing the walk test,
the sensor should not detect any
motion.
- After motion is detected once,
the sensor will not be triggered
DETECTING AREA: (Unit = meter)
14
12
10
8
6
4
2
M
12°
1.2M
55°
55°
11°
27°
22°
22°
unless no motion is detected for
20 seconds. Therefore, wait for
at least 20 seconds during walk
testing between 2 activations.
SENSOR
0 1 2 3 4 5 6 7 8 9 10 11 12 13
False Trigger:
If you experience false triggering, please pay attention to the following.
- When installing the motion sensor, avoid placing it near heat or cold
producing devices (i.e. A/C or furnace vents, fans, ovens, space heaters,
etc). Air movement, especially caused by changes in temperature may
trigger the Motion Sensor and cause false alarms. Please carefully test
your Motion Sensor so that it will only be triggered by wanted movement.
- There is a jumper for sensitivity setting. You may change the sensitivity
to low if you experience false triggering.
8. CE
Declaration of Conformity
This equipment complies with the requirements relating to electromagnetic
compatibility, EN 301489-3:2002, EN300220-2:2007, EN60950-1:2006,
EN50371:2002. This equipment conforms to the essential requirement of the
Directive (1999/5/EC) of the European Parliament and of the Council.
9. WARRANTY
If, within one year from date of purchase, this product should become defective
(except battery), due to faulty workmanship or materials, it will be repaired or
replaced, without charge. Proof of purchase and a Return Authorization are required.
10. CUSTOMER SERVICE
If you would like to order Skylink’s products or have difficulty getting them to work
or download latest information and user manual, please :
1. visit our FAQ section at www.skylinkhome.com, or
2. email us at support@skylinkhome.com
Jumper Location 1 High Sensitivity
Jumper Location 2 Low Sensitivity
5. OPERATION
The motion sensor is designed to detect the “First Motion”. First Motion
means the first movement picked up after 20 seconds without motion
detected. So if you continue to walk in front of the motion sensor, it will
only pick up the first motion. Unless you wait for 20 seconds, then walk
again, the control panel will respond. Otherwise, the control panel will
only respond to the first motion.
6. SENSOR FAILURE / LOW BATTERY INDICATION
The control panel constantly monitors its sensors, if the control panel fails
to communicate with any sensors, it will begin rapidly flashing the zone
LED indicator.
When sensor failure occurs, try the following:
1. Check if the sensor is located at where it should be, and whether there
is any physical damage to the sensor.
2. If the failed sensor is not physically damaged, try to activate the sensor
and see if the control panel reacts to such activation.
3. If not, try to remove the sensor from its location, and bring it closer to
control panel and activate the sensor. It is possible that the sensor is
installed too far from the control panel and it cannot establish a steady
communication with the control panel. If this is the case, please install
the sensor closer to the control panel.
4. Replace the battery of the sensor in that zone if the Control Panel does
not respond when the sensor is activated within short range.
If you have multiple sensors in a zone, you may test the function of each
sensor to identify which sensor is having problem.
7. OTHER MA SERIES ACCESSORIES
The MA Series control panel can work with different accessories include:
Door/Window Sensor, Keychain Remote, Water Sensor, External Keypad,
Audio Alarm, Emergency Dialer, etc. Please visit www.skylinkhome.com
or contact us at support@skylinkhome.com for more information of how
to fully utilize your Wireless Alarm System - MA Series.
CUSTOMER SERVICE
Rm 1303, Block B, Veristrong Industrial Centre,
36 Aupuiwan Street, Fotan, N.T. Hong Kong.
Email:sales@skylinkhome.com
http://www.skylinkhome.com
P/N. 101Z684
©2009 SKYLINK GROUP
 Loading...