

Page 1
Wireless Alarm System
1. INTRODUCTION - INTRODUCTION
Congratulations on purchasing the Skylink Wireless Alarm System MA Series. The
MA Series provide you with powerful features yet easy to use. You will find the installation
to be simple and be able to get the system up and running with little effort.
MA Series Wireless Alarm System consists of the following major features:
- Audio and Visual Alert when the monitored events occur
- Alarm with siren when intruder is detected
- Main unit will check each sensor's functionality periodically to ensure
they are working properly
- Different arm modes for different occasions (Arm Home, Arm Away)
- Backup battery provides power during power failure
- Works with up to 16 wireless sensors and external siren
The user's instructions explain the detailed functions of the MA Series. If you have any
questions regarding this system, please visit our website at www.skylinkhome.com or
contact us at support@skylinkhome.com.
* Note: Batteries for the Control Panel are not included. Please refer to “Control Panel Backup Batteries” in the instructions for more detail information.
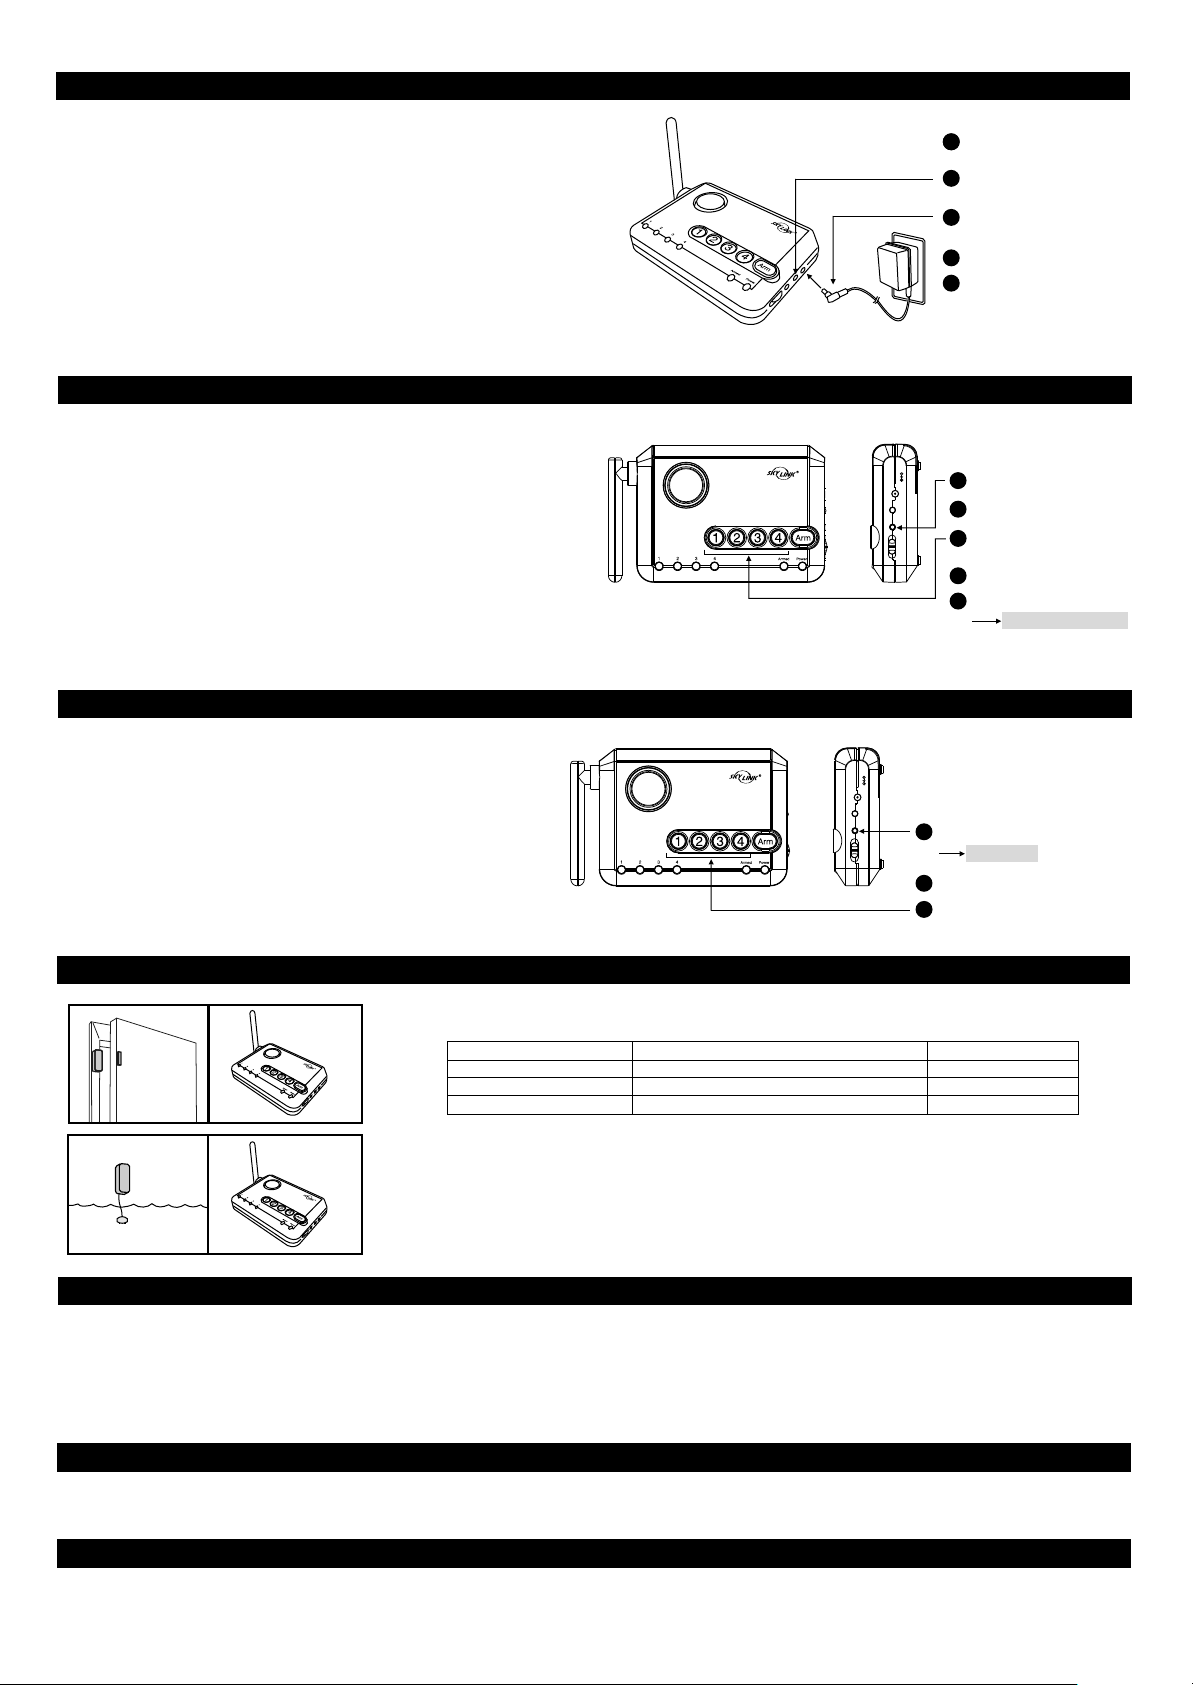
1. INTRODUCTION - USER’S INTERFACE (Buttons / LEDs)
Zone Indications - The LEDs represent the status of the sensors in that zone, and the status during programming.
Armed Indicator - Indicates the Arm Mode, such as Arm Home, Arm Away.
Power Indicator - Indicates the system status.
Keypad - For Arming, Disarming and Programming.
Input 12V DC - AC adapter input jack
Mute Button - To disable alert beeping temporary
Learn Button - To program and erase sensors
Alert Notification Switch - Select the type of audio alert signal
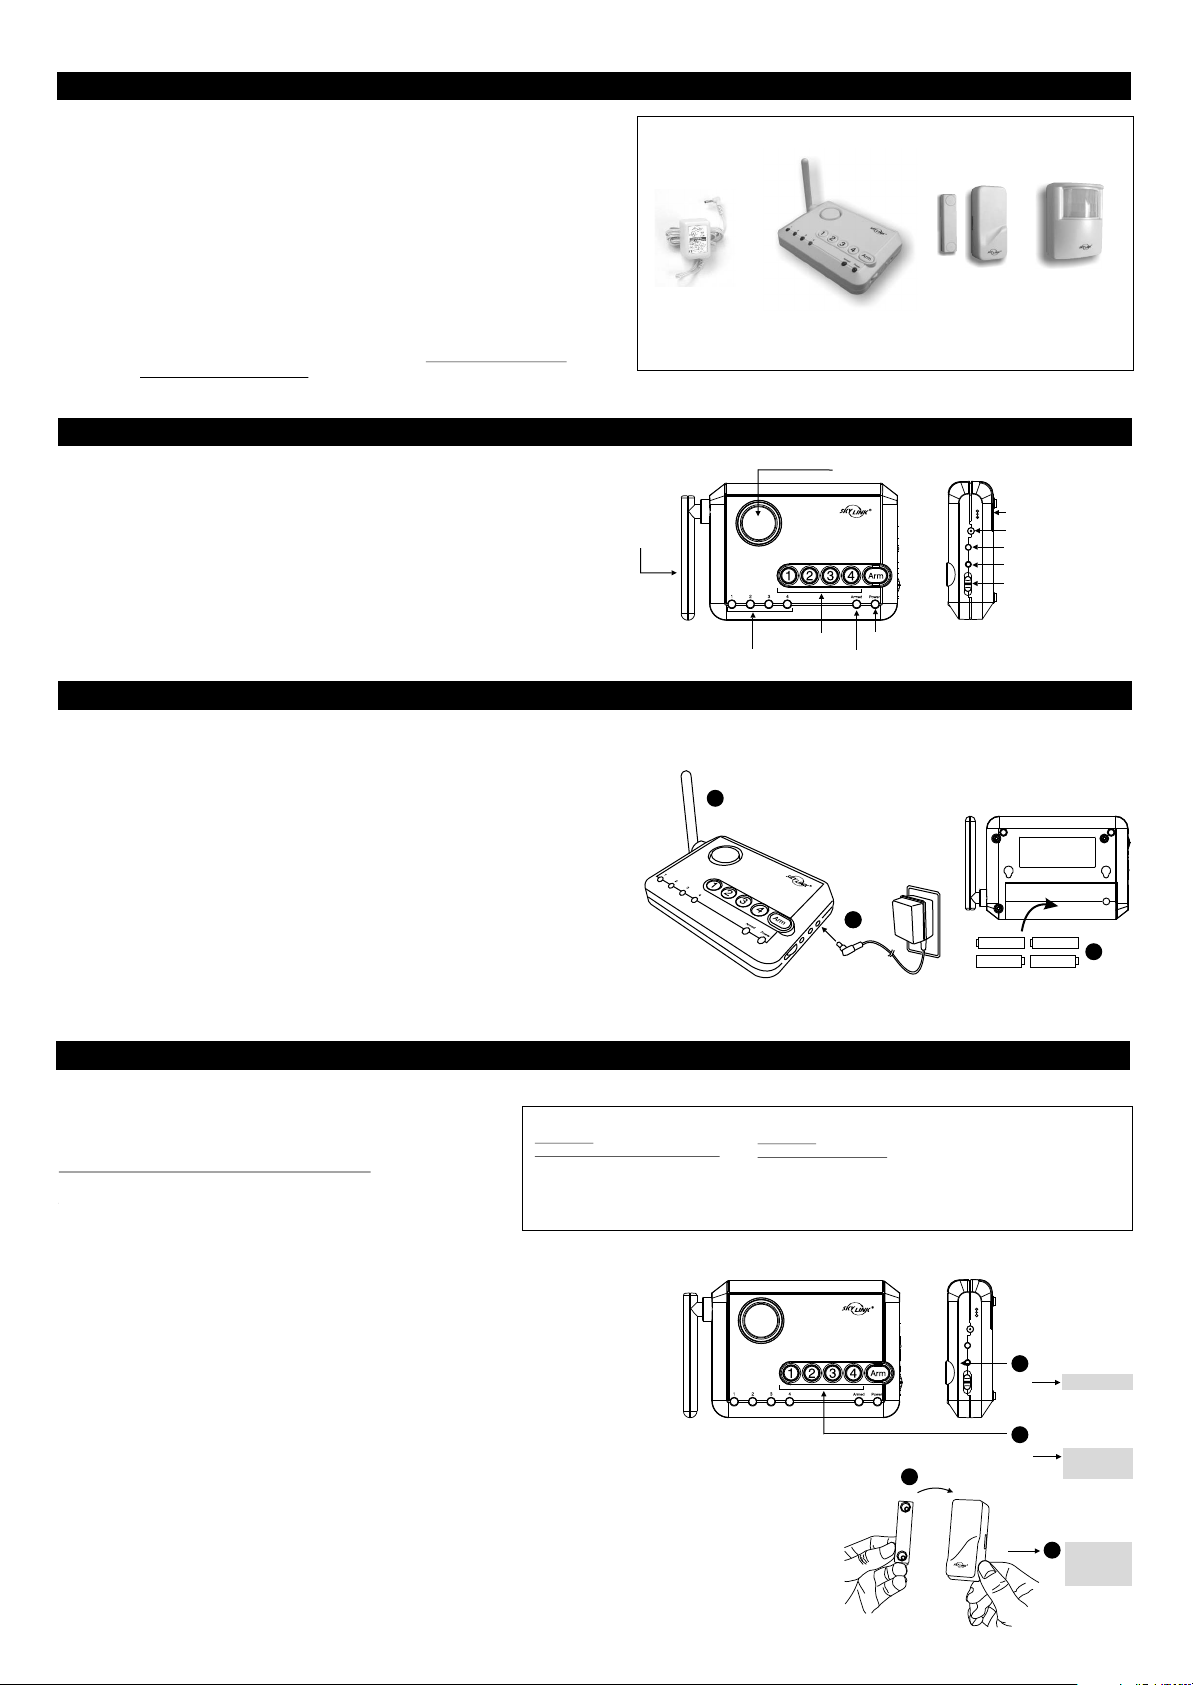
In this package, you will find the following items:
AC Adapter
- *Depends on the exact configuration, sensors may/ may not be
included in this kit.
Antenna
Control Panel
Zone Indications
Built-in Siren
Keypad
Armed Indicator
Power Indicator
Door / Window
Sensor
Model MA-103
Sensors* (optional)
Motion
Sensor
Battery Compartment
Input 12V DC
INPUT DC 12VINPUT DC 12V
MUTEMUTE
Mute Button
LEARNLEARN
Learn Button
ALERTALERT
Alert Notification
CHIMECHIME
OFFOFF
Switch
1. INTRODUCTION - INSTALLATION
You must first determine where the Control Panel will be located. Please follow the criteria below to select the ideal location for the Control Panel.
- Place it near an electrical outlet
- Place it where it is easily accessible by all users
- Place it away from any doors or windows which could be accessed by non-intended users
- Place it away from extreme temperature sources such as oven, stove and away from large
metal objects which could affect the wireless performance
After you have selected a location for the Control Panel, you are now ready to connect the
adapter and batteries to the Control Panel.
1) Plug in the AC adapter to an electrical outlet and the other end into the “Input DC 12V”
jack on the Control Panel. The green Power LED indication will stay on steadily.
2) Rotate the antenna to the upright position for best signal reception.
3) It is recommended to install 4 AAA alkaline batteries to the Control Panel so it can continue to
operate during power failure. To install the batteries, remove the battery cover and insert 4 AAA
alkaline batteries based on the polarity specified in the battery compartment.
2
1
1
You may now being to install the sensors. Refer to the instructions of the sensor that you will be installing.
2. SET UP - LEARN SENSORS
After installing the sensors, there are 2 critical steps before you can operate the system:
1) Program the Sensors to the Control Panel
2) Test the communication between the sensors and Control Panel
Programming the Sensors to the Control Panel
There are 4 zones on the Control Panel. Zones 1 to 3 are alarm
and alert zones, sensors in these zones will alert when the system
is disarmed, and will alarm when the system is armed.
Zone 4 is dedicated alert zone, meaning it will not cause an alarm even if the system is armed. It provides alert indication ONLY.
Please note when planning on programming sensors to the Control Panel:
- Each zone can have up to 4 sensors, programming the 5 sensor will erase the 1 programmed
sensor automatically.
th st
- Do not program one sensor to two different zones.
- You may program the sensor to the Control Panel before mounting them, or you may mount
them before programming.
Follow the steps below to program a sensor to a specific zone.
Step 1: Press and hold the Learn Button on the Control Panel for 3 seconds. Control Panel
beeps once and you may release the Learn Button.
Step 2: Press the zone button (1, 2, 3, or 4) once, for which you want to program the sensor to. Zone LED will flash for
the zone you have selected.
Step 3: Activate the sensor that you would like to program to the Control Panel. Example: Activates the Motion Sensor
by pressing the test button on the back of the Motion Sensor; or Activates the Door Window Sensor by separating
the magnet from the sensor unit.
Step 4: You will hear a long beep and the zone LED stops flashing. The sensor is now programmed to the Control Panel.
Repeat the above steps to program additional sensors.
After programming the sensors, it is important to test them to ensure there is proper communication between the sensors
and the Control Panel. You can set the Control Panel in Test Mode.
Example of some typical installations:
Example 1
(Small apartment with 4 sensors)
Zone 1 Door Sensor (Front Door)
Zone 2 Window Sensor (Bedroom)
Zone 3 Motion Sensor (Kitchen)
Zone 4 Water Sensor (Bathroom)
Example 2
(House with 8 sensors)
Zone 1 2 Door Sensors (Front Door and Patio Door)
Zone 2 2 Window Sensors (Bedroom 1 and Bedroom 2)
Zone 3 3 Motion Sensors (Entrance Area, Kitchen, Living Room)
Zone 4 Water Sensor (Washing Machine)
3
Magnet
INPUT DC 12VINPUT DC 12V
MUTEMUTE
LEARNLEARN
ALERTALERT
CHIMECHIME
OFFOFF
+
-
Sensor
-
-
+
-
+
+
Hold 3 sec.
1
Beep once
Press zone button
2
Zone LED
flashing
4
Long beep
and zone
LED off
3
Page 2
2. SET UP - TEST MODE
To set the Control Panel in Test Mode:
Step 1: Remove the adapter and all batteries from the Control Panel.
Step 2: Press and hold the "Mute" button and plug the AC adapter back into the Control
Panel. All LED indicators will be ON, you may release the "Mute" button. Control
Panel is now in Test Mode, and it will respond to all sensor activations.
Step 3: Place the Alert Notification Switch to "Alert" and you may now activate the sensors,
i.e. by pressing the test button on the Motion Sensor or separating the magnet from
the Door / Window Sensor.
Step 4: Control Panel will respond by flashing the zone LED and alert beeping, according to the
zone number. 1 beep for zone 1, 2 beeps for zone 2 etc.
After testing, unplug the AC adapter and plugs it back into the Control Panel, it will back to Normal Operating Mode.
2. SET UP - PASSWORD
The Password is used for arming and disarming the Control Panel. The factory default Password
is [1234]. It is recommended to setup your own Password by following the steps below.
Step 1: Press and hold the “Learn” button.
Step 2: While holding the “Learn” button, press and hold the “Arm” button (you are now
pressing and holding both “Learn” and “Arm” buttons. Hold them for 3 seconds
until you hear a long beep and the green Power LED flashes.
Step 3: Release all buttons. Enter the current Password. (If new, the factory default
Password is [1234]), you will hear 2 beeps.
Step 4: Enter the new 4-digit Password, you will hear 2 beeps.
Step 5: Enter the new 4-digit Password again to confirm. A long beep will sound and the green LED will stop flashing indicating your
new Password has been set.
Start with removing
Start with removing all power
1
1
from Control Panel.
Hold “Mute”, don’t release
2
until step 4.
Plug in Power, all zone LEDs
3
ON.
Release “Mute”.
4
Activate sensors for testing.
5
Hold “Learn”
1
INPUT DC 12VINPUT DC 12V
MUTEMUTE
LEARNLEARN
ALERTALERT
CHIMECHIME
OFFOFF
Hold “Arm”
2
Release all buttons, enter
3
current Password (1234)
Enter new password (1111)
4
Enter new password (1111)
5
Long beep confirm
Password is now changed from
1234 to 1111.
}
Hold both
buttons for
3 seconds
until hear
long beep.
2. SET UP - ERASE SENSORS
To erase a sensor from a zone, the Control Panel will erase all sensors in that zone.
So any other sensors will need to be programmed back to that particular zone.
To erase a zone:
Step 1: Press and hold the “Learn” button on the Control Panel. The
unit will beep once.
Step 2: While holding the “Learn” button, press and hold the Zone
button to be erased. Hold both buttons for 5 seconds until the
Control Panel emits 2 beeps and the zone LED flashes twice.
Step 3: Release all buttons.
3. ALERT - OPERATION
Alert notification is provided when any sensor is activated while the system is disarmed. Different alert notification can
be provided depends on the setting of the Alert Notification Switch on the side of the Control Panel.
Alert Notification Switch
OFF
CHIME
ALERT
If the Alert Notification Switch is set to “Alert”, the number of beeps depends on what zone is activated.
Example:
Zone 1 sensor: “1 beep, pause, 1 beep, pause, 1 beep, pause… etc”
Zone 2 sensor: “2 beeps, pause, 2 beeps, pause, 2 beeps, pause… etc”
Zone 3 sensor: “3 beeps, pause, 3 beeps, pause, 3 beeps, pause… etc”
Zone 4 sensor: “4 beeps, pause, 4 beeps, pause, 4 beeps, pause… Etc”
The beeping will continue until the sensor is deactivated, i.e. door is closed, or water sensor doesn't detect water anymore.
Zone 1
Door /
Window
Sensor
Zone 2
Water
Sensor
- Beep
- Beep
- Beep Beep
- Beep Beep
INPUT DC 12VINPUT DC 12V
MUTEMUTE
LEARNLEARN
ALERTALERT
CHIMECHIME
OFFOFF
Audio Alert
Chime Once when sensor is activated
Alert beeping depends on zone number
None
Hold “Learn”
1
Beep once
Hold zone button
2
Release all buttons until hearing
3
2 beeps.
Zone LED Flashing
Yes
Yes
Yes
}
Hold both
buttons for
5 seconds.
3. ALERT - MUTE
To temporarily disable the beeping while it is sounding, you may press the “Mute” button on the side of the Control Panel. It will stop all the current beeping.
This is useful when a window will be opened for awhile for ventilation.
To deactivate the mute, reset the sensor (i.e. close the window), the mute function will be deactivated so if the window sensor is activated again, the beeping will continue.
Note: Motion Sensor in Zone 1, 2 and 3 will not respond in Alert mode, i.e. when system is disarmed. Motion Sensors in Zones 1, 2 and 3 will only respond when the Control
Panel is armed. If you would like to have alert indication for Motion Sensor, you must program the Motion Sensor in Zone 4.
4. ALARM
You may arm the Control Panel in 2 different ways:
1) Arm Home 2) Arm Away
4. ALARM - ARM HOME
This setting is used when you wish to secure the area but will be at home and moving around within the armed area. In Arm Home setting, any Motion Sensors in Zone 1, 2,
and 3 will not respond to any movement.
Alarm will sound instantly if any of the sensor in Zone 1, 2, and 3 is activated (except Motion Sensor).
Page 3

4. ALARM - ARM HOME (CONT)
Example:
If you would like to arm the system at night, where all the doors / windows are not expected to be opened. You can arm the system in Home mode and even walking within the
house (activates Motion Sensor), it will not activate the alarm, unless the monitored doors or windows are opened.
To arm the Control Panel in Home mode:
Enter Password
Step 1: Enter the 4-digit Password
Step 2: Press and hold the “Arm” button for 3 seconds. The Arm LED will be ON steadily indicating
the Control Panel is now armed in Home mode.
1
2
Press and hold “Arm”
Arm LED on
Step 3: To disarm, enter the 4-digit Password.
4. ALARM - ARM AWAY
This setting is used when you are the last one to leave the premises. By arming the system in Away mode, you will have 45 seconds to leave the premises after arming. After
45 seconds, all sensors in Zones 1, 2, and 3 are armed. Activating these sensors in Arm Away mode will result in 30 seconds entry delay. If a valid Password is not entered
during the 30-second entry delay, the alarm will sound.
To arm the Control Panel in Away mode:
Step 1: Enter the 4-digit Password
Step 2: Press the “Arm” button twice. The Arm LED will flash indicating the
Control Panel is now armed in Away mode.
Enter Password
1
2
Press “Arm” twice
Arm LED
flashes
Step 3: To disarm, enter the 4-digit Password.
Note: If a sensor in zone 4 is activated, it will not activate the alarm. Zone 4 is dedicated alert zone, it will sound alert beeping only.
4. ALARM - DISARM
To disarm the system when the system is armed, enter the 4-digit Password. The Arm LED indicator will be off if a valid Password is entered. If the alarm is activated, enter
the 4-digit Password to stop the alarm sound.
After entering the valid Password, the entry delay or alarm will stop. The green Power LED will flash for 3 seconds, which is normal.
4. ALARM - BY PASS ZONE
There may be occasions when you would like to temporarily prevent the sensors in a zone from triggering the alarm. In this situation you can bypass a zone when arming the
Control Panel. Once the system is disarmed the bypass setting will be removed.
Example:
You may want to leave a window open but to arm the system, you can bypass the zone with the window
sensor and continue to arm the system. Without bypassing this zone, the Control Panel cannot be armed.
To bypass a zone:
Step 1: Press and hold the zone button that you want to bypass for 3 seconds. After 3 seconds, the zone
LED will be on steadily indicating this zone is set to bypass.
Hold zone button
1
3 seconds
Zone LED on
Arm the system.
2
Step 2: Arm the system (Home or Away)
To remove the bypass, press and hold the zone button for 3 seconds, or disarm the system.
5. SYSTEM STATUS - SENSOR FAILURE / LOW BATTERY INDICATION
The control panel constantly monitors its sensors, if the control panel fails to communicate with any sensors, it will begin rapidly flashing the zone LED indicator.
When sensor failure occurs, try the following:
1. Check if the sensor is located at where it should be, and whether there is any physical damage to the sensor.
2. If the failed sensor is not physically damaged, try to activate the sensor and see if the control panel reacts to such activation.
3. If not, try to remove the sensor from its location, and bring it closer to control panel and activate the sensor. It is possible that the sensor is installed too far from the control
panel and it cannot establish a steady communication with the control panel. If this is the case, please install the sensor closer to the control panel.
4. Replace the battery of the sensor in that zone if the Control Panel does not respond even sensor is within a short distance.
If you have multiple sensors in a zone, you may test the function of each sensor to identify which sensor is having problem.
5. SYSTEM STATUS - CONTROL PANEL BACKUP BATTERIES
The Control Panel offers up to 48 hours battery backup in case of power failure. The system can operate without batteries, but it is recommended to install 4 AAA alkaline batteries.
To ensure the backup batteries are in good condition, there is a built-in battery monitor in the Control Panel.
To test the batteries:
Step 1: All batteries should be installed to the Control Panel and AC adapter is plugged in.
Step 2: Remove the AC adapter from the Control Panel.
Step 3: Monitor the green Power LED indicator based on the table and determine the batteries condition.
Green Power LED
On
Flashing
Off
Backup Batteries Status
Good Condition
Batteries are low, replace batteries
Batteries are dead, replace batteries
5. SYSTEM STATUS - RESET PASSWORD
In case the Password is forgotten, you can reset the Password back to the factory default value, 1234.
To Reset Password
Step 1: Remove AC adapter and all batteries
Step 2: Press and hold “Learn” button, until all 4 Zone LED indicators are on. Release the “Learn” button.
Step 3: Zone 1 LED begins to flash. It will take 4 hours to complete this restore process.
Step 4: The Password is restored when all 4 Zone indicators are off.
During the Password restore process, do not operate the Control Panel.
Page 4

5. SYSTEM STATUS - EXTERNAL ALARM DEVICES
You can add an external alarm devices to the Control Panel so these devices can be activated when the alarm is triggered. These devices include:
External Alarm Siren Model AA-103
Emergency Dialer Model AD-103
Control Module Model IS-001
To program the Control Panel to an external alarm device:
Step 1: Put the external alarm device into programming mode (refer to the instruction manual of the external alarm device)
Step 2: Press and hold the “Mute” button of the Control Panel for 3 seconds. The Control Panel will send a test signal to the external alarm device.
Step 3: Once the test signal is received by the external alarm device, you may release the “Mute” button.
6. FAQ
Q: The Control Panel does not respond to the sensors in the same package, what am I doing wrong?
A: You must program the sensors to the Control Panel before they can work together. Ensure batteries are properly installed to the sensors. Follow the instructions of “Learn
Sensor” to program the sensor to the Control Panel.
Q: When I walk in front of the Motion Sensor, I can see the LED inside the Motion Sensor flashes, but Control Panel does not respond.
A: Control Panel does not respond to Motion Sensors that are in zones 1, 2 and 3 when the system is not armed in Away Mode. That means if you are at home, either when the
system is in disarmed mode or Armed Home Mode, moving in front of the Motion Sensor will not cause any alert indication or alarm. You may program the Motion Sensor to
Zone 4 if you would like to have alert signal from the Motion Sensor.
Q: How can I erase just one sensor from a zone?
A: You cannot erase just one specific sensor from a zone. You must erase all sensors in that zone and then program the ones that you want to keep.
Q: None of the sensors are activated, but some zone LED indicators are flashing rapidly, what does that mean?
A: That means some of the sensors are not communicating with the Control Panel properly. Either the batteries are low in these sensors, or they are too far away from the
Control Panel. Try to reduce the distance between the sensor and the Control Panel. If reducing the distance does not help, try to replace the batteries.
Q: I have multiple sensors in a zone and the Zone indicator is flashing rapidly indicating that is a sensor failure or low battery, how do I know which sensor is having the problem?
A: You need to test each sensor individually. Activate the sensor and if the zone LED continues to flash, that means it is another sensor that is causing the problem. Try this with
each sensor until the zone LED stops flashing.
Q: When the sensor is activated, I can only see the zone LED flashing, but no audio indication.
A: Ensure you place the Alert Notification Switch to either “Alert” or “Chime” position. If you place the switch to “Off” position, no audio alert will be emitted.
Q: Will the Control Panel function properly if no back up batteries are installed?
A: The Control Panel will function properly if there is AC power, even without the backup batteries. The backup batteries provide power when there is no AC power, such as
during power failure.
7. OTHER MA SERIES ACCESSORIES
The MA Series control panel can work with different accessories include:
Motion Sensor, Door / Window Sensor, Keychain Remote, Water Sensor, External Keypad, Audio Alarm, Emergency Dialer, etc. Please visit www.skylinkhome.com or contact
us at support@skylinkhome.com for more information of how to fully utilize your Wireless Alarm System - MA Series.
8. CE
Declaration of Conformity
This equipment complies with the requirements relating to electromagnetic compatibility, EN 301489-3:2002, EN300220-2:2007, EN60950-1:2006, EN50371:2002. This
equipment conforms to the essential requirement of the Directive (1999/5/EC) of the European Parliament and of the Council.
9. WARRANTY
If, within one year from date of purchase, this product should become defective (except battery), due to faulty workmanship or materials, it will be repaired or replaced, without
charge. Proof of purchase and a Return Authorization are required.
10. CUSTOMER SERVICE
If you would like to order Skylink’s products or have difficulty getting them to work or download latest information and user manual, please :
1. visit our FAQ section at www.skylinkhome.com, or
2. email us at support@skylinkhome.com
CUSTOMER SERVICE
Rm 1303, Block B, Veristrong Industrial Centre,
36 Aupuiwan Street, Fotan, N.T. Hong Kong.
Email:sales@skylinkhome.com
http://www.skylinkhome.com
P/N. 101Z685
©2009 SKYLINK GROUP
 Loading...