

Page 1

Setup Guide
HU-318
skylinkhome.com
Page 2

CONTENTS
1. Setup HU-318
1.1 Obtain the IP address of HU-318............... 3
1.2 Login HU-318 Main Page.......................... 4
1.3 HU-318 Network Setting............................ 5
1.4 Setup Portforward......................................6
2. Setup App
2.1 App Download........................................... 7
2.2 App Network Settings................................ 8
2.3 Zone Settings.............................................9
2.4 Device Settings.......................................... 10
2.5 Scene Settings.......................................... 11
2.6 Timer Settings........................................... 14
3. Operation......................................................... 17
4. Putting Receiver into
Programming Mode
..................................... 18
CONTENTS
2
Page 3
192.168.002.036:8081
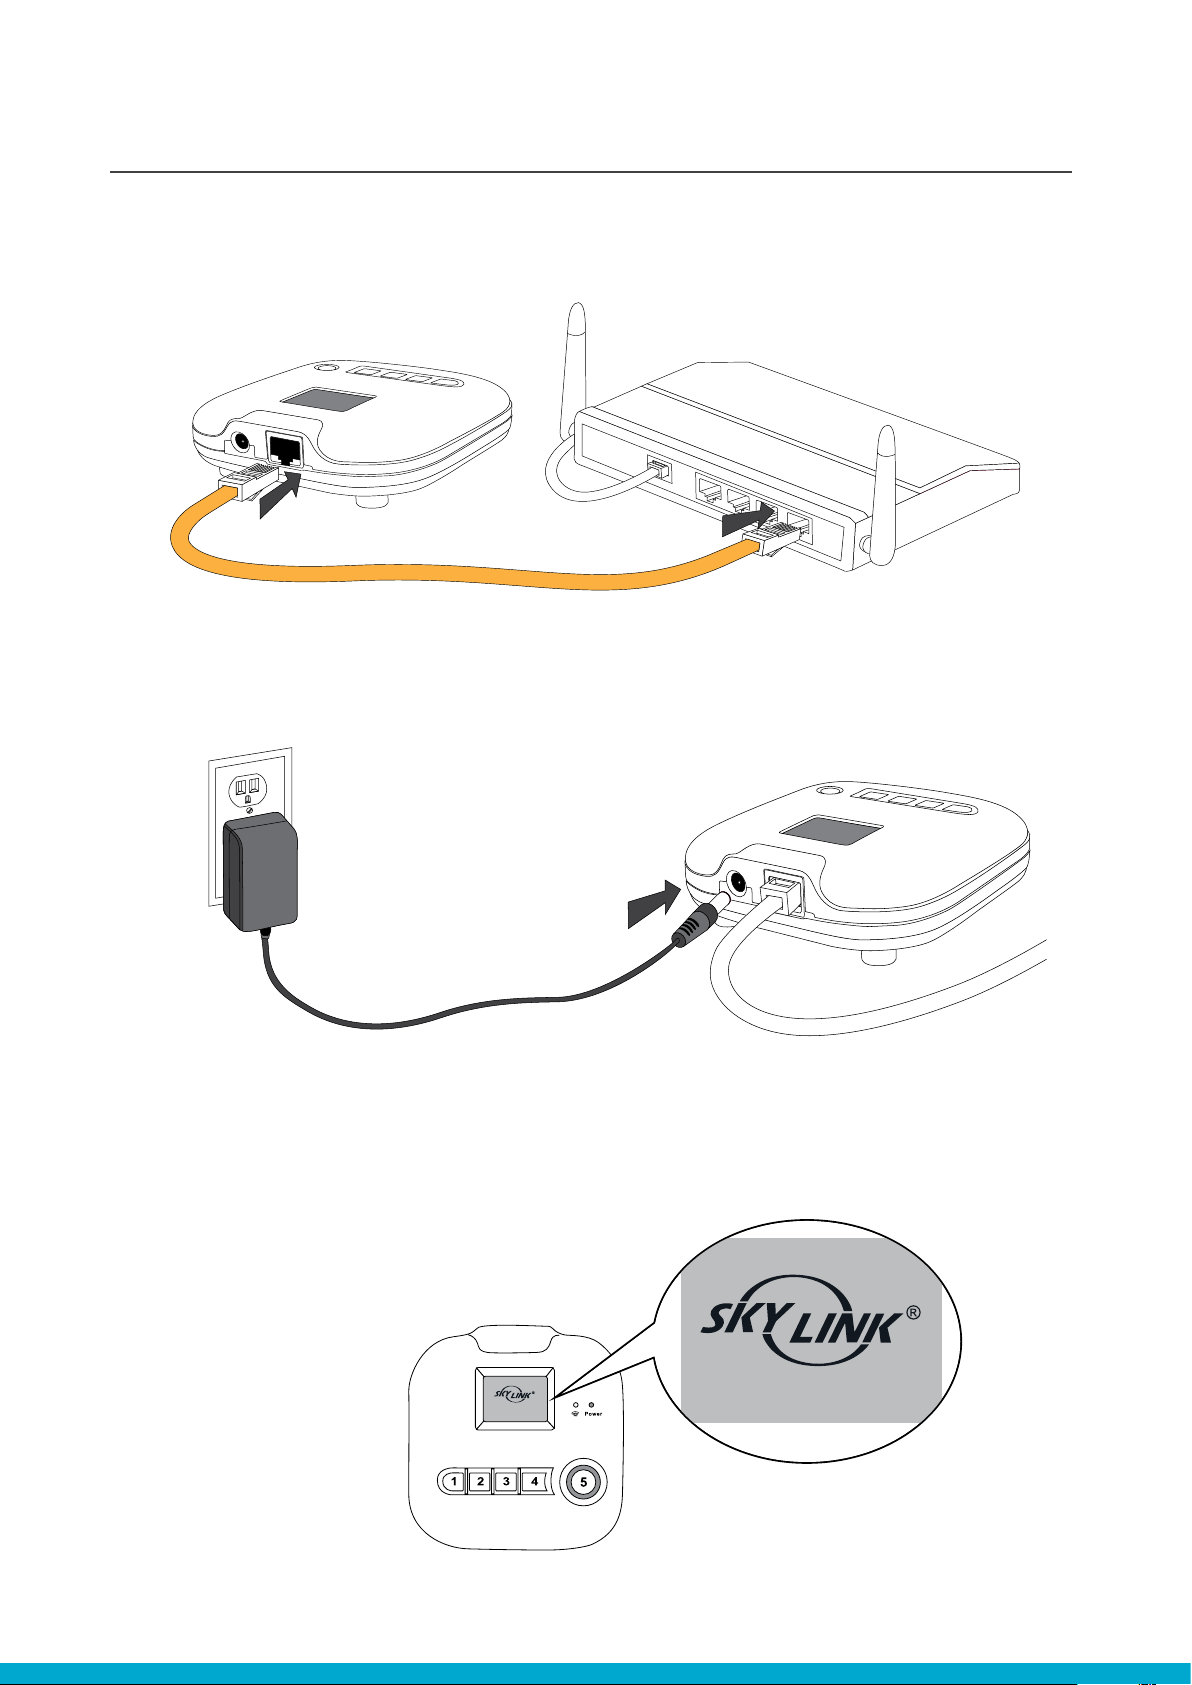
1.1 OBTAINING THE IP ADDRESS OF HU-318
1. Connect the ethernet cable to the HU-318 hub and to your router
2. Connect the power adaptor to the outlet and to the HU-318 hub
SETUP HU-318
3. You will see your IP address as well as the port number on
the HU-318 > 192.168.x.xx:8081
192.168.0.14:8081
Example
1.1 SETUP HU-318
3
Page 4

1.2 LOGING INTO THE HU-318 MAIN PAGE
1. Open the browser on your desktop and input your IP address
http://192.168.x.xx:8081
SETUP HU-318
Omit the zeros from your IP
address shown on the hub to
the following format:
example
http:192.168.002.036:8081
to
http:192.168.2.36:8081
X
2. Input the default user name admin and default password admin
admin
admin
4. Scroll down and click on
3. Click on “Settings” icon
“Network Settings”
1.2 SETUP HU-318
4
Page 5
1.3 HU-318 NETWORK SETTINGS
1. Ensure the DDNS Status is OK.
If it states Fail, Check your internet access
2. Uncheck the DHCP Client and Click on “Save Cong”
SETUP HU-318
DDNS Status : OK
3. Now the HU-318 is rebooting
“Uncheck”
1.3 SETUP HU-318
5
Page 6
SETUP HU-3181.4 SETUP PORTFORWARD
If you want to control your devices/appliances
outside your wi-network, you need to set up
PORT FORWARDING on your Router!
To do this visit http://www.portforward.com and
enter the router brand and model found at the back
of your router, into the search engine.
On the returned page, click on the hyperlink
“Default Guide” and follow the step by step guide.
61.4 SETUP HU-318
Page 7

2.1 APP DOWNLOAD
SETUP APP
1. On your iphone, go to the App Store,
and search “skylink homecontrol”
2. Install the Skylink App 2. Install the Skylink App
1. On your smartphone, go to the App
Store, and search “skylink home”
3. Run the App 3. Run the App
72.1 SETUP APP
Page 8

2.2 APP NETWORK SETTINGS
1. Tap on “Settings” 2. Tap on “Network Settings”
3. Tap on “1” 4. Enter the following information:
1
2
3
4
5
6
7
1. Prole: Home
5. Tap on “Back”
2. IP Address: xxxxx.my.skyhm.net
or
192.168.x.xx
(If you didn’t setup DDNS)
3. Port: 8081
2.2 SETUP APP
4. User name: admin
5. Password: admin
6. Enabled: ON
7. Tap “Save”
8
Page 9

2.3 ZONE SETTINGS
SETUP APP
1. Tap on “Zone Settings” 2. Tap on one of the “Unused” buttons
3. Enter Your Zone Name:
eg. Master Room
and Tap on “Rename”
Zone Name:
1
eg. Master Room, Living Room
4. Tap on “Back”
2
Tap on “Rename”
to Save
92.3 SETUP APP
Page 10

SETUP APP2.4 DEVICE SETTINGS
1. Tap on
“Device Settings”
2. Tap on
your zone
4. Enter Your Device Name and
Tap on “Return”
3. Tap on one of the
“Unused” buttons
5. Select either ON/OFF or
No-Dim/Dim and tap on “Add”
Device Name:
eg. Bed Light,
eg. Table Lamp
6. Tap on the Button you created
7. Put your skylink receiver into
programming mode and Tap on “Learn”
To set your skylink
receiver into
programming
mode please refer
to page 18 of
this guide.
2.4 SETUP APP
After Programmed,
Tap on “Home”
10
Page 11

2.5 SCENE SETTINGS
1. Tap on “Settings” 2. Tap on “Scene Settings”
SETUP APP
3. Tap on one of the
“Unused” buttons
4. Enter your Scene Name and
tap “Rename”
5. Tap on your “Scene Name:
eg.Movie” 6. Tap on “Zone”
Scene Name:
1
eg. Movie,
eg. Evening
2
Tap
“Rename”
to Save
112.5 SETUP APP
Page 12

2.5 SCENE SETTINGS SETUP APP
7. Select your zone name
Tap “Done” 8. Tap on “Device”
Tap “Done”
2
Select
1
Zone
9. Select your Device,
and Tap “Done”
11. Select “% Brightness”
Tap “Done”
Tap “Done”
2
Select
1
Device
eg. Wall Lamp
Select 100% to turn off
dimming function
10. Tap on “Brightness”
12. Tap on “Set”
2.5 SETUP APP
Tap “Done”
2
Select
1
% Brightness
12
Page 13

2.5 SCENE SETTINGS
SETUP APP
13. Set your Device into programming mode
and Tap “Learn” to program
Tap on “Learn”
1
2
After Programmed,
Tap on “Home”
To set your skylink
receiver into
programming
mode please refer
to page 18 of
this guide.
14. To add more devices to the same scene, repeat scene settings: steps 5-13
15. Tap on “Scene”
16. Tap icons to control the device,
ON/OFF switch
ON OFF
132.5 SETUP APP
Page 14

1. Tap on “Settings” 2. Tap on “Timer Settings”
SETUP APP2.6 TIMER SETTINGS
3. Tap one of the “Unused” buttons 4. Enter your Timer Name
6. Tap on “Zone”, Select your zone and
5. Tap on “Return” to Save the name
Tap “Done” to save
Timer Name:
eg. Timer1
eg. NIght
1
1. Tap “Zone”
2. Select
3
from list
3. Tap “Done”
2
to Save
142.6 SETUP APP
Page 15

SETUP APP2.6 TIMER SETTINGS
8. Tap Device, Select your Device
7. Tap “Device”
9. Tap Hour, Select your Hour
from the List and Tap “Done” to Save
from the List and Tap “Done” to Save
1. Select Device:
eg. Wall Lamp
2
2. Tap “Done”
to Save
1
10. Tap Minute, Select your Minute
from the List, Tap “Done” to Save
1. Tap Hour
1
2. Tap to Select
Hour amount:
3 3
eg.01
2 2
3. Tap “Done”
to Save
11. Slide to activate/deactivate
the Days
1. Tap Minute
1
2. Tap to Select
Minute amount:
eg.00
3. Tap “Done”
to Save
12. Tap on the “On/Off” button to
program your action
152.6 SETUP APP
Page 16

2.6 TIMER SETTINGS SETUP APP
13. Tap on “On” or “Off” depending on
your desired action
14. Tap on the “Add” button
to add your timer
1. Select
2
“On” or “Off”
2. Tap “Done”
1
to Save
15. Tap on your Timer name 16. Tap on Activate Icon
17. Timer is now active
2.6 SETUP APP
The above example now has Timer1 Set for:
Wall Lamp to turn ON in Demo Zone,
Monday-Fridays at 1:00am
16
Page 17

OPERATION
1. Tap on the “Zone” button
3. Tap on the Zone you want to control
4. Tap on the device you want to control
and use the 4 buttons below to control
OPERATION
ON OFF BRI DIM
17
Page 18

PUTTING RECEIVER INTO PROGRAMMING MODE
Mini Screw-In Dimmer
Model: LS-318
Start with dimmer off. Position the slide switch
to the desired operating mode. Power on
(by turning on the light switch or the circuit
breaker). The LED will ash quickly for Regular
On/Off mode, slowly for Flashing Alert mode or
will be solid for Countdown Timer mode. LS318 is now in programming mode and will stay
that way for 15 seconds.
Mini Screw-In Dimmer
Model: LX-318
Start with dimmer off. Power on the unit
by turning on the light switch or the circuit
breaker. You will hear a beep. LX is now in
programming mode and will stay that way for
15 seconds.
On/Off & Dimming Control
Model: MD-318
Start with dimmer off; Power on the dimmer
(by turning on light switch or the circuit
breaker), you will hear a beep from the MD318 indicating unit is now in programming
mode and will stay that way for 15 seconds.
On/Off Control
Model: MR-318
Start with unit powered off. Power on the unit
by turning on the light switch or the circuit
breaker. Your will hear a beep from the
On/Off control which indicates the unit is in
programming mode and will stay that way for
15 seconds.
Indoor/Outdoor Plug-In On/Off Control
Model: PA-318
On-Off/Countdown Timer Mode:
Start with the load turned off. Press and hold
the ‘SET’ button; Red LED will ash quickly
(release for On/Off mode) and then it will stay
on solid (release for Countdown Timer mode)
Plug-In Dimmers
Model: PL-318/PR-318
(repeater)
PR-318S (repeater for security)
On-Off/Countdown
Timer/ Flashing Alert Mode:
Start with the load turned off. Press and
hold ‘SET’ button; Red LED will ash quickly
(release for On/Off mode), then slowly (release
for Flashing Alert mode) and then it will be
solid (release for Countdown Timer mode).
Wireless Wall Switch
Model: WE-318/WR-318
On-Off/Countdown
Timer/ Flashing Alert Mode:
Start with the load turned on. Press and hold
‘SET’ button; Blue LED’s will ash quickly
(release for On/Off mode), then slowly
(release for Flashing Alert mode- only the
WR-001 has this feature) and then it will be
solid (release for Countdown Timer mode).
Garage Door Smart Button
Model: GB-318
Press and hold the black learn button (right
side of the unit) for approx. 3 seconds. The
LED light will start to blink faster. Immediately
let go and transmit the learn code from your
transmitter
PUTTING RECEIVER INTO PROGRAMMING MODE
18
Page 19

Page 20

Wireless Control Everywhere.
skylinkhome.com
 Loading...