

Page 1
Garage Door Closer
Model GT-100A
1. INTRODUCTION
Congratulations on your purchase of the Skylink® Garage Door Closer
Model GT-100A. Skylink® Garage Door Closer is very easy to install,
and provides you with the peace of mind you have been looking for by
knowing your garage door will not be left open anymore. Skylink
®
Garage Door Closer consists of 2 units:
Garage Door
MonitorTM Sensor
(Battery Included)
GS-101
4 pcs 3 x 18 screws
2 pcs 3.5 x 25 screws
Double-sided
foam tape
Extension wires
Wall Console
GC-433R
Wall Console does not require any battery to operate and it can replace
most of the existing garage door opener’s push buttons. Garage Door
Sensor is battery operated and can be mounted on to the garage door by
double sided tape or screws. These 2 units operate wirelessly which
simplifies the installation.
Programming is very simple, you can select the time you would like the
door to be closed after it has been opened. The selectable door closing
times are 2 minutes, 5 minutes, 10 minutes and 20 minutes.
WARNING
Before installing the Skylink® garage door closer, ensure your garage
door is equipped with an external entrapment protection device, such
as an infrared beam sensor which “sees” an object obstructing the door
without having actual contact with the object. A Garage door opener does
not have the auto reversing mechanism should be replaced by one that has
the auto reversing mechanism feature and the garage door closer
must not be installed on a garage door opener without this feature.
Without a properly working safety reversal system, a person could be
seriously injured or killed by a closing garage door.
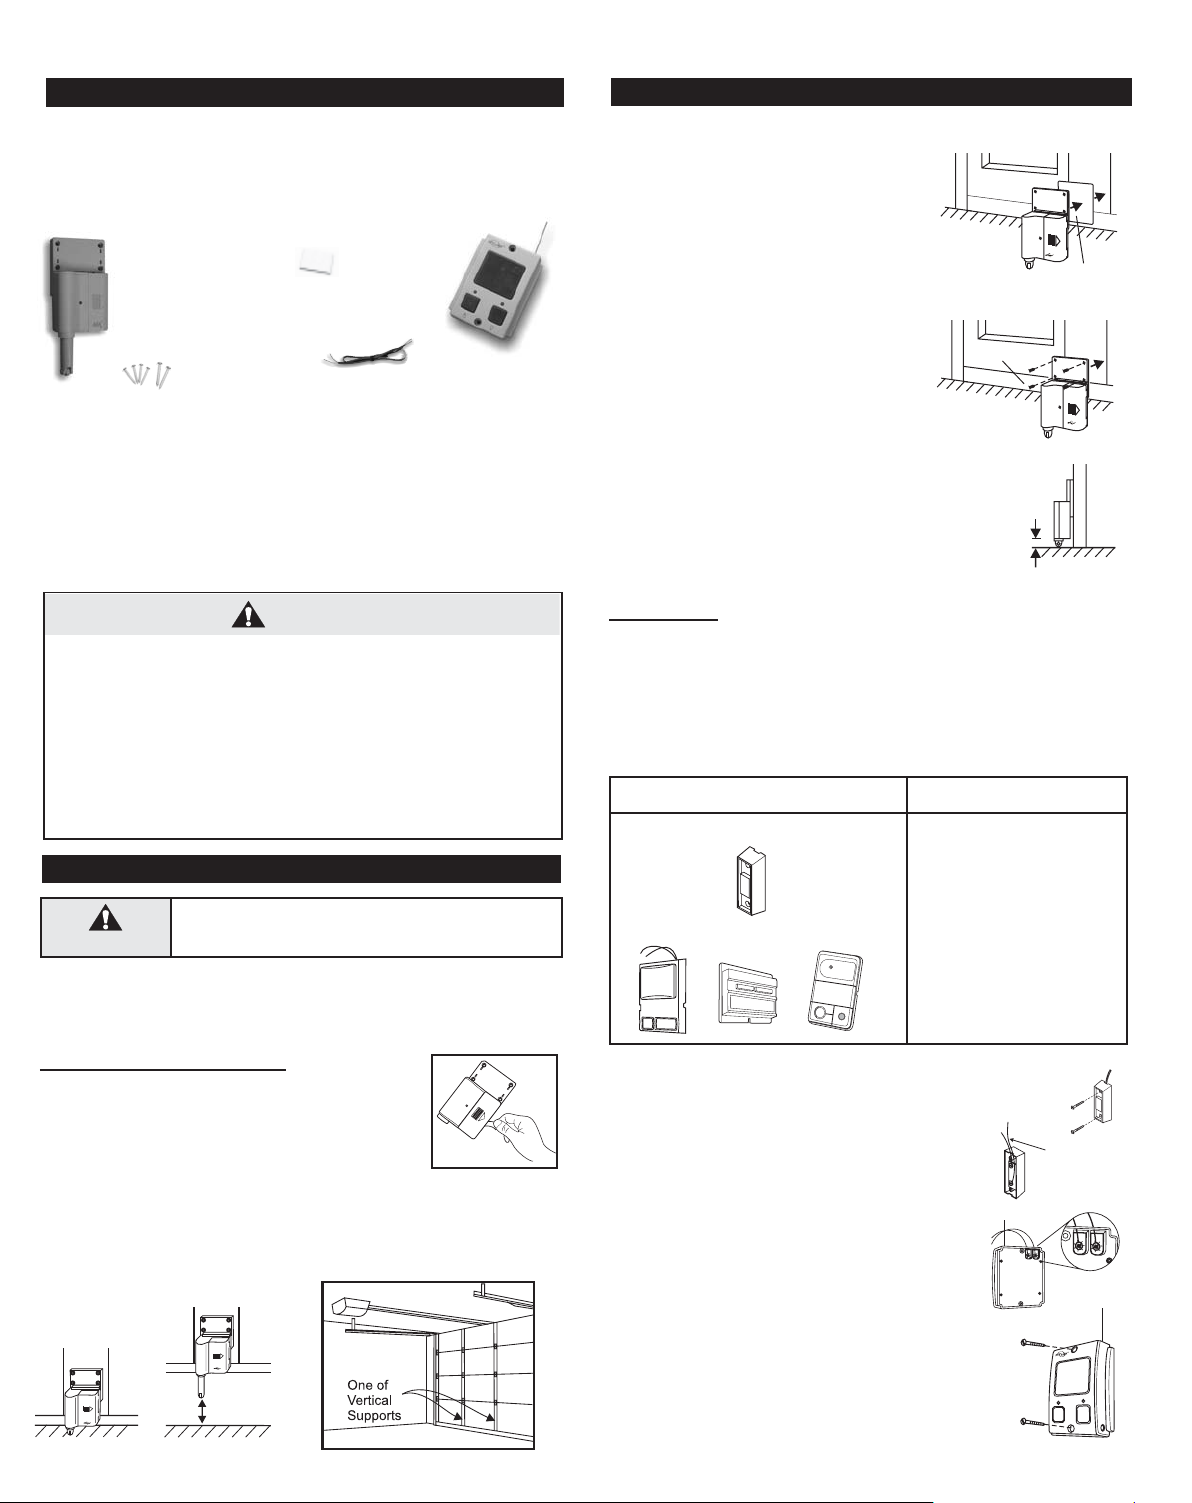
2. INSTALLATION (CONT)
Step 2 – Mount the sensor on to your garage door
You can mount the sensor on to your garage
door with double-sided foam tape if the surface of your garage door is smooth and clean
enough to provide a good adhesive surface,
such surface can usually be found on a metal
garage door. Please ensure the surface is
smooth and clean. Important: The bottom
of the sensor should be 1/2 inch above
Double-sided
foam tape
the ground. (Refer to Diagram A)
For wooden garage doors, it is recommended
to mount the sensor with screws on to the
4 Screws
garage door with 3 x 18 screws provided.
Note:
When the garage door is opening/closing,
make sure the sensor does not interfere with
the safety reversing sensor or safety beam
sensor supplied with your existing garage
door opener.
Note: Ensure you straighten up the antenna
1/2 Inch
on the receiver to receive the best possible
reception.
Diagram A
Wall Console
The GC-433R Wall Console replaces most garage door “push buttons” or
“wall consoles”. There are 2 different kinds of “push buttons”:
- If you have a push button, you can replace the push button by the GC-433R.
- If you have a Chamberlain®, Lift-Master®, Sears® Multi-Functional Wall
Console, you can replace the push button by GC-433R.
Replace Connect in Parallel
All Brands - Push Button
2. INSTALLATION
Unplug the power cord of your garage door opener
WARNING
before installation to ensure power is not connected.
The installation involves 2 units:
1) Garage Door MonitorTM Sensor
2) Wall Console
Garage Door MonitorTM Sensor
Step 1 – Select a spot on your garage door to mount
Before you install the sensor on to the garage door,
make sure the garage door is closed. The sensor
assembly should be mounted on one of the vertical
supports of your garage door near the bottom.
When the door is closed, the detection rod should be retracted. When
the door is open, the detection rod will be extended.
the sensor
Door closed
Door open
Remove the battery
isolator
Chamberlain®, Lift-Master®, Sears® -
Wall Console
Replace
1. Remove the existing screws holding the push
button of the wall console.
2. Disconnect the 2 wires that are connected to the
existing push button / wall console.
3. Connect these 2 wires to the 2 terminals on the
GC-433R wall console. Tighten the screws on
the terminals to secure the wiring.
4. Mount the GC-433R on to the wall with 2 screws
provided and straighten up its antenna for best
reception.
5. You may power up the garage door opener by
plugging in the AC cord.
6. Follow instructions in “Charging Up Wall Console
GC-433R”.
–1 –
Other Brands, other
Wall Consoles
Remove
existing
wires
Page 2
2. INSTALLATION (CONT)
3. OPERATION
Connect in Parallel
1. Remove the existing screws holding the
push button of the wall console.
2. Remove the 2 screws that secure the
wires on the existing wall console.
3. Connect one end of the extension
wires provided in this kit to the 2
Extension
wires
terminals on the existing wall console,
the other end to the GC-433R terminals.
Polarity DOES NOT matter. Note: Do not
remove any wiring from the existing
wall console.
4. Mount both wall consoles (original one
and GC-433R) to the wall with screws
and straighten up the antenna on the
GC-433R for best reception.
5. You may power up the garage door
opener by plugging in the AC cord.
6. Follow instructions in “Charging Up Wall
Console GC-433R”.
Charging Up Wall Console GC-433R
There is a power storage built-in to the GC-433R, this power storage
must be charged fully before it can operate. This charging cycle will
start automatically when the garage door opener is powered up.
1. After powering up the garage door opener, the GC-433R wall
console will be charged.
After installing the Skylink® wall console, you may connect the power to
the garage door opener.
The garage door closer monitors the door position in order to determine
when the door needs to be closed. The Garage Door Sensor will send
wireless signal to the wall console to report the door’s position. User
can set the wall console so it will close the door after it has been opened
for a predetermined period of time.
Door Closer Delay Timer
User has the option to program how long the door
should be closed after it has been open. This is
called “Door Closer Delay Timer”. To change the
setting of this timer, there is a slide switch on the
side of the wall console.
The highest position represents 2 minutes;
2nd position from the top represents 5 minutes;
3rd position from the top represents 10 minutes;
The lowest position represents 20 minutes;
Follow the procedure below to test the function of
the garage door closer.
1) The garage door should be in fully closed position.
2) Press the open / close button (push button) on
the wall console, the garage door will open.
3) Once the door is opened, the wall console will
beep and the “Timer / Learn” LED will flash
indicating the door is open, and it will close the
door after the preset door close delay time.
4) The beeping rate will increase as the timer is
running out, meaning the door is about to close.
5) When the timer expires, the garage door will
be closed automatically.
Slide
Switch
Open / Close
button
(Push button)
Lock
button
Timer /
Learn LED
2. During charging, the red LED will be on steadily.
3. The GC-433R is fully charged when the LED starts flashing with a 2
beep sound. The actual charging time depends on the brand of
garage door opener. Typical charging time ranges from 15 seconds
to 2 minutes.
4. Once charging is completed, your garage door closer is ready to be
operated.
Note: If you have a Genie® Deluxe Wall Console, an external
adapter is required. Follow instructions below “To connect
an external adapter”.
TROUBLE SHOOTING
If you do not see the LED flashing and hear 2 beeps after 3 minutes,
ensure the wire connections are secured. If so, it could mean that
your garage door opener is too old and you may need to add an
external adapter to supply power to the GC-433R. Please consult with
Skylink’s customer service.
To connect an external adapter:
1. Plug in one end of the adapter to an AC outlet.
2. Plug in the other end of the plug to the GC-433R
as shown.
3. GC-433R will be charged and when it is fully
charged, the LED will flash and you will hear a
2 beep sound.
Rating of the transformer: 12V DC, 100mA
Diameter of DC plug : 3.5mm
Disable Door Closer Delay Timer
Cancel Door Closer Delay Timer (when the timer is running)
The door closer delay timer can be cancelled temporarily. If you want the
garage door to stay open for a longer period of time, such as when you
are working in the garage or kids are playing outside, the auto closer
feature can be cancelled temporarily.
To cancel the door closer delay timer when it is running:
1) Press the push button once when the timer is running (i.e. door is
opened).
2) The red timer LED will stop flashing and beeping will stop indicating
the timer is cancelled for that sequence.
3) The door will remain open and will not be closed automatically, until the
next door opening sequence, the timer will start again.
Deactivate Door Closer Delay Timer
It is possible to deactivate the door closer delay timer. When the feature is
deactivated, opening the garage door will not activate the timer, therefore,
the door will not be closed automatically until the timer is activated again.
To deactivate the door closer delay timer:
1) Press and hold the push button for 10 seconds.
2) The timer red LED will stay on, meaning the timer is now disabled.
3) Auto closer feature is now deactivated.
To activate the door closer delay timer:
1) Press and hold the push button for 10 seconds when the timer is
deactivated, until the timer red LED changes from on to off.
2) The door closer delay timer is now activated.
3) Opening the door will start the door closer delay timer.
–2 –
Page 3

3. OPERATION (CONT)
3. OPERATION (CONT)
Operation
Antenna
Push button
Loss of Signal LED
Timer / Learn LED
Learn buttonLock button
Push Button
Press the push button to open or close the garage door.
Lock Button
Lock feature is designed to prevent Skylink® handheld
remotes such as Skylink® Keychain Remote Model 4B-201
(sold separately) to operate the garage door opener.
To activate the lock feature
1. Press and hold the lock button for approx. 2 seconds, then release it.
2. When the lock feature is activated, the red LED underneath the push
button will flash rapidly.
Note: If a valid wireless remote signal is received while the lock feature is
activated, wall console will beep to remind you the wall console is locked.
To deactivate the lock feature (unlock)
1. Press and hold the lock button for approx. 2 seconds, then release it.
2. When the lock feature is deactivated, the red LED underneath the
push button will flash slowly indicating the wall console is in normal
operating mode and the lock feature is deactivated.
If you have a Chamberlain®, LiftMaster®, or Sears® Multi-Function Wall
Console, the lock button will lock/unlock both the Skylink® handheld
remote, as well as other Chamberlain®, Lift-Master®, Sears® remote
controls.
Learn Button
Skylink® Wall Console can be used as a garage door opener receiver. It
does not only operate as a garage door closer, additional handheld remote
controls can be added. Additional remote controls are sold separately.
To program Skylink’s remote control / sensor
1. Press the learn button for approx. 5 seconds.
2. The “Timer / Learn” red LED will be on, release the learn button.
3. Activate the Skylink® remote control. If the Skylink® remote control has
multiple buttons, press the button you would like to operate.
4. The “Timer / Learn” LED will be off after it has successfully programmed
the remote control.
5. You can now press the programmed remote to operate the garage
door opener.
AM-001G Control Panel can operate GC-433R, however, the programming
procedure is different.
To program AM-001G Control Panel to the GC-433R, GC-433R must already
be in lock mode before proceeding. Once the GC-433R is in lock mode,
follow the steps below to program the AM-001G.
1. Press the learn button for approx. 5 seconds.
2. The “Timer / Learn” red LED will be on, release the learn button.
3. Select a remote location on the Control Panel AM-001G, press [6] to
[0] you would like to operate.
4. The “Timer / Learn” red LED will be off after it has successfully
programmed the Control Panel.
5. You can now activate the remote location on the Control Panel to
operate the garage door opener.
Note: Only allow one remote location to be learned in each Control Panel.
If you have a Chamberlain®, Lift-Master®, or Sears® Multi-Function Wall
Console, the learn button also works as a light button. Pressing this
button slightly will turn the light on the garage door opener on / off.
- Chamberlain
- Sears
- LiftMaster
Important!
®
®
®
Open / Close door
Lock / Unlock
Turn light on / off
Ensure both the lock and light functions operate properly. Depends on
which mode you are in:
Lock Button Light Button
Full Function Mode* Lock /Unlock both GC-433R and Turn light on / off
Garage Door Opener
Simple Mode Only lock / unlock GC-433R No Function
* For Chamberlain®, LiftMaster®, Sears® Wall Console ONLY.
Pressing these buttons should result in functions mentioned in the chart
above. If some functions cannot be executed, or if you experience
unexpected functions, such as opening or closing of garage door when
pressing the lock button, you may need to change between Full
Function Mode and Simple Mode. Refer to “Garage Door Opener operating
Mode” below.
Erase Skylink® remote controls / sensors
To erase unwanted remote control(s), first erase all remote controls and
sensors, then program the ones you would like to keep.
1. Press and hold the learn button for 15 seconds.
2. The “Timer / Learn” red LED will flash rapidly meaning all remotes have
been erased.
3. You have now successfully erased all the remote controls and sensors.
Follow the instructions “To program Skylink’s remote control/sensor”
to add the remote control(s) you would like to keep.
Loss of Signal
Skylink® Wall Console also monitors the status of the garage door sensor.
If the garage door sensor fails to communicate with the wall console, the
loss of signal LED will flash indicating a trouble condition for the sensor.
There are 2 types of sensors. The flashing is different depending on the
type of sensor:
Garage Door Sensor: One flash at a time
Audio Sensor (Optional Accessory): Two flashes at a time
When the loss of signal is flashing, please check the following:
- Check the battery of the sensor.
- The LED on the sensor should flash when the sensor is triggered.
For details of how the Audio Sensor works, please refer to “Accessories”.
–3 –
Page 4

3. OPERATION (CONT)
Garage Door Opener Operating Mode
The operation for different brands of openers is slightly different, so
while the GC-433R is charging, it also identifies the brand of your
garage door opener. Mainly there are 2 operating modes:
Full Function Mode: Chamberlain®, LiftMaster®, Sears® with Multi-Function
Wall Console
Simple Mode: Other brands
If your garage door opener is in Full Function Mode, i.e. Chamberlain®,
LiftMaster®, Sears®, you can use both the lock button and light button
on the GC-433R to operate the lock function and light function on your
garage door opener.
If your garage door opener is in Simple Mode, the lock and light buttons
cannot be used to operate the lock and light functions on your garage
door opener. You need to use the buttons on the original MultiFunctional Wall Console to execute these functions.
To identify if your GC-433R has selected the proper brand, press both
the lock and light buttons on your GC-433R (for less than 3 seconds)
and observe the red LED above the lock button.
Red LED above lock button
Full Function Mode ON
Simple Mode OFF
Note: While pressing both buttons together to check the operating
mode, you may change the lock status. Please refer to section “Lock
Button” to ensure you don’t lock the GC-433R or your garage door
opener while checking the operating mode.
4. ACCESSORIES
Optional accessories can be added to the garage door closer.
4-Button Keychain Remote – Model 4B-201
- Keychain remote can be programmed to the garage
door closer so it operates the garage door opener
like an ordinary remote control.
- It transmits Skylink® rolling code.
- Multiple buttons allow operation of multiple garage
door openers and lighting / appliances control.
5. FCC
This device complies with Part 15 of the FCC Rules. Operation is subject to the
following two conditions: (1) This device may not cause harmful interference, and
(2) This device must accept any interference received, including interference that
may cause undesired operation.
WARNING:
Changes or modifications to this unit not expressly approved by the party
responsible for compliance could void the user’s authority to operate the equipment.
NOTE:
This equipment has been tested and found to comply with the limits for a Class B
digital device, pursuant to Part 15 of the FCC Rules. These limits are designed to
provide reasonable protection against harmful interference in a residential installation.
This equipment generates, uses and can radiate radio frequency energy and, if not
installed and used in accordance with the instructions, may cause harmful interference to radio communications.
However, there is no guarantee that interference will not occur in a particular
installation. If this equipment does cause harmful interference to radio or television
reception, which can be determined by turning the equipment off and on, the user is
encouraged to try to correct the interference by one or more of the following measures:
- Reorient or relocate the receiving antenna.
- Increase the separation between the equipment and receiver.
- Connect the equipment into an outlet on a circuit different from that to which the
receiver is connected.
- Consult the dealer or an experienced radio/TV technician for help.
6. WARNING
To prevent possible SERIOUS INJURY or DEATH from a closing garage door:
- Activate door ONLY when it can be seen clearly, is properly adjusted, and there
are no obstructions to door travel.
- ALWAYS keep garage door in sight until completely closed. NEVER permit
anyone to cross path of closing garage door.
7. WARRANTY
If, within one year from date of purchase, this product should become defective
(except battery), due to faulty workmanship or materials, it will be repaired or
replaced, without charge. Proof of purchase and a Return Authorization are required.
8. CUSTOMER SERVICE
If you would like to order Skylink’s products or have difficulty getting them to work
or download latest information & user manual, please :
1. visit our FAQ section at www.skylinkhome.com, or
2. email us at support@skylinkhome.com, or
3. call our toll free at 1-800-304-1187 from Monday to Friday, 9 am to 5 pm EST.
Fax (800) 286-1320
Audio Sensor – Model AS-101
- The Audio Sensor is to be used in conjunction with
the Skylink® garage door closer and any CO detector
(sold separately). It is used to detect the CO emission
inside the garage.
- When the CO level exceeds the safety limit, the alarm
from the CO detector will sound, which will trigger
Skylink’s Audio Sensor. Skylink® wall console will
open the garage door for 10 minutes to improve air
circulation. The door will then be closed automatically
after the CO level resumes within the safety limit.
CUSTOMER SERVICE
17 Sheard Avenue, Brampton, Ontario, Canada L6Y 1J3
Email:support@skylinkhome.com
http://www.skylinkhome.com
P/N. 101Z515
US Patent. 6,597,291
® are registered trademarks of their respective corporations
©2008 SKYLINK GROUP
–4 –
 Loading...