

Page 1
Garage Door
Monitor
TM
Sensor
Model GS-102
1. INTRODUCTION
The garage door monitorTM sensor is designed to monitor the status of
your garage door and advise you if the door is open. It works in
conjunction with AAA+TM Control Panel. When the monitored door is
opened, the control panel will either alert you or alarm will be triggered.
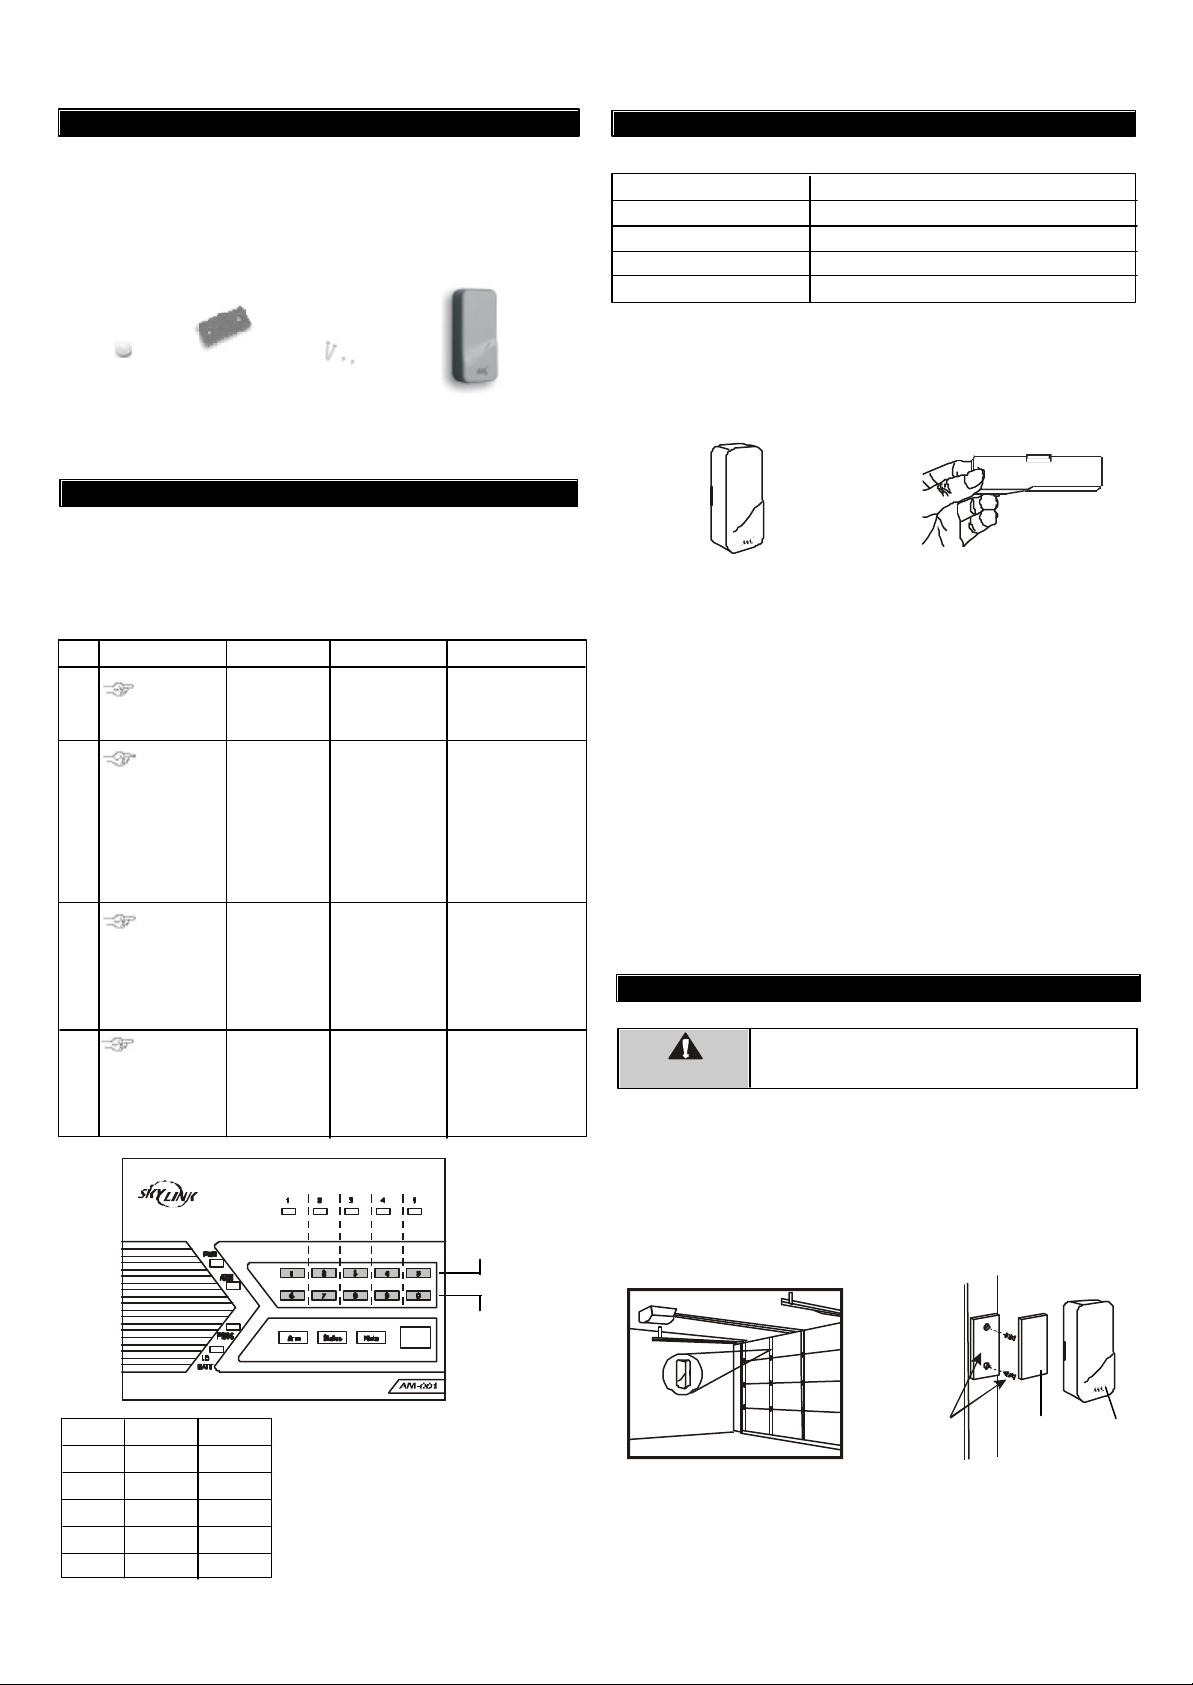
In this package, you should find a garage door monitorTM sensor, 3V
lithium battery and other mounting accessories.
Sensor
3V Lithium
battery
Please follow the instructions below to set up the garage door monitor
sensor.
In order for the sensor to communicate with the control panel properly,
the sensor must be programmed to the control panel. Follow the brief
instructions below or refer to the detail instructions from the AAA+
User’s Instructions to program the sensor to the control panel. Before
proceeding, please remove the battery isolator from the sensor.
Step Keys Function Description Note
1
2
3
4
Mounting plate
2 pcs 3.5 x 18 screws
2 pcs 3.5 x 12 screws
2. LEARN SENSOR TO AAA+TM CONTROL PANEL
[PROG]
[MPIN]
[3]
[0] to [9]
Activate the
sensor by tilting the sensor
from horizontal
to vertical
position
®
Enter Programming mode
Select learn
sensor
programming
Select sensor
location
Activate sensor
Enter master
password to
programming
mode
Refer to the diagram below to
select the sensor
location, which
includes the zone
and sensor
number.
Once the sensor
is activated, the
signal will be transmitted to the Control Panel which
will be stored.
3 beeps for valid
password. 1 long
beep for invalid
password.
After [3] is entered,
some zone LEDs will
flash once, or twice,
some will be off. The
zone LEDs represent
whether that zone is
already occupied by
another sensor.
**See Table A below.
After you have
selected the zone,
that zone LED will
be on.
You will hear [ Zone X
Sensor Y Accepted ],
where X and Y are
the zone and sensor
numbers you have
selected.
This row :
Buttons for
Sensor 1
Zone LED :
Flash once
TM
2. LEARN SENSOR TO AAA+TM CONTROL PANEL (CONT)
ZONE LED DESCRIPTION
Off Zone is not occupied by any sensor
Flashes once This zone is occupied by sensor 1.
Flashes twice This zone is occupied by sensor 2.
Flashes once, then twice This zone is occupied by sensors 1 and 2.
** Table A: Zone LED status for learning sensors.
After learning the sensor to the control panel, you may test the communication by placing the sensor in vertical position & horizontal position.
TM
Vertical
When the sensor is in vertical position,
the receiver will not beep.
When the sensor is in horizontal position, the
receiver will beep and a zone LED will flash.
If the sensor is face up in the vertical position, the control panel will not
beep, indicating the sensor is in a closed position.
If the sensor is face down in the horizontal position, the control panel will
beep and a zone LED will flash to indicate a door is open.
You can change the orientation of the sensor and you should see the
change in response of the receiver. If the sensor and receiver are
working properly in close proximity, you can now begin to install the
sensor onto your garage door.
NOTE: It is normal to hear a rattle from the sensor when tilted or
rotated to another position.
The control panel will announce the sensor's status, such as "Zone 1
Sensor 1 Triggered", and corresponding zone LED will flash and buzzer
will beep. If the magnetic contact is closed, the beeping will stop.
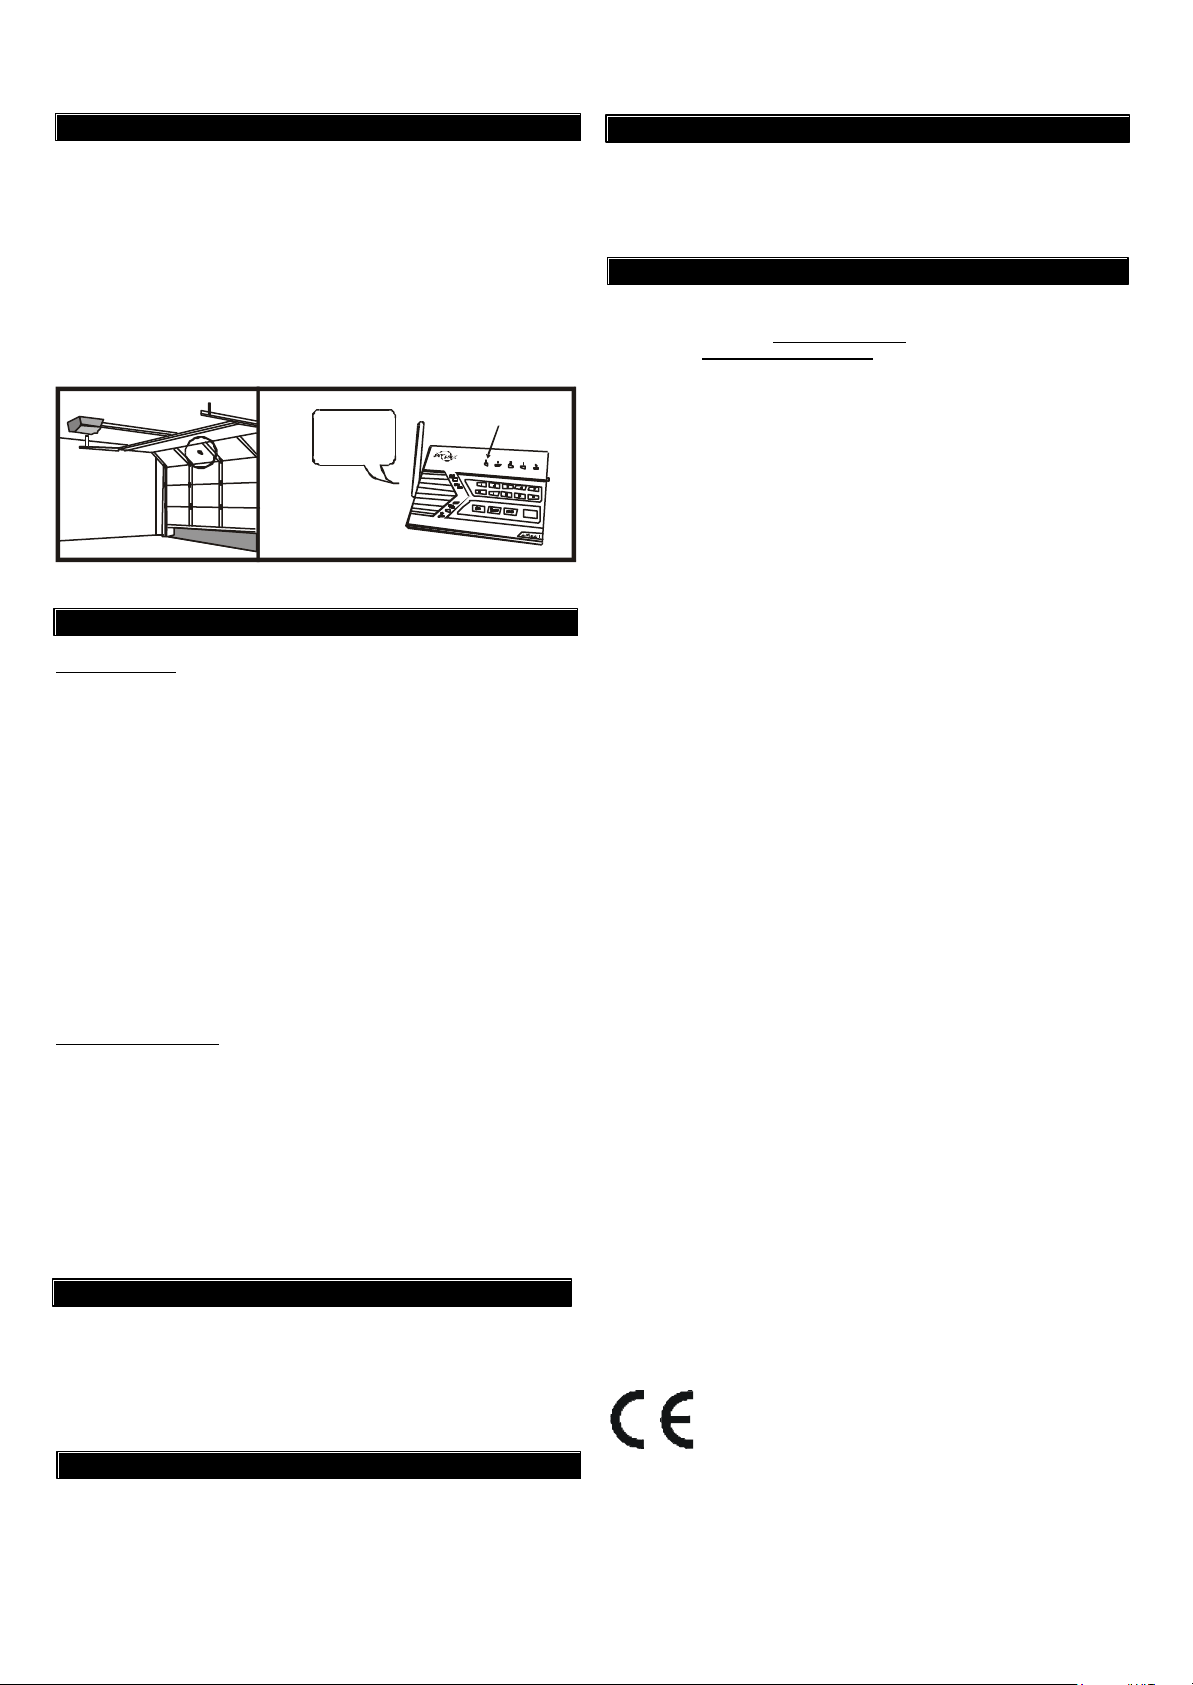
3. INSTALLATION
Unplug the power cord of your garage door opener
WARNING
before installation to ensure power is not connected.
Attached the sensor to the garage door with double-sided foam tape if the
surface of your garage door is smooth and clean enough to provide a
good adhesive surface, such surface can usually be found on a metal
garage door. Please ensure the surface is smooth and clean.
For wooden garage doors, it is recommended to use the mounting plate
and screws as well.
Horizontal
Zone 1
Zone 2
Zone 3
Zone 4
Zone 5
SENSOR 1
Button [1]
Button [2]
Button [3]
Button [4]
Button [5]
SENSOR 2
Button [6]
Button [7]
Button [8]
Button [9]
Button [0]
This row :
Buttons for
Sensor 2
Zone LED :
Flash twice
Note:
Each location is allowed to learn one
sensor only. Learning a sensor to a
location will clear the memory of the
sensor previously learnt.
Mounting plate
and screws
(optional)
Double-sided
foam tape
Sensor
Note: Mount the sensor near the top of the garage door for best results.
Note: Ensure you straighten up the antenna on the receiver to receive the best
possible reception.
Page 2
4. OPERATION
Garage door monitorTM sensor is used to monitor garage door. When the
door is open or closed, the sensor will transmit a signal to the control
panel to notify the user.
After mounting the sensor, test the sensor by opening and closing the
garage door. Open the garage door will result in the followng:
1. Voice announcement - Announce the triggered zone and sensor
2. Beeping - The number of beep represents the zone number
3. Zone LED flashing - Number of flash represents the sensor number.
1. Zone 1
Sensor 1
Triggered
2. Beep___Beep___
Beep___Beep___
............
3. Single flash
5. SENSOR FAILURE OR LOW BATTERY
Sensor Failure
The control panel constantly monitors its sensors, if the control panel fails
to communicate with any sensors, it will notify the user by:
8. WARRANTY
If, within one year from date of purchase, this product should become
defective (except battery), due to faulty workmanship or materials, it will
be repaired or replaced, without charge. Proof of purchase and a Return
Authorization are required.
9. CUSTOMER SERVICE
If you would like to order Skylink’s products or have difficulty getting them to
work, please :
1. visit our FAQ section at www.skylinkhome.com , or
2. email us at support@skylinkhome.com , or
3. call our toll free at 1-800-304-1187 from Monday to Friday, 9 am to 5 pm EST.
Fax (800) 286-1320
1. The zone LED of the failed sensor will be on steadily;
2. Voice announcement “zone X sensor Y failure” will be played.
When sensor failure occurs, try the following:
1. Check if the sensor is located at where it should be, and whether there
is any physical damage to the sensor.
2. If the failed sensor is not physically damaged, try to activate the sensor
and see if the control panel reacts to such activation.
3. If not, try to remove the sensor from its location, and bring it closer to
control panel and activate the sensor. It is possible that the sensor is
installed too far from the control panel and it cannot establish a steady
communication with the control panel. If this is the case, please install
the sensor closer to the control panel.
Sensor Low Battery
Depending on the operating condition and environment, the battery life
is approximately 2 years.
When the sensor is running low in battery, the sensor will send a wireless low battery signal to the control panel. The zone LED representing
that sensor will be on steadily, indicating sensor(s) in that zone is in
trouble condition. Control Panel will also have an announcement to advise
the user the trouble condition is low battery, such as “zone X sensor Y
low battery”, where X and Y represent the zone and sensor number.
Please replace the battery of that sensor.
6. OTHER AAA+TM ACCESSORIES
The AAA+TM control panel can work with different accessories include:
Door /Window sensor, Indoor/outdoor motion sensor, Audio sensor,
Remote control, Audio Alarm, etc. Please visit www.skylinkhome.com or
contact us at support@skylinkhome.com for more information of how to
fully utilize your AAA+TM control panel.
7. CE
Declaration of Conformity
This equipment complies with the requirements relating to electromagnetic
compatibility, EN 301489-3:2002, EN300220-3:2000, EN60950-1:2001,
EN50371:2002. This equipment conforms to the essential requirement of the
Directive (1999/5/EC) of the European Parliament and of the Council.
CUSTOMER SERVICE
17 Sheard Avenue, Brampton, Ontario, Canada L6Y 1J3
Email:support@skylinkhome.com
http://www.skylinkhome.com
P/N. 101A353
©2005 SKYLINK GROUP
 Loading...