

Page 1
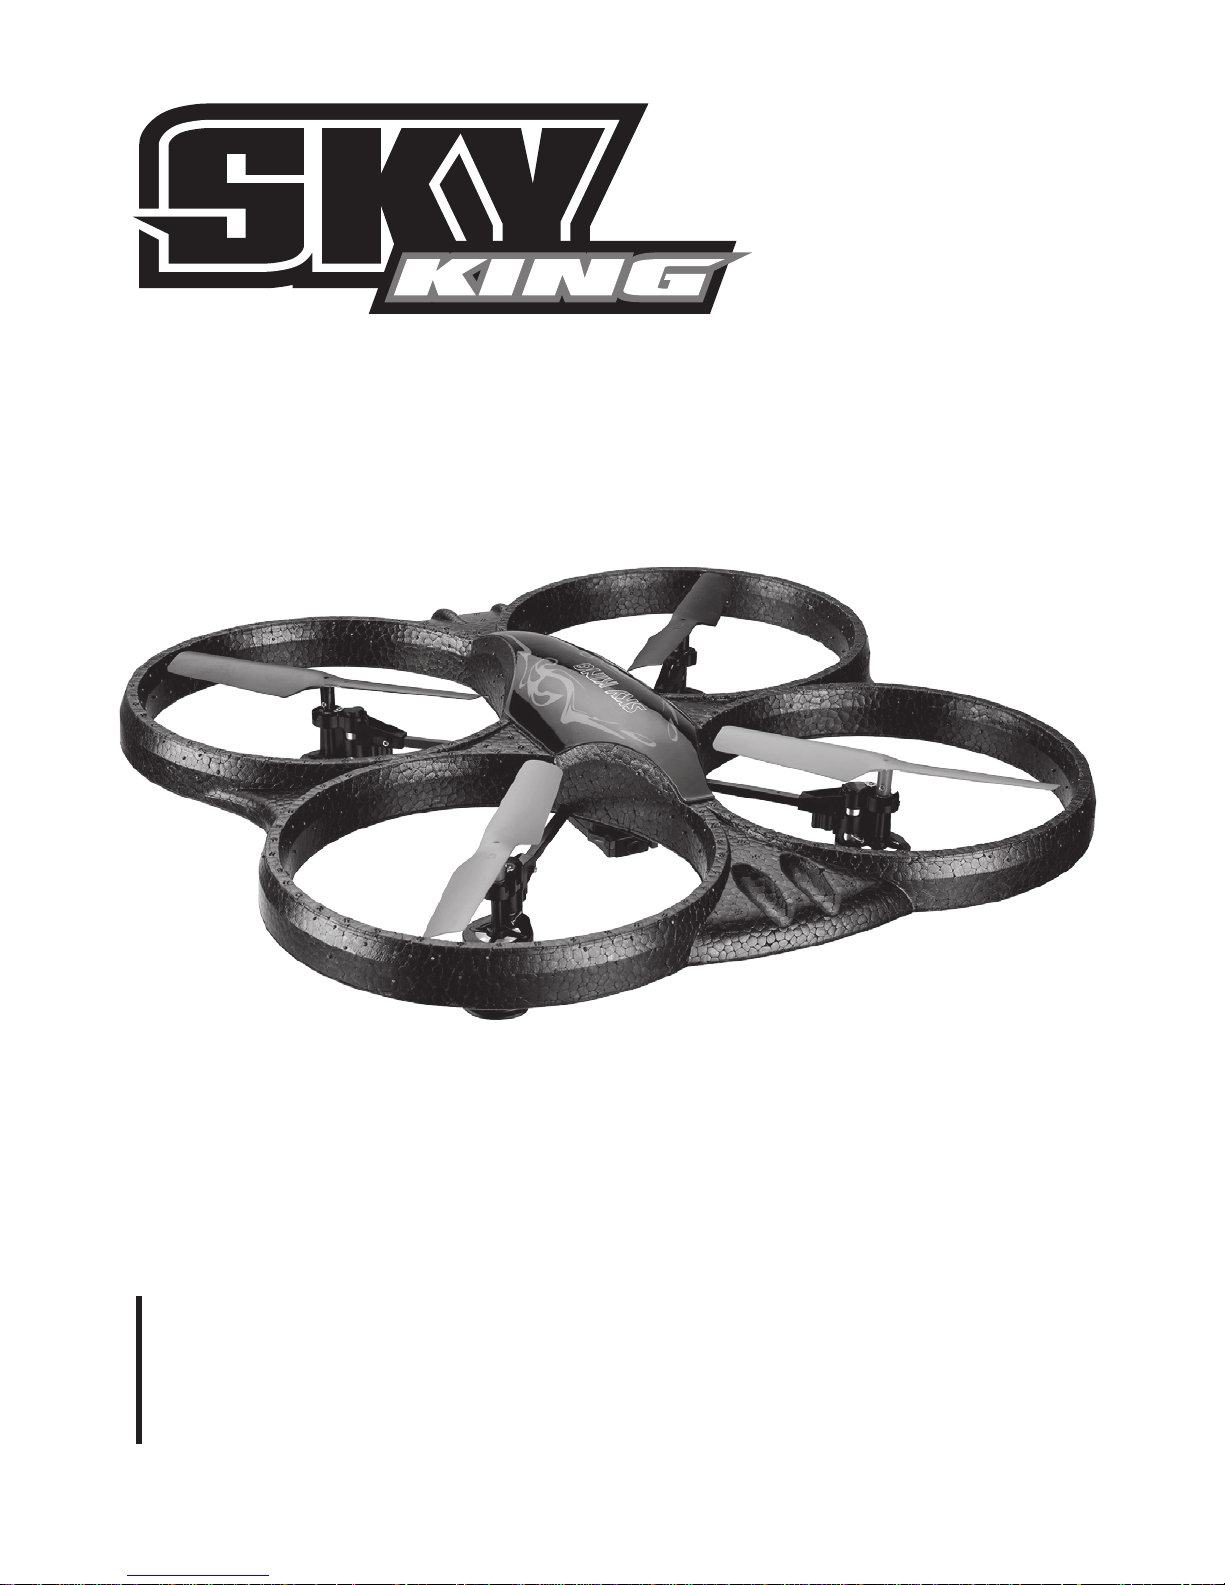
Quadcopter Drone with Video Camera
User’s Guide for Model DR775 v1396-01
For the most up-to-date version of this User’s Guide, go to www.gpx.com
Page 2

2
Warnings & Precautions
Important Safety Instructions
• Read these instructions.
• Keep these instructions for future reference.
• Heed all Warnings.
• Follow all instructions.
• Intended for children ages 14 and higher.
• Adult supervision is required.
• Only use attachments/accessories specied
by the manufacturer.
• Before ying, always check the quadcopter
body, rotors, and battery for any damage or
obstructions.
• Battery should be free from cracks or
swelling.
• Always keep the rotors clear of any
obstructions to avoid potential damage and
injury.
• Manufacturer and dealer assume no liability
for accidental damages from improper use or
installation of parts, or from damage incurred
from worn or broken parts.
• Pilots are responsible for their actions and
any damage caused from improper use.
• Pilots should keep the quadcopter in sight at
all times during ights. If you lose sight of
the quadcopter at any time, power down and
cease ight immediately.
• Only y in large, open areas that are free
from obstacles or potential hazards, such as
trees, power lines, ceiling fans, and the like.
• Never y over open bodies of water.
• Never y the quadcopter at night.
• Never try to retrieve the quadcopter from
areas you cannot safely reach, such as
rooftops or trees.
• Always launch the quadcopter from a at,
level surface.
• Never launch the quadcopter from your hand.
• Never leave the quadcopter unattended while
it is powered on.
FCC Warnings
Warning: Changes or modications to this unit
not expressly approved by the party responsible
for compliance could void the user’s authority
to operate the equipment.
NOTE: This equipment has been tested and
found to comply with the limits for a Class
B digital device, pursuant to Part 15 of the
FCC Rules. These limits are designed to
provide reasonable protection against harmful
interference in a residential installation. This
equipment generates, uses, and can radiate radio
frequency energy and, if not installed and used
in accordance with the instructions, may cause
harmful interference to radio communications.
However, there is no guarantee that interference
will not occur in a particular installation. If
this equipment does cause harmful interference
to radio or television reception, which can be
determined by turning the equipment off and
on, the user is encouraged to try to correct the
interference by one or more of the following
measures:
• Reorient or relocate the receiving antenna.
• Increase the separation between the
equipment and receiver.
• Connect the equipment into an outlet on
a circuit different from that to which the
receiver is connected.
• Consult the dealer or an experienced radio/
TV technician for help.
Page 3

Customer Support: 1-888-999-4215
3
Additional Warnings & Precautions
• WARNING: To reduce the risk of re or
electric shock, do not expose this apparatus to
rain, moisture, dripping, or splashing.
AVIS: Pour réduire le risque d’incendie ou de
choc électrique, ne pas exposer cet appareil
sous la pluie et l’humidité.
• CAUTION: Use of controls or adjustments
or performance of procedures other than
those specied may result in hazardous
radiation exposure.
• WARNING: Changes or modications to
this unit not expressly approved by the party
responsible for compliance could void the
user’s authority to operate the equipment.
• CAUTION: Danger of explosion if battery is
incorrectly replaced. Replace only with the
same or equivalent type.
AVIS: Danger d’explosion si les piles sont
remplacées de façon incorrect. Remplacer les
piles seulement par le même type de pile ou
l’équivalent.
• Lithium batteries, like all rechargeable
batteries, are recyclable and should be
recycled or disposed of according to state
and local guidelines. They should never
be disposed of in normal household waste,
and they should never be incinerated, as
they might explode. Contact your local
government for disposal or recycling
practices in your area.
• WARNING: Shock hazard - Do Not Open.
AVIS: Risque de choc électrique - ne pas
ouvrir
• Battery shall not be exposed to excessive heat
such as sunshine, re, or the like.
Les piles ne doivent pas être exposées à de
forte chaleur, tel qu’à la lumière du soleil, au
feu ou autres choses de semblable.
• Keep new and used batteries away from
children. If the battery compartment does not
close securely, stop using the product and
keep it away from children.
Gardez les piles neuves et d’occasion à partir
des enfants. Si le compartiment de la batterie
ne pas fermer correctement, cesser d’utiliser
le produit et garder loin des enfants.
• If you think batteries might have been
swallowed or placed inside any part of the
body, seek immediate medical attention.
Si vous pensez que les batteries peuvent
avoir été avalé ou placé à l’intérieur d’une
partie du corps, consulter immédiatement
un médecin.
• Do not mix old and new batteries.
Ne pas mélanger vieilles et nouvelles
batteries.
• Completely replace all old batteries with
new ones.
Remplacer complètement toutes les piles par
des neuves.
• Do not mix alkaline, standard (carbon-zinc),
or rechargeable (ni-cad, ni-mh, etc) batteries.
Ne mélangez pas des piles alcalines, standard
(carbone-zinc) ou rechargeables (Ni-Cd,
Ni-MH, etc) batteries.
• Batteries should be recycled or disposed of as
per state and local guidelines.
Piles doivent être recyclées ou éliminées
selon les directives étatiques et locales.
• WARNING: This product may contain
chemicals known to the State of California
to cause birth defects, or other reproductive
harm (California Prop 65). Wash hands after
handling.
• This product meets and complies with all
Federal regulations.
Page 4

4
Orientation � � � � � � � � � � � � � � � � � � � � � � � � � � � � � � � � � � � � � � � � � � � � � � � � � � � � � � � � � � � � � � � � � � 5
Includes
Rear View
Top View
Remote Control
Batteries & Charging � � � � � � � � � � � � � � � � � � � � � � � � � � � � � � � � � � � � � � � � � � � � � � � � � � � � � � � � � 8
Charging Procedure
Remote Batteries
Pre-Flight Calibration � � � � � � � � � � � � � � � � � � � � � � � � � � � � � � � � � � � � � � � � � � � � � � � � � � � � � � � 10
Quadcopter/Remote Link
Step 1 - Power ON & Connect
Step 2 - Take O
Trim Adjustment � � � � � � � � � � � � � � � � � � � � � � � � � � � � � � � � � � � � � � � � � � � � � � � � � � � � � � � � � � � � 11
Countering Drift & Setting Trim
Flying & Tips � � � � � � � � � � � � � � � � � � � � � � � � � � � � � � � � � � � � � � � � � � � � � � � � � � � � � � � � � � � � � � � � 13
Flight Control Sensitivity
Tips for Safe Operation
Stunts � � � � � � � � � � � � � � � � � � � � � � � � � � � � � � � � � � � � � � � � � � � � � � � � � � � � � � � � � � � � � � � � � � � � � � 14
On Board Camera � � � � � � � � � � � � � � � � � � � � � � � � � � � � � � � � � � � � � � � � � � � � � � � � � � � � � � � � � � � 15
Using the Camera
Troubleshooting � � � � � � � � � � � � � � � � � � � � � � � � � � � � � � � � � � � � � � � � � � � � � � � � � � � � � � � � � � � � 17
Repair � � � � � � � � � � � � � � � � � � � � � � � � � � � � � � � � � � � � � � � � � � � � � � � � � � � � � � � � � � � � � � � � � � � � � � 18
Body Repair
Rotor Replacement
Parts � � � � � � � � � � � � � � � � � � � � � � � � � � � � � � � � � � � � � � � � � � � � � � � � � � � � � � � � � � � � � � � � � � � � � � � 19
Parts Replacement
Parts Diagram
Parts List
Company Information � � � � � � � � � � � � � � � � � � � � � � � � � � � � � � � � � � � � � � � � � � � � � � � � � � � � � � � 22
Contact Information
International Support
Warranty
Table of Contents
Page 5
Customer Support: 1-888-999-4215
5
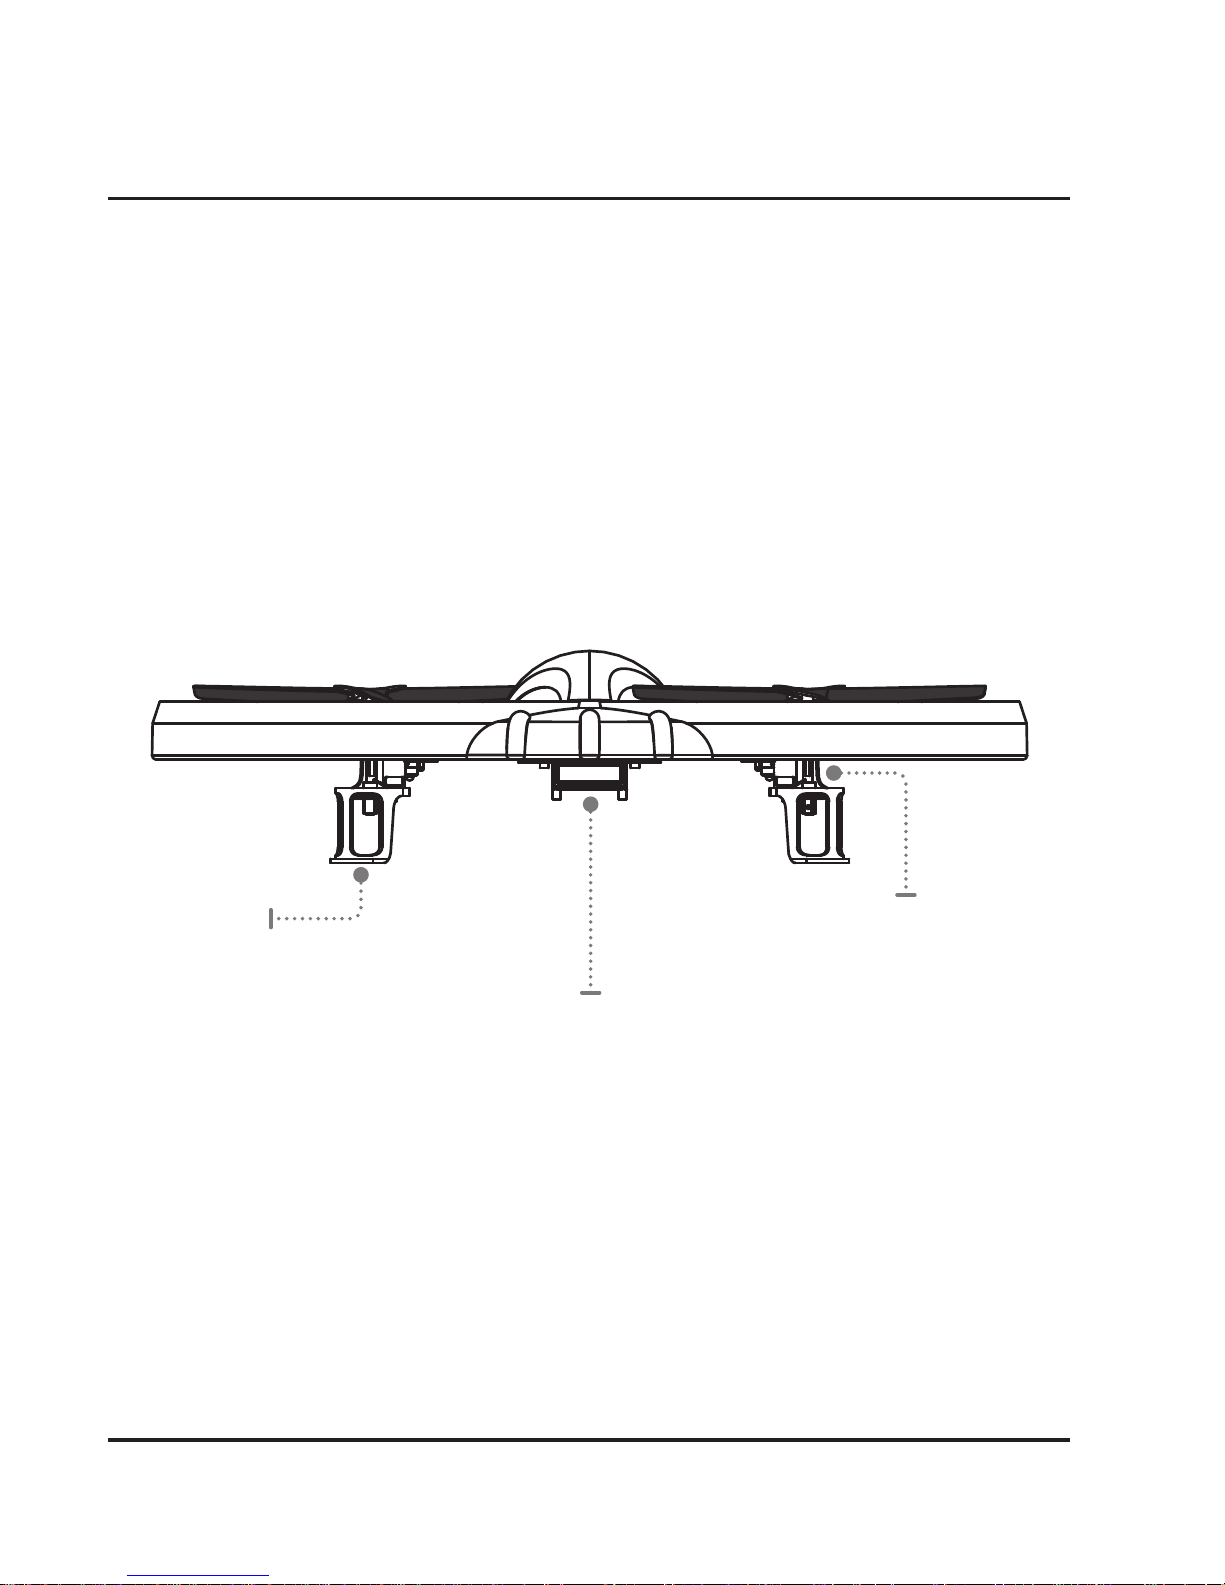
Includes
• Remote control: requires 6 AA batteries (not included)
• USB cable for battery recharge
• 4 GB SD card and Card Reader
• 4 replacement rotors
Orientation
Electric Motor/Gears Housing Landing Feet
Battery/Receiver Board/Camera Housing
(under side)
Rear View
Page 6
6
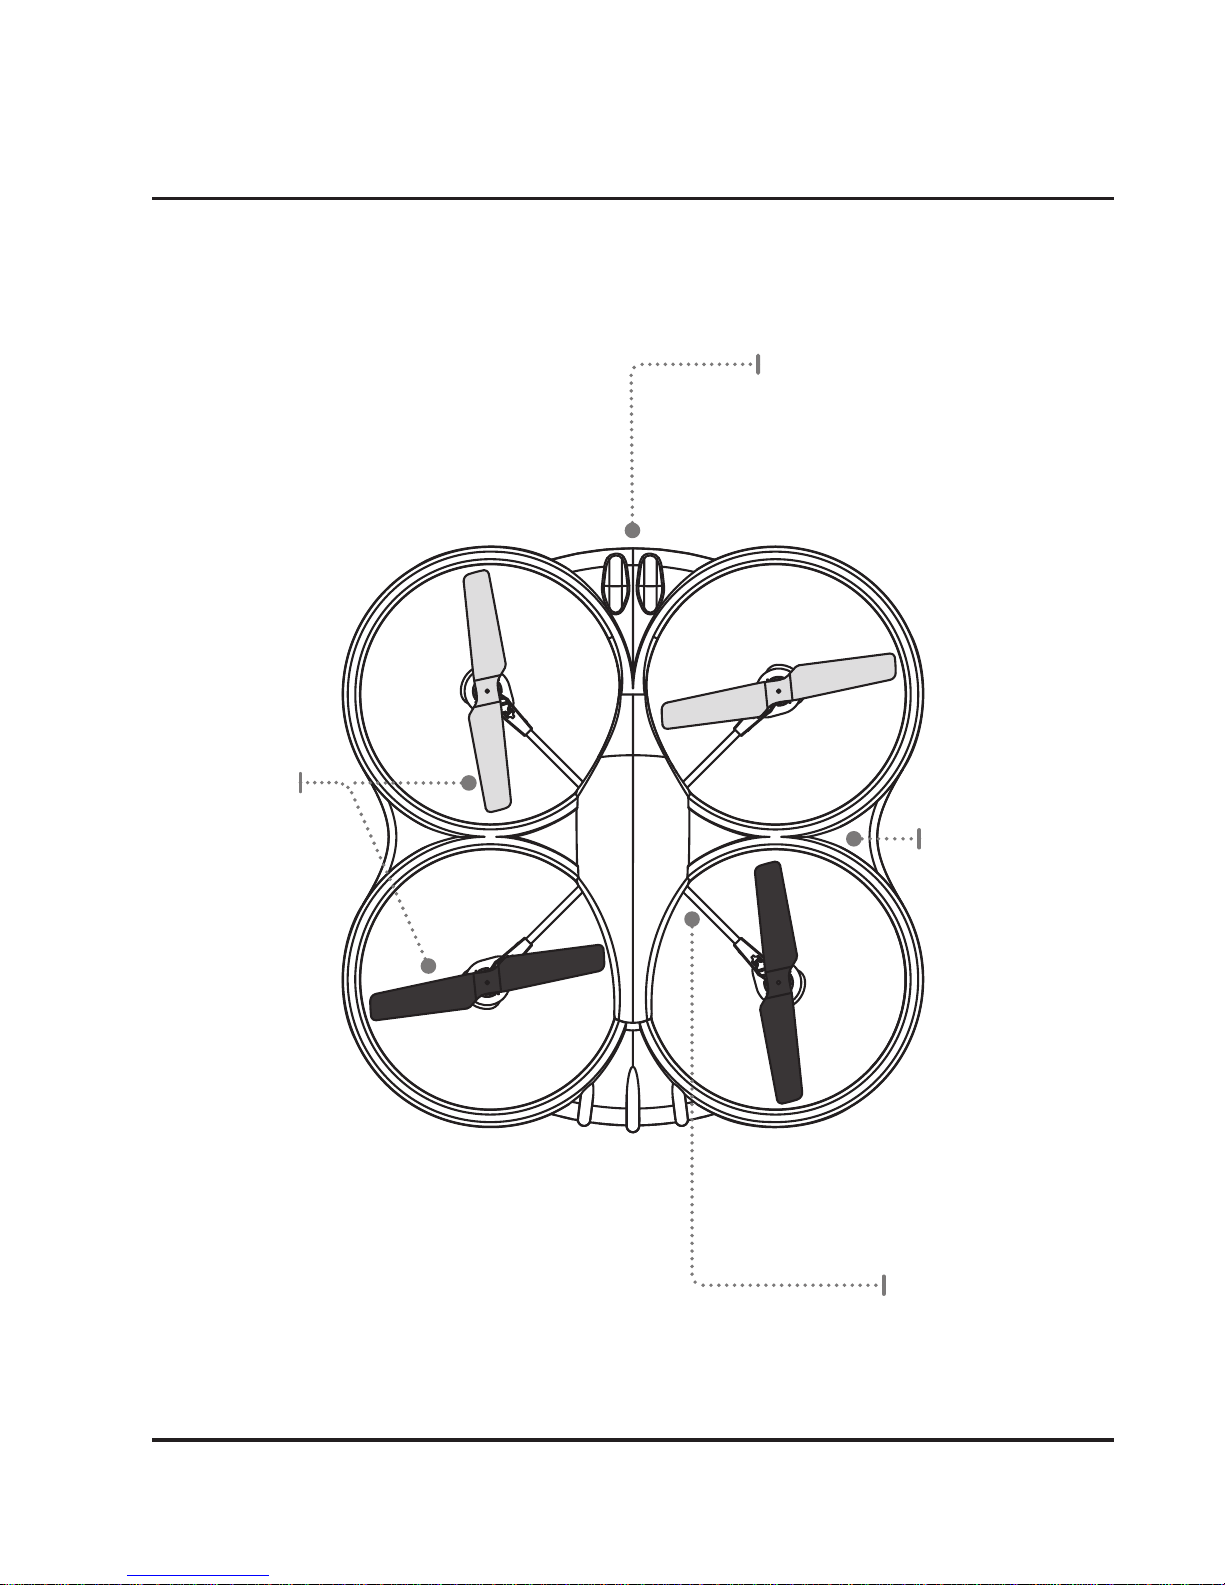
Rotors
Red rotors indicate
front of quadcopter,
black indicates rear.
Orientation
Styrofoam Shell
Rotor A
Rotor B
Rotor B
Rotor A
Quadcopter Chassis
Receiver Light (under side)
Flashes red and blue to indicate remote and
quadcopter are connected.
Top View
Page 7
Customer Support: 1-888-999-4215
7
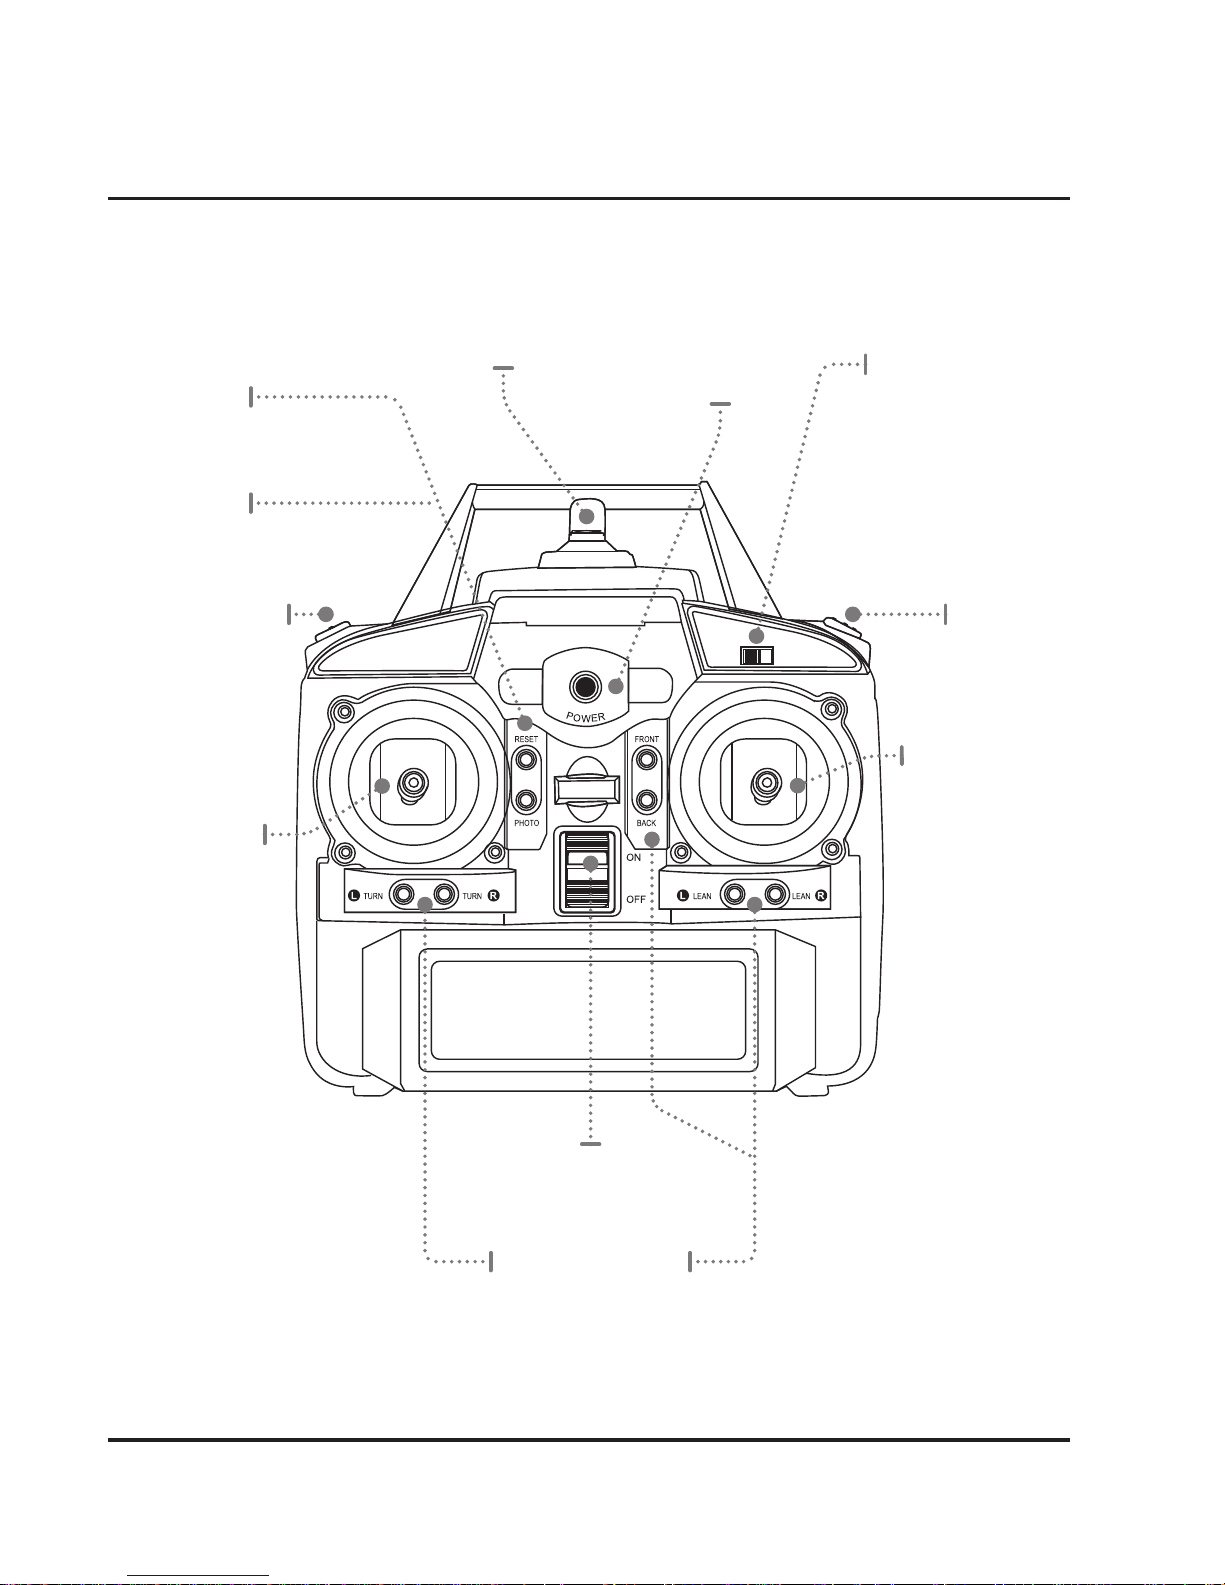
Video Capture
Press to begin
recording video.
Press to stop
recording.
Left Control
Stick
Increase Throttle:
push forward
Decrease
Throttle:
push backward
Yaw/Spin:
push left or
right
Right Control
Stick
Pitch:
push forward/
backward
Roll/Bank:
push left/right
Stunt
Press to perform
a forward ip.
Flight Control
Sensitivity
Adjusts the speed,
sensitivity, and
stunt controls of the
quadcopter.
Trim Adjustment
Adjusts trim settings for smooth and level ight.
Power Switch
Antenna Power/Status
Indicator
Reset
Press to reset trim
to factory default.
Photo
Press to take a photo.
Remote Control
Page 8
8
Batteries & Charging
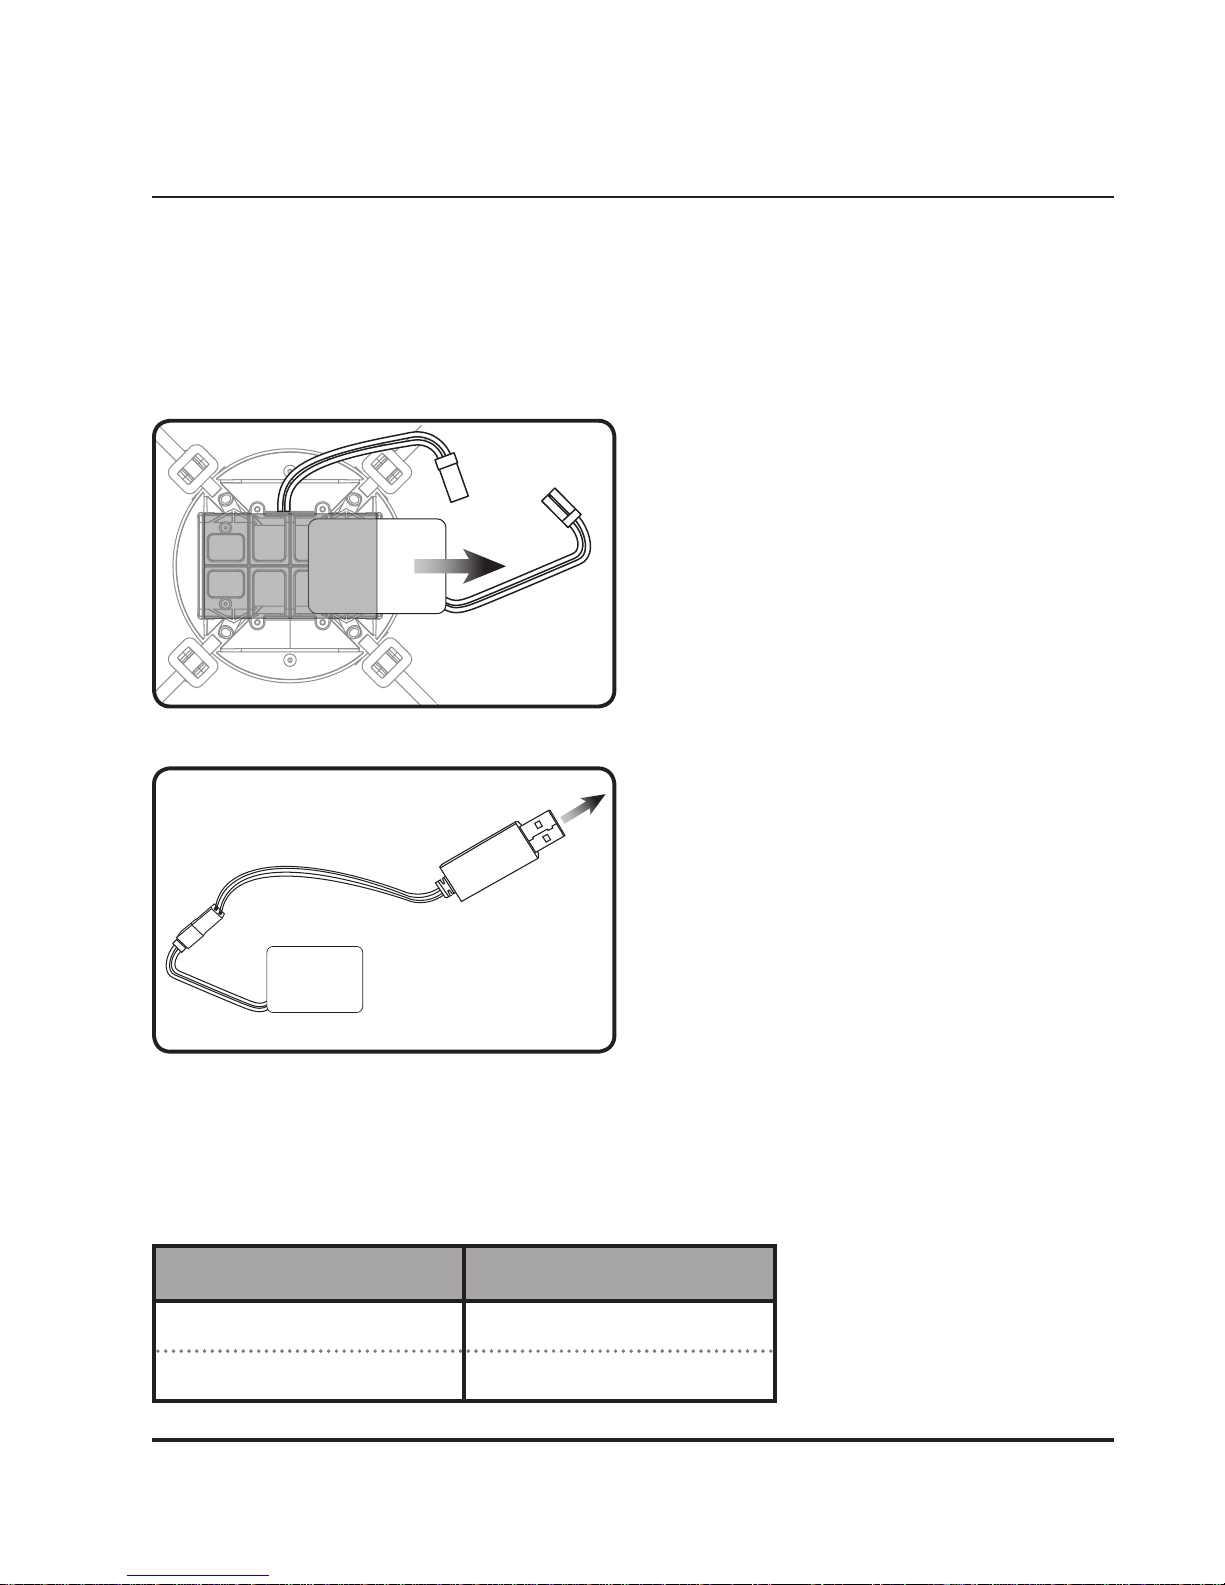
Li-Po Battery
USB Charger
The quadcopter’s Lithium-Polymer battery must be charged before the unit can be
flown. Before charging, be sure the quadcopter and remote control are powered off.
Failure to do so may result in injury.
Step 1
To charge the battery, disconnect the
plugs between the battery and the
receiver board on the underside of the
quadcopter, then gently slide the battery
out of its tray.
Be sure to pull on the connector plugs
only, pulling on the wires may result in
damage to the plugs or wires.
Step 2
Connect the battery plug to the matching
plug on the included USB charger, then
connect the USB charger to a USB power
source, such as a powered on computer
or USB power adapter (recommended,
not included).
The red light in the plug of the USB
charging cable will indicate battery
charge status (see table below).
When the battery is fully charged, reinstall the battery in its tray and connect
the plug to the receiver board.
Charging Procedure
LIGHT STATUS
Red Light ON Battery charging
Red Light OFF Battery fully charged
Charging Status
Page 9
Customer Support: 1-888-999-4215
9
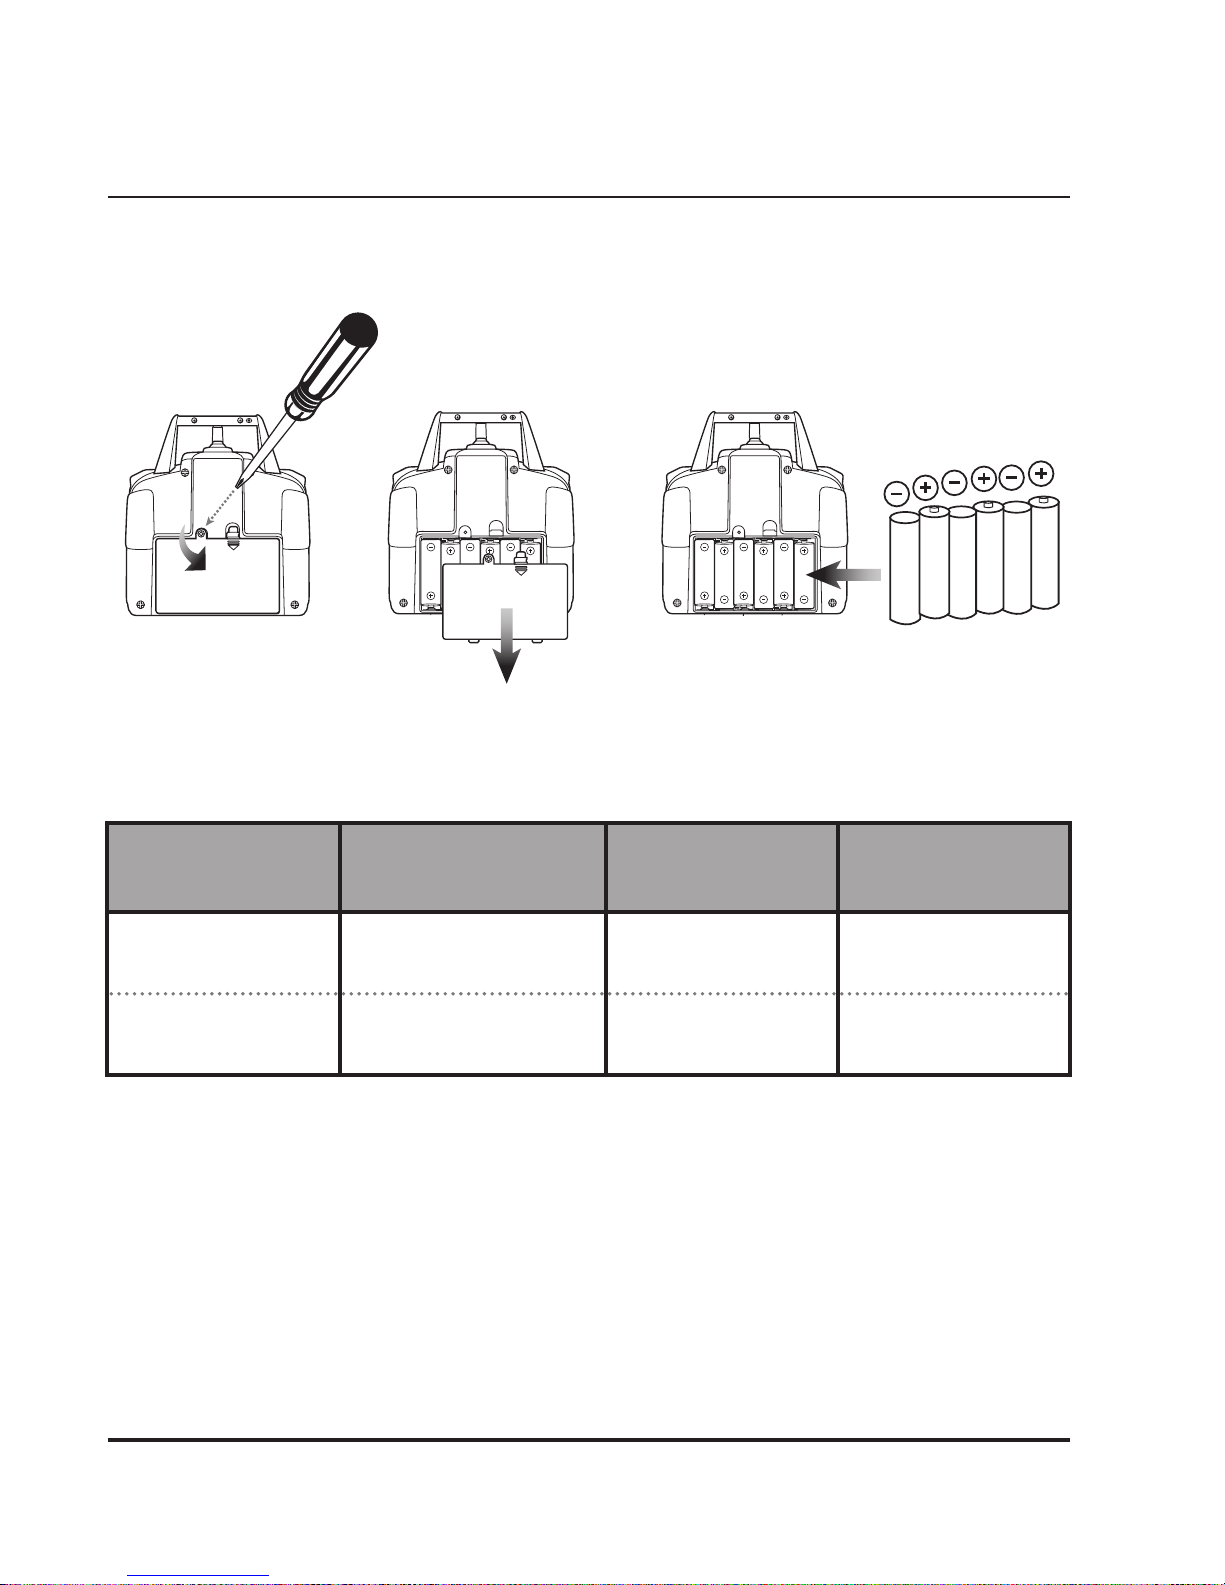
Use a Phillips Head Screwdriver
AA x6
Remote Batteries
Battery & Usage Info
BATTERY
TYPE
SPECIFICATION DURATION CHARGE TIME
Quadcopter
Li-Po Battery
3.7V/650mAH 6 to 8 minutes
flight time
60 to 70 minutes
Remote AA
Batteries
1.5V Approx. 18 hours Non-rechargeable
Page 10
10
Pre-Flight Calibration
Quadcopter/Remote Link
Before flying, the quadcopter and the remote must be linked together, and the
gyroscopes on the quadcopter must be allowed to calibrate to ensure smooth and
level flight.
Begin with the quadcopter and remote powered off.
Step 1 - Power ON & Connect
Connect the battery to the quadcopter, place the quadcopter on a flat surface, and turn
on the remote. This will calibrate the gyroscopes in the quadcopter and connect it to
the remote.
YOU MUST PERFORM THIS ACTION QUICKLY FOR IT TO TAKE EFFECT.
When the receiver light at the front of the styrofoam body begins slowly blinking red
and blue, and the Power/Status indicator on the remote is red, the quadcopter and
remote are successfully calibrated and linked.
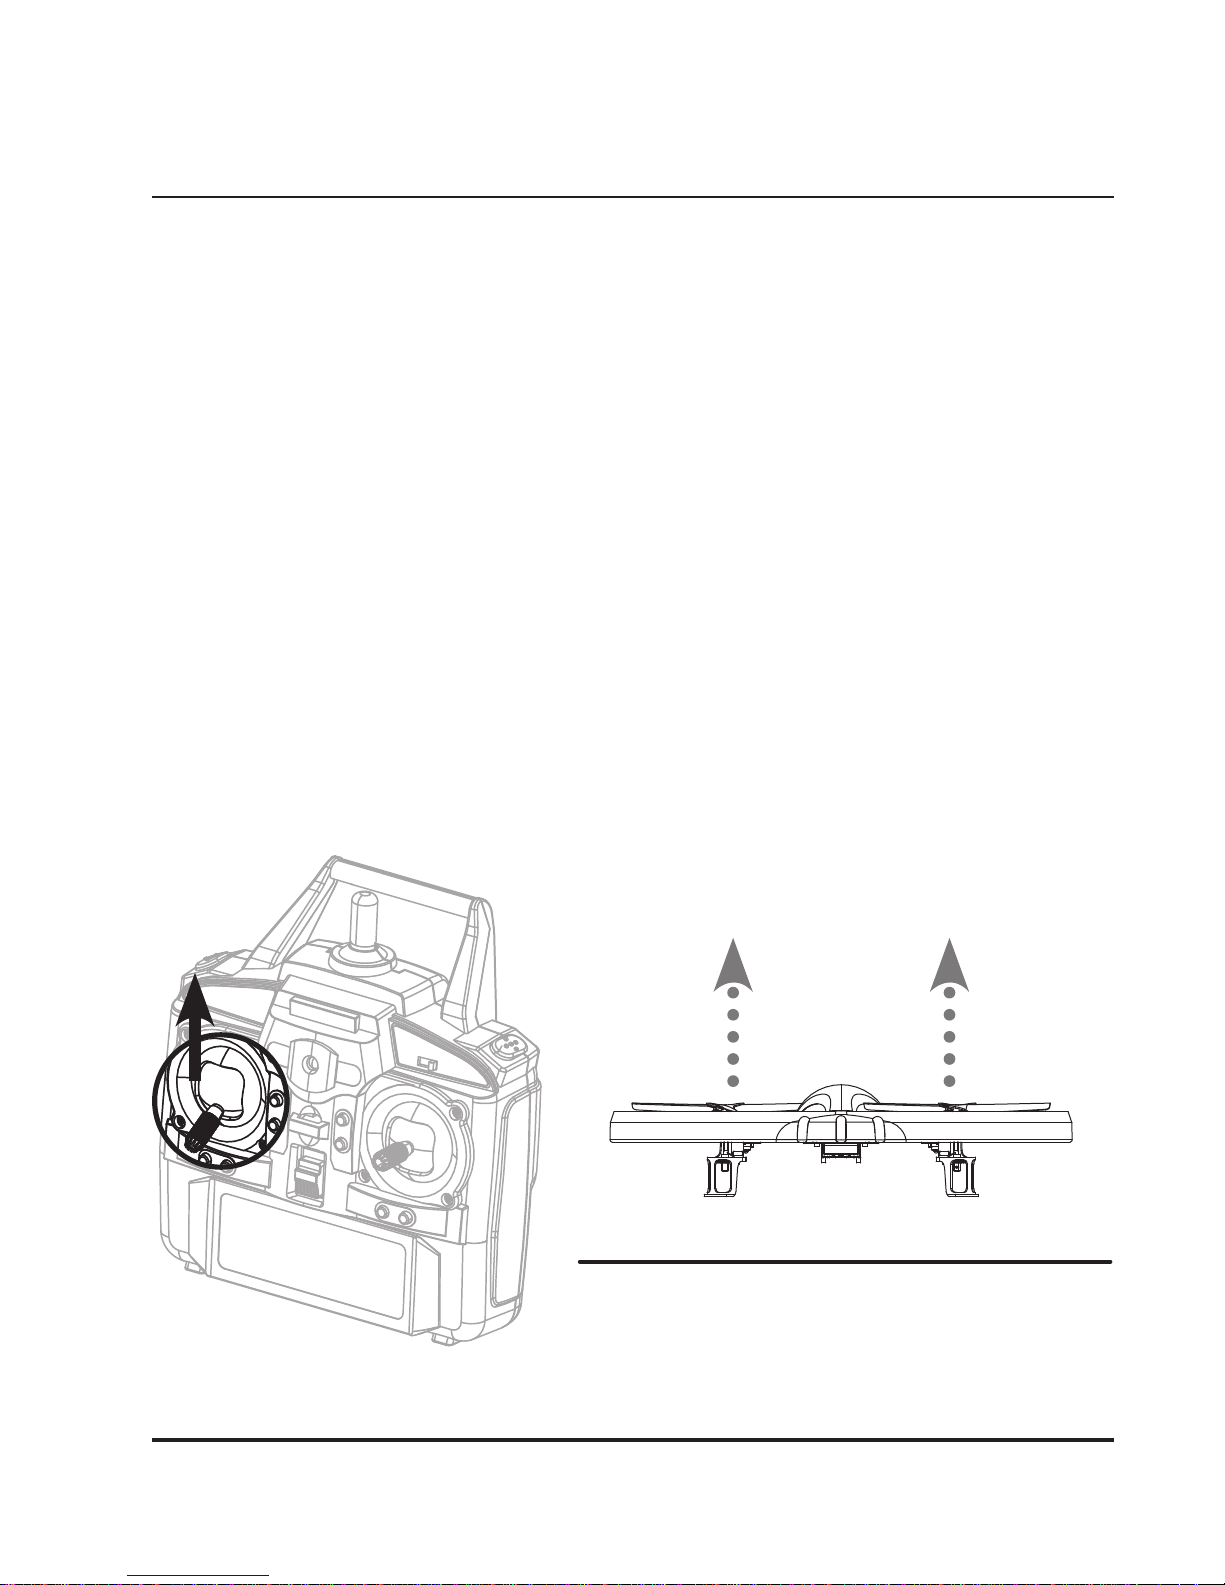
Step 2 - Take O
Add light throttle until the quadcopter is in the air. If there are any problems, perform
these steps again until a stable hover is achieved. If there are no problems, you may
start flying at will.
Attempt a stable hover, low to the ground.
• Use Left Control Stick and add
light throttle.
Page 11
Customer Support: 1-888-999-4215
11
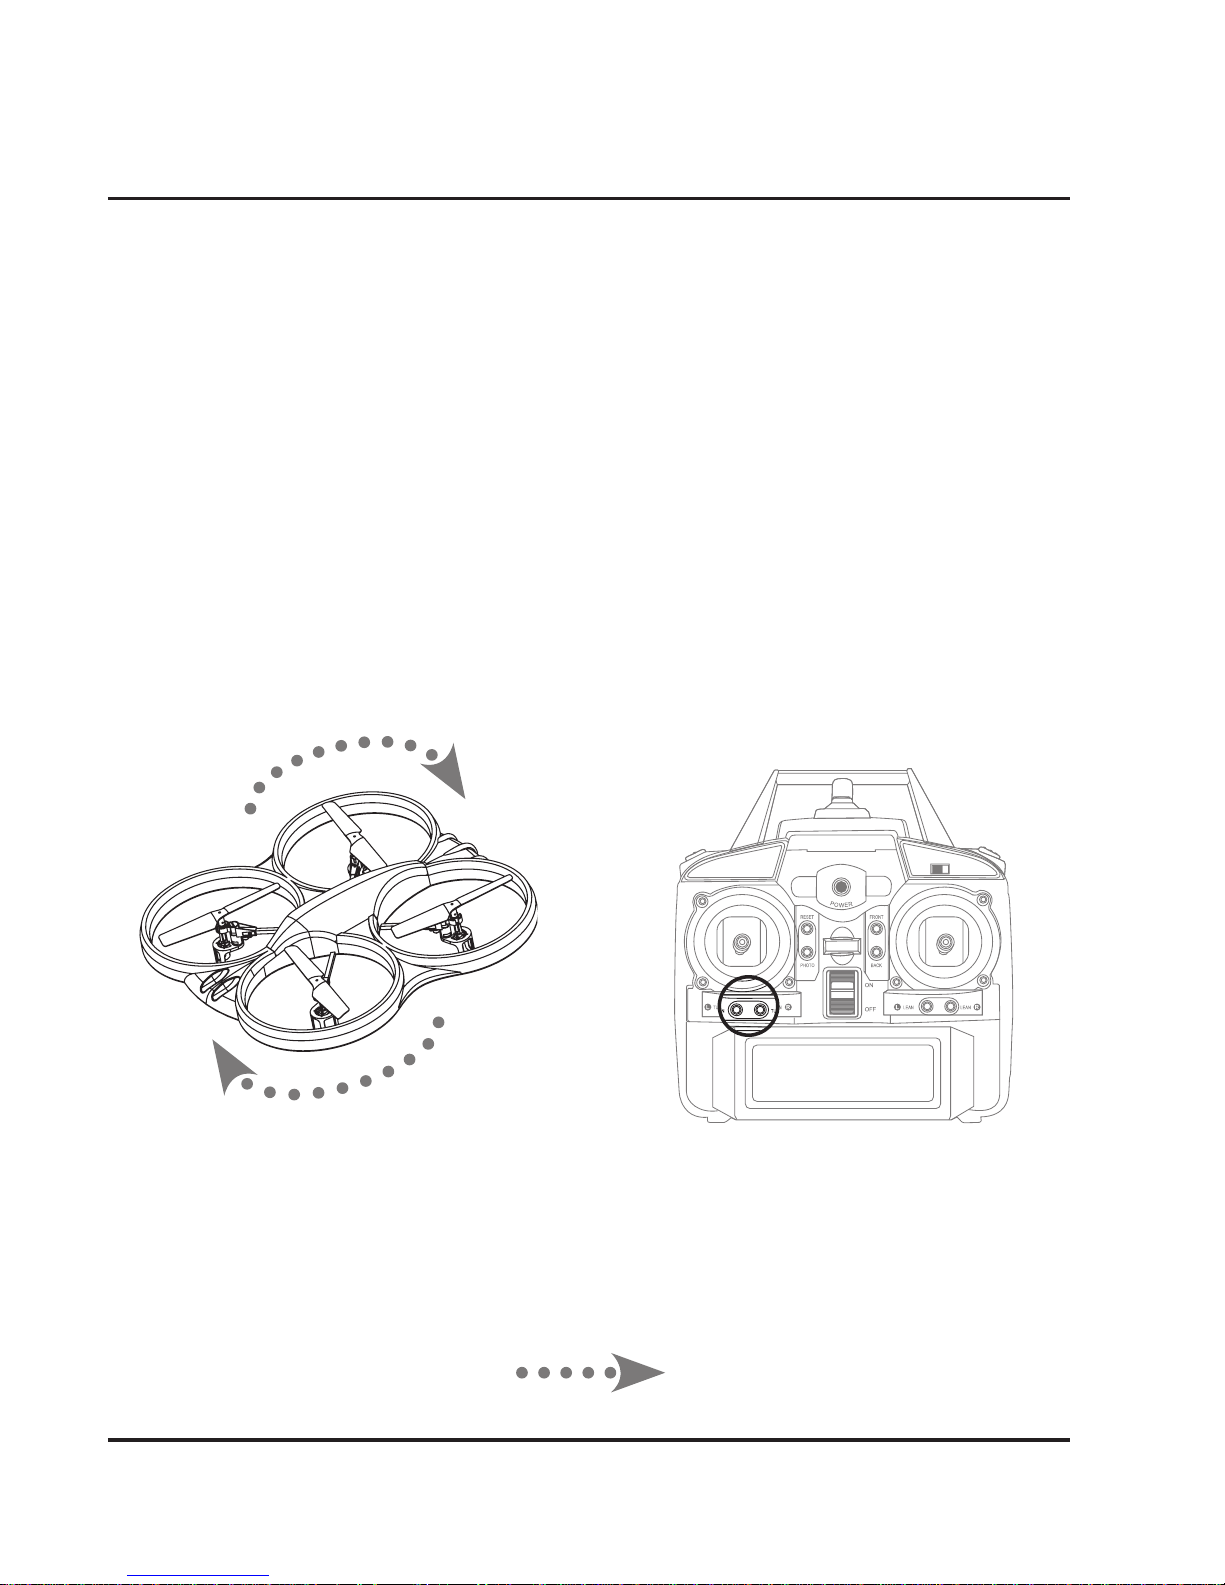
Countering Drift & Setting Trim
Even after the quadcopter is calibrated, it may show a tendency to drift while airborne.
Adjusting the trim will counter this effect and allow the unit to hover in place. Adjust
the trim while flying as controlled and low to the ground as possible.
Remember, the red propeller blades indicate the front of the quadcopter.
If the trim adjustments do not seem to be helping, or seem to be making the problem
worse, press the Reset button to the right of the Left Control Stick, to reset the trim
to factory default settings and try again.
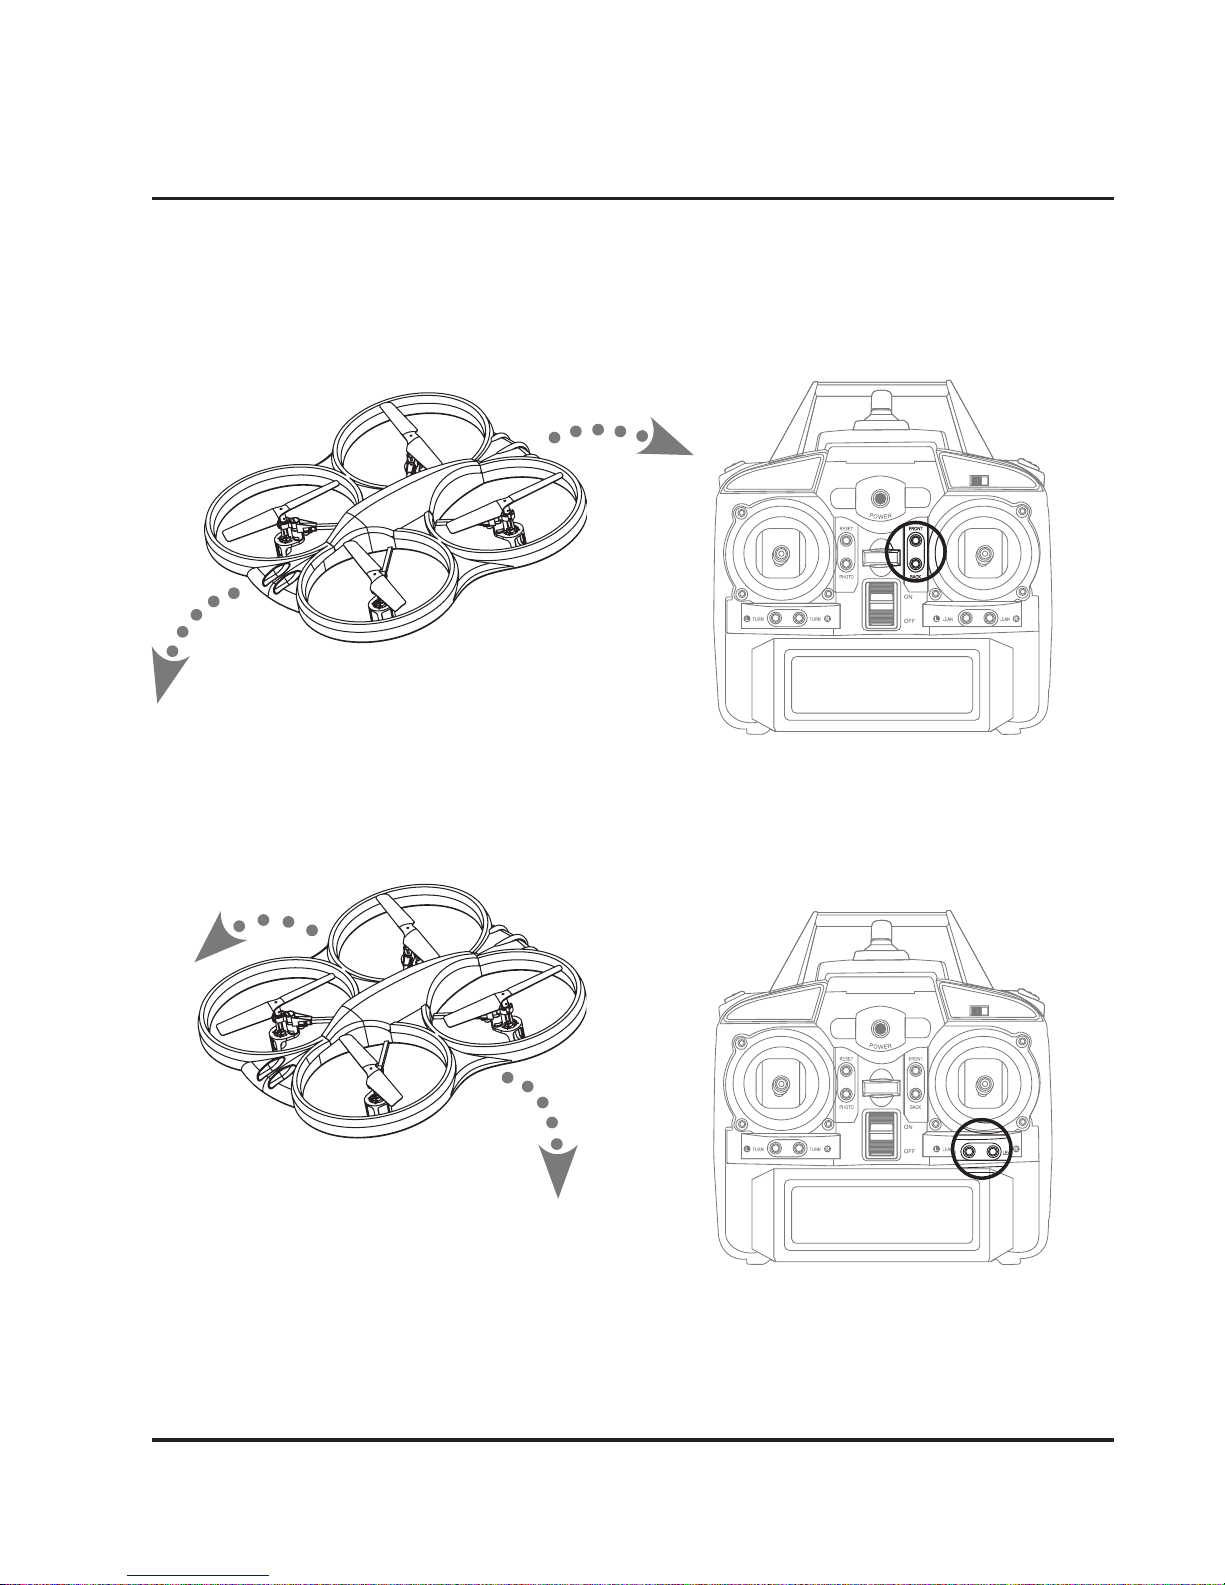
Quadcopter yaws/spins left or right.
Drift Type
Trim settings continued on the following page.
Solution
Press L/R buttons under the
Left Control Stick.
Front
Trim Adjustment
Page 12
12
Quadcopter banks/rolls left or right. Press L/R buttons under the
Right Control Stick.
Front
Trim Adjustment
Quadcopter pitches/moves
forward or backward.
Press Up/Down buttons to the left
of the Right Control Stick.
Front
Drift Type
Solution
Page 13

Customer Support: 1-888-999-4215
13
Tips for Safe Operation
• Only fly in large, open spaces, such as a field or a very large indoor area, free of
obstacles like power lines, trees, ceiling fans, etc.
• When flying indoors, avoid walls and ceilings, as the quadcopter will be drawn
towards them if closer than 2 to 3 feet.
• Stand behind the quadcopter when first taking off, so that you and the quadcopter
are facing the same “forward” direction. This will make it easier to know which
direction the unit is flying. Also, remember that the red colored propellers indicate
the front of the quadcopter.
• Practice basic flight operations like take off, hovering, and landing.
• Flying inside and at low speed, low to the ground will reduce the chance of
turbulence that can negatively affect the stable flight of the quadcopter.
• Novice pilots should move the controls slowly and deliberately, using one control at
a time, to get used to the quadcopter’s flying characteristics. Next try combining the
pitch and roll controls (forward/backward and left/right on the Right Control Stick)
to fly the quadcopter like the way an airplane flies. After mastering this, try the
yaw controls (left/right on the left thumbstick) to spin the quadcopter in place and
perform more complex flights.
• When you crash, throttle down the engines IMMEDIATELY to reduce the chance of
permanent damage to the quadcopter and other objects.
• If anything obstructs the propellers for any reason, throttle down IMMEDIATELY and
safely clear the obstruction.
Flight Control Sensitivity
The quadcopter has three settings for the responsiveness of the flight controls: 30%,
60%, and 100%. The higher settings allow faster and more precise control inputs. It
is recommended to start with the lowest setting, and as you become more skilled at
flying, increase the sensitivity as you see fit.
• 30%: Intended for novice pilots. Gives a smooth, more relaxed control feel.
• 60%: Intended for advanced pilots. The quadcopter will move and respond much
faster to all control inputs.
• 100% (Stunt Mode): The Right Control Stick will perform a flip in any direction, but
loses the ability to change pitch and roll. Use with care.
Flying & Tips
Page 14
14
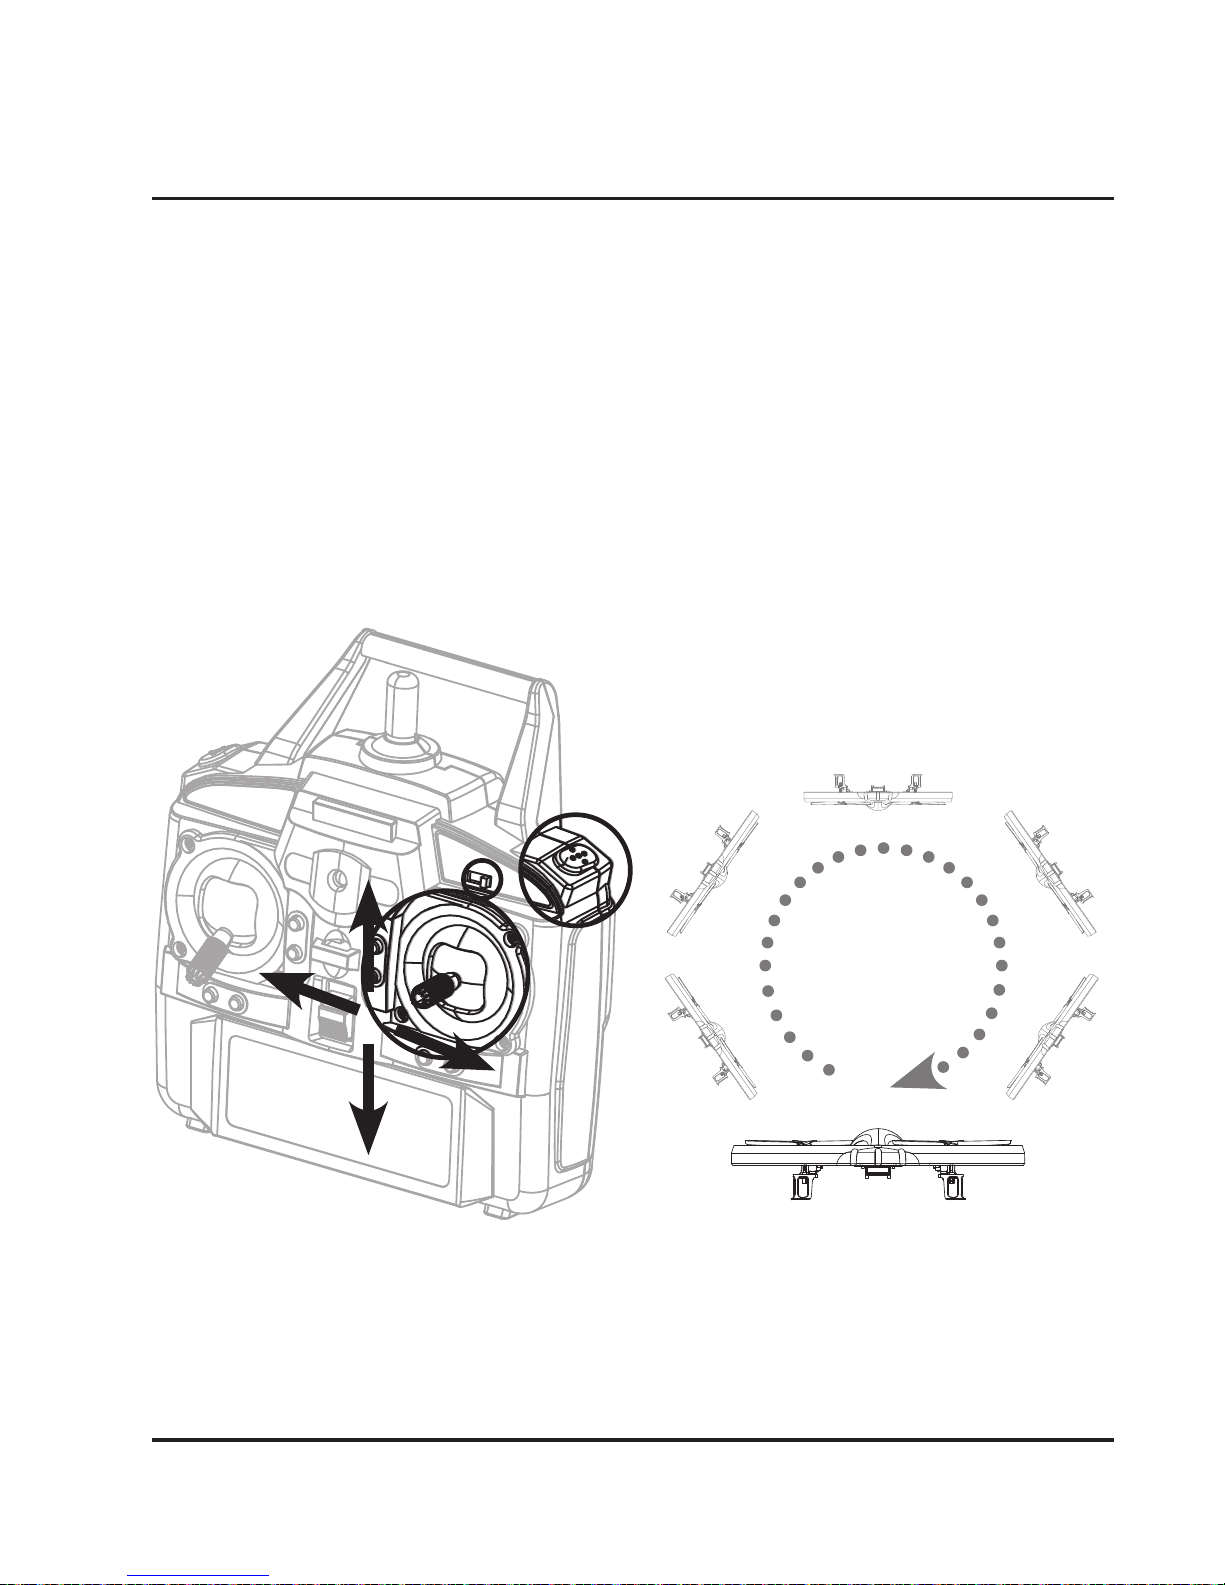
Before attempting any stunts, be sure that there is ample clear space around the
quadcopter, ideally 9 to 10 ft in every direction. It is not recommended to attempt to
stunt around or through any obstacles, as this may result in unintended damage.
There are two ways to perform aerial stunts:
• Press the Stunt button (Right Trigger) to perform a forward flip.
• Set the Flight Sensitivity Control to 100% and use the Right Control Stick to
perform a flip in any direction. The Stunt button does not need to be used in this
case, though it will still function. Note that in this setting, the Right Control Stick will
only perform stunts, and will not adjust the pitch or roll of the quadcopter. Use this
mode with care to avoid damage.
• Press Stunt Button for forward flip.
OR
• Use Right Control Stick with Flight
Control Sensitivity set to 100%.
Stunts
Page 15

Customer Support: 1-888-999-4215
15
Using the Camera
This unit is equipped with an on board camera and SD memory card that allows you to
document your flights and view them later. The camera will record stills and video as
JPEG and AVI files. The video files (AVI) can be viewed on a computer with any common
video playing software, like Quicktime or Windows Media Player.
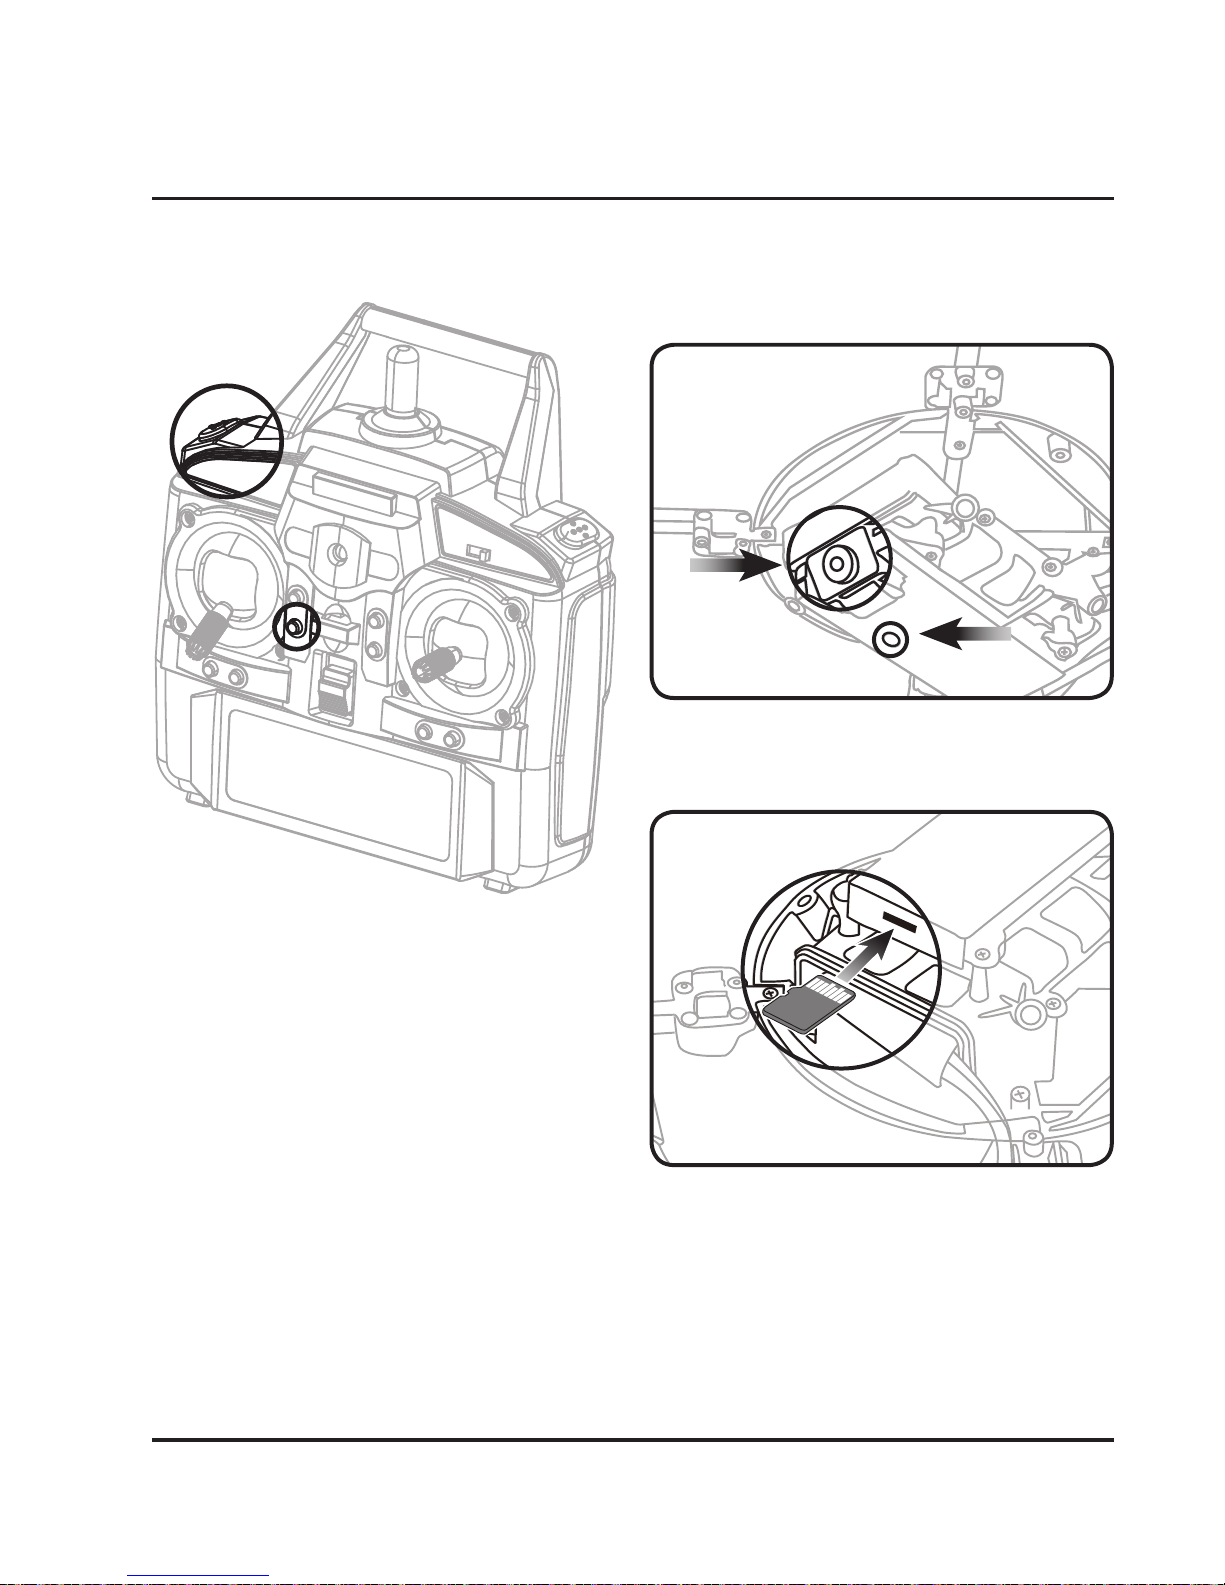
To take video during your flight, press the Left Trigger on the remote control to
begin recording. When the camera is recording video the power/status indicator will
turn green.
To take still shots during your flight, press the Photo button to the right of the Left
Control Stick. The power/status indicator will flash green when it will takes a photo.
Press & hold the Photo button for a 3 photo burst.
When the light on the unit is flashing blue, the SD card’s memory is full and will need
to be downloaded to a computer, and the card formatted, before it can be used again.
The SD card is stored in a slot on the rear of the camera/battery housing. To remove
the SD card, lightly push against it until it springs partially out of its slot, then pull the
card out. Use the included USB/SD card reader to connect to your computer.
After you’ve connected and opened the SD Card file folder (”NO NAME” drive), open the
“DCIM” folder, then “100DSCIM”. You should be able to see and play any of the AVI video
files on the card.
NOTE:
• The video camera does not record sound.
• Proper orientation of the SD Card in the slot (see figure on next page).
• You can format the SD card at any time without worry, the camera will automatically
re-create the DCIM and 100DSCIM file folders.
On Board Camera
Camera info continued on the following page.
Page 16
16
• Press Left Trigger for video.
• Use Photo button to the right of
the left thumbstick for still shots
or 3 shot burst.
On Board Camera
Camera & Indicator
SD Card & Slot
Page 17

Customer Support: 1-888-999-4215
17
PROBLEM POSSIBLE CAUSES SOLUTION
Quadcopter is
unresponsive
• No power to remote
or quadcopter
• Poor contact between
power plugs
• Check remote
batteries.
• Check quadcopter
battery, be sure it is
fully charged.
• Be sure the remote
has an unobstructed
line of sight to the
quadcopter.
• Be sure to remain
within the remote’s 30
ft. range.
Quadcopter
ies erratically
• Gyroscopes may
be misaligned
• Perform Pre-Flight
Calibration again
(see pg. 10).
Quadcopter drifts
while in ight
• Trim not set • Adjust trim settings
(see pg. 11).
Quadcopter suers
from mechanical
diculty or
vibrates excessively
• Damage to styrofoam
body, rotors, or other
major components
• Check to make sure
the quadcopter has
not taken significant
damage.
• Replacement parts
may be needed
(see pg. 21).
Receiver LED ashes,
but quadcopter no
longer responds to
throttle inputs
• Low battery power • Recharge the battery.
If you are experiencing problems using or flying the quadcopter, consult this table.
Troubleshooting
Page 18
18
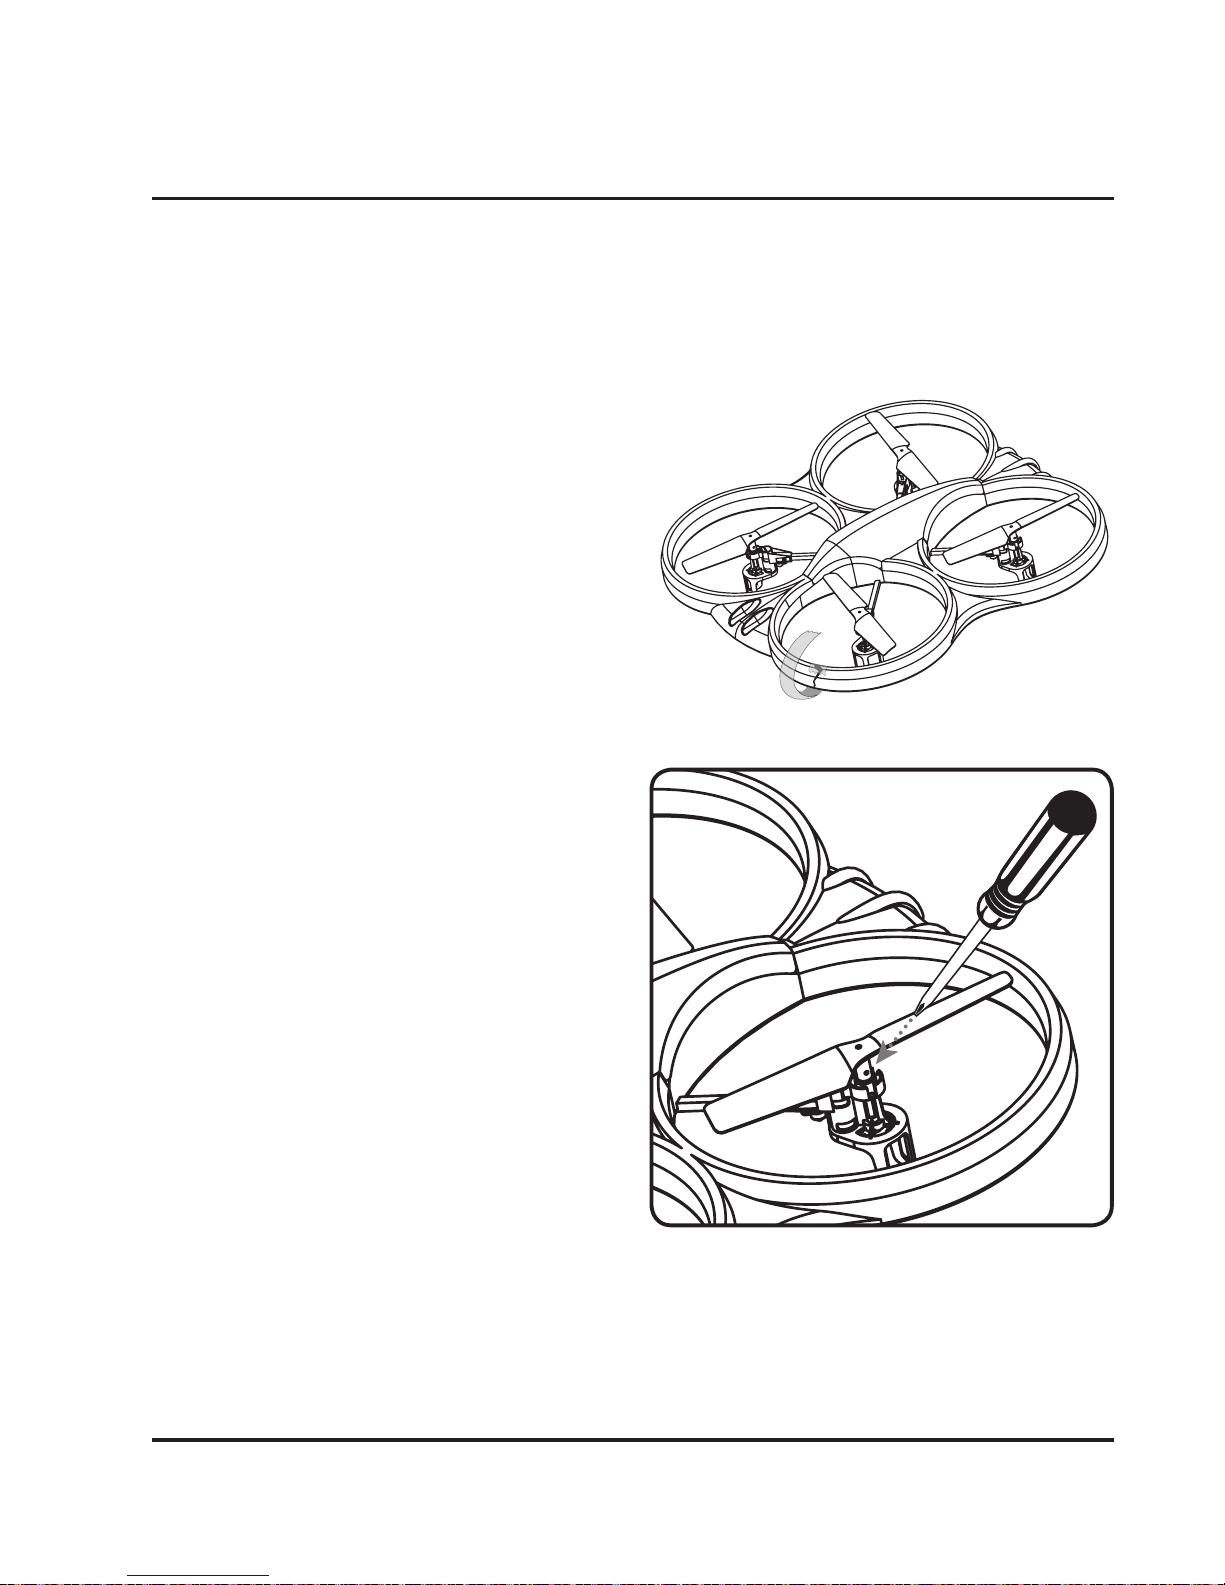
Body Repair
The styrofoam shell is designed to absorb
damage from crashes and impacts, but in
doing so it can develop cracks and tears
over time. The easiest way to repair the
shell is to use any kind of light, clear tape
to reconnect and seal the crack.
Rotor Replacement
The quadcopter comes with 4
replacement rotors, to be used if the
originals are broken or badly damaged.
To replace a rotor, use a small Phillips
head screwdriver and remove the screw
connecting the rotor to the electric motor
shaft. Remove the damaged rotor and
replace with a new one, then screw it
back into place on the motor shaft.
REMINDER: It is extremely important
to use the correct rotor (A or B) for
replacement. Using the incorrect rotor
will cause the quadcopter’s flight to
be erratic and impossible to control.
The marking can be seen on the top of
the rotor.
In the event that the quadcopter absorbs light damage that renders flight difficult,
but not impossible, the following repairs are easy to perform and should get the
quadcopter back to a flyable condition.
REMINDER: Pilots are responsible for any damage caused by improper use.
Repair
Page 19
Customer Support: 1-888-999-4215
19
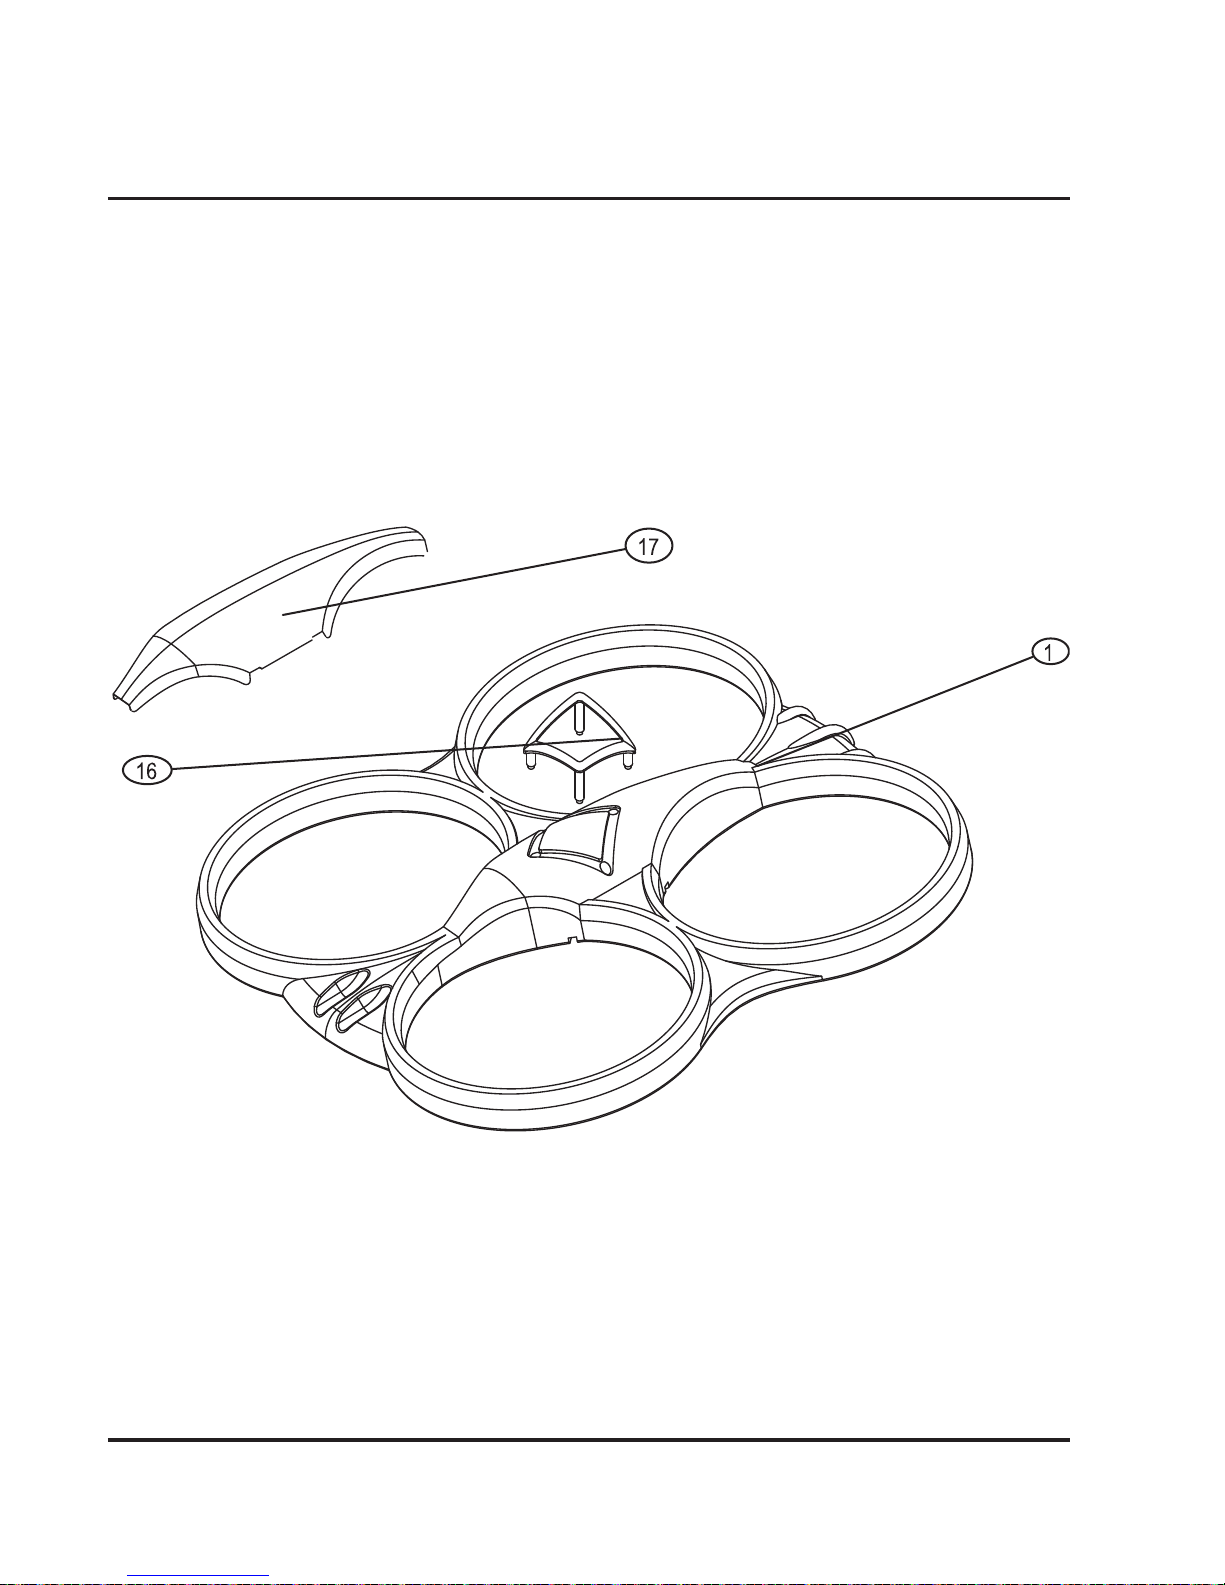
Parts Replacement
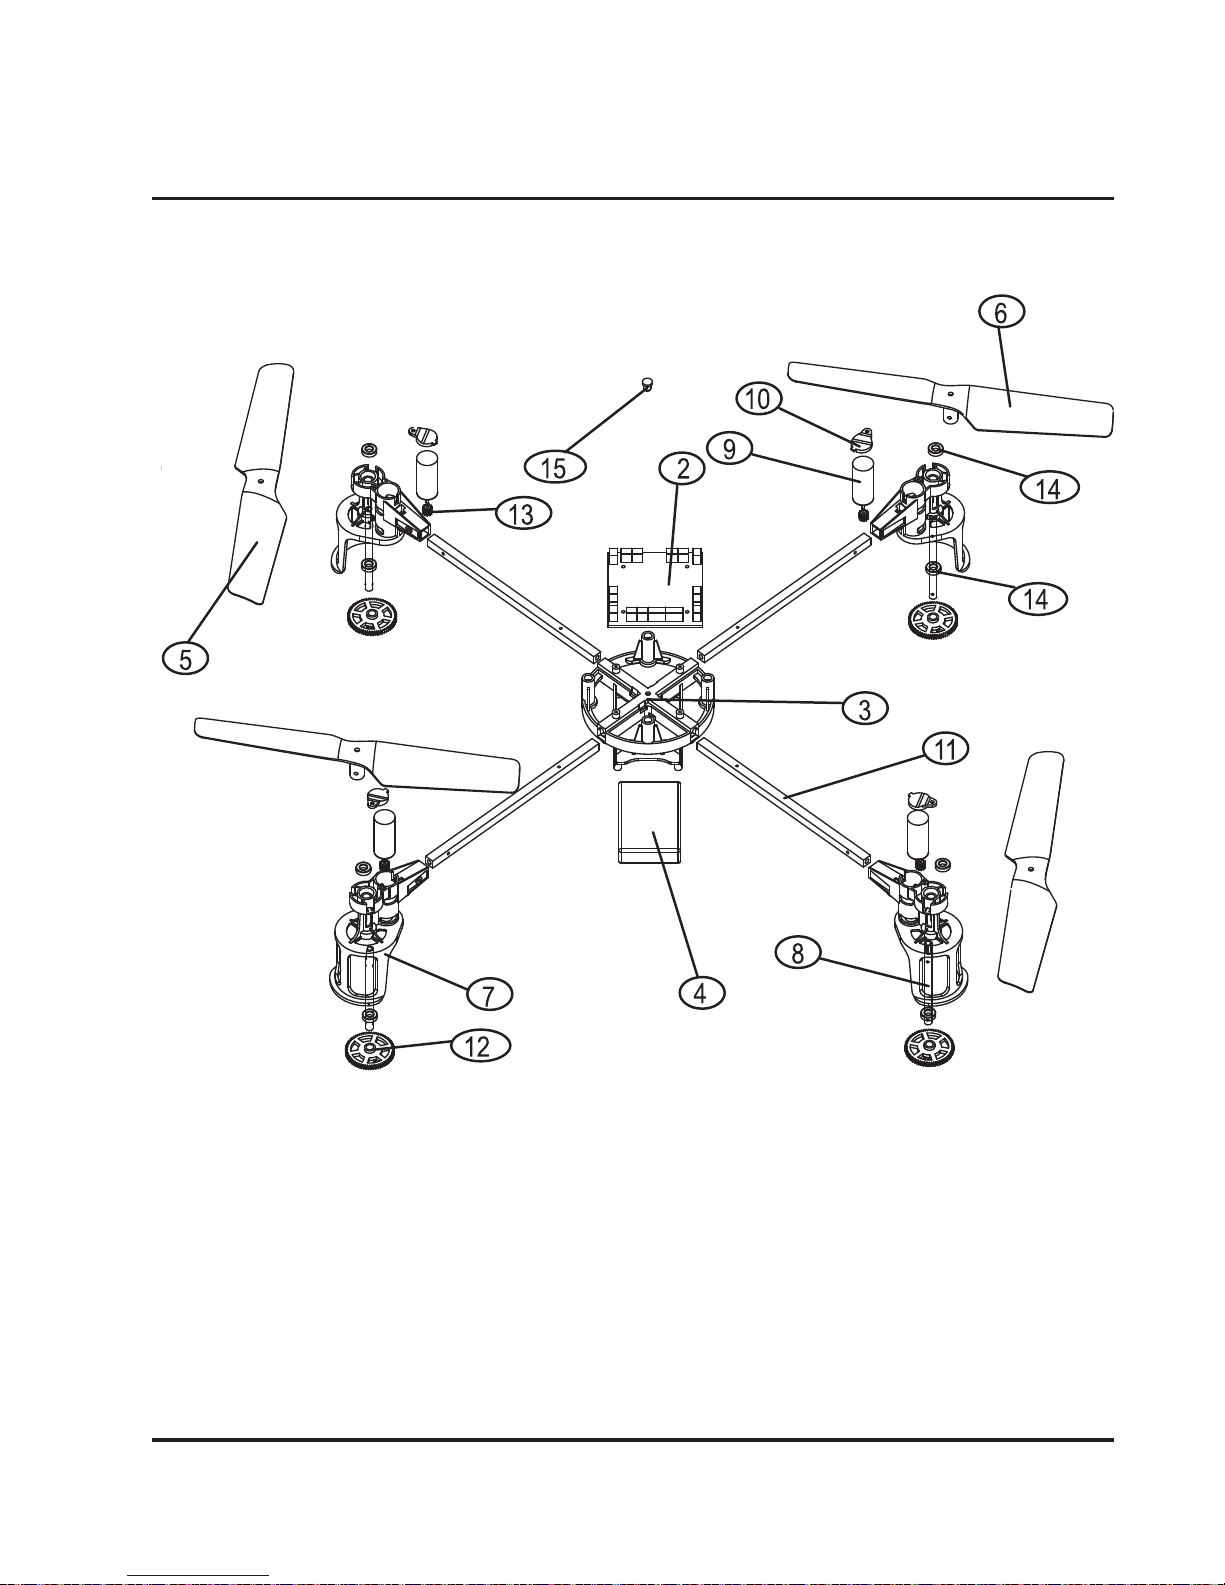
If any major components of the quadcopter are damaged beyond repair, you can
order new parts by contacting the customer support number, or by following the web
address below to the product page and clicking on the “Parts and Accessories” tab.
Product web address: http://bit.ly/1Hl5ziY
Parts
Parts Diagram
Page 20
20
Parts
Parts Diagram
Page 21

Customer Support: 1-888-999-4215
21
PART NAME QUANTITY
1 Styrofoam Shell 1
2 Receiver Board 1
3 Chassis 1
4 Lithium-Polymer Battery 1
5 Rotor Blade A (Red/Black) 4
6 Rotor Blade B (Red/Black) 4
7 Electric Motor Block 4
8 Engine Harness/
Landing Pad
4
9 Electric Motor 4
10 Electric Motor Cover 4
11 Engine Harness Strut 4
12 Electric Motor Pinion Gear 4
13 Copper Gear 4
14 Copper Set 8
15 LED Receiver Light 1
16 Receiver Board Harness 1
17 Name Plate 1
Parts
Parts List
Page 22

22
International Support
To download this User’s Guide in English, Spanish, and French, or to get answers to
frequently asked questions, visit the support section at: www.gpx.com
Para descargar este Manual del Usuario en inglés, español y francés, o para obtener
respuestas a preguntas frecuentes, visite la sección de apoyo en: www.gpx.com
Pour télécharger ce guide de l’utilisateur en anglais, espagnol ou français, ou pour
obtenir des réponses à des questions fréquemment posées, consultez la rubrique
d’assistance sur: www.gpx.com
Contact Information
Website: www.gpx.com
Email Support: [email protected]
Email Parts: [email protected]
Phone Support: 1-888-999-4215
Warranty
See included 30 Day Warranty for
warranty information. Warranty and
the most up-to-date version of this
User’s Guide can also be found at:
www.gpx.com
Copyright © 2015 Digital Products International (DPI, Inc.) All other trademarks
appearing herein are the property of their respective owners. Specifications are subject
to change without notice.
Company Information
 Loading...