

SKYHYDRANT™ SET UP AND OPERATING INSTRUCTIONS
The SkyHydrant water purification unit provides a stand-alone system for supplying clean safe drinking
water for disasters, emergencies and humanitarian programs.
Operations are manual and simple and the unit can be set up for use in refugee camps, communities,
villages, health clinics, schools, orphanages and many other
applications where the source water is not safe.
Where to set-up the SkyHydrant
To avoid theft or vandalism select a secure location to install the
SkyHydrant sheltered from the sun, wind and rain.
• Mount the SkyHydrant in a sturdy position with sufficient
space around the unit to allow for cleaning
• Allow space for access for people to line up and collect the
water. Ensure location is clean and well drained and provide
a disposal area (drain) for backwash water.
• The SkyHydrant unit is a valuable asset and requires daily
cleaning for its continued operation. A local supervisor
should be appointed to oversee operations and provide
security. A daily operational log of water production should
also be maintained.
Assembling the SkyHydrant
Attach the Cleaning Handle to the top of the SkyHydrant. One
handle is already located in position and the other needs to be
screwed into place.
The SkyHydrant can be set up to operate as either a wall mounted
unit using the brackets supplied or as a freestanding unit using the
aluminium legs supplied. Bolts and screws are included in the
accessory kit allowing the brackets or legs to be easily connected.
All fittings use 20mm (3/4”) connectors and lengths of flexible
hoses, clamps and fittings are supplied to assist with setting up and
connecting pipes. Taps T1 and T2 are adjustabl e al lowing them to
be folded down level.
Connect required operating equipment to allow the SkyHydrant to
function – this may include hoses, pipes, water tanks, pump and
other equipment.
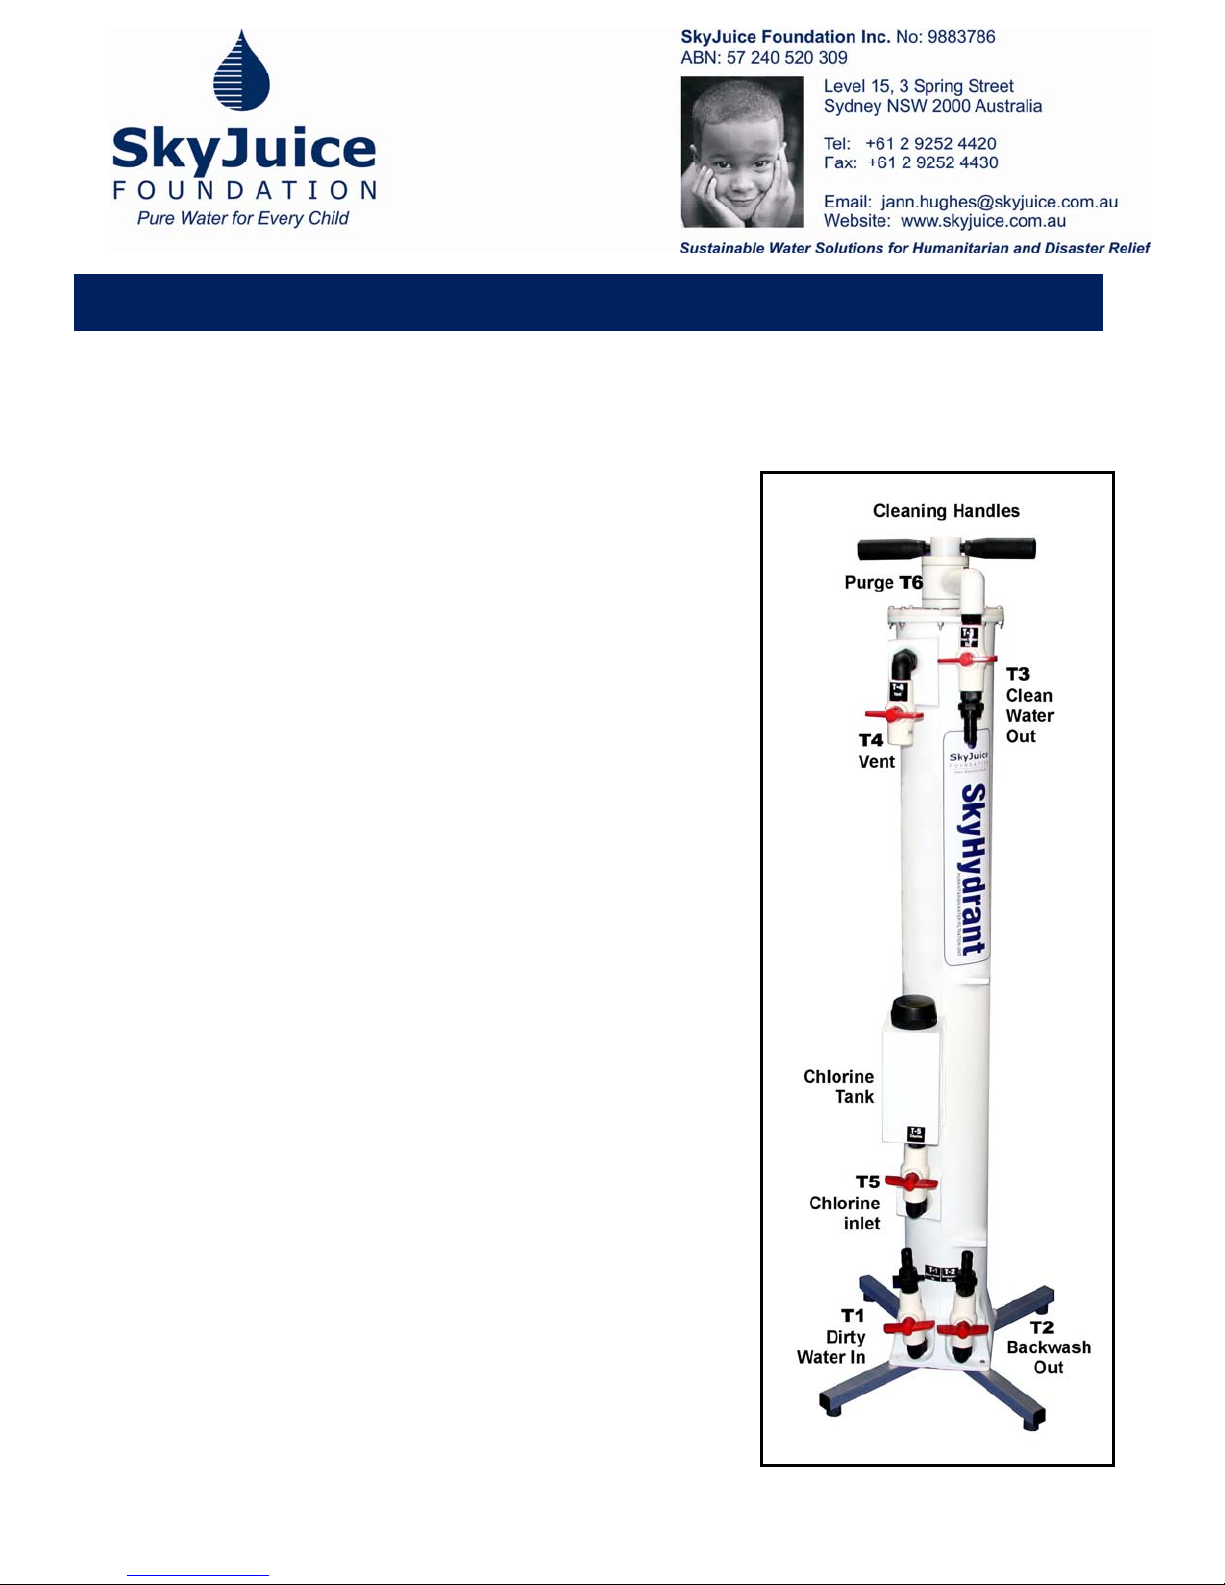
Connect the dirty (raw) water pipe to (T1) connect the backwash
pipe to T2 and connect the drinking water outlet pipe to (T3).
It is good practice to soak and flush drinking containers, hoses,
taps, and other equipment with a 0.1% (1,000 parts per million)
chlorine solution to eliminate any residual or accidental
contamination - add approximately 1 teaspoon of chlorine powder
to 5 litres of water.
Internal Filter Module
The filter module is permanently located inside the SkyHydrant and does not need to be accessed or
replaced providing it is maintained in accordance with instructions. Raw water entering the unit should
not contain any sharp objects or unsuitable chemicals, minerals or excessive turbidity.
Regular cleaning of the SkyHydrant is essential for maintaining a continuous flow of drinking water.
Operating the SkyHydrant
To ensure the correct flow of water is maintained turn all taps
off before commencing each operating procedure:
Fill the SkyHydrant with Water:
Open T1 (dirty water in) & T4 (vent). This fills the
SkyHydrant with raw water. Close T4 (vent) when
water flows out and briefly open tap T6 (air purge) to
clear the lines of any trapped air.
Produce Drinking Water:
Open T1 (dirty water in) and T3 (clean water out) to
commence the flow of drinking water.
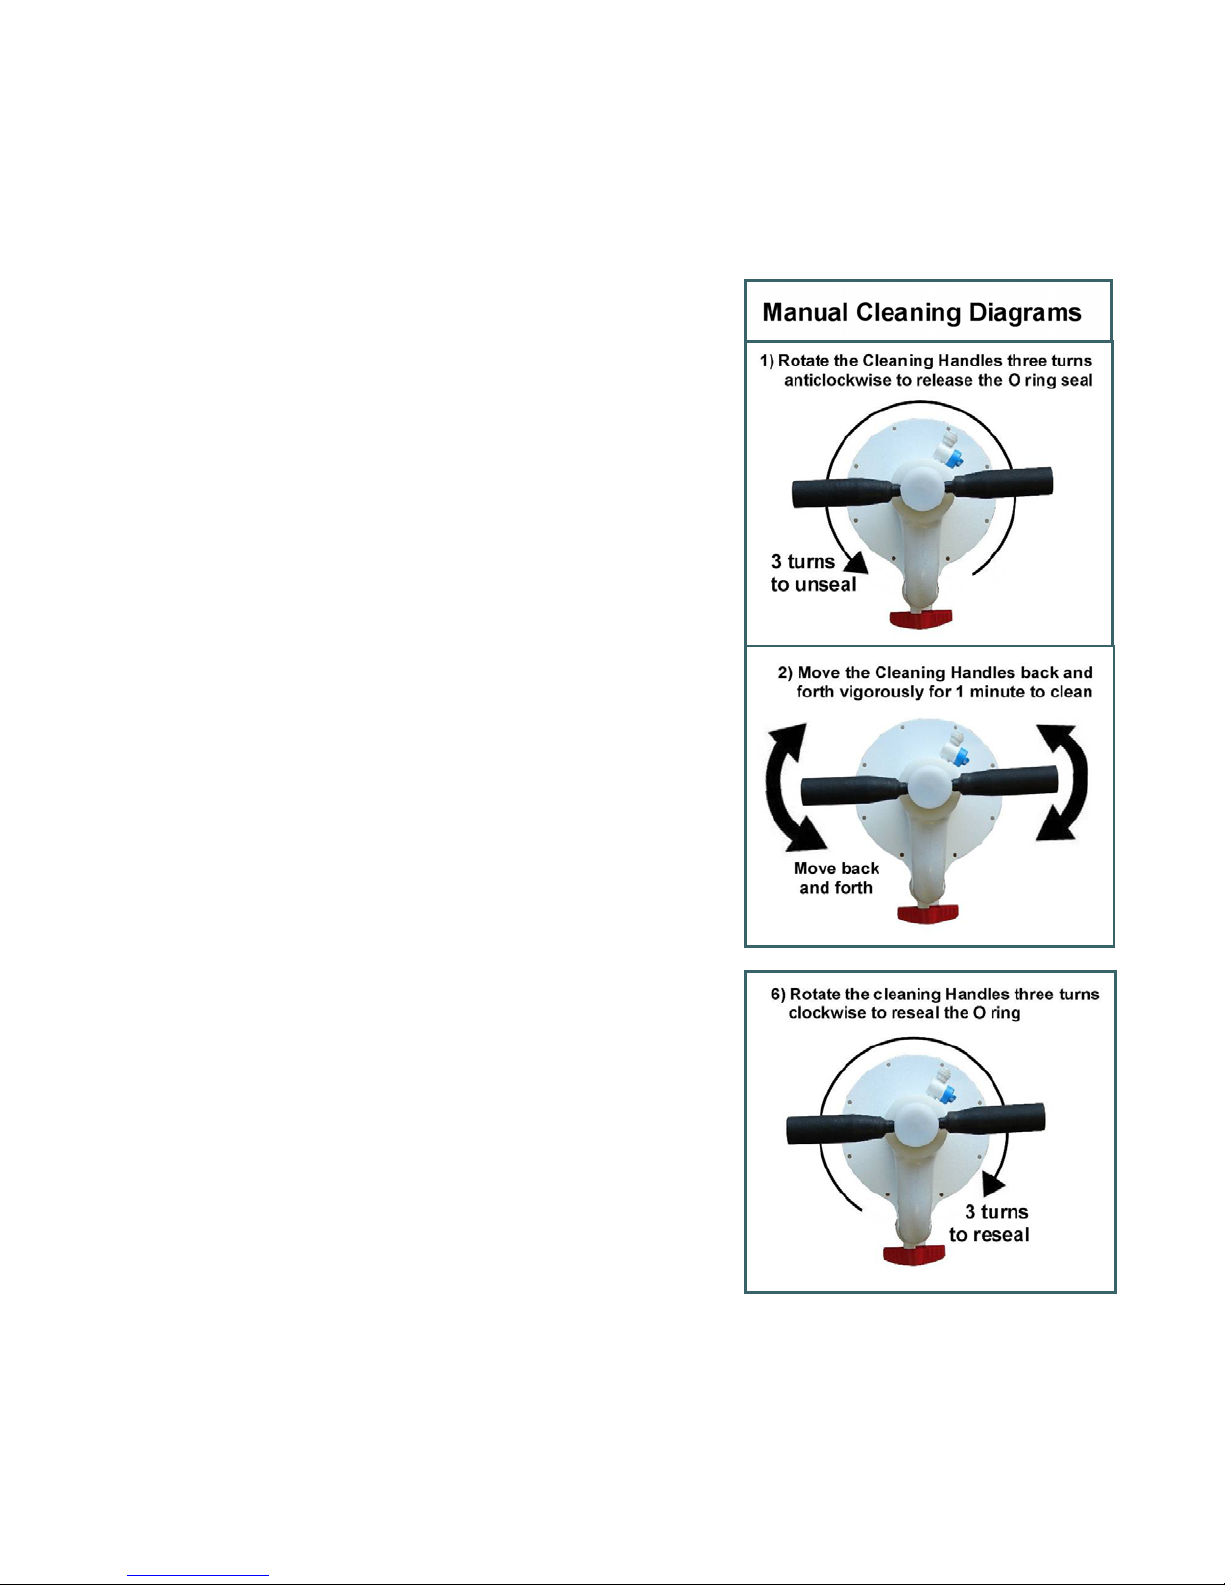
Manual Cleaning (Daily):
Undertake manual cleaning at least once a day or
more often if the flow of drinking water slows. Manual
cleaning is carried out while the SkyHydrant is full of
water. Don’t forget to turn all taps off before
commencing.
1) Rotate the Cleaning Handles three turns
anticlockwise to release the O ring seal.
2) Move the Cleaning Handles back and forth
vigorously for 1 minute. This agitates and cleans
the filter module located inside the SkyHydrant.
Some leakage may occur around the rotating shaft
while cleaning is undertaken – this is not a
problem.
3) Open T4 (vent) & T2 (backwash out) to allow the
backwash water to drain away and continue
moving the Cleaning Handles until the backwash is
complete.
4) If necessary, repeat the manual cleaning procedure
until the wastewater from T2 (backwash out) is the
same colour as the dirty (raw) water passing into
the unit through T1 (dirty water in).
5) Rotate the cleaning Handles three turns clockwise
to reseal the O rings.
6) The “Manual Cleaning Procedure” is now complete
and the unit can again be refilled water.
Chemical Cleaning (Monthly):
Undertake chemical cleaning once a month or more
often if the flow of drinking water slows.
Chemical Cleaning is undertaken using chlorine to remove organic and other matter not easily
removed by the “Manual Clean”.
Caution: When handling chlorine keep safe by wearing protective gloves, eyeglasses and
clothing and do not inhale the chlorine. Chlorine is a dangerous chemical and if injured wash
area thoroughly with water and seek medical attention.
Chlorine comes as dry granules e.g. calcium hypochlorite (bleaching powder) or a liquid e.g.
sodium hypochlorite. To make up a chlorine bath of 0.1% chlorine (1,000 parts per million) for
the filter cleaning process, undertaking the following procedure:

Chemical Cleaning undertaken monthly (continued)
1) Undertake a “Manual Clean Procedure” but leave the unit empty (do not refill).
2) Add water to the Chlorine Tank until ¾ full.
3) Add chlorine to the chlorine tank (see teaspoon amounts below) and use a mixing stick to stir
until dissolved:
2 Teaspoons of Chlorine powder with 65%
available chlorine (700g / kg).
OR
3 Teaspoons of Chlorine powder with 55%
available chlorine (550g / kg).
OR
4 Teaspoons of Chlorine powder with 35%
available chlorine (350g / kg).
OR
6 Teaspoons of Chlorine powder with 25%
available chlorine (250g / kg).
OR
100 Millilitres of Liquid chlorine (Sodium
Hypochlorite) with 12% available chlorine.
4) Open T5 (chlorine) to allow the chlorine tank to drain, than close T5.
5) Fill the SkyHydrant with water by opening T1 & T4 until water flows out of T4 than close both
taps.
6) Move the Cleaning Handles back and forth a few times to mix the chlorine inside the unit
than leave to soak for at least 2 hours.
7) After soaking, undertake a “Manual Clean” to remove the chlorine solution.
8) The “Chemical Cleaning” is now complete. The unit can again be refilled water.
Chemical Cleaning using Citric Acid. If high levels of Iron are present undertake periodic
chemical cleaning using 500 grams of Citric Acid instead of chlorine. Citric acid cleaning is
undertaken in addition to the regular chemical cleaning program using chlorine.
How the SkyHydrant works.
The SkyHydrant water purification unit requires no power to operate instead it relies on gravity water
pressure. Raw water flows through the unit with a water head pressure of between 2 metres and
maximum 4 metres (0.2 bar to 0.4 bar or 3 psi to 6 psi) to produce a typical flow rate of about 700 litres
of drinking water per hour (subject to the quality of source raw water).
SkyHydrant into a lower 1,000-liter drinking water tank located on a 1-meter high tank-stand.
The drinking water tank can be connected with taps or be connected with pipes for supplying drinking
water directly to houses or to a distribution network.
Never pump or connect mains water pressure directly to the SkyHydrant water purification unit without
using a suitable water pressure regulating or control device as excessive water pressure may damage
the filter fibres.
There are many
ways of setting up
SkyHydrant water
purification plants.
A popular method
is to pump raw
water (using
mechanical or
hand pump) to a
1,000 liter header
tank on a 3 meter
high tank-stand
and allow the
water to gravity
feeding down
through the

Site Requirements.
For the SkyHydrant to function it requires additional operating
equipment including hoses, pipes, pumps, taps, float valves,
water bladders, tanks, tank-stands, taps and tap stands. The
amount of additional equipment depends on the installation being
undertaken and individual sites requirements.
Installations where existing roof top water tanks are available
allows the SkyHydrant to become an “in line filter” connected to
the existing water supply system while other installations will
require more extensive site work and equipment.
It is important when setting up SkyHydrant water purification
plants to ensure correct sizing of pipes, pumps and other
equipment.
Suitability of Local Water
Not all water is suitable for filtering through the SkyHydrant
purification unit and testing for unsuitable contaminates should
be undertaken before use. Contact your local water testing
laboratory or water agent for assistance and carefully evaluate
the surrounding watershed area to identify potential harmful
pollutants such as upstream industrial areas, intensive
agricultural or wastewater effluent areas.
YES - The SkyHydrant will significantly remove biological
contaminates and pathogens including bacteria, viruses,
protozoa, cysts, parasites etc making the water safe to drink.
YES - The SkyHydrant will remove turbidity and dirt from water.
However, the dirtier the water, the more often the filter needs
cleaning to remove the build up of sediments on the filter fibres.
NO - The SkyHydrant will not-remove salt or dissolved
chemicals and minerals. If these contaminates are present at
unsafe levels, your water may not be suitable for filtering and
drinking.
Adding Chlorine to Drinking Water Tanks.
Water produced from the SkyHydrant purification unit is free of
SkyHydrant Set Up Options
SkyHydrants can be set up to
operate as single stand alone units
(pictured above) or manifolded
together into multiple units for high
flow production (pictured below).
Raw water to SkyHydrants can be
supplied by gravity feed overhead
tanks or by pumps and mains
pressure using pressure reducing
devices.
Operating pressure should be
limited to 40 kPa (6 psi) or about 4
meters head pressure to produce
a typical flow rate of about 500 to
700 litres per hour per unit.
biological organisms and safe to drink however, prolonged
storage of this water in tanks may cause deterioration in quality.
In hot climates, tank water may stay safe for a few days whereas
in colder climates it may stay safe for weeks. To maintain water
quality it is good practice to disinfect drinking water tanks and
water pipes with a small amount of chlorine to prevent the growth
of unwanted organisms and pathogens in the stored water.
Add sufficient chlorine into drinking water tanks to maintain a
residual free chlorine level of between 0.2 to 0.5 milligrams per
litre (mg/l). Use a water testing kit every few days to monitor the
chlorine levels and make adjustments to the chlorine levels as
necessary.
As a guide for every 1,000-litres of tank water, add about 3/4 teaspoon of chlorine powder (at 65%
available chlorine) or 1 1/2 teaspoons of chlorine powder (at 35% available chlorine). First, mix the
chlorine in a small bucket of water to make a solution before adding to the water tank.
Help and Support
The SkyJuice Foundation is also available for support and assistance and don’t forget to send or email
us your water project story to us together with photos and be included in the SkyJuice Water Projects
web page.

Operation Log-sheet.
It is good practice to keep a daily operational log-sheet recording drinking water production flow rates
and when cleaning procedures were undertaken.
This is useful to identify a pattern of us when monitoring ongoing performance trends or to determine if
operational problems may be occurring. It is also useful as a convenient reminder of when the next
cleaning cycle is due to be undertaken particularly when a cleaning roster is being used.
Time Date Drinking
Water
Production
Manual
Cleaning
Undertaken
Chemical
Cleaning
Undertaken
Amount
Chlorine
Used
Other Information
or Notes
(litres)
SkyJuice Foundation Telephone: +61 2 92524420 Email: info@skyjuice.com.au Website: www.skyjuice.com.au
 Loading...