

Page 1
2001-03 2500 HD
2002-03 Hummer
Multiple Shock Instructions
Part# MS968 / MS268
MS2968-UD1 UPPER HOOP,DRIVER 1
MS2968-UP2 UPPER HOOP,PASSENGER 1
MS2968-UBB3 UPPER BOTTOM BRACKET 2
MS2968-LBB4 LOWER BOTTOM BRACKET 2
MS2968-BR BRAKE LINE BRACKET 2
38X1TCFB 3/8 X 1 THRD-CUTTER FLG BOLT 12
12X4FTB 1/2 X 4 FINE THREAD BOLT 4
12X3FTB 1/2 X 3 FINE THREAD BOLT 8
38SAEW 3/8 SAE WASHER 12
14SAEW 1/4 SAE WASHER 4
38X234FTB 3/8 X 2 3/4 FINE THREAD BOLT 4
38X1FTB 3/8 X 1 FINE THREAD BOLT 2
6X30MMBG5 6MM X 30 METRIC BOLT/ 8.8 4
516X1FTB 5/16 X 1 FINE THRD BOLT 2
12FTN 1/2-20 FINE N/I LOCK NUT 12
38FTN 3/8-24 FINE N/I LOCK NUT 6
516FTN 51/6-24 FINE N/I LOCK NUT 2
12SAEW 1/2 SAE WASHER 24
516SAEW 5/16 SAE WASHER 4
1. Park the vehicle on flat level ground. Set the emergency brake
and properly block the tires.
2. Raise the front of the vehicle and support the frame rails using
jack stands. Remove the front tires.
3. Remove the bushing and washer from the upper portion of the
factory shock. Place the new upper frame bracket over the factory bracket. (See Photo #1). Now reinstall the upper bushing
and washer onto the factory shock.
4. Push the bracket up flush against the frame. The outside
mounting hole on the top plate will now line up with the factory
hole in the upper mount. Drill out the factory hole using a
13/32” drill bit. Install the 3/8 x 1 fine thread bolt with washers
and locknut at this location. (See Photo #2).
5. Mark one of the outer holes on the front and rear of the bracket where it mounts to the frame. (Some models will line up with
1 factory hole in the frame). It is recommended to drill and
install the front bolt first then move to the rear mount. Drill
using a 5/16” drill bit. Once drilled, install the 3/8 x 1” thread
cutter bolt. Once 1 bolt has been installed on the front and
rear, drill the remaining outer holes and install the 3/8” bolts.
6. With all of the outer bolts installed. Mark and drill the center
hole using a 1/2” drill bit. Be sure not to drill into any power
steering lines or wiring. It will be necessary on some models to
remove the factory exhaust heat shield from the backside of
the frame to allow for installation. Once installed, reinstall the
heat shield. Once drilled, install the 1/2 x 4” fine thread bolts
with washers and nuts. Be sure to install the bolt from inside
pointing out. (See Photo #4). The new brakeline bracket will
attach under the bottom bolt in the front mount. Attach the factory brakeline bracket to the extension bracket using the 5/16 x
1” fine thread bolt, washers, and locknut. (See Photo #4).
Photo #1
Photo #2
Photo #3
Photo #4
I-MS268/MS968 12-03 Pg 1
Part # Description Qty.
Part # Description Qty.
Page 2
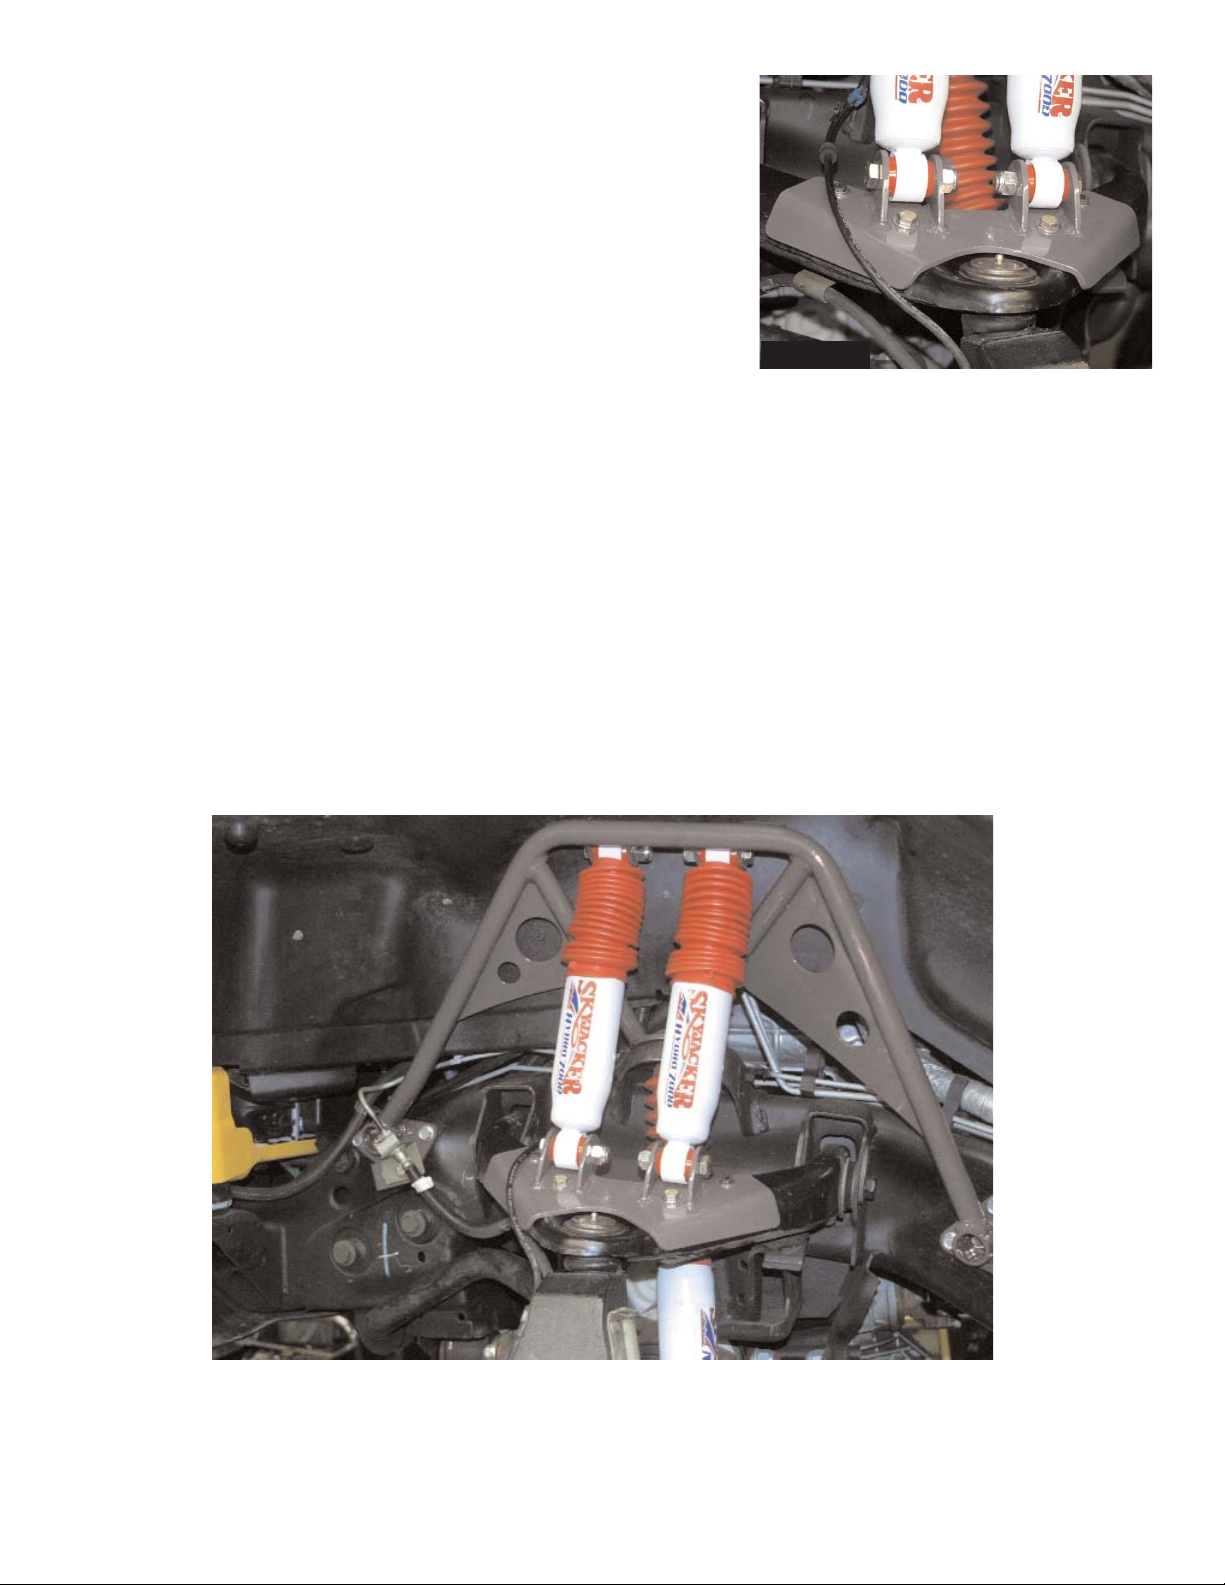
7. Install the new lower bracket on top of the factory upper A-
Arm. The two outside bolts will line up with factory holes in
the upper A-Arm. Attach the bracket at these points using the
6 x 30mm bolts and washers. With the outer bolts installed,
mark and drill the two inner holes using a 13/32” drill bit.
Once drilled install bottom plate on the bottom of upper AArm. Attach to upper bracket using the 3/8 x 2 3/4” bolts,
washers, and lock nuts. (See Photo #6).
8. With all brackets installed, install the new shocks using the
1/2 x 3” fine thread bolts, washers, and nuts.
9. After installation, reinstall front tires and lower vehicle onto
the ground. Cycle the steering left to right and check tires and wheels for clearance.
Photo #6
• After installation is complete, double check that all nuts
and bolts are tight.
• Check all wiring and hoses for proper clearance.
• Retorque all bolts after the first 100 miles.
Seat Belts Save Lives, Please Wear Your Seat Belt.
Pg 2
 Loading...