

Page 1

CK308 Operating Manual
Pictures should be used only as referen ce. If there is
any discrepancy with the actual device, please
refer to the actual device!
Page 2

Directory
1. Preface----------------------------------------------2
2. Accessories------------------------------------------2
3. Product introduction--------------------------------2
4. Attentions--------------------------------------------2
5. Panel introduction-----------------------------------3
6. Instructions-------------------------------------------6
7. Device compatibility -------------------------------9
8. Major technical parameters------------------------9
9. Troubleshooting -----------------------9
1
Page 3

1. Preface
Dear users,
Welcome to join the family of CKY! Your buying of our products is much appreciated!
For full use of your player, please read this manual carefully before use, so as to
grasp connection methods and operational key points of this system. You will also find our
various explorations in design, manufacturing process and operational
humanization all to meet your requirements.
Please keep this manual well for future reference.
Open the package
Please open the package carefully, confirm the following accessories, and put them in
one place in case of loss.
2. Accessories
□ Apparatus 1
□
User’s manual 1
□
USB charging cable 1
3. Product Introduction
This product is a portable audio system that supports Bluetooth playback, TF card,
AUX IN and amplifier functi on. Using dig ital signal processing techniques,
it is suitable for different environments such as offices, homes etc. and can connect
wirelessly to most other devices and mobile phones supporting Bluetooth function
for high quality playback of music in these devices and phones; in addition, it also
comes with Magic Lanterns !
2
Page 4

4. Attentions
First, thanks for your use of digital audio products of our company!
Before use, please read this manual for correct use of this product. For better
services, contents of this manual may change due to variation of product
performance and functions without further notice.
To maintain better performance, do not use this product in places where are
too cold, too hot, dusty or damp, more attention sh ould be paid to the following
circumstances:
1, moisture or underwater environment
2, heater or high-temperature work environment
3, exposure directly to sunlight
4, easy to drop
5, Do not detach the combined recorder by yourself, or the warranty would be void
Warning
1. Please n otice waterproofing of the product and keep it away from
water dropping or splashing. Objects filled with liquids, such
as vases, cannot be placed on the top of device in case of accidents.
2. To avoid accidents such as fire or electric shock, please
check whether the grid voltage is the same required by the power of
this device
5. Product Panel
Buttons and slots: There are 5 buttons and 3 slots on the device:
3
Page 5
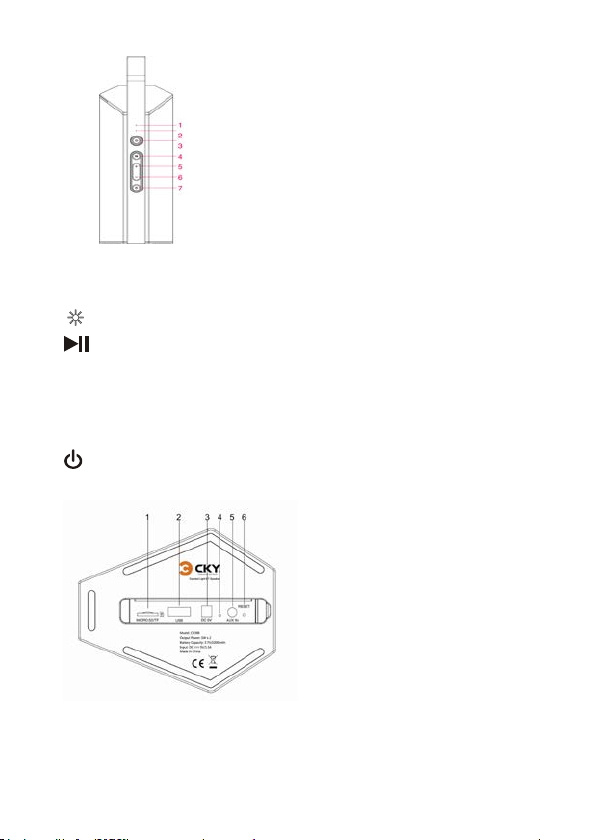
1. 。: Function and charging indicator lamp
2. 。: Hands-free call indicator lamp
3.
: Press the lanterns button to switch among various modes
4.
: In Bluetoot h playback, press it to play/pause; pre s s a n d ho ld it for
Bluetooth pa ring. When th e re i s a n inc oming call, press it to
answer or hang up the call, or press and hold it to refuse the call.
5. +: Pre ss: next track Bluetooth, USB, TF/SD); press and hold: volume +
6. -: Pre ss: pr e vious track Bluetooth, USB, TF/SD; press and hold: volume -
7.
: Press and hold to turn on/off, press to shift the functions
1. Micro TF/SD: TF∕SD card slot
2. USB: USB card s lot
4
Page 6

3. DC 5V: built-in lithium battery DC 5V charging jack;
4. 。: charging indicator
5. AUX IN: AUX IN (specification: 3.5mm jack)
6. RESET: Reset hole
LED INDICATOR:
LED (blue): t he blue indicator will flash quickly when Bluetooth is pairing, and wil l be
on after successful pairing (on top of the device)
LED (red): AUX status red indi cator will always be on (on top of the de vice)
LED (green): SD/TF card, USB status green indicator will always be on (on top of
the device)
LED (red): the red indicator will be on when charging the lithium batte ry, and off
when the battery is fully ch arged (at the bottom of the device)
Power saving mode:
Fully charge the 3.7V built-in lithium battery, press and hold the “ ” button to
power on the device.
Notes: A. Because the internal 3.7v lithium battery has self consumption, users are
suggested to charge the inte r na l 3.7v lithium battery fully for 3 to 4 hours after
their purc ha s e and prior to use, and ensure its use again with one charge in at
least 1 month!
B. In any function or any time period of thi s device, as long as plugin the MICRO
USB connection wire into your computer and the other end into the DC5V hub
5
Page 7

on the back of the device, the internal 3.7v lithium battery can
be charged (about 3 hours for the battery from zero to fully charged).
C. Power supply adapter with output of DC 5V (current of
500~2500 mA) can n ormally charge the device.
D. During charging, the de v ice has a very large consumption of current. If the
device is playing meanwhile, it will take a long time to charge, even failure of
full charging. Users are requested to play the device after full charging
and unplugging the MICRO USB charging cable.
6. Operations
Power on:
Fully charge the 3.7 V built-in lithium battery, press and hold the “ ” button to
power on the device.
● Bluetoot h playback mode:
After st art-up, a "beep" sound will be heard.
1). Put your mobile phone within 3m away from the device;
2). Enable Bluetooth on your phone, and search for Bluetooth device (for details,
refer to the User’s Manual of your phone);
3). Select “CK308” in the searched device list and click Connect. At this ti
me, there will be a "beep" sound.
4). If you are required to input password, please input “0000” and confirm to pair
the device with your phone.
Make sure your phone is within 10m away from t he device without any
5).
obstacles between them, now you can play music v ia t he de vice.
6
Page 8

6). Press “ ” to play/pause the music. Press “-”or“+”to sel e ct previous or
next track.
Bluetooth connection mod e:
If you don’t see the earphone icon on your mobile phone, please activate Bluetooth
connection following the next steps firs t:
(1) Select “CK308” in the device list and click Connect;
(2) Select “Pair” on your phone.
(3) To disconnect, press and hold “
phone. You will hear a reminder tone "Bluetooth is disconnect ed, waiting for a
connection", now you can use another mobile phone to pair with the device. If
you choose not to connect, it will enter standby mode in 20 minutes
automatically.
Hands-free call:
In the Bluetooth playback mode, as the mobile has incoming call, the
device speaker rings, short press the “
Hang-up the phone:
During hand-free call, press the “ ” button to hang up the phone and return to
the music playback.
Reject a call:
When the phone rings, press and h old the “ ” button for more than 3seconds to
reject.
” or you can disconnect on your m obile
” button to answer.
● MICRO TF/SD playback mode:
7
Page 9

In any mode when the device is on, insert the TF∕SD card and the device will
play the music on the card aut omatically; press “
press “-” or “+” to select previous or next track.
” to play/pause the music;
● USB playback mode;
In any mode when the device is on, insert the USB and the device will play the
music on the card automati cally; press “
“-” or “+” to select pr evious or nex t track.
” to play/pause the music; pr ess
●AUX IN mode:
After startup, as long as you plug 3.5 mm AUX audio cable to
input the external audio to the AUX IN hub on your device, the device will
automatically switch to the AUX IN
external audio input functional mode. When an external audio source, such
as MP3/CD etc., is connected using the audio cable to the AUX IN hub on the
device, you can start listening to an external
audio music. (Please adjust the volume of external audio source to moderate, and
in the play mode).
Volume adjustment mode:
After startup, in any playback mode, long press “-”
button to decrease volume; long press “+”button to increase volume.
Remark: when the volume is at the maximum, it will give out a "Dong" sound to
remind the user.
Charging Alert:
8
Page 10

The battery power will be consumed in any play mode. When it is at low
battery, the device will give a "beep " sound until it is power ed off aut omatica lly.
Please charge the batte ry before use again!
Magic Lanterns
When the device is in normal working status, press the key once to switch the
lighting mode of the LED lant erns. Users can press the
any mode according to their favorite! There is a mode which turns off the LED
lanterns temporarily, press this button again to st ar t the light again.
key on device to choose
Power off:
When the device is on, pres s a n d hold the “ ” button to power it off to standby
mode.
REMARK:
1. The device will enter into standby mode if Bluetooth is not connected or
the Bluetooth play is paused for 20 minutes.
2. The device will enter into standby mode if the USB or SD/TF card play
is paused for 20 minutes.
7. Device compatibility
This device theoretically supports all mobile phones and related devices with
Bluetooth function to c onnect on Bluetooth and play music!
8. Major technical parameters
1. Bluetooth specification: V4.0
9
Page 11

2. Output power: Output level 2, maximum connection distance ≥ 10 m
3. Limited output power: L: 5W R: 5W
4. Operational frequency range: 2.4 GHz-2.480 GHz
5. Supporting Profiles: HFPV1.6, HSPV1.2, A2DPV1.2, AVRCPV1.4, DIV1.3
6. Speaker impedance: 4 ω (ohms)
7
.Product size: 124.5*98*297 mm (L*W*D)
8.
Weight: approx 950g (main frame)
The product specifications and design may change without further notice!
9. Troubleshooting
Troubles Solutions
Bluetooth pai
ring isn’t co
mpleted
Other mobi le device has connected before use
and the mobile device has not left as well as
its Bluetooth isn’t off. When it connects, Bluetooth of this device
will automatically find the Bluetooth dev ic e a n d
connect. First, turn off Bluetooth of conne cted Bluetooth
devices, then, the next Bluetooth device can be found and
normally paired for connection.
10
Page 12

Volume of
Bluetooth
playback is s
mall
Bluetooth co
nnection dist
ance is short
Bluetooth co
nnection play
s normally, s
ometimes
staccato.
Silent
play after
Bluetooth co
nnection
Bluetooth ca
n
not connect t
o other phone
s and devices
1. After connecting with mobile devices, volume of
Bluetooth device is not up but at the default output level. Turn
on the mobile device output. 2. Output volume of
Bluetooth device is low itself.
Obstructions exist between mobile devices and Bluetooth device.
Remove obstructions.
1. Obstructions exist between mobile devices and
Bluetooth device. Remove obstructions. 2. Too far away from
Bluetooth device to connected mobile devices, beyond the conne
ction range. Shorten the distance between the Bluetooth
device and mobile devices.
After connecting with mobile devices, Bluetooth device audio
is off. Turn on the phone’s output volume.
Bluetooth device has conne cted to the current mobile device. If
the next device wants to pair and connect, please turn off the
previously paired mobile device or
long press “
again, then click to connect as the next mobile device find
Bluetooth pairing names.
” button on the device to search the Bluetooth
11
Page 13

No sound,
operation
doesn’t work
Attention: As the above methods are all excluded, the
device still cannot work, please notify the technician or the customer service!
Please insert a needle into the RESET hole at the bottom of the
device to reset the device and make it no r m al
12
Page 14

Warning:
changes or modifications not expressly approved by the party responsible for
compliance could void the user’s authority to operate the equipment.
This device complies w it h P art 15 of the FCC R ul e s . Operation i s s ub je ct to the
following two conditions: (1) this device may not cause ha rmful interference, and
(2) this device must accept any interference received, including interference that
may cause undesired ope r ation. changes or modifications not ex pressly appr o ved
by the party responsib le for compliance could void the user's authority to operate
the equipment.
NOTE: This equipment has be en tested and found to comply with the limit s for a
Class B digital device, pursuant to Part 15 of the FCC Rules. These limits are
designed to pr o v ide reasonable protect ion against har m ful interference in a
residential insta llation. This equipment generate s, uses and can radiate radio
frequency energy and, if not installed and used in accordance with the
instructions, may cause harmful interference to radio communications. However,
there is no guarantee that interference will not occur in a particular installation.
If this equipment does cause harmful interference to radio or television reception,
which can be determined by tu rning the equipment off and on, the user is
encouraged to try to correct the inte rference by one or more of the following
measures:
-- Reorient or relocate the r eceiving antenna.
-- Increase the separation between the equipment and receive r.
13
Page 15

-- Connect the equipment into an outlet on a circuit different
from that to which the receiver is connected.
-- Consult the dealer or an expe rienced radio/TV technician for help.
NOTE: This device and its antenna(s) must not be co-located or operation in
conjunction with any other antenna or transmitter.
RF Exposure Statement
To maintain compliance with FCC’s RF Exposure guidelines, This equipment
should beinstalled and operated with minimum distance of 5mm the r adiator your
body.
This device and its antenna(s) must no t be c o -located or operation in conjunction
with any other antenna or t ransmitter
14
 Loading...