

Page 1
Drone Controller for Smartphone
CONTROLLER
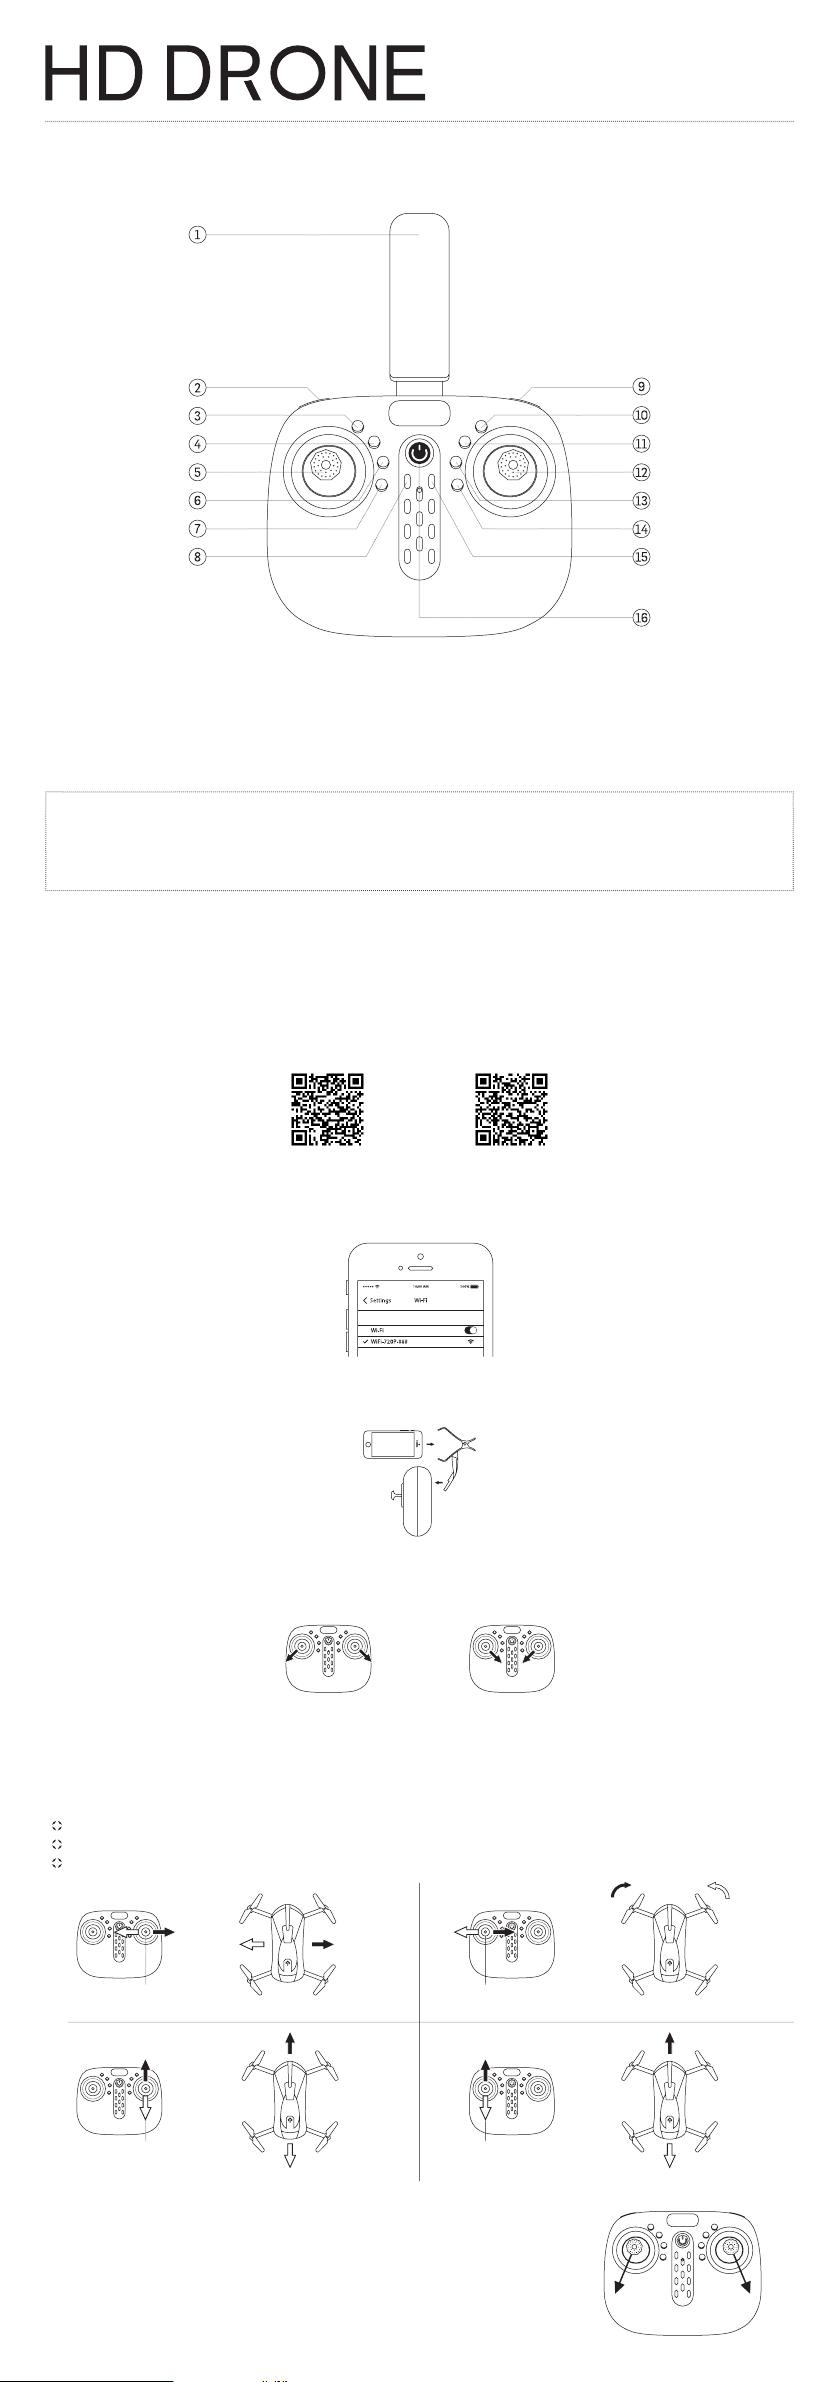
1. Phone Holder
2. High Low / Long Press Emergency Stop
3. Headless Mode
4. One-Key-Return
5. Left Joystick (Height/Turning)
6. Capture Photo
IMPORTANT SAFETY INFORMATION
CAUTION: CONTROLLER PROVIDES CONTROLLING CAPABILITIES WITHIN 50 METERS. DO NOT ATTEMPT TO FLY HD
DRONE BEYOND SUGGESTED PARAMETERS.
WARNING: DO NOT LEAVE CHILDREN UNATTENDED WHEN IN USE.
Important Instructions Before Use
1.
Keep both hands on the unit when in use.
Unit requires 4 x AA batteries (not included).
2.
Operating Your Drone with the Controller
Download Drone App on Your Smart Device.
1.
Scan QR code for your Android or iOS device.
a.
Android iOS
Android (Google Play): https://play.google.com/store/apps/details?id=com.lewei.jyufo&hl=en_US
iOS (App Store): https://itunes.apple.com/us/app/jy-ufo/id1146475731?mt=8
Before use, turn on the drone’s power switch, Open Wi-Fi and connect to WiFi-720P-###.b.
7. Capture Video
8. Up
9. Tumbling Key for 360° Flips
10. Forward Fine-Tuning
11. Backward Fine-Tuning
12. Right Joystick (Strafing)
13. Left Sideward Fine-Tuning
14. Right Sideward Fine-Tuning
15. Down
16. Power Switch
Turn on drone App on your device.
2.
Place your phone in phone holder by pinching the clip together located behind the unit. Place your phone in between the clamp and
3.
release for a firm hold on your phone.
Turn on the drone first, then turn on the controller. Both devices will sync automatically. This may take between 3 and 10 seconds. You will
4.
know when syncing is complete when the drone lights stop flashing.
Pull the control sticks diagonally apart to start, and diagonally together to stop.
5.
Start Stop
Once your phone is synced, your phone’s screen will display the drone’s camera.
6.
Before operating drone for flight, make sure drone is on a flat, leveled surface.
7.
Helpful Tips for Flying Your Drone
To ascend from ground, press “one key start/landing” on controller.
Use the joysticks and function buttons to fly and navigate your HD Drone.
The left joystick (height/turning) and right joystick (strafing) are the primary controls.
Tur n
Left
Left
Fly
Fly
Right
Tur n
Right
Direction Lever
Fly Forward Ascend
Direction Lever
Please read carefully before ying
If your drone is unable to hover in place, you can try placing the drone on a flat, level surface, and
push the left joystick to the bottom left and right joystick to the bottom right. The drone lights will
flash and the controller will beep. This means the drone should be stable for flight.
Fly Backward Descend
Turning
Height
Page 2
Adjustment of each trim
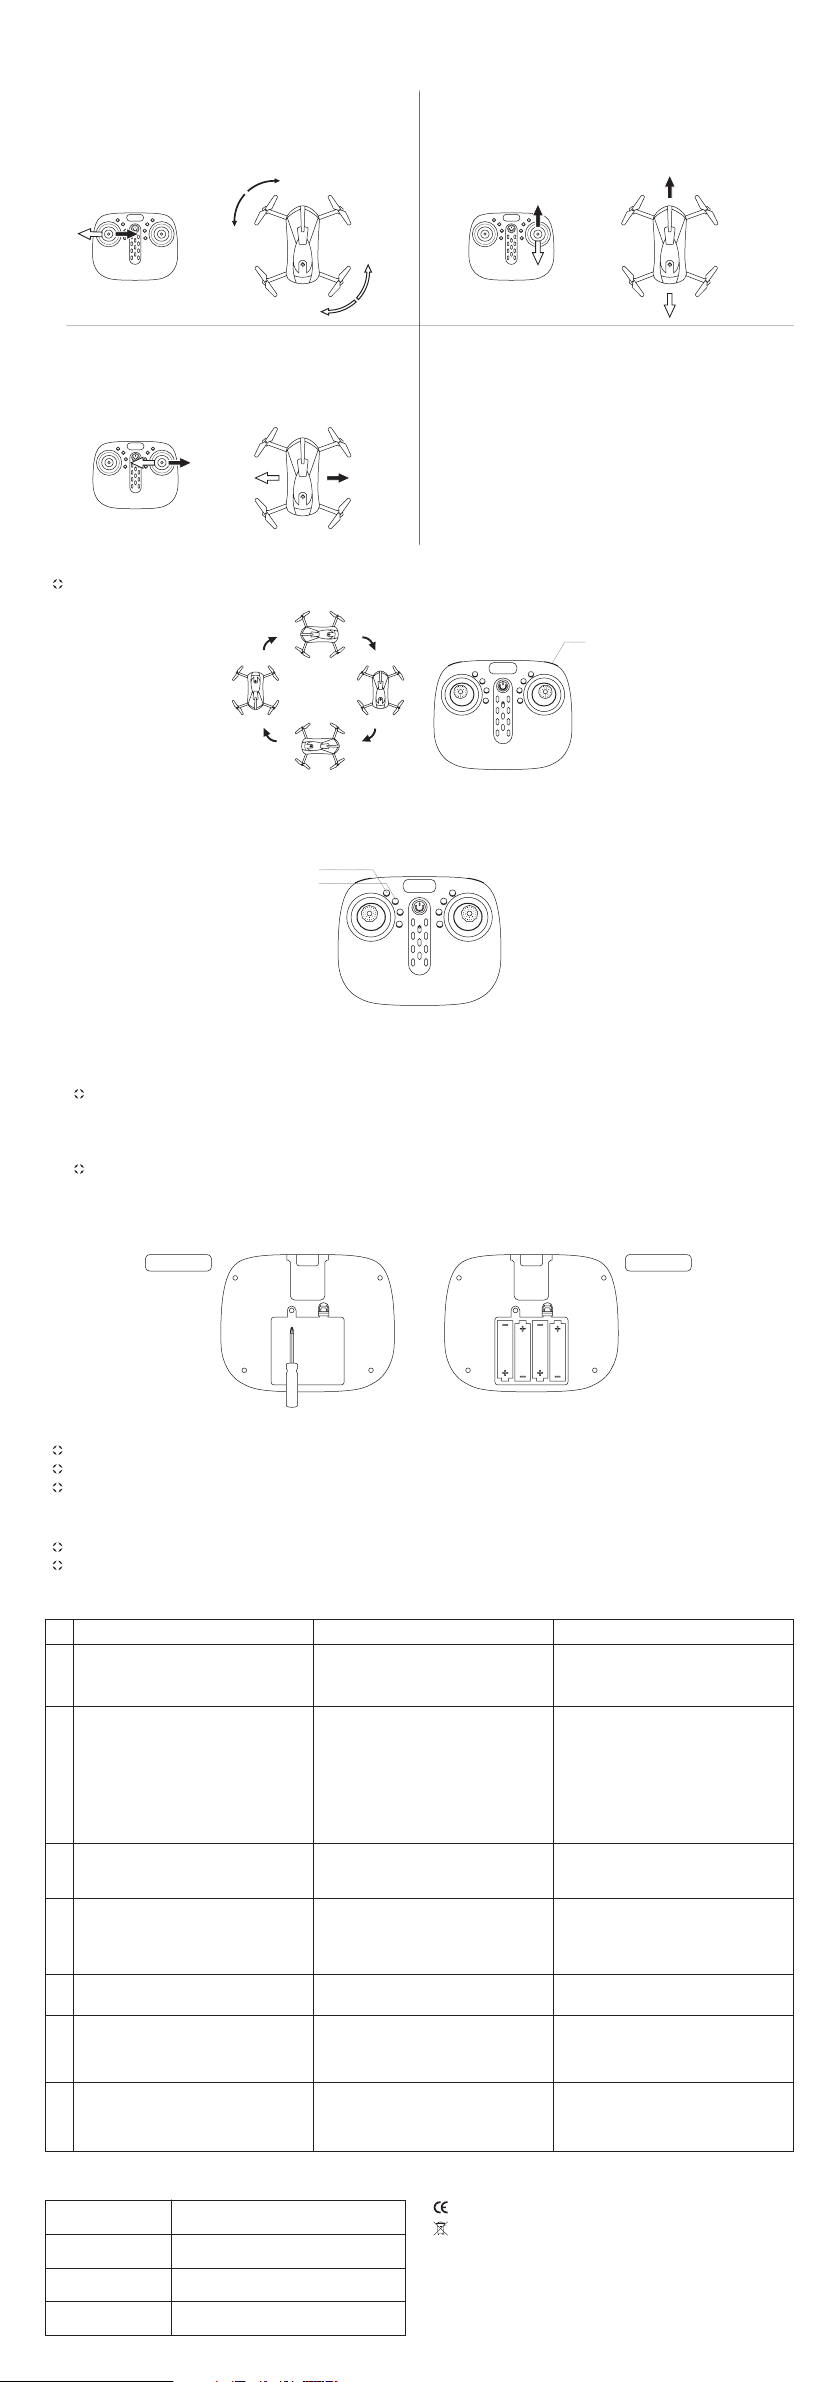
If the drone is moving on its own while flying, you may need to adjust the trims.
If the drone is rotating by itself:
1.
If it rotates to the right, move the left joystick to the left to correct
the trim as it’s taking off.
If it rotates to the left, move the left joystick to the right to correct
the trim as it’s taking off.
2.
If the drone is moving forward/backward by itself:
If it flies forward, move the right joystick down to correct the trim as
it’s taking off.
If it flies backward, move the right joystick up to correct the trim as
it’s taking off.
Forward
Tur n
Left
Turn Left/ Turn Right
If the drone is moving left/right by itself:
3.
If the drone flies strafes (flies sideways) to the right, move the
right joystick to the left to correct the trim as it’s taking off.
If the drone flies strafes to the left, move the right joystick to
the right to correct the trim as it’s taking off.
Fly
Left
Tur n
Right
Fly
Right
Forward/ Backward
Left-side flying/
Right-side flying
To flip drone, press Tumbling Key, use joysticks to direct drone and rotate 360 degrees.
Tumbling Key
Headless mode / One-key-return function:
When the drone is flying forward, press the Headless Mode key to allow it to fly freely, regardless of direction.
Press the One-Key-Return button to hover again.
Headless mode
One-key-return
Backward
How to Insert and Change Batteries
Place the controller on a flat surface with its backside facing up to expose the screw near the center of the device.
1.
To remove the screw, use a Phillips head screwdriver (Figure 1).
2.
Do not throw away the screw.
Gently remove the backing of the device.
3.
4.
Using a pointed edge, gently remove the 4 x AA batteries.
To replace the new batteries, insert each battery into the terminal, aligning with each ‘+’ and ‘-’ symbol (Figure 2).
5.
If batteries are too big, do not attempt to force batteries into device.
6.
To reattach the backside of the device, align the backpiece onto the device.
7.
To close device, place the screw into the hole from which it was originally removed.
Use a Phillips head screw driver to tighten the screw.
8.
Figure 1 Figure 2
Battery Care
Where possible, recycle batteries or dispose in nearby recycling or collection program.
Store unused batteries in original packaging, in a dry place, and at normal room temperature.
Keep all batteries away from children and pets.
Caring Information
Your controller is only intended for flying the HD Drone. Do not attempt to adjust or modify unit.
If unit needs cleaning, first remove batteries. Wipe with damp cloth. Do not attempt to clean with liquid cleansers or submerge in water.
Troubleshooting During Flight
Situation
After batteries are loaded into the drone,
1
the lights keep flashing but there is no
reaction from the controller.
The controller has failed to make a
successful connection with the drone.
Cause Way to deal
Turn both devices off and on again and
try connecting the drone again.
No response after battery is connected to
2
drone.
When taking off, the engine fails to start
3
and the lights start flashing on the drone.
Main rotor spins but the drone is unable to
4
take off.
Drone is vibrating.
5
Drone continues to fly forward on its own,
6
even after adjusting the trim as outlined
above.
After falling, the drone has lost its balance
7
and cannot fly.
1. Check that both the drone and the
controller are both powered and that the
batteries are sufficiently charged.
2. Ensure the “+” and “-” orientation are
correct for the batteries.
Drone batteries are depleted.
1. Deformed propellers.
2. Drone batteries are depleted.
Deformed propellers.
Gyroscope needs recalibration.
Gyroscope needs recalibration.
Technical Specications
Dimensions 160 x 120 x 35 mm
Weight 122 g
Color Black
Battery Type 4x AA batteries (Batteries not included)
1. Switch on the power of the controller
and make sure the batteries inside the
controller are secure and charged.
2. Load the batteries once again, please
confirm if the contact between the battery
and the “+” “-” battery plates are correct
or not.
Fully charge the battery, or replace with a
fully charged battery.
1. Replace propellers.
2. Fully charge the battery, or replace
with a fully charged battery.
Replace propellers.
You can adjust the controller to the
Auto-calibration Mode or restart it and
re-configure the calibration manually.
You can adjust the controller to the
Auto-calibration Mode or restart it and
re-configure the calibration manually.
The device complies with the European Directives 2014/53/EU.
At the end of its service life, this product may not be disposed of in the
normal household waste, but rather must be disposed of at a collection
point for recycling electrical and electronic devices. The materials
are recyclable according to their labelling. You make an important
contribution to protecting our environment by reusing, recycling, or
utilizing old devices in other ways. Please ask the municipal administration
where the appropriate disposal facility is located.
Subject to change.
 Loading...