

SkyBell WiFi Video Doorbell Installation & Starting Manual
Installation &
Starting Guide
www.skybell.com
WiFi Video Doorbell

1
SkyBell works with the majority of
existing home power standards around
the world and with 95% of existing wired
doorbell wires.
SkyBell is designed to work with the
power that is connected to your current
doorbell and is connected to a lowvoltage transformer, no matter if you
have a 110/120 VAC or 220/230/240 VAC
power standard.
SkyBell can only be attached to a low
voltage transformer (8-36 VAC or 12
VDC) and not directly to primary power
(110/120 VAC and 220/230/240 VAC).
Questions? Want to see a video?
Visit www.SkyBell.com/support.
WARNING
Risk of electric shock. Do not attempt
to install SkyBell in wet conditions. Do
not proceed if you, SkyBell or the area
around your door is wet.
SkyBell can only be attached to a low
voltage transformer (8-36 VAC or 12
VDC) and not directly to primary power
(110/120 VAC and 220/230/240 VAC).
2
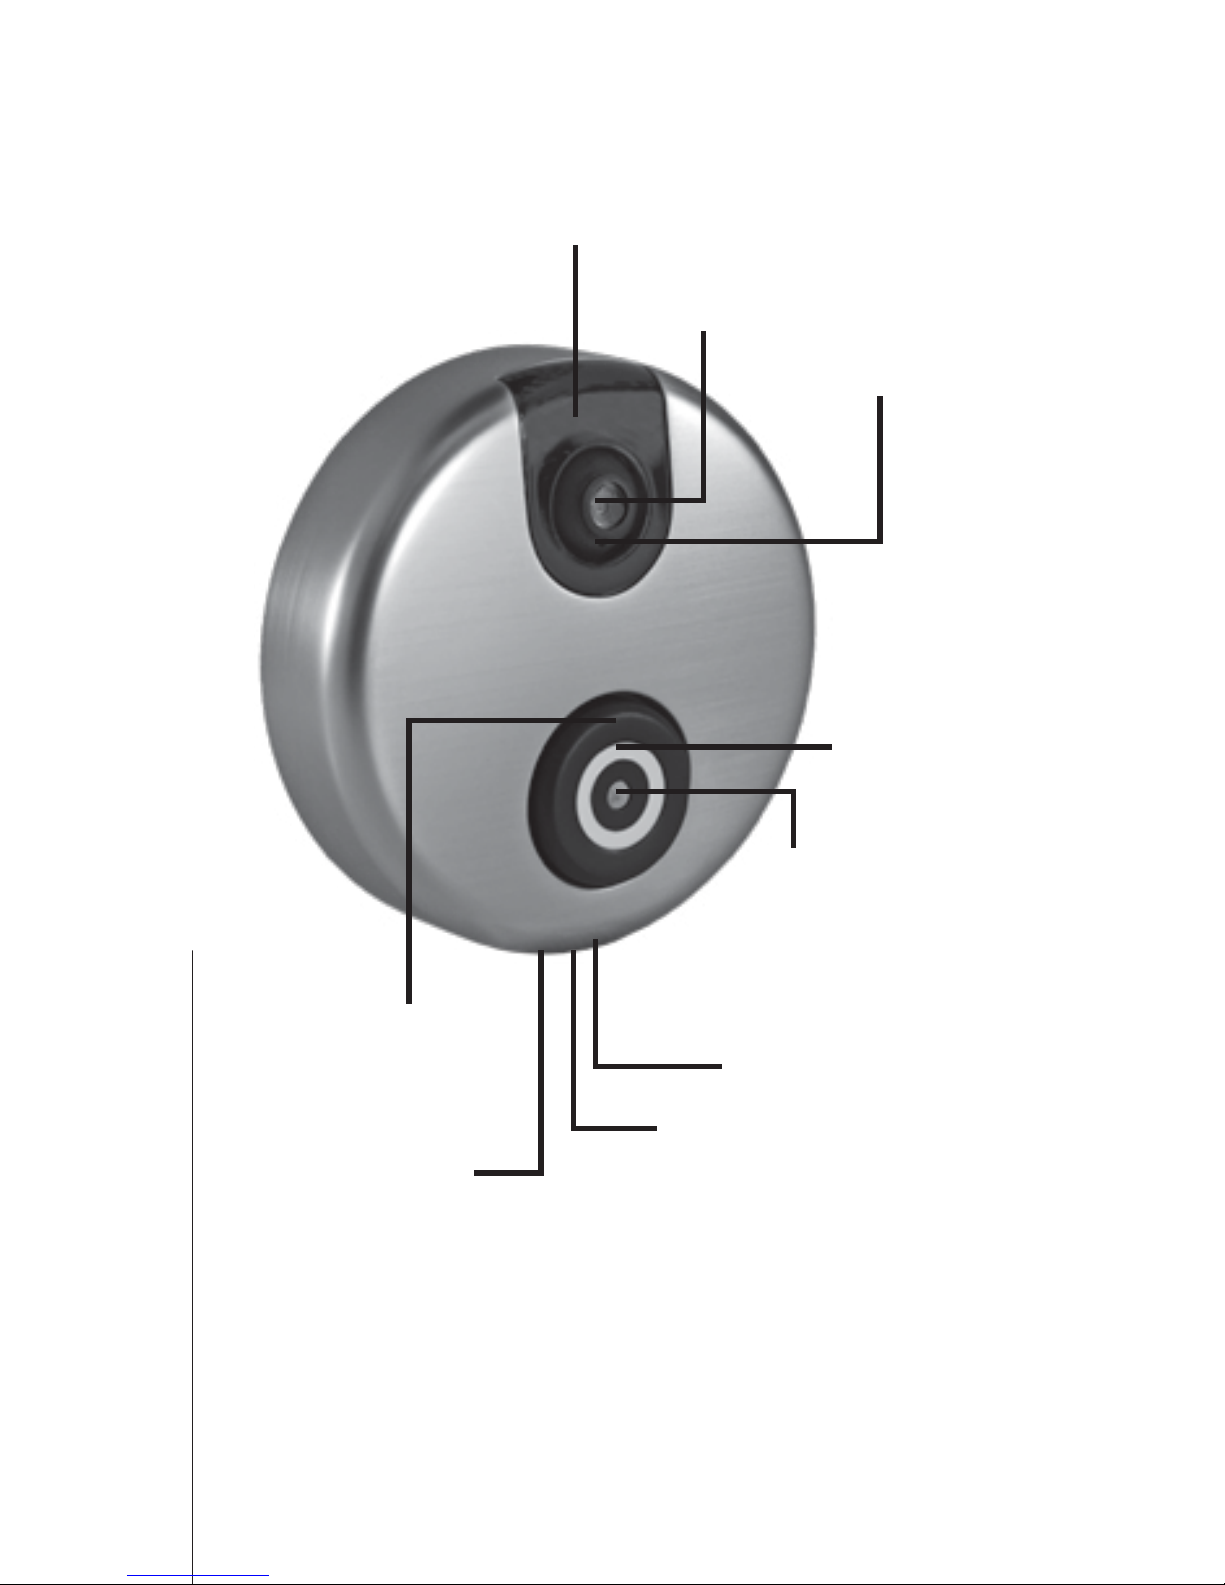
SkyBell Components
Advanced Components
Motion sensors detect a visitor.
LED button tells you if SkyBell is
disconnected from Wi-Fi. Infrared
technology lets you see at night.
Infrared LED
(Night Vision)
Camera
Button
LED
Indicator
Motion
Sensor
Speaker
Set Screw
Microphone
Camera
Positioning
Hole
3
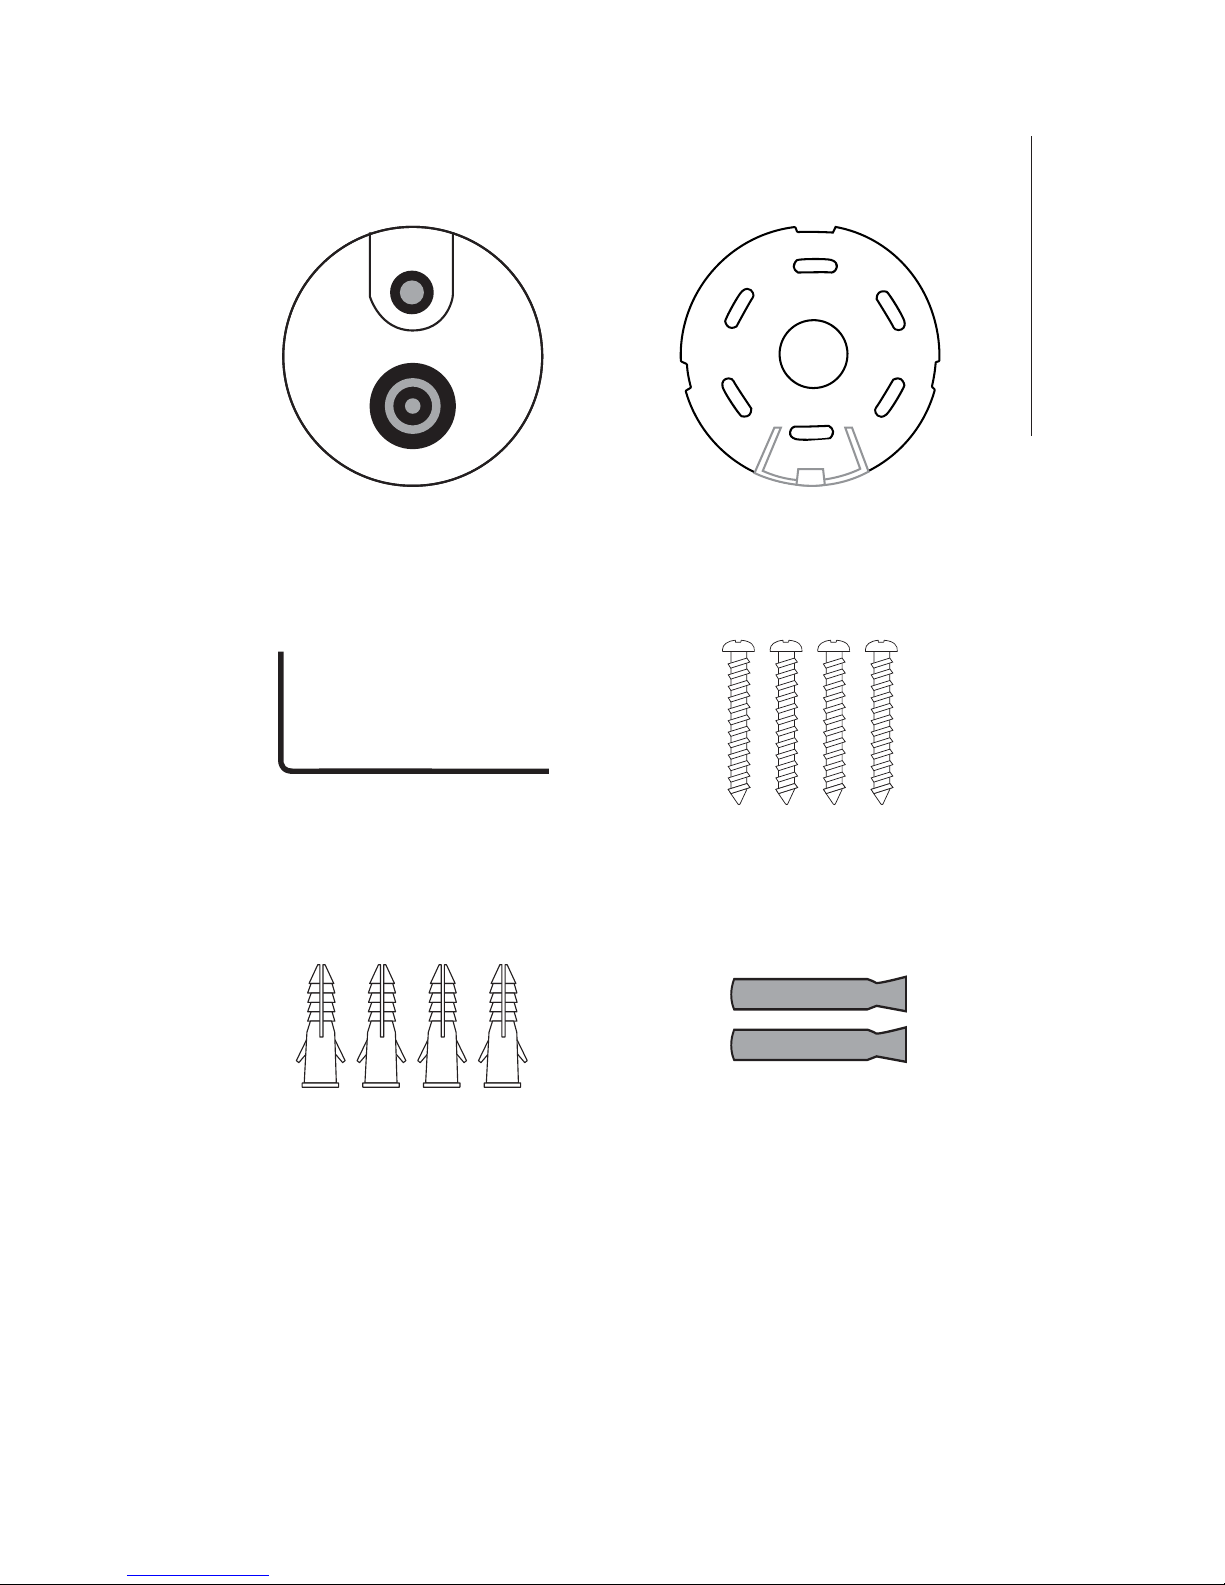
Contents
SkyBell
Doorbell Device
Mounting Plate
Special Locking Tool
Screw Anchors (4)
Wall Screws (4)
Wire Connectors (2)
Tools You May Need for Installation:
Pliers or crimpers
Power Drill or Screw Driver
Outdoor Adhesive
Wire Strippers

4
Part 2 - Installation
1. To begin, press your current doorbell
button to make sure your existing
doorbell chime works. (Skip if you do
not have a home doorbell chime).
2. It is recommended that you turn of
power to your doorbell by switching
o your circuit break.
Installation Guide
WARNING
Risk of electric shock. Do not
attempt to install SkyBell in
wet conditions.
Part 1 – Wi-Fi Test
Before you begin the installation process,
it is a good idea to conrm you have Wi-Fi
signal range at your door.
To test, simply place your smartphone
where you plan to install SkyBell. If
you have a Wi-Fi connection on your
phone, then SkyBell will also have WiFi connection 99% of the time. If the
location is out of range, you will need to
install a Wi-Fi repeater or amplier.

5
Before moving to the next step,
please conrm that your wires are
not connected to high-voltage power.
SkyBell can only be connected to a
low-voltage transformer from 8-36
VAC or 12 VDC.
3. Remove existing doorbell and carefully
detach or cut the 2 wires currently
connected to your existing doorbell.
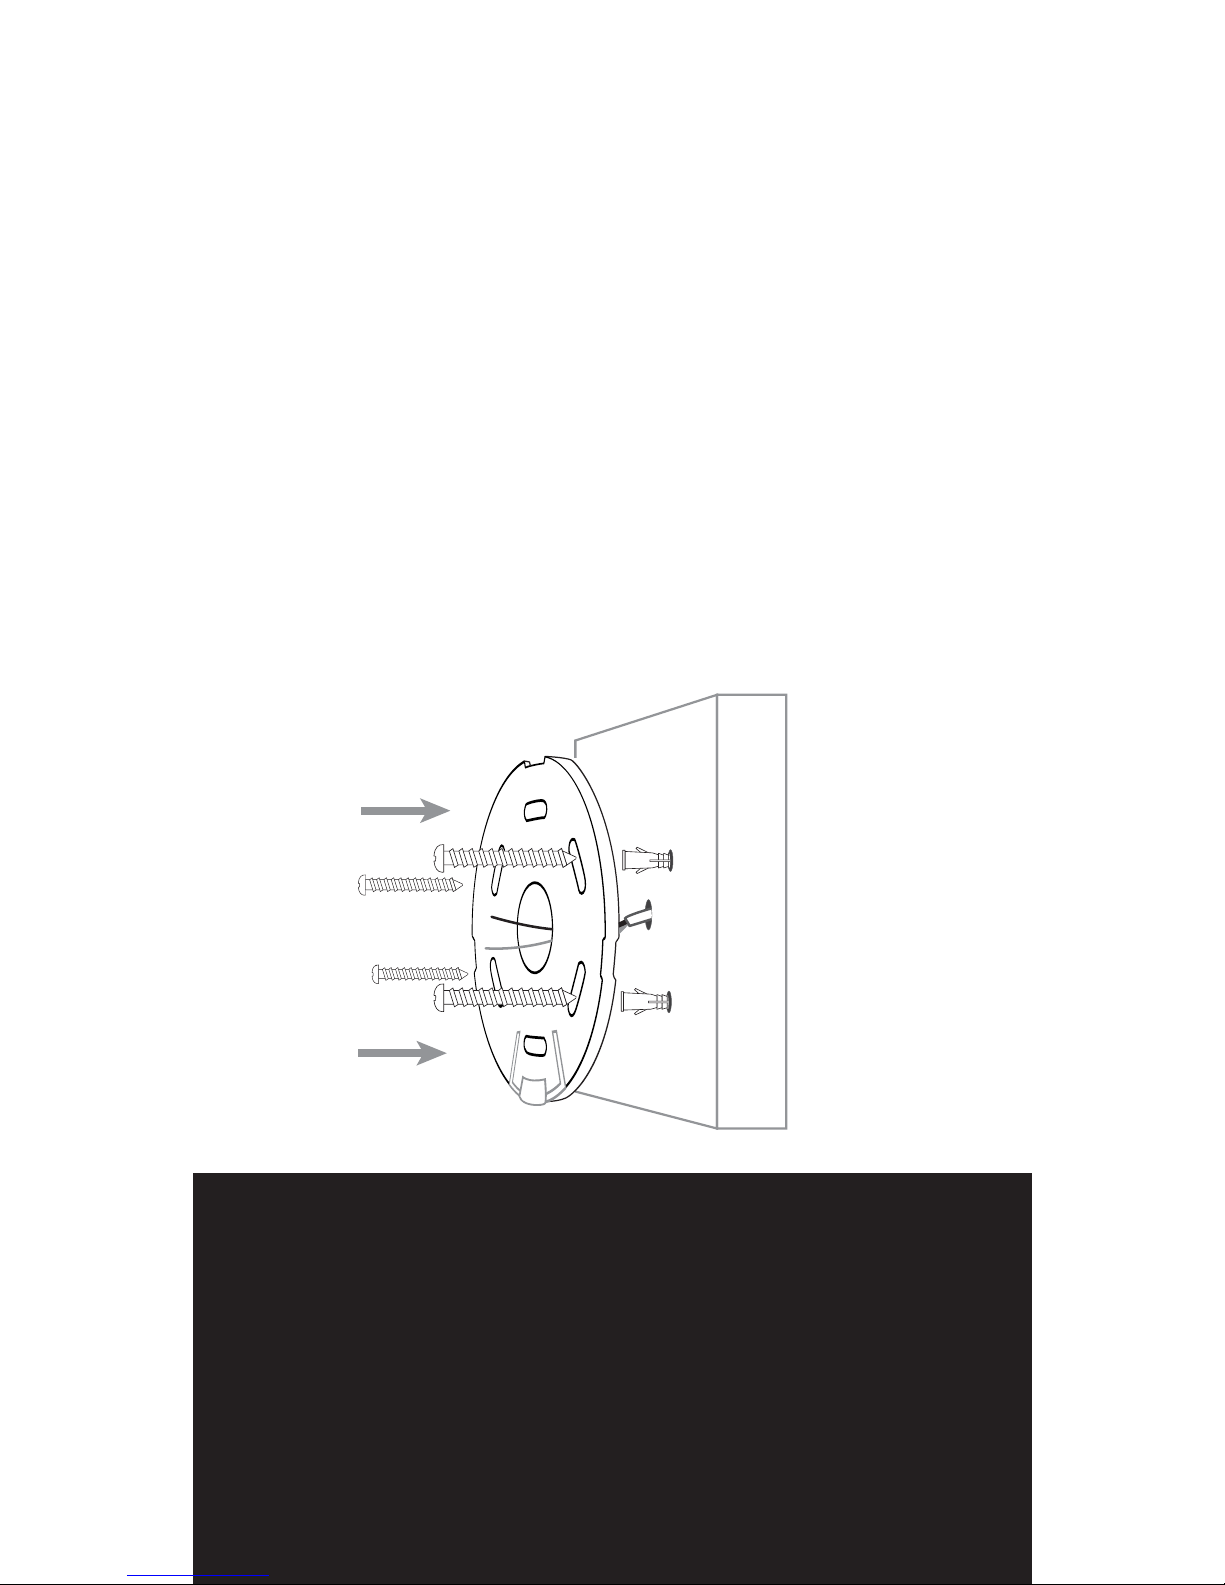
4. Remove mounting plate from the
packaging and run the wires through
the center of the mounting plate. Be
sure the front side of the mounting
plate faces you.
6
5. Secure the mounting plate to the wall
with the 4 screws. If you have stone,
brick or drywall, drill holes with the
correct drill bit for your surface and use
the anchors to secure the screws.
*Correct Drill Bit Sizes:
Masonry: 3/16”
Wood: 9/64”
Steel: 9/64”
Instead of drilling the mounting plate
into place, you may use an outdoor
adhesive to glue the mounting plate
into place.
** Caution: Do not connect SkyBell
directly to high voltage wires
(120/130V or 220/230/240V) from
your primary power system. SkyBell
can only be attached to low voltage
wires from a transformer (8 to 36
VAC or 12 VDC). **

7
6. Use your ngers to rotate the camera
into the correct position. OR insert a
screw driver into the square hole on
the back of the camera and rotate
the camera into desired position.
7. Next, strip the ends of your home’s
wires and the ends of the SkyBell wires.
8. Twist the ends of one SkyBell wire and
one home doorbell wire as shown
below. It does not matter which wires
you use as long as you use one from
the house and one from SkyBell.
or
 Loading...