

Page 1
© 2010 Sunbeam Products, Inc. doing business as Jarden Consumer Solutions.
All rights reserved. Distributed by Sunbeam Products, Inc. doing business as
Jarden Consumer Solutions, Boca Raton, Florida 33431.
1-888-skybar9
www.skybarhome.com
Printed in China.
SPR-022210
Part No. 139402 Rev. A
Page 2
SAFEGUARDS
3
SAFEGUARDS
2
skybarhome.com
IMPORTANT SAFEGUARDS
To reduce the risk of fire, electric shock and/or injury to persons, basic
safety precautions should always be followed when using electrical
appliances, including the following:
1. READ ALL INSTRUCTIONS BEFORE USING THE ONE
WINE SYSTEM.
2. To protect against electric shock, do not immerse the power cord,
power plug or One Wine System in water or in any other
liquid.
3. Do not operate the product with a damaged power cord or
power plug or after the appliance malfunctions or has been
damaged in any manner. Do not return to the place of purchase.
Call 1-888-skybar9 for service.
4. The use of accessory attachments other than the manufacturer’s
brand products may cause hazards or injury.
5. Do not use the
One
Wine System outdoors.
6. Do not let the power cord hang near the edge of a table or cabinet or
across a doorway. Do not allow the cord or the appliance to rest on or
near hot surfaces such as a hot gas or electric burner or a heated oven.
7. Do not place the
One
Wine System in direct sunlight.
8. To disconnect the
One
Wine System, turn OFF the main
power switch located at the back of the unit. Then remove the
power plug from the wall outlet. Disconnect
One
Wine
System when not in use, before user servicing and cleaning.
9. Place the appliance on a hard, flat, stable level surface.
10. Avoid contact with any moving parts.
11. The
One
Wine System is designed for household use only.
12. Do not use this product for anything other than its intended use.
It should only be used with wine. No other liquids should be used.
Liquids with pulp, sugar or syrup will clog the system. Additionally,
do not use with champagne or other sparkling wines. The system
will remove the bubbles in the champagne and ruin your beverage.
13. WARNING: If you are under 21, it is illegal for you to make or
consume beer or wine in the United States.
GOVERNMENT WARNING:
(1) According to the Surgeon General, women should not drink
alcoholic beverages during pregnancy because of the risk of
birth defects.
(2) Consumption of alcoholic beverages impairs your ability to drive
a car or operate machinery, and may cause health problems.
14. Risk of electric shock. Do not attempt to open the back of the
unit. There are no User Serviceable parts inside. A list of User
Serviceable parts has been provided in the User Servicing Section
on page 20 of this document.
15. Use extreme care and supervision when setting up and using
the
product around children. Place the
One
Wine System
in a stable location
to ensure that it will not fall and cause injury.
SAVE THESE INSTRUCTIONS.
Please Note: Special Cord Set Instruction
• An appropriate-size power cord is provided to reduce the
hazards resulting from a person or pet becoming entangled
in or tripping over a longer cord.
• An extension cord may be purchased and used if care is
exercised in its use.
• If an extension cord is used, the marked electrical rating of the
extension cord must be at least as great as the electrical rating
of the
One
Wine System. Extension cord shall be a
grounding-type 3-wire cord. The complete extended cord must
be arranged so that it does not hang near the edge of a table or
cabinet, across a doorway or allow it to come in contact with hot
surfaces.
• The
One
Wine System has a grounded three-prong
electrical plug. It must be plugged only into a properly
grounded three-prong outlet. Do not modify the plug
in any way.
Page 3

FEATURES
5
skybarhome.com
WELCOME
4
WELCOME
Beautifully designed and stylishly functional, the One Wine
System is the perfect accessory for entertaining with wine in your
home. Welcome. Enjoy.
PLACING THE UNIT IN YOUR LIVING SPACE
With its contemporary design, the
One
Wine System will work
well in a number of different spaces in your home. When choosing a
location, it is essential to consider how you will use the Wine System.
• Where do you entertain?
When choosing a location, think about where you entertain with wine,
where you store your barware and how you (and your guests) will use
the One Wine System.
• Away from heat sources.
Always place your One Wine System in a cool location, away
from heat registers or radiators.
• No direct sunlight.
Choose a location where your One Wine System will not
be exposed to direct sunlight. Direct sunlight will affect the time it
takes to chill the bottle and can compromise the chilling effectiveness
of the unit.
• Convenient power source.
Note the need to access a 120V power outlet.
• Stability is critical.
For maximum stability, choose a level and secure location within your
home. Avoid hallways, tight passages or high traffic areas.
• Minimum 2-inch space buffer.
DO NOT place the One Wine System tight into a corner or
directly up against a wall. You must allow at least 2 inches of space
around the unit for optimum performance.
• Consider spills.
Since wine drinkers will gather around the system, consider accidental
spills on carpet, furniture or accessories in the area.
Chill – Serve your favorite wine at its ideal temperature
• Take the guesswork out of wine chilling.
With preset temperatures for 15 popular wine varietals (i.e. Sauvignon
Blanc 45°F, Chardonnay 50°F, etc.), the One Wine System
automatically cools the bottle to the ideal serving temperature – taking
the guesswork out of wine serving.
• Adjust the temperature to your personal preference
Like your Chardonnay a bit cooler? Simple manual temperature
controls allow you to adjust the temperature to your personal liking.
Pour – Sample one perfect glass at a time.
• The right temperature – every time.
Once the chamber has reached the preset temperature, pour directly
into your glass. Each glass is served at the ideal temperature for the
varietal setting you select.
Preserve – Now you can enjoy your favorite bottle of wine longer
• Wine stays fresh up to 10 days
Natural vacuum technology automatically preserves the open bottle
for up to 10 days by removing oxygen that would otherwise oxidize
and ruin the wine. No need for manual pumps, gasses or cartridges.
• Open the wine you want
Open that special bottle you’d like to enjoy now, without worrying
about wasted wine if you don’t finish the bottle.
Metropolitan Design – A sleek and elegant accessory
for your home.
• Form meets function.
The One Wine System is not only beautiful, it also offers the
unique Chill | Pour | Preserve functionality. Perfect for entertaining.
• Place it virtually anywhere.
From spacious suburban homes to modern urban lofts, the One
Wine System is at home in the kitchen, living room, dining room or bar.
Page 4
SETUP
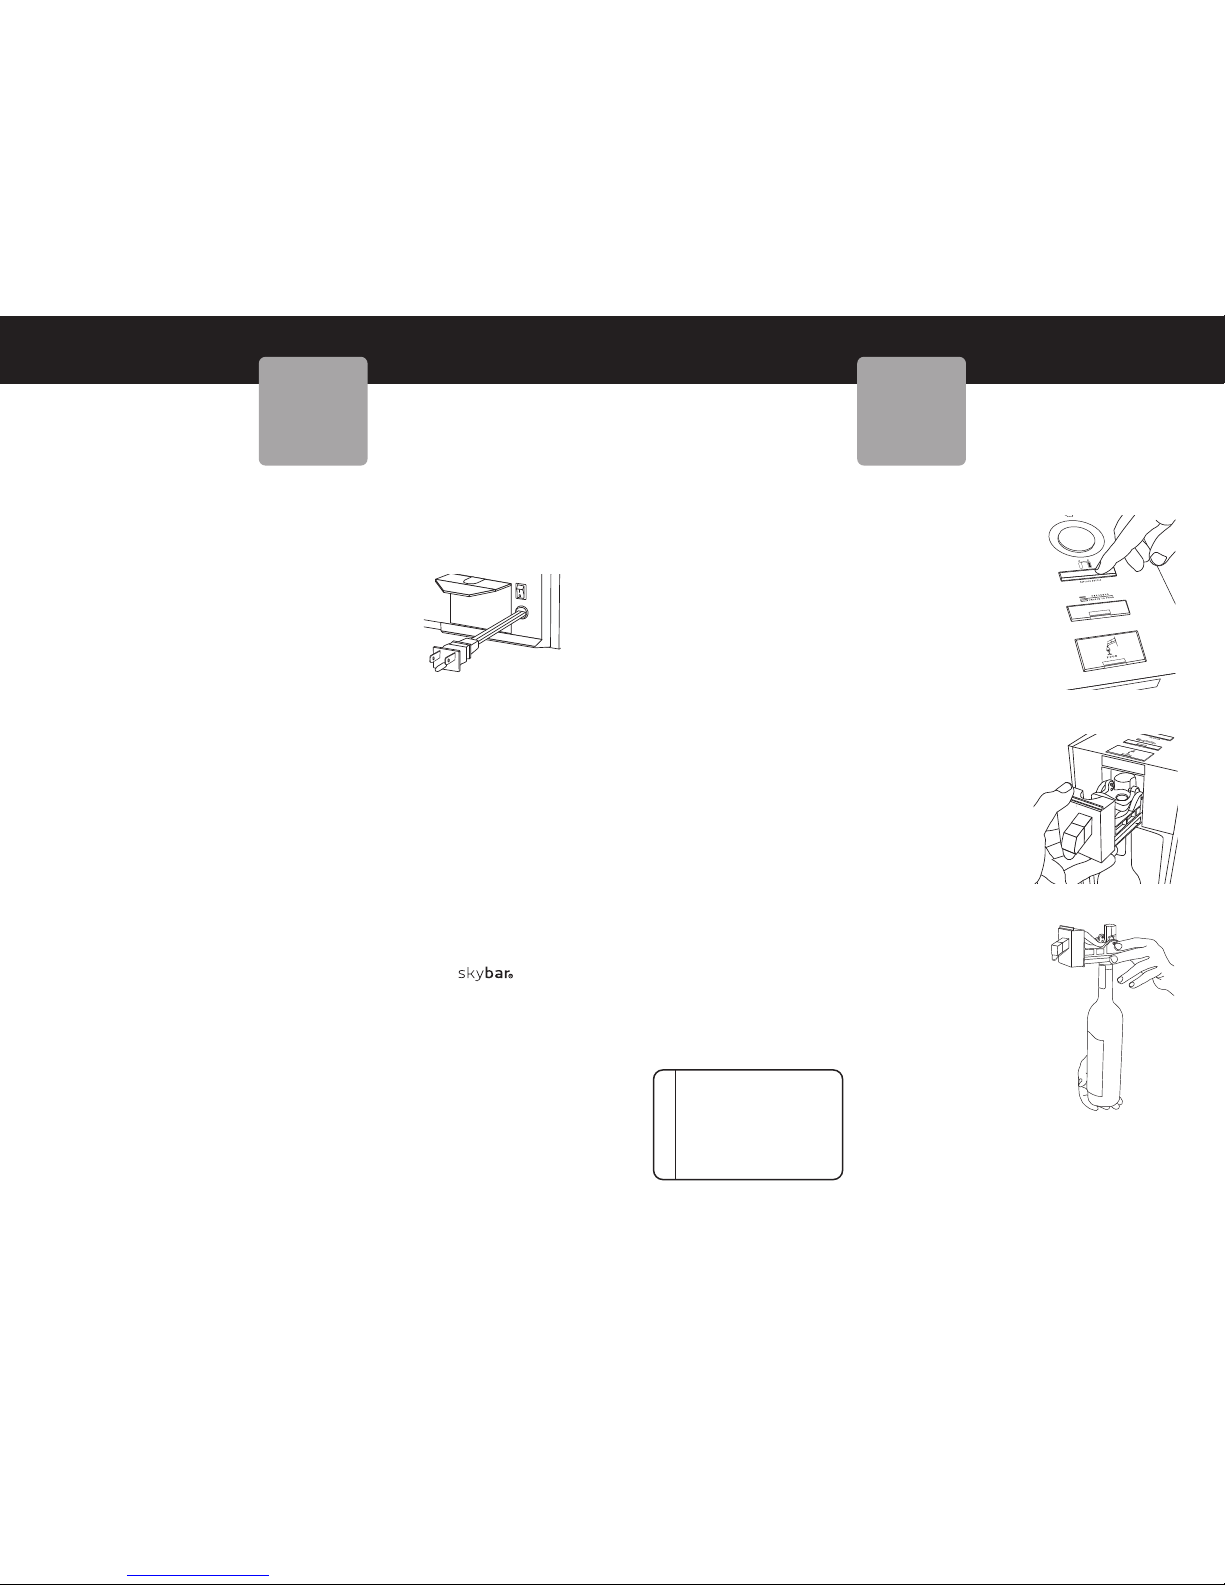
After choosing an appropriate location within your home and safely
placing the
One
Wine System, it is time to set up your
One Wine System.
1.
Before using the One Wine System for the first time, rinse
the Bottle Pour Assembly. The Bottle Pour Assembly is fully
submersible, and can be washed by hand. (DO NOT PUT IN
DISHWASHER – NOT DISHWASHER SAFE.). Soap can noticeably
affect the flavors of fine wine, which is why most wine connoisseurs
simply give their glasses a hot water rinse. With this in mind, it is
recommended that you clean the Bottle Pour Assembly with a
thorough hot water flush. Rinse until you see water run clear. Dry
with a soft cloth or paper towel or allow to air dry.
2. To attach the glass door to the unit:
a. Carefully remove the glass door from its
protective packaging. Be sure to place the
door on a soft padded surface so the glass
is not scratched.
b. Identify the top end (short side) of the glass
door that contains the “longer hinge pin”
and hold the door to position this pin in the
upper left corner. (See Figure A.) Grasp the
door securely to ensure you do not drop it.
c. Carefully insert the long hinge pin fully up
into the upper hinge mount located on the
front of the One Wine System.
(See Figure B.)
d. After the upper hinge pin is fully inserted,
carefully move the lower hinge pin into
place, allowing it to securely rest into the
lower hinge mount located on the front of
the One Wine System. (Note: The
lower hinge pin can most easily be inserted
into the lower hinge mount if the hinge pin is
brought into place from the FRONT RIGHT
SIDE of the hinge mount. (See Figure C.)
SETUP
7
PARTS
6
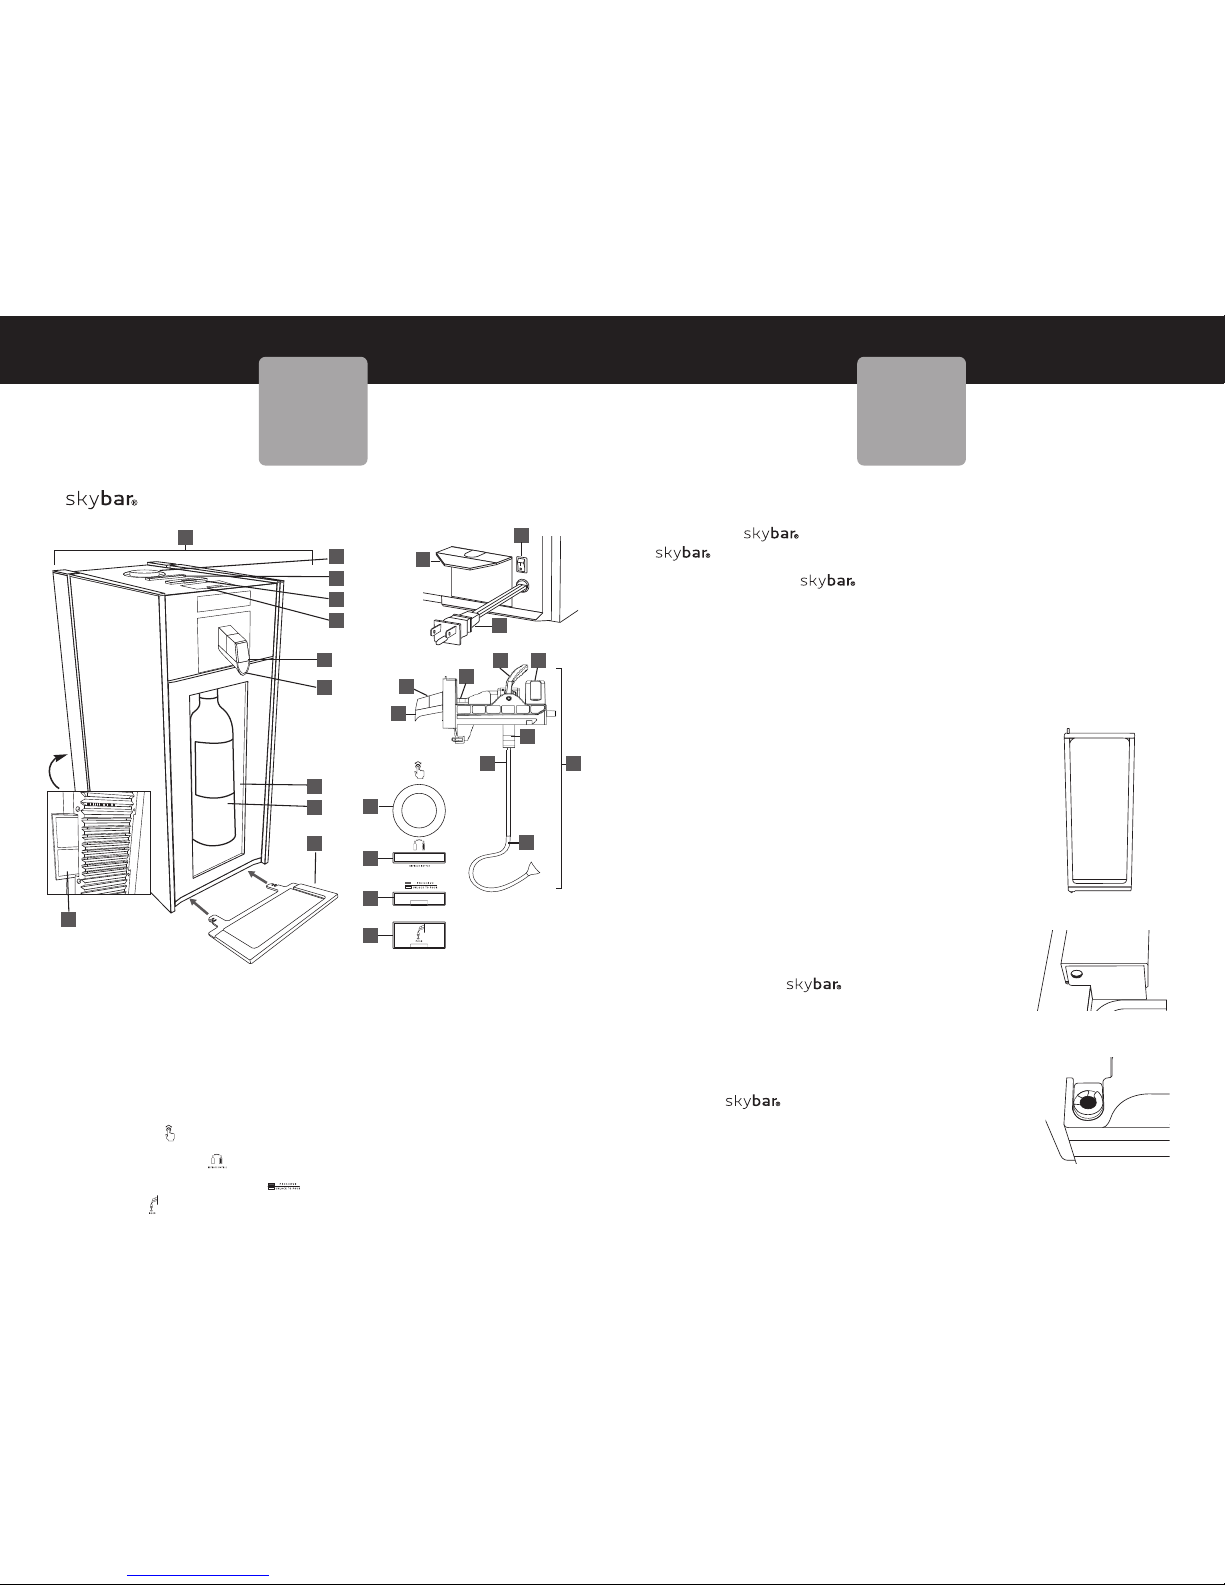
One
Wine System Diagram of Parts
Figure C
skybarhome.com
Figure B
Figure A
1. Wine System
2. Bottle Pour Assembly
3. Pour Tip (with O-ring)
4. Pour Spout
5. Chamber Door
6. Chilling Chamber
7. Drip Tray
8. Control Knob
9. Replace Bottle Button
10.Preserve/Unlock to Pour Button
11.Pour Button
SCROLL/SELECT
12.Main Power Button
13.Power Cord
14.Condensation Tray
15.Bottle Lock Lever
16.Reserve Cup
17.Bottle Stopper
18.Bottle Tube (lower) with filter
19.Bottle Tube (upper)
20.Pour Tube
21. Air Filter (back)
1
2
3
4
5
6
8
9
10
3
4
12
13
20
1615
17
19
18
SCROLL/SELECT
8
9
10
11
14
11
7
21
Page 5
9
skybarhome.com
INSTALLING OR REPLACING THE WINE BOTTLE
1. Open the Chilling Chamber door.
2. Grasp the Pour Spout (or the wine bottle if
there is already a bottle in place), then press
the Replace Bottle Button at the top of the
unit. This will release the Bottle Pour Assembly
locking mechanism. (See Figure B.)
3. Slide the Bottle Pour Assembly forward until
it has cleared the chamber opening.
(See Figure C.)
a. If the Chilling Chamber was empty, carry
the Bottle Pour Assembly to the kitchen.
b. If the Bottle Pour Assembly already has a
bottle attached:
i. Support the bottom of the bottle when
transporting the bottle and Bottle Pour
Assembly to the kitchen. (See Figure D.)
ii. To avoid spills, do not unlock the Bottle
Pour Assembly from the bottle until you
are over a sink or countertop.
iii. Unlock the Bottle Pour Assembly from
the empty bottle.
4. Always thoroughly rinse the Bottle Pour
Assembly and clean the Pour Tip between
bottles. (Refer to Care and Cleaning on page
18 for more information.)
5. Uncork the bottle of wine and remove the foil
wrap around the bottle neck. Please note: This
system is optimized for
use with wine bottles
that utilize corks. It may
be used with some, but
not all, bottles that use
a screw cap closure. Visit
skybarhome.com to view the adaptor
available for screw cap bottles.
INSTALLING
BOTTLES
S
C
R
O
L
L
/
S
E
L
E
C
T
Figure B
Figure C
EXCHANGE BOT TLE S
WITHOUT MAKI NG A
MESS.
To avoid spills, always work
over a sink when attaching or
detaching the Bottle Pour
Assembly from a wine bottle.
SUGGE STION
Figure D
SETUP
8
e. Before releasing the door, check to ensure the door is securely
seated into the hinge mounts. The door should now swing
open and close freely.
3. Plug the unit into a 120V power outlet.
4. Switch the Main Power Button – located in
the back of the unit – to “on.”
• After the unit is switched on (with the door
installed and closed), you will hear the
Chilling Chamber cycle on and begin to chill
and attempt to preserve. If there is no bottle
in place, the preservation cycle will stop
automatically after several seconds.
• The Chilling Chamber is factory pre-set to a temperature of
50°F/10°C. When installing a bottle, you can select the
temperature you prefer. (See Setting the Temperature on
page 13.)
• If the temperature in your home rises above 80°F/27°C or
60% relative humidity for an extended period of time, there is a
possibility that excessive condensation will occur. Please check
the water level in the removable Condensation Tray regularly
in warm, humid environments. If you will be away from your
home for more than one week, we recommend that you remove
wine bottles from the chamber and turn the unit OFF during your
absence.
5. The drip tray attaches to the front bottom of your One
Wine System, below the bottom of the chamber door and slides
underneath the unit and clicks into place. The drip tray protects
table surfaces from the last drop of wine that may occur after
pouring. For best results, when pouring wine, hold your glass a
second longer under the pour spout after releasing the pour
button to catch this last drop.
Figure A
Page 6
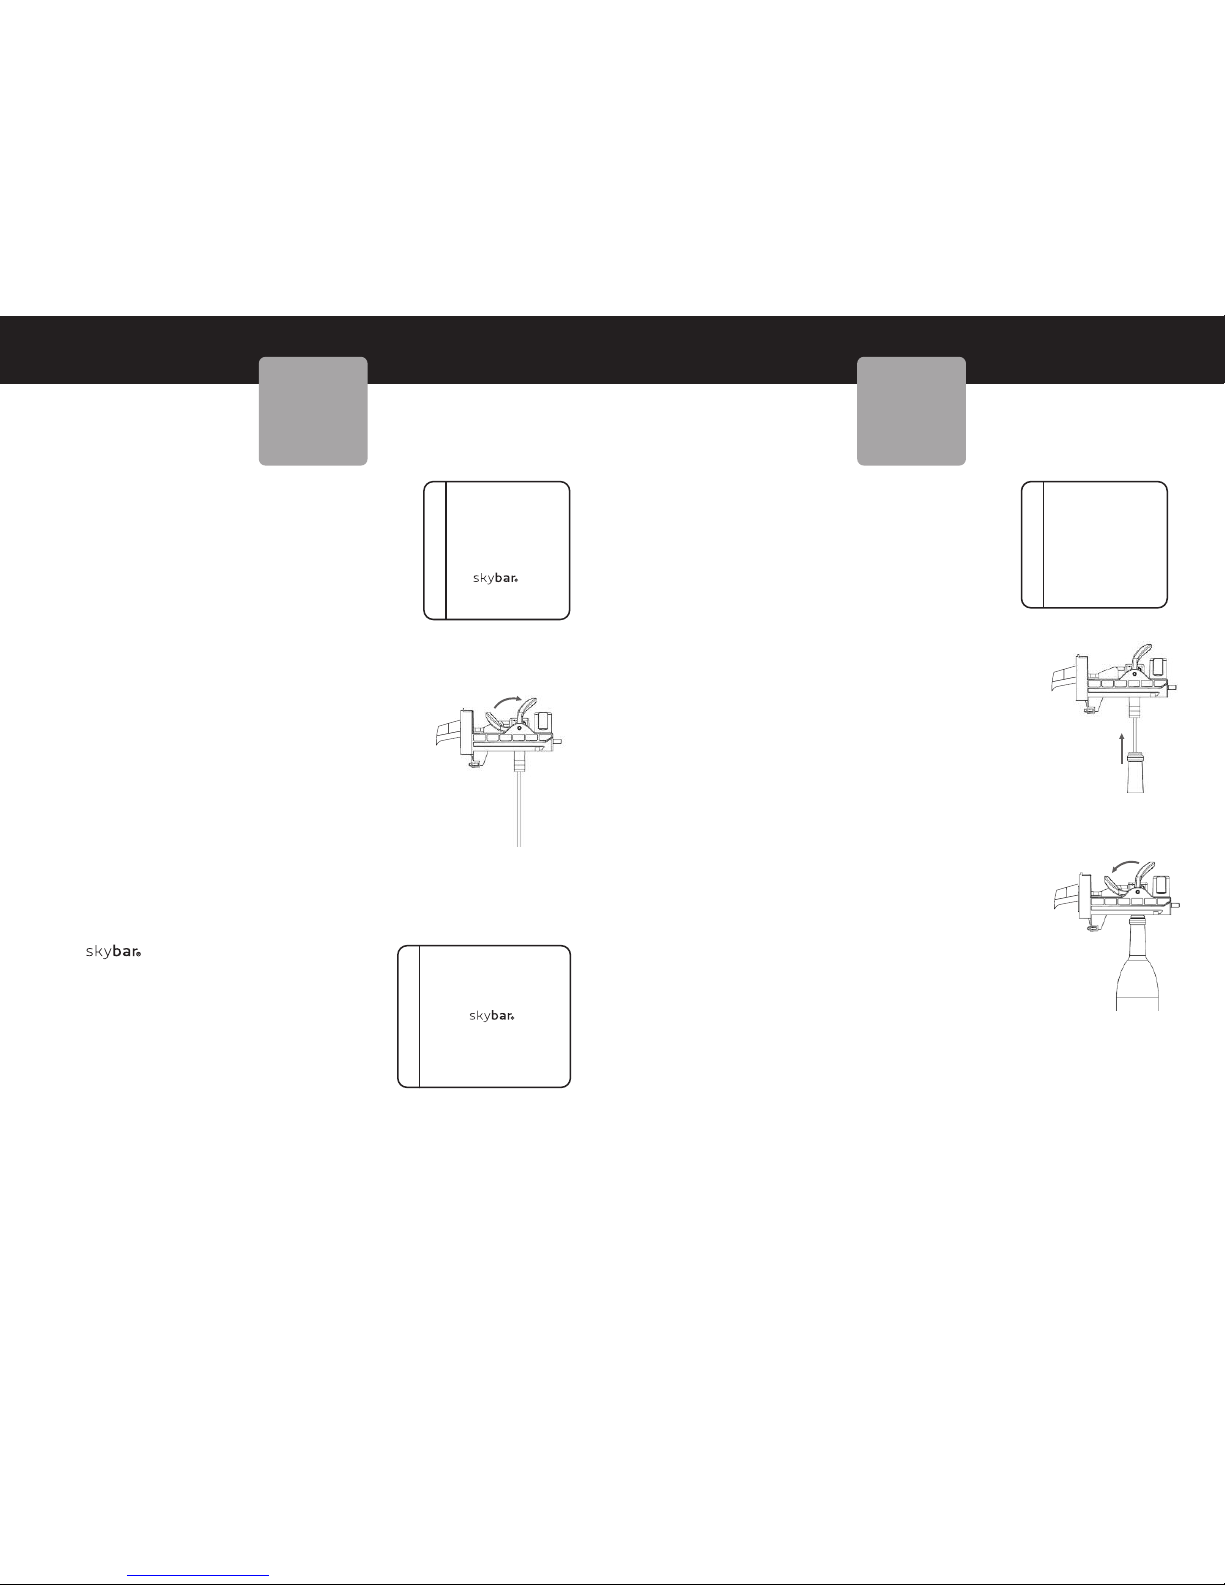
6. Taste a sample of the wine to ensure the
wine is of desired quality.
7. Check the inside of the bottle neck to
ensure no loose pieces of cork or foil will
obstruct the seal between the bottle neck
and the Bottle Pour Assembly.
8. Lift the Bottle Lock Lever into the vertical
(open) position. (See Figure E.)
9. Place the Bottle Tube fully into the bottle.
Ensure the rubber bottle stopper at the top
of the Bottle Tube is fully and firmly
inserted into the bottle.
10. Press the Bottle Lock Lever downward into
the horizontal (closed) position to lock the
Bottle Pour Assembly to the wine bottle.
(See Figure G.)
a. Gently tug upward on the Bottle Pour
Assembly to confirm that it is securely
mounted to the bottle.
11. Securely supporting the bottom of the wine
bottle with your hand, transport the bottle
with the Bottle Pour Assembly to your
One Wine System.
12. Continuing to support the bottle from
the bottom, open the chamber door
and slide the Bottle Pour Assembly into
the unit until you hear it lock into place.
(See Figure C.)
13. Close the Chilling Chamber door.
• The Preserve/Unlock to Pour button light will
blink while you hear the preservation process
begin. The amber light will stop blinking and
will remain lit once the wine has reached the
preservation mode.
11
skybarhome.com
10
Figure F
Figure G
F
ACE T HE LABEL
FORWAR D.
T
o showcase your
w
ine, turn the bottle so
the label is facing the
front before locking
the Bottle Pour
Assembly in place.
SUGGE STION
INSTALLING
BOTTLES
TAST E WINE
BEFORE S ERV ING .
Always sample a bit of wine
before loading a new bottle
into the One Wine
System to ensure the bottle
is satisfactory to your tastes.
I
NSPECT
THE B OTT LE.
I
nspect the neck to
ensure it is free of cork
or foil debris before
loading the bottle into
the One
Wine System.
SUGGE STION
SUGGE STION
Figure E
INSTALLING
BOTTLES
• The Chilling Chamber will automatically
begin chilling the wine to the default setting
of 50°F/10°C. To adjust the temperature to
another setting, press and rotate the Control
Knob on the top of the unit to select another
wine varietal setting or a specific
temperature.
• For optimum performance, keep the Chilling
Chamber door closed while in operation.
Note: If the door is left open, the chamber will
automatically shut off after one hour.
Page 7
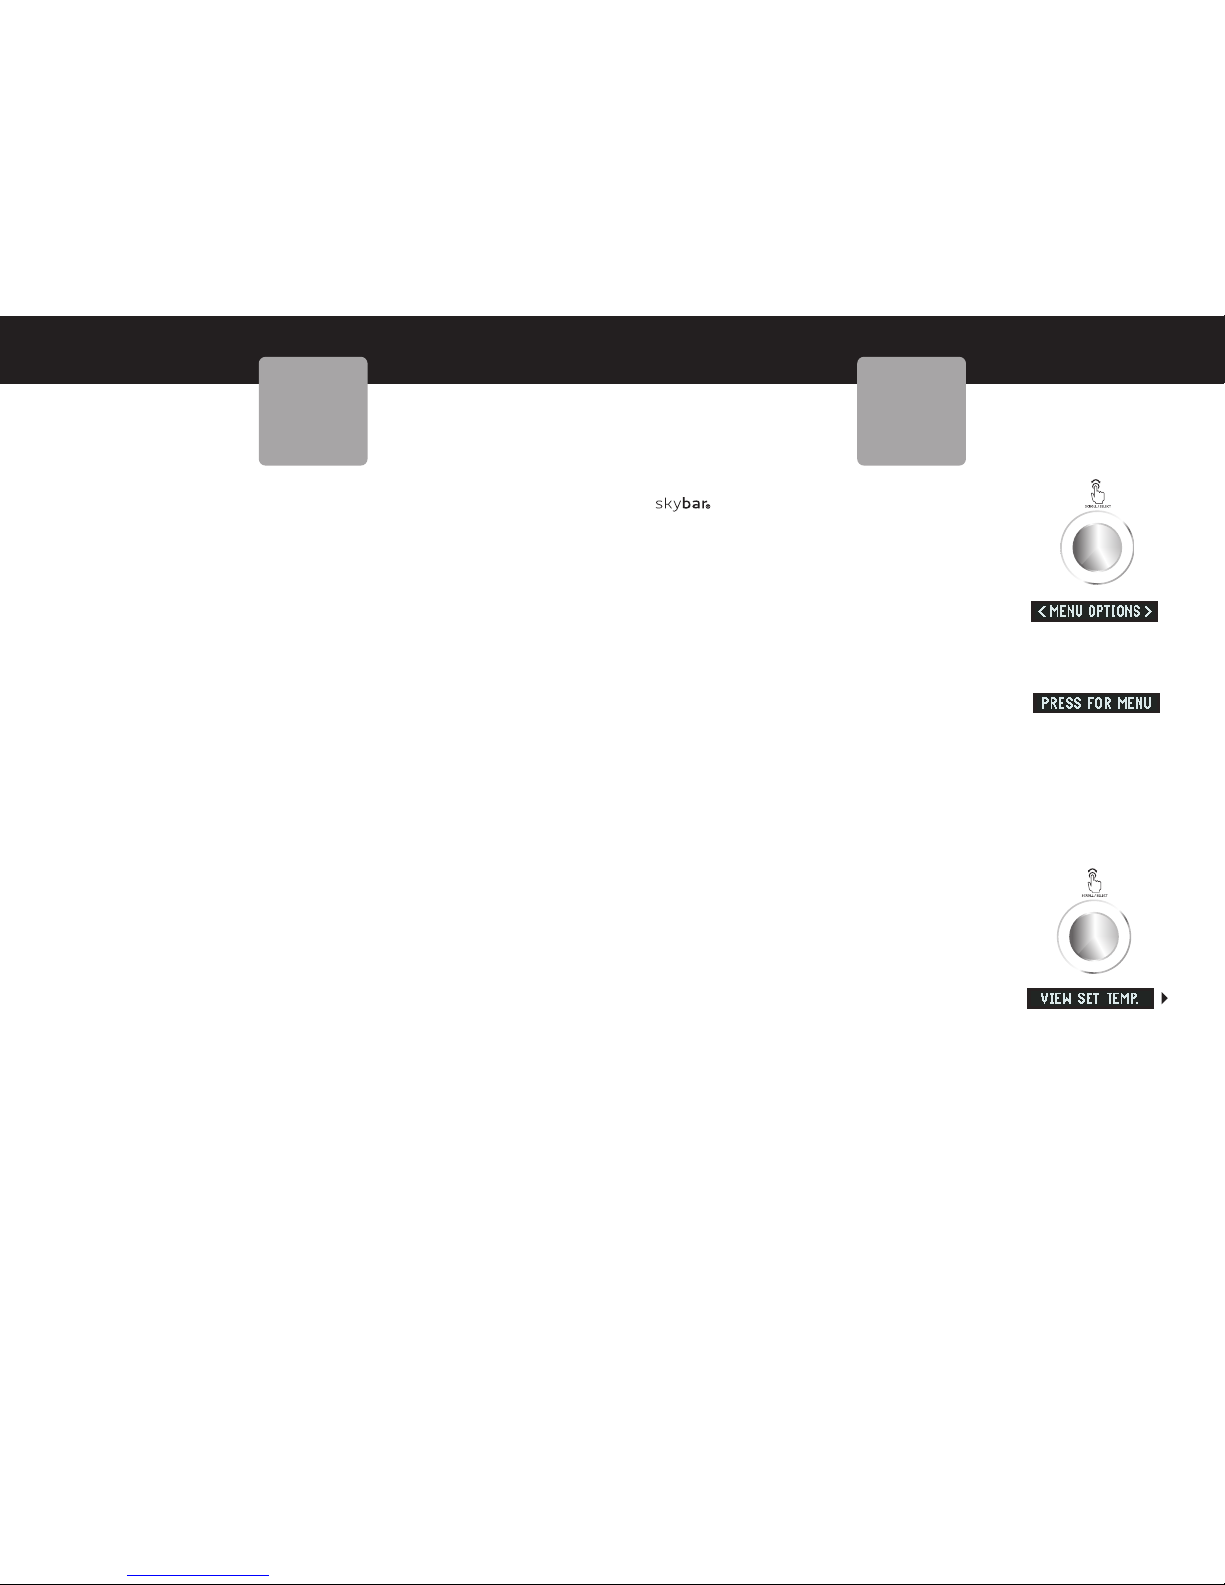
Using the Control Knob located on the top of the
One Wine System, you can:
– View the Current Set Temperature
– Turn the Chamber light ON or OFF
– Set the Temperature by 15 pre-set Wine
Types or to a specific temperature of
your choosing.
Note: The “Chill Status” is always displayed
when the unit is ON, showing either “Chilling”
or “Ready.” The panel will illuminate to 100%
brightness during user interaction, and reduced
illumination during stand by.
1. Press the Control Knob. You will see <MENU
OPTIONS > displayed. (See Figure A.)
Note: If you rotate the Control Knob first,
you will be prompted to PRESS FOR MENU.
(See Figure B.)
2. Rotate the Control Knob either clockwise or
counter-clockwise to see the various feature
options:
a. VIEW SET TEMP.
b. SET BY WINE TYPE
c. SET BY TEMP.
d. TURN LIGHT ON or OFF
3. When you see the desired menu option,
press the Control Knob to select that option.
Note: If no option is selected, the display
will return back to standby mode after 30
seconds.
4. TO VIEW SET TEMP.
Rotate the Control Knob and press when VIEW SET TEMP
is displayed.(See Figure C.)
a. The current SET temperature will be displayed for 5 seconds before
the display returns to the chill status indication of CHILLING or
READY.
13
skybarhome.com
12
SETTING THE
TEMPERATURE
Figure A
Figure B
Figure C
WINE
PRESERVATION
A NOTE ABOUT WINE PRESERVATION
Once a bottle of wine has been uncorked, oxygen comes into
contact with the wine and begins a chemical change called
oxidation. Once oxidation begins, it cannot be stopped but,
fortunately, it can be slowed! The Wine System removes oxygen from
the bottle, slowing the rate of oxidation and keeping your wine
preserved for a longer period of time.
Different wines will oxidize at different rates. For this reason, it is
difficult to predict exactly how long a specific wine will last, even
with preservation techniques. Some wine will naturally oxidize more
quickly. Wine is best enjoyed within ten days after opening.
Page 8
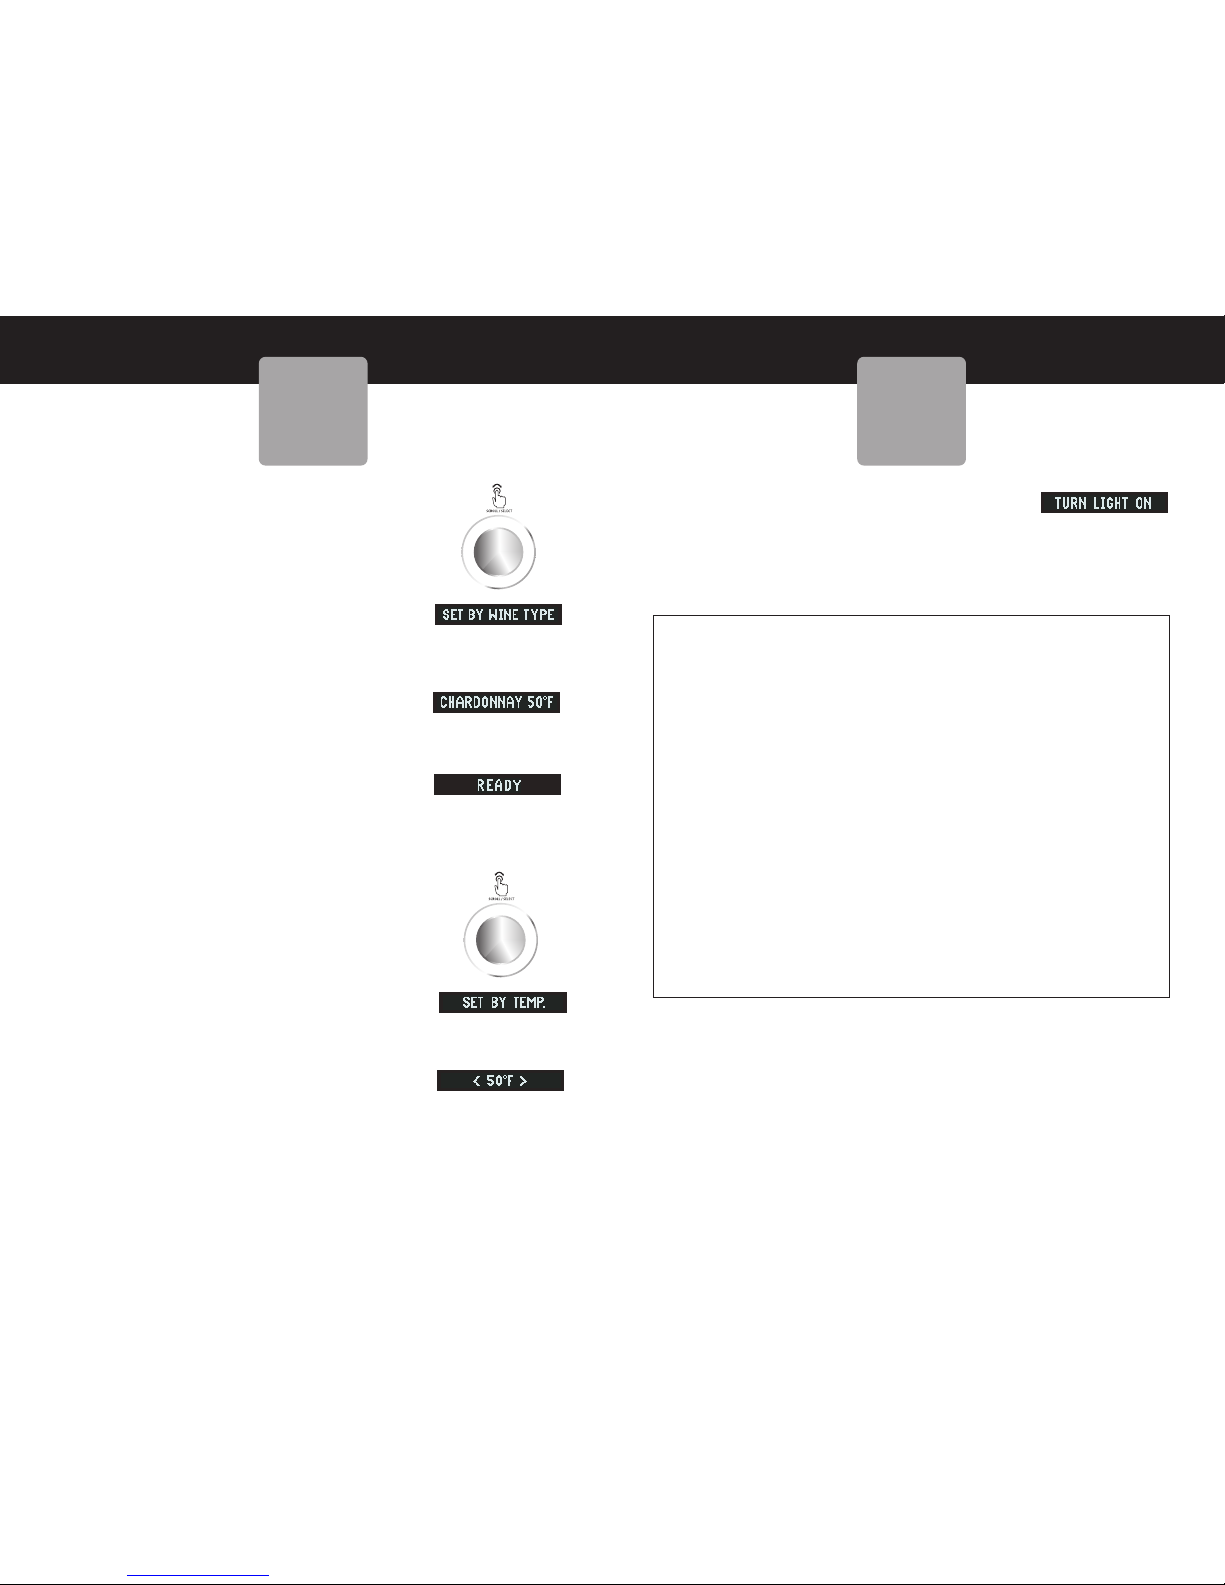
5. SET BY WINE TYPE
Rotate the Control Knob and press when SET
BY WINE TYPE is displayed. (See Figure D.)
a. Rotate the knob clockwise or counter-
clockwise to cycle through the various varietal
pre-set options.
b. Once the desired varietal is displayed, press
the knob to set the Chilling Chamber to that
setting. (See Figure E.)
c. The save setting will be displayed and the
new SET temperature will flash for 5 seconds.
d. The Chilling Chamber will begin to cool to
the desired temperature and the display will
show the Chill Status (CHILLING or READY).
When the chamber has reached the SET
temperature, the display will change to
READY. (See Figure F.)
6. SET BY TEMP.
To set the Chilling Chamber to a specific
temperature, rotate the Control Knob and press
when SET BY TEMP is displayed. (See Figure G.)
a. The display will show the default temperature
of 50ºF/10ºC or the previously Set
Temperature. (See Figure H.)
b. Rotate the Control Knob clockwise or counter-
clockwise to select from the temperature
options, ranging from 45ºF/7ºC to 68°F/20°C.
c. Once the desired temperature is displayed,
press the Control Knob to save the setting.
d. The selected temperature will be displayed
and the new SET temperature will flash.
15
skybarhome.com
14
SETTING THE
TEMPERATURE
SETTING THE
TEMPERATURE
7. TURN LIGHT ON or OFF
Rotate the Control Knob and press when TURN
LIGHT ON [or OFF] is displayed. (See Figure I.)
a. Pressing the Control Knob will change the status
of the light – ON or OFF.
TEMPERATURE PRESETS
WINE VARIETAL PRESET TEMPERATURES
Wine Temperature
Sauvignon Blanc 45ºF/7ºC
Chablis 45ºF/7ºC
Fumé Blanc 45ºF/7ºC
White Burgundy 45ºF/7ºC
Rosé 45ºF/7ºC
Pinot Grigio 45ºF/7ºC
White Zinfandel 45ºF/7ºC
Chardonnay 50ºF/10ºC
Pinot Noir 55ºF/13ºC
Chianti 60ºF/16ºC
Merlot 60ºF/16ºC
Bordeaux 65ºF/18ºC
Cabernet Sauvignon 65ºF/18ºC
Shiraz/Syrah 65ºF/18ºC
Zinfandel (Red) 65ºF/18ºC
For recommended serving temperatures for additional wine types, please visit skybarhome.com. Personal preferences may vary.
Important note:
• Total chilling time will vary based on the initial temperature of
the bottle, the room temperature and the Chilling Chamber Set
temperature. “Ready” will appear on the LCD display when the
wine has reached a desirable drinking temperature.
Figure F
Figure D
Figure E
Figure G
Figure H
Figure I
Page 9
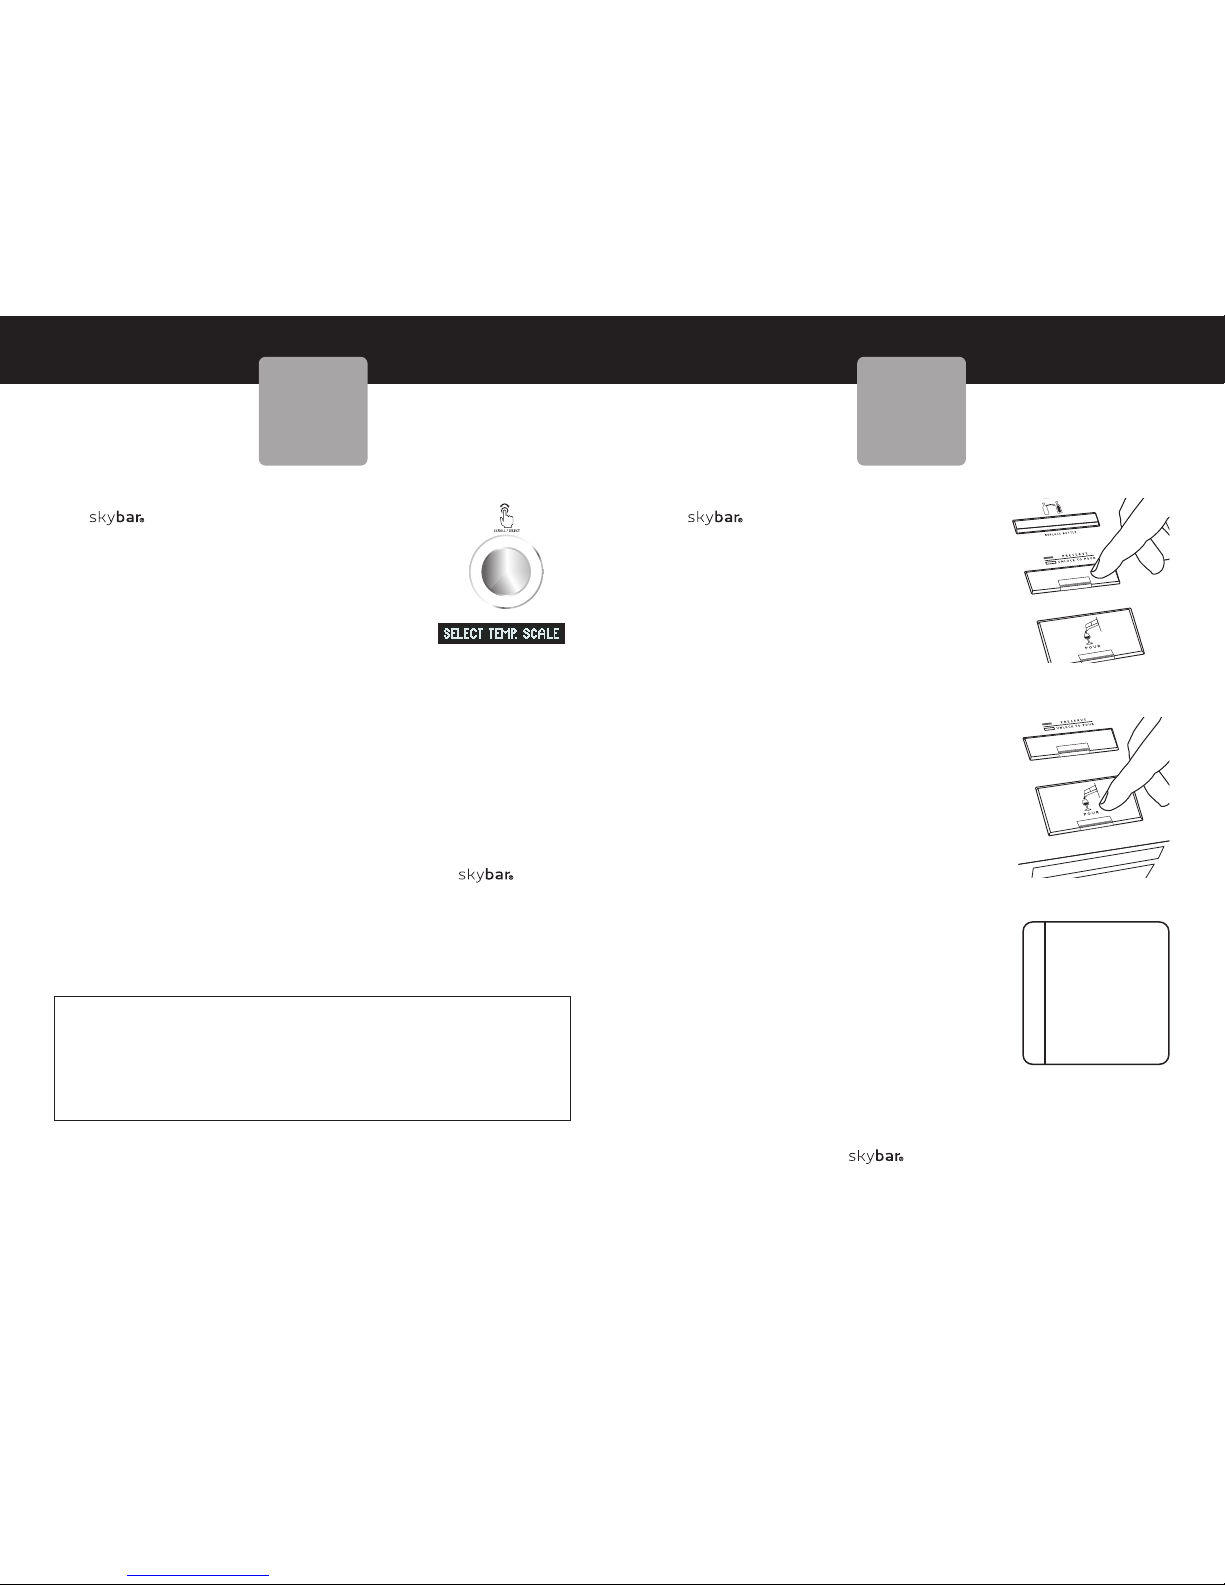
POURING WINE
The One Wine System chills, pours
and preserves your wine so it is ready to
enjoy…one perfect glass at a time. The buttons
that control preservation and pouring are
located on the top of the unit.
1. When the amber light is illuminated on the
“Preserve/Unlock to Pour” Button, the
Chilling Chamber is in preservation mode.
2. Simply press the “Preserve/Unlock to Pour”
to enable the Pour feature. (See Figure A.)
3. A solid green indicator light on the “Pour
Button” will indicate that the bottle is ready
to pour. Be sure the chamber door is closed
and remains closed before you pour.
4. Hold the glass under the Pour Spout before
pressing the Pour Button; wine will begin to
flow when you press the button.
5. Press and hold the Pour Button to pour
wine. Never open the chamber door while
pouring wine.
6. When you have finished pouring, release the
Pour Button and allow the last drop to flow
into your glass before pulling it away from
the Pour Spout.
• The green Pour Button indicator light will
remain lit, and additional glasses can be
poured.
• The bottle will automatically return to
preservation mode after 30 minutes of
inactivity. Or, you can manually return the
bottle to preservation mode by pressing the “Preserve/Unlock
to Pour” Button. The blinking amber light will indicate that the
unit is returning to preservation mode.
Please note: Many wines contain sediment that settles in the
bottom of the bottle. The One Wine System is designed
to leave a small amount of wine in the bottom of every “finished”
bottle to avoid dispensing this unwanted sediment.
CHANGING TEMPERATURE SCALE
The One Wine System allows you to
select between the Fahrenheit (F) or Celsius (C)
temperature scale.
• Press and hold the Control Knob for 3
seconds. SELECT TEMP. SCALE will appear
in the display. (See Figure A.)
• Rotate the knob clockwise or counterclockwise to toggle between Fahrenheit
and Celsius.
• Once the desired scale is displayed, press the Control Knob
to save the desired setting.
For Optimum Performance
• Close the door, the display will indicate if a door is left open.
After 60 minutes, if the door is left open, the chilling function will
shut off.
Important note:
For optimum cooling, thermoelectric products like the One
Wine System should be in an environment with a room temperature
72°F/22°C or less. A higher room temperature will result in a slightly
warmer internal chamber temperature.
Please reference below chart for approximate room temperatures and
the resulting coldest internal wine chamber temperatures:
17
skybarhome.com
16
skybarhome.com
Approx.
Room Temperature
72°F/22°C
74°F/23°C
76°F/24°C
Approx. Internal
Wine Chamber Temperature
45°F/7°C
47°F/8°C
49°F/9°C
SAVOR EACH
DROP.
Don’t waste a drop of
your favorite wine. Be
sure to release the Pour
Button and wait a
moment or two before
moving your glass away
from the Pour Spout.
SUGGE STION
Figure A
POURING
WINE
SETTING THE
TEMPERATURE
Figure A
Figure B
Page 10
19
skybarhome.com
18
CARE AND
CLEANING
CARE AND
CLEANING
CARE AND CLEANING
To ensure optimal performance, it is important to properly clean
and care for your One Wine System. Follow these
recommendations to eliminate cross-contamination of wine flavor
and maintain optimal performance.
BEFORE CLEANING: Switch off and disconnect One Wine
System. Do Not Immerse.
Exterior Care
1. Clean the exterior housing with a slightly damp cloth. (NEVER use
an abrasive cleaner on the exterior.)
2. Very special care should be exercised when cleaning a high
polished cabinet exterior, avoid using an abrasive sponge or
cleaning pad, as this may scratch and damage the unit.
3. Clean the Chilling Chamber glass door with a household glass
cleaner.
4. Clean the Control Panel, the Pour Spout and surrounding area
and all buttons with a slightly damp cloth. Liquids should never be
poured or sprayed near buttons or on or near the Pour Spout or
Control Panel.
5. The interior of the Chilling Chamber and the rear panel can
also be cleaned with a slightly damp cloth.
6. There is an air filter located at the back of the unit, occasionally
remove and rinse with water, let air-dry and then reinstall.
Bottle Pour Assembly Care
1. The Bottle Pour Assembly is fully submersible and can be safely
cleaned with water. We recommend that you do not use soap,
which can noticeably affect the flavors of fine wine. Many wine
connoisseurs simply give their glasses a hot water rinse. With this in
mind, it is possible – and recommended – to clean the Bottle Pour
Assembly with a thorough hot water flush.
DO NOT PUT IN DISHWASHER: NOT DISHWASHER SAFE.
2. We recommend that you rinse the Bottle Pour Assembly between
each bottle of wine, especially when changing from one type of
wine to another. This prevents cross contamination of wine flavor
between different types of wine.
3. Lift the Bottle Lock Lever into the vertical (open) position (See
Figure E, pg. 10) and remove the bottle Pour Assembly from the
empty bottle. There may be some residual wine in the tube so
carefully carry to a sink to clean.
• Remove the Pour Tip by sliding it out from the Pour Spout. This will
allow any remaining liquids to flow out and air and water to pass
through the Bottle Pour Assembly for cleaning. (DO THIS OVER
THE SINK.)
Note: We recommend that occasionally you soak the Pour Tip in
warm water for about 1 hour between bottle changes.
• Run the Bottle Tube under the water faucet, causing water to flow
through the Bottle Pour Assembly and out the Pour Spout.
• There is a filter located at the bottom of the Bottle Tube to keep
sediment from clogging the system. When cleaning, be sure to run
water through this filter to clear any sediment that may remain.
• The Bottle Pour Assembly features a Reserve Chamber that
captures any wine that may be inadvertently drawn into the vacuum
system. To clean this reserve area, simply unscrew the bottle from
the Bottle Pour Assembly, rinse with warm water and air dry.
4. Shake the Bottle Pour Assembly. Dry with
a soft cloth or paper towel or allow it to
completely air dry.
Note: Always be sure to securely replace the
Pour Tip onto the Bottle Pour Assembly by
sliding it back into place into the Pour Spout,
ensuring the O-ring seal is intact.
Air Filter Cleaning Care
For optimum performance, the Air Filter should be removed, clean
with warm running water, and dried properly prior to re-assembly.
However, if you forget, the Skybar One Wine System was designed
with intelligence to remind you and will flash a message “Clean Filter”
on the LCD screen. After the filter is cleaned and replace, reset the
counter by pushing the main Control Knob down for over 1 second.
HIGH AND DRY.
After cleaning the Bottle
Pour Assembly, allow it to
dry completely to ensure
that no water dilutes your
next bottle of wine.
SUGGE STION
Page 11
21
skybarhome.com
20
TROUBLE-
SHOOTING
Problem
Dispensing/Pouring
Wine is not pouring
smoothly.
Wine does not pour when
the Pour Button is pressed.
Recommended Steps
• Remove and clean the Pour Tip over
a sink.
• Ensure that the wine bottle is installed
correctly onto the Bottle Pour Assembly
and that the Bottle Pour Assembly is
securely engaged into the Chilling
Chamber. (See page 9.)
• Press the Pour Button when the green
light is illuminated.
• Note: If the green light is not illuminated
and the amber light is illuminated, press
the Preserve/Unlock to Pour Button, which
will stop preservation, turn off the amber
light and enable pouring, indicated by the
green light. (See page 17.)
• Ensure that the Pour Tip is securely
installed onto the Pour Spout.
• Wine will not dispense if the chamber is
actively in the preservation mode.
– Wait for the preservation cycle to be
completed, or
– Cancel the preservation process by
pressing the Preservation Button.
• If a wine bottle is installed, the lights
should be amber or green. If no lights
are illuminated, neither the preservation
mode nor the pour mode is active.
• Open the Chilling Chamber door and
ensure the bottle is installed correctly
onto the Bottle Pour Assembly and that
the Bottle Pour Assembly is engaged
into the Chilling Chamber. Close the
door, and the system should reset.
TROUBLE-
SHOOTING
Problem
Power
The Wine System does not
turn on.
Lights are flashing
(Amber and Green) with
no bottle installed.
Display
Nothing is shown on the
display window.
Dispensing/Pouring
Pressing the Replace Bottle
Button does not release the
Bottle Pour Assembly.
Recommended Steps
•
Ensure that the Wine System is plugged
into an outlet.
•
Ensure that the outlet has power.
•
Ensure that the power button on the
back of the unit is “On”.
•
Open and close the Chilling Chamber
door to reset.
•
Remove the Bottle Pour Assembly and
wash it thoroughly then replace.
• Ensure that the Pour Tip and Reserve
Cup are securely seated in place.
•
Ensure that the Main Power Button is
“On” and that there is power to the unit.
(See SETUP.)
• Open door first, press and hold the
Replace Bottle Button, reach into
the Chilling Chamber and gently lift
upward and pull the Bottle Pour
Assembly toward you.
TROUBLESHOOTING
Your One Wine System has been carefully designed to give
you many years of trouble-free service. In the unlikely event that
your One Wine System does not operate satisfactorily,
please review the following potential problems and try the steps
recommended BEFORE you call an authorized service center.
To order replacement parts or for additional help with product
questions, please call 1-888-SKYBAR9 (1-888-759-2279).
A wine bottle is securely
installed but preservation
mode is not working.
Page 12
23
skybarhome.com
22
TROUBLE-
SHOOTING
TROUBLE-
SHOOTING
Problem
Dispensing/Pouring
A wine bottle is securely
installed but preservation
mode is not working.
Recommended Steps
• Ensure the Pour Tip is securely in place
on the Pour Spout. If you have reinstalled
the Pour Tip, reset the preservation
mode by opening and closing the door
after you have reinstalled the Pour Tip.
Preservation should begin and the amber
light should illuminate. (See page 17.)
•
Remove the Pour Tip by sliding it out from
the Pour Spout. This will allow any
remaining liquids to flow out and air and
water to pass through the Bottle Pour
Assembly for cleaning. (DO THIS OVER
THE SINK.)
• Ensure that the wine bottle is installed
correctly onto the Bottle Pour Assembly and
that the Bottle Pour Assembly is securely
engaged into the Chilling Chamber.
• Ensure that the Pour Tip is installed onto the
Pour Spout properly and is securely
tightened.
• Clean the Bottle Tube and the Pour Tip by
running clean water through the system or
following the cleaning instructions.
(See page 18.) Dry all parts and reinstall.
• Replace the Pour Tip and reset the Chilling
Chamber function by opening and closing
the door.
• Ensure that the Pour Tip is installed onto
the Pour Spout properly and is securely
tightened.
• Clean the Pour Tip. (See page 18.)
• Replace the Pour Tip and reset the Chilling
Chamber function by opening and closing
the door.
Wine is pouring slowly
Problem
Dispensing/Pouring
There are bubbles moving
from the Bottle Tube into
the bottle of wine.
Recommended Steps
Note:
The
One
Wine System is
attempting to preserve your wine, but the
seal is not closed, which is essential
to enabling it to preserve.
• Ensure that the Pour Tip is securely
tightened to the Pour Spout.
• Ensure that the O-ring is in place on the
Pour Tip. If the O-ring is missing, you
will need to replace the Pour Tip.
• Clean the O-ring and the Pour Spout
and recheck the seal.
• Ensure that the Bottle Lock Lever is in the
vertical (open) position, enabling you to
insert the Bottle Tube fully into the bottle.
• Press the Bottle Lock Lever into the
horizontal (closed) position to engage it to
the bottle.
• If your wine bottle has a screw cap and not
a cork, use the Bottle Adaptor provided by
installing it into the bottle first and then
insert the Bottle Pour Assembly.
Note:
Remember to remove the Bottle
Adaptor from the Bottle Pour Assembly
when the bottle is empty. It can be reused
multiple times.
• Some unusually sized bottles – either
very tall or very wide – may not fit into
the Chilling Chamber, which is sized for
standard 750ml bottles.
The wine bottle will not
securely install onto the
Bottle Pour Assembly.
Bottle Will Not Fit
The bottle is secured to the
Bottle Pour Assembly, but
will not fit into the Chilling
Chamber.
The Pour Tip drips or has
turbulent flow.
Page 13

SERVICE AND
MAINTENANCE
25
skybarhome.com
24
USER
SERVICING
SECTION
SERVICE AND MAINTENANCE
If your One Wine System requires service, do not return it to
the store where you purchased it. All repairs and replacements must be
made by an authorized service center. Please call us at the following
toll-free telephone number for service, parts and accessories.
U.S. 1-888-SKYBAR9 (1-888-759-2279)
You may also visit our website at skybarhome.com to contact us. To
assist us in serving you, please have the One Wine System
model number and date purchased available when you call. The
model number is located next to the master power switch on the
back of the unit.
We welcome your questions, comments or suggestions. In all your
communications, please include your complete name, address,
telephone number and a description of the problem.
USER SERVICEABLE PARTS AND INSTALLATION
User Serviceable Parts
1. Air Inlet Filter
2. Chamber Door Assembly
3. Bottle Pour Assembly
4. Refresh Kit: 1 Set: Pour Tip with O-ring Seals,
Short Pour Tube and Long Bottle Tube
All parts are available at skybarhome.com, as well as our unique
skybar wine accessories, that will complement your wine system or
make a perfect gift for any wine lover.
Page 14

WARRANTY
26
ONE-YEAR LIMITED WARRANTY
Sunbeam Products, Inc. doing business as Jarden Consumer Solutions
or if in Canada, Sunbeam Corporation (Canada) Limited doing business
as Jarden Consumer Solutions (collectively “JCS”) warrants that for a
period of one year from the date of purchase, this product will be free
from defects in material and workmanship. JCS, at its option, will repair
or replace this product or any component of the product found to be
defective during the warranty period. Replacement will be made with
a new or remanufactured product or component. If the product is no
longer available, replacement may be made with a similar product of
equal or greater value. This is your exclusive warranty. Do NOT
attempt to repair or adjust any electrical or mechanical functions on
this product. Doing so will void this warranty.
This warranty is valid for the original retail purchaser from the date of
initial retail purchase and is not transferable. Keep the original sales
receipt. Proof of purchase is required to obtain warranty performance.
JCS dealers, service centers, or retail stores selling JCS products do
not have the right to alter, modify or any way change the terms and
conditions of this warranty.
This warranty does not cover normal wear of parts or damage resulting
from any of the following: negligent use or misuse of the product, use
on improper voltage or current, use contrary to the operating
instructions, disassembly, repair or alteration by anyone other than JCS
or an authorized JCS service center. Further, the warranty does not
cover: Acts of God, such as fire, flood, hurricanes and tornadoes.
What are the limits on JCS’s Liability?
JCS shall not be liable for any incidental or consequential damages caused
by the breach of any express, implied or statutory warranty or condition.
Except to the extent prohibited by applicable law, any implied warranty or
condition of merchantability or fitness for a particular purpose is limited in
duration to the duration of the above warranty.
JCS disclaims all other warranties, conditions or representations, express,
implied, statutory or otherwise.
WARRANTY
27
skybarhome.com
JCS shall not be liable for any damages of any kind resulting from the
purchase, use or misuse of, or inability to use the product including
incidental, special, consequential or similar damages or loss of profits, or
for any breach of contract, fundamental or otherwise, or for any claim
brought against purchaser by any other party.
Some provinces, states or jurisdictions do not allow the exclusion or
limitation of incidental or consequential damages or limitations on how
long an implied warranty lasts, so the above limitations or exclusion may
not apply to you.
This warranty gives you specific legal rights, and you may also have other
rights that vary from province to province, state to state or jurisdiction to
jurisdiction.
How to Obtain Warranty Service
If you have any question regarding this warranty or would like to obtain
warranty service, please call 1-888-SKYBAR9 or 1-888-759-2279 and a
convenient service center address will be provided to you.
In the U.S.A., this warranty is offered by Sunbeam Products, Inc. doing
business as Jarden Consumer Solutions located in Boca Raton, Florida
33431. In Canada, this warranty is offered by Sunbeam Corporation
(Canada) Limited doing business as Jarden Consumer Solutions,
located at 20 B Hereford Street, Brampton, Ontario L6Y 0M1. If you
have any other problem or claim in connection with this product,
please write our Consumer Service Department.
PLEASE DO NOT RETURN THIS PRODUCT TO ANY OF THESE
ADDRESSES OR TO THE PLACE OF PURCHASE.
 Loading...