

Page 1

"Telecommunication Products to solve Telecommunication Problems"
CK1R
Modular Phone Cords (2)
Promotion-On-Hold
Module
For the RCA 25450RE3 telephone system
CK-1R Black Box
Sensor Board Cable
Audio Cables (Use Only One)
Sensor Board
9/13/06
Introduction
Thank you for purchasing the Skutch CK1R Promotion-On-Hold Module for the RCA
25450RE3 four line cordless phone system. The CK1R adds Promotion-On-Hold
capability to the phone system. The CK1R is a true plug and play device. The unit does
not require any "Learning" to operate. When a call is placed ON HOLD from any
cordless phone or the base station, the ON HOLD caller will hear the Promotion-On-Hold
audio. When the line is re-answered, the audio automatically stops. It's that simple!
Power Cube
Installation
1- On the base telephone, make sure that the surface area around the “LINE
BUTTONS” is clean and free from any dust or oil film. The surface MUST be
clean in order for the “SENSOR BOARD” to stick properly.
2- Locate the “SENSOR BOARD”. Peel all three paper protectors off back side, and
carefully align as shown in Fig. 1 . Notice that the “Right” edge of the “SENSOR
BOARD” is aligned to edge “A” of the phone on Fig. 2, and that the lights and
buttons on the “SENSOR BOARD” are centered directly over the LINE
BUTTONS on the base phone.
3- Once you are SURE it is aligned, press down to attach to phone.
Page 1 of 5
Page 2
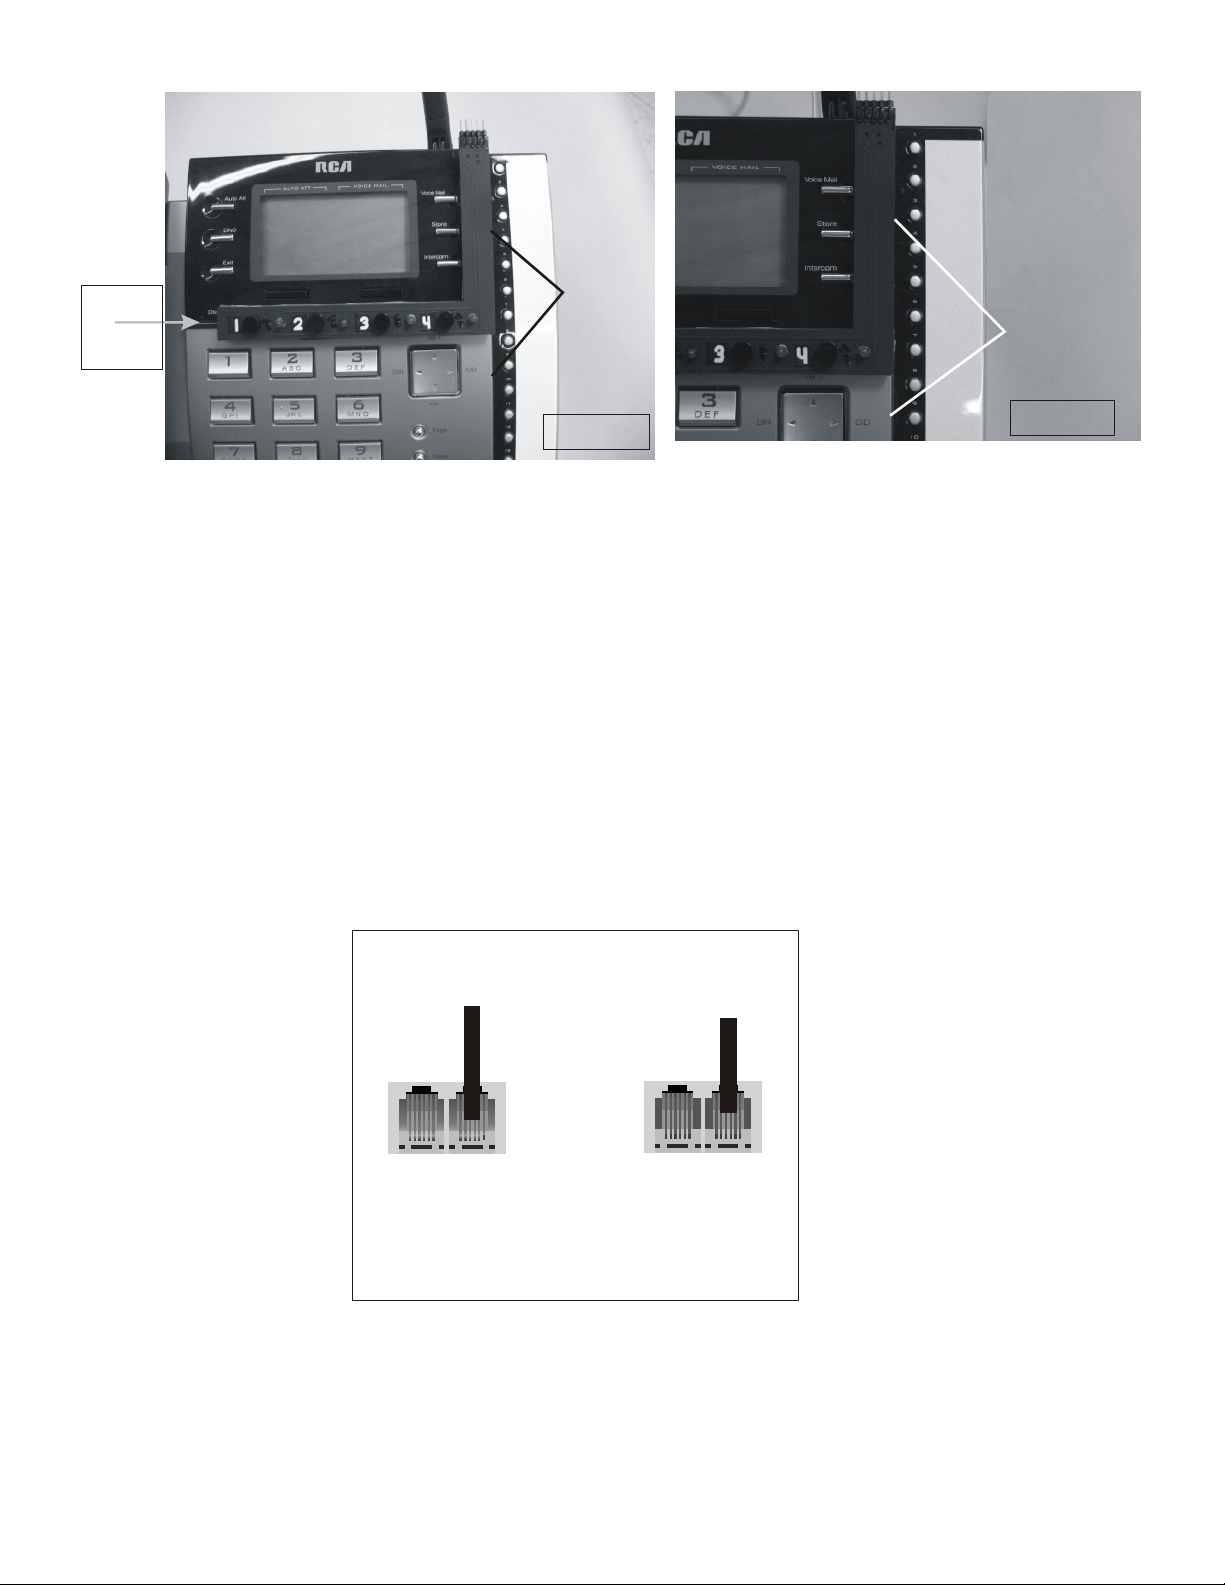
Edge “A”
Centered
Figure 1
Edge “A”
On phone
Figure 2
Over Line
Buttons
CAUTION: The SENSOR BOARD must be mounted and aligned correctly on the base
telephone, or the unit will not operate properly. If you need to remove the SENSOR
BOARD, slowly lift up on one edge of the SENSOR BOARD. Pulling the SENSOR
BOARD off too fast, will damage the foam pads. Excessive removal of the SENSOR
BOARD will weaken the adhesive on the SENSOR BOARD and will prevent it from
staying attached. If the SENSOR BOARD fails to stay attached to the phone, use a small
amount of Contact Cement, carefully applied with a Q-TIP, to re-attach the Sensor
Board. You MUST let the Contact Cement air cure for at least 20 seconds before
attaching to the phone. Please call for technical support for proper assistance in
cementing the SENSOR BOARD to the phone. DO NOT use any other type of glue,
cement, or tape on the SENSOR BOARD.
4- The CK-1R black box can not be located under the base phone like other CK1
units.
5- Connect the SENSOR BOARD CABLE between the CK1R Box and the
SENSOR BOARD as shown in Fig. 3.
To Black Box
3&4 to Phone
L4/Data
L4/L3
To Black Box
1&2 to Phone
L2/L1
L2
Jacks on Rear of Phone
6- Disconnect the modular cable that is connected to the RCA Phone, at the “L2/L1”
jack and hold it in your hand. Now connect the cord in your hand, to the [1&2 To
Line] jack on the CK-1R Black Box.
Page 2 of 5
Page 3

7- Disconnect the modular cable that is connected to the RCA Phone, at the “L4/L3”
jack and hold it in your hand. Now connect the cord in your hand, to the [3&4 To
Line] jack on the CK-1R Black Box.
8- Connect one end of one of the supplied modular cords, to the [1&2 To Phone]
jack on the CK-1R Black Box. Connect the other end of the modular cord to the
“L2/L1” jack on the RCA Base Phone.
9- Connect one end of the other supplied modular cord to the [3&4 to Phone] jack
on the CK-1R Black Box. Connect the other end of the modular cord to the
“L4/L3” jack on the RCA Base Phone.
10- The audio cord that comes with the CK1R is ONLY used for CD Players. If you
have a digital player, then you should be using the audio cord that came with your
digital unit. Connect the proper audio cord from your music source, to the
AUDIO IN jack on the CK-1R Black Box.
Modular Phone Cables
Base Phone
Sensor Board Cable
CK-1R Black Box
Figure 3
9- Connect the POWER CUBE from the CK-1R box to 115VAC power. All lights on
Black Box will flash two times and then will turn OFF.
Disabling ON HOLD BEEP on Phone:
When you place a caller ON HOLD, the 25450 phone will BEEP every 30 seconds or so.
This BEEP can be disabled as follows:
1- From the BASE PHONE, while it is hung up, press the MENU button (On
Display).
2- Press DOWN ARROW until “SYSTEM SETTING” is displayed.
3- Press “SELECT” (On Display).
4- Press DOWN ARROW until “HOLD MESSAGE” is displayed.
5- Press “SELECT” then “SELECT” again. Wait!
Page 3 of 5
Page 4

6- At end of BEEP, press “FINISH”(On Display), then press “BACK” then
“BACK”, then “BACK” again. That’s it!
Testing the System:
1- Pickup line 1 on your telephone. The line one LED on the SENSOR BOARD should
light up.
2- Repeat this test for lines 2-4. If all lines light up when picked up, the CK-1R is
working properly. If the lights on the SENSOR BOARD do not light up, then
a) Make sure that the CK1R and Phone is connected to power.
b) Make sure that the SENSOR BOARD is aligned properly.
Delayed Music Cut Off
When answering a call that has been placed ON HOLD, you could hear up to a
maximum of ½ second of music when the call is first picked up. The amount of music
that you hear will vary. This is considered normal operation of the unit.
Lights on CK-1R Box.
When first connected to power, all lights will flash two times then turn OFF. The lights
on the CK-1R Black Box are normally OFF. When you place a line on HOLD, the
corresponding LED on the rear of the CK1R box lights up to confirm the Promotion-OnHold condition.
Do Not use with other types of phones
The 25450RE3 was only designed to work with other H5450RE3 cordless phones. A
maximum of 16 H5450RE3 can be used with this phone. ONLY one base phone can be
used. The 25450RE3 will not work properly with any other phone (even other RCA
Phones!) You can not clear the HOLD condition, or music, from another type of phone.
This phone was not designed to work with other phones.
Tech Support - 916-786-6186
If you have any problems getting the unit to work properly feel free to give us a call.
Technical Support is available between the hours of 7:30 AM and 4:30 PM Pacific Time,
Monday through Friday.
• ONE YEAR LIMITED WARRANTY
This SKUTCH PRODUCT is warranted against defects for a period of one (1) year from
the date of the original invoice. Within this period, we will repair it without charge for
parts and labor. To obtain warranty service the product must be returned, at the
customer's expense, to SKUTCH Electronics along with a copy of the original invoice.
After the unit has been repaired, SKUTCH will ship the PRODUCT back via UPS
Page 4 of 5
Page 5

GROUND service at our expense. If any other form of return shipment is requested, the
customer will pay for 100% of the shipping cost.
This Warranty does not apply if in the sole opinion of SKUTCH Electronics, the
PRODUCT has been damaged by lightning or any other Acts of God, or by accident,
misuse, neglect, or improper packing, shipping, modification or servicing by other than
an authorized SKUTCH Service Center.
EXCEPT AS SPECIFICALLY PROVIDED IN THIS AGREEMENT, THERE ARE NO
OTHER WARRANTIES, EXPRESSED OR IMPLIED, INCLUDING, BUT NOT
LIMITED TO, ANY IMPLIED WARRANTIES OR MERCHANTABILITIES OR
FITNESS FOR A PARTICULAR PURPOSE AND IN NO EVENT SHALL SKUTCH
ELECTRONICS BE LIABLE FOR LOSS OF PROFITS OR BENEFITS, INDIRECT,
SPECIAL, CONSEQUENTIAL OR OTHER SIMILAR DAMAGES ARISING OUT OF
ANY BREACH OF THIS WARRANTY OR OTHERWISE.
Page 5 of 5
 Loading...