

Page 1
DE/EN
INSTALLATIONS
ANLEITUNG
INSTALLATION INSTRUCTIONS
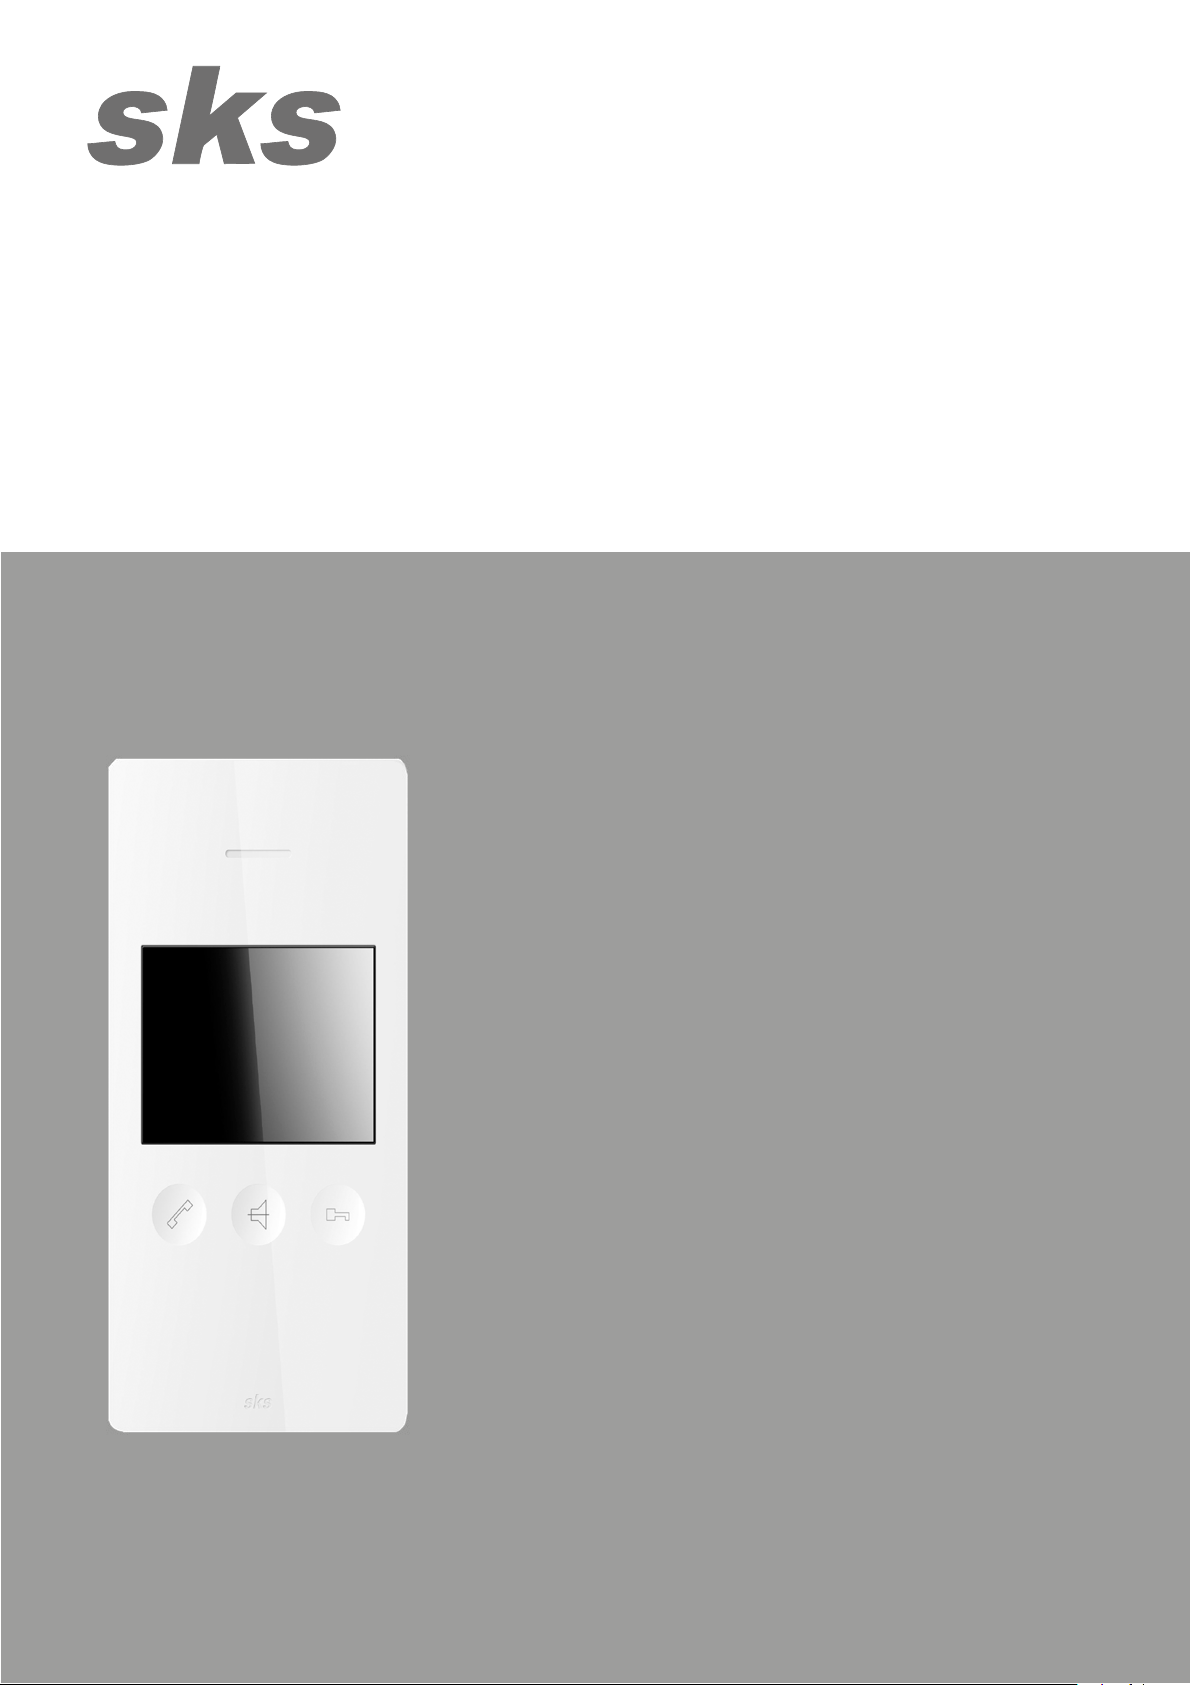
SMARTLine 2D BSV2012
Video Innensprechstelle
SKS-Kinkel Elektronik GmbH
Support Hotline: +49 (0) 2661 98088-112
Support E-Mail: support@sks-kinkel.de
Version 2.0
Dokumentenartikelnr. 97013201
Page 2
SKS-Kinkel Elektronik GmbH
10007001 SMARTLine 2D BSV2012 Video Innensprechstelle
DE
Inhaltsverzeichnis
1 Bedienungsanleitung 3
2 Beschreibung 3
2.1 Bestimmungsgemäßer Gebrauch 3
2.2 Leistungsmerkmale 3
2.3 Lieferumfang 3
2.4 Lagerung und Transport 4
2.5 Pflegehinweise 4
2.6 Modifikation 4
2.7 Sicherheit 4
3 Technische Daten 4
4 DIP-Schalter 5
4.1 Einstellen der Rufadresse 5
4.2 Abschlusselement 5
5 Klemmenbezeichnung 5
5.1 Anschluss 5
6 Strukturplan 6
7 Verdrahtungsplan 7
8 Montageanleitung 8
8.1 Vorbereitung 8
8.2 Montage auf Unterputzdose oder Hohlwanddose 8
8.3 Montage Aufputz 10
8.4 Demontage 11
9 Inbetriebnahme 11
9.1 Rufadresse 12
9.2 Funktionen 13
9.3 Sprache 13
9.4 Kalibrierung 14
9.5 Reinigung 14
9.6 Konfiguration 15
10 Zurücksetzen der Innensprechstelle 15
11 Signalisierung 17
12 Bedienung 17
12.1 Touchtasten 17
12.2 Bedienung über Touchtasten 17
12.3 Menütasten 18
12.4 Bedienung über Menütasten 19
12.4.1 Hauptmenü 19
12.4.1.1 Internruf 19
12.4.1.2 Kamera 20
12.4.1.3 Display 21
12.4.1.4 Lautstärke 21
12.4.1.5 Klingelton 22
13 Service 22
13.1 Gewährleistung 22
13.2 Service und Support 22
13.3 Anschrift 23
14 Entsorgungshinweise 23
15 Haftungsausschluss 23
16 Anhang 24
Support Hotline: +49 (0) 2661 98088-112
Support E-Mail: support@sks-kinkel.de
2
Dokumenten Art. Nr. 97013201
Versionsnr. 2.0
Page 3
SKS-Kinkel Elektronik GmbH
10007001 SMARTLine 2D BSV2012 Video Innensprechstelle
DE
1 Bedienungsanleitung
WICHTIG!
VOR GEBRAUCH SORGFÄLTIG LESEN!
FÜR SPÄTERES NACHSCHLAGEN AUFBEWAHREN!
2 Beschreibung
Mit der SMARTLine 2D BSV2012 Video Innensprechstelle Freisprechen kann mit SKS Türstationen und anderen SKS
Innensprechstellen kommuniziert und ein Türöner entriegelt werden.
2.1 Bestimmungsgemäßer Gebrauch
3 Optische und akustische Signalisierung von Türrufen, Etagenrufen und internen Rufen
3 Rufannahme
3 Freisprechen
3 Türönerfunktion
3 Licht schalten (nur mit zusätzlichem Relaismodul)
3 Ausschließlich zum Gebrauch im tropf- und spritzwasserfreien Innenbereich
2.2 Leistungsmerkmale
3 Tastenfunktionen: Rufannahme, Türönung, Rufabschaltung (Ruf schaltet sich nach 12 Stunden automatisch
wieder ein)
3 Zusatzfunktionen über Touch-Display: Schaltfunktionen möglich (über Relaismodul im SMARTLine 2D Video-
kompaktnetzteil)
3 Einstellung Ruautstärke und Rufmelodien, Farb-, Kontrast und Helligkeitsregelung
3 Automatisches Einschalten des TFT-Displays bei einem eingehenden Türruf
3 Optische Rufsignalisierung über LED
3 Ein-Mann-Installation und -Programmierung
3 Optional Parallelschaltung von bis zu 4 Innensprechstellen
3 Insgesamt 12 Hausruf- und Etagenrufmelodien
3 Ruftonlautstärke 10-fach einstellbar
3 Menüsprache in Deutsch oder Englisch wählbar
3 Freisprechfunktion
3 Internsprechfunktion
3 Automatische Türönerfunktion
3 Aufputz Abmessungen 90 x 180 x 17 mm
2.3 Lieferumfang
3 SMARTLine 2D BSV2012 Video Innensprechstelle
3 Bedienungsanleitung
Support Hotline: +49 (0) 2661 98088-112
Support E-Mail: support@sks-kinkel.de
Versionsnr. 2.0
3
Dokumenten Art. Nr. 97013201
Page 4
SKS-Kinkel Elektronik GmbH
10007001 SMARTLine 2D BSV2012 Video Innensprechstelle
DE
2.4 Lagerung und Transport
Nur in Originalverpackung transportieren, trocken und kühl lagern.
2.5 Pflegehinweise
Reinigen Sie das Gerät nur mit einem weichen Tuch, welches mit einer milden Seifenlösung angefeuchtet ist. Trockene Reinigung, aggressive Reiniger und Scheuermittel können die Oberäche beschädigen.
2.6 Modifikation
Eine Modikation (Umbau oder Änderungen) der SMARTLine 2D BSV2012 Video Innensprechstelle ist nicht erlaubt.
2.7
Gegenmaßnahmen:
Die SKS-Planungshilfe für SMARTLine 2-Draht Innensprechstellen (Download unter www.sks-kinkel.de) muss bei
der Installation beachtet werden!
Sicherheit
Gefahr für Personen durch einen elektrischen Schlag. Verbrennungsgefahr, Geräteschäden und Fehlfunktionen. Bei der Installation sind die Richtlinien der VDE 0100 und
VDE 0800 einzuhalten. (Deutschland)
3 Schalten Sie zu Beginn der Arbeiten alle spannungsführenden Leitungen frei.
3 Sichern Sie die ausgeschalteten Leitungen gegen irrtümliches Wiedereinschalten.
3 Stellen Sie Spannungsfreiheit durch Messung fest.
3 Decken Sie benachbarte, unter Spannung stehende oder leitfähige Teile ab.
3 Alle Arbeiten und elektrische Anschlüsse müssen den nationalen Bestimmungen des jeweiligen Landes ent-
sprechen.
Montage, Installation, Reparaturen und Inbetriebnahme dürfen nur durch Elektrofachpersonal vorgenommen werden!
Für Arbeiten an Anlagen mit Netzanschluss 230 V Wechselspannung sind die Sicherheitsforderungen nach DIN VDE 0100 zu beachten.
3 Technische Daten
Elektrische Daten
Spannung a+/b- 20,5-28 VDC
Spannung Sp+/Sp- 12 VDC/50 mA
Allgemeines
Display 320 x 240 Pixel, 8,9 cm (3,5“)
Temperatur -10°C bis +45°C
Feuchtigkeit 20% bis 90%, nicht kondensierend
Gehäuse Kunststogehäuse
Abmessungen (Breite x Höhe x Tiefe) 90 x 180 x 18 mm
Schutzklasse IP20
Konformität zu EU Richtlinien und Niederspannungsricht-
linie
Support Hotline: +49 (0) 2661 98088-112
Support E-Mail: support@sks-kinkel.de
EMV 2014/30/EU: EN55022 und EN55024,
EG 2014/35/EU
4
Dokumenten Art. Nr. 97013201
Versionsnr. 2.0
Page 5

SKS-Kinkel Elektronik GmbH
10007001 SMARTLine 2D BSV2012 Video Innensprechstelle
DE
4 DIP-Schalter
Damit die Innensprechstelle gerufen werden kann und das Videobild in guter Qualität angezeigt wird, ist es erforderlich,
den DIP-Schalter richtig einzustellen. Im folgenden Abschnitt werden die Funktionen des DIP-Schalters beschrieben.
4.1 Einstellen der Rufadresse
Damit die Innensprechstelle von der Haustürstation gerufen werden kann, ist es erforderlich, dass die Innensprechstelle die gleiche Rufadresse erhält wie der dazugehörige Klingeltaster. Jede Rufadresse ist fest einem Klingeltaster
an der Türstation zugeordnet. Nach der im Anhang bendlichen SKS BUS Rufadressentabelle ist die gewünschte
Rufadresse des Gerätes am DIP-Schalter einzustellen. Die Rufadressenverteilung für die Klingeltaster ist bei SKS
Türstationen in der Türstation oder am Türlautsprecher hinterlegt.
ON
A1
1 2 3 4 5 6
Das linke Beispiel zeigt die DIP-Schalter Einstellung für die Rufadresse A1. Die aktuell eingestellte Rufadresse ist im On-Screen-Menü unter Inbetriebnahme → Konguration → Rufadresse ersichtlich.
4.2 Abschlusselement
Damit auf allen Innensprechstellen das Videobild in guter Qualität angezeigt wird, ist es zwingend erforderlich, den
Abschlusswiderstand anlagenkonform zu aktivieren oder zu deaktivieren. Der Abschlusswiderstand wird mit dem
DIP-Schalter Nummer 6 aktiviert (ON) bzw. deaktiviert (OFF). Bendet sich die Innensprechstelle am Ende einer
Steigleitung oder Stichleitung, muss der DIP-Schalter 6 auf „ON“ gestellt werden.
DIP-Schalterposition Abschlusswiderstand
ON
aktiviert
1 2 3 4 5 6
ON
deaktiviert
1 2 3 4 5 6
5 Klemmenbezeichnung
Klemme Bezeichnung
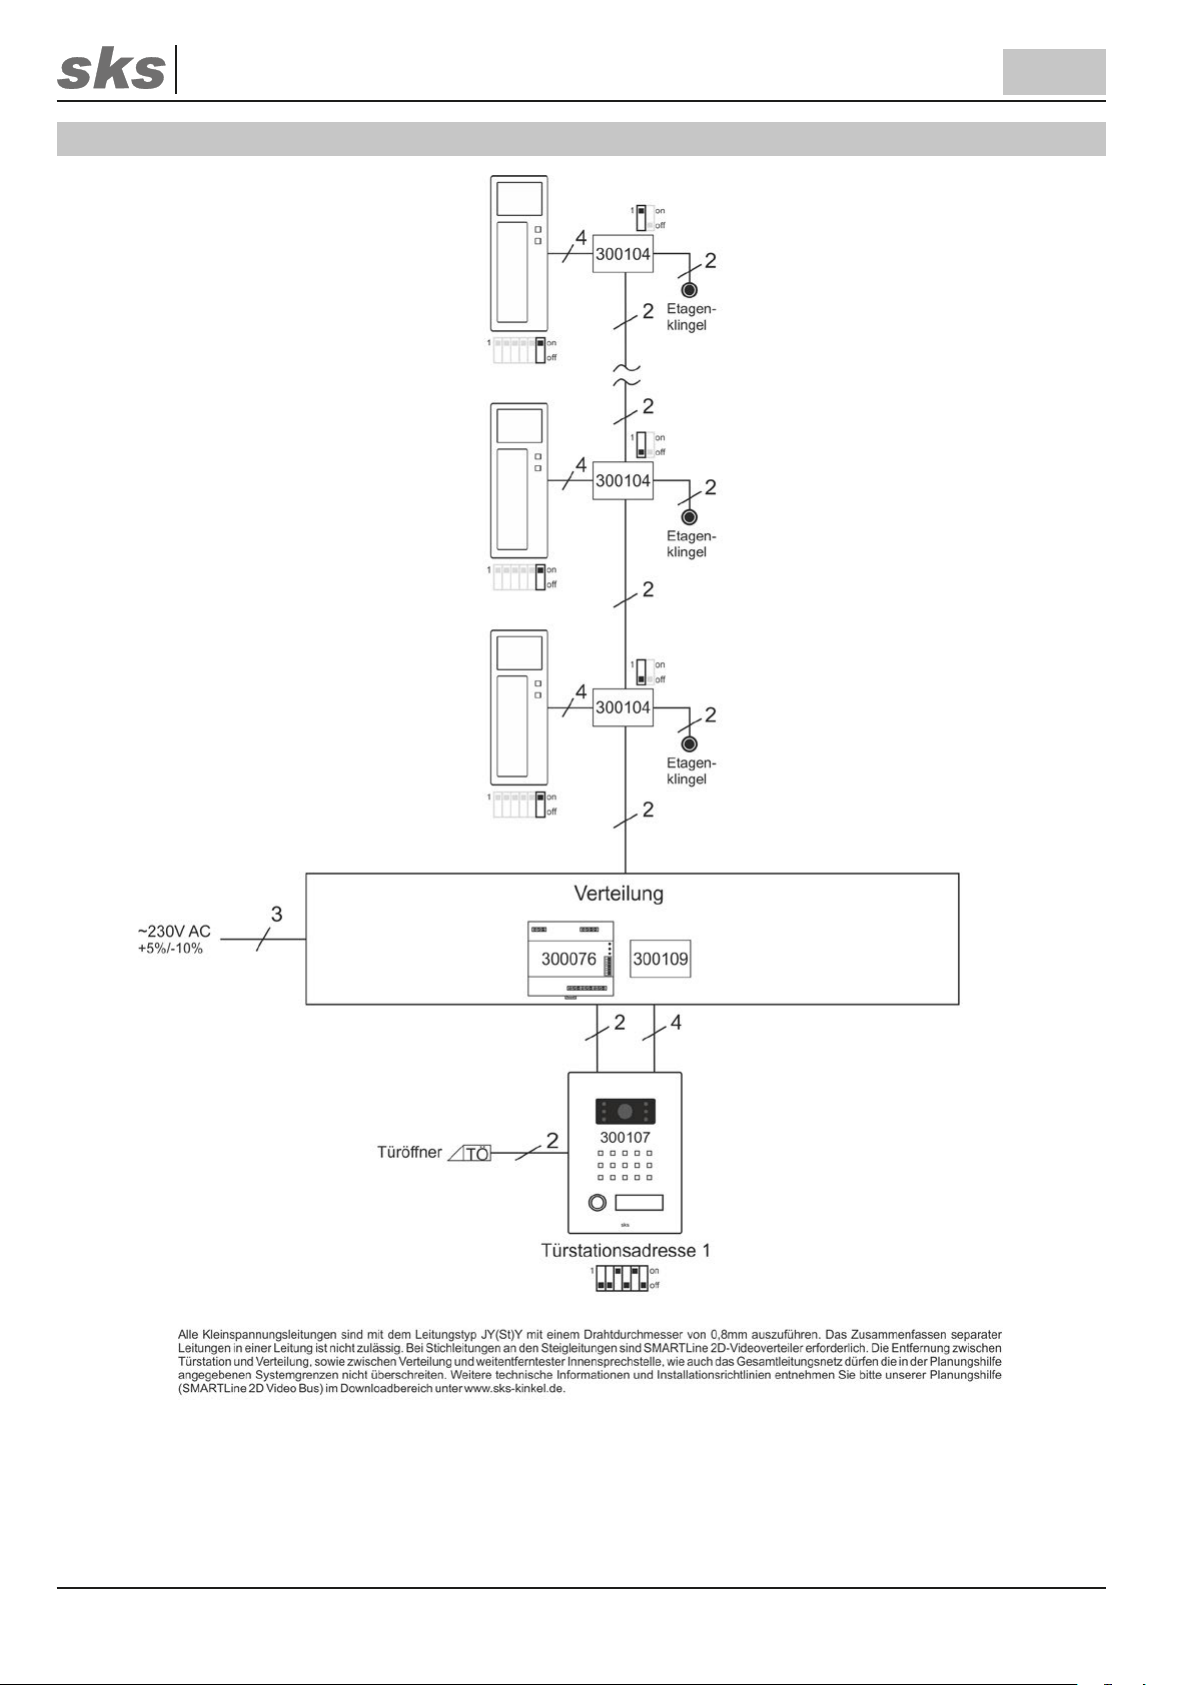
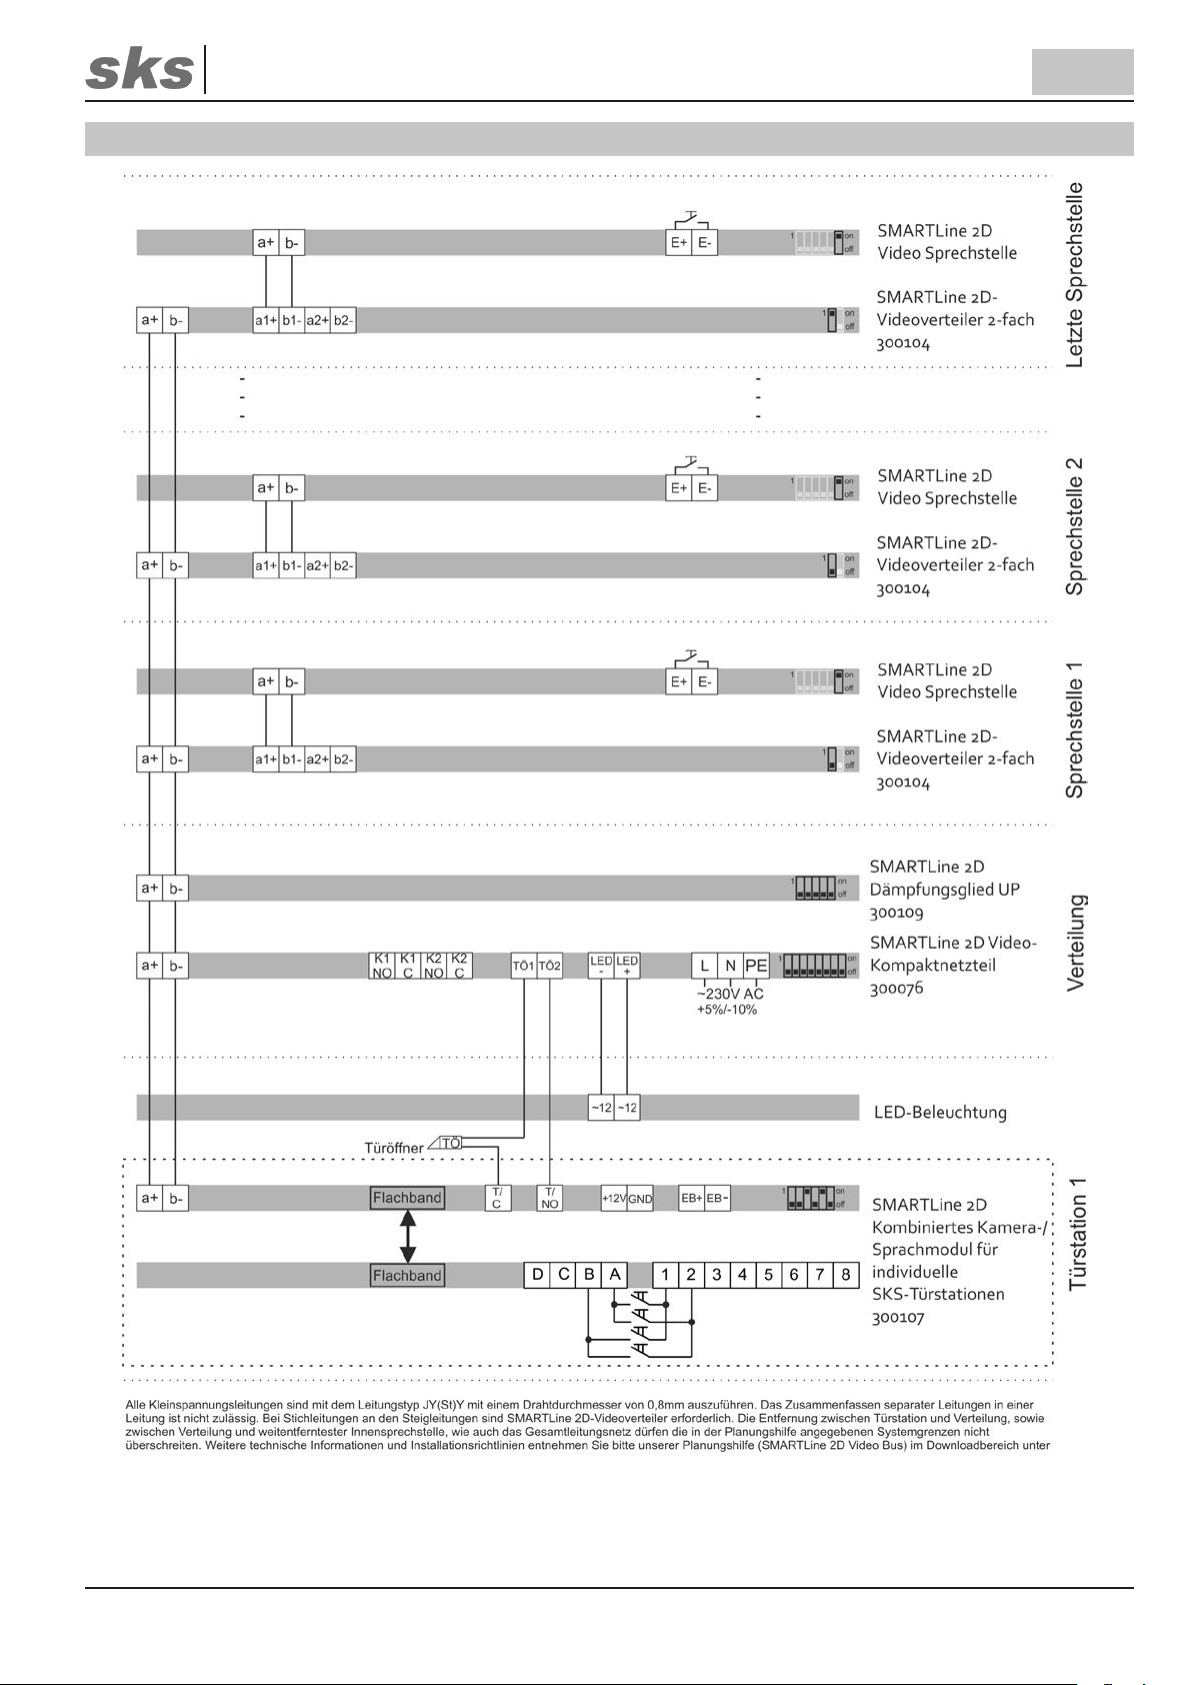
a+/b- Versorgung SMARTLine BUS
E+/E- Etagentaster
Sp+/Sp- Anschluss für externen Gong
5.1 Anschluss
Die SMARTLine 2D BSV2012 Innensprechstelle wird über die
Klemmen a+/b- an den 2-Draht-Video-Bus angeschlossen.
An den Klemmen E+/E- kann optional ein Etagentaster (Schließer) angeschlossen werden.
An den Klemmen Sp+/Sp- kann optional ein externer Gong angeschlossen werden
Um Fehler bei dem Anschluss zu vermeiden, nehmen Sie die
Planungshilfe oder den Verdrahtungsplan zur Hilfe.
Support Hotline: +49 (0) 2661 98088-112
Support E-Mail: support@sks-kinkel.de
5
Versionsnr. 2.0
Dokumenten Art. Nr. 97013201
Page 6
SKS-Kinkel Elektronik GmbH
10007001 SMARTLine 2D BSV2012 Video Innensprechstelle
6 Strukturplan
DE
Support Hotline: +49 (0) 2661 98088-112
Support E-Mail: support@sks-kinkel.de
Versionsnr. 2.0
6
Dokumenten Art. Nr. 97013201
Page 7
SKS-Kinkel Elektronik GmbH
10007001 SMARTLine 2D BSV2012 Video Innensprechstelle
7 Verdrahtungsplan
DE
Support Hotline: +49 (0) 2661 98088-112
Support E-Mail: support@sks-kinkel.de
Versionsnr. 2.0
7
Dokumenten Art. Nr. 97013201
Page 8
SKS-Kinkel Elektronik GmbH
10007001 SMARTLine 2D BSV2012 Video Innensprechstelle
8 Montageanleitung
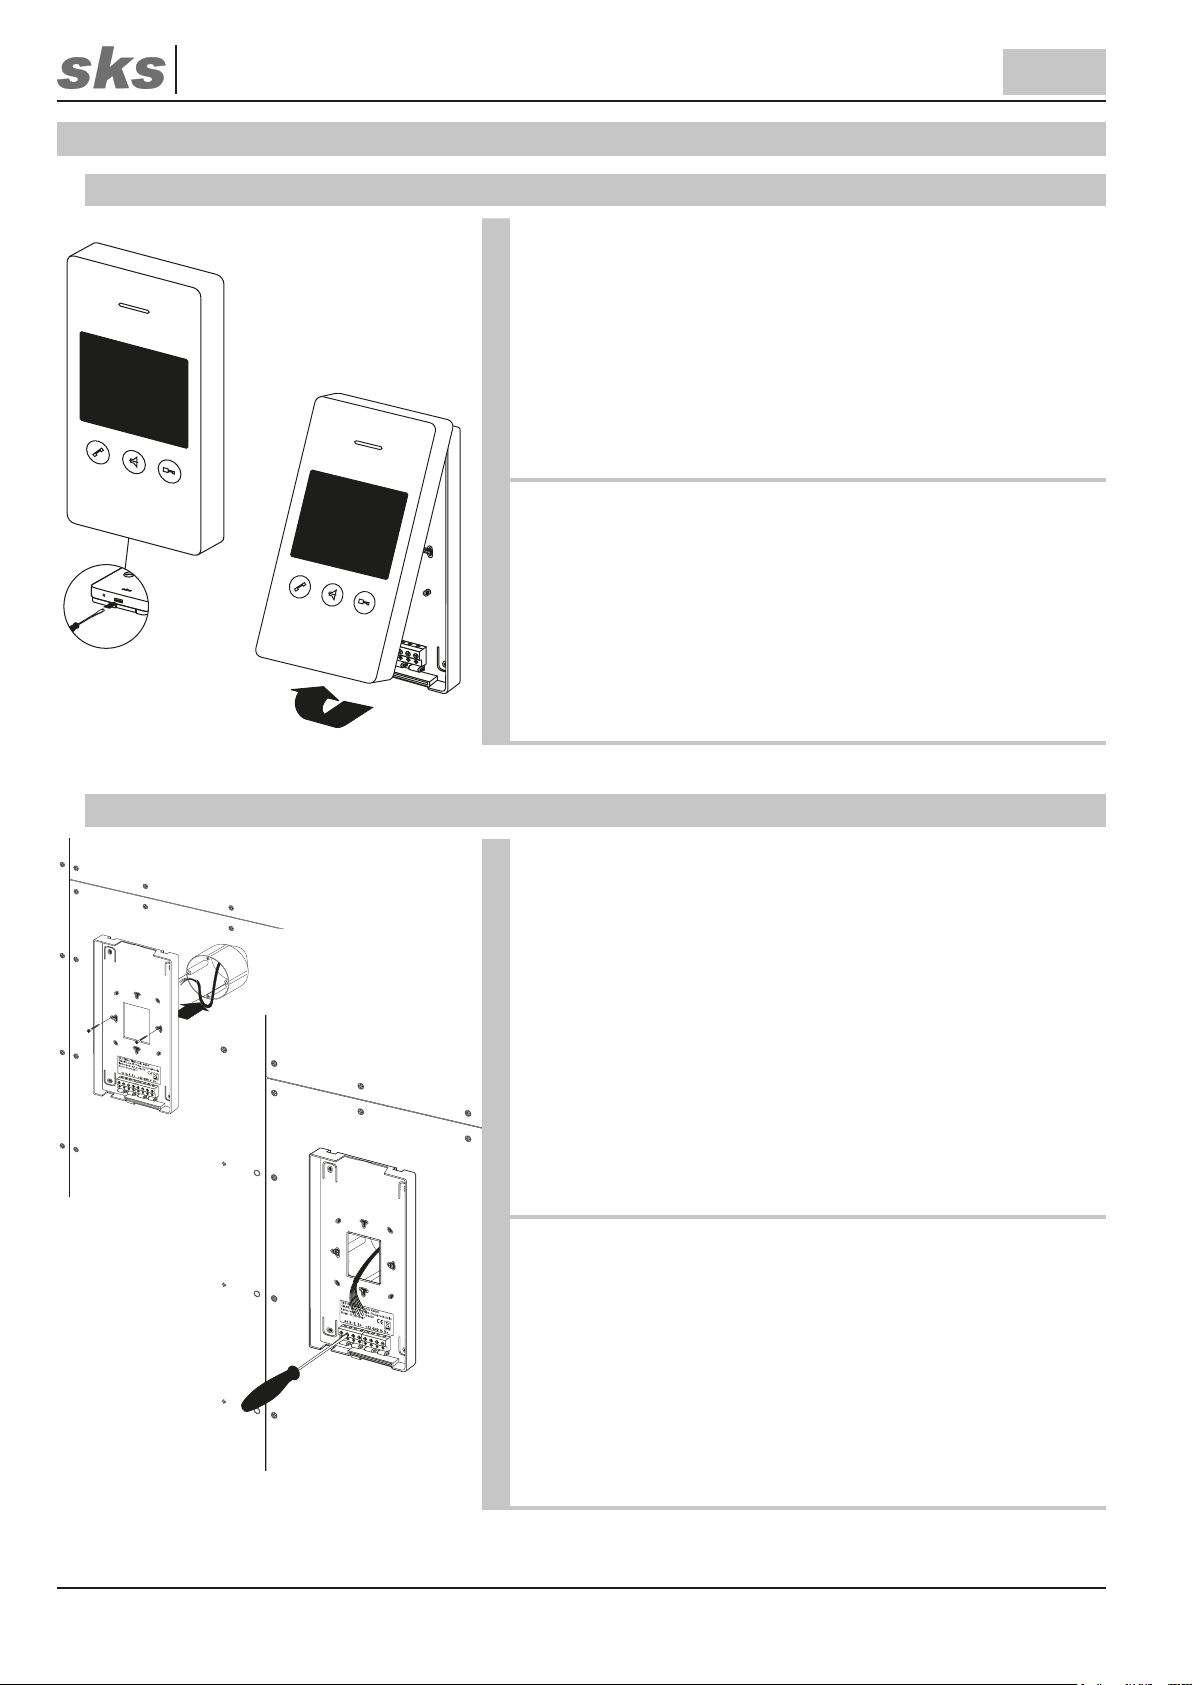
8.1 Vorbereitung
DE
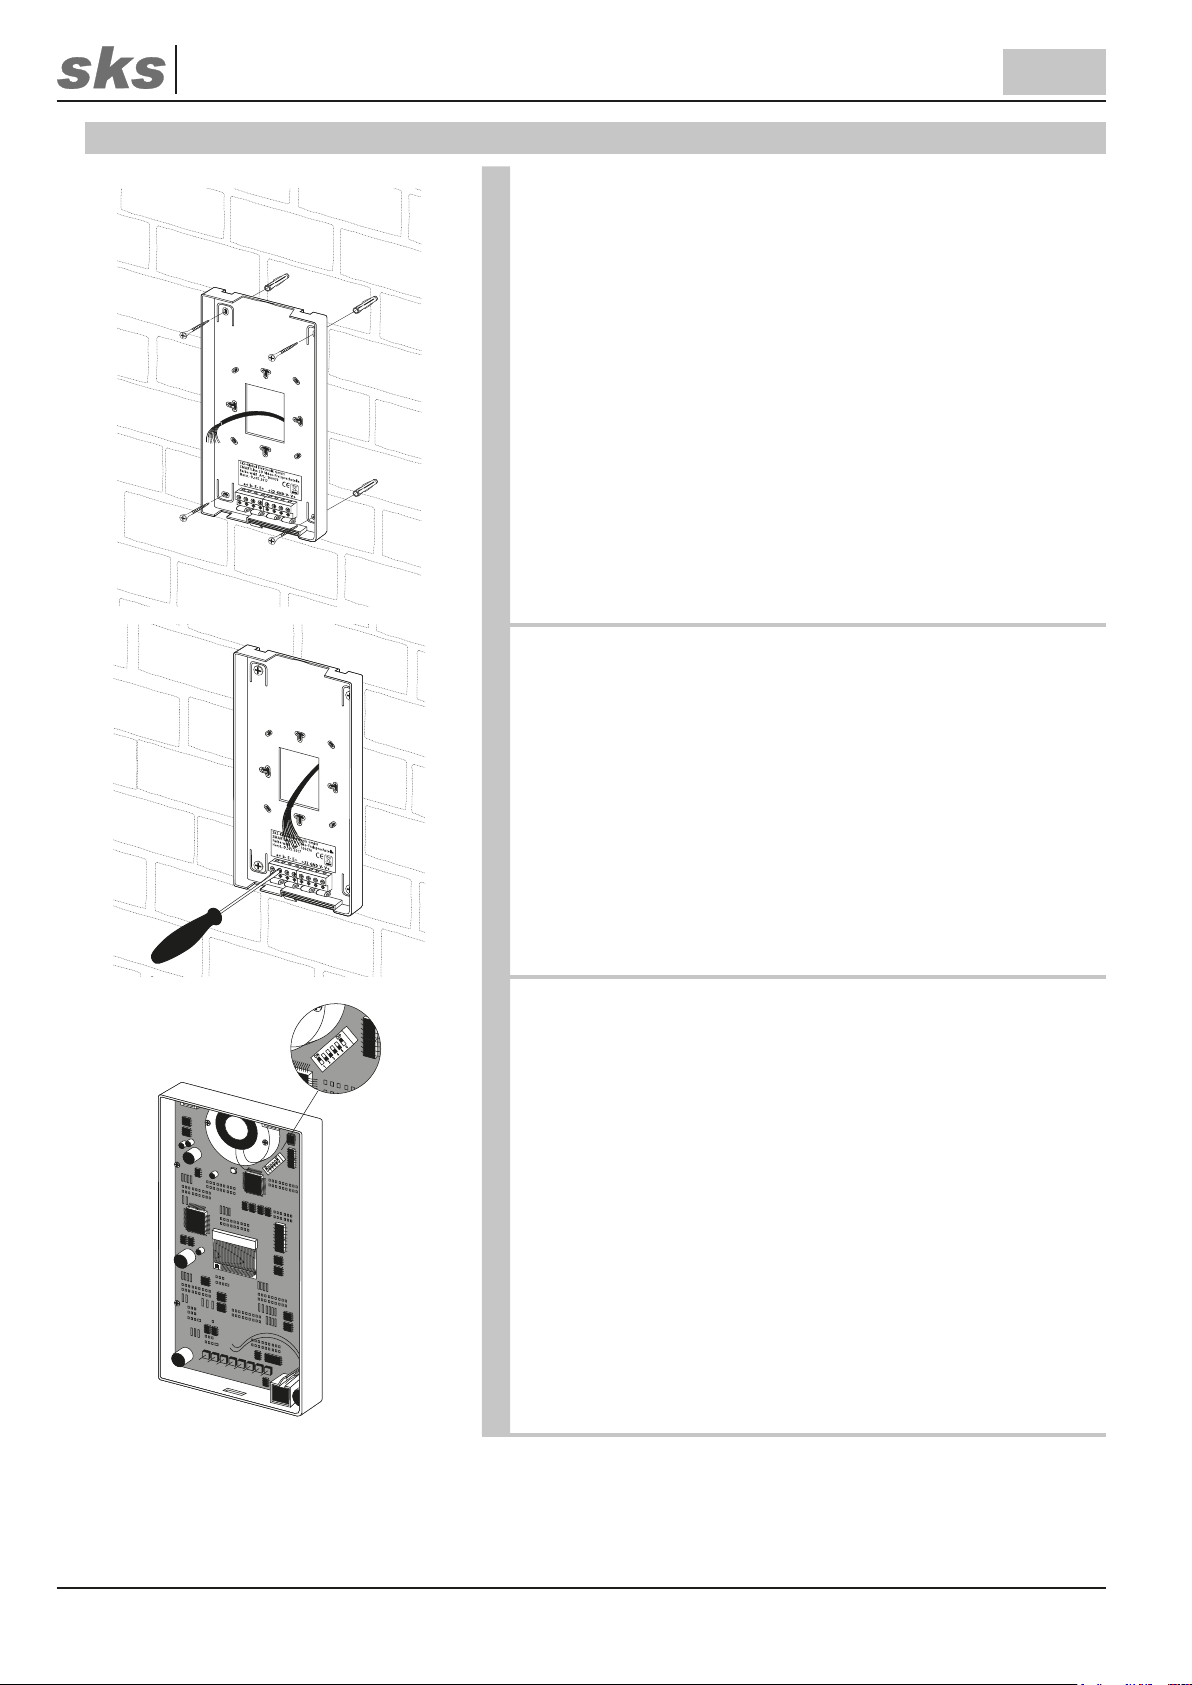
Lösen Sie die Innensprechstelle mit Hilfe eines Schraubendrehers
von dem Geräteträger, indem Sie mit dem Schraubendreher in
die Entriegelungsönung auf der Unterseite der Innensprechstelle
hinein drücken.
Nehmen Sie vorsichtig die Innensprechstelle, wie auf der Zeichnung zu sehen, von dem Geräteträger ab.
Ziehen Sie dazu das Unterteil der Innensprechstelle zu sich hin
und heben Sie dann diese nach oben hin ab.
8.2 Montage auf Unterputzdose oder Hohlwanddose
Vor dem Befestigen des Geräteträgers wird empfohlen, eine Unterputz- oder Hohlwanddose zu installieren, um den Geräteträger
anschließend mit Schrauben an der Unterputz- oder Hohlwanddose zu befestigen. Benutzen Sie dazu die Befestigungslöcher im
mittleren Bereich des Geräteträgers.
Es wird empfohlen, den Geräteträger zusätzlich mit Schrauben an
jeder der vier Ecken zu befestigen
Ziehen Sie das Installationskabel vor dem Anschrauben des
Geräteträgers durch die rückseitige Önung! Legen Sie dabei
nur die zum Anschluss wirklich benötigten Adern in das Gerät. Das
Kabel darf im komplett montierten Zustand nicht gequetscht oder
scharf geknickt werden.
Schließen Sie die Anschlussklemmen an das zuvor verlegte Kabel
an. Die Anschlussklemmen nden Sie auf dem Geräteträger der
Innensprechstelle.
Um Fehler bei dem Anschluss zu vermeiden, nehmen Sie die
SMARTLine Planungshilfe oder den Verdrahtungsplan zur
Hilfe.
Support Hotline: +49 (0) 2661 98088-112
Support E-Mail: support@sks-kinkel.de
Versionsnr. 2.0
8
Dokumenten Art. Nr. 97013201
Page 9
SKS-Kinkel Elektronik GmbH
10007001 SMARTLine 2D BSV2012 Video Innensprechstelle
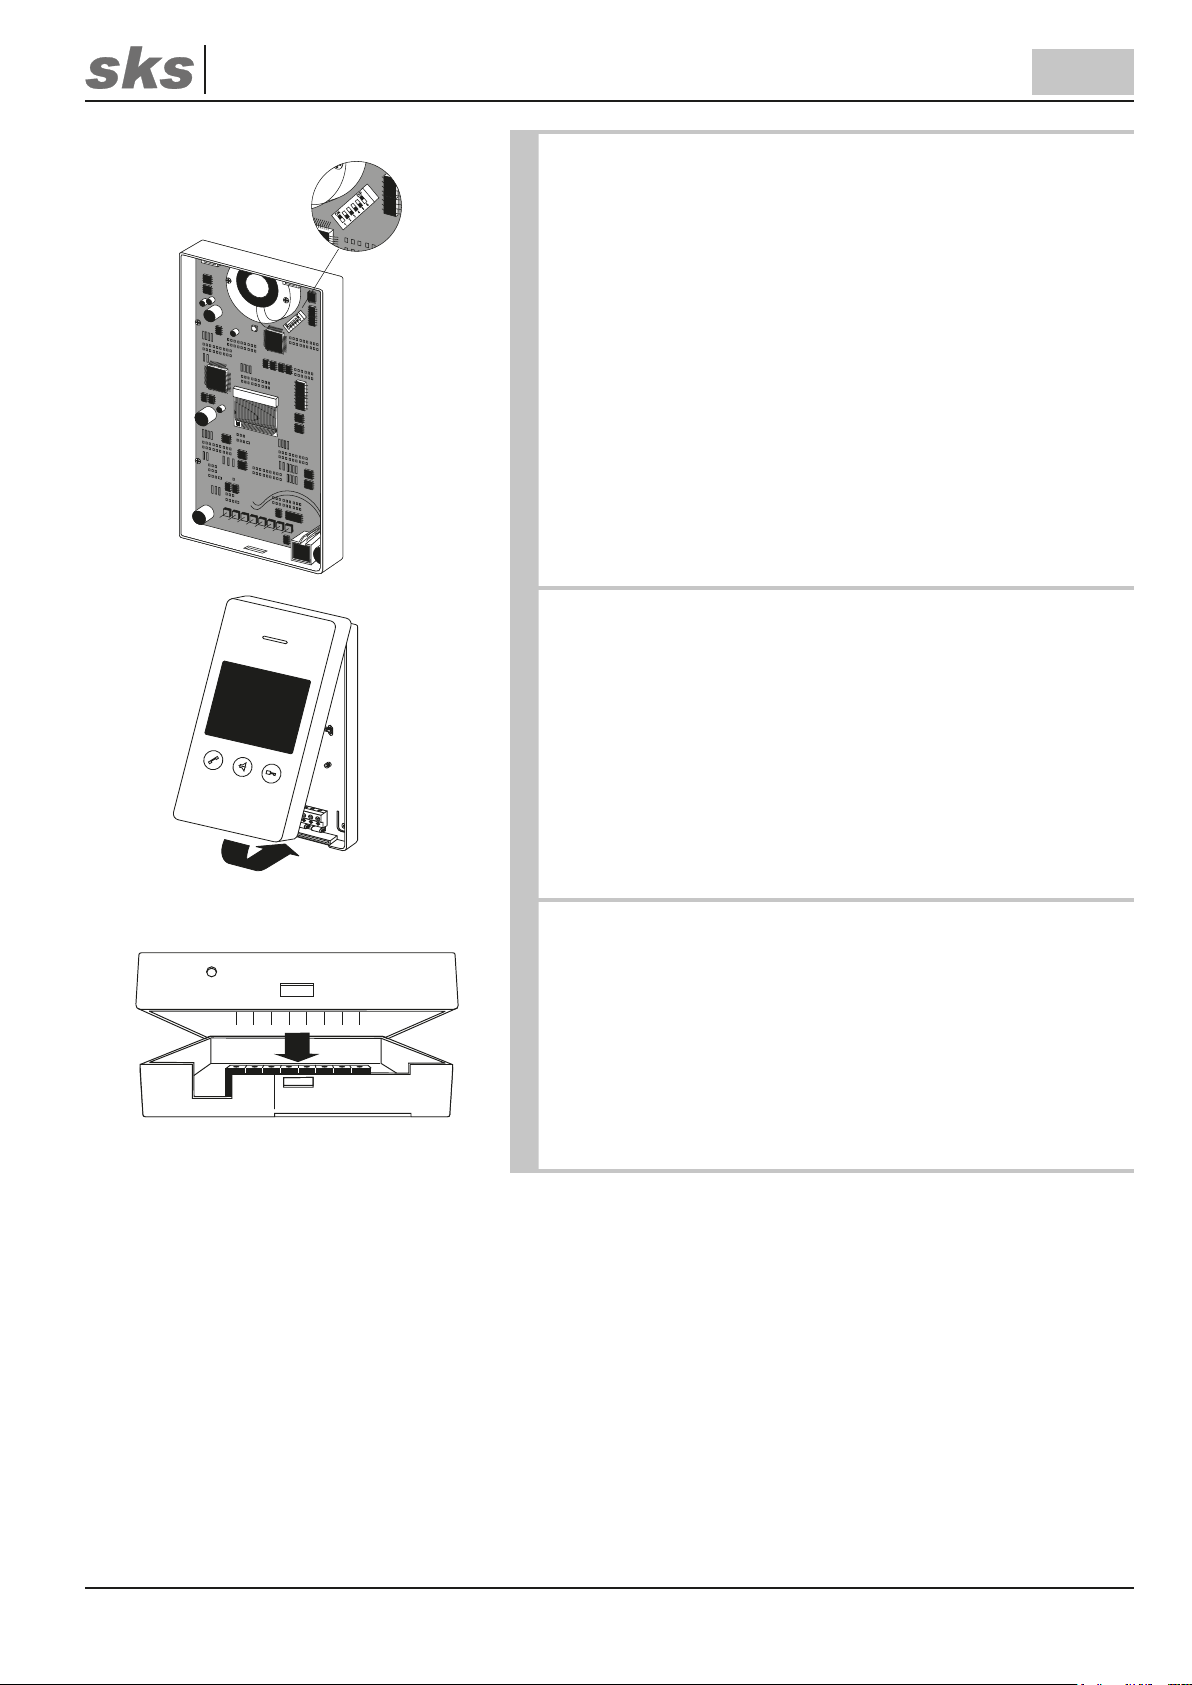
Stellen Sie die SKS BUS-Rufadresse am DIP-Schalter auf der
Rückseite der SMARTLine 2D BSV2012 Video Innensprechstelle
ein. Jede Adresse ist einem Klingeltaster an der Türstation zugeordnet. Die SKS BUS-Rufadressentabelle bendet sich im Anhang dieser Anleitung.
Bei einem späteren Austausch einer Innensprechstelle ist
unbedingt auf die Einstellung des DIP-Schalters zu achten!
DE
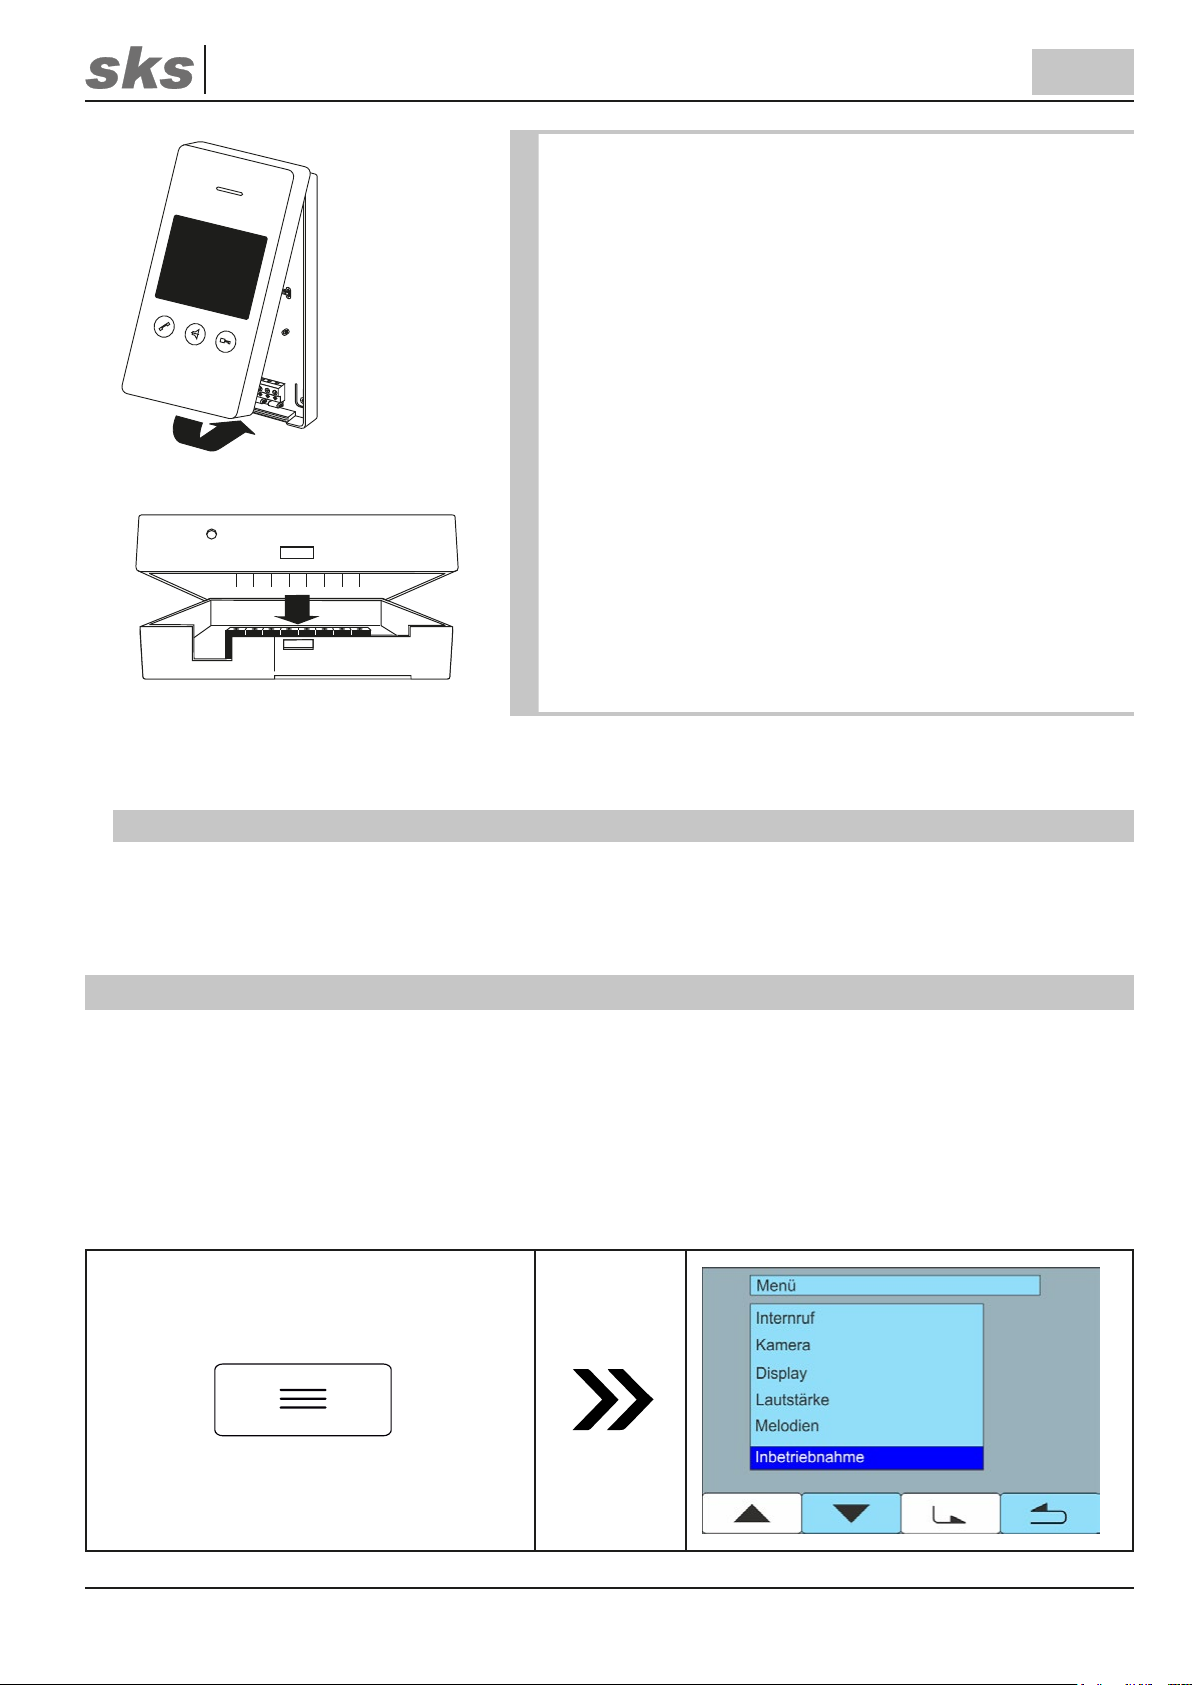
Hängen Sie als nächstes die Innensprechstelle im oberen Bereich
des Geräteträgers ein. Achten Sie hierbei darauf, dass keine freiliegenden Adern die Leiterplatte von hinten berühren können.
Drücken Sie anschließend die SMARTLine 2D BSV2012 Video In-
nensprechstelle auf den Geräteträger bis diese hörbar einrastet.
Beim Verbinden der Innensprechstelle mit dem Geräteträger müssen die Kontakte auf der Innenseite der Innensprechstelle in die
Anschlussklemmen auf dem Geräteträger gesteckt werden.
Support Hotline: +49 (0) 2661 98088-112
Support E-Mail: support@sks-kinkel.de
Versionsnr. 2.0
9
Dokumenten Art. Nr. 97013201
Page 10
SKS-Kinkel Elektronik GmbH
10007001 SMARTLine 2D BSV2012 Video Innensprechstelle
8.3 Montage Aufputz
DE
Befestigen Sie den Geräteträger der Innensprechstelle mit Schrauben an der Wand. Benutzen Sie dazu die Befestigungslöcher am
Geräteträger.
Ziehen Sie das Installationskabel vor dem Anschrauben des
Geräteträgers durch die rückseitige Önung! Legen Sie dabei
nur die zum Anschluss wirklich benötigten Adern in das Gerät. Das
Kabel darf im komplett montierten Zustand nicht gequetscht oder
scharf geknickt werden.
Schließen Sie die Anschlussklemmen an das zuvor verlegte Kabel
an. Die Anschlussklemmen nden Sie auf der Rückseite der
Innensprechstelle.
Um Fehler bei dem Anschluss zu vermeiden, nehmen Sie die
SMARTLine Planungshilfe oder den Verdrahtungsplan zur
Hilfe.
Stellen Sie die SKS BUS-Rufadresse am DIP-Schalter auf der
Rückseite der SMARTLine 2D BSV2012 Video Innensprechstelle
ein. Jede Adresse ist einem Klingeltaster an der Türstation zugeordnet. Die SKS SMARTLine 2D Rufadresstabelle bendet sich im
Anhang dieser Anleitung.
Bei einem späteren Austausch einer Innensprechstelle ist unbedingt auf die Einstellung des DIP-Schalters zu achten!
Support Hotline: +49 (0) 2661 98088-112
Support E-Mail: support@sks-kinkel.de
10
Versionsnr. 2.0
Dokumenten Art. Nr. 97013201
Page 11
SKS-Kinkel Elektronik GmbH
10007001 SMARTLine 2D BSV2012 Video Innensprechstelle
Hängen Sie als nächstes die SMARTLine 2D BSV2012 Video Innensprechstelle im oberen Bereich des Geräteträgers ein. Achten
Sie hierbei darauf, dass keine freiliegenden Adern die Leiterplatte
von hinten berühren können.
Drücken Sie anschließend die Innensprechstelle auf den Geräteträger bis diese fest auf dem Rahmen sitzt.
Beim Verbinden der Innensprechstelle mit dem Geräteträger müssen die Kontakte auf der Innenseite der Innensprechstelle in die
Anschlussklemmen auf dem Geräteträger gesteckt werden.
DE
8.4 Demontage
Önen Sie die SMARTLine 2D BSV2012 Video Innensprechstelle wie im Kapitel „Vorbereitung“ beschrieben und
nehmen Sie sie vom Geräteträger ab und entfernen ggf. auch den Geräteträger durch Abschrauben.
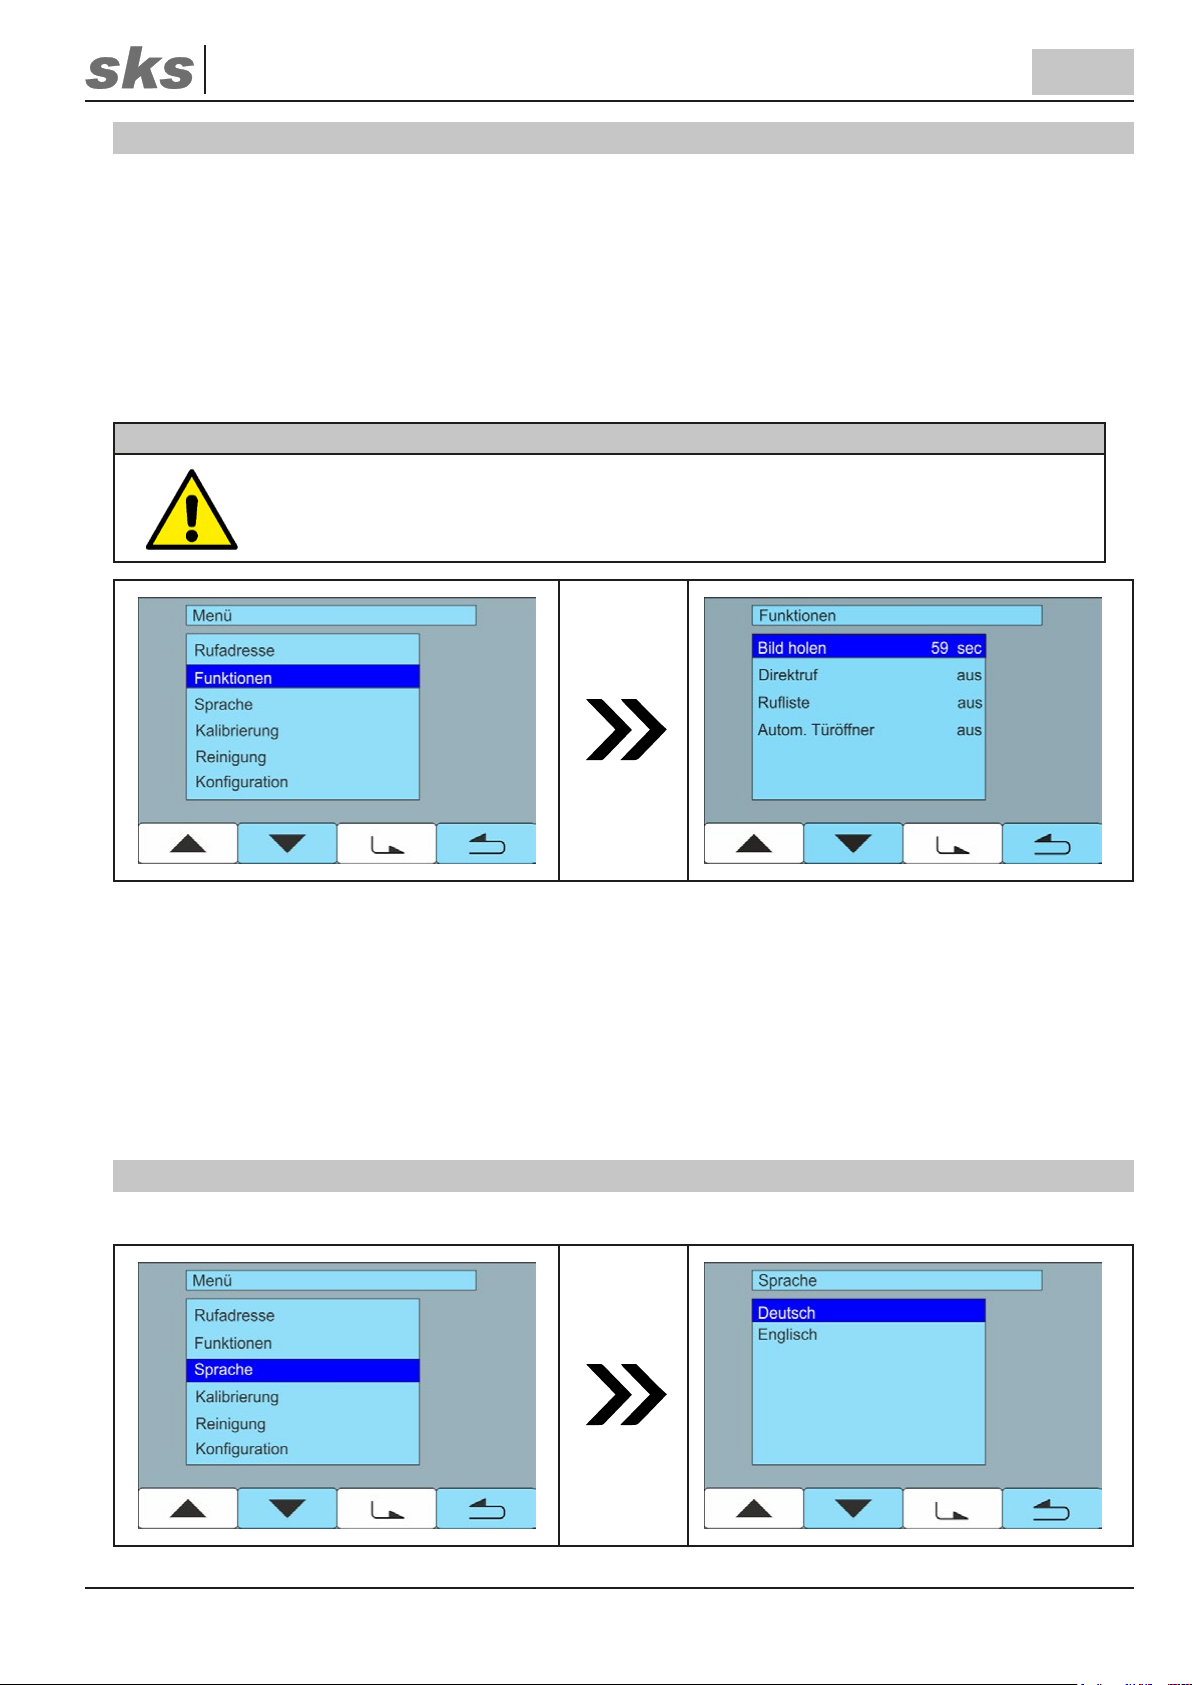
9 Inbetriebnahme
Um das On-Screen-Menü aufrufen zu können, muss der Bildschirm zunächst durch eine Berührung aktiviert werden.
Damit die Menüleiste angezeigt werden kann, muss ein zweites Mal der Bildschirm berührt werden.
Tippen Sie anschließend auf die Menütaste, um in das Hauptmenü zu gelangen und navigieren dort über die Pfeiltasten
auf den letzten Punkt Inbetriebnahme. Um den Punkt auszuwählen, tippen Sie auf die Bestätigungstaste.
Eine Übersicht über die einzelnen Touch- und Menütasten und deren Bedeutung nden Sie im Kapitel Bedienung.
Support Hotline: +49 (0) 2661 98088-112
Support E-Mail: support@sks-kinkel.de
11
Versionsnr. 2.0
Dokumenten Art. Nr. 97013201
Page 12

SKS-Kinkel Elektronik GmbH
10007001 SMARTLine 2D BSV2012 Video Innensprechstelle
DE
9.1 Rufadresse
Unter diesem Menüpunkt wird eingestellt, ob die Innensprechstelle als Haupt- oder Nebensprechstelle fungieren
soll und ob die automatische Bildfunktion aktiviert werden soll. Eine Nebensprechstelle ist dabei eine Innensprech-
stelle, die zur Hauptsprechstelle parallel geschaltet wird, d. h. es wird dieselbe Rufadresse gerufen und Haupt- und
Nebensprechstelle(n) klingeln gleichzeitig. Neben der Hauptsprechstelle können zusätzlich maximal drei Nebensprechstellen angeschlossen werden, die bei einem Haus-, Intern- oder Etagenruf parallel reagieren.
Hinweis
Die Parallelschaltung von Sprechstellen beeinusst die mögliche Leitungslänge negativ!
Um die Innensprechstelle als Haupt- oder Nebensprechstelle einzurichten, wählen Sie mit den Navigationstasten
den Menüpunkt „Rufadresse“ aus und tippen Sie auf die Bestätigungstaste.
Wählen Sie dann mit den Navigationstasten aus, ob die Innensprechstelle die Hauptsprechstelle (Haupt) oder eine
von drei Nebensprechstellen (Nebensp.1, Nebensp.2 oder Nebensp.3) ist. Bestätigen Sie die Auswahl mit der Bestätigungstaste.
Um die automatische Bildaktivierung, d. h. die automatische Anzeige eines Videobildes, sobald ein Klingelknopf betätigt wird, ein- oder auszuschalten, wählen Sie unter „Rufadresse“ den Menüpunkt „Nebensprechst.“ aus und tippen
zur Bestätigung auf die Bestätigungstaste. Wählen Sie nun über die Navigationstasten „aus“, wenn Sie das Kamerabild ausschließlich manuell einschalten möchten oder „ein“, wenn beim Klingeln automatisch das Kamerabild angezeigt werden soll. Bestätigen Sie Ihre Auswahl jeweils durch das Antippen der Bestätigungstaste.
Alle Einstellungen, die im Menü Rufadresse gemacht werden, werden in der Rufadresse der Innensprechstelle dar-
gestellt (ablesbar oberhalb des Auswahlmenüs oder im Menüpunkt „Konguration“):
Die Zahl vor dem Komma gibt die Rufadresse der Innensprechstelle an, so steht z. B. „01.xx“ für A1, „02.xx“ für
A2, „03.xx“ für A3, „09.xx“ für B1, „10.xx“ für B2 usw. Die erste Zahl nach dem Komma zeigt an, ob es sich um eine
Haupt- oder Nebensprechstelle handelt, dabei steht „xx.0x“ für die Hauptsprechstelle, „xx.1x“ für Nebensprechstelle 1, „xx.2x“ für Nebensprechstelle 2 und xx.3x für Nebensprechstelle 3.
Die zweite Zier hinter dem Komma zeigt an, ob die automatische Bildfunktion aktiviert „xx.x1“ oder deaktiviert
„xx.x0“ ist.
Durch Drücken der Zurücktaste können Sie jederzeit das Menü verlassen und kehren zum Hauptmenü bzw. zum
vorigen Menüpunkt zurück.
Support Hotline: +49 (0) 2661 98088-112
Support E-Mail: support@sks-kinkel.de
12
Versionsnr. 2.0
Dokumenten Art. Nr. 97013201
Page 13
SKS-Kinkel Elektronik GmbH
10007001 SMARTLine 2D BSV2012 Video Innensprechstelle
DE
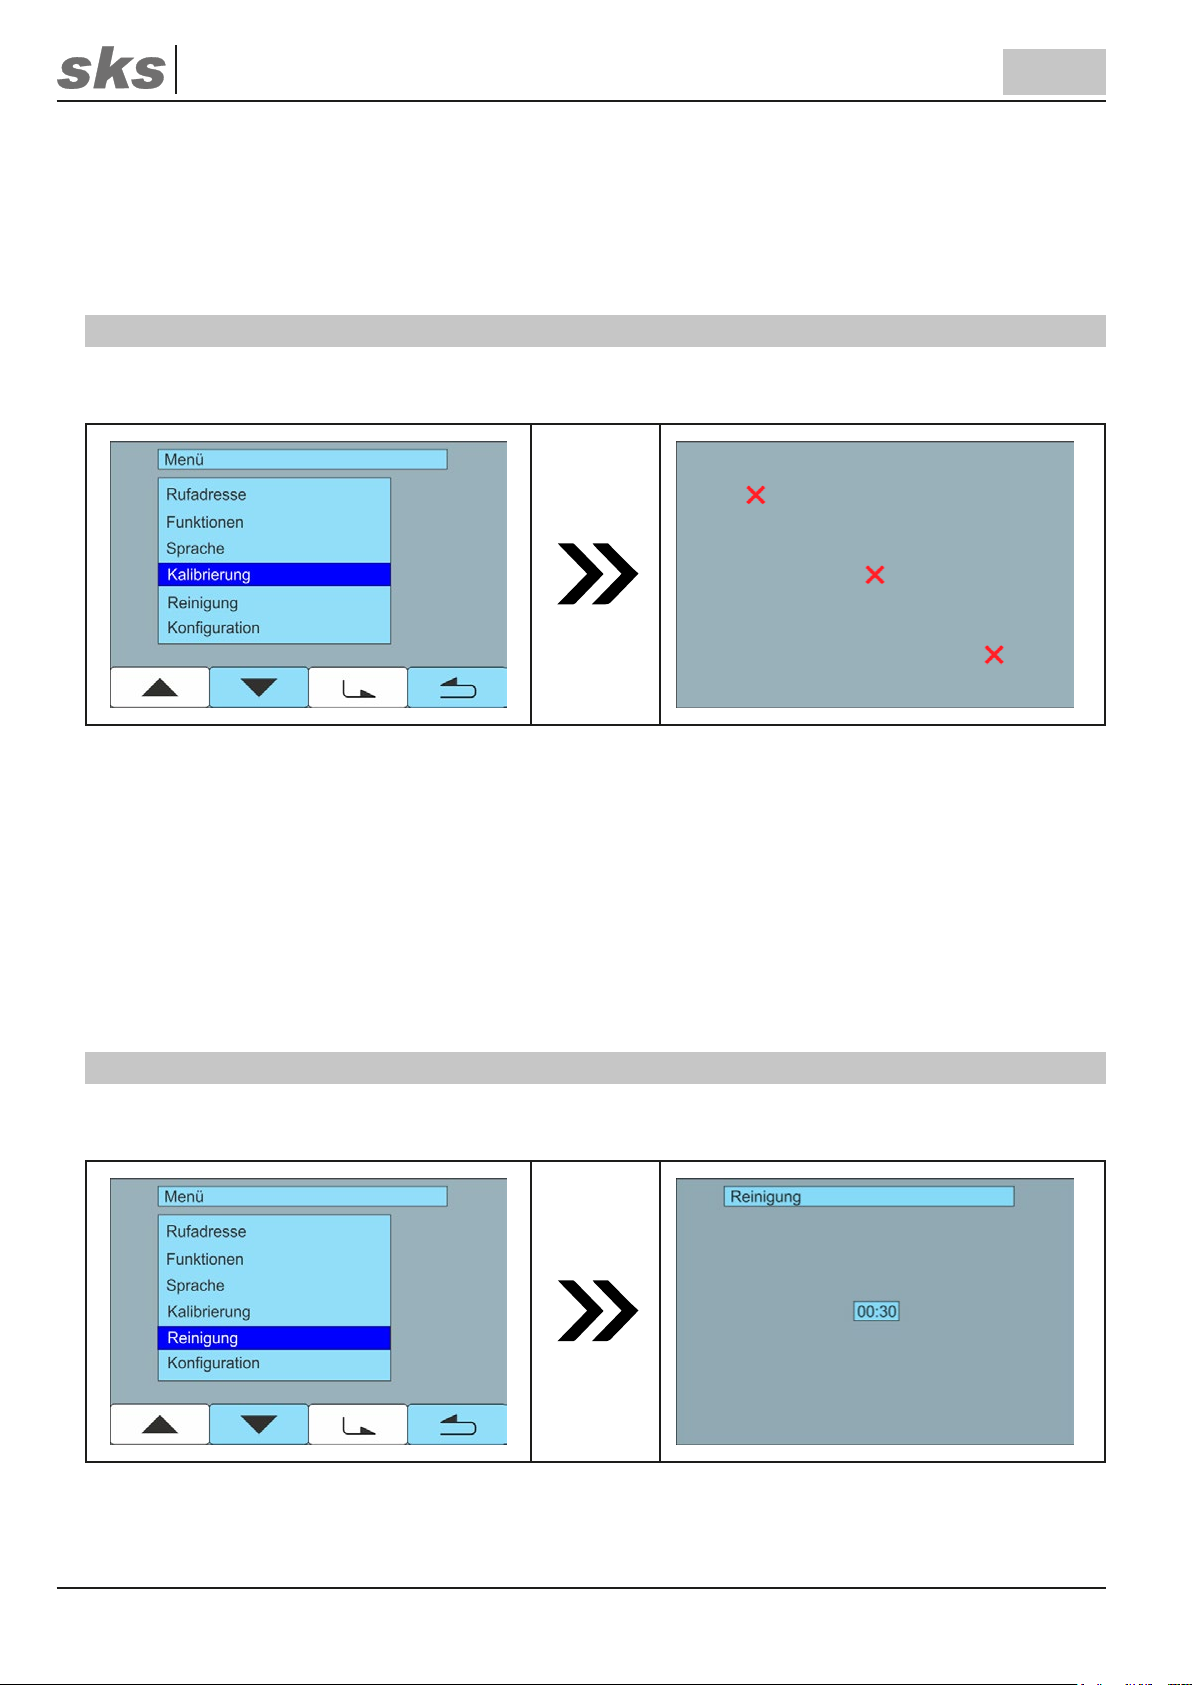
9.2 Funktionen
Unter dem Menüpunkt Funktionen können folgende Einstellungen vorgenommen werden:
3 Unter Bild holen wird die Anzeigedauer für das Videobild in Sekunden eingestellt, nach Ablauf dieser Zeit
schaltet sich das Videobild automatisch ab.
3 Über den Menüpunkt Direktruf kann die Direktruunktion ein- und wieder ausgeschaltet werden.
3 Im Menüpunkt Ruiste kann die Internruunktion ein- und wieder ausgeschaltet werden.
3 Über den Menüpunkt Autom. Türöner kann die automatische Türönerfunktion ein- und wieder ausgeschaltet
werden.
Hinweis
Die automatische Türönung wird bei einem Stromausfall deaktiviert!
Wählen Sie mit den Navigationstasten die gewünschte Funktion aus und bestätigen Sie die Auswahl mit der Bestätigungstaste.
Ändern Sie mithilfe der Navigationstasten die Einstellung. Um die Änderungen zu übernehmen, tippen Sie nochmals
auf die Bestätigungstaste.
Durch Drücken der Zurücktaste können Sie jederzeit das Menü verlassen und kehren zum Hauptmenü bzw. zum
vorigen Menüpunkt zurück.
9.3 Sprache
Unter Sprache können Sie zwischen Deutsch und Englisch als Bedienersprache wählen.
Support Hotline: +49 (0) 2661 98088-112
Support E-Mail: support@sks-kinkel.de
13
Versionsnr. 2.0
Dokumenten Art. Nr. 97013201
Page 14
SKS-Kinkel Elektronik GmbH
10007001 SMARTLine 2D BSV2012 Video Innensprechstelle
Wählen Sie den Punkt Sprache über die Pfeiltasten aus und betätigen dann die Bestätigungstaste, wählen Sie anschließend die gewünschte Sprache über die Pfeiltasten aus und setzen diese durch nochmaliges Antippen der Bestätigungstaste als Standard fest.
Durch Drücken der Zurücktaste können Sie jederzeit das Menü verlassen und kehren zum Hauptmenü bzw. zum
vorigen Menüpunkt zurück.
DE
9.4 Kalibrierung
Unter Kalibrierung kann der Touchscreen kalibriert werden, wenn er nicht mehr zuverlässig auf die Berührungen
reagiert.
Wählen Sie dazu den Punkt Kalibrierung über die Pfeiltasten aus und betätigen dann die Bestätigungstaste. Auf
dem Bildschirm erscheinen von oben links nach unten rechts drei rote Kreuze, die nacheinander (am besten mit
einem stumpfen, schmalen Gegenstand, wie z. B. einem Stift) angetippt werden müssen, um die Neukalibrierung
durchzuführen. Nach der Kalibrierung bestätigt die Mitteilung „OK“ auf dem Bildschirm, dass die Kalibrierung erfolgreich abgeschlossen ist. Bei einer fehlerhaften Kalibrierung ertönt ein Doppelton und Kalibrierung startet erneut.
Tippen Sie auf den Bildschirm, um den Kalibrierungsmodus zu verlassen und in das Auswahlmenü zurückzukehren.
Durch Drücken der Zurücktaste können Sie das Auswahlmenü verlassen und kehren zum Hauptmenü bzw. zum
vorigen Menüpunkt zurück.
9.5 Reinigung
Der Menüpunkt Reinigung ermöglicht eine Deaktivierung des Touchscreens für 30 Sekunden, so dass der Bild-
schirm mit einem weichen Tuch gereinigt werden kann ohne versehentlich ungewollte Einstellungen vorzunehmen.
Wählen Sie den Punkt Reinigung über die Pfeiltasten aus und betätigen dann die Bestätigungstaste. Der Touchscreen wird für 30 Sekunden deaktiviert, eine Bedienung ist in dieser Zeit nicht möglich.
Support Hotline: +49 (0) 2661 98088-112
Support E-Mail: support@sks-kinkel.de
14
Dokumenten Art. Nr. 97013201
Versionsnr. 2.0
Page 15
SKS-Kinkel Elektronik GmbH
10007001 SMARTLine 2D BSV2012 Video Innensprechstelle
Nach Ablauf der 30 Sekunden schaltet sich der Bildschirm automatisch aus. Um ihn wieder zu aktivieren, tippen sie
auf den Bildschirm. Tippen Sie ein zweites Mal auf den Bildschirm, um das Menü aufzurufen.
DE
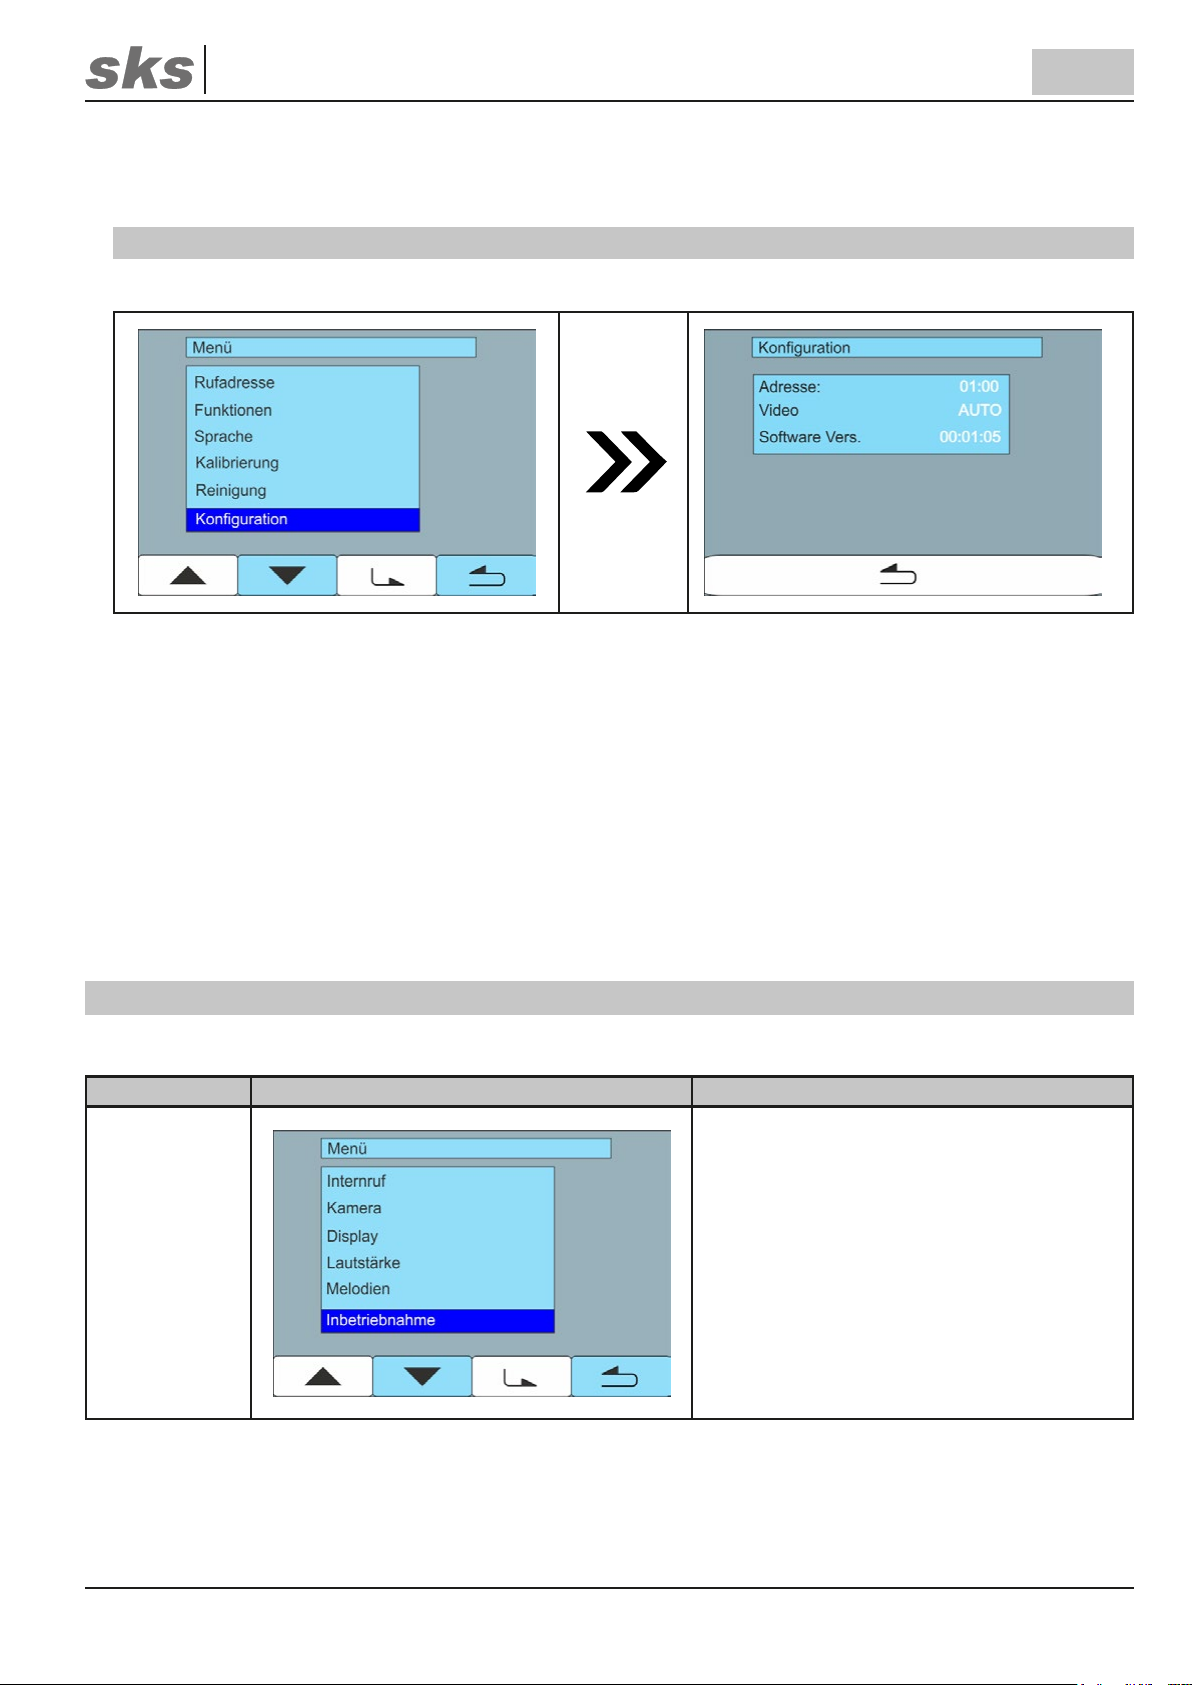
9.6 Konfiguration
Unter dem Menüpunkt „Konguration“ können Sie die wichtigsten Eckdaten zur Konguration ablesen.
Wählen Sie den Punkt Konguration über die Pfeiltasten aus und betätigen dann die Bestätigungstaste, um die
Kongurationsdaten Ihrer Innensprechstelle abzulesen:
Die Adresse der Innensprechstelle setzt sich wie folgt zusammen:
Die Zahl vor dem Komma gibt die Rufadresse der Innensprechstelle an, so steht z. B. „01.xx“ für A1, „02.xx“ für A2,
„03.xx“ für A3, „09.xx“ für B1, „10.xx“ für B2 usw.
Die erste Zahl nach dem Komma zeigt an, ob es sich um eine Haupt- oder Nebensprechstelle handelt, dabei steht
„xx.0x“ für die Hauptsprechstelle, „xx.1x“ für Nebensprechstelle 1, „xx.2x“ für Nebensprechstelle 2 und xx.3x für Ne-
bensprechstelle 3.
Die zweite Zier hinter dem Komma zeigt an, ob die automatische Bildfunktion aktiviert „xx.x1“ oder deaktiviert
„xx.x0“ ist.
10 Zurücksetzen der Innensprechstelle
Um die Innensprechstelle auf die Werkseinstellungen zurückzusetzen, führen Sie folgende Schritte durch:
Arbeitsschritt Abbildung Beschreibung
1
Wählen Sie über die Navigationstasten den Menüpunkt Inbetriebnahme aus und tippen dann
auf die Bestätigungstaste.
Support Hotline: +49 (0) 2661 98088-112
Support E-Mail: support@sks-kinkel.de
15
Versionsnr. 2.0
Dokumenten Art. Nr. 97013201
Page 16

SKS-Kinkel Elektronik GmbH
10007001 SMARTLine 2D BSV2012 Video Innensprechstelle
Arbeitsschritt Abbildung Beschreibung
2
Wählen Sie nun über die Navigationstasten den
Menüpunkt Konguration aus und tippen dann
auf die Bestätigungstaste.
3
DE
Drücken Sie nun, während Sie sich im Kongurationsmenü benden, die Türönertaste (Taste 3)
und halten diese über 3 Sekunden gedrückt.
4
Auf dem Touchscreen erscheint eine Zierntastatur. Geben Sie über die Zierntastatur den
Code 2412 ein und bestätigen diesen mit der
Bestätigungstaste. Die Konguration ist nun auf
die Werkseinstellung zurückgesetzt.
Durch Drücken der Zurücktaste verlassen Sie
die Zierntastatureingabe.
Support Hotline: +49 (0) 2661 98088-112
Support E-Mail: support@sks-kinkel.de
16
Versionsnr. 2.0
Dokumenten Art. Nr. 97013201
Page 17

SKS-Kinkel Elektronik GmbH
10007001 SMARTLine 2D BSV2012 Video Innensprechstelle
11 Signalisierung
DE
LED 1: Optische Rufsignalisierung
LED 2: Signalisierung des Ruhe Modus
LED 3: Tastendruck erkannt
12 Bedienung
Die Bedienung der SMARTLine 2D BSV2012 Video Innensprechstelle erfolgt zum einen über die Touchtasten unterhalb
des Bildschirms, zum anderen über den Touchscreen.
12.1 Touchtasten
1. Hörertaste
2. Ruftonabschalttaste
3. Türönertaste
12.2 Bedienung über Touchtasten
Abbildung Funktion Beschreibung
Um ein Gespräch anzunehmen, wird nach dem Klingeln der
Innensprechstelle die Hörertaste gedrückt, die Sprechfunktion zur Türstation ist damit aktiviert. Um das Gespräch zu
beenden, drücken Sie nochmals die Hörertaste.
Gespräch annehmen
Beachten Sie, dass ein Gespräch für maximal 2 Minuten
nach dem Anklingeln aufgebaut bleibt und der Türöner
auch nur während dieser Zeitspanne funktioniert.
Support Hotline: +49 (0) 2661 98088-112
Support E-Mail: support@sks-kinkel.de
17
Versionsnr. 2.0
Dokumenten Art. Nr. 97013201
Page 18

SKS-Kinkel Elektronik GmbH
10007001 SMARTLine 2D BSV2012 Video Innensprechstelle
Halten Sie die Ruftonabschalttaste so lange gedrückt (ca.
3 Sekunden), bis Sie einen Bestätigungston hören. Der
Rufton ist jetzt abgeschaltet. Um auf diesen Zustand hinzuweisen, blinkt die LED unterhalb der Ruftonabschalttaste alle
2 Sekunden.
Beachten Sie, dass die Rufabschaltung nach Ablauf von
12 Stunden oder nach einem Stromausfall wieder auto-
Rufton abschalten
Rufton einschalten
matisch deaktiviert wird.
Die Rufabschaltung ist nur für den Hausruf wirksam.
Beim Anklingeln der Innensprechstelle von einem Etagentaster, wird weiterhin ein Klingelton abgespielt.
Eingehende Hausrufe werden weiterhin durch das Blinken
der LED 1 signalisiert.
Tippen Sie kurz die Ruftonabschalttaste an. Sie hören
einen Signalton. Der Rufton ist jetzt wieder eingeschaltet.
DE
Tür önen
12.3 Menütasten
Taste Funktion
Menütaste zum Aufrufen des Menüs
Sondertaste zum Ausführen von Schaltfunktionen
Nach dem Anklingeln der Innensprechstelle kann innerhalb
von 2 Minuten die Tür mit der Türönertaste geönet wer-
den.
Bei aktivem Gespräch wird mit Betätigung der Türönertaste die Sprechverbindung nach 10 Sekunden automatisch beendet.
Lichttaste zum Ausführen von Schaltfunktionen
Zurücktaste führt zum vorigen Menüpunkt zurück
Navigationstaste auf zum Navigieren im Menü nach oben
Support Hotline: +49 (0) 2661 98088-112
Support E-Mail: support@sks-kinkel.de
18
Versionsnr. 2.0
Dokumenten Art. Nr. 97013201
Page 19

SKS-Kinkel Elektronik GmbH
10007001 SMARTLine 2D BSV2012 Video Innensprechstelle
Taste Funktion
Navigationstaste ab zum Navigieren im Menü nach unten
Bestätigungstaste zum Bestätigen einer Auswahl
DE
12.4 Bedienung über Menütasten
Die Bedienung der Innensprechstelle erfolgt über den Touchscreen und über die Tasten unter dem Bildschirm. Mit
den Tasten unter dem Bildschirm werden Hausrufe angenommen, die Rufabschaltung aktiviert und der Türöner
betätigt. Mit den Touchtasten auf dem Bildschirm werden Funktionen ausgeführt und im On-Screen Menü navigiert.
In der folgenden Tabelle werden die Funktionen beschrieben:
12.4.1 Hauptmenü
Um das On-Screen-Menü aufrufen zu können, muss der Bildschirm zunächst durch eine Berührung aktiviert werden. Damit die Menüleiste angezeigt werden kann, muss ein zweites Mal der Bildschirm berührt werden.
Sie befinden sich nun im Hauptmenü. Von hier können Sie diverse Einstellungen und Konfigurationen vornehmen.
Wählen Sie mit den Navigationstasten den gewünschten Menüpunkt aus und bestätigen Sie diesen mit der Bestätigungstaste.
Durch Drücken der Zurücktaste verlassen Sie das Menü und kehren zum Hauptmenü bzw. zum vorherigen Menü
zurück.
12.4.1.1 Internruf
Beim Internruf werden zwei Funktionen unterschieden: Direktruf und Rufliste.
Support Hotline: +49 (0) 2661 98088-112
Support E-Mail: support@sks-kinkel.de
19
Dokumenten Art. Nr. 97013201
Versionsnr. 2.0
Page 20

SKS-Kinkel Elektronik GmbH
10007001 SMARTLine 2D BSV2012 Video Innensprechstelle
Wenn der Direktruf aktiviert ist (s. Kapitel „Inbetriebnahme“ der Installationsanleitung), können Sie hiermit
bis zu drei parallel betriebene Innensprechstellen anrufen. Wählen Sie dazu über die Navigationstasten den
Menüpunkt Direktruf aus und bestätigen die Auswahl durch Antippen der Bestätigungstaste, um den Ruf auszulösen. Alle parallel betriebenen Innensprechstellen werden angeklingelt.
Über die „Rufliste“ können Sie alle nicht parallel betriebenen Innensprechstellen aus derselben Hauskommu-
nikationsanlage auswählen und diese direkt anrufen.
DE
Wählen Sie dazu den Menüpunkt Rufliste über die Navigationstasten aus und tippen anschließend auf die
Bestätigungstaste.Wählen Sie mit den Navigationstasten die gewünschte Rufadresse für einen Internruf aus
der Rufliste aus und betätigen dann nochmals die Bestätigungstaste, um die entsprechende Innensprechstelle
zu rufen.
Durch Drücken der Zurücktaste können Sie jederzeit das Menü verlassen und kehren zum Hauptmenü bzw.
zum vorigen Menüpunkt zurück.
12.4.1.2 Kamera
Hier können die im System vorhandenen Kameras ausgewählt und angezeigt werden.
Support Hotline: +49 (0) 2661 98088-112
Support E-Mail: support@sks-kinkel.de
20
Versionsnr. 2.0
Dokumenten Art. Nr. 97013201
Page 21

SKS-Kinkel Elektronik GmbH
10007001 SMARTLine 2D BSV2012 Video Innensprechstelle
Wählen Sie mit den Navigationstasten die gewünschte Kamera 1, 2, 3 oder 4 aus und bestätigen Sie die Auswahl mit der Bestätigungstaste, um die Kamera auszuwählen und deren Bild anzuzeigen.
Durch Drücken der Zurücktaste können Sie jederzeit das Menü verlassen und kehren zum Hauptmenü bzw.
zum vorigen Menüpunkt zurück.
12.4.1.3 Display
Im Menüpunkt Display werden die Bildschirmeinstellungen Kontrast, Helligkeit und Farbe vorgenommen.
DE
Wählen Sie mit den Navigationstasten aus, ob Sie Kontrast, Helligkeit oder Farbe einstellen möchten und bestätigen Sie die Auswahl mit der Bestätigungstaste.
Kontrast, Helligkeit und Farbe können jeweils in Stufen von 0 bis 9 eingestellt werden. Navigieren Sie mit den
Pfeiltasten auf die gewünschte Eigenschaft und tippen auf die Bestätigungstaste, um diese auszuwählen. Stellen Sie anschließend die gewünschte Stufe (0 bis 9) ein und tippen dann nochmals auf die Bestätigungstaste,
um diese als Standard festzusetzen.
Durch Drücken der Zurücktaste können Sie jederzeit das Menü verlassen und kehren zum Hauptmenü bzw.
zum vorigen Menüpunkt zurück.
12.4.1.4 Lautstärke
Im Menüpunkt Lautstärke werden die Einstellungen für Rufton und Sprechen vorgenommen.
Navigieren Sie mit den Pfeiltasten auf die gewünschte Eigenschaft (Rufton- oder Sprachlautstärke) und tippen auf die Bestätigungstaste, um diese auszuwählen. Stellen Sie anschließend die gewünschte Lautstärke
(0 bis 9) ein und bestätigen diese ebenfalls mit der Bestätigungstaste, um diese als Standard festzusetzen.
Durch Drücken der Zurücktaste können Sie jederzeit das Menü verlassen und kehren zum Hauptmenü bzw.
zum vorigen Menüpunkt zurück.
Support Hotline: +49 (0) 2661 98088-112
Support E-Mail: support@sks-kinkel.de
21
Versionsnr. 2.0
Dokumenten Art. Nr. 97013201
Page 22

SKS-Kinkel Elektronik GmbH
@
10007001 SMARTLine 2D BSV2012 Video Innensprechstelle
12.4.1.5 Klingelton
Im Menüpunkt Melodie werden die Klingeltöne der Innensprechstelle eingestellt. Der Hausrufklingelton wird
beim Betätigen einer Klingeltaste an der Haustürstation wiedergegeben. Der Internrufklingelton ist zu hören,
wenn von einer anderen Innensprechstelle die eigene gerufen wird. Der Etagenrufklingelton ertönt bei Betätigung des Etagentasters (nur wenn dieser angeschlossen ist).
DE
Wählen Sie mit den Navigationstasten aus, ob Sie einen Klingelton für den Hausruf, Internruf oder Etagenruf
einstellen möchten und betätigen dann die Bestätigungstaste.
Insgesamt stehen 12 verschiedene Melodien (für Hausruf, Internruf und Etagenruf) zur Auswahl. Wählen Sie
mit den Navigationstasten die gewünschte Melodie aus und setzen diese durch Antippen der Bestätigungstaste als Standard fest.
Durch Drücken der Zurücktaste können Sie jederzeit das Menü verlassen und kehren zum Hauptmenü bzw.
zum vorigen Menüpunkt zurück.
13 Service
Für die Gewährleistung gelten die gesetzlichen Bestimmungen (vgl. hierzu auch unsere beigefügten bzw. im Internet
unter www.sks-kinkel.de/agb/ abrufbaren und einsehbaren AGB).
13.1 Gewährleistung
Wir bieten unseren Kunden und auch Elektrofachkräften eine vereinfachte Abwicklung von Gewährleistungsfällen
an. Dafür beachten Sie die Verkaufs- und Lieferbedingungen auf unserer Internetpräsenz oder wenden Sie sich an
unsere SKS-Support Hotline.
13.2 Service und Support
Unser Supportteam steht Ihnen mit Rat und Tat zur Seite und kümmert sich um Ihre Anliegen. Unser SKS-Support ist
für Sie per E-Mail und Telefon erreichbar. Bitte geben Sie stets eine möglichst genaue Fehlerbeschreibung, Projektbezeichnung, Ihren Namen und Ihre Kundennummer mit an.
Folgende Möglichkeiten stehen Ihnen zur Verfügung:
SKS Support Hotline +49 (0) 2661 98088112
SKS Support E-Mail support@sks-kinkel.de
Support Hotline: +49 (0) 2661 98088-112
Support E-Mail: support@sks-kinkel.de
22
Dokumenten Art. Nr. 97013201
Versionsnr. 2.0
Page 23

SKS-Kinkel Elektronik GmbH
10007001 SMARTLine 2D BSV2012 Video Innensprechstelle
DE
13.3 Anschrift
SKS-Kinkel Elektronik GmbH, Im Industriegebiet 9, 56472 Hof/ Westerwald
Tel.: +49 (0) 2661 980 88 0, Fax: +49 (0) 2661 980 88 200
E-Mail: info@sks-kinkel.de, www.sks-kinkel.de
14 Entsorgungshinweise
Entsorgen Sie das Gerät nicht in den Hausmüll, sondern über eine Sammelstelle für
Elektronikschrott. Die zuständige Sammelstelle erfragen Sie bitte bei Ihrer Stadt- bzw.
Kommunalverwaltung.
Durch die separate Sammlung von Elektro- und Elektronikaltgeräten soll die Wiederverwendung, die stoiche Verwertung bzw. andere Formen der Verwertung von Altgeräten ermöglicht sowie negative Folgen bei der Entsorgung der in
den Geräten möglicherweise enthaltenen gefährlichen Stoe auf die Umwelt und die menschliche Gesundheit vermieden werden. Entsorgen Sie die Verpackungsteile getrennt in Sammelbehältern für Pappe und Papier bzw. Kunststo.
Die Produkte entsprechen den gesetzlichen Anforderungen, insbesondere dem Elektro- und Elektronikgerätegesetz
und der REACH-Verordnung. (EU-Richtlinie 2012/19/EU WEEE und 2011/65/EU RoHS), EU-REACH-Verordnung und
Gesetz zur Durchführung der Verordnung (EG) Nr.1907/2006).
15 Haftungsausschluss
Wir haben den Inhalt der Druckschrift auf Übereinstimmung mit der beschriebenen Hard- und Software geprüft. Es
können dennoch Abweichungen nicht ausgeschlossen werden, so dass wir für die vollständige Übereinstimmung keine Gewähr übernehmen. Die Angaben dieser Druckschrift werden regelmäßig überprüft und notwendige Korrekturen
sind in den nachfolgenden Auagen enthalten.
Support Hotline: +49 (0) 2661 98088-112
Support E-Mail: support@sks-kinkel.de
23
Versionsnr. 2.0
Dokumenten Art. Nr. 97013201
Page 24

16 Anhang
DIP-Schaltereinstellungen für SMARTLine 2D Innensprechstellen
SKS-Kinkel Elektronik GmbH
10007001 SMARTLine 2D BSV2012 Video Innensprechstelle
DE
A8
A7
A6
A5
A4
A3
A2
ON
1 2 3 4 5 6
ON
1 2 3 4 5 6
ON
1 2 3 4 5 6
ON
1 2 3 4 5 6
ON
1 2 3 4 5 6
ON
1 2 3 4 5 6
ON
1 2 3 4 5 6
B8
B7
B6
B5
B4
B3
B2
ON
1 2 3 4 5 6
ON
1 2 3 4 5 6
ON
1 2 3 4 5 6
ON
1 2 3 4 5 6
ON
1 2 3 4 5 6
ON
1 2 3 4 5 6
ON
1 2 3 4 5 6
C8
C7
C6
C5
C4
C3
C2
ON
1 2 3 4 5 6
ON
1 2 3 4 5 6
ON
1 2 3 4 5 6
ON
1 2 3 4 5 6
ON
1 2 3 4 5 6
ON
1 2 3 4 5 6
ON
1 2 3 4 5 6
ON
D8
1 2 3 4 5 6
ON
D7
1 2 3 4 5 6
ON
D6
1 2 3 4 5 6
ON
D5
1 2 3 4 5 6
ON
D4
1 2 3 4 5 6
ON
D3
1 2 3 4 5 6
ON
D2
1 2 3 4 5 6
A1
ON
1 2 3 4 5 6
B1
ON
1 2 3 4 5 6
C1
ON
1 2 3 4 5 6
ON
D1
1 2 3 4 5 6
Support Hotline: +49 (0) 2661 98088-112
Support E-Mail: support@sks-kinkel.de
24
Versionsnr. 2.0
Dokumenten Art. Nr. 97013201
Page 25

INSTALLATION
INSTRUCTIONS
SMARTLine 2W BSV2012
Video Indoor Station
SKS-Kinkel Elektronik GmbH
Support Hotline: +49 (0) 2661 98088-112
Support E-Mail: support@sks-kinkel.de
Version 2.0
Document No. 97013201
Page 26

SKS-Kinkel Elektronik GmbH
10007001 SMARTLine 2D BSV2012 Video Indoor Station
EN
Table of Contents
1 Instruction manual 27
2 Description 27
2.1 Contractual use 27
2.2 Features 27
2.3 Scope of delivery 27
2.4 Storage and transport 28
2.5 Care instructions 28
2.6 Modification 28
2.7 Sicherheit 28
3 Technical data 28
4 DIP-Switches 28
4.1 Setting the call address 29
4.2 Terminating element 29
5 Terminal designation 29
5.1 Connection 29
6 Structure plan 30
7 Wiring plan 31
8 Mounting instructions 32
8.1 Preparations 32
8.2 Mounting on flush mounted or cavity wall box 32
8.3 Surface mounting 34
8.4 Disassembly 35
9 Initial setup 36
9.1 Call address 36
9.2 Function 37
9.3 Language 37
9.4 Calibration 38
9.5 Cleaning 38
9.6 About 39
10 Resetting the indoor station 39
11 Signalling 40
12 Operation 41
12.1 Touch keys 41
12.2 Operating with touch keys 41
12.3 Menu keys 42
12.4 Operation with menu keys 42
12.4.1 Main menu 42
12.4.1.1 Internal call 43
12.4.1.2 Camera 44
12.4.1.3 Display 44
12.4.1.4 Volume 45
12.4.1.5 Ringtone 45
13 Service 46
13.1 Warranty 46
13.2 Service and support 46
13.3 Address 46
14 Disposal instructions 46
15 Liability disclaimer 46
16 Appendix 47
Support Hotline: +49 (0) 2661 98088-112
Support E-Mail: support@sks-kinkel.de
26
Document No. 97013201
Version No. 2.0
Page 27

SKS-Kinkel Elektronik GmbH
10007001 SMARTLine 2D BSV2012 Video Indoor Station
EN
1 Instruction manual
IMPORTANT!
READ CAREFULLY BEFORE USE!
KEEP FOR FUTURE REFERENCE!
2 Description
The SMARTLine 2W BSV2012 Video Indoor Station hands-free is able to communicate with SKS door stations and other
SKS indoor stations and can be used to unlock a door.
2.1 Contractual use
3 Optical and acoustic signalling of door calls, oor calls and internal calls
3 Accept calls
3 Hands-free operation
3 Open the door
3 Switch on light (only with an additional switching actor)
3 Use only indoors in places free from dripping or spraying water
2.2 Features
3 Touch key functions: accept calls,open the door, deactivate ringtone (automatically reactivated after 12 hours)
3 Additional functions via touch display: switching actor functions possible (via relay module in the SMARTLine
2 W Video Compact Power Supply)
3 Setting of ringtone volume, ringtone melodies, colour, contrast and brightness
3 Automatic activation of the TFT-display when a door call comes in
3 Optical call signalisation via LEDs
3 One-man installation and programming
3 Optionally parallel operation of up to 4 indoor stations
3 All in all 12 door call and oor call ringtones
3 Ringtone volume adjustable in 10 steps
3 Menu language German or English
3 Hands-free operation
3 Internal call function
3 Automatic door opener
3 Surface mounting
3 Measurements 90 x 180 x 17 mm
2.3 Scope of delivery
3 SMARTLine 2W BSV2012 Video Indoor Station
3 Operation manual
Support Hotline: +49 (0) 2661 98088-112
Support E-Mail: support@sks-kinkel.de
27
Version No. 2.0
Document No. 97013201
Page 28

SKS-Kinkel Elektronik GmbH
10007001 SMARTLine 2D BSV2012 Video Indoor Station
EN
2.4 Storage and transport
Transport only on original packaging, store in a dry and cool place.
2.5 Care instructions
Just clean the device unit with a soft cloth, moistened with a mild soap solution. Dry cleaning, aggressive detergents
and abrasives may damage the surface.
2.6 Modification
A modication (alteration or conversion) of the SMARTLine 2W BSV2012 Video Indoor Station is not allowed
2.7
Counter measures:
The SKS planning guide for 2-wire SMARTLine Indoor stations (can be downloaded from www.sks-kinkel.de) must
be followed during installation!
Sicherheit
Electrical shock hazard to persons. Danger of burns, damage to device and malfunctions.
VDE 0100 and VDE 0800 guidelines must be complied during installation (Germany).
3 Before beginning any work, deactivate and disconnect all energized electrical wires.
3 Secure the switched o/ disconnected lines against erroneous reconnection.
3 Use a measuring device to make sure that the wires are de energized.
3 Cover up any adjacent, energized or conducting components.
3 All work and all electrical connections must comply with the national provisions for the country in question and
must be performed by appropriately trained personnel.
Mounting, installation, reparation and initial setup must be carried out by qualied electricians only! When working on systems with 230 V alternating voltage the safety requirements of DIN VDE 0100 must be complied with.
3 Technical data
Electrical data
Voltage a+/b- 20,5-28 VDC
Voltage Sp+/Sp- 12 VDC / 50 mA
General data
Display 320 x 240 Pixel, 8,9 cm (3,5“)
Temperature -10°C to +45°C
Humidity 20% to 90%, non-condensing
Housing Plastic housing
Measurements (width x height x depth) 90 x 180 x 18 mm
Protection class IP20
Conformity with EU guidelines and low-voltage directive EMV 2014/30/EU: EN55022 und EN55024,
EG 2014/35/EU
4 DIP-Switches
To ensure that the indoor station can be called and the video will be displayed in good quality it is necessary to set the
DIP-switch correctly. In the following chapter the functions of the DIP-switch will be described.
Support Hotline: +49 (0) 2661 98088-112
Support E-Mail: support@sks-kinkel.de
28
Document No. 97013201
Version No. 2.0
Page 29

SKS-Kinkel Elektronik GmbH
10007001 SMARTLine 2D BSV2012 Video Indoor Station
EN
4.1 Setting the call address
To be able to call the indoor station from the door station it is necessary to set the indoor station to the same call address as the respective door bell button. Each call address is assigned to one bell button at the door station. The call
address must be set at the device’s DIP-switch to the preferred call address according to the SKS BUS call address
table in the appendix.
The distribution of the call addresses is shown either at the door station or at the door loudspeaker.
ON
A1
1 2 3 4 5 6
The example on the left shows the DIP-switch setting for the call address A1.
The call address set for the indoor station can be found in the on-screen menu under
Initial setup → Conguration → Call address.
4.2 Terminating element
To ensure that the video image is displayed in good quality it is essential to activate or deactivate the terminating
element according to the system’s setup. The terminating element is activated (ON) or deactivated (OFF) with DIPswitch number 6. If the indoor station is located at the end of a riser or stub DIP-switch 6 must be set to “ON”.
DIP-switch position Terminating element
ON
activated
1 2 3 4 5 6
ON
deactivated
1 2 3 4 5 6
5 Terminal designation
Terminal Description
a+/b- SMARTLine BUS terminals
E+/E- Floor bell button
Sp+/Sp- Connection for external bell
5.1 Connection
The indoor station is connected to the SMARTLine 2W video BUS
using terminals a+/b-.
Terminals E+/E- can optionally be connected to a oor bell button
(normally open contact).
Terminals Sp+/Sp- can optionally be connected to an external bell.
To avoid mistakes when connecting the indoor station please
use the SMARTLine 2W planning aid or wiring plan.
Support Hotline: +49 (0) 2661 98088-112
Support E-Mail: support@sks-kinkel.de
29
Version No. 2.0
Document No. 97013201
Page 30

SKS-Kinkel Elektronik GmbH
10007001 SMARTLine 2D BSV2012 Video Indoor Station
6 Structure plan
EN
Support Hotline: +49 (0) 2661 98088-112
Support E-Mail: support@sks-kinkel.de
30
Version No. 2.0
Document No. 97013201
Page 31

SKS-Kinkel Elektronik GmbH
10007001 SMARTLine 2D BSV2012 Video Indoor Station
7 Wiring plan
EN
Support Hotline: +49 (0) 2661 98088-112
Support E-Mail: support@sks-kinkel.de
31
Version No. 2.0
Document No. 97013201
Page 32

SKS-Kinkel Elektronik GmbH
10007001 SMARTLine 2D BSV2012 Video Indoor Station
8 Mounting instructions
8.1 Preparations
EN
Use a screwdriver to release the indoor station from its supporting
frame. This is done by inserting the screwdriver into the release
opening at the bottom of the indoor station.
Carefully remove the indoor station from the support frame as
shown in the drawing.
Pull the lower part of the indoor station towards you and carefully
lift it upwards.
8.2 Mounting on flush mounted or cavity wall box
We recommend installing a ush-mounted or cavity wall box before mounting the supporting frame so that it is possible to use
the screws to attach the supporting frame to the ush-mounted or
cavity wall box. Use the fastening holes in the centre area of the
supporting frame for this installation.
We recommend additional xation of the supporting frame with
screws in all four corners of the device.
Pay particular attention to the installation cable when mounting the supporting frame!
Connect the terminals to the previously installed cable. The terminals are located at the back of the indoor station.
The pre-assembled cables are then connected to the indoor station.
To avoid errors when connecting cables please use the
SMARTLine 2W planning guide or the wiring diagram.
Support Hotline: +49 (0) 2661 98088-112
Support E-Mail: support@sks-kinkel.de
32
Version No. 2.0
Document No. 97013201
Page 33

SKS-Kinkel Elektronik GmbH
10007001 SMARTLine 2D BSV2012 Video Indoor Station
Set the SKS SMARTLine 2W BUS call address at the DIP switch
on the back of the SMARTLine 2W BSV2012 Video Indoor Station.
Each address is assigned to a bell button at the door station. The
SKS SMARTLine 2W BUS table of call addresses can be found in
the appendix.
Pay particular attention to the setting of the DIP switch when
the indoor station is replaced!
EN
Remount the indoor station in the upper part of the supporting
frame. Please mind that no exposed cables are in touch with the
back of the circuit board.
Subsequently press the indoor station onto the frame until it is
rmly in place.
When connecting the indoor station with the supporting frame the
contacts on the inside of the indoor station must be inserted into
the terminals on the supporting frame.
Support Hotline: +49 (0) 2661 98088-112
Support E-Mail: support@sks-kinkel.de
33
Version No. 2.0
Document No. 97013201
Page 34

SKS-Kinkel Elektronik GmbH
10007001 SMARTLine 2D BSV2012 Video Indoor Station
8.3 Surface mounting
EN
Using the screws attach the supporting frame of the indoor station
to the wall. Please use the fastening holes provided on the supporting frame.
Pull the installation cables through the back opening of the
frame before screwing it onto the wall.
Doing so insert only those cables into the device that are actually needed for installation. Cables mustn’t be crushed or bended
sharply.
Connect the terminals to the previously installed cable. The terminals are located at the back of the indoor station.
To avoid any errors when connecting cables please use the
SMARTLine 2W planning guide or the wiring diagram.
Set the SKS bus call address at the DIP switch on the back of
the indoor station SMARTLine 2W BSV2012 Video Indoor Station.
Each address is assigned to a bell button at the door station. The
SKS BUS table of call addresses can be found in the appendix.
Pay particular attention to the setting of the DIP switch when
the indoor station is replaced!
Support Hotline: +49 (0) 2661 98088-112
Support E-Mail: support@sks-kinkel.de
34
Version No. 2.0
Document No. 97013201
Page 35

SKS-Kinkel Elektronik GmbH
10007001 SMARTLine 2D BSV2012 Video Indoor Station
Remount the indoor station in the upper part of the supporting
frame. Please mind that no exposed cables are in touch with the
back of the circuit board.
Subsequently press the indoor station onto the frame until it clicks
into place.
When connecting the indoor station with the supporting frame the
contacts on the inside of the indoor station must be inserted into
the terminals on the supporting frame.
EN
8.4 Disassembly
Open the SMARTLine 2W BSV2012 Video Indoor Station as described in Chapter “Preparation” and remove it from
the supporting frame and if necessary unscrew the support frame.
Support Hotline: +49 (0) 2661 98088-112
Support E-Mail: support@sks-kinkel.de
35
Version No. 2.0
Document No. 97013201
Page 36

SKS-Kinkel Elektronik GmbH
10007001 SMARTLine 2D BSV2012 Video Indoor Station
EN
9 Initial setup
To open the on-screen menu activate the touch screen by touching it. Touch it again to open the menu.
Touch the menu key to get into the main menu and navigate to Setup using the error keys. To pick the menu point touch
the enter key.
You will nd an overview on the touch and menu keys in chapter Operation.
9.1 Call address
In this menu point you can set whether the indoor station is to function as a main or a sub indoor station and whether the automatic image function should be activated or not. A sub indoor station is one that is operated in parallel i.
e. the same call address is called and main and sub indoor station(s) ring at the same time. Next to the main indoor
station a maximum of up to three more sub indoor stations may be installed, that reply in parallel to door, internal or
oor calls.
Attention
Parallel operation of indoor stations inuences the possible cable length in a negative way!
To set an indoor station as main or sub indoor station navigate to the menu point Address and hit enter.
Then choose whether the indoor station is your main (master) or one of three sub indoor stations (slave 1, slave 2
or slave 3) using the navigation keys. Conrm your choice by pushing the enter key.
To switch the automatic image function on or o, i. e. that the video image is shown as soon as someone rings the
door bell, choose the menu point Slave Panel under Address and conrm by pushing enter. Now use the navigation
keys to choose o if you want to switch on the video image manually only or on if the video image is to be displayed
automatically when the door bell rings. Conrm your choice in either way by pushing the enter key.
All settings made under menu point address are shown in the indoor station’s call address of (which can be found
both above the current menu or under menu point About):
Support Hotline: +49 (0) 2661 98088-112
Support E-Mail: support@sks-kinkel.de
36
Document No. 97013201
Version No. 2.0
Page 37

SKS-Kinkel Elektronik GmbH
10007001 SMARTLine 2D BSV2012 Video Indoor Station
The digit before the comma shows the indoor stations call address, here i. e. „01.xx“ stands for A1, „02.xx“ for A2, „03.
xx“ for A3, „09.xx“ for B1, „10.xx“ for B2 and so on. The rst digit after the comma shows whether the indoor station
is a main or sub indoor station, here „xx.0x“ stands for a main indoor station, „xx.1x“ for sub indoor station 1, „xx.2x“
for sub indoor station 2 and xx.3x for sub indoor station 3.
The second digit after the comma shows whether the automatic image function is activated (xx.x1) or not (xx.x0).
By pushing the back key you can leave the menu or get back to the last menu.
EN
9.2 Function
Under the menu point Function the following settings can be changed:
3 Under Camera Timing the display time is set in seconds, after this time the video image is switched o auto-
matically.
3 Under menu point Direct Call direct calls can be switched on or o.
3 Under menu point Namelist call the internal call function may be switched on and o again.
3 Under Auto Door Opener the automatic door opener function can be switched on and o.
Attention
The automatic door opener is deactivated after power failure!
Use the navigation keys to choose the function you want and conrm your choice by pushing enter.
Change the settings using the navigation keys. To conrm any changes push again the enter key.
By pushing the back key you can leave the menu or get back to the last menu.
9.3 Language
Under Language you can choose between German and English as user language.
Support Hotline: +49 (0) 2661 98088-112
Support E-Mail: support@sks-kinkel.de
37
Version No. 2.0
Document No. 97013201
Page 38

SKS-Kinkel Elektronik GmbH
10007001 SMARTLine 2D BSV2012 Video Indoor Station
Navigate to the menu point Language and push the enter key to conrm, then choose your preferred language using
the arrow keys and set it as standard by hitting the enter key again.
By pushing the back key you can leave the menu or get back to the last menu.
EN
9.4 Calibration
Under Calibration the touch screen can be calibrated in case it does no longer react reliably to touch any more.
To do so choose the menu point Calibration using the arrow keys. On the touch screen three red crosses appear from
top left to the bottom right which have to be tapped one by one (at best with a blunt and thin object such as a pen) to
recalibrate the device. After calibrating the word OK on the screen conrms that the calibration has been completed
successfully. If the calibration was faulty you will hear a double signal and the calibration starts anew.
Tap the touch screen again to leave the calibrating mode and get back to the menu.
By pushing the back key you can leave the menu or get back to the last menu.
9.5 Cleaning
The menu point Cleaning allows to deactivate the touch screen for 30 seconds, so that the screen may be cleaned
with a soft cloth without accidentally changing the setup.
Choose the menu point Cleaning using the arrow keys, then hit the enter key. The touch screen is disabled for 30
seconds, an operation is not possible during this time.
After the 30 seconds have expired the touch screen switches o automatically. To reactivate it, tap it. Tap it a second
time to open the main menu.
Support Hotline: +49 (0) 2661 98088-112
Support E-Mail: support@sks-kinkel.de
38
Document No. 97013201
Version No. 2.0
Page 39

SKS-Kinkel Elektronik GmbH
10007001 SMARTLine 2D BSV2012 Video Indoor Station
EN
9.6 About
Under the menu point About you can nd the most important data concerning the indoor station’s conguration.
Choose the menu point About using the arrow keys and hit the enter key to read the conguration data of your indoor
station.
The indoor station’s address is assembled as follows:
The digit before the comma shows the indoor stations call address, here i. e. „01.xx“ stands for A1, „02.xx“ for A2, „03.
xx“ for A3, „09.xx“ for B1, „10.xx“ for B2 and so on. The rst digit after the comma shows whether the indoor station
is a main or sub indoor station, here „xx.0x“ stands for a main indoor station, „xx.1x“ for sub indoor station 1, „xx.2x“
for sub indoor station 2 and xx.3x for sub indoor station 3.
The second digit after the comma shows whether the automatic image function is activated (xx.x1) or not (xx.x0).
10 Resetting the indoor station
To reset the indoor station carry out the following steps:
Step Image Description
1
Pick the menu point Setup via the navigation
keys and hit the enter key.
2
Support Hotline: +49 (0) 2661 98088-112
Support E-Mail: support@sks-kinkel.de
39
Navigate to the menu point About and hit the
enter key again.
Version No. 2.0
Document No. 97013201
Page 40

SKS-Kinkel Elektronik GmbH
10007001 SMARTLine 2D BSV2012 Video Indoor Station
Step Image Description
3
While being in the About menu push the door
opener key (no. 3) and hold it for 3 seconds.
EN
3
11 Signalling
After that a number pad appears on screen. Using the number keys enter the code 2412 and
hit enter to conrm. The conguration has now
been set back to default.
By pushing the back key you can leave the num-
ber pad.
LED 1: Optical signal of calls
LED 2: Signalling of mute mode
LED 3: Key touch recognized
Support Hotline: +49 (0) 2661 98088-112
Support E-Mail: support@sks-kinkel.de
40
Version No. 2.0
Document No. 97013201
Page 41

SKS-Kinkel Elektronik GmbH
10007001 SMARTLine 2D BSV2012 Video Indoor Station
EN
12 Operation
The SMARTLine 2W BSV2012 Video Indoor Station is operated by using both the touch keys below the touch screen
and the touch screen.
12.1 Touch keys
1. Receiver touch key
2. Mute touch key
3. Door opener touch key
12.2 Operating with touch keys
Image Function Description
To take a call after the indoor station has rung, push the
receiver key to activate the speech function with the door
station. Push the receiver key again to end the call.
Take call
Please mind that a call is active for a maximum of two
minutes only after ringing and that the door opener will
also function in this time span only.
Hold the Mute touch key (for 3 seconds) until you hear a
sound conrming that the ringtone is now deactivated. To signal this LED 2 (situated below the mute touch key) is ashing
once every two seconds.
Please mind that the ringtone is automatically reactivated
Deactivate ringtone
after 12 hours or after power failure.
Ringtones are deactivated only for calls coming from the
door station, if the indoor station is called from a oor
door the ringtone will be played anyway.
Incoming calls are still recognizable by the ashing of LED 3.
Activate ringtone
Open door
Support Hotline: +49 (0) 2661 98088-112
Support E-Mail: support@sks-kinkel.de
Shortly touch the Mute touch key. You will hear a high signal
tone indicating that the ringtone is active again.
Within two minutes after the indoor station has rung, the door
can be opened using the door opener key.
In case a call is active the call is ended automatically
10 seconds after pushing the door opener key.
Version No. 2.0
41
Document No. 97013201
Page 42

SKS-Kinkel Elektronik GmbH
10007001 SMARTLine 2D BSV2012 Video Indoor Station
12.3 Menu keys
Menu key Function
Menu key to open the main menu
Special key for special switching functions
Light key for special switching functions
Back key leading back to the last menu
EN
Navigation key up to navigate upwards within the menu
Navigation key down to navigate downwards within the menu
Enter key to conrm an action
12.4 Operation with menu keys
The indoor station is operated by using both the touch keys below the touch screen and the touch screen. The touch
keys are used to take calls, to switch o the ringtone and to open the door. Using the menu keys you can navigate
through the menu and perform other functions.
In the following table the functions are described:
12.4.1 Main menu
To open the on-screen menu activate the touch screen by touching it. Touch it again to open the menu.
Support Hotline: +49 (0) 2661 98088-112
Support E-Mail: support@sks-kinkel.de
42
Version No. 2.0
Document No. 97013201
Page 43

SKS-Kinkel Elektronik GmbH
10007001 SMARTLine 2D BSV2012 Video Indoor Station
You are now in the main menu. Here you can enter various settings and configurations.
To choose a menu point navigate to it using the navigation keys and confirm your choice with the enter key.
By pushing the back key you can leave the menu or get back to the last menu.
12.4.1.1 Internal call
For internal calls two functions are possible: Direct call and Namelist call.
If Direct Call is activated (s. chapter Initial setup of the installation manual) you can call up to three indoor sta-
tions which are operated in parallel. To do so navigate to the menu point Direct Call and confirm your choice
by pushing the enter key to initiate the call. All indoor stations operated in parallel are called.
EN
Choosing Namelist Call all indoor stations in the same home communication system which are not operated
in parallel can be called directly.
To do so navigate to the menu point Namelist Call and confirm your choice by pushing the enter key.
Navigate to the call address you want to call from the address list and push the enter key again to initiate the
respective internal call.
By pushing the back key you can leave the menu or get back to the last menu.
Support Hotline: +49 (0) 2661 98088-112
Support E-Mail: support@sks-kinkel.de
43
Version No. 2.0
Document No. 97013201
Page 44

SKS-Kinkel Elektronik GmbH
10007001 SMARTLine 2D BSV2012 Video Indoor Station
12.4.1.2 Camera
Here you can pick the cameras installed in your system and show their video image.
Navigate to the camera you want and confirm your choice by pushing the enter key to open the respective
video image.
By pushing the back key you can leave the menu or get back to the last menu.
EN
12.4.1.3 Display
In the menu point Display the display settings contrast, brightness and colour can be changed.
Using the navigation keys choose whether you want to adjust contrast, brightness or colour and confirm your
choice by hitting the enter key.
Contrast, brightness and colour can be set in steps from 0 to 9. Navigate to the feature you want to change
using the arrow keys and push enter. Pick the step you want (0 to 9) and push again the enter key to set it as
standard.
By pushing the back key you can leave the menu or get back to the last menu.
Support Hotline: +49 (0) 2661 98088-112
Support E-Mail: support@sks-kinkel.de
44
Version No. 2.0
Document No. 97013201
Page 45

SKS-Kinkel Elektronik GmbH
10007001 SMARTLine 2D BSV2012 Video Indoor Station
12.4.1.4 Volume
In the menu point Volume you can set both ringtone and speech volume.
Navigate to the feature you want to change (ringtone and speech volume) using the arrow keys and push enter
to confirm your choice. Switch to the volume you prefer (0 to 9) and confirm your choice again by pushing the
enter key to set your choice as standard.
EN
By pushing the back key you can leave the menu or get back to the last menu.
12.4.1.5 Ringtone
Pick the menu point Melody to choose the indoor station’s ringtones. The house call ringtone is played when
a bell button is pushed at the door station. The Internal call ringtone is heard when the indoor station is called
from another indoor station. The floor ringtone is played when the floor bell button is pushed (only when installed in the system).
Using the navigation keys pick whether you want to set a ringtone for door calls, internal calls or floor calls and
confirm by pushing enter.
All in all 12 different ringtones are available (for door calls, internal calls or floor calls). Pick the ringtone you
prefer by using the navigation keys and set it as standard by pushing the enter key.
By pushing the back key you can leave the menu or get back to the last menu.
Support Hotline: +49 (0) 2661 98088-112
Support E-Mail: support@sks-kinkel.de
45
Version No. 2.0
Document No. 97013201
Page 46

SKS-Kinkel Elektronik GmbH
10007001 SMARTLine 2D BSV2012 Video Indoor Station
EN
13 Service
The current legal regulations apply for warranty. (See also general terms and conditions which are either enclosed or
can be downloaded from www.sks-kinkel.de/agb/.)
13.1 Warranty
Our customers and electricians are oered a simplied handling of warranty claims. For more information on this
please refer to the terms and conditions on our internet page or contact our SKS support hotline.
13.2 Service and support
Our support team is happy to put their services at your disposal and provides practical assistance and advice. The
SKS support team may be reached by email or phone. When contacting us please provide a description of the fault
as accurate as possible, the project name, your name and your customer ID.
The following options are available:
SKS Support Hotline +49 (0) 2661 98088112
@
SKS Support E-Mail support@sks-kinkel.de
13.3 Address
SKS-Kinkel Elektronik GmbH, Im Industriegebiet 9, 56472 Hof/ Westerwald
Tel.: +49 (0) 2661 980 88 0, Fax: +49 (0) 2661 980 88 200
E-Mail: info@sks-kinkel.de, www.sks-kinkel.de
14 Disposal instructions
Do not dispose of the device in the regular household waste but take it to a collection
point for electronic waste. Please ask for your collection point at your municipal administration or the local authority.
Separately disposing of old electrical and electronic devices is supposed to allow for reusing, recycling of materials and
respectively other ways of recycling of old devices as well as to avoid negative eects of the disposal of potentially environmental hazardous substances or substances endangering the human health contained in the devices.
Dispose of the packaging in the respective separate containers for cardboard, paper and respectively plastic.
The products comply with the regulatory requirements, in particular with electrical and electronic equipment act and
the REACH-regulation. (EU- guideline 2012/19/EU WEEE and 2011/65/EU RoHS), EU-REACH-regulation and the law
implementing regulation (EG) Nr.1907/2006).
15 Liability disclaimer
We have checked the content of this document to verify that it corresponds to the hard- and software described herein.
There may, however, be deviations and SKS-Kinkel Elektronik GmbH may not be held liable for a lack of conformity. The
information in this document is checked regularly and necessary changes are made in subsequent issues.
Support Hotline: +49 (0) 2661 98088-112
Support E-Mail: support@sks-kinkel.de
46
Document No. 97013201
Version No. 2.0
Page 47

SKS-Kinkel Elektronik GmbH
10007001 SMARTLine 2D BSV2012 Video Indoor Station
16 Appendix
EN
DIP-switch settings for SMARTLine indoor stations
A8
A7
A6
A5
A4
A3
A2
ON
1 2 3 4 5 6
ON
1 2 3 4 5 6
ON
1 2 3 4 5 6
ON
1 2 3 4 5 6
ON
1 2 3 4 5 6
ON
1 2 3 4 5 6
ON
1 2 3 4 5 6
B8
B7
B6
B5
B4
B3
B2
ON
1 2 3 4 5 6
ON
1 2 3 4 5 6
ON
1 2 3 4 5 6
ON
1 2 3 4 5 6
ON
1 2 3 4 5 6
ON
1 2 3 4 5 6
ON
1 2 3 4 5 6
C8
C7
C6
C5
C4
C3
C2
ON
1 2 3 4 5 6
ON
1 2 3 4 5 6
ON
1 2 3 4 5 6
ON
1 2 3 4 5 6
ON
1 2 3 4 5 6
ON
1 2 3 4 5 6
ON
1 2 3 4 5 6
ON
D8
1 2 3 4 5 6
ON
D7
1 2 3 4 5 6
ON
D6
1 2 3 4 5 6
ON
D5
1 2 3 4 5 6
ON
D4
1 2 3 4 5 6
ON
D3
1 2 3 4 5 6
ON
D2
1 2 3 4 5 6
A1
ON
1 2 3 4 5 6
B1
ON
1 2 3 4 5 6
C1
ON
1 2 3 4 5 6
ON
D1
1 2 3 4 5 6
Support Hotline: +49 (0) 2661 98088-112
Support E-Mail: support@sks-kinkel.de
47
Version No. 2.0
Document No. 97013201
Page 48

SKS-Kinkel Elektronik GmbH
Im Industriegebiet 9
56472 Hof/ Westerwald
Tel.: +49 (0) 2661 980 88 0
Fax: +49 (0) 2661 980 88 200
E-Mail: info@sks-kinkel.de
Web: www.sks-kinkel.de
Support Hotline: +49 (0) 2661 98088-112
Support E-Mail: support@sks-kinkel.de
48
Versionsnr. 2.0
Dokumenten Art. Nr. 97013201
 Loading...