

Page 1
MANUAL RIDEAIR LOCK ¬ 11448
SEAT TUBELESS TYRES
FUNKTIONEN
L
F
A
Ü
E
R
D
I
E-BIKE
P
R
E
O
R
F
F
E
T
C
ALLROAD
TUBELESS
ROAD
MOUNTAIN
GEWICHT G
520
WEIGHT G
Max. tyre-pressure
at completely filled RIDEAIR
TYRE
28" 700c x 23 6,5 bar / 94,3 psi
28" 700c x 28 5,1 bar / 74,0 psi
28" 700c x 35 3,7 bar / 53,7 psi
28" 700c x 42 2,8 bar / 40,6 psi
26" x 1,95 2,2 bar / 31,9 psi
26" x 2,4 1,6 bar / 23,2 psi
29" x 2,1 1,8 bar / 26,1 psi
29" x 2,4 1,4 bar / 20,3 psi
29" x 3,0 1,0 bar / 14,5 psi
27,5" x 2,0 2,0 bar / 29,0 psi
27,5" x 2,4 1,3 bar / 21,8 psi
MAX
16
BAR
MAX
230
PSI
Fülldruck
Pressure
Sclaverand
Presta
Schlauch mit
Autoventilanschluss
zur Reifenbefüllung
Hose with vale access
Auto
Schrader
Dunlop
DV/SV Adapter
presta adapter
27,5" x 3,0 1,0 bar / 14,5 psi
ACHTUNG / CAUTION
Nicht mit CO
Kartuschen befüllen!
!
Do not use
CO
cartridges!
2
EN. RIDEAIR LOCK
Portable and refillable air tank. After filling up the canister with air by a standard floor pump (max. 16bar / 230 psi) your tyre can be
inflated in seconds. Also perfect for seating tubeless tyres to the rim.Threaded hose connection for Schrader includes also an adapter
for Presta & Dunlop. Fits perfectly to your bottle cage for transport. Incl. wire cable lock.
MADE IN GERMANY SKS-GERMANY.COM
2
LOCK
80 CM
Manometer
Gauge
Befüllstutzen mit
Autoventilanschluss
Schradervalve access to fill
(BAR/PSI)
GERMANY
Page 2

MANUAL RIDEAIR LOCK ¬ 11448
ALLROAD
ROAD
MOUNTAIN
!
• Der max. Luftdruck von 16 bar/230 psi darf nicht überschritten werden.
The Max air pressure in the RIDEAIR
• Es darf nur mit LUFT befüllt werden. Es dürfen keine anderen
gasförmigen oder flüssigen Mittel verwendet werden.
Use only air to charge the RIDEAIR
No other gas or liquids are allowed!
• Für den Transport im Flugzeug muss der RIDEAIR
Es wird empfohlen den RIDEAIR
zu transportieren.
Make sure the RIDEAIR
flight. It is recommanded to store RIDEAIRTM with
checked baggage.
• Der RIDEAIR
• Der RIDEAIRTM darf nicht geöffnet werden, bspw. durch Aufbohren.
• Do not heat RIDEAIR
• Do not try to puncture the RIDEAIR
ACHTUNG / CAUTION
TM
should not exceed 230psi/16bar.
TM
.
TM
nicht im Handgepäck
TM
.
leer sein.
TM
TM
is completely empty when boarding it on a
TM
darf nicht beheizt oder in Kontakt mit Feuer kommen.
TM
and do not put in fire.
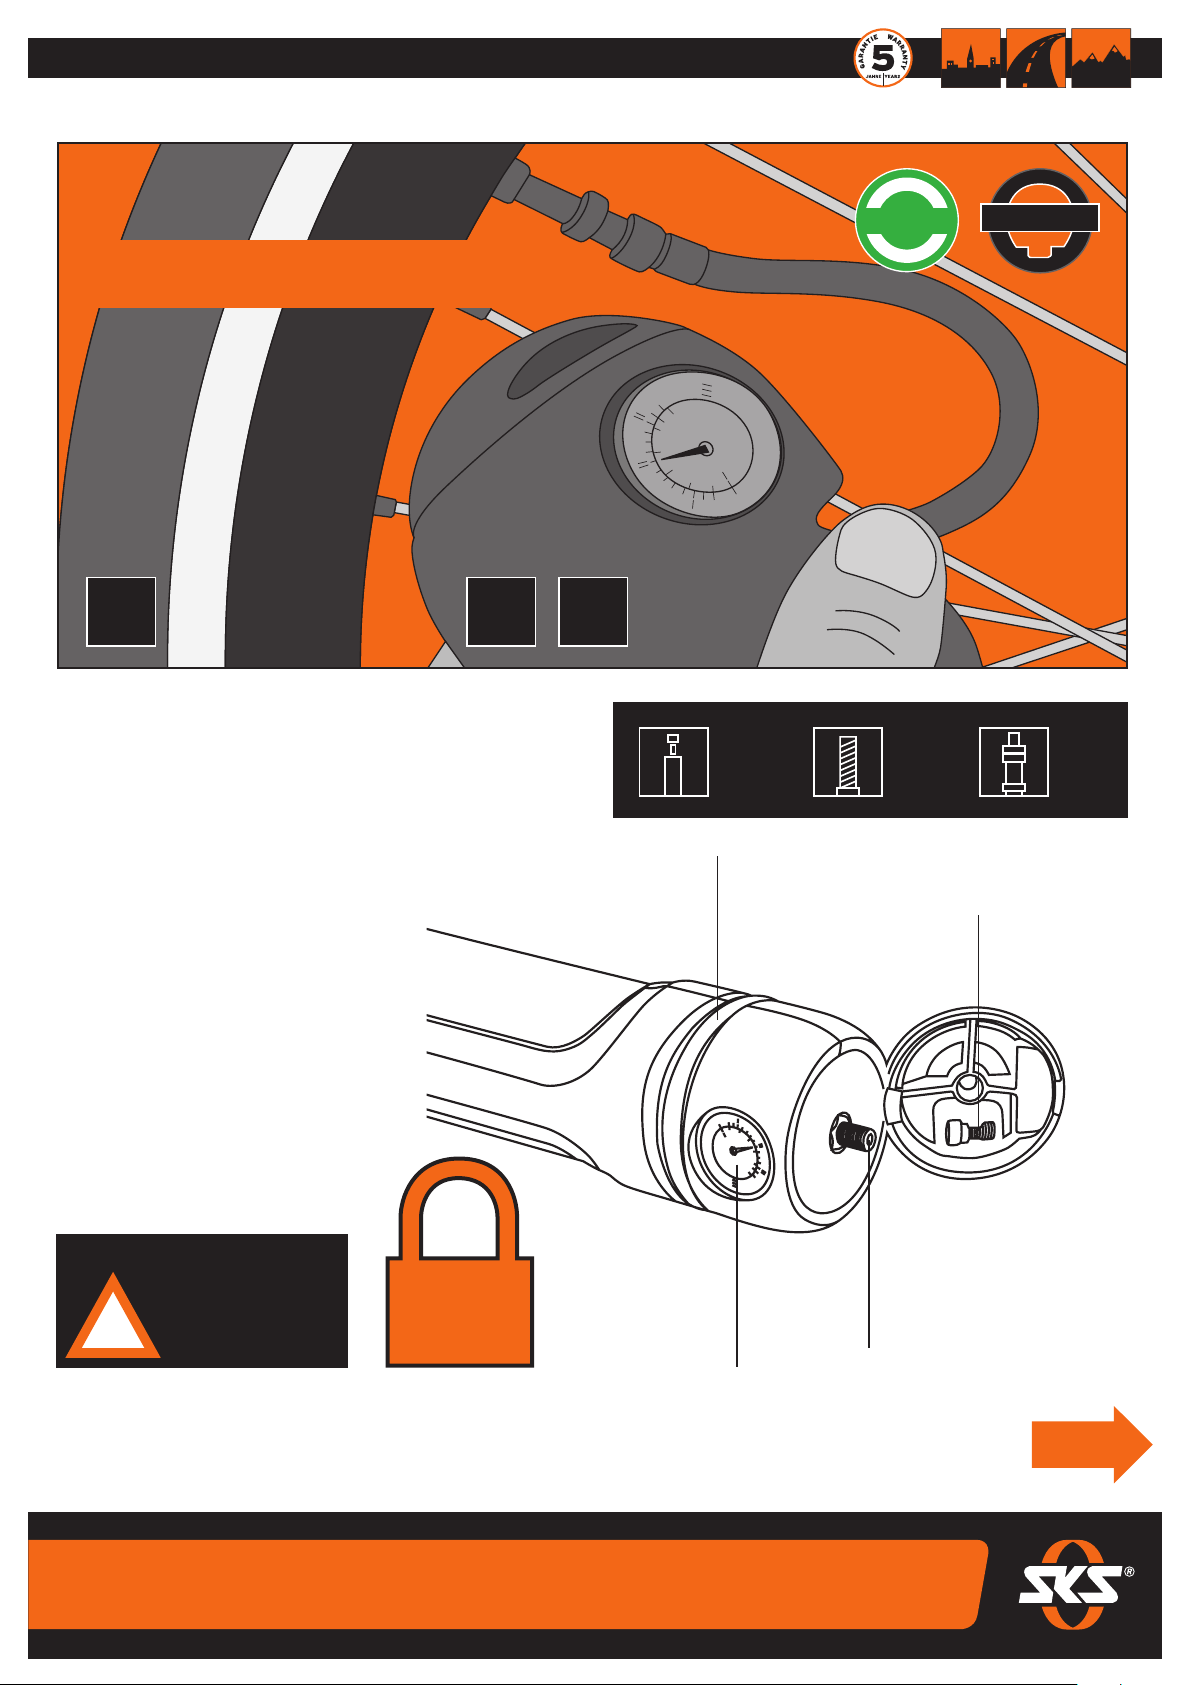
BEFÜLLUNG DES RIDEAIR BEFÜLLEN EINES REIFENS
CHARGING YOUR RIDEAIR
Mittels einer Standpumpe oder eines Kompressors
using a floor pump or a standard air compressor
(can be found in gas station or bike shop).
TM
➊ Öffnen Sie die Kappe des RIDEAIR
Open the RIDEAIR
reveal the inlet valve.
➋ Schließen Sie den Ventilkopf der Standpumpe oder des Kompressors
am Befüllungs-Ventil an. Zum Befüllen des RIDEAIR
SV/DV-Adapter nicht benötigt.
Connect the compressor’s chuck valve or the floor pump
inflation head to the inlet valve.
TM
cap and
TM
wird der
➌ Pumpen Sie den RIDEAIRTM bis max. 16 bar / 230 psi auf.
Inflate by pressing the compressor chuck valve against the
TM
inlet valve/ Manually Inflate using the floor pump
RIDEAIR
leaver up the desired pressure.
Pumpen Sie nicht mehr als die
erlaubten 16 bar / 230 psi auf.
Do not inflate more than the maximum
!
allowed pressure of 230psi or 16bar.
Note: if applicable, make sure the compressor it on Flat tyre mode.
➍ Entfernen Sie den Ventilkopf der Standpumpe/des Kompressors
von dem Befüllungs-Ventil des RIDEAIR
Disconnect the floor pump/compressor from
TM
the RIDEAIR
’s inlet valve and close the cap.
TM
’s und schließen Sie die Kappe.
(für Tubeless Reifen bitte den nächsten Abschnitt beachten)
INFLATE A TYRE
(for tubeless tyre refer to the next section)
➊ Entnehmen Sie den Schlauch aus seiner Halterung.
Pull the tip of the inflation hose.
FÜR SCLAVERAND UND DUNLOP-VENTILE
FOR PRESTA AND DUNLOP VALVE TYRE ONLY
Benutzen Sie den SV/DV Adapter,
1.1
dieser befindet sich in der Kappe.
Use the Presta to Schrader adapter
located in the RIDEAIR
TM
’s cap.
Schrauben Sie den Adapter auf das Ventil ihres Reifens.
1.2
Screw the adapter to the tyre valve.
Kompatibel mit beiden SV/DV Ventilen.
Compitable with both
Presta and Dunlop valves.
TM
➋ Schrauben Sie den Schlauch des RIDEAIR
Reifens auf.
Connect the hose to the tyre's valve and screw the
hose tip to the valve (if Presta - to the adapter).
’s auf das Ventil ihres
➌ Drücken Sie die Befüllungstaste, um den gewünschten Druck
zu erreichen. Die Befüllungstaste befindet sich am Kopf
des RIDEAIRTM’s
Press RIDEAIR
desired pressure is achieved in the tyre.
TM
’s inflation button up to
BEFÜLLEN EINES TUBELESS REIFENS
INFLATE A TUBELESS TYRE
➊ Befolgen Sie die vom Reifenhersteller angegebenen
Montageanweisungen.
Follow tyre manufacturer's recommended installation
instructions for tubeless tyres.
➋ Befestigen Sie das Ventil in der Felge und prüfen Sie den
korrekten Sitz des Reifens bevor Sie mit der Befüllung starten.
Tighten valve and ensure tubeless tyre has been installed
correctly before inflation.
➌ Befolgen Sie nun die Schritte 1-3 »Befüllen eines Reifens«
Follow Steps 1-3 from »Inflate a tyre« (previous section)
➍ Der Reifen ist korrekt montiert, wenn sich die Reifenwulst
in das Felgenhorn gesetzt hat.
If the installation is perfect, the bead of tire will snap into
the rim as shown during inflation.
EINSTELLEN DER ZAHLENKOMBINATION
(NUR BEI RIDEAIR LOCK)
CHANGE LOCK COMBINATION
TM
Der RIDEAIR LOCK
Vor dem Ändern der Kombination, versichern Sie sich, dass diese
auf 0-0-0 eingestellt ist.
RIDEAIR LOCK
to change the combination, make sure the lock's dial is set to 0-0-0.
➊ Drücken Sie den Kabelverschluss in den RIDEAIR LOCKTM
bis Sie ein »Klick« hören.
Press the cable end pin into the RIDEAIR LOCK
➋ Jetzt stellen Sie ihre persönliche Wunschkombination ein.
Change the dial to the desired combination number.
➌ Ziehen Sie den Kabelverschluss in seine Ausgangsposition heraus,
bis Sie ein »Klick« hören.
Pull back the tip back to its original position until a »Click« is felt.
hat die 0-0-0 als voreingestellte Kombination.
TM
default combination number is 0-0-0. Before attempting
TM
until a »Click« is felt.
MADE IN GERMANY SKS-GERMANY.COM
GERMANY
Page 3

MANUAL RIDEAIR LOCK ¬ 11448
TM
BENUTZUNG DES RIDEAIR LOCK ÖFFNEN DES SCHLOSSES HAFTUNGSAUSSCHLUSS
USE RIDEAIR LOCK RELEASE THE LOCK
➊ Stellen sie die eingestellte Zahlenkombination ein.
(Auslieferungszustand: 0-0-0)
Turn the dial until the set combination number
is shown (Default combination number is »0-0-0«).
➌ Sichern Sie den RIDEAIR
um einen festen Gegenstand wickeln und in den Verschluss stecken.
Lock the RIDEAIR
by pushing in the tip of the cable to the lock shack.
und Ihr Fahrrad, indem sie das Kabel
TM
and desired accessories to the bike
➊ Stellen Sie die korrekte Zahlenkombination ein
(Auslieferungszustand: »0-0-0«).
Turn the dial until the set combination number
is shown (Default combination is »0-0-0«).
➋ Drücken Sie den Löseknopf (links vom Schloss).
Press the tip release button to release the cable from the shack.
ALLROAD
• Nicht mehr als 16 bar / 230 psi befüllen.
• Überschreiten Sie nicht den max. Luftdruck des Reifens
(Herstellerangaben des Reifens beachten).
• Befolgen Sie die Anweisungen des Reifenherstellers für die
Installation von Tubeless-Reifen.
• Nicht bei defektem Reifen verwenden.
• Zielen Sie nicht auf Personen und entleeren den RIDEAIR
• Versichern Sie sich, dass der Schlauch korrekt auf dem Ventil
aufgeschraubt ist, bevor Sie die Befüllung des Reifens beginnen.
• Öffnen Sie den RIDEAIR
Feuer aus, auch nicht nach der Benutzung.
• Halten Sie den RIDEAIR
Ofen, Kamin, auch nicht nach der Benutzung.
• Demontieren Sie nicht das Kunststoffgehäuse.
• Der RIDEAIR
wenn Sie ihn in einem Flugzeug transportieren.
• Transportieren Sie den RIDEAIR
TM
nicht gewaltsam oder setzen ihn dem
TM
fern von heißen Plätzen, wie Feuer,
TM
muss komplett leer transportiert werden,
ROAD
TM
vorsichtig.
MOUNTAIN
TM
.
➋ Drücken und halten Sie den Kabeleinzugsknopf und ziehen
das Kabel heraus.
Press the cable's release button continuously and
pull the cable from its tip.
Das Herausziehen des Kabels ohne
Betätigen des Kabeleinzugsknopfes
kann zu Beschädigungen bei der
Kabelisolierung führen.
!
Pulling the cable without pressing
the release button may damage the
cable coating!
PRODUKTANGABEN
Gewicht
Höhe
Durchmesser
Volume
Max. Druck
Kabellänge
Betriebstemp. min.
Betriebstemp. max.
*Mit Schloss
➊ Aluminum Lufttank
➋ Befüllungstaste
➌ Schlauch
➍ Kabelschloss
➎ Befüllungsventil
➏ Manometer
➐ Sclaverant/Dunlop Adapter
Benötigte Materialien
• Kompressor oder eine Standpumpe
• Flaschenhalter – wenn Sie den RIDEAIR
metrisch
450 g (520)*
26 cm (28)*
7,5 cm
600 ml
230 psi
80 cm
- 10°C
+50°C
4
britisch
0.99 pound (1.14)*
10.23" (11.02)
2.75"
22 oz
16 bar
31.5"
14°F
122°F
1
6
TM
am Rad transportieren möchten
3
➍ Verstellen Sie die Zahlenkombination zu einem beliebigen Code,
um das Schloss zu verriegeln.
Chage the dial to a random number to secure the RIDEAIR
TM
.
➌ Drücken Sie den Kabeleinzugsknopf (rechts vom Schloss) so lange,
bis das Kabel komplett eingezogen ist.
Press the cable release button continuously
to retract the cable back to its original place.
GARANTIE
5 Jahre Herstellergarantie.
Garantieanspruch
Um einen Garantieservice zu erhalten,
benötigen Sie den original Kaufbeleg.
Jeglicher Garantieanspruch erlischt, wenn das Produkt durch Unfall,
Missbrauch, Systemänderungen, Modifikationen oder in irgendeiner
anderen Weise, die nicht in der Anleitung beschrieben ist,
Es wird empfohlen, das Kabel so lange festzuhalten,
bis es komplett eingezogen ist.
It is recommanded to hold the cable while retracting it for a safer use.
DISCLAIMER
• Do not exceed maximum allowed pressure of 230 PSI/16 BAR.
• Do not exceed the maximum air pressure of your tyre.
• Follow tire manufacturer‘s recommended installation instructions
for tubeless tyres.
• Do not use with damaged tyres.
• Do not aim or release RIDEAIR
Ensure hose tip is screwed securely to your bike’s valve before
releasing the pressurized air to the tyre.
• Do not pierce or burn the RIDEAIR
• Keep the RideAir away from hot places such as fire, stove,
chimney even after use.
• Do not dismantle RideAir or its plastic cover.
TM
should be stored completely empty of air when travel
RIDEAIR
on a plain.
• Transport RideAir with care.
2
5
5 years Warranty: All mechanical components against
manufacturer defects only.
7
Warranty Claim Requirements
To obtain warranty service, you must have your original
sales receipt.
All warranties will be void if the product is damaged
due to user crash, abuse, system alteration, modification,
or used in any way not intended as described in this manual.
Please contact your RideAir dealer with any questions.
sks-germany.com
TM
pressurized air at anyone.
TM
, even after use.
WARRANTY
Weight
Height
Diameter
Volume
Max. pressure
Gable Lock
Working Temp. min.
Working Temp. max.
*With Lock
➊ Aluminum Air Tank
➋ Inflation Button
➌ Inflation Tube
➍ Combination Lock
➎ Inlet Valve
➏ Pressure Gauge
➐ Presta/Schrader Adapter
Needed tools
• Air compressor or a floor pump
• Water bottle holder – if desired to carry on bicycle
SPECIFICATIONS
Metric
450 g (520)*
26 cm (28)*
7,5 cm
600 ml
230 psi
80 cm
-10°C
50°C
1
4
Imperial
0.99 pound (1.14)*
10.23" (11.02)
2.75"
22 oz
16 bar
31.5"
14°F
122°F
3
5
6
2
beschädigt wird.
Bitte kontaktieren Sie bei jeglichen Fragen Ihren RIDEAIR
sks-germany.com
TM
is a refilable multi-use portable air capsuite that lets cy-
RIDEAIR
clists inflate bicycle tyres at a push of a button. Mobile solution for
tubeless tyres. For best tubeless seating results inflate RIDEAIR
to its max allowed pessure of 230 psi/bar. RIDEAIR
used for additional applications, such as: Strollers, wheelchair, Balls,
Inflatable toys, etc. RIDEAIR
any standard water bottle cage.
Maintenance and caution use of et RIDEAIR
From time to time, check RIDEAIR
If a defect appears do not use the RIDEAIR
from children. Do not try to fix or dismantie RIDEAIR
own. If any problem occurs, kindly refer to your dealer for dealer for
maintenance and spare parts, if applicable.
Hereby, RIDEAIR
conformity with essential requirements of the relevant
CE Directives.
TM
ist eine tragbare, nachfüllbare Druckluft-Kapsel.
RIDEAIR
Radfahrer können auf Knopfdruck die Fahrradreifen wieder befüllen.
Mobile Lösung für Tubeless Reifen. Um zu gewährleisten, dass
die Tubeless Reifen sich optimal in die Felge setzen, muss der
TM
auf 230 psi/16 bar befüllt werden. Der RIDEAIRTM kann
RIDEAIR
auch für zusätzliche Anwendungen verwendet werden, wie zum
Beispiel: Kinderwagen, Rollstuhl, Bälle, aufblasbare Spielzeuge, etc.
Der RIDEAIR
Fahrrad transportiert werden.
Wartung und Benutzung von RIDEAIR
Der RIDEAIRTM muss stetig auf Defekte der Aluminiumdose
überprüft werden. Bei einem Defekt darf der RideAir nicht benutzt
werden. Der RIDEAIR
werden. Reparieren oder zerlegen Sie den RIDEAIR
Bitte wenden Sie sich an Ihren Händler, wenn ein Problem auftritt.
7
Hiermit erklärt RideAir Innovations Ltd., dass der RideAir mit den
Anforderungen der notwendigen CE-Richtlinien übereinstimmt.
Produced on 2017
Bike and other accessories rechargeable inflator.
RideAir Innovations Ltd.
18 Moriya St.
Ramat Hasharon, 4722832
ISRAEL
TM
can be mounted on a bicycle using
TM
TM
Innovations Ltd declares that RIDEAIR
TM
kann mit einem Standard-Flaschenhalter an einem
TM
muss vor Kindern sicher aufbewahrt
TM
Händler:
TM
can also be
TM
for defects of aluminium can.
TM
TM
. Keep RIDEAIR
TM
on your
TM
nicht.
TM
TM
is in
TM
safe
MADE IN GERMANY SKS-GERMANY.COM
GERMANY
 Loading...