

SKP Pro Audio MAX 310, MAX 410X, MAX 710X User Manual

1
MAX 310 / 410X / 710X
User’s Manual
Manual del Usuario.
Manual do Usuário.
SAFETY INFORMATION
CAUTION: To reduce the risk of electric shock, do not remove any cover(or the rear section). No user
serviceable parts inside. Refer servicing to qualified service personnel only.
WARNING: To reduce of fire or electric shock, do not expose this appliance t o rain and moisture. Electrical
equipments should NEVER be kept or stored in damp environments.
This symbol, wherever app ears, is intended to alert the user to the presence of un-insulated
dangerous voltage within the appliance ’s enclosure that may be of sufficient magnitude to a
risk of electric shock.
This symbol, wherever appears, is intended to alert the user to the presence of important
operating and maintenance (servicing) instruction in the literature accompanying this
appliance.
This symbol mean s : indoor u s e only.

2
This symbol means: Read instructions.
Safety Instructions
1. Read Instructions All the safety and operating instructions should be read before this products is
connected and used.
2. Retain Instructions The safety and operating instru ctions s ho uld be kept for future reference.
3. Heed Waning All warnings on this appliance and in these oper ating instructions should be followed.
4. Follow Instruction All op erating and ot her instruc tions should be followed.
5. Heat, Water and Moisture Do not place this appliance to close to any high heat sources such a s
radiators. Also this appliance should be kept awa y from direct cont act with liquids.
6. Ventilation The appliance shou ld be situated so that it’s location or position does no t inter fere with it’s
proper ventilation. For example, the appliance sho uld not be situated on a sofa, bed, or similar sur face that
may block the ventilation opening ; or keep the appliance away of those objects such as newspapers , carpet
whic h may cover the ventila tio n opening or impede the flow of air through the ventila tio n opening.
7. Po w e r S o u rc e & Po w e r C o r d This appliance shou ld be connected to a power sup ply only of the type
described in these operating instructions, or marked on the unit.
Power supply cord should be routed so that the are not likely to be walked upon or pinched by the items
placed on or against them. When re moving the co rd from a power outlet be sure to remove it by holding the
plug attachment and not by pulling on the cord.
Check the total maximum po w er of your AC wall outlet and make sure it has the enough p ower to ma tch the
Power Consumption of this app liance, otherwise you could overload the wa ll outlet, which could cause fire.
8. Internal / External Voltage Selectors Internal of external voltage selector switches, if any, should
only be reset and re-equipped with a proper plug for alternative voltage by a qualified service technician .
Do not attempt to alter this yourself.
9. Object & Liquid Entry Take care to avoid any objects falling into or liquids are not spilled in to the
inside of the appliance.
10. Cleaning Unplug the appliance first and clea n only with a dry c loth.
11. Non-use Period The power cord of the appliance should be unplugged from the outlet when left
unused for long periods of time.
12. Unpacking & Setup Please check your appliance for any damage a fter unpacking(before co nnecting)
and contact your dealer in case of any related complains. Take care of choosing your installat ion place and
the correct AC connection. If built in to a case, be aware that the depth and the weight of some kind
appliance(such as Amplifier) does require an additional fixing on the backside or the use of rack shelf
supports. Never mount the amplifier in a rack just by fixing it on the front plate – Manufacturer takes no
responsibility in this cas e .
13. Damage Requiring Service Servicing is required when t he appliance has been damaged in any way,
such as power cord or plug is damaged, liquid has been spilled or objects have fallen in the appliance, the
app liance has be en e xpose d to r ain or moist ure, does not operate no rmally, or has been dro pped. Refer all
servicing to qualified service personnel or contact your dealer. Do not attempt to repair by yourself.
FUNCTIONS:
Time de lay to start
● Short circuit protection
DC protection
Thermal cut off
Large capacitors provide storage of bass
High effective cooling equ ipment
3
PRECAUTIONS
Do not stand the amplifier vert ically on its back.
Always use power source of adequat e cap acity.
Do no t tur n on the p o w e r of mu ltip le powe r a mpli fi e rs a t the s a me time. N e v e r a llow the
ventilation holes on t he body of the ampl ifier to g et obst ruct ed in any way.
Input level adjust contro ls are pro vided for each ch anne l.
Output can use binding posts, banana posts or 1/4" jacket.
To clean the amplifier, wipe it with a dry cloth. If the case is very dirty, disconnect the AC
cord from the power source, then wipe it witch a c lot h da mpe ned in water or mild soap water, then wipe till
dry thoroughly. Never use solvents or chemical cloth, similarly, never spray insecticides as they may cause
discoloration or peeling.
If any trouble is found, disconnect the po w er cord and contact your dealer.
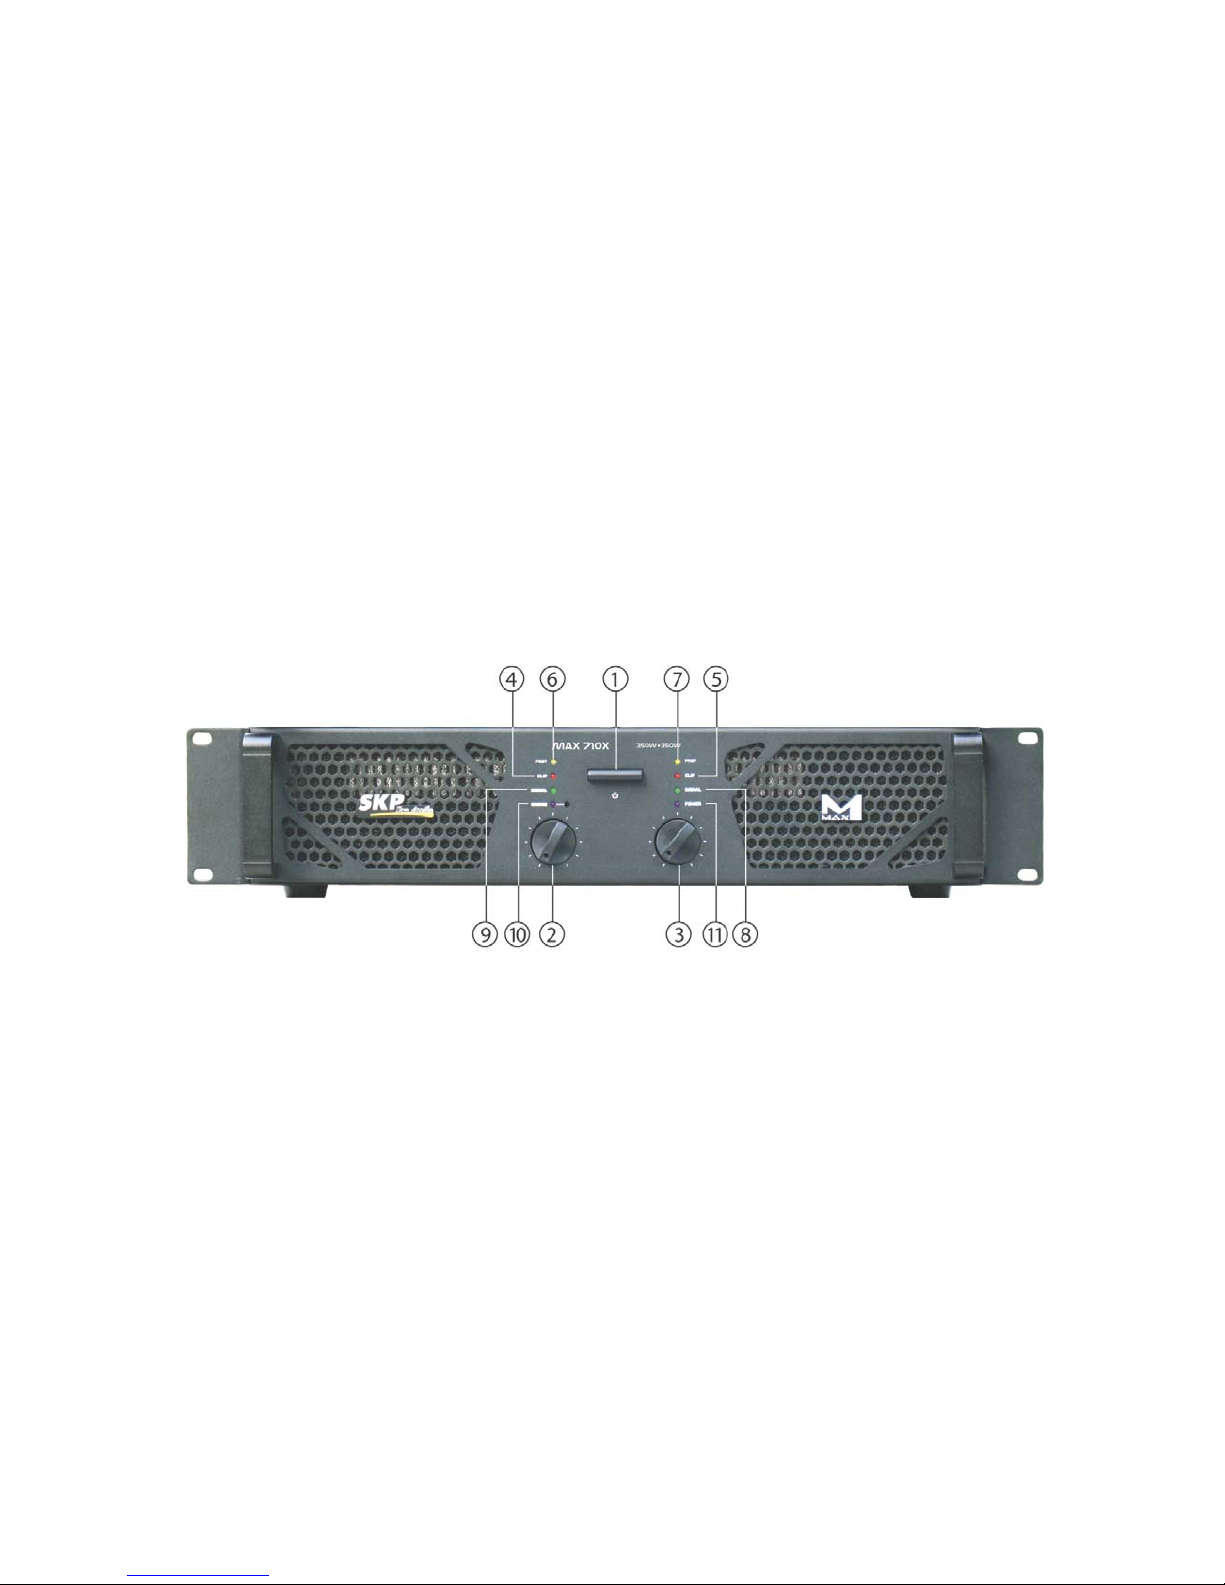
MAJOR OPERATING CONTROLS AND THEIR FUNCTIONS
FRONT PANEL:
1. POWER ON/OFF SWITCH:
When turning o n the amplifier, the power o n/off transi ent prot ectio n s tar ts wo rking. After 3-4
seconds, you can hear a voice "kniak". And 1-2 seconds later, you can hear a voice of "kniak"
once the amplifier has been connect ed w ith the speakers.
2. CHA INPUT LEVEL CONTROL
Adjust this control to get t he voice you need, when you 're far awa y fro m the speaker s, you can
adjust it with the calibrated markings o n t he fro nt panel indicating the amount of att enuation
applied to the input signal. This allows proper volume setting applied to the input signal. Also
allows proper volume sett ing of the speakers whe n t he input s ignal source is at its rated level.
Use this co ntrol when running the amplifier in bridge or parallel mode only.
3. CHB INPUT LEVEL CONTROL
As the same as CHA.
4.5 LEVEL INDICATOR LAMP (RED).
The L EDS will be on in t he two situatio ns :
• When the output signal has reached its clippin g level, the LED lights; possibly result ing in
distortion, should this occur, adjust the input control so that the clip LED turns off.
 Loading...