

Page 1

ŠkodaAuto
RADIO NAVIGATION SYSTEM
Page 2
1
RADIO NAVIGATION SYSTEM
EQUIPMENT ILLUSTRATION
Page 3

2
RADIO NAVIGATION SYSTEM
QUICK REFERENCE
Radio operation
Manual station tuning for FM, TMC and AM
24
TIM, use to select messages 28
CD-/CD changer operation
Select tracks
31
FM button, to activate FM radio operation
for the FM1 and FM2 memory banks
23
TIM button (Trafc Information Memo),
to listen to trafc messages and
to activate TIM trafc standby 27
CD eject button
30,61
TMC button (Trafc Message Channel),
to activate TMC radio operation
for the TC1 and TC2 memory banks
22
AM button, to activate AM radio operation
for the AM1 and AM2 memory banks
23
CD slot
29
Display
8
DSP button, to adjust the display contrast
13
CD button, to activate the CD and CD changer operation
29,30
Night display operation, to switch to night display 9
NAVI button, to activate the main navigation menu
34
TELE button, to display the trafc messages
received via TMC
12
Radio operation
Recalling stored stations
24
Automatic seek tuning for AM
24
Fast seek (audible) TIM
29
CD-/CD changer operation
Fast seek (audible)
30, 31
MUTE button,
Muting the audio sources for radio, CD and CD changers
(extra features)
13
Radio operation
Seeking and scanning stations cyclically
26
CD-/CD changer operation
Scanning all the tracks on a CD
30, 31
INFO button, to display additional information
12
MIX button, to play the tracks on a CD in random order
30,31
Volume adjustment and switching the system on/off 21,20
AS button, to store radio stations automatically
25
Flagged destination button, to set a ag
46
Page 4
3
RADIO NAVIGTION SYSTEM
QUICK REFERENCE
Radio operation
Station preset buttons 24
CD changer operation
CD direct selection buttons 30
Delete button, to delete entries in the character list
37
Tone button, to adjust the tone and sound range
32
Menu button, to select and conrm menu items
10
Trafc detour, to calculate an alternate route
to bypass trafc congestion
58
button, to exit the menu
11
SET button, to access the Setup menu
14
Macro button, programmable function button 16
Page 5

4
RADIO NAVIGATION SYSTEM
CONTENTS
The Škoda Radio
Navigation System ................................. 6
Navigation .......................................................7
How does navigation work? ......................7
Important notes ...................................... 7
Operating the radio navigation system
while driving.....................................................7
Notes on using the radio navigation
system .............................................................7
Display.................................................... 8
Display illustration ...........................................8
Display contents ..............................................8
Switching to the night display ..........................9
Alarm ...............................................................9
Telephone (PHONE)........................................9
Menus................................................... 10
Menu structure ..............................................10
Selecting and conrming
menu items........................................... 10
Altering settings.............................................11
Exiting menus................................................11
Main buttons......................................... 12
INFO button...................................................12
TELE button ..................................................12
MUTE button .................................................13
DSP button ....................................................13
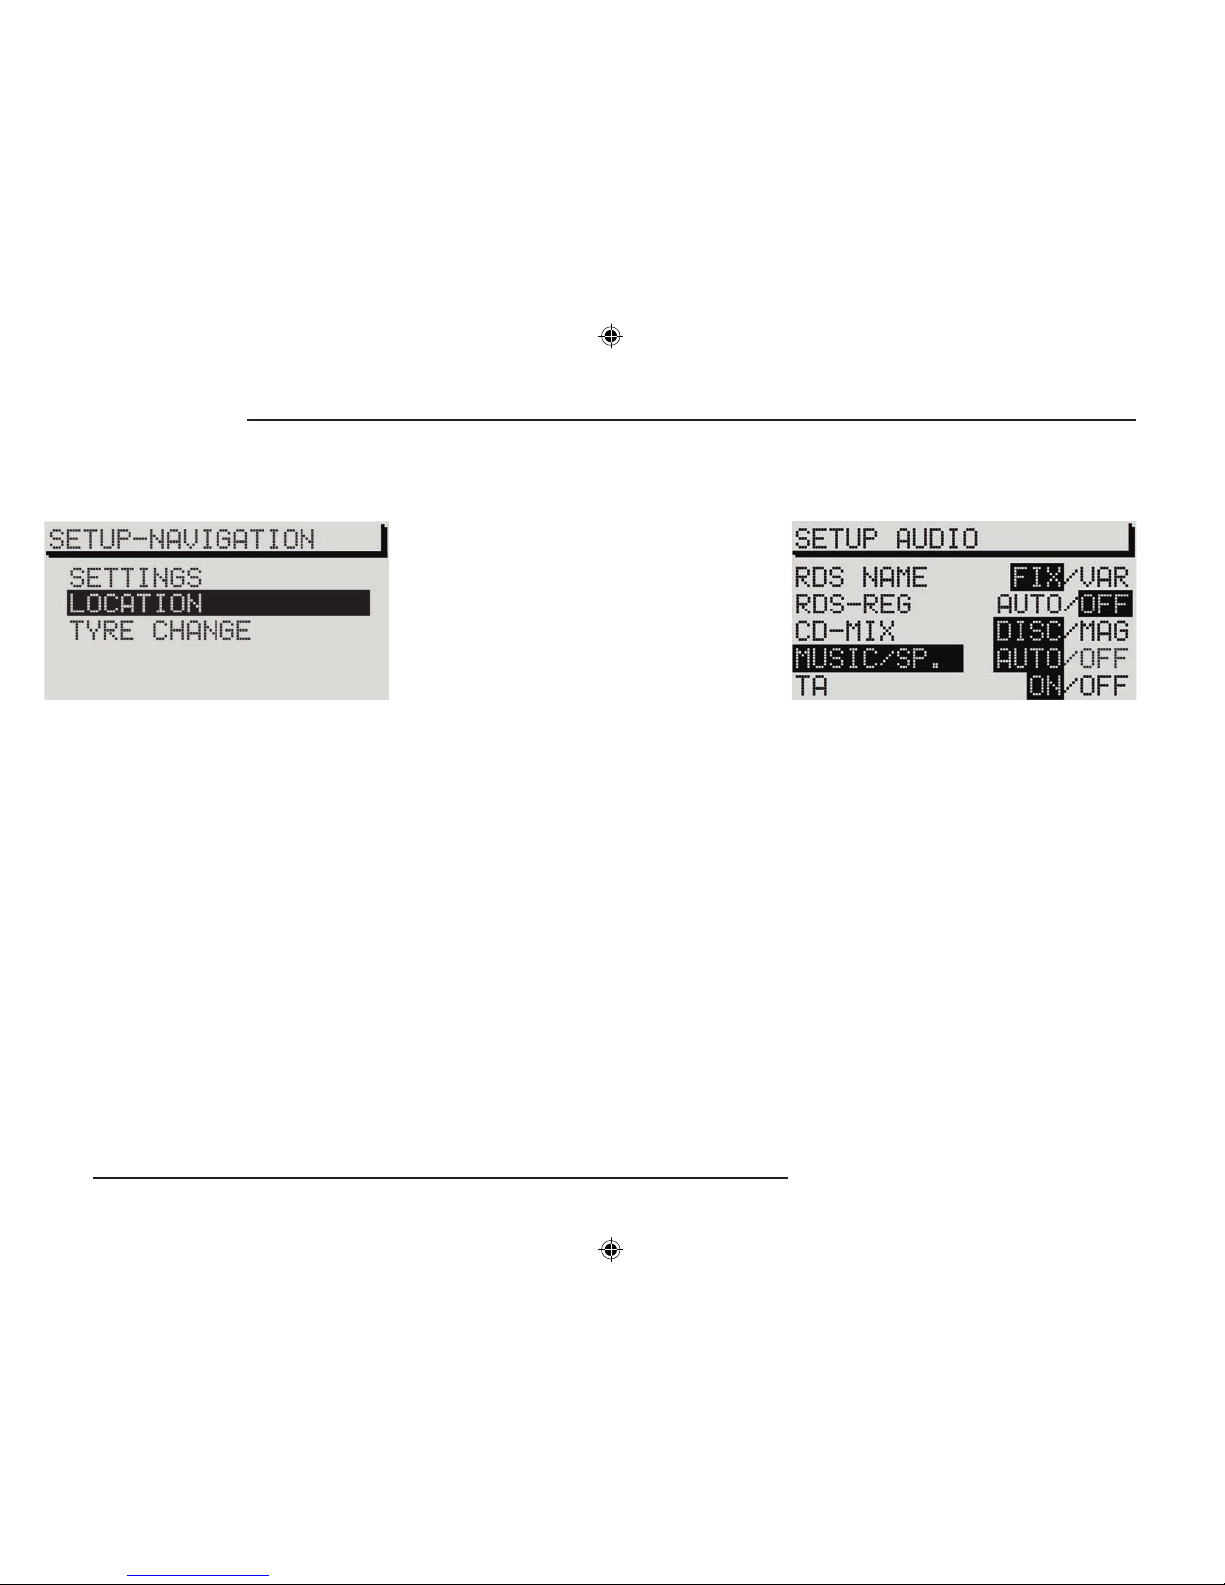
SETUP - Main settings ......................... 14
Navigation setup............................................14
Audio setup ...................................................14
Volume setup.................................................16
Macro key setup ............................................16
Clock setup....................................................17
Language ......................................................18
Default settings..............................................18
Theft Protection .................................... 19
Switching the system on/off.................. 20
Radio operation .................................... 22
Radio operation with RDS .............................22
RDS (Radio Data System) ......................22
Alternate frequency.................................22
TMC (Trafc Message Channel).............22
RDS Regional .........................................22
Switching to regionally related stations...22
Switching on radio operation .........................23
Selecting stations ..........................................24
Manual station tuning for FM, TMC
and AM....................................................24
Recalling stored stations.........................24
Automatic station tuning for AM ..............24
Storing and recalling stations ........................24
Storing stations .......................................24
Recalling stored stations.........................25
Storing stations automatically .................25
Scanning stations (Radio Scan) ....................26
Trafc station reception .................................26
Listening to trafc message ....................27
Interrupting a trafc announcement ........27
AUDIO
INTRODUCTION
CD operation ........................................ 29
Integrated CD player .....................................29
Inserting an audio CD (integrated CD
player) .....................................................29
Starting CD operation (integrated CD
player) .....................................................29
CD functions (integrated CD player) .............30
Selecting a track......................................30
Fast seek tuning (audible).......................30
Scanning all the tracks on a CD (SCAN) 30
Playing all the tracks on a CD in
random order...........................................30
Removing a CD.......................................30
Ending CD operation...............................30
CD changer operation
Trafc Information Memo (TIM).....................27
Activating TIM standby for 24 hours........27
Activating TIM standby for 2 hours..........28
Listening to recorded messages..............28
Selecting a recorded message................28
Fast seek tuning, audible.........................29
Deleting trafc messages........................29
Ending the TIM function...........................29
(extra feature)....................................... 30
Switching on CD changer operation........30
Selecting a CD ........................................31
Selecting a track......................................31
Fast seek tuning......................................31
Scanning all the tracks (SCAN)...............31
Playing all the tracks in random order
(MIX) .......................................................31
Ending CD changer operation.................31
Notes on audio CDs ......................................32
CD label ..................................................32
Skipping during playback ........................32
Condensation..........................................32
Notes on cleaning CDs ...........................32
Tone settings ........................................ 32
Tone settings and balance and fader set-
tings.........................................................32
Page 6

5
RADIO NAVIGATION SYSTEM
CONTENTS
NAVIGATION
Navigation ............................................34
Main navigation menu ...................................34
Destination entry....................................35
Overview........................................................35
Destination entry - City/Town................ 36
Selecting a city or town as your destination ..36
The editor ......................................................36
Entering the city name...................................37
Accessing the list...........................................38
Entering more precise details on your
destination .....................................................38
Destination entry - Street -
Intersection........................................... 39
Selecting a street as your destination ...........39
Selecting streets from the list ........................40
Selecting an intersection as your destination 40
Destination entry - Centre .................... 40
Selecting the city centre (city district) ............40
Selecting the centre.......................................41
Destination entry - Special
destinations .......................................... 41
Entering special destinations.........................41
Destination entry - from the
destination memory .............................. 43
Entering a destination from the destination
memory...........................................................43
Activating the enter destination menu ..........43
Selecting the memory....................................43
Selecting a stored destination.................44
Storing a destination in the destination
memory menu ..............................................44
Entering a short name ............................45
Sorting destinations in the memory yourself 45
Destination entry - to a agged destina-
tion........................................................ 46
Setting a agged destination ........................46
Storing a agged destination.........................46
Naming the agged destination ....................47
Selecting the agged destination as your
destination ....................................................47
Route options ....................................... 48
Planning a route ...........................................48
Selecting route options .................................48
Closing the route options menu.....................49
Calculating the route list ...............................50
Route guidance ................................... 50
Starting route guidance ................................50
Displaying the complete destination ad-
dress...................................
....
......
...
.....
...
51
Route guidance with driving symbols.............51
Route guidance without driving symbols........51
OFF MAP route guidance..........................
....
52
OFF ROAD route guidance............................53
NO MAP route guidance...........................
.....
53
Locating with a CD.........................................54
Destination reached.......................................54
Cancelling active route guidance...................54
Destination memory ............................. 55
Overview........................................................55
Deleting destinations in the destination
memory..........................................................57
Bypassing trafc congestion................. 58
Activating the trafc congestion function ......58
Selecting an alternate route .........................59
Tour list ................................................. 60
Travel guide.......................................... 60
Selecting a destination ..................................61
Changing the navigation
CD ROM .............................................. 61
Calibrating the system after
the tyres have been changed .............. 62
Care of equipment................................ 62
Glossary ............................................... 62
Page 7
6
RADIO NAVIGATION SYSTEM
INTRODUCTION
The Škoda Radio Navigation system
Page 8

7
RADIO NAVIGATION SYSTEM
INTRODUCTION
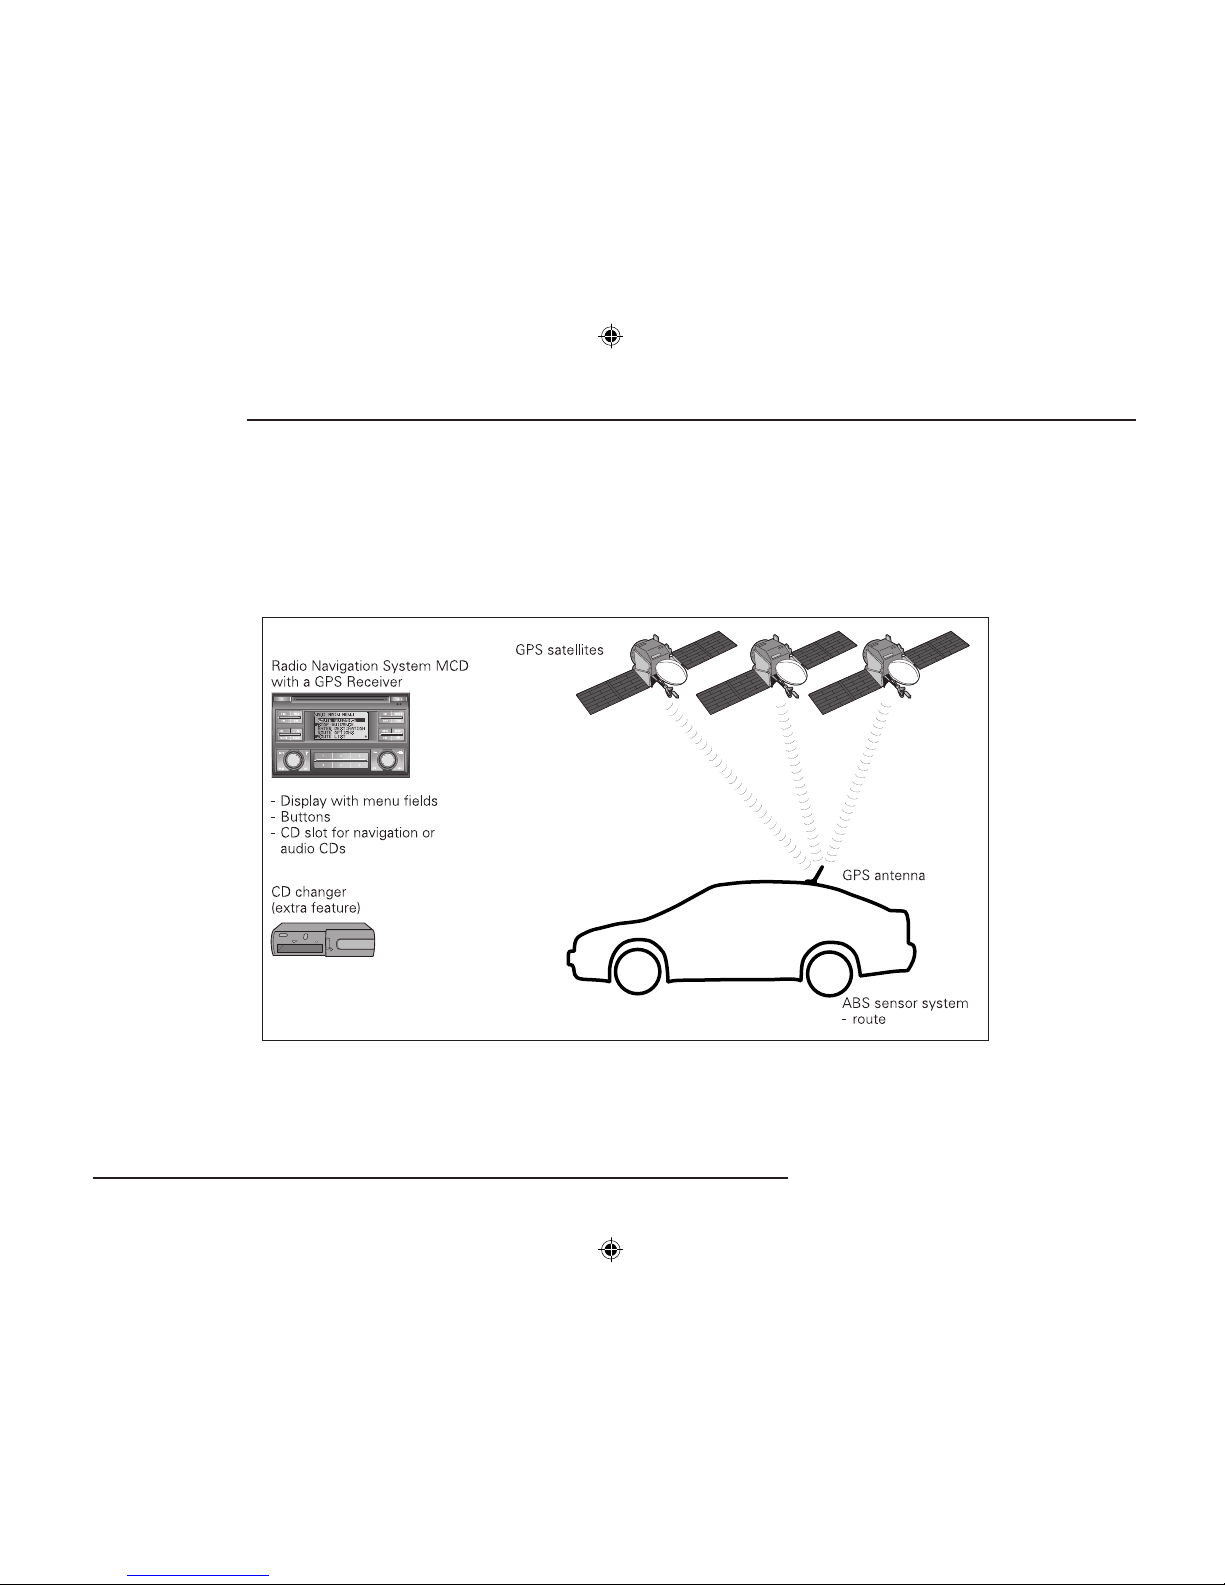
The radio navigation system makes it very
easy to operate the convenient radio, CD and
navigation features in your vehicle. You can also
equip the system with an original Škoda 6-disc
CD changer.
Navigation
The navigation system is your "Intelligent passenger". With its help, you can travel from your
current location to any selected destination quickly, easily and safely without having to use a lot of
complicated roadmaps. In cities and towns unfamiliar to you, for example, you can drive directly
to the nearest petrol station. The system uses
the data stored on the navigation CD to calculate the route to the selected destination. During
route guidance, different display modes provide
you with visual driving recommendations, such
as where to turn (direction and distance to the
next turning point), information on your estimated
time of arrival, on the remaining travelling time
and the distance to your destination.
In addition, you can also receive "spoken" driving
recommendations from your radio navigation
system.
How does navigation work?
Th e elec troni c speedomet er signal and
the locating signals received from the GPS
satellites (Global Positioning System) are used
to determine the vehicle‘s current position. The
route travelled is measured by the speedometer
signal. This information is fed into the navigation
system and compared to the map information
stored there.
Important notes
Operating the radio navigation system
while driving
The demands of today‘s road trafc require the
full concentration of road users at all times.
Never operate the radio navigation system
with its many different features unless trafc
conditions permit. Do not adjust any of the
basic settings for the radio navigation system
or enter your destination information unless
your vehicle is stationary.
The different volume settings should be selected
so that acoustic signals from the outside, e.g.
police or re brigade sirens, can be heard at
all times.
Always devote your attention primarily to
driving! As the driver of a motor vehicle,
you bear full responsibility for your road
safety. Never operate the radio navigation
system in a way that could interfere with
your ability to maintain control of your
vehicle in all trafc situations!
No tes on using the radionavig ation
system
•
The route calculated by the navigation system
is a recommendation on how best to reach
your selected destination. The Road Trafc
Rules always take priority over any driving
re comm endat ion pro vided. Short-ter m
changes in trafc conditions, such as road
works or one-way street regulations are not
included on the CDs.
•
Street and place names may change. In rare
cases, the names stored on the CD might not
be the same as those used now.
•
If you have your tyres changed, the system
may not operate correctly until the navigation
system has determined the new tyre size. For
more information, please read the section on
NAVIGATION SETUP on page 14.
Page 9
8
RADIO NAVIGATION SYSTEM
INTRODUCTION
Display illustration
The contents and menus that appear on the
screen consist of the following standard elds:
Display
Background - When navigation is active, the sta-
tus of the functions for radio, CD or CD changer
(audio sources) will appear at the top of the display. During radio or CD operation, the currently
active function for navigation will appear.
In the menus, for example, for navigation or setup, the title line for the menu will appear.
Foreground - This area displays the visual driving
recommendations for active navigation. The radio
display contains the station name or the frequency, the CD display reads TRACK and the track
number of the song currently playing.
Status line (for audio operation only) - The status
line displays the current audio source or memory
bank during radio operation, the station button
preset, the CD number, the active functions,
such as SCAN, INFO, and trafc information
standby.
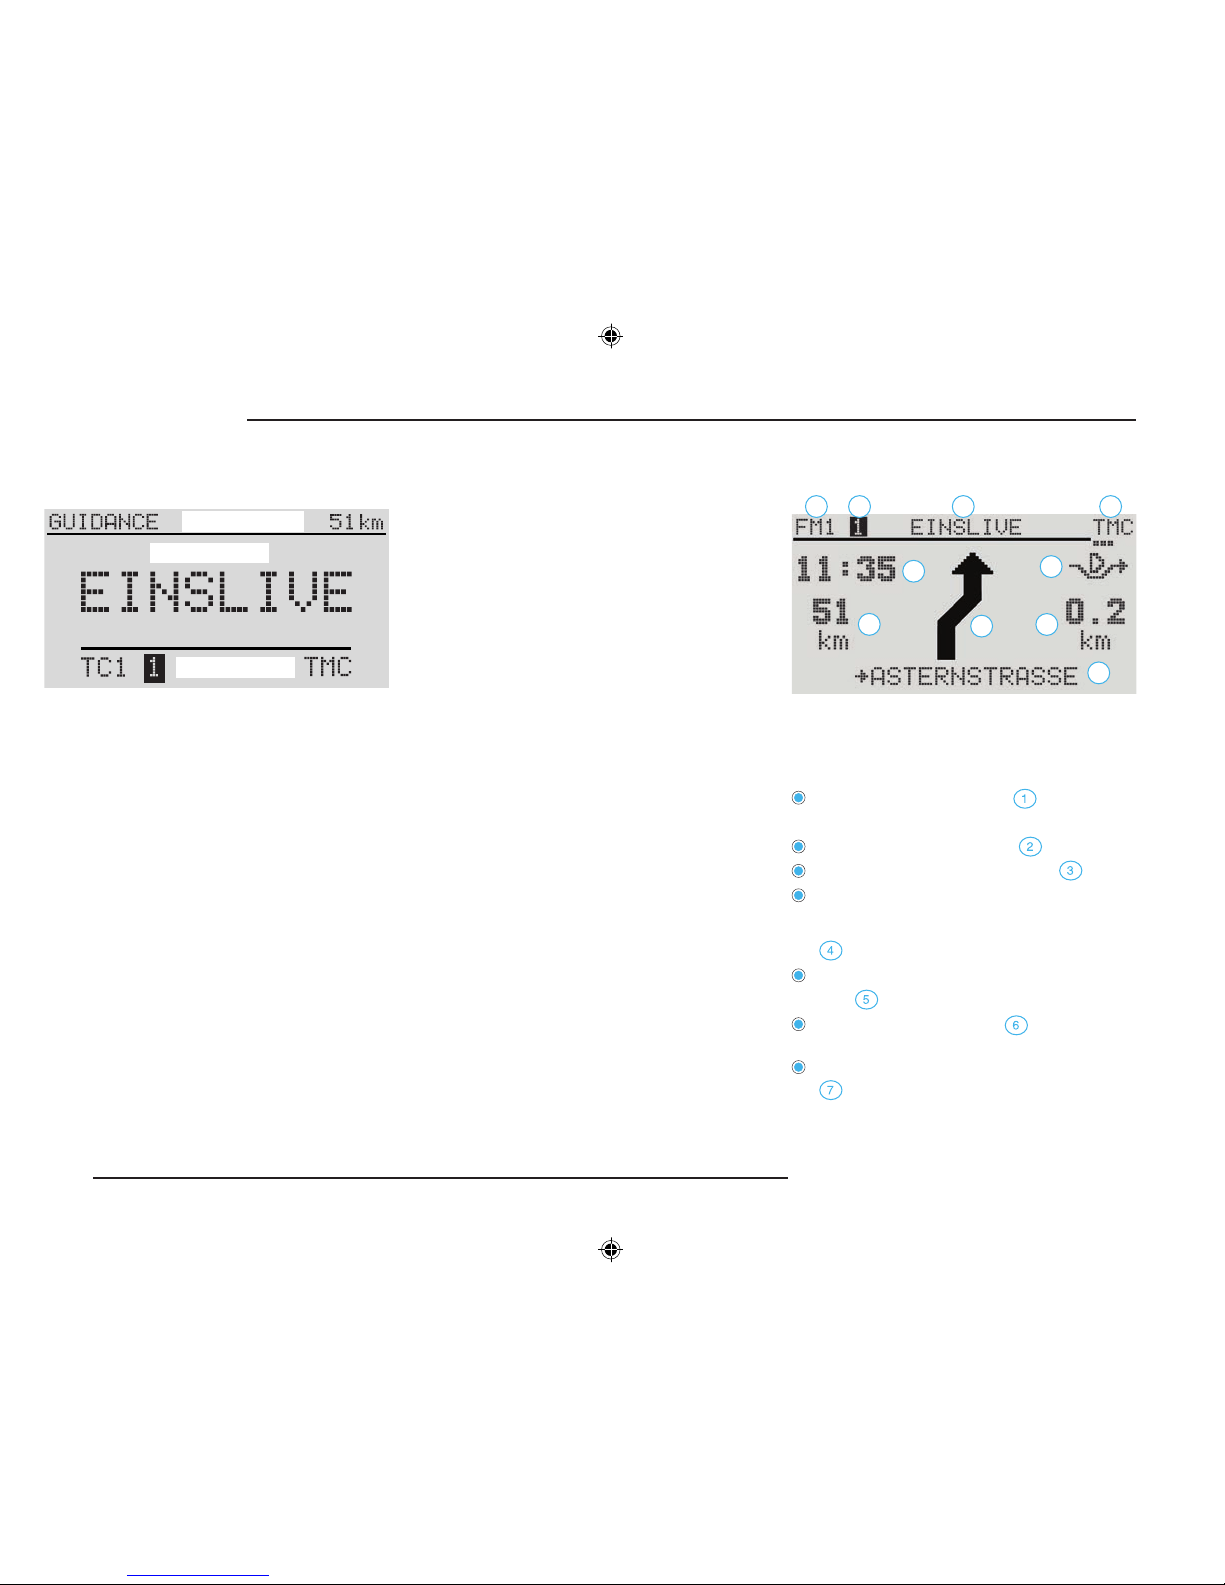
Display contents
The screen is the central display area for your
radio navigation system. The route guidance
display is shown here in the example.
It contains the following:
the selected audio source
(in this case FM level 1),
the selected memory bank ,
the name of the selected station ,
an indication that the tuned station is a
TMC station, and the number of
received trafc messages
(in this case 3 messages),
the remaining journey time or arrival
time
(in this case the arrival time)
the selected route option (in this case
dynamic),
the remaining distance to the destination
,
1 2 3 4
5
6
7
9
10
8
Background
Foreground
Status line
Page 10
9
RADIO NAVIGATION SYSTEM
INTRODUCTION
the directional arrow ,
the distance to the next turning point
and
the name of the street that you are currently
driving down .
Switching to the night display
When driving at night, you can press button
on the main panel to switch to night display.
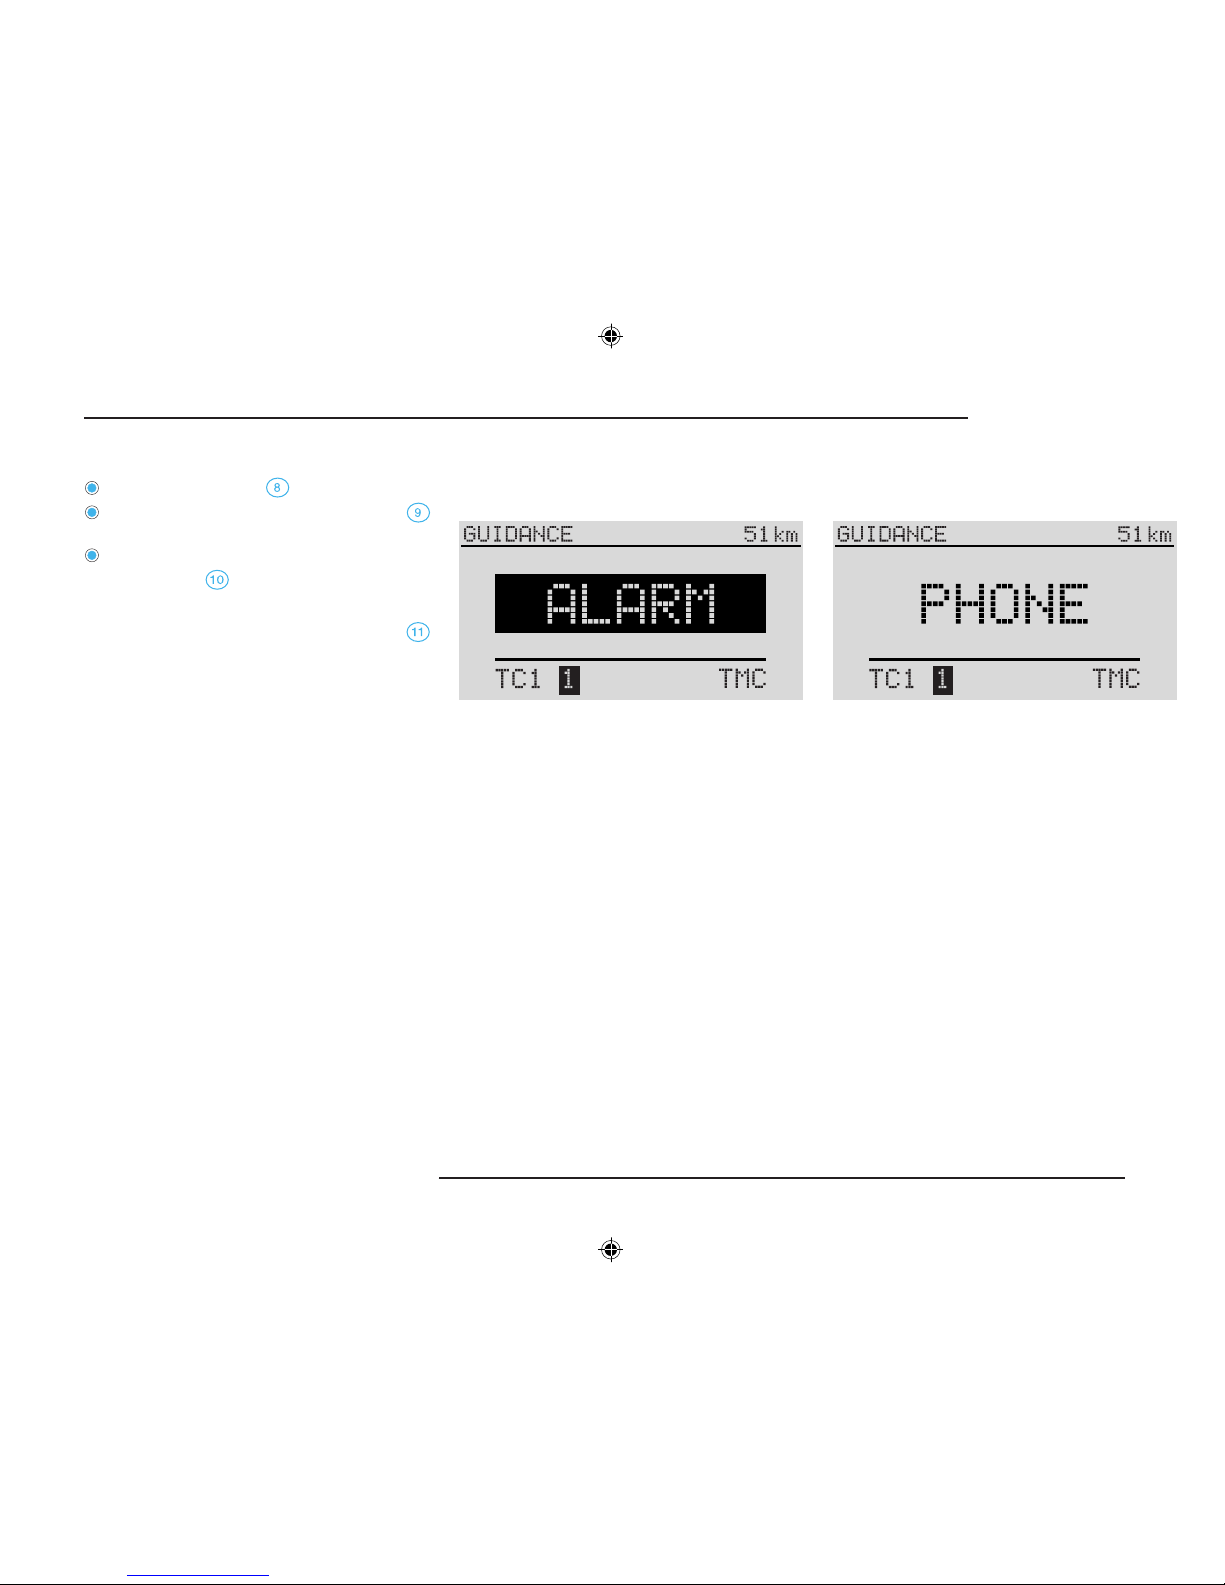
Alarm
If your radio navigation system should receive
an emergency message, ALARM will appear
in the display foreground as illustrated or in the
display background when active route guidance
is in progress.
The currently active audio source will be
interrupted and the radio source broadcasting
the emergency message will have priority.
The message will be put through at the volume
selected for trafc information messages, see
page 16.
After the message has ended, the system will
automatically switch back to the last audio source
that was active.
You can also end the message broadcast at
any time by switching to another audio source
or selecting a different radio station.
Telephone (PHONE)
If your vehicle is equipped with a car phone
system and hands-free equ ipment (extra
features), the voice output for the car phone will
be reproduced via the radio navigation system.
If the telephone is active, the audio sources will
be switched to mute.
PHONE will appear in the display.
After the call has been completed, audio play
will resume.
Note: If you activate the phone while the
radio navigation system is switched off,
the system will switch on automatically. The
display will not switch on. You will be able
to place your call as usual. After the call has
been completed, the radio navigation system
will switch off again automatically.
Page 11
10
RADIO NAVIGATION SYSTEM
INTRODUCTION
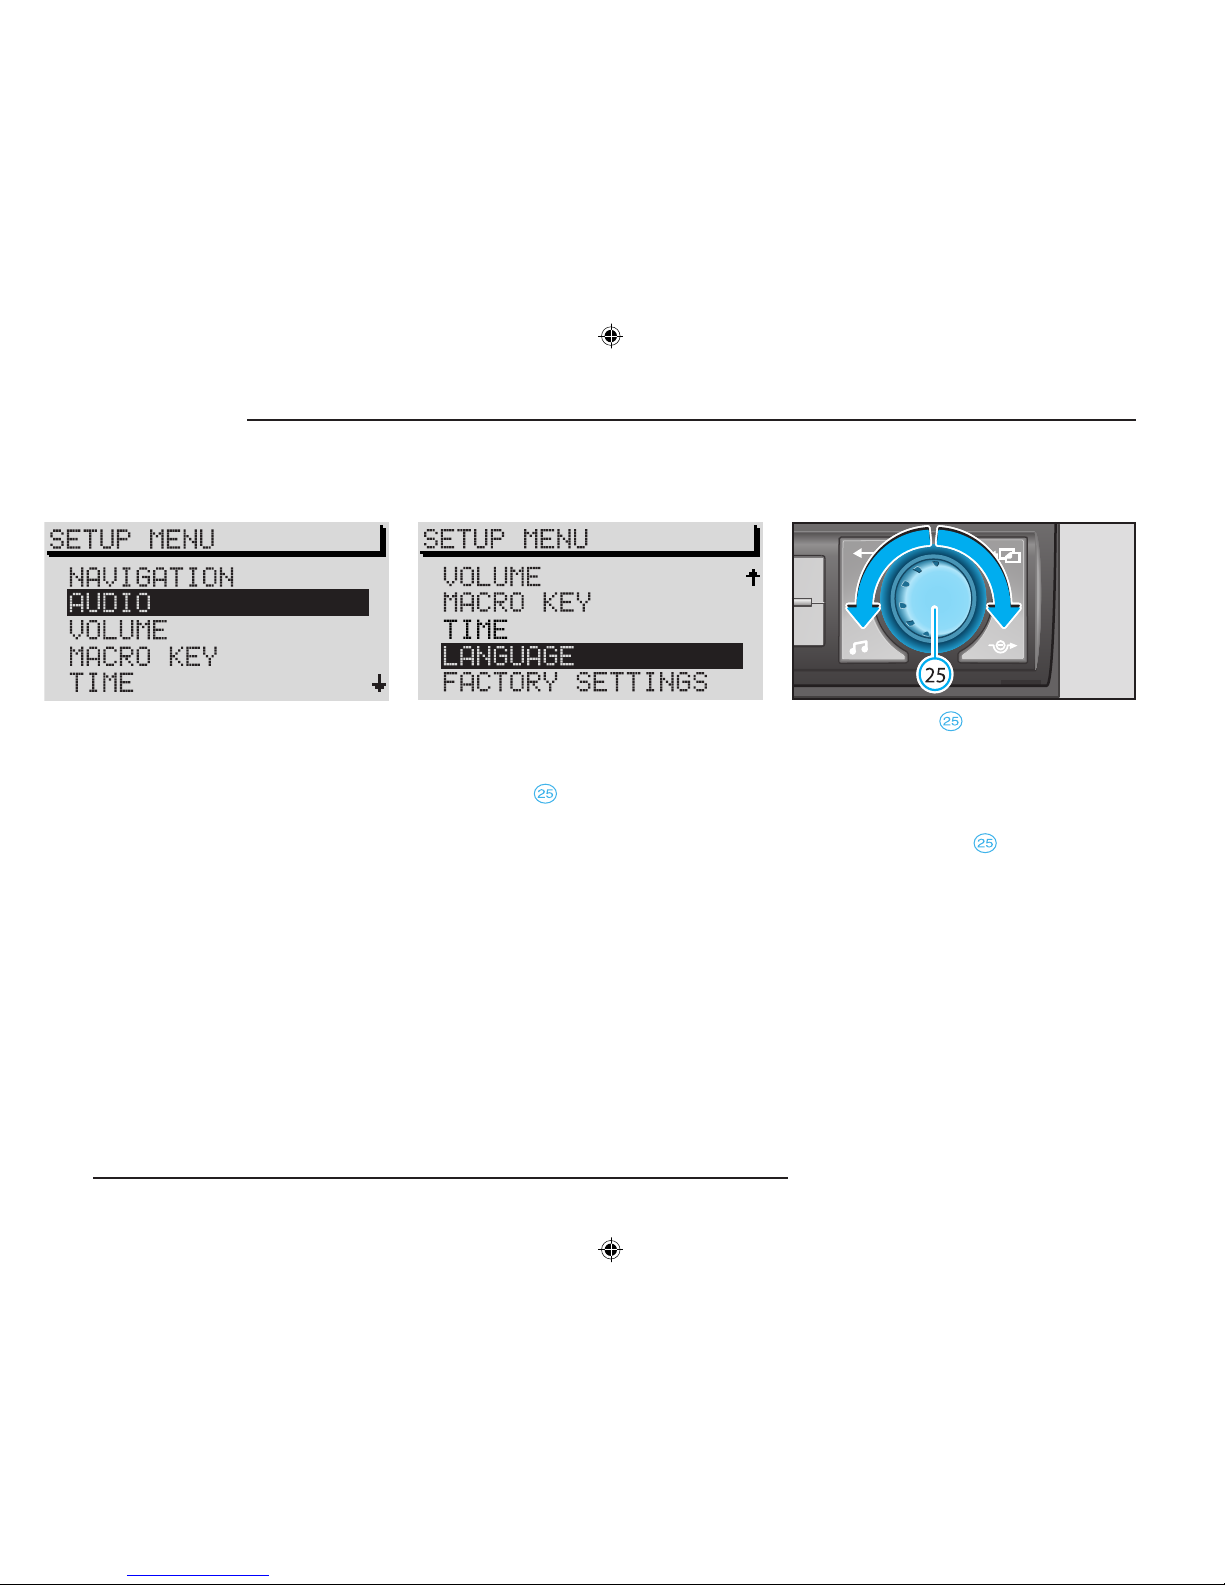
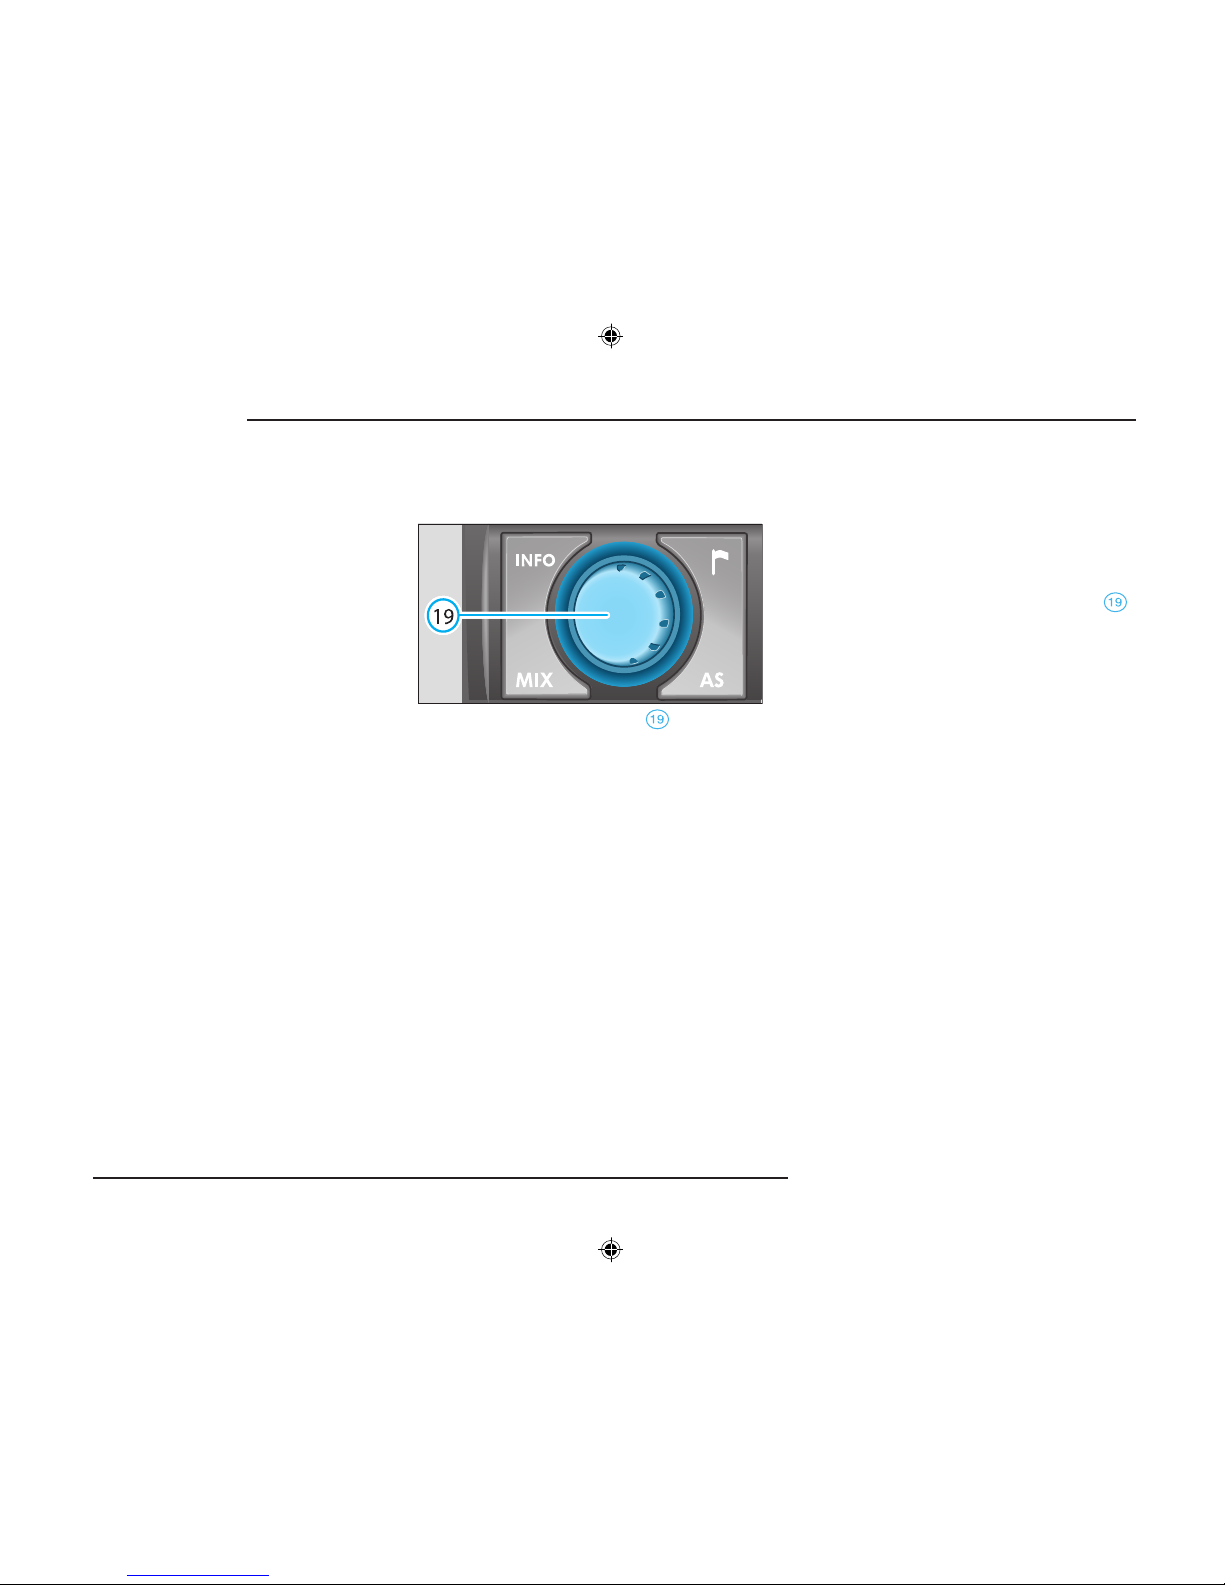
Menu structure
Menus
These menus are marked with an arrow on the
right. The additional menu items will appear in
the display if you move the selection bar to the
second or second-last menu item on the list. Turn
the menu knob again and the selection bar
will remain at this position. The additional menu
items will become visible.
Use the menu knob to select menu items .
•
To move the selection bar up or down, turn the
menu knob clockwise or counter-clockwise.
The menu item selected will be highlighted.
To conrm your selection,
•
press the menu knob .
Selecting and conrming
menu items
All the basic functions for your radio navigation
system can be adjusted in the setup menu.
Menus are also used to make the settings for
navigation and destination entry.
The display contents are divided into the menu
title and menu items. If a menu contains more
than ve items, the remaining items will appear
outside of the current display.
Page 12
11
RADIO NAVIGATION SYSTEM
INTRODUCTION
Once you have conrmed your selection, the next
submenu will appear (here: VOLUME SETUP).
The selection bar will mark the rst menu item.
The menu title will appear in the top line. Use the
menu knob to mark and conrm the menu
item you want to alter .
Now you can alter the settings as desired (here:
VOL-ON volume control).
Altering settings
The slider appears in a frame, use the menu knob
to change the settings. Change the setting
from ON/OFF or to another setting by turning the
menu knob while the corresponding option
has been selected.
If you want to save the selected setting,
•
press the menu knob .
Exiting menus
If you do not want to save the new setting,
•
press .
To return to the previous menu,
•
press the button again.
To exit a main menu, select a different function,
e.g. FM or CD.
Page 13

12
RADIO NAVIGATION SYSTEM
INTRODUCTION
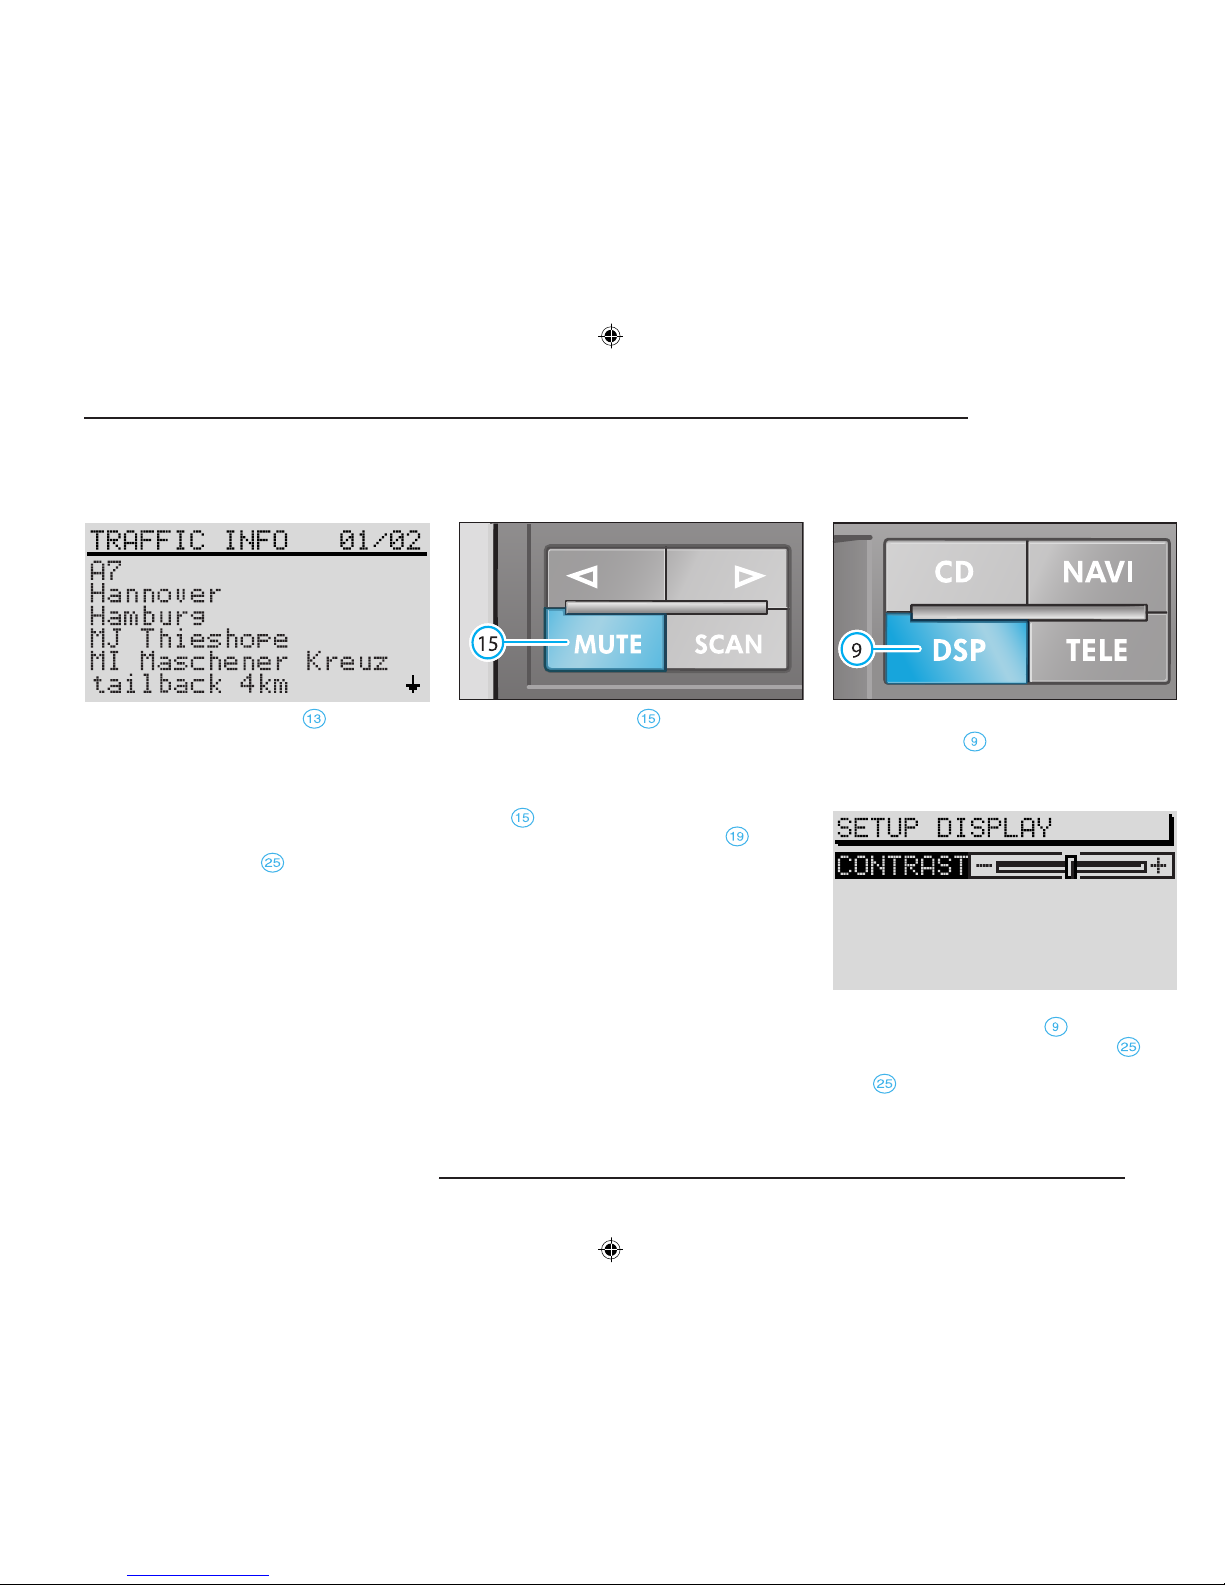
INFO button
Press INFO to obtain more information on
the current destination or on list entries marked
by three dots.
If you press INFO
when route guidance
is active, the current destination will appear
in the foreground and the last spoken driving
recommendation given will be repeated.
In the list menus, you will see a detailed display
of the list entries marked by three dots.
If there is additional information available on
your navigation CD, you can access it in the
"travel guide".
Note: Turn the menu knob
to access other
list entries.
Main buttons
TELE button
The TELE button allows you to view trafc
information received via TMC (Trafc Message
Channel) in the display. This information is used
by the radio navigation system for dynamic route
guidance if this option has been activated (see
"Selecting route options" on page 48).
The number of received trafc messages is displayed as dots beneath the TMC indicator .
As an example, the screenshot displays 3 dots
indicating 3 messages.
1
Page 14
13
RADIO NAVIGATION SYSTEM
INTRODUCTION
If you press the TELE button , a display will
appear as illustrated above. In the background,
following TRAFFIC INFO, there is a number
indicating the number of the trafc message
on display and the number of total messages
in the memory.
To switch between the individual messages,
•
turn the menu knob .
Notes: The TMC function is not available
unless a navigation CD has been inserted
into the system.
Messages are deleted after 15 minutes if they
are not received again. If there is no trafc
information in the memory, a corresponding
message will appear in the display.
MUTE button
Press the MUTE button to switch the audio
sources radio, CD and CD changer (extra
feature) to mute. AUDIO OFF will appear in the
display while the system is switched to mute.
To cancel the mute function, press the MUTE
button
again while the system is muted or
turn the left-hand rotary/push button .
DSP button
The DSP button allows you to adjust the
display contrast.
After pressing the DSP button , you can adjust
the contrast by turning the menu knob . You
can save the set value by pressing the menu
knob .
Page 15
14
RADIO NAVIGATION SYSTEM
INTRODUCTION
Navigation setup
SETTINGS - Here you can access a submenu
to alter the system settings:
- TIME INFO - Here you can select whether
you want to display the ARRIVAL time to your
destination or the REMAINING driving time
to your destination.
- LANGUAGE - If you want to use route
gu idance witho ut the spoken dri ving
recommendations, select OFF. Once the
voice output has been deactivated, route
guidance will be provided via the visual
driving recommendations in the display or
the instrument cluster.
- REMEMBER DESTINATION - use this option
to switch the automatic storage of the last 10
destinations in the LAST DESTINATIONS
memory on or off (see Destination memory,
page 55).
SETUP - Main settings
- DRIVE SYMBOL - If you want to display
the visual driving recommendations in the
instrument cluster only (depends on the
operation), select OFF.
LOCATION - If it is not possible for the system
to receive GPS signals, you can enter your
current vehicle location here manually.
TYRE CHANGE - If you have tted new tyres,
select this menu item (see page 62).
Audio setup
Use the Audio Setup menu to alter the settings
for audio operation.
RDS NAME - Some RDS radio stations use
RDS to transmit not only their name, but
advertising information as well. Here you can
select whether you want the name of the station
displayed permanently or whether changing
information such as advertising will also appear
in the display.
Page 16

15
RADIO NAVIGATION SYSTEM
INTRODUCTION
•
Select FIX if you want the name of the radio
station to appear permanently in the display
without any changing information. This setting
will not become active until the corresponding
station has been selected from the memory.
•
Activate VAR to allow the display of all the
RDS texts transmitted.
RDS-REG - Use this option to allow the radio
navigation system to switch to a "related" regional
station. This may be necessary if reception deteriorates to the point that the system may not be
able to pick up the select station, See page 22.
- AUTO - If you select this setting, the system
will not switch to a regionally related station
frequency unless it is no longer able to pick
up the current station.
- OFF - You can select a regionally related
station frequency manually. The system will
not switch automatically.
CD-MIX - Use this option to activate the MIX
function for CD playback (in combination with a
CD changer only).
- Select DISC if you want to play all the tracks
on the CD selected in random order and
then all the tracks on another CD in random
order.
- Select MAGAZINE to listen to all the tracks
on the CDs in the magazine in random order
(in combination with a CD changer only).
MUSIC/SPEECH - RDS stations are able to
transmit a signal that switches the frequency
response of your radio navigation system to
voice reproduction when a non-musical program
is broadcast; this option reduces the treble, for
example, making the voice reproduction more
clear and easier to understand.
- AUTO, the frequency response for voice
reproduction will be altered automatically
when the corresponding signal is received.
- If you do not want to adjust the frequency
response, select OFF.
Please note that this function is not supported by
all RDS stations and does not always result in an
audible improvement of the voice quality.
TA - Here you can select the settings for incoming
trafc information with respect to incoming trafc
information.
- Select ON to hear all incoming traffic
messages. If TA has been switched on, you
can tune into TP radio stations only.
- Select OFF if you do not want to hear trafc
information.
Page 17
16
RADIO NAVIGATION SYSTEM
INTRODUCTION
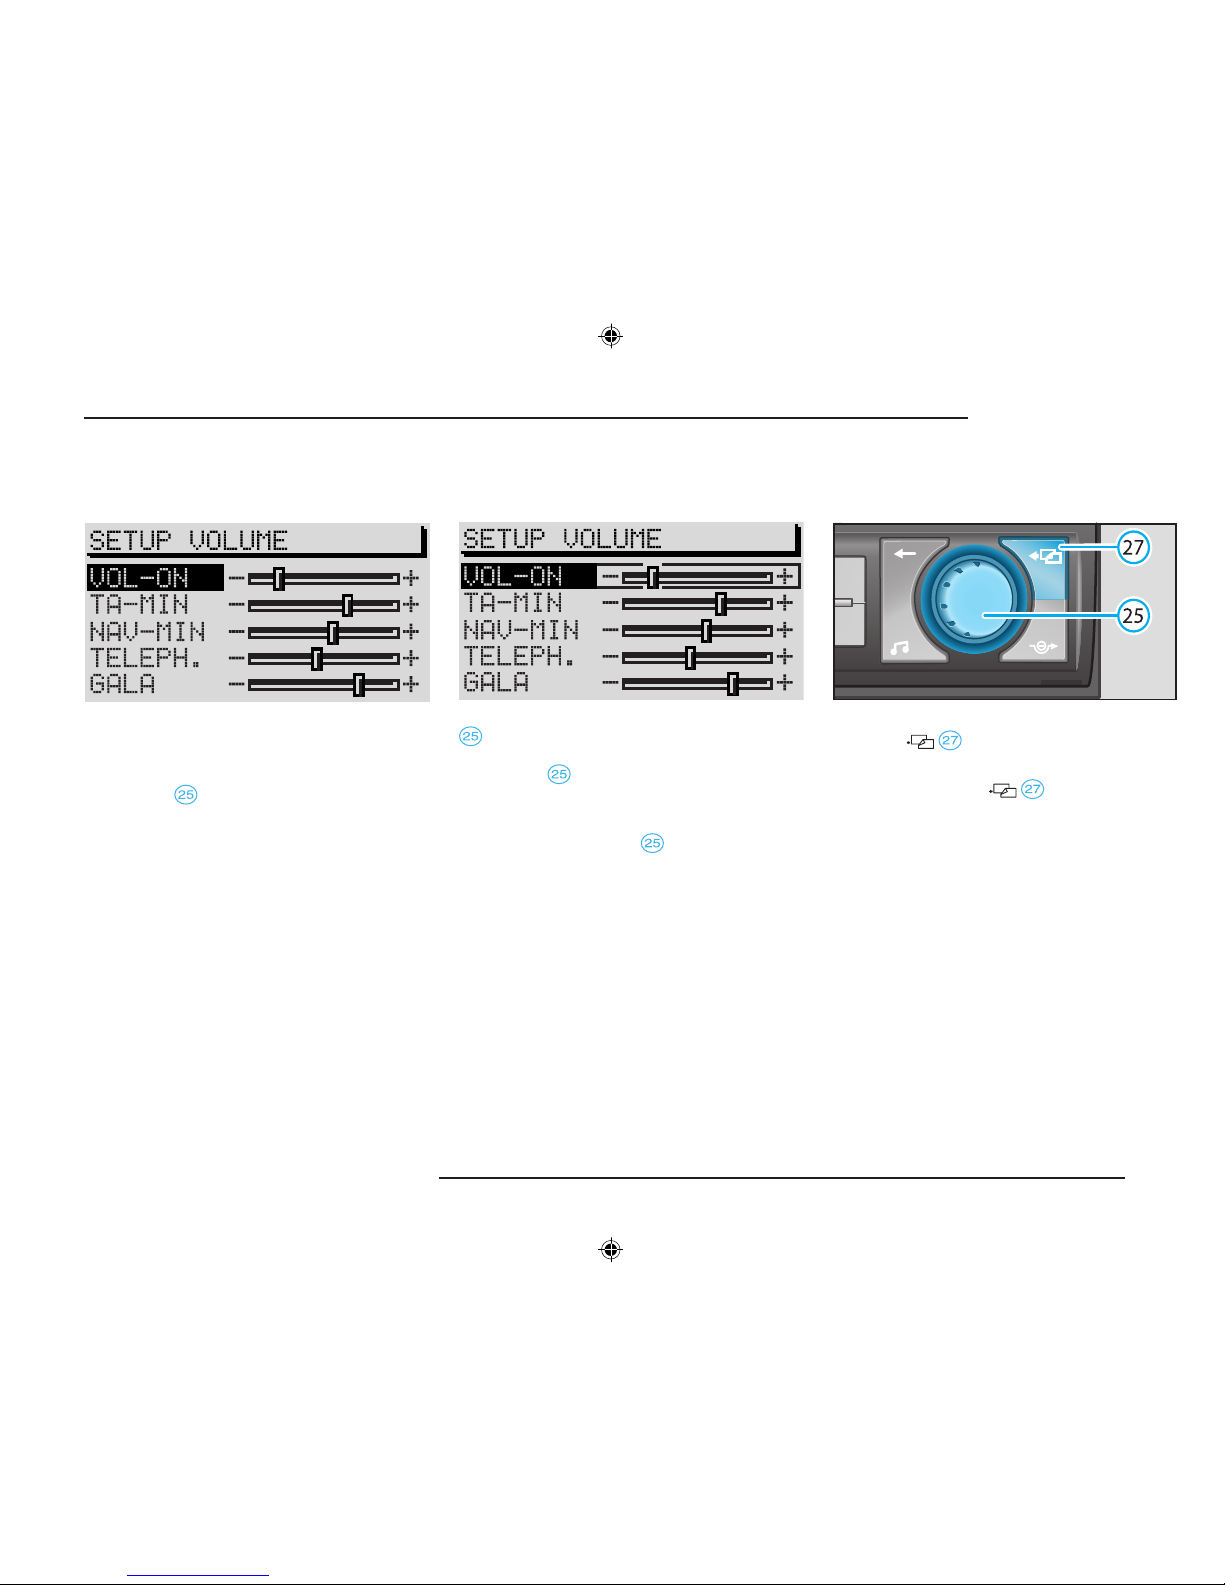
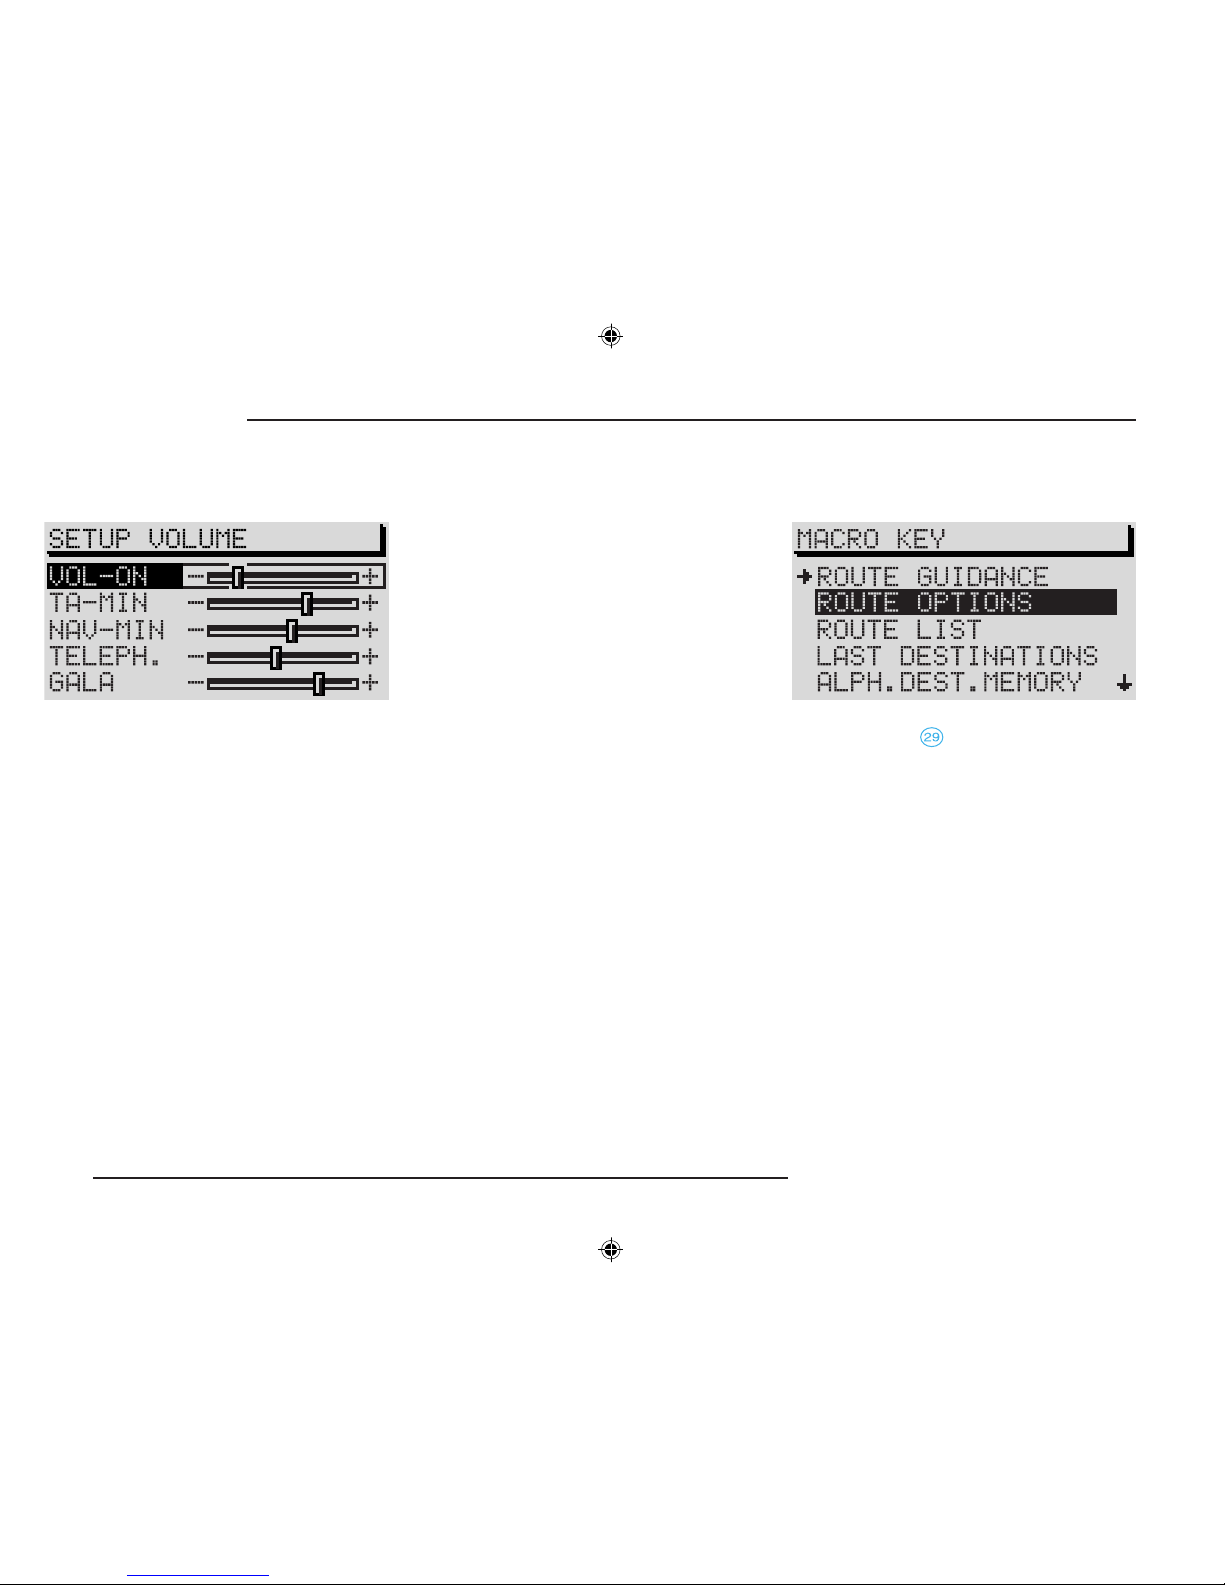
Volume setup
VOL-ON - setting for the power-on volume, the
volume at which the system switches on. Move
the slide control to the desired volume. You will
hear the change in the volume while you are
adjusting this setting.
Note: If the VOL-ON is set to Max., the poweron volume will be extremely loud. This could
result in damage to your hearing.
TA-MIN - the minimum volume for traffic
information announcements.
NAV-MIN - Here you can select the minimum
vo lume for the voice out put used for
navigation.
Note: If the system volume is set louder
than TA-MIN or NAV-MIN when a traffic
announcement or voice output is made, this
information will be emitted at the current
system volume.
TELEPH ONE - If your vehicl e has been
equipped with car phone system, the calls will
be transmitted via the radio navigation system.
Here you can select the volume at which you will
hear the call over the vehicle speaker system.
GALA - The volume of your radio navigation
system will be increased automatically as the
speed of your vehicle and the outside noise
increases. Here you can select by how much
the volume will increase.
Macro key setup
You can assign one of the following functions to
the Macro button .
- ROUTE GUIDANCE activates route
guidance if a destination has already been
entered.
- R
OUTE OPTIONS activates the menu to
select the options used in route calculation.
- ROUTE LIST activates the route list during
active route guidance.
- LAST DESTINA
TIONS indicates the con -
tents of the "Last destinations" memory
for navigation.
Page 18
17
RADIO NAVIGATION SYSTEM
INTRODUCTION
- ALPH. DE ST. MEMORY act ivat es the
alphabetically sorted destination memory.
- GPS STATUS indicates the number of
GPS satellites currently received and your
geographical position.
- TOGGLE TIME INFO allows you to switch
between the display of the arrival time or the
remaining driving time in the Info window.
- SHOW LOC ATION, route guidan ce is
provided by indicating the direction in which
your destination is located and the name of
the street or road you are currently travelling
on, if applicable.
When you access this menu, the selection bar
will mark ROUTE GUIDANCE. The function
currently assigned to the Macro button will be
marked by an arrow.
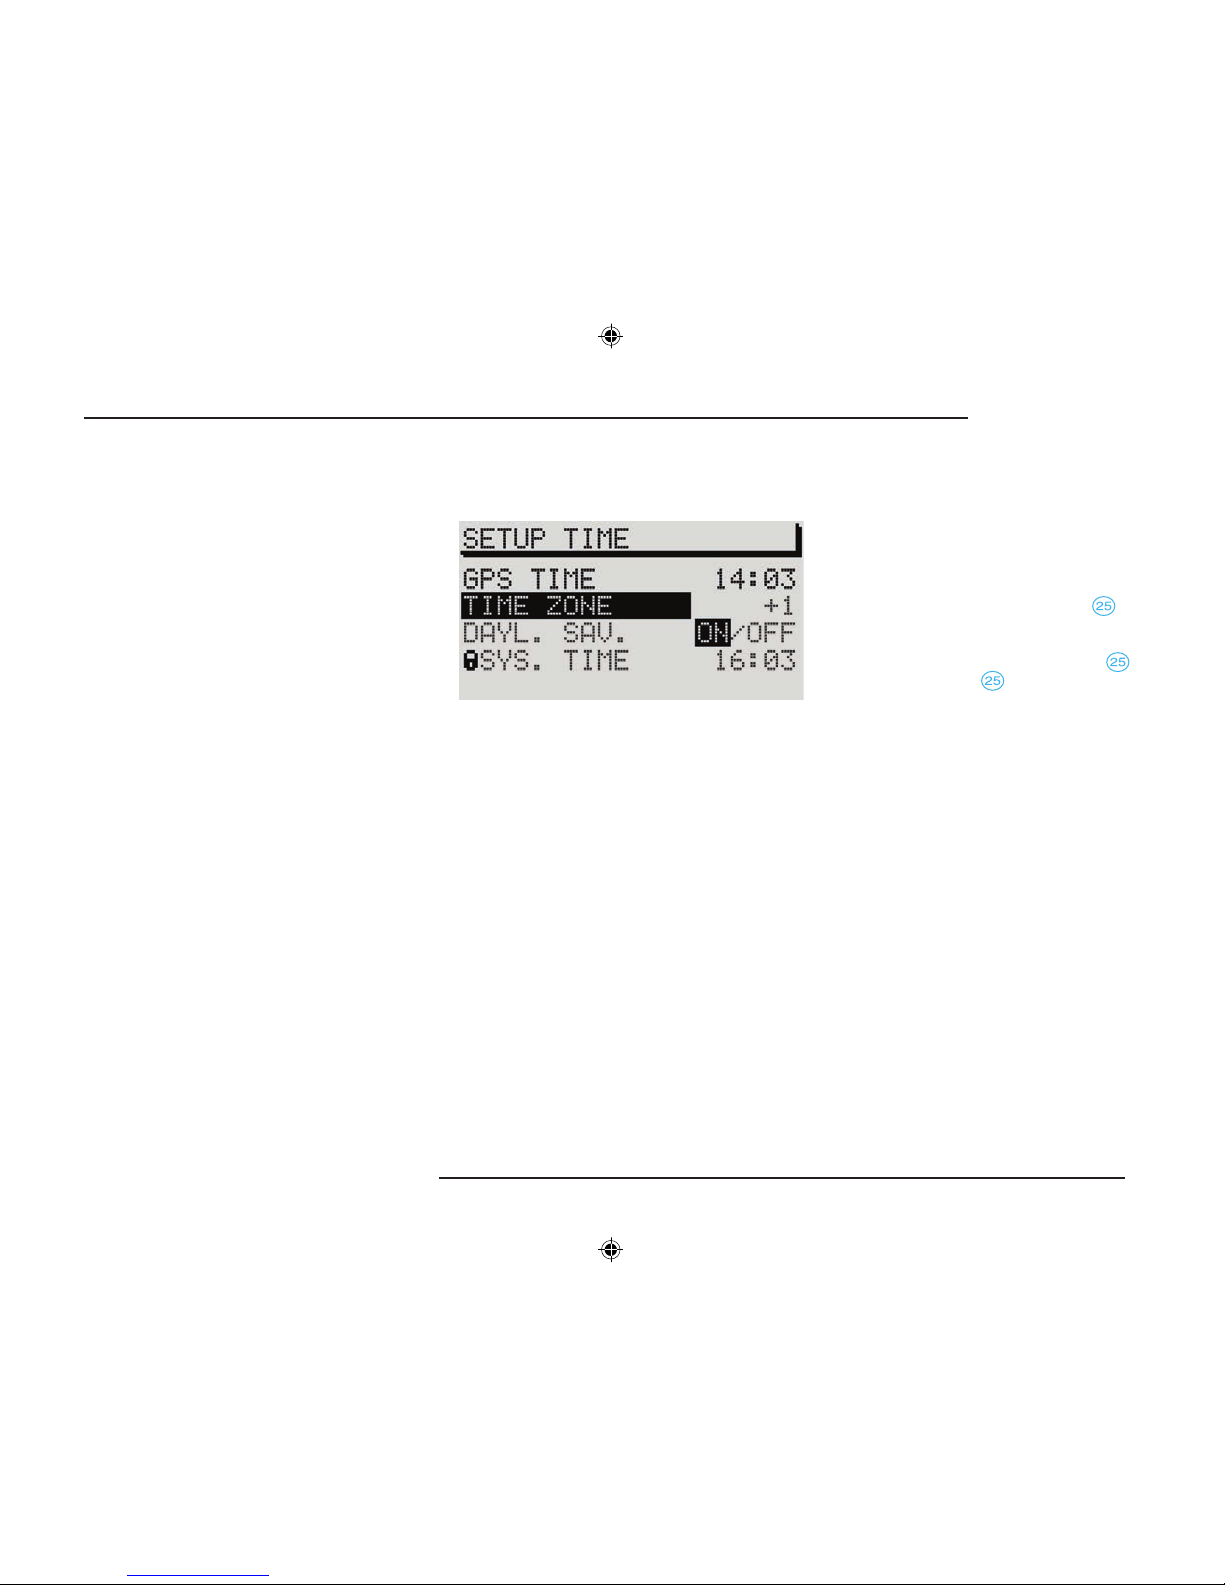
Clock setup
Use this menu to set the system time. It is not
possible to alter the GPS TIME menu item. It
is used to calculate the system time via GPS
reception. If the GPS time is available, it will not
be possible to alter the system time manually.
TIME ZONE - This is where you can enter the
time difference between your current time zone
and world standard time (UTC), (see page 64).
DAYLIGHT SAVING TIME - Select ON if you
are in a country where daylight savings time is
in effect.
SYSTEM TIME - Use the menu knob
to select
the menu item SYSTEM TIME and conrm your
selection. Now turn the knob to alter the hours. To
alter the minutes press the menu knob again.
Turn the menu knob to alter the minutes and
press it to exit this menu.
Note: You cannot alter the system time unless
it is not possible to receive GPS time.
The time zone and summer time must be
adjusted manually.
Page 19
18
RADIO NAVIGATION SYSTEM
INTRODUCTION
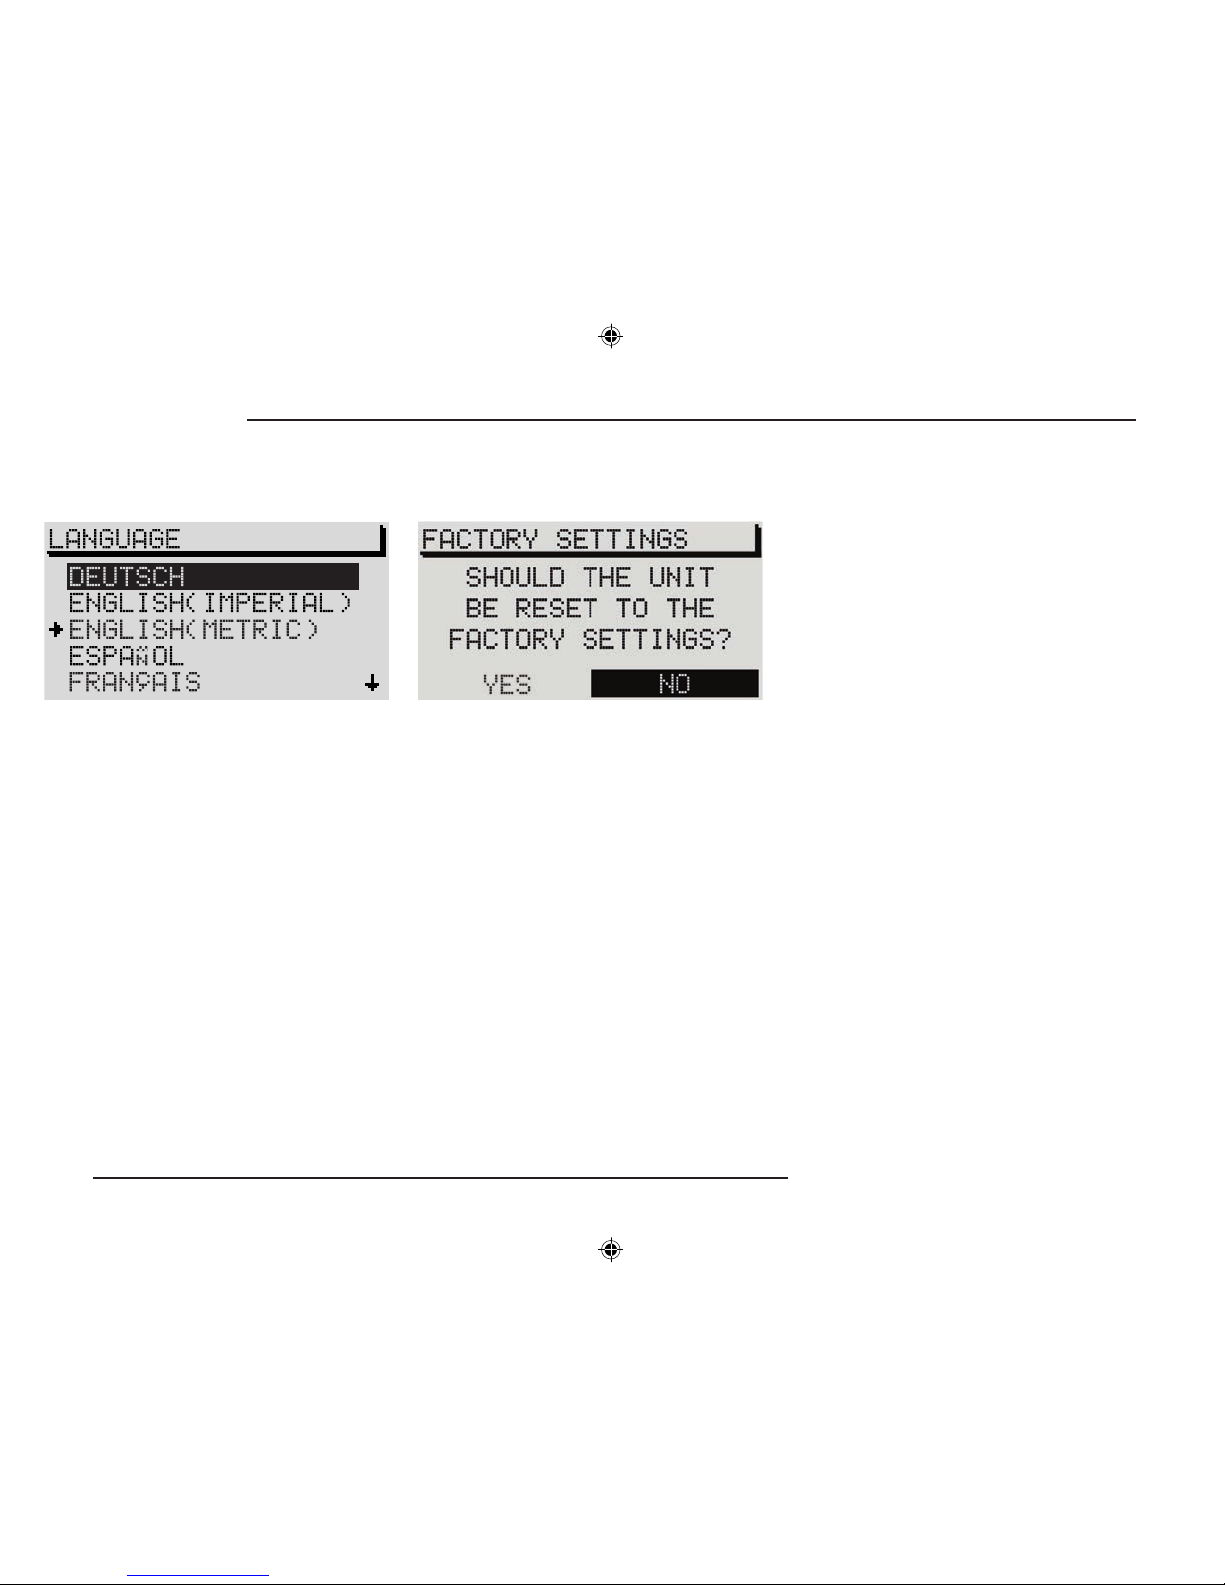
Language
You can select from a number of different
languages for the display of information on the
screen and for the voice output for navigation.
The following languages are available:
- DEUTSCH,
- ENGLISH (IMPERIAL),
Measurements in yards,
- ENGLISH (METRIC),
Measurement in metres,
- ESP
AÑOL,
- FRANÇAIS,
- IT
ALIANO,
- NEDERLANDS.
Default settings
Use this menu to reset all the settings in the
Setup menu and the tone settings to the default
settings. This does not include the language
settings and the calibration.
If you select and conrm FACTORY SETTINGS
in the main Setup menu, you will be required
to conrm your selection again. The settings
will not be reset to the default settings until you
have selected and conrmed YES. The radio
navigation system will switch off briefly and
then back on again.
If you do not want to reset the unit, select NO.
If there is a navigation CD in the system, it is
also possible to delete the stored destinations.
If you want to use this option, select YES in
conrmation menu. If you do not want to delete
the stored destinations, select NO.
Page 20
19
RADIO NAVIGATION SYSTEM
INTRODUCTION
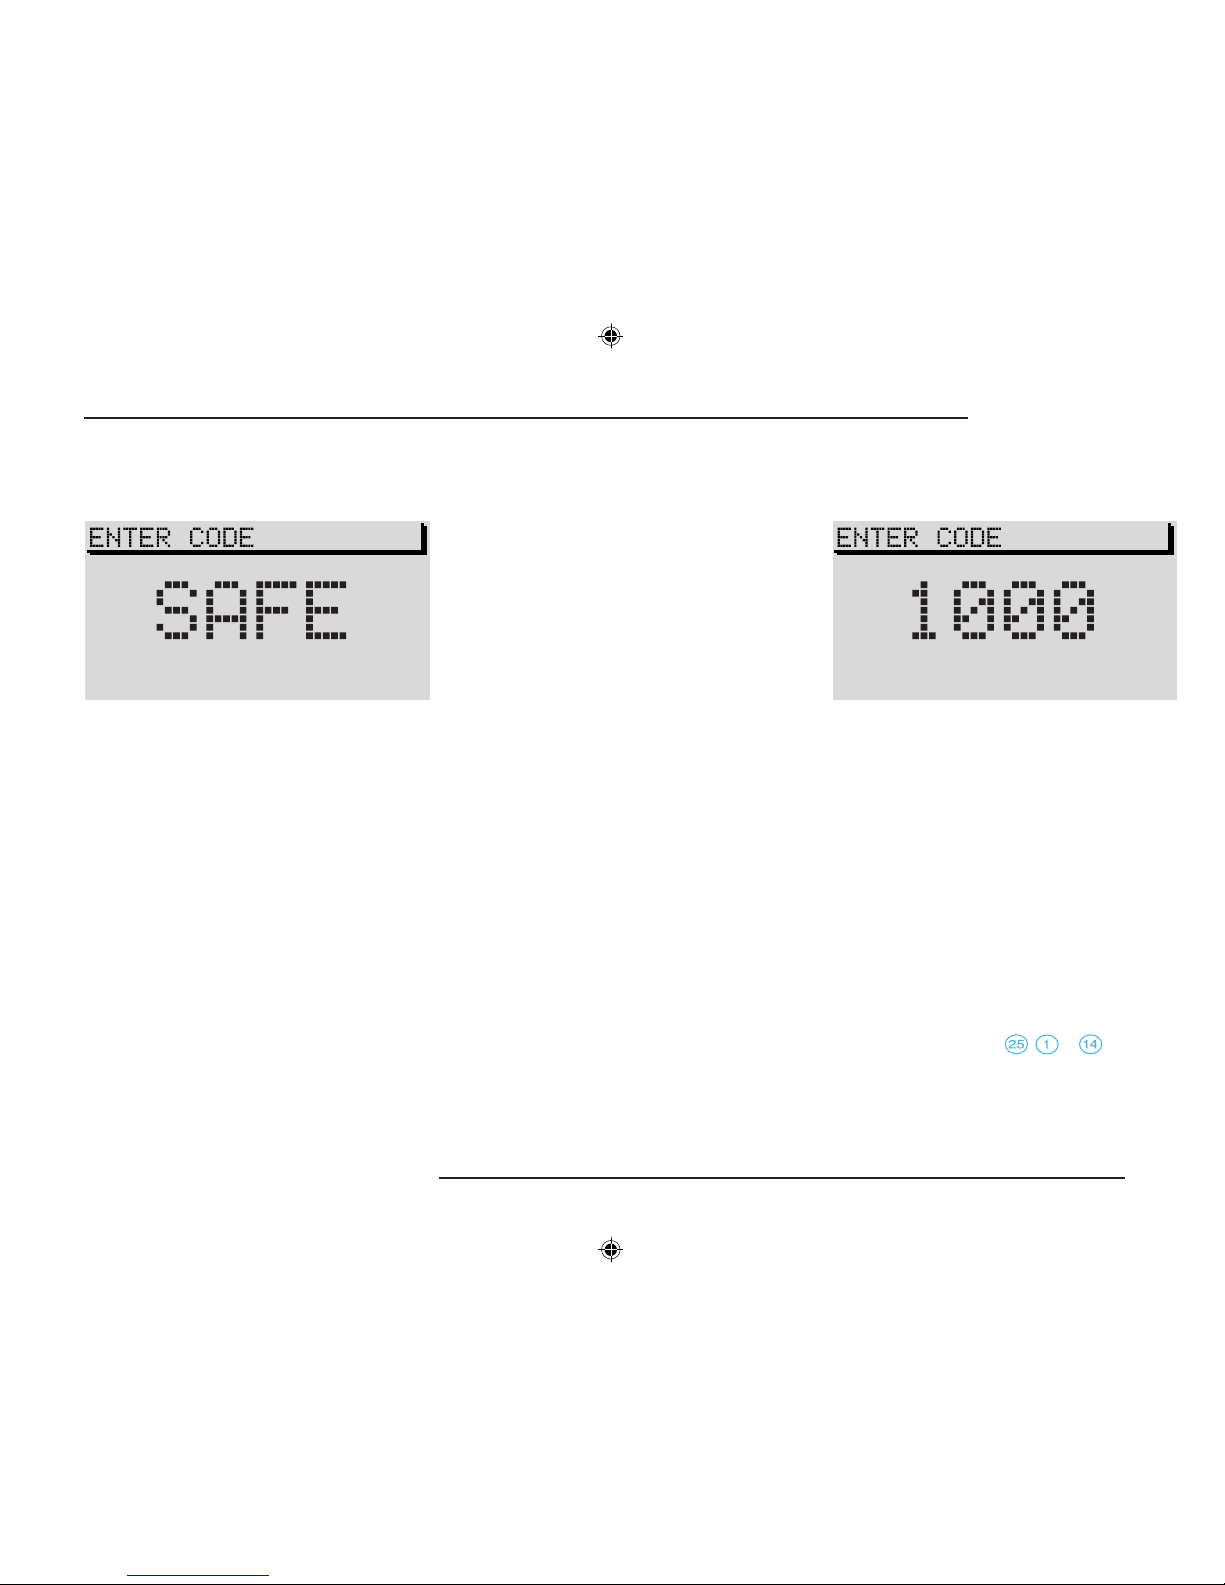
Theft Protection
It is necessary to enter the code, when the
system has been disconnected from the vehicle's
power supply or when a fuse has „blown“.
In this case, SAFE will appear in the display when
the system is switched on.
The code number can be found along with
the serial number of the unit in the front of the
instruction manual on the equipment card.
Make sure to remove the equipment card from
the manual and keep it in a safe place outside
of the vehicle.
Note: As a rule, the code is stored in the
instrument cluster. As a result, the code
will be entered into the radio navigation
system automatically (convenience coding).
It is not usually necessary to enter the code
manually.
Anti-theft coding
The anti-theft coding system for your radio
navigation system prevents unau thorised
persons from using the system once it has been
disconnected from its power source, e.g. while
the vehicle is being repaired or if the system is
stolen.
Cancelling the anti-theft coding
The electronic block can only be cancelled when
the correct code number is entered.
Proceed as follows:
•
Switch the system on.
SAFE will appear in the display. After 2 seconds,
you will be required to enter the correct code
number. 1000 will appear in the display.
•
Press station preset 1 until the rst digit of the
code appears in the display.
•
Press station preset 2 to enter the second
digit of the code.
•
Press station presets 3 and 4 to enter the third
and fourth digit of the code.
•
Once you have entered the code completely,
press the menu knob , or for at least
two seconds.
Page 21
20
RADIO NAVIGATION SYSTEM
INTRODUCTION
Entering the incorrect code number
If you inadvertently enter and conrm an incorrect code number, SAFE will appear again in
the display. First ashing and then permanently.
The following message will appear in the status
line of the display:
WRONG TRIES: 1
Now you can enter the code number again.
If you enter the code number incorrectly a second
time, the system will be blocked for one hour.
Once the hour waiting period has elapsed, it will
be possible to enter the code again. During the
waiting period, you must leave the system switched on with the ignition key in the ignition.
After an hour has elapsed you can enter the code
number once again. If an incorrect code number
is entered twice, the system will be blocked again
for one hour.
Note: If you have lost your equipment card
with the code, please contact your Škoda
Service Centre.
Switching the system on/off
The audio source or navigation status (if the last
route guidance was no longer than 30 minutes
ago) used last before the system was switched
off will be activated.
If the ignition key has been removed, it is possible
to switch on the system for approx. one hour by
pressing the left-hand rotary/push button
.
To prevent the battery from running down, the
system will switch off again automatically. You
can repeat this process as often as desired.
When the system has been switched off and the
ignition key removed, a LED will begin to ash
after a short pause to indicate that the system is
protected by anti-theft coding.
Switching the system on
•
Press the rotary/pushbutton to switch the
system on.
Note: If the system remains mute and "SAFE"
appears in the display when you switch it on,
please refer to the information on page 19.
Page 22

21
RADIO NAVIGATION SYSTEM
INTRODUCTION
Switching the system off
Press the left-hand rotary/push button .
The active audio source and navigation status
will be stored.
If the key is removed from the ignition while the
system is switched on, the system will switch off
automatically.
Adjusting the volume
Turn the left-hand rotary/push button to alter
the volume of the audio source that is currently
active.
It is possible to alter the volume of the navigation
voice output during a trafc announcement by
turning the left-hand rotary/push button
.
Note: Press the INFO button to repeat the
voice output to adjust the volume.
Page 23

22
RADIO NAVIGATION SYSTEM
AUDIO OPERATION
Radio operation with RDS
RDS (Radio Data System)
RDS (Radio Data System) is always active for
the radio navigation system.
In addition to their regular programming, an increasing number of radio stations also transmits
RDS information that is picked up and evaluated
by the RDS receiver in coded form.
This information includes the radio station name
and the trafc information status for the radio
station selected.
Alternate frequency
The alternate frequency function ensures that the
system always tunes into the best frequency for
the currently selected radio station.
The radio may briey switch to mute while searching for the frequency with the best reception.
If the system is unable to nd an alternate frequency for the station selected and it is no longer possible to pick up this station in satisfactory
quality, please select another station.
Radio operation
TMC (Trafc Message Channel)
In addition to their regular programming, a number of radio stations also transmits digital trafc
information on the Trafc Message Channel.
These messages are picked up by your navigation system and can be used for dynamic route
guidance (see Selecting route options, page 48
and Activating the trafc congestion function,
page 58). If a radio station provides TMC service,
TMC will appear in the status line of the display.
TMC stations can be stored in the TC1 and TC2
memory banks.
RDS Regional
Radio stations sometimes divide their programming into regional programming at certain
times of the day.
At rst, the system will tune into only those
alternative frequencies for the radio station
selected.
However, if the reception quality deteriorates to
the point that the radio might “lose” the station,
the system will also switch to frequencies used
by a "related" NDR 1 station. Because these
radio stations sometimes broadcast different
contents, this might mean that you will hear a
different programme.
Switching to regionally related stations
As a rule, the system will only switch to other
frequencies for the same station with the same
PI code. However, if the reception deteriorates
beyond a certain point, the system will also automatically switch to a regionally related broadcasting network.
Page 24

23
RADIO NAVIGATION SYSTEM
AUDIO OPERATION
Use the RDS-Regional function in the AUDIO
SETUP menu to switch RDS-REG to AUTO or
OFF. For more information, please refer to the
section on AUDIO SETUP, page 14.
AUTO - If you select this setting, the system
will switch to a regionally related transmission
frequency when station reception deteriorates
beyond a certain point.
OFF - You can select a regionally related station
frequency manually. The change will not be made
automatically.
Switching on radio operation
To switch the radio on, press one of the following
buttons to activate the corresponding memory
bank or waveband. The radio will automatically
switch to the memory bank used last and begin to
play the last radio station heard, if it is still within
reception range.
FM in 2 memory banks (FM1 and FM2)
•
To switch FM radio on, press FM .
TMC stations (Trafc Message Channel) in
memory banks 1 and 2 (TC1 and TC2). With
TMC your radio also receives the trafc information required by the navigation system for
dynamic route calculation.
•
Press TMC .
AM in 2 memory banks (AM1 and AM2).
•
Press AM .
Note: If you switch from FM to TMC or vice
versa, the radio station you have tuned into
in the selected memory bank will be “taken
along”.
Page 25

24
RADIO NAVIGATION SYSTEM
AUDIO OPERATION
Selecting stations
Manual station tuning for FM, TMC and AM
•
Press one of the buttons briey to tune into
a station manually. Each time you press the
button, the frequency will move up or down
in increments.
Recalling stored stations
Press the buttons to recall the stations stored
in the memory one after the other.
Selecting stations
Automatic station tuning for AM
•
Press one of the buttons to start seek
tuning up or down the waveband. The radio
will automatically stop at the next or previous
station and begin to play.
Hold the buttons
pressed down to start fast
seek tuning to the next station.
Storing and recalling stations
Storing stations
You can store six stations in each memory bank
for each of the wavebands (FM, TMC and AM).
• Press FM , TMC or AM to select
the waveband and the memory bank.
• Tune into a station.
• Press down and hold the station preset on
which you want to store the station until the
radio switches to mute briey.
Page 26

25
RADIO NAVIGATION SYSTEM
AUDIO OPERATION
Recalling stored stations
You can recall any station you have stored at the
touch of a button.
•
Press FM , TMC or AM to select
the waveband and the memory bank.
•
Briey press the station preset on which you
have stored the station.
If it is no longer possible to pick up an FM station
you have stored and the TA function has been
activated in the AUDIO SETUP (see page 14),
TP-SEEK will appear in the display when you
press the station preset. Seek tuning will begin
and the radio will switch to mute. If it is not possible to tune into a TP station, you will hear a beep
and NO TP will appear in the display.
•
Switch off the TA function (see page 15).
If the radio is no longer able to pick up a stored
TMC station, TMC-SEEK will appear in the
display.
If the radio is not able to pick up any TMC station,
NO TMC will appear in the display.
•
Now select an FM station.
Note: If no TMC stations are being received,
dynamic navigation is not possible despite
the fact that you can change the route option
to dynamic.
Storing stations automatically
Use the Autostore function to automatically store the six stations with the strongest reception
signals for the waveband selected (FM, TMC
or AM). This function is particularly useful on
longer trips.
•
Select the waveband (FM, TMC or AM) on
which you want to store the stations automatically.
Page 27

26
RADIO NAVIGATION SYSTEM
AUDIO OPERATION
•
Keep the AS button pressed until the
automatic storing procedure begins and
A-STORE appears in the status line. An additional progress indicator in percent appears
in the display foreground.
The stations with the strongest reception signals
will be automatically stored in memory bank 2
(FM2, TC2 or AM2) for the selected waveband.
The order in which the stations are stored depends on their station code.
Note: An autostore procedure for TMC
stations can take up to 10 minutes since
all receivable stations are tested for TMC
capability. Radio operation is not possible
during this time.
Scanning stations (Radio Scan)
Use Radio Scan to scan all the radio stations
within reception range for ve seconds.
•
Select the waveband you would like to
scan.
•
Press SCAN briey.
•
Press SCAN again to continue listening to
the station that is currently being scanned.
If you do not select a station, the Scan process will start again from the beginning once the
waveband has been run through once.
To end Scan:
•
Press SCAN .
Trafc station reception
Many FM stations transmit regular trafc information for their reception areas.
Stations that broadcast trafc information also
transmit a signal that is evaluated by your RNS.
After you select a radio station, the system will
check to see whether or not it broadcasts trafc
information.
If the radio station you have selected broadcasts
traffic information, TP (Traffic Program) will
appear in the status line of the radio menu.
Notes: If you leave the station reception
area, you will have to tune into a new TP
radio station.
If you are listening to an audio CD when you
leave the station’s reception area, the system
will automatically start seek tuning to nd another TP station.
Page 28

27
RADIO NAVIGATION SYSTEM
AUDIO OPERATION
Listening to trafc messages
If your radio navigation system has been set to
trafc information standby, the trafc messages
will interrupt other programming, i.e. CD playback
will be interrupted and you will hear the trafc
message.
Note: Trafc information standby will not
be active unless the TA function has been
switched on in the AUDIO SETUP menu (see
page 15).
At the same time, the message will be stored
in the Trafc Info Memo (TIM). Once the trafc
message has ended, the system will switch back
to the previous audio source.
The trafc announcement is emitted at a pre-
-set minimum volume: TA-MIN. This volume
can be set in the VOLUME SETUP menu, see
page 16.
You can also turn the left-hand rotary/push button
knob
at any time during the announcement
to alter the volume.
Interrupting a trafc announcement
•
Press FM briey during the announcement
to interrupt it. Trafc information standby will
remain in effect for any following trafc announcements.
Trafc Information Memo (TIM)
Your radio navigation system is able to record
trafc information for a period of time from 2
to 24 hours. Up to nine messages with a total
recording time of four minutes will be recorded
automatically.
When the system is in operation, trafc information from TP stations is always recorded, even
if the FM button has been pressed to interrupt the
message. The actual recording of the message
will only be interrupted if you have tuned into an
EON station, such as “NDR 4”.
If the system has been switched off, trafc information will still be recorded if the TIM function
has been activated.
Activating TIM standby for 24 hours
•
Once you have switched the system off and
removed the ignition key from the ignition,
press down and hold TIM for one second.
Note: 24-hour TIM standby results in increased current consumption over 24 hours.
This can lead to problems with the battery
voltage (excessive battery discharge) if the
vehicle is only driven on short journeys. In
this case, 24-hour TIM standby should not
be activated.
Page 29

28
RADIO NAVIGATION SYSTEM
AUDIO OPERATION
Activating TIM standby for 2 hours
•
Park your vehicle, leave the system switched
on and turn off and remove the ignition key
from the ignition.
This standby mode will be deactivated as soon
as you switch the system back on again.
Note: Once the memory is lled to capacity,
the oldest message will be overwritten. If a
message is longer than four minutes in total,
the beginning will be overwritten.
Listening to recorded messages
•
With the system switched on, press TIM .
The TIM display will appear. TRACK and the
number of the message recorded last will appear
in the display foreground. The message recorded
last has the highest number, the oldest message
the lowest. The recording time appears in the
status line next to the source.
If no traffic information has been recorded,
NO MESSAGE will appear in the display foreground.
Selecting a recorded message
•
While a message is being played back, press
one of the buttons to listen to the previous
or the next message.
Page 30

29
RADIO NAVIGATION SYSTEM
AUDIO OPERATION
Fast seek tuning, audible
•
To run through the message more quickly,
press one of the buttons during playback.
Deleting trafc messages
All trafc messages are deleted automatically six
hours after TIM standby has ended.
Ending the TIM function
•
Press TIM again to end the TIM function.
The function will switch off automatically once
all of the messages have been played.
Note: If TIM was activated from the route guidance menu, you can press the TIM button to
return to this menu.
CD operation
Integrated CD player
You can use your radio navigation system to
listen to audio CDs on the integrated CD player.
You also have the option of connecting a CD
changer (extra feature, see page 30).
Note: You can only use the integrated CD
player when you are not using the navigation system or when you are using NO MAP
route guidance. This type of route guidance
indicates the direction of your destination and
the distance as the crow ies.
Inserting an aud io CD (integra ted CD
player)
Insert an audio CD with the label facing upwards into the CD drive. When you feel a slight
resistance, the CD will be pulled into the drive
automatically. Do not use force when attempting
to insert the CD.
Once the CD is in the player, the radio navigation
system will automatically switch to CD playback.
Playback will begin after a few seconds with the
rst track on the CD.
TRACK and the number of the track currently
playing will appear in the display foreground.
Starti ng CD operation (integr ated CD
player)
•
If there is already a CD in the player, press CD
. Playback will resume at the point where
it was interrupted last. If the CD had played
to the end, playback will begin again with the
rst track.
Note: If the system has been outtted with a
CD changer, the CD changer will be activated
rst when you press CD
.
Page 31

30
RADIO NAVIGATION SYSTEM
AUDIO OPERATION
CD functions (integrated CD player)
Selecting a track
•
To select the next track, press the right-hand
button . To select the previous track, press
the left-hand button .
Fast seek tuning (audible)
•
To start fast seek tuning, press down and
hold the left-hand button to reverse and
the right-hand button to fast forward for
as long as necessary.
Scanning all the tracks on a CD (SCAN)
You can scan all the tracks on a CD for 10 seconds each.
•
Press SCAN . All of the tracks will be
scanned in ascending order. SCAN will appear in the status line of the display.
•
To continue listening to the track being
scanned, press SCAN again.
Playing all the tracks on a CD in random
order
You can also play all the tracks on a CD in random order.
•
Press MIX . MIX will appear in the status
line of the display.
•
Press MIX to end the MIX function. The
next track on the CD will begin to play.
Removing a CD
•
Press ; the CD will eject. Remove the CD
carefully from the CD player.
Ending CD operation
To end CD operation,
•
press FM , TMC or AM to select
another audio function or eject the CD.
CD changer operation
(extra feature)
Switching on CD changer operation
•
With the radio navigation system switched on,
press CD .
CD changer operation will begin with the track
played last on the CD played last. TRACK and
the number of the track playing will appear in the
display foreground.
CDC (CD changer) and the number of the CD
currently playing will appear in the status line as
the source.
If you have not inserted a CD magazine or if the
CD magazine has not been inserted correctly,
NO MAG will appear in the display.
Note: If the radio navigation system has
not been outtted with a CD changer, the
integrated CD player will be activated when
you press CD
as long as an audio CD has
been inserted.
Page 32

31
RADIO NAVIGATION SYSTEM
AUDIO OPERATION
Selecting a CD
•
Press one of the station presets briey.
The numbering of the station presets 1 - 6
corresponds to the number of the CD.
Selecting a track
•
Press the right-hand button briey to se-
lect the next track. This track on the currently
selected CD will then begin to play.
•
If you want to listen to the previous track,
press the left-hand button twice within
1 second. If you press this button only once,
the current track will start to play again from
the beginning.
Fast seek tuning
•
To start fast seek tuning (audible), press down
and hold the left-hand button for reverse
or the right-hand button for fast forward
for as long as necessary. The CD will play
audibly at a higher speed.
Scanning all the tracks (SCAN)
You can scan all of the tracks for 10 seconds
each.
•
To start Scan, press SCAN .
•
Press SCAN again to end the function.
Playing all the tracks in random order (MIX)
You can also play all of the tracks of a single CD
or of all the CDs in the magazine in random order.
Make your settings in the AUDIO SETUP menu.
For more information, read AUDIO SETUP: CD-
-MIX, page 15.
•
Press MIX ; the tracks will be played in
random order.
Ending the MIX function:
•
To end the MIX function, press MIX
again.
Ending CD changer operation
To end CD changer operation
•
select a different audio source or
•
press the eject button on the CD changer
Unit to eject the CD magazine from the CD
changer. The system will switch to radio
operation.
Page 33

32
RADIO NAVIGATION SYSTEM
AUDIO OPERATION
Notes on audio CDs
CD label
Make sure that you only play audio CDs that bear
the symbol illustrated here.
Skipping during playback
CDs may skip while you are driving over very
uneven ground.
In this case, switch the CD player off and wait
until the road conditions improve before playing
CDs.
Condensation
Condensation may occur in the CD changer
housing when it is cold or humidity is high, such
as during or after rain showers. This can lead to
skipping or make playback impossible. In this
case, remove the CD or leave the sliding door
of the CD changer open to allow it to dry before
you use it.
Notes on cleaning CDs
Clean CDs with a soft, lint-free cloth. Wipe the
CDs in a straight line from the middle to the
outside edge.
Note: Never use such solvents as alcohol,
petrol, paint thinner or LP cleaner to clean
the CD!
Tone settings
Tone settings and balance and fader settings
In the Sound menu you can adjust the treble and
bass as well as the balance (left/right speakers)
and fader (front/rear speakers) settings.
The settings for bass and treble can be made
and stored for each sound source individually,
the settings made for balance and fader apply
to all the sound sources.
Page 34

33
RADIO NAVIGATION SYSTEM
AUDIO OPERATION
It will not be possible to adjust the fader setting
unless speakers have been installed in the rear
of the vehicle.
•
Press to access the Sound menu.
•
Use the menu knob to select the function
you want to adjust (BASS, TREBLE, BAL-
ANCE or FADER).
•
Turn the menu knob to alter the setting.
•
Press the menu knob to store the new
setting. Press to reset the setting to
the old value.
•
After you have made all your adjustments,
press or one of the audio source
buttons for CD, FM, AM or TMC to exit the
Sound menu.
Page 35

34
RADIO NAVIGATION SYSTEM
NAVIGATION
Navigation
Activating the main navigation menu
•
Press NAVI .
If you have not yet entered a destination, the
selection bar will mark SHOW LOCATION.
If you have entered a destination, the selection
bar will mark ROUTE GUIDANCE.
Note: You can press NAVI
to return to the
main navigation menu from all of the submenus, lists or displays.
Press NAVI during active route guidance to
switch between route guidance or locating
and the main navigation menu.
Accessing submenus, selecting options
•
First turn the menu knob to mark the de-
sired menu item and press the knob to conrm
your selection.
Main navigation menu
- ROUTE GUIDANCE (starting page 50). Route
guidance will be started once you have entered a destination.
- STOP GUIDANCE (page 54). The active
route guidance session is stopped and the
main navigation menu is displayed.
- ENTER DESTINATION (starting page 35).
Destination entry with the entry of the destination address or by selecting a destination
from the destination memory.
- ROUTE OPTIONS (starting page 48). Here
you can select dynamic route guidance or
display the route list.
- ROUTE LIST (page 50). The route list is cal-
culated and displayed.
- SHOW LOCATION (page 54). Route guid-
ance in the locating mode is a compass function. The display will indicate due north and
the name of the street/road you are travelling
on, if applicable.
- DESTINATION MEMORY (starting page 55).
Storing, editing and deleting destinations in
the destination memory.
Page 36

35
RADIO NAVIGATION SYSTEM
NAVIGATION
-
TOURLIST (page 60). Combining and re-
calling destinations to form a tour.
- TRAVEL GUIDE (starting page 60). View
travel information (e.g. hotel prices) on destinations and select these destinations.
- GPS STATUS. The display will indicate the
number of GPS satellites the system can currently receive and the geographical location
of the vehicle.
Note: Any menu items you cannot select are
marked with a lock symbol.
Overview
Access the enter destination menu directly from
the main navigation menu via ENTER DESTI-
NATION.
Destination entry
Now you can use the menu items to choose
between the following ways to enter your intended destination:
- DESTINATION FROM MEMORY (memory of
the last destinations, alphabetical memory or
memory sorted by user preference), see page
43.
- SPECIAL DESTINATIONS, see page 46.
- FLAGGED DESTINATION, see page 46.
- TOWN (and city submenu), see page 36.
- STREET (and intersection), see page 38.
- TOWN CENTRE, see page 40.
Page 37

36
RADIO NAVIGATION SYSTEM
NAVIGATION
Destination entry - City/Town
Selecting a city or town as your
destination
Use the TOWN menu item to rst select the
town/city as your destination and then use the
city submenu to make your destination more
precise.
Use the following menu items in the city submenu:
- Destination entry via the STREET menu
item
- Destination entry via the TOWN CENTRE
menu item
- Destination entry via the CLOSE TO AD-
DRESS menu item
Selecting the TOWN menu item
•
Use the menu knob to select the TOWN
menu item in the enter destination menu.
The editor
Use the editor to make all the alphanumeric
entries required for navigation.
These include:
Destination entries including city and street
names,
Entering a short name to store a destination
in the destination memory,
Entering a position name for a agged desti-
nation.
1
3
4
2
5
Page 38

37
RADIO NAVIGATION SYSTEM
NAVIGATION
The edit menu consists of:
the Speller with letters, a space and num-
bers,
the control eld ,
the edit eld with standard names or the enter
marking ,
a window with a list (edit list) and
the zoom , which magnies the marked
letter here.
The marker in the Speller will mark letter A.
Note: You can only enter names that are
stored on the CD. Letters in the speller
are displayed and hidden accordingly.
Entering the city name
Enter the starting letters of the name of the city
you want to select in the edit eld . With each
letter that you enter, the next matching entry in
the list will appear in the edit list .
In this way, you can quickly nd the name you
are looking for without having to enter the entire
name.
3
4
1
•
Use the menu knob to mark the correct let-
ter. The cursor will move to the corresponding
letter and the letter will appear enlarged.
Note: You can only enter names that are
stored on the CD. Letters in the speller
are displayed and hidden accordingly.
•
Press the menu knob briey to conrm
your selection.
The letter will appear in the edit eld. At the
same time, the cursor will move one space to
the right. The next matching entry will appear in
the edit list
.
•
Select additional letters if required.
Note: You can delete any letters that you
entered incorrectly by pressing the button
← .
2
Page 39

38
RADIO NAVIGATION SYSTEM
NAVIGATION
Accessing the list
Use a list to help you select your desired destination city.
There are two ways to access the list from the
edit menu:
•
Press the menu knob for longer than 2
seconds or
•
use the menu knob to select and conrm
the control eld marked
.
Note: If the city name you want to select appears on the list more than once, a submenu
will appear from which you can select the
desired entry.
Selecting city names from the list
•
Use the menu knob to select and conrm
the desired entry.
Scrolling through the list: Turn the menu knob I
to move the selection bar rst to the arrow and
then beyond the rst or last entry.
To scroll through the list page by page, move
the selection bar to the arrow and then press
the menu knob
.
Press the Info button INFO to display an
abbreviated list entry marked with … in full.
Entering more precise details on your
destination
The submenu for ADDRESS ENTRY will appear
once you have selected your destination city.
Here you can enter more precise details on your
destination.
STREET - allows you to select a street and
then an intersection depending on the CDROM being used (see CD book).
Page 40

39
RADIO NAVIGATION SYSTEM
NAVIGATION
TOWN CENTRE - allows you to select the
town centre of the place you selected. In the
case of smaller towns, this menu item is used
for entering the town centre, since entering a
destination using the STREET menu item is
not always possible.
CLOSE TO ADDRESS - allows you to select
a destination close to the last destination you
entered. This selection is made by category,
e.g. motorway access or shopping centre.
This will not be possible unless the navigation
CD you are using contains the corresponding
data. Destinations close to the address can
also be located outside of the destination
entered, i.e. a shopping centre outside of
the city. The possible destinations close to
the address are then listed along with their
distance away.
Selecting a street as your destination
Use the STREET menu item to select the desired
street and then the street submenu to dene your
destination more closely.
Enter destination - Street
- Intersection
Selecting the STREET menu item
•
Use the menu knob to mark and conrm
the STREET menu item in the enter destination menu or in the following menu for
entering the city.
The following will appear:
- a street list (for a maximum of 20 digitised
streets in the destination town) or
- the edit menu for more than 20 entries.
Entering street names in the edit menu
•
Enter the street name in the edit eld of the
edit menu.
•
Now press and hold the menu knob to
access the street list or
•
use the menu knob to mark and conrm
the control eld marked
.
Page 41

40
RADIO NAVIGATION SYSTEM
NAVIGATION
Selecting streets from the list
To scroll through the list, move the selection
bar beyond the last entry (to page forwards) or
beyond the rst entry (to page back).
•
Use the menu knob to mark and conrm
the desired entry.
The street submenu will appear.
Note: If the street name selected appears
more than once for the city, a submenu
will appear from which you can select the
desired entry.
A long street name may be stored more than
once to make it easier to nd, e.g.:
RAABE-WEG, WILHELMWILHELM-RAABE-WEG.
Selecting an intersection as your
destination
Use the street submenu to dene your destination address more precisely:
INTERSECTION - activates the edit menu/
the list from which you can select an intersection.
HOUSE NUMBER - activates the edit menu/
the list from which you can select a house
number.
Note: If you cannot sel ect the HOU SE
NUMBER menu item, your CD ROM does
not contain the data required for house
numbers.
CONTINUE - address entry is completed; the
main navigation menu will appear.
Once you have pressed CONTINUE you have
ended your destination input at this point. You can
now start route guidance to the street entered,
see page 50.
Enter destination - Centre
Selecting the city centre (city district)
In large cities, you can use the TOWN CENTRE
menu item to select the centre of part of the city
as your destination.
Note: In the case of smaller towns, this
menu item is used for entering the town
centre, since entering a destination using
the STREET name depends on the database
available on the CD.
Page 42

41
RADIO NAVIGATION SYSTEM
NAVIGATION
In large cities you can use the TOWN CENTRE
menu item to directly select individual parts of the
city or their main centres as your destination.
Selecting the TOWN CENTRE menu item
•
Use the menu knob to mark and conrm
the TOWN CENTRE menu item in the enter
destination menu.
The following will appear:
- the list (for a maximum of 20 possible centres)
or
- the edit menu.
Selecting the centre
•
Enter the name of the desired part of the city
in the edit eld or conrm an existing entry on
the list.
•
Now activate the list.
•
Use the menu knob to mark and conrm
the desired centre on the list.
Now the main navigation menu will appear.
You can now start route guidance, see page
50.
Notes: In large cities, the list will also include
the parts or districts in the city.
If the city name (city district name) exists
more than once, a submenu will appear from
which you can select the desired entry.
Enter destination - Special
destinations
Entering special destinations
If you select the SPECIAL DESTINATIONS
menu item in the enter destination menu, you
can also enter other destinations.
Special destinations include:
Destinations in SURROUNDING AREA
Here you can view and select special destinations, e.g. car parks, at your destination.
Page 43

42
RADIO NAVIGATION SYSTEM
NAVIGATION
SUPRAREGIONAL DESTINATIONS
The special destination category for supraregional destinations is not dependent on whether you have already entered a destination.
You can use this function to dene a motorway
service centre or an airport, for example, directly
as your destination and start route guidance to
that destination.
Destinations CLOSE TO ADDRESS
This special destination is related to a destination
that you have already selected. You can use this
function to nd a car park near your point of destination in an unfamiliar city, for example.
Destinations close to your vehicle location
(CLOSE TO LOCATION).
This type of special destination depends on the
current location of your vehicle. You can use it
to plan a stopover, for example, or to drive to the
nearest petrol station. If necessary, you can also
nd the nearest Škoda Service Centre quickly
and easily.
•
Use the menu knob to mark and conrm
the desired special destination.
Destination input continues on the basis of categories that are stored in alphabetical order.
Depending on the type of special destination
you choose, there will be different categories
available.
Categories include, e.g.:
- Motorway service centre.
- Škoda service centre.
If there is no data available for a category, it will
usually not appear.
After you have selected the category, you can
use the edit menu and the list to select your
desired destination.
Selecting a category
•
Use the menu knob to mark and conrm
the desired entry.
A list will appear for the category selected.
Note: If there are more than 20 entries for
the category selected, rst the edit menu will
appear. Enter the desired name or beginning
letters and then activate the corresponding
list.
Page 44

43
RADIO NAVIGATION SYSTEM
NAVIGATION
Selecting an entry from the list
•
Use the menu knob to mark and conrm
the desired entry on the list.
Now the main navigation menu will appear.
Now you can start route guidance, see page
50.
Note: To view the full entry (an abbreviated
entry is marked by three dots), use INFO
.
Use the menu knob to mark the corresponding
entry and press INFO .
Turn the menu knob to access additional
information.
Enter destination - from the
destination memory
Entering a destination from the
destination memory
Activating the enter destination menu
Use the menu knob to mark and conrm the
ENTER DESTINATION menu item in the main
navigation menu.
Selecting the DESTINATION FROM MEMORY
menu item
When you activate the enter destination menu,
the selection bar will mark the DESTINATION
FROM MEMORY menu item.
•
Press the menu knob to conrm the menu
item.
A submenu will appear.
Selecting the memory
•
Use the menu knob to select and conrm
the desired memory in the submenu.
You can choose from:
- LAST DESTINATIONS, this is where the
last 10 destinations used for navigation have
been stored, if this option has been selected
in NAVIGATION SETUP (p. 14).
- ALPHABETICAL SORTING.
- PERSONAL ORDER.
Page 45

44
RADIO NAVIGATION SYSTEM
NAVIGATION
Selecting a stored destination
•
Use the menu knob to select one of the
memories listed above. The name of the
memory selected will appear in the menu
title of the display.
•
Use the menu knob to mark the desired
entry.
•
Press the menu knob rmly to accept the
destination for route guidance.
Now the main navigation menu will appear. The
destination selected is active.
Now you can start route guidance, see page
50.
Storing a destination in the destination
memory menu
You can also rst store a destination in the destination memory to use it for route guidance at
a later date.
A destination is stored in the DESTINATION
MEMORY.
You can enter a short name (e.g. someone’s
rst name) for the destination. This will make it
easier for you to nd it in the destination memory
at a later date.
Use the DESTINATION MEMORY menu item to
activate the destination memory menu directly
from the main navigation menu.
You can display the destinations in the order in
which you have entered them or in alphabetical
order to use them again to enter your destination.
You can alter the order in which the destinations
are stored at any time.
A memory called LAST DESTINATIONS can also
be used to enter destinations from the destination
memory. This memory automatically stores the
last 10 destinations used for route guidance.
Note: If the destination memory is unable to
store any further destinations, the following
message will appear: “The destination memory is full.” You will then have to delete one
or more destinations.
Page 46

45
RADIO NAVIGATION SYSTEM
NAVIGATION
Storing a destination in the destination
memory
Use the STORE DESTINATION function to
store the current destination in the destination
memory.
•
Use the menu knob to conrm the STORE
DESTINATION menu item.
The edit menu will appear so that you can enter
a short name.
Entering a short name
•
Enter the short name (e.g. HOME) in the edit
eld.
•
Press the menu knob rmly to conrm the
name you have entered or
•
use the menu knob to mark and conrm
the control eld marked
.
Now the destination has been stored in the destination memory along with the short name.
If you do not want to enter a short name, you can
press the menu knob
to exit the menu without
entering any letters.
Sorting destinations in the memory
yourself
If you want to use any of the destinations more
frequently, it is advisable to sort them according
to your own criteria.
•
Use the menu knob to conrm the SORT
DESTINATIONS menu item.
The user -sorted des tination me mory will
appear.
•
Use the menu knob to mark and conrm
the destination you want to move.
The entry selected will be highlighted by the
move marking.
•
Turn the menu knob to move the marked
destination to the desired position.
•
Use the menu knob to conrm the new
position.
Page 47

46
RADIO NAVIGATION SYSTEM
NAVIGATION
Setting a agged destination
A agged destination is the current position of
your vehicle that you have marked with the agged destination button during active route guidance or locating. This does not apply unless you
have inserted a navigation CD into the system.
This destination might be an interesting shop that
you would like to return to at a later date.
•
Press the agged destination button .
Enter destination - to a agged
destination
Note: You should not set a agged destination
unless the name of the street it is located on
appears in the display. Otherwise, it might
not be possible for the system to nd this
destination at a later date.
To conrm your selection, SET FLAG will appear
in the display along with the time.
Once you have set the flagged destination,
you can store it immediately in the destination
memory and enter a short name, if desired. If you
store the agged destination in the destination
memory, you can use it for route guidance at a
later date.
•
Select NAME to store the agged destination
under a short name immediately
or
•
select BACK. The last agged destination in
the memory will be overwritten.
Storing a agged destination
You can also store a agged destination you have
set permanently in the destination memory.
•
Mark and conrm the DESTINATION MEM-
ORY menu item in the main navigation menu
to activate the destination memory menu.
•
Use the menu knob to mark and conrm
the STORE FLAG menu item.
Now the edit menu will appear so that you can
enter a short name for the agged destination.
Page 48

47
RADIO NAVIGATION SYSTEM
NAVIGATION
Naming the agged destination
In the edit menu you can select either the standard name of FLAG DEST. (TIME) or give it a
name of its own.
Using the standard name:
•
Press the menu knob rmly (for longer
than 2 seconds) to conrm the entry FLAG
DEST. (TIME).
Entering a name of your own choosing:
•
Use the edit menu to enter a name of your
own choosing. The standard name will be deleted when you enter the rst character.
•
Use the menu knob to conrm your en-
try.
The agged destination has now been stored
in the destination memory under the name entered.
Note: If required, you can switch to the special character set in the editor by pressing
the or control elds.
Selecting the agged destination as your
destination
Activating the enter destination menu
To activate the enter destination menu, use
the menu knob to mark the ENTER DESTI-
NATION menu item in the main navigation menu
and conrm your selection.
Page 49

48
RADIO NAVIGATION SYSTEM
NAVIGATION
Selecting the FLAGGED DESTINATION menu
item
•
Use the menu knob to mark and conrm
the FLAGGED DESTINATION menu item in
the enter destination menu.
Now the main navigation menu will appear and
you can start route guidance to the agged destination.
Now you can start route guidance, see page
50.
Note: There is only one destination stored in
the agged destination memory. Once you
press the agged destination button
to
enter a new agged destination, the previous
agged destination will be deleted if you have
not entered it in the alphabetical destination
memory.
Route options
Planning a route
Once you have entered a destination, you can
use the ROUTE OPTIONS menu item in the main
navigation menu to plan the route.
The menu item appears if you turn the menu
knob
to the left.
Selecting route options
•
Use the menu knob to mark and conrm
the ROUTE OPTIONS menu item in the main
navigation menu.
The menu for selecting the route options will
then appear.
Selecting route options
•
Highlight the required option turning the menu
knob .
•
Choose another setting by pressing the menu
knob .
Page 50

49
RADIO NAVIGATION SYSTEM
NAVIGATION
DYNAMIC - If you select ON for this option, the
route will be calculated whilst taking the current
trafc situation into account. The ROUTE, MO-
TORWAYS, FERRIES and TOLL ROAD menu
items will then be labelled with a lock symbol and
cannot be selected.
ROUTE - This option allows you to select
whether you want the fast or short route to be
calculated.
MOTORWAYS - Select here whether you want
to use or avoid motorways.
FERRIES - Select here whether you want to use
or avoid ferries.
TOLL ROAD - Select here whether you want to
use or avoid toll roads.
Notes: Because of local conditions or for
purposes of route optimisation, a route may
be calculated using one of the options even
though it was marked as “AVOID”.
The selected route option is indicated in the route
guidance display by the following symbol:
dynamic route
fast route
short route
Closing the route options menu
•
Press the button to close the route
options menu again.
You now have the option of saving the selected
route options as the default value.
•
Select the YES menu item and conrm your
selection by pressing the menu knob .
Notes: The selected options apply to every
route guidance session.
If you selected and conrmed the NO menu
item using the menu knob , only the
current route will be calculated using the
selected options.
After route guidance is nished or the standby time has elapsed, the saved route options
will apply once more.
Page 51

50
RADIO NAVIGATION SYSTEM
NAVIGATION
Calculating the route list
•
Select the ROUTE LIST menu item from the
main navigation menu and conrm your selection by pressing the menu knob .
Note: If route guidance is active, press the
NAVI button or the button to open
the main navigation menu.
Depending on the length of the route, the calculation process can take a few seconds.
Then the route list will appear.
The route list will remain in the display during
route guidance, but it is not dynamic, i.e. the list
will not change to reect the route driven during
the trip.
The entries also include their distances. If you alter the route, it will be necessary to have the route
list re-calculated. The list indicates the sections
of road you will travel on with the corresponding
distances travelled.
Note: If it is not possible to calculate a route
list, a corresponding message will appear in
the display.
Closing the route list
Press the
button - the main navigation
menu appears.
Route guidance
Starting route guidance
After entering your destination and selecting
any route options, if desired, you can conrm
the ROUTE GUIDANCE menu item in the main
navigation menu to start route guidance.
Now the route guidance screen will appear.
Information display
The information display indicates the distance to
your driving destination and your estimated time
of arrival at your destination, the driving direction
and the bar graph indicating the distance to the
next intersection/turning point.
Page 52

51
RADIO NAVIGATION SYSTEM
NAVIGATION
If the DRIVE SYMBOLS: ON option is set in the
navigation setup menu (see page 14), the visual
driving recommendations will appear in the radio
navigation system’s display and in the instrument
cluster. If the DRIVE SYMBOLS: OFF option is
selected, the visual driving recommendations will
only appear in the instrument cluster’s display. In
this case, the radio navigation system’s display
will contain information on your destination. If the
instrument cluster is not equipped with a display
and the DRIVE SYMBOLS: OFF option is set,
route guidance will only provide spoken driving
recommendations.
Displaying the complete destination address
Press INFO
to display the current destination
along with detailed information. The most recent
spoken driving recommendation will also be repeated at this time.
Route guidance with driving symbols
If the DRIVE SYMBOLS: ON option is activated
in the navigation setup menu (see page 14), the
visual driving recommendations, the remaining
driving time or arrival time (see page 14, TIME
INFO), the selected route option and the distance
to the next turning point or a bar graph will appear
in the display during route guidance.
The name of the street you are travelling on
will appear at the bottom of the display when a
straight arrow is displayed.
If a turning arrow is displayed, the name of the
street onto which you will turn will appear. A small
arrow pointing to the right in front of the street
name is an additional indication.
The active audio sources and functions appear
in the display background. During route guidance
you can use all the audio sources, with the exception of the internal CD drive, as usual.
Page 53

52
RADIO NAVIGATION SYSTEM
NAVIGATION
Route guidance without driving symbols
If you have activated the option for DRIVE SYM-
BOLS: OFF in the navigation setup menu (see
page 14), the visual driving recommendations
will appear in the instrument cluster only. During
navigation mode, the info screen will appear in
the foreground of the display and the active audio
source in the background. In audio mode, this is
the other way around.
The navigation status, e.g. GUIDANCE and the
distance to your destination, appears in the display background.
If the option LANGUAGE: ON has been selected
in the navigation setup menu, route guidance
will also be accompanied by spoken driving recommendations. You can have the most recent
spoken recommendation repeated at any time
by pressing INFO
.
OFF MAP route guidance
If the destination you have entered or your current vehicle position is located outside of the
digitised map database on the navigation CD,
navigation will be performed OFF MAP.
The display will indicate the direction in which
your destination lies along with its distance away
“as the crow ies”.
Page 54

53
RADIO NAVIGATION SYSTEM
NAVIGATION
OFF ROAD route guidance
If your current vehicle position cannot be assigned to any street on the navigation CD used,
navigation will be performed OFF ROAD.
The display will indicate the direction in which
your destination lies along with its distance away
“as the crow ies”.
NO MAP route guidance
You can also use the route guidance function
without a CD. In this case, route guidance is provided without a map. The display will indicate the
direction in which your destination lies along with
its distance away “as the crow ies”. There will
be no spoken driving recommendations.
This function was designed for longer trips on
the motorway that generally require little information from the navigation system. The system
will switch to NO MAP route guidance if you
remove the CD during route guidance.
Once you insert the CD ROM again, route
guidance will resume if it was active before the
CD ROM was removed.
Note: For reasons of a technical nature, it
may take several minutes until route guidance resumes correctly acoustically and
with the pictograms after you insert the CD
ROM. The system needs this time to identify
its current location precisely. During this
time, “OFF ROAD” may appear in the display.
In densely built-up areas with a complicated
road network, the system may make errors in
the locating process until it has oriented itself
correctly. If possible, we recommend that you
replace the CD ROM in the system while you
are still on the motorway to make the process
of orientation less complicated.
Page 55

54
RADIO NAVIGATION SYSTEM
NAVIGATION
Locating with a CD
When locating is active, an arrow pointing north
will appear. The name of the street you are currently travelling on will also appear, if available.
Destination reached
Once you have reached your destination, the display will appear as illustrated. After 5 seconds,
the main navigation menu will appear.
If the destination is located in a non-digitised area
(possible for agged destinations only) close to
a digitised street, route guidance will guide you
to this street and you will receive the following
message: “You have reached your destination.”
If the destination is located further away from
a digitised street, you will receive the following
message: “You have reached the area of your
destination.” After that “OFF ROAD” will appear
along with a directional arrow pointing towards
the destination and the remaining distance you
must travel.
Cancelling active route guidance
To cancel route guidance, activate the main
navigation menu.
•
Press the NAVI button or the button
.
•
Select STOP GUIDANCE and conrm your
selection using the menu knob .
The active route guidance session is cancelled.
Page 56

55
RADIO NAVIGATION SYSTEM
NAVIGATION
Destination memory
Overview
Use the DESTINATION MEMORY menu item
to access the destination menu directly from the
main navigation menu.
You can store, edit, sort and delete destinations
in the destination memory.
You can view the destinations stored in the
alphabetical destination memory sorted in any
order you choose in the user-sorted memory.
The last destinations memory contains the
last ten destinations used for navigation in
chronological order. It is possible to deactivate
the automatic storage of these destinations. For
more information, please read the section on
NAVIGATION SETUP, see page 14.
Entering short names for your destinations will
allow you to nd them in the destination memory
more quickly. The short name always precedes
the destination name. As a short name, you can
enter such things as someone’s rst name or a
term such as HOME.
Destination memory
Use the menu items to choose how you want to
store the destination:
STORE DESTINATION - to store a navigation
destination in the destination memory, see
page 44.
STORE FLAG - to store and edit a previously set
agged destination, see page 46.
Page 57

56
RADIO NAVIGATION SYSTEM
NAVIGATION
CHANGE SHORT NAME - to edit short names
in the destination memory, see below.
DELETE DESTINATIONS - to delete last destinations, single destinations or all destinations,
see page 57.
SORT DESTINATIONS - to sort the destinations
in the destination memory to create a list with
the destinations sorted in the order you choose,
see page 57.
Entering/changing a short name
You can assign a short name to a destination.
This will help you to nd the destination more
quickly in the corresponding destination memory.
A short name can be someone’s rst name, for
example. You can edit any short name you enter
any time at a later date.
The short name always precedes the actual
destination name. You enter the short name in
the edit menu.
Editing the short name
•
Use the menu knob to mark and conrm
the CHANGE SHORT NAME menu item.
The alphabetical destination memory will
appear.
Now use the menu knob
to mark and select the desired entry. Then the edit menu will
appear.
•
Use the character set to enter the short name.
The short name you enter will appear in the
highlighted text line.
•
Press the menu knob rmly to conrm
your entry.
Page 58

57
RADIO NAVIGATION SYSTEM
NAVIGATION
Sorting Destinations
•
Use the menu knob to mark and conrm
the SORT DESTINATIONS menu item.
•
Use the menu knob to select and conrm
the entry you want to move.
The entry selected will be highlighted by a move
marking.
•
Move the marked entry to the desired po-
sition.
•
Press the menu knob to confirm this
change.
Now you can select another entry.
•
Press to return to the main destination
memory.
Deleting destinations in the
destination memory
You can delete destinations you no longer need
from the memory.
To prevent you from inadvertently deleting one or
more destinations, you will be required to conrm
a pop-up inquiry.
Page 59

58
RADIO NAVIGATION SYSTEM
NAVIGATION
•
Use the menu knob to mark and conrm
the DELETE DESTINATIONS menu item in
the main destination memory menu.
LAST DESTINATIONS - The memory containing
the last destinations will be deleted. This option is
not available unless the last destinations memory
has been activated (see NAVIGATION SETUP,
page 14).
SINGLE DESTINATION - You can also delete
single destinations from the memory. First you
will see a list of all the destinations to allow you
to select the destination you want to delete.
ALL DESTINATIONS - All the destinations in the
destination memory will be deleted.
After you select one of these menu items, you
will be required to conrm a pop-up inquiry. The
cursor will automatically mark CANCEL in the
inquiry.
Bypassing trafc congestion
Activating the trafc congestion function
Use this function to exclude certain sections of
the route lying ahead. Use the menu items to
extend the length of road you want to exclude
from your route. Based on this information, the
radio navigation system will calculate an alternate route to your destination that will bypass
the sections of the route that were excluded if
possible. Route guidance will continue with the
new route.
The navigation system automatically limits the
length of the route section you can exclude to a
reasonable length. In the country, for example,
bypassing trafc congestion can mean having
to take a much longer route because the road
network is not as dense as in the cities.
Automatic trafc congestion function
As an alternative to using the trafc congestion
function to exclude sections of your route manually, you can also take advantage of TMC (Trafc
Message Channel) and dynamic route guidance
to conveniently detour around any trafc congestion on your route. With TMC your radio navigation system receives current, digital trafc information from TMC radio stations. The system then
evaluates this information in planning the route.
This is not possible unless you have tuned into
a TMC radio station (for more information, refer
to Radio operation, starting on page 22) and
dynamic route guidance has been activated (see
Selecting route options, page 48).
Page 60

59
RADIO NAVIGATION SYSTEM
NAVIGATION
Note: The radio navigation system always
calculates the best route in terms of time for
the automatic trafc congestion function,
i.e. if bypassing the congestion means that
you will have to drive much farther, the radio
navigation system may choose to go through
the congestion. This depends on the length
and type of trafc congestion involved as
reported in the trafc information and the
length of a possible detour.
Activating the main trafc congestion menu
•
Press the trafc congestion button du-
ring route guidance to calculate an alternate
route.
The TRAFFIC MENU will appear.
There are two ways to enter trafc congestion
manually.
Selecting an alternate route
JAM AHEAD - You can exclude a section of the
route by entering the beginning (FROM) and end
(TO) of the trafc congestion with respect to your
current vehicle position.
Mark and conrm the menu item for FROM and
TO and mark the section of the route you want
to exclude. The navigation system will determine the length of the route sections that can
be excluded.
BLOCK ROUTE - The route list will appear and
you can exclude individual streets.
•
Use the menu knob to mark and conrm
the starting and end point of the route section
you want to exclude.
The excluded route section is indicated by a black
bar in front of the entries in the route list.
Note: It is not always possible to calculate
an alternate route for the section of the route
lying ahead.
Any exclusions you make will remain stored
until you have reached your destination.
Any previous route exclusions will be automatically deleted when you use the trafc congestion function again and the new exclusion
will be stored for the route lying ahead.
If it is not possible to calculate an alternate
route, you will hear the following message:
“Continue to follow the route.”
Page 61

60
RADIO NAVIGATION SYSTEM
NAVIGATION
Tour list
Use the tour list to combine several destinations
to form a tour and then use this list for route guidance. This is a convenient function if you want
to tour the sights of a city, for example.
START TOUR - Use this menu item to activate
the tour list. Select the destination on the tour list
to which you want to start route guidance.
ENTER DESTINATION - Here you can enter the
destinations you want to combine to form a tour.
Enter these destinations in the same way as you
do for navigation (see from page 35 onwards).
STORE DESTINATION - The current destination
or the destination that was active last will be added to the tour list.
DELETE DESTINATIONS - Here you can delete
individual destinations from the tour list or the
entire tour list.
SORT DESTINATIONS - Here you can sort the
destinations for a tour.
Travel guide
Use a travel guide to obtain travel information on
your destination. This travel information is stored
in categories.
Categories include:
- Accommodation,
- Restaurants,
- Tourist Info.
Travel information might include prices, facilities
and telephone/fax numbers for hotel accommodation.
Page 62

61
RADIO NAVIGATION SYSTEM
NAVIGATION
To take advantage of the travel guide, you require a navigation CD that includes travel guide
information.
Activating the travel guide
•
Use the menu knob to mark and conrm
the TRAVEL GUIDE menu item in the main
navigation menu.
The main travel guide menu will appear.
Note: If there is only one travel guide on your
navigation CD, then the name of that travel
guide will appear directly in the main navigation menu. If there are several travel guides
available, a menu listing the choice of travel
guides will appear.
Selecting a destination
•
Use the menu knob to mark and conrm
the desired menu item.
The entries in the travel guide menu depend
on the travel guide selected and may vary. As a
result, the following are only examples of possible entries.
PLACE NAME - activates the edit menu so that
you can enter the desired place name.
GOLF COURSE - activates the edit menu so that
you can enter the desired golf course.
ACCOMMODATION - activates the list of categories in the area close to the destination
address.
ENTERTAINMENT - activates the list of categories in the area around the current vehicle
position.
Selecting a category and a destination
Use the speller menus and lists to select the
destinations for route guidance.
Use
to return to the list of categories.
Changing the navigation CD ROM
To change the CD ROM, press the CD eject
button . The navigation CD will eject.
Insert the new navigation CD, with the label facing upwards, carefully into the CD slot until the
system automatically pulls it into position.
Notes on navigation CDs
To ensure the trouble-free operation of the navigation system, always use clean CDs without
scratches or other damage.
Always keep CDs in their original cases.
Never expose the CDs to direct sunlight!
Do not write on or put stickers on the CDs!
Page 63

62
RADIO NAVIGATION SYSTEM
NAVIGATION
Calibrating the system after the tyres
have been changed
After a tyre change it might be necessary to
recalibrate the radio navigation system.
•
Use the menu knob to mark and conrm
the TYRE CHANGE menu item in the NAVI-
GATION SETUP menu.
After you have conrmed a pop-up inquiry, the
automatic calibration process will begin. A bar
graph will indicate the progress made in the calibration process. Route guidance is not possible
during the calibration process.
Care of equipment
Care of the screen
Please handle the screen carefully. Pressure
applied with your ngers may result in dents
and contact with pointed objects could leave
scratches.
Cleaning the screen
Fingerprints can be removed from the screen by
gently rubbing it with a soft cloth, moistened with
a little alcohol, if necessary.
Note: Please do not any solvents, such as
petrol or turpentine, as they will damage the
material.
Glossary
EON - Enhanced Other Network
With RDS, EON makes it possible to exchange
station information within a station network.
If a trafc message is broadcast while you are
listening to a station in the network that does not
offer trafc information service, for example, then
the radio will automatically switch to the other
station for the duration of the message. Once
the message has been completed, the radio will
switch back to the original station.
GALA - Speed-dependent volume adjustment
The volume of the system is automatically rai-
sed or lowered, depending on the driving noise
experienced.
COMFORT CODING
The Comfort Coding function automatically enters the code via the instrument cluster.
Page 64

63
RADIO NAVIGATION SYSTEM
NAVIGATION
MAG
CD-changer magazine for 6 CDs.
SCAN
This function can be used to scan the radio
stations within reception range or the tracks of a
CD for CD operation.
TA - Trafc Announcement
Priority for trafc information.
TMC - Trafc Message Channel
Special service provided by a number of radio
stations. TMC delivers trafc messages in digital
form. This information is used by the radio navigation system for dynamic route calculation.
TP - Trafc Program
TP in the display indicates that you have tuned
into a radio station that provides trafc information.
Page 65

64
RADIO NAVIGATION SYSTEM
NOTES
Johannesburg
Sao Paulo
Dakar
London
Rome
Moscow
Tehran
Bangkok
Tokyo
Hong Kong
Singapore
Jakarta
Sydney
Perth
Auckland
Mogadishu
Bombay
Montreal
Washington D.C.
Chicago
Honolulu
Mexico City
Los Angeles
Anchorage
Caracas
Buenos Aires
Khartoum
Beijing
Cairo
Rayadh
0:00
12
3:0094:0085:0076:0067:0058:0049:00310:00211:00
1
2:00
10
1:00
11
12:00013:00114:00215:00316:00417:00518:00619:00720:00821:00922:001023:001124:00
12
Page 66

65
RADIO NAVIGATION SYSTEM
NOTES
Page 67

66
RADIO NAVIGATION SYSTEM
NOTES
Page 68

Notes
Please make sure to remove the
“Equipment card” and keep it in
a safe place. Never leave it in
the vehicle!
If you should lose the “Equipment
card” with the code number,
please contact a Škoda service
centre. They will be able to help
you free of charge
.
Radio Passport
Radio Navigation System MCD
Radio
name
Serial
number
Code
number
Please apply the stickers for the serial and code
numbers.
Page 69

Please make sure to remove the “Equipment
card” and keep it in a safe place. Never leave
it in the vehicle!
If you should lose the “Equipment card” with
the code number, please contact a Škoda
service centre. They will be able to help you
free of charge.
Page 70

Škoda Auto is constantly working on the further development of all types and models. Please understand that, for this reason, changes to the scope of supply in terms of shape, equipment and engineering may be introduced at any time. It is therefore not possible
to derive any claims from the information, illustrations and descriptions contained in this Owner ´s Manual .
Reprinting, reproduction, translation or any other use of this document, in whole or in parts, is not permitted without the written
consent of Škoda Auto.
Škoda Auto expressly reserves all rights in respect of copyright.
Subject to modification.
Published by
ŠKODA AUTO a.s.
© ŠKODA AUTO a.s. 2003
` This paper was manufactured from pulp bleached without using chlorine.
Page 71

www.skoda-auto.com Radionavigační systém
Škoda Auto anglicky 08.03
S00.5610.21.20
3U0 012 151 AK
Mala_navigace_anglicky.indd 30.6.2003, 13:461
 Loading...