

SKODA Fabia II 2007, Fabia II 2009, Fabia II 2011, Rapid 2011, Rapid NH 2013 Workshop Manual
...Page 1

Service
Workshop Manual
Fabia II 2007 ➤ , Fabia II 2009 ➤ ,
F
Rapid NH 2013 ➤ , Rapid NH 2014 ➤ ,
Roomster 2006 ➤
abia II 2011 ➤ , Rapid 2011 ➤ ,
Gearbox 02T
Edition 05.2014
Service Department. Technical Information
Page 2

Service
List of Workshop Manual Repair GroupsList of Workshop Manual
Repair GroupsList of Workshop Manual Repair Groups
R
ep ai r Gr ou p
00 - Technical data
30 - Clutch
34 - Controls, housing
35 - Gears, shafts
39 - Final drive - differential
Page 3

Fabia II 2007 ➤ , Fabia II 2009 ➤ , Fabia II 2011 ➤ , Rapid 2011 ➤ , R ...
Gearbox 02T - Edition 05.2014
Contents
00 - Technical data . . . . . . . . . . . . . . . . . . . . . . . . . . . . . . . . . . . . . . . . . . . . . . . . . . . . 1
1 Identification of the gearbox . . . . . . . . . . . . . . . . . . . . . . . . . . . . . . . . . . . . . . . . . . . . . . . . 1
1.1 Identification characters, aggregate assignment, ratios, filling capacities (Fabia II) . . . . . . 1
1.2 Identification characters, aggregate assignment, ratios, filling capacities (Roomster) . . . . 6
1.3 Identification characters, aggregate assignment, ratios, filling capacities (Rapid) . . . . . . . . 10
1.4 Identification characters, aggregate assignment, ratios, filling capacities (Rapid NH) . . . . 11
2 Overview of Transmission System . . . . . . . . . . . . . . . . . . . . . . . . . . . . . . . . . . . . . . . . . . . . 13
2.1 Designation of components and transmission ratio . . . . . . . . . . . . . . . . . . . . . . . . . . . . . . 13
3 General repair instructions . . . . . . . . . . . . . . . . . . . . . . . . . . . . . . . . . . . . . . . . . . . . . . . . . . 14
30 - Clutch . . . . . . . . . . . . . . . . . . . . . . . . . . . . . . . . . . . . . . . . . . . . . . . . . . . . . . . . . . 18
1 Clutch control . . . . . . . . . . . . . . . . . . . . . . . . . . . . . . . . . . . . . . . . . . . . . . . . . . . . . . . . . . . . 18
1.1 Summary of components - foot controls (Fabia II 2007 ►; Roomster 2006 ►) . . . . . . . . . . 19
1.2 Removing and installing, setting angular clutch pedal switch F36 , (Fabia II 2007 ►; Roomster
2006 ►) . . . . . . . . . . . . . . . . . . . . . . . . . . . . . . . . . . . . . . . . . . . . . . . . . . . . . . . . . . . . . . . . 20
1.3 Removing and installing, setting cylindrical clutch pedal switch F36 , (Fabia II 2007 ►;
Roomster 2006 ►) . . . . . . . . . . . . . . . . . . . . . . . . . . . . . . . . . . . . . . . . . . . . . . . . . . . . . . . . 21
1.4 Removing and installing the crash strut for the clutch pedal (Fabia II 2007 ►; Roomster 2006
►) . . . . . . . . . . . . . . . . . . . . . . . . . . . . . . . . . . . . . . . . . . . . . . . . . . . . . . . . . . . . . . . . . . . . 22
1.5 Removing and installing the over-centre helper spring (Fabia II 2007 ►; Roomster 2006 ►)
. . . . . . . . . . . . . . . . . . . . . . . . . . . . . . . . . . . . . . . . . . . . . . . . . . . . . . . . . . . . . . . . . . . . . . . . 24
1.6 Removing and installing the clutch pedal (Fabia II 2007 ►; Roomster 2006 ►) . . . . . . . . . . 27
1.7 Summary of components - foot controls (Fabia II 2011 ►; Roomster 2011 ►; Rapid NH 2013
►) . . . . . . . . . . . . . . . . . . . . . . . . . . . . . . . . . . . . . . . . . . . . . . . . . . . . . . . . . . . . . . . . . . . . 29
1.8 Summary of components - Foot controls (Rapid) . . . . . . . . . . . . . . . . . . . . . . . . . . . . . . . . 36
1.9 Removing and installing the bracket with the master cylinder (Fabia II 2011 ►; Roomster 2011
►; Rapid NH 2013 ►) . . . . . . . . . . . . . . . . . . . . . . . . . . . . . . . . . . . . . . . . . . . . . . . . . . . . . . 38
1.10 Removing and installing the bracket with the master cylinder (Rapid 2011 ►) . . . . . . . . . . 41
1.11 Removing and installing the bracket without the master cylinder (Fabia II 2011 ►; Roomster
2011 ►; Rapid NH 2013 ►) . . . . . . . . . . . . . . . . . . . . . . . . . . . . . . . . . . . . . . . . . . . . . . . . . . 43
1.12 Removing and installing the bracket without the master cylinder (Rapid 2011 ►) . . . . . . . . 44
1.13 Removing and installing the clutch pedal with the over-centre helper spring (Fabia II 2011 ►;
Roomster 2011 ►) . . . . . . . . . . . . . . . . . . . . . . . . . . . . . . . . . . . . . . . . . . . . . . . . . . . . . . . . 46
1.14 Removing and installing the clutch pedal with the over-centre helper spring (Rapid) . . . . 48
1.15 Removing and installing the clutch pedal with the tension spring (Fabia II 2011 ►; Roomster
2011 ►; Rapid NH 2013 ►) . . . . . . . . . . . . . . . . . . . . . . . . . . . . . . . . . . . . . . . . . . . . . . . . . . 49
1.16 Summary of components - Hydraulic (Fabia II ►; Roomster ►; Rapid NH) . . . . . . . . . . . . 51
1.17 Summary of components - Hydraulic (Rapid 2011 ►) . . . . . . . . . . . . . . . . . . . . . . . . . . . . 54
1.18 Check hydraulic clutch control . . . . . . . . . . . . . . . . . . . . . . . . . . . . . . . . . . . . . . . . . . . . . . 57
1.19 Removing and installing the master cylinder (Fabia II 2007 ►; Roomster 2006 ►) . . . . . . 58
1.20 Removing and installing the master cylinder (Fabia II 2011 ►; Roomster 2011 ►; Rapid NH
2013 ►) . . . . . . . . . . . . . . . . . . . . . . . . . . . . . . . . . . . . . . . . . . . . . . . . . . . . . . . . . . . . . . . . 61
1.21 Removing and installing the slave cylinder . . . . . . . . . . . . . . . . . . . . . . . . . . . . . . . . . . . . 61
1.22 Bleeding the clutch control . . . . . . . . . . . . . . . . . . . . . . . . . . . . . . . . . . . . . . . . . . . . . . . . . . 65
2 Repairing the clutch release mechanism . . . . . . . . . . . . . . . . . . . . . . . . . . . . . . . . . . . . . . 66
3 Repairing clutch . . . . . . . . . . . . . . . . . . . . . . . . . . . . . . . . . . . . . . . . . . . . . . . . . . . . . . . . . . 68
3.1 Fault finding power transmission - problems with the clutch and clutch control . . . . . . . . . . 70
34 - Controls, housing . . . . . . . . . . . . . . . . . . . . . . . . . . . . . . . . . . . . . . . . . . . . . . . . . . 76
1 Shift mechanism . . . . . . . . . . . . . . . . . . . . . . . . . . . . . . . . . . . . . . . . . . . . . . . . . . . . . . . . . . 76
1.1 Installation position - selector mechanism . . . . . . . . . . . . . . . . . . . . . . . . . . . . . . . . . . . . . . 76
1.2 Summary of components - Gearshift mechanism . . . . . . . . . . . . . . . . . . . . . . . . . . . . . . . . 78
1.3 Summary of components - Gearshift knob with shift lever collar . . . . . . . . . . . . . . . . . . . . 79
1.4 Removing and installing gearshift knob and shift lever collar (Fabia II, Roomster) . . . . . . 79
Contents i
Page 4

Fabia II 2007 ➤ , Fabia II 2009 ➤ , Fabia II 2011 ➤ , Rapid 2011 ➤ , R ...
Gearbox 02T - Edition 05.2014
1.5 Remove and install gearshift knob and shift lever collar (Rapid) . . . . . . . . . . . . . . . . . . . . 80
1.6 Remove and install gearshift knob and shift lever collar (Rapid NH) . . . . . . . . . . . . . . . . . . 81
1.7 Summary of components - Shift lever and shift housing . . . . . . . . . . . . . . . . . . . . . . . . . . 82
1.8 Summary of components - Control cables . . . . . . . . . . . . . . . . . . . . . . . . . . . . . . . . . . . . . . 84
1.9 Plastic relay lever as of 06.07 (Fabia II, Roomster, Rapid NH) . . . . . . . . . . . . . . . . . . . . . . 87
1.10 Remove and install shift mechanism (Fabia II, Roomster, Rapid NH) . . . . . . . . . . . . . . . . 89
1.11 Removing and installing shift mechanism (Rapid) . . . . . . . . . . . . . . . . . . . . . . . . . . . . . . . . 94
1.12 Setting the shift mechanism . . . . . . . . . . . . . . . . . . . . . . . . . . . . . . . . . . . . . . . . . . . . . . . . 96
2 Removing and installing the gearbox . . . . . . . . . . . . . . . . . . . . . . . . . . . . . . . . . . . . . . . . . . 99
2.1 Removing the gearbox . . . . . . . . . . . . . . . . . . . . . . . . . . . . . . . . . . . . . . . . . . . . . . . . . . . . 99
2.2 Installing the gearbox . . . . . . . . . . . . . . . . . . . . . . . . . . . . . . . . . . . . . . . . . . . . . . . . . . . . . . 108
3 Inspect the gear oil level in the gearbox . . . . . . . . . . . . . . . . . . . . . . . . . . . . . . . . . . . . . . . . 112
4 Disassembling and assembling the gearbox . . . . . . . . . . . . . . . . . . . . . . . . . . . . . . . . . . . . 113
4.1 Gearbox - Summary of components . . . . . . . . . . . . . . . . . . . . . . . . . . . . . . . . . . . . . . . . . . 113
4.2 Summary of components . . . . . . . . . . . . . . . . . . . . . . . . . . . . . . . . . . . . . . . . . . . . . . . . . . 114
4.3 Removing and installing gearbox housing cover and 5th gear . . . . . . . . . . . . . . . . . . . . . . 115
4.4 Detaching and attaching clutch housing . . . . . . . . . . . . . . . . . . . . . . . . . . . . . . . . . . . . . . . . 116
4.5 Removing and installing the drive shaft, output shaft, differential gear, shift mechanism and
gearshift forks . . . . . . . . . . . . . . . . . . . . . . . . . . . . . . . . . . . . . . . . . . . . . . . . . . . . . . . . . . . . 117
4.6 Mounting sequence . . . . . . . . . . . . . . . . . . . . . . . . . . . . . . . . . . . . . . . . . . . . . . . . . . . . . . 118
5 Repairing gearbox housing and clutch housing . . . . . . . . . . . . . . . . . . . . . . . . . . . . . . . . . . 126
6 Repairing shift mechanism . . . . . . . . . . . . . . . . . . . . . . . . . . . . . . . . . . . . . . . . . . . . . . . . . . 130
7 Disassembling and assembling the gearshift forks . . . . . . . . . . . . . . . . . . . . . . . . . . . . . . 132
35 - Gears, shafts . . . . . . . . . . . . . . . . . . . . . . . . . . . . . . . . . . . . . . . . . . . . . . . . . . . . 135
1 Drive shaft . . . . . . . . . . . . . . . . . . . . . . . . . . . . . . . . . . . . . . . . . . . . . . . . . . . . . . . . . . . . . . 135
1.1 Disassembling and assembling the drive shaft . . . . . . . . . . . . . . . . . . . . . . . . . . . . . . . . . . 135
2 Output shaft . . . . . . . . . . . . . . . . . . . . . . . . . . . . . . . . . . . . . . . . . . . . . . . . . . . . . . . . . . . . 144
2.1 Disassembling and assembling the output shaft . . . . . . . . . . . . . . . . . . . . . . . . . . . . . . . . 144
39 - Final drive - differential . . . . . . . . . . . . . . . . . . . . . . . . . . . . . . . . . . . . . . . . . . . . . . 151
1 Replacing the flange shaft gasket rings (gearbox assembled) . . . . . . . . . . . . . . . . . . . . . . 151
1.1 Removing . . . . . . . . . . . . . . . . . . . . . . . . . . . . . . . . . . . . . . . . . . . . . . . . . . . . . . . . . . . . . . 151
1.2 Install . . . . . . . . . . . . . . . . . . . . . . . . . . . . . . . . . . . . . . . . . . . . . . . . . . . . . . . . . . . . . . . . . . 152
2 Differential gear . . . . . . . . . . . . . . . . . . . . . . . . . . . . . . . . . . . . . . . . . . . . . . . . . . . . . . . . . . 154
2.1 Disassembling and assembling differential gear . . . . . . . . . . . . . . . . . . . . . . . . . . . . . . . . 154
2.2 Adjusting the differential gear . . . . . . . . . . . . . . . . . . . . . . . . . . . . . . . . . . . . . . . . . . . . . . . . 159
ii Contents
Page 5

Fabia II 2007 ➤ , Fabia II 2009 ➤ , Fabia II 2011 ➤ , Rapid 2011 ➤ , R ...
00 – Technical data
1 Identification of the gearbox
(SRL000700; Edition 05.2014)
Assignment Fabia II ⇒ page 1 .
Assignment Roomster ⇒ page 6 .
Assignment Rapid ⇒ page 10 .
Assignment Rapid NH ⇒ page 11 .
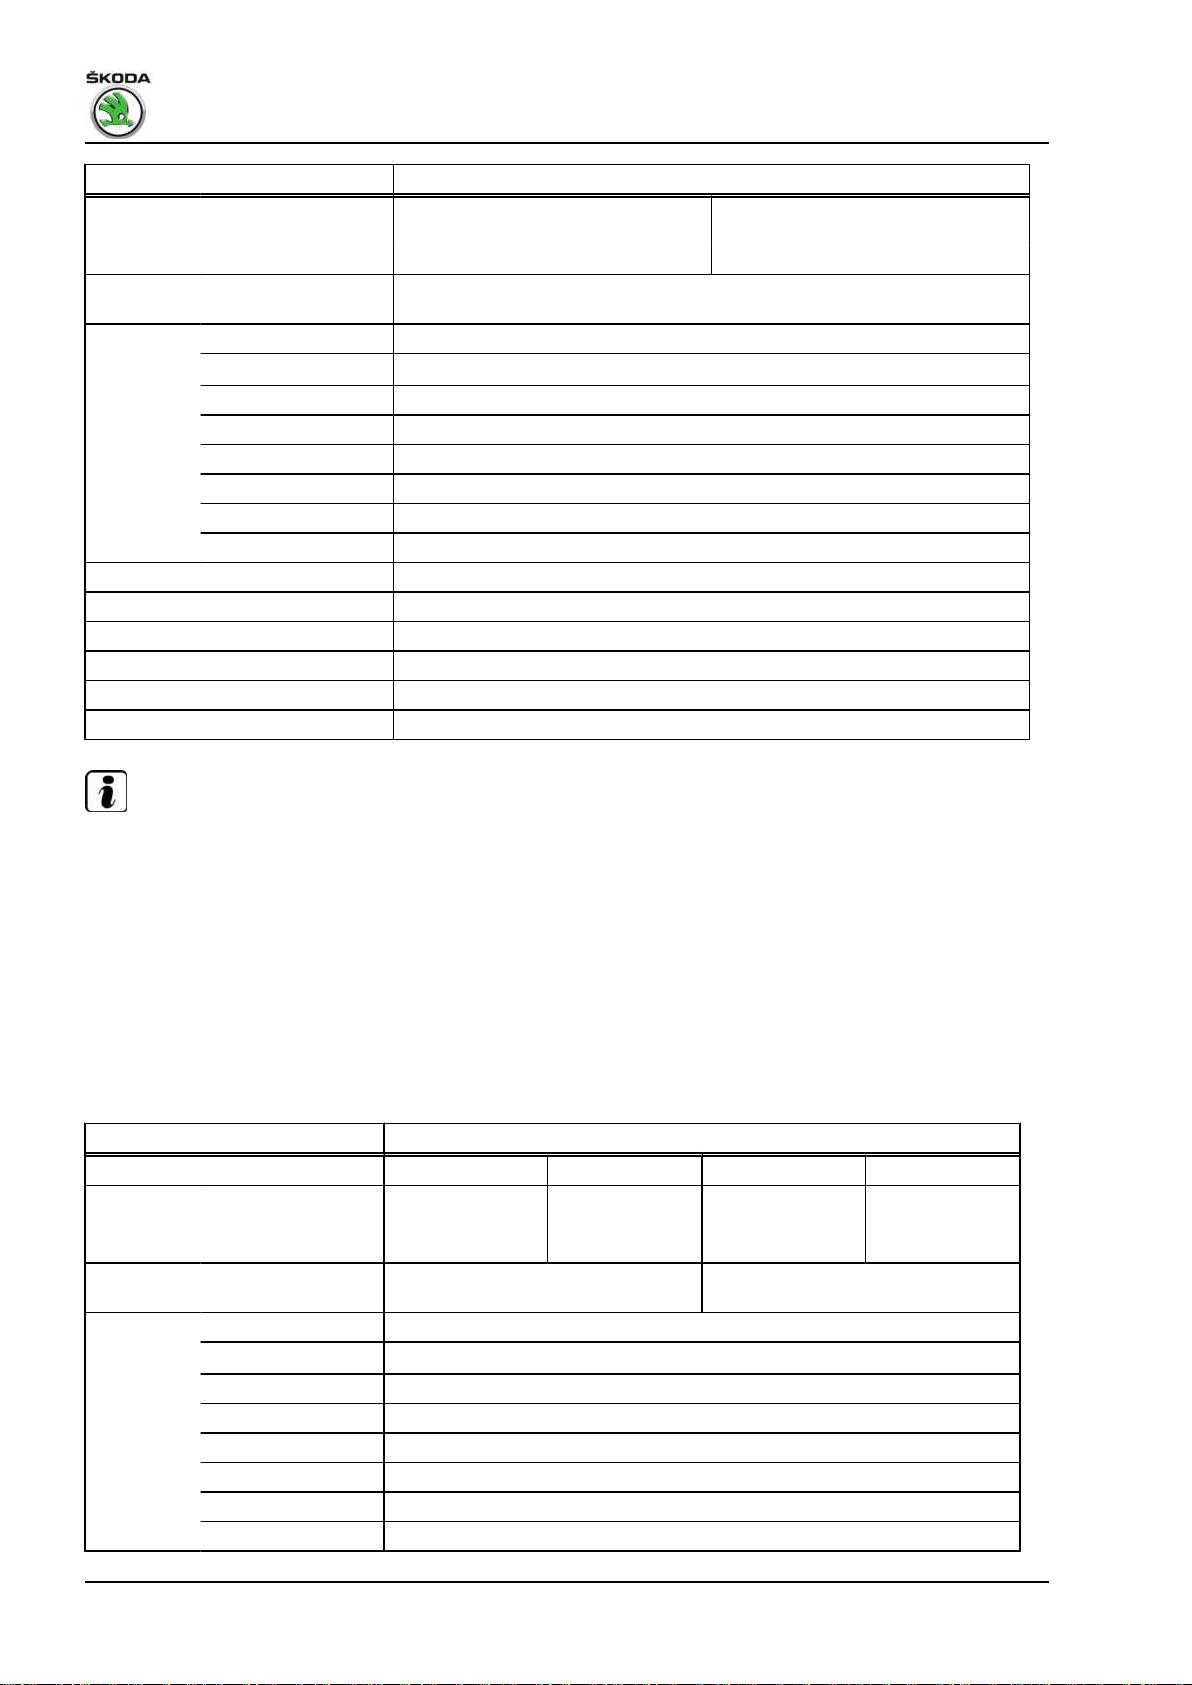
Location on the gearbox
Identification characters and production date -arrow 1-.
Identification of materials for the gearbox housing -arrow 2-.
Gearbox 02T - Edition 05.2014
Identification characters and production date of the gearbox
Example: JHN 17 11 6
Additional data depend on the manufacturing.
Note
I I I I
Identifica‐
tion charac‐
ters
Day Month Manufac‐
turing year
(2006)
The gearbox identification characters also appear on the vehicle
data stickers.
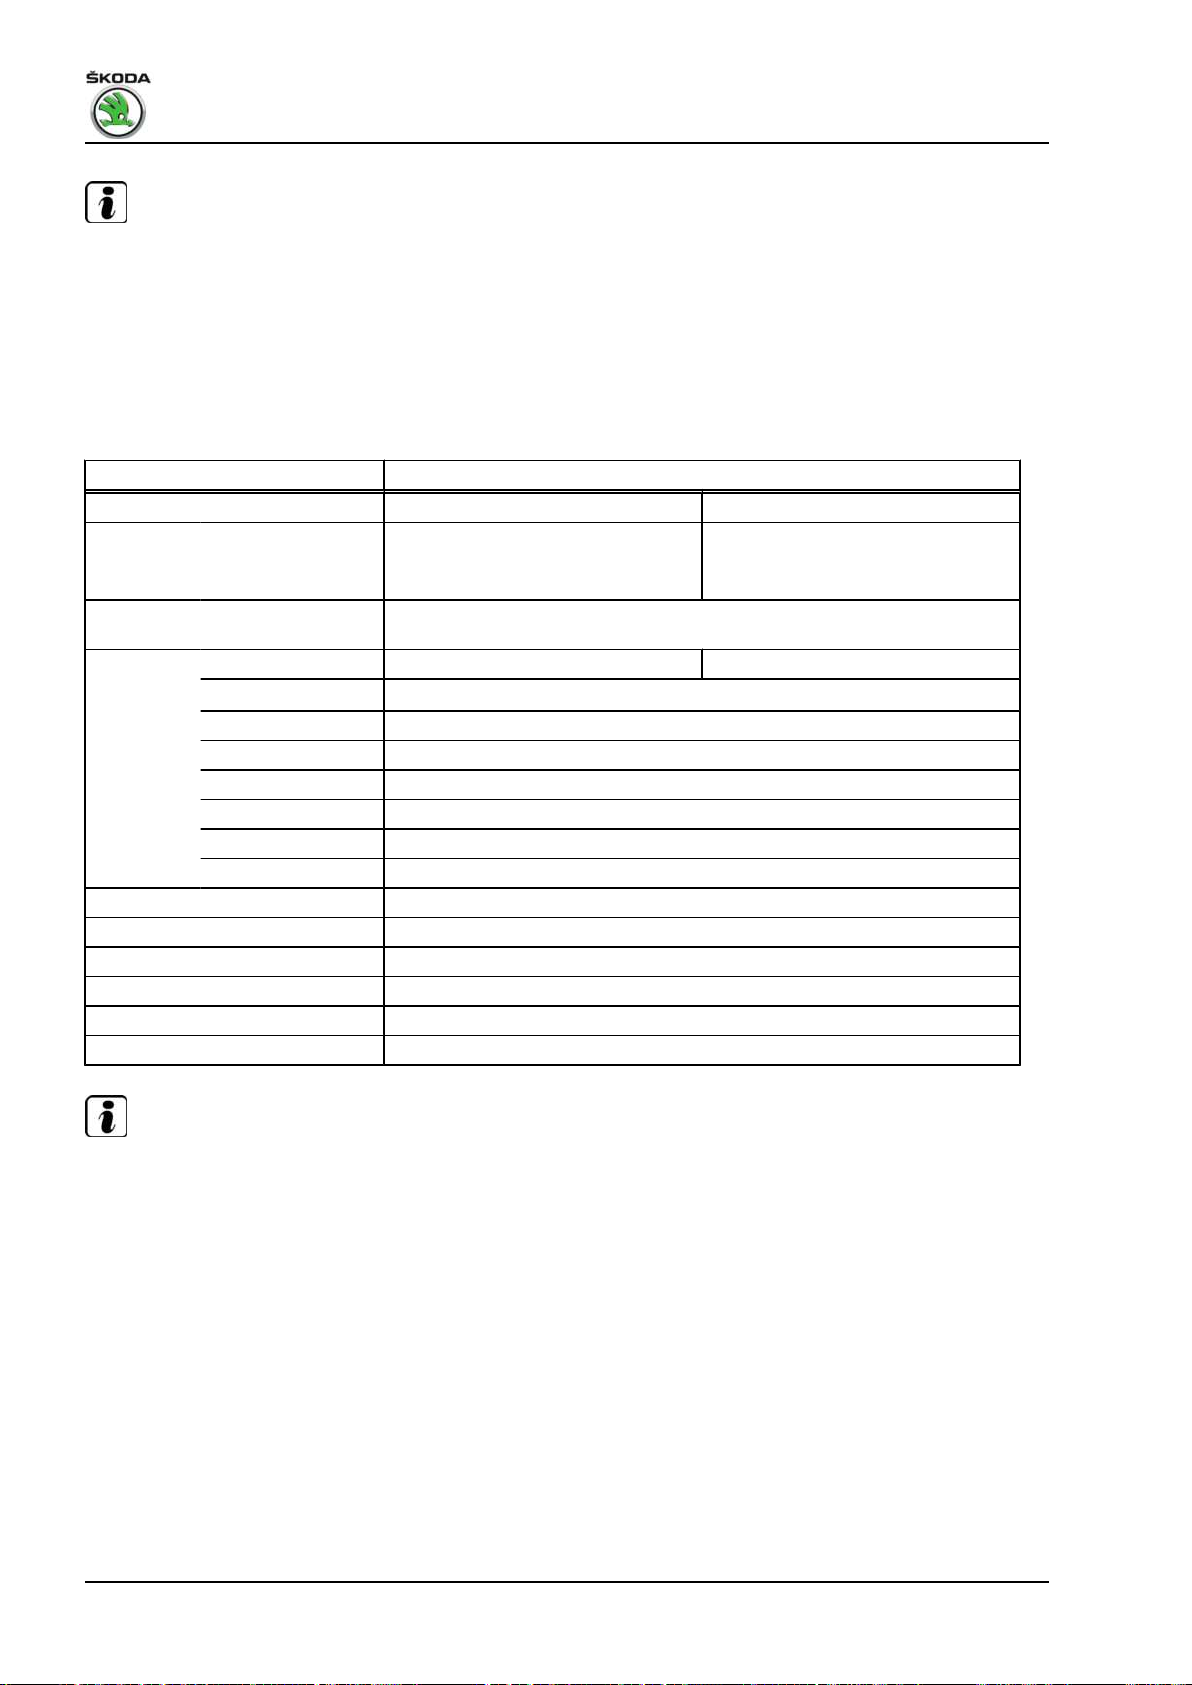
Identification of materials for the gearbox housing
There is lettering on aluminium gearboxes -arrow- -GD TL 023-,
or -AlSi9Cu3- or -AlSi6Cu4-.
One can also use the gearbox identification characters to deter‐
mine whether it is an aluminium or a magnesium gearbox.
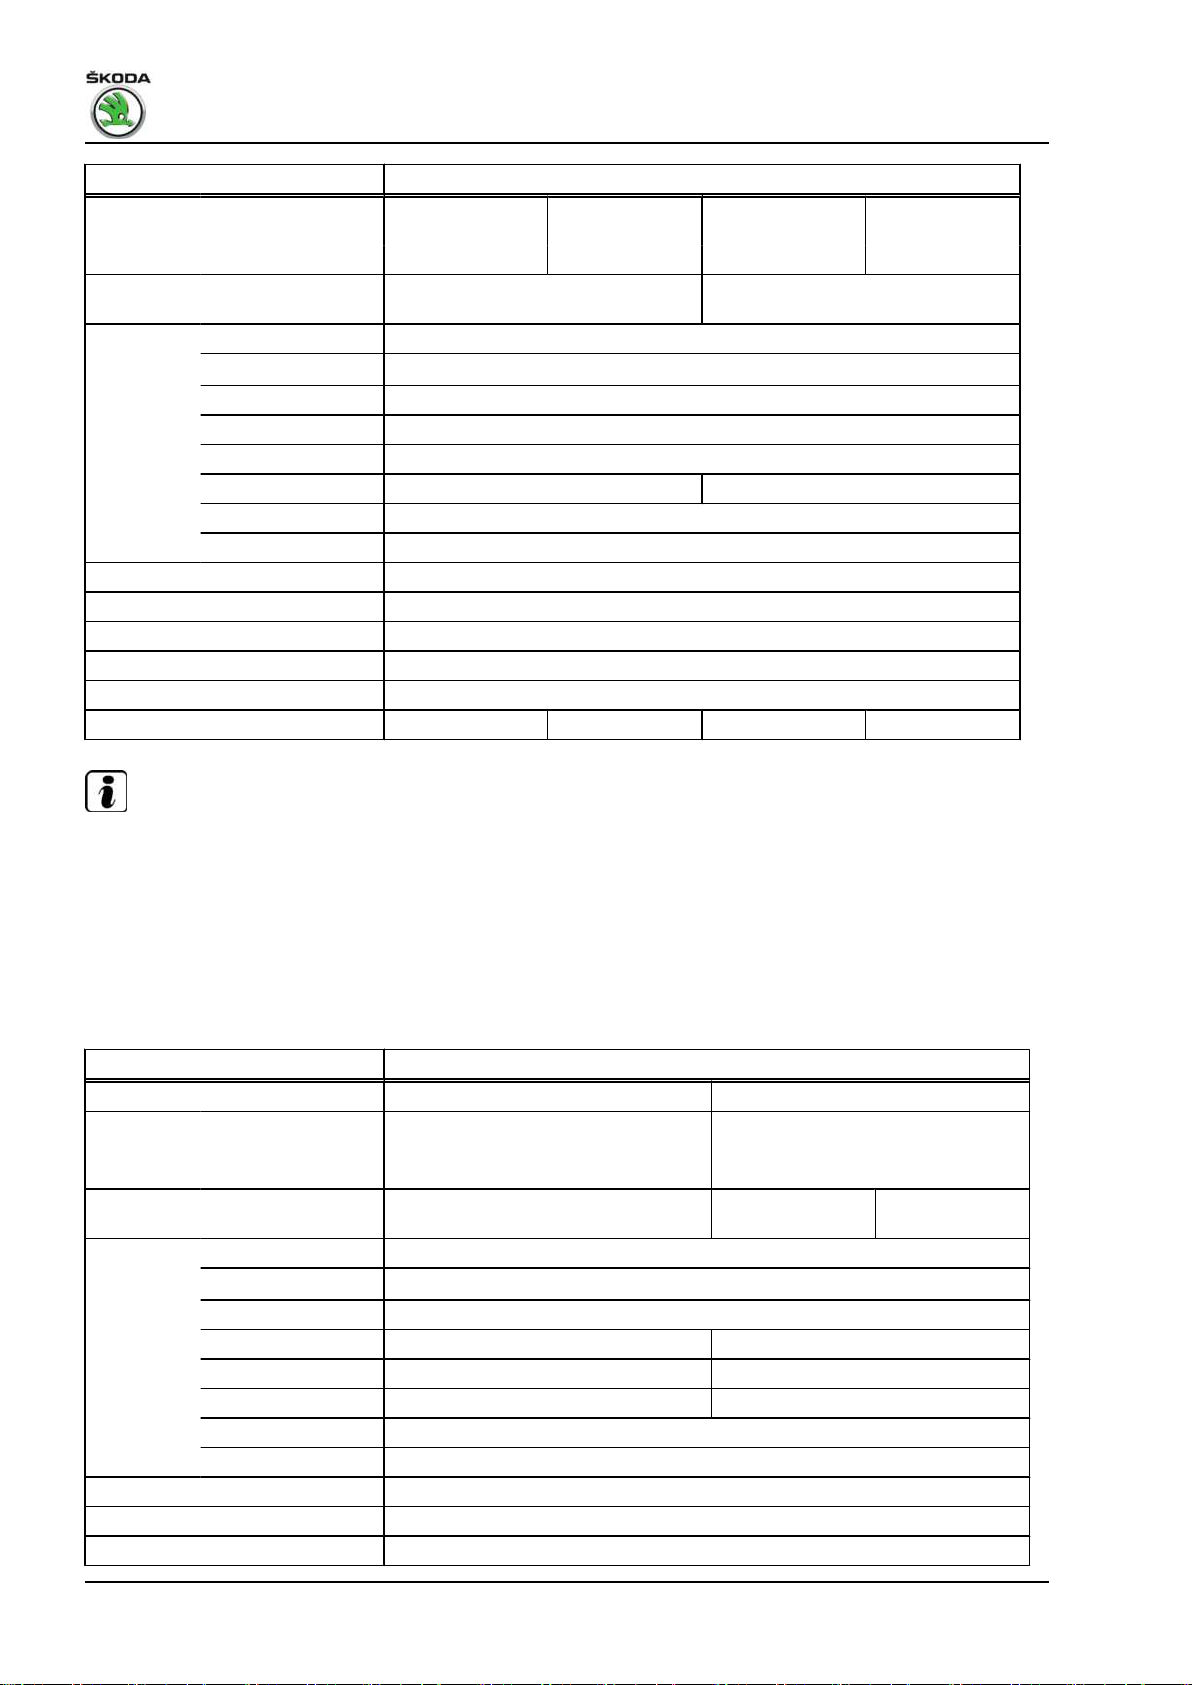
1.1 Identification characters, aggregate assignment, ratios, filling capacities (Fabia II)
Manual gearbox 5 speed 02T
Identification characters JHN LVC JUS LVG
1. Identification of the gearbox 1
Page 6
Fabia II 2007 ➤ , Fabia II 2009 ➤ , Fabia II 2011 ➤ , Rapid 2011 ➤ , R ...
Gearbox 02T - Edition 05.2014
Manual gearbox 5 speed 02T
Manufac‐
tured
Assign‐
ment:
Ratio: Final drive 67 : 16 = 4.188
Z2:Z
1
Filling capacity 2.0 litre
Specification ⇒ Electronic Catalogue of Original Parts
Gear oil change interval Filled for life
Clutch control hydraulic
Clutch disc ∅ ⇒ Electronic Catalogue of Original Parts
Drive shaft flange ∅ 90 mm 100 mm 90 mm 100 mm
Reverse gear 35 : 24 x 24 : 11 = 3.182
Speedometer electronic
from 12.06 06.09 01.07 06.09
to 05.09 03.10 05.09 03.10
Engine 1.2 ltr./44 kW 1.2 ltr./51 kW
1. gear 49 : 13 = 3.769
2. gear 44 : 21 = 2.095
3. gear 43 : 31 = 1.387
4. gear 40 : 39 = 1.026
5. gear 39 : 48 = 0.813 40 : 47 = 0.851
Note
♦
Vehicles with ABS do not have the sender for speedometer G22- .
♦
On gearboxes as of production date 06.09, the springs of the
sliding sleeve with synchronizer body for 3rd, 4th and 5th gear
are changed (the springs are longer), at the same time the
synchronizer ring for 3rd and 4th gear is changed as of this
date ⇒ Electronic Catalogue of Original Parts .
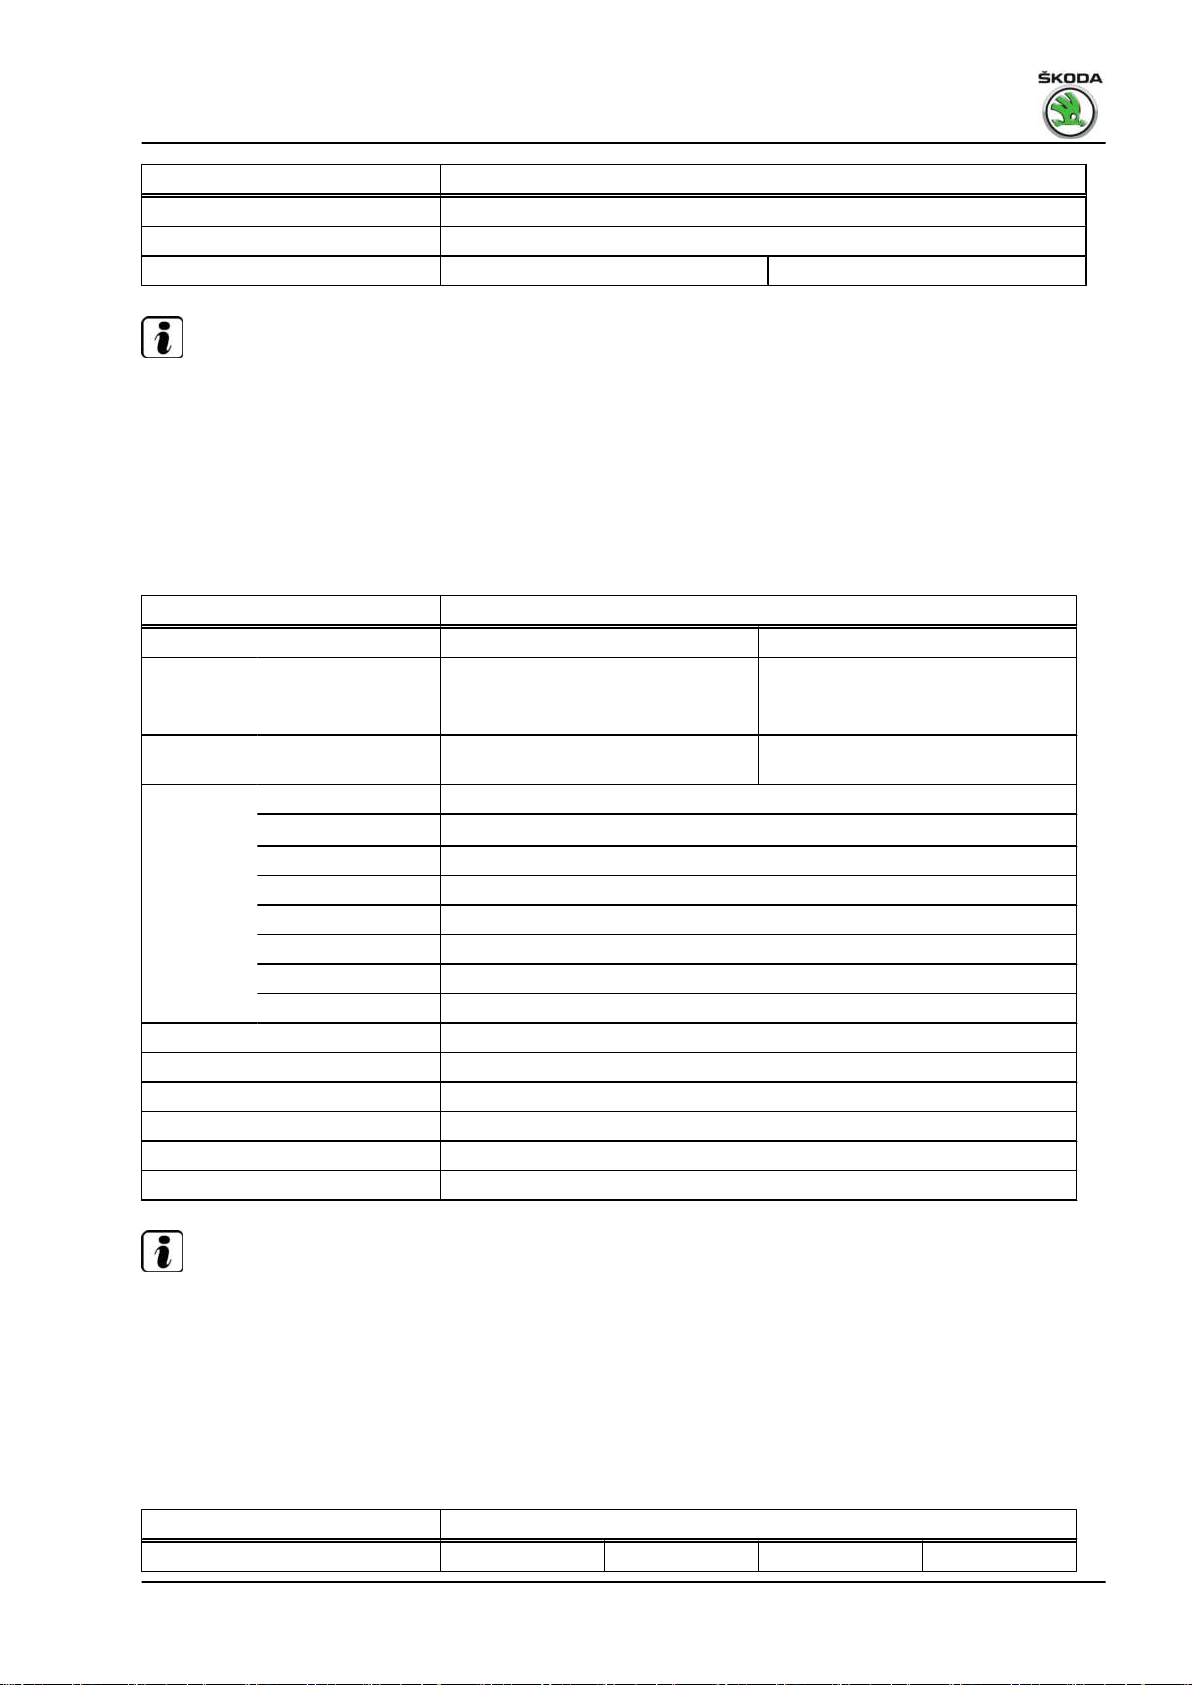
Manual gearbox 5 speed 02T
Identification characters LVC LNR
Manufac‐
tured
Assign‐
ment:
Ratio: Final drive 67 : 16 = 4.188
Z2:Z
1
Filling capacity 2.0 litre
Specification ⇒ Electronic Catalogue of Original Parts
Gear oil change interval Filled for life
Reverse gear 35 : 24 x 24 : 11 = 3.182
Speedometer electronic
from 09.10 03.10
to
Engine 1.2 ltr./55 kW 1.2 ltr./44 kW 1.2 ltr./51 kW
1. gear 49 : 13 = 3.769
2. gear 44 : 21 = 2.095
3. gear 43 : 31 = 1.387 41 : 32 = 1.281
4. gear 40 : 39 = 1.026 38 : 41 = 0.927
5. gear 39 : 48 = 0.813 37 : 50 = 0.74
2 Rep. gr.00 - Technical data
Page 7
Fabia II 2007 ➤ , Fabia II 2009 ➤ , Fabia II 2011 ➤ , Rapid 2011 ➤ , R ...
Gearbox 02T - Edition 05.2014
Manual gearbox 5 speed 02T
Clutch control hydraulic
Clutch disc ∅ ⇒ Electronic Catalogue of Original Parts
Drive shaft flange ∅ 100 mm 90 mm
Note
♦
Vehicles with ABS do not have the sender for speedometer G22- .
♦
On gearboxes as of production date 06.09, the springs of the
sliding sleeve with synchronizer body for 3rd, 4th and 5th gear
are changed (the springs are longer), at the same time the
synchronizer ring for 3rd and 4th gear is changed as of this
date ⇒ Electronic Catalogue of Original Parts .
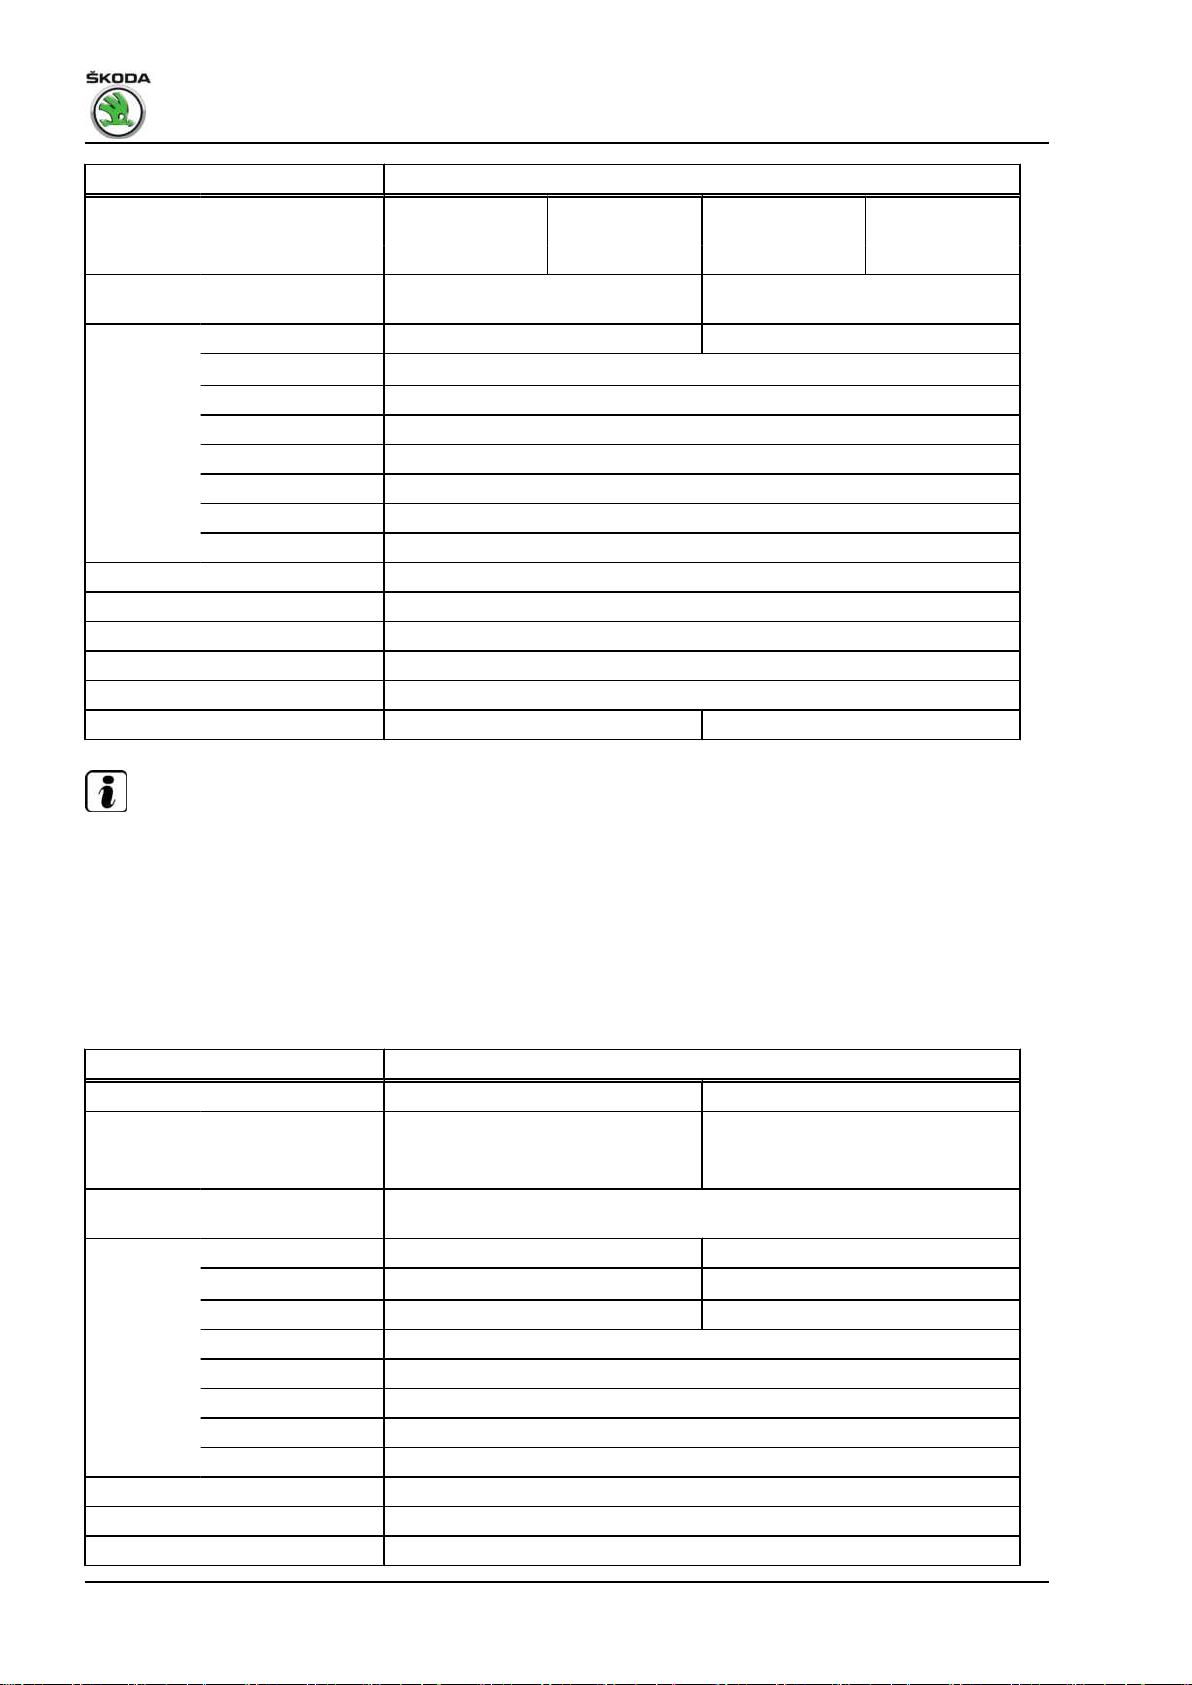
Manual gearbox 5 speed 02T
Identification characters MFX LMG
Manufac‐
tured
Assign‐
ment:
Ratio: Final drive 58 : 16 = 3.625
Z2:Z
1
Filling capacity 2.0 litre
Specification ⇒ Electronic Catalogue of Original Parts
Gear oil change interval Filled for life
Clutch control hydraulic
Clutch disc ∅ ⇒ Electronic Catalogue of Original Parts
Drive shaft flange ∅ 100 mm
Reverse gear 35 : 24 x 24 : 11 = 3.182
Speedometer electronic
from 03.10 03.10
to
Engine 1.2 ltr./63 kW TFSI 1.2 ltr./77 kW TFSI
1. gear 49 : 13 = 3.769
2. gear 43 : 22 = 1.955
3. gear 41 : 32 = 1.281
4. gear 38 : 41 = 0.927
5. gear 37 : 50 = 0.74
Note
♦
Vehicles with ABS do not have the sender for speedometer G22- .
♦
On gearboxes as of production date 06.09, the springs of the
sliding sleeve with synchronizer body for 3rd, 4th and 5th gear
are changed (the springs are longer), at the same time the
synchronizer ring for 3rd and 4th gear is changed as of this
date ⇒ Electronic Catalogue of Original Parts .
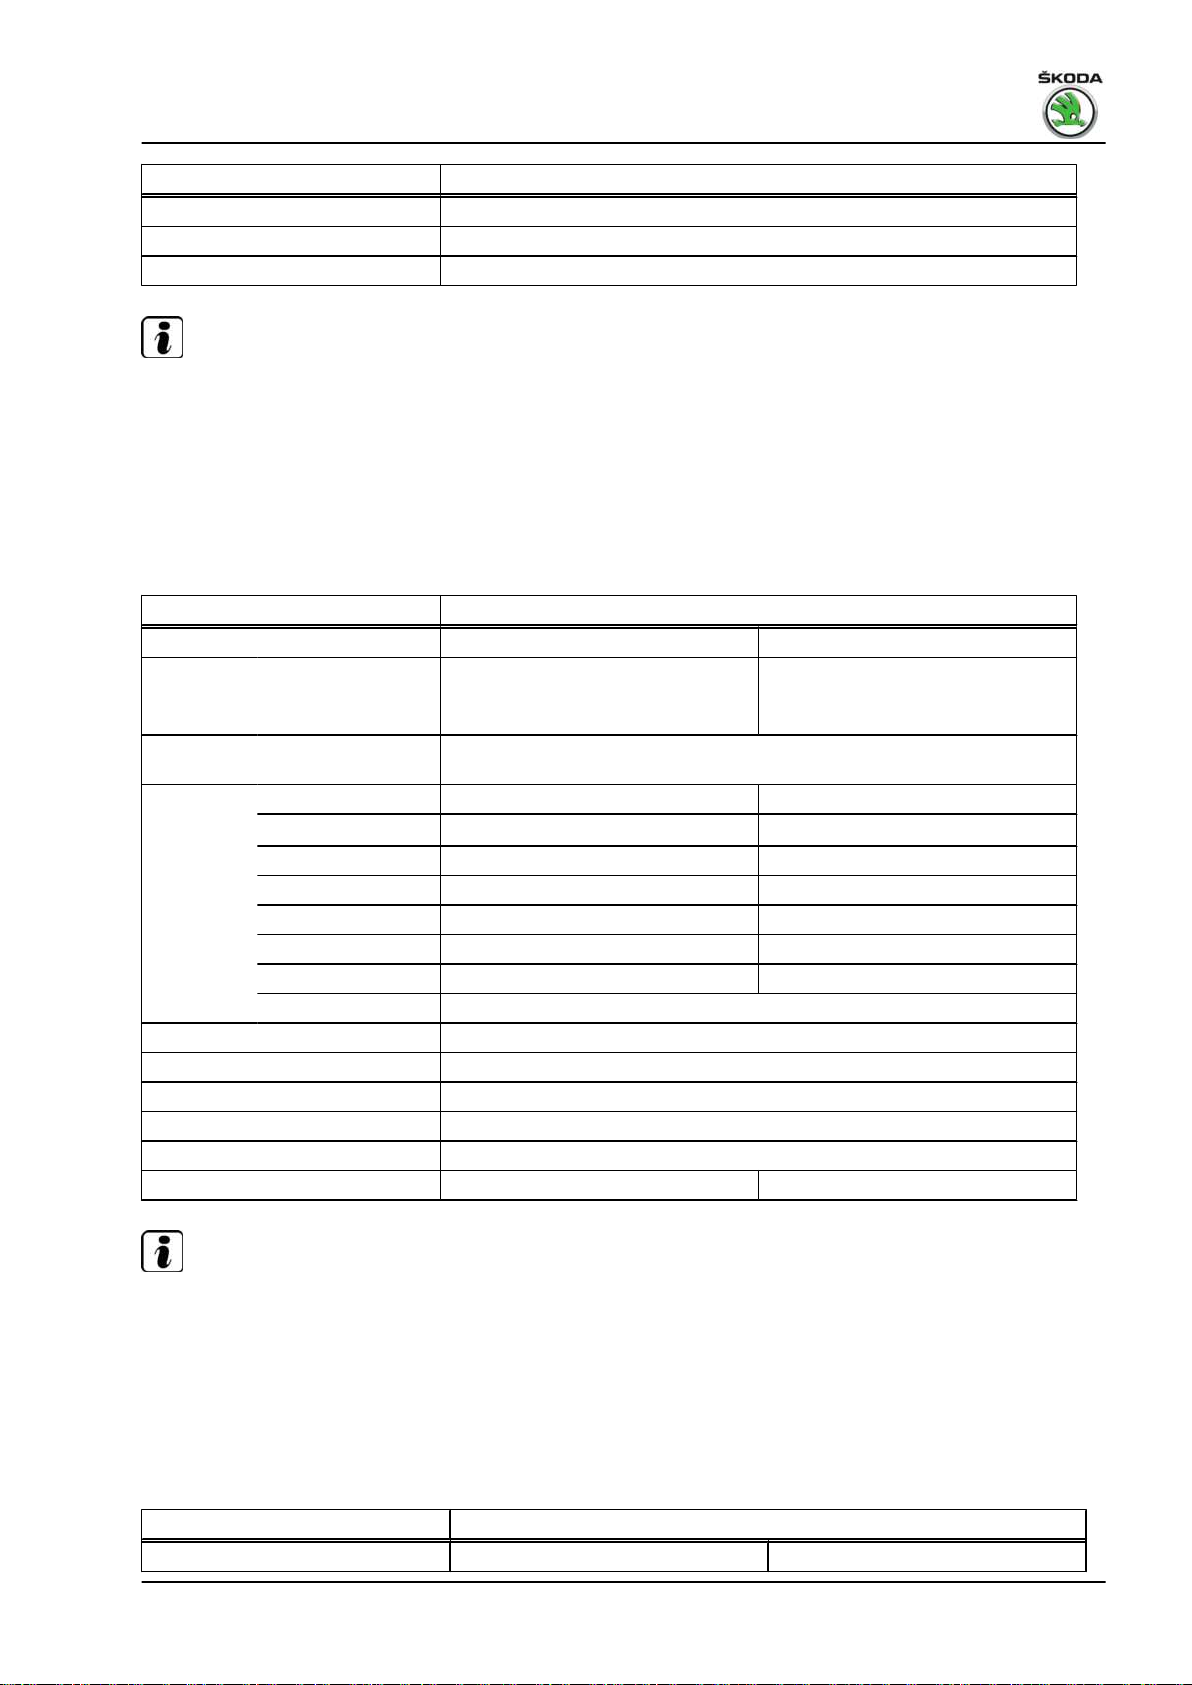
Manual gearbox 5 speed 02T
Identification characters JHQ LVE JHL LVA
1. Identification of the gearbox 3
Page 8
Fabia II 2007 ➤ , Fabia II 2009 ➤ , Fabia II 2011 ➤ , Rapid 2011 ➤ , R ...
Gearbox 02T - Edition 05.2014
Manual gearbox 5 speed 02T
Manufac‐
tured
Assign‐
ment:
Ratio: Final drive 66 : 17 = 3.882 59 : 15 = 3.933
Z2:Z
1
Filling capacity 2.0 litre
Specification ⇒ Electronic Catalogue of Original Parts
Gear oil change interval Filled for life
Clutch control hydraulic
Clutch disc ∅ ⇒ Electronic Catalogue of Original Parts
Drive shaft flange ∅ 90 mm 100 mm
Reverse gear 35 : 24 x 24 : 11 = 3.182
Speedometer electronic
from 02.07 06.09 04.07 06.09
to 05.09
Engine 1.4 ltr./63 kW 1.6 ltr./77 kW
1. gear 49 : 13 = 3.769
2. gear 44 : 21 = 2.095
3. gear 43 : 31 = 1.387
4. gear 40 : 39 = 1.026
5. gear 39 : 48 = 0.813
05.09 05.10
Note
♦
Vehicles with ABS do not have the sender for speedometer G22- .
♦
On gearboxes as of production date 06.09, the springs of the
sliding sleeve with synchronizer body for 3rd, 4th and 5th gear
are changed (the springs are longer), at the same time the
synchronizer ring for 3rd and 4th gear is changed as of this
date ⇒ Electronic Catalogue of Original Parts .
Manual gearbox 5 speed 02T
Identification characters MAB LNJ
Manufac‐
tured
Assign‐
ment:
Ratio: Final drive 68 : 15 = 4.533 59 : 15 = 3.933
Z2:Z
1
Filling capacity 2.0 litre
Specification ⇒ Electronic Catalogue of Original Parts
Gear oil change interval Filled for life
Reverse gear 35 : 24 x 24 : 11 = 3.182
Speedometer electronic
from 06.10 09.10
to 01.12 01.11
Engine 1.6 ltr./77 kW
1. gear 38 : 11 = 3.455 49 : 13 = 3.769
2. gear 43 : 22 = 1.955 44 : 21 = 2.095
3. gear 41 : 32 = 1.281
4. gear 37 : 42 = 0.881
5. gear 35 : 52 = 0.673
4 Rep. gr.00 - Technical data
Page 9
Fabia II 2007 ➤ , Fabia II 2009 ➤ , Fabia II 2011 ➤ , Rapid 2011 ➤ , R ...
Gearbox 02T - Edition 05.2014
Manual gearbox 5 speed 02T
Clutch control hydraulic
Clutch disc ∅ ⇒ Electronic Catalogue of Original Parts
Drive shaft flange ∅ 100 mm
Note
♦
Vehicles with ABS do not have the sender for speedometer G22- .
♦
On gearboxes as of production date 06.09, the springs of the
sliding sleeve with synchronizer body for 3rd, 4th and 5th gear
are changed (the springs are longer), at the same time the
synchronizer ring for 3rd and 4th gear is changed as of this
date ⇒ Electronic Catalogue of Original Parts .
Manual gearbox 5 speed 02T
Identification characters NVS
Manufac‐
tured
Assign‐
ment:
Ratio: Final drive 64 : 14 = 4.571
Z2:Z
1
Filling capacity 2.0 litre
Specification ⇒ Electronic Catalogue of Original Parts
Gear oil change interval Filled for life
Clutch control hydraulic
Clutch disc ∅ ⇒ Electronic Catalogue of Original Parts
Drive shaft flange ∅ 100 mm
Reverse gear 35 : 24 x 24 : 11 = 3.182
Speedometer electronic
from 02.12
to
Engine 1.6 ltr./77 kW
1. gear 38 : 11 = 3.455
2. gear 43 : 22 = 1.955
3. gear 41 : 32 = 1.281
4. gear 37 : 42 = 1.881
5. gear 35 : 52 = 0.673
Note
♦
Vehicles with ABS do not have the sender for speedometer G22- .
♦
On gearboxes as of production date 06.09, the springs of the
sliding sleeve with synchronizer body for 3rd, 4th and 5th gear
are changed (the springs are longer), at the same time the
synchronizer ring for 3rd and 4th gear is changed as of this
date ⇒ Electronic Catalogue of Original Parts .
Manual gearbox 5 speed 02T
Identification characters JQM LVF
1. Identification of the gearbox 5
Page 10
Fabia II 2007 ➤ , Fabia II 2009 ➤ , Fabia II 2011 ➤ , Rapid 2011 ➤ , R ...
Gearbox 02T - Edition 05.2014
Manual gearbox 5 speed 02T
Manufac‐
tured
Assign‐
ment:
Ratio: Final drive 64 : 19 = 3.368
Z2:Z
1
Filling capacity 2.0 litre
Specification ⇒ Electronic Catalogue of Original Parts
Gear oil change interval Filled for life
Clutch control hydraulic
Clutch disc ∅ ⇒ Electronic Catalogue of Original Parts
Drive shaft flange ∅ 90 mm
Reverse gear 35 : 24 x 24 : 11 = 3.182
Speedometer electronic
from 02.07 06.09
to 05.09 09.10
Engine 1.4 ltr./51 kW TDI-PD
1. gear 49 : 13 = 3.769
2. gear 44 : 21 = 2.095
3. gear 43 : 31 = 1.387
4. gear 40 : 39 = 1.026
5. gear 38 : 49 = 0.776
Note
♦
Vehicles with ABS do not have the sender for speedometer G22- .
♦
On gearboxes as of production date 06.09, the springs of the
sliding sleeve with synchronizer body for 3rd, 4th and 5th gear
are changed (the springs are longer), at the same time the
synchronizer ring for 3rd and 4th gear is changed as of this
date ⇒ Electronic Catalogue of Original Parts .
1.2 Identification characters, aggregate assignment, ratios, filling capacities (Roomster)
Manual gearbox 5 speed 02T
Identification characters HZK JHM JHM LVB
Manufac‐
tured
Assign‐
ment:
Ratio: Final drive 69 : 14 = 4.929
Z2:Z
1
Reverse gear 35 : 24 x 24 : 11 = 3.182
Speedometer electronic
from 05.06 11.06 01.07 06.09
to 11.06 12.06 05.09 03.10
Engine 1.2 ltr./47 kW 1.2 ltr./51 kW
1st gear 49 : 13 = 3.769
2nd gear 44 : 21 = 2.095
3rd gear 43 : 31 = 1.387
4th gear 40 : 39 = 1.026
5th gear 38 : 49 = 0.776
6 Rep. gr.00 - Technical data
Page 11

Fabia II 2007 ➤ , Fabia II 2009 ➤ , Fabia II 2011 ➤ , Rapid 2011 ➤ , R ...
Gearbox 02T - Edition 05.2014
Manual gearbox 5 speed 02T
Filling capacity 2.0 l
Specification ⇒ Electronic Catalogue of Original Parts
Gear oil change interval Filled for life
Clutch control hydraulic
Clutch disc ∅ ⇒ Electronic Catalogue of Original Parts
Drive shaft flange ∅ 90 mm
Note
♦
Vehicles with ABS do not have the sender for speedometer G22- .
♦
On gearboxes as of production date 06.09, the springs of the
sliding sleeve with synchronizer body for 3rd, 4th and 5th gear
are changed (the springs are longer), at the same time the
synchronizer ring for 3rd and 4th gear is changed as of this
date ⇒ Electronic Catalogue of Original Parts .
Manual gearbox 5 speed 02T
Identification characters MKG MFX LMG
Manufac‐
tured
Assign‐
ment:
Ratio: Final drive 69 : 14 = 4.929 58 : 16 = 3.625
Z2:Z
1
Filling capacity 2.0 ltr.
Specification ⇒ Electronic Catalogue of Original Parts
Gear oil change interval Filled for life
Clutch control hydraulic
Clutch disc ∅ ⇒ Electronic Catalogue of Original Parts
Drive shaft flange ∅ 90 mm 100 mm
Reverse gear 35 : 24 x 24 : 11 = 3.182
Speedometer electronic
from 04.10 04.10
to
Engine 1.2 ltr./51 kW 1.2 ltr./63 kW
1st gear 49 : 13 = 3.769 49 : 13 = 3.769
2nd gear 44 : 21 = 2.095 43 : 22 = 1.955
3rd gear 41 : 32 = 1.281 41 : 32 = 1.281
4th gear 37 : 42 = 0.881 38 : 41 = 0.927
5th gear 35 : 52 = 0.673 37 : 50 = 0.74
1.2 ltr./77 kW
TFSI
TFSI
Note
♦
Vehicles with ABS do not have the sender for speedometer G22- .
♦
On gearboxes as of production date 06.09, the springs of the
sliding sleeve with synchronizer body for 3rd, 4th and 5th gear
are changed (the springs are longer), at the same time the
synchronizer ring for 3rd and 4th gear is changed as of this
date ⇒ Electronic Catalogue of Original Parts .
1. Identification of the gearbox 7
Page 12

Fabia II 2007 ➤ , Fabia II 2009 ➤ , Fabia II 2011 ➤ , Rapid 2011 ➤ , R ...
Gearbox 02T - Edition 05.2014
Manual gearbox 5 speed 02T
Identification characters HZM JHN LVC
Manufac‐
tured
Assign‐
ment:
Ratio: Final drive 67 : 16 = 4.188
Z2:Z
1
Filling capacity 2.0 ltr.
Specification ⇒ Electronic Catalogue of Original Parts
Gear oil change interval Filled for life
Clutch control hydraulic
Clutch disc ∅ ⇒ Electronic Catalogue of Original Parts
Drive shaft flange ∅ 90 mm 100 mm
Reverse gear 35 : 24 x 24 : 11 = 3.182
Speedometer electronic
from 05.06 11.06 06.09
to 11.06 05.09
Engine 1.4 ltr./63 kW
1st gear 49 : 13 = 3.769
2nd gear 44 : 21 = 2.095
3rd gear 43 : 31 = 1.387
4th gear 40 : 39 = 1.026
5th gear 39 : 48 = 0.813
Note
♦
Vehicles with ABS do not have the sender for speedometer G22- .
♦
On gearboxes as of production date 06.09, the springs of the
sliding sleeve with synchronizer body for 3rd, 4th and 5th gear
are changed (the springs are longer), at the same time the
synchronizer ring for 3rd and 4th gear is changed as of this
date ⇒ Electronic Catalogue of Original Parts .
Manual gearbox 5 speed 02T
Identification characters HXL JHL LVA MAB
Manufac‐
tured
Assign‐
ment:
Ratio: Final drive 59 : 15 = 3.933 68 : 15 = 4.533
Z2:Z
1
Filling capacity 2.0 l
Reverse gear 35 : 24 x 24 : 11 = 3.182
Speedometer electronic
from 05.06 11.06 06.09 06.10
to 11.06 05.09 05.10 01.12
Engine 1.6 ltr./77 kW
1st gear 49 : 13 = 3.769 38 : 11 = 3.455
2nd gear 44 : 21 = 2.095 43 : 22 = 1.955
3rd gear 43 : 31 = 1.387 41 : 32 = 1.281
4th gear 40 : 39 = 1.026 37 : 42 = 0.881
5th gear 39 : 48 = 0.813 35 : 52 = 0.673
8 Rep. gr.00 - Technical data
Page 13

Fabia II 2007 ➤ , Fabia II 2009 ➤ , Fabia II 2011 ➤ , Rapid 2011 ➤ , R ...
Gearbox 02T - Edition 05.2014
Manual gearbox 5 speed 02T
Specification ⇒ Electronic Catalogue of Original Parts
Gear oil change interval Filled for life
Clutch control hydraulic
Clutch disc ∅ ⇒ Electronic Catalogue of Original Parts
Drive shaft flange ∅ 100 mm
Note
♦
Vehicles with ABS do not have the sender for speedometer G22- .
♦
On gearboxes as of production date 06.09, the springs of the
sliding sleeve with synchronizer body for 3rd, 4th and 5th gear
are changed (the springs are longer), at the same time the
synchronizer ring for 3rd and 4th gear is changed as of this
date ⇒ Electronic Catalogue of Original Parts .
Manual gearbox 5 speed 02T
Identification characters NVS
Manufac‐
tured
Assign‐
ment:
Ratio: Final drive 68 : 15 = 4.533
Z2:Z
1
Filling capacity 2.0 ltr.
Specification ⇒ Electronic Catalogue of Original Parts
Gear oil change interval Filled for life
Clutch control hydraulic
Clutch disc ∅ ⇒ Electronic Catalogue of Original Parts
Drive shaft flange ∅ 100 mm
Reverse gear 35 : 24 x 24 : 11 =
Speedometer electronic
from 02.12
to
Engine 1.6 ltr./77 kW
1st gear 38 : 11 = 3.455
2nd gear 43 : 22 = 1.955
3rd gear 41 : 32 = 1.281
4th gear 37 : 42 = 0.881
5th gear 35 : 52 = 0.673
3.182
Note
♦
Vehicles with ABS do not have the sender for speedometer G22- .
♦
On gearboxes as of production date 06.09, the springs of the
sliding sleeve with synchronizer body for 3rd, 4th and 5th gear
are changed (the springs are longer), at the same time the
synchronizer ring for 3rd and 4th gear is changed as of this
date ⇒ Electronic Catalogue of Original Parts .
1. Identification of the gearbox 9
Page 14

Fabia II 2007 ➤ , Fabia II 2009 ➤ , Fabia II 2011 ➤ , Rapid 2011 ➤ , R ...
Gearbox 02T - Edition 05.2014
Manual gearbox 5 speed 02T
Identification characters HZL JHP LVD
Manufac‐
tured
Assign‐
ment:
Ratio: Final drive 65 : 18 = 3.611
Z2:Z
1
Filling capacity 2.0 ltr.
Specification ⇒ Electronic Catalogue of Original Parts
Gear oil change interval Filled for life
Clutch control hydraulic
Clutch disc ∅ ⇒ Electronic Catalogue of Original Parts
Drive shaft flange ∅ 90 mm
Reverse gear 35 : 24 x 24 : 11 = 3.182
Speedometer electronic
from 08.06 11.06 06.09
to 11.06 05.09 03.10
Engine 1.4 ltr./51 kW TDI-PD
1st gear 49 : 13 = 3.769
2nd gear 44 : 21 = 2.095
3rd gear 43 : 31 = 1.387
4th gear 40 : 39 = 1.026
5th gear 38 : 49 = 0.776
Note
♦
Vehicles with ABS do not have the sender for speedometer G22- .
♦
On gearboxes as of production date 06.09, the springs of the
sliding sleeve with synchronizer body for 3rd, 4th and 5th gear
are changed (the springs are longer), at the same time the
synchronizer ring for 3rd and 4th gear is changed as of this
date ⇒ Electronic Catalogue of Original Parts .
1.3 Identification characters, aggregate assignment, ratios, filling capacities (Rapid)
Manual gearbox 5 speed 02T
Identification characters MAB NVS
Manufac‐
tured
Assign‐
ment:
Ratio: Final drive 68 : 15 = 4.533 64 : 14 = 4.571
Z2:Z
1
from 09.11 04.12
to 03.12
Engine 1.6 ltr./77 kW
1. gear 38 : 11 = 3.455
2. gear 43 : 22 = 1.955
3. gear 41 : 32 = 1.281
4. gear 37 : 42 = 0.881
5. gear 35 : 52 = 0.673
10 Rep. gr.00 - Technical data
Page 15

Fabia II 2007 ➤ , Fabia II 2009 ➤ , Fabia II 2011 ➤ , Rapid 2011 ➤ , R ...
Gearbox 02T - Edition 05.2014
Manual gearbox 5 speed 02T
Filling capacity 2.0 litre
Specification ⇒ Electronic Catalogue of Original Parts
Gear oil change interval Filled for life
Clutch control hydraulic
Clutch disc ∅ ⇒ Electronic Catalogue of Original Parts
Drive shaft flange ∅ 100 mm
Note
♦
Vehicles with ABS do not have the sender for speedometer -
Reverse gear 35 : 24 x 24 : 11 = 3.182
Speedometer electronic
G22- .
♦
On gearboxes as of production date 06.09, the springs of the
sliding sleeve with synchronizer body for 3rd, 4th and 5th gear
are changed (the springs are longer), at the same time the
synchronizer ring for 3rd and 4th gear is changed as of this
date ⇒ Electronic Catalogue of Original Parts .
1.4 Identification characters, aggregate assignment, ratios, filling capacities (Rapid NH)
Manual gearbox 5 speed 02T
Identification characters MKG MFX LGQ
Manufac‐
tured
Assign‐
ment:
Ratio: Final drive 69 : 14 = 4.928 58 : 16 = 3.625
Z2:Z
1
Filling capacity 2.0 ltr.
Specification ⇒ Electronic Catalogue of Original Parts
Gear oil change interval Filled for life
Clutch control hydraulic
Clutch disc ∅ ⇒ Electronic Catalogue of Original Parts
Drive shaft flange ∅ 90 mm 100 mm
Reverse gear 35 : 24 x 24 : 11 = 3.182
Speedometer electronic
from 07.12 07.12 07.12
to
Engine 1.2 ltr./55 kW MPI 1.2 ltr./63 kW TSI
1st gear 49 : 13 = 3.769 49 : 13 = 3.769
2nd gear 44 : 21 = 2.095 43 : 22 = 1.954
3rd gear 41 : 32 = 1.281 41 : 32 = 1.281
4th gear 37 : 42 = 0.881 38 : 41 = 0.927
5th gear 35 : 52 = 0.673 37 : 50 = 0.74
1. Identification of the gearbox 11
Page 16
Fabia II 2007 ➤ , Fabia II 2009 ➤ , Fabia II 2011 ➤ , Rapid 2011 ➤ , R ...
Gearbox 02T - Edition 05.2014
Note
♦
Vehicles with ABS do not have the sender for speedometer G22- .
♦
On gearboxes as of production date 06.09, the springs of the
sliding sleeve with synchronizer body for 3rd, 4th and 5th gear
are changed (the springs are longer), at the same time the
synchronizer ring for 3rd and 4th gear is changed as of this
date ⇒ Electronic Catalogue of Original Parts .
Manual gearbox 5 speed 02T
Identification characters MAB NVS
Manufac‐
tured
Assign‐
ment:
Ratio: Final drive 68 : 15 = 4.533 64 : 14 = 4.571
Z2:Z
1
Filling capacity 2.0 litre
Specification ⇒ Electronic Catalogue of Original Parts
Gear oil change interval Filled for life
Clutch control hydraulic
Clutch disc ∅ ⇒ Electronic Catalogue of Original Parts
Drive shaft flange ∅ 100 mm
Reverse gear 35 : 24 x 24 : 11 = 3.182
Speedometer electronic
from 07.12 07.12
to
Engine 1.6 ltr./77 kW MPI
1. gear 38 : 11 = 3.455
2. gear 43 : 22 = 1.955
3. gear 41 : 32 = 1.281
4. gear 37 : 42 = 0.881
5. gear 35 : 52 = 0.673
Note
♦
Vehicles with ABS do not have the sender for speedometer G22- .
♦
On gearboxes as of production date 06.09, the springs of the
sliding sleeve with synchronizer body for 3rd, 4th and 5th gear
are changed (the springs are longer), at the same time the
synchronizer ring for 3rd and 4th gear is changed as of this
date ⇒ Electronic Catalogue of Original Parts .
12 Rep. gr.00 - Technical data
Page 17
Fabia II 2007 ➤ , Fabia II 2009 ➤ , Fabia II 2011 ➤ , Rapid 2011 ➤ , R ...
Gearbox 02T - Edition 05.2014
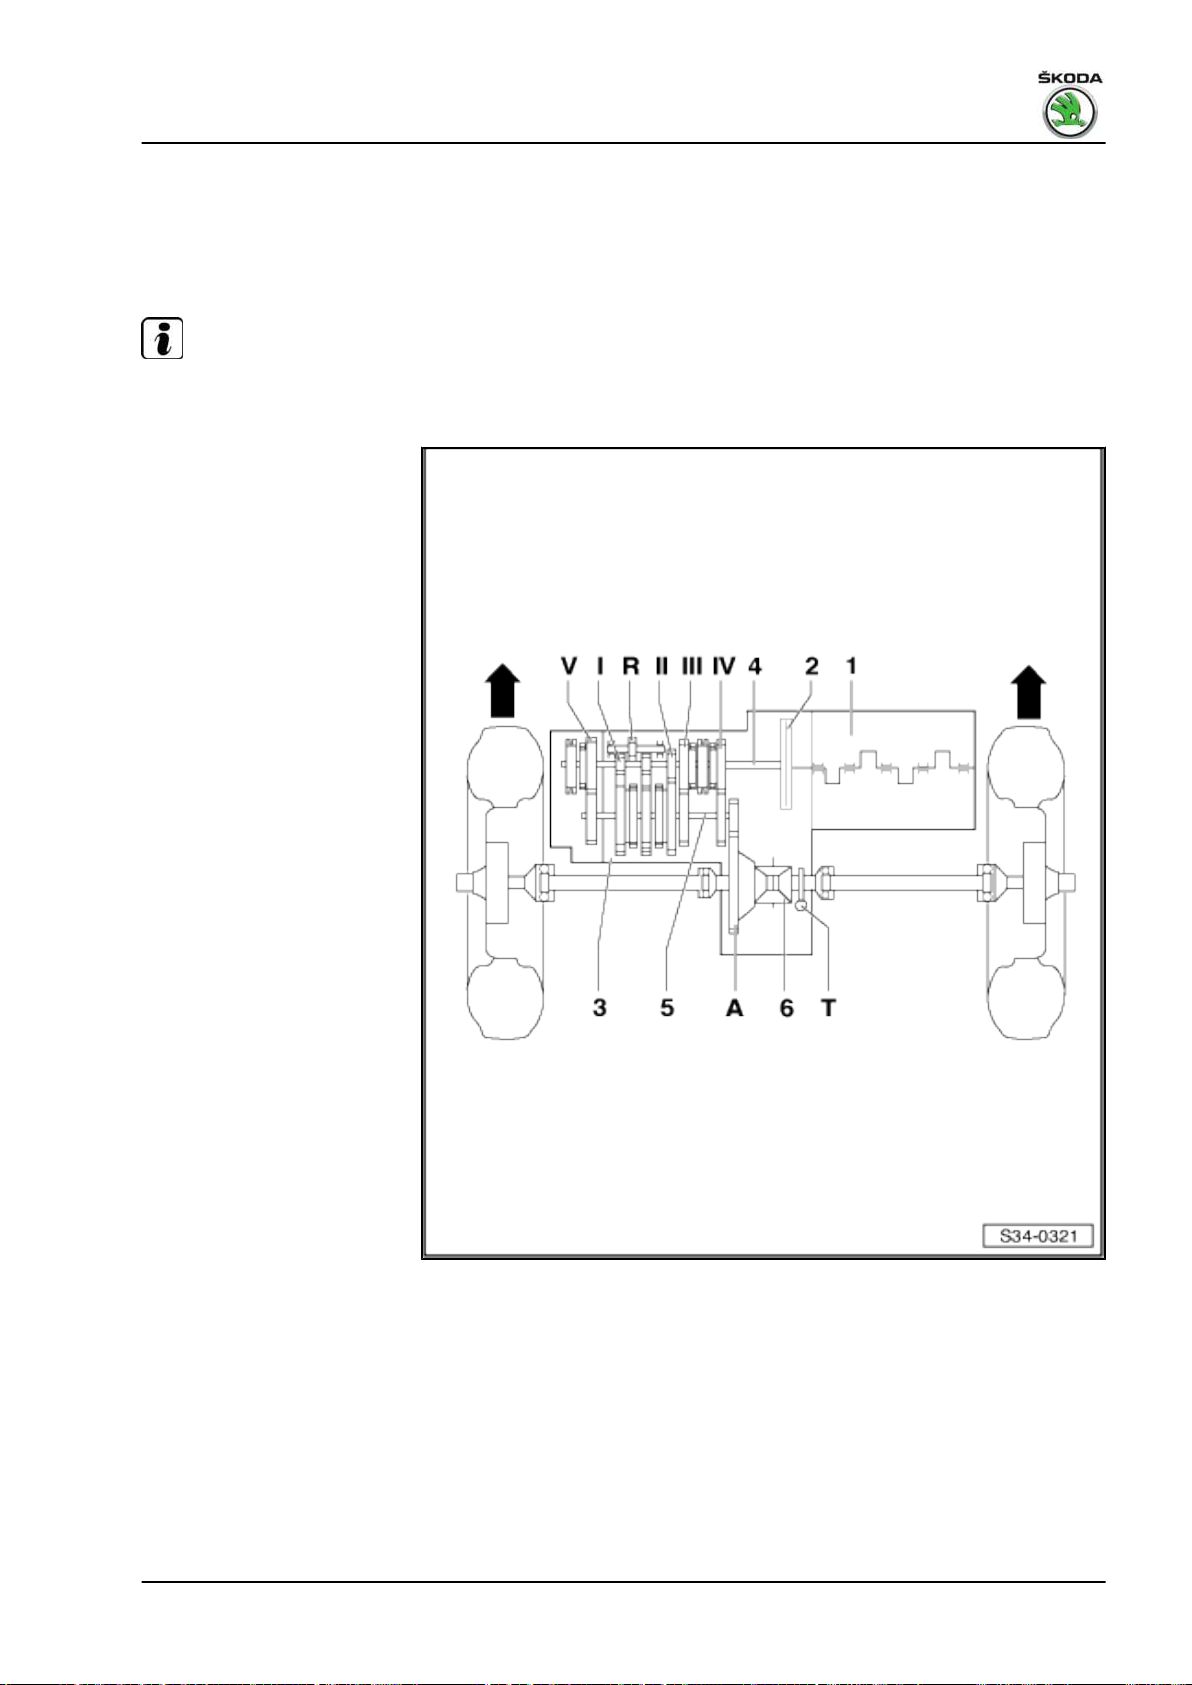
2 Overview of Transmission System
2.1 Designation of components and transmission ratio
Note
The arrow shows the direction of travel.
1 - Engine
2 - Clutch
3 - Manual gearbox
4 - Drive shaft
5 - Output shaft
6 - Differential gear
I - 1. gear
II - 2. gear
III - 3. gear
IV - 4. gear
V - 5. gear
R - Reverse gear
A - Final drive
T - Speedometer drive
2. Overview of Transmission System 13
Page 18

Fabia II 2007 ➤ , Fabia II 2009 ➤ , Fabia II 2011 ➤ , Rapid 2011 ➤ , R ...
Gearbox 02T - Edition 05.2014
3 General repair instructions
To ensure flawless and successful gearbox repairs, the greatest
care and cleanliness as well as the use of good and proper tools
are essential. Also note the basic rules on safety when performing
repair procedures.
A number of generally valid notes for individual repair operations
- which are otherwise listed several times at numerous points in
the workshop manual - are summarized here. They apply for this
particular workshop manual.
Gearbox
Gearboxes are constructed of aluminium and of magnesium
⇒ page 1 .
♦ Gearbox housing and clutch housing are made of the same
materials.
♦ Bolts and other attachments that come into direct contact with
the gearbox can have varying finishes depending on whether
the gearbox is made of aluminium or magnesium.
♦ On gearboxes which are made of magnesium, the screws
must always be replaced for the following screw connections:
Cover for gearbox housing at gearbox housing and clutch
housing at gearbox housing.
♦ The use of substitute components causes contact corrosion.
This will result in damage to the gearbox.
♦ Bolts and other attachments should have a classification in the
⇒ Electronic Catalogue of Original Parts .
♦ When installing, ensure the dowel sleeves are correctly loca‐
ted between the engine and gearbox.
♦ When replacing the gearbox, pour in gear oil up to lower edge
of filler hole.
♦ Filling capacity and specification (Fabia II) ⇒ page 1 .
♦ Filling capacity and specification (Roomster) ⇒ page 6 .
♦ Filling capacity and specification (Rapid) ⇒ page 10 .
♦ Filling capacity and specification (Rapid NH) ⇒ page 11 .
Gaskets and seals
♦ Clean contact surfaces thoroughly and apply sealant -
AMV 188 200 03- .
♦ Apply sealant evenly - not too thickly.
♦ Replace O-rings.
♦ Replace radial shaft seals.
14 Rep. gr.00 - Technical data
Page 19

Fabia II 2007 ➤ , Fabia II 2009 ➤ , Fabia II 2011 ➤ , Rapid 2011 ➤ , R ...
Before installing
Lightly lubricate the outside diameter of the gasket ring. Fill half
the space between the sealing lips -arrow- with grease - G 052
128 A1- .
After installing
Check gear oil level, if necessary pour in oil up to lower edge of
filler hole ⇒ page 112 , specification:
♦ Fabia II ⇒ page 1 .
♦ Roomster ⇒ page 6 .
♦ Rapid ⇒ page 10 .
♦ Rapid NH ⇒ page 11 .
Locking elements
♦ Replace circlips.
♦ Do not over-tension the circlips.
♦ Circlips must be positioned in the base of the groove.
♦ Replace roll pins. Fitting position: Slot longitudinal to power
flow -arrow-.
Gearbox 02T - Edition 05.2014
3. General repair instructions 15
Page 20
Fabia II 2007 ➤ , Fabia II 2009 ➤ , Fabia II 2011 ➤ , Rapid 2011 ➤ , R ...
Gearbox 02T - Edition 05.2014
Nuts and bolts
♦ Slacken and tighten fixing screws and nuts of covers and
housings diagonally across in stages.
♦ Do not twist particularly sensitive parts - e.g. clutch pressure
plates - slacken and tighten diagonally across in stages.
♦ Specified torques given are for unlubricated nuts, bolts and
screws.
♦ Always replace the self-locking screws and nuts ⇒ Electronic
Catalogue of Original Parts .
♦ It is important to ensure at all bolted connections that the con‐
tact surfaces as well as the nuts and bolts are waxed only after
being installed, should this be necessary.
♦ Clean all threaded holes into which self-locking bolts were
screwed in, using a suitable thread tap to remove old locking
agent residues. Otherwise there is the risk that the self-locking
screw will shear when removing.
Bearings
♦ New taper roller bearings are fitted as supplied and do not
require any additional lubrication.
♦ Fit needle bearings to the gearbox with some gearbox fluid.
♦ Replace all taper roller bearings belonging to one shaft at the
same time. As far as possible use bearings of the same make.
♦ Before installing, heat the inner rings of the bearing on a heat‐
ing plate or with the hot-air blower , e.g. -V.A.G 1416- , to
approx. 100°C, when installing press in axial and play-free up
to the stop.
♦ The temperature can be checked with a temperature measur‐
ing instrument.
♦ Do not exchange the outer and inner rings of bearings of the
same size. The bearings are matched in pairs.
♦ Position needle bearing with the lettered side (thicker end) to‐
wards the drift pin.
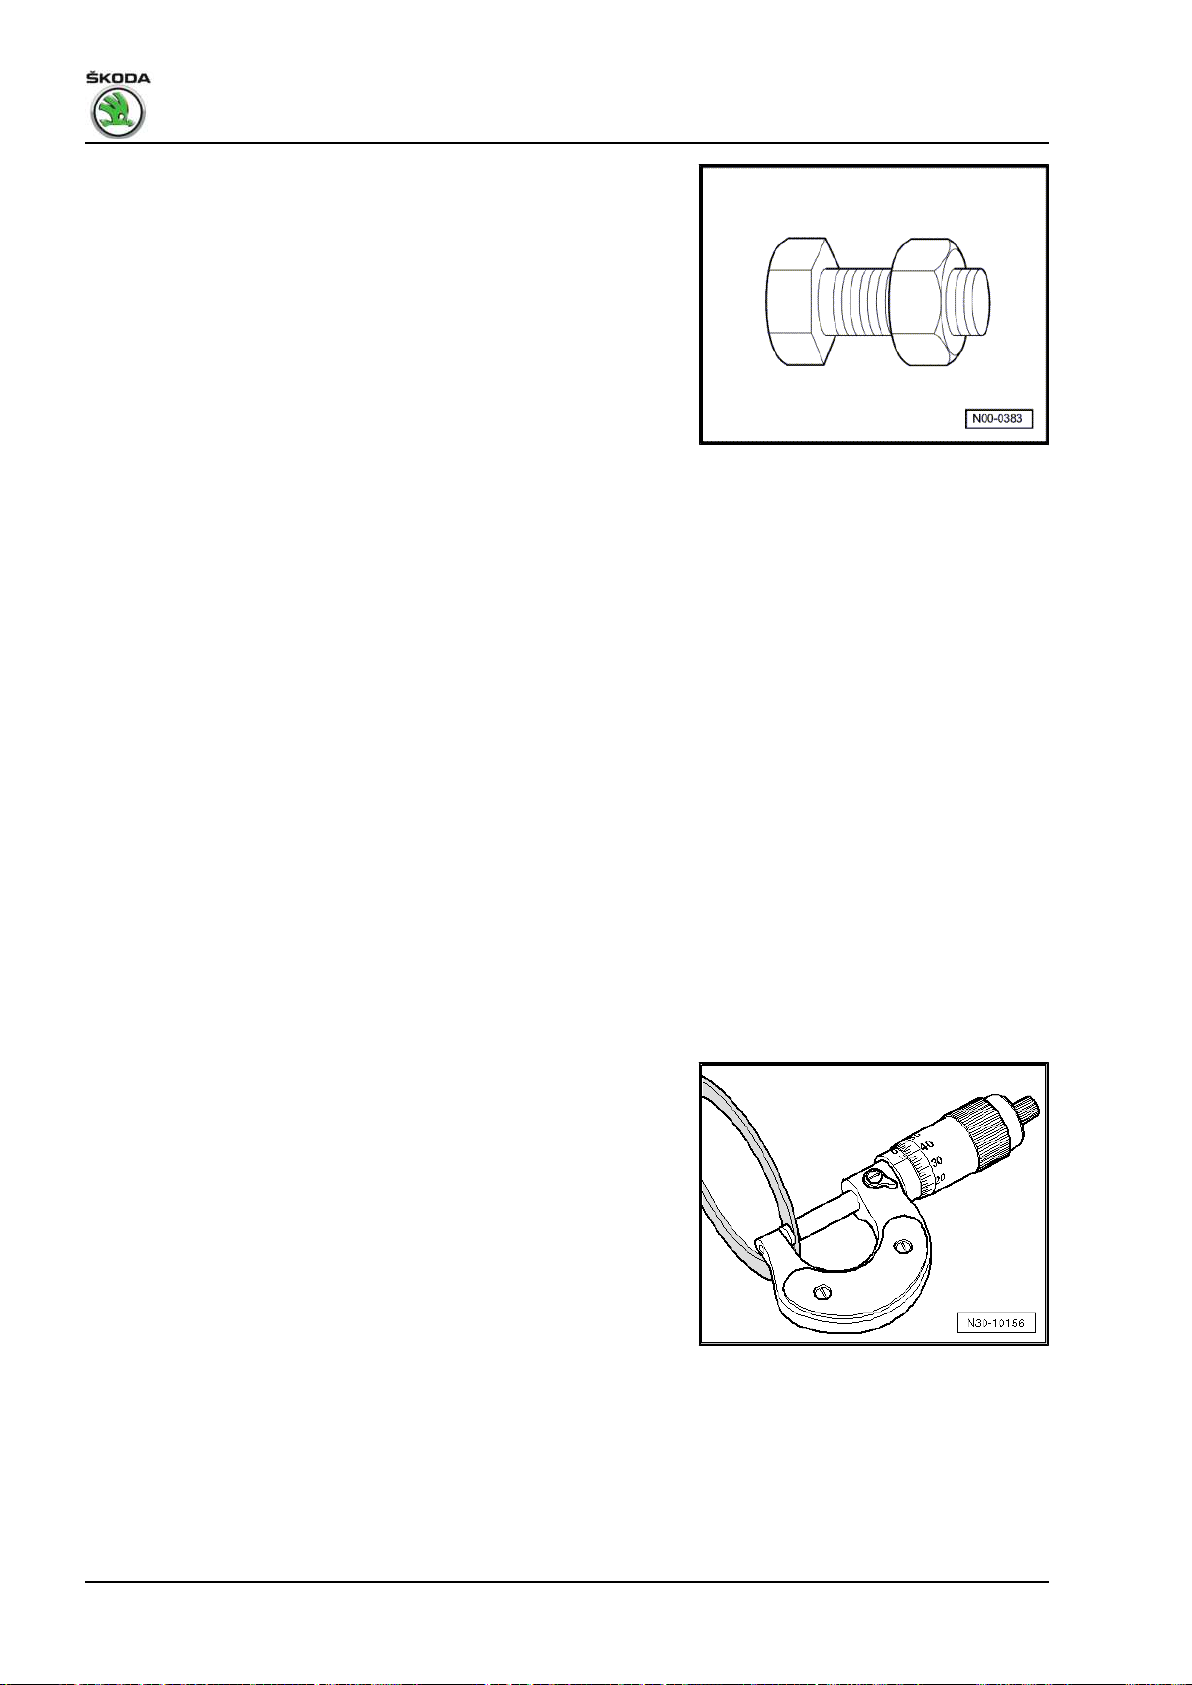
Shims
♦ Gauge shims at several points with a micrometer. Different
tolerances allow to measure the required thickness for each
washer very precisely ⇒ electronic catalogue of original parts .
♦ Inspect washers for burrs and damage.
♦ Install only adjusting washers which are in perfect condition.
Synchronizer rings
16 Rep. gr.00 - Technical data
Page 21

Fabia II 2007 ➤ , Fabia II 2009 ➤ , Fabia II 2011 ➤ , Rapid 2011 ➤ , R ...
♦ These are not interchangeable. If re-using, allocate synchron‐
izer rings to the same sliding gear.
♦ Inspect for wear, replace if necessary ⇒ Electronic Catalogue
of Original Parts .
♦ Check grooves -arrow 1- on synchronizer ring -A-, or check
the inside of the ring for flattened parts (grooves worn).
♦ When installing the intermediate ring -B-, check outer contact
surface -arrow 2- and inner contact surface -arrow 3- for
grooves, blue coloring (caused by overheating) and other
damages.
♦ Insert moist with some gearbox fluid.
Pinions
♦ Clean and heat on a heating plate or with the hot-air blower ,
e.g. -V.A.G 1416- to approx. 100°C before pressing on.
♦ The temperature can be checked with a temperature measur‐
ing instrument.
♦ Check fitting position.
Clutch control
♦ When removing gearbox, remove slave cylinder, do not de‐
tach the hoses.
♦ If the slave cylinder with connected hydraulic line is removed,
do not depress the clutch pedal. Otherwise the tappet is press‐
ed out of the slave cylinder.
♦ Do not tilt the clutch pressure plate; release and tighten cross‐
wise in small stages.
♦ If the clutch pedal does not return to its initial position after the
coupling procedure - clutch pedal in home position - the clutch
control must be bled ⇒ page 65 (further measures
⇒ page 57 ).
♦ In order to reduce unpleasant odours if the clutch is burnt,
thoroughly clean the clutch housing as well as the flywheel and
the engine on the side of the gearbox.
Safety precautions for vehicles with start-stop system
Gearbox 02T - Edition 05.2014
WARNING
On vehicles with start-stop system, there is the risk of injury
from automatic engine start.
♦ On vehicles with activated start-stop system (recogniza‐
ble by a message in the dash panel insert), the engine can
start automatically if required.
♦ It is therefore necessary to ensure that the start-stop sys‐
tem is deactivated when carrying out work on the vehicle
(ignition switched off; if required switch ignition on again).
3. General repair instructions 17
Page 22

Fabia II 2007 ➤ , Fabia II 2009 ➤ , Fabia II 2011 ➤ , Rapid 2011 ➤ , R ...
Gearbox 02T - Edition 05.2014
30 – Clutch
1 Clutch control
Summary of components - foot controls (Fabia II 2007 ►; Room‐
ster 2006 ►) ⇒ page 19 .
Removing and installing, setting angular clutch pedal switch F36- , (Fabia II 2007 ►; Roomster 2006 ►) ⇒ page 20 .
Removing and installing, setting cylindrical clutch pedal switch F36- , (Fabia II 2007 ►; Roomster 2006 ►) ⇒ page 21 .
Removing and installing the crash strut for the clutch pedal (Fabia
II 2007 ►; Roomster 2006 ►) ⇒ page 22 .
Removing and installing the over-centre helper spring (Fabia II
2007 ►; Roomster 2006 ►) ⇒ page 24 .
Removing and installing the clutch pedal (Fabia II 2007 ►; Room‐
ster 2006 ►) ⇒ page 27 .
Summary of components - foot controls (Fabia II 2011 ►; Room‐
ster 2011 ►; Rapid NH 2013 ►) ⇒ page 29 .
Summary of components - Foot controls (Rapid) ⇒ page 36 .
Removing and installing the bracket with the master cylinder (Fa‐
bia II 2011 ►; Roomster 2011 ►; Rapid NH 2013 ►)
⇒ page 38 .
Removing and installing the bracket with the master cylinder
(Rapid 2011 ►) ⇒ page 41 .
Removing and installing the bracket without the master cylinder
(Fabia II 2011 ►; Roomster 2011 ►; Rapid NH 2013 ►)
⇒ page 43 .
Removing and installing the bracket without the master cylinder
(Rapid 2011 ►) ⇒ page 44 .
Removing and installing the clutch pedal with the over-centre
helper spring (Fabia II 2011 ►; Roomster 2011 ►) ⇒ page 46 .
Removing and installing the clutch pedal with the over-centre
helper spring (Rapid) ⇒ page 48 .
Removing and installing the clutch pedal with the tension spring
(Fabia II 2011 ►; Roomster 2011 ►; Rapid NH 2013 ►)
⇒ page 49 .
Summary of components - Hydraulic (Fabia II ►; Roomster ►;
Rapid NH ►) ⇒ page 51 .
Summary of components - Hydraulic (Rapid 2011 ►)
⇒ page 54 .
Check hydraulic clutch control ⇒ page 57 .
Removing and installing the master cylinder (Fabia II 2007 ►;
Roomster 2006 ►) ⇒ page 58 .
Removing and installing the master cylinder (Fabia II 2011 ►;
Roomster 2011 ►; Rapid NH 2013 ►) ⇒ page 61 .
Remove and install slave cylinder ⇒ page 61 .
Bleed the clutch control ⇒ page 65 .
18 Rep. gr.30 - Clutch
Page 23

Fabia II 2007 ➤ , Fabia II 2009 ➤ , Fabia II 2011 ➤ , Rapid 2011 ➤ , R ...
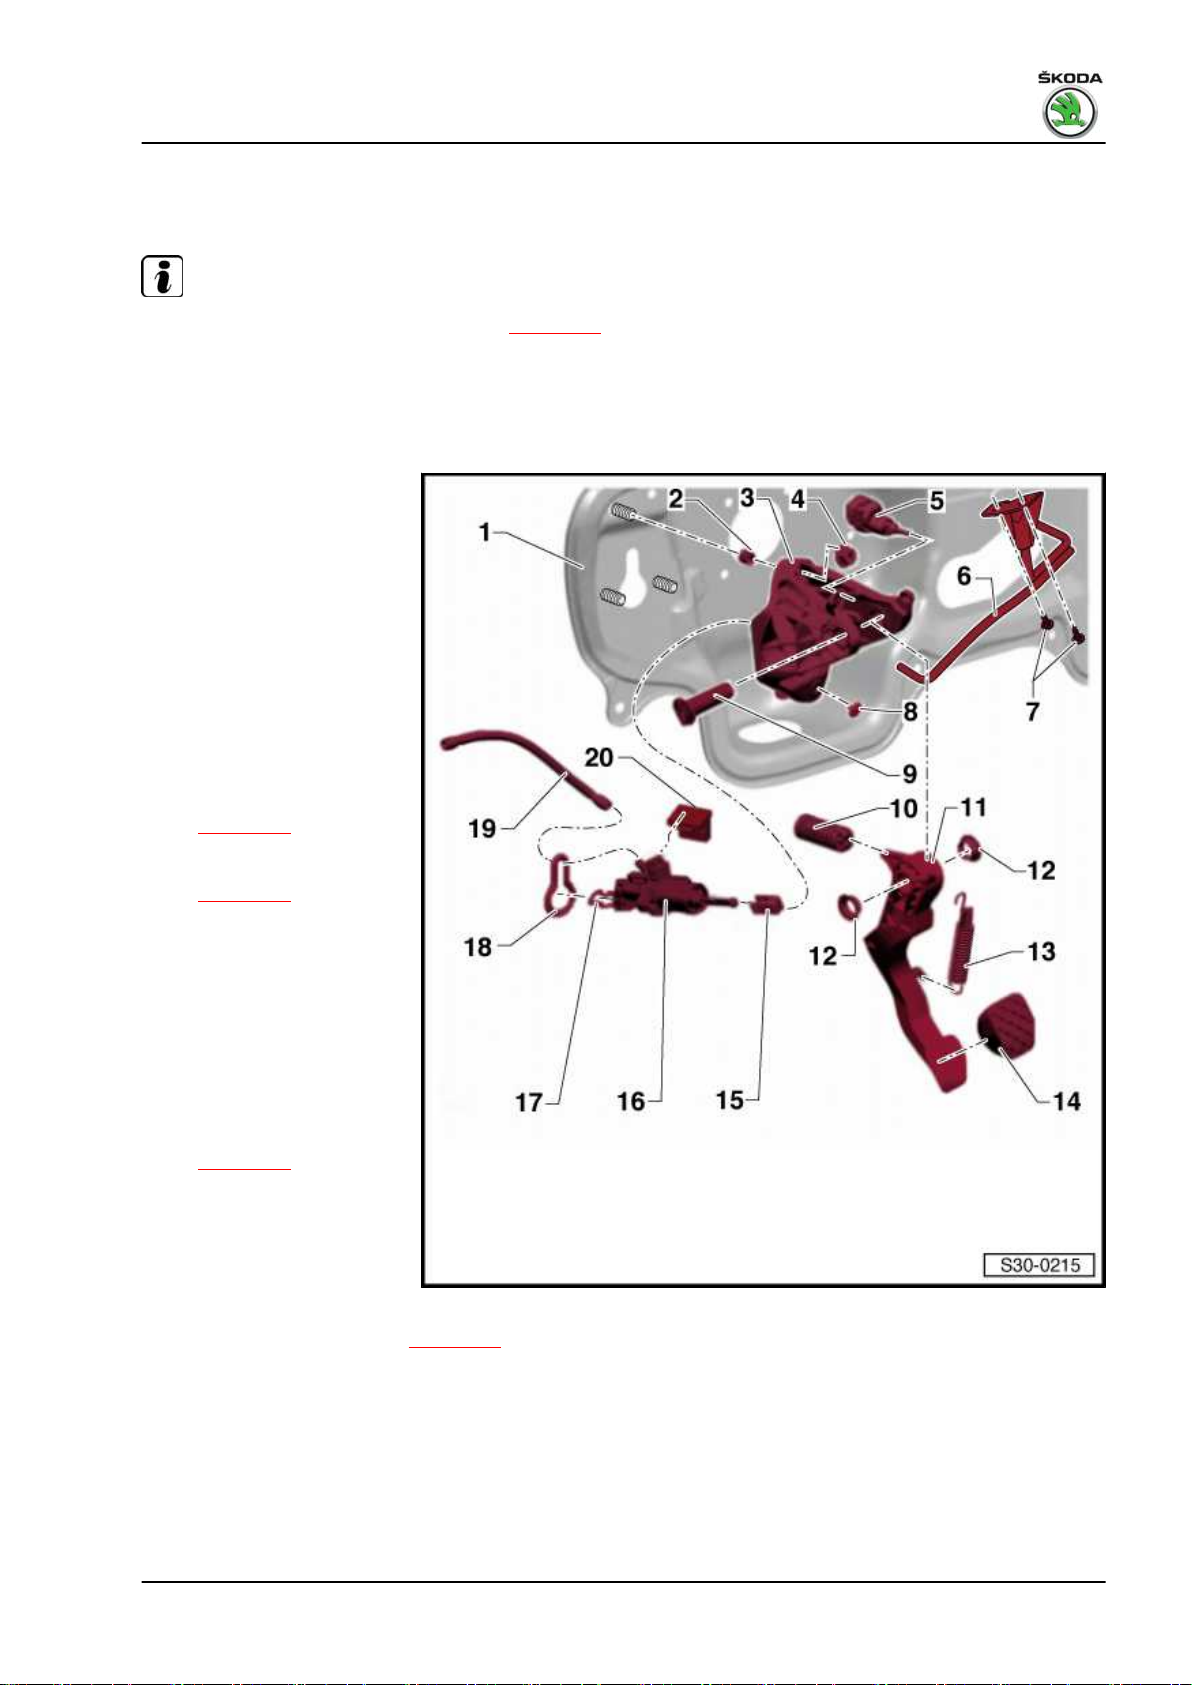
1.1 Summary of components - foot controls
(Fabia II 2007 ►; Roomster 2006 ►)
Note
♦
Summary of components - Hydraulics ⇒ page 51 .
♦
If the battery earth strap is disconnected and connected, carry
out additional operations ⇒ Electrical System; Rep. gr. 27 .
♦
Grease all bearing points and contact surfaces with grease -
G 000 450 02- .
♦
Prior to working on the foot controls remove the storage area
on the driver's side ⇒ Body Work; Rep. gr. 70 .
1 - Support/Front wall
❑ for master cylinder and
bracket
2 - Gasket
❑ always replace ⇒ Elec‐
tronic Catalogue of
Original Parts
3 - Bearing bracket
4 - Screw
5 - Gas/brake foot controls
6 - 28 Nm
❑ always replace ⇒ Elec‐
tronic Catalogue of
Original Parts
7 - Clutch pedal switch -F36-
❑ Difference between
clutch pedal switch
⇒ page 20
❑ assign according to the
⇒ Electronic catalogue
of original parts .
❑ Removing and installing
⇒ page 20 angular
clutch pedal switch
❑ Removing and installing
⇒ page 21 cylindrical
clutch pedal switch
8 - Over-centre helper spring
❑ removing and installing
⇒ page 24
9 - Bushing
10 - Bearing pins
11 - Clutch pedal
❑ removing and installing ⇒ page 27
12 - Support
❑ removing and installing ⇒ page 27
Gearbox 02T - Edition 05.2014
1. Clutch control 19
Page 24

Fabia II 2007 ➤ , Fabia II 2009 ➤ , Fabia II 2011 ➤ , Rapid 2011 ➤ , R ...
Gearbox 02T - Edition 05.2014
13 - 28 Nm
❑ always replace ⇒ Electronic Catalogue of Original Parts
14 - Master cylinder
❑ removing and installing ⇒ page 58
❑ test tightness ⇒ page 57
15 - Spring strap clamp
16 - Supply hose
❑ out of rubber
❑ as of 12.05 on certain vehicles out of plastic ⇒ page 54
❑ if the return hose is made out of plastic, do not use hose clamp - MP7-602-
❑ test tightness ⇒ page 57
17 - Bearings
❑ insert in bearing bracket
❑ always replace ⇒ Electronic Catalogue of Original Parts
18 - Screw
❑ Pedal stop on bracket -Pos. 319 - Pedal stop
❑ screw with screw -Pos. 18- onto bracket -Pos. 320 - 25 Nm
❑ always replace ⇒ Electronic Catalogue of Original Parts
Difference between clutch pedal switch -F36♦ -A- Switch with angular housing
Removing and installing ⇒ page 20
♦ -B- Switch with cylindrical housing
Removing and installing ⇒ page 21
1.2 Removing and installing, setting angular
clutch pedal switch - F36- , (Fabia II
2007 ►; Roomster 2006 ►)
Note
The clutch pedal switch - F36- may only be installed once to en‐
sure that it has an adequately tight fit in the bracket.
20 Rep. gr.30 - Clutch
Page 25
Fabia II 2007 ➤ , Fabia II 2009 ➤ , Fabia II 2011 ➤ , Rapid 2011 ➤ , R ...
Removing
– Remove the storage area on the driver's side ⇒ Body Work;
Rep. gr. 70 .
– Unplug connector from the clutch pedal switch - F36- .
– Turn clutch pedal switch - F36- 90° to the left and remove it
from the support.
Installing and setting
– Remove tappet up to the stop
– Press down the clutch pedal by hand as far as possible.
– Insert clutch pedal switch into the support and turn switch 90°
to the right.
– Insert connector for the clutch pedal switch - F36- .
– Install the storage area on the driver's side ⇒ Body Work; Rep.
gr. 70 .
1.3 Removing and installing, setting cylin‐
drical clutch pedal switch - F36- , (Fabia
II 2007 ►; Roomster 2006 ►)
Gearbox 02T - Edition 05.2014
Note
The clutch pedal switch - F36- may only be installed once to en‐
sure that it has an adequately tight fit in the bracket.
– Remove the storage area on the driver's side ⇒ Body Work;
Rep. gr. 70 .
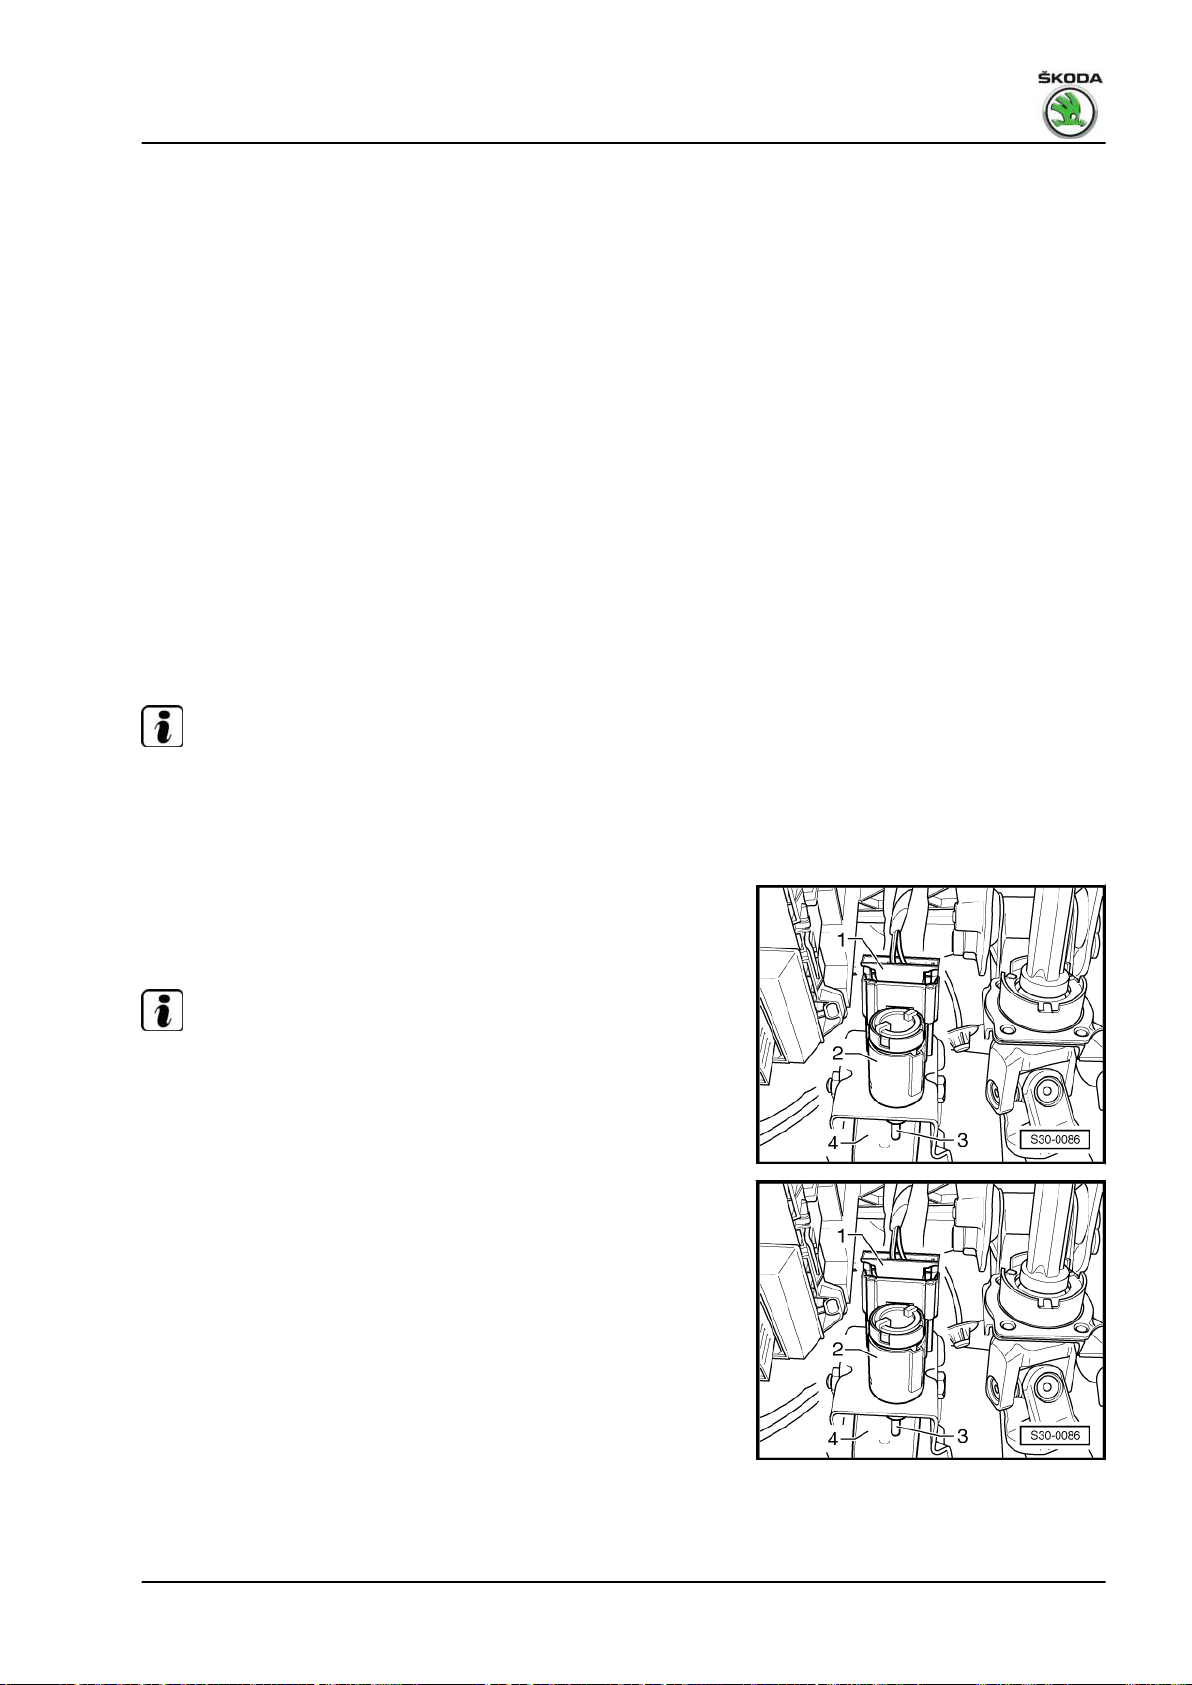
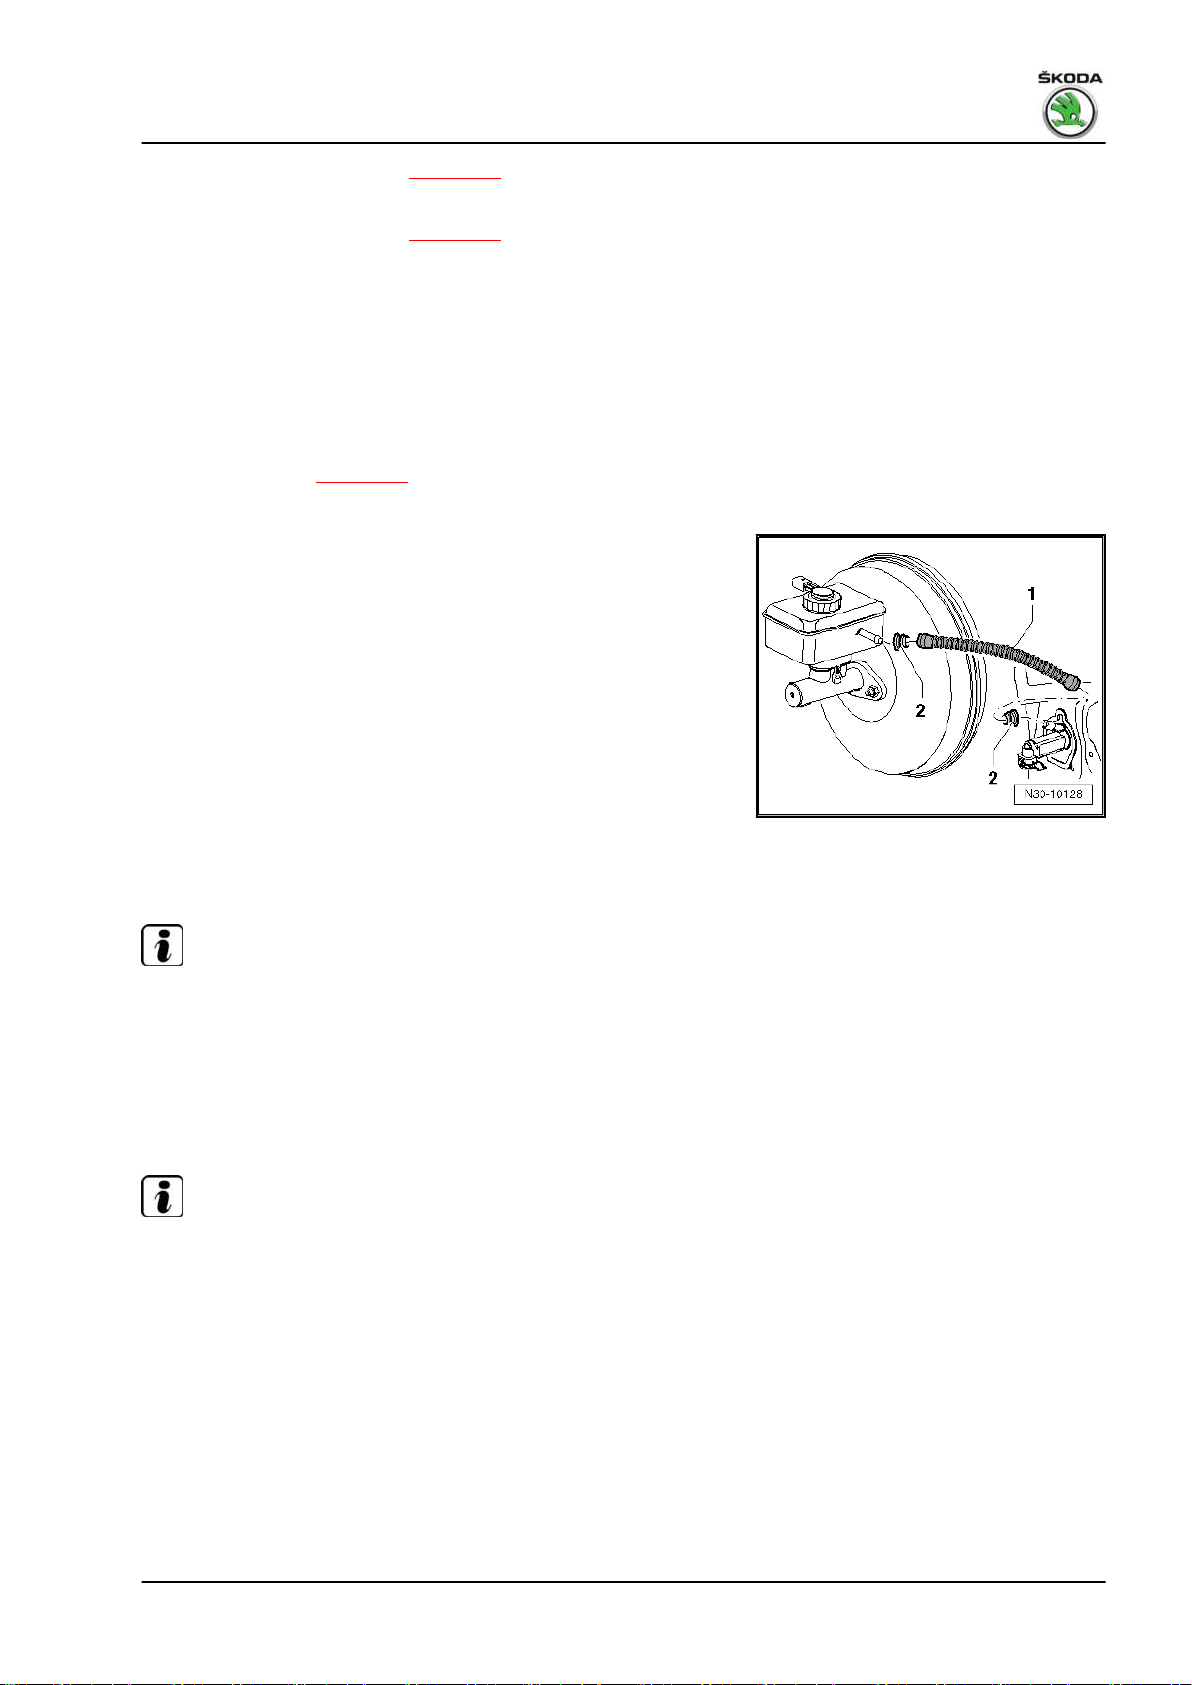
– Unplug connector -1- from the clutch pedal switch - F36- .
– Turn clutch pedal switch - F36- -2- in the bracket 45° to the left
and remove it from the support.
Note
The clutch pedal remains in the off position in this case (do not
depress).
Installing and setting
– Before installing the clutch pedal switch - F36- pull out tappet
-3- fully.
• Clutch pedal -4- in the off position.
– Guide the clutch pedal switch - F36- through the assembly
opening, press against the clutch pedal and attach by turning
it 45° to the right.
– Insert connector for the clutch pedal switch - F36- .
– Install the storage area on the driver's side ⇒ Body Work; Rep.
gr. 70 .
1. Clutch control 21
Page 26
Fabia II 2007 ➤ , Fabia II 2009 ➤ , Fabia II 2011 ➤ , Rapid 2011 ➤ , R ...
Gearbox 02T - Edition 05.2014
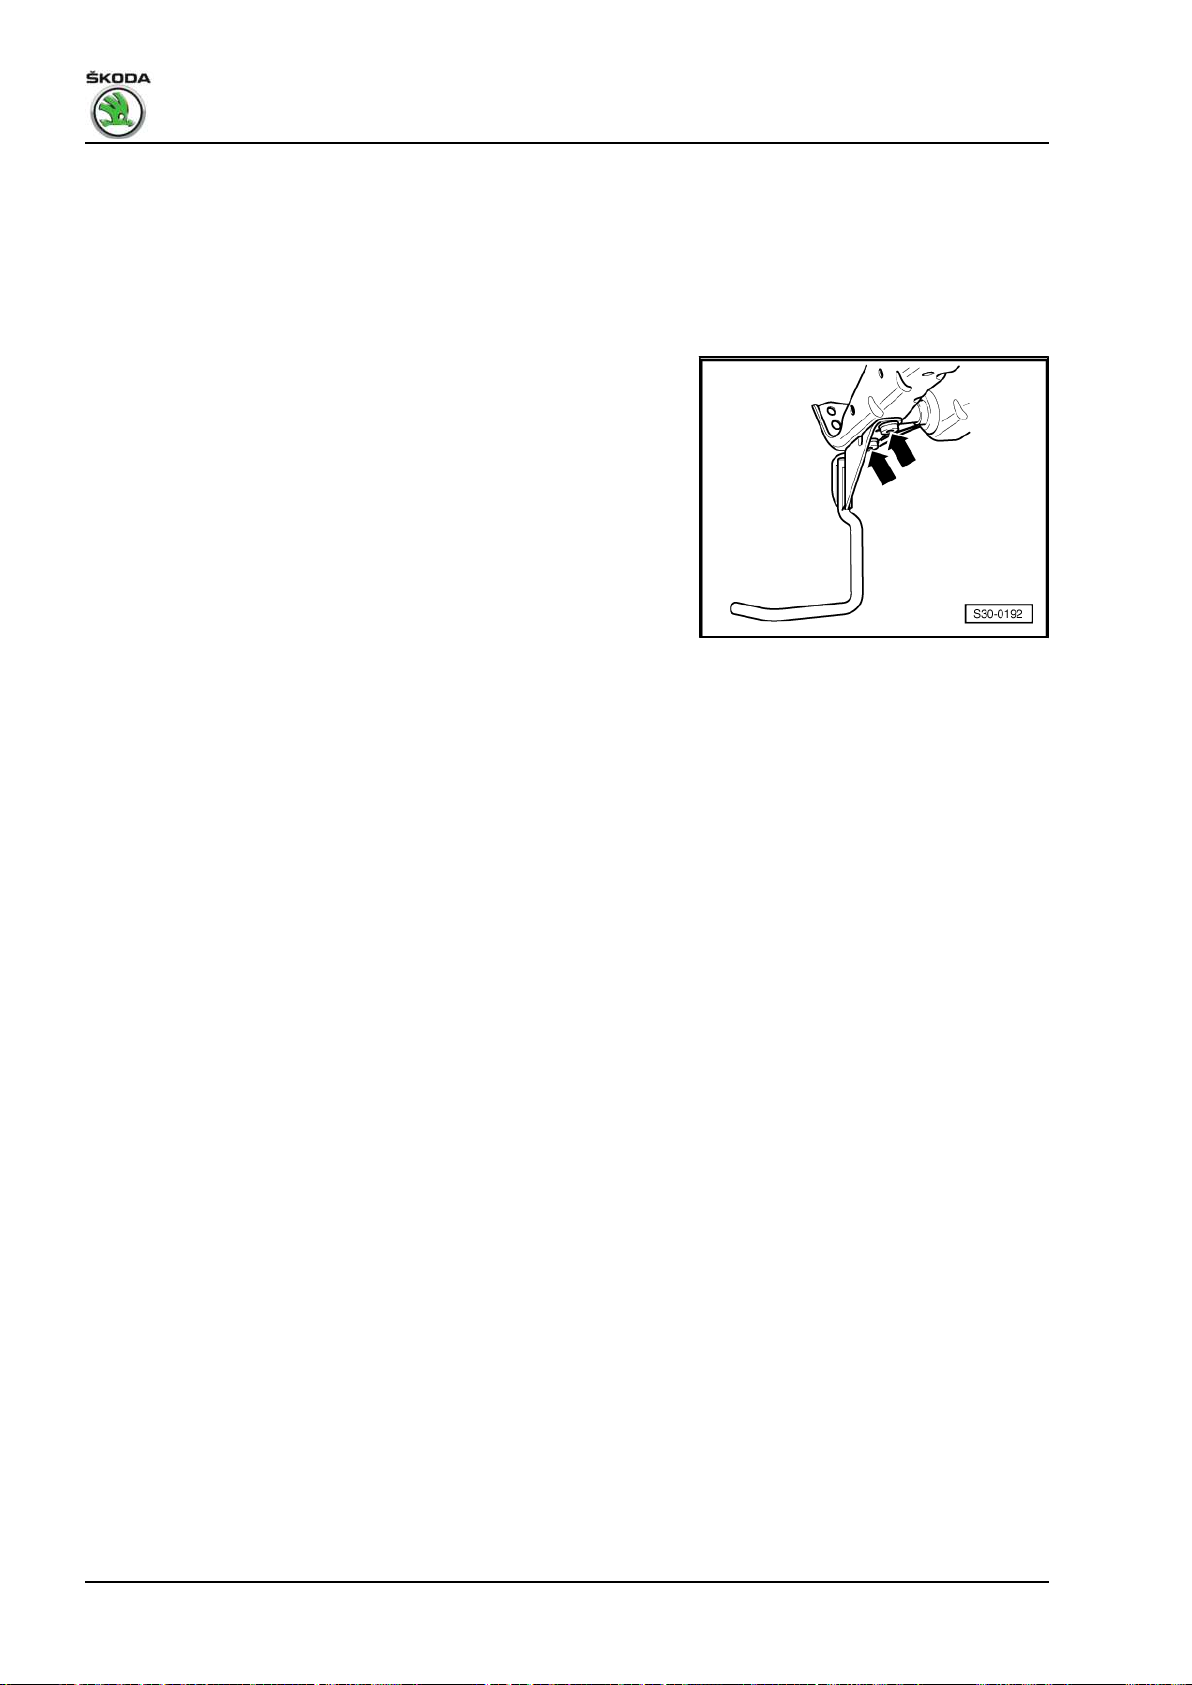
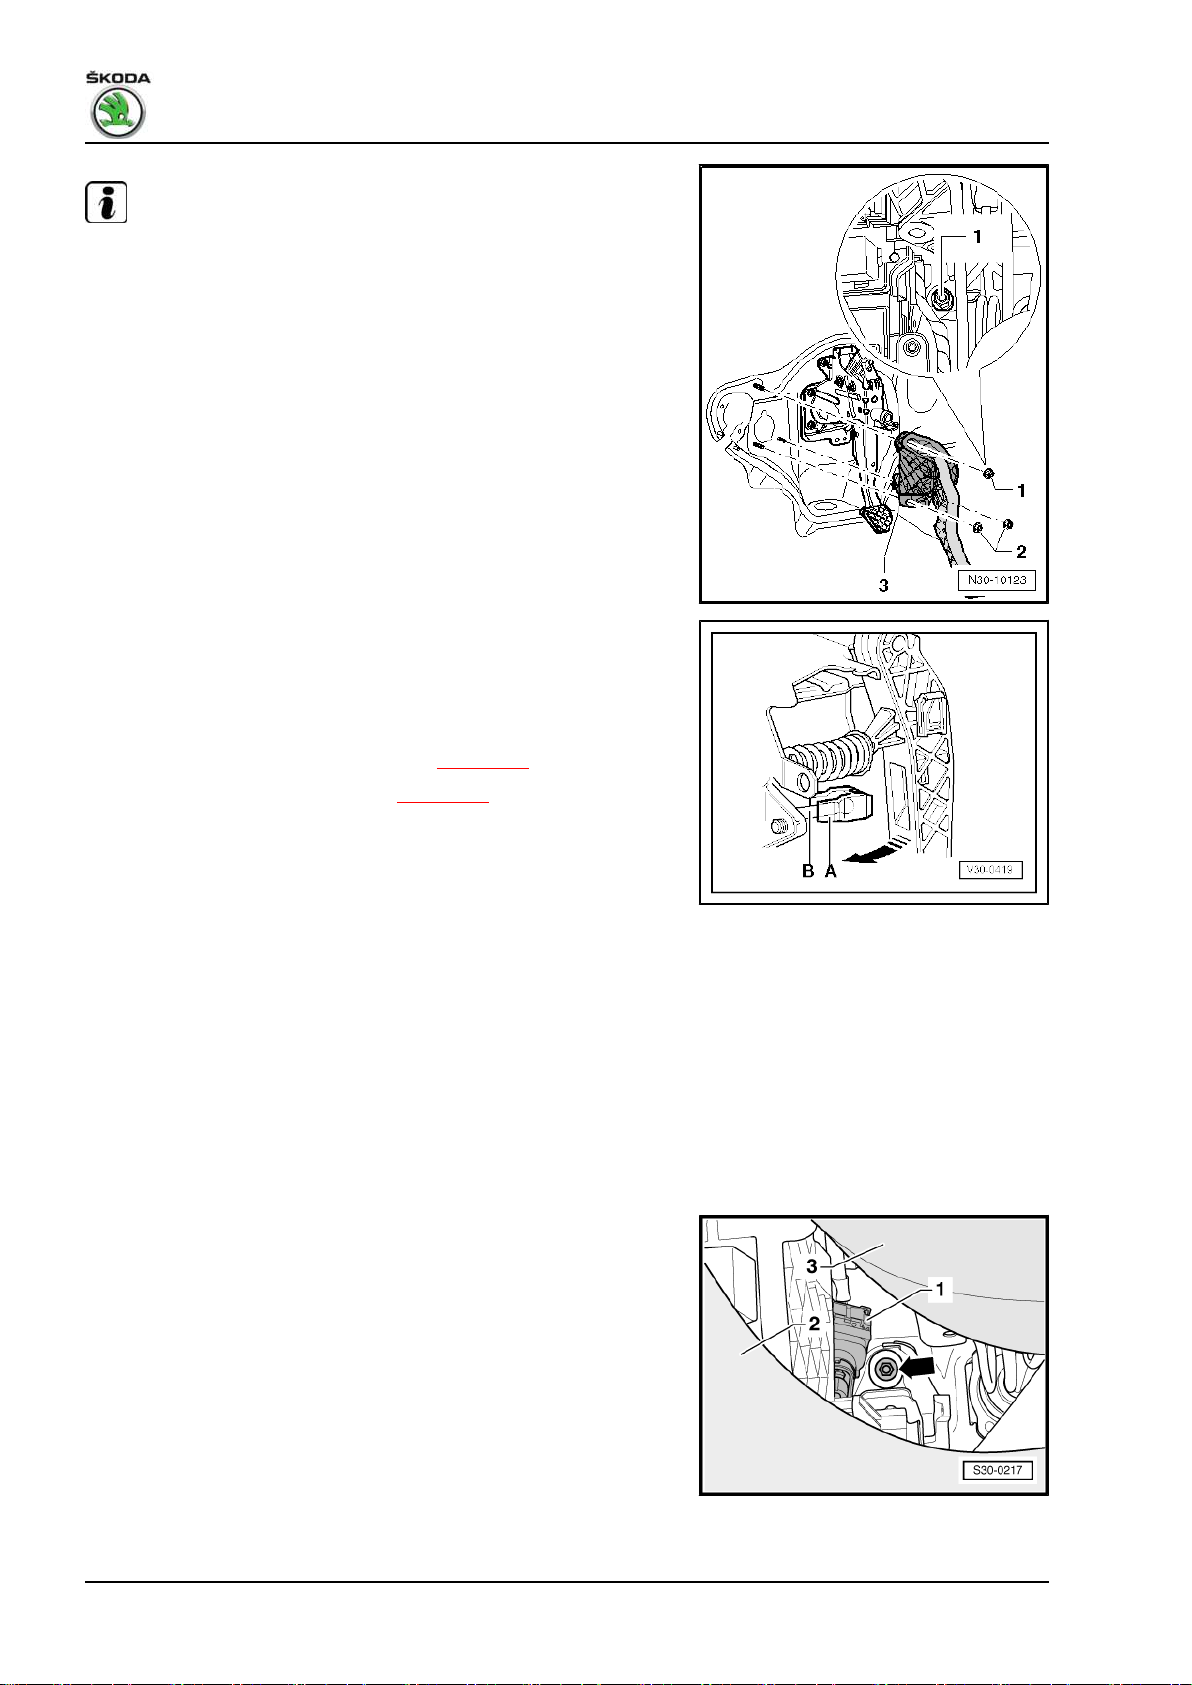
1.4 Removing and installing the crash strut for the clutch pedal (Fabia II 2007 ►; Roomster 2006 ►)
Removing
– Remove the storage area on the driver's side ⇒ Body Work;
Rep. gr. 70 .
– Release screws -arrows-.
Install
Installation is carried out in the reverse order.
22 Rep. gr.30 - Clutch
Page 27
Tightening torque
Crash strut to steering column 9 Nm
Fabia II 2007 ➤ , Fabia II 2009 ➤ , Fabia II 2011 ➤ , Rapid 2011 ➤ , R ...
Gearbox 02T - Edition 05.2014
23
Page 28
Fabia II 2007 ➤ , Fabia II 2009 ➤ , Fabia II 2011 ➤ , Rapid 2011 ➤ , R ...
Gearbox 02T - Edition 05.2014
1.5 Removing and installing the over-centre
helper spring (Fabia II 2007 ►; Roomster
2006 ►)
Special tools and workshop equipment required
♦ Pliers - T10005♦ Polycarbamide grease - G 052 142 A2Removing
– Remove the storage area on the driver's side ⇒ Body Work;
Rep. gr. 70 .
– Remove crash strut (if present) ⇒ page 22 .
– Remove clutch pedal switch ⇒ page 19 -Pos. 7-, if provided.
– Unlock the actuating rod/master cylinder from the clutch pedal.
Unlock the actuating rod/master cylinder from the clutch pedal as
follows:
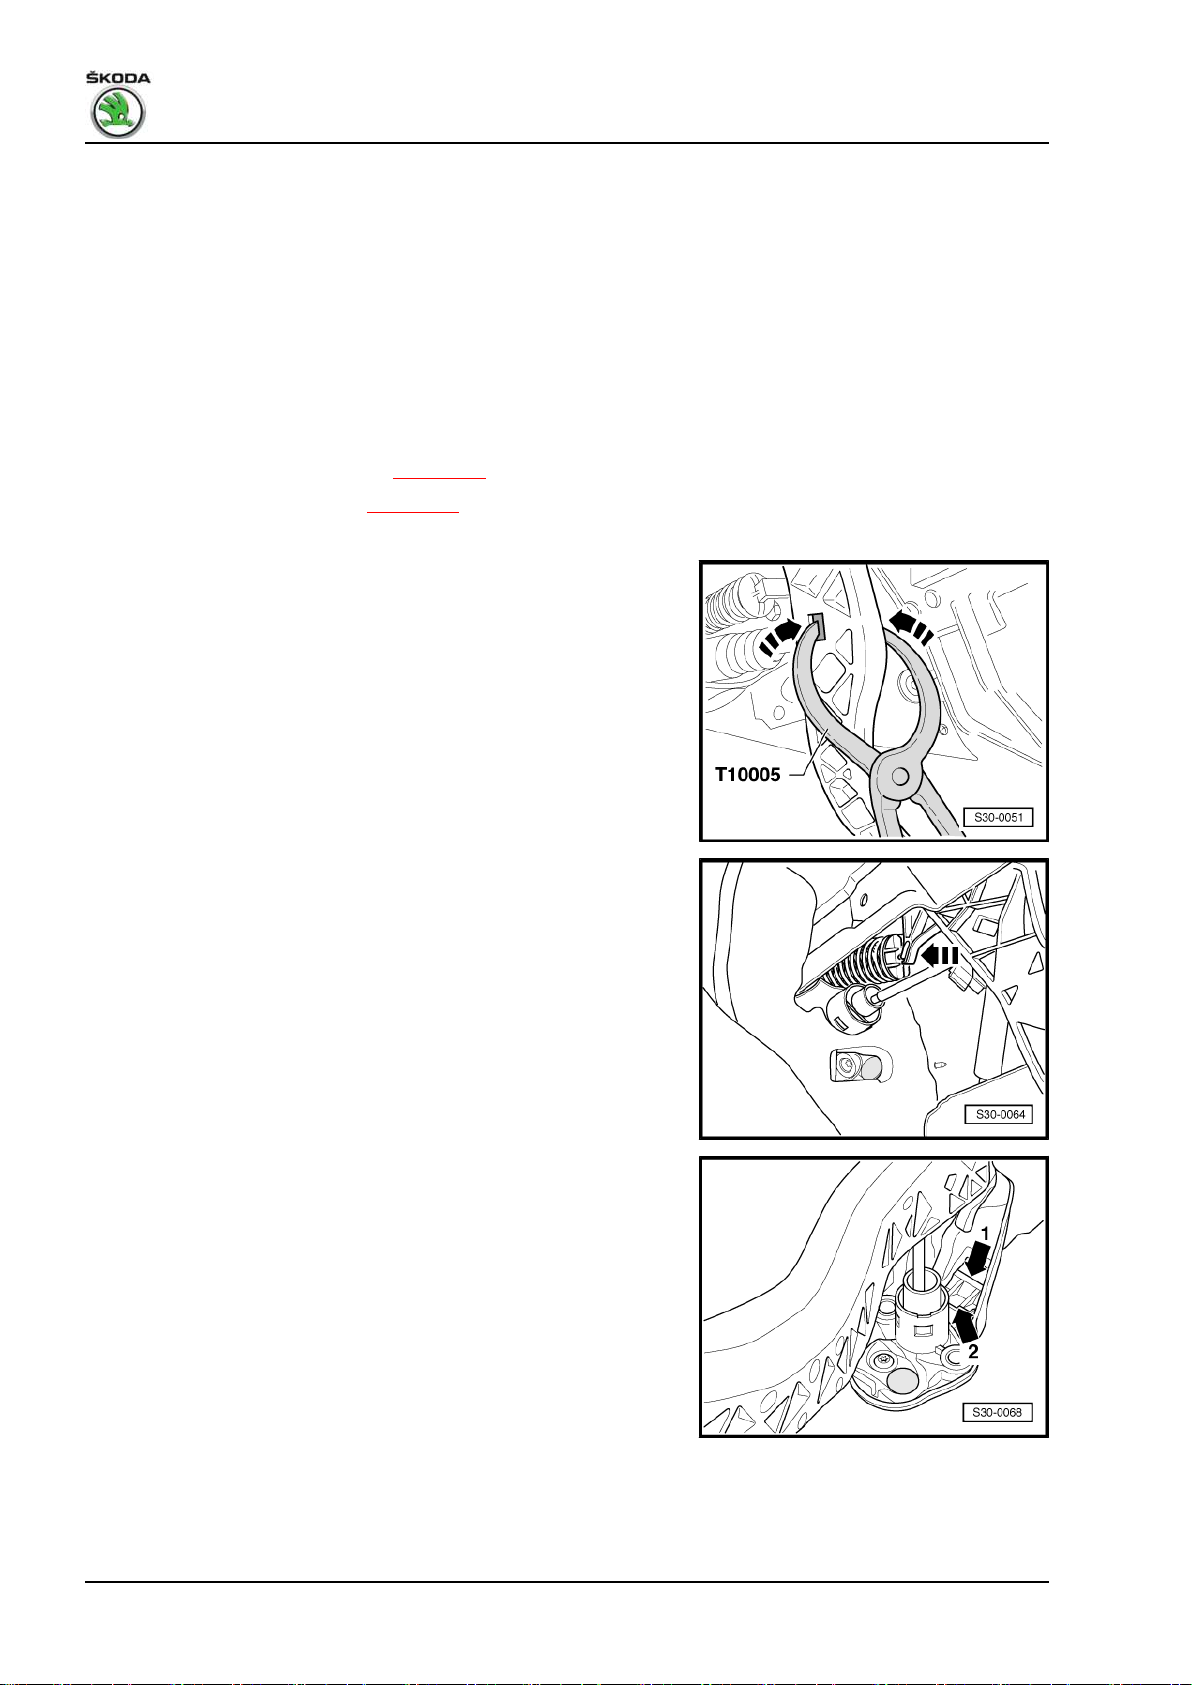
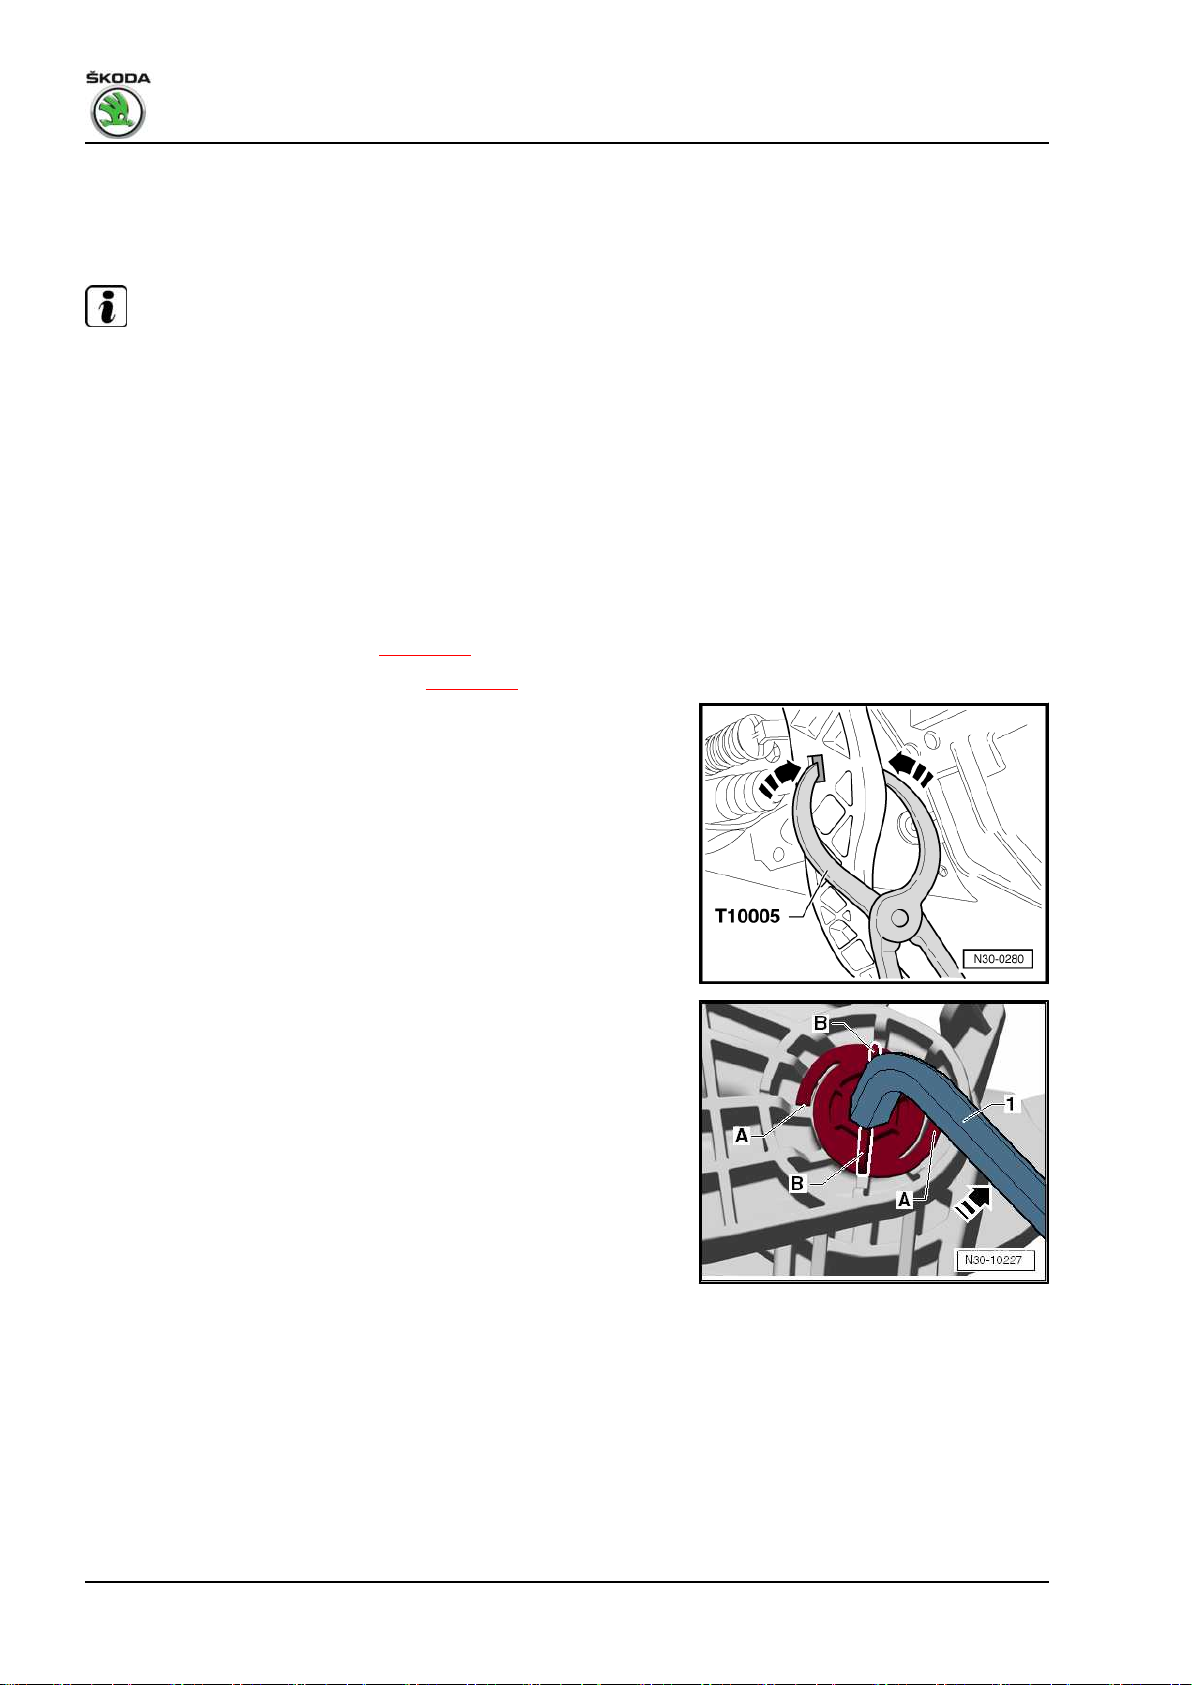
– Insert pliers - T10005- in the clutch pedal recesses.
– Press together support and separate the clutch pedal from the
master cylinder.
– Push the over-centre helper spring against the bulkhead
-in the direction of the arrow- and remove from the bracket
from the bottom.
Install
– Insert bearing for over-centre helper spring -arrow 1- in the
bracket holder.
The peg of the bearing is located in the recess of the master cyl‐
inder -arrow 2-.
– Insert over-centre helper spring in the bearing.
24
Page 29

Fabia II 2007 ➤ , Fabia II 2009 ➤ , Fabia II 2011 ➤ , Rapid 2011 ➤ , R ...
– Press over-centre helper spring against the bearing and posi‐
tion on the support of the clutch pedal -arrow-.
– Position the clutch pedal with the master cylinder
⇒ page 27 .
– Install clutch pedal switch ⇒ page 19 -Pos. 7-.
– Install crash strut ⇒ page 22 .
– Install the storage area on the driver's side ⇒ Body Work; Rep.
gr. 70 .
Gearbox 02T - Edition 05.2014
25
Page 30

Fabia II 2007 ➤ , Fabia II 2009 ➤ , Fabia II 2011 ➤ , Rapid 2011 ➤ , R ...
Gearbox 02T - Edition 05.2014
Tightening torque
Crash strut to steering column ⇒ page 22
26
Page 31

Fabia II 2007 ➤ , Fabia II 2009 ➤ , Fabia II 2011 ➤ , Rapid 2011 ➤ , R ...
1.6 Removing and installing the clutch pedal (Fabia II 2007 ►; Roomster 2006 ►)
Special tools and workshop equipment required
♦ Pliers - T10005♦ Polycarbamide grease - G 052 142 A2Removing
– Remove crash strut (if present) ⇒ page 22 .
– Remove clutch pedal switch ⇒ page 19 -Pos. 7-, if provided.
– Removing the over-centre helper spring ⇒ page 24 .
– Put steering wheel in the lower position.
– Unscrew nut -A-.
– Slowly turn steering wheel in a suitable position.
– Pull screw out of the bracket.
– Remove clutch pedal.
Install
Installation is performed in the reverse order, pay attention to the
following points:
Gearbox 02T - Edition 05.2014
– The support -A- must be located on the actuating rod -B- of
the master cylinder.
– To click in the support push the clutch pedal towards the front
wall -direction of the arrow- and make sure it catches correctly.
27
Page 32

Fabia II 2007 ➤ , Fabia II 2009 ➤ , Fabia II 2011 ➤ , Rapid 2011 ➤ , R ...
Gearbox 02T - Edition 05.2014
Tightening torques
Crash strut to steering column ⇒ page 22
Clutch pedal to bracket
1)
Always replace self-locking nut ⇒ Electronic Catalogue of Original Parts .
1)
⇒ page 19
28
Page 33
Fabia II 2007 ➤ , Fabia II 2009 ➤ , Fabia II 2011 ➤ , Rapid 2011 ➤ , R ...
Gearbox 02T - Edition 05.2014
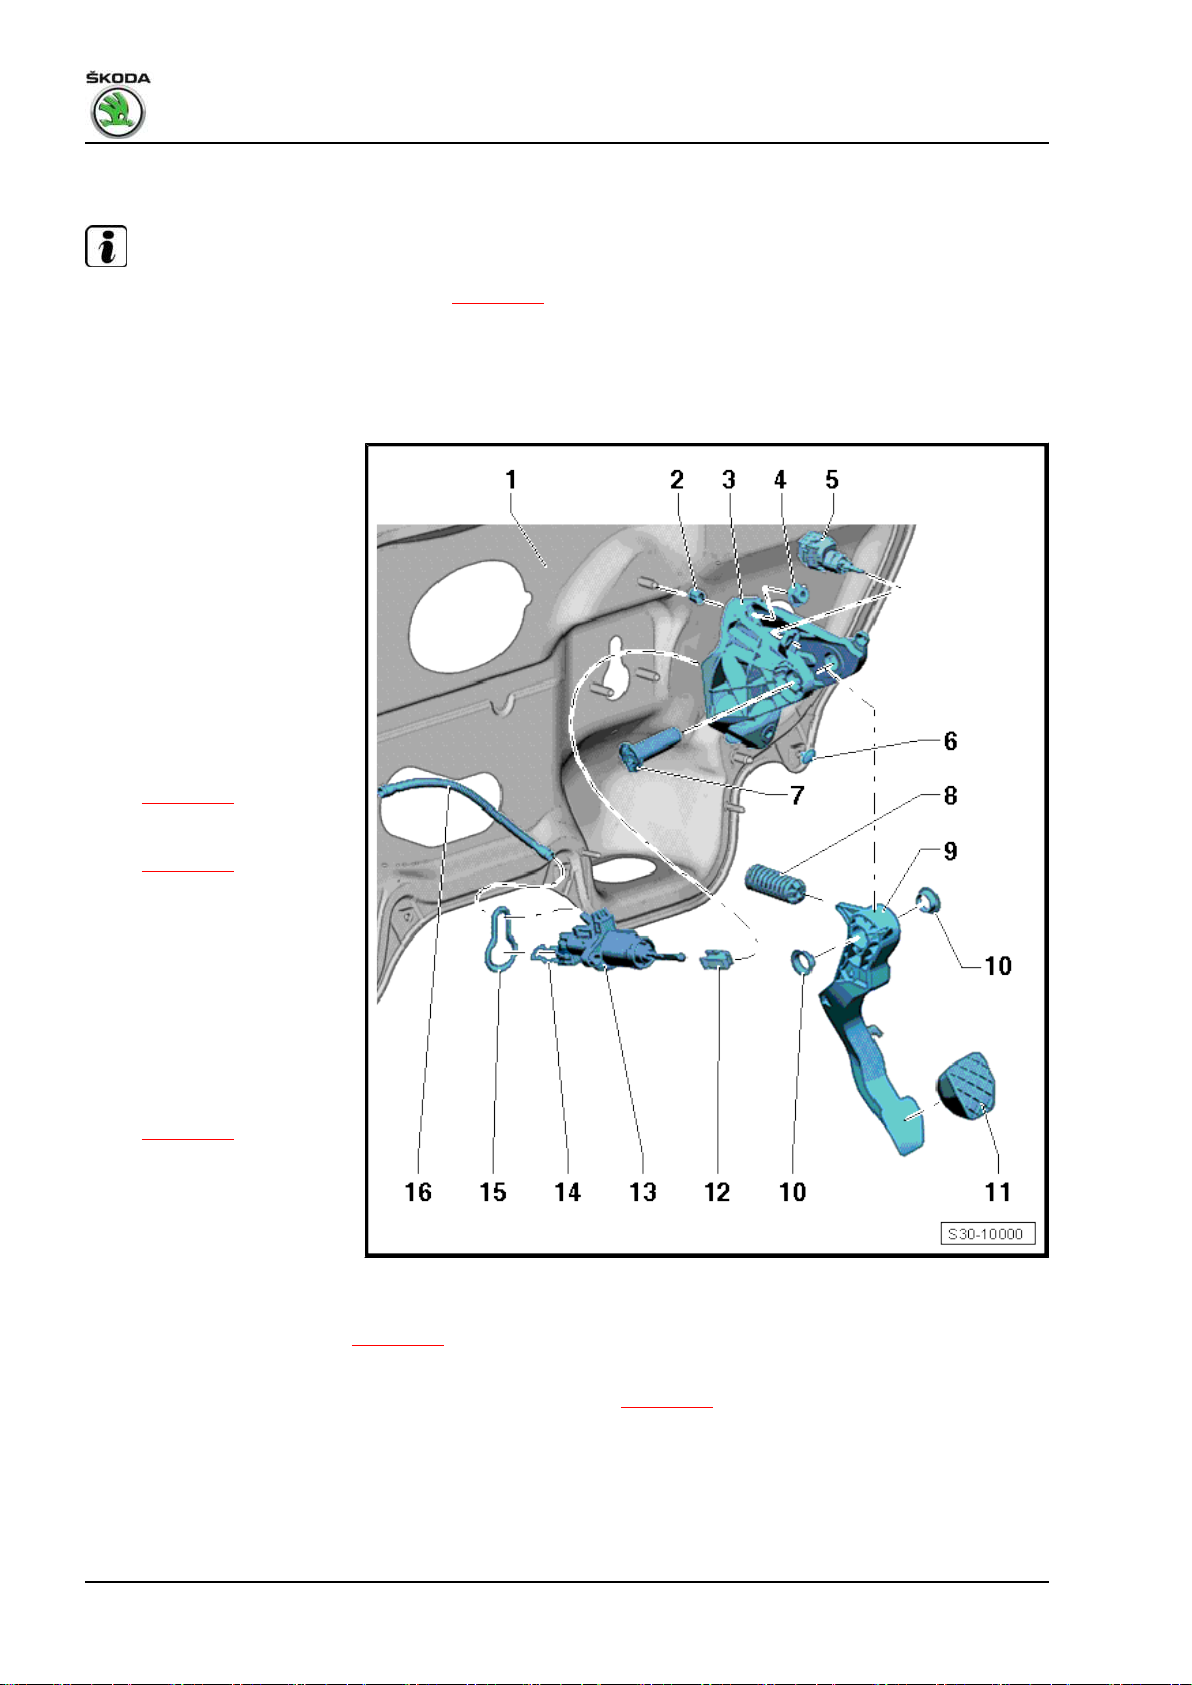
1.7 Summary of components - foot controls (Fabia II 2011 ►; Roomster 2011 ►; Rapid NH 2013 ►)
Note
♦
Summary of components - Hydraulics ⇒ page 51 .
♦
After the battery earth strap is disconnected and connected, carry out additional operations ⇒ Electrical
System; Rep. gr. 27 .
♦
Grease all bearing points and contact surfaces with Polycarbamide Grease - G 052 142 A2- .
1 - Front wall
❑ with mount for bearing
bracket and master cyl‐
inder
2 - Bushing
❑ for the top location hole
in the bracket
❑ The bushings for the
bottom location hole in
the bracket are located
in the master cylinder
3 - Bearing bracket
❑ removing and installing
with master cylinder
⇒ page 38
❑ removing and installing
without master cylinder
⇒ page 43
4 - 25 Nm
❑ for bracket on front wall
❑ self-locking
❑ 3 pieces
❑ always replace ⇒ Elec‐
tronic Catalogue of
Original Parts
5 - Clutch pedal switch - F36-
❑ removing and installing
⇒ page 31
6 - Crash strut
❑ is attached to the steer‐
ing column
❑ different versions ⇒
electronic catalogue of
original parts
❑ removing and installing ⇒ page 32
7 - Screw
❑ for crash strut -Pos. 6- at steering column
❑ Tightening torque:
♦ Version with two screws - 9 Nm
♦ Version with one screw - 20 Nm
29
Page 34
Fabia II 2007 ➤ , Fabia II 2009 ➤ , Fabia II 2011 ➤ , Rapid 2011 ➤ , R ...
Gearbox 02T - Edition 05.2014
8 - Stop
❑ for the clutch pedal
9 - Bearing bolt
❑ always replace ⇒ Electronic Catalogue of Original Parts
10 - Over-centre helper spring
❑ depending on the equipment version, a tension spring or an over-centre helper spring is installed
❑ Assign components via the ⇒ Electronic catalogue of original parts
❑ removing and installing ⇒ page 46
11 - Clutch pedal
❑ removing and installing with over-centre helper spring ⇒ page 46
❑ removing and installing with tension spring ⇒ page 49
12 - Bushing
13 - Tension spring with vibration damper
❑ depending on the equipment version, a tension spring or an over-centre helper spring is installed
❑ Assign components via the ⇒ Electronic catalogue of original parts
❑ is inserted on the bracket -Pos. 3- and on the clutch pedal
❑ removing and installing ⇒ page 31
14 - Cap
15 - Support
❑ only replace if the master cylinder has been removed
❑ removing and installing ⇒ page 51
16 - Master cylinder
❑ removing and installing ⇒ page 61
17 - Clamp
❑ to remove and install the tube-hose line pull out retaining clip up to the stop
❑ is pulled out from the side on certain master cylinders
18 - Gasket
❑ always replace ⇒ Electronic Catalogue of Original Parts
❑ stick onto the master cylinder
19 - Supply hose
❑ out of plastic ⇒ page 54
20 - Clutch position sender - G476-
❑ for vehicles with start-stop system
❑ Assign components via the ⇒ Electronic catalogue of original parts
❑ removing ⇒ page 39
❑ installing ⇒ page 40
❑ can be checked in the “targeted fault finding” ⇒ Vehicle diagnostic tester
30
Page 35

Fabia II 2007 ➤ , Fabia II 2009 ➤ , Fabia II 2011 ➤ , Rapid 2011 ➤ , R ...
Removing and installing tension spring
– Removing and installing with hook - 3438- .
– Insert the vibration damper with the recess -arrows- as of the
2nd spring coil -arrows-.
1.7.1 Removing and installing clutch pedal switch - F36-
Note
The clutch pedal switch - F36- may only be installed once to en‐
sure that it has an adequately tight fit in the bracket.
Gearbox 02T - Edition 05.2014
Removing
– Removing the footwell vent ⇒ Heating and Air Conditioning;
Rep. gr. 80 .
Note
The clutch pedal switch is installed from the front wall.
– Unplug connector from the clutch pedal switch - F36- .
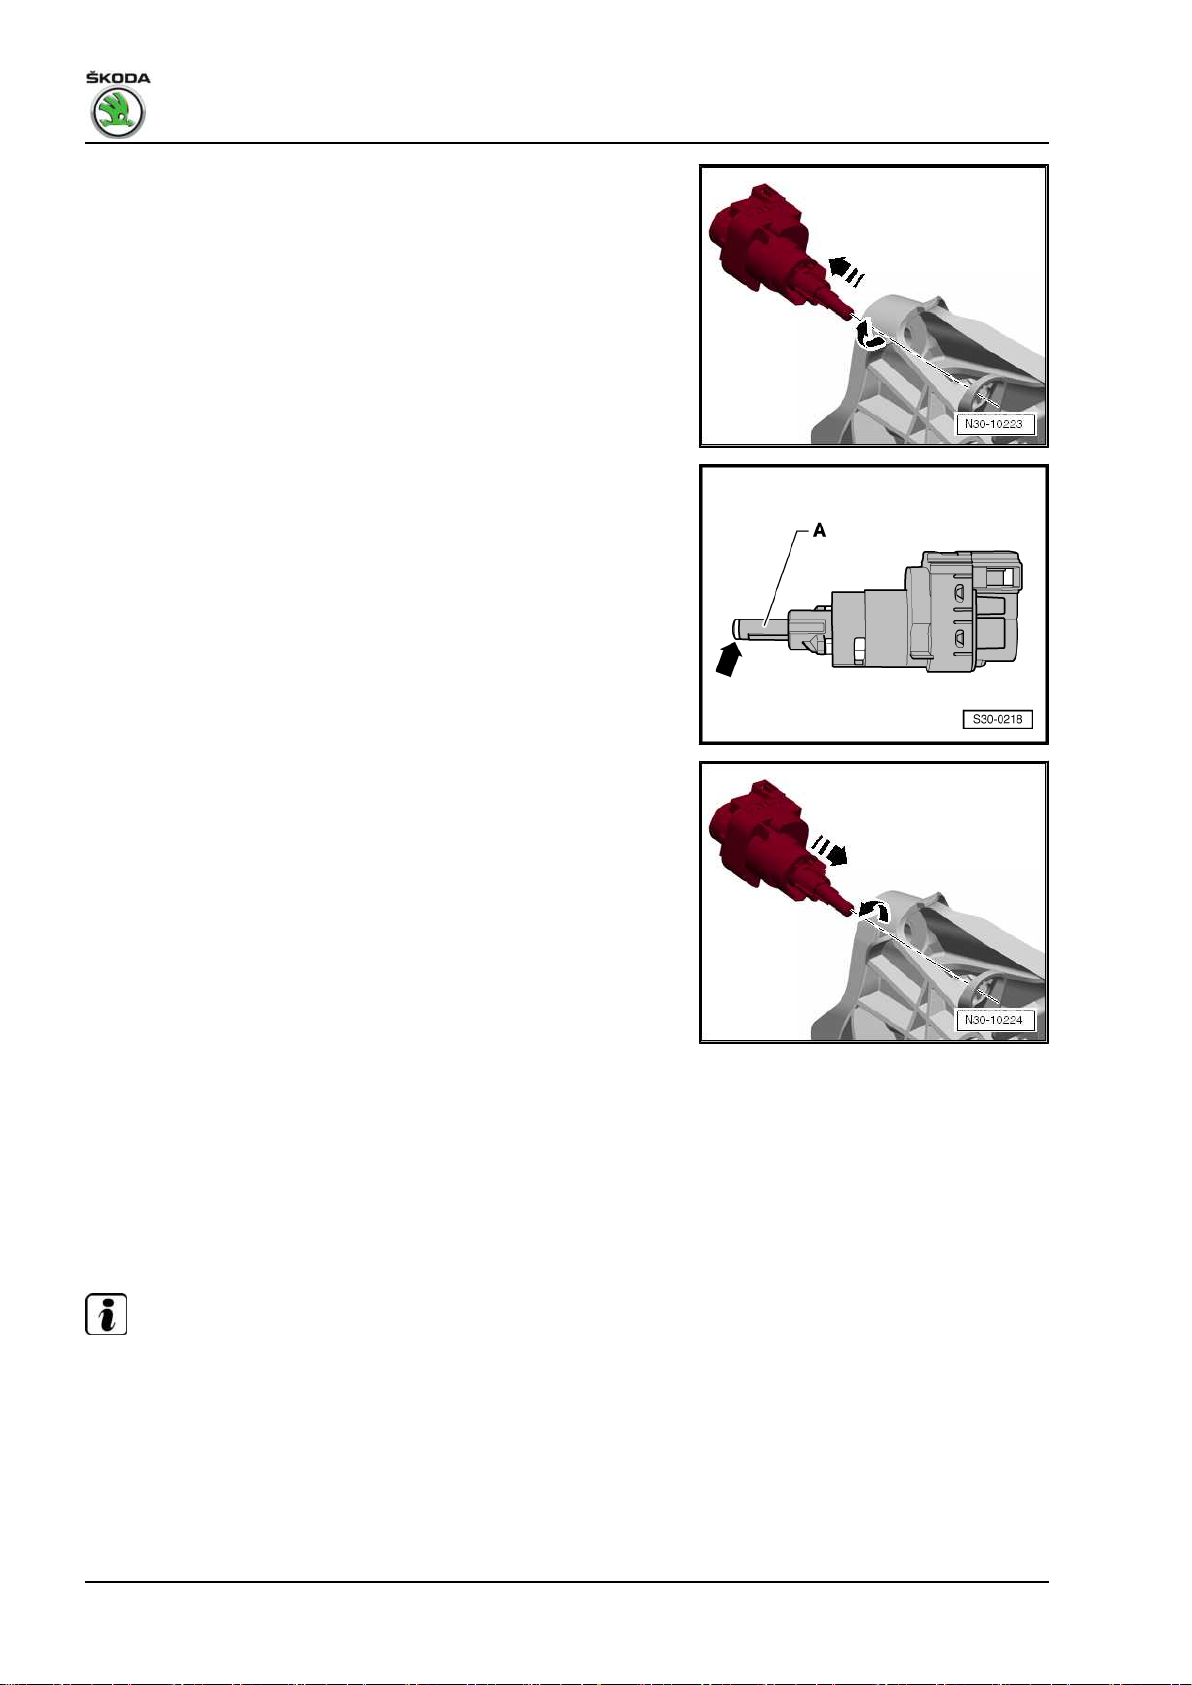
– Turn the clutch pedal switch at the bracket 45° in
-direction of arrow- and remove it from the support.
Install
• The tappet -A- of the clutch pedal switch must not be pulled
out.
• Grease the tappet head -arrow-.
• Assign the grease via the ⇒ Electronic Catalogue of Original
Parts .
• When installing the clutch pedal switch the clutch pedal must
always remain in the off position. During the complete assem‐
bly, the clutch pedal must only be touched with the tappet head
-arrow- of the clutch pedal switch .
31
Page 36

Fabia II 2007 ➤ , Fabia II 2009 ➤ , Fabia II 2011 ➤ , Rapid 2011 ➤ , R ...
Gearbox 02T - Edition 05.2014
The clutch pedal switch is installed from the front wall.
– Insert the clutch pedal switch into the support of the bracket
and turn it 45° in -direction of arrow-.
– Insert connector for the clutch pedal switch .
– Install the footwell vent ⇒ Heating and Air Conditioning; Rep.
gr. 80 .
1.7.2 Removing and installing crash strut
The crash strut for the clutch pedal, which is installed on the
steering column, is offered in two versions.
Version with two fixing screws
Removing
– Remove the storage area on the driver's side ⇒ Body Work;
Rep. gr. 70 .
– Release screws -arrows-.
Install
Installation is carried out in the reverse order.
32
Page 37

Tightening torque
Crash strut to steering column (2 screws) 9 Nm
Fabia II 2007 ➤ , Fabia II 2009 ➤ , Fabia II 2011 ➤ , Rapid 2011 ➤ , R ...
Gearbox 02T - Edition 05.2014
33
Page 38

Fabia II 2007 ➤ , Fabia II 2009 ➤ , Fabia II 2011 ➤ , Rapid 2011 ➤ , R ...
Gearbox 02T - Edition 05.2014
Version with one fixing screw
Removing
– Remove the storage area on the driver's side ⇒ Body Work;
Rep. gr. 70 .
– Release screw -arrow-.
– Unclip the crash strut from the steering column.
Install
Installation is carried out in the reverse order.
34
Page 39
Tightening torque
Crash strut to steering column (1 screw) 20 Nm
Fabia II 2007 ➤ , Fabia II 2009 ➤ , Fabia II 2011 ➤ , Rapid 2011 ➤ , R ...
Gearbox 02T - Edition 05.2014
35
Page 40
Fabia II 2007 ➤ , Fabia II 2009 ➤ , Fabia II 2011 ➤ , Rapid 2011 ➤ , R ...
Gearbox 02T - Edition 05.2014
1.8 Summary of components - Foot controls (Rapid)
Note
♦
Summary of components - Hydraulics ⇒ page 54 .
♦
After the battery earth strap is disconnected and connected, carry out additional operations ⇒ Electrical
System; Rep. gr. 27 .
♦
Grease all bearing points and contact surfaces with Polycarbamide Grease - G 052 142 A2- .
1 - Front wall
❑ with mount for bearing
bracket and master cyl‐
inder
2 - Bushing
❑ for the top location hole
in the bracket
❑ The bushings for the
bottom location hole in
the bracket are located
in the master cylinder
3 - Bearing bracket
❑ removing and installing
with master cylinder
⇒ page 41
❑ removing and installing
without master cylinder
⇒ page 44
4 - 25 Nm
❑ for bracket on front wall
❑ self-locking
❑ 3 pieces
❑ always replace ⇒ Elec‐
tronic Catalogue of
Original Parts
5 - Clutch pedal switch - F36-
❑ removing and installing
⇒ page 37
6 - Stop
❑ for the clutch pedal
7 - Bearing bolt
❑ always replace ⇒ Elec‐
tronic Catalogue of Original Parts
8 - Over-centre helper spring
❑ removing and installing ⇒ page 48
9 - Clutch pedal
❑ removing and installing with over-centre helper spring ⇒ page 48
10 - Bushing
11 - Cap
12 - Support
❑ only replace if the master cylinder has been removed
36
Page 41
Fabia II 2007 ➤ , Fabia II 2009 ➤ , Fabia II 2011 ➤ , Rapid 2011 ➤ , R ...
Gearbox 02T - Edition 05.2014
❑ removing and installing ⇒ page 54
13 - Master cylinder
❑ removing and installing ⇒ page 61
14 - Clamp
❑ to remove and install the tube-hose line pull out retaining clip up to the stop
❑ is pulled out from the side on certain master cylinders
15 - Gasket
❑ always replace ⇒ Electronic Catalogue of Original Parts
❑ stick onto the master cylinder
16 - Supply hose
❑ out of plastic ⇒ page 37
Plastic return hose -1-
• The gaskets -2- must be located in the return hose.
1.8.1 Removing and installing clutch pedal switch - F36-
Note
The clutch pedal switch - F36- may only be installed once to en‐
sure that it has an adequately tight fit in the bracket for clutch
pedal.
Removing
– Removing the footwell vent ⇒ Heating and Air Conditioning;
Rep. gr. 80 .
Note
The clutch pedal switch is installed from the front wall.
– Unplug connector from the clutch pedal switch - F36- .
37
Page 42
Fabia II 2007 ➤ , Fabia II 2009 ➤ , Fabia II 2011 ➤ , Rapid 2011 ➤ , R ...
Gearbox 02T - Edition 05.2014
– Turn the clutch pedal switch at the bracket 45° in
-direction of arrow- and remove it from the support.
Install
• The tappet -A- of the clutch pedal switch must not be pulled
out.
• Grease the tappet head -arrow-.
• Assign the grease via the ⇒ Electronic Catalogue of Original
Parts .
• When installing the clutch pedal switch the clutch pedal must
always remain in the off position. During the complete assem‐
bly, the clutch pedal must only be touched with the tappet head
-arrow- of the clutch pedal switch .
The clutch pedal switch is installed from the front wall.
– Insert the clutch pedal switch into the support of the bracket
and turn it 45° in -direction of arrow-.
– Insert connector for the clutch pedal switch .
– Install the footwell vent ⇒ Heating and Air Conditioning; Rep.
gr. 80 .
1.9 Removing and installing the bracket with
the master cylinder (Fabia II 2011 ►;
Roomster 2011 ►; Rapid NH 2013 ►)
Special tools and workshop equipment required
♦ Closing tool - T10249-
1.9.1 Removing
Note
After the battery earth strap is disconnected and connected, carry
out additional operations ⇒ Electrical System; Rep. gr. 27 .
– If necessary, remove engine cover ⇒ Engine; Rep. gr. 10 .
– Remove battery ⇒ Electrical System; Rep. gr. 27 .
– Remove air filter housing ⇒ Engine; Rep. gr. 23 , or ⇒ Engine;
Rep. gr. 24 .
38
Page 43
Fabia II 2007 ➤ , Fabia II 2009 ➤ , Fabia II 2011 ➤ , Rapid 2011 ➤ , R ...
– If the master cylinder is not accessible, remove the engine
control unit from the front wall ⇒ Engine; Rep. gr. 23 or ⇒
Engine; Rep. gr. 24 .
– Lay a cloth under the master cylinder.
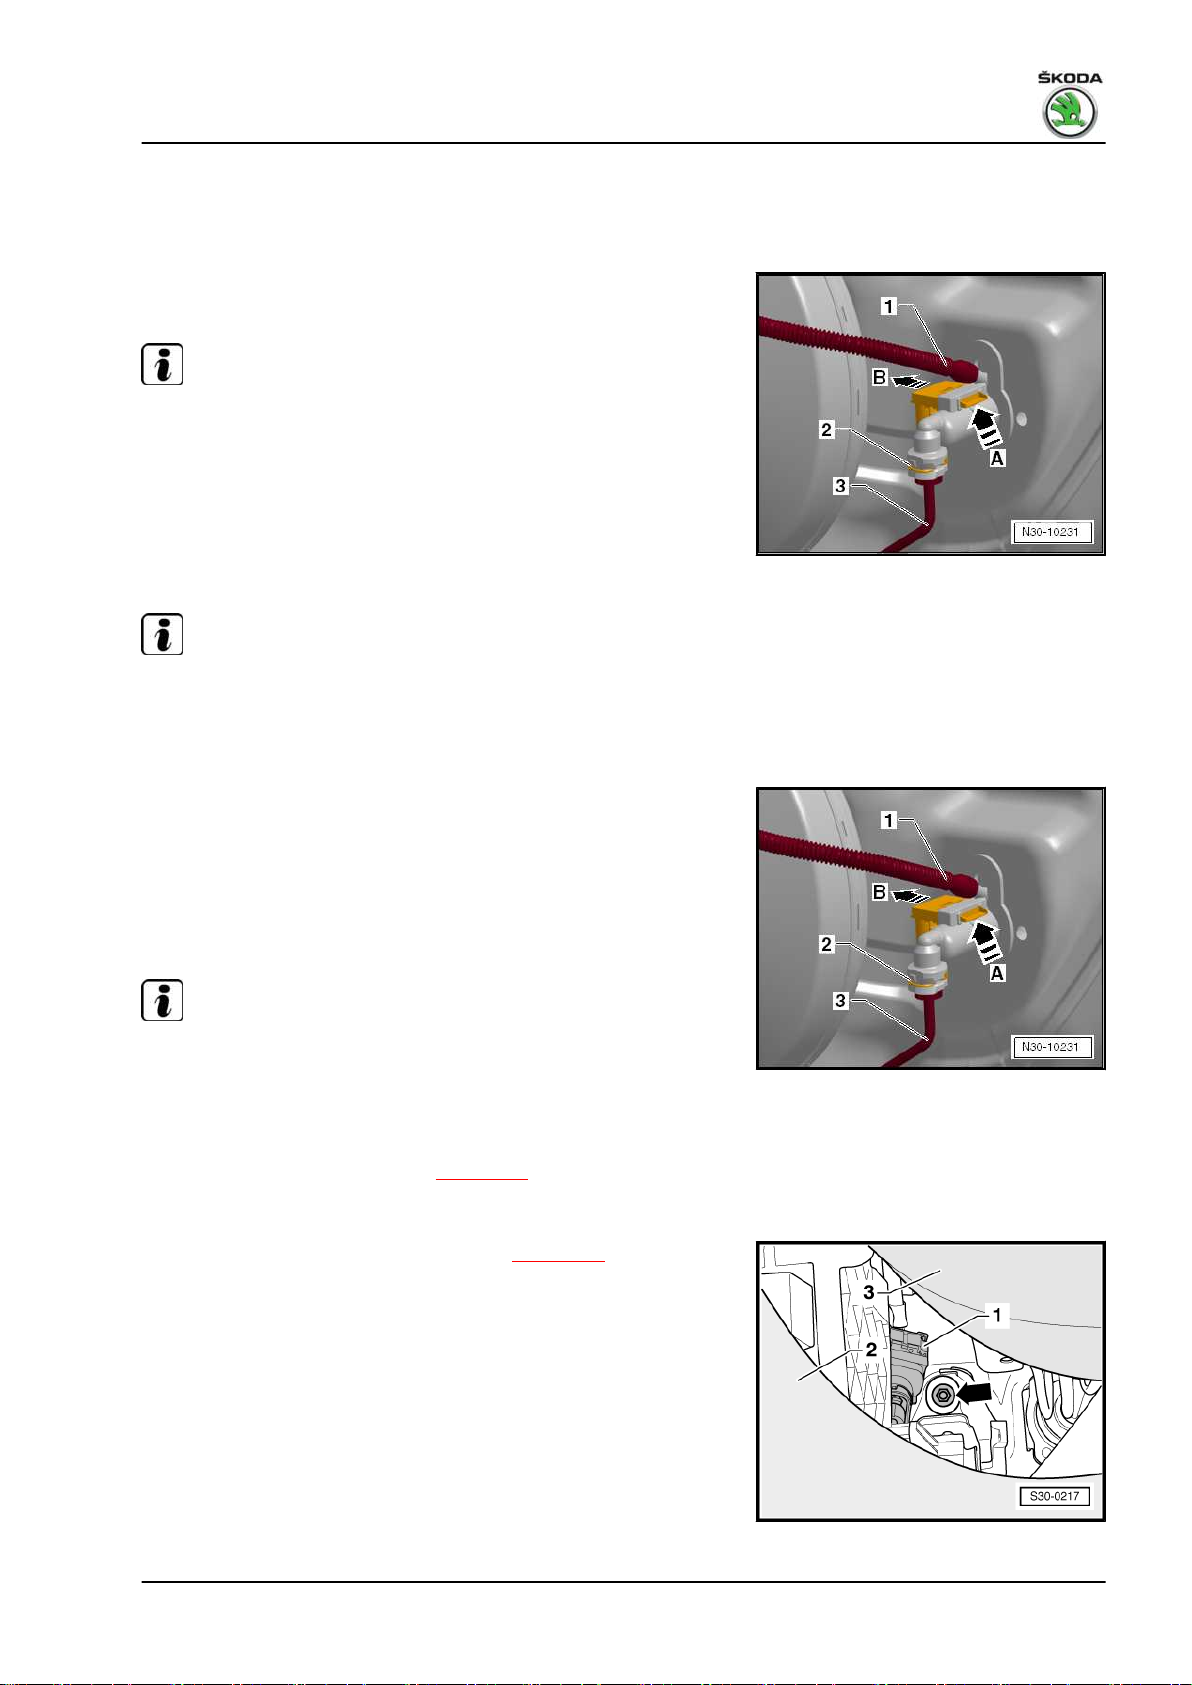
– Detach return hose -1- at master cylinder and close with a
suitable tool, e.g. closing tool - T10249/1- .
Note
♦
Do not use the hose clamp - MP7-602- , otherwise the return
hose -1- will be damaged.
♦
During the following work, ensure that no brake fluid lands on
longitudinal member or gearbox. If this is the case, these
points must be cleaned thoroughly.
– Pull out the locking clip -2- on the master cylinder up to the
stop.
Note
On certain master cylinders, the locking clip -2- can also be pulled
out from the side.
Gearbox 02T - Edition 05.2014
– Pull the tube-hose line -3- out of the master cylinder and close.
Vehicles with start-stop system
– Unclip clutch position sender - G476- at master cylinder
-arrow A- and -arrow B-.
– Remove the clutch position sender with fitted electrical plug
connectors from the master cylinder.
Continued for all vehicles
Note
When performing work in the footwell, put cloths on the carpet to
protect it from possible brake fluid spills.
– Removing the footwell vent ⇒ Heating and Air Conditioning;
Rep. gr. 87 .
– If present, remove crash strut ⇒ page 32 .
– Put steering wheel in the highest position.
– Remove clutch pedal switch - F36- -1- ⇒ page 31 .
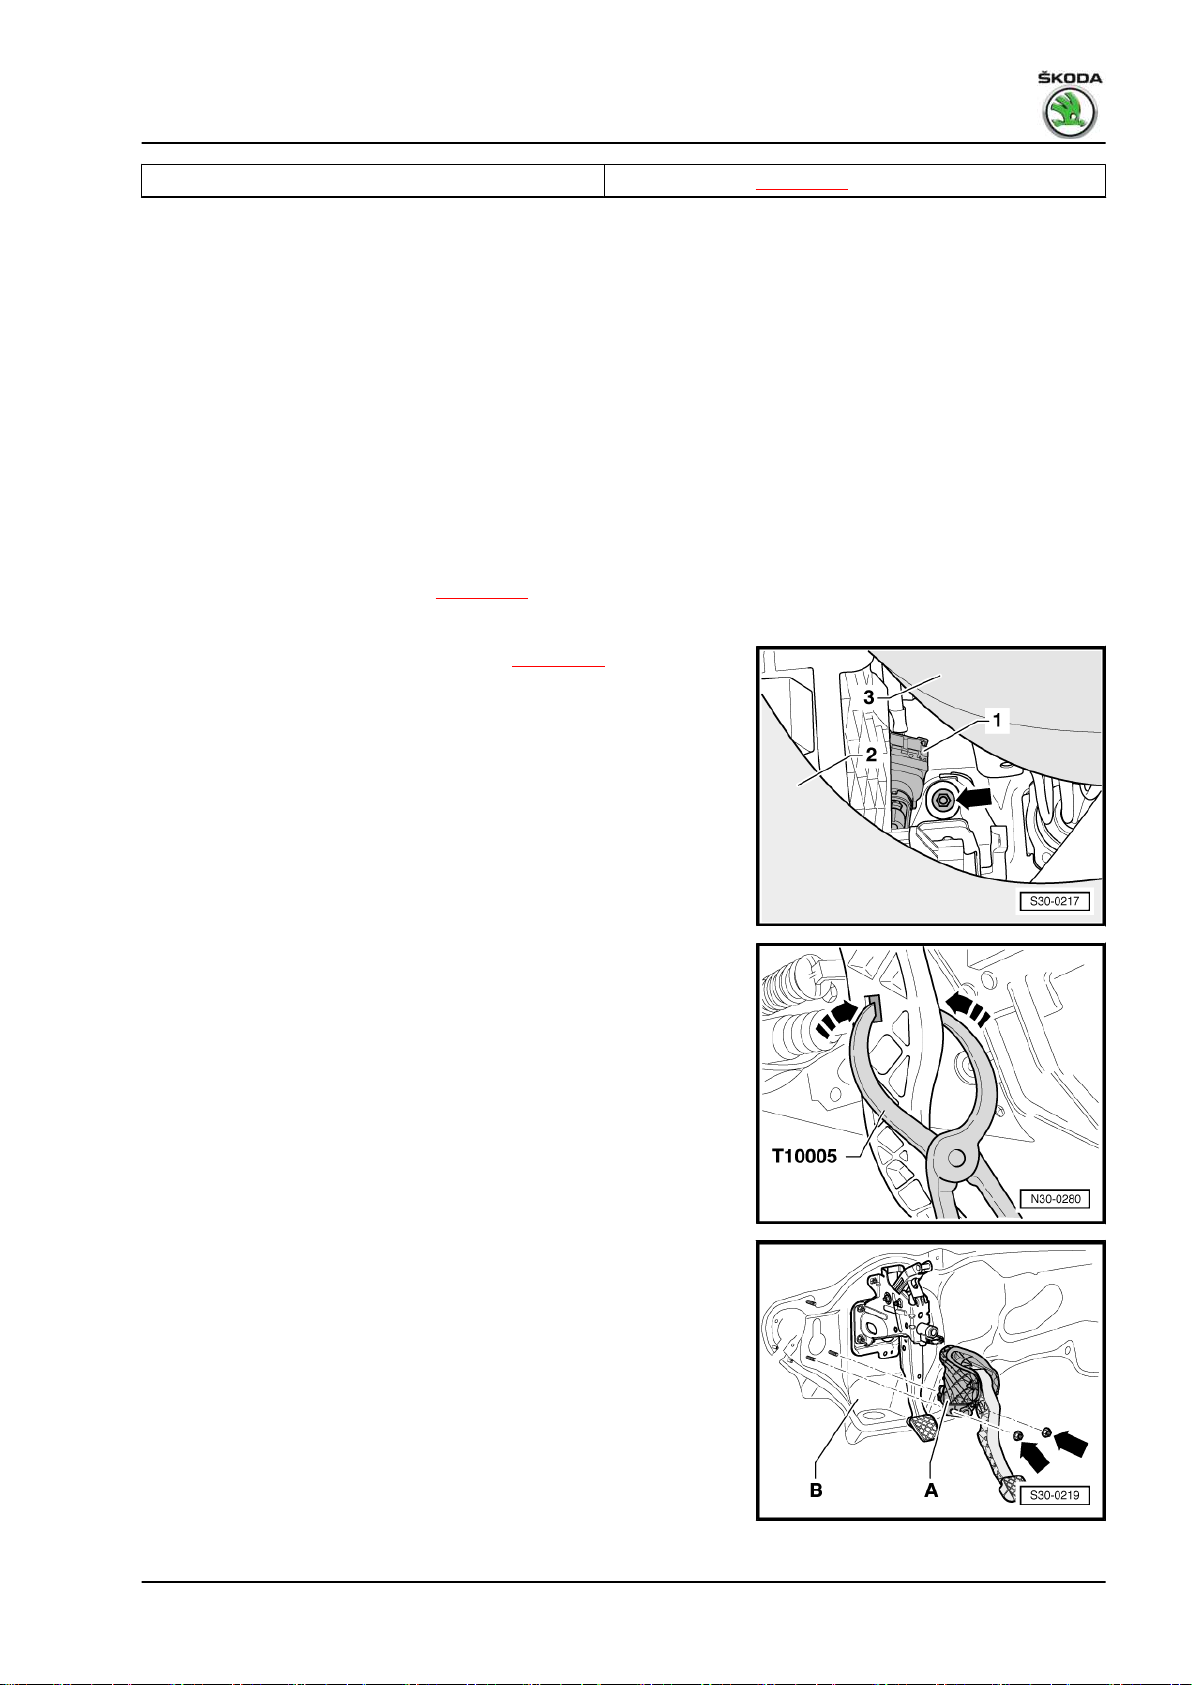
– Unscrew the top fixing nut -arrow- for the bracket. To do so,
position an long extension on the nut in the opening between
the dash panel -2- and the bottom steering column trim panel
-3-.
39
Page 44

Fabia II 2007 ➤ , Fabia II 2009 ➤ , Fabia II 2011 ➤ , Rapid 2011 ➤ , R ...
Gearbox 02T - Edition 05.2014
– Unscrew the two lower fixing nuts -arrows-.
– Remove the bracket -A- from the front wall -B-.
1.9.2 Install
Installation is performed in the reverse order, pay attention to the
following points:
Note
Position self-locking nuts -1- and -2- for bracket -3- on front wall.
– Install the clutch pedal switch - F36- ⇒ page 31 .
– If present, install the crash strut ⇒ page 32 .
– Install the footwell vent ⇒ Heating and Air Conditioning; Rep.
gr. 87 .
Vehicles with start-stop system
– Insert the clutch position sender - G476- with fitted electrical
plug connectors up to the stop on the master cylinder.
• The clutch position sender must lock in place -arrow A-.
– For checking, pull at clutch position sender -arrow B-.
Continued for all vehicles
– Press in tube-hose line -3- onto the connection of the master
cylinder, until the locking clip -2- is heard to click into position.
– Fit return hose -1- on the master cylinder.
– For checking, pull on the line.
– Bleed the clutch control ⇒ page 65 .
– If removed, install the engine control unit at the front wall ⇒
Engine; Rep. gr. 23 or ⇒ Engine; Rep. gr. 24 .
– Install battery ⇒ Electrical System; Rep. gr. 27 .
– Install air filter housing ⇒ Engine; Rep. gr. 23 or ⇒ Engine;
Rep. gr. 24 .
40
Page 45

Tightening torques
Fabia II 2007 ➤ , Fabia II 2009 ➤ , Fabia II 2011 ➤ , Rapid 2011 ➤ , R ...
Gearbox 02T - Edition 05.2014
Bracket/clutch pedal to front wall
Master cylinder to front wall
1)
Replace self-locking nut.
1)
1)
1.10 Removing and installing the bracket with the master cylinder (Rapid 2011 ►)
Special tools and workshop equipment required
♦ Closing tool - T10249-
1.10.1 Removing
– Lay a cloth under the master cylinder.
– Using an extraction bottle extract as much brake fluid as pos‐
sible from the brake fluid reservoir.
– Detach return hose -A- at master cylinder and close with a
suitable tool e.g. closing tool - T10249/1- .
Note
♦
Do not use the hose clamp - MP7-602- , otherwise the return
hose -A- will be damaged.
♦
During the following work, ensure that no brake fluid lands on
longitudinal member or gearbox. If this is the case, these
points must be cleaned thoroughly.
⇒ page 29 -Position 4-
⇒ page 29 -Position 4-
– Remove the locking clip -B- on the master cylinder up to the
stop.
– Release and cut the tube-hose line -C- out of the master cyl‐
inder.
Note
When performing work in the footwell, put cloths on the carpet to
protect it from possible brake fluid spills.
– Removing the footwell vent ⇒ Heating and Air Conditioning;
Rep. gr. 87 .
– Put steering wheel in the highest position.
– Unplug connector from the clutch pedal switch - F36- .
– Unscrew the top fixing nut -arrow- for the bracket. To do so,
position an long extension on the nut in the opening between
the dash panel -2- and the bottom steering column trim panel
-3-.
41
Page 46

Fabia II 2007 ➤ , Fabia II 2009 ➤ , Fabia II 2011 ➤ , Rapid 2011 ➤ , R ...
Gearbox 02T - Edition 05.2014
– Unscrew the two lower fixing nuts -arrows-.
– Remove the bracket -A- from the front wall -B-.
1.10.2 Install
Installation is performed in the reverse order, pay attention to the
following points:
Note
Position self-locking nuts -1- and -2- for bracket -3- on front wall
and tighten.
– Connect the connector to the clutch pedal switch - F36- .
– Install the footwell vent ⇒ Heating and Air Conditioning; Rep.
gr. 87 .
– Press in tube-hose line -C- onto the connection of the master
cylinder, until the locking clip -B- is heard to click into position.
– Fit return hose -A- on the master cylinder.
– For checking, pull on the line.
– Bleed the clutch control ⇒ page 65 .
Tightening torques
Bracket/clutch pedal to front wall
42
1)
⇒ page 36 -Position 4-
Page 47
Fabia II 2007 ➤ , Fabia II 2009 ➤ , Fabia II 2011 ➤ , Rapid 2011 ➤ , R ...
Gearbox 02T - Edition 05.2014
Master cylinder to front wall
1)
Replace self-locking nut.
1)
1.11 Removing and installing the bracket without the master cylinder (Fabia II 2011 ►; Roomster 2011 ►; Rapid NH 2013 ►)
Special tools and workshop equipment required
♦ Pliers - T10005Removing
– Removing the footwell vent ⇒ Heating and Air Conditioning;
Rep. gr. 87 .
– If present, remove crash strut ⇒ page 32 .
– Put steering wheel in the highest position.
– Remove clutch pedal switch - F36- -1- ⇒ page 31 .
– Unscrew the top fixing nut -arrow- for the bracket. To do so,
position an long extension on the nut in the opening between
the dash panel -2- and the bottom steering column trim panel
-3-.
⇒ page 36 -Position 4-
Unlock the actuating rod/master cylinder from the clutch pedal as
follows:
– Pull clutch pedal slightly into the passenger compartment.
– Press together both sides of the support using the pliers -
T10005- -arrows-.
– Unscrew the two lower fixing nuts -arrows-.
– Remove the bracket -A- from the front wall -B-.
• The master cylinder is locked into position with the bracket.
• When removing the bracket, the master cylinder in the engine
compartment must be held by a 2nd mechanic.
Install
Installation is performed in the reverse order, pay attention to the
following points:
43
Page 48
Fabia II 2007 ➤ , Fabia II 2009 ➤ , Fabia II 2011 ➤ , Rapid 2011 ➤ , R ...
Gearbox 02T - Edition 05.2014
Note
Position self-locking nuts -1- and -2- for bracket -3- on front wall.
– The support -A- must be located on the actuating rod -B- of
the master cylinder.
– To click in the support -A-, press the clutch pedal towards the
front wall in -direction of arrow-. While doing so, make sure it
catches correctly in the support.
– Install the clutch pedal switch - F36- ⇒ page 31 .
– If present, install the crash strut ⇒ page 32 .
– Install the footwell vent ⇒ Heating and Air Conditioning; Rep.
gr. 87 .
1.12 Removing and installing the bracket
without the master cylinder (Rapid 2011
►)
Special tools and workshop equipment required
♦ Pliers - T10005Removing
– Removing the footwell vent ⇒ Heating and Air Conditioning;
Rep. gr. 87 .
– Put steering wheel in the highest position.
– Unplug connector from the clutch pedal switch - F36- .
– Unscrew the top fixing nut -arrow- for the bracket. To do so,
position an long extension on the nut in the opening between
the dash panel -2- and the bottom steering column trim panel
-3-.
44
Page 49

Fabia II 2007 ➤ , Fabia II 2009 ➤ , Fabia II 2011 ➤ , Rapid 2011 ➤ , R ...
Unlock the actuating rod/master cylinder from the clutch pedal as
follows:
– Pull clutch pedal slightly into the passenger compartment.
– Press both sides of the support inwards using the pliers -
T10005- -arrows-
– Unscrew the two lower fixing nuts -arrows-.
– Remove the bracket -A- from the front wall -B-.
• The master cylinder is locked into position with the bracket.
• When removing the bracket, the master cylinder in the engine
compartment must be held by a 2nd mechanic.
Install
Installation is performed in the reverse order, pay attention to the
following points:
Gearbox 02T - Edition 05.2014
Note
Position self-locking nuts -1- and -2- for bracket -3- on front wall
and tighten.
– The support -A- must be located on the actuating rod -B- of
the master cylinder.
– To click in the support -A-, press the clutch pedal towards the
front wall in -direction of arrow-. While doing so, make sure it
catches correctly in the support.
– Connect the connector to the clutch pedal switch - F36- .
– Install the footwell vent ⇒ Heating and Air Conditioning; Rep.
gr. 87 .
45
Page 50
Fabia II 2007 ➤ , Fabia II 2009 ➤ , Fabia II 2011 ➤ , Rapid 2011 ➤ , R ...
Gearbox 02T - Edition 05.2014
1.13 Removing and installing the clutch pedal
with the over-centre helper spring (Fa‐
bia II 2011 ►; Roomster 2011 ►)
Note
♦
Install clutch pedal with new bearing bolt.
♦
If only the over-centre helper spring should be removed, the
clutch pedal must not be separated from the master cylinder.
Special tools and workshop equipment required
♦ Pliers - T10005♦ Allan key, wrench size 8 mm, commercially available
Removing
– Removing the footwell vent ⇒ Heating and Air Conditioning;
Rep. gr. 87 .
– If present, remove crash strut ⇒ page 32 .
– Remove clutch pedal switch - F36- ⇒ page 31 .
– Unlock the actuating rod/master cylinder from the clutch pedal
as follows:
– Pull clutch pedal slightly into the passenger compartment.
– Press together both sides of the support using the pliers -
T10005- -arrows-.
– Remove the bearing bolt for the clutch pedal.
– Turn the bearing bolt for the clutch pedal to the left
-in direction of arrow-, for this purpose use the hexagon socket
wrench -1-, wrench size 8 mm.
While doing so, the catches -A- are destroyed.
Then the bolts -B- are positioned horizontally.
– Subsequently move the clutch pedal so that the bearing bolt
can be pulled out.
– Remove over-centre helper spring.
– Remove clutch pedal from bracket.
Install
• Install the clutch pedal with a new bearing bolt.
46
Page 51

Fabia II 2007 ➤ , Fabia II 2009 ➤ , Fabia II 2011 ➤ , Rapid 2011 ➤ , R ...
– The support -2- must be located on the actuating rod -1- of the
master cylinder.
– Press the support -2- into the recess on the clutch pedal -3-
until it clicks audibly into place.
– Insert the over-centre helper spring laterally from the bottom
into the support -A- in the bracket next to the tappet of the
master cylinder and next to the clutch pedal.
• The area of the support -arrow- for the bearing bolt of the clutch
pedal must be vertical.
Gearbox 02T - Edition 05.2014
– Now position the over-centre helper spring on the centering
pin of the clutch pedal -arrow-.
– Press on the clutch pedal slightly and insert a new bearing bolt.
– Position the bolts -A- horizontally.
– Turn the bearing bolt to the right -in direction of arrow-, for this
purpose use the hexagon socket wrench -1-, wrench size
8 mm.
• The catches -B- must click audibly into place.
Then the bolts -A- are positioned vertically.
– Install the clutch pedal switch - F36- ⇒ page 31 .
– If present, install the crash strut ⇒ page 32 .
– Install the footwell vent ⇒ Heating and Air Conditioning; Rep.
gr. 87 .
47
Page 52
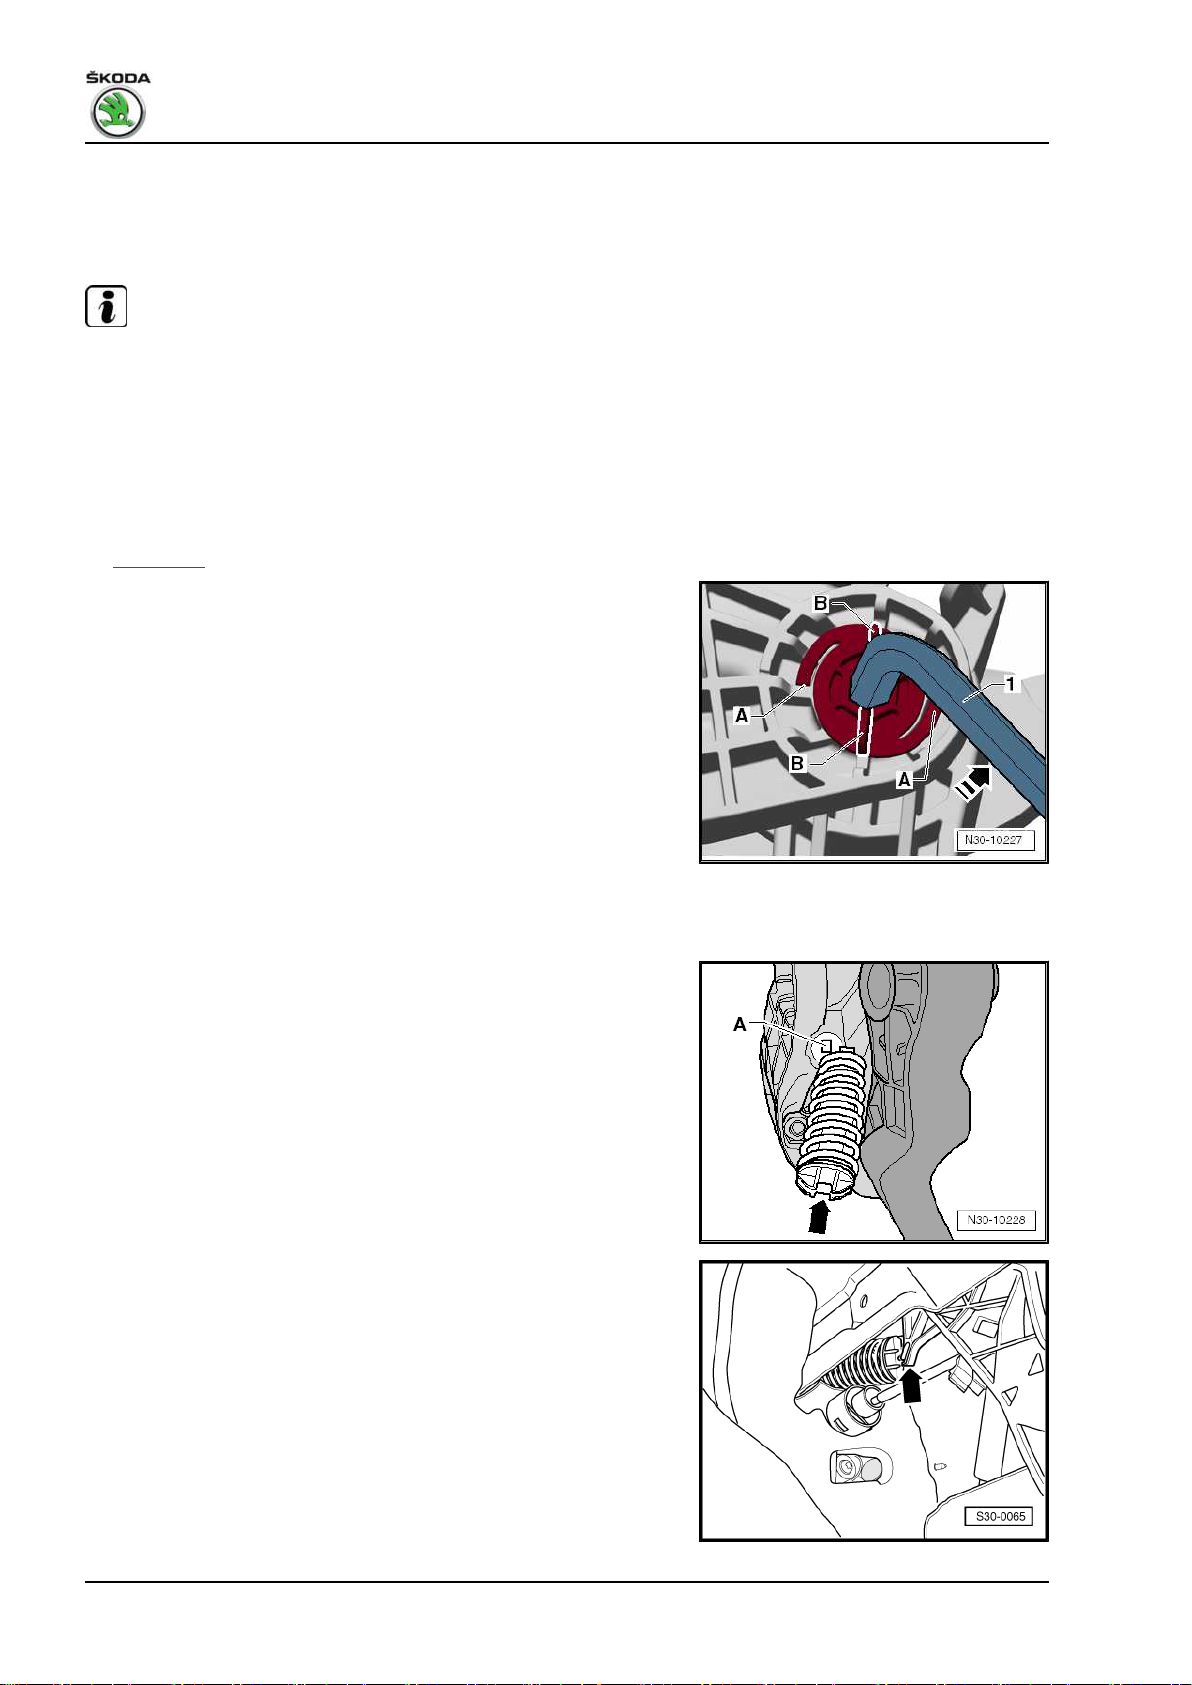
Fabia II 2007 ➤ , Fabia II 2009 ➤ , Fabia II 2011 ➤ , Rapid 2011 ➤ , R ...
Gearbox 02T - Edition 05.2014
1.14 Removing and installing the clutch pedal
with the over-centre helper spring (Rap‐
id)
Note
Install the clutch pedal with a new bearing bolt.
Special tools and workshop equipment required
♦ Pliers - T10005♦ Allan key, wrench size 8 mm, commercially available
Removing
– Remove mounting bracket without master cylinder
⇒ page 44 .
– Remove the bearing bolt for the clutch pedal.
– Turn the bearing bolt for the clutch pedal to the left
-in direction of arrow-, for this purpose use the hexagon socket
wrench -1-, wrench size 8 mm.
While doing so, the catches -A- are destroyed.
Then the bolts -B- are positioned horizontally to the fitting position.
– Subsequently move the clutch pedal so that the bearing bolt
can be pulled out.
– Remove over-centre helper spring.
– Remove clutch pedal from bracket.
Install
• Install the clutch pedal with a new bearing bolt.
– Insert the over-centre helper spring laterally from the bottom
into the support -A- in the bracket next to the tappet of the
master cylinder and next to the clutch pedal.
• The area of the support -arrow- for the bearing bolt of the clutch
pedal must be vertical.
– Now position the over-centre helper spring on the centering
pin of the clutch pedal -arrow-.
48
Page 53

Fabia II 2007 ➤ , Fabia II 2009 ➤ , Fabia II 2011 ➤ , Rapid 2011 ➤ , R ...
– The support -2- must be located on the actuating rod -1- of the
master cylinder.
– Press the support -2- into the recess on the clutch pedal -3-
until it clicks audibly into place.
– Press on the clutch pedal slightly and insert a new bearing bolt.
– Position the bolts -A- horizontally.
– Turn the bearing bolt to the right -in direction of arrow-, for this
purpose use the hexagon socket wrench -1-, wrench size
8 mm.
• The catches -B- must click audibly into place.
Then the bolts -A- are positioned vertically.
– Install bracket without master cylinder ⇒ page 44 .
Gearbox 02T - Edition 05.2014
1.15 Removing and installing the clutch pedal with the tension spring (Fabia II 2011 ►; Roomster 2011 ►; Rapid NH 2013 ►)
Note
♦
Install the clutch pedal with a new bearing bolt.
♦
If only the tension spring is removed, pay attention
⇒ page 51 .
Special tools and workshop equipment required
♦ Hook - 3438♦ Pliers - T10005♦ Allan key, wrench size 8 mm, commercially available
Removing
– Removing the footwell vent ⇒ Heating and Air Conditioning;
Rep. gr. 87 .
– If present, remove crash strut ⇒ page 32 .
– Remove clutch pedal switch - F36- ⇒ page 31 .
49
Page 54

Fabia II 2007 ➤ , Fabia II 2009 ➤ , Fabia II 2011 ➤ , Rapid 2011 ➤ , R ...
Gearbox 02T - Edition 05.2014
– Unhook the tension spring e.g with hook - 3438- .
Note
Only observe the right part of the fig. -arrows- when installing.
Unlock the actuating rod/master cylinder from the clutch pedal as
follows:
– Pull clutch pedal slightly into the passenger compartment.
– Press together both sides of the support using the pliers -
T10005- -arrows-.
– Remove the bearing bolt for the clutch pedal.
– Turn the bearing bolt for the clutch pedal to the left
-in direction of arrow-, for this purpose use the hexagon socket
wrench -1-, wrench size 8 mm.
While doing so, the catches -A- are destroyed.
Then the bolts -B- are positioned horizontally.
– Subsequently move the clutch pedal so that the bearing bolt
can be pulled out.
– Remove clutch pedal from bracket.
Install
• Install the clutch pedal with a new bearing bolt.
• The support -2- must be located on the actuating rod -1- of the
master cylinder.
– Insert a new bearing bolt in the bracket and the clutch pedal.
50
Page 55
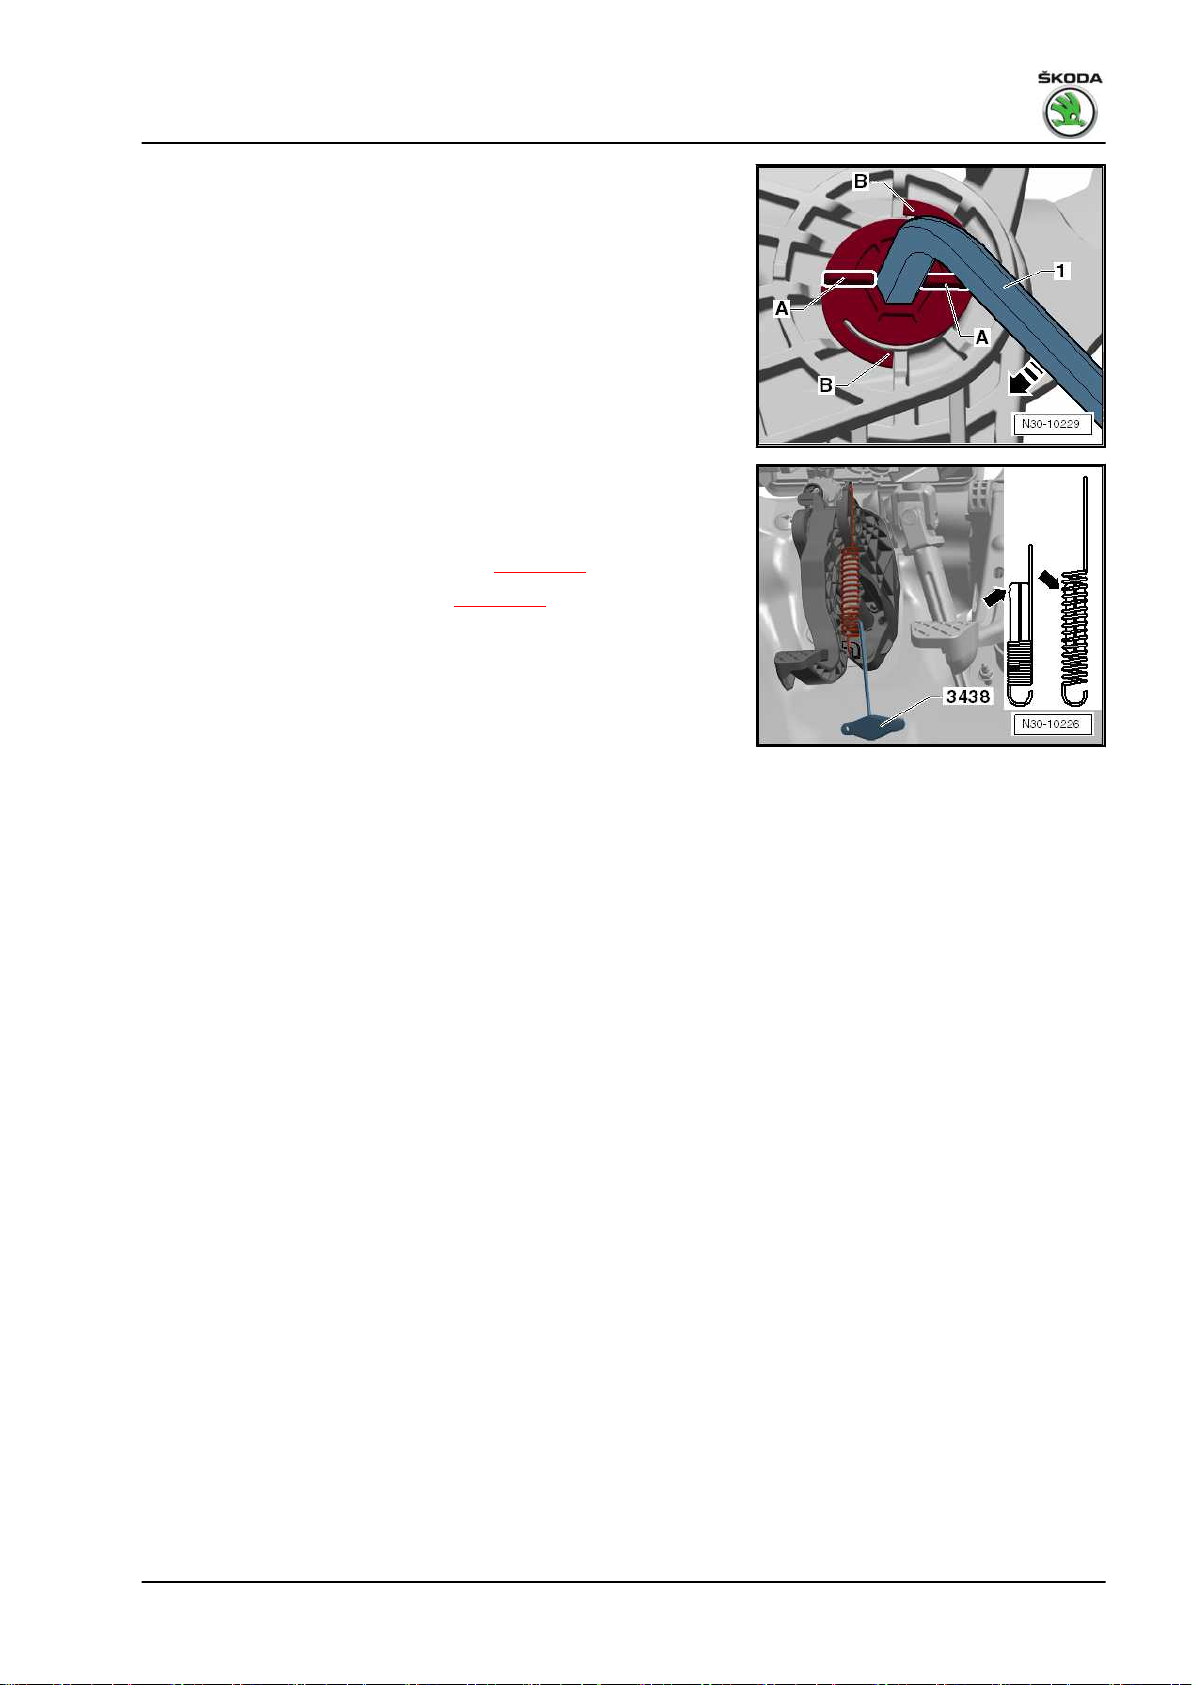
Fabia II 2007 ➤ , Fabia II 2009 ➤ , Fabia II 2011 ➤ , Rapid 2011 ➤ , R ...
– Position the bolts -A- horizontally.
– Turn the bearing bolt to the right -in direction of arrow-, for this
purpose use the hexagon socket wrench -1-, wrench size
8 mm.
• The catches -B- must click audibly into place.
Then the bolts -A- are positioned vertically.
– Lock the clutch pedal with the support on the actuating rod of
the master cylinder.
– Hook in the tension spring.
– Insert the vibration damper with the recess -arrows- as of the
2nd spring coil -arrows-.
– Install the clutch pedal switch - F36- ⇒ page 31 .
– If present, install the crash strut ⇒ page 32 .
– Install the footwell vent ⇒ Heating and Air Conditioning; Rep.
gr. 87 .
Gearbox 02T - Edition 05.2014
1.16 Summary of components - Hydraulic (Fabia II ►; Roomster ►; Rapid NH)
51
Page 56
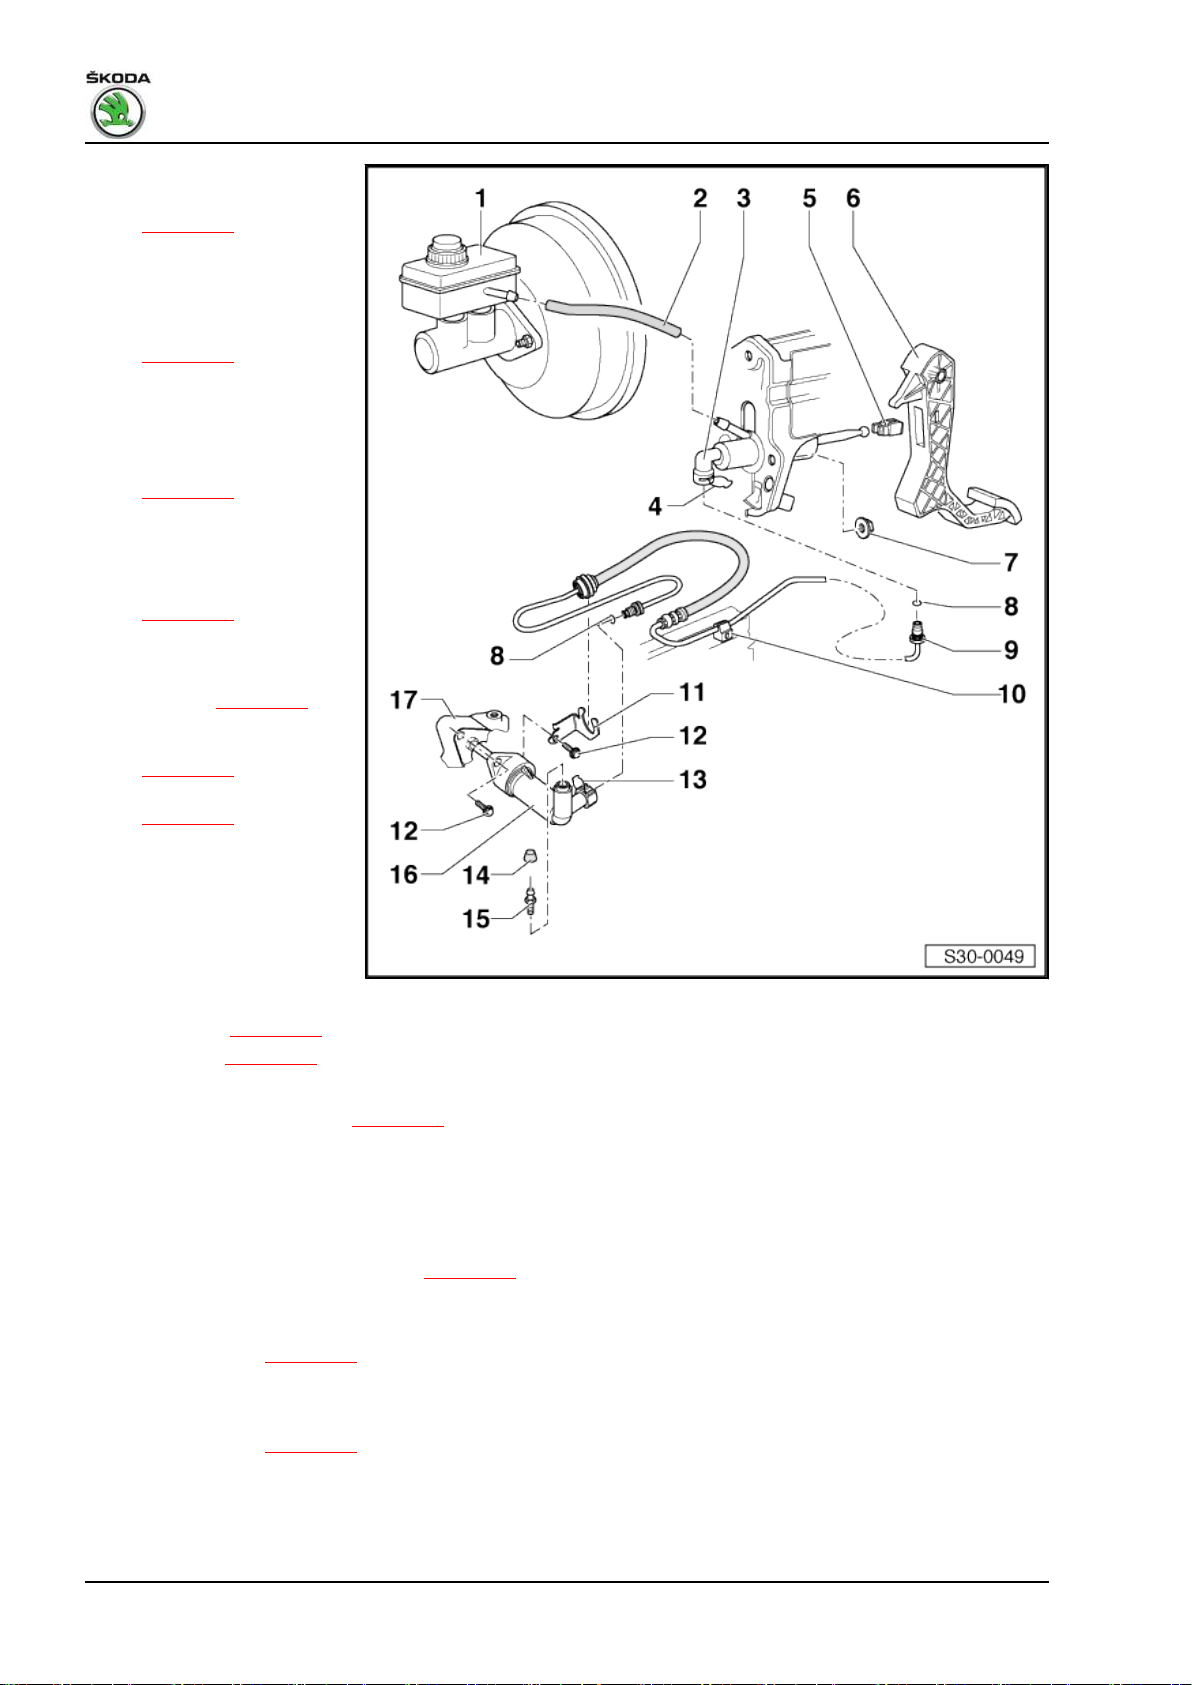
Fabia II 2007 ➤ , Fabia II 2009 ➤ , Fabia II 2011 ➤ , Rapid 2011 ➤ , R ...
Gearbox 02T - Edition 05.2014
1 - Brake fluid reservoir
❑ test tightness
⇒ page 57
2 - Supply hose
❑ out of rubber
❑ as of 12.05 on certain
vehicles out of plastic
⇒ page 54
❑ if the return hose is
made out of plastic, do
not use hose clamp MP7-602-
❑ test tightness
⇒ page 57
3 - Master cylinder
❑ removing and installing
(Fabia II 2007 ►; Room‐
ster 2006 ►)
⇒ page 58
❑ removing and installing
(Fabia II 2011 ►; Room‐
ster 2011 ►; Rapid NH
2013 ►) ⇒ page 61
❑ after installing, bleed the
clutch control
⇒ page 65
❑ test tightness
⇒ page 57
4 - Locking clip
❑ to remove the tube-hose
line -Pos. 9- pull out of
the master cylinder
-Pos. 3- up to the stop
5 - Support
❑ only replace if the master cylinder -Pos. 3- has been removed
❑ removing ⇒ page 53
❑ installing ⇒ page 53
6 - Clutch pedal
❑ removing and installing ⇒ page 27
7 - 28 Nm
❑ always replace ⇒ Electronic Catalogue of Original Parts
8 - O-ring
❑ always replace
❑ Difference between the O-rings ⇒ page 53
❑ assign according to the ⇒ Electronic catalogue of original parts .
❑ moisten with brake fluid before installing
❑ test tightness ⇒ page 57
9 - Tube-hose line
❑ assign according to the ⇒ Electronic catalogue of original parts .
❑ test tightness ⇒ page 57
10 - Support
❑ at front left frame side rails
❑ for clipping in the tube-hose line -Pos. 9-
52
Page 57

Fabia II 2007 ➤ , Fabia II 2009 ➤ , Fabia II 2011 ➤ , Rapid 2011 ➤ , R ...
Gearbox 02T - Edition 05.2014
11 - Support
❑ holds the tube-hose line -Pos. 9- on the gearbox
❑ not fitted to all vehicles
12 - 20 Nm
13 - Locking clip
❑ to remove the tube-hose line -Pos. 9- pull out of the slave cylinder -Pos. 16- up to the stop
14 - Dust cap
15 - Vent valve
❑ Bleeding the clutch control ⇒ page 65
16 - Slave cylinder
❑ removing and installing ⇒ page 61
❑ after installing, bleed the clutch control ⇒ page 65
17 - Gearbox
Lift off the support -A- in -the direction of the arrow-.
Push the actuator rod/master cylinder in the support -A- in
-direction of the arrow-.
Difference between the O-rings
Pos. Version of line connection
-1- Line connection with round slot -arrow 1-
-2- Line connection with shoulder -arrow 2-
-3- Line connection with shoulder -arrow 2- and with
round slot -arrow 3-
• In case of a line connection with round slot -arrow 1- and
-arrow 3-, O-rings must be inserted into the slots.
53
Page 58

Fabia II 2007 ➤ , Fabia II 2009 ➤ , Fabia II 2011 ➤ , Rapid 2011 ➤ , R ...
Gearbox 02T - Edition 05.2014
As of 12.05 on certain vehicles plastic return hose -1-:
♦ Gaskets -2- must be present on the return hose.
♦ Do not use hose clamp - MP7-602-
1.17 Summary of components - Hydraulic (Rapid 2011 ►)
1 - Brake fluid reservoir
2 - Spring strap clamp
3 - Supply hose
4 - Master cylinder
❑ removing and installing
⇒ page 61
❑ after installing, bleed the
clutch control
⇒ page 65
5 - Support
❑ only replace if the mas‐
ter cylinder -Pos. 4- has
been removed
❑ removing ⇒ page 55
❑ installing ⇒ page 56
6 - Clutch pedal
7 - Clamp
❑ to remove the tube-hose
line -Pos. 14- pull it out
of the master cylinder up
to the stop
8 - 25 Nm
❑ self-locking
❑ always replace ⇒ Elec‐
tronic Catalogue of
Original Parts
9 - Brake lines
10 - Support
❑ attached to the vehicle
body
❑ for tube-hose line
-Pos. 14-
11 - Support
❑ attached to the vehicle body
❑ for tube-hose line -Pos. 14-
12 - Support
❑ attached to the vehicle body
❑ for tube-hose line -Pos. 14-
54
Page 59

Fabia II 2007 ➤ , Fabia II 2009 ➤ , Fabia II 2011 ➤ , Rapid 2011 ➤ , R ...
Gearbox 02T - Edition 05.2014
13 - Gasket ring/O-ring
❑ pull onto line connection
❑ insert with brake fluid
❑ Gasket rings/O-rings are adapted to the version of the line connection ⇒ page 56
❑ Assignment ⇒ Electronic Catalogue of Original Parts
14 - Tube-hose line
❑ Assignment ⇒ Electronic Catalogue of Original Parts
15 - Support
❑ fixed at front left frame side rail
❑ for tube-hose line -Pos. 14-
16 - Support
❑ for tube-hose line -Pos. 14- on the gearbox
❑ not fitted to all vehicles
❑ Assignment ⇒ Electronic Catalogue of Original Parts
17 - Screw, 20 Nm
❑ not fitted to all vehicles
❑ Assignment ⇒ Electronic Catalogue of Original Parts
18 - Dust cap
19 - Vent valve
❑ Bleeding the clutch control ⇒ page 65
20 - Screw, 20 Nm
21 - Slave cylinder
❑ removing and installing ⇒ page 61
❑ after installing, bleed the clutch control ⇒ page 65
22 - Clamp
❑ to remove the tube-hose line -Pos. 14- pull it out of the slave cylinder up to the stop
23 - Gearbox
Lift off the support -A- in -the direction of the arrow-.
55
Page 60

Fabia II 2007 ➤ , Fabia II 2009 ➤ , Fabia II 2011 ➤ , Rapid 2011 ➤ , R ...
Gearbox 02T - Edition 05.2014
Push the actuator rod/master cylinder in the support -A- in
-direction of the arrow-.
Gasket rings/O-rings for tube-hose lines
Pos. Version of line connection
-1- Line connection with round slot -arrow 1-
-2- Line connection with shoulder -arrow 2-
-3- Line connection with shoulder -arrow 2- and with
round slot -arrow 3-
• In case of a line connection with round slot -arrow 1- and
-arrow 3-, O-rings must be inserted into the slots.
56
Page 61
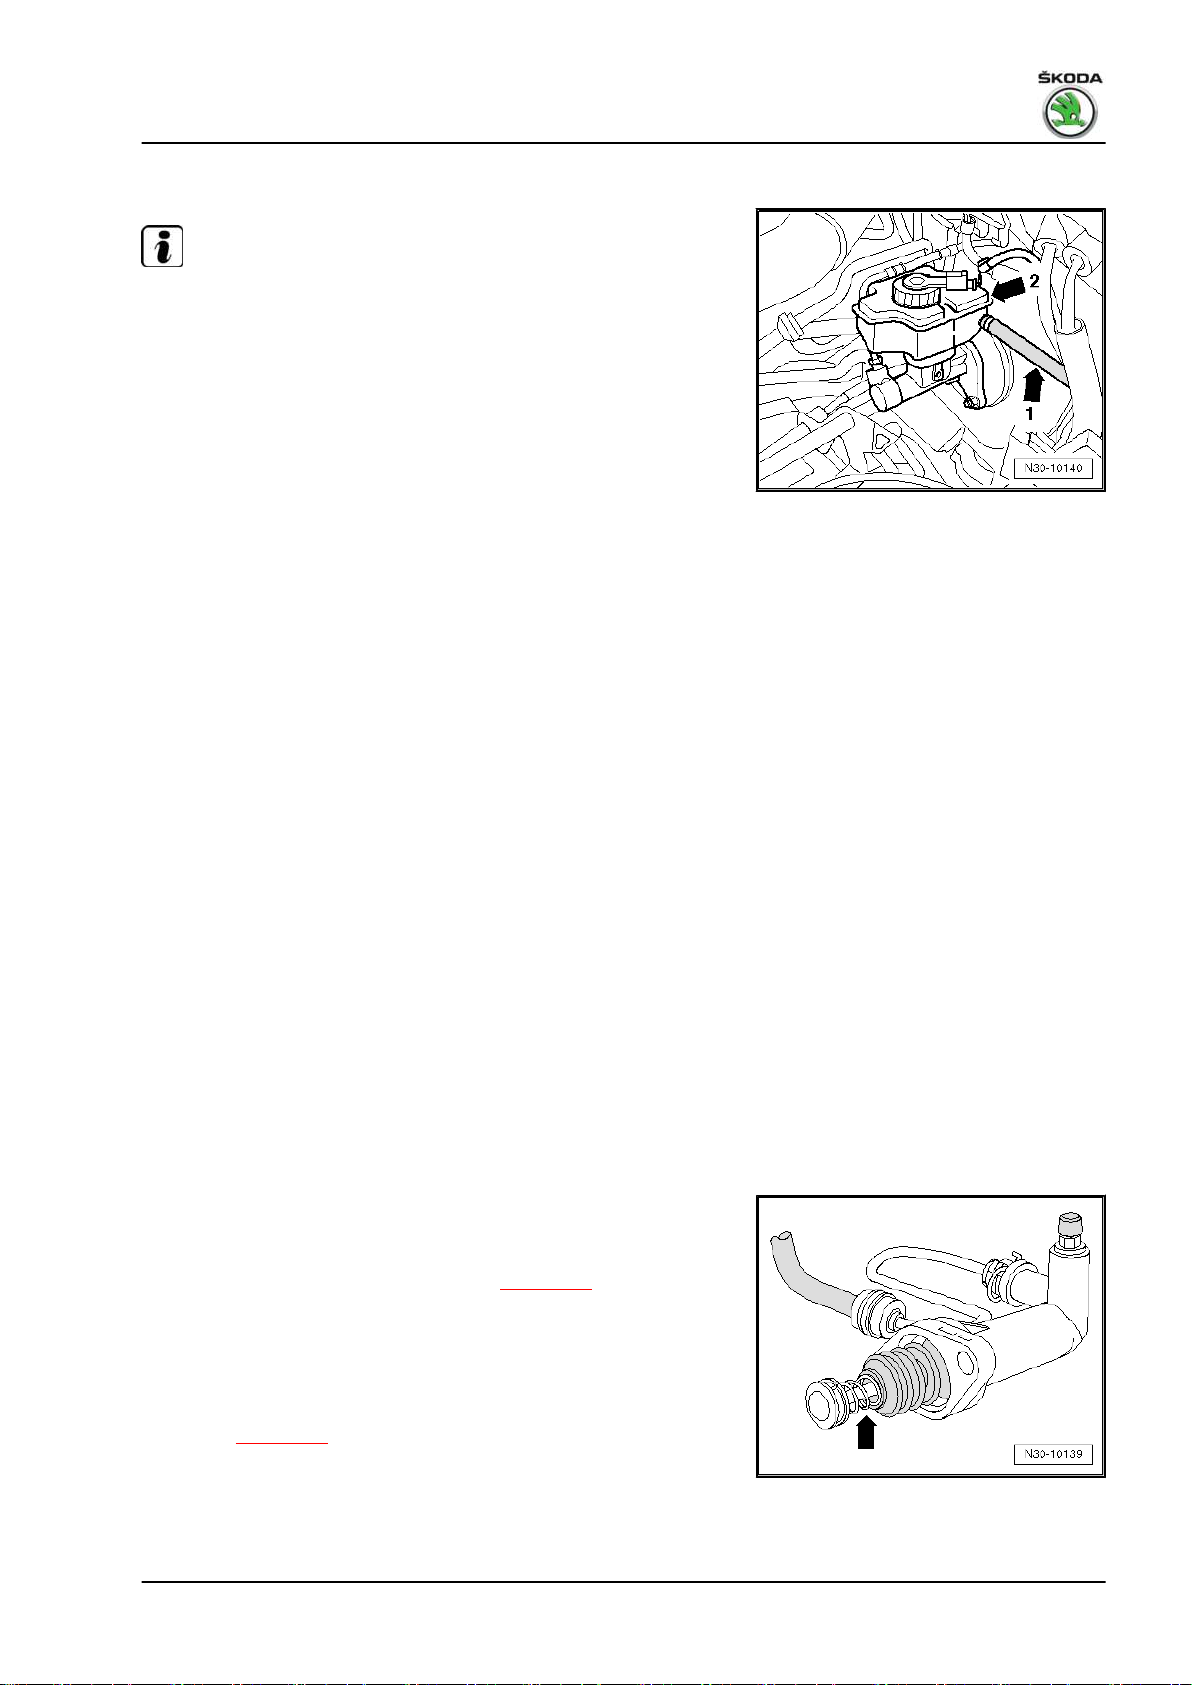
Fabia II 2007 ➤ , Fabia II 2009 ➤ , Fabia II 2011 ➤ , Rapid 2011 ➤ , R ...
1.18 Check hydraulic clutch control
Note
♦
If the master cylinder and/or slave cylinder must be replaced
due to the predetermined fault, first of all check the hydraulic
clutch control.
♦
If the slave cylinder with the connected tube-hose line is re‐
moved from the gearbox, do no longer depress the clutch
pedal. Otherwise, the piston can be pressed out of the slave
cylinder and thus be destroyed.
♦
The clutch hydraulic is connected to one of the chambers
-arrow 2- of the brake fluid reservoir by the return hose
-arrow 1-.
♦
If there is little or no brake fluid in this chamber, there is a leak
in the system.
♦
Traces of brake fluid on or below the gearbox, as well as on
the noise insulation under the gearbox is a result, amongst
others, of an external leak.
♦
In case of leakage, the corresponding component must be re‐
placed ⇒ Electronic Catalogue of Original Parts .
♦
Check the correct routing of the tube-hose line between the
master and slave cylinder. The line must not be kinked or trap‐
ped.
♦
The brake pedal return must not be obstructed by moved or
additional covers (floor coverings).
Gearbox 02T - Edition 05.2014
Inspect the complete hydraulic system for leaks.
– Carry out a visual inspection of the following components of
the hydraulic clutch control for leaks:
♦ Check brake fluid level in the brake fluid reservoir.
♦ Return hose between brake fluid reservoir and master cylin‐
der.
♦ Master cylinder.
♦ Tube-hose line between master cylinder and slave cylinder.
♦ Connection points (plug and screw connections) also in a non-
visible area.
♦ Slave cylinder.
– Remove the slave cylinder (do not open the line system) and
check if no brake fluid drips out of the bellows, to do so remove
the bellows from the rod -arrow-.
– If necessary, bleed the clutch control ⇒ page 65 .
– Then depress the clutch pedal carefully, at the same time hold
the pedal in five different positions for approx. 20s over the
entire distance the pedal has to travel and check that the pedal
does not fall through on its own while being held (in five posi‐
tions). While doing so, a second mechanic must check if fluid
is leaking from the other components of the hydraulic clutch
control ⇒ page 57 .
57
Page 62

Fabia II 2007 ➤ , Fabia II 2009 ➤ , Fabia II 2011 ➤ , Rapid 2011 ➤ , R ...
Gearbox 02T - Edition 05.2014
1.19 Removing and installing the master cyl‐
inder (Fabia II 2007 ►; Roomster 2006
►)
Special tools and workshop equipment required
♦ Pliers - T10005♦ Hose clamp - MP7-602 (3094)-
1.19.1 Removing
Note
If the battery earth strap is disconnected and connected, carry out
additional operations ⇒ Electrical System; Rep. gr. 27 .
– Disconnect the battery-earth strap with the ignition off ⇒ Elec‐
trical System; Rep. gr. 27 .
– Remove engine cover ⇒ engine; Rep. gr. 10 .
– Remove air filter ⇒ Engine; Rep. gr. 23 or ⇒ Engine; Rep.
gr. 24 .
– Remove battery and battery tray ⇒ Electrical System; Rep.
gr. 27 .
– Pinch off return hose -A- to master cylinder with hose clamp -
MP7-602 (3094)- (if the return hose is made out of plastic, do
not use the hose clamp - MP7-602- , otherwise the return hose
can get damaged).
– Release the return hose -A- to the brake fluid reservoir and
shut it off in a suitable manner.
– Pull locking clip -B- out of the master cylinder.
– Release and cut the tube-hose line -C- out of the master cyl‐
inder.
– Remove the storage area on the driver's side ⇒ Body Work;
Rep. gr. 70 .
– Remove crash strut for clutch pedal (if present) ⇒ page 22 .
– Remove clutch pedal switch, if provided, ⇒ page 19 ,-Pos. 7-.
Note
To remove the master cylinder completely remove the clutch con‐
trol. Before removing first separate the master cylinder from the
clutch pedal.
– Unlock the actuating rod/master cylinder from the clutch pedal.
58
Page 63
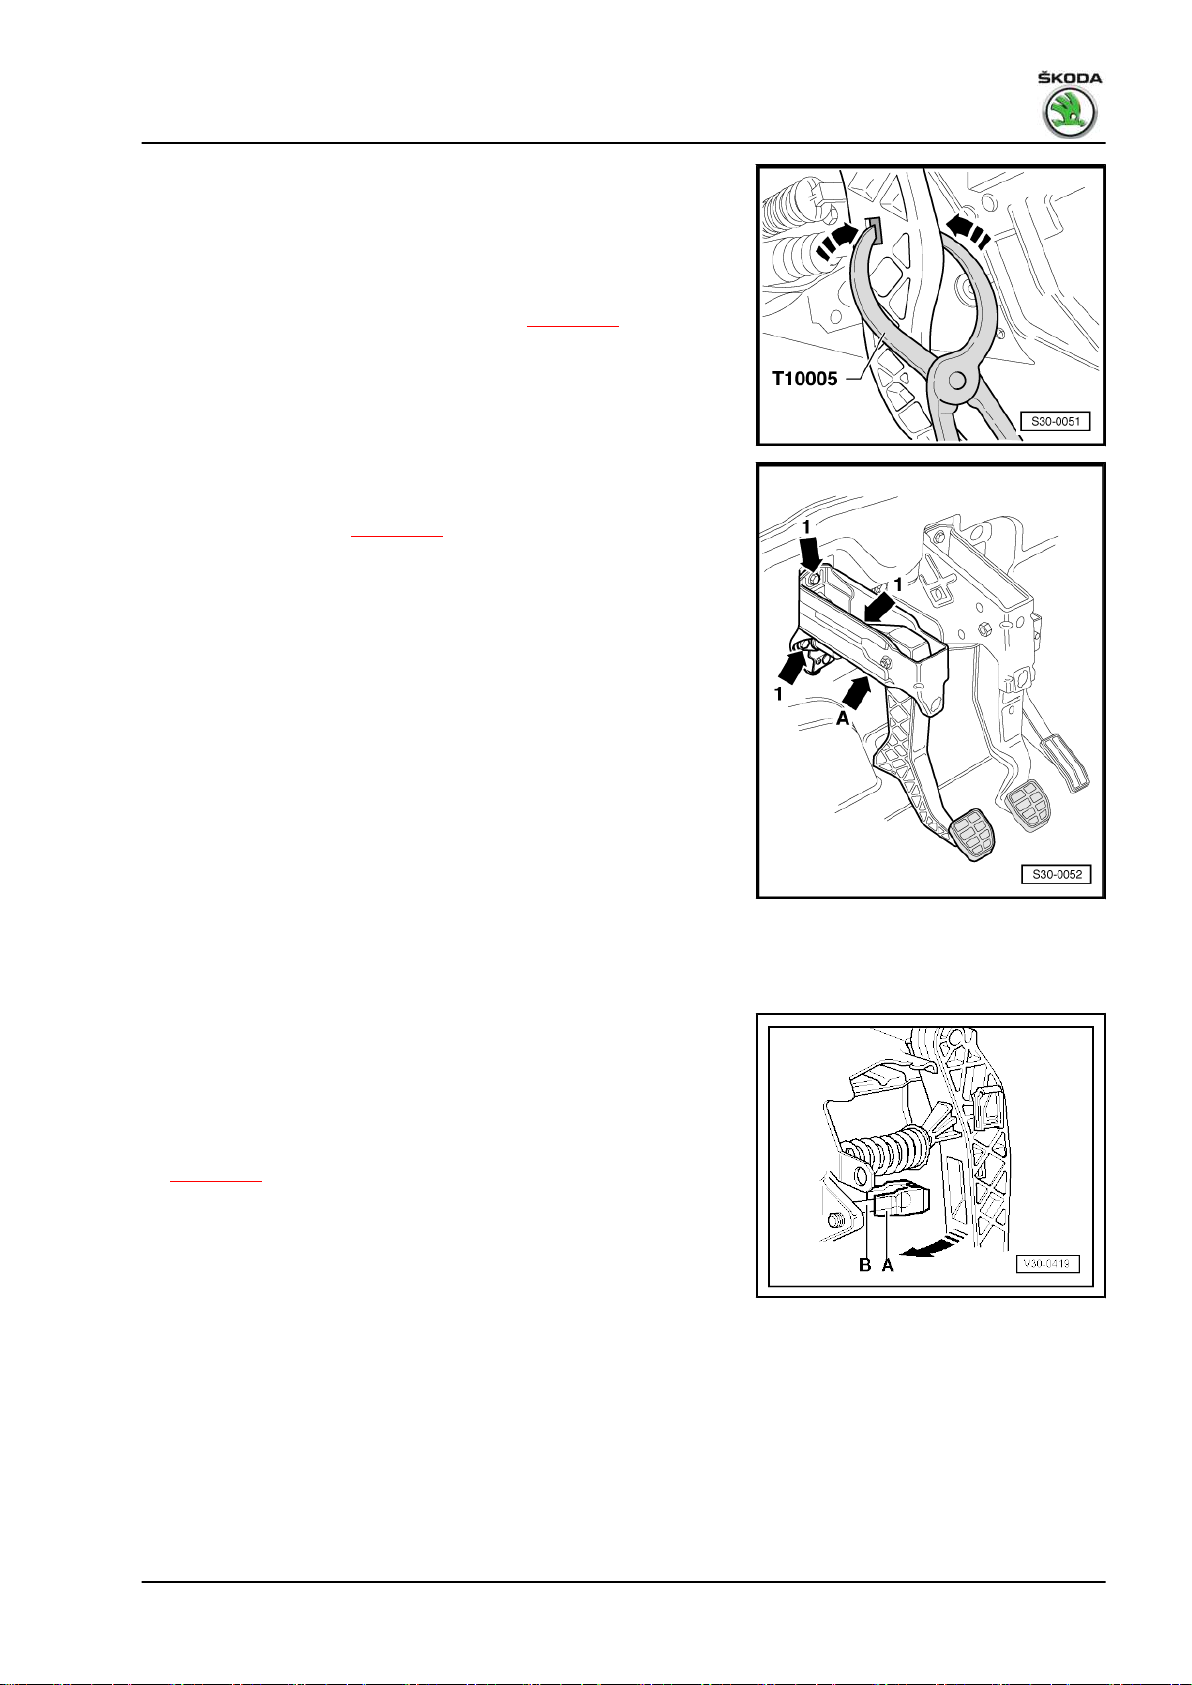
Fabia II 2007 ➤ , Fabia II 2009 ➤ , Fabia II 2011 ➤ , Rapid 2011 ➤ , R ...
Unlock the actuating rod/master cylinder from the clutch pedal as
follows:
– Insert pliers - T10005- in the clutch pedal recesses.
– Press together support and separate the clutch pedal from the
master cylinder.
– Removing the over-centre helper spring ⇒ page 24 .
– Unscrew the nuts -arrows 1- and remove the clutch controls
-arrow A- together with the master cylinder.
– Unscrew pedal stop ⇒ page 19 ,-Pos. 19-.
– Remove the master cylinder.
Gearbox 02T - Edition 05.2014
1.19.2 Install
Installation is performed in the reverse order, pay attention to the
following points:
– The support -A- must be located on the actuating rod -B- of
the master cylinder.
– To click in the support push the clutch pedal towards the front
wall in the -direction of the arrow-; while doing so make sure
it catches correctly.
– After installing the master cylinder bleed the clutch control
⇒ page 65 .
59
Page 64
Fabia II 2007 ➤ , Fabia II 2009 ➤ , Fabia II 2011 ➤ , Rapid 2011 ➤ , R ...
Gearbox 02T - Edition 05.2014
Tightening torques
Crash strut to steering column ⇒ page 22
Clutch pedal to bracket
1)
Always replace self-locking nut ⇒ Electronic Catalogue of Original Parts .
1)
⇒ page 19
60
Page 65

Fabia II 2007 ➤ , Fabia II 2009 ➤ , Fabia II 2011 ➤ , Rapid 2011 ➤ , R ...
1.20 Removing and installing the master cyl‐
inder (Fabia II 2011 ►; Roomster 2011
►; Rapid NH 2013 ►)
Special tools and workshop equipment required
♦ Pliers - T10005♦ Polycarbamide grease - G 052 142 A2Removing
– Remove bracket with master cylinder:
♦ Fabia II 2011 ►; Roomster 2011 ►; Rapid NH 2013 ►
⇒ page 38 .
♦ Rapid 2011 ► ⇒ page 41 .
– Unlock the clutch pedal from the master cylinder with the pliers
- T10005- .
– Remove master cylinder from mounting bracket.
Install
– Insert the master cylinder in the bracket.
Gearbox 02T - Edition 05.2014
– The bracket -2- must be located on the actuating rod -1-.
– Press the support -2- into the recess on the clutch pedal -3-
until it clicks audibly into place.
– Install bracket with master cylinder:
♦ Fabia II 2011 ►; Roomster 2011 ►; Rapid NH 2013 ►
⇒ page 38 .
♦ Rapid 2011 ► ⇒ page 41 .
1.21 Removing and installing the slave cylin‐
der
Special tools and workshop equipment required
♦ Hose clamp - MP7-602 (3094)♦ Grease - G 000 100-
61
Page 66
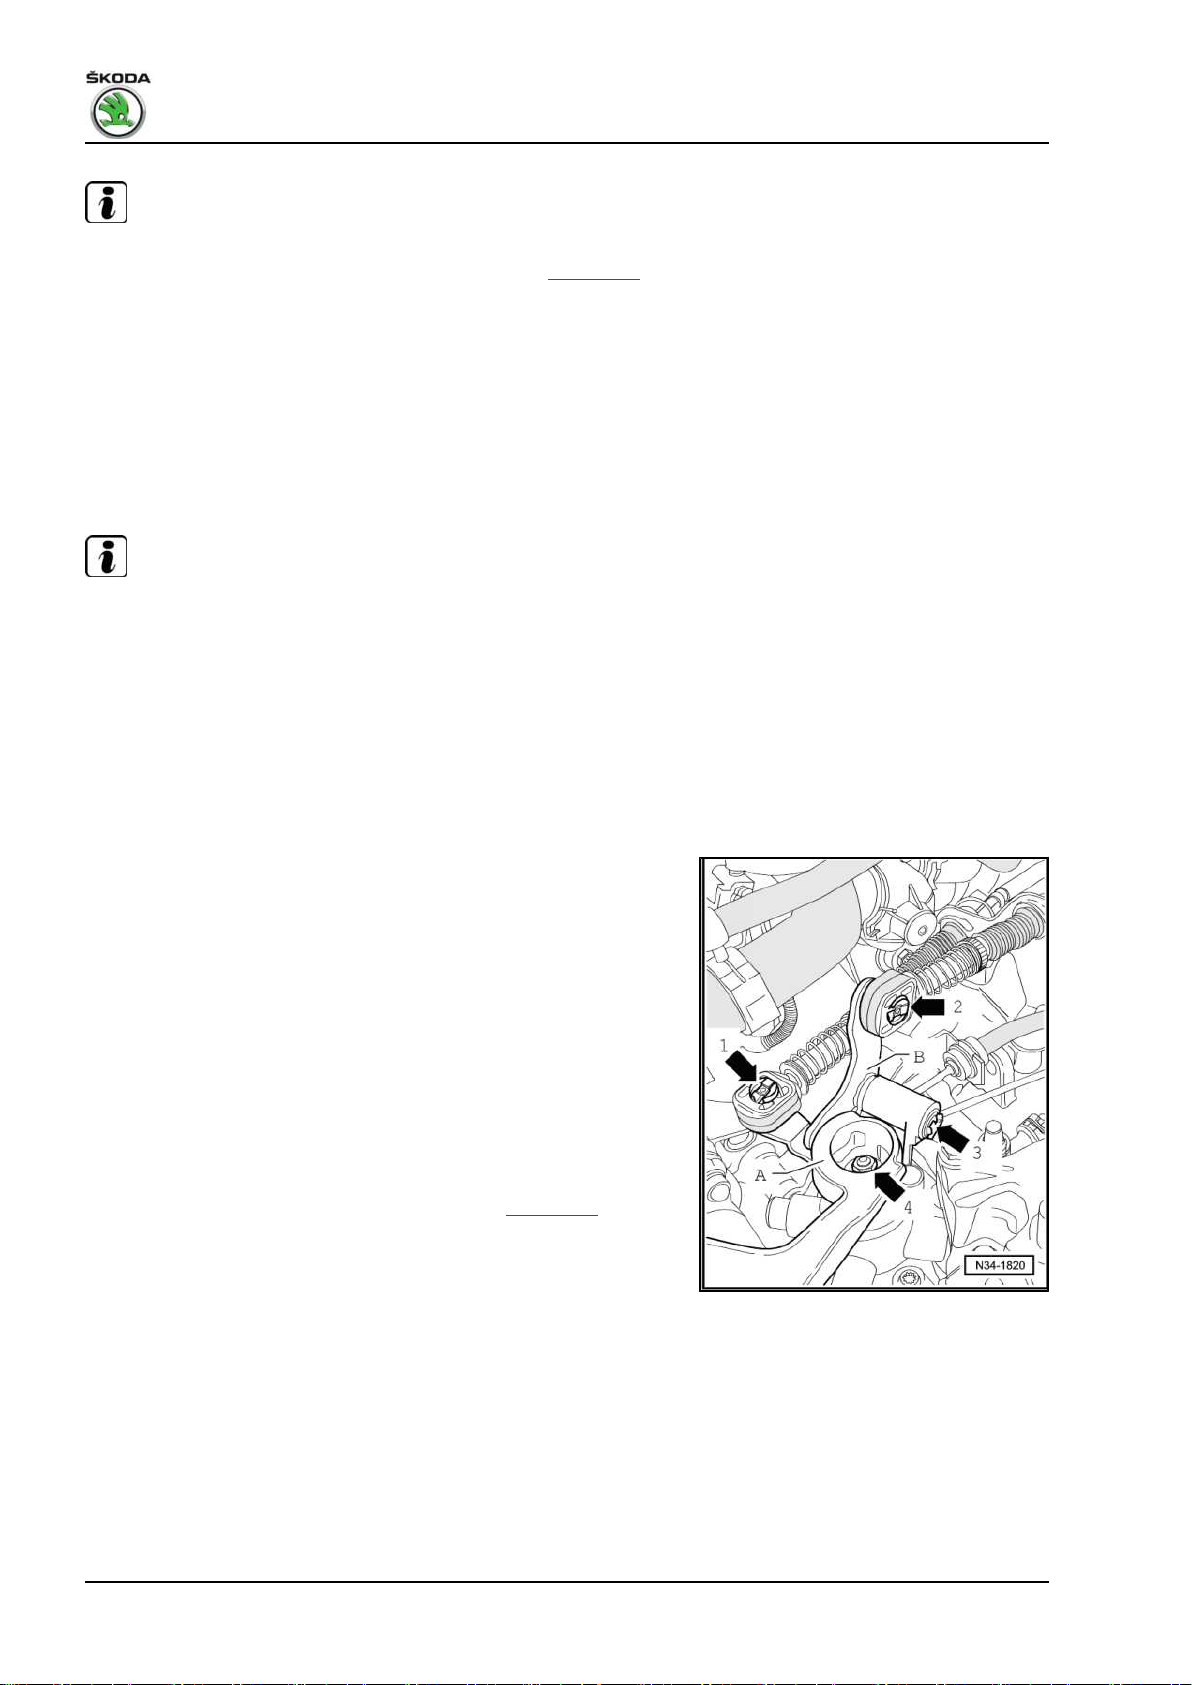
Fabia II 2007 ➤ , Fabia II 2009 ➤ , Fabia II 2011 ➤ , Rapid 2011 ➤ , R ...
Gearbox 02T - Edition 05.2014
Note
♦
If the slave cylinder must be replaced due to a predetermined
fault, first of all check the hydraulic clutch control ⇒ page 57 .
♦
If the slave cylinder with the connected tube-hose line is re‐
moved from the gearbox, do no longer depress the clutch
pedal. Otherwise, the piston can be pressed out of the slave
cylinder and thus be destroyed.
♦
When performing the following work, make sure no brake fluid
comes into contact with the gearbox. If this is the case, these
points must be cleaned thoroughly.
1.21.1 Removing
Note
If the battery earth strap is disconnected and connected, carry out
additional operations ⇒ Electrical System; Rep. gr. 27 .
– Disconnect the battery-earth strap with the ignition off ⇒ Elec‐
trical System; Rep. gr. 27 .
– If present, remove engine cover ⇒ Engine; Rep. gr. 10 .
– Remove air filter ⇒ Engine; Rep. gr. 23 or ⇒ Engine; Rep.
gr. 24 .
– Remove battery and battery tray ⇒ Electrical System; Rep.
gr. 27 .
– Remove circlip -arrow 1- for shift cable from gearbox shift lever
-A-.
Vehicles Fabia II and Roomster up to 05.07 and vehicles Rapid
(metal relay lever)
– Remove circlip -arrow 2- for selector cable from relay lever
-B-.
– Remove selector cable and shift cable from the studs.
– Detach circlip -arrow 3- from the relay lever -B- and remove
relay lever.
Vehicles Fabia II and Roomster as of 06.07 and vehicle Rapid NH
(plastic relay lever)
– Pull off shift cable from the stud.
– Remove relay lever together with cable lock ⇒ page 87 .
Continued for all vehicles
– Remove the gearshift lever -A-, for this step unscrew nut
-arrow 4-.
62
Page 67

Fabia II 2007 ➤ , Fabia II 2009 ➤ , Fabia II 2011 ➤ , Rapid 2011 ➤ , R ...
– Disconnect the Bowden cable support from gearbox
-arrows-.
– Tie up shift cable and selector cable.
– Place a non-fluffing cloth under the slave cylinder.
Note
Make sure no brake fluid comes into contact with the gearbox. If
this is the case, this point must be cleaned thoroughly.
– Pinch off the tube-hose line to the master cylinder with the
hose clamp - MP7-602 (3094)- (if the tube-hose line to the
master cylinder is made out of plastic, do not use the hose
clamp - MP7-602- ).
– Pull retaining clip -A- for tube-hose line out of the slave cylinder
up to the stop.
– Pull tube-hose line out of the support -C-.
– Pull tube-hose line -B- out of the slave cylinder and close
opening in a suitable manner.
– Unscrew slave cylinder -arrows- and take out.
Gearbox 02T - Edition 05.2014
Note
Do not depress the clutch pedal.
1.21.2 Install
Installation is performed in the reverse order, pay attention to the
following points:
– Grease tappet head with grease - G 000 100- .
– Install slave cylinder and tighten screws -arrows- to the given
tightening torque.
– Insert tube-hose line -B- into the slave cylinder up to the stop.
– Press in retaining clip -A- for attaching the tube-hose line up
to the stop.
– Press tube-hose line up to the stop into the support -C- at the
gearbox.
– After installing the slave cylinder bleed the clutch control
⇒ page 65 .
– Installing Bowden cable support, relay lever and gearshift lev‐
er:
♦ For vehicles Fabia II, Roomster and Rapid NH ⇒ page 89 .
♦ For vehicles Rapid ⇒ page 94 .
– Setting the shift mechanism ⇒ page 96 .
– Install the battery tray and battery ⇒ Electrical System; Rep.
gr. 27 .
– Install air filter ⇒ Engine; Rep. gr. 23 or ⇒ Engine; Rep. gr.
24 .
– Connect earth strap of battery ⇒ Electrical System; Rep. gr.
27 .
63
Page 68
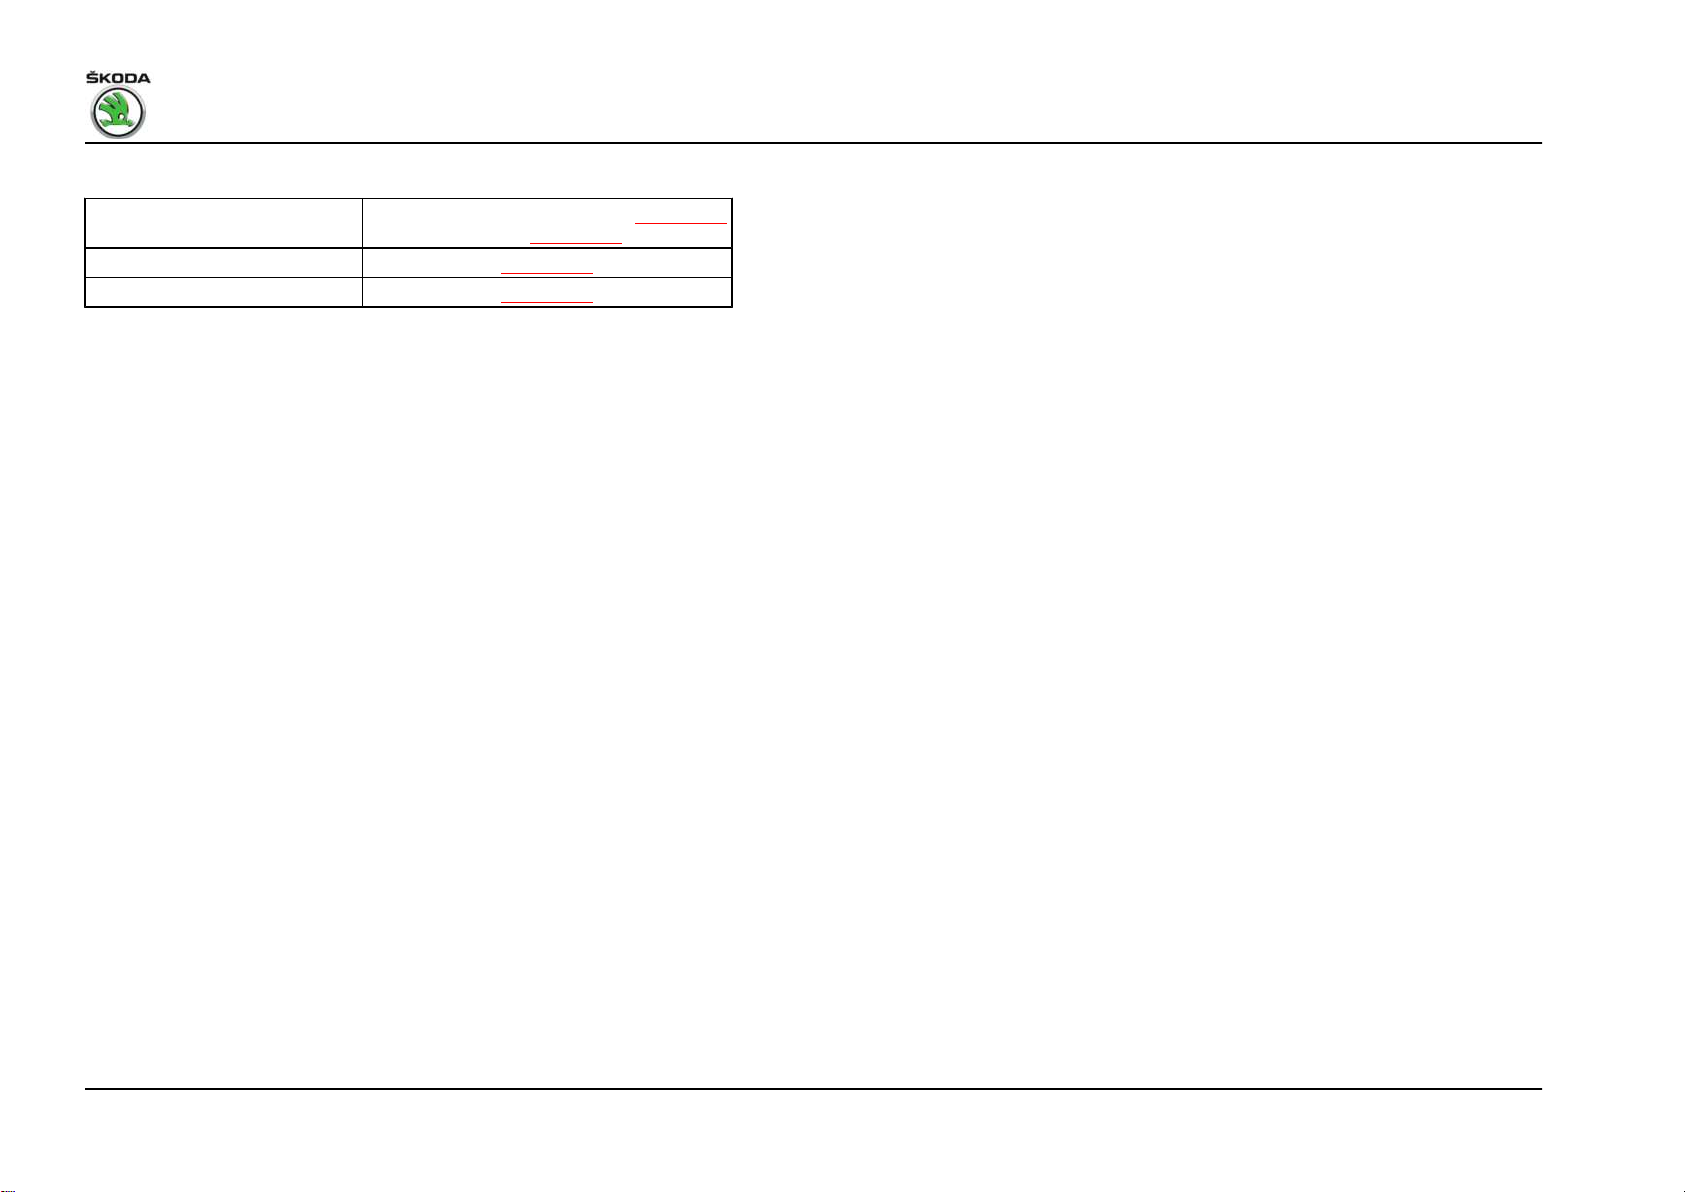
Fabia II 2007 ➤ , Fabia II 2009 ➤ , Fabia II 2011 ➤ , Rapid 2011 ➤ , R ...
Gearbox 02T - Edition 05.2014
Tightening torques
Slave cylinder to gearbox Fabia II, Roomster, Rapid NH ⇒ page 51
Rapid ⇒ page 54
Cable support to gearbox ⇒ page 84
Gearbox shift lever to gearbox ⇒ page 84
64
Page 69
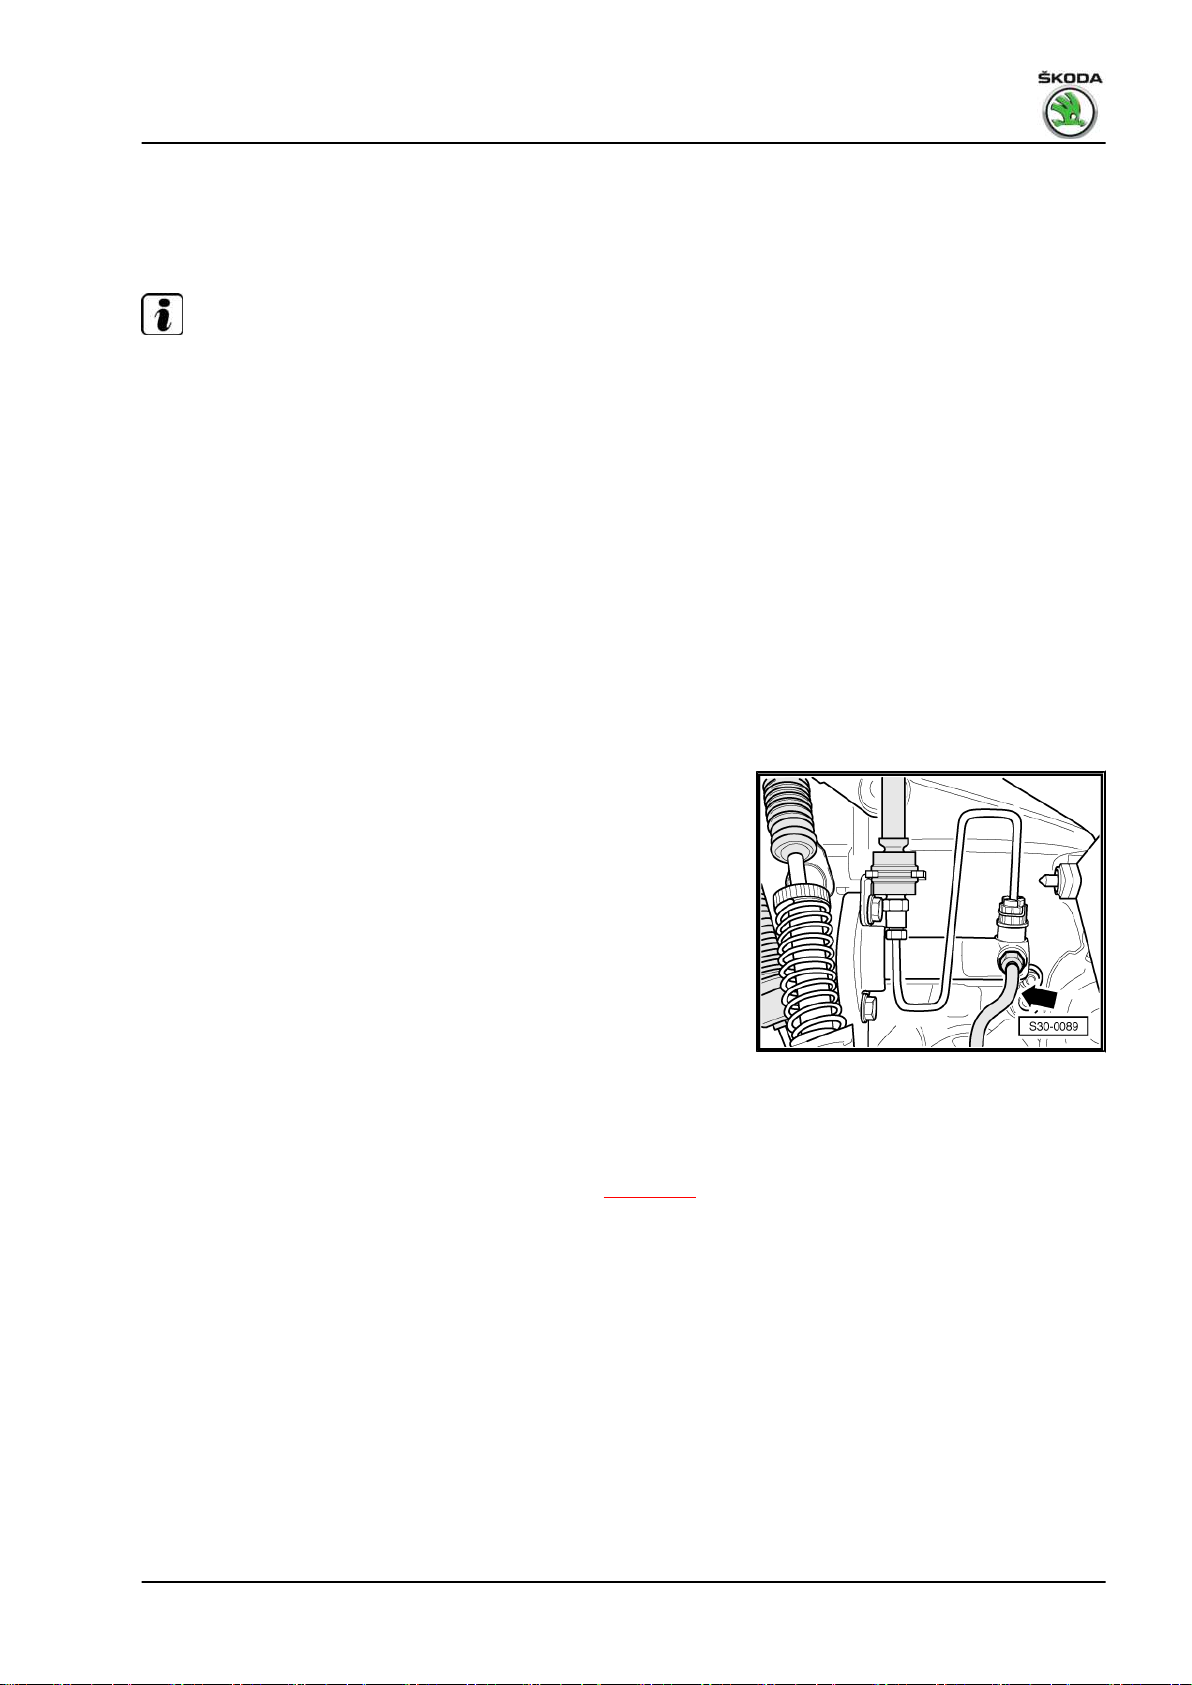
Fabia II 2007 ➤ , Fabia II 2009 ➤ , Fabia II 2011 ➤ , Rapid 2011 ➤ , R ...
1.22 Bleeding the clutch control
Special tools and workshop equipment required
♦ Brake filling and bleeding device , e. g. -VAS 5234-
Note
♦
If the battery earth strap is disconnected and connected, carry
out additional operations ⇒ Electrical System; Rep. gr. 27 .
♦
During the following work, ensure that no brake fluid lands on
longitudinal member or gearbox.
♦
A pre-filling of the system is not necessary!
Brake fluid specification ⇒ Chassis; Rep. gr. 00 .
– If present, remove engine cover ⇒ Engine; Rep. gr. 10 .
– Disconnect the battery-earth strap with the ignition off ⇒ Elec‐
trical System; Rep. gr. 27 .
– Remove air filter ⇒ Engine; Rep. gr. 23 or ⇒ Engine; Rep.
gr. 24 .
– Remove battery and battery tray ⇒ Electrical System; Rep.
gr. 27 .
– Connect the brake filling and bleeding device.
– Fit the bleeder hose -A- on the vent valve of the slave cylinder
-arrow- and open the valve.
– Activate system with a brake fluid pressure of 0.2 MPa.
–
Allow approx. 100 cm3 of brake fluid to flow out until no more
air bubbles are visible.
– Close vent valve.
– Rapidly operate pedal from stop to stop 10 to 15 times.
– Open vent valve.
– Activate system with a brake fluid pressure of 0.2 MPa.
–
Allow another approx. 50 cm3 of brake fluid to flow out.
– Close vent valve.
– After completing the bleeding procedure activate the clutch
pedal repeatedly.
– If necessary, bleed the clutch control once again ⇒ page 65 .
– Disconnect bleeding device.
Gearbox 02T - Edition 05.2014
65
Page 70
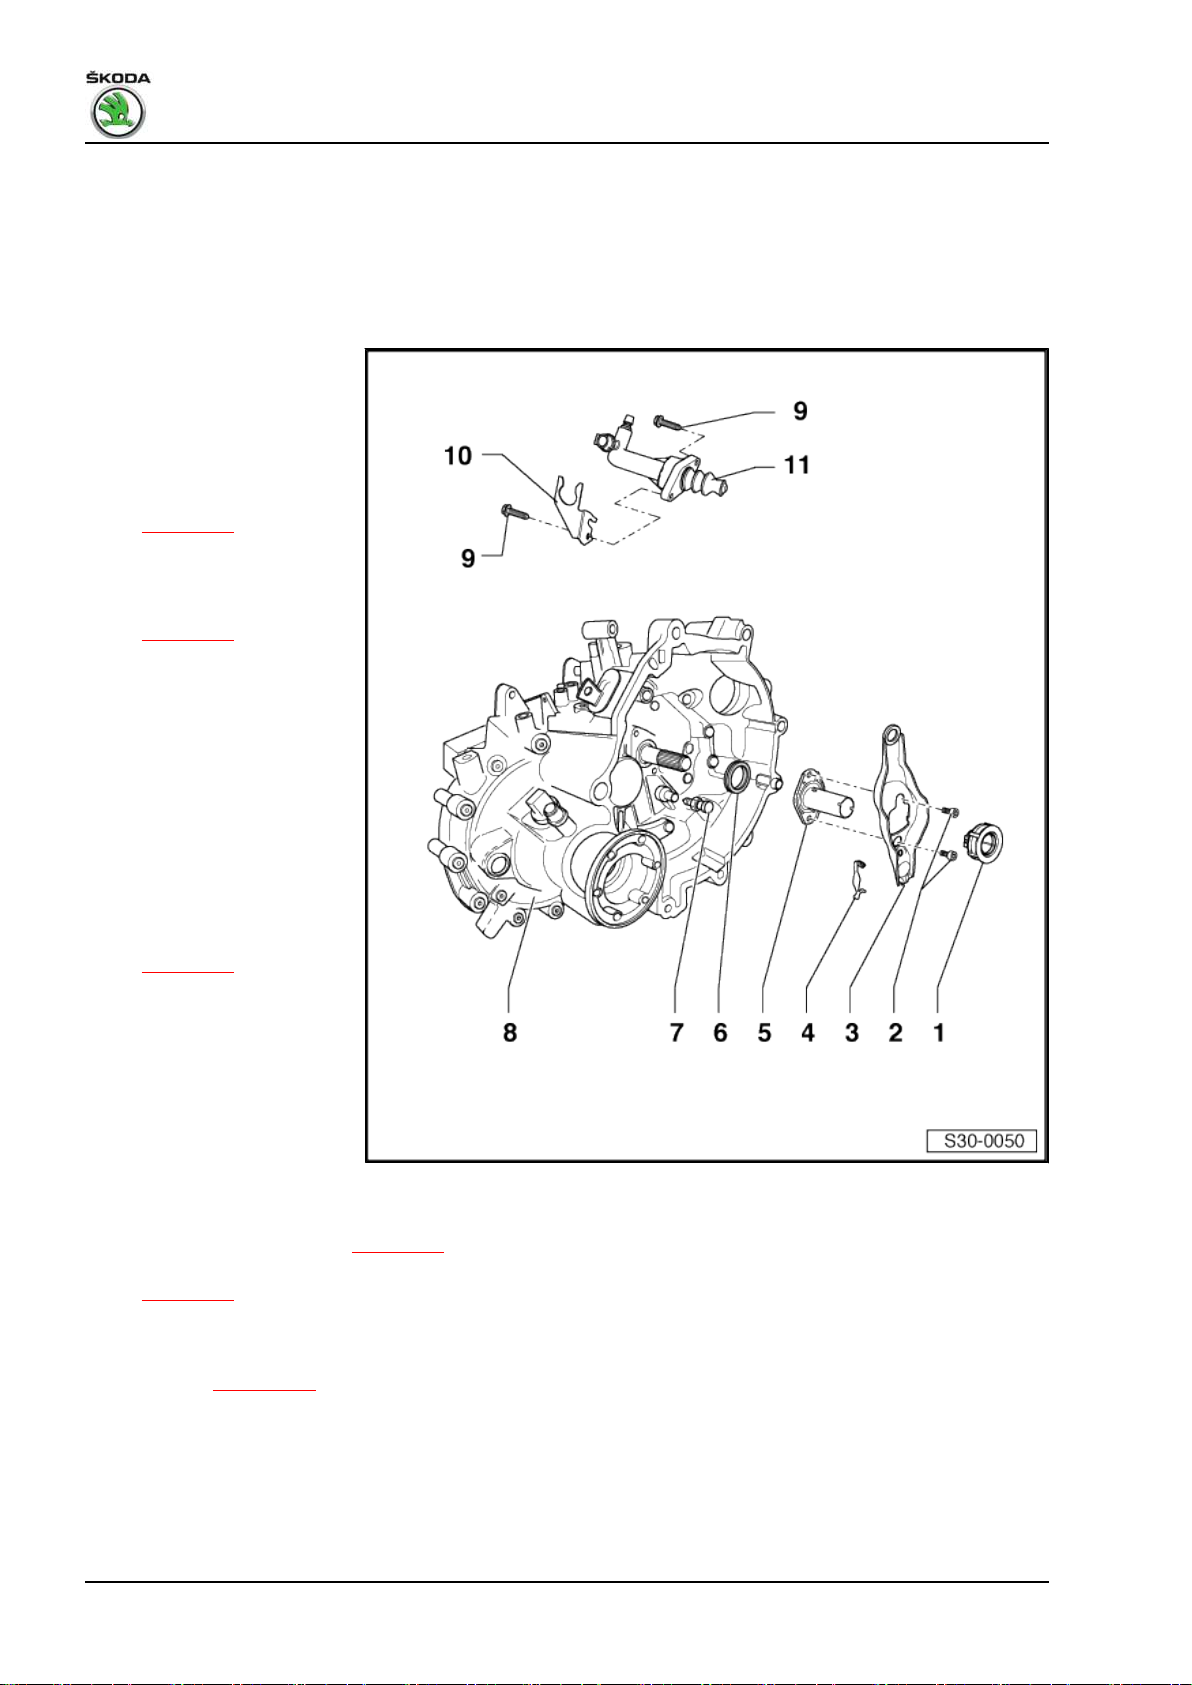
Fabia II 2007 ➤ , Fabia II 2009 ➤ , Fabia II 2011 ➤ , Rapid 2011 ➤ , R ...
Gearbox 02T - Edition 05.2014
2 Repairing the clutch release mecha‐
nism
Special tools and workshop equipment required
♦ Grease - G 000 100-
1 - Clutch release bearing
❑ Do not wash the bear‐
ing, just wipe clean
❑ replace noisy bearings
⇒ Electronic Catalogue
of Original Parts
❑ removing and installing
⇒ page 67
❑ remove and install to‐
gether with the clutch re‐
lease lever -Pos. 3- and
guide bushing -Pos. 5-
⇒ page 67
❑ grease contact points
on the clutch release
lever with grease - G
000 100-
2 - 5 Nm + 90° further
❑ always replace ⇒ Elec‐
tronic Catalogue of
Original Parts
3 - Clutch release lever
❑ remove and install to‐
gether with the clutch re‐
lease lever -Pos. 1- and
guide bushing -Pos. 5-
⇒ page 67
❑ Original grease must be
removed from the con‐
tact surface of the clutch
release lever
❑ Grease contact surface
on the ball stud with
grease - G 000 100-
4 - Retaining spring
❑ attach to clutch release lever
5 - Guide bushing for clutch release bearing
❑ removing and installing ⇒ page 67
❑ remove and install together with the clutch release lever -Pos. 3- and clutch release bearing -Pos. 1-
⇒ page 67
❑ Grease guide bushing in the area of the release lever with grease - G 000 100-
6 - Gasket ring for drive shaft
❑ replace ⇒ page 126
7 - Ball stud, 20 Nm
❑ Original grease must be removed from the contact surface of the clutch release lever
❑ grease with grease - G 000 100-
66
Page 71
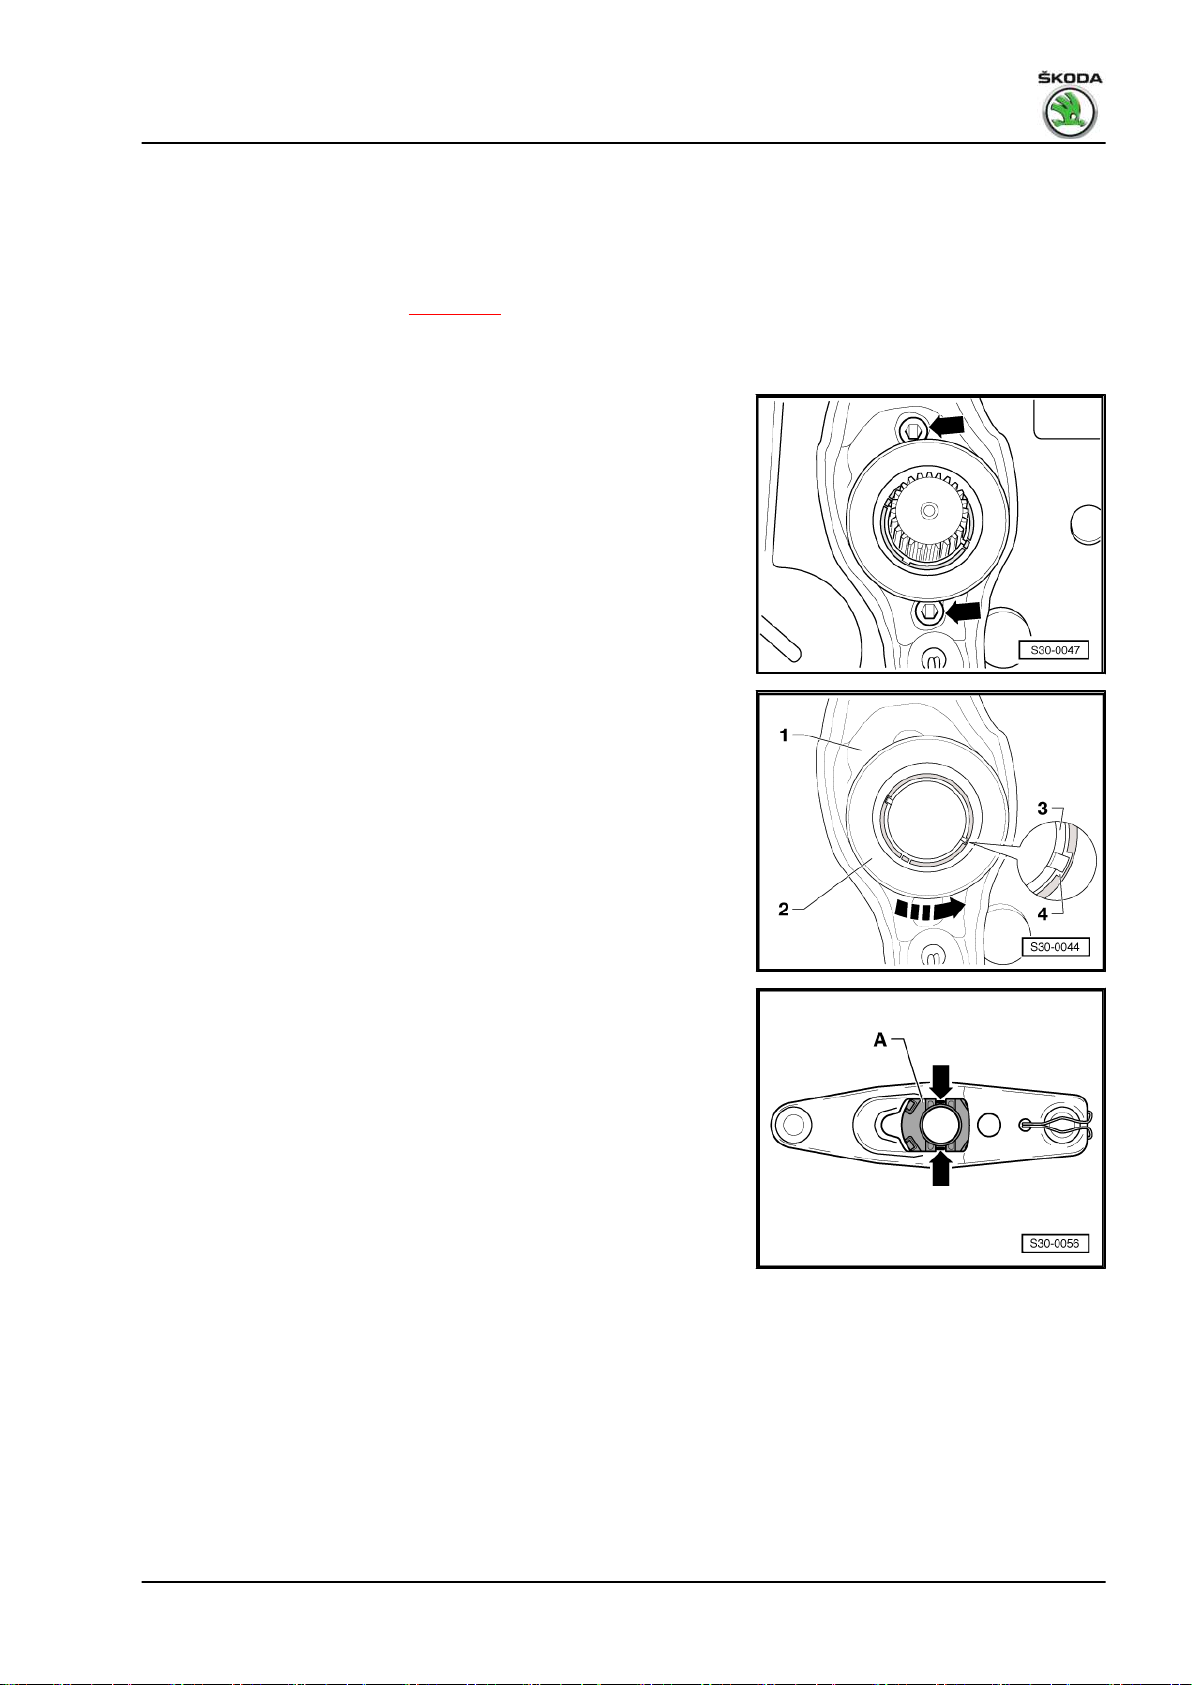
Fabia II 2007 ➤ , Fabia II 2009 ➤ , Fabia II 2011 ➤ , Rapid 2011 ➤ , R ...
8 - Gearbox
9 - 20 Nm
10 - Support
11 - Slave cylinder
❑ removing and installing ⇒ page 61
❑ Grease tappet head with grease - G 000 100-
Remove and install the clutch release lever together with the re‐
lease bearing and guide bushing
– Release screws -arrows-.
– Separate the clutch release lever together with the release
bearing and guide sleeve from the drive shaft and ball stud.
Installation is carried out in the reverse order.
Gearbox 02T - Edition 05.2014
Removing and installing the guide sleeve
– Rotate the guide bushing -3- opposite the release bearing
-2- by approx. 90° in the -direction of the arrow- until the catch
pegs of the guide bushing are aligned with the slots -4- of the
release bearing.
– In this position remove the guide sleeve from the release bear‐
ing.
Installation is carried out in the reverse order.
Removing and installing the release bearing
– Press the catch pegs -arrows- together and remove clutch re‐
lease bearing -A- from the clutch release lever.
– To install press clutch release bearing -A- into the clutch re‐
lease lever until the catch pegs -arrows- lock into position.
2. Repairing the clutch release mechanism 67
Page 72
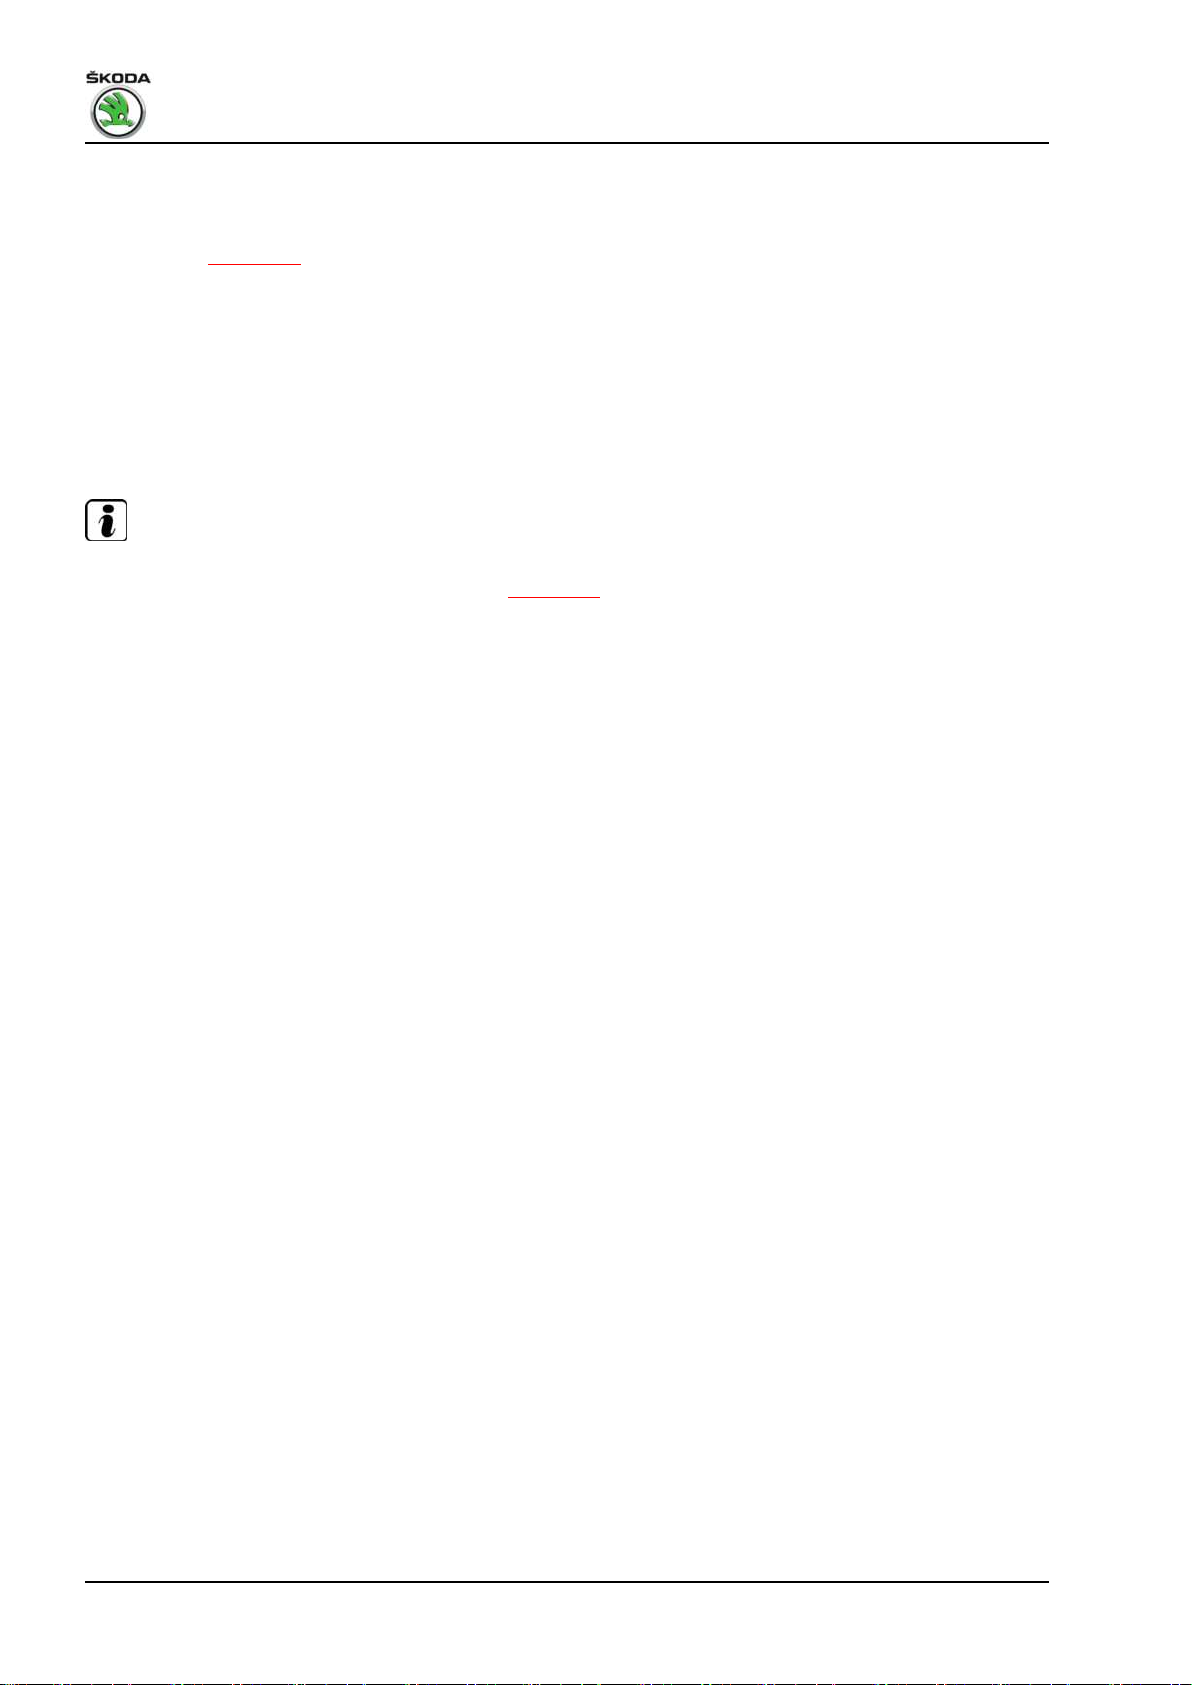
Fabia II 2007 ➤ , Fabia II 2009 ➤ , Fabia II 2011 ➤ , Rapid 2011 ➤ , R ...
Gearbox 02T - Edition 05.2014
3 Repairing clutch
Fault finding power transmission - problems with the clutch and
clutch control ⇒ page 70 .
Special tools and workshop equipment required
♦ Counterholder - MP1-223 (3067)♦ Centering mandrel - T10086♦ Centering mandrel - MP3-475A (3190A)♦ Grease - G 000 100(Gearbox removed)
Note
♦
Observe the fault finding of the power transmission before replacing the clutch disc and the pressure plate
- problems with the clutch and clutch control ⇒ page 70 .
♦
Replace the clutch discs and pressure plates if the riveting is damaged or loose.
♦
Assign the clutch disc and pressure plate in accordance with engine identification characters ⇒ Electronic
Catalogue of Original Parts .
♦
Clean the drive shaft serration and hub serration on used clutch discs. Remove corrosion and only apply a
very thin layer of grease -G 000 100- on the drive shaft serration.
♦
Subsequently move the clutch disc up and down on the drive shaft until the hub fits smoothly on the shaft.
♦
Remove all excess grease.
♦
The pressure plates are protected against corrosion and are greased. Only clean the thrust surface as
otherwise the life of the clutch may be considerably reduced.
♦
Check whether the dowel sleeves for centering the engine/gearbox are present in the cylinder block; insert
if necessary.
♦
If the dowel sleeves are not installed, there are problems with the gearshift and the clutch or the gearbox is
loud.
68
Page 73

1 - Flywheel
❑ make sure the centering
pins are correctly fitted
❑ The locating face for the
clutch lining must be
free from grooves, oil
and grease
❑ Removing and Installing
⇒ Engine; Rep. gr. 13
2 - Clutch disc
❑ Diameter ⇒ Electronic
Catalogue of Original
Parts
❑ Fitting position: The
spring cage points to‐
wards the pressure
plate
❑ centering for vehicles
with 1.2 ltr and 1.4 ltr en‐
gines ⇒ page 70
❑ centring for vehicles
with 1.4 ltr (TDI) and 1.6
ltr engines ⇒ page 70
❑ slightly grease the ser‐
ration
Fabia II 2007 ➤ , Fabia II 2009 ➤ , Fabia II 2011 ➤ , Rapid 2011 ➤ , R ...
Gearbox 02T - Edition 05.2014
Note
Clean the drive shaft serration and
hub serration on used clutch discs,
remove corrosion. Apply a very thin
layer of grease - G 000 100- onto the
serration. Subsequently move the
clutch disc up and down on the drive
shaft until the hub fits smoothly on
the shaft. Remove all excess
grease.
3 - Pressure plate
❑ removing and installing for vehicles with 1.2 ltr and 1.4 ltr engines ⇒ page 70
❑ removing and installing for vehicles with 1.4 ltr (TDI) and 1.6 ltr engines ⇒ page 70
❑ Check the extremities of the membrane spring ⇒ page 70
4 - Screw M6 - 13 Nm; screw M7 - 20 Nm
❑ loosen or tighten gradually and crosswise
❑ assign according to the ⇒ Electronic catalogue of original parts .
3. Repairing clutch 69
Page 74

Fabia II 2007 ➤ , Fabia II 2009 ➤ , Fabia II 2011 ➤ , Rapid 2011 ➤ , R ...
Gearbox 02T - Edition 05.2014
Centering the clutch disc and removing and installing the pressure
plate for vehicles with 1.2 ltr and 1.4 ltr engines
– Release and tighten screws gradually and crosswise.
– When removing inverse the position of the pressure pad -
MP1-223 (3067)- .
Note
♦
The thrust surface of the pressure plate and the clutch disc
lining must fully rest against the flywheel.
♦
Tighten the screws crosswise and uniformly so as not to dam‐
age the centering holes on the pressure plate and the center‐
ing pins of the flywheel.
Centering the clutch disc and removing and installing the pressure
plate for vehicles with 1.4 ltr (TDI) and 1.6 ltr. engines
– Release and tighten screws gradually and crosswise.
– When removing inverse the position of the pressure pad -
MP1-223 (3067)- .
Note
♦
The thrust surface of the pressure plate and the clutch disc
lining must fully rest against the flywheel.
♦
Tighten the fixing screws crosswise and uniformly so as not to
damage the centering holes on the pressure plate and the
centering pins of the flywheel.
Check the extremities of the membrane spring
• Wear is allowed up to half the membrane spring thickness.
3.1 Fault finding power transmission - prob‐
lems with the clutch and clutch control
Note
Check hydraulic clutch control ⇒ page 57 .
Before each clutch repair, examine and reconstruct the complaint
of the customer. In each individual case, it must be determined if
indeed there are problems with the clutch or the incorrect setting
of the gearshift is cause for complaint.
70
Page 75

Fabia II 2007 ➤ , Fabia II 2009 ➤ , Fabia II 2011 ➤ , Rapid 2011 ➤ , R ...
Gearbox 02T - Edition 05.2014
Complaint Fault description Measure
Clutch pedal does not return to ini‐
tial position.
♦ Air in line system. – Vent air from the line system;
top up with brake fluid.
♦ Line system, master or slave
cylinder leaking.
– Replace defective component,
vent air from the line system; top
up with brake fluid.
♦ Release bearing is tilted on the
guide bushing, seizured.
– Replace guide bushing and re‐
lease bearing.
♦ Membrane spring of the pres‐
– Replace pressure plate.
sure plate broken.
Complaint Fault description Measure
Actuating force on the clutch pedal
too high.
♦ Over-centre helper spring de‐
fective.
♦ The clutch release force has in‐
creased through the wear of the
– Replace over-centre helper
spring.
– Inform customer (higher release
force with increased wear).
clutch lining.
– Replace the clutch disc if the
distance base of the rivet is be‐
low 0.1 mm.
♦ Release bearing is tilted on the
– Replace defective components.
guide bushing, seizured.
♦ Pressure plate with wrong
spring identification.
– Assign pressure plate via the ⇒
Electronic catalogue of original
parts .
♦ Mechanical fault at the pressure
– Replace defective components.
plate or the clutch disc.
♦ Clutch disc on the serration
sluggish/jams.
– Check the hub for damage
(burrs), if necessary replace
clutch disc.
– Clean the hub and the drive
shaft serration from corrosion
and residues of lubricant and
grease with grease for plug ser‐
ration of clutch disc G 000 100- . Move clutch disc
back and forth, remove excess
grease.
Complaint Fault description Measure
Noises when operating the clutch. ♦ Release bearing defective,
guide of clutch release bearing
– Always replace noisy release
bearing.
not in order, contact surface
drained off.
– Replace damaged guide bush‐
ing.
♦ Contact surface of the pressure
– Replace pressure plate.
plate defective (tips of mem‐
brane spring bent, broken). Re‐
lease bearing is off-center.
– Check release bearing and
guide bushing, replace if neces‐
sary.
– Check position of clutch release
lever.
– Check dowel sleeves.
3. Repairing clutch 71
Page 76

Fabia II 2007 ➤ , Fabia II 2009 ➤ , Fabia II 2011 ➤ , Rapid 2011 ➤ , R ...
Gearbox 02T - Edition 05.2014
Complaint Fault description Measure
♦ Centre displacement of engine/
gearbox.
– Check dowel sleeves.
Complaint Fault description Measure
Rattling, scratching occurs when
the forward or reverse gear is en‐
gaged, gearschift jams, is sluggish,
shifting is not possible, clutch with‐
out operation.
♦ Clutch disc installed the wrong
way up.
♦ Wrong clutch disc installed. – Assign clutch disc via the ⇒
♦ Air in the system, clutch does
not separate fully.
♦ Master cylinder or slave cylinder
is leaking, line is leaking.
♦ The travel of the clutch pedal is
not sufficent (carpet, foot mat
under the foot controls), clutch is
not fully depressed.
♦ The pressure plate is bent due
to incorrect installation, the
clutch disc is deformed due im‐
proper handling.
♦ Tips of membrane spring broken
or bent (assembly fault, release
bearing moves off-center).
– Correct installation.
Electronic catalogue of original
parts .
– Bleed system; check system,
top up with brake fluid.
– Replace defective component,
top up with brake fluid, bleed
system.
– Inform customer.
– Check components, if necessa‐
ry replace, make sure the cen‐
tering pins are correctly fitted.
– If scratching still occurs, check
the serration of the clutch disc
on the drive shaft for ease of
movement, if necessary repair
the gearbox.
– Replace pressure plate.
– Check release bearing and
guide bushing, replace if neces‐
sary.
72
– Check dowel sleeves.
♦ Clutch disc too thick. – Assign clutch disc via the ⇒
Electronic catalogue of original
parts .
♦ Deposit of corrosion adhering to
the flywheel (long immobiliza‐
tion time, high humidity).
– Slightly rub down friction surfa‐
ces of the clutch linings or re‐
place completely the severely
corroded parts.
Page 77

Fabia II 2007 ➤ , Fabia II 2009 ➤ , Fabia II 2011 ➤ , Rapid 2011 ➤ , R ...
Gearbox 02T - Edition 05.2014
Complaint Fault description Measure
♦ Clutch disc on the serration
sluggish/jams. Corrosion on the
hub, damage during the assem‐
– Check the hub for damage, if
necessary replace the clutch
disc.
bly. Hub profile knocked out on
one side.
– Remove corrosion from the hub
and the shaft as well as residues
of lubricant. Grease shaft with
grease for plug serration of
clutch disc - G 000 100- .
– Move clutch disc back and forth,
remove excess grease.
– Check position of dowel sleeves
on knocked out hub profile.
– Check release bearing, guide
bushing and pressure plate, re‐
place if necessary.
♦ Lifting of pressure plate too low
(wrong pressure plate installed).
– Assign pressure plate via the ⇒
Electronic catalogue of original
parts .
♦ Displacement of engine/gear‐
box too large (dowel sleeves
– Insert dowel sleeves before
gearbox has been fitted.
missing), support panel of clutch
plate bent through this.
– Check clutch disc and pressure
plate for damage, if necessary
replace.
♦ The lining is spalled off because
of too high revs (shift back into
– Replace clutch disc. Inform cus‐
tomer.
lower gears during high
speeds).
♦ When starting, linings are spal‐
led off through slipping for too
long a time.
Complaint Fault description Measure
Load change jolts when throttle is
depressed and sudden reduction of
the engine speed.
♦ Assembly bracket too soft. – Inform customer. Assign hanger
via the ⇒ Electronic catalogue
of original parts .
♦ Irregular engine running. – Check engine power, correct.
♦ Clutch disc with predamper is
– Inform customer.
built in against gear rattling.
♦ Centre displacement of engine/
gearbox.
– Test dowel sleeves, replace if
necessary.
Complaint Fault description Measure
Clutch slips through, no or bad pre‐
drive.
♦ Wrong clutch disc fitted, wrong
pressure plate installed.
– Assign the clutch disc and pres‐
sure plate via the ⇒ Electronic
catalogue of original parts .
3. Repairing clutch 73
Page 78
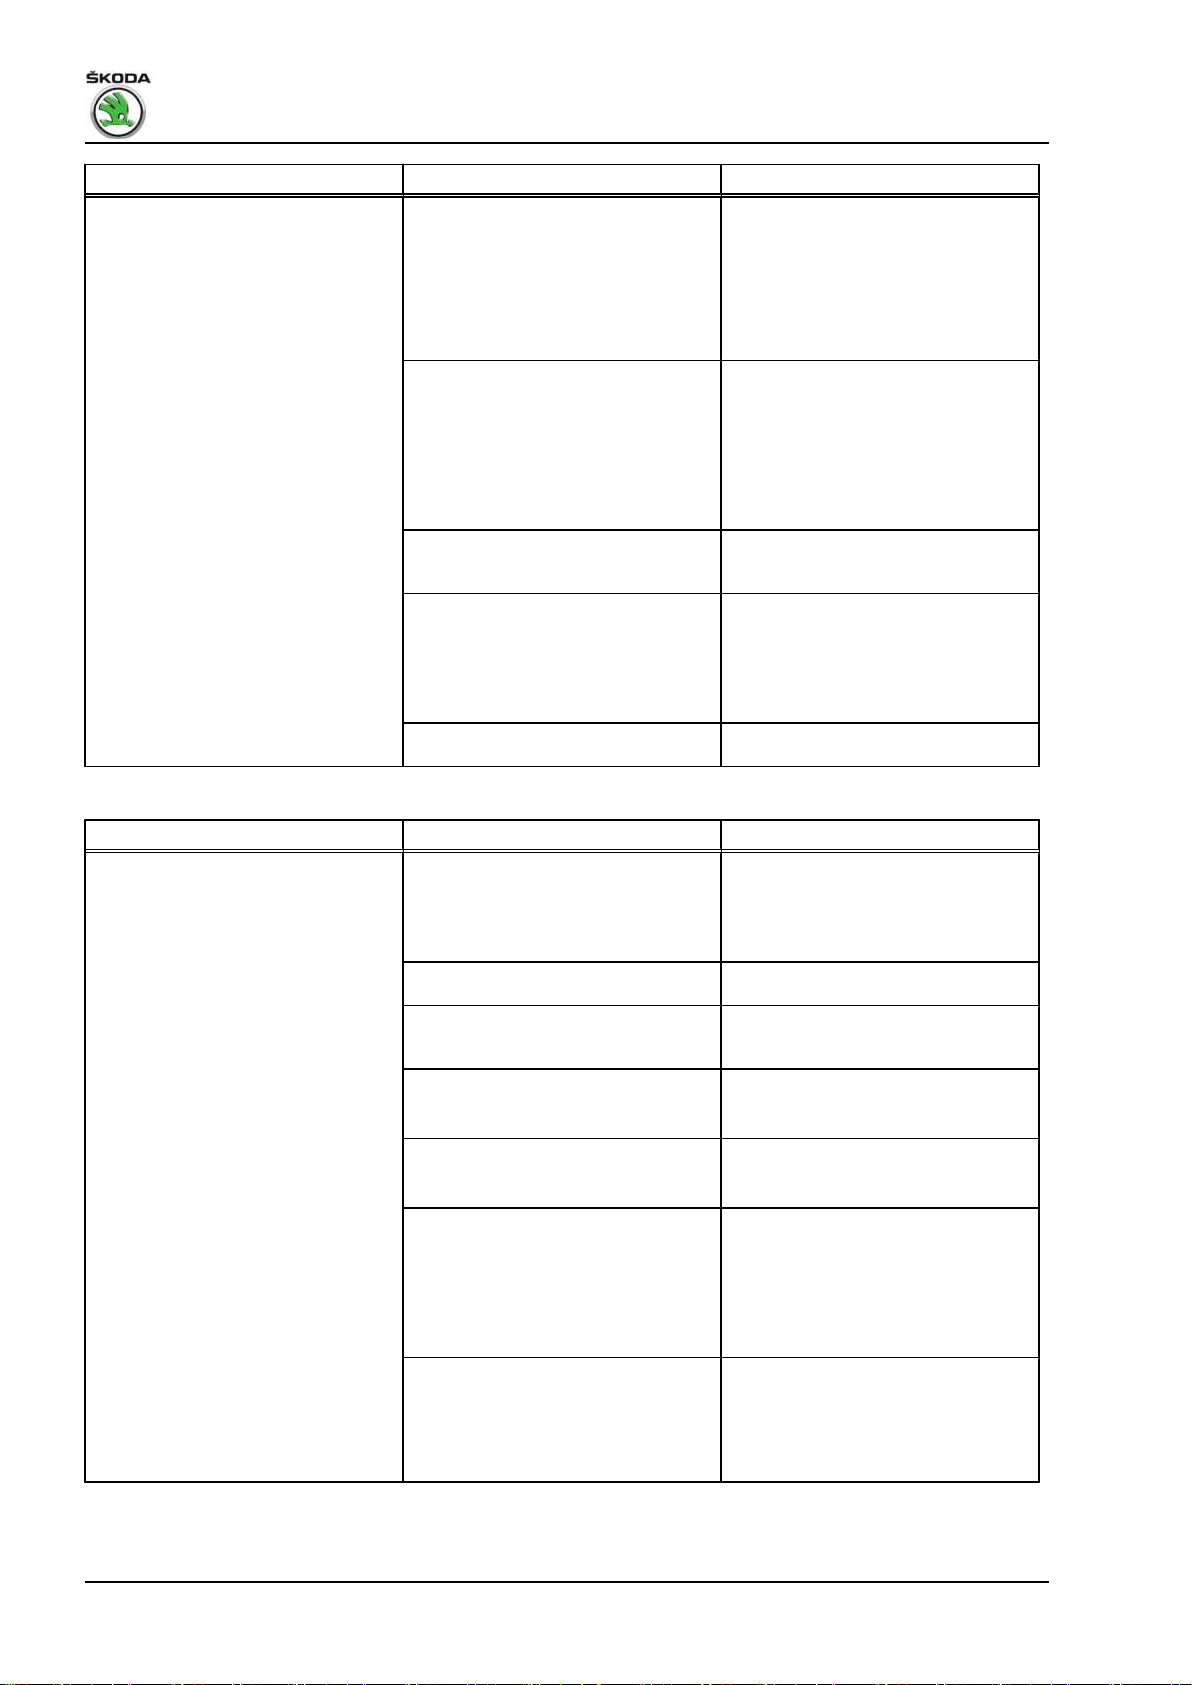
Fabia II 2007 ➤ , Fabia II 2009 ➤ , Fabia II 2011 ➤ , Rapid 2011 ➤ , R ...
Gearbox 02T - Edition 05.2014
Complaint Fault description Measure
♦ Clutch disc worn out, burnt,
pressure plate overheated,
grooves, pressure plate de‐
formed through incorrect as‐
sembly, compressive force of
the pressure plate too low, driv‐
ing error, natural wear.
– Replace clutch disc.
– Replace pressure plate.
– Inform customer.
Complaint Fault description Measure
Clutch grabbing,
unit shaking.
♦ Clutch disc, pressure plate, fly‐
wheel - oily. Radial shaft seal of
the engine or the gearbox de‐
fective. Grease on the contact
surface through excess greas‐
ing of the hub.
♦ Clutch disc installed the wrong
way up.
♦ Flywheel depth too large or ex‐
cessive abrasion on the contact
surface of the lining.
♦ Slave cylinder leaking. – Replace slave cylinder.
♦ Air in the system. – Bleed system, check brake fluid
♦ Engine does not run clean. – Check engine power, correct.
– Replace clutch disc.
– Clean contact surfaces of pres‐
sure plate and flywheel.
– Replace radial shaft seal, re‐
move excess grease from the
drive shaft.
– Correct installation, check
clutch disc, replace if necessary.
– Assign the sealing flange via the
⇒ electronic catalogue of origi‐
nal parts .
– Inspect clutch disc and pressure
plate, replace if necessary.
level, check system for tight‐
ness.
– Replace defective part.
♦ Driving error, starting speed is
too low.
♦ Wrong clutch disc installed. – Assign clutch disc via the ⇒
♦ Assembly bearing too soft,
knocked out.
♦ Clutch lining, contact surface of
pressure plate and flywheel oily
(oil leakage from the clutch
housing).
♦ Release bearing is tilted on the
guide bushing (seizured)
(presses on one side onto the
membrane spring of the pres‐
sure plate).
– Inform customer.
Electronic catalogue of original
parts .
– Assign the assembly bracket via
the ⇒ Electronic catalogue of
original parts .
– Check radial shaft seal of the
drive shaft for clutch or check
crankshaft, if necessary re‐
place.
– Replace clutch disc, clean pres‐
sure plate and flywheel.
– Replace release bearing and
guide bushing.
– Check control elements and
bearing for control elements.
74
Page 79

Fabia II 2007 ➤ , Fabia II 2009 ➤ , Fabia II 2011 ➤ , Rapid 2011 ➤ , R ...
Gearbox 02T - Edition 05.2014
Complaint Fault description Measure
♦ The contact surface of the pres‐
sure plate lifts off only unilater‐
ally due to the tilted release
bearing.
♦ Pressure plate housing de‐
formed when installed. Contact
surface of the pressure plate lifts
off only unilaterally.
– Check the contact surface of the
clutch lining on the flywheel,
check pressure plate and mem‐
brane springs, replace pressure
plate if necessary.
– Replace release bearing and
guide bushing.
♦ Drive schaft too heavily greased
(traces of grease on the clutch
disc, pressure plate and fly‐
wheel).
– Remove grease from pressure
plate and flywheel, replace if
damaged (traces of wear, traces
of overheating, grooves).
– Remove traces of grease from
hub and shaft, grease shaft with
grease for plug serration of
clutch disc - G 000 100- .
– Move clutch disc back and forth,
remove excess grease.
Complaint Fault description Measure
Acoustic knock »klack« when cou‐
pling.
♦ Carrier earth/drive shaft is ac‐
celerated with sudden coupling.
– Inform customer.
The drive shaft serration of the
pinions in mesh knocks, this
noise is increased for clutch
discs with noise insulation as the
damping reaches the stop.
Complaint Fault description Measure
Noises in idle. ♦ Torsional damper spring kinked. – Replace clutch disc.
♦ Clutch disc fitted without pre‐
damper (idle rattling).
– Assign clutch disc via the ⇒
Electronic catalogue of original
parts .
♦ Pressure plate deformed, imbal‐
– Replace pressure plate.
ance.
♦ Irregular engine running. – Check engine power, correct if
necessary.
♦ Displacement of engine/gear‐
box too large (dowel sleeves
– Insert dowel sleeves before
gearbox has been fitted.
missing).
♦ Intermediate plate grinds at fly‐
wheel.
– Insert intermediate plate on
sealing flange and push onto the
dowel sleeves.
3. Repairing clutch 75
Page 80

Fabia II 2007 ➤ , Fabia II 2009 ➤ , Fabia II 2011 ➤ , Rapid 2011 ➤ , R ...
Gearbox 02T - Edition 05.2014
34 – Controls, housing
1 Shift mechanism
Installation position - selector mechanism ⇒ page 76 . Summary of components - Gearshift mechanism ⇒ page 78 . Summary of components - Gearshift knob with shift lever collar
⇒ page 79 .
Remove and install gearshift knob and shift lever collar (Fabia II,
Roomster) ⇒ page 79 .
Remove and install gearshift knob and shift lever collar (Rapid)
⇒ page 80
Remove and install gearshift knob and shift lever collar (Rapid
NH) ⇒ page 81 .
Summary of components - Shift lever and shift housing
⇒ page 82 .
Summary of components - Control cables ⇒ page 84 .
Plastic relay lever as of 06.07 (Fabia II, Roomster, Rapid NH)
⇒ page 87 .
Remove and install shift mechanism (Fabia II, Roomster, Rapid
NH) ⇒ page 89 .
Removing and installing shift mechanism (Rapid) ⇒ page 94 .
Setting the shift mechanism ⇒ page 96 .
1.1 Installation position - selector mecha‐
nism
Arrow A - Shift movement
Arrow B - Selector movement
76 Rep. gr.34 - Controls, housing
Page 81
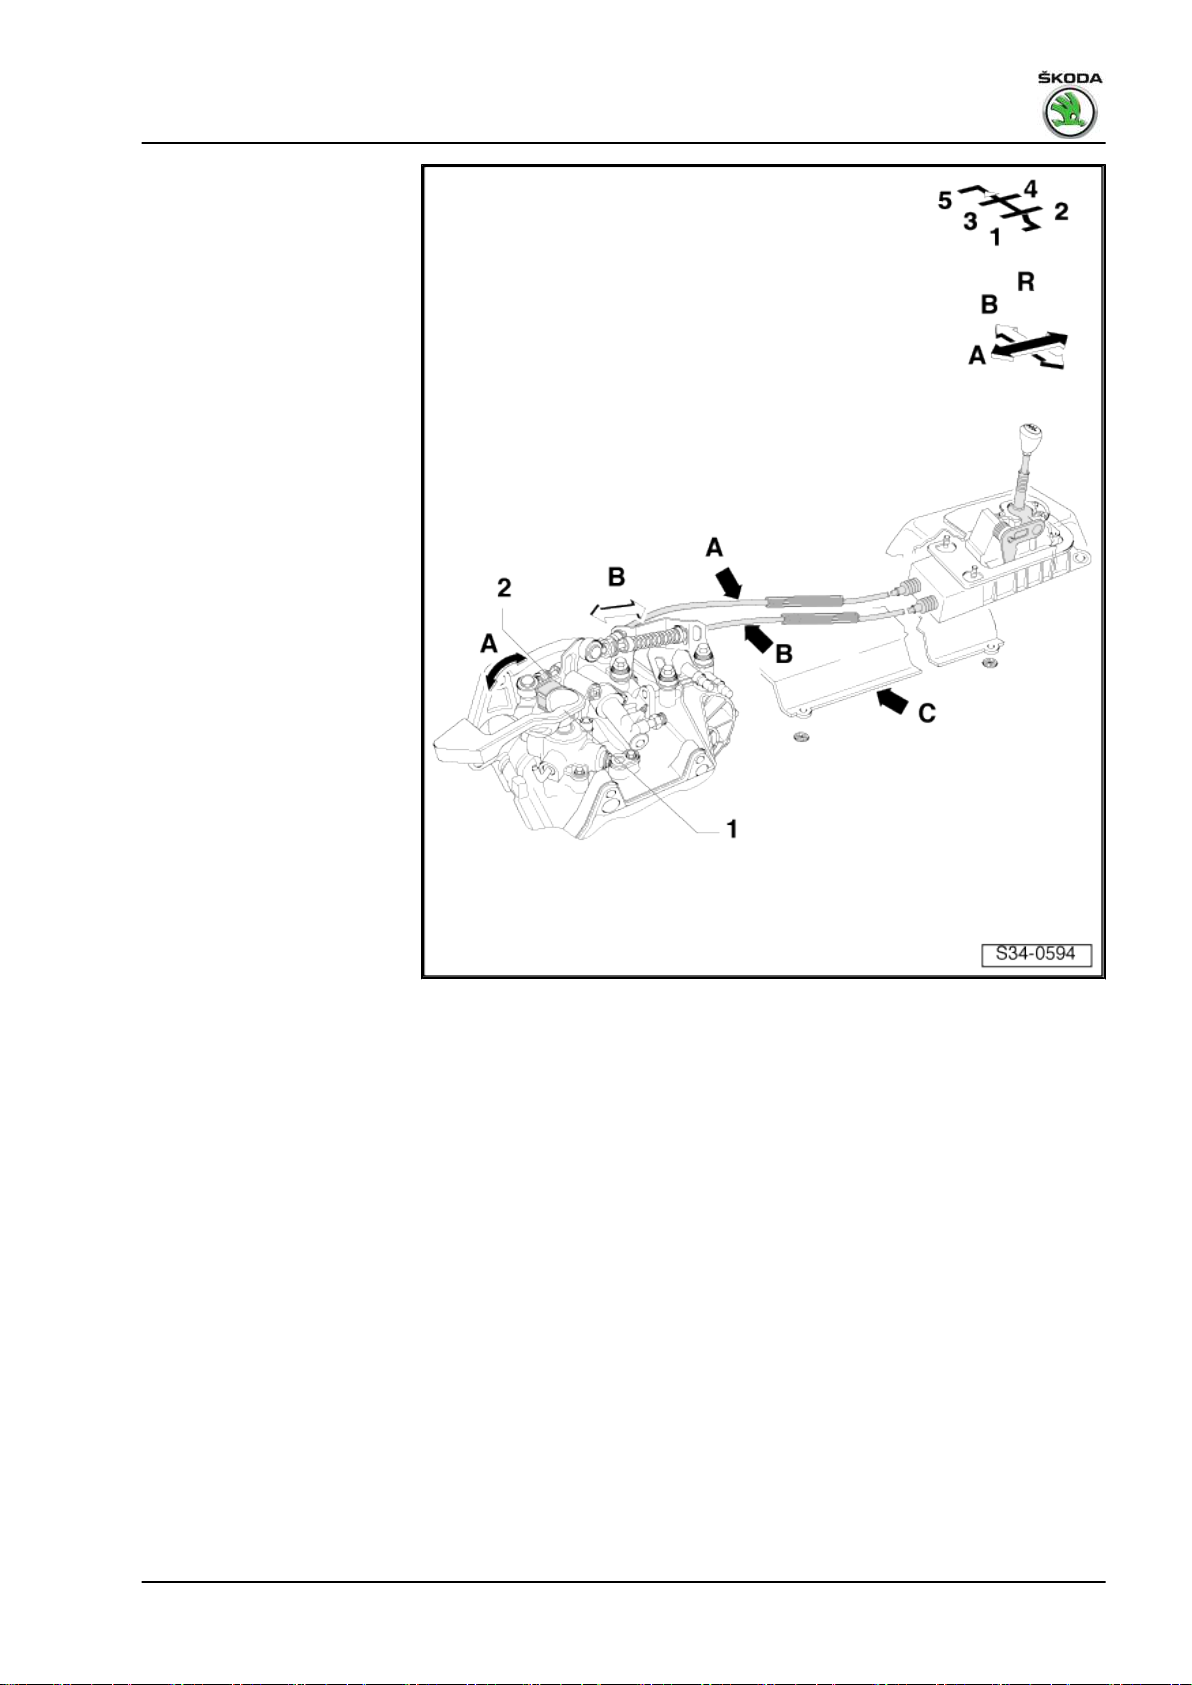
A - Shift cable
B - Selector cable
C - Heat shield
❑ take off before removing
the shift mechanism
1 - Gearshift lever
2 - Reversing lever
Fabia II 2007 ➤ , Fabia II 2009 ➤ , Fabia II 2011 ➤ , Rapid 2011 ➤ , R ...
Gearbox 02T - Edition 05.2014
1. Shift mechanism 77
Page 82

Fabia II 2007 ➤ , Fabia II 2009 ➤ , Fabia II 2011 ➤ , Rapid 2011 ➤ , R ...
Gearbox 02T - Edition 05.2014
1.2 Summary of components - Gearshift mechanism
Note
♦
If the battery earth strap is disconnected and connected, carry out additional operations ⇒ Electrical System;
Rep. gr. 27 .
♦
Do not kink the control cables.
♦
Remove shift mechanism for replacing the control cables:
♦
Fabia II, Roomster, Rapid NH ⇒ page 89 .
♦
Rapid ⇒ page 94 .
I - Summary of components Gearshift knob with shift lever
collar ⇒ page 79
II - Assembly overview - shift
mechanism ⇒ page 82
III - Summary of components Control cables ⇒ page 84
78 Rep. gr.34 - Controls, housing
Page 83
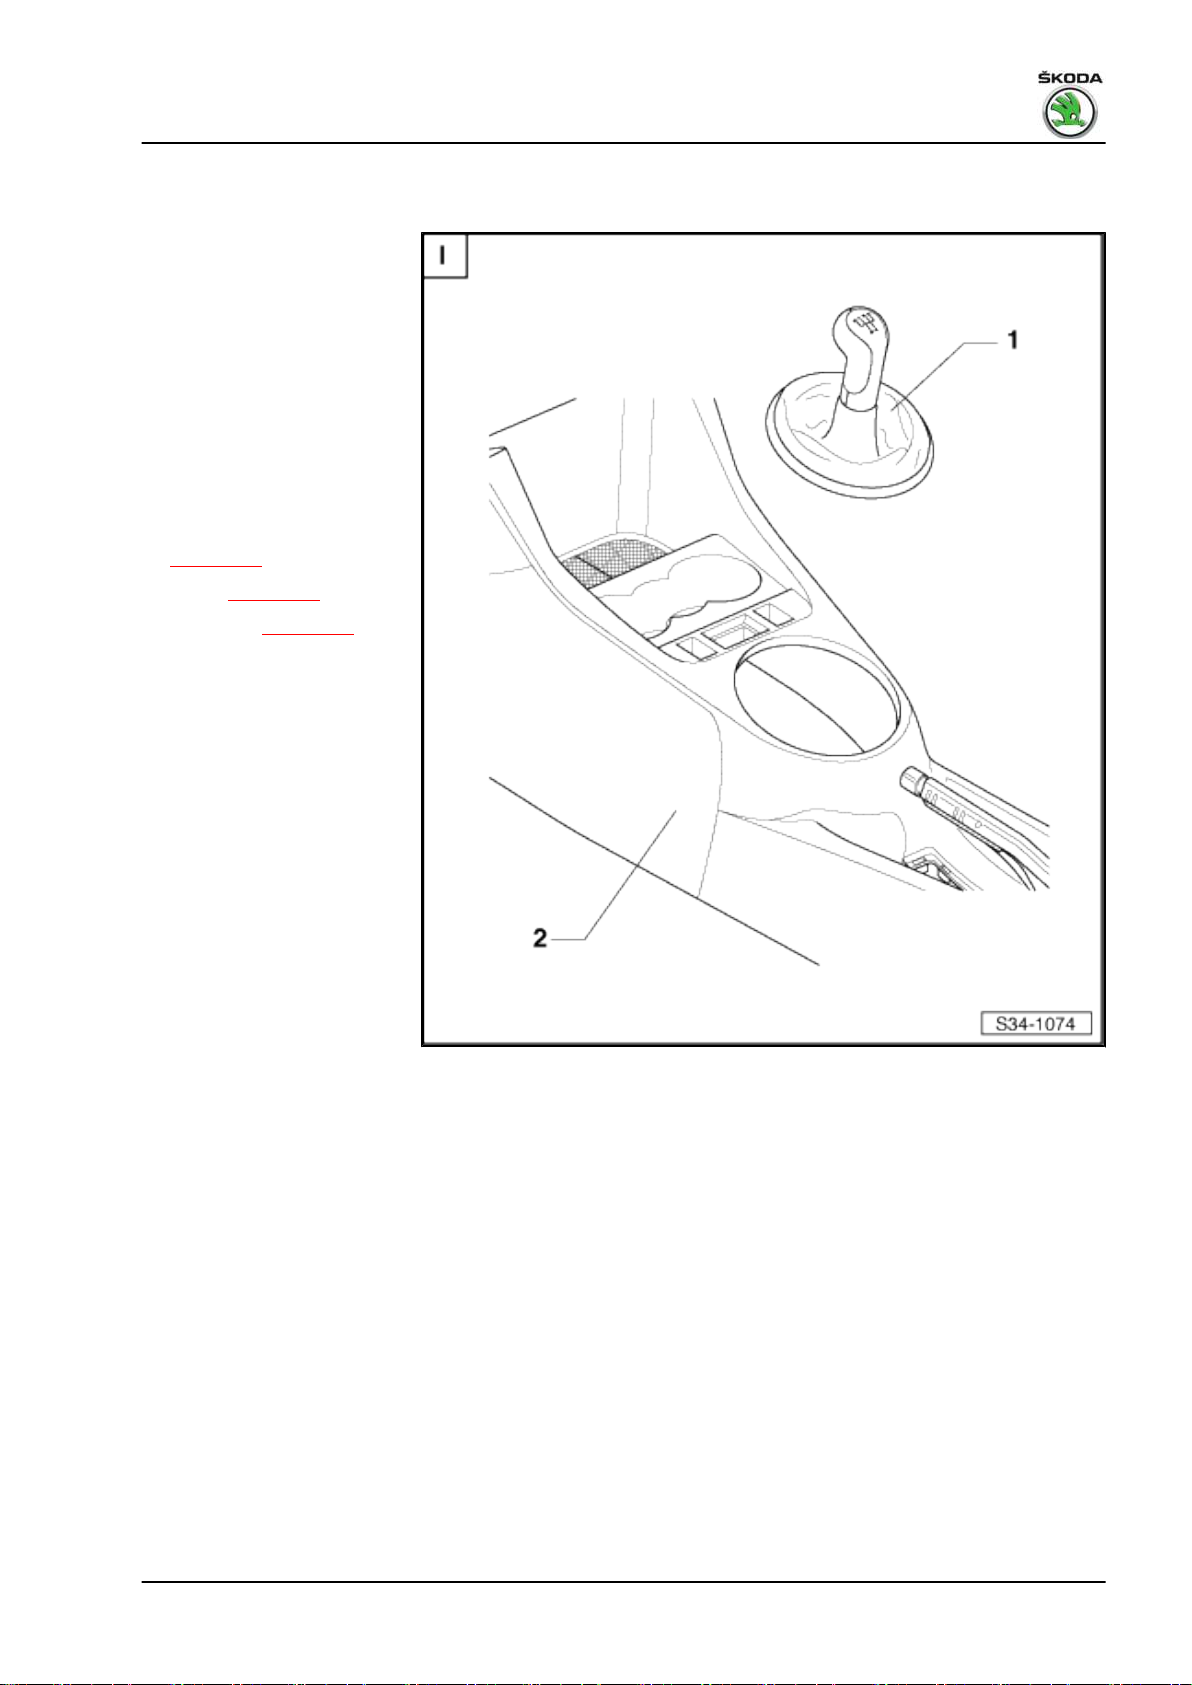
Fabia II 2007 ➤ , Fabia II 2009 ➤ , Fabia II 2011 ➤ , Rapid 2011 ➤ , R ...
Gearbox 02T - Edition 05.2014
1.3 Summary of components - Gearshift knob with shift lever collar
1 - Gearshift knob
❑ with collar
❑ it can be different in
shape on individual
models
❑ It is not possible to sep‐
arate the gearshift knob
from the collar
❑ always replace together
⇒ Electronic Catalogue
of Original Parts
❑ removing and installing:
♦ Fabia II, Roomster
⇒ page 79
♦ Rapid ⇒ page 80
♦ Rapid NH ⇒ page 81
❑ Plaque of gearshift lever
can be separated from
the gearshift knob e.g.
with a screwdriver (2011
►)
2 - Centre console
1.4 Removing and installing gearshift knob
and shift lever collar (Fabia II, Room‐
ster)
Special tools and workshop equipment required
♦ Disassembly wedge - 3409- (2 pieces)
1. Shift mechanism 79
Page 84

Fabia II 2007 ➤ , Fabia II 2009 ➤ , Fabia II 2011 ➤ , Rapid 2011 ➤ , R ...
Gearbox 02T - Edition 05.2014
– Lever off the collar with two disassembly wedges - 3409- out
of the surround of the centre console in -direction of arrow-.
– Pull the collar upwards over the gearshift knob.
– Turn securing mechanism -arrow A- in -direction of arrow B-
and pull off gearshift knob together with the collar.
Install
– Turn collar inside out.
– Position the gearshift knob together with the collar and secure
with securing mechanism -arrow A- against the
-direction arrow B-.
When inserting the gearshift knob on the shift lever the gearshift
knob must lock into the round slot of the gearshift lever.
1.5 Remove and install gearshift knob and
shift lever collar (Rapid)
Special tools and workshop equipment required
♦ Release tool - T30098- (2 pieces)
80 Rep. gr.34 - Controls, housing
Page 85

Fabia II 2007 ➤ , Fabia II 2009 ➤ , Fabia II 2011 ➤ , Rapid 2011 ➤ , R ...
– Lever off the collar frame with the disassembly wedge -
T30098- out of the surround for the centre console in
-direction of arrow-.
– For this step, press on the frame -arrows- and at the same time
raise the frame.
– Lift off the frame.
– Pull the collar upwards over the gearshift knob.
– Turn securing mechanism -arrow A- in -direction of arrow B-
and pull off gearshift knob together with the collar.
Install
– Turn collar inside out.
– Position the gearshift knob together with the collar and secure
with securing mechanism -arrow A- against the
-direction arrow B-.
When inserting the gearshift knob on the shift lever the gearshift
knob must lock into the round slot of the gearshift lever.
– Fit the frame with its catch pegs into the rear part of the centre
console.
– Lock the frame into the cover of the centre console in the front
part.
Gearbox 02T - Edition 05.2014
1.6 Remove and install gearshift knob and
shift lever collar (Rapid NH)
Special tools and workshop equipment required
♦ Release tool - T30098♦ Hose strap pliers , e.g. -V.A.G 1275 A– Lever the collar frame out of the centre console. To do so, fit
the release tool - T30098- between the collar frame and the
cover of the centre console in the middle of the front side
-arrow 1- and press it forwards in -direction of arrow 2-.
– Lift off the frame.
– Pull the collar upwards over the gearshift knob.
1. Shift mechanism 81
Page 86
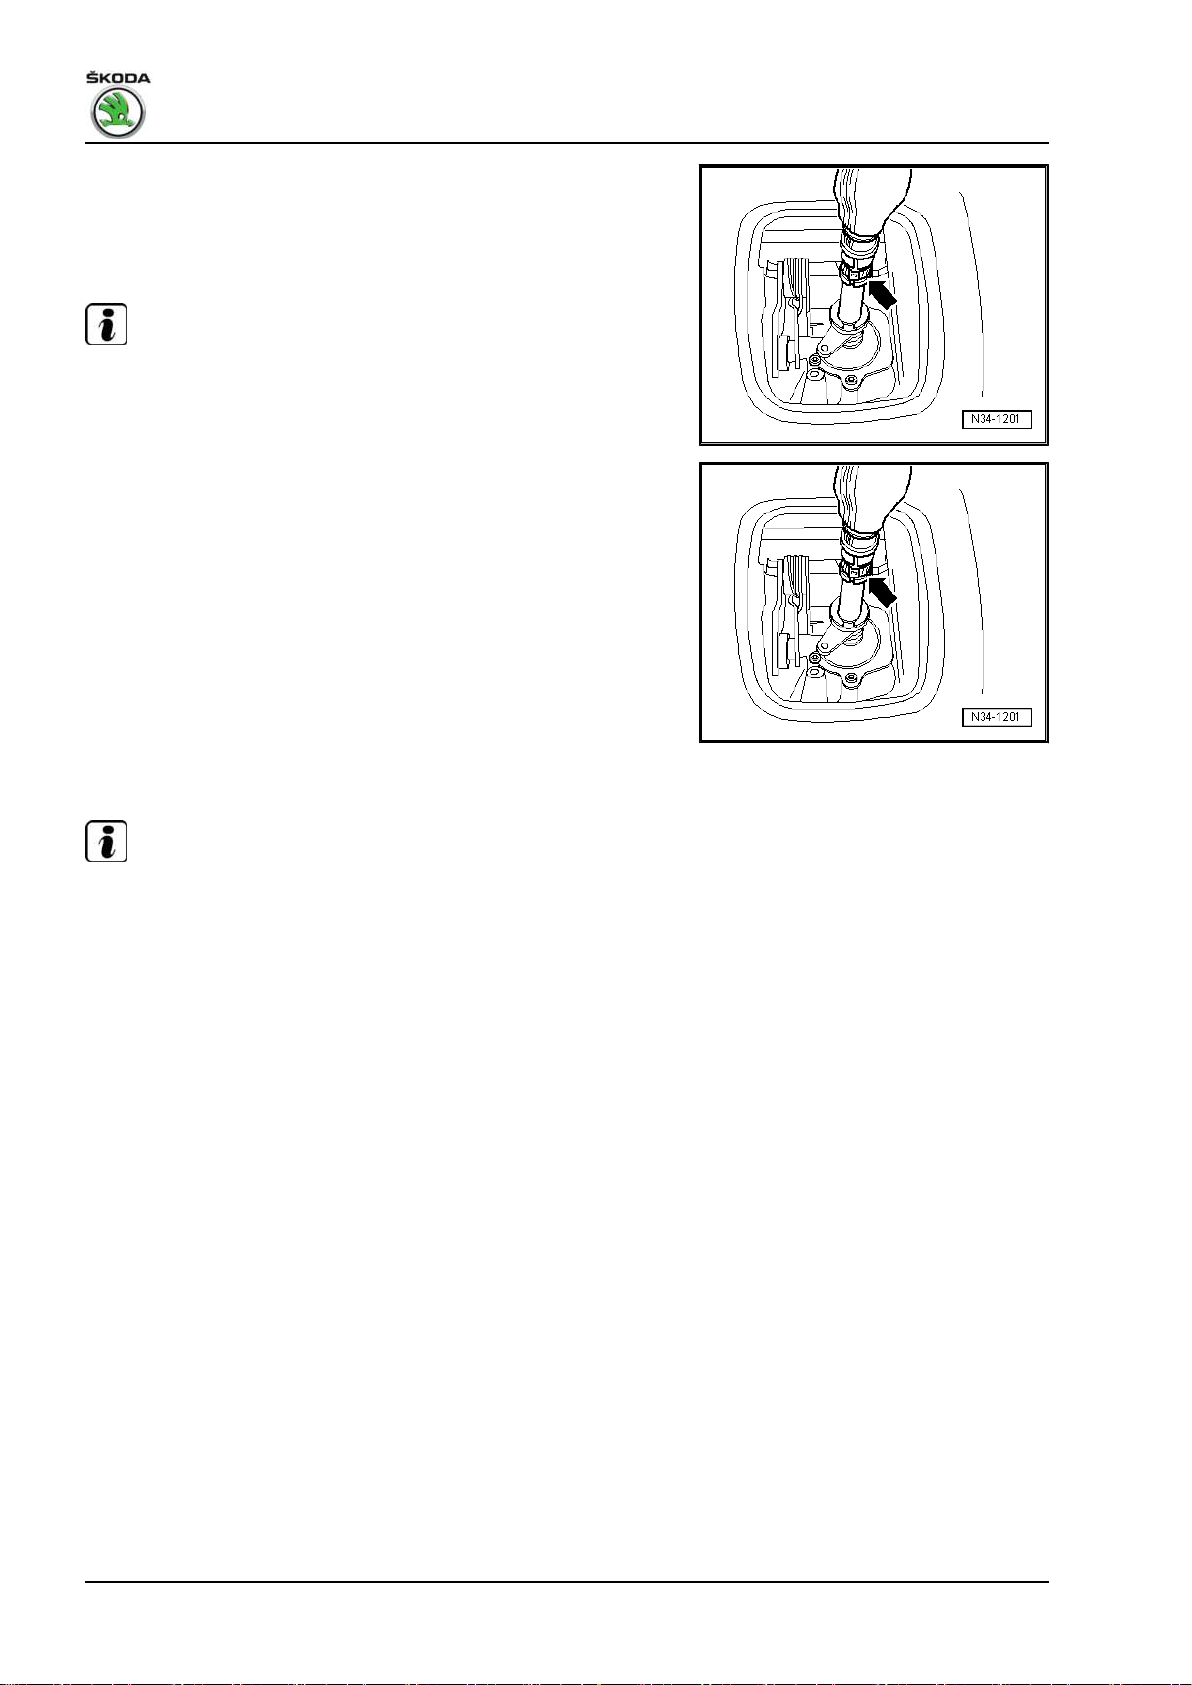
Fabia II 2007 ➤ , Fabia II 2009 ➤ , Fabia II 2011 ➤ , Rapid 2011 ➤ , R ...
Gearbox 02T - Edition 05.2014
– Open clamp -arrow- and pull off gearshift knob together with
the collar.
Install
– Turn collar inside out.
Note
When inserting the gearshift knob on the selector lever the gear‐
shift knob must be pressed in up to the stop.
– Position the gearshift knob together with the collar and secure
it with a new open warm-type clamp -arrow- by pressing it to‐
gether.
– Fit the frame of the collar onto the pegs in the rear part of the
centre console.
– Press the frame onto the cover of the centre console until it
locks into the pegs in the front part.
1.7 Summary of components - Shift lever and shift housing
Note
Grease bearing and friction surfaces with grease - G 000 450 02- .
82 Rep. gr.34 - Controls, housing
Page 87

Fabia II 2007 ➤ , Fabia II 2009 ➤ , Fabia II 2011 ➤ , Rapid 2011 ➤ , R ...
1 - Lock washer
❑ removing and installing
⇒ page 84
2 - Pressure spring
3 - Gasket
❑ between shift housing
and body
❑ self-adhesive
❑ stuck onto the shift
housing
4 - Shift lever
5 - Damping
❑ removing and installing
⇒ page 84
6 - Shift housing
7 - Insulating washer
❑ must be present in the
round slot -arrow- at the
shift lever -Pos. 48 - Gasket
❑ replace ⇒ Electronic
Catalogue of Original
Parts
9 - Cover
❑ bend up tabs for remov‐
ing
❑ replace ⇒ Electronic
Catalogue of Original
Parts
10 - Bush
11 - Selector cable
❑ pressed onto selector angle plate
❑ slacken from selector angle plate within the shift mechanism
❑ press onto selector angle plate within the shift mechanism
❑ Fitting position ⇒ page 76
❑ after installing set shift mechanism ⇒ page 96
12 - Shift cable
❑ pressed onto the shift lever guide
❑ slacken from the shift lever guide within the shift mechanism
❑ press onto the selector angle guide within the shift mechanism
❑ Fitting position ⇒ page 76
❑ after installing set shift mechanism ⇒ page 96
13 - 23 Nm
❑ 4 pieces
Gearbox 02T - Edition 05.2014
1. Shift mechanism 83
Page 88

Fabia II 2007 ➤ , Fabia II 2009 ➤ , Fabia II 2011 ➤ , Rapid 2011 ➤ , R ...
Gearbox 02T - Edition 05.2014
Removing and installing lock washer
– When removing and installing the circlip -A- pull the gearshift
lever in the -direction of the arrow A- while simultaneously
pressing the spring down with a screwdriver up to the stop in
the -direction of the arrow B-.
Note
♦
The mounting slot in shift lever for circlip must be visible.
♦
Release spring carefully.
Removing and installing damping -arrow– Press the pressure spring arm -A- as far as possible to the left
until it is located outside the damping -arrow-.
– Press the shift lever to the lift and pull off the damping.
• After installing the damping, the pressure spring arms -A- and
-B- must rest on the damping -Pfeil-.
1.8 Summary of components - Control cables
Note
Grease bearing and friction surfaces with grease - G 000 450 02- .
84 Rep. gr.34 - Controls, housing
Page 89

Fabia II 2007 ➤ , Fabia II 2009 ➤ , Fabia II 2011 ➤ , Rapid 2011 ➤ , R ...
1 - Shift cable
❑ slacken from the shift
lever guide within the
shift mechanism
❑ press onto the selector
angle guide within the
shift mechanism
❑ connect with cable lock
-Pos. 11-
❑ Fitting position
⇒ page 76
❑ after installing set shift
mechanism
⇒ page 96
2 - Selector cable
❑ slacken from selector
angle plate within the
shift mechanism
❑ press onto selector an‐
gle plate within the shift
mechanism
❑ at selector angle plate
❑ connect with cable lock
-Pos. 10-
❑ Fitting position
⇒ page 76
❑ after installing set shift
mechanism
⇒ page 96
3 - Bush
4 - Lock washer
❑ do not damage cables
when removing
❑ always replace ⇒ Elec‐
tronic Catalogue of Original Parts
5 - Shift housing
6 - Cable support
❑ can be made out of plastic or metal
7 - Bush
❑ for mounting of cable support to gearbox
8 - Spacer bush
9 - 20 Nm
❑ 3 pieces
❑ for cable support
10 - Cable lock
❑ for selector cable ⇒ page 86
❑ after installing set shift mechanism ⇒ page 96
11 - Cable lock
❑ for shift cable ⇒ page 86
❑ after installing set shift mechanism ⇒ page 96
12 - Lock washer
❑ always replace ⇒ Electronic Catalogue of Original Parts
Gearbox 02T - Edition 05.2014
1. Shift mechanism 85
Page 90

Fabia II 2007 ➤ , Fabia II 2009 ➤ , Fabia II 2011 ➤ , Rapid 2011 ➤ , R ...
Gearbox 02T - Edition 05.2014
❑ it is not necessary, if it is a plastic relay lever
13 - Bush
❑ it is not necessary, if it is a plastic relay lever
14 - Selector lever
❑ Fitting position ⇒ page 87
❑ after installing set shift mechanism ⇒ page 96
❑ as of 06.07 the relay level is made of plastic
❑ Removing and installing plastic relay lever together with cable lock ⇒ page 87
❑ If the relay lever is made of plastic, neither the bushings -Pos. 13- nor the lock washer -Pos. 12- are
required
15 - Sliding shoe
16 - Gearshift lever
❑ with balancing weight
❑ Fitting position ⇒ page 87
❑ after installing set shift mechanism ⇒ page 96
17 - 20 Nm
❑ always replace ⇒ Electronic Catalogue of Original Parts
18 - Lock washer
❑ always replace ⇒ Electronic Catalogue of Original Parts
❑ is not required on cable locks for selector cable at relay lever, if relay lever is made of plastic
Assign cable locks
The holes in the cable locks have different diameters.
Cable lock Dimension “a”
Shift cable at gearbox shift lever 10 mm
Selector cable at metal relay lever 8 mm
Selector cable at plastic relay lever 10 mm
86 Rep. gr.34 - Controls, housing
Page 91

Fabia II 2007 ➤ , Fabia II 2009 ➤ , Fabia II 2011 ➤ , Rapid 2011 ➤ , R ...
Fitting location of gearbox shift lever
– When inserting the gearbox shift lever, make sure that the
tooth opening -arrow A- is located above the interrupted spac‐
ing of the teeth -arrow B- for the gearshift shaft.
Fitting location of relay lever
1 - Gearbox shift lever -1- with balancing weight
2 - The relay lever -2- is inserted over the sliding shoe -arrow- into
the guiding nut of the gearbox shift lever
Gearbox 02T - Edition 05.2014
1.9 Plastic relay lever as of 06.07 (Fabia II,
Roomster, Rapid NH)
Removing
• Gearbox shift lever is located in the neutral position.
• Before removing the gearbox shift lever the cable lock must
be separated from the selector cable in order to avoid damage
to the selector cable.
1. Shift mechanism 87
Page 92

Fabia II 2007 ➤ , Fabia II 2009 ➤ , Fabia II 2011 ➤ , Rapid 2011 ➤ , R ...
Gearbox 02T - Edition 05.2014
– Pull forward the locking mechanism as far as the stop in
-direction of arrow 1-, then lock by turning to the left in
-direction of arrow 2-.
– Press the relay lever towards the front in the
-direction of arrow 3-.
Relay lever with a catch
– Carefully press down the pin detent -arrow 1- as far as the
stop.
– Carefully take the relay lever -A- together with the cable lock
-B- out of its bearing point.
88 Rep. gr.34 - Controls, housing
Page 93
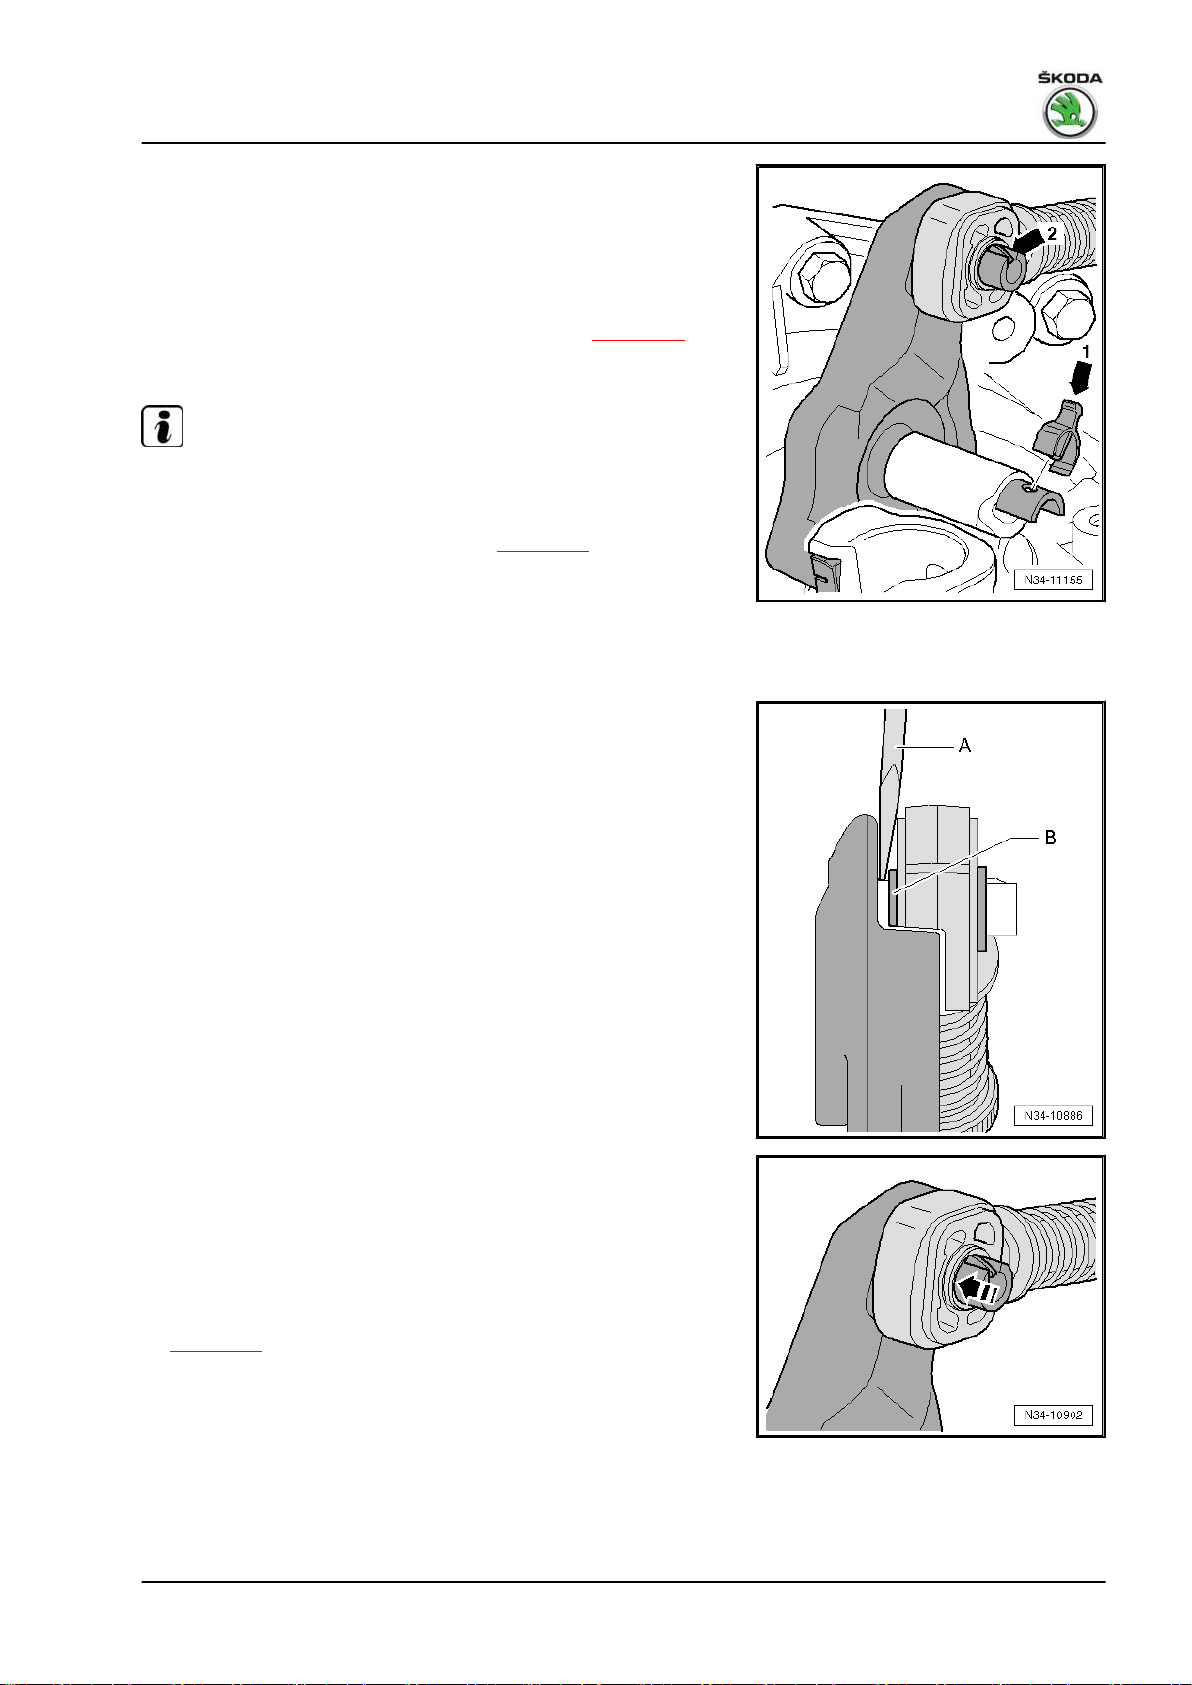
Fabia II 2007 ➤ , Fabia II 2009 ➤ , Fabia II 2011 ➤ , Rapid 2011 ➤ , R ...
Relay lever with clip
– Remove clip -arrow°1-.
– Carefully take the relay lever together with the cable lock out
of its bearing point.
Continued for all versions
• Only remove cable lock on removed relay lever ⇒ page 89 .
Install
Note
Before installing, grease bearing points and friction surfaces with
grease - G 000 450 02- .
– Press cable lock onto the relay lever ⇒ page 89 .
– Insert relay lever together with cable lock up to the stop in its
bearing point.
• The cable lock must be located behind the catch -arrow 2-.
• The pin detent or the clip -arrow 1- secures the relay lever.
Gearbox 02T - Edition 05.2014
Lever off cable lock for selector cable from plastic relay lever
• Relay lever removed.
– Position a cross-head screwdriver -A- between bushing -B-
and relay lever.
Press on cable lock
• Relay lever removed.
• The cable lock must only be pressed onto the bushing
-arrow-.
• Cable lock must move freely on relay lever.
• The cable lock must be located behind the pin detent
⇒ page 89 .
1.10 Remove and install shift mechanism
(Fabia II, Roomster, Rapid NH)
Special tools and workshop equipment required
1. Shift mechanism 89
Page 94

Fabia II 2007 ➤ , Fabia II 2009 ➤ , Fabia II 2011 ➤ , Rapid 2011 ➤ , R ...
Gearbox 02T - Edition 05.2014
♦ Disassembly wedge - 3409- (2 pieces) (Fabia II, Roomster)
♦ Release tool - T30098- (Rapid NH)
♦ Grease - G 000 450 02-
1.10.1 Removing
Note
If the battery earth strap is disconnected and connected, carry out
additional operations ⇒ Electrical System; Rep. gr. 27 .
– Remove air filter ⇒ Engine; Rep. gr. 23 or ⇒ Engine; Rep.
gr. 24 .
– Remove battery and battery tray ⇒ Electrical System; Rep.
gr. 27 .
– Remove circlip -3- for shift cable from gearbox shift lever -1-.
Metal relay lever
– Remove circlip -4- for selector cable from relay lever -2-.
– Remove selector cable and shift cable from the studs.
Plastic relay lever
– Pull off shift cable from the stud.
– Remove relay lever together with cable lock ⇒ page 87 .
Continued for all vehicles
– Disconnect the Bowden cable support from gearbox
-arrows-.
– Remove gearshift knob and shift lever collar:
♦ Fabia II and Roomster ⇒ page 79 .
♦ Rapid NH ⇒ page 81 .
– Remove the centre console cover ⇒ Body Work; Rep. gr. 68 .
– If present, remove noise insulation from shift housing.
– Unscrew fixing nuts -arrows- attaching the shift housing.
– Remove pre-exhaust pipe ⇒ Engine; Rep. gr. 26 .
90 Rep. gr.34 - Controls, housing
Page 95

Fabia II 2007 ➤ , Fabia II 2009 ➤ , Fabia II 2011 ➤ , Rapid 2011 ➤ , R ...
– Remove underbody cover on right and left (if present)
-arrows-.
– Remove tunnel bridge -arrows-.
Vehicles Rapid NH
– Remove bracket for retaining straps of middle silencer from
the body.
Continued for all vehicles
– Unhook rear silencer in such a way that it does not come in
contact with the rear axle.
Gearbox 02T - Edition 05.2014
– Remove heat shield -arrows-.
– Swivel shift housing down and remove with control cables.
1.10.2 Install
Installation is carried out in the reverse order. However, pay at‐
tention to the following:
1. Shift mechanism 91
Page 96

Fabia II 2007 ➤ , Fabia II 2009 ➤ , Fabia II 2011 ➤ , Rapid 2011 ➤ , R ...
Gearbox 02T - Edition 05.2014
– Always replace lock washers -3- and -4- after each disassem‐
bly ⇒ Electronic Catalogue of Original Parts .
– Secure the shift cable with the lock washer -3- and the selector
cable with the lock washer -4- (for metal relay lever).
Cable lock with plastic relay lever
– The relay lever and the cable lock must be mounted together
⇒ page 87 .
– Insert the selector cable into the cable lock.
Continued for all gearshift mechanisms
– Align shift housing parallel to vehicle body.
• The distance to the vehicle body must be the same on both
sides.
– Assemble exhaust system free of stress and attach tunnel
bridges ⇒ Engine; Rep. gr. 26 .
– Install the noise insulation ⇒ Body Work; Rep. gr. 50 .
– Setting the shift mechanism ⇒ page 96 .
– Install air filter ⇒ Engine; Rep. gr. 23 or ⇒ Engine; Rep. gr.
24 .
– Connect earth strap of battery while paying attention to the
notes in the ⇒ Electrical System; Rep. gr. 27 .
92 Rep. gr.34 - Controls, housing
Page 97

Tightening torques
Components Tightening torque
Underbody cover 2 Nm
Shift housing to body ⇒ page 82
Cable support to gearbox ⇒ page 84
Tunnel bridge ⇒ Engine; Rep. gr. 26
Bracket for the exhaust system ⇒ Engine; Rep. gr. 26
Fabia II 2007 ➤ , Fabia II 2009 ➤ , Fabia II 2011 ➤ , Rapid 2011 ➤ , R ...
Gearbox 02T - Edition 05.2014
93
Page 98
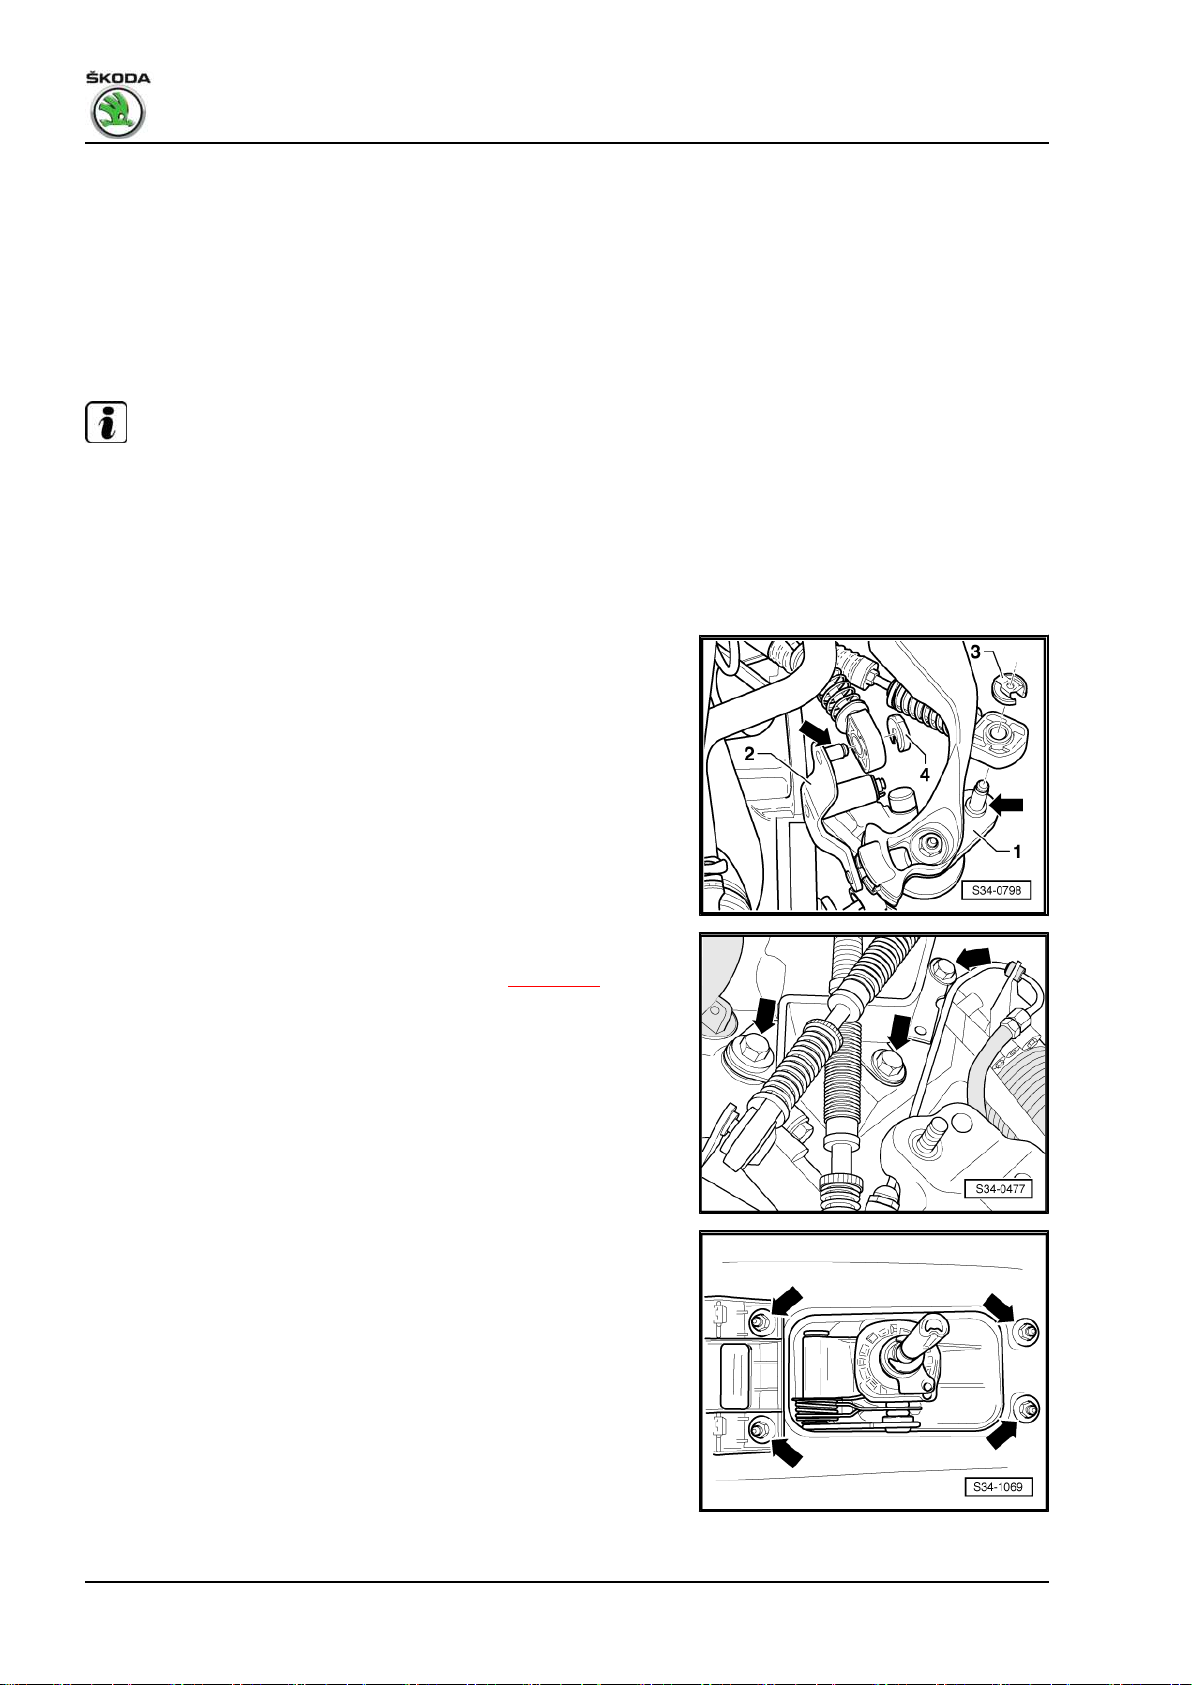
Fabia II 2007 ➤ , Fabia II 2009 ➤ , Fabia II 2011 ➤ , Rapid 2011 ➤ , R ...
Gearbox 02T - Edition 05.2014
1.11 Removing and installing shift mecha‐
nism (Rapid)
Special tools and workshop equipment required
♦ Release tool - T30098- (2 pieces)
♦ Grease - G 000 450 02-
1.11.1 Removing
Note
After the battery earth strap is disconnected and connected, carry
out additional operations ⇒ Electrical System; Rep. gr. 27 .
– Remove battery and battery tray ⇒ Electrical System; Rep.
gr. 27 .
– Remove air filter ⇒ Engine; Rep. gr. 23 or ⇒ Engine; Rep.
gr. 24 .
– Remove circlip -3- for shift cable from gearbox shift lever -1-.
– Pull off shift cable from the stud -arrow-.
– Remove circlip -4- for the selector cable from relay lever -2-.
– Pull off the selector cable from the stud -arrow-.
– Remove Bowden cable support -arrows-.
– Remove gearshift knob and shift lever collar ⇒ page 80 .
– Remove the centre console ⇒ Body Work; Rep. gr. 68 .
– If present, remove noise insulation from shift housing.
– Unscrew nuts -arrows- attaching the shift housing.
– Remove pre-exhaust pipe ⇒ Engine; Rep. gr. 26 .
94
Page 99

Fabia II 2007 ➤ , Fabia II 2009 ➤ , Fabia II 2011 ➤ , Rapid 2011 ➤ , R ...
– Remove underbody cover on right and left (if present)
-arrows-.
– Remove tunnel bridge -A- -arrows-.
– Unhook rear silencer in such a way that it does not come in
contact with the rear axle.
Gearbox 02T - Edition 05.2014
– Remove heat shield -arrows-.
– Swivel shift housing down and remove with control cables.
1.11.2 Install
Installation is performed in the reverse order, pay attention to the
following points:
The holes in the cable locks have different diameters ⇒ page 84
95
Page 100

Fabia II 2007 ➤ , Fabia II 2009 ➤ , Fabia II 2011 ➤ , Rapid 2011 ➤ , R ...
Gearbox 02T - Edition 05.2014
– Apply a small quantity of grease - G 000 450 02- onto the studs
-arrows- of the gearbox shift lever -1- and of the relay lever
-2-.
– Always replace lock washers -3- and -4- after each disassem‐
bly ⇒ Electronic Catalogue of Original Parts .
– Secure the shift cable with the lock washer -3- and the selector
cable (for metal relay lever) with the lock washer -4-.
– Align shift housing parallel to vehicle body.
• The distance to the vehicle body must be the same on both
sides.
– Assemble exhaust system free of stress and attach tunnel
bridges ⇒ Engine; Rep. gr. 26 .
– If present, position the noise insulation on the shift housing.
– Install centre console ⇒ Body Work; Rep. gr. 68 .
– Setting the shift mechanism ⇒ page 96 .
– Install air filter ⇒ Engine; Rep. gr. 23 or ⇒ Engine; Rep. gr.
24 .
– Install the battery tray and battery ⇒ Electrical System; Rep.
gr. 27 .
Note
After the battery earth strap is disconnected and connected, carry
out additional operations ⇒ Electrical System; Rep. gr. 27 .
Tightening torques
Components Tightening torque
Underbody cover 2 Nm
Shift housing to body ⇒ page 82
Cable support to gearbox ⇒ page 84
Tunnel bridge ⇒ Engine; Rep. gr. 26
Bracket for pre-exhaust pipe ⇒ Engine; Rep. gr. 26
1.12 Setting the shift mechanism
Special tools and workshop equipment required
♦ Rig pin - T10027A♦ Disassembly wedge - 3409- (2 pieces - Fabia II, Roomster)
♦ Release tool - T30098- (2 pieces - Rapid, 1 piece - Rapid NH)
Note
The following are required for correct setting of the shift mecha‐
nism:
• Gearbox, clutch and clutch control in perfect condition.
• Selector mechanism must move freely.
• Control elements and transmission elements of the shift mech‐
anism are in perfect condition.
96
 Loading...