

Skoda Radio Bolero Owner's Manual

SIMPLY CLEVER
Radio Bolero
Owner's Manual

Structure of this owner's manual
(explanations)
This owner's manual has been systematically designed to make it easy for you to
search for and obtain the information you require.
Chapters, table of contents and subject index
The text of the owner's manual is divided into relatively short sections which are
combined into easy-to-read chapters. The chapter you are reading at any particular
moment is always specified on the bottom right of the page.
At the beginning of this manual you will find a Table of contents with all the topics
arranged sequentially.
Direction indications
All direction indications such as “left”, “right”, “forwards”, “reverse” relate to the direction of travel of the vehicle.
Units of measurement
All values are expressed in metric units.
Explanation of symbols
Denotes the end of a section.
Denotes the continuation of a section on the next page.
® Denotes a registered trademark.
Notes
WARNING
The most important notes are marked with the heading WARNING.
TheseWARNING notes alert you to a serious risk of accident or injury.
CAUTION
A
Caution note draws your attention to the possibility of damage to your vehicle
(e.g. damage to gearbox), or points out general risks of an accident.
Note
A normal
Note draws your attention to important information about the operation
of your vehicle.

Preface
You have chosen a ŠKODA vehicle, which is fitted with the Bolero Radio (hereafter referred to only as the
radio) – thank you for choosing ŠKODA.
The new operating concept allows you to adjust vehicle settings and to operate some electronic systems
centrally via the device.
Please read this owner's manual carefully, because the operation in accordance with these instructions is a
prerequisite for the proper use of the vehicle.
If you have any questions about your device, please contact your ŠKODA partner.
Your ŠKODA AUTO a.s. (hereinafter referred to as ŠKODA)

Table of Contents
General information
Important information 3
Anti-theft protection 3
Device desrciption and operation 4
Device setup
Tone settings 7
Settings main menu (Setup) 7
Setup radio
7
Traffic station set-ups 8
Setup Media
8
Setup system
8
Telephone set-ups 8
Radio
Using the system
10
Media
Using the system 13
External sources
Using the system
16
Phone
Using the system
18
2
Table of Contents

General information
Important information
Introductory information
These operating instructions describe all possible equipment variants without
identifying them as special equipment, model variants or market-dependent
equipment.
Consequently, this vehicle does not need to contain all of the equipment compo-
nents described in these operating instructions.
The scope of equipment of your vehicle refers to your purchase contract for the
vehicle. More information is available from the ŠKODA Partner 1)from which you
bought the vehicle.
Please note that these instructions are meant only as an addendum to the information provided in your vehicle's owner's manual. Therefore, they can be used
only in conjunction with the latest manual for this vehicle. For a detailed description of some of the functions listed in these instructions, see the owner's manual
for your vehicle.
If you have any questions about your device, please contact your ŠKODA Partner.
The illustrations may differ in minor details from your vehicle; they are only inten-
ded for general information.
Device operation
The device should only be used when traffic conditions permit safe use.
WARNING
■
Concentrate fully on your driving at all times! As the driver you are wholly re-
sponsible for the operation of your vehicle.
■
Only use the device such that you are in full control of your vehicle in every
traffic situation – do not run the risk of an accident.
■
Adjust the volume to ensure that audible signals from outside the vehicle,
e.g. sirens from vehicles with right-of-way such as police cars, ambulances
and fire engines, can be heard at all times.
■
High volumes can cause hearing damage!
Screen care
CAUTION
■
Do not use solvents such as petrol or turpentine which could damage the
screen surface.
■
Treat the screen with care. Finger pressure or contact with sharp objects may
cause dents and scratches on the surface.
Note
The screen can be cleaned with a soft cloth and alcohol if necessary.
Anti-theft protection
Anti-theft coding
Your radio is equipped with a convenience coding. If the radio is being operated
for the first time, the safety code is not only stored in the radio but also in the
vehicle.
After disconnecting and reconnecting the battery, you must switch on the ignition before switching on the radio.
If you want to install the radio in another vehicle you will need to enter the safety
code. This requires the services of your ŠKODA partner1).
1)
Explanation of terms » Owner's Manual, chapter Foreword.
3
General information
As the device only functions after entering the safety code it cannot be used if
stolen. This increases vehicle security.
Note
The code is stored in the instrument cluster. This ensures that it is automatically
decoded (convenience coding). Manual input of the code is normally not necessary.
Enter code
If a keypad appears after switching on with the command to enter the code, the
unit can be unlocked by entering the correct four-digit code number.
›
Tap on one of the numbers 0 to 9on the numeric keypad shown on the screen.
The digit is accepted in the entry line.
›
After a four-digit sequence has been entered, the group of digits will turn grey
(inactive) and no further digits can be accepted in the entry line.
›
Tap the screen to delete digits in the entry line from right to left to correct
the input if necessary.
›
When the correct code is displayed in the entry line, press the function button
OK
.
Code number
The code number can only be called up “online” via the ŠKODA system, as this
guarantees even more effective anti-theft protection. If in doubt, contact a
ŠKODA Partner.
Incorrect code number
If an incorrect code is confirmed after entry of the code, the procedure can be repeated once again. The number of attempts is shown in the second screen line.
If the code number is entered incorrectly for the second time, the unit will be
blocked for approx. one hour. It is possible to enter again the safety code after
one hour has expired, when the unit and the ignition have been switched on.
If two further invalid attempts are made, the device will be blocked for another
hour.
The cycle - two attempts, blocked for an hour - will continue to apply.
Note
The code is normally stored in the instrument cluster. This ensures that it is automatically decoded (convenience coding). Manual input of the code is normally not
necessary.
Device desrciption and operation
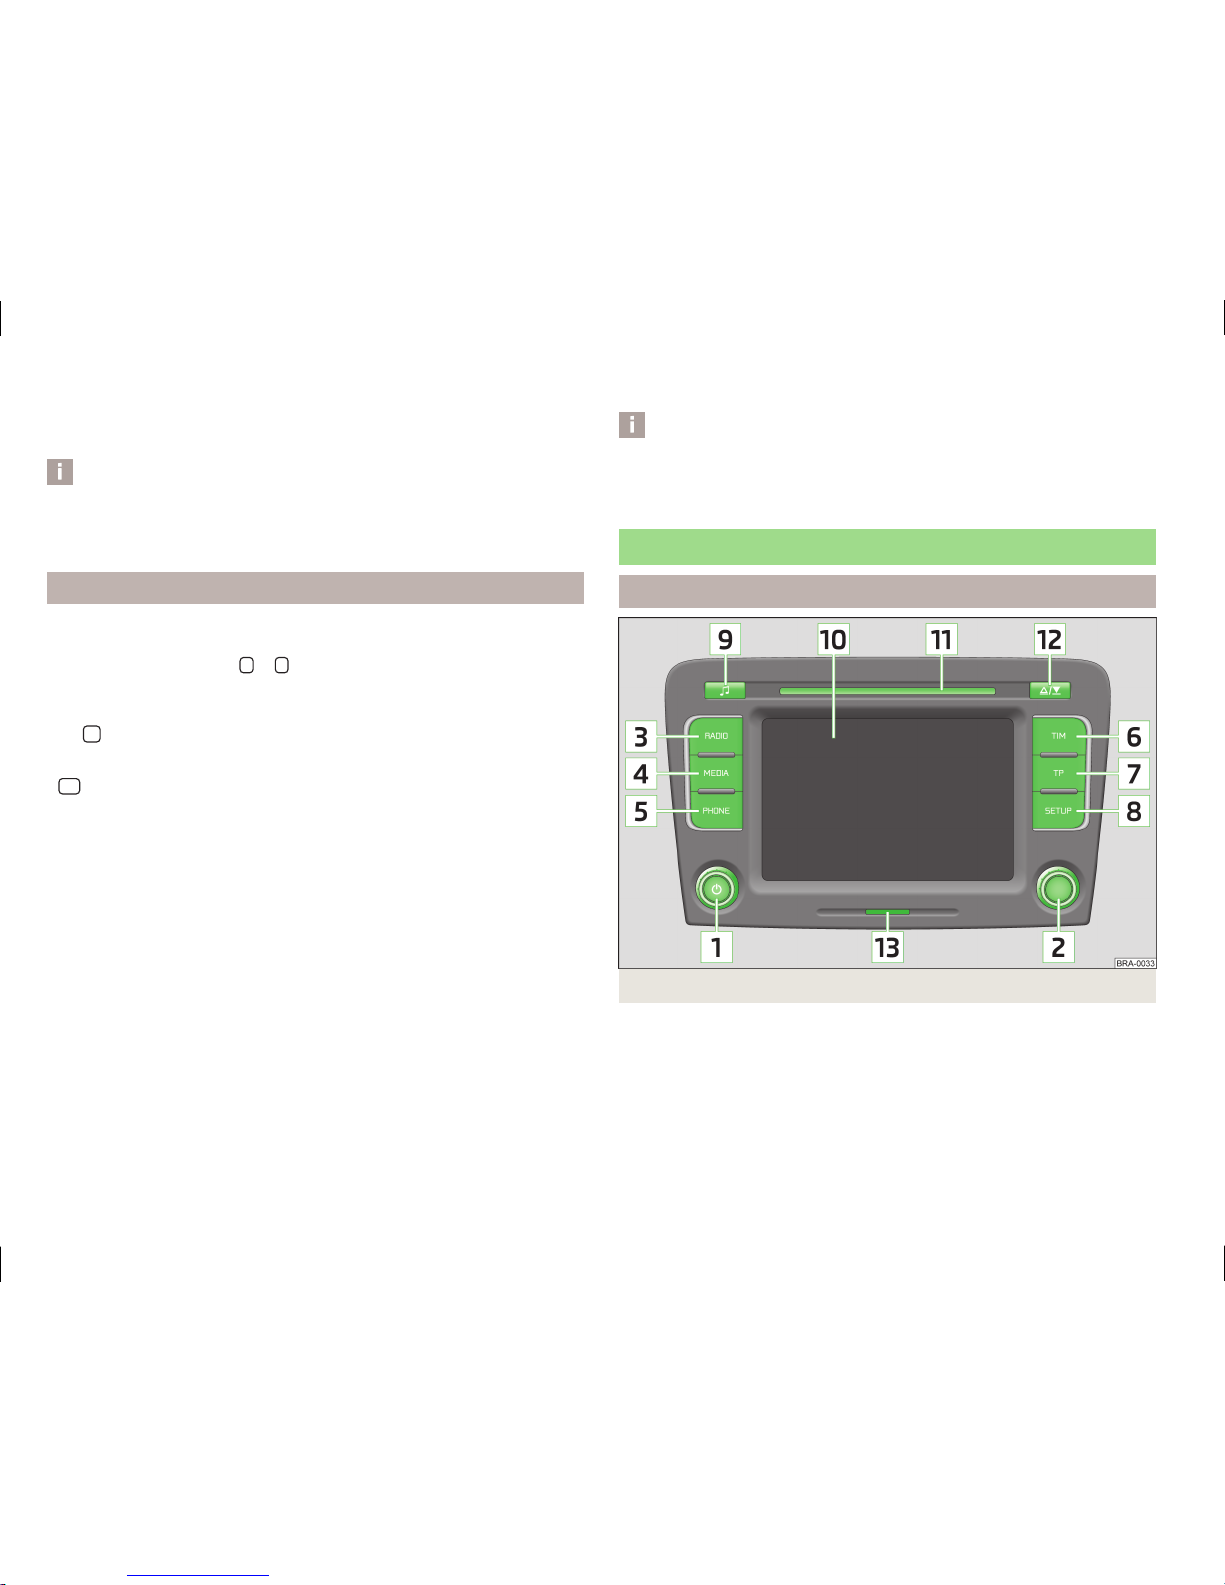
Device overview
Fig. 1
Device overview
4
General information

- On/Off button
›
switches the radio on and off (press)
›
for volume control (turn)
Menu knob
›
RADIO mode - turn for manual station adjustment; press briefly
to start/stop the automatic play (scan).
›
Menu mode - turn to change title; press briefly to start/stop the
automatic play (scan).
RADIO
- changes over into the radio mode and changes the fre-
quency range when in the radio mode
MEDIA
– changes over to the last played media source or selects a
new media source
PHONE
– Telephone function – Muting of the current audio source
TIM
- TIM function (Traffic Information Memory) recorded traffic
announcements can be replayed. After entering up to two different TIM recording times in the SETUP menu, a recording of the
traffic announcements is also possible if the unit is switched off
TP
- switch traffic information function (Traffic Program) on or off
or pause playback of the currently recorded traffic bulletin
SETUP
- enables setting-up the individually selected field
- opens the sound and volume settings menu
Touch screen:fields with coloured surrounds on the screen are
currently “active” and can be operated by touching the screen.
CD case
Eject key
/
- press briefly to move an inserted CD into the ini-
tial position ready for removal
SD memory card slot: SD memory cards, SDHC memory cards with
a size of 32 mm x 24 mm x 2.1 mm and a capacity of up to 32GB are
supported (FAT 32).
Switching the device on/off
›
Press and hold the On/Off button1 to turn the device on or off.
After switching on the unit, the last audio source that was active before switching off will be played.
1
2
3
4
5
6
7
8
9
10
11
12
13
If the button is removed from the ignition while the device is still switched on, it
will turn off automatically. The device can be switched on again by pressing the
On/Off button1. If the ignition is switched off, the device protects the vehicle
battery by switching off automatically after approx. one hour.
If you have switched the radio off by removing the ignition button, the radio
switches back on when the ignition is turned on again.
General - operation
The device screen is a so-called “touch screen”. Fields with coloured surrounds on
the screen are currently “active” and can be operated by touching the screen. Active fields, which call up a function or a menu, are called “function keys”.
Moving objects or regulators
›
Place your finger on one of the movable elements on the screen, for example
the“ slider ” in a “scrollbar”.
›
Move your finger across the screen without lifting it off. The element follows
the movement, but will move only within the predefined range.
›
At the desired point, lift your finger from the screen.
›
To view a menu, move the right slider in the scrollbar right to the bottom.
›
Alternatively, move the slider up and down on the screen by tapping the function keys
and .
›
A sliding regulator in a set-up bar can alternatively be moved by pressing
-
or
+
“Return to previous menu item”
To return to the previous menu, press the function button .
“Scrollbar”
A vertical bar on the right side of the screen with a slider between the arrow keys
and is called a“ scrollbar”. It indicates that further menu entries become visi-
ble if the sliding regulator is moved completely to the bottom.
“Set value”
In a set-up menu a set-up or value is infinitely adjustable. Move the slider or
press
+
or -to change a displayed setting.
“Pop-up window”
A function key with an arrow behind another function key shows the presently
selected set-up, e.g. with an
Acoustic feedback
Off
.
Press the
Off
function button on the screen. This will open a so-called “Pop-up
window” in which the various settings options can be viewed.
5
General information

Tap briefly on the settings option you require. The pop-up window is closed and
the setting you have selected is displayed. To close the pop-up window without
changing the set-up, press the function button in the pop-up window .
“Check box”
A so-called “Check box” appears in front of a function which can only be switched
on or off: A check mark in the check box indicates that the function is turned
on, an empty check box means that it is turned off.
To turn on or off briefly tap the corresponding function button.
6
General information
 Loading...