

Skoda Infotainment Radio Bolero Owner's Manual

SIMPLY CLEVER
Infotainment Radio Bolero
Owner's Manual

Structure of this Owner's Manual
(explanations)
This Owner's Manual has been systematically designed to make it easy for you to
search for and obtain the information you require.
At the beginning of this manual you will find a table of contents where all the topics described are arranged sequentially. At the end of this manual you will find an
alphabetical index.
Direction indications
All direction indications such as “left”, “right”, “front”, “rear” relate to the direction of
travel of the vehicle.
Explanation of symbols
Denotes the end of a section.
Denotes the continuation of a section on the next page.
® Denotes a registered trademark.
Notes
WARNING
The most important notes are marked with the heading WARNING. These
WARNING notes draw your attention to a serious risk of accident or injury.
CAUTION
A Caution note draws your attention to the possibility of damage to your vehicle
(e.g. damage to gearbox), or points out general risks of an accident.
Note
A normal
Note draws your attention to important information about the operation
of your vehicle.

Preface
You have chosen a ŠKODA vehicle, which is fitted with an Infotainment Radio Bolero (hereafter called the
unit) – we thank you for your confidence in us.
The new operating concept allows you to make all the vehicle settings and to operate electronic systems
centrally from the device.
Please read this Owner's Manual carefully, because the operation in accordance with these instructions is a
prerequisite for proper use of the unit.
Please note that these instructions are meant only as an addendum to the information presented in the
Owner's Manual of your vehicle. Therefore, they can be used only in conjunction with the latest manual for
this vehicle. For a detailed description of some functions listed in these instructions, see the Owner's Manual
for your vehicle.
If you have any questions about your device, please contact a ŠKODA Service Partner.
Your ŠKODA AUTO a.s. (hereinafter referred to as ŠKODA)

Table of Contents
Introductory information
Vehicle equipment 3
Safety information 3
Warranty 3
Component protection 3
Touch screen 3
Unit overview and operation 4
Unit setup
Main menu 7
Sound setup
7
Screen settings
8
Time and date settings 8
Keypad settings
8
Settings for units 8
Settings for voice control
9
Restore factory settings
9
Bluetooth settings
®
9
Radio
Main menu
10
Operation 10
Settings
10
Switch on/off traffic programme TP
11
Digital radio DAB 12
Media
Main menus 14
Select audio source 14
Operating audio sources 14
Track/folder browser 15
Media settings 15
CD 15
Memory card 16
External audio sources 17
Telephone
Introductory information
19
Main menu
19
Connecting mobile phone with hands-free
system
19
Speed dialling a telephone number 21
Direct entry of a phone number
21
Phone book
22
Call lists 22
Settings in telephone mode
23
Telephone conversation 23
MAXI DOT (information display)
24
Voice control
Introductory information
26
Switching on/off 26
Operation
26
Setting vehicle systems
Main menu 28
Vehicle data 28
Auxiliary heater and ventilation 29
Vehicle settings 29
Other functions
Introductory information 33
Selecting driving mode 33
Climatronic settings
34
Unit menus
Main menu 35
Index
2
Table of Contents

Introductory information
Vehicle equipment
These operating instructions describe all possible equipment variants without
identifying them as special equipment, model variants or market-dependent
equipment.
Consequently, this vehicle does not need to contain all of the equipment compo-
nents described in these operating instructions.
The level of equipment of your vehicle refers to your purchase contract of the vehicle. For more information, contact your local ŠKODA retailer.
The illustrations can differ in minor details from your vehicle; they are only intended for general information.
Note
High volumes can cause sound resonance in the vehicle.
Ð
Safety information
WARNING
■
Concentrate fully at all times on your driving! As the driver you are fully responsible for the operation of your vehicle. Only use the device such that you
are in full control of your vehicle in every traffic situation - risk of accident!
■
Adjust the volume to ensure that acoustic signals from outside, e.g. sirens
from vehicles which have the right of way, such as police, ambulance and fire
brigade vehicles, can be heard at all time.
■
High volumes can cause hearing damage.
Ð
Warranty
The equipment warranty terms and conditions apply to this unit just like to new
vehicles » service schedule.
Ð
Component protection
Some electronic control units are factory-equipped with component protection.
The component protection was developed as a protection mechanism for:
›
impairment of factory- or garage-fitted control units after installation in another
vehicle (for example, after a theft);
›
impairment of components operated outside of the vehicle;
›
the possibility of a legitimate installation or change of control units for repairs
at a ŠKODA specialist garage.
When the component protection is enabled, the following message appears on
the display of the device Component theft protection: the infotainment system
is not fully available at present. Please switch on the ignition.
If the component protection does not activate by switching on the ignition,
please contact a ŠKODA specialist garage.
Ð
Touch screen
The unit is equipped with a so-called capacitive touch screen which can only be
operated by the touch of a finger.
CAUTION
■
Operate the screen by lightly touching it with your finger. Do not apply pressure
to the screen - risk of damage!
■
Do not use any objects to operate the screen - risk of damage!
■
Do not use solvents such as benzine or turpentine, which may damage the
screen surface.
Note
■
Use a soft cloth and, if necessary, methylated spirits, to remove fingerprints
from the screen. When doing so, ensure that you do not cause damage to other
parts of the interior.
■
It is not possible to operate the screen with your fingernails or while wearing
gloves.
■
Do not affix anything to the area of the unit below the screen. This could affect
the functioning of the sensors for the “zoom effect”.
■
To protect the screen, you can use a suitable screen protector for touchpads
that does not affect the function of the touch screen.
Ð
3
Introductory information
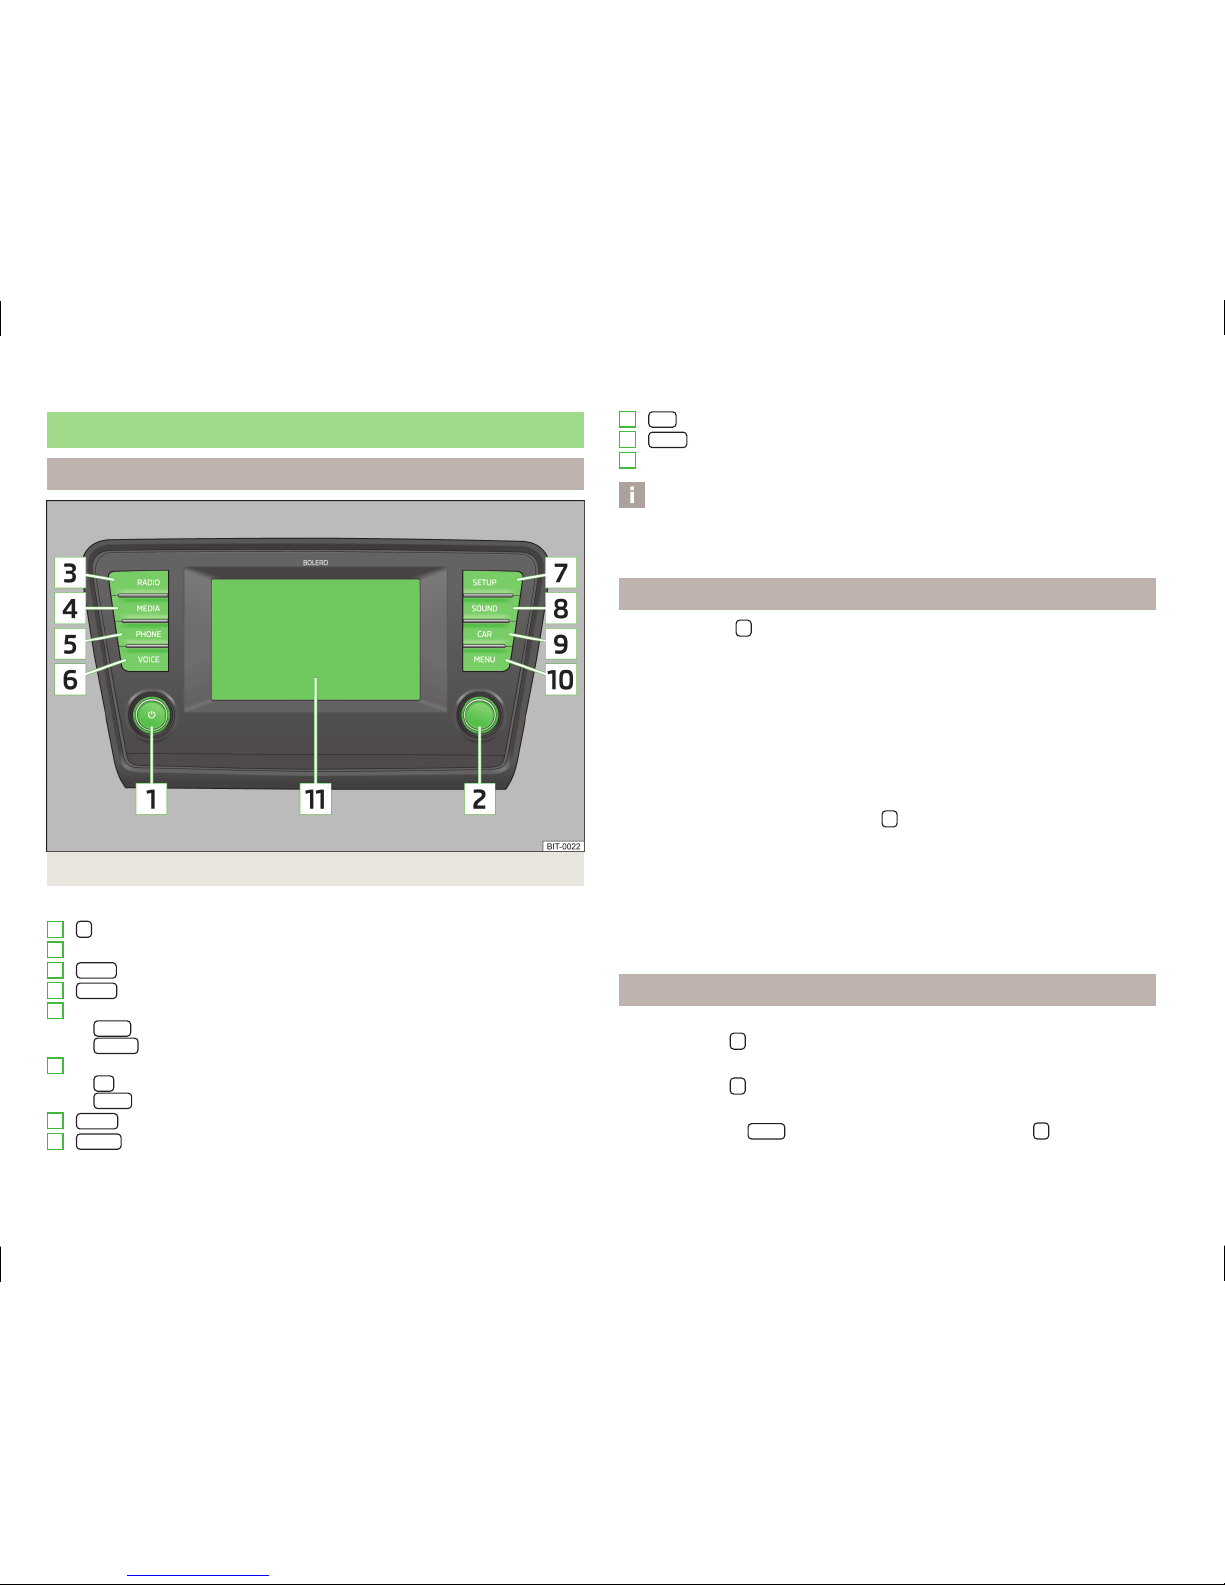
Unit overview and operation
Unit overview
Fig. 1 Unit overview
Unit overview
- Unit on/off, adjust volume
Operation and confirmation
RADIO
- Radio menu » page 10
MEDIA
- Media menu » page 14
Depending on equipment fitted:
›
MUTE
- Mute
›
PHONE
- Phone menu » page 19
Depending on equipment fitted:
›
TP
- Traffic information » page 11
›
VOICE
- Voice control » page 26
SETUP
- Unit settings » page 7
SOUND
- Sound settings » page 7
1
2
3
4
5
6
7
8
CAR
- Settings of the vehicle systems » page 28
MENU
- Display the unit menus » page 35
Touch screen » page 5
Note
Some functions can be operated via the multifunction steering wheel » Owner's
Manual.
Ð
Switching the unit on/off
›
Press the knob to switch the unit on or off.
After switching on the unit, the last audio source and operating mode that was
active before switching off will be played.
If telephone mode was active before you switched off the unit and the ignition
and Bluetooth® function is not switched on, the unit displays the message » page 19. Switch on the ignition or the Bluetooth® function» page 9.
If the vehicle key is pulled out of the ignition lock while the unit is switched on,
the unit will switch off automatically. After switching on the ignition, the unit is
turned on automatically.
If the unit is switched off with the knob
, it will not switch on automatically
when you switch on the ignition.
If your vehicle is fitted with the KESSY system, the unit will switch off automati-
cally after the engine is turned off and the door opened. If you open the driver's
door before switching off the engine, the unit will also switch off.
When the ignition is switched off, the system switches off automatically after approx. half an hour (discharge protection of the vehicle battery).
Ð
Adjusting the volume
Increase volume
›
Turn the knob to the right.
Decrease volume
›
Turn the knob to the left.
Muting
›
Press the button
MUTE
or set the volume to 0 with the knob .
£
9
10
11
4
Introductory information

Note
■
The volume change is displayed on the screen of the unit.
■
When the sound is muted, the symbol appears in the display.
Ð
Screen display and control of the unit
Fig. 2
Screen display
Screen areas which confirm a function or a menu are called “function keys”.
Greyed out function keys are not active.
White or green function keys are active.
Message line
In the main menu of some operating modes, the upper screen area contains a
message line displaying time details and the external temperature, as well as information on the currently selected operating mode.
Function keys in the main menu
In the main menu of some operating modes, the lower screen area contains function keys with symbols for functions or menus. When you move your finger towards this screen area, the unit displays the names of the function keys alongside the symbols.
Explanation of graphic
Currently selected menu
- Return to the higher-level menu
Function with “checkbox”
Scroll bar - Shows the position in the menu; touch the scroll bar to navigate
the menu
Menu item with “pop-up window”
A
B
C
D
E
Selecting menu/menu item
›
Drag your finger over the screen in the required direction
›
Turn the menu knob 2 » Fig. 1 on page 4
If you make the selection by turning the menu knob 2, the currently selected
menu is highlighted in green.
Confirming menu/menu item
›
Touch the function key with your finger
›
Press the menu knob
2
» Fig. 1 on page 4
Returning to higher-level menu
Context-dependent:
›
By pressing
›
By pressing the relevant button next to the screen
›
By touching the screen outside of the pop-up window with your finger
Switching function on/off with “checkbox”
Press the relevant function key
›
- Function is switched on.
›
- Function is switched off
Set value
›
Touch the function keys
/, /, -/
+
›
Touch or move your finger over the scale
Note
Some menus or menu items, the current setting is displayed, e.g. Distance: km or
Distance: mi.
Ð
Examples of the information listed in the Owner's Manual
Examples of actions
›
Press the button
RADIO
→ .
This information indicates that you must first press the
RADIO
button on the unit
and then confirm the function key
on the screen.
The “→” symbol indicates the next step.
This may be followed by a list of available menus, menu items or functions, such
as:
£
5
Introductory information

■
Sound
- Sound setup
■
Volume
- Volume setting
■
Bass - Mid - Treble
- Sets the bass, mid and treble
■
Balance - Fader
- Sets the balance between left and right, front and rear
Example menu
■
xyz
- the first menu level
■
xyz
- the second menu level
■
xyz
- the third menu level
■
xyz
- the first menu level
Ð
Input screen with keypad
Fig. 3
Input screen
If you press a function key with a character on the keypad, this character appears
in the input line in the upper part of the screen.
Further input possibilities:
- Return to the higher-level menu
- Display the menu with selected contacts, information on the number of rele-
vant contacts
- Delete characters in the entry line
- Change from upper case to lower case and vice versa
- Display the menu using keys in the selected language, including diacritics
123
- Switch to the input screen for digits and special characters
- Switch to the input screen for special characters.
ABC
- Switch to the input screen for letters
- Enter a space
OK
- Confirm the text entered in the entry line
Ð
6
Introductory information

Unit setup
Main menu
Fig. 4
Unit settings: Main menu
First and foremost, pay attention to the safety instructions » page 3.
Select and confirm all functions as described at the beginning of this manual » page 4.
Call up the main menu
›
Press the button
SETUP
.
Menus in the main menu for unit setup
■
Sound
- Sound setup » page 7
■
Screen
- Screen settings » page 8
■
Time and date
- Time and date settings » page 8
■
Language
- Defines the menu language for displays
■
Keypad
- Keypad layout for text entry » page 8
■
More keypad languages
- Enables you to enter characters other than those valid for
the selected language
■
Units
- Settings for units of measurement » page 8
■
Voice control
- Settings for voice control » page 9
■
Remove SD card 1 safely
- Safe removal of the SD card
■
Remove USB device safely
- Safe removal of USB device
■
Factory settings
- Resets to factory settings » page 9
■
Bluetooth
- Settings for the Bluetooth® function » page 9
■
System information
- Displays system information
■
Device part number - Part number of the unit
■
Hardware - Hardware used
■
Software version - Software version
■
Copyright
- Information on licences and copyrights used (only displayed in Eng-
lish)
Ð
Sound setup
Fig. 5 Sound settings
›
Press the button
SETUP
→
Sound
or the button
SOUND
.
■
Volume
- Volume setting
■
Traffic report
- Sets the volume for the traffic program alerts (TP)
■
Voice control
- Sets the volume for the voice control
■
Maximum switch-on volume
- Sets the maximum volume after switching on
■
Volume adjustment (GALA)
- Speed-dependent volume increase
■
Telephone
- Sets the telephone volume
■
iPod volume
- Sets the volume for the connected iPod
■
Quiet
- Low volume
■
Medium
- Medium volume
■
Loud
- High volume
■
AUX volume
- Sets the volume for the device connected via AUX
■
Quiet
- Low volume
■
Medium
- Medium volume
■
Loud
- High volume
■
Bluetooth audio
- Sets the volume of the connectedd Bluetooth® device
■
Quiet
- Low volume
■
Medium
- Medium volume
■
Loud
- High volume
£
7
Unit setup

■
Audio lowering:
- Setting the reduction of the volume when the park distance
control is active
■
Off
- switches off
■
Weak
- weak reduction
■
Medium
- medium input sensitivity
■
Strong
- strong reduction
■
Bass - Mid - Treble
- Sets the bass, mid and treble
■
Balance - Fader
- Sets the balance between left and right, front and rear
■
Confirmation tone
- Switches confirmation tone on/off by pressing a function sur-
face
■
Subwoofer
- Subwoofer volume settings
■
CANTON advanced setup
- Canton settings
■
Select equaliser sound
- Equaliser settings
■
Music
- Music
■
Language
- Language
■
Sound focus
- Sets the sound perception for different zones in the vehicle inte-
rior
■
Off
- Settings apply to the whole vehicle
■
Front
- Optimised setting for the front occupants
■
Driver
- Optimised setting for the driver
■
CANTON surround
- Virtual surround sound system
Ð
Screen settings
›
Press the button
SETUP
→
Display
.
■
Switch off display (in 10 seconds)
- Switches the display to energy-saving mode
1)
■
Brightness
- Adjusts the brightness of the screen
■
Brightest
- brightest level
■
Brighter
- brighter level
■
Medium
- medium level
■
Darker
- darker level
■
Darkest
- darkest level
■
Confirmation tone
- Switches confirmation tone on/off by pressing a function sur-
face
■
Show clock in standby mode
- Time and date displayed on the screen when the igni-
tion is switched on and the unit is switched off
Ð
Time and date settings
›
Press the button
SETUP
→
Time and date
.
■
Time
- Time settings
■
Summer (DST)
- Switches the summer time setting on/off
■
Time zone
- Sets the time zone
■
Time format
- Sets the time format
■
Date
- Date settings
■
Date format
- Sets the date format
Ð
Keypad settings
›
Press the button
SETUP
→
Keypad
.
■
ABC
- keys arranged alphabetically
■
QWERTY
- Arrangement of the keys as per the QWERTY system
Ð
Settings for units
›
Press the button
SETUP
→
Units
.
■
Distance:
- Distance units
■
km
- Kilometres
■
mi
- Miles
■
Speed
- Speedunits
■
km/h
- Kilometres per hour
■
mph
- Miles per hour
■
Temperature
- Temperature units
■
°C
- Degrees Celsius
■
°F
- Degrees Fahrenheit
■
Volume
- Volume units
■
l
- Litres
■
gal (US)
- Gallons (US)
■
gal (UK)
- Gallons (UK)
£
1)
The screen will turn black if you do not activate it within 10 seconds, either by approaching the
screen, touching the screen, or pressing menu button 2. You can switch the display back on again by
approaching it, touching it, or operating the menu knob 2.
8
Unit setup
■
Consumption
- Consumption units
■
l/100 km
- Litres per 100 kilometres
■
km/l
- Kilometres per litre
■
mpg (US)
- Miles per gallon (US)
■
mpg (UK)
- Miles per gallon (UK)
■
Gas consumption
- Gas consumption units
■
kg/100 km
- Kilograms per 100 km
■
km/kg
- Kilometres per kilogram
■
m3/100 km
- Cubic metres per 100 kilometres
■
km/m3
- Kilometres per cubic metre
■
Pressure
- Pressure units for tyre pressure
■
kPa
- Kilopascal
■
bar
- bar
■
psi
- Pounds per square inch
Ð
Settings for voice control
›
Press the button
SETUP
→
Voice control
.
■
Dialogue style:
Setting the dialogue style
■
Long
- Long dialogue (the system plays complete acoustic messages)
■
Short
- Short dialogue (the system shortens some acoustic messages or sub-
stitutes them with an acoustic signal)
■
Display available commands
- Switch on/off the menus containing basic voice com-
mands when voice control is activated
■
Voice control session start tone
- Switch on/off the audible signal that is output
when voice control is activated
■
Voice control session end tone
- Switch on/off the audible signal that is output when
voice control is ended
■
Input tone in voice dialogue
- Switch on/off the audible signal that is output to sig-
nal that voice control is waiting for a command
Ð
Restore factory settings
›
Press the button
SETUP
→
Factory settings
.
■
Restore factory settings
- Reset the unit to all factory settings
■
Sound
- Restore default settings for sound
■
Radio
- Restore default settings for radio
■
Vehicle
- Restore default settings for the vehicle systems
■
Telephone
- Restore default settings for phone
■
Media
- Restore default settings for media
■
Voice control
- Restore default settings for voice control
■
Bluetooth
- Restore default settings for the Bluetooth® function
■
System
- Restore the system default settings
Ð
Bluetooth settings
®
›
Press the button
SETUP
→
Bluetooth
.
■
Bluetooth
- Bluetooth® function on/off
■
Visibility
- Switches the visibility of the Bluetooth® device on/off for other devi-
ces
■
Visible
- Visibility is always on
■
Hidden
- Visibility is off
■
At start-up
- Turns on visibility for 5 minutes after switching on the ignition or
until the driving speed has exceeded 5 km/h
■
Forename:
Name of the hands-free system with the possibility to rename it
■
Paired devices
- Display the list of paired Bluetooth® devices; connect or delete a
paired device; delete the list of paired devices
■
Delete all
- Delete all paired Bluetooth® devices
■
- Delete the paired Bluetooth® device
■
Find devices
- Searches for available external devices with enabled Bluetooth
®
functions and activated visibility
■
Bluetooth audio (A2DP/AVRCP)
- Switches on/off the connection option for Blue-
tooth® profiles A2DP and AVRCP
1)
Ð
1)
A2DP and AVRCP are Bluetooth® profiles that support multimedia functions.
9
Unit setup
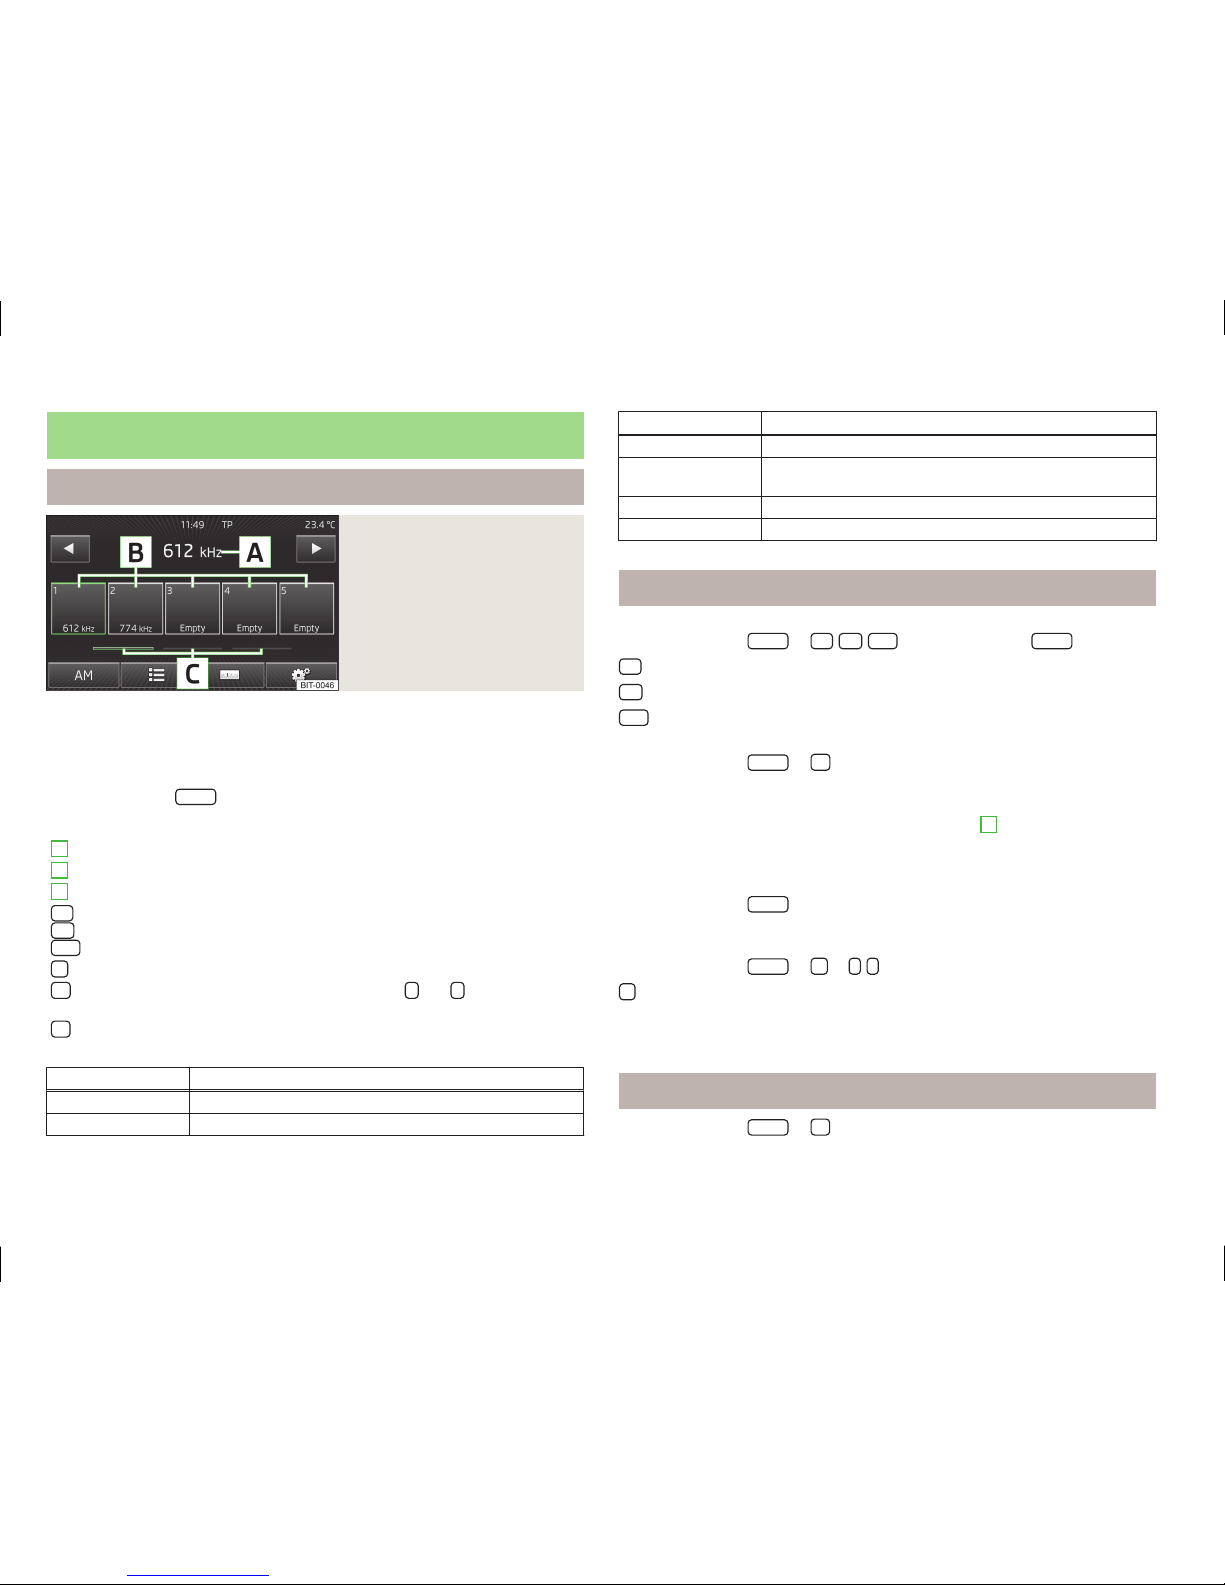
Radio
Main menu
Fig. 6
Radio: Main menu
First and foremost, pay attention to the safety instructions » page 3.
Select and confirm all functions as described at the beginning of this manual » page 4.
Call up the main menu
›
Press the button
RADIO
.
Explanation of graphic
A
Selected radio station
B
Function keys used to select a station stored in the preset list
C
Function keys used to scroll through the list of stored radio stations
FM
/
AM
/
DAB
Selecting the frequency band
Selecting a radio station from the station list
Manual station search using the function keys and or using the slider
Radio settings
Symbols in the display
Symbol
Importance
Sound is muted
Traffic information station
Symbol Importance
Station without traffic information
Radio station from the station list is a station from the
preset list
Selected radio station
RDS function is switched off
Ð
Operation
Selecting a frequency band
›
Press the button
RADIO
→ FM/AM/
DAB
or press the button
RADIO
repeatedly.
FM
- FM frequency band
AM
- AM frequency band
DAB
- Digital radio stations » page 12
Station finding
›
Press the button
RADIO
→ .
Saving a radio station
›
Set the desired radio station or press and hold the desired station in the station
list → press and hold the corresponding function key
B
» Fig. 6 on page 10 un-
til a beep is heard.
Selecting a stored radio station from the preset list
15 presets are available in each frequency band.
›
Press the button
RADIO
→ and the function key of the desired radio sta-
tion » Fig. 6 on page 10.
Selecting a radio station from the station list
›
Press the button
RADIO
→ or / and select the desired radio station.
- Update the list of stations (only for the AM frequency band)
If no station list is available, the device will automatically search for radio stations.
Ð
Settings
›
Press the button
RADIO
→ .
£
10
Radio

■
Sound
- Sound setup » page 7, Sound setup
■
Scan
- Auto-play all stations in the current frequency band, each station for
around five seconds Press again to stop the auto-play function at the current
radio station
■
Arrow buttons
- Sets the function of the station selection in radio mode
■
Preset list
- Switches to only stored stations
■
Station list
- Switches all stations currently in range for the selected frequency
band
■
Traffic programme (TP)
- Switches traffic programme on/off
■
Preset list
- Deletes the stored stations
■
- Deletes a radio station
■
Delete all
- Deletes all stored stations
■
Station logos
- Replaces the name of the station with the logo stored on the SD
card or USB data medium
1)
■
Radio text
- Radio text display on/off
■
Advanced setup
- Sets an alternative frequency and the RDS
■
Alternative frequency (AF)
- Search for alternative frequencies of the station cur-
rently being listened to on/off
■
Radio Data System (RDS)
- Switches on/off the RDS function
■
RDS regional
- Switches the automatic tracking of related regional stations on/
off
■
Fixed
- Maintains the selected regional station continuously. When the sig-
nal is lost, another regional station must be set manually.
■
Automatic
- Auto-selects the station with the best reception at the moment
If you lose reception the region, the unit will automatically set another available region.
Note
■
RDS (Radio Data System) is used to transmit programme IDs and additional
services, thus enabling automatic station tracking, for example. In the event of
sufficiently satisfactory reception, the suitable RDS radio stations will display the
station name instead of the station frequency.
■
In countries where the RDS (Radio Data System) function is not adequately
supported, we recommend turning off the AF and RDS setting, otherwise they
can affect the functionality of the radio.
■
The AF (alternative frequency) function ensures that the best receivable fre-
quency of the selected station is automatically and precisely set.
■
DAB (Digital Audio Broadcasting) is the digital transmission of radio pro-
grammes based on the DAB, DAB+ or DMB standards. It allows multiple stations
to be transmitted in a single frequency in the form of a so-called ensemble. It also
allows for the transmission of additional data and information (e.g. messages,
sport, weather, warnings, etc.)
Ð
Switch on/off traffic programme TP
Depending on equipment fitted:
›
Press the button TP.
›
Press the button
RADIO
→ →
Traffic programme (TP)
.
Traffic monitoring is indicated by the letters in the display.
While playing in Media mode, the last selected radio station continues to be re-
ceived in the background if it supports traffic information. If a radio station is set
that does not support TP, the most appropriate TP station is set automatically in
the background to continuously receive traffic reports in the media.
The radio works the same in a selected AM frequency range. If no traffic programme station can be found because, for example, radio reception is interrupted
in general, No TP will be displayed instead of TP.
Note
TP (traffic program identification) - Traffic information identification - the selec-
ted radio station broadcasts the TP signal (traffic radio).
Ð
1)
The following image formats are supported: jpg, gif, png, bmp.
11
Radio
 Loading...