

Škoda India 2017 Owner's Manual
OWNER'S MANUAL
ŠKODA RAPID
Documentation of vehicle delivery
Date of vehicle delivery
ŠKODA partner
I confirm that I have taken delivery of the specified vehicle in good condition, have received information on how to operate it correctly, and have
had the terms of the warranty explained to me.
Does the vehicle have an extended warranty? Yes
Limitations of the ŠKODA extended warranty
Years: or km:
miles:
a)
Due to the requirements of the generally binding country-specific regulations,
the date of first registration can be given instead of the date of the vehicle
handover.
b)
(whichever comes first).
Stamp and signature of the vendor
or
a)
Signature of the customer
No
b)
Affix the vehicle data sticker here
5J5012791AJ
1st vehicle owner
This vehicle with the official registration
number
(filled in by the vendor)
belongs to:
Title, Name/Company:
Address:
Telephone:
ŠKODA Partner
Service consultant:
Telephone:
2nd vehicle owner
This vehicle with the official registration
number
belongs to:
Title, Name/Company:
Address:
Telephone:
ŠKODA Partner
Service consultant:
Telephone:
5J5012791AJ

Table of Contents
Materials defect liability and ŠKODA
Warranty for new cars 4
On-board literature 7
Notes 8
Safety
Passive Safety 9
General information 9
Correct and safe seated position 9
Seat belts 12
Using seat belts 12
Inertia reels and belt tensioners
Airbag system
Description of the airbag system
Airbag deactivation
Transporting children safely 18
Child seat
Usage
Cockpit
Overview
Instruments and Indicator Lights 22
Instrument cluster 22
Warning Lights
Information system 28
Driver information system
Driving data (Multifunction display) 29
Unlocking and opening 31
Unlocking and locking
Luggage compartment door 34
Window operation
20
23
28
34
Lights and visibility 36
Lights 36
Interior lighting 38
Visibility 39
Windscreen wipers and washers 40
Rear mirror 40
Seats and head restraints
Front seats 42
Folding down rear armrest 42
Headrests 43
Transporting and practical equipment 44
Transporting loads and practical equipment 44
Heating and ventilation
Manual air conditioning system, Climatronic
14
Communication and Multimedia 52
15
Phone operation via the multifunction steering
15
wheel
17
Multimedia operation via the multifunction
steering wheel 52
18
Driving
Starting-off and Driving
21
Starting and stopping the engine
Brakes and parking 54
Manual gear changing and pedals
Automatic gearbox 56
Running in and economical driving 58
Avoiding damage to your vehicle
Assist systems 60
General information
Braking and stabilisation systems 60
Parking assistance (ParkPilot) 61
31
Reversing camera
Cruise control system 64
General Maintenance
Care and maintenance 66
Service work, adjustments and technical
alterations 66
Service intervals 67
Cleaning and care 69
42
Inspecting and replenishing
Fuel 72
Engine compartment 74
Engine oil 76
Coolant 77
Brake fluid
Vehicle battery
48
48
Wheels
Wheels and tyres 82
Operating in winter conditions
52
Do-it-yourself
Emergency equipment and self-help
Emergency equipment
Changing a wheel 86
53
Jump-starting
53
Towing the vehicle
Remote - change battery 91
56
Emergency unlocking / unlocking of doors
Replace wiper blades 92
Fuses and light bulbs 93
59
Fuses
Bulbs 95
60
62
72
79
79
82
84
85
85
89
90
91
93
2
Table of Contents

Technical data
Technical data 101
Basic vehicle data 101
Vehicle-specific details per engine type 105
Index
Table of Contents
3

Materials defect liability and ŠKODA Warranty for new cars
Warranty period
Using a ŠKODA partner, ŠKODA Auto India Private Limited gives 4 years/100
000 Kms* new car warranty from the date of purchase. *Promotional offer,
Additional Warranty 3rd & 4th year.
Warranty coverage
This warranty extends to the repair or replacement of all parts that need to be
repaired or replaced due to inadequate workmanship or the parts being defective; this is in order to restore the vehicle to its original production specifications while adhering to deadlines and the requirements set out in this Owner's
Manual.
The ŠKODA partner decides on the type of repair, taking into account economic aspects as regards to the technologies recommended by ŠKODA Auto
India Private Limited.
An adequate period of time should be provided for the completion of the warranty repair after the notification of the vehicle with a ŠKODA partner.
Where can you claim warranty
The warranty is provided by a ŠKODA partner.
Beginning and end of the warranty period
The warranty period begins on the date of delivery of the new vehicle to the
original purchaser or lessee.
This new vehicle warranty is automatically transferred free of charge when
ownership of the vehicle takes place during the warranty period.
In terms of the repairs made, or parts built-in during the warranty period, the
warranty expires at the end of the warranty period of the respective vehicle.
Tyres and vehicle batteries
Some parts with which ŠKODA vehicles are equipped, such as tyres, batteries,
etc., are not produced by ŠKODA Auto India Private Limited, but are provided
by other suppliers. These parts are excluded from the ŠKODA warranty, but
the vehicle purchaser can make a warranty claim with the respective manufacturer / supplier. If there are any problems with the provision of the guarantee
by these manufacturers, an authorized ŠKODA dealer will assist you in finding
a solution.
Maintenance implementation and mechanical customisations
This warranty does not apply to costs of consumables or work as part of regular maintenance. A tyre change, a wheel alignment and balancing are also considered to be scheduled maintenance.
This warranty does not apply to the change of spark plugs, oils, lubricants, fluids or refrigerants, as long as their exchange is not an integral part of the warranty with respect to the relevant part.
Defective light bulbs 1), wiper blades, brake shoes or brake pads which occur
within six months or 10 000 km, whichever occurs first, can be repaired due to
poor workmanship or the parts being defective. After expiry of the time limits
mentioned above these are regarded as natural wear and tear and are excluded
from the warranty.
Taking care of the minor vehicle parts, such as the cleaning of fabrics / leather
upholstery inside the vehicle, the protective wax covering of various body
parts, are considered maintenance and are excluded from the warranty. A
damaged or fading of trim, soft elements and leather parts due to the effect of
weather conditions or usage are excluded from the warranty.
The term "normal wear and tear" cannot be predefined, because different
types of use leads to different defects or types of wear. Particularly sensitive
components, such as spark plugs, clutch plates and related components, are
easily identifiable and are excluded from the warranty.
Mechanical adjustments that are not material or workmanship related (especially doors, flaps and headlight settings) are excluded from the guarantee after 10 000 km or 6 months, whichever occurs first. After this period, these
faults are considered normal wear and tear.
1)
Exception is for the bi-xenon gas discharge lamps in the headlights, they are
covered by a 2 year warranty. Damaged bulbs in the headlights caused by
external influences are excluded from the warranty.
4
Materials defect liability and ŠKODA Warranty for new cars

Incidental errors that do not affect the vehicle function, including noise or vibration, and anything similar, are excluded from the warranty.
Damage or failure due to the misuse, neglect, alteration, accident or in the
event of a fire
This warranty does not relate to:
▶
Damage or failure due to improper vehicle repair, such as by the installation
of non-original parts or accessories that have an effect on the specifications
of the vehicle performance compared to the specifications of the vehicle
manufacturer (unwarranted changes are excluded from the warranty).
▶
Cases in which in the vehicle parts, especially electronic components, have
been installed, which have not been released by the manufacturer ŠKODA
Auto India Private Limited.
▶
Damage or failure due to the use of contaminated or incorrect / falsified
fuels, intentional or unintentional incorrectly refuelled.
▶
Damage or failure due to vehicle use for competitions or for record attempts, driving schools or for driving generally in unsuitable places or as a result of an accident or fire.
▶
Damage or failure due to permanent vehicle operation in spite of the indication of a mechanical or operational problem by warning light, a measuring instrument or other warning.
▶
Damaged, or due to the declaration of an insurance company, fully written
off vehicles or vehicles that were essentially assembled or repaired with
parts from other used stripped vehicles.
▶
Vehicles where the damage is due to improper storage, intentional or fraudulent conduct on the part of the owner or driver.
▶
Vehicles where the damage is due to operating in contradiction to the instructions in the vehicle Owner's Manual.
▶
Repairs or regular / recommended service work that is performed other than
by an authorized specialist garage.
Damage or failure due to the lack of maintenance
This warranty does not apply to damage or failure due to a failure to implement the recommended maintenance and operational requirements set out in
this Owner's Manual.
Damage caused by environmental influences
This warranty does not cover damage caused by highly atmospheric industrial
pollution (e.g. acid rain), bad weather, fire, theft or terrorist activities, frost or
heat, floods including any immersion, flooding and/or hydrostatic obstacles
and other damage due to water soaking, earthquakes, natural disasters, strikes,
riots, civil unrest, nuclear threat, bird droppings, stone chips, tree resin or other
similar external mechanical or chemical events of any kind.
Damage caused by external influences are not considered faults and are excluded from the warranty.
Manipulation of the odometer
This warranty does not apply to repairs of ŠKODA vehicles in which the odometer has been tampered with or where the actual mileage cannot be read directly.
Other costs
This warranty does not refer to the incidental or consequential damages mentioned below that are due to a fault or a warranty/advertising repair by a dealer.
Costs related to communication, loading, parking in the garage and other services due to a vehicle breakdown in a remote location or in the city.
All costs relating to personal injury or property damage.
Psychological damage caused by the breakdown and during the period in
which the vehicle is in a repair shop.
Reimbursement of lost time, loss of business or for hiring a replacement prod-
uct during the repair period.
Legal obligations with respect to deaths, injuries or property damage, etc.
Other terms and conditions
This warranty explicitly does not cover a vehicle exchange or money refund.
ŠKODA Auto India Private Limited reserves the right to enhance or make de-
sign changes to all models of the ŠKODA brand without having to make similar
changes to previously sold vehicles.
All replaced faulty parts under this warranty become the property of ŠKODA
Auto India Private Limited.
The place of jurisdiction for the negotiation and processing of any legal disputes is the city of Aurangabad (Maharashtra State).
Materials defect liability and ŠKODA Warranty for new cars
5

Paintwork and body warranty
In addition to the warranty conditions listed in the purchase contract for new
ŠKODA vehicles, an authorized ŠKODA dealer additionally ensures that the vehicle has the following warranty:
▶
3 years against paint damage1),
▶
6 years against the corrosion of the bodywork1).
This type of damage will be repaired by any authorized ŠKODA dealer free of
charge.
The warranty does not relate to:
▶
Damage due to external factors or inappropriate/insufficient care.
▶
Body and paint damage, whereby the repair was not carried out promptly
and professionally in accordance with the manufacturer's instructions and
using ŠKODA genuine parts.
▶
Corrosion perforation due to the use of parts other than ŠKODA Genuine
Parts or the application of technologies other than those authorized by the
manufacturer or due to an incorrectly performed repair contrary to the manufacturer's instructions.
Customer Notice
The vehicle owner has the right and the duty to bring the vehicle during the
warranty period to an authorized ŠKODA dealer for a service check / regular
maintenance according to the instructions listed in the service schedule and in
the Owner's Manual.
If a fault or problem is detected on the vehicle the nearest authorized ŠKODA
dealer must be informed immediately. Should the customer violate these instructions, use the vehicle and thus increase the extent of damage, the warranty may be limited or possibly even revoked.
For repair under this warranty the vehicle should be registered with the authorized ŠKODA dealer during normal working hours.
The authorized ŠKODA dealer may refuse warranty service if it is not able to
be proven with the service forms or repair orders / invoices that regular maintenance has been performed at the right time.
Should the original purchaser sell the vehicle during the warranty period, the
subsequent purchaser is obliged to inform the authorized ŠKODA dealer from
which the vehicle was purchased about this fact within 30 days of purchase,
and fill out an item in this manual.
The customer must present an invoice to the seller in order to claim the spare
parts warranty for these parts.
1)
From the date of delivery of the new vehicle.
6
Materials defect liability and ŠKODA Warranty for new cars

On-board literature
You will always find this Owner's Manual in the on-board literature. Depending
on the equipment installed, the on-board literature may also contain the Own-
er's Manual - Infotainment.
Owner's Manual
Read this Owner's Manual carefully, because operation in accordance with
these instructions is a prerequisite for proper use of the vehicle.
When using the vehicle, the universally applicable country-specific legal requirements (e.g. for transporting children, deactivating the airbag, tyre use,
road traffic etc.) must always be observed.
Always pay attention when driving! As the driver you are fully responsible for
road safety.
The Owner's Manual applies to all body variants of the vehicle, all related
model versions as well as all equipment levels.
The Owner's Manual describes all possible equipment variants without identifying them as special equipment, model variants or market-dependent equipment. Consequently, this vehicle does not contain all of the equipment com-
ponents described in the Owner's Manual.
The range of equipment installed in your vehicle depends on the purchase contract for the vehicle. For any questions regarding the scope of equipment,
please contact a ŠKODA Partner.
The pictures in the Owner's Manual are for illustrative purposes only. The illustrations can differ in minor details from your vehicle; they are only intended to
provide general information.
ŠKODA AUTO pursues a policy of ongoing product and model development
with all vehicles. Changes in terms of supply scope are possible at any time
with regard to design, equipment and technology. The information listed in the
Owner's Manual corresponds to the information available at the time of going
to press.
Therefore legal claims cannot be made based on the technical data, illustrations and information contained in the Owner's Manual.
Infotainment Owner´s Manual
The Infotainment Owner´s Manual contains a description of the Infotainment
service and possibly also some functions and vehicle systems.
On-board literature
7

Notes
Terms used
“Specialist garage”
ŠKODA vehicles. A specialist can be a ŠKODA partner, a ŠKODA service
partner, as well as an independent workshop.
“ŠKODA Service Partner”
ised by ŠKODA AUTO or its sales partner to service ŠKODA vehicles
and to sell ŠKODA Genuine Parts.
“ŠKODA Partner”
its sales partner to sell new ŠKODA vehicles and, when applicable, to
service them using ŠKODA Genuine Parts and sell ŠKODA Genuine
Parts.
Text notes
- Short press (e.g. a button) within 1 s
“Press”
- Long press (e.g. a button) for more than 1 s
“Hold”
Direction indications
All direction indications such as “left”, “right”, “front”, “rear” relate to the forward direction of travel of the vehicle.
Explanation of symbols
WARNING
Texts with this symbol draw attention to threats of a serious accident, injury or loss of life.
CAUTION
Texts with this symbol draw attention to the risk of vehicle damage or possible
inoperability of some systems.
Notice
Texts with this symbol contain additional information.
- a workshop that carries out specialist service tasks for
- A workshop that has been contractually author-
- A company that has been authorised by ŠKODA AUTO or
8
Notes

Safety
Driving safety
Passive Safety
General information
Introduction
In this section of the instructions you will find important information on the
subject of passive safety. We have combined everything here with which you
should be familiar regarding seat belts, airbags, safety of children and anything
similar.
Other important safety information can also be found in the subsequent sections of this Owner’s Manual. Therefore, the Owner's Manual should always be
kept in the vehicle.
Before setting off
For your own safety and the safety of the people travelling with you, please
pay attention to the following points before setting off.
▶
Check the function of the lighting and turn signal systems.
▶
Check the wiper function and the wiper blades for wear. Check the windscreen washer fluid level.
▶
Ensure that all of the windows offer good visibility to the outside.
▶
Adjust the rear-view mirror so that viewing to the rear is assured. Ensure
that the mirrors are not covered.
▶
Check the tyre inflation pressure.
▶
Check the engine oil, brake fluid and coolant level.
▶
Secure all items of luggage.
▶
Do not exceed the permissible axle loads and permissible gross weight of the
vehicle.
▶
Close all doors and the engine compartment and luggage compartment lid.
▶
Ensure that no parts and components are visibly loose in the vehicle.
▶
Ensure that no objects can obstruct the pedals.
▶
Protect children by using a suitable child seat» page 18, Transporting chil-
dren safely.
▶
Adopt the correct seating position. Tell your passengers to assume the correct seating position » page 9, Correct and safe seated position.
In the interests of traffic safety, the following information must be observed.
▶
Do not become distracted from concentrating on the traffic situation, (e.g.
by your passengers or mobile phone calls, etc.).
▶
Never drive when your driving ability is impaired, (e.g. due to medication, alcohol, drugs or similar).
▶
Keep to the traffic regulations and the permissible speed limit.
▶
Always adjust the driving speed to the road, traffic and weather conditions.
▶
Take regular breaks on long journeys (at least every two hours).
Correct and safe seated position
Introduction
Always assume the correct seated position before setting off and do not
change this position while driving. Also advise your passengers to adopt the
correct seated position and not to change this position while the car is moving.
The following list contains instructions for the front passenger which, if not
observed, may cause serious injuries or death.
▶
Do not lean against the dash panel.
▶
Do not put your feet on the dash panel.
The following list contains instructions for all passengers which, if not observed, may cause serious injuries or death.
▶
Do not sit only on the front part of the seat.
▶
Do not sit facing to the side.
▶
Do not lean out of the window.
▶
Do not put your limbs out of the window.
▶
Do not put your feet on the seat cushion.
Passive Safety
9
WARNING
■
The front seats and head restraints must be adjusted to match the body
size at all times and the seat belt must always be fastened properly to provide the most effective levels of protection to the passengers.
■
Each occupant must correctly fasten the seat belt belonging to the seat.
Children must be fastened » page 18, Transporting children safely with a
suitable restraint system.
■
The seat backrests must not be angled too far back when driving, otherwise this will affect proper operation of the seat belts and of the airbag
system – risk of injury!
WARNING
By sitting incorrectly, the passenger is risking life-threatening injuries.
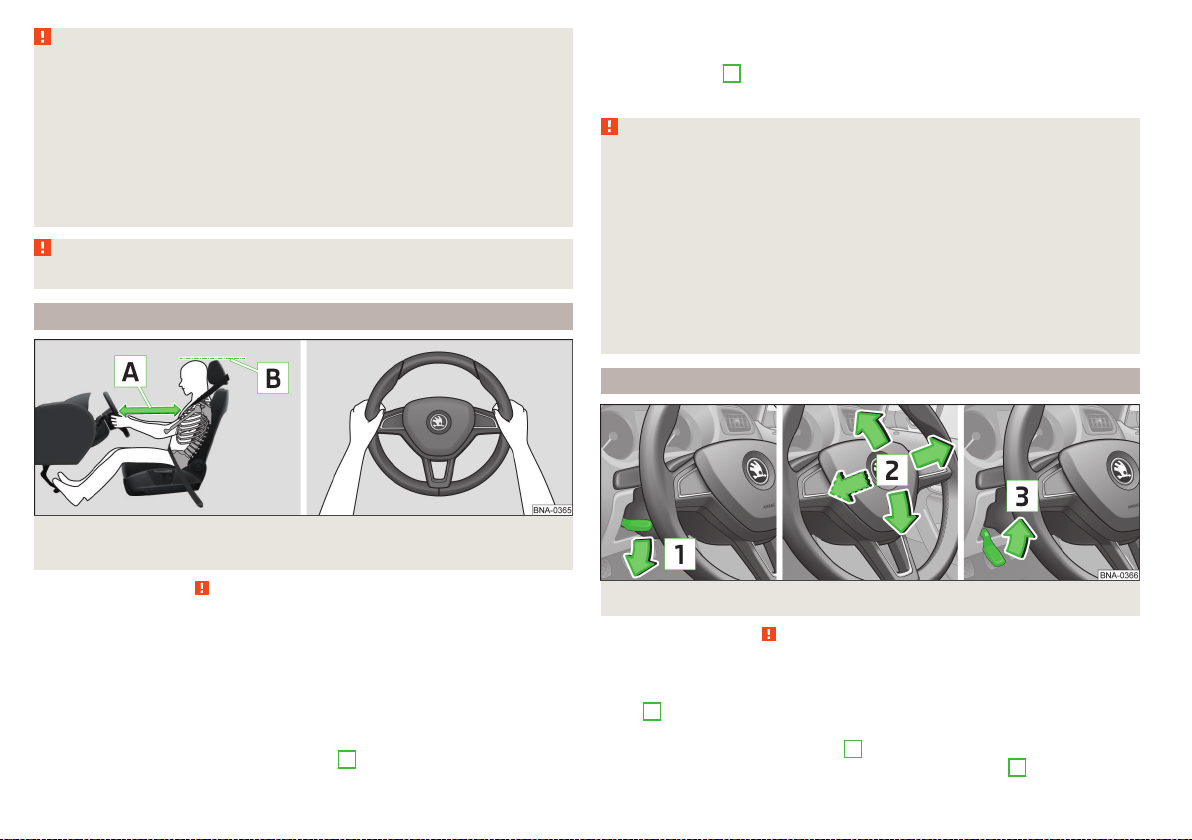
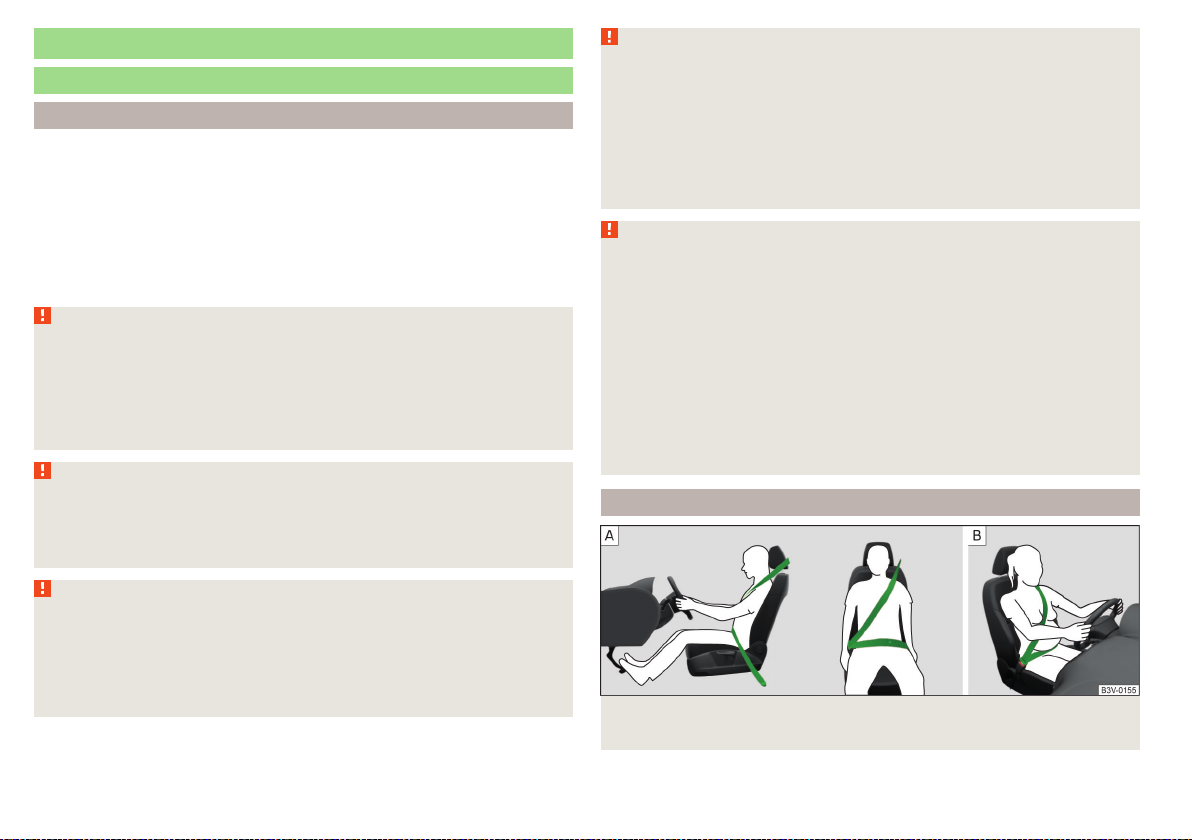
The correct seating position for the driver
Correct seated position for the driver/correct steering wheel po-
Fig. 1
sition
Read and observe on page 10 first.
For your own safety and to reduce the risk of injury in the event of an accident,
we recommend the following setting.
Adjust the driver’s seat in the forward/back direction so that the pedals
can be fully depressed with slightly bent legs.
Adjust the seat backrest so that the highest point of the steering wheel
can be reached with your arms at a slight angle.
Adjust the steering wheel so that the distance between the steering wheel
and your chest is at least 25 cm » fig. 1 -
A
.
Adjust the headrest so that the top edge of the headrest is at the same
level as the upper part of your head (not for seats with integrated headrests) » fig. 1 - B.
Correctly fasten the seat belt » page 12, Using seat belts.
WARNING
■
A distance of least 25 cm to the steering wheel should be maintained,
otherwise the airbag system will not be able to protect you - hazard!
■
When driving, hold the steering wheel with both hands firmly on the outer edge in the “9 o'clock” and “3 o'clock” position » fig. 1. Never hold the
steering wheel in the “12 o'clock” position or in any other way (e.g. in the
middle, inner edge of the steering wheel or similar). Otherwise, in the event
of airbag deployment, you could suffer serious injury to the arms, hands
and head.
■
Ensure there are no objects in the driver's footwell as they may get behind the pedals while driving. You would then no longer be able to operate
the clutch, brake or accelerate.
Adjusting the steering wheel position
Fig. 2
Setting the steering wheel position
Read and observe on page 10 first.
The height and forward/back position of the steering wheel can be adjusted.
Swivel the safety lever underneath the steering wheel in the direction of ar-
›
row 1» fig. 2.
Adjust the steering wheel to the desired position. The steering wheel can be
›
adjusted in the direction of arrow 2.
Pull the safety lever until it stops in the direction of arrow 3.
›
10
Safety

WARNING
■
Never adjust the steering wheel when the vehicle is moving, only do so
when the vehicle is stationary!
■
The safety lever must always be locked so that the steering wheel cannot
accidentally change position – There is a risk of an accident!
Correct seated position for the front passenger
Read and observe
For passenger safety and to reduce the risk of injury in an accident, the following instructions must be observed.
Position the front passenger seat back as far as possible. The front pas-
senger must maintain a distance of at least 25 cm to the dash panel so
that the airbag offers the greatest possible safety if it is deployed.
Adjust the headrest so that the top edge of the headrest is at the same
level as the upper part of your head » fig. 1 on page 10
with integrated headrests).
Correctly fasten the seat belt » page 12, Using seat belts.
WARNING
■
A distance of least 25 cm to the dashboard should be maintained, otherwise the airbag system will not be able to protect you - There is a risk to
life!
■
Always keep your feet in the foot well when the car is being driven – never place your feet on the instrument panel, out of the window or on the
surface of the seats. You will be exposed to increased risk of injury if it becomes necessary to apply the brake or in the event of an accident. If an airbag is deployed, you may suffer fatal injuries when adopting an incorrect
seated position!
on page 10 first.
B
(not for seats
Correct seating position for the passengers in the rear seats
Read and observe on page 10 first.
For the safety of the passengers in the rear seats, and to reduce the risk of injury in an accident, the following instructions must be observed.
Adjust the headrest such that the top edge of the headrest is at the same
level as the upper part of the head » fig. 1 on page 10 B.
Correctly fasten the seat belt » page 12, Using seat belts.
Passive Safety
11
Seat belts
Using seat belts
Introduction
Seat belts that are fastened correctly offer good protection in the event of an
accident. They reduce the risk of an injury and increase the chance of survival
in the event of a major accident.
The seat belts reduce kinetic energy to a considerable extent. They also prevent uncontrolled movements which, in turn, may well result in severe injuries.
When transporting a child the following instructions must be observed
» page 18, Transporting children safely.
WARNING
■
Fasten seat belts before every ride! This also applies to other passengers -
there is a risk of injury!
■
Maximum seat belt protection is only achieved if you are correctly seated
» page 9, Correct and safe seated position.
■
The seat backrests of the front seats must not be tilted too far to the rear
otherwise the seatbelts can lose their effectiveness.
WARNING
Information on dealing with the safety belts
■
The belt webbing must not be jammed in-between at any point or twis-
ted, or chafe against any sharp edges.
■
Make sure you do not catch the seat belt in the door when closing it.
WARNING
Information on the proper use of safety belts
■
Adjust the height of the belt in such a way that the shoulder part of the
belt is roughly positioned across the middle of your shoulder - on no account across your neck.
■
No two persons (including children) should ever use a single seat belt together.
WARNING (Continued)
■
The lock tongue should only be inserted into the lock which is the correct
one for your seat. Wrong use of the safety belt will reduce its capacity to
protect and the risk of injury increases.
■
Many layers of clothing and loose clothing (e. g. a winter coat over a jacket) do not allow you to be correctly seated and impairs proper operation of
the seat belts.
■
Do not use clamps or other objects to adjust seat belts (e.g. to shorten
the belts for smaller persons).
WARNING
Information on the care and maintenance of safety belts
■
The belt webbing must always be kept clean. Soiled belt webbing may impair proper operation of the inertia reel » page 71.
■
The seat belts must not be removed or changed in any way. Do not attempt to repair the seat belts yourself.
■
Check the condition of all the seat belts on a regular basis. If damage to
the parts of the seat belt system (e.g. the strap, the belt connectors, the retractor, the lock or similar) are detected, the seat belt in question must be
replaced immediately by a specialist.
■
Seat belts which have been subjected to stress in an accident should be
replaced by a specialist garage. The anchorage points for the belts should
also be checked.
Correct routing of seat belt
Fig. 3
Routing of belt webbing over the shoulders and the lap
belt/Routing of belt webbing for an expectant mother
12
Safety
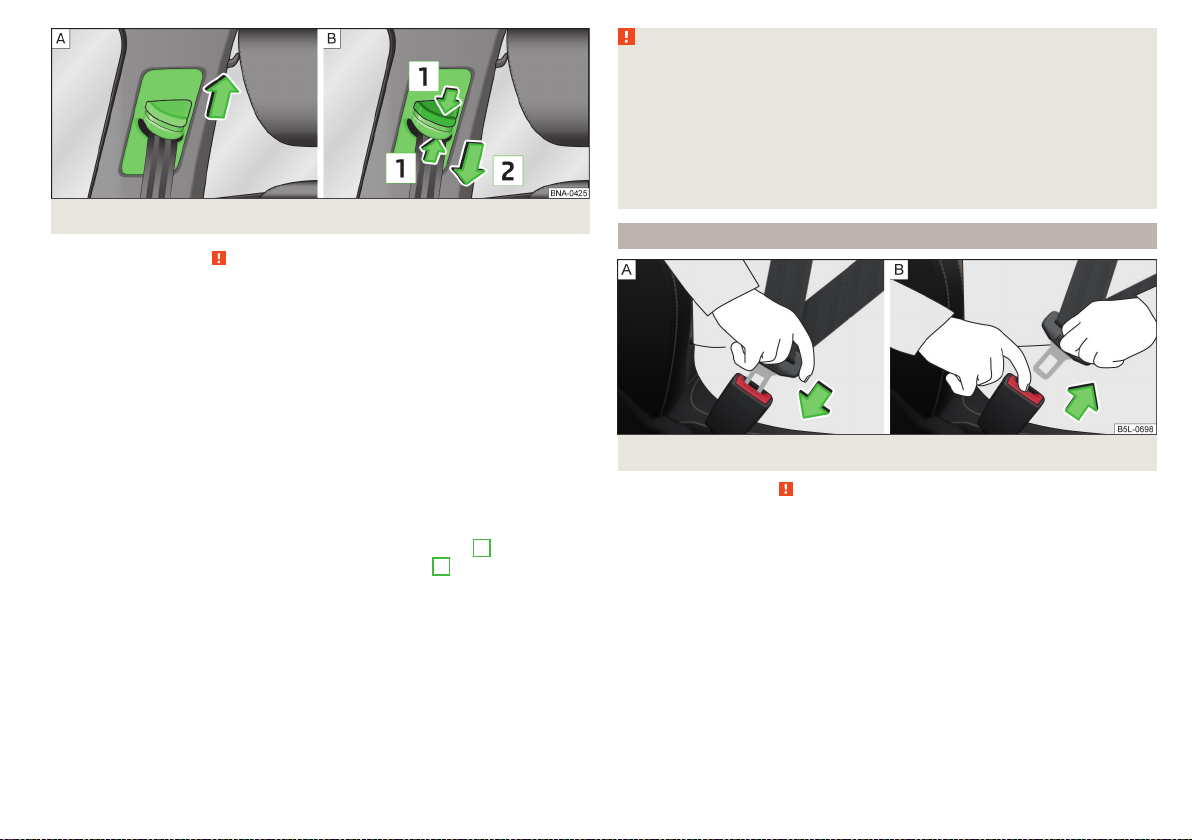
Fig. 4 Seat belt height adjusters for front seats
Read and observe on page 12 first.
It is important that the belt is properly routed to ensure seat belts offer the
maximum protection.
The shoulder belt should be positioned approximately over the middle of your
shoulder (on no account across your neck) and lie flush to the chest » fig. 3 -
.
The lower part of the belt should run across the pelvis (it should not lie on top
of the stomach) and must always fit snugly » fig. 3 - .
For pregnant women, the lower part of the belt must be positioned as low
down as possible across the pelvis, to avoid exerting any pressure on the lower
abdomen » fig. 3 - .
Seat belt height adjusters for front seats
Push the return pulley upwards in the direction of arrow » fig. 4 - .
›
Or: push together the mechanism in the direction of arrows 1 and push the
›
return pulley downwards in the direction of the arrow2 » fig. 4 - .
Then pull firmly on the belt to ensure that the seat belt height adjuster has
›
correctly locked in place.
WARNING
■
Always ensure that the webbing of the seat belts is properly routed. Seat
belts which are not correctly adjusted can themselves cause injuries even in
minor accidents.
■
A seat belt which is hanging too loose can result in injuries as your body is
moved forward by the kinetic energy produced in an accident and is then
suddenly held firm by the belt.
■
The belt webbing must not run across solid or fragile objects (e.g. pencils,
spectacles, pens, keys etc.). Such objects can cause injury.
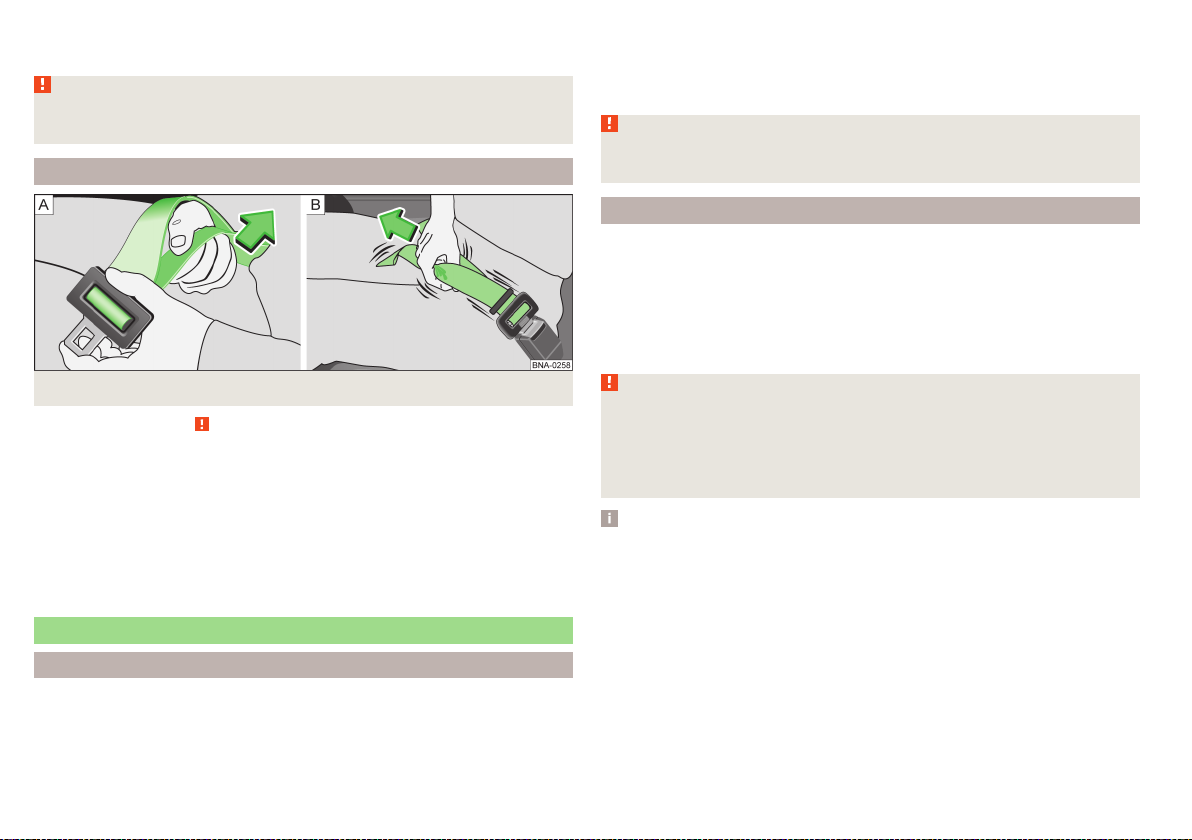
Fastening and unfastening seat belts
Fastening/unfastening the seat belt
Fig. 5
Read and observe on page 12 first.
Before fastening the belt
Properly adjust the head restraint.
›
Adjust the seat (applies to the front seats).
›
Adjust the belt height (applies to the front seats).
›
Fasten
Use the lock tongue to slowly pull the webbing over your chest and pelvis.
›
Insert the lock tongue into the belt buckle » fig. 5 – that is part of the seat
›
until it clicks into place.
Pull on the belt to check that it has engaged correctly in the lock.
›
Release
Grip the lock tongue and press the red button in the buckle » fig. 5 - , the
›
lock tongue pops out.
Seat belts
13
Guide the belt back by hand so that the seat belt does not twist and the
›
webbing rolls up fully.
WARNING
The reel opening for the lock tongue must not be blocked otherwise the
lock tongue will not lock into place properly.
Two-point safety belt
Two-point safety belt
Fig. 6
Read and observe
The middle rear seat is fitted with a two-point pelvic belt.
Extend lap
Hold the latch plate at a right angle to the strap and pull the strap to the de-
›
sired length » fig. 6 - .
Shorten lap
Pull on the free end of the strap » fig. 6 - .
›
Thread the excess strap length in the plastic slide.
›
on page 12 first.
When pulling slowly on the seat belt, the belt can move freely. When pulling
sharply on the seat belt, the movement is locked by the inertia reel. The belts
also lock when full braking, when the car accelerates, when driving downhill
and when cornering.
WARNING
If the seat belt does not lock when pulling sharply on it, have it inspected
immediately by a specialist garage.
Belt tensioners
Safety for the driver and front passenger wearing their seat belts is enhanced
by the belt tensioners fitted to the inertia reels of the front seat belts.
If there is a collision of a certain severity, the seat belts are tightened by the
belt tensioner so that unwanted body motion is prevented.
Belt tensioners are not activated in the event of minor collisions, in the case of
a roll-over and also not in accidents in which no major forces are produced.
WARNING
■
Any work on the belt tensioner system, including the removal and installation of system components because of other repair work, must only be carried out by a specialist garage.
■
If the belt tensioners have been deployed, it is then necessary to replace
the entire system.
Notice
■
The belt tensioners can also be deployed if the seat belts are not fastened.
■
Smoke is generated when the belt tensioners are deployed. This is not an in-
dication of a fire in the vehicle.
Inertia reels and belt tensioners
Inertia reels
Each three-point seat belt is equipped with an inertia reel.
14
Safety
Airbag system
Description of the airbag system
Introduction
The airbag system provides, as a supplement to the seat belts, additional occupant protection during severe frontal and side-on collisions.
The airbag will only provide optimum protection in conjunction with wearing the seat belt - the airbag is not a substitute for the seat belts.
The functional status of the airbag system is indicated by the indicator light
in the instrument cluster » page 26.
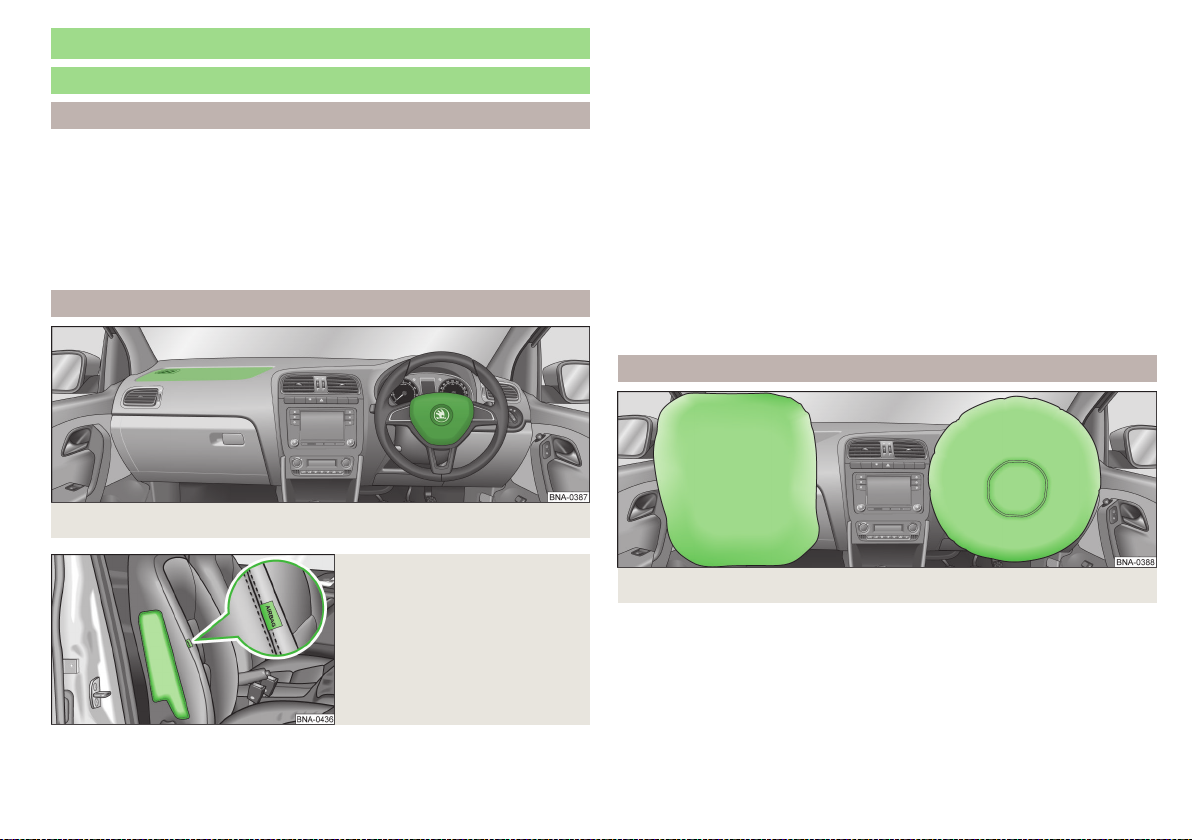
System description
Fig. 7 Installation positions of the front airbags
Front airbags - the forward thrust of the driver and of the front passenger is
cushioned when they make contact with the fully inflated airbag, and the risk
of injury to head and chest is thus reduced.
The front airbags can be identified by the lettering featured on the steering wheel and on the dashboard on the passenger side.
Side airbags - The forward thrust of the people seated in the vehicle is cushioned when they make contact with the fully inflated airbag. The risk of injury
to the entire upper body (chest, stomach and pelvis) is reduced on the side
facing the door.
The side air bags can be identified by a label with the lettering marked on
the front seat backrests.
Depending on the vehicle equipment, the airbag system consists of the
following parts.
▶
Individual airbags.
▶
Indicator light in the instrument cluster » page 26.
Airbag deployment
Fig. 8
Installation position of the side
airbag in driver's seat
Fig. 9
Gas-filled front airbags
Airbag system
15
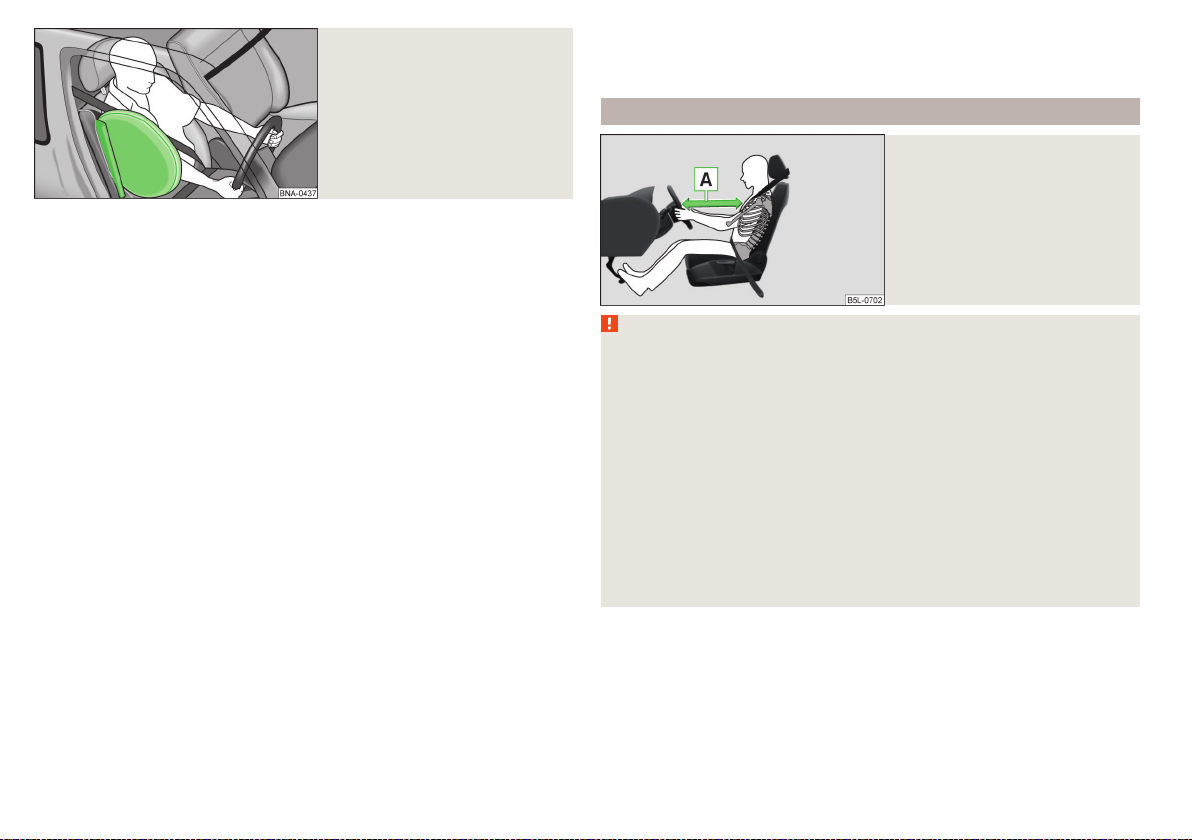
Fig. 10
Gas-filled driver side airbag
The airbag system is only functional when the ignition is switched on.
When triggered, the airbag fills with gas and unfolds. The airbag inflates in a
fraction of a second.
When the airbag inflates, smoke is released. This is not a sign of a fire in the
vehicle.
Triggering conditions
It is not possible to generally determine which deployment conditions apply to
the airbag system in every situation. The important factors here are the hardness of the object with which the vehicle collides, the angle of impact, vehicle
speed etc.
A decisive factor in the deployment of the airbags is the degree of deceleration at the time. If the vehicle deceleration which occurs and is measured during the collision remains below the prescribed reference values specified in the
control unit, the airbags are not deployed although the vehicle may well suffer
severe damage to the bodywork as a consequence of the accident.
The following airbags will be deployed in the event of a severe frontal
collision.
▶
Driver’s front airbag.
▶
Front passenger airbag.
The front side airbag will be deployed in the event of a severe side collision.
The following events occur when an airbag deploys.
▶
The hazard warning lights are switched on.
▶
All the doors are unlocked.
▶
The fuel supply to the engine is cut off.
▶
The interior light illuminates (if the automatic operation of the interior light is
switched on – switch ).
When is the airbag not deployed?
In the event of minor frontal and side collisions, rear-end collisions, the airbag
is not deployed, or if the vehicle overturns or rolls over.
Safety instructions
Fig. 11
Safe distance from the steering
wheel and dashboard
WARNING
General information
■
The seat belts and the airbag system can only offer proper protection
if the driver and passengers are seated properly » page 9.
■
The airbag unleashes enormous force when triggered, which can lead to
serious injuries or fatalities if the driver and passengers are not seated
properly. This applies in particular to children who are transported without
using a suitable child safety seat.
■
If there is a fault, have the airbag system checked immediately by a specialist garage. Otherwise, there is a risk of the airbag not being activated in
the event of an accident.
■
If the airbag has been deployed, the airbag system must then be replaced.
■
The surface of the steering wheel and the dash panel should only be
cleaned with a dry or slightly dampened cloth in the area of the front airbags.
16
Safety

WARNING
Information about the front airbags
■
For the driver and passenger, it is important to maintain a distance of at
least 25 cm from the steering wheel or dashboard » fig. 11 - A. If this distance is not maintained, the airbag system cannot protect you - hazard! The
front seats and the head restraints must always also be correctly adjusted
to match the body size of the occupant.
■
The front passenger airbag must be deactivated if using a rear-facing
child seat on the front passenger seat » page 17, Airbag deactivation. If
this is not done, there is a risk of the child suffering severe or even fatal injuries if the front passenger airbag is deployed.
■
No other persons, animals or objects should be placed in front of the occupants in the front seats in the deployment area of the front airbags.
■
The steering wheel and the surface of the dashboard on the passenger
side must not be stickered, covered or modified in any way. No parts (e.g.
cup holders, mobile phone mounts and the like) may be mounted near the
airbag installation points and in the airbag deployment area.
■
Never place objects on the surface of the dashboard on the passenger
side.
WARNING
Information about the side airbags
■
There must not be any objects in the deployment area of the side airbags,
and no accessories may be attached to the doors (e.g. cup holders etc.) there is a risk of injury!
■
Hang only light clothing on the hooks in the vehicle, do not leave any
heavy or sharp objects in the pockets. Do not use hangers to hang up the
clothes.
■
No excessive force, e.g. through blows, kicks etc. should be applied to the
seat backrests - there is a risk of damage to the side airbags. The side airbags would not be deployed in such a case!
■
Any seat or protective covers which you fit to the driver or front passenger seats must only be of a type expressly authorised by ŠKODA
AUTO. In view of the fact that the airbag inflates out of the backrest of
the seat, use of non-approved seat or protective covers would considerably impair the protective function of the side airbag.
■
Any damage to the original seat covers or stitching at the installation
points for the side airbags should be immediately repaired by a specialist
company.
WARNING
Information on the use of the airbag system
■
Any work on the airbag system including the installation and removal of
system components due to other repair work (e.g. removal of the steering
wheel) must only be carried out by a specialist garage. Further information
» page 67.
■
No changes of any sort should be made to parts of the airbag system, the
front bumper or the bodywork.
■
Do not manipulate individual parts of the airbag system, as this might result in the airbag being deployed.
Airbag deactivation
Deactivating airbags
We recommend that you ask a ŠKODA service partner to deactivate any other
airbags.
Deactivating an airbag should be considered in cases such as the ones
below.
▶
A child seat is mounted on the front passenger seat, in which the child is
transported with its back to the direction of travel » page 18, Transporting
children safely.
▶
Despite correct adjustment of the driver's seat, the distance of at least
25 cm between the middle of the steering wheel and chest cannot be maintained.
▶
Additional controls for drivers with a physical disability are installed in the vehicle.
▶
Special seats (e.g. orthopaedic seats) are installed in the vehicle.
WARNING
If an airbag is deactivated at the time of the vehicle being sold, the purchaser must be informed!
Airbag system
17
Transporting children safely
Child seat
Introduction
To reduce the risk of injury in an accident, children should only be transported
in child seats!
Please refer to the instructions in this Owner's Manual and the child seat manufacturer's instructions with regard to the installation and use of the child seat.
For safety reasons, we recommend that you always transport children on the
rear seats. Only transport a child on the passenger seat in exceptional circumstances.
Child seats complying with the ECE-R 44 Economic Commission for Europe
standard must be used.
Child seats that comply with the ECE-R 44 standard have a test seal that cannot be removed: a large E within a circle with the test number below.
WARNING
■
One should never carry children, and also not babies! - on one's lap.
■
When leaving the vehicle, do not leave children unattended in the vehicle.
Children might not be capable of leaving the vehicle or helping themselves
independently in the event of an emergency. Can be fatal at very high or
very low temperatures!
■
The child must be secured in the vehicle during the entire journey! Otherwise, the child would be thrown through the vehicle in the event of an accident, causing fatal injuries to both the child and other occupants.
■
Children are exposed to an increased risk of injury in the event of an accident if they lean forward or adopt an incorrect seated position when the
vehicle is moving. This particularly applies to children who are transported
on the front passenger seat as they can suffer severe, or even fatal injuries
if the airbag system is deployed!
■
Pay particular attention to the information provided by the manufacturer
of the child safety seat regarding the correct routing of the belt. Seat belts
which are not correctly adjusted can themselves cause injuries even in minor accidents.
WARNING (Continued)
■
Safety belts must be checked to ensure that they are running properly.
One should also ensure that the belt is not damaged by sharp-edged fittings.
■
When installing the child seat on the back seat, the corresponding front
seat must be adjusted so that there is no contact between the front seat
and the child seat or the child being transported in a child seat.
■
When installing a child seat in which the child faces forward, adjust the
head restraints so that they are as high as possible.
■
If the head restraints still prevent the child seat from being installed, even
in the highest position, you will need to remove them » page 43. After removing the child seat, refit the head restraints.
Notice
We recommend that you use child seats from ŠKODA Original Accessories.
These child seats were developed and also tested for use in ŠKODA vehicles.
They meet the ECE-R 44 standard.
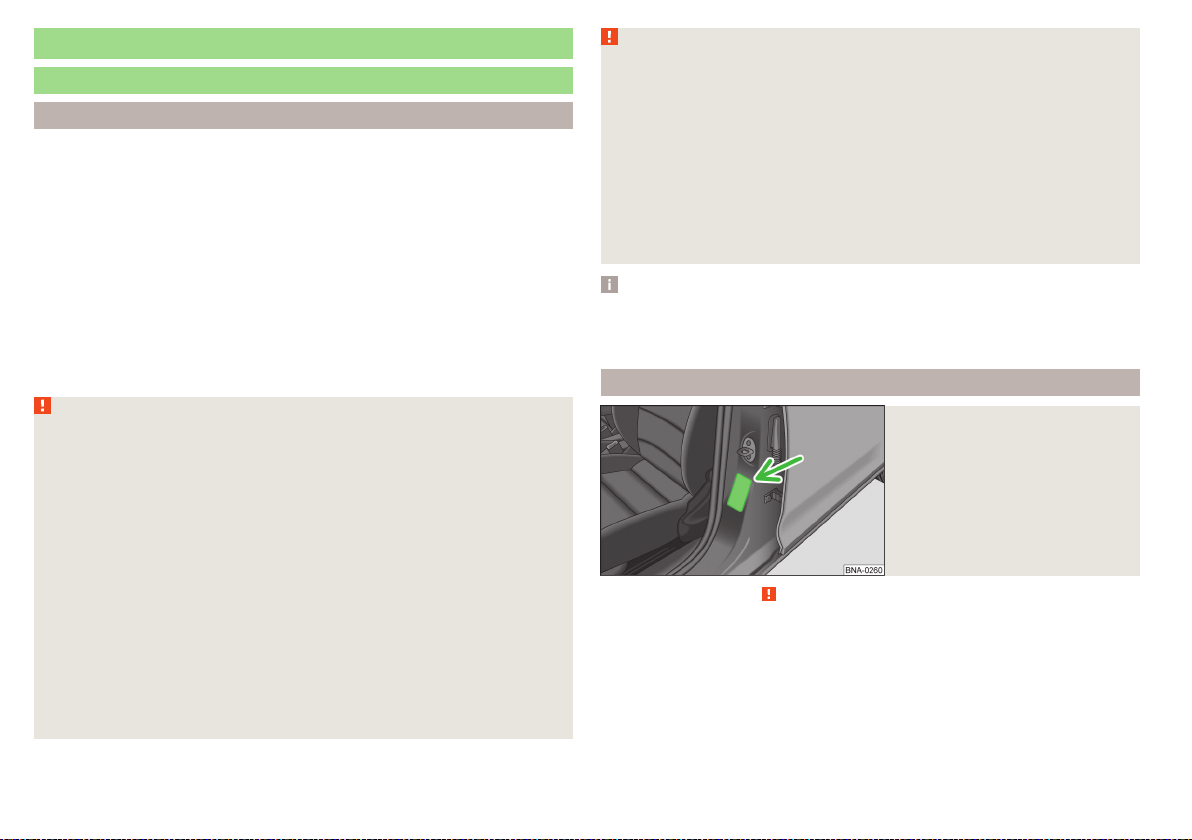
Use of a child seat on the front passenger seat
Fig. 12
Sticker on the B column on the
front passenger side.
Read and observe on page 18 first.
Never use a rearward-facing child restraint system on a seat which is protected by an active airbag. This could cause serious injury to the child, or
even death.
The sticker which is located on the B column on the front passenger side also
clearly states this» fig. 12.
18
Safety
The following instructions must be followed when using a child seat on the
front passenger seat.
▶
It is essential to deactivate the front passenger airbag if using a child seat in
which the child is transported with its back facing the direction of travel » .
▶
If possible, adjust the front passenger seat backrest so that it is as vertical, so
as to ensure secure contact between the passenger seat backrest and the
back of the child seat.
▶
If possible, move the front passenger seat backwards so that there is no contact between the front passenger seat and the child seat behind it.
▶
Set the front passenger seat belt as high up as possible.
▶
With child safety seats in groups 2 and 3, ensure that the loop-around fittings attached to the child seat headrest are positioned in front of or at the
same height as the loop-around fittings on the B pillar on the passenger side.
Adjust the height of the front passenger seat belt so that the belt does not
“jam” in the return pulley. In the event of an accident, the child's neck may be
injured by the seat belt!
WARNING
■
Never use a rear-facing child seat on the front passenger seat if the pas-
senger airbag is activated. This child safety seat is positioned in the deployment area of the front passenger airbag. The airbag may cause the child severe, or even fatal injuries, in the event of it being deployed.
■
Once a child seat in which the child is transported with its back to the direction of travel is no longer being used on the passenger seat, the front
passenger airbag should be reactivated.
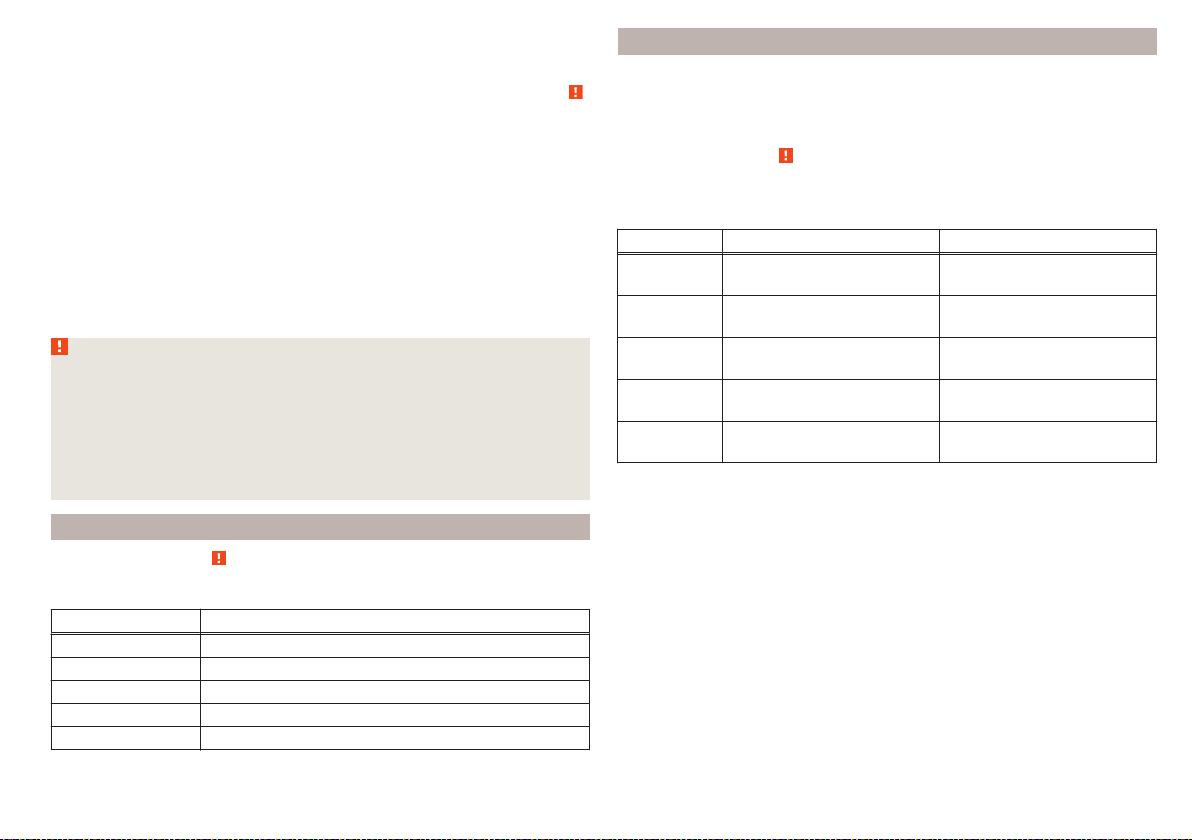
Classification of child seats
Read and observe on page 18 first.
Classification of child seats according to the ECE-R 44 standard.
Group Weight of the child
0 up to 10 kg
0+ up to 13 kg
1 9-18 kg
2 15-25 kg
3 22-36 kg
Use of child safety seats which are secured with a safety belt
Never use a rear-facing child seat on the front passenger seat if the passenger
airbag is activated. This child safety seat is positioned in the deployment area
of the front passenger airbag. The airbag may cause the child severe, or even
fatal injuries, in the event of it being deployed.
Read and observe on page 18 first.
Overview of the usability of child seats fastened with a seat belt on each of
the seats in accordance with the ECE-R 16 standard.
Group Front passenger seat Outer rear seats
0
up to 10 kg
0+
up to 13 kg
1
9-18 kg
2
15-25 kg
3
22-36 kg
“Universal” child seat category - a child seat designed to be attached to
U
the seat using the seat belt.
U U
U U
U U
U U
U U
Transporting children safely
19
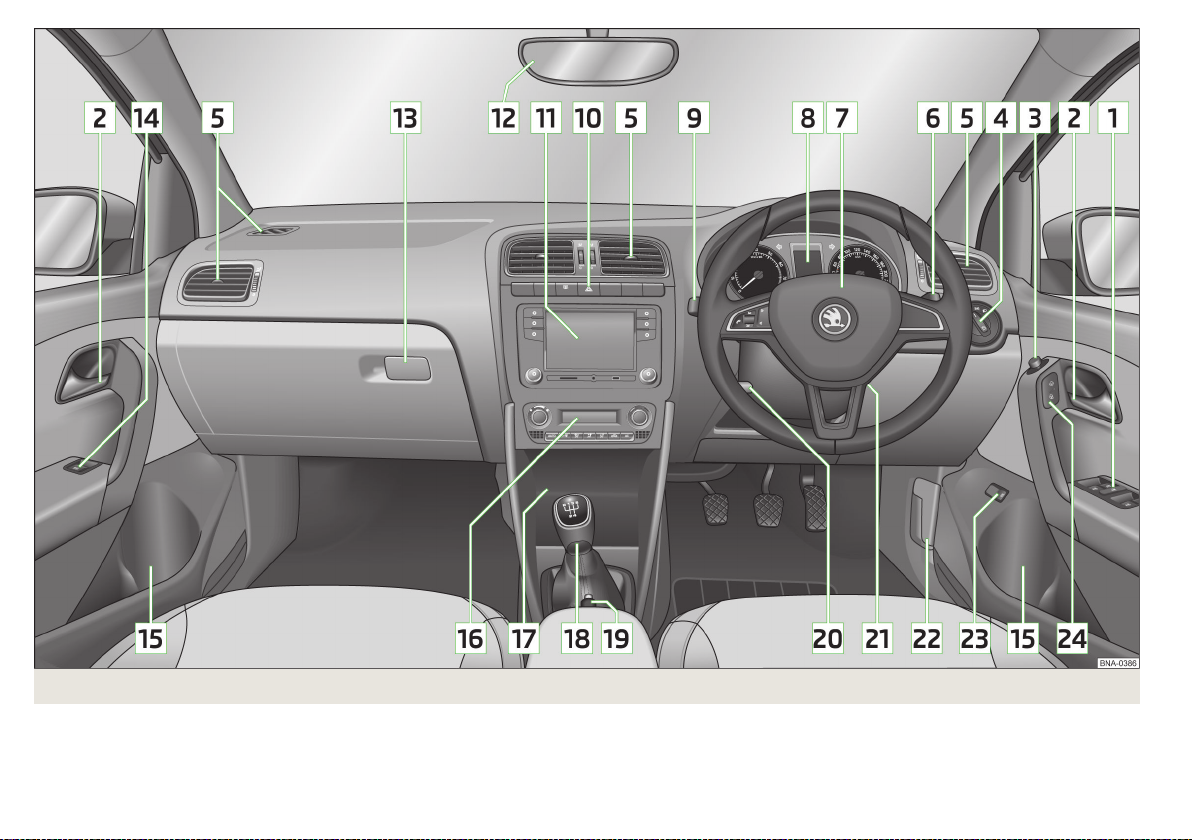
Fig. 13 Cockpit
20
Usage

Usage
Cockpit
Overview
1
Electric power windows 34
2
Door opening lever
3
Electric exterior mirror adjustment 41
4
Light switch 36
5
Air outlet vents 51
6
Operating lever (depending on equipment):
▶
Windscreen wipers and washers 40
▶
Information system
7
Multifunction steering wheel with horn / with driver's front airbag (depending on equipment fitted)
8
Instrument cluster
9
Operating lever (depending on equipment):
▶
Indicator light and high-beam headlight
▶
Speed regulating system 64
10
Bar with keys (depending on the equipment fitted):
▶
Traction control (TCS)
▶
Rear window heater
▶
Hazard warning lights system 38
11
Radio/Infotainment » Infotainment manual
12
Interior rear-view mirror 41
13
Storage compartment on the front passenger side
14
Electric power window in the front passenger door 34
15
Storage compartment
16
Operating controls for the air conditioning system 48
17
Storage compartment 46
18
Depending on equipment fitted:
▶
Gearshift lever (manual gearbox) 56
▶
Gear selector lever (automatic gearbox)
19
Handbrake lever 55
20
Steering wheel locking lever 10
21
Ignition lock
33
28
22
37
60
39
45
44
57
54
22
Bonnet release lever 75
23
Button to unlock the boot lid 34
24
Central locking system 32
15
Cockpit
21
Instruments and Indicator Lights
Instrument cluster
Notice
If appears in the display, then the system indicates that the ignition is
switched on.
Introduction
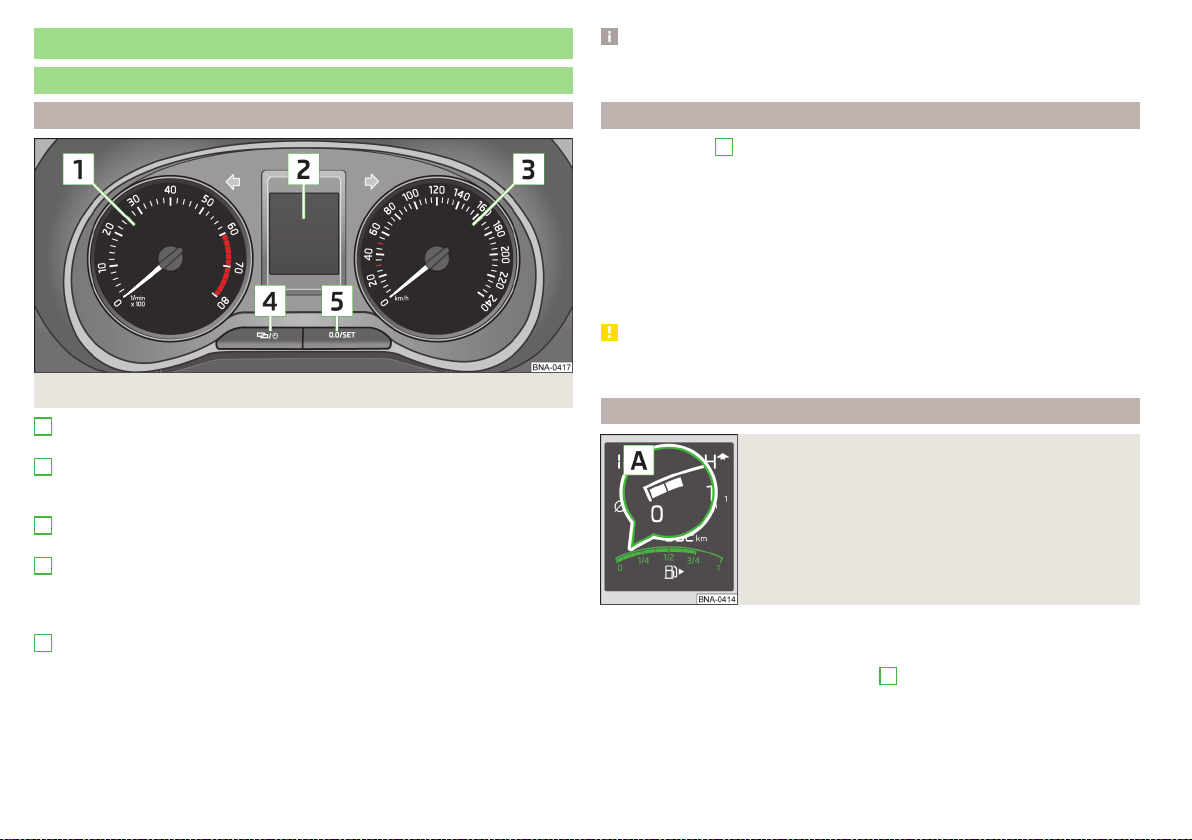
Instrument cluster
Fig. 14
1
Engine revolutions counter » page 22
▶
with warning lights » page 23
2
Display » page 28
▶
with fuel gauge » page 22
▶
with warning lights » page 23
3
Speedometer
▶
with warning lights » page 23
4
Button for:
▶
Setting the time » page 28
▶
Displaying the distance and days until the next service interval
» page 29
5
Button for:
▶
switching between the odometer display and the counter for the distance driven (trip) » page 28
▶
Reset the counter for distance driven (Trip) » page 28
▶
Setting the time » page 28
Rev counter
The tachometer 1 » fig. 14 on page 22 shows the actual engine speed per minute.
The beginning of the red scale range of the tachometer indicates the maximum permitted engine speed of a driven-in and operating warm engine.
You should shift into the next higher gear before the red scale of the revolution counter is reached, or select mode D on the automatic gearbox.
The gear recommendation is important to note in order to maintain the optimum engine speed » page 28.
CAUTION
The rev counter pointer may only move into the red area for a short time - otherwise there is a risk of engine damage!
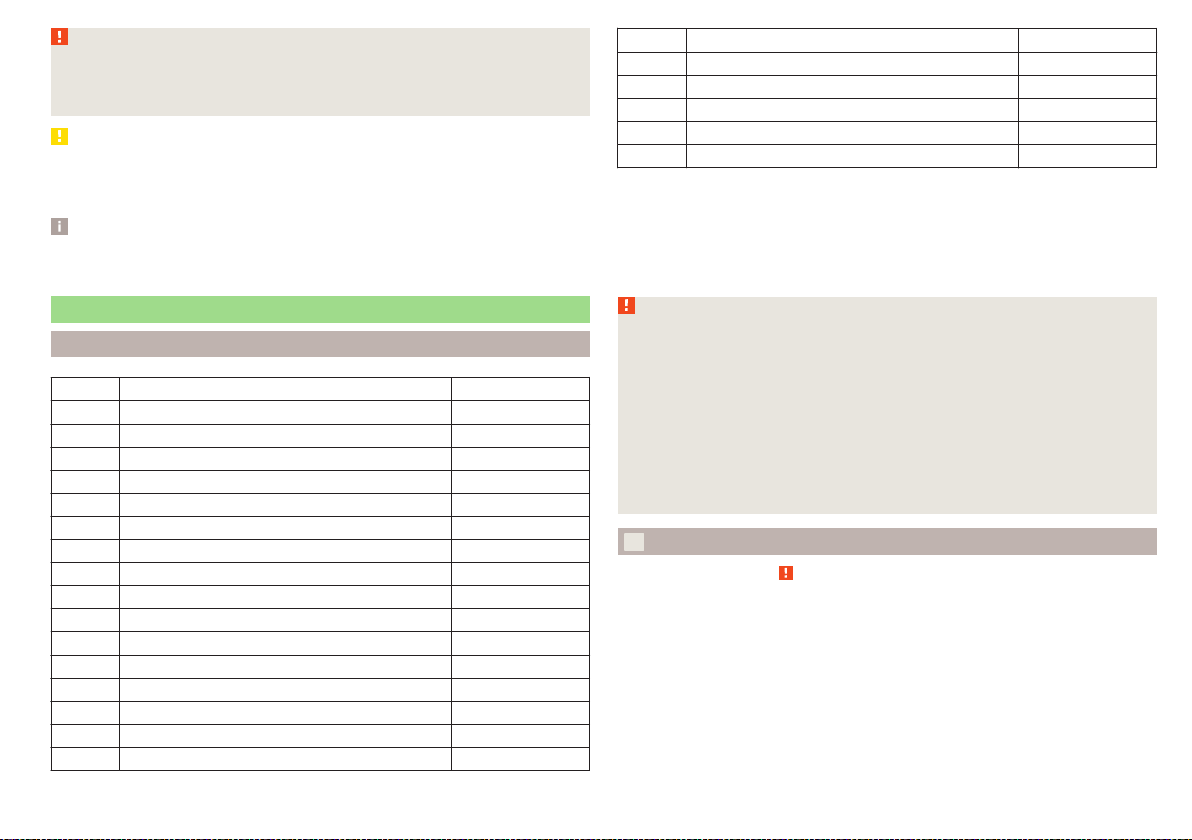
Fuel gauge
Fig. 15
Fuel gauge
The display» fig. 15 only works if the ignition is switched on.
The fuel tank has a capacity of about 55 litres.
If the fuel level reaches the reserve level A » fig. 15, the warning light illumi-
nates in the instrument cluster» page 26.
22
Usage
WARNING
For the vehicle systems to function correctly, and thus for safe driving,
there must be sufficient fuel in the tank. Never drain the fuel tank completely – There is a risk of an accident!
CAUTION
Never drive until the fuel tank is completely empty! Irregular supply of fuel can
cause misfiring, which can result in damage to parts of the engine and the exhaust system.
Notice
The arrownext to the symbolwithin the fuel gauge displays the installation
location of the fuel filler on the right side of the vehicle.
Warning Lights
Introduction
Handbrake » page 23
Brake system » page 24
Alternator » page 24
Open door » page 24
Engine oil » page 24
Coolant » page 24
Power steering » page 25
Antilock brake system (ABS) » page 25
Stabilisation control (ESC) » page 25
Traction control (ASR) deactivated » page 26
Rear fog light » page 26
Exhaust control system » page 26
Glow plug system (diesel engine) » page 26
EPC fault light (petrol engine) » page 26
Fuel reserve » page 26
Airbag system » page 26
Water in fuel filter (diesel engine). » page 26
Turning signal system » page 27
Cruise control » page 27
Brake pedal (automatic gearbox) » page 27
High beam » page 27
Display of a low temperature » page 27
Service » page 27
The warning lights in the instrument cluster indicate certain functions or faults.
Some warning lights can be accompanied by acoustic signals.
After switching on the ignition, some warning lights illuminate briefly as a
function test. If the tested systems are OK, the corresponding warning lights
extinguish a few seconds after switching on the ignition or leaving the vehicle.
WARNING
■
Ignoring illuminated warning lights and related messages or instructions
in the display of the instrument cluster may lead to serious personal injury
or damage to the vehicle.
■
If you have to stop for technical reasons, then park the vehicle at a safe
distance from the traffic, switch off the engine and activate the hazard
warning light system » page 38. Place the warning triangle at the specified distance.
■
The engine compartment of your car is a hazardous area. The following
warning instructions must be followed at all times when working in the engine compartment » page 74, Engine compartment.
handbrake
Read and observe
lights up – the handbrake has been applied.
An acoustic signal will sound if you drive the vehicle above 6 km/h while the
handbrake is still on.
▶
Release the handbrake.
on page 23 first.
Instruments and Indicator Lights
23

Braking system
Read and observe on page 23 first.
lights up – the brake fluid level in the brake system is too low.
▶
Park the vehicle, stop driving! Seek help from a specialist garage.
WARNING
A fault to the braking system can increase the vehicle’s braking distance There is a risk of an accident!
Generator
Read and observe on page 23 first.
lights up – the battery is not being charged whilst the engine is running.
▶
As the battery discharges while driving, all non-essential electrical consumers
(e.g. Infotainment) should be switched off.
▶
You can drive on, exercising appropriate caution. Seek assistance from a specialist garage immediately.
CAUTION
If, in addition to light , light lights up while driving, stop driving – risk of
engine damage! Switch off the engine and seek assistance from a specialist
garage.
Door open
Read and observe
illuminates – one or more doors are open.
Engine oil
Read and observe on page 23 first.
Low oil pressure
illuminates/flashes.
on page 23 first.
▶
Stop the vehicle, switch off the engine and check the engine oil level.
▶
If the warning light illuminates or flashes , stop driving, even if the oil
level is correct! Also do not leave the engine running at an idling speed.
▶
Seek help from a specialist garage.
Engine oil level too low
illuminates.
▶
Stop the vehicle, switch off the engine and check the engine oil level, top up
if necessary.
The warning light will go out if the bonnet is left open for more than 30 seconds. If no engine oil has been replenished, the warning light will illuminate
again after driving about 100 km.
Fault on the engine oil level sensor
flashes.
The warning light flashes several times after switching on the ignition and
there is an audible signal.
▶
You can drive on, exercising appropriate caution. Seek assistance from a specialist garage immediately.
CAUTION
If, under the given conditions, it is not possible to top up with engine oil,
stop driving - there is a risk of engine damage! Switch off the engine and seek
assistance from a specialist garage.
Coolant
Read and observe on page 23 first.
lights up or flashes – the coolant temperature is too high or the coolant lev-
el is too low.
▶
Stop the vehicle, switch off the engine, and allow the engine to cool down.
▶
Check the coolant level » page 78, Checking and refilling.
If the coolant level is within the specified range and the warning light lights
up again, there may be a malfunction of the cooling fan.
▶
Switch off the ignition.
▶
Check the fuse for the radiator fan, replace if necessary.
If the coolant level and fan fuse are both OK but the warning light lights up
again, stop driving!
24
Usage

▶
Seek help from a specialist garage.
Power steering
Read and observe on page 23 first.
Fault in the power steering
lights up – this indicates a complete failure of the power steering and the
steering assist is no longer working (significantly higher steering forces).
lights up – this indicates a partial failure of the power steering and the
steering forces can be higher.
▶
Switch off the ignition, start the engine again and travel a short distance.
▶
If the warning light does not go off, stop the vehicle, do not continue
to drive. Seek help from a specialist garage.
▶
If the warning light does not go out, you can drive on, exercising appropriate caution. Seek assistance from a specialist garage immediately.
Disconnecting the vehicle battery
If the vehicle's battery has been disconnected and reconnected, the warning
light illuminates after switching on the ignition.
The warning light should go out after driving a short distance.
If, after restarting the engine is restarted and driving a short distance, the
warning light does not go out, there is a system error.
▶
You can drive on, exercising appropriate caution. Seek assistance from a specialist garage immediately.
Anti-lock braking system (ABS)
Read and observe
lights up – there is an ABS fault.
The vehicle will only be braked by the normal brake system without the ABS.
▶
You can drive on, exercising appropriate caution. Seek assistance from a specialist garage immediately.
on page 23 first.
WARNING
■
If the warning light illuminates simultaneously with warning light
» page 24, Braking system, stop driving! Seek help from a specialist
garage.
■
A fault to the ABS system or the braking system can increase the vehicle's braking distance – risk of accident!
Stability Control (ESC)
Read and observe on page 23 first.
flashes - the ESC is now being activated.
ESC fault
illuminates - there is a ESC fault.
▶
You can drive on, exercising appropriate caution. Seek assistance from a specialist garage immediately.
If the warning light illuminates immediately after you start the engine, the
ESC might be switched off for technical reasons.
▶
Switch the ignition off and on again.
The ESC is fully functional again if the warning light does not illuminate after you switch the engine back on.
Disconnecting the vehicle battery
If the vehicle's battery has been disconnected and reconnected, the warning
light illuminates after switching on the ignition.
The warning light should go out after driving a short distance.
If, after driving a short distance, the warning light does not go out, there is a
system error.
▶
You can drive on, exercising appropriate caution. Seek assistance from a specialist garage immediately.
For more information about the ESC system » page 60, Stability Control
(ESC).
Instruments and Indicator Lights
25

Traction control (TCS) disabled
Read and observe on page 23 first.
illuminates - the TCS system is deactivated » page 60, Stability Control
(ESC).
Rear fog light
Read and observe on page 23 first.
lights up – the rear fog light is switched on.
Emission control system
Read and observe on page 23 first.
lights up – there is a fault in the emission control system. The system makes
it possible to drive on in emergency mode - there may be a noticeable reduction in engine performance.
▶
You can drive on, exercising appropriate caution. Seek assistance from a specialist garage immediately.
Preheating unit (diesel)
Read and observe on page 23 first.
The warning light illuminates after the ignition has been switched on. Once
the light has gone out, the engine can be started immediately. There is a fault
in the glow plug system if the warning light does not illuminate or illuminates continuously.
▶
Seek help from a specialist garage.
flashes – there is a fault in the engine management system. The system
makes possible operation emergency mode - there may be a noticeable reduction in engine performance.
▶
You can drive on, exercising appropriate caution. Seek assistance from a specialist garage immediately.
EPC checking (petrol engine)
Read and observe on page 23 first.
lights up – there is a fault in the engine management system. The system
makes it possible to drive on in emergency mode – there may be a noticeable
reduction in engine performance.
▶
You can drive on, exercising appropriate caution. Seek assistance from a specialist garage immediately.
Fuel reserve
Read and observe
illuminates - the fuel level in the fuel tank has reached the reserve area.
▶
Fill up with fuel » page 73.
Airbag system
Read and observe on page 23 first.
lights up – there is a fault in the airbag system.
▶
Seek help from a specialist garage.
WARNING
When there is a fault in the airbag system, there is a risk that the system
will not be triggered during an accident. Therefore, it must be checked immediately by a specialized dealer.
Water in the fuel filter (diesel engine)
Read and observe on page 23 first.
The fuel filter with water separator, filters out dirt and water from the fuel.
illuminates - too much water is present in the separator.
▶
You can drive on, exercising appropriate caution. Seek assistance from a specialist garage immediately.
on page 23 first.
26
Usage

Turn signal system
Read and observe on page 23 first.
flashes – the left turn signal is turned on.
flashes – the right turn signal is turned on.
If there is a fault in the turn signal system, the warning light flashes at twice its
normal rate.
When the hazard warning light system is switched on, all turn signals and both
warning lights flash.
Cruise control
Read and observe on page 23 first.
illuminates – the vehicle speed is regulated by the cruise control system.
Brake pedal (automatic gearbox)
Read and observe on page 23 first.
lights up – apply the brake.
Main beam
Read and observe on page 23 first.
lights up – the main beam or the headlight flasher is switched on.
Display of a low temperature
Read and observe
lights up – the outside temperature is below +4 °C.
WARNING
Even at temperatures around +4 °C, black ice may still be on the road surface! Do not only rely upon the information given on the outside temperature display that there is no ice on the road.
on page 23 first.
Service
Read and observe on page 23 first.
lights up – information regarding a service appointment that is due
» page 29, Service interval display.
Instruments and Indicator Lights
27
Information system
Driver information system
Display in the instrument cluster
Depending on the vehicle's equipment, the information system provides the
following information via the instrument cluster display.
▶
Total distance travelled/distance travelled after resetting the memory (trip)
» page 28
▶
Time » page 28
▶
Engaged gear / gear recommendation » page 28
▶
Service interval display » page 29
▶
Driving data (multifunction display) » page 29
▶
Selector lever positions for an automatic gearbox » page 57
▶
Speed regulating system » page 64
CAUTION
Pull out the ignition key if it comes into contact with the display (e.g. when
cleaning) to prevent any possible damage.
Reset the counter for distance driven (Trip)
Select the counter for distance driven (Trip).
›
Press and hold the 5 button.
›
Setting the clock
The time is set using the buttons 4 and 5 » fig. 14 on page 22.
4
The choice to change the display (hours or minutes).
5
The change of the displayed value.
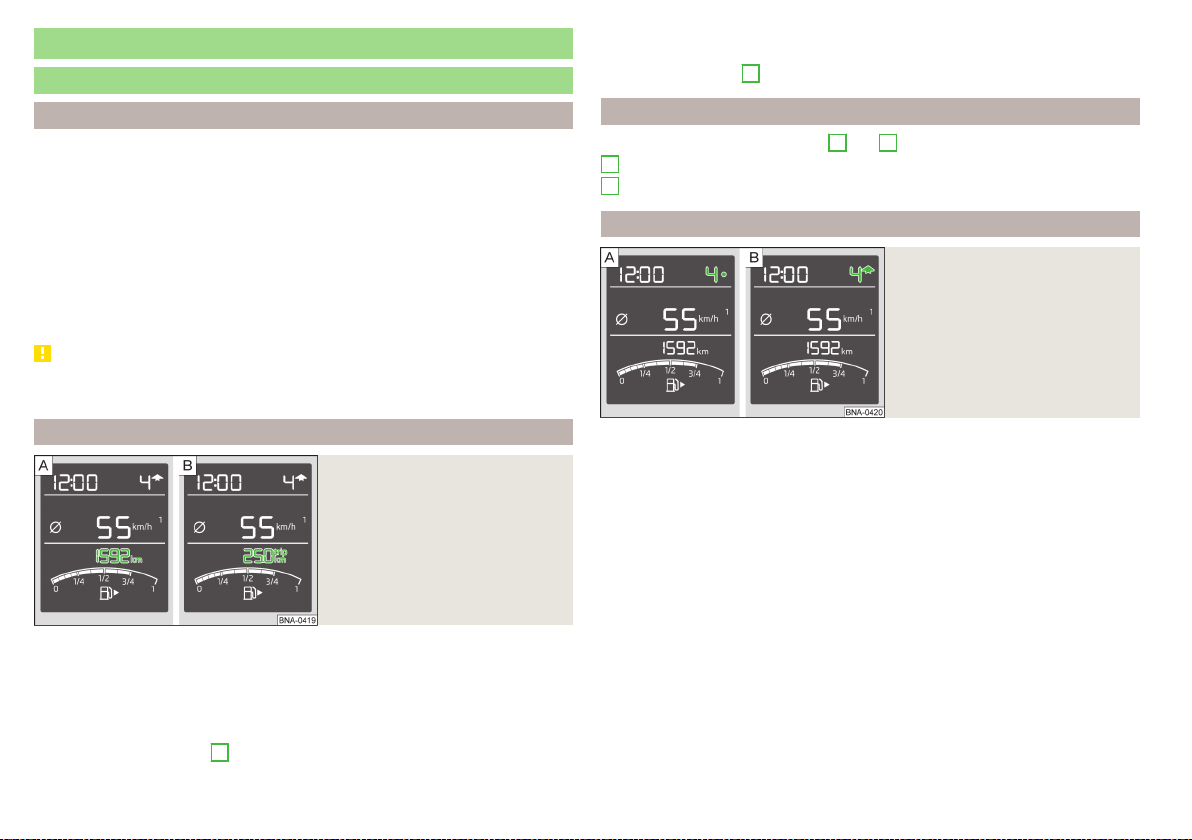
Gear recommendation
Fig. 17
Information on the selected
gear / gear recommendation
Counter for distance driven
Fig. 16
Odometer: Total distance travelled/distance travelled after resetting
Display » fig. 16
Odometer
Counter for the distance travelled after resetting (Trip)
Select between the odometer display and the counter for the distance
driven (Trip)
Briefly press the button 5 » fig. 14 on page 22.
›
28
Usage
A suitable engaged gear or, where appropriate, a recommended gear is displayed, with the aim of conserving the life of the engine and increasing driving
efficiency.
For vehicles with DSG automatic transmission, the recommended gear will be
shown provided the manual switching mode (Tiptronic) is selected.
Display » fig. 17
Optimal gear engaged
Recommended gear
- Recommends that you change up to a higher gear
- Recommends that you change down to a lower gear
▶
On vehicles with a manual gearbox, the recommended gear and an arrow symbol is displayed (e.g. means that it is advantageous to
change up from a lower gear to 4. gear).
▶
For vehicles with a DSG automatic gearbox mode, the currently engag-
ed gear and an arrow symbol (e.g. means that it is advantageous to
switch from 4 to a higher gear) is displayed in manual shifting mode
(Tiptronic).
 Loading...