

Page 1

ŠkodaAuto
CAR RADIO RHAPSODY
Page 2

Contents
Overview............................................. next page
Quick Reference Guide ...................... next page
Important notes ................................................4
Radio and CD operation................................... 5
RDS operation................................................ 17
DSP (Digital Sound Processor)
Display............................................................ 19
Anti-theft coding .............................................20
Points concerning the car radio...................... 21
Technical Quick Reference Guide
...................... 18
.................. 22
CONTENTS
1
Page 3

OVERVIEW
Dear Customer,
In teh event that you did not receive the secu-
rity code for your radio, this is because your
car is equiped with the convenience system
of coding for which this code is not needed. In
the battery is disconnected and then re-connected, rst of all switch the ignition on with
the key and then, after this, the radio. Should
you nevertheless wish to have the security
code, please contact your Škoda dealer.
Overview
Pos. Page
1 Rotary/push knob ....................................5
- Switch on/off (ON/OFF):
Press knob
- Volume control (VOLUME):
Turn knob
Quick Reference Guide
Pos. Page
2 Sound setting buttons.............................. 6
The following settings can be made by
pressing and turning the tone setting but
tons.
- Bass setting (BASS)
- Mid-range setting (MIDDLE)
- Treble setting (TREBLE)
- Balance (BALANCE)
- Fader (FADER)
-
2
Page 4

QUICK REFERENCE GUIDE
Pos. Page
3 TP button.................................................7
The traffic information function can be
switched on by pressing briey.
4 Source selection buttons ....................... 10
The programme source or memory level can
be selected by briey pressing the button:
- FM button (VHF)
- AM button (MW)
- CD button (CD operation)
5 Search function......................................10
A station search can be started in in AM
mode. The memory list can be viewed in
FM or TP mode.
In CD operation, you can jump from one
track to the next in order by briey pressing
the rocker switch. A track can be audibly
fast-forwarded and reversed using this
rocker switch.
6 TIM button .............................................12
The TIM function is used to replay all traf-
c information notices. The replay can be
started by pressing the TIM button.
- All trafc notices will be recorded when the
radio is switched on
- When the radio is switched off, the recording
mode can be activated by pressing the TIM
button
Pos. Page
7 Trafc radio announcement
rocker switch.......................................... 12
Trafc announcements stored in TIM mode
can be selected by briefly pressing the
rocker switch.
The trafc radio announcement function
(TP) can be switched on or off by briey
pressing this rocker switch. It can also be
used to select the individual trafc radio
stations.
8 Flashing diode ....................................... 13
When the unit has been switched off and the
ignition key has been removed, this ashing
diode indicates that the anti-theft coding on
the car radio has been activated.
9 Station buttons.......................................13
- for 12 FM and 12 AM stations.
The station buttons are used to select CDs
1 - 6 in CD changer mode.
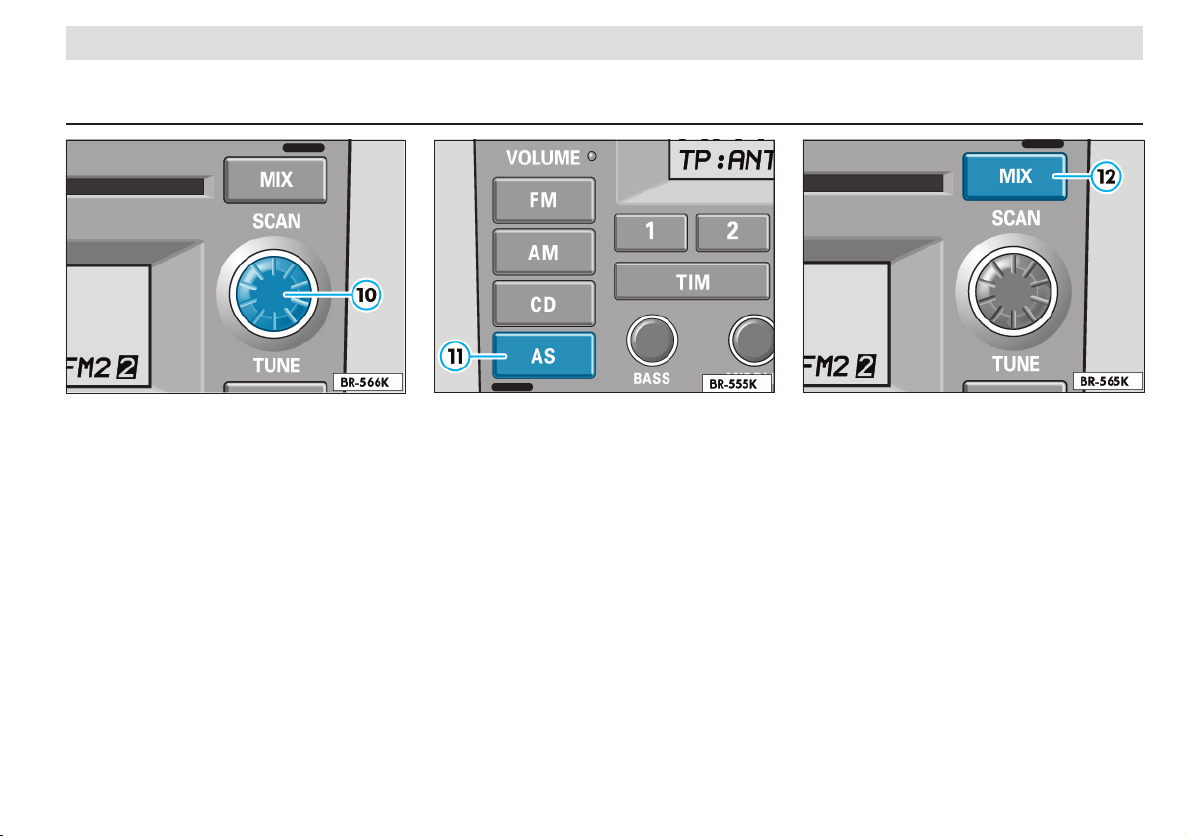
10 SCAN button
- Stations can be tuned in manually by turn-
ing.......................................................... 14
- All stations that can be received will briey
be played............................................... 14
- Special settings can be made in the set-up
menu by pressing and holding............... 14
- The tracks on a CD can be scrolled through
in order by turning the button in CD
mode......................................................15
Pos. Page
11
AS button............................................... 15
The AS button can be used to store the 6 sta-
tions with the best reception automatically.
12 MIX button ............................................. 15
In CD mode, all tracks on a CD will be played
in random order. All the CDs in a CD player
will be used in one is connected.
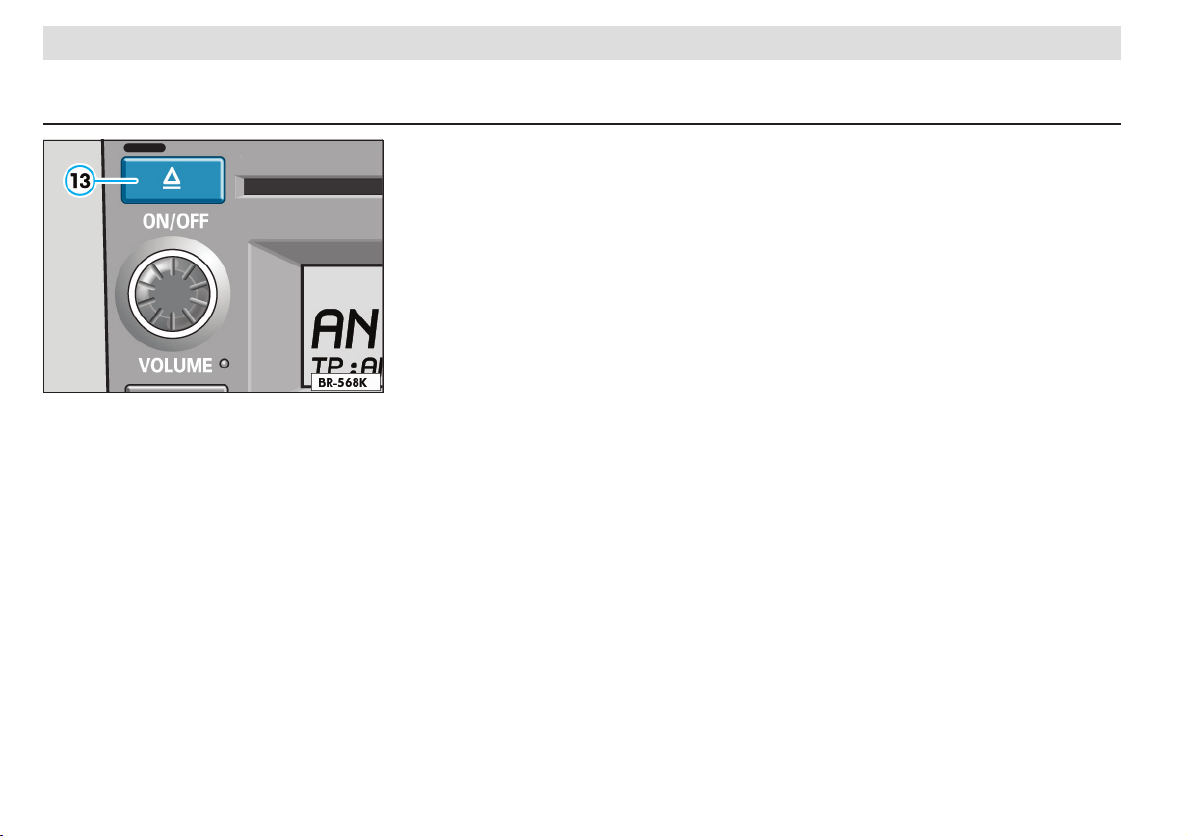
13 CD eject................................................. 16
14 CD slot................................................... 16
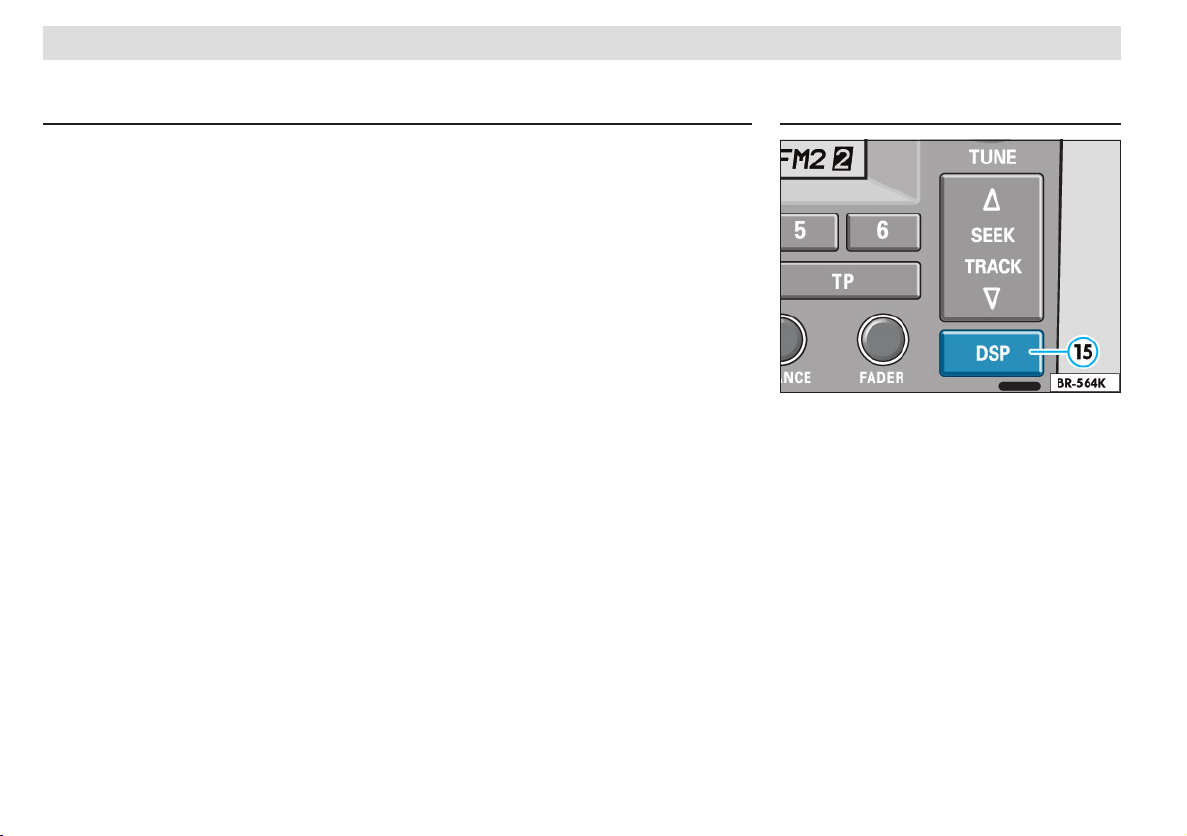
15 DSP button ............................................ 18
Various tone settings can be selected by
pressing the DSP button (e.g. CONCERT,
ARENA).
16 Displays................................................. 19
Note
The radio features an anti-theft coding system.
If the radio does not emit any sound when it is
switched on and the word „SAFE“ is displayed, it
has been electronically locked. See page 20 for
instructions!
3
Page 5

CONTROLS AND EQUIPMENT
Important notes
Operating the radio whilst driving
Modern trafc conditions demand the constant
attention of road users.
Besides a wealth of entertainment, modern car
radios, with their range of sophisticated features,
also provide a great deal of information about
trafc and road conditions, etc.
However, the radio, with all its possibilities,
should only be used if conditions really allow it.
For example, changing CDs or reading CD labels
while driving has frequently led to dangerous situations.
The volume of the radio should also be set so
that acoustic signals from outside can also be
heard.
Warning
Please concentrate on your driving above
all!
Convenience radio coding
In the past one had to recode the radio manually
every time the unit was removed or when the
vehicle battery had been disengaged.
That has all changed with the new convenience
radio coding function: Once the code number has
been input in the radio, it will then synchronise
itself with „its“ vehicle!
If the current supply has been interrupted the radio
will automatically check to see if it is still in „its“
vehicle after the ignition has been switched on. If
it is happy, the radio will be ready for use after just
a few seconds.
It is therefore no longer necessary to disengage
the electronic lock manually!
CD changer
This car radio also has the attractive option of
controlling the genuine Škoda CD changer1).
The operation of the unit is described in a separate manual.
Qualied dealers have all the information concerning the retrotting of these units.
Safety precautions for items of equipment
tted with lasers
Laser devices are classied by DIN IEC 76 (CO)
6/VDE 0837 into safety classes 1 to 4.
The Škoda CD changer corresponds to safety
class 1.
The laser used in units of class 1 is of low energy
or is shielded, so that there is no danger when
being correctly used.
Do not remove the unit’s cover. It does not
have any parts which can be serviced by the
user.
1)
Can be delivered as tted from the factory. The
units should be tted by a Škoda dealer if to be
installed at a later date.
4
Page 6

Radio and CD operation
CONTROLS AND EQUIPMENT
Tips on CD operation
To ensure perfect, high-quality CD reproduction,
only clean, undamaged CDs should be used.
Please do not stick any labels onto the CD’s.
Compact discs not being used should always be
stored in the CD rack from the Genuine Škoda
accessories range or in the original box.
Never leave CDs exposed to direct sunlight!
Notes on cleaning compact discs
Use a soft, lint-free cloth to clean CDs. Wipe the
disc in a straight line from the centre outwards.
Stubborn soiling can be removed with a commercial CD cleaner or isopropyl alcohol.
Never use uids like petrol, paint thinner or
record cleaner, as these can damage the surface of the CD!
1 - Rotary/Push knob
The knob serves:
l Switching on/off (ON/OFF).
l Volume control (VOLUME).
Switching on/off (ON/OFF)
Briey press the knob to switch the radio on
and off.
The frequency and volume settings used before
the radio was last switched off will be reactivated.
If the radio is on when the key is removed from
the ignition, it automatically switches off.
The radio will switch on automatically if the key is
replaced in the ignition.
The radio can be switched on again when the
ignition key has been removed by pressing the
rotary/push knob 1. It will then switch off automatically approximately 1 hour later to ensure
that the battery does not run at.
This procedure can, however, be repeated as
often as required.
When the unit is switched off and the ignition key
has been removed, a ashing diode (see page
16) indicates that the radio is equipped with an
activated Anti-Theft Code.
If the radio unit makes no noise after switching on
and „SAFE“ is shown in the display, please refer
to the operating notes as of page 20.
Volume control (VOLUME)
The volume can be set by turning the knob.
„VOLUME“ is shown in the display with a settings
bar. The bar shows the change in volume.
The settings bar will disappear approximately 5
seconds after the volume has been altered.
Note
If the minimum volume is selected, the settings
bar will be shown with „MIN“ additionally in the
display.
5
Page 7

CONTROLS AND EQUIPMENT
2 - Sound setting
Bass setting (BASS)
l Press the BASS button to release the button.
l Select the required value by turning the BASS
button to the left (-) or right (+).
l Press the button again to engage the button.
Mid-range setting (MIDDLE)
l Press the MIDDLE button to release the button.
l Select the required value by turning the MIDDLE button to the left (-) or right (+).
l Press the button again to engage the button.
Treble setting (TREBLE)
l Press the TREBLE button to release the button.
l Select the required value by turning the TREBLE button to the left (-) or right (+).
l Press the button again to engage the button.
Note
The sound settings BASS, MIDDLE and TREBLE can be set for AM, FM, CD and PHONE
individually.
Balance (BALANCE)
The balance of volume between the right and left
hand speakers is adjusted using this function.
l Press the BALANCE button to release the
button.
l Select the required value by turning the BALANCE button to the left (< - left loudspeaker) or
right (> - right loudspeaker).
l Press the button again to engage the button.
Fader (FADER)
The volume balance between the loudspeakers at
the front and rear can be set using this function.
l Press the FADER button to release the button.
l Select the required value by turning the
FADER button to the left (R - rear loudspeakers)
or right (F - front loudspeakers).
l Press the button again to engage the button.
6
Page 8

CONTROLS AND EQUIPMENT
3 - TP button
Using the Trafc Program button you can control
trafc program functions (trafc information).
The TP function is switched on or off by pressing
the TP button. At the same time , a TA ready
mode (Trafc Announcement) is set up.
„TP“ will appear in the display when the TP function is switched on (e.g. „TP: ANTENNE“).
„TP: No TP“ will appear in the display if a TP station cannot be found.
If the current station is not a TP station, the radio
automatically selects the last TP station listened
to (Last Station Memory).
If this station is cannot be received, the radio will
automatically search for the next TP station with
a strong signal. „TP: TP-SeeK“ appears in the
display. The letters „TP“ appear in the display as
conrmation that a TP station is being received
(e.g. „TP: ANTENNE“).
The frequencies and names of stations broadcasting trafc news announcements are frequently
posted along motorways and trunk roads.
It is possible to store 6 trafc information stations
in the TP mode.
Changing TP station
Using trafc radio rocker switch 7, TP stations in
the memory levels (e.g. FM1) can be selected.
Press the right side of the rocker switch to select
the next TP station.
Press the left side of the switch to select the
previous TP station.
Auto-TP
The function Auto TP is used to automatically
select the TP station with the strongest signal.
Press the trafc radio rocker switch 7 until „TP:
auto TP“ appears in the display. Release the
rocker switch.
A signal can be heard after approximately 5 seconds and „TP: auto TP“ ashes. The radio will
look for the TP station with the strongest signal
and will display it.
TA ready mode
The TA ready mode makes it possible to listen
to trafc information reports. These reports will
be played at the programmed volume, even
when the volume is set at „very quiet“ or another
source (AM, CD) is being used. If the range of
the set trafc information station is left, the station search function will start after approximately
30 seconds.
The system will automatically switch to mono
whilst in TA ready mode and the DSP menu
„TALK“ is activated for the duration of the announcement - see page 19.
Interrupting a trafc news announcement
In some situations it can occur that a trafc news
announcement is interrupted, e.g.:
- The announcement does not apply to this
stretch of road.
- The announcement is very long and the part
concerning this stretch of road is complete.
Press the TP button
which is to be interrupted.
The announcement is interrupted and the previous operating mode - CD or radio - is resumed.
The trafc announcement is recorded in the TIM
memory and can be heard later. New trafc news
announcements will still interrupt the source be
ing heard.
To turn the function off
hold the TP button
the display.
during the announcement
permanently press and
3 until „TP: OFF“ appears in
-
7
Page 9

CONTROLS AND EQUIPMENT
Set-up Menu
If the SCAN knob 10 is pressed for longer than
2 seconds, specic settings can be made via the
display and the SCAN knob.
The following set-up menu points can be selected
by turning the SCAN knob:
l TIM Time 1
l TIM Time 2
l CLOCK
l GALA
l ON Volume
l PHONE
l RDS Name
l Exit
Settings can be made for the selected menu point
by briey pressing the SCAN knob.
Your alterations will be stored and you will exit
from the set-up menu if you then press the SCAN
knob for longer than 2 seconds or select the menu
option „Exit“.
If no changes are made for 15 seconds, you will
automatically exit from the set-up menu and the
alterations will
set-up menu will be indicated with a signal.
not be stored. The exit from the
TIM Time 1 and TIM Time 2
Using the set-up menu points TIM Time 1 and
TIM Time 2 it is possible, when the vehicle is not
moving, to enter two different recording times for
trafc announcements with a total length of 4
minutes - please also refer to page 12.
Example:
You travel every working day at 8.00 a.m. to work
and come home at 5.00 p.m.
You enter 8.00 a.m. in the set-up menu point TIM
Time 1. All trafc announcements made by the
programmed TP station between 6.30 a.m. and
8.30 a.m. will be stored.
Enter 5.00 p.m. in the set-up menu point TIM
Time 2. All trafc announcements made by the
programmed TP station between 3.30 p.m. and
5.30 p.m. will be stored.
Setting the recording times
l Select the function „TIM Time 1“ (This description also applies for TIM Time 2).
l Select „ON“ and briefly press the SCAN
knob.
l „Set Hours“ appears in the display. Set the
hour using the SCAN knob.
l Press the SCAN knob. „Set Minutes“ appears
in the display. Set the minutes using the SCAN
knob.
l Press the SCAN knob to store the setting and
to exit the menu.
Switching off TIM Time
l Select the function „TIM Time 1“ (This description also applies to TIM Time 2).
l Select „OFF“ and briefly press the SCAN
knob.
CLOCK
The time can be set either manually or automati
cally via the RDS signal. The time is only shown
in the CLOCK set-up menu point.
l Select in the menu: CLOCK. „Clock“ is displa-
yed and the function currently selected.
l Briey press the SCAN knob 10 and choose
whether you want to set the clock either ma
nually or automatically by turning the SCAN
knob.
Setting the clock automatically
l Select the function „Automatic“.
l Briey press the SCAN knob. The time is set
automatically via the RDS signal.
Setting the clock manually
l Select the function „Manual“.
l „Set Hours“ appears in the display. Use the
SCAN knob to set the time.
l Briey press the SCAN knob. „Set Minutes“
appears in the display. Use the SCAN knob
to set the minutes.
l Press the SCAN knob to store the settings and
to exit the menu.
-
-
8
Page 10

CONTROLS AND EQUIPMENT
Note
l The CLOCK function is only available in certain
countries.
l We recommend that you set the clock using
the automatic function.
If the time, however, is not identical with the
time shown by the TP station, it should be set
manually.
GALA
As road speed increases, the noise level in the car
increases accordingly. In the past, radio volume
had to be adjusted manually.
GALA (Speed dependent volume control)will now
automatically adjust the volume in accordance
with road speed.
The GALA function can be set to meet your individual requirements:
l Select in the menu: GALA. „GALA“ appears in
the display with a settings bar.
l Briey press the the SCAN knob 10 and select
the required value using the SCAN knob.
We recommend that you make the basic volume
settings whilst the vehicle is stationary and to
make the GALA settings whilst the vehicle is in
motion.
If the basic volume has to be reset (when the station or CD is changed, for example), simply adjust
the rotary/press knob 1. The volume adjustment
will continue to function automatically.
ON Volume
The maximum volume level of the radio upon
switching on is set using the ON Volume value:
Normally, the last setting for the volume will automatically be used when the radio is switched
on. If, however, that value is greater than the ON
Volume value, the volume when switching on will
automatically reset to the ON Volume value.
l Select in the menu: ON Volume.
„SETUP ON Volume“ and a settings bar are
shown in the display.
l Briey press the SCAN knob 10 and select the
desired value using the SCAN knob.
PHONE
It is possible, using the PHONE function, to set-up
the system to enable a telephone conversation to
be heard over the loudspeaker system, if a mobile
phone has been installed.
l Select PHONE in the menu.
„SETUP PHONE“ appears in the display with the
function currently selected.
Muting telephone conversation
l Select „Mute“ using the SCAN knob if you wish
to mute the radio. The telephone conversation will
not be relayed via the radio loudspeakers.
Telephone conversation relayed via the loudspeakers
l Select „Hands-free“ from the menu using the
SCAN knob if the telephone conversation is to be
relayed via the radio loudspeakers.
RDS name
Some stations also transmit running advertising
and information text along with the station name
in the display.
Using the RDS name function for stored stations
you can decide if these texts should be shown
or not.
l Select in the menu: RDS Name.
„SETUP Name“ and the current value will be
shown in the display.
l Press the SCAN knob 10 briey and select the
required value using the SCAN knob. The text can
be switched on with „VAR“ and off with the value
„FIX“.
Note
Please ensure that the station name is always
displayed when storing.
9
Page 11

CONTROLS AND EQUIPMENT
4 - Source selection buttons
Radio operation
FM button
The VHF wavelength can be selected by pressing
the FM button.
The rst memory level of the VHF wavelength can
be reached by pressing the FM button once.
The second level can be reached by pressing
the button again.
„FM1“ appears in the display for the rst memory
level or „FM2“ for the second - see page 19.
AM button
The MW wavelength can be selected by pressing
the AM button.
The rst memory level of the AM wavelengths can
be reached by pressing the AM button once.
The second level can be reached by pressing
the button again.
„AM1“ appears the rst memory level or „AM2“
for the second - see page 19.
CD operation
CD button
The CD mode of the internal CD player is selected
by pressing this button.
„NO CD“ will appear in the display if no CD is in
the player.
If a CD changer has been installed it is possible to
switch between the CD player and the CD changer
by pressing the CD button.
The operation of the CD changer is described in
a separate instruction manual.
Note
If the connection to a connected CD changer has
been interrupted, „NO CHANGER“ will appear in
the display if you wish to switch between the CD
player and the CD changer.
5 - Manual setting
Radio operation
Search
Only on AM wavelength!
Briey press the search rocker switch on the upper or lower part - the search will be started in the
direction as selected and the radio will select the
rst station with a strong signal and then stay at
that frequency.
Memory list
Only on FM wavelength!
Your radio is constantly orientating itself to the
station frequencies. After switching on, it automatically stores all RDS stations (see information
as of page 17) in a memory list according to their
PI code (Programme Identication).
10
Page 12

CONTROLS AND EQUIPMENT
The radio uses the PI code to identify a station,
e.g. NDR 2).
It is possible to scan backwards and forwards
through this list by pressing either the left or the
right hand side of the switch.
Please also refer to the further notes in the
following text.
Example:
The following stations are contained in the list:
NDR 1, NDR 2, Radio 3, NDR 4, ANTENNE,
FFN
You are, for example, listening to NDR 2 (display
reads „NDR 2“). By pressing the upper side of the
rocker switch the unit selects the next station. In
this case Radio 3.
The next station in the list (NDR 4) will be shown
in the display above the station currently being
listened to (Radio 3). The previous station in the
list (NDR 2) is shown in the display underneath
the current station.
Pressing this button again will select NDR 4 etc.
Use the lower side of the switch to scan the
list downwards - in this example from NDR 2
to NDR 1.
If a station name is at a point in time not recognizable to the unit only the frequency will be
shown. Once the name has been evaluated, it
will be shown in the display.
Fast forward/reverse rocker switch
It is possible, by listening during fast forward/
rewind, to locate a particular point in track.
l Press either the upper or lower side of the
switch during playback and hold until the desired
position is reached.
l Release switch
CD operation
Track selection
l It is possible to „ick“ in order backwards and
forwards through the tracks on a CD by briey
pressing the upper or lower side of this rocker
switch or by turning the SCAN knob 10.
The track currently selected then appears in the
display:
„TRACK 1 . . . TRACK 2 . . . TRACK 3 . . .“ etc.
Note
If the lower side of the search rocker switch is
pressed while a track is being played, the unit
will jump back to the start of the track and recommence playback.
11
Page 13

CONTROLS AND EQUIPMENT
6 - TIM button
Up to 9 trafc information reports with a total
length of 4 minutes can be stored automatically
with the TIM function (Trafc Information Memory)
in the quality of a telephone conversation. This
function uses a digital memory.
Recording trafc reports
You have 3 different possibilities to record trafc
announcements:
l When the radio is switched on, every trafc
announcement of the selected station will be re
corded as soon as „TP“ appears in the display.
l Recording period: 2 hours
1 - Switch on the TP ready mode with the TP
2 - Remove the ignition key.
All incoming trafc announcements will now be
recorded for the next 2 hours.
l Using the functions TIM Time 1 and TIM Time
2, the TP recording function can be made avail
able for a period of 2 hours. Trafc announce
ments will be recorded during this period - see
page 8.
Note
l The oldest report will be deleted if a new report
is to be recorded and the memory is full.
l If a report is longer than 4 minutes the beginning will be recorded over. An acoustic signal
will indicate that it was not possible to record the
entire report.
l No trafc announcements will be recorded if
the vehicle is not used for three days or longer.
-
3 and select the required TP station by
button
pressing the trafc radio rocker switch
7.
-
-
7 - Trafc radio rocker switch
Listening to trafc reports chronologically
Press the TIM button 6 - the most recent trafc
report will be played rst and the reports will then
be played in chronological order through to the
oldest. „TP Memo 2/3“, for example.
„TP-Memo“: TIM replay
„2/3“: 2nd trafc announcement of three recorded
trafc announcements.
„No TP Message“ will appear in the display if no
trafc reports have been recorded.
Listening to trafc reports in any order
l Press the TIM button 6.
l Move from message to message with the
trafc radio rocker switch
side (next message) and the left side (previous
message) or to the beginning of a message.
7 by pressing the right
12
Page 14

8 - Flashing diode
When the unit is switched off and the ignition
key is removed, this ashing diode indicates that
the car radio is equipped with activated anti-theft
coding.
CONTROLS AND EQUIPMENT
Manually storing
l Select desired waveband 4.
l Tune radio to desired station 10.
l Press the button on which the station is to be
stored and hold until the programme is muted
and a signal is emitted. The station is now stored.
The number of the station button appears in the
display (if, for example, you store a station on
button number 3, a „3“ will appear in the display.
Note
Please ensure that the name of the station is
shown in the display when storing. Otherwise
any running text being displayed, and not the
station name, will be stored!
9 - Station buttons
Radio operation
A maximum of 24 stations can be stored on the 6
station buttons and the different memory levels.
FM1/FM2 = 6 stations each,
AM1/AM2 = 6 stations each.
„FM2“ indicates that you are on the second memory level. You can switch between the memory
levels by pressing the FM or AM button 4.
13
Page 15

CONTROLS AND EQUIPMENT
Scanning stations
All station with a strong reception in one memory
level (e.g. FM1) will be played briey by pressing
the SCAN knob.
l Briey press the SCAN knob:
„SCAN“ appears in the display. All stations that
can be received will be played for approximately
5 seconds.
The station currently being played will be selected
permanently if the SCAN knob is pressed again.
CD operation
Briey press buttons 1 to 6 to select the individual
CDs in the magazine if a CD changer has been
installed.
„CD1“ to „CD6“ in the display indicates a CD
already loaded.
If no magazine is in the changer, „NO MAGAZINE“
appears in the display.
14
10 - SCAN knob
Setting station manually
The stations can be selected manually using the
SCAN knob.
l Turn button briey:
„MAN“ appears in the display. Tuning changes in
single steps (100 kHz for FM, 9 kHz for AM).
Note (only for AS, TP and FM)
When using manual tuning by frequency, alter-
native frequencies are not automatically selected
and the station name is not displayed.
Page 16
CONTROLS AND EQUIPMENT
CD operation
It is possible to „ick“ in order backwards and
forwards through the tracks on a CD by turning
the SCAN knob 10.
The track currently selected then appears in the
display:
„TRACK 1 . . . TRACK 2 . . . TRACK 3 . . .“ etc.
11 - AS button
In the AS mode it is possible to automatically
store the 6 stations with the strongest signals
in a user friendly fashion on the memory level
FM2 or AM2.
Automatic storing
l Select the wavelength.
l Press the AS button for approximately 2
seconds.“AUTOSTORE“ appears in the display.
The 6 stations with the strongest signals on
memory level FM2 or AM2 are automatically
stored.
12 - MIX button
Press the MIX button during CD operation. The
tracks of the CD will be played in random order.
l „MIX“ appears in the display.
l The MIX function can be switched off by press-
ing the button again.
Note
If a CD changer is installed, all the CDs in the
changer will be played according to the random
principle.
15
Page 17
CONTROLS AND EQUIPMENT
13 - CD eject
The Cd will be ejected from the CD player when
the CD eject button is pressed.
l „CD EJECT“ appears in the display.
Note
The CD will automatically be pulled back into the
player if it is not removed from the slot within ap
proximately 10 seconds.
14 - CD slot
Push the CD with the printed side facing up
into the CD slot until it is pulled in automatically.
The tracks on the CD will be played.
CD mode and trafc news
If TP mode is switched on before the CD button 4
is pressed, CD playback is interrupted for trafc
news announcements.
If the transmitting range of the station is left, the
radio automatically selects a new trafc news
station.
A trafc announcement being made can be interrupted by pressing the TP button 3 and the
CD player will resume its function.
The interrupted announcement will still be recorded and can be played at a later point.
Any subsequent trafc news announcement will
still be played.
To enjoy listening to your CD without interruption,
press and hold the Tp button 3 until „TP: OFF“
appears in the display.
-
Fault indicators
The following fault messages can appear in the
display:
- „NO MAGAZINE“
No magazine in the CD changer.
- „NO DISC“
No CD in the CD player
- „NO CD“
The chosen compartment in the magazine of the
CD changer is empty.
- „CD ERROR“
The CD in the chosen compartment has been
inserted with the printed side down or the CD is
heavily soiled or damaged.
16
Page 18

RDS operation
CONTROLS AND EQUIPMENT
First of all RDS (Radio Data System), makes it
possible to show the name of the station being
received in the display - „NDR 2“, for example.
Previously, for stations broadcasting on several
frequencies, you had to manually tune the radio
to station frequency with best reception as you
travelled from one area to the next. This was
frequently necessary when reception conditions
were poor.
RDS now automatically selects the best frequency from a list of alternative frequencies and
tunes the radio to it. This process is inaudible!
This ensures you the best possible reception
in a transmitting range even under unfavourable
reception conditions.
Local stations
German broadcasting companies broadcast
some programmes that vary from one region
to the next.
Programme 1 of ffn in Brunswick (display: „ffn
- BS“) for instance, transmits different regional
programmes to Hanover (display: „ffn - H“) and
Kassel (display: „ffn - KS“).
The radio rst tries to collect only alternative frequencies for the selected station.
However, if the quality become so bad that reception becomes intermittent, the radio will also
accept frequencies of a „related“ ffn station. As
such stations broadcast different programmes
from time to time, such a change in frequency
can also result in a different programme being
heard.
The RDS system is programmed to prioritise
regional stations with the same content.
General notes on RDS reception
l Depending on the strength of the signals received, it may take the radio up to several minutes
to evaluate the RDS data.
l RDS always selects the most favourable frequency from a list of alternative frequencies. If
none of the alternatives provides a clear signal,
you will, of course, also hear interference in RDS
mode!
l It is not possible to evaluate RDS data when
the signal received is too weak. In this case the
frequency will remain in the display.
l The running text will not be shown if the option
„FIX“ in the set-up menu RDS Name is selected
and the text which appeared at the announcement
time - see page 9.
Storing RDS stations
When storing RDS stations, the appropriate station button should not be pressed until the station
name appears in the display. This ensures that all
RDS information has been evaluated and, where
appropriate, automatically stored.
When selecting stored RDS stations, the
respective station name appears. If the stored
frequency is not available, the radio automatically
selects a suitable alternative frequency (Best station function).
if none of the stored alternative frequencies are
available, the desired station cannot be received.
A different station should be selected.
Note
Please ensure that the name of the station is
shown in the display when storing. Otherwise
any running text being displayed, and not the
station name, will be stored!
17
Page 19
CONTROLS AND EQUIPMENT
DSP
(Digital Sound Processor)
How does RDS work?
In many European countries RDS has already
been introduced by a great many radio stations.
These stations attempt to cover the widest possible area.
In addition to normal FM radio signals, a further,
inaudible ow of digitalized information is transmitted to the RDS receiver. Amongst other things,
this information controls the following functions.
l Programme Identication
(PI code)
The PI code tells the radio which station is cur
rently being received - e.g. NDR 2.
l Programme Service Name
(PS code)
The PS code contains the station name, which is
then shown in the display.
Some stations also transmit running advertising
text along with the station name. It is possible
to set whether or not this running text should be
shown or not by using the „RDS Name“ set-up
menu function - see page 9.
l Alternative Frequencies
(AF code)
Since the range of FM radio waves is quite limited,
stations broadcast from several transmitters on
various frequencies. The AF code provides the
radio with a list of frequencies on which the station
broadcasts. The radio is thus able to tune to the
frequency with the best reception.
The radio switches from once frequency to another virtually inaudibly, and the station name
shown in the display remains unchanged.
A practical example:
On a trip on the Autobahn from Flensburg to Göttingen you would like to listen to NDR 2. All you
have to do is tune to this station at the beginning
of your trip. The station name - „NDR 2“ - lights
up in the display.
During your entire trip, your RDS radio searches
for alternative frequencies for the selected station
and, when necessary, tunes to them automatically
and virtually inaudibly.
l Trafc programme
(TP Code)
The TP code informs the radio when a trafc news
station is being received.
l Trafc announcement
(TA Code)
The radio uses the TA code to recognize a traf
c news announcement. If the radio is muted
or in Cd player mode, the radio automatically
switches to trafc news announcements at the
programmed volume. The unit switches to mono
at the same time.
15 - DSP knob
Sound elds
The following sound elds can be selected with
the DSP knob:
l TALK
-
l LIVE
l CONCERT
l ARENA
l DRIVER
l DSP OFF
You can, with these various different elds, alter
the sound of music and spoken presentations
from the radio and CD player to suit your requirements.
18
Page 20
CONTROLS AND EQUIPMENT
Display
l Press the DSP button to select a certain sound
eld. The chosen sound eld (e.g. DRIVER) will
be shown in the display with a settings bar.
l The sound eld can be further dened by turning the SCAN button 10. The alteration made can
be seen on the settings bar.
The chosen sound eld (e.g. „DRIVER“) will be
shown permanently in the display.
TALK
The sound eld „TALK“ is particularly suited for
the spoken word.
LIVE
The sound eld „LIVE“ alters the sound presentation of the spoken word and music so that you
feel as if you are in a small club.
CONCERT
The sound eld „CONCERT“ alters the sound
presentation of the spoken word and music so
that you feel as if you are in a concert hall.
ARENA
The sound eld „ARENA“ alters the sound presentation of the spoken word and music so that you
feel as if you are at an open air concert.
DRIVER
The sound eld „DRIVER“ places the acoustic
centre of the music at the driver’s position.
Activating headphones
A set of headphones can be used to listen to
spoken word and music. The loudspeakers are
muted when in use.
l To activate the headphones, press the DSP
button for approximately 2 seconds.
The radio is muted. „HEADSET“ appears in the
display.
l Briey press the DSP button to deactivate the
headphones. The radio will return to loudspeaker
mode.
Note
l The headphones connection is located on the
rear side of the unit. Please go to a qualied deal
ership to have a set of headphones installed.
l The sound elds are not available once the
headphones have been activated.
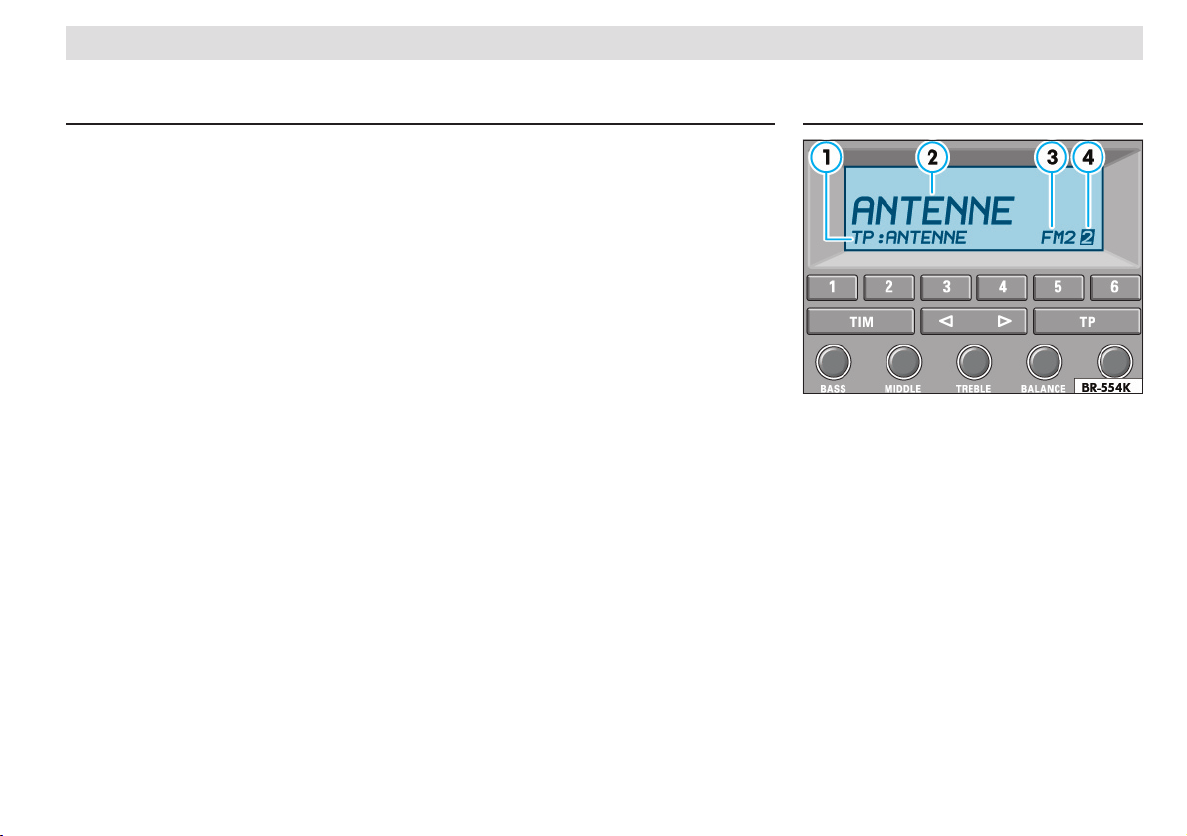
16 - Displays in radio mode
1 - TP display
2 - Station name
3 - Wavelength
(FM, AM)
4 - Station buttons display
The station name will be shown instead of the
frequency if the RDS function is switched on
(see page 17)
19
Page 21

CONTROLS AND EQUIPMENT
Anti-theft coding
When the unit is switched off and the ignition key
has been removed, the ashing diode 8 will show
that the radio has anti-theft coding.
The anti-theft coding will electronically prevent
unauthorized persons from operating the unit if it
has been removed from the vehicle.
Convenience radio coding
For technical reasons, the convenience radio coding is not available for all vehicle models.
In the past one had to recode the radio manually
every time the unit was removed or when the
vehicle battery had been disengaged.
That has all changed with the new convenience
radio coding function: Once the code number
has been input in the radio it will then be stored
in the vehicle!
If the current supply has been interrupted the radio
will automatically compare „its“ code number with
the one stored in the vehicle. If the code numbers
are identical the radio will be ready for use after
just a few seconds.
It is therefore no longer necessary to disengage
the electronic lock manually!
If the code numbers are not identical, however,
because the radio has been tted to another vehicle, for example, the electronic lock will have to
be disengaged manually.
In teh event that you did not receive the security code for your radio, this is because your
car is equiped with the convenience system
of coding for which this code is not needed. In
the battery is disconnected and then re-connected, rst of all switch the ignition on with
the key and then, after this, the radio. Should
you nevertheless wish to have the security
code, please contact your Škoda dealer.
Cancelling the electronic lock
If the radio was installed in another vehicle,
„SAFE“ will appear in the display after the radio
is switched on.
To cancel the electronic lock, you must enter the
correct code number.
It is essential that the following steps be carried
out in the correct order:
l Turn on the radio - the word „SAFE“ appears
in the display.
l „1000“ will appear in the display after approximately 3 seconds.
If, however, „SAFE“ is still shown - together
with a small „2“ - in the left of the display,
the radio is blocked! The radio must remain
switched on for 1 hour to lift this block.
l Input the code number attached to the code
card using the station buttons (9).
Use button 1 to input the rst digit of the code
number, button 2 to input the second digit
and so on.
l Then press either the search or the manual
setting rocker switch for longer than 2 seconds.
Release button!
l A frequency will be shown automatically shortly
after the correct code has been input.
The radio can now be used again!
Incorrect Code Number
Should you inadvertently input the incorrect code
number in attempting to release the electronic
lock, the word „SAFE“ will appear in the display
- rst ashing and then permanently.
You can now repeat the entire cancelling proce-
dure once. The number of attempts will be shown
in the display.
If you input another incorrect number, your radio will be blocked for approximately one hour,
i.e. the radio cannot be turned on. This will be
indicated through the small „2“ in the bottom
left of the display. After an hour, the radio must
remain switched on, the display with the number
of attempts goes out and you can cancel the
electronic lock as described above.
This cycle - two attempts, one hour lock - will
remain the same.
,
20
Page 22

Points concerning the car radio
Warranty
The warranty conditions that apply to our new cars
also apply to our radio systems.
Note
The damage to be resolved as a warranty claim
must not be caused by improper treatment of the
unit or attempts to repair it in a non-qualied way;
it must not have external damage.
When you place a warranty claim or make use of
the exchange service, you must always present
the Owner´s Manual to the Škoda dealer. The
radio must have a (production) number.
WARRANTY
21
Page 23

TECHNICAL DATA
Technical Quick Reference Guide
Connection options
Electronic aerial, CD changer, headphones, mobile telephone, muting, output circuit for antenna
diversity system. Information is available from
Škoda dealers.
Displays
Frequency, station name, RDS, wavelength, station button, TP (trafc radio) with station name
for TP batch station, CD functions, display for
CD slot content for connected CD changer, DSP,
headphones.
Max. output
4 x 20 Watt (max),
4 x 17 Watt (DIN measurement at 4 Ohm).
Illumination
Non-dazzle illumination of controls from within
(night design), brightness controlled with instrument lighting.
Waveband selection
Touch buttons
Anti-theft coding
Radio is electronically locked up if current supply
is interrupted.
Frequency ranges
FM (VHF) AM (MW), additional FM tuner for TP
batch reception.
Suppression
Automatic suppression in radio largely eliminates
interference in FM and in AM mode.
Specially tuned suppressors largely eliminates all
interference impulses from the engine and other
parts of the electrical system e.g. heater blowers,
windscreen wipers, cooler fan etc.
Station selection
In radio mode, automatic selection of last station
tuned in before radio switched off (last station
memory).
Six station buttons for AM1/AM2 and FM1/FM2
stations. Manual tuning up-band and down-band.
Microcomputer-controlled frequency stabilization
(PLL quartz tuning).
Trafc radio batch receiver for individual TP station selection independent of the station being
listened to. Permanent and automatic updates
of the RDS direct synchronisation with a special
display of the last selected station, current station
and the station to be expected.
Trafc news feature
Trafc radio batch receiver for individual TP station selection independent of the station being
listened to.
Switch from MONO and DSP menu „Talk“ when
the trafc announcement function is active (TA:
Trafc Announcement).
Trafc radio announcement store (TIM) with a
4 minute memory and 2 individually selectable
recording times for parked vehicle.
Automatic station nder, automatic trafc news
announcement function, switch to „mono“ for
trafc news announcements.
Stereo (radio and CD), active sound settings,
fader integrated into radio, speed-dependent
volume control (GALA), multi-speaker system.
Active sound settings for BASS, MIDDLE, TREBLE which can be set individually for every source
(AM, FM, CD and telephone).
22
Page 24

Technical data of the
CD player
Both units are „remote“ controlled from the radio.
Changer-magazine for 6 CDs with motor eject
Read function
CD-R and CD-RW media can be played.
Multi-session CDs can be played.
Auto-Insert
Ejected CDs will be pulled back into the CD slot
if they are not removed.
Frequency range:
5 - 20000 Hz (+/- 1 dB)
Signal/noise ratio:
96 dB
CD distortion:
0.006 % (at 1 kHz)
Wow and utter:
Negligible
TECHNICAL DATA
23
Page 25

INDEX
A
AF code .......................................................... 18
Alternative frequencies................................... 18
AM button ....................................................... 10
Anti-theft coding .............................................20
AS function ..................................................... 15
Automatic storing............................................ 15
Automatic storing function .............................. 15
Automatic suppression ................................... 22
Automatic volume control ................................. 9
B
Balance ............................................................6
Balance adjustment.......................................... 6
Bass setting...................................................... 6
Brief description.............................................. 22
Brief technical description .............................. 22
C
CD button ................................................. 10, 11
CD changer ......................................................4
CD eject.......................................................... 16
Clock.................................................................8
Code number.................................................. 20
Coding ............................................................ 22
Connection options......................................... 22
Convenience coding....................................... 20
D
Digital display .................................................20
Diode .............................................................. 13
Display............................................................ 20
Displays.......................................................... 22
DSP ................................................................ 18
E
Electronic lock ................................................20
F
Fader ................................................................ 6
Fader adjustment .............................................6
Fast forward/reverse ...................................... 11
Flashing diode ................................................ 13
FM button .......................................................10
Frequency ranges ..........................................22
G
GALA................................................................9
H
Headphones
- Activating
..................................................19
I
Illumination .....................................................22
L
Local stations .................................................17
M
Manually storing .............................................13
Memory list ..................................................... 10
Mid-range setting.............................................. 6
MIX function ...................................................16
O
ON Volume....................................................... 9
Output............................................................. 22
Overview...........................................................2
P
PI code ..................................................... 11, 18
PS code..........................................................18
Q
Quick reference guide ......................................2
R
RDS................................................................ 17
RDS name........................................................ 9
S
SCAN button ..................................................14
Serial number ................................................. 20
Set-up Menu..................................................... 8
Sound elds
Sound setting ...................................................6
Speed dependent volume control..................... 9
Station buttons ...............................................13
Storing
- Automatic
- Manually ................................................... 13
Storing stations............................................... 17
....................................................18
..................................................15
T
TA code...........................................................18
Theft coding.................................................... 22
Theft protection ..............................................20
TIM button ......................................................12
TIM Time
Time
TP code
Trafc announcement
- Interrupting ..................................................... 7
Trafc news
Trafc radio rocker switch
Treble setting
...........................................................8
- Setting the clock ......................................... 8
..........................................................18
....................................... 7
....................................................22
............................... 12
.................................................... 6
V
Volume control
- Automatic
.................................................... 9
W
Warranty......................................................... 21
24
Page 26

Škoda Auto is constantly working on the further development of all types and models. Please understand that, for this reason, changes to the scope of supply in terms of shape, equipment and engineering may be introduced at any time. It is therefore not possible
to derive any claims from the information, illustrations and descriptions contained in this Owner ´s Manual .
Reprinting, reproduction, translation or any other use of this document, in whole or in parts, is not permitted without the written
consent of Škoda Auto.
Škoda Auto expressly reserves all rights in respect of copyright.
Subject to modification.
Published by ŠKODA AUTO a.s.
© ŠKODA AUTO a.s. 2003
` This paper was manufactured from pulp bleached without using chlorine.
Page 27

www.skoda-auto.com Autorádio Rhapsody
Škoda Auto anglicky 08.03
S00.5610.23.20
3U0 012 095 CE
 Loading...