

Skoda amundsen,bolero Owner's Manual

SIMPLY CLEVER
OWNER'S MANUAL
OWNER'S MANUAL
Amundsen and Bolero infotainment systems

3V0012720ED

Preface
This Owner's Manual is intended for the Amundsen and Bolero infotainment
systems.
Please read these Owner's Manual carefully, because the operation in accordance with these instructions is a prerequisite for proper use of the unit.
3V0012720ED

Table of Contents
Important information about this Owner's
Manual 3
Explanations and further information 4
Abbreviations
Introductory information
Important notes 6
Device overview 7
Device operation and settings
Device operation
Voice control
Device settings
Radio
Operation 19
Settings 21
Media
Operation 22
Audio sources 24
Pictures
Image viewer 27
Media Command
Using the system
29
Telephone
Introductory information 31
Pair and connect 32
Telephone functions 34
Text messages (SMS) 37
Hotspot (WLAN) and data connection
Hotspot (WLAN) 39
Data connection 40
SmartLink
Introductory information
11
Android Auto
13
Apple CarPlay
15
MirrorLink
™
™
®
Navigation
Introductory information 46
Search for destination and enter 47
Import my destinations 51
Map
Route guidance 54
Route 57
Traffic reports 58
Settings 59
Vehicle systems
CAR - vehicle setting 62
41
42
43
43
52
2
Table of Contents
Index

Important information about this Owner's Manual
This Owner's Manual is valid for all types of Amundsen and Bolero infotainment systems (hereafter only devices). The device may differ depending on the
vehicle model, in which it is installed in both its appearance and in the arrangement of the controls.
This Owner's Manual describes all possible device functions without identifying them as special equipment, model variants or market-dependent equipment. Consequently, the device in your vehicle does not need to contain all of
the functions described in this Owner's Manual.
For example, if the vehicle is not factory equipped with the sound system, the
menu points
settings menu.
The availability of some features described in this Owner's Manual depends
on the type of external devices (for example, telephone, music player, etc.).
The illustrations in this Owner's Manual are for illustrative purposes only. The
illustrations can differ in minor details from your vehicle; they are only intended to provide general information.
ŠKODA AUTO pursues a policy of ongoing product and model development
with all vehicles. Therefore, changes to the scope of delivery with regard to
design, equipment and technology are possible at any time. The information
provided in this Owner's Manual corresponds to the information available at
the time of publishing.
Therefore, legal claims cannot be made based on the technical data, illustrations and information contained in this Owner's Manual.
We recommend that the web pages that are referred to in this Owner's Manual are displayed using the classic view. Not all necessary information may be
displayed correctly if the mobile view is chosen.
Screen texts that appear in this Owner's Manual may differ slightly depending
on the texts show on the device screen.
Information and System Support
Information e.g. related to updating the device software, compatible external
devices etc., Please refer to the following websites.
http://go.skoda.eu/infotainment
ŠKODA Surround
and
Virtual Subwoofer
are not displayed in the sound
Declaration of conformity
ŠKODA AUTO hereby declares that the ŠKODA Infotainment systems meet the
basic requirements and additional provisions of the 1999/5/EC Directive with
reference to radio equipment and telecommunications devices.
Important information about this Owner's Manual
3

Explanations and further information
Structure of these Owner's Manual
The Owner's Manual are hierarchically divided into the following areas.
■
Main chapters (e.g. Introductory information) - the title of the main chapter is
always shown on the lower right side of the page
■
Chapter (e.g. Equipment overview)
■
Module (for example, Switching the unit on/off)
Information search
When searching for information in the Owner's Manual, we recommend using
the Index at the end of the manual.
Text notes
- Short press (e.g. a button) within 1 s
“Press”
- Long press (e.g. a button) for more than 1 s
“Hold”
Text Symbols
® Trademark
™ Trademark
→ Marker to the next operation step.
The text symbol used for the right control dial
WARNING
Texts with this symbol draw attention to threats of a serious accident, injury or loss of life.
CAUTION
Texts with this symbol draw attention to the risk of vehicle damage or possible
inoperability of some systems.
Note
Texts with this symbol contain additional information.
4
Explanations and further information

Abbreviations
Abbreviation Definition
2D planar map display
3D spatial map display
A2DP
ACC Adaptive cruise control
AF Alternative frequencies for the current radio station
AM Identification of the radio-frequency range
TCS Traction Control of the drive wheels
AVRCP
DAB Digital radio reception
DRM
ESC Electronic Stability Control
FM Identification of the radio-frequency range
HFP
GPS Satellite system for determining the position
GPT
ID3 tag
mp3 compressed audio format
mp4 Compressed video format
MSC a communication protocol for a USB device
MTP a communication protocol for a data device
PIN personal identification number
RDS
Messages a service for short text messages
TMC Traffic reports, which may affect the navigation
a Bluetooth® profile for the one-sided audio data transmission
a Bluetooth® profile for the operation associated with the
transmission of audio data multimedia functions
a system for monitoring or restricting the use of digital media content
a Bluetooth® profile for communication between a mobile
telephone and the Infotainment
method for the division of the areas in the data devices (to
be used for mass storage resources)
an additional feature of a music file, which allows for the display of artist, title, album name, etc.
a system for the transmission of additional information for
FM radio reception
Abbreviation Definition
TP Identification of a traffic information station
UPnP
VIN Vehicle identification number
wav Audio format
WLAN Wireless Local Area Network
WPS
wma compressed audio format
Network protocol for establishing a wireless connection of
an external device with the device
Establishing a secure connection of the device to an available hotspot (WLAN)
Abbreviations
5

Introductory information
External devices and applications
Important notes
Introduction to the subject
WARNING
■
Concentrate fully at all times on your driving! As the driver you are fully
responsible for the operation of your vehicle.
■
Only use the device in such a way that you have control of the vehicle in
every traffic situation (e.g. Do not write text messages while driving, do not
couple or connect the telephone, do not work with the contact list, do not
enter any destinations, do not connect WLAN or SmartLink etc.)- Otherwise
there is a risk of an accident!
WARNING
■
Adjust the volume to ensure that acoustic signals from outside the vehicle, e.g. sirens from emerging vehicles instructing you to give way to, such
as the police, ambulance and fire brigade, can be heard at all times.
■
High volumes can cause hearing damage.
WARNING
■
Never leave a communication device, e.g. mobile phone, audio sources, in
the deployment area of an airbag, on a seat, on the dashboard or any another area, from which it can be thrown during a sudden braking manoeuvre, an accident or a collision - There is a risk of injury!
■
Never connect or disconnect an external device while driving - There is a
risk of accident!
■
Always route the connection cable of the external device such that is
does not restrict you when driving.
CAUTION
In some countries, some unit features can no longer be selected when the vehicle is running faster than a certain speed. This is not a malfunction, but complies with the national legal regulations.
Fig. 1
Compatibility of the phones on
the ŠKODA websites
The availability of some of the functions described in this Owner's Manual
depends on the type of device to be connected and the applications installed
in it.
Mobile phones
On the ŠKODApages, check to see if the device is compatible with the selected
mobile phones. This verification is done by reading the QR code » Fig. 1 by the
associated application in the external device (e.g. phone, tablet) or after typing
the following address into the web browser.
http://go.skoda.eu/compatibility
Due to the large number of mobile phones as well as the ongoing development of these devices, ŠKODA AUTO cannot always ensure compatibility with
the device unconditionally. It is always recommended to physically check the
function on the associated vehicle, including the ŠKODA Partners, beforehand.
Only those versions of the selected phones will be tested and supported which
originate from the official distribution network. The same also applies to their
firmware and software.
The functions of the mobile phone to be tested may differ from the same type
of mobile phone depending on the specification for the respective country or
the specific service.
Mobile phones with the operating system and in the version available at the
time of these tests will be tested. In this regard, it could be the case that the
functions of a mobile phone may differ with a different operating system version compared to the one used with the tested phone.
ŠKODA AUTO can accept no responsibility for the continuous changes made by
the mobile phone manufacturers and application vendors.
6
Introductory information

ŠKODA AUTO does not accept any liability for any damage to the device or vehicle due to the use of incorrect or illegal applications or the improper or unauthorized use of mobile phones.
Applications
Applications can be installed in external devices (e.g. Mobile, tablet) making it
possible to display additional information in the device screen or to operate
the device.
Due to the large number of applications and communication systems (e.g..
SmartLink » page 41) As well as the ongoing development of these devices,
the applications may not be functional in all external devices. ŠKODA AUTO can
accept no liability for their proper function.
Applications, their use and the required data connection may be chargeable.
The range of available applications and their functionality is dependent on the
device, vehicle and region.
The function of mobile applications can be influenced by the quality of the In-
ternet connection.
Some applications are dependent on the availability of services that are provi-
ded by third parties.
Device overview
Device Description - Amundsen (not applicable to Yeti)
The device may differ depending on the vehicle model, in which it is installed
in both its appearance and in the arrangement of the controls.
Fig. 2
Illustrative device description: Amundsen 6.5-Screen
Left control dial for switching the device on and off; volume adjustment
Control dial for calls and confirmations
1
Radiomenu » page 19
2
Mediamenu » page 22
3
Telephonemenu » page 31
4
- Voice control » page 13
5
Navigation menu » page 46
6
- Target-oriented traffic information » page 58
7
- Vehicle system settings » page 62
8
- Display of the device menu overview » page 10
9
Touchscreen » page 9
Introductory information
7

Device Description - Amundsen (applies to Yeti)
Fig. 3 Equipment overview
Left control dial for switching the device on and off; volume adjustment
Control dial for calls and confirmations
1
Radiomenu » page 19
2
Mediamenu » page 22
3
Telephonemenu » page 31
4
- Voice control » page 13
5
- Switches traffic programme on/off » page 21
6
Navigation menu » page 46
7
- Target-oriented traffic information » page 58
8
- Display of the device menu overview » page 10
9
Touchscreen » page 9
10
SD memory card slot “SD1”
11
SD memory card slot “SD2”
Device Description - Bolero (not applicable to Yeti)
The device may differ depending on the vehicle model, in which it is installed
in both its appearance and in the arrangement of the controls.
Fig. 4 Illustrative device description: Bolero 6.5-Screen
Left control dial for switching the device on and off; volume adjustment
Control dial for calls and confirmations
1
Radiomenu » page 19
2
Mediamenu » page 22
3
Telephonemenu » page 31
4
Depending on equipment fitted:
▶
- Voice control » page 13
▶
- Switches traffic programme on/off » page 21
5
- Device Settings » page 15
6
-Sound settings
7
- Vehicle systems settings » page 62
8
- Display of the device menu overview » page 10
9
Touchscreen » page 9
8
Introductory information

Device Description - Bolero (applies to Yeti)
Fig. 5 Equipment overview
Left control dial for switching the device on and off; volume adjustment
Control dial for calls and confirmations
1
Radiomenu » page 19
2
Mediamenu » page 22
3
Telephonemenu » page 31
4
- Voice control » page 13
5
- Switches traffic programme on/off » page 21
6
- Muting
7
-Sound settings
8
- Display of the device menu overview » page 10
9
Touchscreen » page 9
10
SD memory card slot “SD1”
External module (not applicable to Fabia)
Fig. 6 External infotainment module: Bolero / Amundsen
The external module is located in the storage compartment on the front passenger side.
1
SD1 card slot
2
SD2 card slot
External module (applies to Fabia)
Fig. 7
External module
The external module is located in the storage compartment on the front passenger side.
Only the SD1 card slot A is visible and accessible » Fig. 7.
Touch screen
The unit is equipped with a touch screen which can be operated with a light
touch or swipe of a finger.
Introductory information
9

The brightness level of the screen can be set in the menu
Brightness level:
.
→ →
screen
CAUTION
■
It is not possible to operate the screen with your fingernails or while wearing
gloves.
■
To protect the screen, you can use a suitable screen protector for touchpads
that does not affect its functionality.
■
Dirt can be removed from the screen by using a soft cloth and, if necessary,
methylated spirits.
Software update
Fig. 8
Available software updates on
the ŠKODA websites
Part of the device is the installed software.
The software update ensures optimum operation of the device (e.g.. Compati-
bility with new phones, updating the radio station logo).
Current information on the compatibility of external devices can be found on
the following ŠKODAInternet pages. This is done by reading the QR code
» Fig. 8 by the associated application in the external device (e.g. phone, tablet)
or after typing the following address into the web browser.
http://go.skoda.eu/updateportal
▶
To display the software information, press the
System information function surface Tap→
▶
To start the software update, tap on the
button, then tap on the
System information
Update software
function surface in
.
the displayed menu.
Device on / off
To power on/off the device, press .
›
→
Automatic Power On of the device
If the device was not turned off with the control switch before the ignition
was turned off, it will automatically switch on after the ignition is switched on.
Automatic Power Off of the device
If the vehicle key is pulled out of the ignition lock while the unit is switched on,
the device will switch off automatically.
If the vehicle is fitted with the starter button, the device will switch off automatically after the engine is switched off and the door is opened.
With the ignition off, the device will automatically turn off after about 30 minutes.
The device turns off automatically under certain circumstances. The device informs of this via a text message on the device display.
Restart the device
If the device does not respond (if it “freezes”) This can be restarted by holing
for longer than 10 s.
Unit menus
Fig. 9
Overview of the device menu
To display the device menu overview, press the
›
Overview of the device menu » Fig. 9
Menu Radio » page 19
Menu Media » page 22
Menu Images » page 27
sound settings
Unit set-up » page 15
- Setting the vehicle systems (dos not apply to Yeti) » page 62
Navigation » page 46menu (Applies to Amundsen)
button.
10
Introductory information

Menu Telephone » page 31
Target-oriented traffic information (TMC) (applies to Amundsen)
» page 58
Media Command menu » page 29
Menu SmartLink » page 41
When connecting a supported external device instead of the symbol
the actual connection is shown instead of a symbol
▶
▶
▶
-
-
Android Auto
Apple CarPlay
» page 42
MirrorLink®
-
» page 43
» page 43
Adjusting the volume
Every change in volume is displayed on the screen.
To
increase the volume, turn the controller
›
To reduce volume, turn the controller anticlockwise.
›
To mute, turn the controller to the left to 0.
›
or: Press the key
›
(applies to Bolero in the Yeti model ).
The following symbol appears in the display when the sound is muted: .
If, at the time of muting, sound is played from the source in the media menu,
then the playback is interrupted (pause)1).
CAUTION
■
High volumes can cause sound resonance in the vehicle.
■
When changing or connecting an audio source, this may cause sudden
changes in volume. Reduce the volume before changing or connecting an audio source.
clockwise.
Device operation and settings
Device operation
Operating principles
Fig. 10 Screen area / screen display
Fig. 11
Using the menus
Description of the display » Fig. 10
A
Status line with time and outdoor temperature data and other information
B
Information and the operation of the current menu
C
Function surfaces of the current menu
D
Identification of the current menu
E
Return to the higher-level menu
1)
Does not apply to AUX.
Device operation and settings
11

F
Scroll symbol - positioning and moving in the menu is possible by moving
fingers on the scroll symbol up or down
G
Menu item with “Checkbox”
▶
- Function is switched on
▶
- Function is switched off
H
Open a sub menu of the menu item with the “pop-up window”
Operating the menus » Fig. 11
Reduction / enlargement of the menu window
Browse the menu- List entries
Open / close the menu window
Close the menu window
Function interfaces
The screen areas which confirm a function or a menu are called “function interfaces”.
▶
White background - The button is active and thus selectable
▶
Grey background - The button is inactive and thus not selectable
▶
Green frame - Currently selected key
Selecting menu/menu item/function
▶
Drag your finger over the screen in the required direction.
▶
Turning the knob .
Confirming menu/menu item/function
▶
By tapping on the function interface.
▶
Press the wheel .
Returning to higher-level menu
▶
By tapping on the function interface .
▶
By tapping on the screen outside of the “pop-up window”.
▶
By pressing the corresponding button next to the screen (e.g. in the menu
Media, by pressing the
Select the menu item / function value
▶
- Selected menu item / function value
▶
- Deselected menu item / function value
Set value
▶
By pressing the function surface with one of the following symbols
.
▶
Touching or moving your finger over the scale.
▶
Turning the knob .
button).
Note
Depending on the equipment fitted, the device can be operated using the buttons on the multifunction steering wheel. Additional information » Owner's
Manual.
Alphanumeric with keyboard
Fig. 12
Example of the keyboard display
The alphanumeric keypad is used to enter for letters, numbers and characters.
Description of the alphanumeric keyboard » Fig. 12
A
Input line
B
Context-dependent:
▶
- Switch to capital letters
▶
- Switch to special characters
▶
- Switch to numbers
C
Context-dependent:
▶
- Switch to numbers
▶
- Switch to Latin letters
▶
- Switch to Cyrillic letters
- Display of searched entries (the number of searched entries is displayed
in the function surface)
Erase the entered characters
By holding the variants of each type are displayed.
Switching between keyboards with specific characters of the selected lan-
guages » page 17
Enters a blank
Move the cursor within the input line to the left
Move the cursor within the input line to the right
Confirmation of the entered number
12
Device operation and settings

Search
While entering characters, a search is made for corresponding entries.
The entry such as a telephone contact to be searched for must be entered
along with the special characters (diacritics).
By tapping on the function surface a list of matching entries opens. If less
than 5 entries were found, a list of the found entries opens automatically.
Operating using an application in the external device
Applies to Amundsen (not applicable to Yeti).
Several device functions can be operated using an application in the supported
external device.
Enable the data transfer in the device. To do this, press
›
Tap→
Release the device operation using the application. To do this, press
›
then tap on Tap→
firm/Allow
Connect the equipment to an external device via WLAN» page 39.
›
In the external device, install an application for the device operation (e.g.
›
Start ŠKODA Media Command).
The description of the device operation ŠKODA Media Command is part of the
application.
Mobile device data transfer → Enable data transmission for ŠKODA Apps
.
Mobile device data transfer
Note
→
and then tap on
Use apps to operate:
→
.
Con-
and
Voice control
Introduction to the subject
Fig. 13
Voice control: Main menu
The voice control system can be used either by the driver or by the front passenger.
The voice control is available in the following menus» Fig. 13.
▶
“Navigation”
▶
“Telephone”
▶
“Radio”
▶
“Media”
Voice commands that can be issued, are indicated during voice control in “quotation marks”.
WARNING
do not use the function of the phone voice control in an emergency . Your
voice commands may not be recognized in such situations. The telephone
connection may not be established or the connection may take too much
time to complete. The emergency number should be dialled manually!
CAUTION
The messages are generated by the device. The flawless clarity (e.g. road or
city name) cannot always be guaranteed.
Voice control on / off
Switching on
Press the key
›
or: Press The button on the multifunction steering wheel.
›
Switching off
Press the button
›
or: Press The button twice on the multifunction steering wheel.
›
or: Issue the voice command “End voice control”.
›
on the device.
twice on the device.
Some equipment functions can be operated by using voice commands.
Device operation and settings
13

Operation principle
Fig. 14
Screen areas and screen display
The voice command must only be issued when the symbol is displayed
›
and the input tone has completely faded. The input tone can be switched
on / off. To do this, press
In the voice control main menu, choose one of the menus (z. B. Navigation)
›
the following screen is displayed » Fig. 14.
On the screen, examples of available menu items are display in area
and examples of each possible command are displayed in area C.
By tapping on the function interface a detailed help menu is displayed.
During voice control operation, the following symbols appear in the device
screen.
symbols
It is not necessary to wait for the end of message playback when the device is
playing a message. The device message can be ended by pressing the button
wheel. Then a voice command can be issued. The voice control is hereby much
faster.
A
» Fig. 14
or by pressing the symbol key Ended on the multifunction steering
Waiting for your voice command
A voice command is recognized
A message will be played
Voice control is stopped
and then Tap→
Meaning
Voice control
.
B
not recognizing a voice command
If a voice command is not detected three times in succession from the device,
then the voice control is stopped.
Note
The display of the Voice mode symbols are dependent of the equipment fitted
also on the display of the instrument cluster.
Function requirements
Function requirements for voice control.
The unit is switched on.
There will be no telephone call using a phone connected to the device.
The parking aid is not active.
Notes on voice control for navigation
To the destination, you are first required to issue the command“enter address” and then follow the device instructions.
You can say the house number and a further additional address in the form of
a number where necessary. The device then offers the number combination it
has found if the house number and the additional address, exists in the street
entered where appropriate.
It is not necessary to spell city and street names if the entered destination is
located in a country that has no voice control available for the language.
Notes on voice control of the radio
In order for a radio station can be selected by means of voice command, the
station must be stored in the list of available stations » page 20.
CAUTION
For some languages, there is no voice control available. This device indicates
this fact through a text message that is displayed after setting the device language screen .
Note
During voice control, no navigation announcements and traffic announcements are played.
14
Device operation and settings

voice commands
Requirements for optimum voice command recognition
▶
Speak with a normal tone of voice without intonation and excessive pauses.
▶
Avoid bad pronunciation.
▶
Close the doors, windows and sliding roof, in order to avoid disturbing envi-
ronmental influences on the function of the voice commands.
▶
You are recommended to speak louder at higher speeds, so that the sound of
your voice is not drowned out by the increased ambient noise.
▶
During voice control, limit additional noise in the vehicle, e.g. passengers
talking at the same time.
Voice commands can be used anytime during voice control.
Voice command Function
“Back” Return to the previous menu
“Help”
reproducing and displaying possible voice commands
Voice commands that can be used while browsing the list entries.
Voice command Function
“Next page”
“Previous page”
“First page”
Browse menu / list / directory
“Last page”
Correction of a voice command input
A voice command can be corrected, modified or re-entered by pressing the
button
or the icon key Actuated on the multifunction steering wheel.
However, this is only possible as long as the symbol appears on the screen.
You do not have to wait until the voice command is recognized by the device.
Stop/restore voice command input
Stop
This allows you more time for the voice command input.
The process for voice command input can by turning the dial stopped.
When stopping, the symbol changes from .
Restore
The procedure for voice command input can be restarted in one of the following ways.
▶
By tapping on the function interface .
▶
By pressing the button
▶
By pressing the icon key on the multifunction steering wheel.
on the device.
Device settings
Configuration wizard
Fig. 15
Configuration wizard
The Configuration Wizard is automatically displayedif there are at least two
non-selected menu items after turning on the device.
Disable the automatic display of the Configuration wizard by tapping the function surface
For manual display, press the
›
figuration wizard Tap→
The Configuration wizard allows you to set the following menu items in sequence.
The selected menu item is with the symbol provided.
Menu items which can be set by tapping on the respective function surface in
the A » Fig. 15 area.
Don´t show again
.
button, then tap the function surface Con-
Configuration wizard
.
Time and date format (not applicable to Yeti)
Storing the radio stations with the currently strongest reception signal
in the first memory group of each individual broadcast area
Pairing and connecting a phone to the device
Home address (applies to Amundsen)
Device operation and settings
15

Sound settings
The scope of the following menu is dependent on the vehicle equipment with
the sound system.
Press the
›
■
Volume
■
Announcements
■
Navigation announcements
ments
■
Voice control
■
Maximum switch-on volume
device
■
Speed-dependent vol. adjustment
■
AUX volume:
■
■
■
■
Bluetooth audio:
dio profile of the connected external device
■
Entertainment fading while parking
with activated parking aid
■
Entertainment fading (nav. announcements)
volume) in the event of a nav. announcements
■
Bass - Mid - Treble
■
Balance - Fader
■
Subwoofer
■
ŠKODA Surround
■
Virtual Subwoofer
mode)
■
Sound Character
■
Surround
■
Sound focus
■
All
■
Driver
■
Touchscreen tone
■
No navigation announcements during call
prompts during a telephone conversation
button, then tap on the function surface surface.
- Volume settings
- Adjustment of traffic announcements volume (TP)
- sets the volume for the navigation announce-
- volume setting for voice output
- Sets the maximum volume after switching on the
- increases the volume as speed increases
- Sets the volume for the device connected via AUX
Quiet
- low volume
Medium
- Medium volume
Loud
- High volume
- Volume setting of the device connected via Bluetooth ® au-
- Lowers the audio volume (e.g. radio volume)
- Lowers the audio volume (e.g. radio
- setting the equalizer
- Sets the balance between left and right, front and rear
- Subwoofer volume settings
- Turn surround sound on/off (Cannot be used in Radio mode)
-Turn virtual subwoofer on/off (Cannot be used in Radio
- Select the sound character (applies to Yeti)
- Optimising the sound for the room (applies to Yeti)
-Setting the optimum room sound perception
- Optimising the sound for the entire vehicle interior
- Optimising the sound for the driver
- Switch on/off audible tone when touching the screen
- Switches on or off the navigation
■
Switch off screen (in 10 seconds)
tion
■
Brightness:
■
Touchscreen tone
■
Proximity sensor
- Adjusts the brightness of the screen
- Switch on/off audible tone when touching the screen
- Turn the proximity sensors on/off (When the function is on,
- Enable / disable the automatic power off func-
e.g.Navigation will be shown in the main menu when moving a finger towards the bottom bar with the functional surfaces on the screen)
■
Show clock in standby mode
- Time and date displayed on the screen when the
ignition is switched on and the unit is switched off
Time and date settings
Press the
›
date
■
Clock time source:
sen)
■
Time:
■
Summer (DST)
sen)
■
automatically adjust DST
time
■
Time zone:
■
Time format:
■
Date:
■
Date format:
With the Yeti model, the time and date settings are set via the MAXI DOT display» Owner's Manual.
button, then tap on the function surface Tap on →
.
- Setting the time source: manual / GPS (applies to Amund-
- Time settings
- Switches the summer time setting on/off (applies to Amund-
- Select the time zone
- Set the time format
- Date settings
- Set the date format
Note
Time and
- Turn on / off the automatic switch to daylight saving
Setting the device language
Press the
›
Select the device language or tap the function surface
›
MAXI DOT display matching language (applies to the Yeti).
In some languages, after selecting the function surface
played for the choice of voice prompts for the device.
button, then tap on the function surface Tap on →
Automatic
Female
and
Language
to set the
Male
are dis-
.
Screen settings
Press the
›
16
button, then tap on the function surface Tap→
Device operation and settings
screen
.

Note
■
When a language is selected which does not support voice control, the device will indicate with a message on the screen .
■
The messages are generated by the device. The flawless clarity (e.g. road or
city name) cannot always be guaranteed.
Additional keypad language settings
Press the
›
keypad languages
In this menu, a keyboard language set can be added to allow the entering of
characters other than those in the currently selected language (function surface ).
button, then tap on the function surface Tap on→
.
Additional
Unit settings
Press the
›
■
Distance:
■
Speed:
■
Temperature:
■
Volume:
■
Consumption:
■
Pressure:
With the Yetimodel setting the device units is carried out via the MAXI DOT
display.» Owner's Manual.
button, then tap on the function surface Tap on→
- Distance units
- Speed units
- Temperature units
- Volume units
- Consumption units
- Pressure units for tyre pressure
Note
units
.
Setting data transfer
An active data transfer allows data transfer between the device and the external device (e.g. MirrorLink® application) or the operation of some device functions using the application of the external device (e.g. ŠKODA Media
Command).
Press the
›
vice data transfer
button, then tap on the function surface Tap on→
.
Mobile de-
■
Enable data transfer for ŠKODA apps
■
Use apps to operate:
ternal device (applies to Amundsen)
■
Deactivate
■
Confirm
- Device operation with required confirmation
■
Allow
- Device operation without any restriction
- Setting device operation using the applications of the ex-
- Prohibition of device operation through an external device
- Turning data transfer on and off
Voice control settings
Press the
›
■
Example commands (infotainment syst.)
voice commands when voice control is activated
■
Voice control session start tone
the voice control
■
Voice control session end tone
trol ends
■
Input tone in voice dialogue
■
End tone in voice dialog
command
button, then tap on the function surface Tap→
- Switch on/off the menus containing basic
- Switch on/off the audible signal when turning on
- Switch on/off the audible signal when voice con-
- Switch on/off the audible signal for the voice input
- Turn on / off the acoustic signal after the end of a voice
Safe removal of the external device
Press the
›
ly:
button, then tap on the function surface Tap on
and select the external device to be removed.
Reset to factory settings
Press the
›
In this menu, all or only chosen settings can be restored.
button, then tap on the function surfaces →
Bluetooth®Settings
Press the
›
tooth
■
Bluetooth
■
Visibility:
ces
■
Name:
■
Paired devices
button, then tap on the function surface Tap on→
.
- Switch on/off Bluetooth® function
- switch on/off the visibility of the Bluetooth® device for other devi-
- Changing the name of the Bluetooth®unit
- display the list of paired Bluetooth ® devices
voice Actions
.
Remove safe-
Factory settings
.
Blue-
Device operation and settings
17

■
Find devices
■
Bluetooth audio (A2DP/AVRCP)
- searches for available devices
- Turn on/off the ability to connect an audio device
(e.g. MP3 player, tablet etc.)
Wireless settings
Applies to Amundsen (does not apply to Yeti).
Press the
›
■
WLAN
■
WLAN
■
WPS Quick Connect (WPS button)
spot of the external device using WPS
■
Manual settings
hotspot of the external device
■
■
■
■
■
Search
■
Mobile hotspot
■
Mobile hotspot
■
WPS Quick Connect (WPS button)
vice via hotspot WPS
■
Hotspot settings
hotspot
■
■
■
■
■
button, then tap on the function surface Tap on→
- List of available hotspots of external devices
- Turn on / off the device wireless
- Establishing a secure connection to the hot-
- Setting the parameters for search and connection to the
Network name
Network key
Security level:
■
WPA2
■
WPA
■
No security level
- Enter the Hotspot name
- Setting the access password
- Adjusting the security
- WPA2 security
- WPA security
- No coverage (without required entry of the access pass-
word)
Connect
- Connection establishment
- Search / Restore the list of available hotspots
- Setting device hotspots (in the functional surface the symbol
displayed with the number of connected external devices)
- Turn on / off device hotspots
- Establishing a secure connection to the de-
- Setting the parameters for the connection to the device
Security level:
■
WPA2
■
WPA
■
No security level
- Setting the connection security
- WPA2 security
- WPA security
- No coverage (without required entry of the access pass-
word)
Network key
SSID: ...
Do not send network name (SSID)
Storage
- Entering the access password
- Name of the device hotspot
-Switch WLAN hotspot security on/off
- Storage of the device hotspot parameters
WLAN
System information
Press the
›
information
To perform a Software Update (Z. B. Bluetooth® or radio station logo) Tap
›
the functional surface
Displaying system information.
.
▶
Device part number: ... - Part number of the device
▶
Hardware: ... - Version of the hardware used
▶
Software: ... - Version of the software used
▶
Navigation database: ... - Version of the navigation data
▶
Media Codec: ... - Media codec version
▶
Bluetooth version: ... - Version of the Bluetooth® software used
The information on available software updates is to be obtained from a ŠKODA
partner or on the following ŠKODA Internet pages.
http://go.skoda.eu/infotainment
button, then tap on the function surface Tap on→
.
Update software
.
system
18
Device operation and settings

Radio
Operation
Introduction to the subject
The device allows analogue radio reception of FM and AM frequency ranges as
well as DAB digital radio reception.
CAUTION
■
For vehicles with window antennas do not stick foil or metal coated stickers
to the window - Radio signal reception could be affected.
■
Car parks, tunnels, tall buildings or mountains can interfere with the radio
signal even causing it to fail completely.
Main menu
Fig. 16
Radio: Main menu (DAB)
To display the main menu, press the
›
Main menu » Fig. 16
A
The selected radio station (description or frequency)
B
Radio Text (FM) / Description of the group (DAB)
C
Preset station buttons for favourite channels
D
Choice of radio range (FM / AM / DAB)
E
Choice of storage group for the preferred station
Changing the station
List of available stations
Manual / semi-automatic station search
Radio text display and images presentation (DAB)
Menu Settings Radio
button.
Information symbol in the status line
Symbol Meaning
Traffic signal is available
Traffic signal is not available
RDS function is switched off (FM)
AF Alternative frequency is switched off (FM)
Signal is not available (DAB)
If the displayed station name continuously changes (dynamic text), then it is
possible to fix the current text by holding your finger on the device screen in
the station name area. By holding your finger in the area of the station name
again, the station name is displayed in its entirety again.
DAB main menu display
In DAB broadcasting, the display of additional information and images (Slideshow) is possible as long as the currently tuned station is broadcasting this information.
The display variant can be selected from the menu that appears as follows.
▶
In the Radio menu press the function surface in the
DAB
area surface.
Search stations and select frequency
Find stations
Tap on the Radio main menu function or surface.
›
Depending on the setting →
the Stations list or a station of the current broadcast range on the Station
buttons.
Select frequency
To display the value of the currently chosen frequency, tap the functional
›
surface in the Radio main menu surface. To return the controller press.
To set the desired frequency value, tap the function surface And use the
›
slider or the functional surfaces .
Scan through the stations one after the other (SCAN)
The function scans through all the available stations in the current frequency
range in succession, for a few seconds each.
To start/finish the automatic play of the available stations, press the func-
›
tion surface in the Radio main menu Tap on→
To to end autoplay, tap the functional surface surface.
›
Arrow buttons:
will set an available station from
scan
.
Radio
19
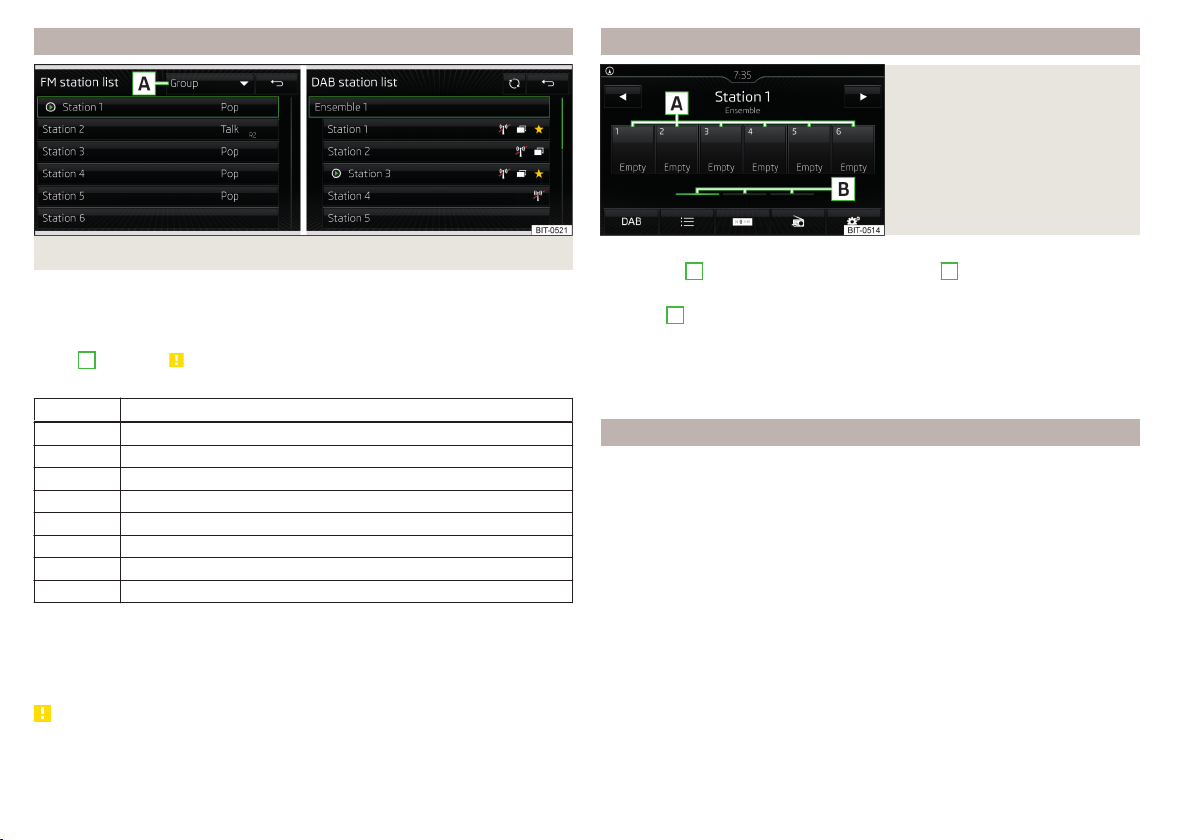
List of available stations
Station buttons for your favourite stations
Fig. 18
Station buttons
Fig. 17 Example, the list of available stations: FM / DAB
To display the list of available stations of the currently selected broadcasting
›
area, rotate the controller in the Radio functional surface surface.
To play, tap on the function surface of the desired station.
›
To Sort (FM) the stations by name, group or genre, tap on the functional sur-
›
face A » Fig. 17 » .
Information symbols
Symbol Meaning
Radio station, which is stored under a preset button
Currently played stations
Traffic information station
(e.g.) Type of program being broadcast (FM)
(e.g.) Type the regional broadcast (FM)
Signal reception is not available (DAB)
Signal reception is not safe (DAB)
Transmitter with image broadcasting (DAB)
Update list
In the FM radio area, the station list is updated automatically.
In the AM and DABradio area, the update takes place manually by tapping the
function surface » Fig. 17.
CAUTION
To sort the stations according to genre, the RDS and AF functions must be
switched on. These functions can be set in theradio main menu in the FM band
by pressing the functional surface →
20
Radio
Advanced settings
switched on / off.
For each field of broadcasting, there are station buttons available to store
each stationA That are split into groups of three B » Fig. 18.
To
save a station on the main menu Radio, hold down the desired function
›
›
If a station is saved on an already assigned station button, this station button
will be overwritten.
A
surface
To save a station in the station list, keep the function surface of the desired
station held down, and then tap the desired station button.
until an acoustic signal sounds.
Station logos
Channel logos are stored in the device memory which are assigned automatically by the device when storing the stations under preset buttons.
assign station logo automatically
to Disable / Enable in the radio main menu, tap on the functional surface
›
Tap on→
Assign station logo manually
Tap on the Radio main menu function →
›
Tap on an occupied station button and select the data carrier (SD card, USB).
›
Search for and select the desired station logo on the respective data carrier.
›
Remove channel logo manually
Tap on the Radio main menu function →
›
Tap on the station button from which you want to remove a logo.
›
Update station logos
Current information on the on available software, the components of which
are also station logos, can be found on the following ŠKODAwebsite.
Advanced settings
→
Automatic storage station logos
Station logos
Station logos
.
.
.

http://go.skoda.eu/infotainment
Note
■
The following image formats are supported: jpg, gif, png, bmp.
■
We recommend a resolution of up to 500 x 500 pixels.
TP Traffic programme
To switch on/off the traffic monitoring in the main menu Radio, tap on the
›
function surface →
Traffic program (TP)
.
During a traffic announcement, it is possible to cancel the current announcement if necessary by deactivating the traffic monitoring.
Note
■
Should this station not transmit traffic reports or the signal is not available,
then the device automatically searches in the background for another TP station.
■
During playback in menu Media or a station in the AM radio range, traffic
news is received from the previously selected FM radio range.
Settings
Settings for all broadcasting areas
Tap on the Radio main menu function surface.
›
■
Sound
- sound settings
■
Scan
-Start auto-playing all available stations in the current frequency band,
each station for around 5 seconds
■
Arrow buttons:
surfaces )
■
Preset list
■
Station list
casting range
■
Traffic programme (TP)
■
Delete presets
■
Station logos
■
Radio text
off
■
Advanced settings
ted broadcasting range(valid only for FM and DAB)
Arrow buttons: - setting the station change function (function
- Change between stations stored under the preset buttons
- Change between all available stations of the selected broad-
- Switches TP traffic programme on/off
- Deletes the preset buttons
- manual assignment /removal of station logos
- Switching the text display radio (valid only for FM and DAB) on and
- further settings that are different depending on the selec-
Advanced Settings (FM)
Select the FM band in the Radio main menu and tap on the function surface
›
Tap on→
■
Auto-save station logos
■
Region for station logo
■
Automatic frequency control (AF)
currently being played to on/off
■
Radio Data System (RDS)
formation from the station)
■
RDS Regional:
stronger reception signal
■
Fix
■
Automatic
Advanced settings
.
- Automatic storage of the station logos
- Clarification of the station logo region
- Search for alternative frequencies of the station
- enable/disable RDS function (receiving additional in-
- Setting the automatic change to a regional stations with a
- Turn off the automatic change
- Switching on the automatic change
Advanced settings (DAB)
In the Radio main menu, select the DAB range and tap on the function sur-
›
face Tap on →
■
Auto-save station logos
■
DAB traffic announcements
■
Other DAB announcements
regional weather, sports reports, financial news)
■
DAB - DAB station tracking
other frequency or in other station groups
■
Automatic DAB - FM switching
broadcasting range if the DAB signal is lost
■
L-band
- Enable / disable the availability of L-band
DAB station tracking
When a DAB transmitter is a part of several broadcast stations and if the current station group is not available on any other frequency, then when the signal is poor, the same station will be searched in another channel group.
Automatic change from DAB to FM
With bad DAB reception the device tries to find an FM transmitter.
The station name is followed by () while the station is being received on the
FM band. The () marker disappears when the relevant DAB station can be received again.
Advanced settings
.
- Automatic storage of the station logos
- Switch on/off DAB traffic announcements
- Switch on/off other announcements (e.g., warnings,
- Switch on/off automatic DAB station tracking on an-
- Switch on/off auto-switching from DAB to the FM
Radio
21
 Loading...