

Page 1
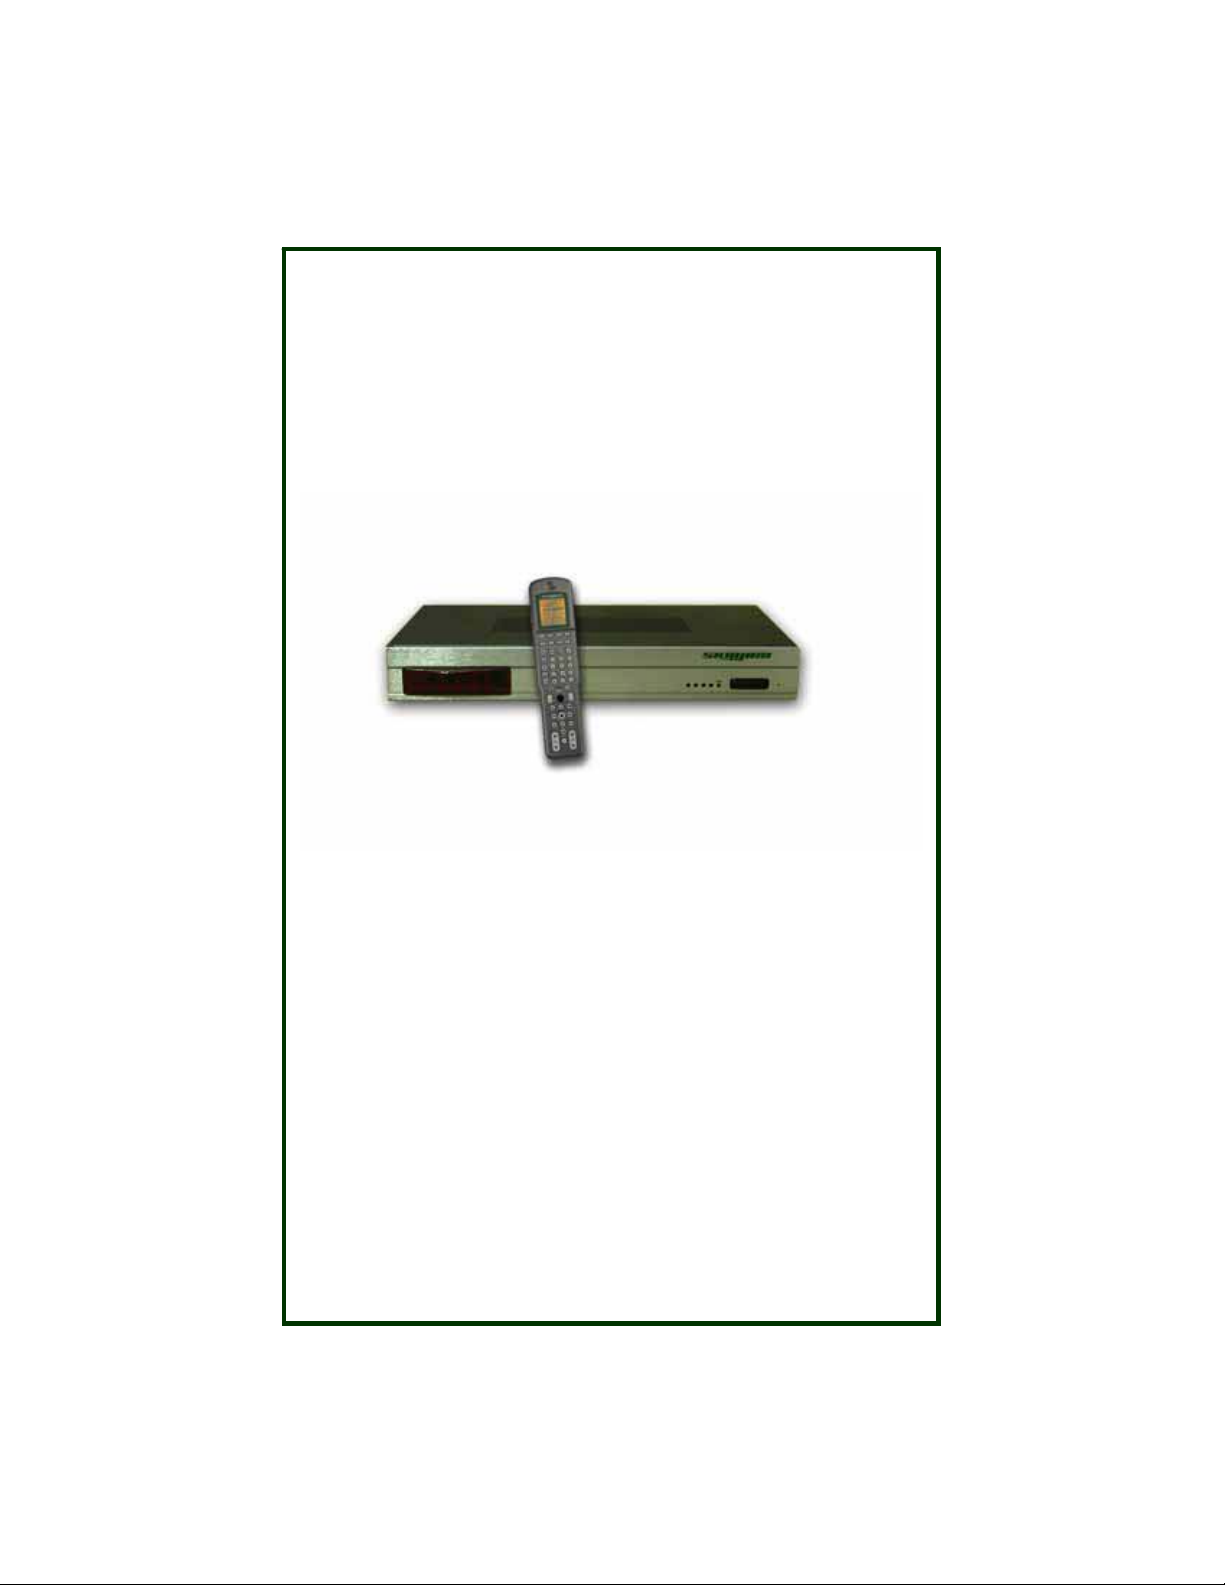
SkipJam iMedia Center ™
User’s Guide
Revision 1.03
Page 2
Important Safeguards and Notices
The following pages provide important safety guidelines for operators
and service personnel. Specific warnings and cautions appear
throughout the manual where they apply. Please read and follow this
important information, especially those instructions related to the risk of
electric shock or injury to persons.
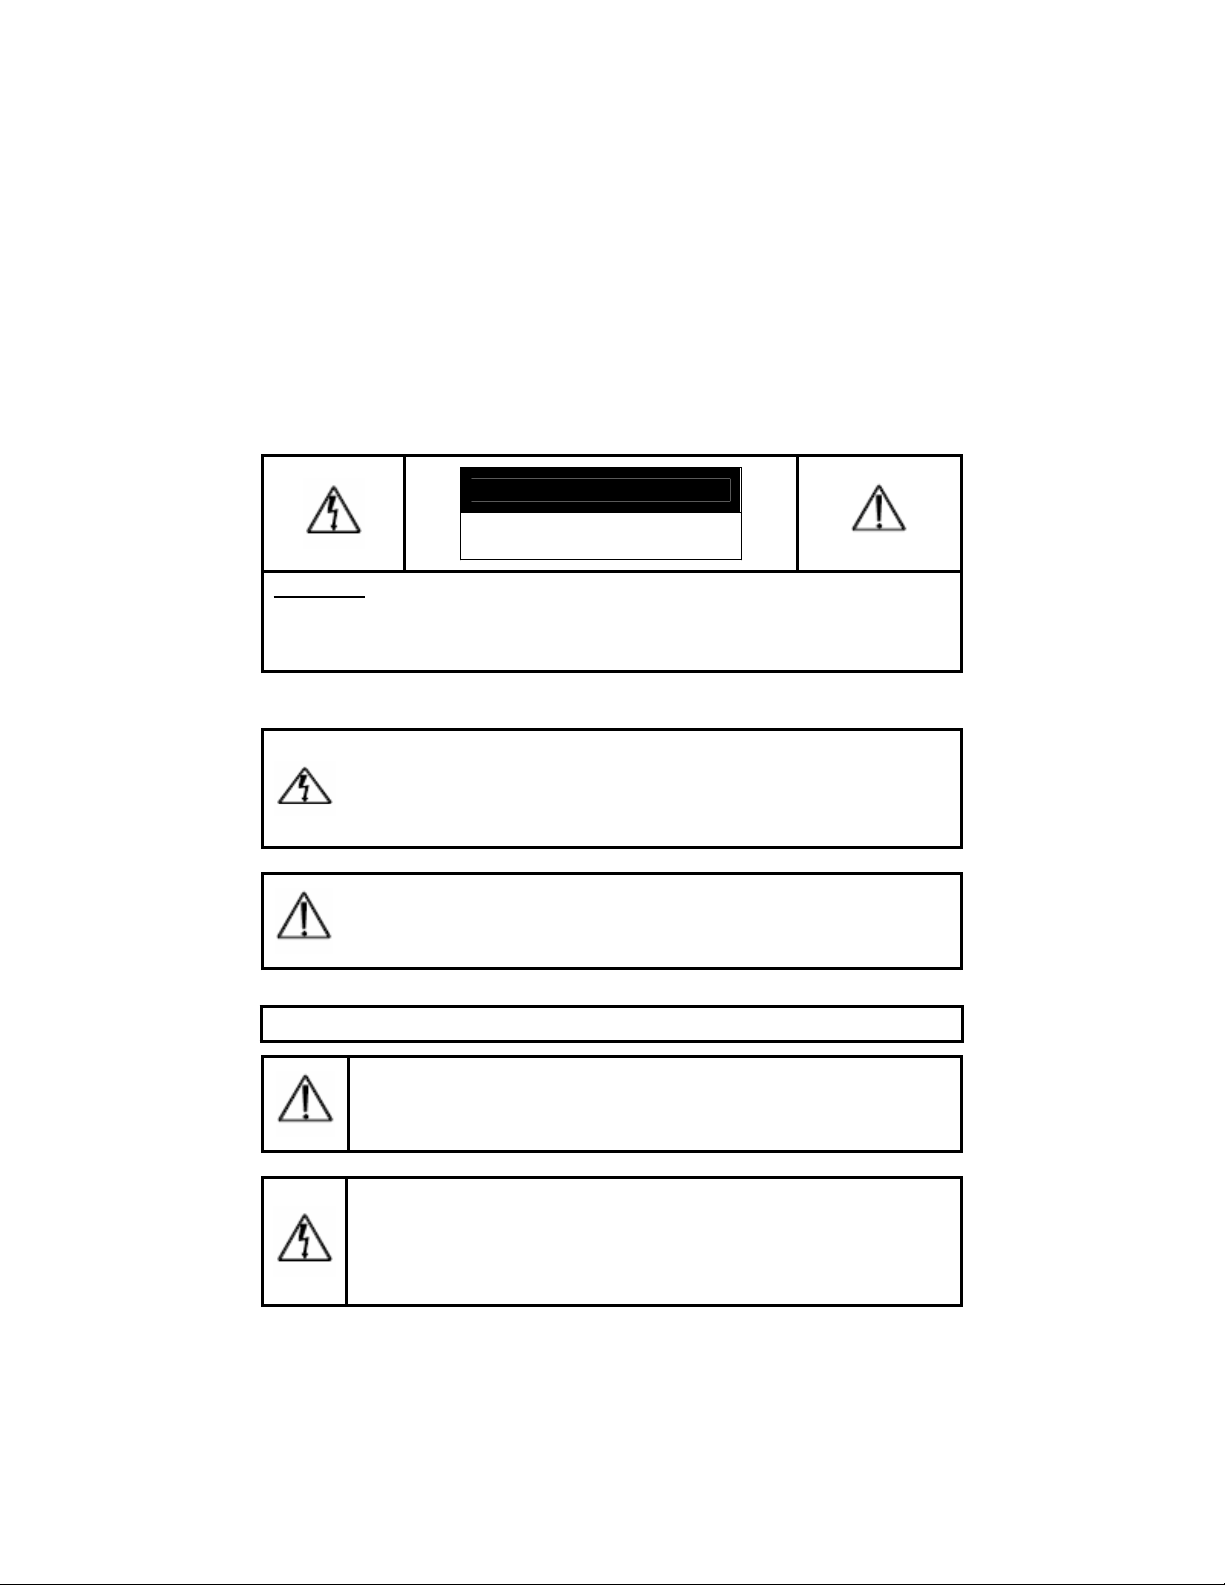
CAUTION
RISK OF ELECTRIC
SHOCK. DO NOT OPEN!
CAUTION: TO REDUCE THE RISK OF ELECTRIC SHOCK DO NOT
REMOVE THE COVER. THERE ARE NO USER SERVICEABLE PARTS
INSIDE. REFER TO AUTHORIZED SERVICE PERSONNEL FOR
SERVICING
Explanation of Symbols:
The lightning flash with an arrowhead symbol within an equilateral
triangle is intended to alert the user to the presence of uninsulated
“dangerous voltage” within the product’s enclosure that may be of
sufficient magnitude to constitute a risk of electric shock to
persons.
The exclamation point within an equilateral triangle is intended to
alert the user to presence of important operating and maintenance
(Servicing) instructions in the literature accompanying the
appliance.
READ THE FOLLOWING INSTRUCTIONS CAREFULLY.
Warning: This device can display static images which can cause
“burn in” of certain displays and display types. Please avoid
leaving static images (such as photos or paused videos) on screen
for long periods on displays prone to burn in.
Warning There are no user serviceable fuses To avoid fire hazard,
only the specified fuse(s) with the correct type number,voltage
use
and current ratings as referenced in the appropriate locations in
service instructions or on the equipment. Fuses should be
the
replaced
only by qualified service personnel.
Page 3

SkipJam iMedia Center User’s Guide
Warning: This device should be used only indoors in well
ventilated areas. To reduce the risk of fire or electric shock or
annoying interference do not expose this appliance to moisture or
rain and use only the recommended accessories.
This device complies with Part 15 of the FCC Rules. Operation is
subject to the following two conditions: (1) this device may not cause
harmful interference, and (2) this device must accept any interference
received, including interference that may cause undesired operation.
This equipment has been tested and found to comply with the limits
pursuant to part 15 of the FCC Rules. These limits are designed to
provide reasonable protection against harmful interference in a
residential installation. This equipment generates, uses and can
radiate radio frequency energy and if not installed and used in
accordance with the instructions, may cause harmful interference to
radio communications. However, there is no guarantee that
interference will not occur in a particular installation. If this equipment
does cause harmful interference to radio or television reception, which
can be determined by turning the equipment off and on, the user is
encouraged to try to correct the interference by one or more of the
following measures:
* Reorient or relocate the receiving antenna
* Increase the separation between the equipment and the antenna
* Consult the dealer or an experienced radio/TV technician for help
The user is cautioned that changes and modifications made to the
equipment without the approval of the manufacturer could void the
user’s authority to operate this equipment.
Acknowledgements
Copyright © 2004-5 SkipJam Corp., USA, ALL RIGHTS RESERVED.
Patents Pending.
SkipJam, SkipJam iMedia are trademarks of SkipJam Corp. All other
manufacturer's trademarks acknowledged.
- ii -
Page 4

SkipJam iMedia Center User’s Guide
Table of Contents
Table of Contents ....................................................................................... iii
Warranty Information .................................................................................. 1
What is covered and for how long:............................................................. 1
How to get service...................................................................................... 1
Limitations of this warranty – what is not covered ..................................... 1
Quick Start Guide: ....................................................................................... 3
Using the iMedia Remote Controls ............................................................ 4
Overview ....................................................................................................... 5
SkipJam iMedia Center Physical Layout.................................................... 7
Audio / Video Input Connections ............................................................ 8
Audio / Video Output Connections ......................................................... 8
Networking and Storage ......................................................................... 9
Wireless .................................................................................................. 9
Device and System Control........................................................................ 9
SkipJam iMedia Windows Client.............................................................. 10
Requirements for SkipJam Windows Software .................................... 10
Getting Started........................................................................................... 11
Requirements........................................................................................... 11
Packing List:............................................................................................. 11
iMedia Center Setup .................................................................................. 12
Connecting the cables.............................................................................. 12
Configuration Diagrams........................................................................ 13
Connect to your home network ............................................................ 14
Power it up............................................................................................ 15
SkipJam iMedia RF Controller ................................................................. 15
Configuring the iMedia Center ................................................................. 16
Navigating SkipJam iMedia Center ...................................................... 16
Controlling the SkipJam iMedia Center.................................................... 16
SkipJam iMedia Controller (RF Remote Control & Phone) .................. 17
Navigating with the SkipJam iMedia Controller .................................... 17
Switching between on-Remote and on-TV display .............................. 19
IR Remote Control................................................................................ 20
Select a Room Name ........................................................................... 20
- iii -
Page 5

SkipJam iMedia Center User’s Guide
Set up Devices ..................................................................................... 20
Special Information about the “TV” device: .......................................... 20
Adding devices:........................................................................................ 21
Cable and Satellite boxes:.................................................................... 21
Power control options: .......................................................................... 22
Configuring device remote control:....................................................... 22
Understanding the iMedia Universal Remote Capability ......................... 22
Infrared Emitters ................................................................................... 23
IR Interference...................................................................................... 24
Teaching the iMedia Center to Control Your System........................... 25
Searching the iMedia Remote Database.............................................. 25
Learning Keys Individually.................................................................... 25
Controlling a Device’s Power On/Off.................................................... 26
Automatic On/Off .................................................................................. 27
Using the iMedia Controller to Control Other Devices ............................. 27
Controlling a “Session” ......................................................................... 28
Controlling a Specific Device / Devices Menu...................................... 28
Accessing Your Digital Media .................................................................. 29
Sharing Your Media Files......................................................................... 29
Windows PC: ........................................................................................ 29
Macintosh OSX..................................................................................... 31
Linux ..................................................................................................... 32
Configuring the iMedia Center for Network Access ................................. 32
Locating Media Files............................................................................. 32
iMedia Playback ....................................................................................... 32
Combining Different Sources................................................................ 33
Digital Recording to a Network Disk ........................................................ 34
Understanding Digital Video Recording ............................................... 34
Types of Recordings............................................................................. 35
Recording Settings ............................................................................... 36
iMedia Menus ............................................................................................. 37
Power Off ................................................................................................. 37
TV / Video................................................................................................. 37
Recorded Videos .................................................................................. 37
Video Devices....................................................................................... 38
Using the SkipJam Video Player .......................................................... 38
Music ........................................................................................................ 39
- iv -
Page 6

SkipJam iMedia Center User’s Guide
Photos ...................................................................................................... 40
Schedule Recordings ............................................................................... 41
Add a new entry.................................................................................... 41
Modify / Remove entry.......................................................................... 41
View To Do List .................................................................................... 41
Access PC................................................................................................ 42
Now playing.............................................................................................. 43
More…...................................................................................................... 43
Devices..................................................................................................... 43
Change Current Room ............................................................................. 43
Phone functions ....................................................................................... 43
Follow Me................................................................................................. 44
Send Message ......................................................................................... 44
Scripts ...................................................................................................... 44
Supervisor functions................................................................................. 44
Setup .................................................................................................... 44
Device Status ....................................................................................... 47
Free up Device ..................................................................................... 47
Look for media files .............................................................................. 47
Common Tasks .......................................................................................... 48
Add a new device ................................................................................. 48
Watch video source device................................................................... 48
Watch a recorded video........................................................................ 48
Listen to digital audio media................................................................. 48
Listen to Radio...................................................................................... 48
Listen to audio source device............................................................... 48
Add shared media folder ...................................................................... 48
iMedia Windows Software......................................................................... 49
SkipJam iMedia Center for Windows ....................................................... 49
SkipJam iMedia Windows Player............................................................. 50
SkipJam iMedia Tag Tool......................................................................... 51
Browser Interface & Menus ...................................................................... 52
Using the Browser Interface..................................................................... 52
Advanced Setup Options ......................................................................... 54
Power on sequences ............................................................................ 54
- v -
Page 7

SkipJam iMedia Center User’s Guide
Editing IR .............................................................................................. 55
Creating Script Screens........................................................................ 57
Macros and Automation............................................................................ 58
SkipJam iMedia Command Wizard.......................................................... 59
Script Media Files ................................................................................. 59
Script Screens ...................................................................................... 60
Advanced Networking Topics .................................................................. 61
Wireless Networking ................................................................................ 61
Mixed Network Environments .................................................................. 62
DHCP and fixed IP addresses ................................................................. 63
Network Security ...................................................................................... 64
HomeView™ Access Away from Home................................................... 66
Using a VPN ......................................................................................... 66
Using an iMedia HomeView Server...................................................... 66
Dynamic IP Addresses ......................................................................... 66
Accessing Your Home iMedia Network ................................................ 67
Frequently Asked Questions.................................................................... 68
Troubleshooting......................................................................................... 71
Connection Checklist ................................................................................ 74
Audio / Video Output Devices .................................................................. 74
Audio / Video Input Devices ..................................................................... 75
Technical Specifications........................................................................... 76
- vi -
Page 8

Warranty Information
What this warranty covers:
Defects in material or workmanship
What is covered and for how long:
LABOR: For 90 days after purchase, SkipJam will replace
(optionally with a refurbished unit) or repair any SkipJam product
determined by SkipJam to be defective within 90 days after purchase. You
will be responsible for shipping to SkipJam.
PARTS: For one year after purchase SkipJam will replace parts
determined by SkipJam to be defective with equivalent new or refurbished
parts. You will be responsible for labor charges to replace the defective
part(s) and for all shipping costs.
How to get service
Contact SkipJam (e-mail to support@skipjam.com) or an Authorized
SkipJam Repair Center (see www.skipjam.com
service centers) for troubleshooting help. If a SkipJam representative
determines that your unit is defective you will be provided with a Returned
Merchandise Authorization (RMA) and instructions on the procedure for
return.
for a list of world-wide
No returns will be accepted without an RMA. If you ship us a unit without
an RMA, we will charge storage fees until you provide payment for a return
shipment.
Limitations of this warranty – what is not covered
This warranty does not cover any of the following: Instruction, installation,
setup, adjustment of settings or controls, network access, cosmetic damage,
damage from improper operation, improper maintenance or neglect, a unit
who’s cover has been removed or which has been modified in any way,
damage due to acts of God, accident, negligence, connection to improper
voltage or power supply, institutional or commercial use, use in security,
critical care, childcare or any other non-entertainment uses, any unit
purchased or serviced or operated outside the United States or Canada, or
damage which occurs during return shipments to SkipJam whether or not
the unit was returned in it’s original packaging or in accordance with
SkipJam instructions.
THE WARRANTY STATED ABOVE IS THE ONLY WARRANTY
APPLICABLE TO THIS PRODUCT. ALL OTHER WARRANTIES,
Page 9

SkipJam iMedia Center User’s Guide
EXPRESS OR IMPLIED, INCLUDING ALL IMLPIED WARRANTIES OF
MERCHANTABILITY OR FITNESS FOR A PARTICULAR PURPOSE, AND
ANY SUCH ARE HEREBY SPECIFICALLY DISCLAIMED. NO VERBAL
OR WRITTEN INFORMATION GIVEN BY SKIPJAM, ITS AGENTS OR
EMPLOYEES SHALL CREATE A WARRANTY OR IN ANY WAY
INCREASE THE SCOPE OF THIS WARRANTY.
REPAIR OR REPLACEMENT AS PROVIDED HEREIN IS THE
EXCLUSIVE REMEDY FOR THE CONSUMER. SKIPJAM SHALL NOT BE
LIABLE FOR ANY INCEDENTIAL OR CONSEQUENTIAL DAMAGES
ARISING FROM THE USE OR LOSS OF USE OF THIS PRODUCT OR
ARISING FROM ANY BREACH OF ANY EXPRESS OR IMPLIED
WARRANTY FOR THIS PRODUCT. THIS DISCLAIMER OF WARRANTY
AND LIMITED WARRANTY ARE GOVERNED BY THE LAWS OF THE
STATE OF NEW YORK. EXCEPT TO THE EXTENT PROHIBITED BY
APPLICABLE LAW, ANY IMPLIED WARRANTY OF MERCHANTABILITY
IS LIMITED TO THE APPLICABLE PERIOD SET FORTH ABOVE.
Some states do not allow the exclusion or limitation of incidental or
consequential damages or allow limitations on how long an implied warranty
lasts, so the above limitations or exclusions may not apply to you. This
warranty gives you specific legal rights, and you may have other rights that
vary from state to state.
Warranties and specifications are subject to change without prior notice.
Please contact SkipJam for the latest information.
- 2 -
Page 10
SkipJam iMedia Center User’s Guide
Quick Start Guide:
1. Connect Cables (NOT POWER):
a. Connect only S-Video (S) or Composite (V) at any one numbered
input connection, not both. (See “Connecting the cables” on page
12 for a diagram.)
b. Use network port number 1.
c. For quickest startup use analog audio (you can connect digital audio
later.)
d. Connect RF antenna if you have the optional RF Controller/Phone.
e. Connect IR emitters, but do not tape them in place until you are
certain of the location; You may need an “IR Blaster” cable (not
included) for Projection TV screens that do not have a visible IR
receptor. (see “Infrared Emitters” on page 23)
2. Install the battery in RF Remote and/or remove the battery protector
from IR Remote.
3. Connect Power to main unit and turn on your TV
IMPORTANT: The BRICK power
supply which has a detachable power
cord is for the iMedia Center; The
small (2 inch cube) block supply that
plugs directly to the wall is for
recharging the iMedia Controller.
4. Configure the system following on-screen instructions.
5. Enjoy your new found control and convenient media access.
- 3 -
Page 11
SkipJam iMedia Center User’s Guide
Using the iMedia Remote Controls
On the SkipJam iMedia RF Controller, pressing the “back Å” button when
the main menu is on-screen, moves the Menu back and forth between the
display on the TV and the display on the remote. If you don’t see the menu,
press “Home” then “Back”. For more on this see page 19
To use the iMedia Center universal remote capabilities you will need to set
up the IR emitters and teach the iMedia Center the remote codes for your
devices (see page 22 – Understanding the iMedia Universal Remote
Capability)
- 4 -
Page 12

SkipJam iMedia Center User’s Guide
Overview
Welcome to the Digital Home of the 21st Century!
This manual is set up in 2 sections. The first is a direct step by step walkthrough explaining how to set up and use your iMedia Center. We suggest
you at least skim this part through page 37 – iMedia Menus . Please pay
particular attention to highlighted items
The second part (starting on page 37) is a detailed explanation of each
menu and function independently.
Thank you for purchasing the SkipJam iMedia Center – the first Network
Attached Media solution. The SkipJam iMedia Center is the heart of your
whole-house distribution and control system. The SkipJam iMedia system
networks all your home entertainment, making all your media both digital
and analog, available everywhere. The iMedia Center also provides a
unified control system that learns, stores and distributes remote control
codes so a single remote manages all your entertainment equipment.
With the SkipJam iMedia RF Controller, the iMedia Center gains full
telephone functionality with messaging, whole-house paging, and on-TV
caller ID.
The SkipJam iMedia Center can play audio and video sources from locally
connected A/V components or A/V components connected to other iMedia
Centers in your home. The iMedia Center can also play digital media files
located in any shared network folder on Windows, Mac OSX or Linux
computers or Network Attached Storage systems.
With the SkipJam iMedia Windows Client, you can watch any iMedia
connected device right on your PC’s screen, and control any device in your
- 5 -
Page 13
SkipJam iMedia Center User’s Guide
home from your web browser. The iMedia Windows Client also provides
access to your PC screen from any iMedia connected TV.
The SkipJam iMedia Center’s digital video recorder (DVR) allows you to
record any audio and video source to a digital file anywhere on your home
network. The built-in scheduler and program guide provide a convenient
and effortless method for recording your favorite TV shows.
Central to the iMedia Center’s operation is a menu system that provides
access to its various functions. The menu is accessible via the SkipJam
iMedia Controller, on TV screens through an on-screen display (OSD)
menu, and through any browser on a PC or PDA on your home network.
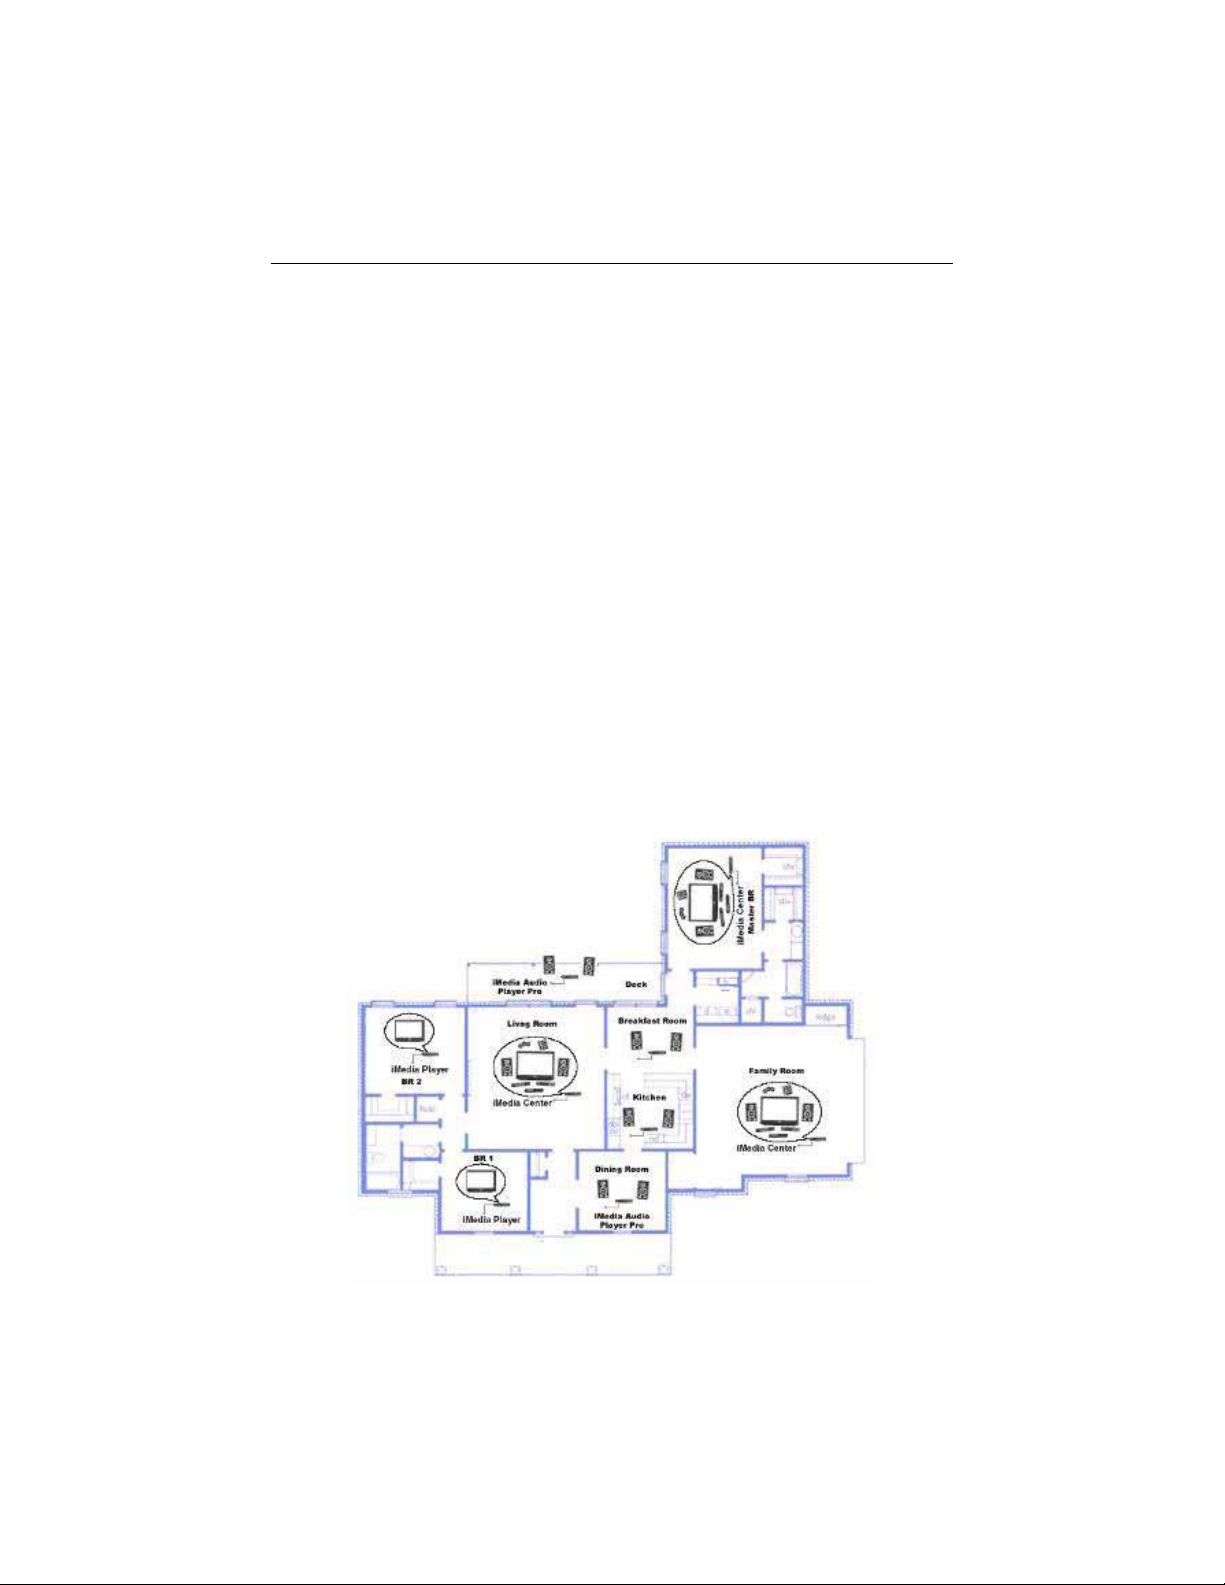
Overview of the SkipJam iMedia System
The SkipJam iMedia system sees your home much as you do. The iMedia
system operates in terms of “rooms” “devices” and “media.”
Typically, you would include either an iMedia Center, an iMedia Player, or a
PC with the iMedia Client Software in each “room.” Each iMedia system
(center or player) is connected to “output” devices such as TVs and stereos,
and has connected to it “input” devices such as DVD players, satellite and
cable tuners and so on.
When you’ve set it up, your home might look something like this:
- 6 -
Page 14
SkipJam iMedia Center User’s Guide
To operate the iMedia system, you simply tell it in which “room” you want to
watch, and what you want to watch there. The iMedia System then
establishes the appropriate connection to set up this “session.”
iMedia Centers can send the signals from any input devices to any other
iMedia enabled device. iMedia Centers can also record signals from any
input devices to any shared network hard drive.
iMedia Players can play recordings from any shared network hard drive, and
can display “live” signals sent from any iMedia Center. This means you can
watch a device (DVD or cable tuner) remotely as it’s playing.
You can mix and match iMedia Centers, iMedia Players and PCs as you see
fit for your system.
iMedia Audio players play any audio on the network, and the “pro” versions
include amplifiers for in-wall installation so that all you need are speakers.
You can control the whole system from any room using an IR controller, an
iMedia RF Controller, an iMedia Touch Panel, or from any PC or PDA using
the iMedia Browser interface.
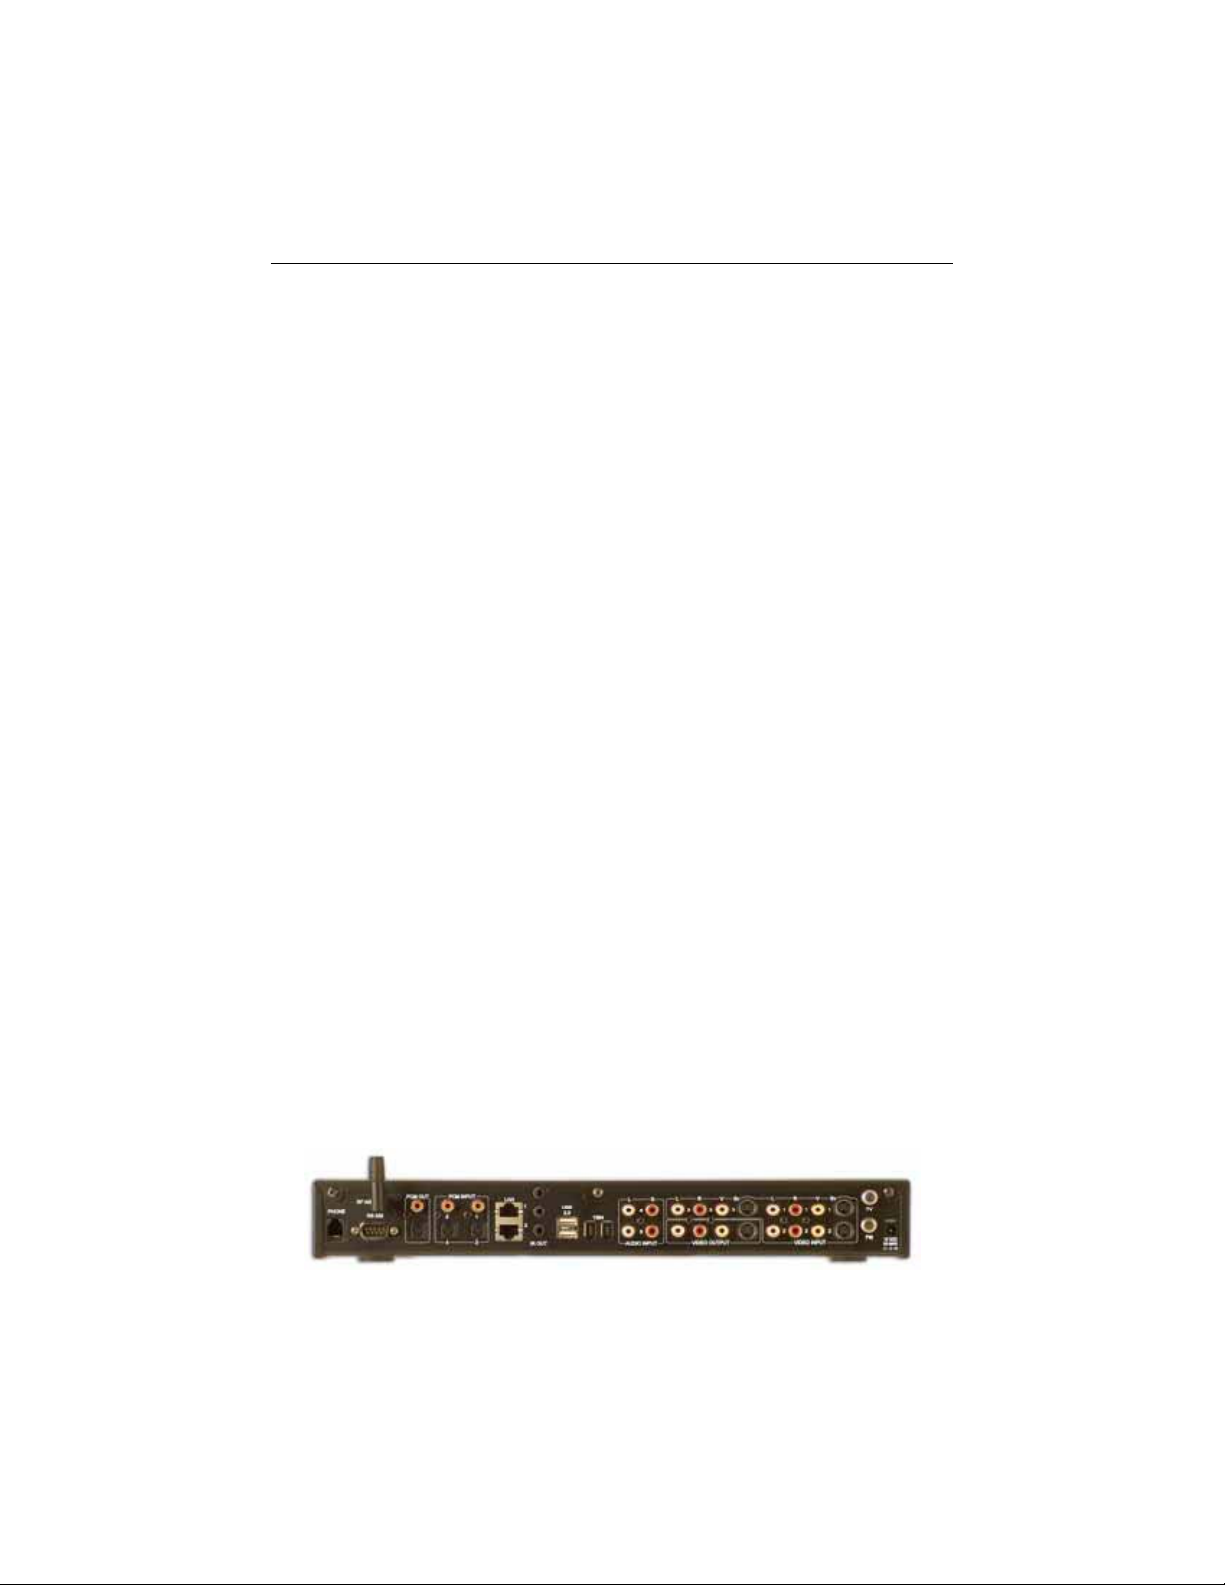
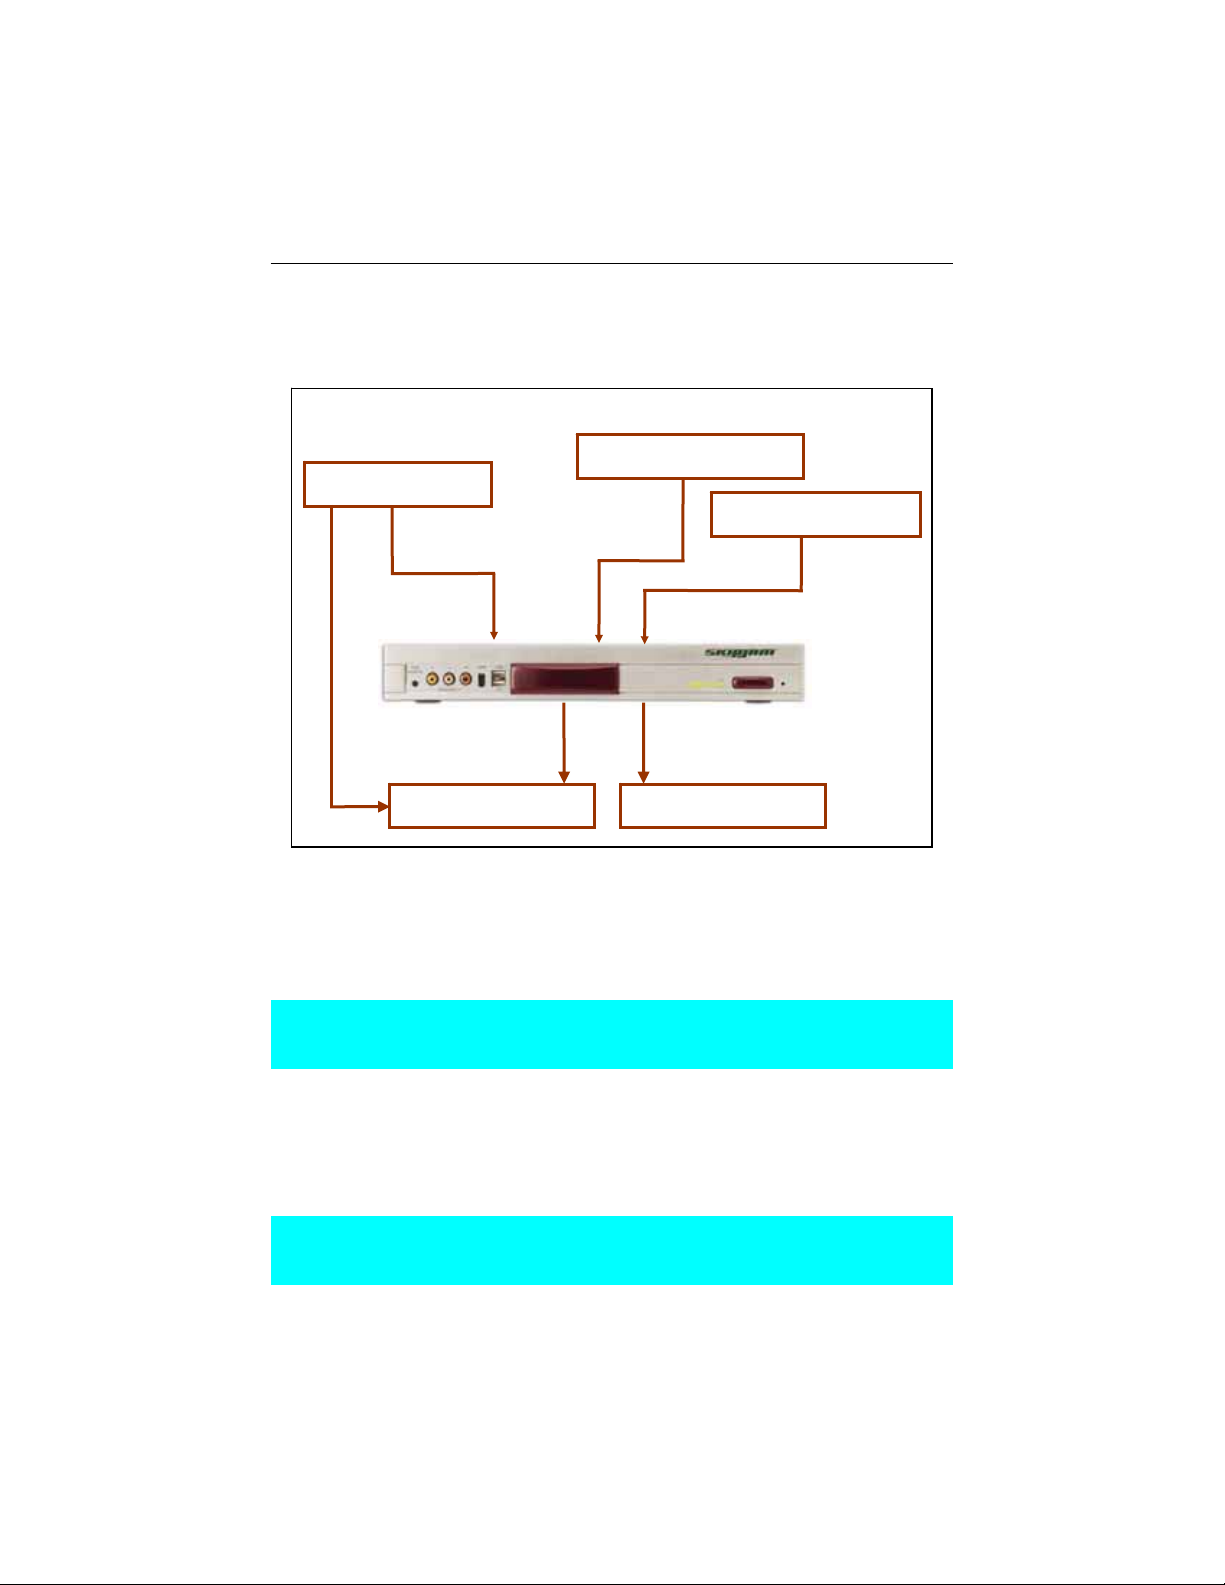
SkipJam iMedia Center Physical Layout
The SkipJam iMedia Center unit can support up to 10 audio and 5 video
sources. It has a built in cable-ready TV tuner and an FM radio tuner. It has
two 10/100 Mbps network interfaces for connection to your network. It also
has the capability of storing and reading media files on a external Firewire
(IEEE 1394) or USB hard drive connected to the iMedia Center USB or
Firewire ports.
When attached to an active phone line, the SkipJam iMedia Controller can
be used as a telephone and will display caller ID on all iMedia connected
screens in your home.
The majority of the SkipJam iMedia Center connectors are located at the
back of the unit. Each connector is clearly marked. The 12 Volt DC power
input jack is also located in the lower right corner as seen from the rear of
the unit.
iMedia Center Rear View
- 7 -
Page 15

SkipJam iMedia Center User’s Guide
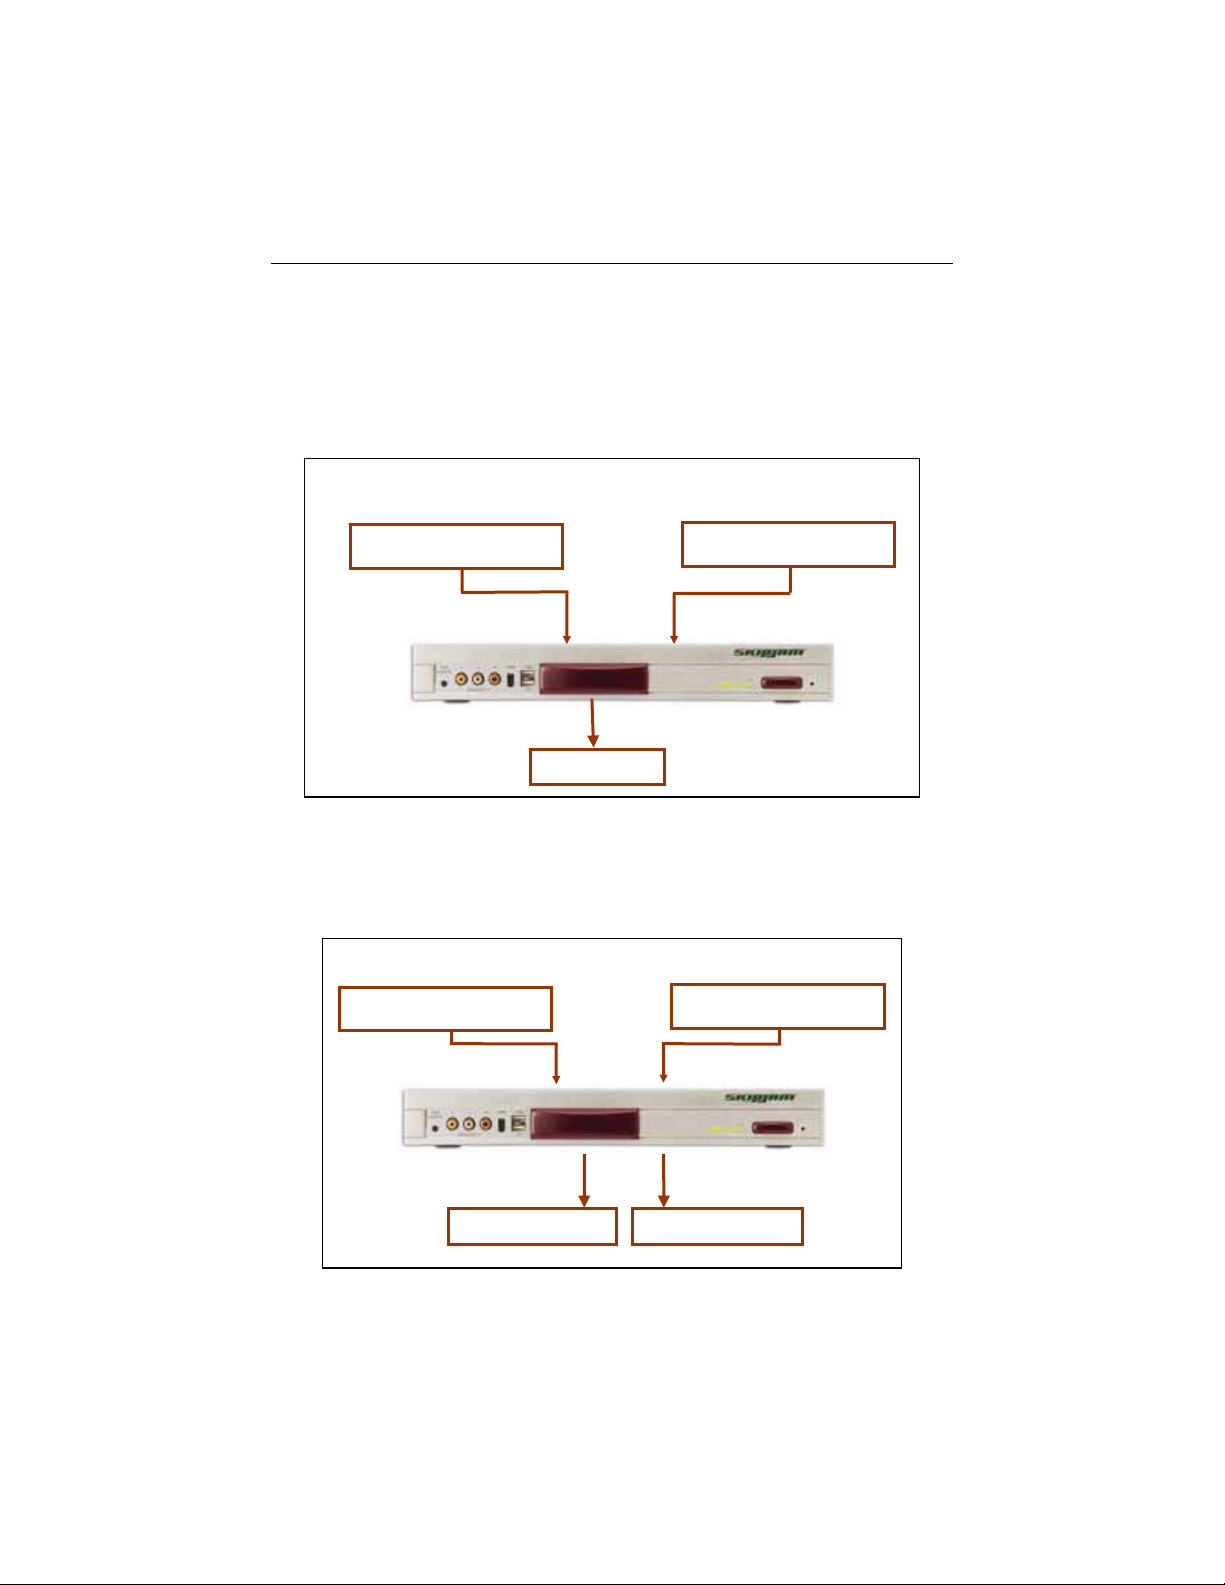
The front of the unit has a set of A/V composite connectors, an IEEE 1394
connector and a pair of USB connectors behind the sliding panel.
The switch marked “FIND REMOTE” is used to page the SkipJam iMedia
Controller (press the switch once to have the remote emit a series of loud
beeps) or to learn a new infrared remote for use in controlling the iMedia
Center’s menu system in the event the iMedia Controller is lost or broken.
(press the switch 5 times in a row to access the learning remote function)
There is also a set of five LEDs and the infrared IR receiver window on the
right side of the unit. Three LEDs are on when the unit has properly
initialized. There is a pin-sized hole to the right of the IR window where the
reset switch is located.
iMedia Center Front View
Audio / Video Input Connections
The iMedia Center supports analog RCA-type audio and digital PCM audio
(coax and optical) connections. A total of 10 independent audio sources
(four digital, six analog) can be attached. Four of the RCA audio inputs are
located next to four video inputs, however you can use each audio and
video port independently. So that if you connect a DVD to Video input 1
and the DVD’s audio to a digital audio input, you can use Audio Input 1 for a
separate Audio device (CD or TAPE)
For Video you have a choice of using either an RCA-type composite video
connectors or S-video connectors for higher quality. There is also a built-in
cable-ready TV tuner and FM tuner.
IMPORTANT: Each video input connection has an s-video and composite
(RCA-type) connector. Connect only one or the other but NOT both.
Audio / Video Output Connections
The iMedia Center has one S-Video and one RCA-type composite video
output which MAY be used at the same time to drive two different TVs (with
the same picture on each). The iMedia Center also has one pair of analog
RCA audio output connectors and two digital PCM audio (coax and optical)
output connections. While the inputs must be either Composite or S-Video
- 8 -
Page 16

SkipJam iMedia Center User’s Guide
you may connect both the Composite and S-Video output connectors at the
same time (for example to drive two different TVs.)
All audio outputs will provide the same signal. So that the analog, optical
digital, and coaxial digital connectors will all “play” the same audio, and you
may use these output connectors interchangeably, regardless of the input
source.
Networking and Storage
Storage for digital media is limited only to the space available on your
network. The iMedia Center is equipped with two 10/100 Mbps network
interface ports. You only need to connect one of the two ports. The only
requirement is to have access to a network shared folder.
Local external storage devices may also be used for digital media storage
and can be connected optionally to one of the three available 1394 Firewire
or USB connectors.
Note: The iMedia Center must be configured initially to recognize available
network shares in order to identify digital media. A search of your network
shares is performed during setup of the unit. You can also manually modify
this setting from the Setup menu. See page 29, Accessing Your Digital
Media, for more information on sharing your media files.
Wireless
You can connect the iMedia Center to your network using any readily
available wireless bridge. However, we recommend connecting the iMedia
Center using cat-5 cabling. If you choose to use a wireless connection, you
well get best results from an 802.11a or 802.11g system, and we
recommend that you hard-wire as much of your network as possible. (eg.
Try to wire either your PC or your iMedia Center directly to your wireless
router to minimize “air hops” or “air-to-air” connections. As an alternate
solution try to connect the iMedia Center directly to the PC using an “adhoc” connection type.) For more information please see “Wireless
Networking” on page 61.
Device and System Control
The SkipJam RF iMedia Controller lets you control your whole house from
virtually anywhere in your home. The iMedia Controller has an LCD screen
that shows the iMedia Menus that you would otherwise see on the TV or on
the browser interface. The iMedia Controller control is powered using the
included NiCd battery pack.
- 9 -
Page 17

SkipJam iMedia Center User’s Guide
Use the 9V battery charger to charge the battery whenever the remote is not
in use. If the battery is low on charge, you can use the remote while it is
connected to the charger.
SkipJam iMedia Windows Client
The SkipJam iMedia Windows Client provides a tray icon for easy access to
and control of your entire SkipJam iMedia Network via the iMedia browser
menus. The SkipJam iMedia Windows Client also provides the SkipJam
iMedia Player for Windows which allows your PC to play any streamed
content from any device on your SkipJam iMedia Network.
Requirements for SkipJam Windows Software
x Intel Pentium/Celeron family or AMD K6/Athlon/Duron family or
compatible PC connected to a network
x Windows XP or Windows 2000 with the latest service packs.
x SuperVGA (800x600) or higher-resolution video adapter and
monitor
x 128 MB of memory
x 10 megabytes (MB ) available hard disk space
- 10 -
Page 18

SkipJam iMedia Center User’s Guide
Getting Started
Requirements
Although the SkipJam iMedia Center can function as a stand-alone
player/recorder, switching station and universal remote, we recommend
connecting the SkipJam iMedia Center to a home network. For several of
the SkipJam iMedia functions to operate, it is necessary to have access to
writable network shares (drives). You will also need the necessary A/V
cables to connect your A/V equipment to the iMedia Center’s input.
Packing List:
The SkipJam iMedia Center comes with the following components:
1 x SkipJam iMedia Center
1 x RF Remote control
1 x Rechargeable NiMH batteries for the RF remote control
1 x 9V 250 mA charger for the RF remote control
3 x Dual headed IR Emitters
1 x 12V AC/DC power supply for the iMedia Center
1 x CAT5 network cable
1 x Composite RCA-type A/V cable
1 x IEC power cable
1 x Infrared remote control
2 x AAA batteries
1 x Compact disc containing SkipJam iMedia for Windows
1 x User’s Guide
1 x Quick Start Guide
Contact SkipJam to get a replacement of any missing component.
- 11 -
Page 19
SkipJam iMedia Center User’s Guide
iMedia Center Setup
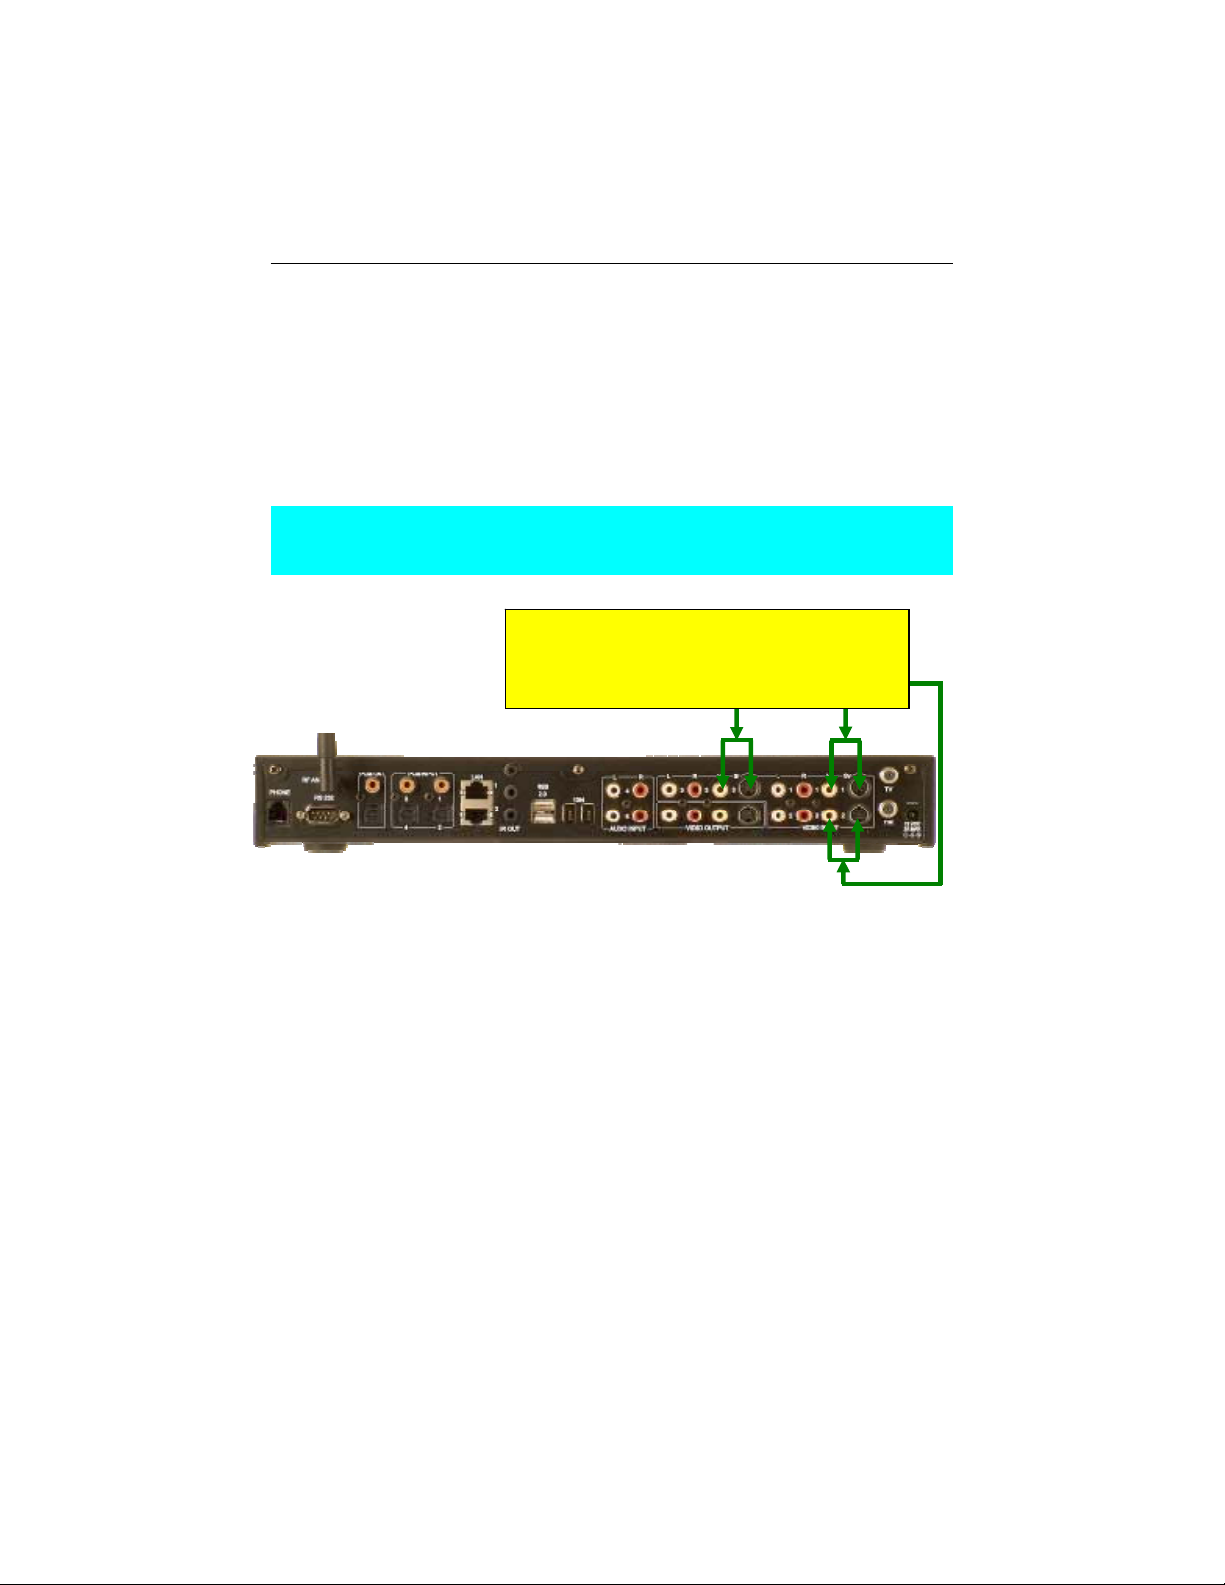
Connecting the cables
Connect the input and output devices you wish to use
Keep a record of which device is connected to each input on your iMedia
Center. There are tables for this purpose on page 74.
IMPORTANT: Connect either the black s-video connector or the yellow “v”
composite video connector for any input device, BUT NOT BOTH. Image
quality will suffer if you connect both
These are the video input connectors.
Connect only one from each pair of
video connectors
Connect audio and video cables from your components to the “input”
connectors on your iMedia Center.
Connect Audio and video cables from the “video output” section to your TV.
If you are using a separate Home Theater Amplifier or Receiver, connect the
“L” and “R” connectors from the “Video Output” section to your home theater
amplifier or receiver. If you wish, you may also connect the “PCM” digital
audio output to your home theater receiver for surround sound and direct
digital processing.
- 12 -
Page 20
SkipJam iMedia Center User’s Guide
V
eater
Configuration Diagrams
The following diagrams outline basic connections for different component
configurations.
In the basic configuration, the TV is used to display images and to generate
the sound (audio amplifier). This is the simplest setup and you may wish to
start in this configuration until you get the hang of the system.
Basic Configuration
DVD / VHS / ETC
Cable / Satellite
Audio
and
Video
Audio and Video
In an intermediate configuration, the TV is used for images, and a separate
system is used for audio. This would be the configuration for “Home
Theater” systems.
Intermediate Configuration
DVD / VHS / ETC
Audio
Cable / Satellite
and
Video
Video
T
- 13 -
Audio
Home Th
Page 21
SkipJam iMedia Center User’s Guide
Other configurations are possible, but may require you to set up “power on /
off macros” (see “Power on / off sequences” on page 54) and / or “Bypass
Sequences” (see page 55) and are therefore only recommended for
advanced users or professional installers:
Advanced Configuration
DVD / VHS / ETC
HD Source
SD Video and
Cable / Satellite
SD Video
HDMI
TV Home Theater
Audio
Connect to your home network
Your iMedia Center should be connected to a network using an RJ45 Cat 5
or better cable. If you wish to connect wirelessly please see the section on
wireless connections on page 61.
Note that the iMedia Center can function on a stand-alone basis without a
network as a audio video switching center, universal remote control and
phone, and even as a digital video recorder if you add a firewire hard drive.
By default the iMedia Center expects an external DHCP server to provide it
with a network address. If you have a network with personal computers,
and the computers are set to “obtain IP address automatically” you already
have a DHCP server. This is the usual setting for a home network. If not
please, see “DHCP and fixed IP addresses” on page 63.
IMPORTANT: If you do not have a DHCP server, or you do not connect a
network cable, the iMedia Center will try to connect to your network. This
will cause the iMedia Center to spend up to 10 minutes attempting to
- 14 -
Page 22

SkipJam iMedia Center User’s Guide
connect, with no messages on the screen. If you are using the iMedia
Center with no network connection, please wait patiently.
Power it up
After connecting all your components’ cables, turn on the television
connected to the iMedia Center and connect the 12 V “brick” power supply
to the iMedia Center to power it up.
Connect the 12V brick power supply to its AC power cable, plug the cable
into an AC socket, and then connect the 5mm power connector into the
connector labeled POWER on the back of the iMedia Center.
Warning: DO NOT USE ANY POWER SUPPLY OTHER THAN THE ONE
THAT IS SUPPLIED WITH THE UNIT. DOING SO MAY DAMAGE THE
UNIT AND WILL VOID THE WARRANTY.
SkipJam iMedia RF Controller
While the iMedia Center is powering up, unpack the rechargeable battery
pack and install it in the battery compartment of the iMedia Controller. You
must plug-in the battery pack into the battery connector located in the
battery compartment.
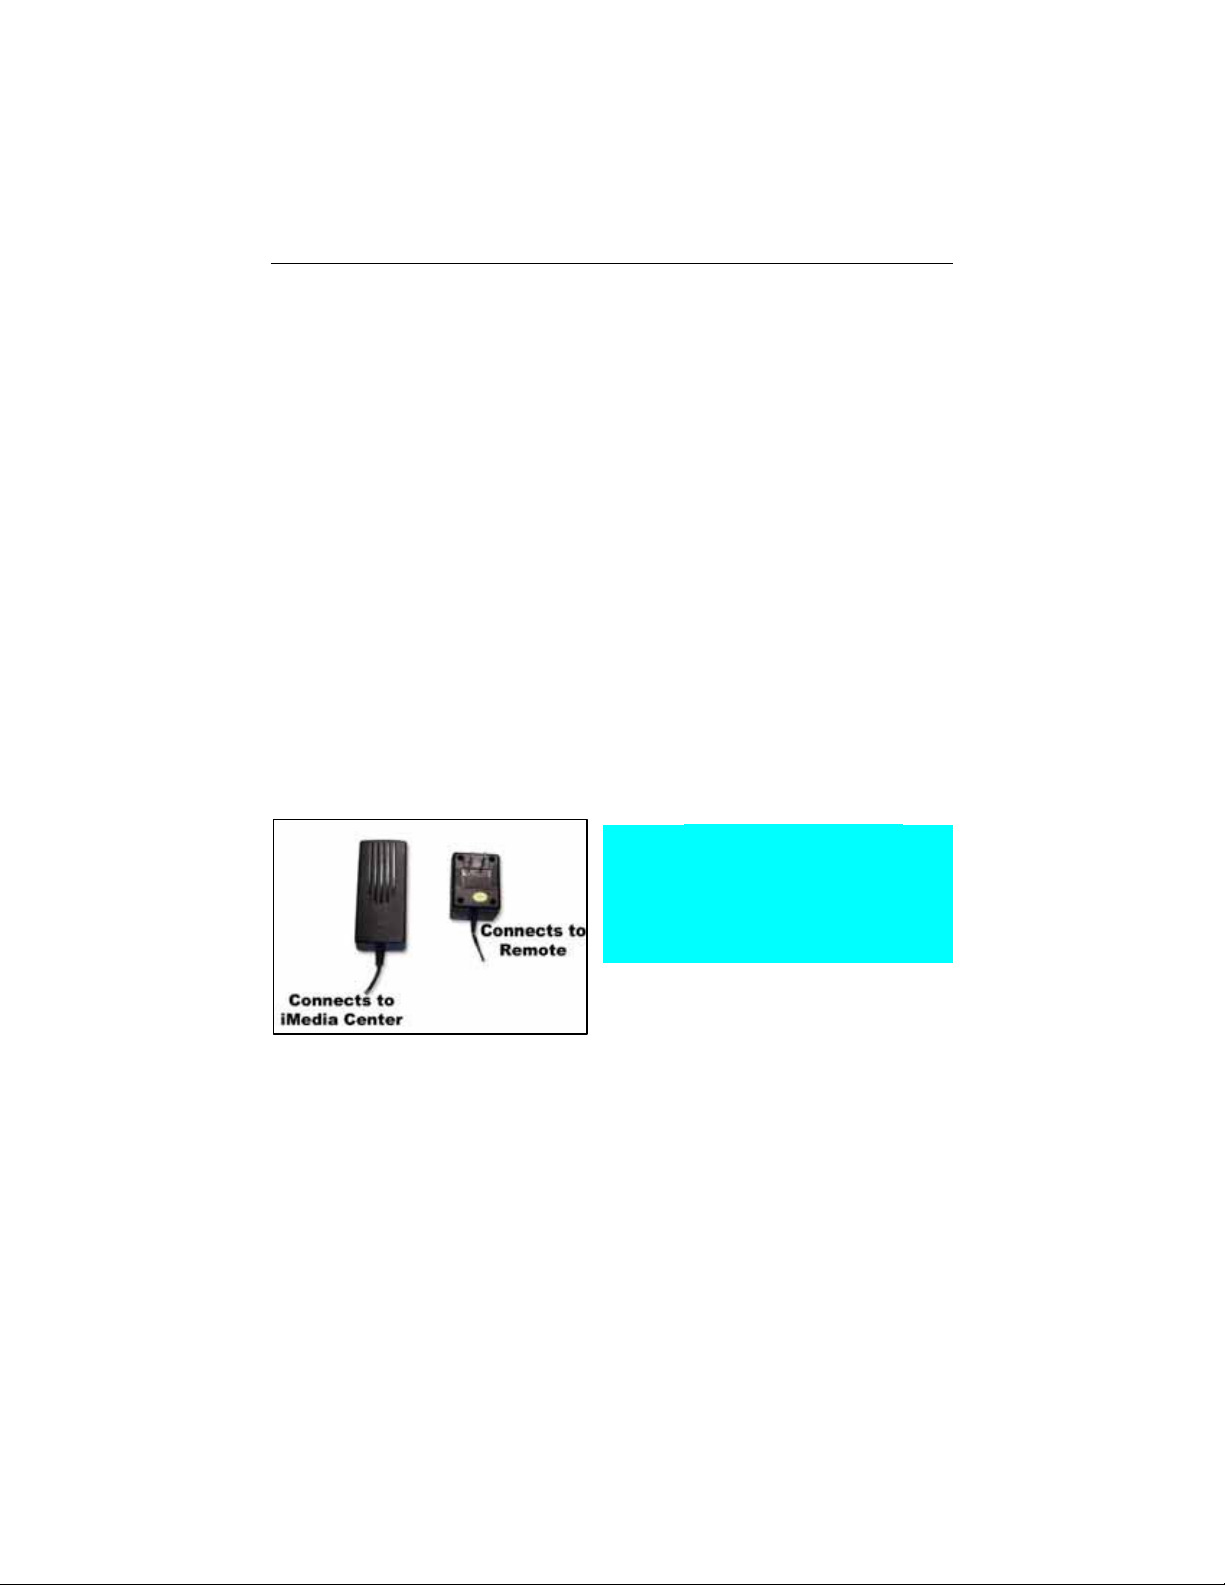
You may use the RF remote while it is charging.
Be sure to connect the battery before connecting the charger. Connect
the 9V AC-DC adaptor plug into the power input jack located at the bottom
of the remote. Plug the power supply into an AC outlet to charge the
battery. Keep the charger connected for at least 12 hours before using the
remote without the charger. It is best to keep the remote control charging
when not in use.
IMPORTANT: The battery plug in the battery compartment is keyed to
prevent incorrect insertion into the battery connector. The plug should
install into the connector with little force. DO NOT FORCE THE PLUG
INTO THE CONNECTOR. FORCING THE PLUG INTO PLACE MAY
DAMAGE THE REMOTE.
To use the IR remote, you must open the battery compartment and remove
the tab which keeps the batteries from discharging.
- 15 -
Page 23

SkipJam iMedia Center User’s Guide
Configuring the iMedia Center
If you do not have a television connected to the iMedia Center, you can
configure the iMedia Center through the network using a browser. See the
section labeled Browser Interface & Menus on page 52
Navigating SkipJam iMedia Center
Once your iMedia Center is powered up, you will see a series of menus on
the TV screen allowing you to configure the iMedia Center.
Navigating the SkipJam iMedia Center Menus is easy. If you do not see a
menu on either the SkipJam iMedia Controller screen or on your TV, press
the “Home” button. This will bring up the iMedia Home Menu. The Home
Menu is the starting point for all SkipJam iMedia operations.
Pressing “Home” will turn on your TV, if your TV is off. You must select “auto
on/off” in the device configuration for your TV and set up the control codes
for the TV, (see Understanding the iMedia Universal Remote Capability on
page 22).
Pressing “Home” will also bring up the iMedia Home Menu over any video or
photo session currently on the TV.
Controlling the SkipJam iMedia Center
The SkipJam iMedia Center can be controlled with the supplied IR remote
control, with the SkipJam iMedia RF Controller, via any browser capable
device such as a PC or PDA on your home network, or with any standard
remote control you may happen to have available.
The iMedia Center remotes operate both to navigate the iMedia Center
menus and to control any audio or video playing. Once you activate a
“Session” listening or viewing anything, the Universal Remote Keys (shown
below) become active controlling the session.
For example, if you choose to watch a recorded video, once the video starts
playing the “Pause” key will pause the video. If you choose to watch a DVD
player, when you press “Pause” the remote control code for pause will be
sent to the DVD player you are watching.
- 16 -
Page 24
SkipJam iMedia Center User’s Guide
When the iMedia Menus are not on screen, the directional keys (joystick on
the iMedia Controller) will function as universal remote keys. In other words,
pressing up / down / left / right will, for example, navigate the DVD or Cable
box menus when the iMedia Menus are not shown, and will navigate the
iMedia Menus when they are on screen.
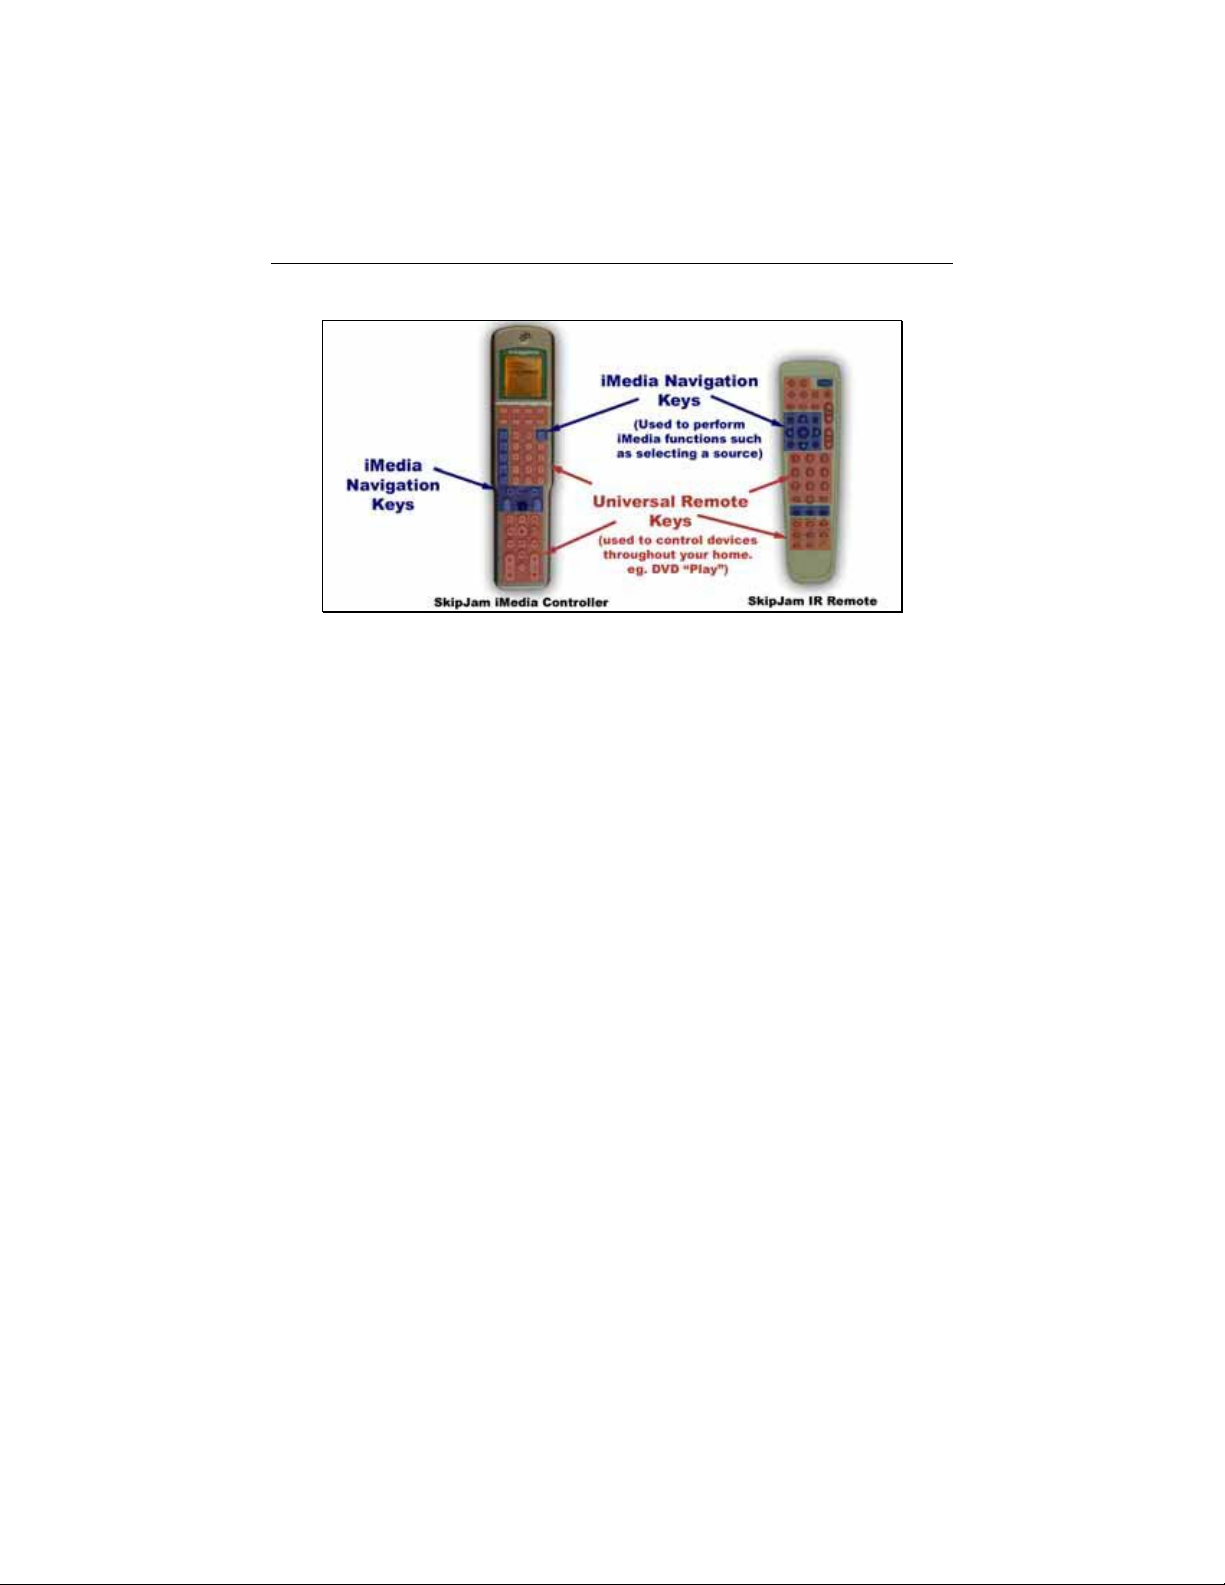
SkipJam iMedia Controller (RF Remote Control & Phone)
The SkipJam iMedia Controller can control the iMedia system from any
location in your home (We have tested across a 150 feet through solid
plaster walls) and does not require a line-of-sight to the iMedia Center
because it operates using Radio Frequencies (RF) like a cordless phone.
This lets you hide your Audio / Video components out of sight.
The SkipJam iMedia Controller has an LCD screen that shows the same
information that you would normally see on the On Screen Display (OSD) on
the TV. This lets you select music or videos without turning on your TV.
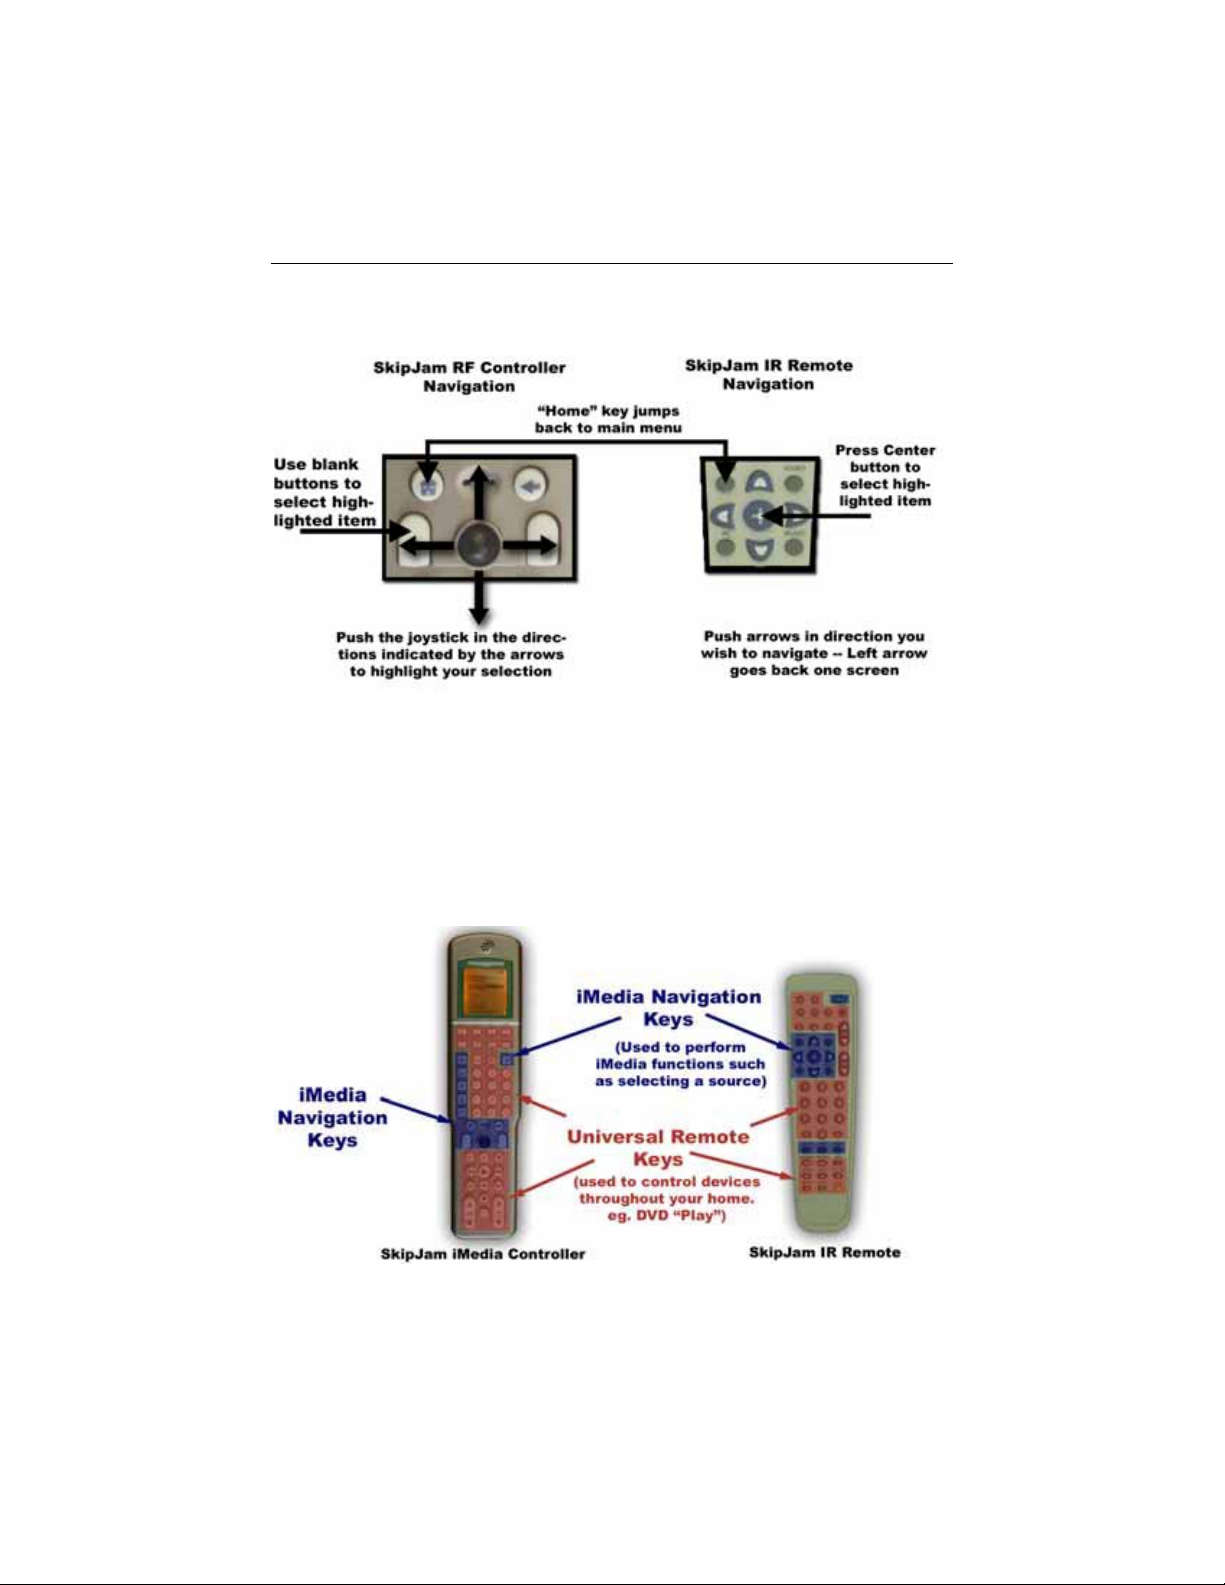
Navigating with the SkipJam iMedia Controller
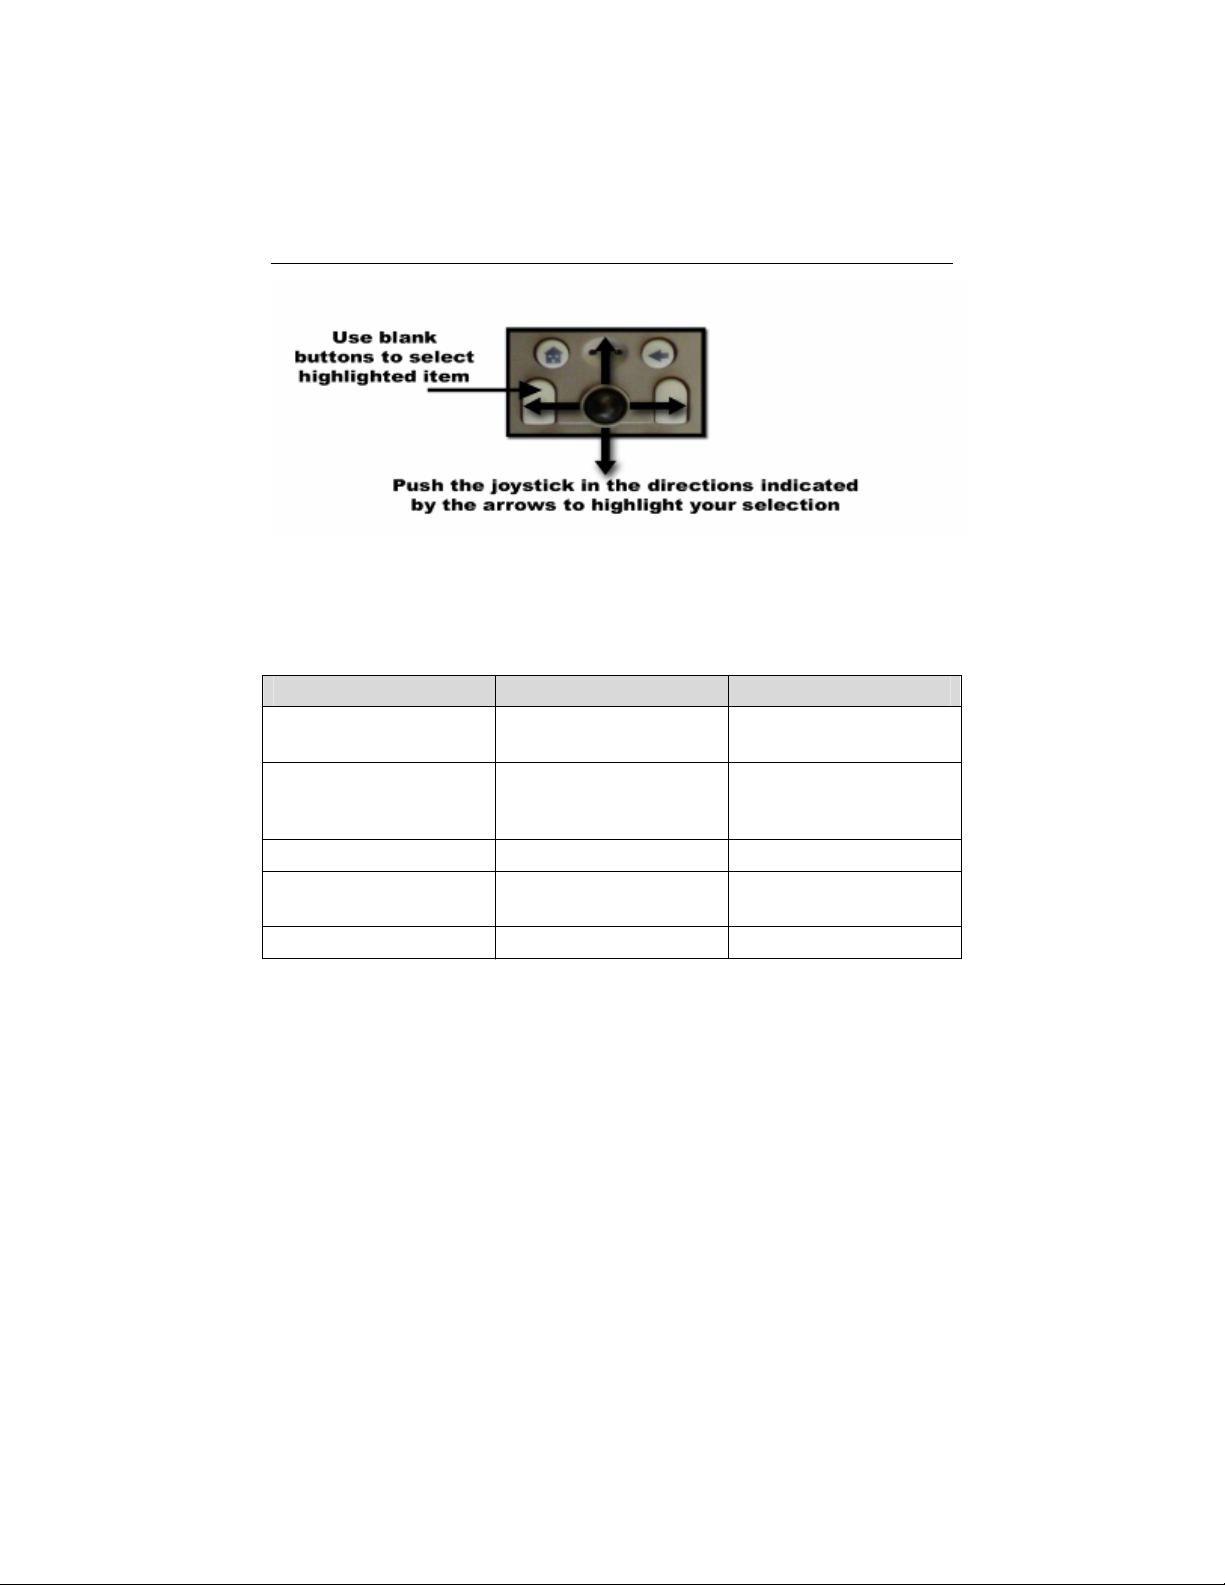
The SkipJam iMedia Controller has a central navigation “pad.” This
navigation section contains a joystick selector which moves the menu
selector bar selection up and down (and left and right) as well as 2 blank
keys used for “select” (and for “mouse left-click” and “mouse right-click”
when accessing your PC).
- 17 -
Page 25
SkipJam iMedia Center User’s Guide
Above the joystick is a “Home” button which takes you directly to the iMedia
Home Menu, and a “Back” button which backs up to the previous menu or
selection.
The following table lists the keys used to navigate the iMedia Menus:
Action RF Controller Key IR Remote Key
Up / Down / Left / Right
Select
Joystick – press lightly
in the direction
Blank left or right
buttons on either side
Up / Down / Left / Right
arrows
Center of arrows key
marked “diamond”
of joystick
Page Up / Down Channel Up / Down Channel Up / Down
Go to / display SkipJam
“Home” “Home”
iMedia home menu
Go back one screen Back (Å) key Left arrow key
The short-cut keys (labeled video, TV, Music, PC, Phone) are convenient for
jumping directly to the corresponding menus once you have become familiar
with the system.
- 18 -
Page 26
SkipJam iMedia Center User’s Guide
IMPORTANT
: DO NOT PRESS ON THE JOYSTICK TO SELECT (this
won’t work and could damage the joystick), AND DO NOT PLACE THE
REMOTE WITH THE KEYS FACING DOWN ON ANY SURFACE (this could
scratch the display or damage the joystick).
Use the blank “left” and “right” keys to select. These keys also function as
left and right mouse buttons when accessing your PC. When navigating the
SkipJam iMedia menus the left and right select keys can be used
interchangeably.
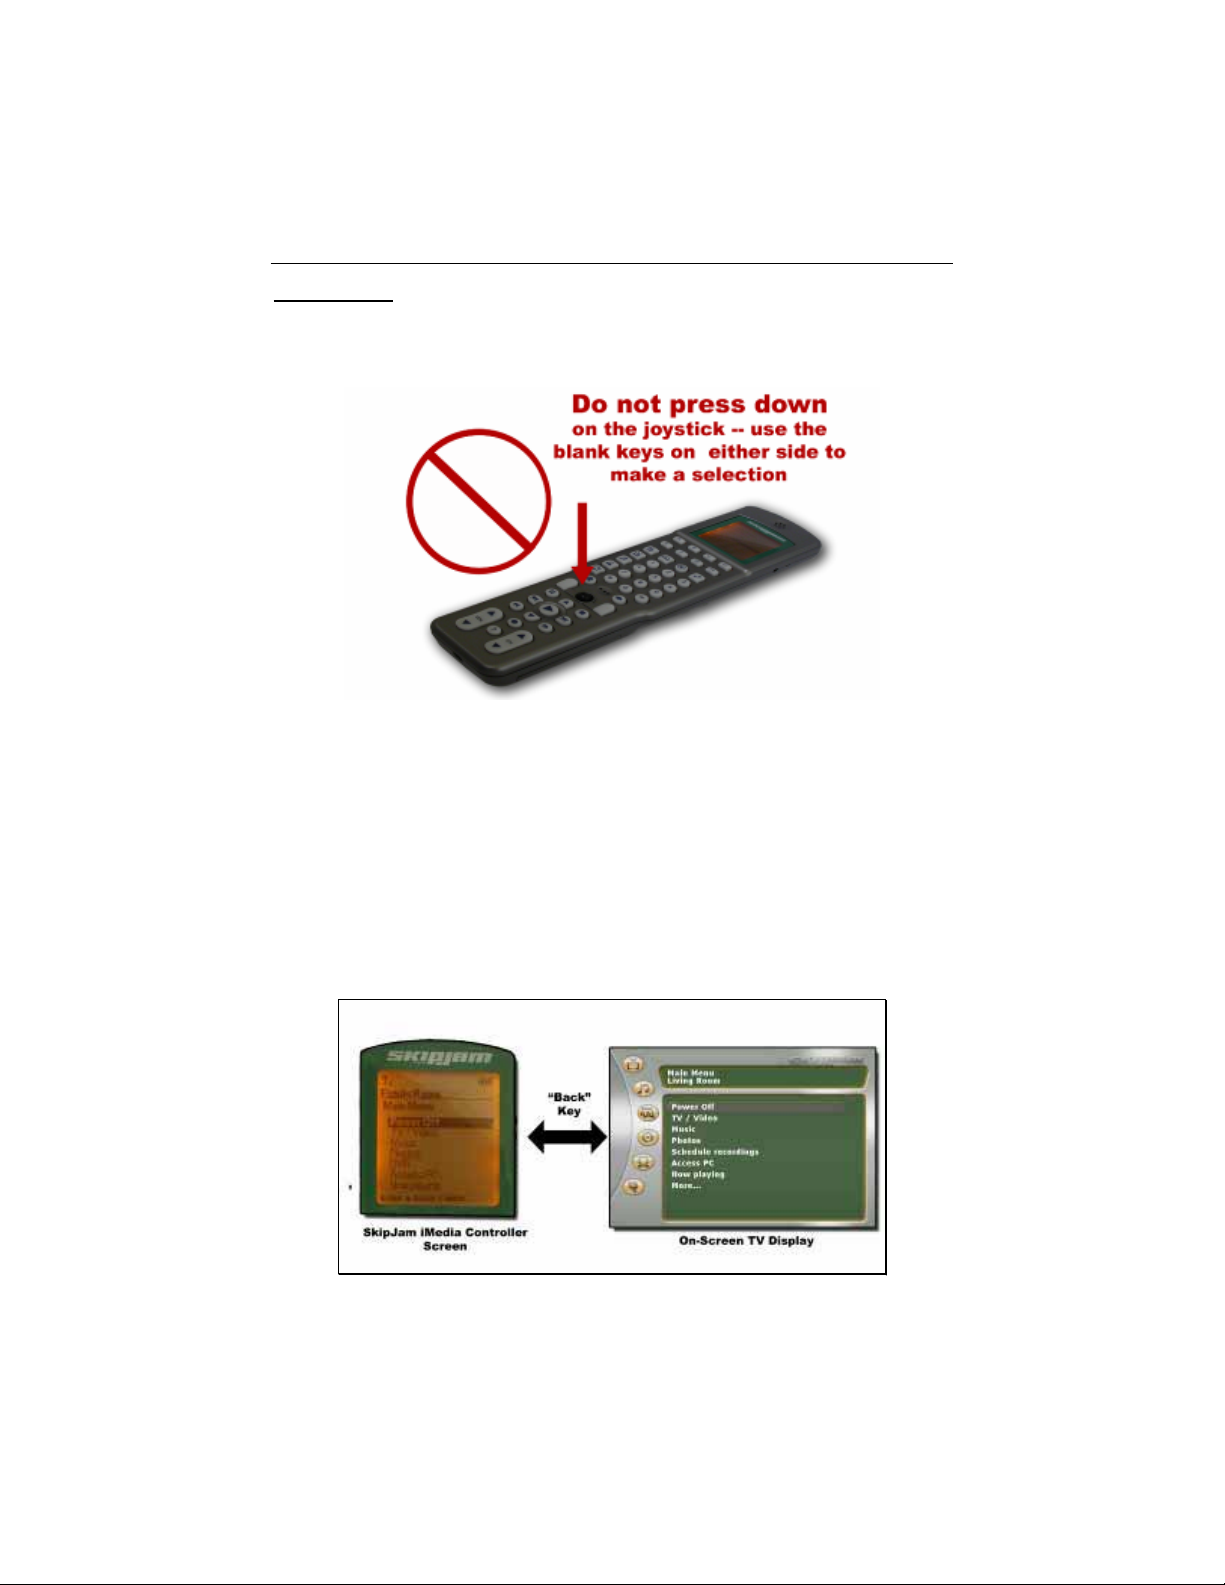
Switching between on-Remote and on-TV display
When you wish to control the system using only the display on the iMedia
Controller, you press the “back” key until the display jumps from the TV
screen to the iMedia Controller.
- 19 -
Page 27

SkipJam iMedia Center User’s Guide
IMPORTANT! Pressing the “PHONE” key switches the display to the remote
so that you can dial phone numbers without interfering with the TV. You can
continue to use the on-Remote menus when you are done with the phone
call, or you can press “Home” and then “Back” to get the display back to the
TV Set.
IR Remote Control
You may control the functions of the iMedia Center using the SkipJam IR
remote control and the On-Screen TV Display. You MUST have a TV
screen connected to the iMedia Center in order to use the SkipJam IR
remote control.
Note: If you are using the SkipJam IR Remote control, you may need to
shield the devices from IR coming from the remote, so that the SkipJam IR
remote will not interfere with commands issuing from the iMedia Center
itself. For more on this see Understanding the iMedia Universal Remote
Capability on page 22.
Select a Room Name
Select a “room name” for your iMedia Center. Each iMedia Center and the
devices connected to it are identified by the “room name.” For example, a
device might be known on the iMedia Network as “Family Room Sony VCR”
If you have multiple iMedia Centers in the same physical location we
suggest naming them manually.
Set up Devices
You are now ready to configure the iMedia Center and configure the devices
you have connected to it.
Select “More…” from the main menu, then select “Setup”
Select “Device Setup”
Each device connected to the iMedia Center must be configured in the
Device Setup section, or you will not be able to access the device.
Special Information about the “TV” device:
The iMedia Center comes pre-defined with a “TV” device configured as
connected to the video and audio outputs. If this device is deleted you will
not be able to view videos or listen to music, because the iMedia Center will
think it has no output devices available. (You will still be able to bring up the
menus and re-configure the iMedia Center.) This is in case you want to
- 20 -
Page 28

SkipJam iMedia Center User’s Guide
remove all output capabilities from iMedia Centers that are used for
recording or streaming media only.
If you have a separate TV/Screen and Home Theater or Receiver device
which receives the audio output and controls the volume, you will need to
add that device manually, and re-configure the “TV” device to “not
connected” in the audio section.
Adding devices:
Select “Add new device” from the menu. Select the device type.
IMPORTANT: Devices operate differently under iMedia depending on their
“type.” For example, “Receiver” “TV” “Home Theater” “pre-Amp” “Amplifier”
are considered “output” devices which do not produce any music or
pictures and thus cannot be connected to the audio and video inputs on the
iMedia Center. (Keep in mind that you can configure a single device to
connect in more than one spot by creating multiple “device” entries.
Cable and Satellite boxes:
The iMedia system treats cable and satellite boxes in a special manner.
The iMedia System assumes that all cable and satellite boxes in your home
are equivalent to each other. When you select to view “Cable TV” the
iMedia System will assign the nearest (fastest network-wise) Cable Tuner to
you automatically. This way, if the Tuner connected to the iMedia Center in
the room you are viewing is currently recording a show, the iMedia Center
will automatically connect you to the “nearest” available cable tuner.
The TV Tuners built into the iMedia Center are designed for over-the air
reception and basic cable. These Tuners are also treated in the same way
and shared among all the iMedia Centers in a home.
If you do not connect cable or an antenna to your TV Tuner input, you’ll
need to change the Internal TV Tuner device to “Not Connected.”
After selecting the device type, select the brand name for the device. (Use
the Channel Up/Down keys move the cursor a full screen).
Select the connection location for the device. Press the “select” key to show
the choices, navigate to the connection you want and press “select” again.
Select “Left” to move to the next option. Select “Next” when done.
- 21 -
Page 29

SkipJam iMedia Center User’s Guide
Note: You may configure more devices than are directly connected to the
iMedia Center. Devices configured as “Not Connected” can still be
controlled (turned on/off, etc) by the iMedia Center and can be part of the
system as a whole.
Power control options:
Each device in the iMedia configuration can be turned on and off
automatically by the iMedia Center as needed using remote control
commands (see Understanding the iMedia Universal Remote Capability on
page 22). This allows you to power on only those devices actively being
used, saving power and increasing the life span of your devices.
If you want the iMedia Center to turn your devices on and off automatically,
select the auto on/off option. Note that for this to work, you’ll need to teach
the iMedia Center the remote control codes for the device.
Select Finish to complete the port configuration for this device. You can
always go back and change settings.
Configuring device remote control:
The SkipJam iMedia Center can be configured as a universal remote control
system which can control all the devices in your home with the iMedia
Center’s own remote. Once you’ve set up a device, you can teach the
iMedia Center the remote control codes for that device.
If you wish, you can start using your iMedia Center now and return to this
section later. Skip to Accessing Your Digital Media on page 29 to configure
your network setup for Network Media such as MP3 or MPEG files, or skip
to iMedia Playback on page 32 to start using your local devices.
Understanding the iMedia Universal Remote Capability
Each iMedia Center can learn and store the remote control codes for up to
256 devices, each with up to 512 codes. You may have up to 512 iMedia
Centers on any home network. When you play any device or file on your
iMedia network, the iMedia network automatically directs the command keys
and sends the appropriate remote codes to the device you are viewing.
For example: If you are in the “Bedroom” watching a DVD player which is in
the “Family Room” and you press “Play” in the Bedroom, the iMedia System
sends the “play” command to the iMedia Center which is connected to the
DVD player and that iMedia Center sends the remote control code for the
DVD’s play button to the DVD. If you press “Volume Up,” the iMedia Center
- 22 -
Page 30

SkipJam iMedia Center User’s Guide
sends the volume up command to the Home Theater Receiver in the
Bedroom.
Using the “Devices” Menu (pressing the “Devices” key or from the “More…”
menu off the main menu) the iMedia System can be instructed to emit any
remote code for any device at any time.
If you have devices set to power on/off automatically, when you select to
view a device, that device is turned on. When you are done using the
device, the device will be turned off. There is a slight delay in the “off”
processing, so that a device is not actually turned off for a short while after
you have “turned off” the device in case you change your mind. For
example, if you are listening to music, you may stop listening to one song
while you search for another. You do not generally want your amplifier
turned off during this time.
If your TV device is set to power on/off automatically (and you have taught
the iMedia Center the codes for your TV), your TV will turn on automatically
when you press the “Home” key to view the iMedia Center main menu on
the TV. After a period of inactivity it will shut off. To force the TV to turn off,
select “Power Off” and power off the current room (first selection) in the
power off menu.
Infrared Emitters
In order to have the iMedia Center send remote control codes to the devices
near it, you must connect the supplied “Infrared Emitters.” These cables
allow the iMedia center to send infrared (IR) signals to the A/V devices
connected to the iMedia Center. There are 3 emitter jacks. Connect the IR
emitter plug into any of the 1/8” (3.5 mm) mono jacks labeled “IR Out”
located on the back of the iMedia Center.
The side of the emitter with tape on it is designed to emit lower levels of IR
and to be positioned directly over the IR sensor of the device being
controlled. The side without the tape emits higher levels of IR and can be
placed near the front of the unit or adhered to the inside of a cabinet door.
- 23 -
Page 31

SkipJam iMedia Center User’s Guide
The following diagram illustrates various placement options for the IR
emitters:
IR Interference
Some light sources can interfere with smooth remote control operations.
These sources include fluorescent lights, many plasma TVs, and direct
sunlight.
In such cases you will obtain better results adhering the emitters directly to
the sensor on the device. If you find that your devices are still not
responding to codes from the SkipJam iMedia Center, try shielding the
device not responding from other light sources: You can place these
devices in a sealed cabinet, or obscure the front of the device from ambient
light sources, or obtain an IR shield from the SkipJam web site.
Note: Some devices can be confused by multiple IR signals at one time.
This could happen, for example, if you are using the SkipJam IR Remote
control. When you are watching cable TV and you press Channel Up, the
iMedia Center sends the cable box’s channel up command to your cable
box. The cable box may “see” both the SkipJam IR Channel Up code as
well as it’s own Channel Up code and get confused.
To avoid this situation, use the SkipJam RF Controller, or shield your
devices from IR coming from the SkipJam remote. IR shields for this
purpose are available on the SkipJam web site, or you can simply use
anything that will obscure emissions from outside.
- 24 -
Page 32

SkipJam iMedia Center User’s Guide
Teaching the iMedia Center to Control Your System
When you have finished configuring the input and output ports, you can
have the iMedia Center “learn” the remote control codes for all your devices.
IMPORTANT: When you want the iMedia Center to learn codes for a
remote, make sure your remote has fresh batteries, and hold the remote
level and 6 to 12 inches from the IR learning window on the front of the
iMedia Center.
For best results during the learning process, also turn off any ambient light
sources which may interfere. See “IR Interference” above. Preventing
interference is particularly important during the learning process.
Searching the iMedia Remote Database
The iMedia Center contains a database of remote control codes for
thousands (over 7,000 at last count) of devices. You can have the iMedia
Center locate the codes for your device by pressing only a few keys on the
remote control of the device you want the iMedia Center to “learn.”
Select “Find remote control codes” from the “Modify” menu for that device.
The iMedia Center will ask you to press several of the keys on the remote.
Hold the remote near the IR learning window and press the keys as
instructed on-screen.
If the remote is found in the database you are done. If not proceed to
learning keys individually.
Learning Keys Individually
Although our database is very extensive, your device may not be included.
Even if your remote is found in our database, some of the keys for the
particular revision or sub-model that you have may differ from what is found
in our database.
- 25 -
Page 33

SkipJam iMedia Center User’s Guide
Also, the iMedia Center remote control database contains only codes for
common keys such as “Play” and “Pause” – those keys which are found on
the iMedia Controller. However, many devices contain special function keys
such as “Zoom” or “Pan” or “Edit” and so on.
To deal with these issues, the iMedia Center can learn any key for any
remote control. These individually learned codes override whatever was
automatically found in the database (so that if you manually learn “Play”
your new Play code will replace the “Play” code loaded from the database).
The iMedia Center also has 8 “SoftKeys” which give direct access to
additional learned remote codes from any device, and has up to 200
“custom” keys which can be defined for each device.
To learn a key individually, select “Modify remote control record” for the
device whose remote you wish to learn. Select the key you wish to learn
and follow the on-screen instructions.
If you are learning a “Soft Key” (one of the keys labeled A through H) you
will be asked to name the key. (use the number keys in a Multitap fashion to
enter text). This name will appear on the iMedia Controller screen as a
menu entry, once you’ve accessed the particular device. You can activate
the device by pressing the Soft Key A-H or by selecting the key from the
menu.
Tip: Don’t feel constrained by the labeling of the keys. You can learn any
function into any key location, just be sure you can remember what you
placed where…. For example your device has an “Enter” key you may wish
to program that into the “#” on the iMedia Center remote, and a “Clear” key
might go in the “*” position. But be consistent and use the same convention
for all your devices.
Controlling a Device’s Power On/Off
Any given device may have several different ways of being turned on or off
(in addition to the power switch and unplugging it). Many devices have a
“Power Toggle” switch which turns the device on if it is off and turns it off if it
is on.
Some other devices have separate on and off keys known as “discrete”
power keys. These discrete codes are an “On” code which only turns the
device on and an “Off” code which only turns the device off.
To complicate matters further, some devices have a switch labeled “power”
which alternately emits discrete on and off codes.
- 26 -
Page 34

SkipJam iMedia Center User’s Guide
Discrete on / off codes are generally better and you should use those if they
are available, since an “on” code will never accidentally turn your TV off. If
the iMedia knows both the discrete and the “toggle” codes, it will use the
discrete codes only.
Note: The www.remotecentral.com website contains discrete on/off codes
for many devices. If your remote does not emit discrete on/off codes, you
may find them there. You can cut and paste the codes found on Remote
Central into the iMedia Browser interface. It is useful to have the discrete
on/off codes for maximum reliability in operation and in order to program
remote control macros.
When you’re watching a device using the iMedia system, you also have
control over at least 2 (source and TV) devices and sometimes several
others.
Because of this diversity in devices, you will not find a simple “Power” button
on the SkipJam iMedia Controller. Instead, when controlling a device you
will see several power options in the iMedia Controller display, allowing you
to turn on/off the source devices (DVDs, etc) and the TV.
Because it lacks a screen, the SkipJam IR Remote has a single power
function which serves to turn off all the devices currently in use, and only if
those devices are set to “auto on/off.” Select “power” to turn on your TV and
display the Home Menu. Then once you are watching / listening to
something, pressing power will turn off all devices you are accessing.
Automatic On/Off
The iMedia Center can automatically turn on whatever devices are needed
for you to view or listen to anything connected to the iMedia network, and
then turn the devices off when you are finished.
To set up the iMedia Center to turn devices on and off, you need each
device to be defined with “auto on/off” in its device configuration, and you
need to make sure that the device’s power control codes have been learned
correctly.
Using the iMedia Controller to Control Other Devices
Once you have had the iMedia Center learn all the codes for your devices,
you can control these devices in one of 2 ways:
1. By accessing (viewing/listening) those devices – accessing the devices
creates a “session” in which you are watching a particular device;
- 27 -
Page 35

SkipJam iMedia Center User’s Guide
2. By telling the iMedia Center to emit the remote control codes for a
particular device directly using the “Devices” menu.
Controlling a “Session”
Once you’ve chosen what you want to watch / listen to, the “universal
remote” keys on your remote become active and control the appropriate
device automatically. For example, if you choose to watch a DVD player,
the play, pause, fast forward, and other navigation keys on your iMedia
Remote or Controller will be sent to the DVD.
At the same time, the Volume and Mute commands will be sent to your TV
or Home Theater device.
If you have defined any Soft Keys or Custom Keys for your DVD player,
those will be available through the iMedia RF Controller’s menu, and for the
Soft Keys, directly by pressing A through H.
This method of controlling several devices at once is considered “Session
Control” – there must be something playing in the room you are currently
controlling in order for session control to be active.
Once you’ve started something playing and you have an active session, you
may press the “Home” key to get back to the iMedia Menus. The shuttle
control (Play, etc), number keys, and Volume will continue to operate the
current session, but the menu navigation keys will navigate the iMedia
Menus. Press “Home” again to go back to your A/V session.
Controlling a Specific Device / Devices Menu
If you want to access the custom keys for a specific device, or if you want to
control a device when nothing is currently playing, or if you want to control
any specific device for any reason, you can do so by selecting the device
from the “Devices” menu.
To access the Devices Menu, press the “Devices” key on the remote or
select “More / Devices” from the iMedia Home Menu.
The first selection on the Devices menu lets you return to “Session Control”
mode for the room you are currently controlling (see above). “Session
Control” mode is the default behavior of the iMedia System, in which keys
are sent selectively to the appropriate device.
In the Devices menu, all devices in your iMedia Network will be listed by
room, and selecting a device will allow you to send remote control codes to
that device.
- 28 -
Page 36

SkipJam iMedia Center User’s Guide
Accessing Your Digital Media
Sharing Your Media Files
In order to play digital media files (music/photos/videos) from your home
network, you will first need to make those files accessible to the iMedia
Center. To do this, follow these instructions:
Be sure to read “Network Security” on page 64.
Windows PC:
Make sure the Windows Firewall is off (XP SP1 or earlier) or allows file
sharing as an exception (XP SP2):
Windows XP SP1 or earlier
Turn off the firewall. From the start menu, select “Settings / Network
Settings.”
Select your network connection and click “change settings.” Select the
“Advanced” tab, and uncheck the “Protect my computer…” setting, and click
OK. (For more information on the Windows firewall, see Microsoft
knowledge base article number 283673 or number 298804 found at the
support.microsoft.com
web site.)
Once the system is up and running, for better security you can configure
your windows firewall to allow file access while blocking other network ports.
To have this security ability you will need Windows XP Service Pack 2. See
below.
- 29 -
Page 37

SkipJam iMedia Center User’s Guide
Windows XP SP2:
Check that your firewall allows file sharing. Access the windows firewall
settings by clicking on “Windows Firewall” in the Windows Security Center
or in Control Panel. On the Firewall “General” tab, make sure the box
labeled “Don’t allow exceptions” is NOT checked. Select the “Exceptions”
tab and check the entry labeled “File and Printer Sharing”
Enable file sharing (both SP2 and earlier)
Select the folder(s) which contain your digital media files: Right click
on the folder you wish, and select “Sharing.” From the dialog select “share
this folder on the network.” If you wish to be able to record to this folder,
also select “Allow network users to change my files.”
- 30 -
Page 38

SkipJam iMedia Center User’s Guide
Windows System Passwords
If your system requires a password on startup you will need to use one of
the following access methods:
1. Recommended: Enable Guest Access on PCs which have a
startup password. To do this go to Settings/Control Panel/User
Accounts, and select “Enable Guest Access”
2. Manually enter passwords on each iMedia Device connected to the
system.
3. Remove the password from the main “administrator account”.
Macintosh OSX
Turn off the Macintosh Firewall: Select the “sharing” icon from “system
preferences.”
Click on the “Firewall” tab. Select “Stop” and verify that “Firewall off” is
displayed.
Select the “sharing” icon from “system preferences” and check the selection
“Windows Sharing.” Make sure that “Windows Sharing On” is displayed.
Once the system is up and running, for better security you can configure
your OSX firewall to allow file access while blocking other network ports.
For file sharing you must allow access through TCP ports 139 and 445, and
UDP ports 137 and 138.
- 31 -
Page 39

SkipJam iMedia Center User’s Guide
Linux
You will need to load and install a Samba server. On Redhat 9 systems,
click the Red Hat button and select “System Settings / Server Settings /
Samba Server.” Click “Add” from the dialog that pops up. On other
systems, you may need to install the Samba server (smbd) manually and
modify the samba configuration file (/etc/smb.conf on most systems – check
“man smbd”). If you do not have Samba installed, please see
www.samba.org.
Configuring the iMedia Center for Network Access
Once “shares” are available on your network, you can configure the iMedia
Center to scan them automatically for media files, and you can set the
iMedia Center recording options to record to these shares.
Locating Media Files
Select “More…” from the iMedia Home menu and select “Supervisor
Functions” and then “Setup” and “Network Setup.” Choose “Build host list”
to have the iMedia Center scan your network for available servers. When
this process is complete, select the server(s) on which your files are located.
And then select the folders on the server that contain media.
Then select “Look for media files” in the “Supervisor Functions” menu to
have the iMedia Center catalog all the media files on the shares you’ve
selected.
You are now ready to play digital media files.
iMedia Playback
Your iMedia Center can play a variety of digital files, and can combine the
playback of digital and analog sources at the same time.
To watch a device, select “Home” then “TV/Video” or press the “TV” button;
then select the device you want to watch.
To watch a digital recorded video file from your network, select “Home”
“TV/Video” “Recorded Video” or press the “Video” button and pick the video
you want to watch.
To view photos select “Home” then “Photos” or press the button, then pick
the photos or group of photos you want to view.
To listen to music select “Home” then “Music” or press the “Music” button.
- 32 -
Page 40

SkipJam iMedia Center User’s Guide
Once watching or listening to music photos or videos, the remote buttons
will behave much as you would expect. For advanced use of the buttons
see the sections on the Music, Photo and Videos menus (for example you
can zoom, pan or change the aspect ratio of photos).
Combining Different Sources
You can combine any audio and video source by selecting them in
sequence. For example, if you are watching TV and are waiting for
something to start, or are simply scanning the headlines on a news channel,
you can play music. You can do the same with photos.
To do this, select the video or photos you want to watch. Then press the
Music, select the music, and when asked whether you want to leave the
video playing, answer “Yes.” Press “Home” to take the iMedia Menus off the
screen.
When you have multiple sources playing at one time, the remote keys
operate the last source started. So if you view photos, then start music,
selecting “skip forward” will skip to the next song.
COOL:
If you are watching TV and start Music, pressing Channel Up/Down will still
control your TV Tuner! (Your remote is controlling 3 devices: digital music
player, TV Tuner, and Home Theater/TV volume) Pressing “Stop” will stop
the Music and resume the TV Audio.
- 33 -
Page 41

SkipJam iMedia Center User’s Guide
Digital Recording to a Network Disk
To record any media source to disk you must first set up the network
recording destination using the Recording Setup menu located in
Home/Supervisor Functions/Setup/Recording Settings.
Understanding Digital Video Recording
When recording video digitally, the video signal is converted into a digital
stream of bits. For regular TV or DVD this stream of bits occupies
approximately 15 GigaBytes per hour of video. Since this is an
unacceptably large amount of space, the SkipJam iMedia Center utilizes
video compression technology to reduce the amount of disk space required.
Compressed video is generally known as “MPEG” video for the Motion
Picture Experts Group that developed the compression standards. Using a
variety of techniques, compressed video can store video that is nearly
indistinguishable from the original in as little as 1/10
However, the more the video is compressed, the lower the quality of the
resultant compressed video. Video compression is counted by the size of
the resulting video stream. Keeping in mind that the original video takes 15
GigaBytes per hour, a typical DVD requires only about 4 GigaBytes / hour to
hold the same video.
th
of the space.
Industry standards count video recordings in Mega bits per second (Mbps)
instead of counting GigaBytes per hour, and they call compressing the video
“encoding.” So we use their terminology for compatibility.
So, when a video source enters the SkipJam iMedia Center, it is encoded
(compressed) into a more manageable size. You get to set the amount of
compression that happens by dictating the size of the resulting video in
Mega-bits-per-second (Mbps). The more Mbps, the higher the quality of the
resulting video, but the more disk space is used.
A higher encoding bit-rate (Mbps) results in a higher quality picture,
however, a higher quality recording requires more disk space as well as
more network resources, and may strain wireless networks…
As a rule of thumb, a typical 2 hour movie will use 1GByte of disk
space per 1 Mbps of encoding. Or if you prefer, 1Mbps = ½ GB /hour.
One other thing to remember is that MPEG have revised and improved their
compression schemes. DVDs are compressed using MPEG version 2
(MPEG-2). The iMedia Center can also compress videos using the newer
MPEG version 4 (MPEG-4). Generally speaking MPEG-4 can achieve
- 34 -
Page 42

SkipJam iMedia Center User’s Guide
roughly equivalent quality at half the bit-rate of MPEG-2. So that a 4Mbps
MPEG-4 recording is equivalent in over-all quality to a DVD’s 7Mbps MPEG-
2.
So when you are recording video, you get to select the type
of compression
(MPEG-2 or 4) as well as the degree of compression as dictated by the
Mbps rate. You therefore control the size of the media file and the quality.
IMPORTANT: Note that the MPEG-4 standard is more complex and is
implemented in a variety of different ways. So for maximum compatibility
with other systems you may want to record using MPEG-2 despite the
increased disk space usage for a given quality.
If you plan to use a portable media player, test various recording formats
from the iMedia Center on your portable player before committing.
Types of Recordings
The SkipJam iMedia Center provides 2 different recording capabilities.
The first is what you might expect in a recording: When you press “record”
whatever you are currently watching is recorded to a hard disk file. The
recording continues for an amount of time you specify, or until you press
“Stop.” The resulting .mpg file is a standard movie file which you can play
on most PCs. This is known as “DVR” recording (Digital Video Recording).
For Example: To record a video source such as a VHS tape of your family
wedding to hard disk, you would select to view the tape: (Place the tape in
your VCR, and select Home/ TV-Video/ VCR). Then press “Play” until
you’ve skipped past the tape’s header, and then press “Pause” to pause the
tape playback. Press “Record.” When the “recording” message appears on
screen, press “Play” to start the tape playing again. Press “Stop” when the
recording is complete.
You can also set a fixed duration for your recording, and watch something
else while the recording is on-going. After you’ve started recording, press
“Home” and select what you want to watch.
The second type of recording is known as “Continuous Loop Recording.”
This type of recording which we call “loop file” for short is used for
continuous recording of live-TV sources such as cable tuners. A loop file
recording keeps a continuous loop of the last hour or two (you set how large
it is) of TV and lets you pause and rewind through your TV viewing.
A loop file has a fixed size and as new video comes in to the loop file, the
oldest is discarded.
- 35 -
Page 43

SkipJam iMedia Center User’s Guide
Loop files are only created for live-TV sources, which are Cable (either with
the built in tuner in the iMedia Center or through an external Cable Tuner) or
Satellite. To start recording to a loop file, select any live-TV source and
press “pause”. This will create the loop file and pause playback of the
source.
Press “play” to restart playback.
Recording Settings
The iMedia Recordings settings let you configure the recording destination,
default duration and bit rate at which all recordings are made. The
recording settings also allow you to control the default bit rate at which
iMedia Centers stream video to other iMedia devices and the size of the
loop file recordings.
iMedia Recording Settings
When watching any video source, pressing “record” on your remote will
record what you are currently watching. If you select “use settings
automatically” the recording will commence immediately, using the settings
in the “Recording Settings” menu.
If “use settings automatically” is not selected, pressing “record” brings up a
screen that lets you modify these settings (for example entering a more
descriptive file name) and the recording begins when you select “OK”
iMedia Streaming Settings
This screen lets you set the default bit rate used by the iMedia Center for
streaming videos to other iMedia devices. This same encoding bit rate is
used by the iMedia Center when recording to a loop file. Set this value low
if you have a wireless network.
The loop file duration setting tells the iMedia center how much of live TV to
maintain in a loop file. If you select 2 hours, you will be able to rewind
through the last 2 hours of TV. Remember that the loop file will be larger if
the duration is longer. ½ GB of disk space per hour for each Mbps. So a 2
hour loop file at 2 Mbps will use 2GBytes of disk space.
- 36 -
Page 44

SkipJam iMedia Center User’s Guide
iMedia Menus
Power Off
This displays the power off menu. The power off menu lets you selectively
power off rooms or specific devices.
To power off all devices you are currently watching / listening to the current
room you can highlight “Power Off” and press “Select” twice.
You can also power off other rooms or all rooms by selecting the rooms you
want to power down.
The Power off menu also lists individual devices, and allows you to send
them Power Toggle commands. This can be useful if a device did not turn
off automatically, or has gotten out of “sync”.
TV / Video
This displays a submenu of available video sources to watch. This includes
digital media and video devices attached locally to the iMedia Center and
other iMedia Centers.
At the top of the menu are selections for “TV Tuner,” “Cable Tuner,” and
“Satellite Tuner.” These selections will appear if you have any devices
configured as “Cable” or “Satellite” devices. The “TV Tuner” selection will
appear if you have any of the iMedia Center’s internal TV Tuner connections
connected to a Cable source – The iMedia Center assumes that the Tuner
is connected, and if it is not you will need to go to Setup/Device
Setup/Internal TV Tuner and modify the setting to “Not Connected”.
Selecting “TV Tuner” will connect you to the internal TV tuner of the nearest
(networkly speaking) iMedia Center that is not busy.
Selecting “Cable” will connect you to an available “Cable” device, and
“Satellite” to an available “Satellite device”. These choices will only appear
if you set up any devices and selected “Cable” or “Satellite” as the device
type.
Recorded Videos
The next entry is “Recorded Videos.” This screen can also be accessed
directly by pressing the “Videos” button on the remote. Accessing this
function lets you browse through your collection of videos and video macros
(see the section on macros on page 58).
- 37 -
Page 45

SkipJam iMedia Center User’s Guide
You can browse any videos you’ve recorded using the iMedia Center PVR
function, or any videos you’ve downloaded or created on your PC, so long
as the videos are on a hard drive that is shared and defined in the network
shares scanned by the iMedia Center. (see page 29 for information on
setting up the network shares).
Video Devices
Below these (TV/Cable/Satellite) you will find all the other devices you’ve set
up, listed by room. You can select any of these to establish a connection
which lets you view and control that device directly.
For example, if you have set up a “Family Room” which has a “DVD” player,
you can view the DVD player in any room by selecting that DVD player from
the TV/Video menu.
Using the SkipJam Video Player
Once you’ve selected a video source, the SkipJam remote control buttons
can be used to control that source. If you are viewing a recorded video file
from a shared network drive, the following keys can be used to navigate
through the file:
Key When playing While Paused
Play Hide/Show status Start Playing Resume Play
Pause Pause video - Pause
Stop Stop playback Stop playback Stop playback
Fast Forward Fast forward Slow motion FFwd Faster
Rewind Rewind - Rewind Faster
Skip Forward Skip forward 30s Single frame Skip 15 min forward
Skip Back Skip back 10s - Skip 15 min back
If you are viewing a video device, the keys on the remote cause the system
to send the corresponding IR command to the device.
- 38 -
When Fast Forward
or Rewind
Page 46

SkipJam iMedia Center User’s Guide
Music
The music menu lets you access all your audio sources. The music menu
includes browse categories for digital music (MP3, etc) and music macros
(see the section on macros on page 52). The music menu also provides
direct access to Internet Radio and FM Radio, and to other devices through
a sub-menu.
The “other devices” entry on the music menu lets you listen to the audio
portion of any device in your home. This lets you listen to the audio from
any device (including devices which generate video too), letting you
combine video from any source with audio from any other.
When listening to an audio file from any network share (MP3, etc.) the
following keys can be used to navigate the audio player:
Key Action
Play Resume play if paused
Pause Pause playback
Stop Stop playback
Fast Forward Fast forward
Skip Forward Skip to next track
Skip Back Skip to previous track
If you are playing an audio device, the keys on the remote cause the system
to send the corresponding IR command to the device.
You can mix any audio source with any video source by starting the video,
and then starting the audio (with photos you may start the audio first if you
prefer.)
When mixing audio and video, the navigation keys will be sent to the last
device started. For example, if you select to watch a DVD and you start an
audio file playing, pressing “Pause” will pause the audio. If you press “Stop”
the audio will return to the DVD. Only the navigation keys will be affected.
Other keys (Channel, etc.) will continue to be sent to the original device.
So, if you select “TV” and then select a music playlist, pressing “Pause” will
pause the music, while pressing the number keys or “Channel Up” will
change channels, allowing you to channel surf while listening to your
favorite music.
- 39 -
Page 47

SkipJam iMedia Center User’s Guide
Photos
The Photos menu lets you browse and view digital photos stored on your
network. The photo viewer lets you browse your photos by Title, by Folder,
or by Year.
Once you’ve selected a given set of photos you can browse them in name
order, or randomly by selecting “[Random view all]”.
The photo viewer has 2 modes: Full screen and Thumbnail. The full screen
mode cycles through the photos at a fixed rate, displaying each photo in the
same size and zoom level it was last viewed (note: for the iMedia Center to
remember the zoom and view settings, the network share containing the
photos must be write enabled.) The thumbnail view shows thumbnails of 12
of the photos at a time, allowing you to scroll between them.
The following keys can be used to control the playback of photos:
Key Action
Play Resume play if paused
Pause Pause playback
Stop Stop playback
Fast Forward Speed up slide show
Rewind Slow down slide show
Skip Forward Skip to next photo
Skip Back Skip to previous photo
Select Toggle to/from thumbnail view
Ch Up Zoom in
Ch Down Zoom Out
Numeric 1 Set 4x3 aspect
Numeric 2 Set 16x9 aspect
Numeric 3 Set 16x9 letterbox aspect
The aspect ratio settings adjust the display of the photo to compensate for
the stretching of pixels when the photo is displayed on different types of TV
sets.
- 40 -
Page 48

SkipJam iMedia Center User’s Guide
Schedule Recordings
This menu lets you use the downloadable program guide to schedule
automatic recording of broadcast TV, and to manage the recording
schedule.
Add a new entry
This menu entry lets you search for or browse the program guide to find
programs you wish to record. You can search for specific text in each of the
fields of the program information database, or you can browse by using the
various categories and meta categories found in our unique program guide
tree.
For example, you can easily select “Broadcast Network / Prime Time /
Reality Show” as a category. You can then browse the individual shows
that match those criteria, and then browse the individual episodes which will
air within the next week.
Once you’ve found a show, you can choose to record episodes individually,
or to set up “rules” which record episodes on an automatic basis.
IMPORTANT: The SkipJam iMedia Center NEVER deletes any data from
any of your network shares. So you will need to manage your disk space,
and to be careful to clean up once you no longer wish to keep any given
recording.
Modify / Remove entry
This menu entry lets you change or delete recording rules and scheduled
episode recordings.
View To Do List
This menu simply displays a list of up-coming scheduled recordings.
- 41 -
Page 49

SkipJam iMedia Center User’s Guide
Access PC
This menu entry lets you directly access any PC running the SkipJam
iMedia Client for windows on the local network. The PC’s screen is shown
on the TV and you can use the remote to navigate the PC using the keys
below.
Key Action Key Action
RF Joystick Move mouse RF Up Scroll up
RF L/R Select Left / Right click RF Down Scroll down
IR select Left mouse click IR Arrows Nudge mouse
IR Info Right Click
Ch Down Zoom Out Skip Forward Next / Alt Æ
Ch Up Zoom In / region Skip Back Back / Alt Å
Stop Close (Alt-F4) * Backspace
Play Switch (Alt-Tab) # Enter
Fast Forward Tab
Rewind Back Tab
Numeric Multitap (e.g. 2,2=b)
Pause Show keyboard
Guide Alt (activates menu)
Notes: 0 key on Multitap includes “http://” and other web shortcuts.
Pressing pause quickly will change the location of the pop-up keyboard so
the screen is not obscured.
To access a menu, press Guide followed by the letter of the menu. For
example for F
ile / New press Guide, 3, 3, 3, 6, 6.
- 42 -
A
B
C
D
E
F
H
Launch browser
Launch e-mail
Launch IM
Launch Word
Launch Excel
Show Favorites
Browser Home
Page 50

SkipJam iMedia Center User’s Guide
Now playing
Displays information on what is currently playing. Press left or right to scroll
between rooms.
More…
This displays the next available set of menu entries that includes supervisor
settings and setup.
Devices
This menu lets you send remote control codes to any device connected to
the system.
The first entry “Playing in xxxxx” reverts the remote to its normal state in
which the control codes are distributed intelligently. For example, if you are
watching a DVD, the volume up keys are sent to your TV, while the Play key
is sent to the DVD.
Selecting a device from the Devices menu, forces the remote to control
ONLY that device. This is useful, for example, if you want to control special
functions on the TV while you are watching a DVD. Under normal
circumstances, the menu and shuttle control keys would be sent to the DVD,
but if you wish, say, to change the color setting or aspect setting on the TV,
you would select the TV from the Devices menu, control it, and then revert
to the “Playing…” session control to control the DVD once you are done.
Change Current Room
This menu lets you select which room you wish to control. You can use the
TV, or the menu on the remote to start and stop things playing in any iMedia
room in your home.
Remember to set your remote back to it’s normal state so that you don’t
accidentally activate another room…
Phone functions
On iMedia devices that have an RF remote, the phone functions menu lets
you manage the RF remote functionality.
- 43 -
Page 51

SkipJam iMedia Center User’s Guide
Follow Me
The follow me menu lets you move or replicate whatever you are watching
to other rooms. This lets you have multi-room audio playback. Select the
music list you wish to listen to, then select “follow me” and add the rooms in
which you wish to hear the music (or select Everywhere).
To change the volume, you’ll need to do so in each room.
For video, follow me lets you relocate to another room and continue
watching. When watching a video, press “Pause” to pause playback.
Select “Follow me” and the destination. When you get to the destination
press “Play.”
Send Message
This menu lets you broadcast text messages to all iMedia Systems,
including iMedia PC Clients on the network.
Scripts
This menu accesses the scripts pages which have been set up through the
browser menus. Please see “Browser Interface & Menus” on page 52
Supervisor functions
The supervisor functions menu contains all functions to which you might
want to limit access, such as setup. If you have a Supervisor password
defined, you will need to enter the password to access these functions.
Setup
The setup menu lets you set up the iMedia system. A detailed description of
the setup process is provided in the section titled iMedia Center Setup on
page 12. The following is a brief description of each menu:
Device Setup
Add a new device: allows adding device definitions to the iMedia Center.
You will need to select the Device Type, Device Brand, and Device
connections. You can change settings as described below.
Remove device: Remove one of the device definitions
- 44 -
Page 52

SkipJam iMedia Center User’s Guide
To change a device, select it from the list of devices shown. Once the basic
device properties are configured, you can access the device’s IR and control
settings. The options are:
View device properties: lets you see how the device is configured
Change device properties: lets you change the type and connection
settings
Modify remote control record: lets you individually program any of the IR
codes for the device
Find remote control codes: lets you search the IR database for your
remote codes
Clear all remote control codes: lets you re-initialize the IR codes for the
device
Notes: you may set up devices which are not connected to any iMedia
Center ports so that you can control these devices with your iMedia remote.
Alternately, you can add keys for other devices to any the IR codes for any
device if that is convenient. You can also set up custom power-on
sequences comprised of several IR codes (see “Power on / off sequences”
on page 54), and you can create automation scripts to automate complex
functions (see “Macros and Automation” on page 58)
The “record” button on the iMedia remotes always causes the iMedia Center
to begin digital recording of the device you are watching. If you want to be
able to record using the device itself (for example on a VCR) you’ll need to
define one of the other keys on the remote to perform the record function for
that device. For example “A” or “*” could be used.
If you do not connect cable to your TV Tuner input, you’ll need to select the
Internal TV Tuner device and change it to “Not Connected.”
Device types and their associated definitions:
TV – Output only display device, may control volume if “audio” is connected
to this device
Home Theater, Receiver, Pre-Amp – Ouput only audio output device. May
only be connected to “audio out port.” If you have an amp/pre-amp set-up,
define the Amp as other, “not connected”
TV-DVD, TV-VCR – both input and output device.
- 45 -
Page 53

SkipJam iMedia Center User’s Guide
Cable – Cable tuner. All “cable” type devices are shown as “Cable Tuner”
in the TV/Video menu and will be aggregated. When you select “Cable
Tuner” you will be connected to the nearest available Cable type device.
Satellite – Satellite tuner. All “Satellite” type devices are shown as “Satellite
Tuner” in the TV/Video menu and will be aggregated. When you select
“Satellite Tuner” you will be connected to the nearest available Satellite type
device.
All other device types are interchangeable.
Local Settings
Change room name: lets you change the name by which this iMedia
Center is identified
Set clock: lets you adjust clock settings
Display settings: lets you adjust settings, including the screen saver
settings
Zip code: lets you set your local zip code
Network setup
Set up network shares: lets you define which shares on the network will
be scanned for media
Add shares manually: lets you specify the name and password for a
share that was not detected by the automatic scan. Shares specified
manually are automatically added to the host list.
Select shares from host list: Lets you select the shares you want to
use from the list.
Build host list: Scans the network for available hosts and shares.
Configure Lan 1, 2: lets you set up the network settings for the Ethernet
ports such as IP address
Connect Lan 1, 2: lets you re-set and re-connect the Ethernet ports.
Recording Settings
Device recording settings: Settings used to digitally record to a network
drive.
- 46 -
Page 54

SkipJam iMedia Center User’s Guide
iMedia streaming settings: Settings used to stream media from one iMedia
device to another
Photo Settings
Lets you set the minimum size for images recognized by the iMedia Center.
Photos smaller than this size will not be included in the photo viewer. This
lets you avoid thumbnails, small icon bitmaps and album art.
Infrared remote control
Modify iMedia Center IR codes: lets you use a different remote control to
control the iMedia Center.
Set volume sensitivity: lets you set how quickly volume ramps up and
down when you press volume up
Update
Searches for and updates the iMedia Center software. Please do not
update unless instructed to do so by SkipJam support.
System information
Provides information on your iMedia Center such as version numbers and IP
address.
Device Status
Shows the current state of all devices in your home.
Free up Device
Lets you stop all activity for a given device. Generally you would do this if
you wanted to access a device that someone left recording or playing
indefinitely.
Look for media files
Causes the iMedia Center to re-scan the network for new additions or
changes.
- 47 -
Page 55

SkipJam iMedia Center User’s Guide
Common Tasks
This is a list of common task and how to access each one from the main
menu
Add a new device
Main > More… > Supervisor Functions > Setup > Device Setup > Add new
device
Watch video source device
Main > TV / Video
Watch a recorded video
Main > TV / Video > Recorded Video >
Listen to digital audio media
Main > Music > Choose a play criteria or browse
Listen to Radio
Main > Music > FM Radio
Listen to audio source device
Main > Music >Other devices
Add shared media folder
Main > More… > Supervisor functions > Setup > Network Setup > Setup
network shares
- 48 -
Page 56

SkipJam iMedia Center User’s Guide
iMedia Windows Software
Each iMedia device comes with a single license for the iMedia Windows
Suite. The iMedia Windows suite consists of several tools which let you
access and control the iMedia network from the PC.
SkipJam iMedia Center for Windows
The SkipJam iMedia Center for Windows lets you access, control and view
any devices connected to any iMedia Center. When you run the iMedia
Center for Windows, you will see a task bar icon appear:
Double clicking on the task bar icon will launch your browser and connect it
to the first available iMedia Center. From the browser interface you can
control playback on your PC as well as anywhere else in the home. When
the iMedia Center for Windows is running on your PC you can also access
the PC from any TV in the home.
Click with the right mouse button to bring up the iMedia Center shortcut
window. This window lets you access common functions quickly.
The Rooms menu lets you connect directly to the browser interface of a
specific room, for instance to configure scripts or setup that room.
The Devices menu lets you access a device directly – streaming it to your
PC. For instance selecting “Cable” will display an available cable tuner
signal on your PC.
The Play menu lets you play recorded media using the SkipJam iMedia
Windows Client media player function. The iMedia Player contains more
- 49 -
Page 57

SkipJam iMedia Center User’s Guide
controls than Windows Media Player, and includes the ability to scroll
through files.
The Status menu lets you see what’s happening in each room on the
network, and to selectively power off each room.
The Settings menu lets you turn off access to your PC as well as set the
default streaming rate and loop file location for TV playback.
SkipJam iMedia Windows Player
When you’ve selected a device or file to view, the iMedia software opens a
window which contains the device or file you selected. In the upper left of
the window, a control panel appears allowing you to control the playback
directly. If you move the mouse off the player controls, the control panel will
disappear after a few seconds of inactivity so as not to obscure the
playback. To show the control panel, move the mouse back over its last
location.
IMPORTANT: In order to connect to other iMedia Devices on the network
the SkipJam iMedia Windows Player must be able to “see” through your
firewall. To do this you can disable your firewall (see page 29 for
information on disabling your firewall) or you must allow access to TCP and
UDP ports 49000 to 50000.
- 50 -
Page 58

SkipJam iMedia Center User’s Guide
SkipJam iMedia Tag Tool
The SkipJam iMedia Tag Tool lets you add or modify the identification
information stored in video or audio files. Using the iMedia Tag Tool you
can associate various information, such as Artist name, and rating with each
music or video file in your collection.
By setting or changing the rating of a given file you can also control access
to that file. To tag a specific file select File/Open. You can also load a
sequence of files by clicking “Browse”.”
- 51 -
Page 59

SkipJam iMedia Center User’s Guide
play
Browser Interface & Menus
You can also control the iMedia Center menus via a web browser. The
iMedia Center includes a web server which can be accessed using any
browser that supports HTML 3.2, including browsers on PCs and on most
PDAs. The same menus are accessible from the Browser Interface as
appear on the TV and a few functions are ONLY available through the
Browser Interface.
When used in conjunction with the iMedia Windows Client, the Browser
Interface turns your PC into an iMedia device which can view any other
iMedia connected source.
Note: Cookies must be enabled for the HTML menus to work properly.
The browser interface operates very similarly to the TV interface. However,
there are several functions that are ONLY available through the browser
interface. This section will cover those functions. To understand the
operation of other iMedia menus, please see the general section regarding
those functions.
Using the Browser Interface
To access the browser interface, right click the iMedia Center for Windows
task bar icon and select the room name of the iMedia Center you want to
access, or set your browser to the IP address of the iMedia Center you want
to configure. (e.g.: http://192.168.0.10 ) The iMedia Center displays its IP
address in the System Information menu.
Remote
control
buttons
to control
Shortcut
buttons for
quick
access to
common
functions
back
Navigation links
to navigate
iMedia menus
Click room
name to
control a
different
room
- 52 -
Page 60

SkipJam iMedia Center User’s Guide
y
To start a playback session, click on a shortcut button or, click on the
corresponding menu entry. For example clicking on “music” will bring up the
music browser menu.
You can control any room from any browser. To change which room you
are controlling, click the room name. You will be presented with a list of
available rooms.
IMPORTANT: To use the browser interface to configure or change settings
of a room, you must connect directly to that room. Use the iMedia Center
for Windows “rooms” menu to access the specific iMedia Center you want to
configure by room name, or access the iMedia Center directly using it’s IP
address (found in System Information menu)
Once you’ve started a playback session, the browser will jump to the remote
control screen shown below. The buttons on this screen correspond to the
buttons on the SkipJam remotes, and clicking them will send the
corresponding command to the session. (e.g. Clicking on Channel Up will
send a “Channel Up” command to the session.)
Click Here to return to this
screen at an
time
- 53 -
Page 61

SkipJam iMedia Center User’s Guide
Advanced Setup Options
The following setup capabilities are only available from the browser menus:
x Power-on sequences
x Editing of IR Sequences
x Script setup
Power on / off sequences
Power on or off sequences let you define a sequence of IR commands that
are sent to a device when it is powered up or turned off. For example, you
may have a TV that needs to be switched to it’s “Aux” input whenever it is
powered up. Or you may have a stereo that includes an Amp and Pre-Amp
that each need to be sent their own “power on” and “power off” commands.
In either case you would need to use the browser menus to access the
device’s properties. Select “Setup > Device Setup” Then either create a
device, or modify an existing device. You will see a screen with a link titled
“Configure Power Options.” Select this link, and then “Power-On Sequence”
You will be presented with a screen listing all the IR codes defined for the
device. Click the arrows to add or remove key sequences as needed.
The following screen shows an example of a power-on sequence for a TV
that uses a custom key “Input Select” to switch the input on power on.
Tip: If you need keys from a different device, define them as custom keys for
the device you are turning on. To copy keys use the “Modify Raw IR”
screens to copy and paste from one device to another.
- 54 -
Page 62

SkipJam iMedia Center User’s Guide
Bypass Sequences
You may have a device which has advanced capabilities that can be used
locally but are not supported by the iMedia Center for streaming. Examples
are High Definition HDMI or progressive scan component video devices.
You may also wish to stream stereo audio to other rooms (which may not
have home theater systems) while playing surround sound locally.
All these configurations and devices can be set up using “Bypass”
commands which allow you to set up a separate configuration for viewing a
device locally than for sending it’s picture to another room.
For example: If you have a cable receiver with a high definition output
which you wish to watch on a high definition basis on your local HDTV, but
you wish to watch it on non HDTVs in the rest of the house, you would
connect the HD output of the cable receiver directly to the HDTV, and
connect the S-Video or Composite output of the cable box to the iMedia
Center, as shown here:
HD Cable Tuner
SD Video
SD Video
HDMI
Audio
Home TheaterTV
You would then create “video bypass” on and off sequences for the HD
Cable Tuner. This sequence would switch the TV to it’s HDMI input for the
“on” sequence, and back to it’s SD for the “off” sequence.
When you select to watch Cable from within this room, the iMedia Center
would send the “Video Bypass On” command to the TV, switching it to the
HD input. When you press “Home” to bring up the iMedia Menus, or when
you turn off the Cable Tuner, the iMedia Center would switch back to the SD
input. Allowing you to see other devices connected to the iMedia Center.
- 55 -
Page 63

SkipJam iMedia Center User’s Guide
If you select to watch this cable tuner from another room, the iMedia Center
would not send the bypass sequences, and stream the SD output of the
cable to the other room.
Editing IR
The browser menus allow you to manually enter or edit IR codes for any
key. This lets you fine tune the IR and to use IR sequences from other
remote controls. The following options are found for each device in “More >
Supervisor functions > Setup > Device Setup > device > Modify device >
Modify keys individually”
Enter Hex Codes
This menu lets you paste in remote control codes in the Pronto format found
on http://www.remotecentral.com. This web site has many discrete codes
for various devices.
Modify Raw Infrared Codes
This screen lets you modify the learned codes for any key in order to tweak
the IR for maximum efficiency and / or copy codes from one location to
another.
- 56 -
Page 64

SkipJam iMedia Center User’s Guide
Creating Script Screens
Script screens are screens that contain selectable icons. Selecting an icon
causes the iMedia Center to execute the script. A script is a sequence of
instructions created by the SkipJam iMedia Command Wizard.
For example. You might want to have a simple way to access your favorite
TV channels. You could set up a script screen called “TV Channels” which
contains all your favorites. When you move the selector box to one of the
icons on the screen and press Select, the iMedia Center will start playing TV
and switch to the channel you specified in the script. This might look as
follows on your TV Screen:
The browser menu script screen setup lets you configure the script screens
and associate each icon with a script.
First you’ll need to create and test the scripts you wish to use. Please see
the section “” on page 59 for information on creating scripts.
Script screens each consist of a matrix of x by y buttons. Each button can
have associated with it a text title or name, a graphical icon, and a script.
Each button also specifies what screen is displayed once that button is
selected. This lets you create buttons that jump to other screens, or back
to the main iMedia Menus (simply have no script associated with the
button).
- 57 -
Page 65

SkipJam iMedia Center User’s Guide
Macros and Automation
The SkipJam iMedia system includes sophisticated automation capabilities
that allow you to manage your entire home media network at the touch of a
key. These automation capabilities also let you customize the iMedia
Center to your household and your viewing habits.
SkipJam iMedia automation is based on the SkipJam iMedia Network
Control Protocol. This “language” is used by the various iMedia devices to
talk to each other. At the most complex level the iMedia System can be
automated using programming languages such as C and Visual Basic.
However this is beyond the scope of this document.
For your convenience the SkipJam iMedia center includes several tools
which let you automate the system fairly quickly and easily.
The SkipJam iMedia Command Wizard lets you create automation scripts,
and the Scripts menu lets you use these scripts and even completely
customize the look of your iMedia system.
See the Creating Script Screens section on page 57 for information on
creating script screens, and see the next section, SkipJam iMedia
Command Wizard, for information on creating scripts.
- 58 -
Page 66

SkipJam iMedia Center User’s Guide
SkipJam iMedia Command Wizard
This Windows program creates scripts that can be executed by the SkipJam
Command Automation tool sjcmd.exe (found in the SkipJam program files
directory) or by the SkipJam iMedia Center. Scripts can perform any
function that can be performed by the iMedia system, including several not
available from any other source.
Script Media Files
Script files can also be used as “pseudo” media files: When searching for
media on your shared drives, the iMedia Center looks for script files with the
extension “.sjv” and “.sja” These files are then treated as video and audio
content respectively and show up in the list of videos or music. If you tag
these files with the iMedia Tag Tool (see page 51) they will appear just as
any other music or video file, but when you select these pseudo media files,
the iMedia Center executes the script.
For example, if you have a DVD changer, and you would like to have
automated access to one of the disks on the DVD changer, you could create
a “.sjv” script that makes the iMedia System play the DVD changer in a
given room, and then have the script send the IR codes to change to the
specific disk you want to watch.
The script for this sequence would look like this in the iMedia Command
Wizard:
- 59 -
Page 67

SkipJam iMedia Center User’s Guide
The SkipJam iMedia Command wizard lets you create these scripts easily.
You can then “tag” the scripts with media information so that they show up
in the Video or Audio browser menus and when you select the script it
executes.
Script Screens
You can also set up script pages which show up as graphical icons on your
TV. When you select an icon, the script executes.
For example, you might want to have direct access to a particular TV
channel. Say PBS-Kids. You could set up a script which turns on the TV
and switches to PBS-Kids. Once you’ve created several such scripts, you
could then create a screen called “Kids Channels” with graphical icons for
your kid’s favorite channels, and have that screen pop up whenever the
“Home” key is pressed on the remote.
To create these screen pages you need to access the Scripts setup section.
This Scripts setup capability is only available through the browser menus, so
you will need a Browser and the IP address of your iMedia Center, or select
the room you want to configure from the “Rooms” menu of the SkipJam
iMedia Windows Client. See “Creating Script Screens” on page 57 for more
information on setting up script screens.
- 60 -
Page 68

SkipJam iMedia Center User’s Guide
Advanced Networking Topics
Wireless Networking
SkipJam iMedia networks can be wireless in part or in whole, and the iMedia
system automatically scales video streaming to match the available
bandwidth of wireless networks. However wireless networks can be subject
to prolonged outages due to interference and other environment factors
such as distance and construction materials.
Here are some tips for setting up a more robust wireless network for your
media:
1. Keep in mind that a wireless G network will typically have a real-life
maximum sustained throughput of at most 20Mbps (forget the
claims of 54 or 108 Mbps), so the number of simultaneous video
streams is fairly limited.
2. Attempt to hard-wire as many of the devices as possible. For
example, wire your iMedia Center and NAS to the wireless router,
and connect your PC wirelessly.
3. Use 802.11a or 802.11n if possible. 802.11a is flat out faster than
802.11g. Though both “g” and “a” are rated at 54Mbps, 802.11g
has more overhead built into the communications, reducing the
effective throughput.
802.11a and n are also less common than g and is therefore less
likely to bump into others of the same. And, they both operate at
5GHz and are therefore less susceptible to interference from
microwave ovens and cell phones.
4. If you are using 802.11g, make sure that there are no 802.11b
devices connected. Having any 802.11b devices connected
reduces the overall throughput of your network even if the 802.11b
devices are not active.
5. Change the default streaming setting to 2Mbps or less on any
iMedia device that is connected wirelessly.
6. Try to avoid recording across a wireless connection. Glitches in the
wireless transmission will permanently mar recordings. Instead,
attach a hard drive directly to any iMedia Center that you will use to
make recordings or hard wire those centers, as well as the PCs or
hard drives you are recording to.
- 61 -
Page 69

SkipJam iMedia Center User’s Guide
7. If you are primarily using a wireless connection to watch TV, disable
the “Pause Live TV” PVR capability by clearing the iMedia
Recording settings dialog. When you watch in PVR mode you are
creating 2 video streams – one to record TV and the other to play,
and this can strain a wireless network.
8. Try setting up ad-hoc connections to connect directly from the
iMedia devices to the PC you use as a server. This will minimize
the wireless traffic by avoiding the access point.
9. We do not recommend the use of wireless in a crowded wireless
environment, such as apartment buildings or offices.
Mixed Network Environments
In many circumstances it is not possible to use a single type of networking
throughout a home. In this case some planning and foresight can go a long
way towards smooth functioning of the system. Here are some general
guidelines:
1. Use cat-5 or better cabling wherever possible. No additional
bridges or connection devices are required, and this provides
maximum throughput
2. Use Cat5 wired networking technology wherever possible. If
possible, use other wired networking for hard to reach locations.
Coaxsys, TMT and MoCA devices can be used for networking over
RG6 Cable. You can use 10base networking for thin coax. You
can use Homeplug 1.5 or 2.0 for power line networking, and
Homeplug 1.1 for audio only applications.
We suggest wireless for outdoor access, or for destinations which
are unreachable through other means. Try to keep connections
between source devices (Cable, DVD) wired over cat 5 to hard drive
locations, so as to minimize network issues when recording to hard
drive.
- 62 -
Page 70

SkipJam iMedia Center User’s Guide
3. Keep in mind the following rough figures for various networking
topologies (figures based on SkipJam testing):
Rated
speed
Network type
Gigabit Cat 6/5e 1000 600+ 100+*
Cat 5 100 60 – 80 12+*
Coaxsys COAX 70 10 – 35 5
802.11n (pre-n) 100 10 – 25 5
802.11a/g 54/108 8 – 17 2-4
Homeplug 1.5 85 11 2-3
802.11b 11 1 – 6 2
Homeplug 1.1 14 1 – 4 0
* Note that unlike with the other network topologies shown here, on
Cat-5, point to point video streams may not affect over-all network
performance (depending on configuration), and so the actual
number of concurrent streams can be much higher than shown.
4. Use switches or routers instead of hubs. Switches allow for direct
connection between two nodes without using up bandwidth from the
rest of the network.
5. Don’t skimp on network hardware. An unreliable router or switch
that crashes can result in many hours of frustration.
6. Try to connect storage to the network at the fastest point, and to
directly connect iMedia Centers doing the recording to the same
sub-net.
(in Mbps)
Real-world
Throughput
(in Mbps)
Concurrent
DVD Video
Streams
DHCP and fixed IP addresses
By default the iMedia Center uses an IP addressed assigned by a DHCP
server. In some circumstances it may be useful to maintain an iMedia
Center at a fixed IP address. To configure a fixed IP address use Main >
More… >Supervisor functions > Setup > Network Setup and then configure
the LAN connection you are using.
An alternative is using your router to force a fixed IP address based on an
iMedia Center’s Mac address. See the documentation for your router.
- 63 -
Page 71

SkipJam iMedia Center User’s Guide
Network Security
The iMedia System makes network security all the more important. You
presumably do not want others to be able to access your in-home cameras
or view your photos or control your TV. It is therefore important that you
gain a good understanding of network security so that you can protect your
privacy.
Here are some basic steps you should take to secure your network:
1. When sharing media use the following precautions:
a. Share only the folders containing media files. DO NOT share your
main hard drive or any folder containing programs or personal
data!
b. Share media folders on a read-only basis (do not allow others to
write to the folders.) unless recording to the folders.
c. Keep the shares used for recording separate and copy recordings
you wish to keep off to other folders.
d. For maximum security consider a network attached storage device
dedicated to entertainment and media.
2. Wireless networks are inherently less secure. If you must use a
wireless network you should:
a. Use a password to encrypt the network traffic. This is generally
known as “WEP Encryption” (use 128 bit keys) or “WPA Encryption”
(much better) or “WPA2 Encryption” (even better) and must be
specifically enabled. See the documentation for your network and
your PCs.
If your network does not have “WPA Encryption” consider
upgrading to a model that does, since WEP Encryption is
flawed and can be easily “cracked”. The network cards and
drivers for your PC operating system must also support the
encryption method you choose.
b. Change your SSID. Do not use “default” or “vendor-name” for your
network. Do not use obvious names like street address or family
name.
c. Password protect the wireless access point’s configuration screens.
Do not use the default password; Don’t make it obvious.
- 64 -
Page 72

SkipJam iMedia Center User’s Guide
d. If possible, use Mac Address access control so that only specific
systems have access to your network. To display the Mac Address
of your iMedia Center check System Information (see page 47).
e. Disable SSID broadcast. This will hide your network from random
scans.
3. Use a firewall with “Network Address Translation” or NAT, which hides
your in-home systems from the internet. Better still, use a firewall with
“stateful packet inspection,” which actually examines traffic for evidence
of attacks.
4. Set the firewall to prevent all access from outside the network, and, if
possible, to not respond to “pings.”
5. Use antivirus software and anti-spyware software on all your PCs, and
limit family members’ ability to download and install software.
6. Do not use obvious passwords anywhere: Don’t use names, pet names,
birthdays, license plate numbers or any other readily obtainable
common information. Do use a combination of letters, numbers and
special characters.
7. Do not let friends and neighbors (or strangers) plug into your network –
you never know where their computers have been.
8. Consider password protecting all your shared drives.
9. The iMedia Center contains a Telnet client which can be enabled from
the Setup Menu for remote support. Do not enable this unless
instructed to do so your dealer or SkipJam support. Remember to
disable the setting when the troubleshooting is completed.
10. For additional information see:
http://www.cert.org/tech_tips/home_networks.html
- 65 -
Page 73

SkipJam iMedia Center User’s Guide
HomeView™ Access Away from Home
SkipJam iMedia Centers allow you to access your home media network
while away from home using the exclusive HomeView feature. You can
access your connected devices on a “Live” streaming basis, and control
your entire home as if you were there.
Using a VPN
The most secure way to establish a connection to your home Network is to
set up a VPN (Virtual Private Network) which will allow you to access your
home network and use the iMedia System as if you are connected locally.
This requires multiple configuration settings and will prevent you from
accessing your home iMedia network from PCs that do not have your VPN
software installed. For information on setting up a VPN see Microsoft
knowledge base article 314076 at support.microsoft.com
Using an iMedia HomeView Server
You can also access the iMedia network by accessing any iMedia Center on
the network using our HomeView feature. Setting up HomeView access
requires some advanced networking knowledge that is beyond the scope of
this manual, however the following are the steps needed for those familiar
with advanced networking topics.
.
One iMedia Center on your home network must be assigned the task of
providing HomeView access. This iMedia Center must be “exposed” to the
internet and accessible at your IP address.
We suggest setting up a home firewall/router (such as the Netgear FR114P)
which manages the internet connection to the home. In order to expose an
iMedia Center you should fix the internal IP address of the iMedia Center
(see DHCP and fixed IP addresses on page 63). Then use the Firewall /
Router to direct iMedia network traffic to this iMedia Center. You can do this
by setting the iMedia Center as the “DMZ” server (not very secure), or you
can have the firewall direct TCP/UDP traffic on ports 80, 8080 and 4900050000 to the iMedia Center (best solution). You will need to refer to the
instructions for your firewall/router.
Dynamic IP Addresses
Most home internet services have dynamic IP addresses, which means the
Internet location of your home network may vary from day to day. In order
to make it simple to find your home you can use a Dynamic DNS service
such as that from www.dyndns.org
. These services are generally free.
- 66 -
Page 74

SkipJam iMedia Center User’s Guide
In order to be able to always locate your home IP address you need to set
your router/firewall to update your personal dynamic DNS address. See the
instructions for your router/firewall.
Accessing Your Home iMedia Network
When you’ve set up the above, you can access your home network by
running the SkipJam iMedia Center and selecting HomeView from the
“Rooms” menu.
The iMedia Windows Client will ask you to enter the IP address of your
home. If you’ve set up a dynamic DNS you can simply enter the DNS
address. For instance “myhomeimedia.homeip.net”. Otherwise you’ll need
to enter the DNS address of your home.
Once the HomeView wizard connects, you will be able to access your
iMedia Devices from the Devices menu of the iMedia Windows Client. The
quality of the signal will vary depending on your location and the upload
speed of your home internet connection.
To control your home using your browser, simply enter your home IP
address or dynamic DNS name into your web browser.
- 67 -
Page 75

SkipJam iMedia Center User’s Guide
Frequently Asked Questions
Question: Where is the power button?
Answer: There is no power button. The iMedia Center was designed to be
an integral part in the use of your entertainment system and must be on all
the time in order to record programs you’ve selected and in order to respond
to your commands. Don’t worry, an iMedia Center uses less power than a
night light, and can save you power by automatically turning off your other
devices when you are not using them. You can reset the system using the
reset switch located on the front panel. You will need a narrow object such
as a paper clip to depress the switch.
Question: What type of digital media files can I play?
Answer: Please see the SkipJam web site for the latest list of supported
formats. As of this printing the iMedia Center supports at least:
Audio Playback MP3, WAV, PCM, WMA, FLAC, OGG, M4A, M4P
(Support for M4A and M4P iTunes formats require
that iTunes for Windows be installed on the PC that
contains the iTunes files, and iMedia Windows
Client be running on the same PC)
Audio Playlists: WPL, ASX, WAX, WVX, PLS, M3U, RMP
(These are for Windows Media Player, WinAmp,
RealPlayer, MusicMatch, iTunes,)
Video Playback: MPEG-1, MPEG-2, MPEG-4, DivX
Photo Playback: JPG, BMP, TIFF
Question: What affects the operation of my infrared (IR) remote control?
Answer: Interference to infrared can come from many sources. The most
common source is ambient and direct sunlight. Other source of interference
can come from fluorescent lighting and plasma screens.
Question: Is it possible to reset the iMedia Center to its default settings?
Yes. The iMedia Center can be set to its factory settings. Perform the
following steps: Restart the iMedia Center. When the second LED from the
- 68 -
Page 76

SkipJam iMedia Center User’s Guide
right goes steady (The second LED will blink before going steady),
immediately press and hold down the FIND REMOTE button located on the
front of the iMedia center.
This will first try to update your system. If no updates are available, all setup
and configuration settings are restored to factory default.
Question: What is the battery consumption of the RF remote?
Answer: The RF remote control typically uses on average of 80 mA during
active use. Its peak power usage is 160 mA. However, when not in active
use, the RF is goes into sleep mode and will use only 20 mA of power.
When in sleep mode, you must “wake up” the remote by pressing the
“HOME” key once before you can use it to send commands. Typically, the
battery can last up to 3-4 days on sleep mode.
Question: What video quality settings are available?
Generally speaking, the quality of the video depends on the degree to which
the video was compressed. More highly compressed video uses less disk
space, but has a lower quality. Also, generally speaking MPEG 4
compression provides much better quality for a given amount of space:
disk space
required per
Compression Quality Bit Rate
hour of video
MPEG 2 VHS Tape 1 Mbps 500MB
Digital TV 2 Mbps 1GB
Near DVD 4 Mbps 2GB
DVD 7 Mbps 4GB
MPEG 4 Digital TV 1 Mbps 500MB
Near DVD 2 Mbps 1GB
DVD 4 Mbps 2GB
These numbers have been rounded up for convenience and depend on the
type and quality of audio that is being recorded.
- 69 -
Page 77

SkipJam iMedia Center User’s Guide
Question: I just added new files to my media share folder. I don’t see it in
the menu selection to play. How can I see these files in the play selection
list?
Answer: The media shares are scanned once when the SkipJam iMedia
Center first boots up and then once daily. If you wish to see your files
before the daily scan you must perform a manual scan of media files to add
them to the play list. This command is accessed from the menu under More
> Supervisor functions > Look for media files.
- 70 -
Page 78

SkipJam iMedia Center User’s Guide
Troubleshooting
Question: I powered up the unit and I don’t see anything on my video output
device. How can I tell if the system is working?
Answer: It takes approximately three minutes for the unit to start up. The
unit should be ready to use when you see the three LEDs from the right light
up. If any of these LEDs are out after waiting for the allotted amount of time,
check your power connection, network connection, and video output
connection.
If you are trying to use the iMedia Center on a stand-alone basis without a
network connection, it will take as much as 15 minutes for the iMedia Center
to start because it attempts to establish a network connection by default and
this process retires several times.
Question: The infrared remote control does not appear to work.
Answer: Make sure you removed the battery protector tab from the battery
compartment. Also make sure that you are operating in an environment
away from IR interference sources such as florescent light, and plasma and
direct sunlight.
Question: I get a black and white picture.
Answer: You’ve selected “S-Video” connection, when the device is actually
connected to the Composite video RCA connector.
Question: The picture looks washed out, too red or too yellow
Answer: You’ve connected both S-Video and Composite cables to your
device. Connect only one or the other.
Question: The picture and sound is jittery.
Answer: You may be experiencing low network throughput or interference
on your wireless network. Generally, the iMedia Center will adjust the
compression to compensate. Try also turning off the session and reconnecting to the device you are trying to view. If the problem adjusting the
compression type and bit rate to a lower bit rate at the destination.
Question: Recording stops at around 4 GB during recording even though
there is plenty of hard drive space.
Answer: The most likely issue is that you are trying to use a Windows share
that is using a FAT32 volume. A file in a FAT 32 volume has a maximum
size of 4 GB minus 1 byte.
- 71 -
Page 79

SkipJam iMedia Center User’s Guide
It is best to use a Windows network share that uses NTFS. A file in an
NTFS volume can be as big as 16 terabytes (approximately).
Some Linux implementations on 32-bit systems such as x86, PowerPC and
MIPS are limited to 2GB due to a restriction in older Linux kernels. There
may be a patch for the kernel that you are using to add Large File Support
or LFS.
Macintosh HFS+ file system has a file limit of 2 terabytes.
Also check your server settings for a quota or limit and make sure your disk
has space available.
Question: Sometimes a file won’t play.
Answer: A Windows XP Home system allows has a maximum of 5
simultaneous users and an XP Pro system 10. If 5 iMedia Centers are
playing a file at once, the 6
th
will be rejected by Windows. At the same time,
any person accessing a file on an XP system will count as a user and
reduce the number of iMedia sessions possible.
If you are recording, or are viewing cable or satellite and have “loop file”
recording enabled, you will be using 2 connections (one to record and one
to play the recording) to the server and count as 2 users.
To get around this issue: Upgrade your system to Windows XP Pro, or
Windows NT Server / Windows Server 2003 (which can be configured to
many more users) or use a Macintosh or Linux server or a Network
Attached Storage Device.
Question: I can’t see video or is unintelligible when I try to use a video
device that I just added and configured.
Answer: Check that the device is powered on. Check your cable
connections for a loose connection. Check that the iMedia Configuration
matches your physical connections – that the device is actually connected to
the port you configured in the iMedia Device Setup.
Question: How can I automatically turn off the TV or output devices after
watching or listening to media?
If you are using the universal remote capabilities of the iMedia Center, each
device is turned on and off when you select to view it, provided you have
configured the devices for automatic On/Off. If not, you can turn the device
on manually by sending the appropriate code from the Devices menu.
- 72 -
Page 80

SkipJam iMedia Center User’s Guide
If this does not work, check that the power on/off or power toggle codes are
learned for the device you are trying to control. Check also that the IR
emitter
If you have not taught the iMedia Center the control codes for your various
devices or want to use an external control system to use the iMedia Center,
you’ll need to get an external universal remote and teach it the iMedia
Center’s control codes.
Question: I don’t see any “Rooms” or “Devices” from my iMedia Windows
Client?
Check that your firewall is off (XP SP1) or allows iMedia Center in the
exceptions list (XP SP2) (see page 29) If you don’t see “iMedia Center” in
the exception list in the Windows XP SP2 Firewall, select “Add Program”
and select iMedia Center from the programs list.
- 73 -
Page 81

Connection Checklist
Audio / Video Output Devices
SkipJam iMedia Center User’s Guide
Connection
Video
Output
Analog
Composite
Audio Out
Digital PCM
Out Coax
Digital PCM
Out Optical
Device
Type
Device Brand Device Model Composite S-Video
- 74 -
Page 82

SkipJam iMedia Center User’s Guide
Audio / Video Input Devices
Connection
Video Input 1
Audio Input 1
Video Input 2
Audio Input 2
Video Input 3
Audio Input 3
Video Input 4
(Front)
Audio Input 4
(Front)
Analog Audio Input 4
Analog Audio Input 5
Digital PCM Audio
Input 1 (Coaxial)
Device
Type
Device
Brand
Device Model C-Vid S-Vid
Digital PCM Audio
Input 2 (Optical)
Digital PCM Audio
Input 3 (Coaxial)
Digital PCM Audio
Input 4(Optical)
TV Tuner
FM Tuner
- 75 -
Page 83

Technical Specifications
CPU:
x 200 MHz MIPS 64/128 bit media
processor
x 64 MB + 16 MB VRAM
x Integrated FPU
Hardware Video Encoder:
x MPEG 1, 2, 4
Hardware Video Decoder:
x MPEG 1, 2, 4
Audio ADC:
x 24 bit 192KHz 114db
Standards Compliance:
Video Output:
Audio Output:
Network:
SkipJam iMedia Center User’s Guide
x RF Remote, FCC part 15.247/249
x Integrated TV/FM tuner, FCC sub-part
15 (b)
x 1 Analog Composite Connector
x 1 S-Video Connector
x 1 Analog Stereo Composite Connector
x 1 Coaxial, 1 Optical Digital Connectors
x 2 10/100 Ethernet
Audio DAC:
x 24 bit 192KHz 114db
Supported Digital Video File Formats:
x MPEG 1, 2, 4, DivX,
Supported Digital Audio File Formats:
x MP3, WMA, WAV, AC3, AAC,
FLAC, Ogg, PCM, M4P, M4A
(iTunes)
Supported Digital Photo File Formats:
x JPG, BMP, PNG, GIF
Video Inputs:
x 4 Analog Composite
x 3 S-Video
x 1 RG6 75 ohms Integrated
Cable-ready TV tuner, 55.25
MHz to 801.25 MHz
Audio Inputs:
x 6 Analog Stereo Composite
Connectors
x 2 Coaxial, 2 Optical Digital
x 1 RG6 75 ohms FM tuner, 76
MHz to 108 MHz
Safety Certifications:
x iMedia Center 12V AC Adapter,
UL E193430, IEC Cable UL
E137357
Power Requirements:
x SkipJam iMedia Center 12 V 2A
x RF Remote Control 3.6V 1000mAh
rechargeable pack with 9V charger
Power Consumption:
x 18 Watts
Optional PC Requirement:
x Networked PC running Windows XP or
Windows 2000
x 128K MB Memory
x 5 MB free disk space
Dimensions (W x H x D):
x 14 7/8” x 2 1/8” x 9 3/8”
x 377 mm x 54 mm x 238 mm
RF Remote:
x 2.4 Ghz (2400 to 2483 MHz)
x Fast Frequency hopping, 95 Channels,
Spread Spectrum
x Expected range 350m outdoor, 75m
indoor
x Transmit power ~ 200mW
x 60 mA peak, 160 mA max, 80 mA
typical, 20 mA standby, 10 mA sleep
Weight:
x SkipJam iMedia Unit 6lbs
x Shipping weight 8.5 lbs
IR Remote:
x 3VDC 2xAAA dry cell
x 38 KHz transmission carrier
x 200 mm x 55 mm x 25 (LxWxH)
x 10 m operating distance
- 76 -
Page 84

SkipJam iMedia Center User’s Guide
- 77 -
 Loading...