

Page 1
ORIGINAL INSTRUCTIONS 9
NOTICE ORIGINALE 11
ORIGINALBETRIEBSANLEITUNG 14
ORIGINELE GEBRUIKSAANWIJZING 16
BRUKSANVISNING I ORIGINAL 19
ORIGINAL BRUGSANVISNING 21
ORIGINAL BRUKSANVISNING 24
ALKUPERÄISET OHJEET 26
MANUAL ORIGINAL 28
MANUAL ORIGINAL 31
ISTRUZIONI ORIGINALI 34
EREDETI HASZNÁLATI UTASÍTÁS 36
PŮVODNÍM NÁVODEM K POUŽÍVÁNÍ 39
ORİJİNAL İŞLETME TALİMATI 41
INSTRUKCJA ORYGINALNA 43
ПОДЛИННИК РУКОВОДСТВА
ПО ЭКСПЛУАТАЦИИ 46
ОРИГІНАЛЬНА ІНСТРУКЦІЯ
З ЕКСПЛУАТАЦІЇ 49
ΠΡΩΤΟΤΥΠΟ Ο∆ΗΓΙΩΝ ΧΡΗΣΗΣ 52
INSTRUCŢIUNI DE FOLOSIRE 5
ORIGINALE 55
ОРИГИНАЛНО РЪКОВОДСТВО
ЗА ЕКСПЛОАТАЦИЯ 57
PÔVODNÝ NÁVOD NA POUŽITIE 60
ORIGINALNE UPUTE ZA RAD 62
ORIGINALNO UPUTSTVO ZA RAD 65
IZVIRNA NAVODILA 67
ALGUPÄRANE KASUTUSJUHEND 70
ORIĢINĀLĀ LIETOŠANAS PAMĀCĪBA 72
ORIGINALI INSTRUKCIJA 74
AR
84
AR
FA
83
GB
F
D
NL
S
DK
N
FIN
E
P
I
H
CZ
TR
PL
RU
UA
GR
RO
BG
SK
HR
SRB
SLO
EST
LV
LT
AR
FA
UA
GR
RO
BG
SK
HR
SRB
SLO
EST
LV
LT
AR
FA
www.skilmasters.com
WET & DRY
VACUUM CLEANER
8700 (F0158700..)
SKIL Europe BV - Konijnenberg 60 11/10 2610Z00876
4825 BD Breda - The Netherlands
Page 2
2
R
H
J
K
L
M
Q
S
T
F
B
U
V
N
C
G
A
P
D
E
Watt
1500
30 ltr
PVC
6 m
1
8700
3
2
3,5 m
220
-
240
MAX.
8,6 kg
EPTA 01/2003
Page 3
3
4
N
5
Q
J
6
P
Page 4
4
R
E
7
S
8
Page 5

5
S
E
R
T
E+R
S
9
Page 6

6
@
0
Z
X
!
Page 7

7
#
$
Page 8

8
%
^
ACCESSORIES Skil nr.
2610Z01535
Page 9

9
Wet & Dry Vacuum cleaner 8700
INTRODUCTION
• This appliance is intended for the collection and
vacuuming of non-ammable liquids as well as
dry materials
• This appliance is intended for indoor use only and
suitable for industrial usage as required in hotels,
schools, hospitals, factories, shops, oces and
rental businesses
• This appliance is not suitable for vacuuming
hazardous dusts
• Read this instruction manual carefully before use and
save it for future reference 2
• Pay special attention to the safety instructions and
warnings; failure to follow the warnings and
instructions may result in electric shock, fire and/or
serious injury
• Check whether the packaging contains all parts as
illustrated in drawing 3
• When parts are missing or damaged, please contact
your dealer
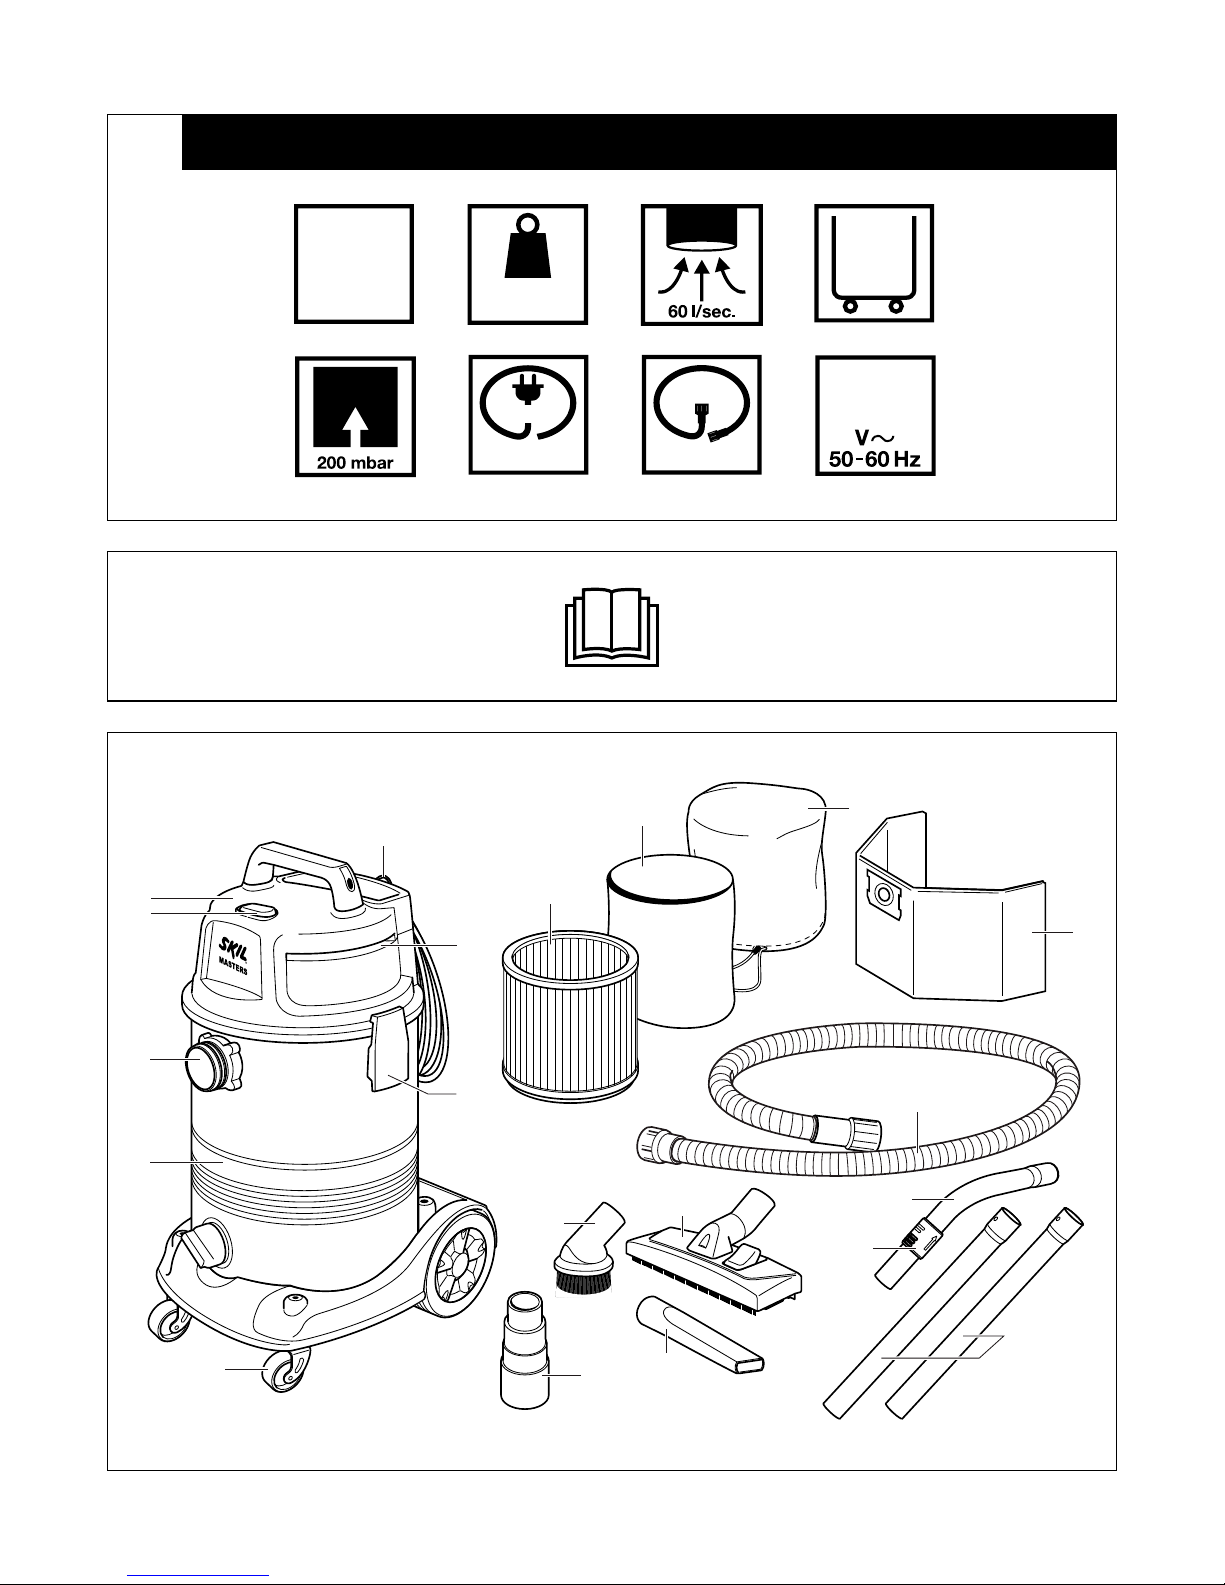
TECHNICAL SPECIFICATIONS 1
APPLIANCE ELEMENTS 3
A Locking latch (2)
B Motor head
C Container
D Caster (4)
E Cartridge lter
F Vacuum hose
G Hose connection
H Extension tube (2)
J Airow control handle
K Floor brush nozzle
L Round brush nozzle
M Crevice nozzle
N On/o switch
P Universal power tool adapter
Q Airow regulator
R Cartridge lter protection
S Dust bag
T Foam sleeve lter
U Cable clip
V Ventilation slots
W Filter retainer
X HEPA Filter door
Z HEPA Filter
SAFETY
ELECTRICAL SAFETY
• Always check that the supply voltage is the same as the
voltage indicated on the nameplate of the appliance
(appliances with a rating of 230V or 240V can also be
connected to a 220V supply)
• Connect this earthed appliance only to a properly earthed
power supply system; ensure that socket and extension
cable have a functional protective conductor
• When operating the appliance in damp environments,
use a residual current device (RCD) with a triggering
current of 30 mA maximum
• Always disconnect plug from power source during work
breaks, when not in use or when working on the
appliance (e.g. changing/cleaning lters), in order to
prevent accidental starting
• Switch o the appliance before disconnecting the plug
• Do not use the appliance when the power supply cable,
plug or switch is damaged
• If the power supply cable is damaged while working, do
not touch it, but immediately disconnect the plug
• Do not drive over, crush or stretch the power supply cable
• Do not pull the power supply cable to disconnect the plug
or to move the appliance
• A damaged power cord shall be replaced at a SKIL
service centre only in order to avoid a hazard
PERSONAL SAFETY
• This appliance is not intended for use by persons
(including children) with reduced physical, sensory
or mental capabilities, or lack of experience and
knowledge, unless they have been given
supervision or instruction concerning use of the
appliance by a person responsible for their safety
• Ensure that children do not play with the appliance
• Never vacuum materials that contain asbestos
(asbestos is considered carcinogenic)
• Do not vacuum inflammable or explosive fluids
(such as gasoline, oil, alcohol, solvents)
• Do not vacuum explosive dusts (such as coal dust,
magnesium dust, grain dust)
• Do not vacuum toxic materials
• Never vacuum hot ashes or pointed/sharp objects
• Do not operate the appliance in rooms where the
danger of an explosion exists
• Provide for good ventilation at the working place
• If foam or liquid escapes from the appliance, switch
off immediately
• Never operate the appliance without the necessary lters
as described in this manual
• Do not leave the appliance unattended when plugged in
• Use extra care when cleaning on stairs
• Regularly check the proper condition of the vacuum hose
(when doing so leave the vacuum hose mounted to
prevent dust from coming out)
• Keep the ventilation slots uncovered during vacuuming
WHEN CONNECTING NEW 3-PIN PLUG (U.K. ONLY):
• Do not connect the blue (= neutral) or brown (= live) wire
in the cord of this tool to the earth terminal of the plug
• If for any reason the old plug is cut o the cord of this tool,
it must be disposed of safely and not left unattended
USE
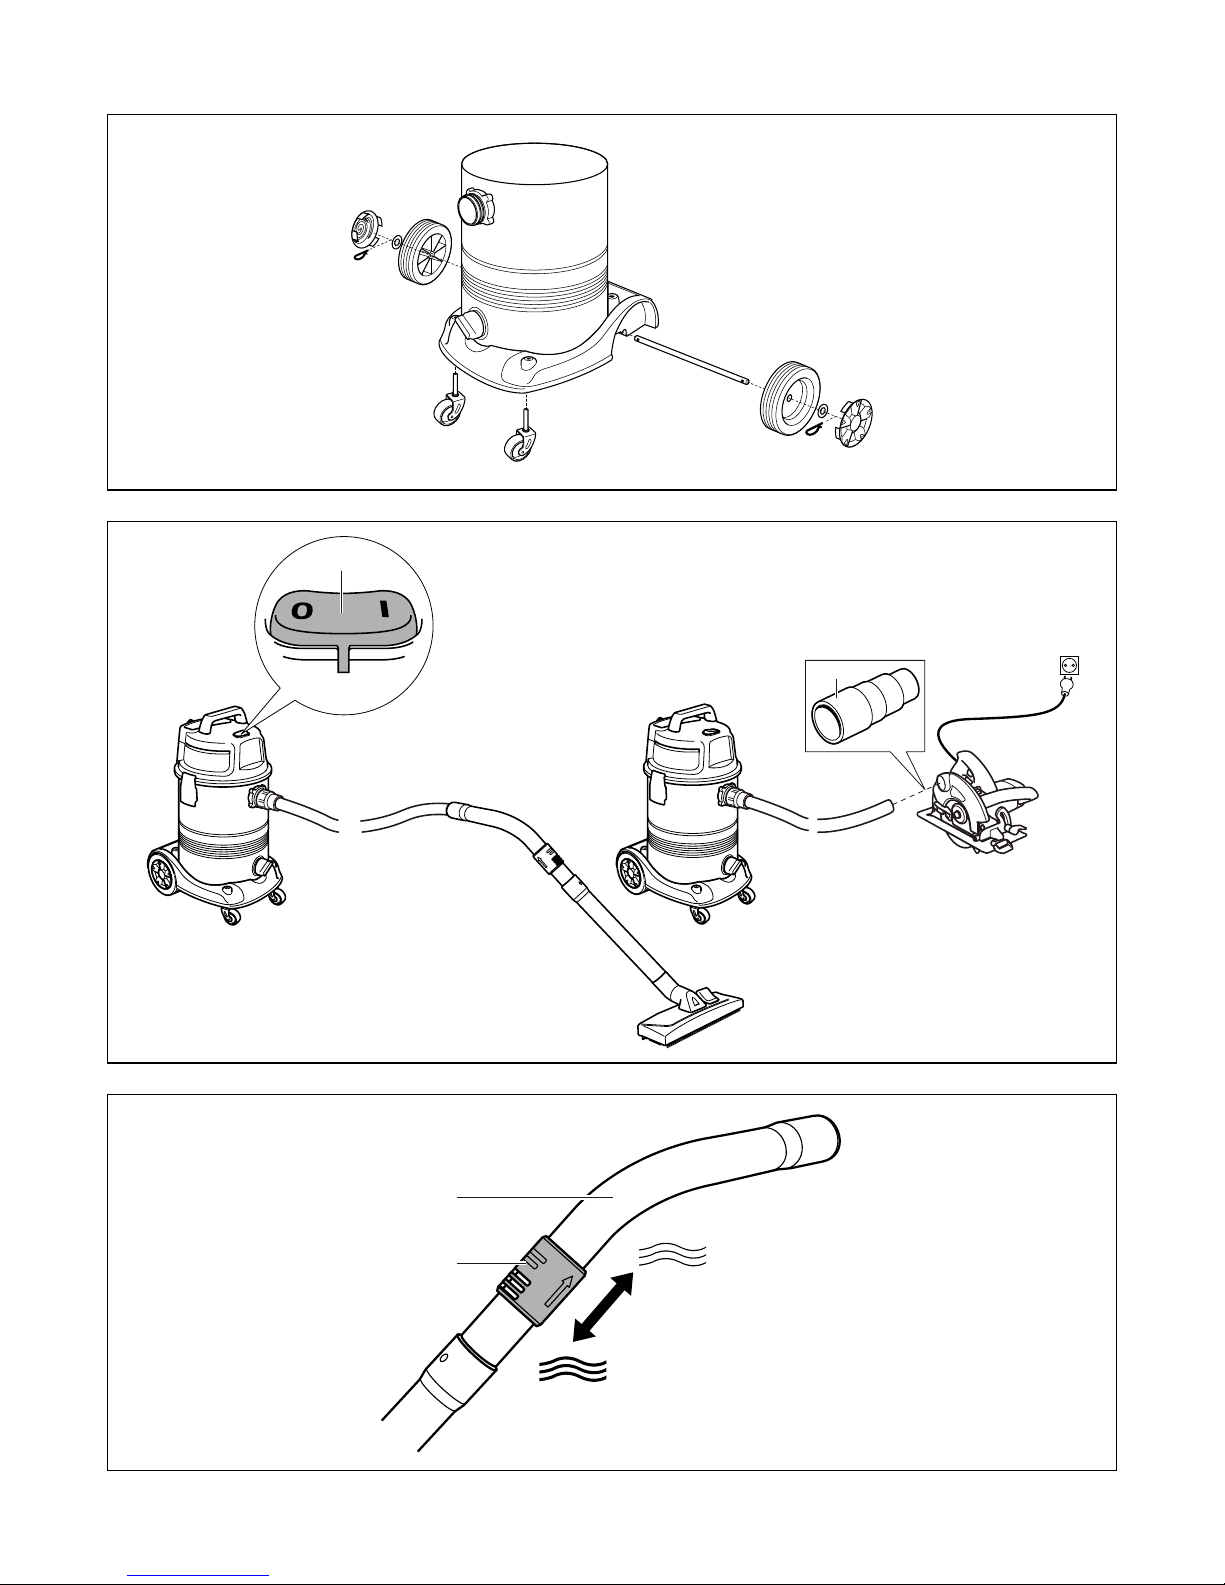
• Assembly 3 4
! ensure that the plug is disconnected from the
power source before assembling the appliance
- unlock latches A and lift motor head B o container C
- remove contents from container and turn it
upside down
Page 10

10
- mount 4 casters D as illustrated
- the appliance is ready for dry vacuum cleaning with
cartridge lter E pre-installed
- place motor head back onto container and secure it
into place by using both latches A
- mount vacuum hose F onto hose connection G and
screw it into place
- insert extension tubes H and handle J rmly into each
other and connect them to the vacuum hose
- mount desired nozzle K, L or M onto suction tube
• On/o 5
- set switch N to position “I” to start wet or dry
vacuum cleaning
- set switch N to position “O” for switching o the
vacuum cleaner
- when connecting a power tool directly to the vacuum
cleaner, universal power tool adapter P may be used
(if needed)
• Airow control 6
Control the airow by sliding regulator Q up or down the
opening in handle J
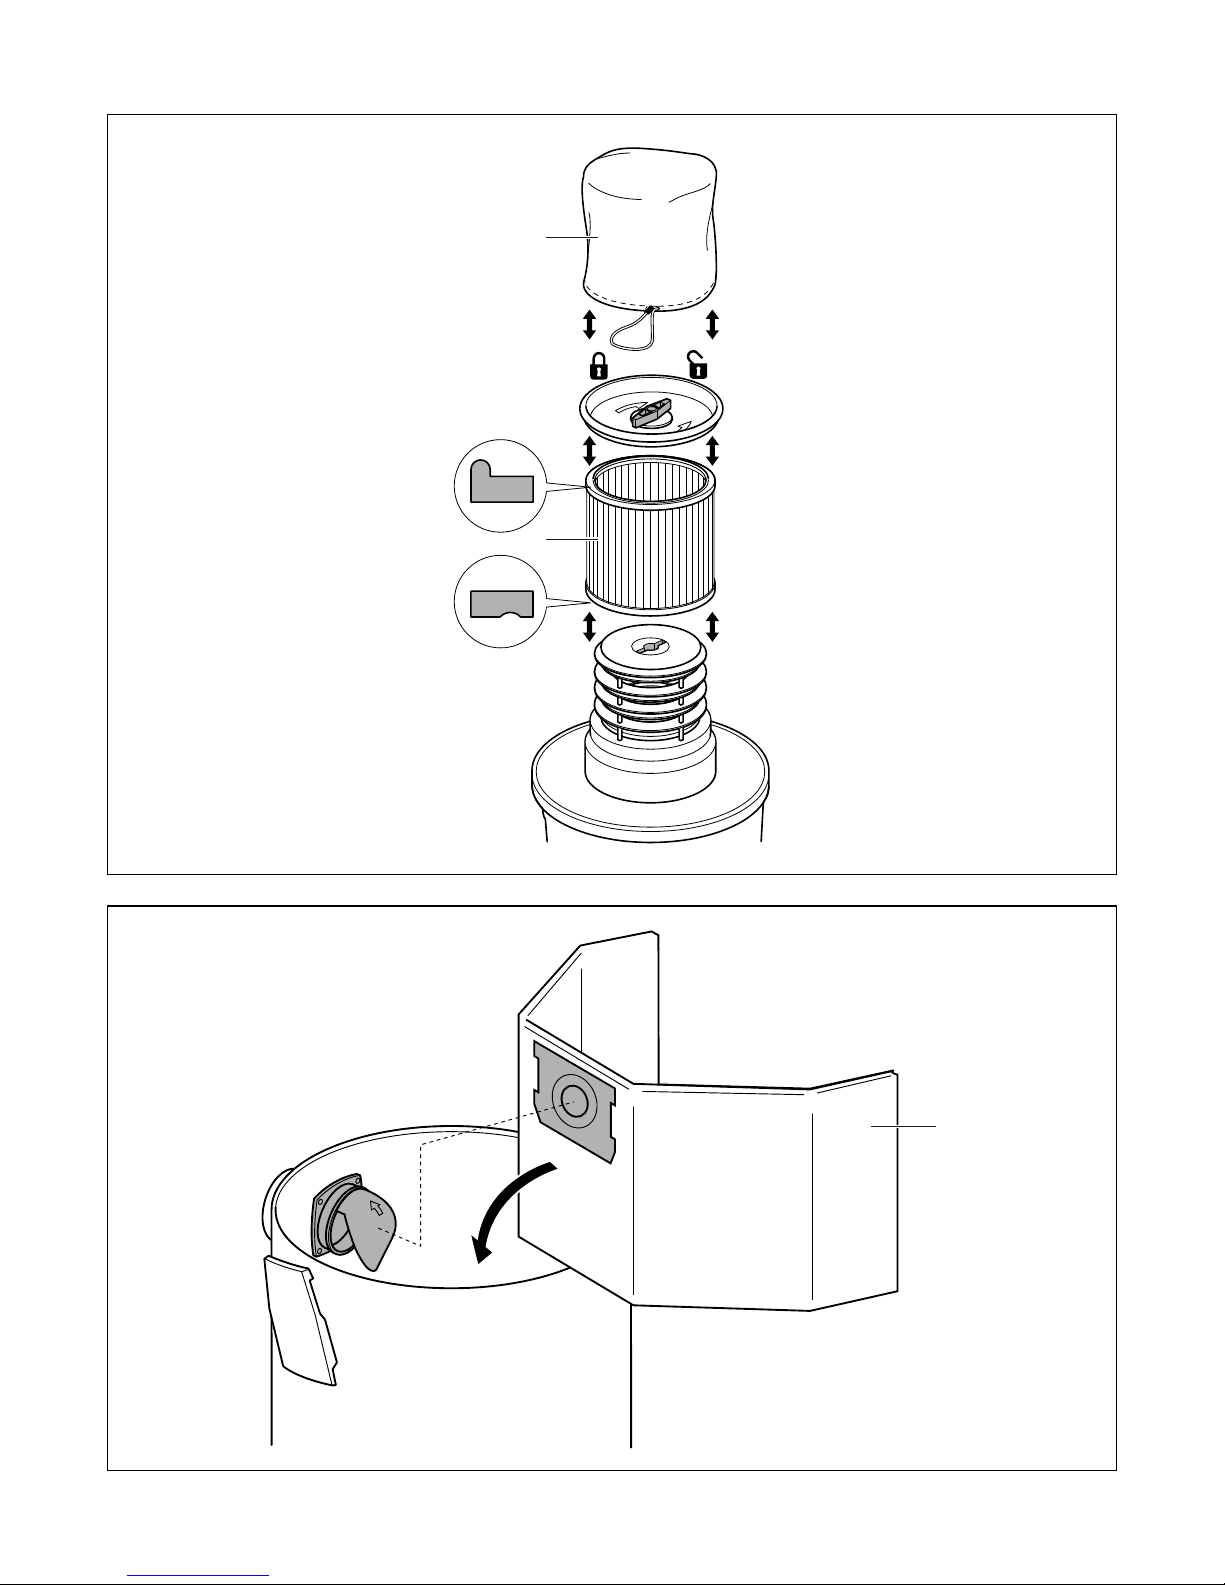
• Mounting/removing of cartridge lter 7
! disconnect the plug
- mount/remove cartridge lter E as illustrated
- mount protection lter R over cartridge lter E for
prolonging its service life and easy cleaning purposes
• Dry vacuum cleaning 8
! ensure that all information mentioned in the
chapter “SAFETY” is read and understood
! inform yourself beforehand about the handling of
materials that are hazardous to one’s health
- verify that cartridge lter E 3 and protection lter R 3
are securely mounted
- insert dust bag S as illustrated (when using a dust bag,
cartridge lter E 3 clogs slower, the vacuuming
performance is kept longer and the disposal of dust
becomes easier)
- only vacuum directly in the container when materials
not hazardous to one’s health are being vacuumed
- switch o the appliance and disconnect the plug
after vacuuming
• Wet vacuum cleaning 9
! ensure that all information mentioned in the
chapter “SAFETY” is read and understood
! inform yourself beforehand about the handling of
materials that are hazardous to one’s health
! remove dust bag S, cartridge filter E and
protection filter R before starting wet vacuuming
- ensure that container C 3 is emptied and clean
- carefully mount foam sleeve lter T as illustrated
- secure motor head back on the container, mount
desired nozzle directly onto vacuum hose or extension
tube, and switch on the appliance
- do not immerse the nozzle completely in the liquid;
leave a gap at the nozzle opening to allow air inow
- when the container reaches its maximum capacity, the
motor speed increases
- when this happens, switch o the appliance,
disconnect the plug, and empty the container 0
- switch o the appliance and disconnect the plug
after vacuuming
- clean and dry the inside and outside of the container
before storage 0
• Mounting/removing of HEPA lter !
! disconnect the plug
- unlock lter door X as illustrated and pull it out
- remove HEPA lter Z and clean it or mount a new one
- insert tabs of lter door X into upper slots and lock it
into place
• Storage of tubes and nozzles @
MAINTENANCE / SERVICE
• Always disconnect plug from power source before
cleaning and/or maintenance
• Store the appliance indoors in a dry place
• Keep appliance clean (especially ventilation slots V 3)
- clean ventilation slots V 3 regularly with a brush or
compressed air
! do not attempt to clean ventilation slots by
inserting pointed objects through openings
• Cleaning of cartridge lter #
- regularly clean the carefully removed cartridge lter by
gently tapping or brushing dirt o (wear dust mask)
- do not clean indoors in living areas
! do not wash filter with soap and water
- for picking up dust the cartridge lter needs to be dry
- if the cartridge lter is wet, it will clog quickly and be
very dicult to clean
- handle the cartridge lter carefully when removing,
cleaning or replacing it
! do not use a cartridge filter with tears or small
holes; replace it immediately
• Cleaning of foam sleeve lter $
- wash lter with mild soap and water and rinse it with
clean water
- allow lter to dry before mounting it again
• Cleaning of HEPA lter %
- clean lter by brushing dirt o (wear dust mask)
- for optimal performance mount a new lter (for
ordering see “Service” on www.skilmasters.com)
• If the appliance should fail despite the care taken in
manufacturing and testing procedures, repair should be
carried out by an after-sales service centre for SKIL
power tools
- send the appliance undismantled together with proof
of purchase to your dealer or the nearest SKIL service
station (addresses as well as the service diagram of
the appliance are listed on www.skilmasters.com)
TROUBLESHOOTING
• The following listing shows problem symptoms, possible
causes and corrective actions (if these do not identify
and correct the problem, contact your dealer or
service station)
! switch off the tool and disconnect the plug before
investigating the problem
★ Appliance does not operate
- no power supply -> check power supply (power cable,
circuit breakers, fuses)
- faulty power cable -> unplug and check power cable; if
damaged, have it repaired by a professional
- container full -> empty container
Page 11

11
★ Dust comes out from motor head cover
- cartridge lter or dust bag is missing or damaged ->
mount or replace cartridge lter or dust bag
★ Reduced eciency and motor/speed vibration
- blockage in nozzle/hose/container inlet ->
remove blockage
- cartridge lter blocked by ne dust -> clean cartridge
lter or mount a new one
ENVIRONMENT
• Do not dispose of electric tools, accessories and
packaging together with household waste material
(only for EU countries)
- in observance of European Directive 2002/96/EC on
waste of electric and electronic equipment and its
implementation in accordance with national law,
electric tools that have reached the end of their life
must be collected separately and returned to an
environmentally compatible recycling facility
- symbol ^ will remind you of this when the need for
disposing occurs
DECLARATION OF CONFORMITY
• We declare under our sole responsibility that this product
is in conformity with the following standards or
standardized documents: EN 60335 in accordance with
the provisions of the directives 2006/95/EC,
2004/108/EC, 2006/42/EC
• Technical file at: SKIL Europe BV (PT-SEU/PJE),
4825 BD Breda, NL
ÊÆÇιƼ½ÊÄÇÇÌ
Б»½К½ЛБ¼½ЖМ
И½К¹МБЗЖЛŵЖ¿БЖ½½КБЖ¿
ÍÊÇȽƓˁ˅ʿ˂ʽ¼¹Ɠ
¹ÆÊÇÅŽĽÆ
ИИКЗО¹Д¹Ж¹¿½К
25.11.2010
NOISE/VIBRATION
• Measured in accordance with EN 60704 the sound
pressure level of this tool is <70 dB(A)
Aspirateur eau et poussières 8700
INTRODUCTION
• Cet appareil est destiné à la collecte et l’aspiration de
liquides non inammables ainsi que de
substances sèches
• Cet appareil est destiné à un usage intérieur uniquement
et convient à un usage industriel, comme dans les hôtels,
les écoles, les hôpitaux, les usines, les magasins, les
bureaux et les sociétés de location
• Cet appareil ne convient pas à l’aspiration de
poussières dangereuses
• Lisez attentivement ce manuel d’instruction avant
d’utiliser l’outil et conservez-le pour pouvoir vous y référer
ultérieurement 2
• Prêtez attention aux instructions de sécurité et aux
avertissements; ne pas suivre les avertissements et
instructions peut entraîner un choc électrique,
un incendie et/ou de graves blessures sur les
personnes
• Vériez que le conditionnement contient toutes les
pièces présentées dans le schéma 3
• Lorsque des pièces manquent ou sont endommagées,
veuillez contacter votre distributeur
SPECIFICATIONS TECHNIQUES 1
ELEMENTS DE L’APPAREIL 3
A Dispositif de blocage (2)
B Tête de moteur
C Conteneur
D Roulette orientable (4)
E Filtre à cartouche
F Tuyau d’aspiration
G Connexion du exible
H Rallonge (2)
J Poignée de contrôle du débit d’air
K Suceur à brosse pour le sol
L Suceur à brosse rond
M Bec soueur
N Interrupteur marche/arrêt
P Adaptateur universel pour outils électriques
Q Régulateur de ux d’air
R Protection du ltre à cartouche
S Sac à poussière
T Filtre manchon en mousse
U Attache-câble
V Fentes de ventilation
W Dispositif de retenue de ltre
X Trappe du ltre HEPA
Z Filtre HEPA
SECURITE
SECURITE RELATIVE AU SYSTEME ELECTRIQUE
• Contrôlez toujours si la tension secteur correspond à la
tension indiquée sur la plaquette signalétique de
l’appareil (les appareils conçus pour une tension de 230V
ou 240V peuvent également être branchés sur 220V)
• Branchez cet appareil mis à la terre uniquement à un
système d’alimentation correctement mis à la terre;
veillez à ce que la prise et le câble d’allongement aient un
conducteur de protection fonctionnel
• Lors de l’utilisation de l’appareil dans des
environnements humides, utilisez un interrupteur
diérentiel (RCD) avec un courant de réaction de 30
mA maximum
• Débranchez toujours la prise du secteur durant les
pauses, lorsque l’appareil n’est pas utilisé ou lorsque l’on
travaille sur l’appareil (par ex. changement/nettoyage des
ltres) an d’éviter un démarrage accidentel
• Mettez l’appareil à l’arrêt avant de débrancher la che
• N’utilisez pas l’appareil lorsque le câble d’alimentation, la
che ou l’interrupteur est endommagé
 Loading...