

Page 1
CIRCULAR SAW
5885 (F0125885..)
SKIL - Divisão de Ferramentas Elétricas F000.622.326
Caixa Postal 1195 - CEP 13065-9000 - Campinas/SP - Brasil 05/2010
GB ORIGINAL INSTRUCTIONS
E MANUAL ORIGINAL
P MANUAL ORIGINAL
www.skil.com.br
SKIL_IB5885_BR.indd 1 28-05-2010 09:41:42
Page 2
2
1
5885
E
D
A HH
F
G
C
A
B
3
/II
2
7,9 kg
EPTA 01/2003
5000 /min
65 mm
45°
235 mm
MAX.
30 mm
230 mm
MIN.
30 mm
Watt
2000
85 mm
90°
110 V/127 V =
1700 W
Leia o manual de instruções
antes de operar a ferramenta.
Leia el manual de instrucciones
antes de operar con la
herramienta.
Usar proteção auricular. Ruídos
podem provocar a surdez.
Utilice unos protectores
auditivos. El ruido intenso
puede provocar sordera.
Usar óculos
de proteção.
Colóquese
unas gafas de
protección.
Símbolo para classe de
proteção II
(completamente isolada)
Símbolo para clase de
protección II
(completamente aislada)
110 V/127 V =
5300 /min
Standard included:
reduction ring 25,4 mm
Incluye: anillo reductor 25,4 mm
Incluso: anel de redução 25,4 mm
SKIL_IB5885_BR.indd 2 28-05-2010 09:41:45
Page 3
3
K
J
L
3 mm
4
HF G
K
N
M
M
5
SKIL_IB5885_BR.indd 3 28-05-2010 09:41:46
Page 4
4
M
A D E H
P
M
A D E H
K
NOT STANDARD INCLUDED
ÍTEM NO INCLUSO
ITEM NÃO INCLUSO
6
Q
7
SKIL_IB5885_BR.indd 4 28-05-2010 09:41:48
Page 5
5
0
QF
G
R
S U V T
Ø 34-35 mm
9
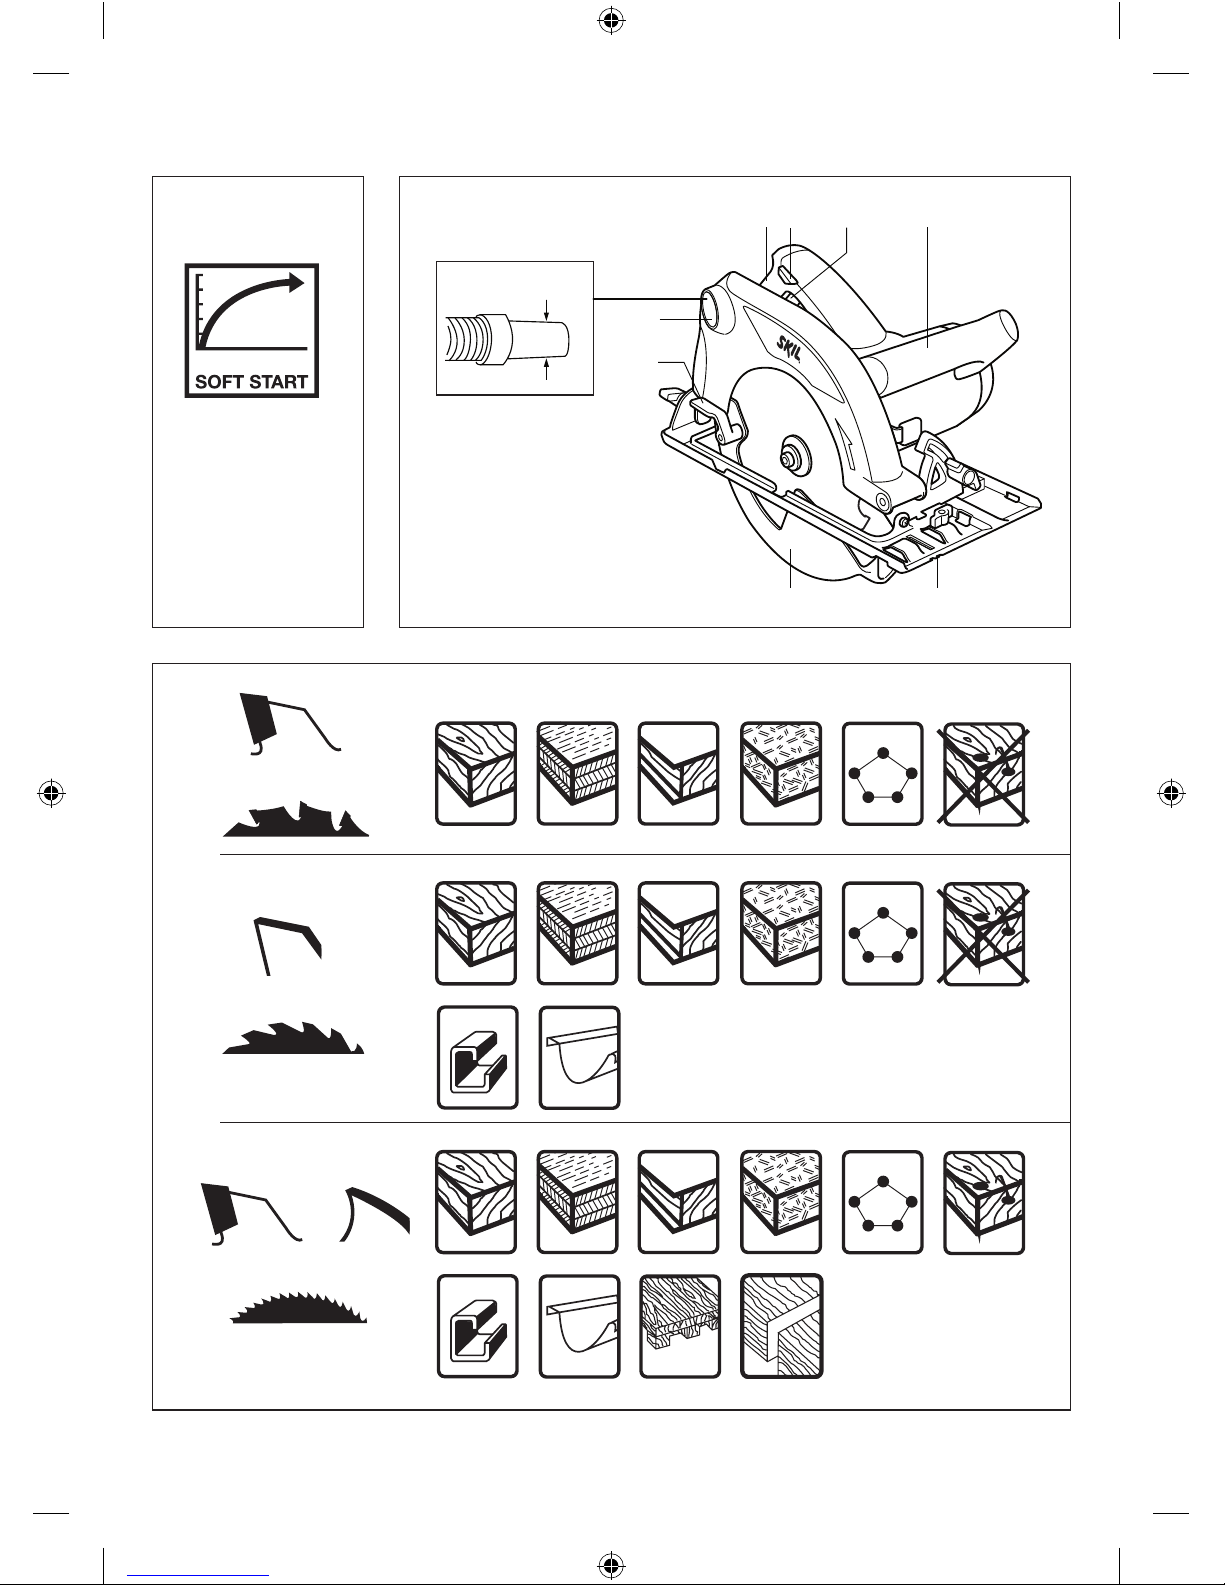
ARRANQUE
ELETRÔNICO
SUAVE
ARRANQUE
SUAVE
ELECTRÓNICO
8
SKIL_IB5885_BR.indd 5 28-05-2010 09:41:49
Page 6
6
#
$
X
W
Q
!
Q
F
G
@
No caso de descarte não jogue no lixo comum.
En casos que quiera descartar su herramienta,
no tirar en la basura.
SKIL_IB5885_BR.indd 6 28-05-2010 09:41:50
Page 7

7
GB
Circular saw 5885
INTRODUCTION
• This tool is intended for lengthways and crossways
cutting of wood with straight cuts as well as angle cuts
to 45°; with the appropriate saw blades also non-ferrous
metals, light building materials and plastics can be cut
•
Read and save this instruction manual 2
TECHNICAL SPECIFICATIONS 1
SAFETY
GENERAL SAFETY INSTRUCTIONS
WARNING! Read all safety warnings and all
instructions. Failure to follow the warnings and
instructions may result in electric shock, fire and/or serious
injury. Save all warnings and instructions for future
reference. The term “power tool” in the warnings refers to
your mains-operated (corded) power tool.
1)
WORK AREA SAFETY
a)
Keep work area clean and well lit.
Cluttered or dark areas invite accidents.
b) Do not operate power tools in explosive
atmospheres, such as in the presence of flammable
liquids, gases or dust.
Power tools create sparks
which may ignite the dust or fumes.
c)
Keep children and bystanders away while operating
a power tool.
Distractions can cause you to lose
control.
2)
ELECTRICAL SAFETY
a)
Power tool plugs must match the outlet.
Never modify the plug in any way. Do not use any
adapter plugs with earthed (grounded) power tools.
Unmodified plugs and matching outlets will reduce risk
of electric shock.
b)
Avoid body contact with earthed or grounded
surfaces such as pipes, radiators, ranges and
refrigerators.
There is an increased risk of electric
shock if your body is earthed or grounded.
c)
Do not expose power tools to rain or wet conditions.
Water entering a power tool will increase the risk of
electric shock.
d)
Do not abuse the cord. Never use the cord for
carrying, pulling or unplugging the power tool.
Keep cord away from heat, oil, sharp edges or
moving parts.
Damaged or entangled cords increase
the risk of electric shock.
e)
When operating a power tool outdoors, use an
extension cord suitable for outdoor use.
Use of a
cord suitable for outdoor use reduces the risk of electric
shock.
f)
If operating a power tool in a damp location is
unavoidable, use an earth leakage circuit breaker.
Use of an earth leakage circuit breaker reduces the risk
of electric shock.
3)
PERSONAL SAFETY
a)
Stay alert, watch what you are doing and use
common sense when operating a power tool.
Do not use a power tool while you are tired or
under the influence of drugs, alcohol or medication.
A moment of inattention while operating power tools
may result in serious personal injury.
b)
Use personal protective equipment. Always wear
eye protection. Protective equipment such as dust
mask, non-skid safety shoes, hard hat, or hearing
protection used for appropriate conditions will reduce
personal injuries.
c)
Prevent unintentional starting. Ensure the switch is
in the off-position before connecting to power
source, picking up or carrying the tool.
Carrying
power tools with your finger on the switch or energising
power tools that have the switch on invites accidents.
d)
Remove any adjusting key or wrench before turning
the power tool on.
A wrench or a key left attached to a
rotating part of the power tool may result in personal
injury.
e)
Do not overreach. Keep proper footing and balance
at all times.
This enables better control of the power
tool in unexpected situations.
f)
Dress properly. Do not wear loose clothing or
jewellery. Keep your hair, clothing and gloves away
from moving parts.
Loose clothes, jewellery or long
hair can be caught in moving parts.
g)
If devices are provided for the connection of dust
extraction and collection facilities, ensure these are
connected and properly used.
Use of dust collection
can reduce dust-related hazards.
4)
POWER TOOL USE AND CARE
a)
Do not force the power tool. Use the correct power
tool for your application. The correct power tool will
do the job better and safer at the rate for which it was
designed.
b) Do not use the power tool if the switch does not turn
it on and off.
Any power tool that cannot be controlled
with the switch is dangerous and must be repaired.
c)
Disconnect the plug from the power source before
making any adjustments, changing accessories, or
storing power tools.
Such preventive safety measures
reduce the risk of starting the power tool accidentally.
d)
Store idle power tools out of the reach of children
and do not allow persons unfamiliar with the power
tool or these instructions to operate the power tool.
Power tools are dangerous in the hands of untrained
users.
e)
Maintain power tools. Check for misalignment or
binding of moving parts, breakage of parts and any
other condition that may affect the power tool’s
operation. If damaged, have the power tool repaired
before use.
Many accidents are caused by poorly
maintained power tools.
SKIL_IB5885_BR.indd 7 28-05-2010 09:41:51
Page 8

8
f) Keep cutting tools sharp and clean.
Properly maintained cutting tools with sharp cutting
edges are less likely to bind and are easier to control.
g)
Use the power tool, accessories and tool bits etc.,
in accordance with these instructions, taking into
account the working conditions and the work to be
performed.
Use of the power tool for operations
different from those intended could result in a
hazardous situation.
5)
SERVICE
a)
Have your power tool serviced by a qualified repair
person using only identical replacement parts.
This will ensure that the safety of the power tool is
maintained.
SAFETY INSTRUCTIONS FOR CIRCULAR SAWS
DANGER
•
Keep hands away from cutting area and the
blade; keep your second hand on front handle
(if both hands are holding the saw, they can not be cut
by the blade)
•
Do not reach underneath the workpiece
(the guard
cannot protect you from the blade below the workpiece)
•
Adjust the cutting depth to the thickness of the
workpiece
(less than a full tooth of the blade teeth
should be visible below the workpiece)
•
Never hold piece being cut in your hands or across
your leg
(it is important to support the work properly to
minimise body exposure, blade binding, or loss of
control)
•
Hold tool by insulated gripping surfaces when
performing an operation where the cutting tool may
contact hidden wiring or its own cord
(contact with a
“live” wire will also make exposed metal parts of the
tool “live” and shock the operator)
•
When ripping always use a rip fence or straight edge
guide
(this improves the accuracy of cut and reduces
the chance for blade binding)
•
Always use blades with correct size and shape of
arbor holes (diamond or round)
(blades that do not
match the mounting hardware of the saw will run
eccentrically, causing loss of control)
•
Never use damaged or incorrect blade washers or
bolts
(the blade washers and bolt were specially
designed for your saw, for optimum performance and
safety of operation)
KICKBACK - CAUSES
•
Kickback is a sudden r
eaction to a pinched, bound or
misaligned saw blade, causing an uncontrolled saw to
lift up and out of the workpiece toward the operator
• When the blade is pinched or bound tightly by the kerf
closing down, the blade stalls and the motor r
eaction
drives the unit rapidly back toward the operator
• If the blade becomes twisted or misaligned in the cut,
the teeth at the back edge of the blade can dig into the
top surface of the wood causing the blade to climb out
of the kerf and jump back towar
ds operator
KICKBACK - OPERATOR PREVENTION
Kickback is the result of tool misuse and/or incorrect
operating procedures or conditions and can be avoided by
taking proper precautions as given below
•
Maintain a firm grip with both hands on the saw and
position your arms to resist kickback forces;
position your body to either side of the blade, but
not in line with the blade
(kickback could cause the
saw to jump backwards, but kickback forces can be
controlled by the operator, if proper precautions are
taken)
•
When blade is binding, or when interrupting a cut for
any reason, release the trigger and hold the saw
motionless in the material until the blade comes to a
complete stop; never attempt to remove the saw
from the work or pull the saw backwards while the
blade is in motion or kickback may occur (investigate
and take corrective actions to eliminate the cause of
blade binding; avoid cutting nails or screws)
•
When restarting a saw in the workpiece, centre the
saw blade in the kerf and check that saw teeth are
not engaged into the material
(if saw blade is binding,
it may walk up or kickback from the workpiece as the
saw is restarted)
•
Support large panels to minimise the risk of blade
pinching and kickback
(large panels tend to sag under
their own weight; supports must be placed under the
panel on both sides, near the line of cut and near the
edge of the panel)
•
Do not use a dull or damaged blade
(unsharpened or
improperly set blades produce narrow kerf causing
excessive friction, blade binding and kickback)
•
Blade depth and bevel adjusting locking levers must
be tight and secure before making cut
(if blade
adjustment shifts while cutting, it may cause binding
and kickback)
•
Use extra caution when making a plunge cut into
existing walls or other blind areas
(the protruding
blade may cut objects that can cause kickback)
WARNING
•
Check lower guard for proper closing before each
use
• Do not operate the saw if lower guard does not
move freely and close instantly
• Never clamp or tie the lower guard into the open
position
• If saw is accidentally dr
opped, lower guard may be
bent; disconnect the plug, raise the lower guard with
the retracting handle and make sure it moves freely and
does not touch the blade or any other part, in all angles
and depths of cut
• Check the operation of the lower guard spring; if the
guard and the spring are not operating properly,
they must be serviced before use
(lower guard may
operate sluggishly due to damaged parts, gummy
deposits, or a build-up of debris)
•
Lower guard should be retracted manually only for
special cuts such as plunge cuts and compound
cuts; raise lower guard by retracting handle and as
soon as blade enters the material, the lower guard
must be released
(for all other sawing, the lower guard
should operate automatically)
SKIL_IB5885_BR.indd 8 28-05-2010 09:41:52
Page 9

9
• Always observe that the lower guard is covering the
blade before placing saw down on bench or floor (an
unprotected, coasting blade will cause the saw to walk
backwards, cutting whatever is in its path; be aware of
the time it takes for the blade to stop after switch is
released)
GENERAL
•
A
void damage that can be caused by screws, nails and
other elements in your workpiece; remove them before
you start working
• Secure the workpiece
(a workpiece clamped with
clamping devices or in a vice is held more securely than
by hand)
•
Use suitable detectors to find hidden utility lines or
call the local utility company for assistance
(contact
with electric lines can lead to fire or electrical shock;
damaging a gas line can result in an explosion;
penetrating a water pipe will cause property damage or
an electrical shock)
•
When you put away the tool, switch of
f the motor and
ensure that all moving parts have come to a complete
standstill
• Use completely unr
olled and safe extension cords with
a capacity of 16 Amps (U.K. 13 Amps)
• In case of jamming or electrical or mechanical
malfunction, immediately switch of
f the tool and
disconnect the plug
• SKIL can assur
e flawless functioning of the tool only
when the correct accessories are used which can be
obtained from your SKIL dealer
• Use only accessories with an allowable speed matching
at least the highest no-load speed of the tool
• Never use the tool without the original pr
otection guard
system
• This tool should not be used by people under the age of
16 years
• The noise level when working can exceed 85 dB(A);
wear ear pr
otection
• If the cor
d is damaged or cut through while working, do
not touch the cord, but immediately disconnect the plug
• Never use the tool when cor
d is damaged; have it
replaced by a qualified person
• Always check that the supply voltage is the same as the
voltage indicated on the nameplate of the tool (tools
with a rating of 230V or 240V can also be connected to
a 220V supply)
• Starting cycles generate brief voltage dr
ops;
interference with other equipment/machines may occur
in case of unfavourable mains system conditions
(malfunctions are not to be expected for system
impedances below 0.36 ohm) - if you need further
clarification, you may contact your local power supply
authority
•
This tool is not suitable for wet cutting
• After switching off your circular saw, never stop the
rotation of the saw blade by a lateral force applied
against it
• Never use cir
cular saw blades made of high speed steel
(HSS)
• Never use grinding/cutting discs with this tool
•
Do not work materials containing asbestos (asbestos
is considered carcinogenic)
• Dust fr
om material such as paint containing lead, some
wood species, minerals and metal may be harmful
(contact with or inhalation of the dust may cause
allergic reactions and/or respiratory diseases to the
operator or bystanders); wear a dust mask and work
with a dust extraction device when connectable
•
Certain kinds of dust are classified as carcinogenic
(such as oak and beech dust) especially in conjunction
with additives for wood conditioning; wear a dust
mask and work with a dust extraction device when
connectable
• Follow the dust-r
elated national requirements for the
materials you want to work with
• Do not attempt to cut extr
emely small workpieces
• Remove all obstacles on top of as well as underneath
the cutting path before you start cutting
• Do not work overhead with the tool
•
Only use a saw table provided with a switch that
prevents restarting of the motor after interruption of
voltage
• Only use a saw table pr
ovided with a kerf guide
• Always disconnect plug from power source before
making any adjustment or changing any accessory
WHEN CONNECTING NEW 3-PIN PLUG (U.K. ONLY):
• Do not connect the blue (= neutral) or br
own (= live) wire
in the cord of this tool to the earth terminal of the plug
• If for any r
eason the old plug is cut off the cord of this
tool, it must be disposed of safely and not left
unattended
USE
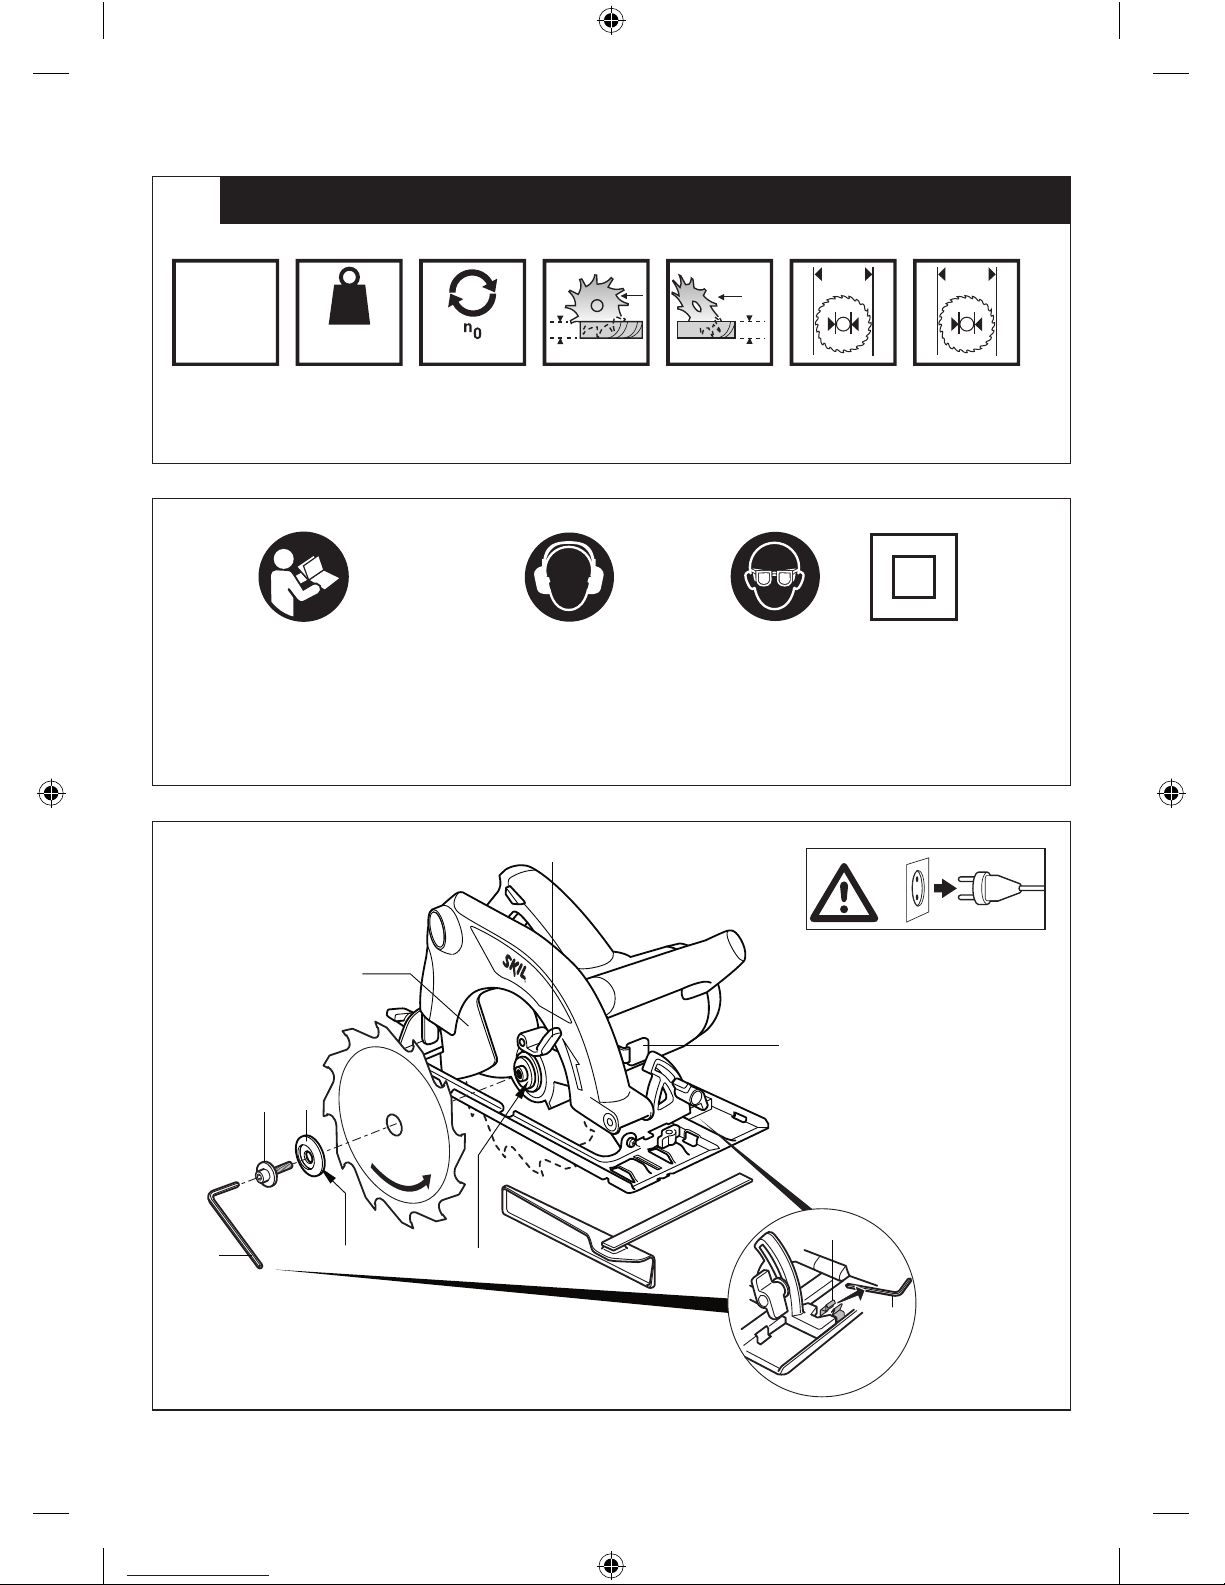
• Mounting saw blade 3
! disconnect the plug
- take hex key A from storage B
- push spindle-lock button C and hold it while you
remove blade bolt D with blade wrench
! push spindle-lock button C only when tool is at a
standstill
- r
elease spindle-lock button C
- remove flange E
- open lower guard F with lever G and hold it while you
mount saw blade with saw teeth and arrow printed
on saw blade pointing in same direction as arrow on
lower guard
-
r
elease lower guard F
- mount flange E
! make sure that clamping surfaces H of flanges
are perfectly clean and face the blade
- push spindle-lock button C and hold it while you
tighten blade bolt with hex key 1/8 tur
n past finger
tight (ensures slippage of saw blade when it
encounters excessive resistance thus reducing motor
overload and saw kickback)
- r
elease spindle-lock button C
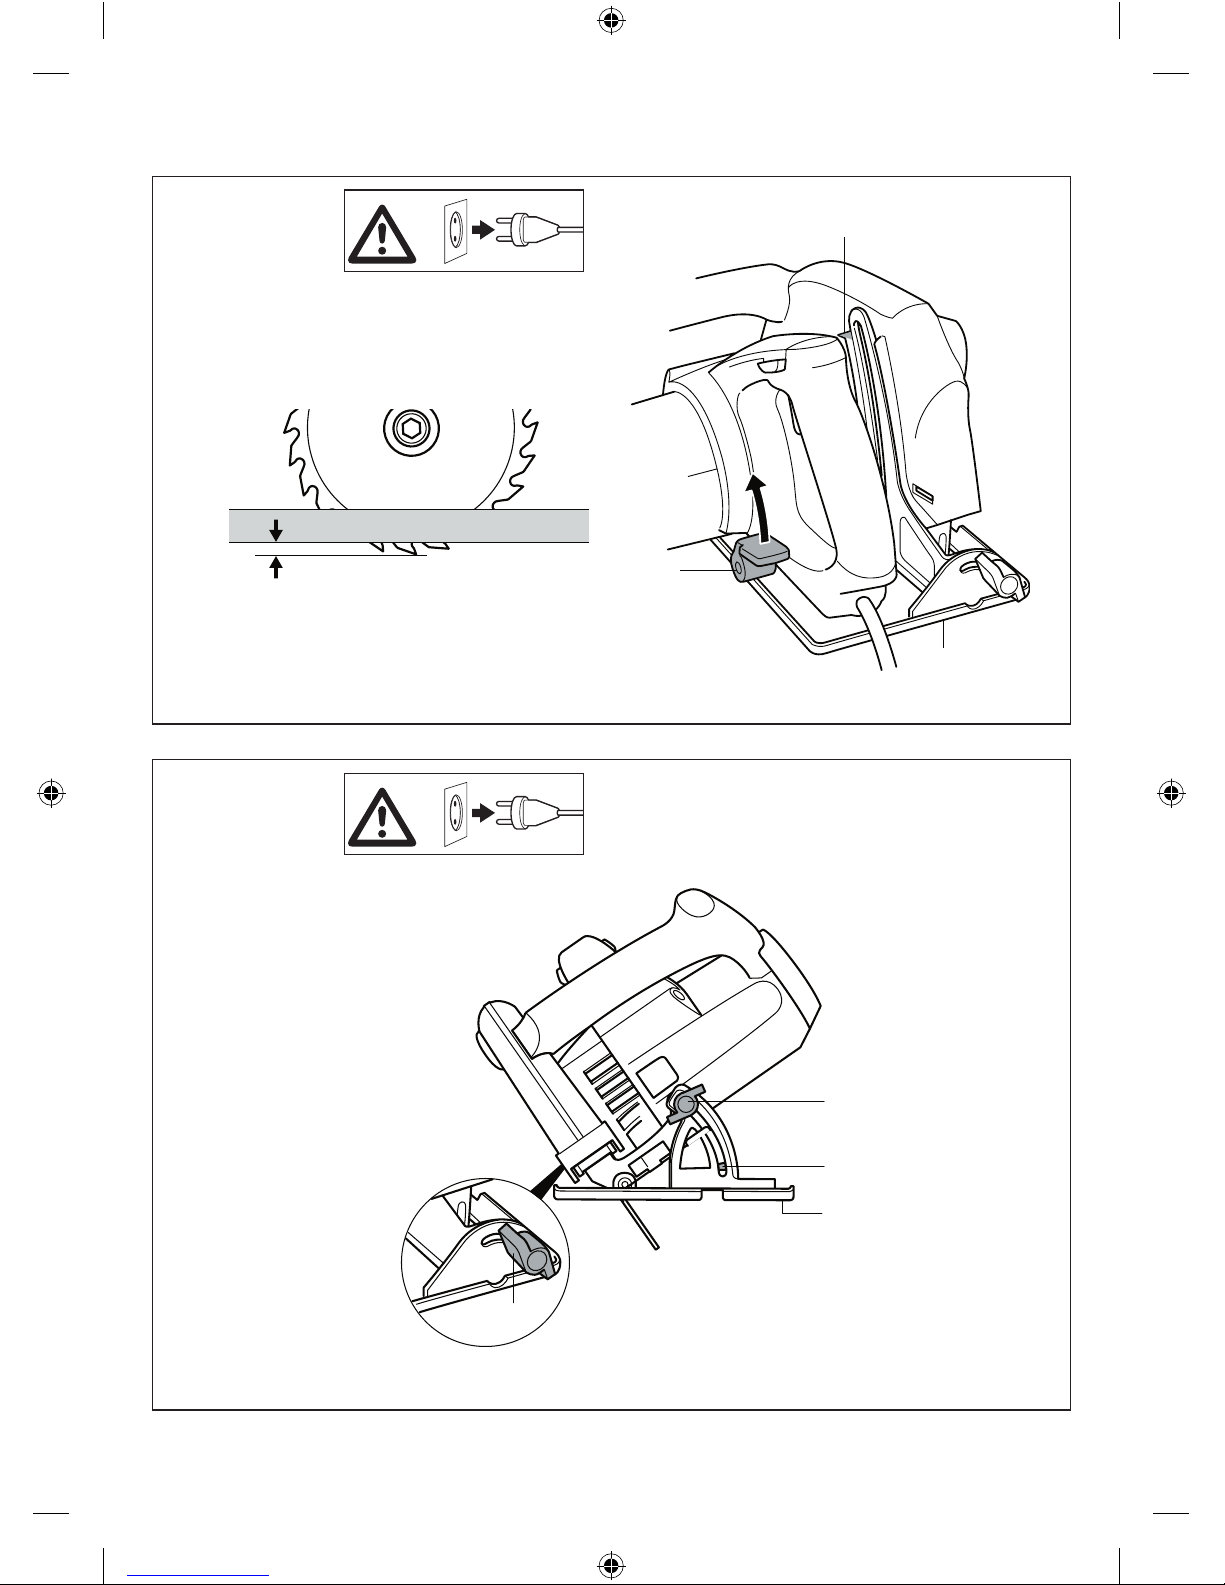
• Adjusting cutting depth (0-85 mm)
4
- for an optimal quality cut the saw blade should not
extend mor
e than 3 mm below the workpiece
- loosen lever J
-
raise/lower foot K until desired cutting depth is set on
scale using indicator L
- tighten lever J
SKIL_IB5885_BR.indd 9 28-05-2010 09:41:52
Page 10

10
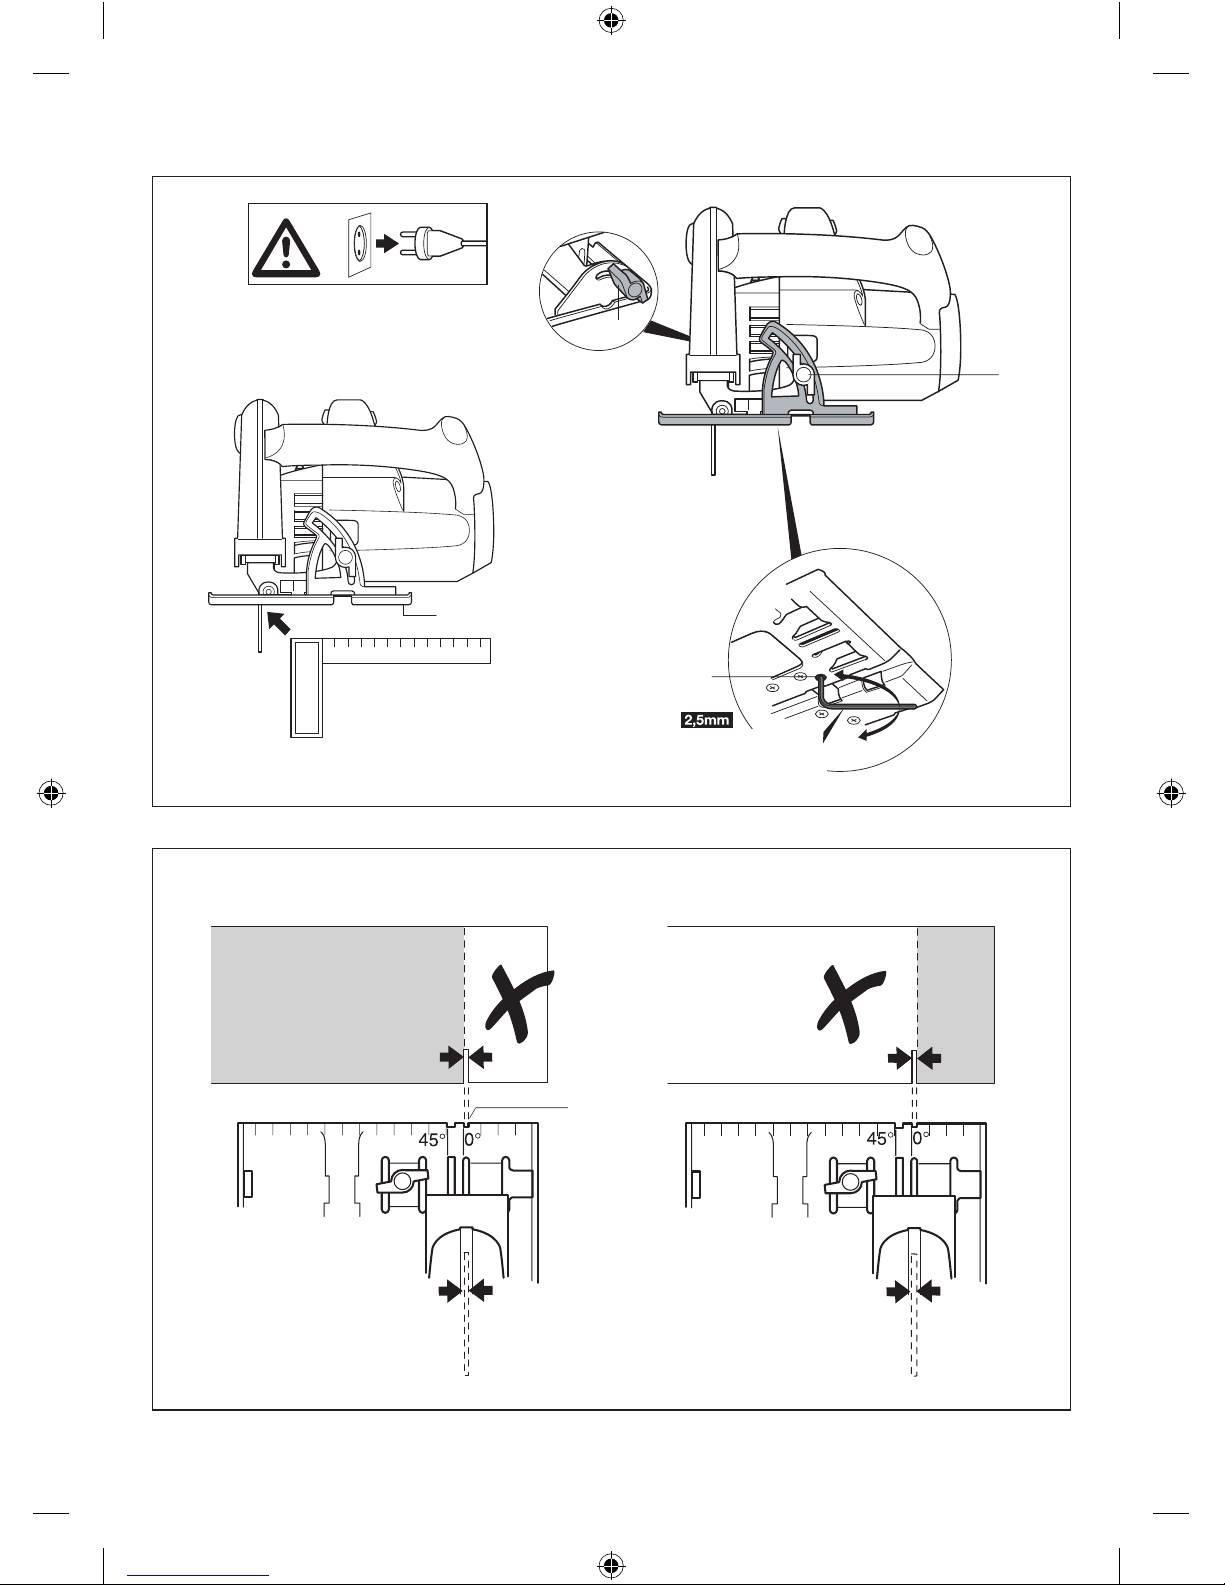
• Adjusting cutting angle (0-45°) 5
- loosen 2 knobs M
- tilt tool until desir
ed cutting angle is set on scale
using indicator N
- tighten 2
knobs M
! when bevel cutting, cutting depth does not
correspond with value on cutting depth scale
• 90° Cutting angle check 6
- a
djust and tighten foot K to maximum cutting depth 4
- adjust and tighten cutting angle to 0°
-
check for 90° angle between the blade and bottom of
foot with a square
- if adjustment is needed, loosen 2
knobs M and use
adjustment screw P as illustrated
•
Line-of-cut indicator Q 7
- for guiding tool along desir
ed line of cut marked on
the workpiece
- for a straight 0° cut or a 45° bevel cut use the
indicator line concer
ned
- allows you to choose whether waste material is on
inner or outer side of blade
! the wide part of the foot should rest on the
supported part of the workpiece
! cutting width is determined by width of blade
teeth and not by width of blade body
! always make trial cuts first to verify actual line of
cut
• Electr
onic soft-start 8
Ensures r
eaching the maximum speed smoothly without
a sudden impact when tool is switched on
• Dust suction
-
connect vacuum cleaner to extension R
9
! never let the vacuum cleaner hose interfere with
the lower guard or the cutting operation
- one may also use a dust bag (SKIL accessory
2610387402)
• Operating the tool 9
- connect plug to power sour
ce
- always hold handle S firmly with one hand and
handle T firmly with the other hand
- place tool with fr
ont end of foot flat on workpiece
! ensure that the saw teeth are not engaged into
the workpiece
- switch on tool by first pr
essing knob U (= safety
switch which cannot be locked) and then pulling
trigger V
! the tool should run at full speed before the blade
enters into the workpiece
- lower guar
d F opens automatically when saw blade
enters the workpiece (open lower guard manually by
using lever G only for special cuts such as plunge
cuts)
- do not for
ce the tool; apply light and continuous
pressure
- after completing the cut switch of
f tool by releasing
trigger V
! ensure that the blade has come to a complete
standstill, before you lift the tool from the
workpiece
APPLICATION ADVICE
• Always face the good side of the workpiece down to
ensure minimum splintering
• Only use sharp saw blades of the corr
ect type 0
- quality of cut impr
oves by the number of teeth
- carbide tipped blades stay sharp up to 30 times
longer than ordinary blades
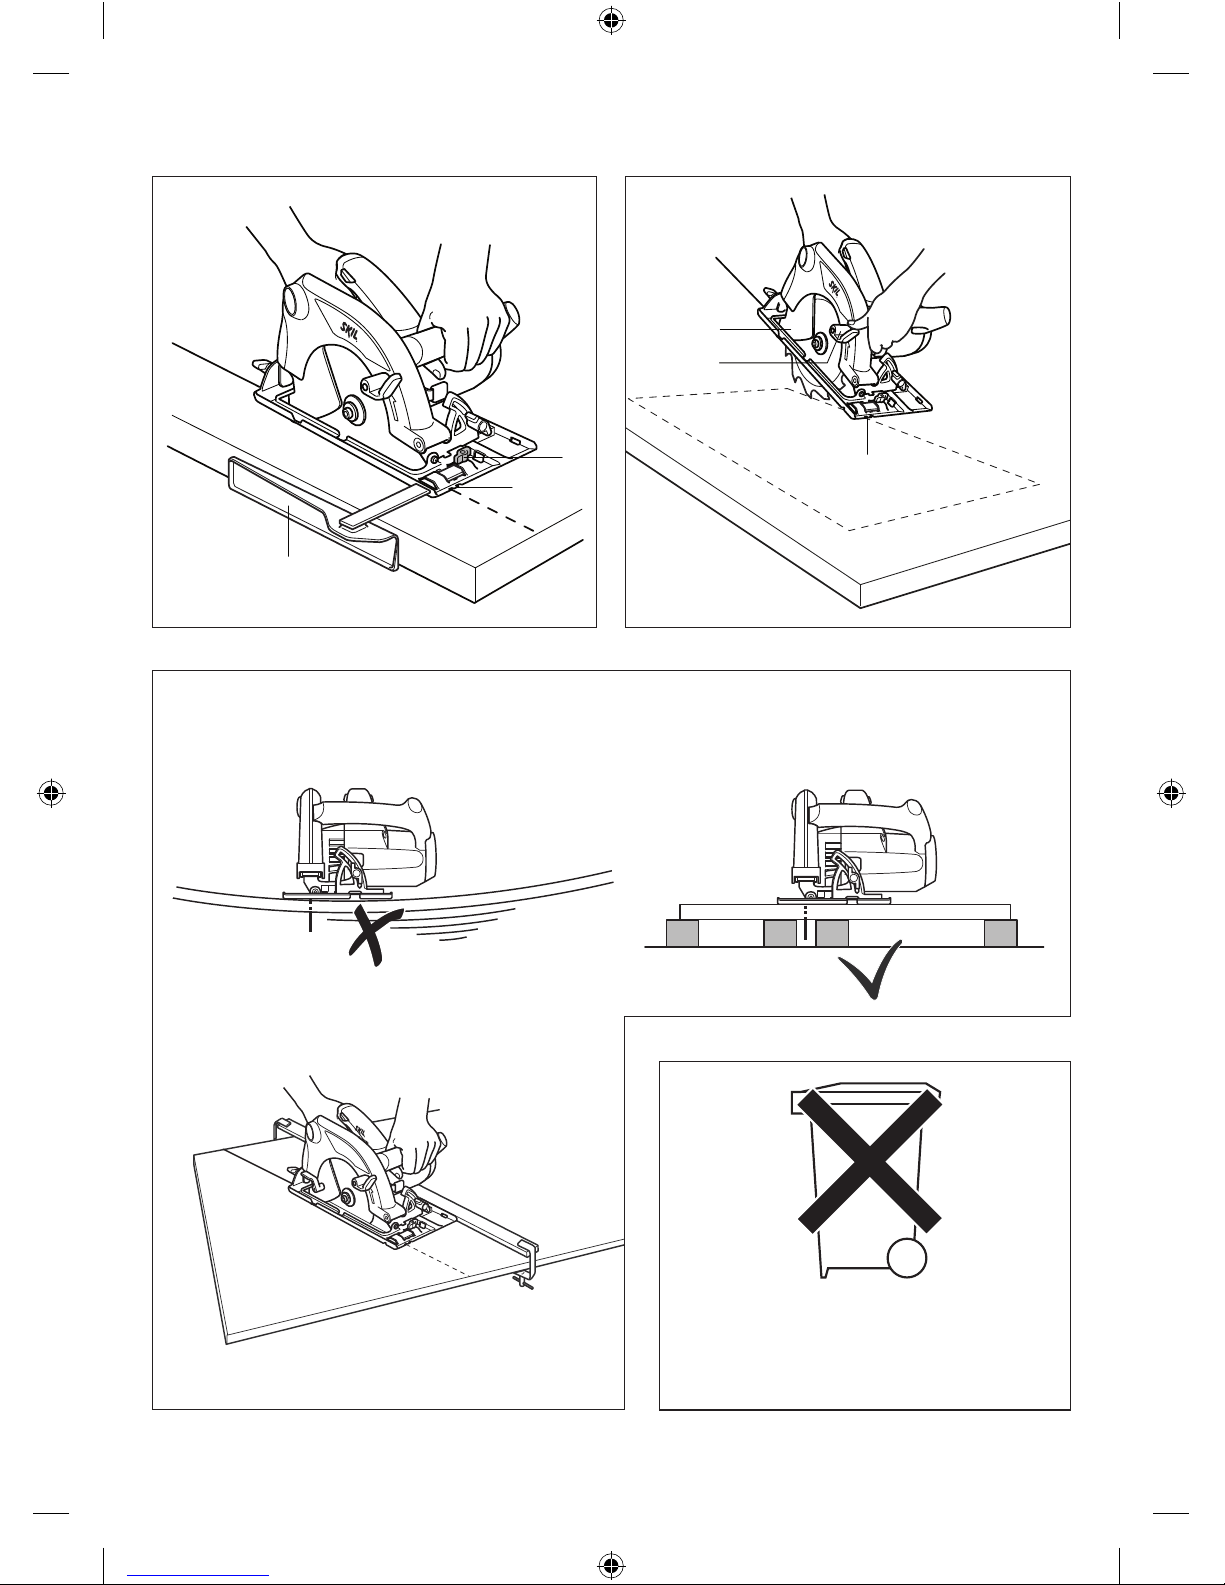
• Rip fence W !
- for making exact cuts along a workpiece edge
-
can be inserted in either side of foot
Adjusting rip fence
- loosen knob X
- adjust to desired cutting width by using rip fence
scale (use line-of-cut indicator Q as 0-reference)
- tighten knob X
•
Plunge cutting
@
- set desir
ed cutting depth
- tilt tool forward with line-of-cut indicator Q lined up
with desired line of cut marked on the workpiece
- open lower guar
d F with lever G
- just before blade enters workpiece, switch on tool
and gradually lower back end of tool using front end
of foot as hinge-point
- gradually move tool downwar
d as well as forward
- as soon as blade enters the material, release lever G
! the tool should run at full speed before the blade
enters into the workpiece
! never pull tool backwards
•
Cutting large panels
#
- support panel close to the cut either on floor
, table or
workbench
! set cutting depth so that you cut through panel
and not through support
- in case rip fence does not allow desir
ed width of cut,
clamp or nail straight piece of wood to workpiece as
a guide, and use the left side of the foot against this
guide
• V
ibration level
The vibration emission level stated at the back of this
instruction manual has been measured in accordance
with a standardised test given in EN 60745; it may be
used to compare one tool with another and as a
preliminary assessment of exposure to vibration when
using the tool for the applications mentioned
-
using the tool for different applications, or with
different or poorly maintainted accessories, may
significantly increase the exposure level
- the times when the tool is switched of
f or when it is
running but not actually doing the job, may
significantly reduce the exposure level
! protect yourself against the effects of vibration by
maintaining the tool and its accessories, keeping
your hands warm, and organizing your work
patterns
MAINTENANCE / SERVICE
• Always keep tool and cord clean (especially the
ventilation slots)
! disconnect the plug before cleaning
•
Clean saw blade immediately after use (especially from
resin and glue)
SKIL_IB5885_BR.indd 10 28-05-2010 09:41:53
Page 11

11
• If the tool should fail despite the care taken in
manufacturing and testing procedures, repair should be
carried out by an after-sales service centre for SKIL
power tools
-
send the tool undismantled
together with proof of
purchase to your dealer or the nearest SKIL service
station (addresses as well as the service diagram of
the tool are listed on www.skil.com.br)
ENVIRONMENT
• Do not dispose of electric tools, accessories and
packaging together with household waste material
(only for EU countries)
-
in observance of Eur
opean Directive 2002/96/EC on
waste of electric and electronic equipment and its
implementation in accordance with national law,
electric tools that have reached the end of their life
must be collected separately and returned to an
environmentally compatible recycling facility
-
symbol $
will remind you of this when the need for
disposing occurs
DECLARATION OF CONFORMITY
• We declare under our sole responsibility that this
product is in conformity with the following standardized
documents: IEC 60745 series.
Robert Bosch Ltda.
www.skil.com.br
E
Sierra circular 5885
INTRODUCCIÓN
• Esta herramienta ha sido proyectada para efectuar
cortes longitudinales y transversales rectos y con un
ángulo de inglete hasta 45° en madera; al emplear las
hojas de sierra correspondientes pueden aserrarse
también materiales no férricos, materiales de
construcción ligeros y materiales sintéticos
•
Lea y conserve este manual de instrucciones 2
CARACTERISTICAS TECNICAS 1
SEGURIDAD
INSTRUCCIONES GENERALES DE SEGURIDAD
¡ATENCIÓN! Lea íntegramente estas advertencias
de peligro e instrucciones. En caso de no atenerse a las
advertencias de peligro e instrucciones siguientes, ello
puede ocasionar una descarga eléctrica, un incendio y/o
lesión grave. Guardar todas las advertencias de peligro
e instrucciones para futuras consultas. El término
“herramienta eléctrica” empleado en las siguientes
advertencias de peligro se refiere a herramientas eléctricas
de conexión a la red (con cable de red).
1)
SEGURIDAD DEL PUESTO DE TRABAJO
a)
Mantenga limpia y bien iluminada su área de trabajo.
El desorden o una iluminación deficiente en las áreas de
trabajo pueden provocar accidentes.
b)
No utilice la herramienta eléctrica en un entorno con
peligro de explosión, en el que se encuentren
combustibles líquidos, gases o material en polvo.
Las herramientas eléctricas producen chispas que
pueden llegar a inflamar los materiales en polvo o
vapores.
c)
Mantenga alejados a los niños y otras personas de
su área de trabajo al emplear la herramienta
eléctrica.
Una distracción le puede hacer perder el
control sobre la herramienta.
2)
SEGURIDAD ELÉCTRICA
a)
El enchufe de la herramienta debe corresponder a la
toma de corriente utilizada. No es admisible
modificar el enchufe en forma alguna. No emplear
adaptadores en herramientas dotadas con una toma
de tierra. Los enchufes sin modificar adecuados a las
respectivas tomas de corriente reducen el riesgo de una
descarga eléctrica.
b)
Evite que su cuerpo toque partes conectadas a
tierra como tuberías, radiadores, cocinas y
refrigeradores.
El riesgo a quedar expuesto a una
descarga eléctrica es mayor si su cuerpo tiene contacto
con tomas de tierra.
c)
No exponga las herramientas eléctricas a la lluvia o
a condiciones de humedad.
Existe el peligro de recibir
una descarga eléctrica si penetran líquidos en la
herramienta.
d)
No utilice el cable de red para transportar o colgar
la herramienta, ni tire de él para sacar el enchufe de
la toma de corriente. Mantenga el cable de red
alejado del calor, aceite, esquinas cortantes o
piezas móviles.
Los cables de red dañados o
enredados pueden provocar una descarga eléctrica.
e)
Al trabajar con la herramienta eléctrica en la
intemperie utilice solamente cables de prolongación
homologados para su uso en exteriores.
La utilización de un cable de prolongación adecuado
para su uso en exteriores reduce el riesgo de una
descarga eléctrica.
f)
Si el funcionamiento de una herramienta eléctrica
en un lugar húmedo fuese inevitable, utilice un
cortacircuito de fuga a tierra.
El uso de un
cortacircuito de fuga a tierra reduce el riesgo de
descarga eléctrica.
3)
SEGURIDAD DE PERSONAS
a)
Esté atento y emplee la herramienta con prudencia.
No utilice la herramienta eléctrica si estuviese
cansado, ni bajo los efectos de alcohol, drogas o
medicamentos. El no estar atento durante el uso de
una herramienta eléctrica puede provocarle serias
lesiones.
b)
Utilice un equipo de protección personal y en todo
caso unas gafas de protección. El riesgo a lesionarse
se reduce considerablemente si, dependiendo del tipo y
la aplicación de la herramienta eléctrica empleada, se
utiliza un equipo de protección adecuado como una
mascarilla antipolvo, zapatos de seguridad con suela
antideslizante, casco, o protectores auditivos.
SKIL_IB5885_BR.indd 11 28-05-2010 09:41:53
Page 12

12
c) Evite una puesta en marcha fortuita. Asegurarse de
que la herramienta eléctrica esté desconectada
antes de conectarla a la toma de corriente, al
recogerla, y al transportarla. Si transporta la
herramienta eléctrica sujetándola por el interruptor de
conexión/desconexión, o si introduce el enchufe en la
toma de corriente con la herramienta eléctrica
conectada, ello puede dar lugar a un accidente.
d)
Retire las herramientas de ajuste o llaves fijas
antes de conectar la herramienta eléctrica.
Una herramienta o llave colocada en una pieza
rotativa puede producir lesiones graves al accionar la
herramienta eléctrica.
e)
Sea precavido. Trabaje sobre una base firme y
mantenga el equilibrio en todo momento.
Ello le
permitirá controlar mejor la herramienta eléctrica en
caso de presentarse una situación inesperada.
f)
Lleve puesta una vestimenta de trabajo adecuada.
No utilice vestimenta amplia ni joyas. Mantenga su
pelo, vestimenta y guantes alejados de las piezas
móviles.
La vestimenta suelta, las joyas y el pelo largo
se pueden enganchar con las piezas en movimiento.
g)
Siempre que sea posible utilizar equipos de
aspiración o captación de polvo, asegúrese que
éstos estén montados y que sean utilizados
correctamente.
El empleo de estos equipos reduce los
riesgos derivados del polvo.
4)
CUIDADO Y UTILIZACIÓN DE HERRAMIENTAS
ELÉCTRICAS
a) No sobrecargue la herramienta. Use la herramienta
prevista para el trabajo a realizar. Con la herramienta
adecuada podrá trabajar mejor y con mayor seguridad
dentro del margen de potencia indicado.
b)
No utilice herramientas con un interruptor
defectuoso.
Las herramientas que no se puedan
conectar o desconectar son peligrosas y deben
repararse.
c)
Saque el enchufe de la red antes de realizar un
ajuste en la herramienta, cambiar de accesorio o al
guardar la herramienta.
Esta medida preventiva
reduce el riesgo de conectar accidentalmente la
herramienta.
d)
Guarde las herramientas fuera del alcance de los
niños y de las personas que no estén familiarizadas
con su uso.
Las herramientas utilizadas por personas
inexpertas son peligrosas.
e)
Cuide sus herramientas con esmero. Controle si
funcionan correctamente, sin atascarse, las partes
móviles de la herramienta, y si existen partes rotas o
deterioradas que pudieran afectar al funcionamiento
de la herramienta. Si la herramienta eléctrica
estuviese defectuosa haga repararla antes de volver
a utilizarla.
Muchos de los accidentes se deben a
herramientas con un mantenimiento deficiente.
f)
Mantenga los útiles limpios y afilados.
Los útiles
mantenidos correctamente se dejan guiar y controlar
mejor.
g)
Utilice herramientas eléctricas, accesorios, útiles,
etc. de acuerdo con estas instrucciones, teniendo
en cuenta las condiciones de trabajo y la tarea a
realizar.
El uso de herramientas eléctricas para trabajos
diferentes de aquellos para los que han sido
concebidas puede resultar peligroso.
5)
SERVICIO
a)
Únicamente haga reparar su herramienta eléctrica
por un profesional, empleando exclusivamente
piezas de repuesto originales. Solamente así se
mantiene la seguridad de la herramienta eléctrica.
INSTRUCCIONES DE SEGURIDAD PARA SIERRAS
CIRCULARES
PELIGRO
•
Mantenga las manos apartadas del área de corte
y de la hoja; mantenga su mano auxiliar en el asa
delantera (si ambas manos están sujetando la sierra,
no pueden ser cortadas por la hoja)
•
No meta la mano debajo de la pieza de trabajo
(la guar
da no puede protegerle contra la hoja debajo de
la pieza de trabajo)
•
Ajuste la profundidad de corte al grosor de la pieza
de trabajo
(por debajo de la pieza de trabajo debe
sobresalir al menos un diente de la hoja de sierra)
•
No sujete nunca la pieza que esté cortando con las
manos o sobre la pierna
(es importante soportar la
pieza de trabajo correctamente para minimizar la
exposición del cuerpo, el atasco de la hoja o la pérdida
de control)
•
Sujete la herramienta por las superficies de agarre
aisladas cuando realice una operación en la que la
herramienta de corte pueda hacer contacto con
alambres ocultos o su propio cable de alimentación
(el contacto con un cable bajo tensión también
conectará la corriente a la herramienta y dará una
sacudida eléctrica al operario)
•
Al aserrar con corte longitudinal utilice siempre una
guía de borde recto
(esto mejora la precisión del corte
y reduce las probabilidades de que la hoja se atasque)
•
Utilice siempre hojas del tamaño y la forma
apropiados para los agujeros del portaherramientas
(diamante o redonda)
(las hojas que no correspondan
a los accesorios de montaje de la sierra rodarán
excéntricamente, causando pérdida de control)
•
No utilice arandelas o pernos de hoja dañados o
incorrectos
(las arandelas y el perno de la hoja fueron
diseñados especialmente para su sierra, para
proporcionar un rendimiento y una seguridad de
funcionamiento óptimos)
ACCIÓN DE RETROCESO - CAUSAS
•
La acción de r
etroceso es una reacción repentina
producida en una hoja de sierra mal alineada, atascada
o enganchada, que causa que una sierra incontrolada
se levante y salga de la pieza de trabajo y salte hacia el
operario
• Cuando la hoja se engancha o queda atrapada debido
a que el corte de la sierra se cierra, la hoja se atasca y
la r
eacción del motor impulsa la unidad rápidamente
hacia atrás y contra el operador
SKIL_IB5885_BR.indd 12 28-05-2010 09:41:54
Page 13

13
• Si la hoja se tuerce o queda mal alineada en el corte,
los dientes del borde posterior de la sierra pueden
clavarse en la superficie superior de la madera
haciendo que la hoja se salga del corte y salte hacia
atrás y contra el operador
ACCIÓN DE RETROCESO - PREVENCIÓN POR PARTE
DEL OPERARIO
La acción de retroceso es causada por la utilización
incorrecta de la herramienta y los procedimientos o
condiciones operativas incorrectas y puede evitarse
tomando las precauciones apropiadas, que se describen a
continuación
•
Mantenga la sierra bien agarrada con ambas manos
y posicione los brazos para resistir las fuerzas de la
acción de retroceso; posicione el cuerpo a cualquier
lado de la hoja, pero no alineado con la hoja
(la
acción de retroceso podría causar que la sierra saltara
hacia atrás, pero las fuerzas de la acción de retroceso
pueden ser controladas por el operario si toma las
precauciones apropriadas)
•
Cuando la hoja está atascada o cuando se
interrumpe un corte por cualquier razón, deje de
pulsar el gatillo y sujete la sierra en el material hasta
que la hoja se pare completamente; nunca intente
retirar la hoja de la pieza de trabajo ni tire de la
sierra mientras la hoja está en movimiento o puede
producirse una acción de retroceso
(investigue y
tome medidas correctivas para eliminar la causa del
atasco de la hoja; evite cortar clavos o tornillos)
•
Cuando vuelva poner en marcha una hoja en la
pieza de trabajo, centre la hoja de la sierra en el
corte y compruebe que los dientes de la sierra no
estén enganchados en el material
(si la hoja de la
sierra está atascada, puede salirse o producir un acción
de retroceso desde la pieza de trabajo cuando la sierra
se vuelva a poner en marcha)
•
Soporte los paneles grandes para minimizar el
riesgo de que la hoja se enganche y produzca una
acción de retroceso (los paneles tienden a hundirse
bajo su propio peso, por lo tanto deberían colocarse
soportes debajo del panel en ambos lados, cerca de la
línea del corte y del borde del panel)
•
No utilice una hoja embotada o dañada
(las hojas sin
afilar o colocadas incorrectamente producen un corte
estrecho que causa fricción excesiva, enganche y
acción de retroceso en la hoja)
•
Las palancas de ajuste de profundidad y biselado de
la hoja deben estar apretadas y seguras antes de
realizar el corte
(si el ajuste de la hoja cambia durante
el corte, puede causar atascos y acción de retroceso en
la hoja)
•
Vaya con cuidado extra cuando realice un corte
profundo en paredes existentes u otras áreas ciegas
(la hoja que sobr
esale puede cortar objetos que pueden
causar acción de retroceso)
¡ATENCIÓN!
•
Compruebe que la guarda inferior se cierre
correctamente antes de cada utilización
• No haga funcionar la sierra si la guarda inferior no
se mueve libremente y no se cierra
instantáneamente
• No sujete nunca la guarda inferior en la posición de
apertura
• Si la sierra cae accidentalmente, la guarda inferior
puede doblarse; desenchufe la herramienta, levante la
guarda inferior con el asa de retracción y asegúrese de
que se mueva libremente y que no haga contacto con la
hoja ni ninguna otra pieza en todos los ángulos y
profundidades de corte
•
Compruebe el funcionamiento del resorte de la
guarda inferior; si la guarda y el resorte no
funcionan correctamente, se les debe prestar
servicio antes de utilizarlos
(es posible que la guarda
no funcione bien debido a piezas dañadas, acumulación
de residuos pegajosos y otros desechos)
•
La guarda inferior debe retraerse manualmente
solamente para cortes especiales como cortes
profundos y cortes compuestos; levante la guarda
inferior retrayendo el asa y tan pronto como la hoja
entre en el material, suelte la guarda inferior
(para
todos los otros tipos de aserrado, la guarda inferior
debería funcionar automáticamente)
•
Compruebe siempre que la guarda inferior cubra la
hoja antes de colocar la sierra sobre un banco de
trabajo o en el suelo (una hoja sin protección que no
esté completamente parada puede desplazarse hacia
atrás cortando todo lo que encuentre a su paso; sea
consciente del tiempo que la hoja tarda en pararse
completamente después de que se ha dejado de pulsar
el interruptor de activación)
GENERAL
•
Evite los daños que puedan causar los tor
nillos, clavos
y otros objetos sobre la pieza de trabajo; retírelos antes
de empezar a trabajar
• Asegure la pieza de trabajo
(una pieza de trabajo
fijada con unos dispositivos de sujeción o en un tornillo
de banco, se mantiene sujeta de forma mucho más
segura que con la mano)
•
Utilice aparatos de detección adecuados para
localizar posibles conductores o tuberías ocultas,
o consulte a su compañía abastecedora
(el contacto
con conductores eléctricos puede provocar una
descarga eléctrica e incluso un incendio; al dañar una
tubería de gas puede producirse una explosión; la
perforación de una tubería de agua pueden causar
daños materiales o una descarga eléctrica)
•
Ponga atención al guar
dar su herramienta de que el
motór está apagado y las partes móviles están parados
• Utilice cables de extensión segur
os y completamente
desenrollados con una capacidad de 16 amperios
• En caso de bloqueo o de un mal funcionamiento
eléctrico o mecánico, desconectar la herramienta
inmediatamente y sacar el enchufe del contacto
• SKIL únicamente puede garantizar un funcionamiento
corr
ecto de la herramienta, cuando se utilicen los
accesorios adecuados que podrá obtener de su
proveedor de SKIL
• Utilice únicamente accesorios cuyo límite de
r
evoluciones permitido sea como mínimo igual a las
revoluciones en vacío máximas de la herramienta
• Nunca utilice su herramienta sin la capa de pr
otección
original sistemática
SKIL_IB5885_BR.indd 13 28-05-2010 09:41:54
Page 14

14
• Esta herramienta no debe utilizarse por personas
menores de 16 años
• El nivel de ruido, con la herramienta trabajando, podrá
sobr
epasar 85 dB(A); usar protectores auditivos
• Si llega a dañarse o cortarse el cable eléctrico durante
el trabajo, no tocar el cable, sino extraer
inmediatamente el enchufe de la r
ed
• No utilizar la herramienta cuando el cable esté dañado;
hágalo cambiar por una persona calificada
• Compruebe siempr
e que la tensión de alimentación es
la misma que la indicada en la placa de características
de la herramienta (las herramientas de 230V o 240V
pueden conectarse también a 220V)
• Los pr
ocesos de conexión provocan una breve caída de
la tensión; si las condiciones de la red fuesen
desfavorables, ello puede llegar a afectar a otros
aparatos (en redes con impedancias inferiores a
0,36 ohmios es improbable que lleguen a perturbarse
otros aparatos) - si usted necesita alguna aclaración,
contacte con su proveedor de energía eléctrica
•
Esta herramienta no es adecuada para hacer cortes con
agua
• Al desconectar su sierra cir
cular, nunca frene la rotación
de la hoja empujando algo contra ella lateralmente
• No utilice nunca hojas de sierras cir
culares de HSS
• Nunca utilice discos de amolar/tronzar con esta
herramienta
• No trabaje materiales que contengan amianto
(el amianto es cancerígeno)
•
El polvo del material, como por ejemplo la pintura que
contiene
plomo, algunas especies de madera, minerales
y metal podrían ser dañinos (el contacto o inhalación
del polvo podría producir reacciones alérgicas y/o
transtornos respiratorios al operador u otras personas
cerca); utilice una máscara contra el polvo y trabaje
con un dispositivo de extracción de polvo cuando lo
conecte
•
Ciertos tipos de polvo están catalogados como
cancerígenos (por ejemplo el polvo de r
oble y de haya)
especialmente junto con aditivos para el
acondicionamiento de la madera; utilice una máscara
y trabaje con un dispositivo de extracción de polvo
cuando lo conecte
•
Siga la normativa nacional en cuanto a extracción de
polvo, en función de los materiales que vayan a ser
utilizados
• No intente cortar piezas extr
emadamente pequeñas
• Antes de empezar a cortar, aparte todos los obstáculos
que haya encima y debajo de la línea de corte
• No trabaje con herramientas a una altura por encima de
la cabeza
• Use unicamente mesas de serrar pr
ovistas de un
interruptor que prevenga el arranque del motor desoués
de que se interrumpa la corriente
• Use unicamente mesas de serrar pr
ovistas de una guía
de corte
• Desenchufar siempre la herramienta antes de
realizar cualquier ajuste o cambiar algún accesorio
USO
• Montaje de la hoja de sierra 3
! desenchufar la herramienta
- coger la llave hexagonal A del depósito B
- pulse el botón de cierre de husillo C y manténgalo
pulsado mientras quita el tornillo de hoja D con la
llave de la hoja
! apriete el botón de cierre de husillo C solamente
cuando la herramienta se haya detenido
- suelte el botón de cierre de husillo C
- retire la brida E
- abra la guarda inferior F con la palanca G y sujétela
mientras monta la hoja de sierra con los dientes de la
sierra y la flecha impresa en la hoja apuntanda en la
misma dirección que la flecha mostrada en la guarda
inferior
-
suelte la guarda inferior F
- monte la brida E
! asegúrese de que las superficies de enganche H
de las bridas estén perfectamente limpias y estén
encaradas a la hoja
- pulse el botón de cierr
e de husillo C y manténgalo
pulsado mientras aprieta el tornillo de la hoja con la
llave hexagonal dando 1/8 de giro después de que
esté apretado al máximo con los dedos (asegura que
la hoja de sierra resbale si encuentra excesiva
resistencia, y evita que el motor se sobrecargue y la
sierra retroceda)
-
suelte el botón de cierre de husillo C
• Ajuste de la profundidad de corte (0-85 mm)
4
- para obtener una óptima calidad de corte, la hoja no
debe de pr
ofundizar más de 3 mm en la pieza de
trabajo
- aflojar la palanca J
-
levantar/bajar la base K hasta la profundidad de
corte deseada, que se encuentra indicada en la
escala, usando para ello el indicador L
- apr
etar la palanca J
• Ajuste del ángulo de corte (0-45°)
5
- desapr
etar los 2 botones M
- inclinar la herramienta hasta el ángulo de corte
deseado, que se encuentra indicado en la escala,
usando para ello el indicador N
- apr
etar los 2 botones M
! para cortes biselados, la profundidad de corte se
corresponde con el valor en la escala de
profundidad de corte
• Compr
obación del ángulo de corte a 90° 6
- ajustar la base K para una máxima pr
ofundidad de
corte 4
- ajustar el ángulo de corte a 0°
-
comprobar el ángulo de corte de 90° entre la hoja y
la base con un cartabón
- si es necesario un ajuste, desapr
ete los 2 botones M,
e utilice el tornillo de ajuste P como muestra la figura
SKIL_IB5885_BR.indd 14 28-05-2010 09:41:55
Page 15

15
• Indicador Q de la línea de corte 7
- para guiar la herramienta a lo largo de la línea de
corte deseada, márquela en la pieza de trabajo
- para un corte r
ecto de 0° o para bisealar a 45°, use el
indicador de la línea adecuado
- para permitir escoger si el material de desecho está
en el lado inter
no o externo de la sierra
! la parte ancha de la base debe de reposar en el
soporte de la pieza de trabajo
! la anchura de corte viene determinada por el
ancho de los dientes de la hoja y no por el ancho
del cuerpo de la sierra
! realice siempre cortes de prueba para verificar la
línea actual de corte
• Arranque suave electr
onico 8
Asegura el alcance de la velocidad máxima suavemente
sin la reacción súbita de la herramienta al conectarla
• Aspiración de polvo
-
monte el aspirador a la extensión R
9
! nunca permita que la media del aspirador
interfiera con la chapa protectora o con la
operación de corte
- se puede utilizar también una bolsa de polvo
(accesorio SKIL 2610387402)
• Utilización de la herramienta 9
- enchufar a la r
ed
- siempre mantener la empuñadura S firmemente con
una mano y la empuñadura T firmemente con la otra
mano
- colocar la herramienta con la parte delantera de la
misma tendida sobr
e la pieza de trabajo
! asegurese de que los dientes de la hoja no estan
encalados en la pieza de trabajo
- poner en mar
cha su herramienta primero apretando
el botón U (= interruptor de seguridad que no puede
bloquearse) y luego tirando del gatillo V
! la sierra debe detener su velocidad máxima
antesde que usted pueda realizar el trabajo de
corte
- la chapa pr
otectora F se abre automáticamente
cuando la hoja de sierra penetra en la pieza de
trabajo (abrir la chapa protectora manualmente con
la palanca G solámente para cortes particulares
como cortes de emersión)
- no forzar la herramienta; trabaje com pr
esión ligera y
continua
- después de haber r
ealizado el corte, pare su
herramienta soltando el gatillo V
! asegurese que la hoja esté completamente
parada antes de que la levante de la pieza a
trabajar
CONSEJOS DE APLICACIÓN
• Poner siempre el lado bueno de la pieza de trabajo
hacia abajo, para asegurar un mínimo astillado
• Utilice únicamente hojas de sierra afiladas del modelo
adecuado
0
- cuanto más dientes, más lisado el corte
-
hojas de sierra con dientes de metal duro (Widia) se
mantienen 30 veces más afiladas que las hojas
normales
• Guía paralela W !
- para hacer cortes exactos a lo lar
go de una esquina
de la pieza de trabajo
- puede insertarse en ambos lados de la base
Ajuste de la guía paralela
-
desaflojar la tuerca X
- ajustar a la anchura del corte deseado, utilizando la
escala de la guía paralela (utilice el indicador de la
línea de corte Q como referencia 0)
-
apr
etar la tuerca X
• Cortes de emersión directa
@
- fijar la pr
ofundidad de corte deseada
- incline la herramienta hacia adelante con el indicador
de la línea de corte Q alineado con la línea de corte
deseada y marcada en la pieza de trabajo
- abrir la guar
da inferior F con la palanca G
- justo antes de que la sierra penetre en la pieza de
trabajo, desvíe la herramienta y baje gradualmente la
parte delantera de la herramienta, usando el frontal
de la base como punto de apoyo
- mover la herramienta gradualmente, tanto hacia
abajo, como hacia adelante
- tan pronto como la hoja entre en el material, suelte la
palanca G
! la sierra debe detener su velocidad máxima an-
tesde que usted pueda realizar el trabajo de corte
! nunca empuja la herramienta hacia atras
•
Cortar tableros largos
#
- sostener el tabler
o, bien en el suelo, mesa o banco
de trabajo
! fijar la profundidad de corte de tal manera, que
usted pueda cortar a través del tablero y no a
través del soporte
- e
n el caso de que la guía paralela no permita la
anchura de corte deseada, empalme o clave una pieza
de madera recta a la pieza de trabajo como guía, y use
la parte izquierda de la base contra esta guía
• Nivel de vibración
El nivel de emisión total de vibraciones (suma vectorial
de tr
es direcciones) determinado según el
procedimiento de medición fijado en la norma
EN 60745: valor de vibraciones generadas a
h
=
3,5 m/s², tolerancia K=1,5 m/s²; puede utilizarse para
herramienta con otra y como valoración preliminar de la
exposición a las vibraciones al utilizar la herramienta
con las aplicaciones mencionadas
-
al utilizarla para distintas aplicaciones o con
accesorios difer
entes o con un mantenimiento
deficiente, podría aumentar de forma notable el nivel
de exposición
- en las ocasiones en que se apaga la herramienta o
cuando está funcionando per
o no está realizando
ningún trabajo, se podría reducir el nivel de
exposición de forma importante
! protéjase contra los efectos de la vibración
realizando el mantenimiento de la herramienta y
sus accesorios, manteniendo sus manos
calientes y organizando sus patrones de trabajo
SKIL_IB5885_BR.indd 15 28-05-2010 09:41:55
Page 16

16
MANTENIMIENTO / SERVICIO
• Mantenga limpio el cable eléctrico y la herramienta
(sobre todo las ranuras de ventilación)
! desenchufar la herramienta antes de limpiar
•
Limpie la hoja de sierra después de cada uso
(especialmente de resina y cola)
• Si a pesar de los esmerados pr
ocesos de fabricación y
control, la herramienta llegase a averiarse, la reparación
deberá encargarse a un servicio técnico autorizado para
herramientas eléctricas SKIL
- envíe la herramienta sin desmontar
junto con una
prueba de su compra a su distribuidor o a la estación
de servicio más cercana de SKIL (los nombres así
como el despiece de piezas de la herramienta figuran
en www.skil.com.br)
-
si necesita del cambio de las escobillas de carbón,
envié tu herramienta para un servicio técnico
autorizado para r
eemplazo; en el caso del cable de
energía o el enchufe esté dañado, envié tu
herramienta para un servicio técnico autorizado para
reemplazo.
Argentina - Robert Bosch Argentina S.A.
Av. Córdoba 5160 - C1414BAW
Ciudad Autonoma de Buenos Aires
Atencion al Cliente
Tel.: +54 (0810) 555 2020
E-Mail: herramientas.bosch@ar.bosch.com
Bolivia - HANSA
(591) 2 240 7777
Chile - EMASA S.A.
Irarrázaval 259 – Ñuñoa - Santiago
Tel.: +56 (02) 520 3100
E-Mail: emasa@emasa.cl
Colombia - Robert Bosch Ltda
(57) 1 658 5000 ext. 308
Costa Rica - COFERSA
(506) 2205-25-25
Cuba - GRUPO JOAN BOLUFER S.L.
(53) 270 3820
Ecuador - TECNOVA
(59) 34 2200 500
El Salvador - HEACSA
(203) 2221 9000
Guatemala - EDISA
(502) 2234-4063
Honduras - CHIPS
(504) 556 9781
México - Robert Bosch S.A. de C.V.
Tel. Interior: +52 (01) 800 627 1286
Tel. D.F.: +52 (01) 52 84 30 62
E-Mail: arturo.fernandez@mx.bosch.com
Nicarágua - MADINISA
(505) 249 8152 / 249 8153
Panamá - ZENTRUM
(507) 229 2800
Paraguai - CHISPA
(595) 2155 3315
Peru - AUTOREX
(511) 706 1100 / 706 1143
Republica Dominicana - JOCASA
(1809) 372 6000 / 530 2720
Uruguay - EPICENTRO
(59) 82 200 6225
Venezuela - Robert Bosch Venezuela
(58) 212 207 4511/ 207 4420
AMBIENTE
• No deseche las herramientas eléctricas, los
accesorios y embalajes junto con los residuos
domésticos (sólo para países de la Unión Europea)
-
de conformidad con la Dir
ectiva Europea 2002/96/CE
sobre residuos de aparatos eléctricos y electrónicos
y su aplicación de acuerdo con la legislación
nacional, las herramientas eléctricas cuya vida útil
haya llegado a su fin se deberán recoger por
separado y trasladar a una planta de reciclaje que
cumpla con las exigencias ecológicas
-
símbolo $ llamará su atención en caso de necesidad
de tirarlas
DECLARACIÓN DE CONFORMIDAD
• Declaramos bajo nuestra sola responsabilidad que este
producto está en conformidad con las normas o
documentos normalizados siguientes: serie IEC 60745.
Robert Bosch Ltda.
www.skil.com
SKIL_IB5885_BR.indd 16 28-05-2010 09:41:57
Page 17

17
P
Serra circular 5885
INTRODUÇÃO
• Esta ferramenta foi projetada para realizar cortes em
madeiras, cortes longitudinais e transversais em cortes
retos e em ângulo de 45º; com lâminas de serras
apropriadas, também é possível serrar metais não
ferrosos, materiais leves e plásticos
•
Leia e guar
de este manual de instruções 2
ESPECIFICAÇÕES TÉCNICAS 1
SEGURANÇA
AVISOS DE SEGURANÇA PARA FERRAMENTAS EM
GERAL
ATENÇÃO! Leia todos os avisos de segurança e
todas as instruções. Falha em seguir todos os avisos e
instruções listados abaixo pode resultar em choque
elétrico, fogo e/ou em ferimento sério. Guarde todos os
avisos e instruções para futuras consultas. O termo
"ferramenta" em todos os avisos listados abaixo referemse a ferramenta alimentada através de seu cordão de
alimentação ou a ferramenta operada a bateria (sem
cordão).
1)
S
EGURANÇA DA ÁREA DE TRABALHO
a) Mantenha a área de trabalho limpa e iluminada.
As áreas desorganizadas e escuras são um convite aos
acidentes.
b)
Não opere ferramentas em atmosferas explosivas,
como na presença de líquidos inflamáveis, gases ou
poeira.
As ferramentas criam faíscas que podem
inflamar a poeira ou os vapores.
c)
Mantenha crianças e visitantes afastados ao operar
uma ferramenta.
As distrações podem fazer você
perder o controle.
2)
S
EGURANÇA ELÉTRICA
a)
Os plugues da ferramenta devem ser compatíveis
com as tomadas. Nunca modifique o plugue.
Não use nenhum plugue adaptador com as
ferramentas aterradas. Os plugues sem modificações
aliados a utilização de tomadas compatíveis reduzem o
risco de choque elétrico.
b)
Evite o contato do corpo com superfícies ligadas à
terra ou aterradas tais como as tubulações,
radiadores, fornos e refrigeradores. Há um aumento
no risco de choque elétrico se seu corpo for ligado à
terra ou aterramento.
c)
Não exponha a ferramentas à chuva ou às
condições úmidas.
A água entrando na ferramenta
aumenta o risco de choque elétrico.
d)
Não for
ce o cordão de alimentação. Nunca use o
cordão de alimentação para carregar, puxar ou o
para desconectar a ferramenta da tomada.
Mantenha o cabo elétrico longe do calor, óleo,
bordas afiadas ou das partes em movimentos.
Os cabos danificados ou emaranhados aumentam o
risco de choque elétrico.
e)
Ao operar uma ferramenta ao ar livr
e, use um cabo
de extensão apropriado para o uso ao ar livre.
O uso de um cabo apropriado ao ar livre reduz o risco
de choque elétrico.
f)
Se a operação de uma ferramenta em um local
segur
o não for possível, use alimentação protegida
por um dispositivo de corrente residual (RCD).
O uso de um RCD reduz o risco de choque elétrico.
3)
S
EGURANÇA PESSOAL
a)
Fique atento, olhe o que você está fazendo e use o
bom senso ao operar uma ferramenta. Não use a
ferramenta quando você estiver cansado ou sob a
influência de drogas, álcool ou de medicamentos.
Um momento de desatenção enquanto opera uma
ferramenta pode resultar em grave ferimento pessoal.
b)
Use equipamento de segurança. Sempre use óculos
de segurança. O equipamento de segurança tal como
a máscara contra a poeira, sapatos de segurança
antiderrapantes, capacete de segurança, ou protetor
auricular utilizados em condições apropriadas reduzirão
os riscos de ferimentos pessoais.
c)
Evite a partida não intencional. Assegur
e que o
interruptor está na posição desligada antes de
conectar o plugue na tomada e/ou bateria, pegar ou
carregar a ferramenta. Carregar as ferramentas com
seu dedo no interruptor ou conectar as ferramentas que
apresentam interruptor na posição “ligado” são
convites a acidentes.
d)
Remova qualquer chave de ajuste antes de ligar a
ferramenta. Uma chave de boca ou de ajuste
conectada a uma parte rotativa da ferramenta pode
resultar em ferimento pessoal.
e)
Não for
ce além do limite. Mantenha o apoio e o
equilíbrio adequado toda vez que utilizar a
ferramenta. Isto permite melhor controle da ferramenta
em situações inesperadas.
f)
V
ista-se apropriadamente. Não use roupas
demasiadamente largas ou jóias. Mantenha seus
cabelos, roupas e luvas longe das peças móveis.
A roupa folgada, jóias ou cabelos longos podem ser
presos pelas partes em movimento.
g)
Se os dispositivos são for
necidos com conexão
para extração e coleta de pó, assegure que estes
estão conectados e utilizados corretamente.
O uso destes dispositivos pode reduzir riscos
relacionados a poeira.
4)
U
SO E CUIDADOS DA FERRAMENTA
a) Não for
ce a ferramenta. Use a ferramenta correta
para sua aplicação. A ferramenta correta faz o trabalho
melhor e mais seguro se utilizada dentro daquilo para a
qual foi projetada.
b)
Não use a ferramenta se o interruptor não ligar e
desligar
. Qualquer ferramenta que não pode ser
controlada com o interruptor é perigosa e deve ser
reparada.
SKIL_IB5885_BR.indd 17 28-05-2010 09:41:58
Page 18

18
c) Desconecte o plugue da tomada antes de fazer
qualquer tipo de ajuste, mudança de acessórios ou
armazenamento de ferramentas. Tais medidas de
segurança preventivas reduzem o risco de se ligar a
ferramenta acidentalmente.
d)
Guar
de as ferramentas fora do alcance das crianças
e não permita que pessoas não familiarizadas com a
ferramenta ou com estas instruções operem a
ferramenta. As ferramentas são perigosas nas mãos
de usuários não treinados.
e)
Manutenção das ferramentas. Cheque o
desalinhamento ou coesão das partes móveis,
rachaduras e qualquer outra condição que possa
afetar a operação da ferramenta. Se danificada, a
ferramenta deve ser r
eparada antes do uso.
Muitos acidentes são causados pela inadequada
manutenção das ferramentas.
f)
Mantenha ferramentas de corte afiadas e limpas.
A manutenção apropriada das ferramentas de corte
com lâminas afiadas tornam estas menos prováveis ao
emperramento e são mais fáceis de controlar.
g)
Use a ferramenta, acessórios, suas partes etc. de
acor
do com as instruções e na maneira designada
para o tipo particular da ferramenta, levando em
consideração as condições e o trabalho a ser
desempenhado. O uso da ferramenta em operações
diferentes das designadas podem resultar em situações
de risco.
5)
REPAROS
a)
Tenha sua ferramenta reparada por um agente de
reparos qualificado que usa somente peças
originais. Isto assegura que a segurança da ferramenta
é mantida.
b) Caso necessite a tr
oca de escovas de carvão, envie a
uma assitência técnica autorizada para substituição.
c) Caso o cor
dão de alimentação ou o plugue esteja
danificado, envie a uma assistência técnica autorizada
para substituição.
INSTRUÇÕES DE SEGURANÇA PARA SERRA
CIRCULARES
PERIGO
•
Mantenha as mãos afastadas da área de corte e
da lâmina; mantenha sua segunda mão na
empunhadura auxiliar ou na carcaça do motor
(se ambas as mãos estiver segurando a serra, elas não
podem ser cortadas pela lâmina)
•
Não manipule nada abaixo da peça de trabalho
(a capa de pr
oteção não protege você da lâmina abaixo
da peça de trabalho)
•
Ajuste a profundidade do corte de acordo com a
espessura da peça de trabalho
(menos que um dente
completo dos dentes da lâmina deve ser visível abaixo
da peça de trabalho)
•
Nunca segure a peça a ser cortada com suas mãos
ou suas pernas; fixe a peça de trabalho em uma
plataforma estável
(isto é importante para realizar o
trabalho adequadamente para minimizar a exposição
do corpo, compressão da lâmina, ou perda de controle)
•
Segure a ferramenta pela superfície isolada da
empunhadura da ferramenta ao executar uma
operação de corte pode entrar em contato com uma
fiação não visível ou seu próprio cordão de
alimentação
(o contato com uma fiação energizadas e
tornar as partes metálicas expostas das ferramenta
energizadas causando choque elétrico ao operador)
•
Ao cortar sempre use uma régua ou um
guia
paralelo (isto melhora a precisão do corte e reduz
o risco de tocar a lâmina)
•
Sempre use lâminas com tamanho e formato de
furos corretos (losango verso redondo)
(lâminas que
não são compatíveis com a serra guiarão de forma
excêntrica causando perda de controle)
•
Nunca use parafusos ou arruelas danificadas ou
incorretas
(as arruelas da lâmina e parafusos foram
fabricados especificamente para a sua serra, para o
ótimo desempenho e segurança de operação)
C
ONTRA
-GOLPE - CAUSAS DO CONTRA-GOLPE AO
OPERADOR
O ressalto resulta de uma má utilização da ferramenta e/
ou de procedimentos de utilização ou condições
incorrectos e pode ser evitado tomando as devidas
precauções, conforme a seguir indicado
•
O contra-golpe é uma r
eação inesperada de uma
lâmina de serra apertada, presa ou desalinhada,
provocando um movimento repentino que levanta a
serra ao encontro do operador devido a perda de
controle
• Quando a lâmina é apertada ou pr
esa pelo corte que se
fecha na madeira, a lâmina trava e a reação do motor
levanta a serra repentinamente ao encontro do
operador
• Se a lâmina se entortar ou desalinhar no corte, o dente
oposto da lâmina pode cavar a superfície superior da
madeira levantnado a lâmina saltando do corte e indo
ao encontro do operador
CONTRA-GOLPE - PREVENÇÃO DO CONTRA-GOLPE
AO OPERADOR
O contra-golpe é o resultado do uso incorredo e/ou
procedimentos e condições de operação incorretos e
podem ser evitados tomando as precauções adequadas
como descritos abaixo
•
Manter uma empunhadura firme com ambas as
mãos na serra e posicionar seus braços para resistir
as forças do contra-golpe; posicionar seu corpo ao
lado da serra mas nunca alinhado com a serra
(o contra-golpe pode levantar e arremessar a serra para
traz, mas as forças do contra-golpe podem ser
controladas pelo operador se precauções adequadas
são tomadas)
•
Quando a lâmina estiver prendendo, ou quando
interromper um corte por qualquer razão, solte
o
interruptor e mantenha a serra imóvel no material
até que a lâmina pare de girar completamente.
Nunca tente remover ou puxar a serra da
peça
trabalahada enquanto a lâmina está em
movimento porque pode ocorrer um contra-golpe
(investigue e corrija, eliminanando a causa do
prendimento da lâmina)
SKIL_IB5885_BR.indd 18 28-05-2010 09:41:58
Page 19

19
• Ao religar a serra na peça trabalhada, centralize a
lâmina da serra no corte e verifique se o dente da
lâmina não está encaixado no material (se a lâmina
da serra estiver presa na peça trabalhada, esta pode
subir ou ocorrer um contra-golpe quando a serra é
religada)
•
Prenda
peças grandes a ser trabalhada para
minimizar o risco de aperto de lâmina e contragolpe. Peças grandes tendem a empenar devido ao
seu próprio peso (os suportes devem ser montados
em baixo do peça em ambos os lados, próximo a linha
de corte e próximo a borda da peça)
•
Não use lâminas cegas ou danificadas
(lâminas não
afiadas ou desajustadas produzem um corte estreito
causando excesso de fricção, pr
endendo
e ocorrendo o
contra-golpe)
• Alavancas de ajuste de profundidade e ângulo de
corte da lâmina devem estar apertadas e seguras
antes de executar o corte
(se o ajuste da lâmina
altera-se ao executar o corte, pode causar prendimento
e contra-golpe)
•
Use cuidado extra ao executar um corte de
bolso
em paredes ou em outras áreas cegas (a lâmina
excedente pode cortar objetos que podem causar
contra-golpe)
ATENÇÃO!
• Verifique o correto fechamento da capa de proteção
inferior antes de cada uso
• Não opere a serra se a capa de proteção inferior
não se movimenta facilmente e fecha
instantaneamente
• Nunca prenda ou prenda a capa de proteção inferior
na posição aberta
• Se a serra cair acidentalmente, a capa de pr
oteção
inferior pode entortar; levante a capa de proteção
inferior manualmente através de sua alavanca e
certifique que ela se movimenta livremente, não toca na
lâmina ou em qualquer outra parte, verificar em todos
os ângulos e profundidades de corte
•
Verifique a operação da mola da capa de proteção
inferior. Se a capa ou a mola não estão operando
corretamente, elas devem ser consertadas antes do
uso
(a capa de proteção inferior pode funcionar
lentamente devido a peças danificadas, depósito de
goma ou um acúmulo de detritos)
•
A capa de proteção inferior pode ser retraída
manualmente para cortes especiais como "cortes
de
bolso" e "cortes compostos"; levante a capa de
proteção inferior através da alavanca e assim que a
lâmina entrar no material, a capa de proteção
inferior deve ser liberada (para todos os outros tipos
de corte, a capa de proteção inferior deve operar
automaticamente)
•
Sempre observe se a capa de proteção inferior está
cobrindo a lâmina antes de colocá-la na bancada ou
no chão
(uma lâmina não protegida que se encosta
causará um movimento da serra para traz que cortará o
que estiver em seu caminho; esteja atento ao momento
que lâmina para após o interruptor se liberado)
INFORMAÇÃO
•
Evite danificar a ferramenta em superfícies com pr
egos
ou parafusos; remova-os antes de começar a trabalhar
• Fixe a peça de trabalho
(uma peça de trabalho fixa
com dispositivos de fixação ou num torno fica melhor
fixa do que manualmente)
•
Utilizar detectores apropriados para detectar tubos
e cabos de alimentação escondidos, ou consulte a
firma de alimentação local
(o contacto com um cabo
eléctrico pode levar a incêndio e choque eléctrico; a
danificação de um cano de gás pode levar à explosão;
a penetração de uma tubulação de água provoca danos
materiais ou pode provocar um choque eléctrico)
•
Quando guardar a ferramenta, deverá certificar-se que
o motor esta devidamente parado assim como todas as
peças rotativas
• Utilize extensões completamente desenr
oladas e
seguras, com uma capacidade de 16 Amp
• Em caso de bloqueio ou de anomalias eléctricas ou
mecânicas, desligue imediatamente a ferramenta e a
ficha da tomada
• A SKIL só pode garantir um funcionamento perfeito da
ferramenta, quando utilizada com os acessórios
adequados que poderá adquirir nos r
evendedores
autorizados SKIL
• Utilize apenas acessórios com um númer
o de rotação
admissível no mínimo tão alto como o mais alto número
de rotação em vazio da ferramenta
• Nunca utilize a ferramenta sem o sistema de pr
otecção
original
• Esta ferramenta não deve ser utilizada por pessoas
menor
es de 16 anos
• O nível de ruído durante o trabalho pode exceder
85 dB(A); utilize pr
otectores auriculares
•
Caso o fio for danificado ou cortado durante o trabalho,
não toque no fio, mas tir
e imediatamente a ficha da
tomada
• Não utilizar ferramenta caso o fio esteja danificado;
mandando-o substituir por pessoal qualificado
• Certifique-se sempr
e de que a tensão de alimentação
está de acordo com a tensão indicada na placa de
identificação da ferramenta (ferramentas com a
indicação de 230V ou 240V também podem ser ligadas
a uma fonte de 220V)
• Pr
ocessos de ligação provocam uma breve redução de
tensão; no caso de condições de rede desfavoráveis, o
funcionamento de outros aparelhos pode ser
prejudicado (em impedâncias de rede inferiores a
0,36 Ohm não se conta com avarias) - se necessita de
algum esclarecimento adicional, contacte o seu
fornecedor de energia eléctrica
•
Esta ferramenta não é aconselhada para cortar com
água
• Depois de desligar a sua serra cir
cular, nunca pare a
rotação da lâmina exercendo pressão lateral sobre a
mesma
• Nunca utilize lâminas para serras cir
culares em HSS
• Nunca utilize discos de rebarbe/corte com esta
ferramenta
• Não processar material que contenha asbesto
(asbesto é considerado como sendo cancerígeno)
SKIL_IB5885_BR.indd 19 28-05-2010 09:41:58
Page 20

20
• O pó do material, como tinta com chumbo, algumas
espécies de madeira, minerais e metais, pode ser
prejudicial (contacto ou inalação do pó pode provocar
reacções alérgicas e/ou doenças respiratórias ao
operador ou às pessoas presentes); use máscara
respiratória e trabalhe com um dispositivo de
extracção de pó quando ligado a
•
Determinados tipos de pó são classificados como
substâncias cancerígenas (como pó de carvalho e faia),
em especial, juntamente com aditivos para
acondicionamento da madeira;
use máscara
respiratória e trabalhe com um dispositivo de
extracção de pó quando ligado a
•
Siga o r
egulamento nacional quanto a extração de pó,
em função dos materiais que vão ser utilizados
• Não tente cortar peças de trabalho extr
emamente
pequenas
• Retir
e todos os obstáculos que se encontram no topo
superior e na parte inferior da peça a cortar antes de
iniciar o trabalho
• Não trabalhe em suspensão com a ferramenta
•
Apenas utilize mesas de serrar munidas de interruptor
de voltagem que previna o reiniciar do motor depois de
interrupcão de voltagem
• Apenas utilize mesas de serrar munidas de guia de
corte
• Desligue sempre a ficha da tomada antes de
proceder a qualquer ajustamento ou troca de
acessório
MANUSEAMENTO
• Montagem da lâmina da serra 3
! desligar a ferramenta da fonte de corrente
- tire a chave hexagonal A do alojamento B
- pressione o botão C de fecho do veio e mantenha-o
nessa posição, enquanto remove a porca da
lâmina D com a chave da lâmina
! pressione o botão C de fecho do veio sómente
quando a ferramenta estiver parada
- solte o botão C de fecho do veio
- remova o anel E
- abra a protecção inferior com a alavanca G e
mantenha-a nessa posição, enquanto monta a
lâmina da serra com os dentes da serra e a seta
imprimida na lâmina apontanda na mesma direcção
da seta da protecção inferior
-
solte a protecção inferior F
- aplique o anel E
! certifique-se que as superfícies de aperto dos
anéis H estão perfeitamente limpas e em frente
da lâmina
- pr
essione o botão C de fecho do veio e mantenha-o
nessa posição, enquanto aperta a porca da lâmina
com a chave hexagonal 1/8 de volta após ter
apertado à mão (a lâmina patina quando encontra
demasiada resistência reduzindo sobrecargas do
motor e ressaltos da lâmina)
-
solte o botão C de fecho do veio
•
Ajuste da profundidade de corte (0-85 mm) 4
- para um corte de óptima qualidade a lâmina da serra
não deverá exceder mais de 3 mm abaixo da peça
de trabalho
- solte a alavanca J
-
eleve/abaixe a base K até atingir na escalo a
profundidade de corte desejada utilizando o
indicador L
- aperte a alavanca J
•
Ajuste do ângulo de corte (0-45°)
5
- solte os 2
botães M
- incline a ferramenta até atingir na escalo o ângulo de
corte desejado utilizando o indicador N
- aperte os 2
botães M
! quando cortar de ângulo, a profundidade de corte
não está de acordo com o valor indicado na
escala de profundidade de corte
• V
erificação do ângulo de corte de 90° 6
- ajuste e aperte a base K na pr
ofundidade de corte
máxima 4
- ajuste e aperte o ângulo de corte a 0°
-
verifique o ângulo de 90° com um esquadro entre a
lâmina e o fundo da base
- se o ajuste for necessário, solte os 2
botães M e
utilize o parafuso de ajuste P conforme ilustrado
•
Indicador da linha de corte Q 7
- para guiar a ferramenta ao longo da linha de corte
mar
cada na peça a trabalhar
- para um corte dir
eito a 0° ou um corte de ângulo a
45° utilize a linha indicadora relativa
- permite escolher se os desper
dícios ficam dentro ou
fora da lâmina
! a parte larga da base deve estar assente na parte
apoiada da peça a trabalhar
! o tamanho de corte é determinado pelo tamanho
dos dentes da lâmina e não pelo tamanho do
corpo da lâmina
! faça sempre cortes de ensaio para verificar a
linha de corte
• Arranque suave electrónico 8
Para conseguir suavemente a velocidade máxima sem
o impacto súbito que o arranque origina
• Aspiração de pó
-
aplique o aspirador à extensão R
9
! nunca deixe que o tubo do aspirador interfire com
a protecção inferior ou com a operação de corte
- pode-se utilizar tambén um saco de pó (acessório
SKIL 2610387402)
• Utilização da ferramenta 9
- ligue a ficha na tomada
-
sempre segure com firmeza o punho S com uma
mão e o punho T com a outra mão
- coloque a ferramenta com a parte fr
ontal da base
bem assente sobre na peça a trabalhar
! certifique-se que os dentes não estão em
contacto com a peça a trabalhar
- ligue a ferramenta pr
emindo primeiro o botão U
(= interruptor de segurança que não pode ser
trancado) e depois apertando o gatilho V
!
a ferramenta deverá trabalhar na velocidade
máxima, antesda lâmina da serra penetrar na
peça a trabalhar
SKIL_IB5885_BR.indd 20 28-05-2010 09:41:59
Page 21

21
- a protecção inferior F abre automáticamente quando
a lâmina da serra penetra na peça a trabalhar (abra a
protecção inferior manualmente utilizando a alavanca
G somente para cortes especiais tal como cortes
profundos)
-
não forçe a ferramenta; pr
essione leve e
continuamente
- depois de completar o trabalho, desligue a
ferramenta soltando o gatilho V
! certifique-se que a lâmina está completamente
parada antes de retirar a ferramenta da peça a
trabalhar
CONSELHOS DE APLICAÇÃO
• Coloque sempre a peça a trabalhar com a face virada
para baixo assegurando assim o mínimo de
estilhaçamento
•
Use sempr
e lâminas da serra devidamente afiadas e do
tipo correcto 0
- a qualidade de corte melhora consoante o númer
o
de dentes
- lâminas c/ pastilhas Widia mantêm-se afiadas
30 vezes mais do que as lâminas normais
•
Guia paralela W !
- para fazer cortes exactos ao longo do bor
do lateral
da peça a trabalhar
- pode ser intr
oduzida em qualquer dos lados da base
Ajuste da guia paralela
- solte o botão X
- ajuste a largura de corte desejada com a escala da
guia paralela (use o indicador da linha de corte Q
como referência 0)
-
aperte o botão X
•
Cortes profundos
@
- r
egule a profundidade de corte desejada
- incline a ferramenta para a frente com o indicador da
linha de corte Q alinhado com a linha de corte
desejada marcada na peça a trabalhar
- abra a pr
otecção inferior F com a alavanca G
- antes da lâmina penetrar na peça a trabalhar, ligue a
ferramenta e gradualmente baixe o dorso da
ferramenta utilizando a parte frontal da base como
ponto de dobradiça
- gradualmente incline a ferramenta para baixo e ao
mesmo tempo para a fr
ente
- assim que a lâmina penetrar no material, solte a
alavanca G
! a ferramenta deverá trabalhar na velocidade
máxima, antesda lâmina da serra penetrar na
peça a trabalhar
! nunca puxe a ferramenta para trás
•
Corte de grandes paneis
#
- apoia o painel próximo do corte no chão, na mesa ou
na bancada de trabalho
! ajuste a profundidade de corte de modo a cortar
a través do painel e não a través do apoia
- caso o guia paralela não permita a lar
gura de corte
desejado, fixe uma tira de madeira sobre a peça a
trabalhar como um guia, e conduza o lado esquerdo
da ferramenta contra esta guia
• Nível de vibração
O nível de emissão total de vibração (soma dos vetor
es
de três direções) determinadas conforme EN 60745:
valor de emissão de vibrações a
h
= 3,5 m/s², incerteza
K=1,5 m/s²; pode ser utilizado para comparar uma
ferramenta com outra e como uma avaliação preliminar
de exposição à vibração quando utilizar a ferramenta
para as aplicações mencionadas
-
utilizar a ferramenta para difer
entes aplicações ou
com acessórios diferentes ou mantidos
deficientemente, pode aumentar significativamente
o nível de exposição
- o númer
o de vezes que a ferramenta é desligada ou
quando estiver a trabalhar sem fazer nada, pode
reduzir significativamente o nível de exposição
! proteja-se contra os efeitos da vibração,
mantendo a ferramenta e os acessórios,
mantendo as mãos quentes e organizando os
padrões de trabalho
MANUTENÇÃO / SERVIÇO
• Mantenha a ferramenta e o fio sempre limpos
(especialmente as aberturas de ventilação)
! desligar a ferramenta da fonte de corrente antes
de limpar
• Limpe a lâmina logo após a sua utilização
(especialmente de r
esina ou cola)
• Se a ferramenta falhar apesar de cuidadosos pr
ocessos
de fabricação e de teste, a reparação deverá ser
executada por uma oficina de serviço autorizada para
ferramentas eléctricas SKIL
- envie a ferramenta sem desmontar
, juntamente com
a prova de compra, para o seu revendedor ou para o
centro de assistência SKIL mais próximo
(os endereços assim como a mapa de peças da
ferramenta estão mencionados no www.skil.com.br)
Brasil
SKIL - Divisão de Ferramentas Elétricas
Caixa Postal 1195 - CEP 13065-9000
Campinas/SP
SAC
Grande São Paulo .....(11) 2126-1950
Outras localidades ...0800 - 70 45446
www.skil.com.br
AMBIENTE
• No caso de descarte desse produto não jogue no
lixo comum, leve a uma rede de assistência técnica
credenciada Skil que ela dará o destino adequado,
seguindo critérios de não agressão ao meio
ambiente, reciclando as partes e cumprindo a
legislação local vigente $
DECLARAÇÃO DE CONFORMIDADE
• Declaramos sob nossa exclusiva responsabilidade que
este produto cumpre com as seguintes normas:
serie IEC 60745.
Robert Bosch Ltda.
www.skil.com.br
SKIL_IB5885_BR.indd 21 28-05-2010 09:41:59
Page 22

22
✎
SKIL_IB5885_BR.indd 22 28-05-2010 09:41:59
Page 23

23
Certificado de Garantia *
FE RRAMEN TAS ELÉ TRICAS
5885 (F 012 5885..) Voltagem: 127 V ou 220V
Nome do comprador:
Endereço:
Nº de série: Nota fiscal: Data da venda:
Nome do vendedor: Carimbo da revenda:
Prescrições de garantia
1. As ferramentas elétricas são garantidas contra eventuais defeitos de montagem
ou de fabricação devidamente comprovados.
2. Esta garantia é válida por 12 meses, contados a partir da data de fornecimento ao
usuário, sendo 3 meses o prazo de garantia legal (C.D.C.) e mais 9 meses concedidos
pelo fabricante.
3. Dentro do período de garantia, as peças ou componentes que comprovadamente apresentarem defeitos de fabricação, serão consertados ou (conforme o caso)
substituídos gratuitamente por qualquer assistência técnica autorizada para
ferramentas elétricas BOSCH, contra a apresentação do “Certificado de Garantia”
preenchido e/ou da fatura respectiva.
Não estão incluídos na garantia
4. Os defeitos originados de:
4.1 uso inadequado da ferramenta (uso industrial);
4.2 instalações elétricas deficientes;
4.3 ligação da ferramenta elétrica em rede elétrica inadequada;
4.4 desgaste natural;
4.5 desgaste oriundo de intervalos muito longos entre as revisões;
4.6 estocagem incorreta, influência do clima, etc.
Cessa a garantia
5. Se o produto for modificado ou aberto por terceiros; se tiverem sido montadas
peças fabricadas por terceiros; ou ainda, se o produto tiver sido consertado por
pessoas não autorizadas.
6. Se a máquina for aberta enquanto ainda se encontrar em período de garantia.
* Este certificado de garantia é valido somente para o Brasil.
Divisão de Ferramentas Elétricas
Via Anhanguera, km 98
CEP 13065-9000 - Campinas/SP
F000.622.326 (2009.10)
SKIL_IB5885_BR.indd 23 28-05-2010 09:42:00
Page 24

SKIL_IB5885_BR.indd 24 28-05-2010 09:42:00
 Loading...