


HAND MOWER
0720 (F0150720..)
ME77
ORIGINAL INSTRUCTIONS 5
GB
NOTICE ORIGINALE 6
F
ORIGINALBETRIEBSANLEITUNG 7
D
NL
ORIGINELE GEBRUIKSAANWIJZING 8
BRUKSANVISNING I ORIGINAL 9
S
ORIGINAL BRUGSANVISNING 11
DK
N
ORIGINAL BRUKSANVISNING 12
FIN
ALKUPERÄISET OHJEET 13
E
MANUAL ORIGINAL 14
P
MANUAL ORIGINAL 15
I
ISTRUZIONI ORIGINALI 16
H
EREDETI HASZNÁLATI UTASÍTÁS 18
CZ
PŮVODNÍM NÁVODEM K POUŽÍVÁNÍ 19
TR
ORİJİNAL İŞLETME TALİMATI 20
PL
INSTRUKCJA ORYGINALNA 21
RU
ПОДЛИННИК РУКОВОДСТВА
ПО ЭКСПЛУАТАЦИИ
22
ОРИГІНАЛЬНА ІНСТРУКЦІЯ
UA
З ЕКСПЛУАТАЦІЇ
GR
ΠΡΩΤΟΤΥΠΟ Ο∆ΗΓΙΩΝ ΧΡΗΣΗΣ 25
RO
INSTRUCŢIUNI DE FOLOSIRE
ORIGINALE
BG
ОРИГИНАЛНО РЪКОВОДСТВО
ЗА ЕКСПЛОАТАЦИЯ
SK
PÔVODNÝ NÁVOD NA POUŽITIE 29
HR
ORIGINALNE UPUTE ZA RAD 30
SRB
ORIGINALNO UPUTSTVO ZA RAD 31
SLO
IZVIRNA NAVODILA 32
EST
ALGUPÄRANE KASUTUSJUHEND 33
LV
ORIĢINĀLĀ LIETOŠANAS PAMĀCĪBA 34
LT
ORIGINALI INSTRUKCIJA 36
AR
FA
40
40
24
26
27
www.skileurope.com
SKIL Europe BV - Konijnenberg 60 11/09 2610Z00099
4825 BD Breda - The Netherlands
1
0720
2
7,1 kg
EPTA 01/2003
C
30 cm
D
12-44 mm
A
5x
F
25 L
3
E
B
G
2

4
M6x30 (6x)
3

5
E
G
E
6 7
F
G
F
G
B
B
G
4

GB
Hand mower 0720
INTRODUCTION
• This product is intended for domestic lawn mowing only
! do not use the hand mower to cut grass on roofs
or balconies
• Check whether the packaging contains all parts as
illustrated in drawing 2
• When parts are missing or damaged, please contact
your dealer
TECHNICAL SPECIFICATIONS 1
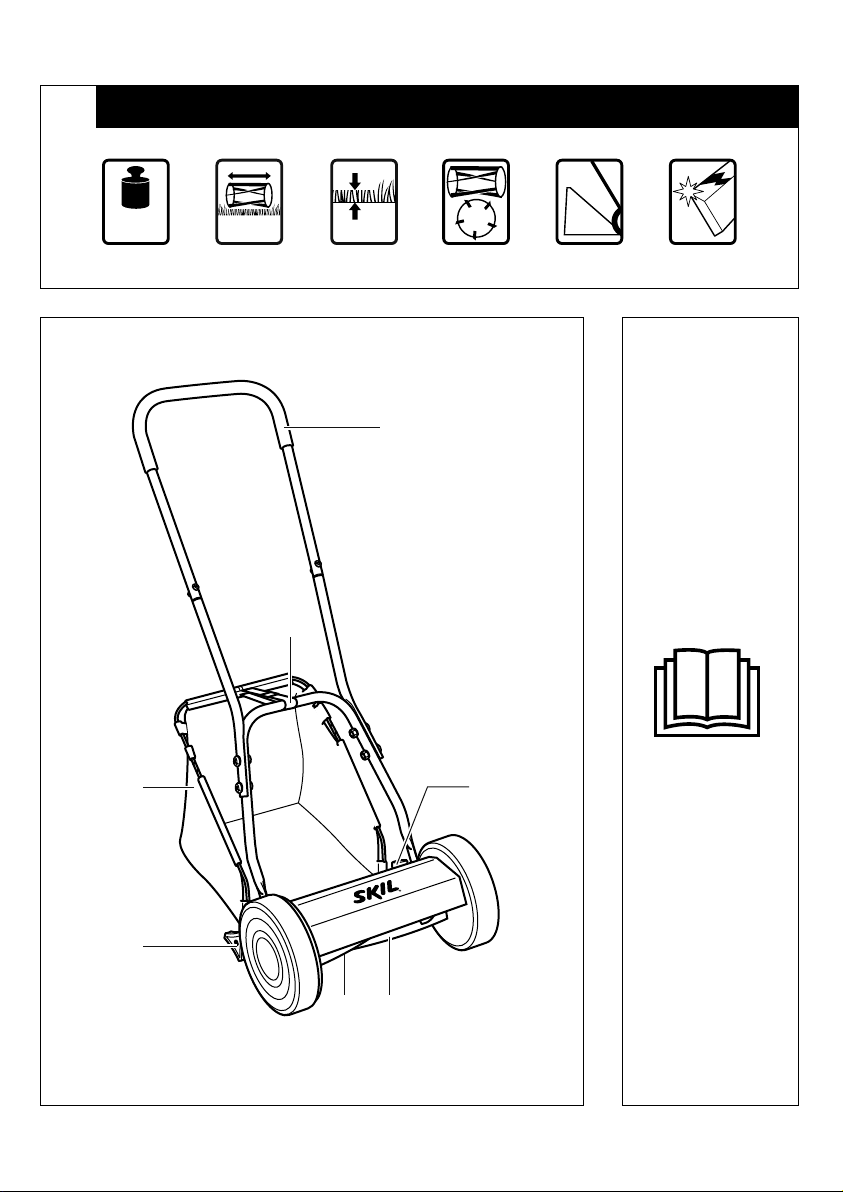
TOOL ELEMENTS 2
A Push bar
B Cutting blades
C Foldable grass collector
D Holding belt
E Wing nut for adjusting mowing height
F Screw for adjusting bottom blade
G Bottom blade
SAFETY
• Read this instruction manual carefully before use and
save it for future reference 3
• Take care when transporting the mower to the lawn, as
the cutting blades are sharp
• Always wear long trousers when mowing
• Do not operate the mower when barefoot or wearing
open sandals
• Thoroughly inspect the area where the mower is to be
used and remove all hard objects which could be
caught up and thrown by the cutting mechanism
• Always ensure that the cutting mechanism is in good
working order (have worn or damaged parts replaced)
• Keep all nuts, bolts and screws tight to be sure that the
mower is in safe working condition
• Only mow with suffi cient daylight or with appropriate
artifi cial lighting
• Never mow in the direct vicinity of persons (especially
children) and animals
• Always keep hands and feet away from rotating
parts
• Operate the mower at a walking pace only (do not run)
• Keep proper footing on slopes and do not mow
extremely steep slopes
• Be extremely careful when moving backwards or pulling
the mower towards you
• Never leave the mower unattended
• Never let children or other persons who are not familiar
with the operating instructions use the product
USE
• Assembly instructions 4
- the sequence of the numbers appearing in the
drawing corresponds with the sequence of the steps
to be followed for assembling the hand mower
! firmly tighten all screws and nuts
• Adjusting cutting height (12 - 44 mm) 5
! wear protective gloves
- place the mower on a fi rm, fl at surface
- loosen both wing nuts E
- lift the housing in the center to the required cutting
height
- adjust the cutting height so that bottom blade G has
no ground contact if there are uneven areas on the
lawn surface
- tighten both wing nuts E
! ensure that wing nuts E are adjusted at the same
height on both sides
• Operating instructions
- hold the mower with both hands
- place the mower on the edge of the lawn and mow in
a forward direction
- reverse at the end of each turn, slightly overlapping
the previous cut strip
- only use the mower on dry grass
- keep the mower away from hard objects and plants
- for mowing long grass, fi rst set the cutting
mechanism to the maximum cutting height, then to a
lower cutting height
- adjust bottom blade G when the grass is not cut
cleanly and evenly
• Adjusting bottom blade 6
! prevent entrapment of the fingers between
moving cutting blades and fixed parts of the
mower
! wear protective gloves
- turn the mower upside down
- adjust bottom blade G to the required position by
loosening/tightening both adjustment screws F
- the adjustment is correct, if a piece of paper inserted
between cutting blades B and bottom blade G is cut
sharp like through a pair of scissors (to do this
carefully rotate the blade cylinder by hand)
MAINTENANCE / SERVICE
• Clean the mower after each use with a hand brush and
a soft cloth
! do not use water (especially no high-pressure
sprays)
- remove compacted grass cuttings from the blade
area with a wooden or plastic implement
• Lubricate the cutting blades regularly to avoid oxydation
• Regularly check for loose or damaged cutting blades,
and worn or damaged components
• The mower is equipped with self-sharpening cutting
blades
! be aware that the self-sharpening function does
not work, when bottom blade G is not correctly
adjusted (see 6)
5

• When necessary, take the mower to your dealer to have
the cutting mechanism sharpened
• Store the mower indoors in a dry place
• Do not place other objects on top of the mower when
stored
• If the appliance should fail despite the care taken in
manufacturing and testing procedures, repair should be
carried out by an after-sales service centre for SKIL
power tools
- send the appliance undismantled together with
proof of purchase to your dealer or the nearest SKIL
service station (addresses as well as the service
diagram of the appliance are listed on
www.skileurope.com)
ENVIRONMENT
• Dispose of product and packaging by sorting them for
environment-friendly recycling (the plastic components
are labeled for categorized recycling)
- symbol 7 will remind you of this when the need for
disposing occurs
• Veillez toujours à ce que le mécanisme de coupe soit en
bon état de fonctionnement (remplacez les pièces
usées ou endommagées)
• Veillez à ce que tous les écrous, boulons et vis soient
bien serrés afi n de garantir un fonctionnement sûr de la
tondeuse
• Tondez uniquement lorsqu’il fait suffi samment clair ou
qu’il y a suffi samment d’éclairage artifi ciel
• Ne tondez jamais à proximité immédiate de personnes
(surtout d’enfants) et d’animaux
• Gardez toujours les mains et les pieds à distance
des pièces rotatives
• Utilisez uniquement la tondeuse en marchant (il ne faut
pas courir)
• Conservez un bon équilibre sur les pentes et ne tondez
pas les pentes très raides
• Soyez extrêmement prudent lorsque vous vous
déplacez vers l’arrière ou tirez la tondeuse vers vous
• Ne laissez jamais la tondeuse sans surveillance
• Ne laissez jamais d’enfants ou d’autres personnes ne
connaissant pas les instructions de fonctionnement
employer l’appareil
F
Tondeuse manuelle 0720
INTRODUCTION
• Ce produit est destiné uniquement à la tonte du gazon
chez soi
! n’utilisez pas la tondeuse manuelle pour tondre
l’herbe de toits ou de balcons
• Vérifi ez que le conditionnement contient toutes les
pièces présentées dans le schéma 2
• Lorsque des pièces manquent ou sont endommagées,
veuillez contacter votre distributeur
SPECIFICATIONS TECHNIQUES 1
ELEMENTS DE L’OUTIL 2
A Barre de poussée
B Lames de coupe
C Bac de ramassage pliable
D Courroie de fi xation
E Ecrou papillon pour régler la hauteur de coupe
F Vis pour régler la lame inférieure
G Lame inférieure
SECURITE
• Lisez attentivement ce manuel d’instruction avant
d’utiliser l’appareil et conservez-le pour pouvoir vous y
référer ultérieurement 3
• Soyez prudent lors du transport de la tondeuse sur la
pelouse car les lames de coupe sont acérées
• Portez toujours des pantalons longs lors de la tonte
• N’utilisez pas la tondeuse alors que vous êtes pieds nus
ou que vous portez des sandales ouvertes
• Inspectez soigneusement la zone où vous devrez utiliser
la tondeuse et enlevez tous les objets qui pourraient
être attrapés et rejetés par le mécanisme de coupe
UTILISATION
• Instructions de montage 4
- la séquence des numéros apparaissant sur le
schéma correspond à la séquence des étapes à
suivre pour le montage de la tondeuse manuelle
! serrez fermement toutes les vis et les écrous
• Réglage de la hauteur de coupe (12 à 44 mm) 5
! portez des gants de protection
- placez la tondeuse sur une surface solide et plane
- desserrez les deux écrous papillons E
- soulevez le bâti au centre jusqu’à l’obtention de la
hauteur de coupe voulue
- réglez la hauteur de coupe de manière à ce que la
lame inférieure G ne touche pas le sol si la pelouse
présente des zones inégales
- resserrez les deux écrous papillons E
! veillez à ce que les écrous papillons E soient
réglés à la même hauteur des deux côtés
• Instructions d’utilisation
- tenez la tondeuse à deux mains
- placez la tondeuse au bord de la pelouse et tondez
en vous dirigeant vers l’avant
- faites demi-tour au bout de chaque bande en
recouvrant légèrement un peu de la bande
précédente
- utilisez uniquement la tondeuse sur de l’herbe sèche
- éloignez la tondeuse des objets et des plantes durs
- si vous devez tondre de l’herbe haute, réglez d’abord
le mécanisme de coupe à la hauteur de coupe
maximale et ensuite, à une hauteur de coupe moins
élevée
- réglez la lame inférieure G lorsque l’herbe n’est pas
coupée proprement et de manière uniforme
• Réglage de la lame inférieure 6
! évitez de vous coincer les doigts entre les lames
de coupe mobiles et les pièces fixes de la
tondeuse
! portez des gants de protection
- retournez la tondeuse.
6
 Loading...