

"DETECTOR"
MEASURING TOOL
0550 (F0150550 . . )
SKIL Europe BV - Konijnenberg 60 01/06 2610395888
4825 BD Breda - The Netherlands
www.skileurope.com
www.skileurope.com
INSTRUCTIONS page 5
INSTRUCTIONS page 7
HINWEISE Seite 9
INSTRUCTIES bladz. 11
INSTRUKTIONER sida 13
INSTRUKTION side 15
ANVISNING side 18
OHJEET sivu 20
INSTRUCCIONES pág. 22
INSTRUÇÕES pág. 24
ISTRUZIONI pag. 26
LEÍRÁS oldal 28
POKYNY strana 31
KILAVUZ sayfa 33
INSTRUKCJA strona 35
ИНСТРУКЦИИ страница 37
ІНСТРУКЦІЯ страница 40
O∆ΗΓΙΕΣ σελιδα 42
INSTRUCØIUNI pagina 45
YKA3AНИЕ страница 47
POKYNY strana 50
UPUTE stranica 52
UPUTSTVA stranica 54
NAVODILA stran 56
KASUTUSJUHEND lehekülg 58
INSTRUKCIJA lappuse 60
INSTRUKCIJA puslapis 63
GB
F
D
NL
S
DK
N
FIN
E
P
I
H
CZ
TR
PL
RU
UA
GR
RO
BG
SK
HR
SCG
SLO
EST
LV
LT
ME77
2
132
F
E
K
D
C
B
A
J
I
H
J
G
P
RST
M
Y
L
VU
NO
Q
W
3
4

4
5
6
7

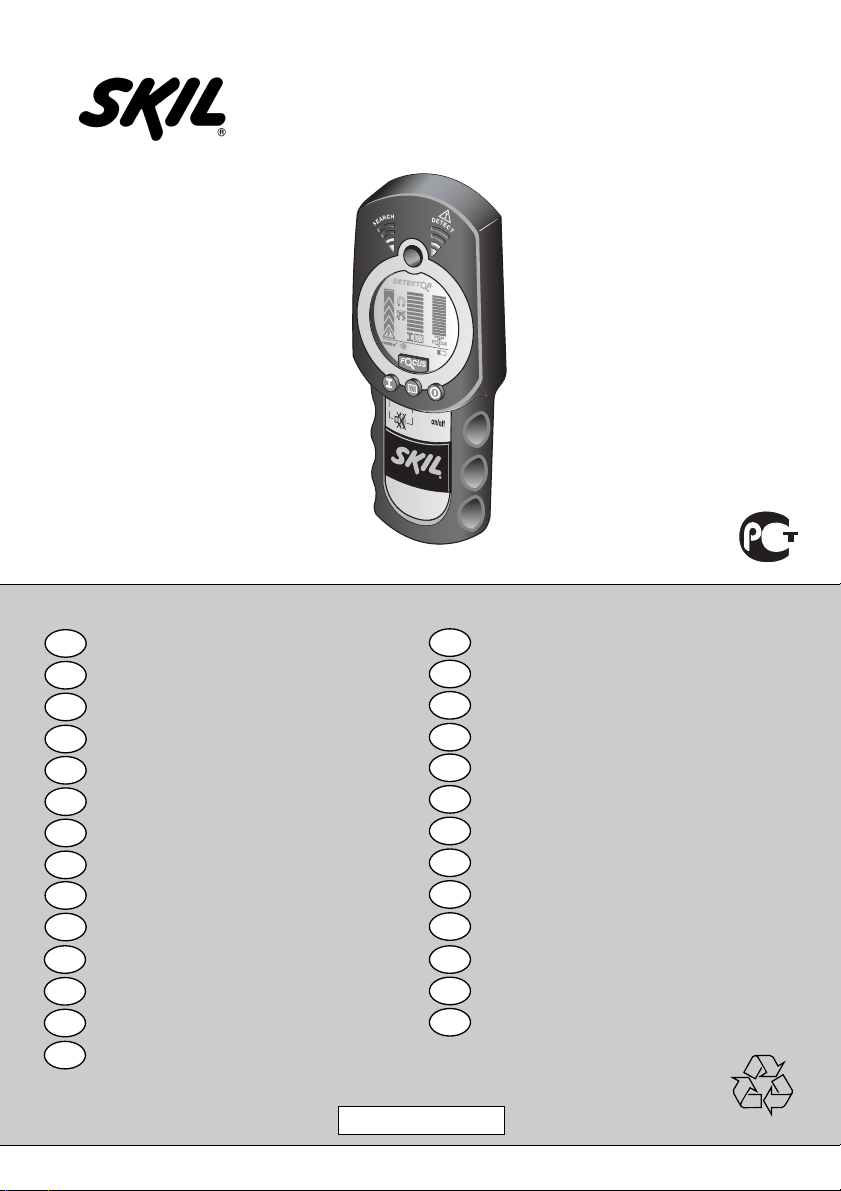
"Detector" measuring tool 0550
INTRODUCTION
● This measuring tool is intended for locating ferrous and
non-ferrous metals, wooden beams and live wires/
conductors in walls, ceilings and floors
● The material and size of the object to be located as well
as the material and condition of the surface to be scanned
may affect the scanning depth of the measuring tool
● Under certain conditions, such as in case of
moisture, metal-containing building materials, or
aluminium-backed insulation materials, the
measuring results can be impaired; using the
measuring tool in the vicinity of appliances which
produce strong (electro)magnetic fields may also
impair the measuring results
● Read and save this instruction manual
TECHNICAL SPECIFICATIONS
Maximum scanning depth
- ferrous metals 80 mm
- non-ferrous metals (copper) 60 mm
- copper conductors (live) 50 mm
- wood 20 mm
Power supply 1x 6LR61/9V battery
Estimated battery life 6 hours
Operating temperature -10°C to 50°C
Storage temperature -10°C to 70°C
Weight 0,3 kg
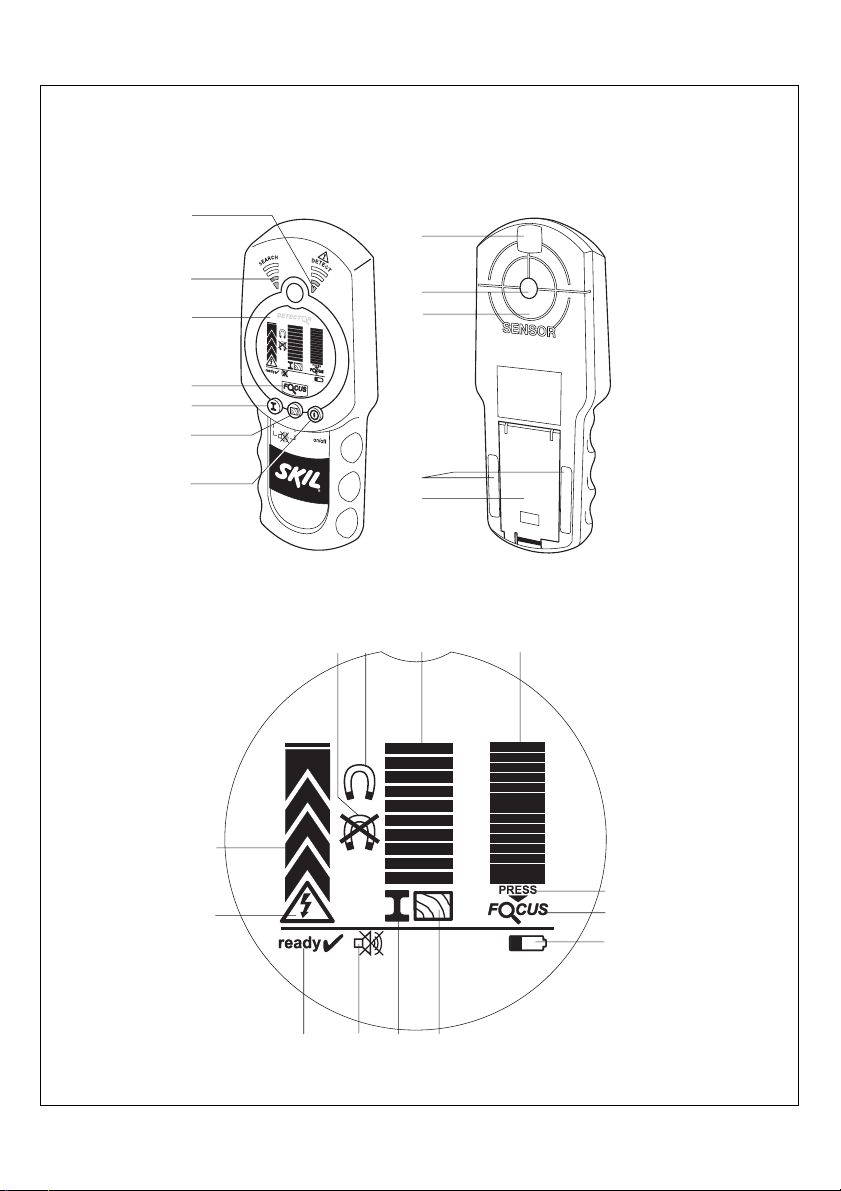
TOOL ELEMENTS 1
A On/off button
B Wood-detection button
C Metal-detection button
D "Focus" button
E Search mode indicator (green light)
F Detect mode indicator (red light)
G Battery compartment cover
H Sensor area
I Marking opening
J Felt pads
K LCD display
L Live wire detection indicator
M Live wire measuring indicator
N Wood-detection mode indicator
O Metal-detection mode indicator
P Measuring indicator
Q "Focus" mode indicator
R "Focus" measuring indicator
S Magnetic metals indicator
T Non-magnetic metals indicator
U Ready-for-use indicator
V Switched-off acoustic signal indicator
W Low battery level indicator
Y Signal for pressing "Focus" button
USE
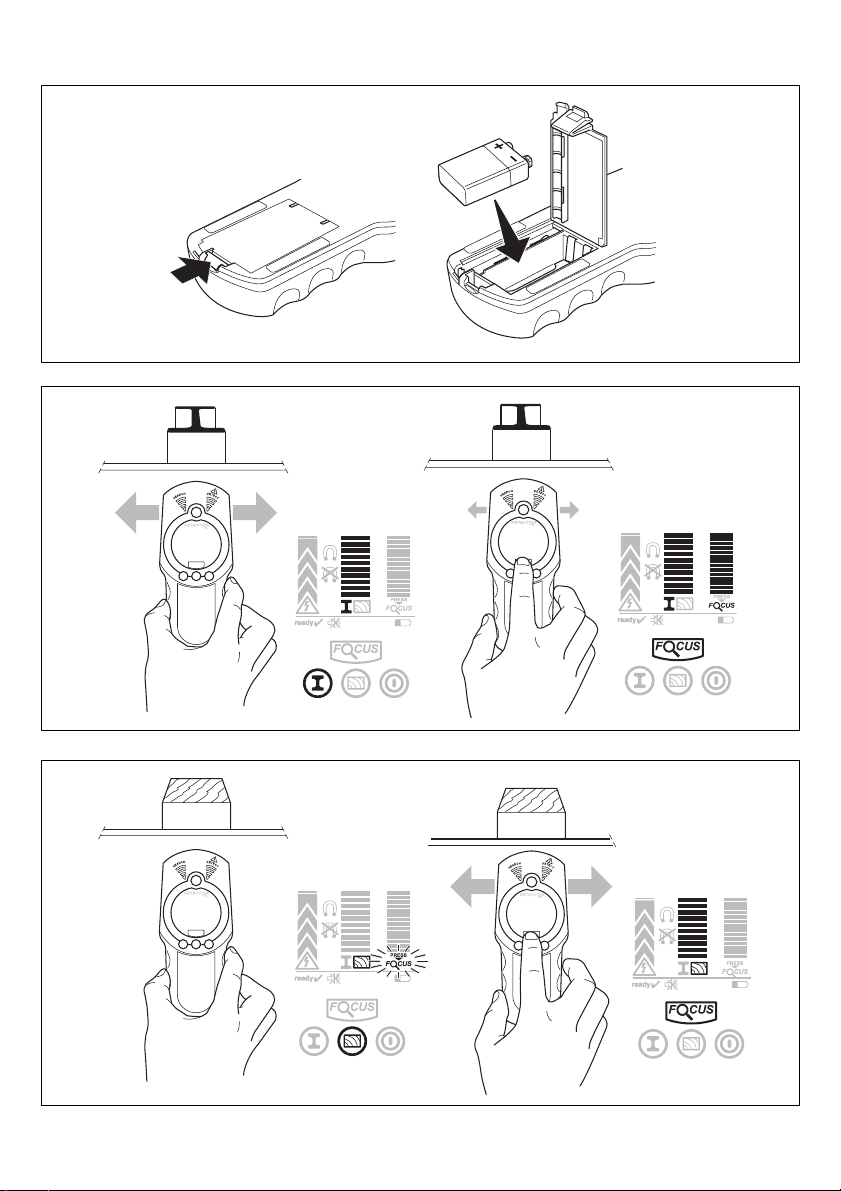
● Mounting of battery 2
- open cover G
- insert 9V battery (pay attention to correct polarisation)
- close cover G
- when battery level is low, symbol W lights up;
measuring is still possible for approximately 1 hour
- when symbol W starts flashing, approximately
10 more minutes of measuring are possible
- when symbol W flashes together with red light F,
measuring is no longer possible; replace the battery
- always remove the battery from the tool, if the tool will
not be used for a long period
● On/off
! before switching on the tool, ensure that sensor
area H is dry
- switch on the tool by pressing any button; after a brief
self-check the tool is ready for use indicated by a
check mark behind symbol U
- when switching on with button B or button C, the tool
will automatically be in the wood-detection mode or
metal-detection mode
- when switching on with button A or button D, the tool
will be in the detection mode last used
- switch off the tool by pressing "On/off" button A
- the tool automatically switches off after 5 minutes of
inactivity
- in case of severe temperature changes, allow the tool
to adjust to the ambient temperature for half an hour
before starting new measurements
● Detecting metal objects 3
- press button C and move the tool over the surface to
be scanned
- when the tool comes close to a metal object, red light
F turns on and the amplitude of measuring indicator P
increases; when it moves away from the object, green
light E turns on and the amplitude decreases
- at maximum amplitude the metal object is located
below the centre of sensor area H
- as long as the tool is above the metal object, red light
F remains on and a steady acoustic signal sounds
- for a more precise localisation of the object, press
"Focus" button D and hold it in that position while
repeatedly moving the tool over the object; "Focus"
measuring indicator R has the greatest amplitude
over the centre of the metal object
- mark the location with a pencil through marking
opening I, if needed
- in case of magnetic metal objects (e.g. iron), symbol
S appears in display
- in case of non-magnetic metal objects (e.g. copper),
symbol T appears in display
NOTES:
- in case of weak signals, the differentiation between
magnetic and non-magnetic metal objects cannot be
made
- for detecting very small or deeply embedded metal
objects (which do not activate measuring indicator P)
use "Focus" button D and observe "Focus" measuring
indicator R only
GB
5

- if there are any metallic materials included in the
surface being scanned (e.g. in tiles), measuring
indicator P continuously shows an amplitude; in that
case use "Focus" button D and observe "Focus"
measuring indicator R only
- in case of steel wire mesh and reinforcements in the
surface being scanned, measuring indicator P shows
an amplitude over the complete surface; use "Focus"
button D and observe "Focus" measuring indicator R
only
- typically for steel wire mesh is that symbol S is
displayed directly above the iron bars and symbol T is
displayed in between the iron bars
● Detecting wooden objects 4
- press button B and position the tool on the surface to
be scanned
- press "Focus" button D and hold it in that position
while moving the tool over the surface (ensure that
felt pads J have contact with the surface)
- when a wooden object is detected, red light F turns
on and an amplitude is displayed in measuring
indicator P; move the tool over the surface repeatedly
to localise the wooden object more precisely
- as long as the tool is above the wooden object, red
light F remains on and a steady acoustic signal
sounds
- measuring indicator P has the greatest amplitude
over the centre of the wooden object
- mark the location with a pencil through marking
opening I, if needed
NOTES:
- when a wooden object happens to be located under
the surface on which the tool was positioned at the
start of the search, and when the tool was moved
after that, measuring indicator P, symbol Y and light F
will start flashing; reposition the tool on the surface
and press "Focus" button D again
! "Focus" measuring indicator R cannot be used
when searching wooden objects
- be aware that in the wood-detection mode also metal
objects are found up to approximately 40 mm depth;
switch to metal-detection mode in order to
differentiate (no signal: wooden beam)
● Detecting live wires/conductors 5
! only live wires/conductors with 50 or 60 Hz of
alternating current can be detected (other
wires/conductors are indicated as metal objects)
- live wires/conductors are detected while searching for
metal as well as wooden objects
- when the tool comes close to a live wire/conductor,
red light F starts flashing and the acoustic signal
sounds with a rapid tone sequence
NOTES:
- for easier detection connect power consumers (e.g.
lamps, appliances) to the wire/conductor being
sought and switch them on
- under certain conditions, such as behind metal
surfaces or behind surfaces with high water content,
live wires/conductors cannot be detected with
certainty (these areas are recognised in the metaldetection mode); when all over a rather large area a
measuring value is indicated, the measuring
sensitivity is disturbed and the search for live wires/
conductors is unreliable
- wires that are not “live” can be found as metal objects
with the metal-detection mode; how-ever, stranded
cables are not indicated (contrary to solid copper
conductors)
● Acoustic signal
- the acoustic signal can be switched on and off by
pressing button C and button B simultaneously
- symbol V appears in display when the acoustic signal
is switched off
● Belt bag for easy and convenient storage 6
MAINTENANCE
● When measuring indicator P continuously shows an
amplitude without a metal object being in the vicinity, the
tool can be calibrated manually:
- remove all metal objects in the vicinity of the tool
(including wrist watches or rings of metal)
- hold the tool up in the air
- switch off the tool and press both "on/off" button A
and metal-detection button C until red light F and
green light E light up simultaneously
- release buttons A and C
- after a few seconds the tool returns to the normal
metal-detection mode and is ready for operation
again
● Clean the tool with a dry, soft cloth (do not use cleaning
agents or solvents)
● Do not remove felt pads J and replace them when they
are damaged or used
● When the check mark behind symbol U flashes for
longer periods, or is not displayed at all anymore,
reliable scanning is no longer possible; in this case send
the tool to your dealer or the nearest Skil service-station
● Do not attach stickers (especially metal ones) to the
sensor area on the front or back side of the tool
● Always store the tool indoors in its protective
carton/case
● Always keep the tool free of dust, moisture and direct
sunlight
● Do not disassemble or modify the tool in any way
GUARANTEE / ENVIRONMENT
● This Skil product is guaranteed in accordance with
statutory/country-specific regulations; damage due to
normal wear and tear, overload or improper handling will
be excluded from the guarantee
● In case of a complaint, send the tool undismantled
together with proof of purchase to your dealer or the
nearest Skil service-station (addresses are listed on
www.skileurope.com)
6

● Do not dispose of electric tools, batteries,
accessories and packaging together with household
waste material (only for EU countries)
- in observance of European Directive 2002/96/EC on
waste of electric and electronic equipment and its
implementation in accordance with national law,
electric tools that have reached the end of their life
must be collected separately and returned to an
environmentally compatible recycling facility
- symbol 7 will remind you of this when the need for
disposing occurs
Outil de mesure "Detector" 0550
INTRODUCTION
● Cet outil de mesure est conçu pour la recherche de
métaux ferreux et non ferreux, de poutres en bois et de
fils sous tension ou conducteurs dans les murs, les
plafonds et les sols
● Le matériau et la taille de l’objet recherché, ainsi que le
matériau et l’état de la surface à balayer peuvent avoir
une incidence sur la profondeur de pénétration de l’outil
de mesure
● Certaines conditions, par exemple la présence
d’humidité, de matériaux de construction contenant
du métal ou de matériaux d’isolation à support en
aluminium, peuvent avoir une incidence sur les
résultats des mesures, de même que l'utilisation à
proximité d’appareils produisant des champs
(électro)magnétiques puissants
● Lisez et conservez ce manuel d'instruction
SPECIFICATIONS TECHNIQUES
Profondeur maximale de pénétration
- métaux ferreux 80 mm
- métaux non ferreux (cuivre) 60 mm
- conducteurs cuivre (sous tension) 50 mm
- bois 20 mm
Alimentation 1 pile 6LR61/9 V
Autonomie estimée de la batterie 6 heures
Température en fonctionnement -10°C à 50°C
Température d’entreposage -10°C à 70°C
Poids 0,3 kg
ELEMENTS DE L'OUTIL 1
A Bouton marche/arrêt
B Bouton de détection de bois
C Bouton de détection de métal
D Bouton "Focus"
E Indicateur de mode recherche (voyant vert)
F Indicateur de mode détection (voyant rouge)
G Couvercle du compartiment des batteries
H Zone du capteur
I Ouverture de marquage
J Tampons en feutre
K Écran à cristaux liquides
L Indicateur de détection de fil électrique sous tension
M Indicateur de mesure de fil électrique sous tension
N Indicateur de mode de détection de bois
O Indicateur de mode de détection de métal
P Indicateur de mesure
Q Indicateur de mode "Focus"
R Indicateur de mesure "Focus"
S Indicateur de métaux magnétiques
T Indicateur de métaux non magnétiques
U Indicateur prêt
V Indicateur de signal acoustique coupé
W Indicateur batterie faible
Y Invite à appuyer sur le bouton "Focus"
UTILISATION
● Installation de la pile 2
- ouvrez le couvercle G
- insérez la pile de 9 V (respectez les polarités)
- fermez le couvercle G
- lorsque la batterie est faible, le pictogramme W
s'allume; il reste alors approximativement 1 heure
d’autonomie pour les mesures
- lorsque le pictogramme W clignote, il ne reste plus
qu’approximativement 10 minutes d’autonomie pour
les mesures
- lorsque le pictogramme W clignote en même temps
que le voyant rouge F, il n’est plus possible
d’effectuer des mesures; vous devez remplacer la
batterie
- si vous n’utilisez pas l'outil pendant une longue
période, retirez toujours la pile
● Marche/arrêt
! avant d'allumer l’outil, assurez-vous que la zone
du capteur H est sèche
- allumez l’outil en appuyant sur un bouton
quelconque; après un bref contrôle automatique, une
coche à côté du pictogramme U indique que l’outil est
prêt à être utilisé
- lorsque vous mettez l’outil en marche avec le bouton
B ou C, il démarre automatiquement en mode
détection du bois ou en mode détection du métal
- lorsque vous l’allumez avec le bouton A ou le
bouton D, il démarre dans le dernier mode de
détection utilisé
- éteignez l’outil en appuyant sur le bouton "On/off" A
- l’outil s’éteint automatiquement après 5 minutes
d’inactivité
- en cas de changement de température important,
laissez l’outil s’adapter à la température ambiante
pendant 30 minutes avant de continuer à prendre des
mesures
● Détection d’objets métalliques 3
- appuyez sur le bouton C et déplacez l’outil au-dessus
de la surface à balayer
- lorsque l’outil s’approche d’un objet métallique, le
voyant rouge F s’allume et l’amplitude de l’indicateur
de mesure P augmente; lorsqu’il s’éloigne de l’objet,
le voyant vert E s’allume et l’amplitude diminue
F
7

✎
66

✎
67

CE DECLARATION OF CONFORMITY
We declare under our sole responsibility that this product is in
conformity with the following standards or standardized documents:
EN 61 326, in accordance with the provisions of the directives
89/336/EC, 2002/96/EC.
CE DÉCLARATION DE CONFORMITÉ
Nous déclarons sous notre propre responsabilité que ce produit est
en conformité avec les normes ou documents normalisés suivants:
EN 61 326, conforme aux réglementations 89/336/EC,
2002/96/EC.
CE KONFORMITÄTSERKLÄRUNG
Wir erklären in alleiniger Verantwortung, daß dieses Produkt mit
den folgenden Normen oder normativen Dokumenten
übereinstimmt: EN 61 326, gemäß den Bestimmungen der
Richtlinien 89/336/EG, 2002/96/EG.
CE CONFORMITEITSVERKLARING
Wij verklaren, dat dit product voldoet aan de volgende normen of
normatieve documenten: EN 61 326, overeenkomstig de
bepalingen van de richtlijnen 89/336/EG, 2002/96/EG.
CE KONFORMITETSFÖRKLARING
Vi intygar och ansvarar för, att denna produkt överensstämmer
med följande norm och dokument: EN 61 326, enl. bestämmelser
och riktlinjema 89/336/EG, 2002/96/EG.
CE KONFORMITETSERKLÆRING
Vi erklærer under almindeligt ansvar, at dette produkt er i
overensstemmelse med følgende normer eller normative
dokumenter: EN 61 326, i henhold til bestemmelserne i direktiverne
89/336/EF, 2002/96/EF.
CE SAMSVARSERKLÆRING
Vi erklærer at det er under vårt ansvar at dette produkt er i
samsvar med følgende standarder eller standard- dokumenter:
EN 61 326, i samsvar med reguleringer 89/336/EF, 2002/96/EF.
CE TODISTUS STANDARDINMUKAISUUDESTA
Todistamme täten ja vastaamme yksin siitä, että tämä tuote en
allalueteltujen standardien ja standardoimisasiakirjojen
vaatimusten mukainen EN 61 326, seuraavien sääntöjen
mukaisesti 89/336/ETY, 2002/96/ETY.
CE DECLARACION DE CONFORMIDAD
Declaramos bajo nuestra sola responsabilidad que este producto
está en conformidad con las normas o documentos normalizados
siguientes: EN 61 326, de acuerdo con las regulaciones
89/336/CE, 2002/96/CE.
CE DECLARAÇÃO DE CONFIRMIDADE
Declaramos sob nossa exclusiva responsabilidade que este
producto cumpre as seguintes normas ou documentos normativos:
EN 61 326, conforme as disposições das directivas 89/336/CE,
2002/96/CE.
CE DICHIARAZIONE DI CONFORMITÀ
Dichiaramo, assumendo la piena responsabilità di tale
dichiarazione, che il prodotto è conforme alle seguenti normative e
ai relativi documenti: EN 61 326, in base alle prescrizioni delle
direttive 89/336/CE, 2002/96/CE.
CE MINÖSÉGI TANUSITVANY
Teljes felelösségünk tudatában kijelentjük, hogy jelen termék a
következö szabványoknak vagy kötelezö hatósági elöírásoknak
megfelel: EN 61 326, a 89/336/EK, 2002/96/EK elöírásoknak
megfelelöen.
CE STRVZUJÍCÍ PROHLÅ◊ENÍ
Potvrzujeme na odpovπdnost, Ωe tento v¥robek odpovídå
nåsledujícím normåm nebo normativním podkladüm: EN 61 326,
podle ustanovení smπrnic 89/336/EG, 2002/96/EG.
CE STANDARDIZASYON BEYANI
Ye¤ane sorumlu olarak, bu ürünün afla¤ıdaki standartlara veya
standart belgelerine uygun oldu¤unu beyan ederiz: EN 61 326,
yönetmeli¤i hükümleri uyarınca 89/336/EC, 2002/96/EC.
OÂWIADCZENIE ZGODNOÂCI CE
Niniejszym oÊwiadczamy ponoszàc osobistà odpowiedzialnoÊç, ˝e
produkt wykonany jest zgodnie z nast´pujàcymi normami i
dokumentami normalizujàcymi: EN 61 326, z godnie z wytycznymi
89/336/WE, 2002/96/WE.
ЗАЯВЛЕНИЕ О СООТВЕТСТВИИ
Мы с полной ответственностыо заявляем, что это изделие
соответствует следующим стандартам или
стандартизованным документам: EN 61 326, в соответсувии с
инструкциями 89/336/EC, 2002/96/EC.
CE ∆ΗΛΩΣΗ ΣYMBATOTΗΤΑΣ
∆ηλούµε υπευθύνως τι το προϊν αυτ είναι
κατασκευασµένο σύµφωνα µε τους εξής κανονισµούς ή
κατασκευαστικές συστάσεις: EN 61 326, κατά τις διατάξεις
των κανονισµών της Κοινής Αγοράς 89/336/EK, 2002/96/EK.
DECLARAØIE DE CONFORMITATE CE
Declaråm pe proprie råspundere cå acest product este conform cu
urmåtoarele standarde sau documente standardizate: EN 61 326, în
conformitate cu regulile 89/336/EC, 2002/96/EC.
CE ДЕKЛАPAЦИЯ ЗA CБOTВETCTBИE
Декларираме на изцяло наша отговорност, че това изделие е
съобразено със следните стандарти или стандартизирани
документи: EN 61 326, в съответствие с нормативната уредба
на 89/336/EG, 2002/96/EG.
CE PREHLÁSENIE O ZHODE Vÿhradne na na√u vlastnú
zodpovednos† prehlasujeme, Ωe tento vÿrobok zodpovedá
nasledujúcim normám alebo normovanÿm dokumentom:
EN 61 326, v súlade s predpismi 89/336/EG, 2002/96/EG.
GB
I
F
D
NL
S
DK
N
FIN
E
P
H
CZ
TR
PL
RU
GR
BG
SK
RO
ДЕКЛАРАЦІЯ ВІДПОВІДНОСТІ СТАНДАРТАМ ЄС
Ми пpоголошуємо, на нашу виключну відповідальність, що цей
пpодукт відповідає таким стандаpтам чи стандаpтизованим
документам: EN 61 326, відповідно до положень директив
89/336/ЄС, 2002/96/ЄС.
UA
CE DEKLARACIJA O UDOVOLJAVANJU STANDARDIMA
Izjavljujemo pod svojom iskljuãivom odgovorno‰çu da ovaj
proizvod odgovara sljedeçim standardima ili standardiziranim
dokumentima: EN 61 326, prema odredbama smjernica
89/336/EG, 2002/96/EG.
HR
CE DEKLARACIJA O ZADOVOLJAVANJU STANDARDA
Izjavljujemo pod svojom iskljuãivom odgovorno‰çu da ovaj proizvod
zadovoljava sledeçe standarde ili standardizovane dokumente:
EN 61 326, u skladu sa odredbama smernica 89/336/EG,
2002/96/EG.
SCG
DEKLARACIJA O PRILAGOJENOSTI STANDARDOM CE
Izjavljamo z lastno odgovornostjo, da je ta izdelek v skladu z
naslednjimi standardi oz. standardiziranimi dokumenti:
EN 61 326, v skladu s predpisi navodil 89/336/EG, 2002/96/EG.
SLO
CE VASTAVUSDEKLARATSIOON
Kinnitame ainuvastutajana, et antud toode on vastavuses järgmiste
standardite või normdokumentidega: EN 61 326, vastavalt
direktiivide 89/336/EÜ, 2002/96/EÜ nõuetele.
EST
CE PAZIøOJUMS PAR ATBILST±BU STANDARTIEM
Mïs ar pilnu atbild¥bu pazi¿ojam, ka ‰is izstrÇdÇjums atbilst ‰Çdiem
standartiem vai standartizÇcijas dokumentiem: EN 61 326, un ir
saska¿Ç ar EEK direkt¥vÇm 89/336/EG, 2002/96/EG.
LV
CE KOKYBñS ATITIKTIES DEKLARACIJA
Mes atsakingai parei‰kiame, kad ‰is gaminys atitinka tokius
standartus ir normatyvinius dokumentus: EN 61 326, pagal EEB
reglament˜ 89/336/EG, 2002/96/EG nuostatas.
LT
06 SKIL Europe B.V. A. v.d. Kloot
 Loading...