

Page 1
GB
F
D
NL
S
DK
N
FIN
E
P
I
H
CZ
TR
PL
RU
UA
GR
RO
BG
SK
HR
SRB
SLO
EST
LV
LT
TC
SC
UA
GR
RO
BG
SK
HR
SRB
SLO
EST
LV
LT
TC
SC
www.skileurope.com
ME77
LASER MEASURING TOOL
0530 (F0150530..)
ORIGINAL INSTRUCTIONS 6
NOTICE ORIGINALE 8
ORIGINALBETRIEBSANLEITUNG 10
ORIGINELE GEBRUIKSAANWIJZING 13
BRUKSANVISNING I ORIGINAL 15
ORIGINAL BRUGSANVISNING 17
ORIGINAL BRUKSANVISNING 19
ALKUPERÄISET OHJEET 22
MANUAL ORIGINAL 24
MANUAL ORIGINAL 26
ISTRUZIONI ORIGINALI 29
EREDETI HASZNÁLATI UTASÍTÁS 31
PŮVODNÍM NÁVODEM K POUŽÍVÁNÍ 34
ORİJİNAL İŞLETME TALİMATI 36
INSTRUKCJA ORYGINALNA 38
ПОДЛИННИК РУКОВОДСТВА
ПО ЭКСПЛУАТАЦИИ
41
ОРИГІНАЛЬНА ІНСТРУКЦІЯ
З ЕКСПЛУАТАЦІЇ
44
ΠΡΩΤΤΥΠ ∆ΗΓΙΩΝ ΡΗΣΗΣ 46
INSTRUCŢIUNI DE FOLOSIRE
ORIGINALE
49
ОРИГИНАЛНО РЪКОВОДСТВО
ЗА ЕКСПЛОАТАЦИЯ
51
PÔVODNÝ NÁVOD NA POUŽITIE 54
ORIGINALNE UPUTE ZA RAD 56
ORIGINALNO UPUTSTVO ZA RAD 58
IZVIRNA NAVODILA 61
ALGUPÄRANE KASUTUSJUHEND 63
ORIĢINĀLĀ LIETOŠANAS PAMĀCĪBA 65
ORIGINALI INSTRUKCIJA 68
SKIL Europe BV - Konijnenberg 60 06/10 2609140784
4825 BD Breda - The Netherlands
Ташев-Галвинг ООД
www.tashev-galving.com
SKIL_IB0530_EUCH_v3.indd 1 08-06-2010 13:03:40
Page 2
2
1
2
Q
P
A B
C
N
G
H
L
E
F
K
J
M
D
IEC 60825-1:07
3
Ташев-Галвинг ООД
www.tashev-galving.com
SKIL_IB0530_EUCH_v3.indd 2 08-06-2010 13:03:41
Page 3
3
Q
4
5
50 cm
50 cm
6
Ташев-Галвинг ООД
www.tashev-galving.com
SKIL_IB0530_EUCH_v3.indd 3 08-06-2010 13:03:44
Page 4
7
8
9
0
!
4
Ташев-Галвинг ООД
www.tashev-galving.com
SKIL_IB0530_EUCH_v3.indd 4 08-06-2010 13:03:46
Page 5
@
# $
ACCESSORIES SKIL Nr.
2610395907
5
Ташев-Галвинг ООД
www.tashev-galving.com
SKIL_IB0530_EUCH_v3.indd 5 08-06-2010 13:03:48
Page 6
6
GB
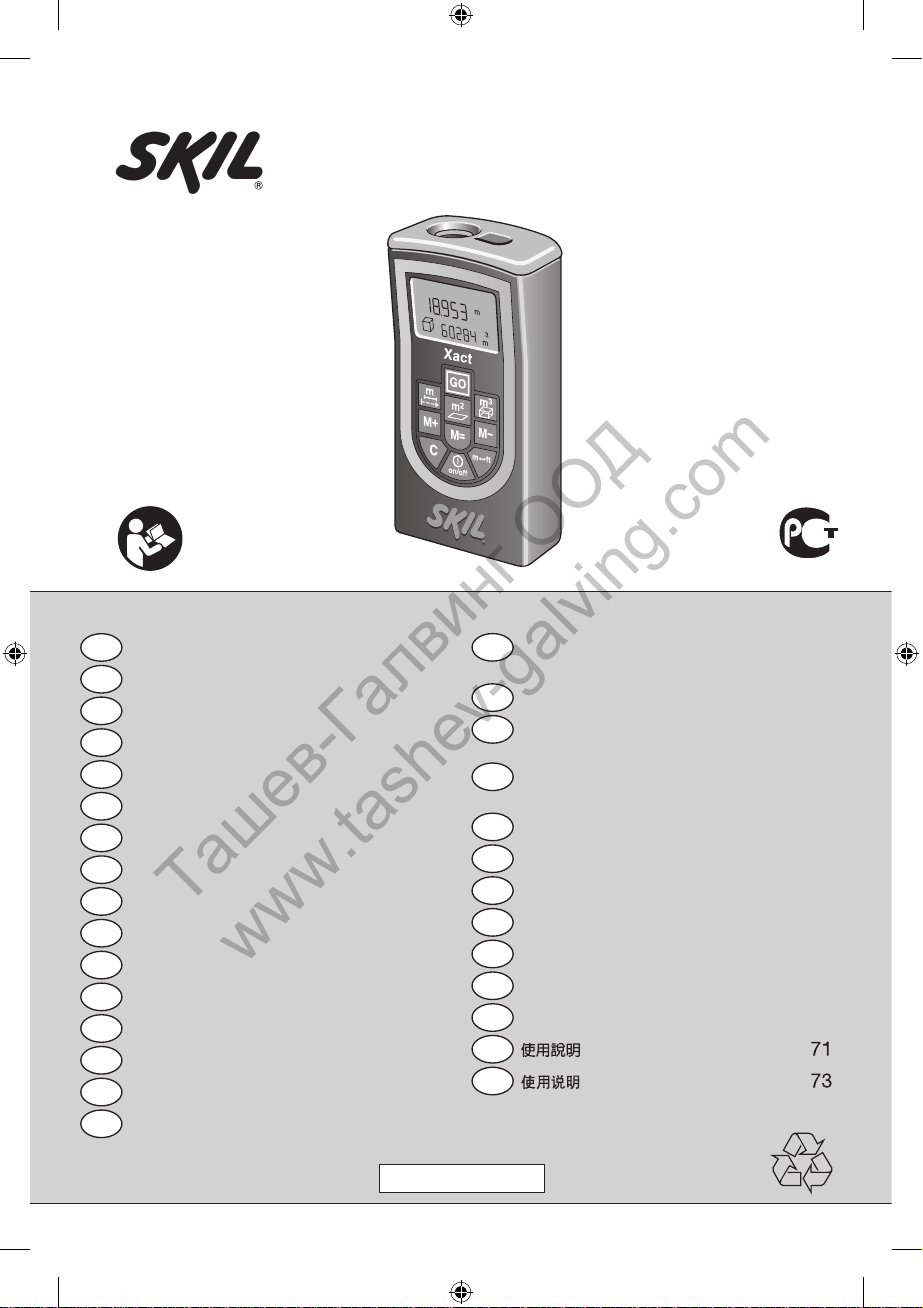
Laser measuring tool 0530
INTRODUCTION
• This tool is intended for measuring distances indoors as
well as outdoors by means of laser beam projection
•
When used properly, this tool easily and accurately
measures length, surface and volume
•
Carefully read this instruction manual and pay
special attention to the safety instructions and
warnings; failure to follow these may result in
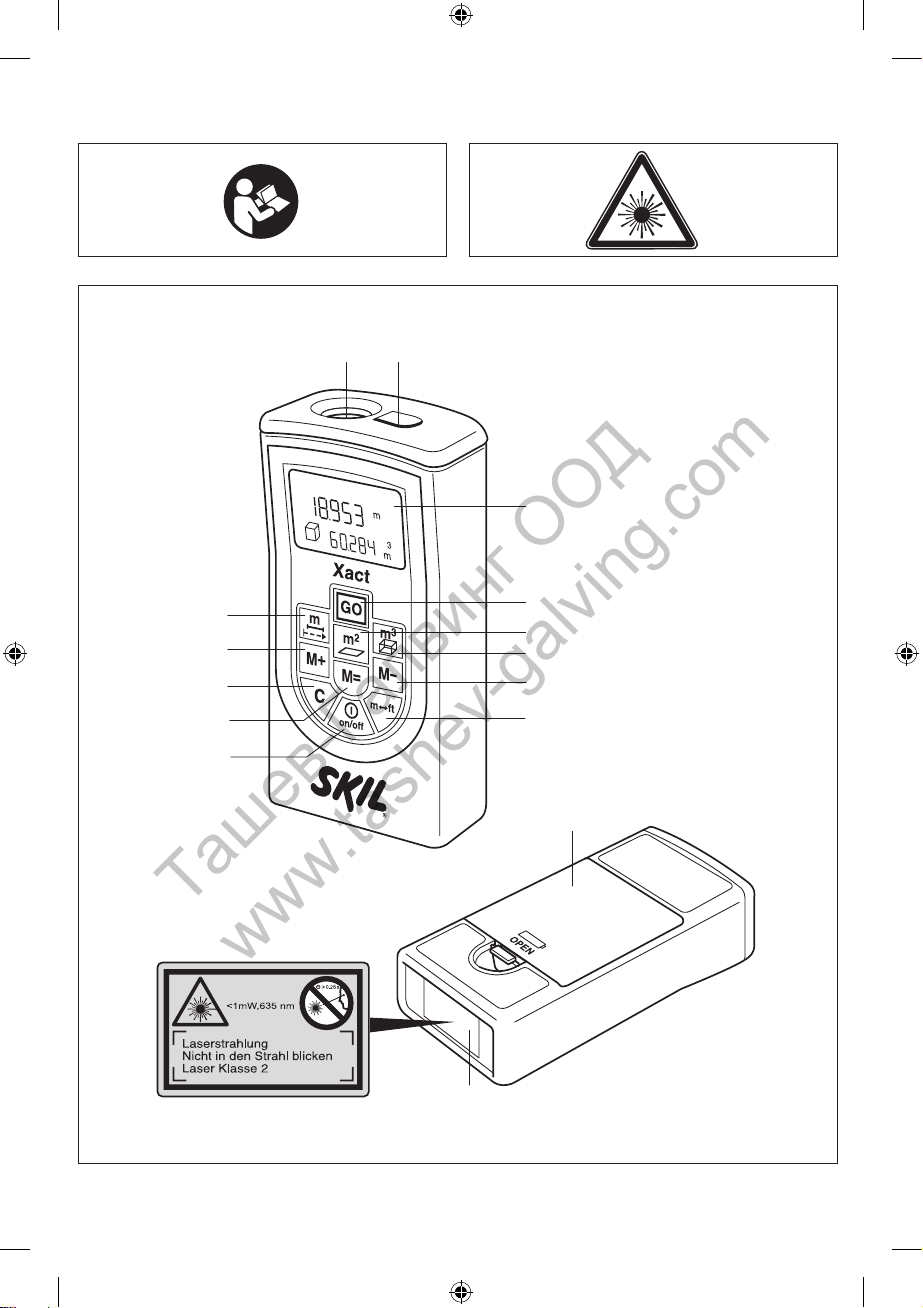
serious (eye) injury 1
•
Before using the tool for the first time, paste the
supplied sticker in your national language over the
German text of warning label P 3
•
Save this instruction manual for future reference
TECHNICAL SPECIFICATIONS
Measuring method optic/laser
Measuring range 0.2 - 20 m
1
)
Measuring accuracy (typical) +/- 3.0 mm
2
)
Measuring duration (typical) < 0.5 sec.
Lowest indication unit 1 mm
Operating temperature -10°C to 50°C
Storage temperature -20ºC to 70°C
Relative humidity (max.) 90%
Laser class 2
Laser type 635 nm
Maximum power output < 1 mW
Laser beam diameter
(at approx. 20°C)
- at 10 m distance
6 mm
- at 20 m distance 16 mm
Batteries (included) 4 x AAA (LR03) 1.5V
Rechargeable batteries 4 x AAA (KR03) 1.2V
Automatic switch-off
- laser
after approx. 20 sec. of
non-measurement
- measuring tool
after approx. 5 min. of
inactivity
W
eight 0,18 kg
1) The measuring range increases depending on how well
the laser light is reflected from the target surface and
how bright the laser point is in relation to the ambient
light intensity
2)
The measuring accuracy deviates +0,06% at
unfavorable conditions (e.g. at intense sunlight)
TOOL ELEMENTS 3
A Reception lens
B Laser beam opening
C LCD display
D On/of
f button
E Metr
e/feet conversion button
F Length and continuous measur
ement mode
G Surface measur
ement mode
H V
olume measurement mode
J Clearing button (“C”)
K Memory add button (“M+”)
L Memory subtract button (“M-”)
M Memory r
etrieve button (“M=”)
N Measuring button (“GO”)
P W
arning label
Q Battery compartment cover
SAFETY
• Do not look into the laser beam (laser radiation) 2
• Do not point the laser beam at persons or animals
• Do not place the tool in a position that may cause
anyone to look into the laser beam intentionally or
unintentionally
•
Do not use any magnifying optical tools (such as
magnifying glasses, telescopes, or binoculars) to view
the laser beam
•
Do not remove or damage the warning label on the tool
• Do not operate the tool in the presence of flammable
liquids, gases or dust
•
Do not operate the tool with children around
• This tool should not be used by people under the age of
16 years
•
Do not use the tool for any purpose other than those
mentioned in this instruction manual
USE
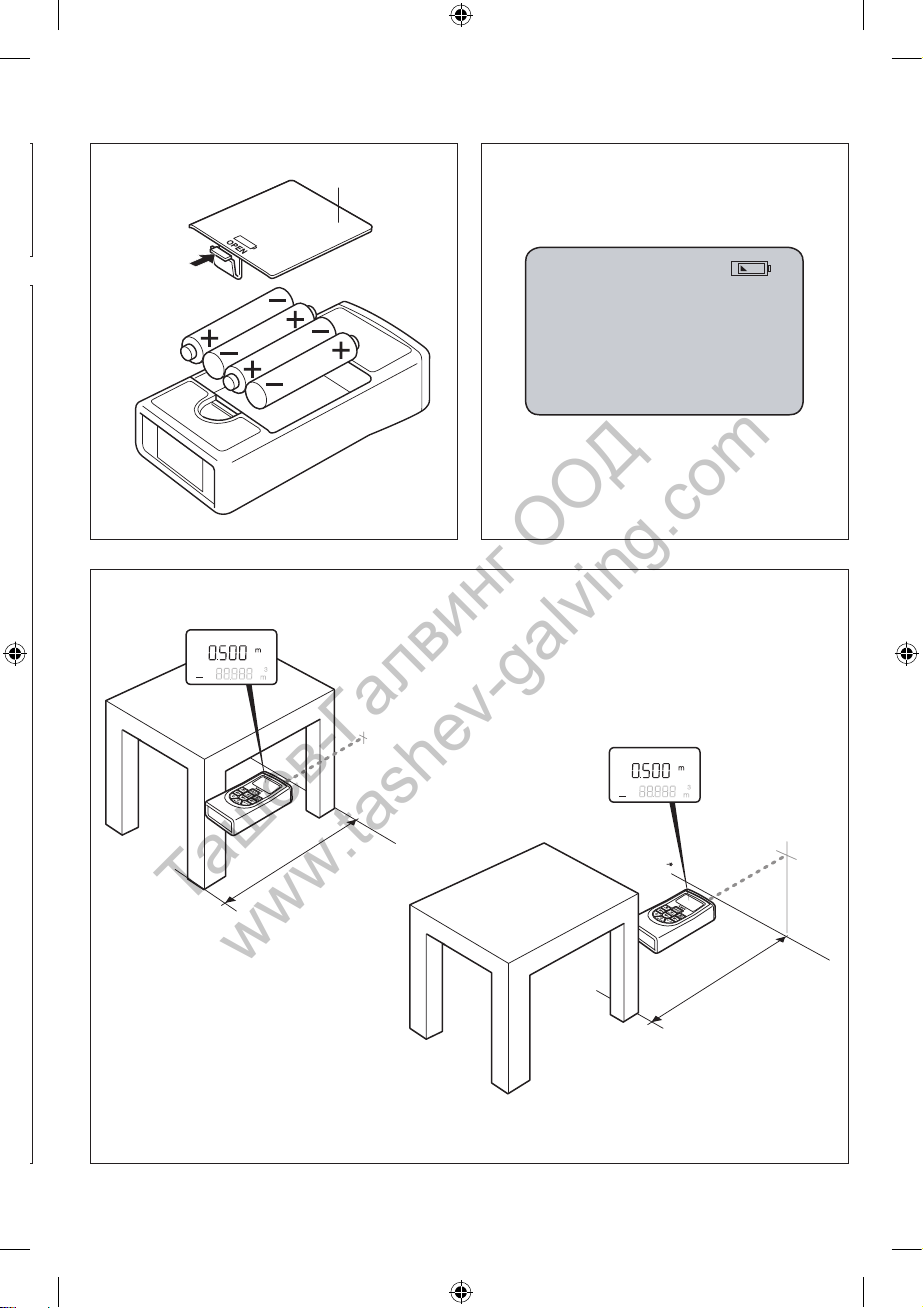
• Mounting of batteries 4
! ensure that the tool is switched off
- use exclusively alkaline-manganese or rechargeable
batteries
-
turn tool upside down
- remove cover Q
- insert 4 x 1,5V battery (pay attention to correct
polarisation)
-
mount cover Q
- when battery level is low, symbol
5 will appear in
display
-
when symbol 5 appears in the display for the first
time, then at least 100 measurements are still
possible
-
replace the batteries when symbol 5 starts flashing
(measuring no longer possible)
-
always replace the complete set of batteries
- always remove the batteries from the tool, if the tool
will not be used for a long period
•
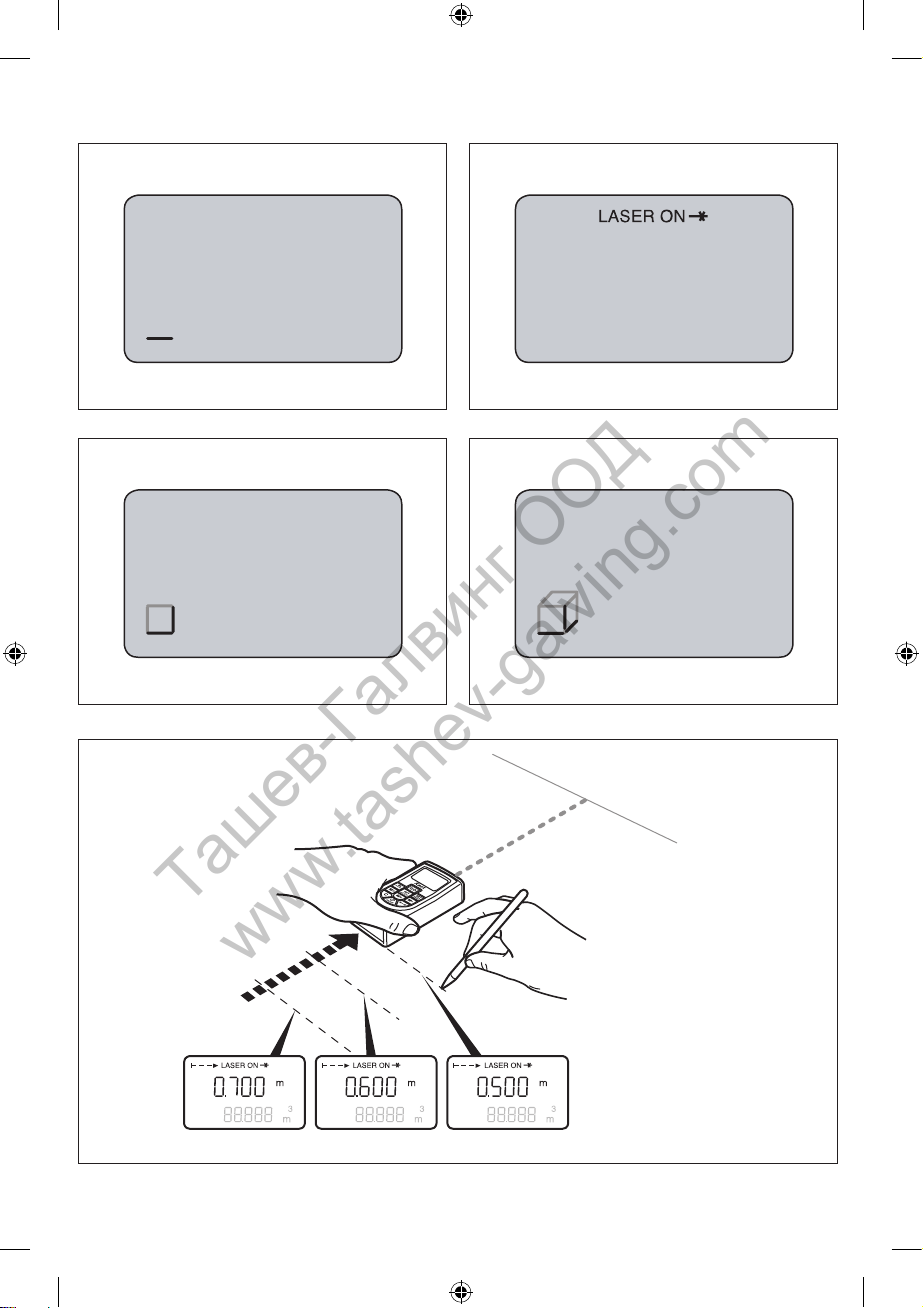
On/off
- switch on the tool by either pressing “on/off” or “GO”
(the laser beam is not switched on yet)
-
switch off the tool by pressing “on/off”
- the tool automatically switches off after 5 minutes of
inactivity
•
Metre/feet conversion
- measurements are in metres/centimetres by default
- press button E
3 for converting metres/centimetres
into feet/inches
•
Operating the tool 6
-
switch on the tool (symbol 7 appears in display
indicating that the tool is already in the length
measurement mode)
-
select other measurement mode (surface/volume), if
desired
Ташев-Галвинг ООД
www.tashev-galving.com
SKIL_IB0530_EUCH_v3.indd 6 08-06-2010 13:03:49
Page 7
7
-
press “GO” to switch on the laser beam (symbol 8
will appear in display)
-
aim the tool towards the target surface
! do not look into the laser beam
! do not point the laser beam at persons or animals
- press “GO” again; measured value appears in display
(laser beam switches off automatically)
-
the laser beam also automatically switches off when
during approximately 20 seconds after switching on
the laser beam no measurements have been taken
!
keep in mind that the tool measures from its rear
(the tool length is included in the measuring result)
-
press “C” for clearing the last individual measured
value
-
press “C” repeatedly for clearing the last individual
measured values in reverse order (m³ - m²)
•
Instructions for proper measurement
! do not move the tool during measuring
(except in
continuous measurement mode)
-
do not cover reception lens A 3 and laser beam
opening B 3 when measuring
-
in unfavorable conditions (e.g. when measuring
outdoors at intense sunlight) use laser enhancing
glasses (SKIL accessory 2610395907) or place a
piece of paper on the target surface
-
measuring against transparent, reflecting, porous or
structured surfaces may lead to faulty measurements
•
Surface measurement
- press button G
3 (symbol 9 will appear in display)
-
aim the tool towards the first target surface (length)
-
press “GO” (symbol 8 will appear in display)
-
press “GO” again; measured length appears on top
line of display
-
aim the tool towards the second target surface
(width)
-
press “GO” again; measured width appears on top
line of display while calculated surface appears on
bottom line of display
-
press “GO” again for starting a completely new
surface measurement
•
Volume measurement
- press button H
3 (symbol 0 will appear in display)
-
aim the tool towards the first target surface (length)
-
press “GO” (symbol 8 will appear in display)
-
press “GO” again; measured length appears on top
line of display
-
aim the tool towards the second target surface (width)
-
press “GO” again; measured width appears on top
line of display while calculated surface appears on
bottom line of display
-
aim the tool towards the third target surface (height)
-
press “GO” again; measured height appears on top
line of display while calculated volume appears on
bottom line of display
-
press “GO” again for starting a completely new
volume measurement
•
Continuous measurement !
-
press button F 3 after switching on the tool
(symbol @ will appear in display)
-
press “GO” (symbol 8 will appear in display)
-
the laser beam remains switched on, so that the
actual distance can be read out continuously
-
press “GO” again for interrupting the continuous
measurement (the current measured value is
indicated in the display)
-
press “GO” again for restarting the continuous
measurement
-
the continuous measurement mode automatically
switches off after 5 minutes (the last measured value
remains indicated in the display) and can also be
ended by selecting another measurement mode
•
Storing/adding measured values
- after taking a measurement press “M+” for storing
the measured value
-
the letter “M” appears in the display and the plus-
sign underneath briefly flashes
-
add additional measured values to the memory value
with “M+” (possible only when the measuring units
correspond)
•
Subtracting measured values
- press “M-” in order to subtract the current measured
value from the memory value (possible only when the
measuring units correspond)
-
the letter “M” appears in the display and the minus-
sign underneath briefly flashes
•
Reading memory
- when pressing “M=”, the value stored in the memory
is displayed together with symbol “M=” (the last
measured value remains indicated in the display)
-
double the memory contents by pressing “M+”
- set memory contents to zero by pressing “M-”
• Clearing memory
First press “M=”, then press “C” (the letter “M” is no
longer displayed)
•
Faulty measurement
- when the measurement is unsuccessful, “ERROR”
appears in display
-
determine the cause, take corrective action, and take
the measurement again
Possible causes for faulty measur
ement:
- the measurement took place outside the measuring
range
-
the angle between laser beam and target was too
acute
-
the target surface reflected too intensely (e.g. mirror)
or insufficiently (e.g. black fabric), or the ambient light
was too bright
-
the reception lens A 3 or the laser beam opening
B 3 was misted up (e.g. due to a rapid temperature
change)
-
measured values were added/subtracted with non-
corresponding measuring units
•
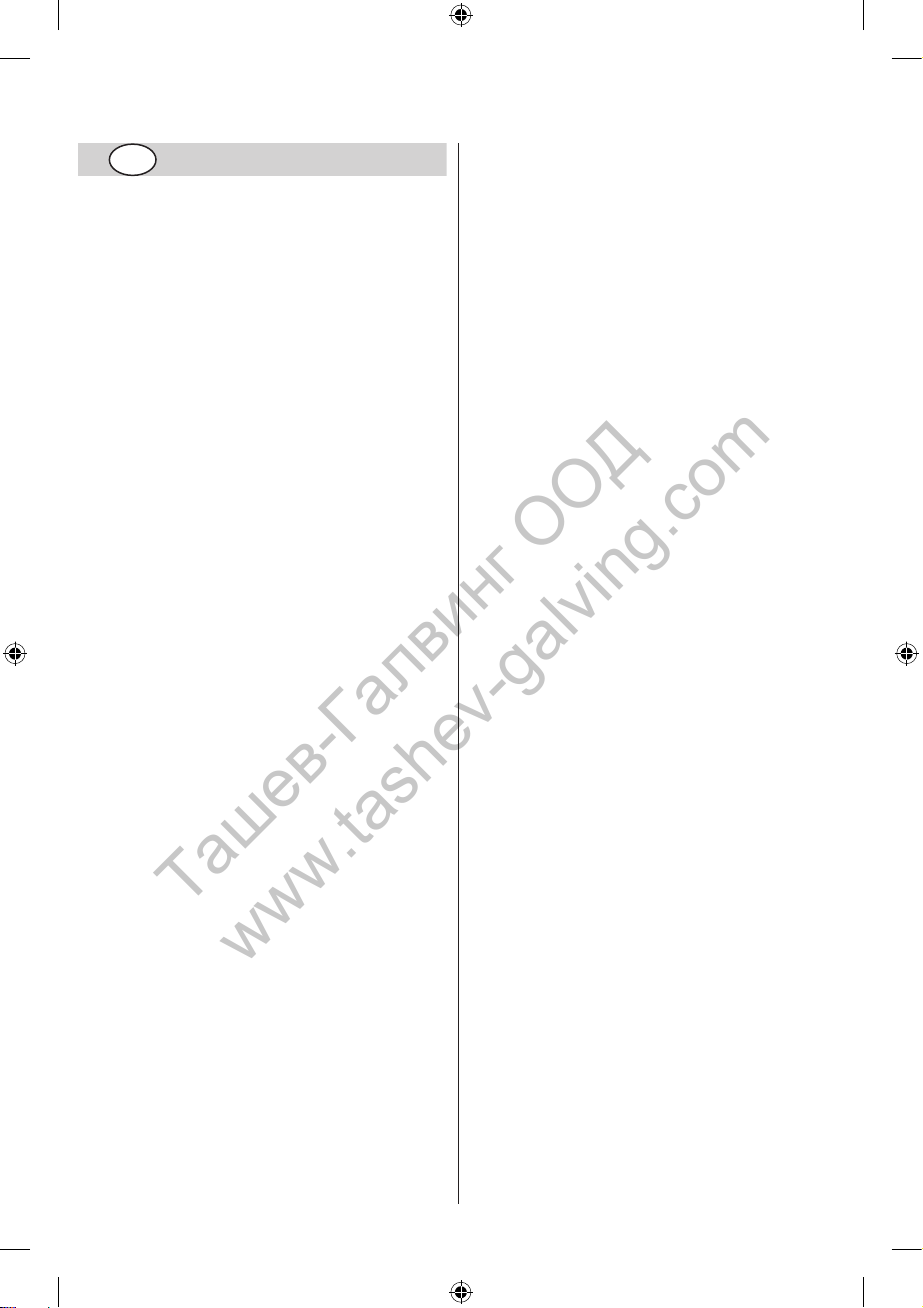
Belt bag for easy and convenient storage #
APPLICATION ADVICE
• When corrective action cannot correct an error, or when
“FAIL” appears in display, measuring is no longer
possible; in this case send the tool to your dealer or the
nearest SKIL service-station
•
Do not expose the tool to continuous vibration or
extremely hot or cold temperatures
•
Always store the tool indoors in its protective carton/
case
Ташев-Галвинг ООД
www.tashev-galving.com
SKIL_IB0530_EUCH_v3.indd 7 08-06-2010 13:03:50
Page 8
8
• Always keep the tool free of dust, moisture and direct
sunlight
•
Clean the tool with a damp cloth and mild soap
! always remove the batteries before cleaning the
lens
•
Do not disassemble or modify the tool in any way
• Do not attempt to change any part of the laser lens
GUARANTEE / ENVIRONMENT
• This SKIL product is guaranteed in accordance with
statutory/country-specific regulations; damage due to
normal wear and tear, overload or improper handling will
be excluded from the guarantee
•
In case of a complaint, send the tool undismantled
together with proof of purchase to your dealer or the
nearest Skil service-station (addresses are listed on
www.skileurope.com)
•
Do not dispose of electric tools, batteries,
accessories and packaging together with household
waste material (only for EU countries)
-
in observance of European Directive 2002/96/EC on
waste of electric and electronic equipment and its
implementation in accordance with national law,
electric tools that have reached the end of their life
must be collected separately and returned to an
environmentally compatible recycling facility
-
symbol $ will remind you of this when the need for
disposing occurs
F
Outil de mesure laser 0530
INTRODUCTION
• Cet outil permet de mesurer des distances tant à
l’intérieur qu’à l’extérieur par la projection d’un faisceau
laser
•
Lorsqu’il est utilisé correctement, il mesure facilement
et avec exactitude les longueurs, les surfaces et les
volumes
•
Lisez soigneusement ce mode d’emploi et prêtez
attention aux consignes de sécurité et aux
avertissements; sinon, vous risquez d’endommager
gravement vos yeux 1
•
Avant d’utiliser cet outil pour la première fois, collez
l’autocollant fourni dans votre langue sur le texte
allemand de l’étiquette d’avertissement P 3
•
Conservez ce mode d’emploi pour vous y reporter à
l’avenir
SPECIFICATIONS TECHNIQUES
Méthode de mesure optique / laser
Plage de mesure 0,2 - 20 m
1
)
Précision de mesure (typique) +/- 3,0 mm
2
)
Durée de mesure (typique) < 0,5 sec.
Plus petite unité d’indication 1 mm
Température de fonctionnement -10°C à 50°C
Température de stockage -20ºC à 70°C
Humidité relative (max.) 90%
Catégorie de laser 2
Type de laser 635 nm
Puissance de sortie maximale < 1 mW
Diamètre du faisceau laser
(à environ 20°C)
- à une distance de 10 m
6 mm
- à une distance de 20 m 16 mm
Piles (comprises) 4 x AAA (LR03) 1,5V
Piles rechargeables 4 x AAA (KR03) 1,2V
Coupure automatique
- laser
après environ 20 sec.
de non-utilisation
- outil de mesur
e après environ 5 min.
d’inactivité
Poids
0,18 kg
1) La plage de mesures augmente selon la manière dont la
lumière laser est reflétée depuis la surface cible et selon
la luminosité du point laser par rapport à l’intensité
lumineuse ambiante
2)
La précision de le mesure s’écarte de +0,06% dans des
conditions défavorables (par ex. en cas de rayonnement
solaire intense)
ELEMENTS DE L’OUTIL 3
A Lentille de réception
B Ouvertur
e du rayon laser
C Écran à cristaux liquides
D Bouton mar
che/arrêt
E Bouton de conversion mètr
es/pieds
F Mode de mesur
e de la longueur, en continu
G Mode de mesur
e de surface
H Mode de mesur
e de volume
J Bouton ef
facement (“C”)
K Bouton ajout mémoir
e (“M+”)
L Bouton soustraction mémoir
e (“M-”)
M Bouton récupération mémoir
e (“M=”)
N Bouton de mesur
e (“GO”)
P Etiquette d’avertissement
Q Couver
cle du compartiment des piles
SECURITE
• Ne projetez pas le rayon laser dans vos yeux
(rayonnement laser) 2
•
Ne dirigez pas le rayon laser vers des personnes ou
des animaux
•
Ne placez pas cet outil dans une position où le rayon
laser pourrait atteindre l’œil d’une personne,
volontairement ou non
•
N’utilisez pas d’outils optiques grossissants (loupes,
télescopes ou jumelles) pour voir le rayon laser
•
Veillez à ne pas enlever l’étiquette d’avertissement de
l’outil ni à l’endommager
•
N’utilisez pas cet outil en la présence de liquides
inflammables, de gaz ou de poussière
•
N’utilisez pas cet outil en la présence d’enfants
• Cet outil est interdit aux jeunes n’ayant pas atteint l’âge
de 16 ans
•
N’utilisez pas cet outil dans un but autre que ceux
mentionnés dans ce mode d’emploi
Ташев-Галвинг ООД
www.tashev-galving.com
SKIL_IB0530_EUCH_v3.indd 8 08-06-2010 13:03:51
Page 9

9
UTILISATION
• Installation des piles 4
! veillez à ce que l’outil soit hors tension
- utilisez exclusivement des piles alcaline-manganèse
ou des piles rechargeables
-
retournez l’outil pour le placer la tête en bas
- retirez le couvercle Q
- insérez 4 piles de 1,5 V (respectez les polarités)
- replacez le couvercle Q
- quand le niveau de la pile est bas, le symbole
5
s’affiche
-
lorsque le symbole 5 apparaît à l’écran pour la
première fois, au moins 100 mesures peuvent encore
être prises
-
remplacez les piles lorsque le symbole 5 commence
à clignoter (impossible de prendre des mesures)
-
remplacez toujours la totalité des piles en même temps
- si vous n’utilisez pas l’outil pendant une longue
période, retirez toujours les piles
•
Marche/arrêt
- allumez l’outil en appuyant soit sur “on/off”, soit sur
“GO” (le faisceau laser n’est pas encore allumé)
-
éteignez l’outil en appuyant sur “on/off”
- l’outil s’éteint automatiquement après 5 minutes
d’inactivité
•
Conversion mètres/pieds
- par défaut, les mesures sont en mètres/centimètres
- pour convertir les mètres/centimètres en pieds/
pouces, appuyez sur le bouton E 3
•
Utilisation de l’outil 6
-
allumez l’outil (le symbole 7 apparaît à l’écran
indiquant que l’outil est déjà en mode mesure de la
longueur)
-
sélectionnez un autre mode de mesure (surface/
volume), si nécessaire
-
appuyez sur “GO” pour allumer le faisceau laser (le
symbole 8 apparaît à l’écran)
-
orientez l’outil vers la surface cible
! ne projetez pas le rayon laser dans vos yeux
! ne dirigez pas le rayon laser vers des personnes
ou des animaux
-
appuyez à nouveau sur “GO”; la valeur mesurée
apparaît à l’écran (le faisceau laser s’éteint
automatiquement)
-
le faisceau laser s’éteint également automatiquement
si aucune mesure n’est prise pendant environ
20 secondes après avoir allumé le faisceau laser
!
n’oubliez pas que l’outil mesure à partir de sa
partie arrière (la longueur de l’outil est incluse dans
le résultat de la mesure)
-
appuyez sur “C” pour effacer la dernière valeur
mesurée individuelle
-
appuyez sur “C” à plusieurs reprises pour effacer les
dernières valeurs mesurées individuelles en ordre
inverse (m³ - m²)
•
Mode d’emploi pour effectuer des mesures exactes
! ne déplacez pas l’outil pendant la mesure
(sauf
lorsque vous vous trouvez en mode de mesure
continue)
-
ne masquez pas la lentille de réception A 3 et
l’ouverture du faisceau laser B 3 lorsque vous
mesurez
-
dans des conditions défavorables (par ex. en cas de
mesures à l’extérieur avec un rayonnement solaire
important), utilisez les verres d’amélioration laser
(accessoire SKIL 2610395907) ou placez un morceau
de papier sur la surface cible
-
des mesures effectuées sur des surfaces
transparentes, qui reflètent, poreuses ou structurées
peuvent entraîner des mesures erronées
•
Mesure de surface
- appuyez sur le bouton G
3 (le symbole 9 s’affiche
sur l’écran )
-
orientez l’outil vers la première surface cible
(longueur)
-
appuyez sur “GO” (le symbole 8 s’affiche sur
l’écran)
-
appuyez à nouveau sur “GO”; la longueur mesurée
apparaît sur la première ligne de l’écran
-
orientez l’outil vers la deuxième surface cible
(largeur)
-
appuyez à nouveau sur “GO”; la largeur mesurée
apparaît sur la première ligne de l’écran, tandis que
la surface calculée apparaît sur la ligne du bas de
l’écran
-
pour effectuer une nouvelle mesure de surface,
appuyez à nouveau sur “GO”
•
Mesure de volume
- appuyez sur le bouton H
3 (le symbole 0 s’affiche
sur l’écran )
-
orientez l’outil vers la première surface cible
(longueur)
-
appuyez sur “GO” (le symbole 8 s’affiche sur l’écran)
-
appuyez à nouveau sur “GO”; la longueur mesurée
apparaît sur la première ligne de l’écran
-
orientez l’outil vers la deuxième surface cible
(largeur)
-
appuyez à nouveau sur “GO”; la largeur mesurée
apparaît sur la première ligne de l’écran, tandis que
la surface calculée apparaît sur la ligne du bas de
l’écran
-
orientez l’outil vers la troisième surface cible
(hauteur)
-
appuyez à nouveau sur “GO”; la hauteur mesurée
apparaît sur la première ligne de l’écran, tandis que le
volume calculé apparaît sur la ligne du bas de l’écran
-
pour effectuer une nouvelle mesure de volume,
appuyez à nouveau sur “GO”
•
Mesure continue !
-
appuyez sur le bouton F3 après avoir allumé l’outil
(le symbole @ apparaît à l’écran)
-
appuyez sur “GO” (le symbole 8 s’affiche sur l’écran)
-
le faisceau laser reste allumé de telle sorte que la
distance réelle peut être lue en continu
-
appuyez à nouveau sur “GO” pour interrompre la
mesure en continu (la valeur mesurée actuelle est
indiquée à l’écran)
-
appuyez à nouveau sur “GO” pour reprendre la
mesure en continu
-
le mode mesure continue s’éteint automatiquement
après 5 minutes (la dernière valeur mesurée reste
indiquée à l’écran) mais un terme peut également
être mis à ce mode en sélectionnant simplement un
autre mode de mesure
Ташев-Галвинг ООД
www.tashev-galving.com
SKIL_IB0530_EUCH_v3.indd 9 08-06-2010 13:03:52
Page 10
10
• Stockage/ajout des valeurs mesurées
- après avoir pris une mesure, appuyez sur “M+” pour
stocker la valeur mesurée
-
la lettre “M” apparaît à l’écran et le signe plus en
dessous clignote brièvement
-
ajoutez des valeurs mesurées supplémentaires à la
valeur en mémoire à l’aide de la touche “M+”
(uniquement possible si les unités de mesure
correspondent)
•
Soustraction des valeurs mesurées
- appuyez sur “M-” pour soustraire la valeur mesurée
actuelle de la valeur en mémoire (uniquement
possible si les unités de mesure correspondent)
-
la lettre “M” apparaît à l’écran et le signe moins en
dessous clignote brièvement
•
Lecture de la mémoire
- lorsque vous appuyez sur “M=”, la valeur stockée
dans la mémoire est affichée avec le symbole “M=”
(la dernière valeur mesurée reste indiquée à l’écran)
-
doublez le contenu de la mémoire en appuyant sur
“M+”
-
réinitialisez le contenu de la mémoire à zéro en
appuyant sur “M-”
•
Effacement de la mémoire
Appuyez d’abord sur “M=”, et ensuite sur “C” (la lettre
“M” n’est plus affichée)
•
Échec de mesure
- quand la mesure échoue, “ERROR” s’affiche
- déterminez la cause, entreprenez l’action de
correction et mesurez à nouveau
Causes éventuelles d’une mesure erronée:
-
la mesure a eu lieu en dehors de la plage de mesure
- l’angle entre le faisceau laser et la cible était trop aigu
- la surface cible réfléchissait trop intensément (ex.
miroir) ou insuffisamment (ex. tissu noir), ou la
lumière ambiante était trop vive
-
la lentille de réception A 3 ou l’ouverture du faisceau
laser B 3 était embuée (par ex. en raison d’un rapide
changement de température)
-
les valeurs mesurées ont été ajoutées/soustraites alors
que les unités de mesure ne correspondaient pas
•
Sac de ceinture pratique pour ranger l’outil facilement #
CONSEILS D’UTILISATION
• Lorsqu’une action rectificative ne peut corriger une
erreur, ou lorsque “FAIL” apparaît dans l’affichage, plus
aucune mesure n’est possible ; dans ce cas, envoyez
l’outil à votre revendeur ou au service après-vente SKIL
le plus proche
•
N’exposez pas cet outil à des vibrations continues ni à
des extrêmes de température
•
Rangez toujours cet outil à l’intérieur dans son carton/
sa mallette de protection
•
Protégez l’outil de la poussière, de l’humidité et de la
lumière directe du soleil
•
Nettoyez l’outil à l’aide d’un tissu humide et d’un
détergent doux
!
retirez toujours les piles avant de nettoyer l’objectif
•
Ne démontez pas cet outil et ne le modifiez d’aucune
façon
•
N’essayez pas de modifier des parties de l’objectif du
laser
GARANTIE / ENVIRONNEMENT
• Ce produit SKIL est garanti conformément aux
dispositions légales/nationales; tout dommage dû à
l’usure normale, à une surcharge ou à une mauvaise
utilisation de l’outil, sera exclu de la garantie
•
En cas de réclamation, envoyez l’outil non démonté
avec votre preuve d’achat au revendeur ou au centre de
réparation Skil le plus proche (adresse à
www.skileurope.com)
•
Ne pas jetez les outils électriques, les piles, les
accessoires et l’emballage dans les ordures
ménagères (pour les pays européens uniquement)
-
conformément à la directive européenne 2002/96/EG
relative aux déchets d’équipements électriques ou
électroniques, et à sa transposition dans la législation
nationale, les outils électriques usés doivent être
collectés à part et être soumis à un recyclage
respectueux de l’environnement
-
le symbole $ vous en souvient quand la nécessité
du débarras se présente
D
Laser-Messgerät 0530
EINLEITUNG
• Dieses Gerät dient zum Messen von Entfernungen im
Innen- und Außenbereich mithilfe von
Laserstrahlprojektion
•
Bei bestimmungsgemäßer Verwendung misst dieses
Gerät Längen, Oberflächen und Volumen einfach und
präzise
•
Lesen Sie die vorliegende Anleitung aufmerksam
durch und achten Sie besonders auf die Sicherheitsund Warnhinweise; ihre Nichtbeachtung kann schwere
Verletzungen (der Augen) nach sich ziehen 1
•
Vor dem ersten Gebrauch des Gerätes den
deutschsprachigen Warnhinweis P 3 mit dem
beigefügten Aufkleber in Ihrer Landessprache überkleben
•
Diese Bedienungsanleitung zur zukünftigen
Bezugnahme aufheben
TECHNISCHE DATEN
Messverfahren Optisch/Laser
Reichweite 0,2 - 20 m
1
)
Messgenauigkeit (typisch) +/- 3,0 mm
2
)
Messdauer (typisch) < 0,5 Sek.
Kleinste Anzeigeeinheit 1 mm
Betriebstemperatur -10°C bis 50°C
Lagertemperatur -20ºC bis 70°C
Relative Luftfeuchtigkeit (max.) 90%
Laserklasse 2
Lasertyp 635 nm
Maximale Leistungsabgabe < 1 mW
Laserstrahldurchmesser
(bei ca. 20°C)
- bei 10 Meter
n Entfernung 6 mm
- bei 20 Metern Entfernung 16 mm
Batterien (enthalten) 4 x AAA (LR03) 1,5 V
Ташев-Галвинг ООД
www.tashev-galving.com
SKIL_IB0530_EUCH_v3.indd 10 08-06-2010 13:03:53
Page 11
11
Wiederaufladbare Batterien 4 x AAA (KR03) 1,2 V
Automatische Abschaltfunktion
- Laser
nach ca. 20 Sek. Inaktivität
beim Messen
- Messgerät
nach ca. 5 Min. Inaktivität
Gewicht 0,18 kg
1) Die Reichweite erhöht sich entsprechend der Reflektion
des Lasers auf der Zieloberfläche und der Helligkeit des
Laserpunktes in Relation zur Intensität des
Umgebungslichts
2)
Die Messgenauigkeit hat bei ungünstigen Bedingungen
(z. B. intensives Sonnenlicht) eine Abweichung von
+0,06%
WERKZEUGKOMPONENTEN 3
A Empfangslinse
B Laserstrahlöf
fnung
C LCD-Display
D Ein/Aus-T
aste
E Meter/Fuß-Umr
echnungstaste
F Messmodus - Länge und Dauermessung
G Messmodus - Oberfläche
H Messmodus - V
olumen
J Löschtaste (“C”)
K Speicheradditionstaste (“M+”)
L Speicherabzugstaste (“M-”)
M Speicheraufruftaste (“M=”)
N Messtaste (“GO”)
P W
arnhinweisschild
Q Batteriefachdeckel
SICHERHEIT
• Nicht in den Laserstrahl blicken (Laserstrahlung) 2
• Den Laserstrahl nicht auf Menschen oder Tiere
richten
•
Das Gerät nicht an einer Stelle positionieren, die zur
Folge hat, dass irgendjemand absichtlich oder
unabsichtlich in den Laserstrahl blickt
•
Keine vergrößernden optischen Geräte (z.B.
Vergrößerungsgläser, Teleskope oder Ferngläser) zum
Betrachten des Laserstrahls benutzen
•
Das Warnhinweisschild am Gerät nicht entfernen oder
beschädigen
•
Das Gerät nicht in der Gegenwart von entzündlichen
Flüssigkeiten, Gasen oder Stäuben benutzen
•
Das Gerät nicht benutzen, wenn sich Kinder in seiner
Nähe befinden
•
Der Benutzer dieses Werkzeuges sollte älter als
16 Jahre sein
•
Das Gerät für keinen anderen Zweck als den in dieser
Anleitung erwähnten benutzen
BEDIENUNG
• Einlegen der Batterien 4
! darauf achten, dass das Gerät abgeschaltet ist
- Alkali-Mangan oder wiederaufladbare Batterien
verwenden
-
das Gerät umkehren
- Deckel Q abnehmen
- 4 x 1,5 V-Batterie (richtig herum) einlegen
- Deckel Q aufsetzen
- bei schwacher Batterie erscheint Symbol
5 im
Display
-
wenn im Display das Symbol 5 zum ersten Mal
angezeigt wird, sind noch mindestens100
Messungen möglich
-
die Batterien ersetzen, wenn das Symbol 5
aufleuchtet (keine weiteren Messungen möglich)
-
Batterien stets komplett satzweise wechseln
- die Batterien stets aus dem Gerät herausnehmen,
wenn es längere Zeit nicht benutzt wird
•
Ein/Aus
- das Gerät durch Drücken der Tasten “on/off” oder
“GO” einschalten (der Laserstrahl ist noch nicht
eingeschaltet)
-
das Gerät durch Drücken von “on/off” abschalten
- das Gerät wird nach 5 Minuten Inaktivität
automatisch abgeschaltet
•
Umrechnung Meter/Fuß
- Messungen erfolgen standardmäßig in Meter/
Zentimeter
-
Taste E 3 drücken, um Meter/Zentimeter in Fuß/Zoll
umzurechnen
•
Anwendung des Gerätes 6
-
das Gerät einschalten (das Symbol 7 wird im
Display angezeigt und gibt an, dass das Gerät im
Messmodus “Länge” betriebsbereit ist)
-
wenn gewünscht, einen anderen Messmodus
auswählen (Oberfläche/Volumen)
-
auf “GO” drücken, um den Laserstrahl einzuschalten
(das Symbol 8 wird im Display angezeigt)
-
das Gerät auf die Zieloberfläche richten
! nicht in den Laserstrahl schauen
! den Laserstrahl nicht auf Personen oder Tiere
richten
-
erneut auf “GO” drücken; die gemessenen Werte
werden im Display angezeigt (Laserstrahl schaltet
automatisch ab)
-
der Laserstrahl schaltet sich auch nach etwa
20 Sekunden automatisch aus, wenn nach dem
Einschalten des Lasers keine Messungen
durchgeführt wurden
!
bedenken Sie, dass das Gerät von seiner
Rückseite aus misst (die Gerätelänge wird im
Messergebnis berücksichtigt)
-
“C” drücken, um den zuletzt gemessenen Wert zu
entfernen
-
mehrfach auf “C” drücken, um die zuletzt
gemessenen Werte in der umgekehrten Reihenfolge
zu entfernen (m³ - m²)
•
Anleitung für korrekte Messung
!
das Gerät während des Messvorgangs nicht
bewegen (außer im Dauer-Messmodus)
-
während des Messvorgangs nicht die Empfangslinse
A 3 und die Laseröffnung B 3 verdecken
-
bei ungünstigen Bedingungen (z. B. bei Messungen
im Außenbereich und intensiver Sonneneinstrahlung),
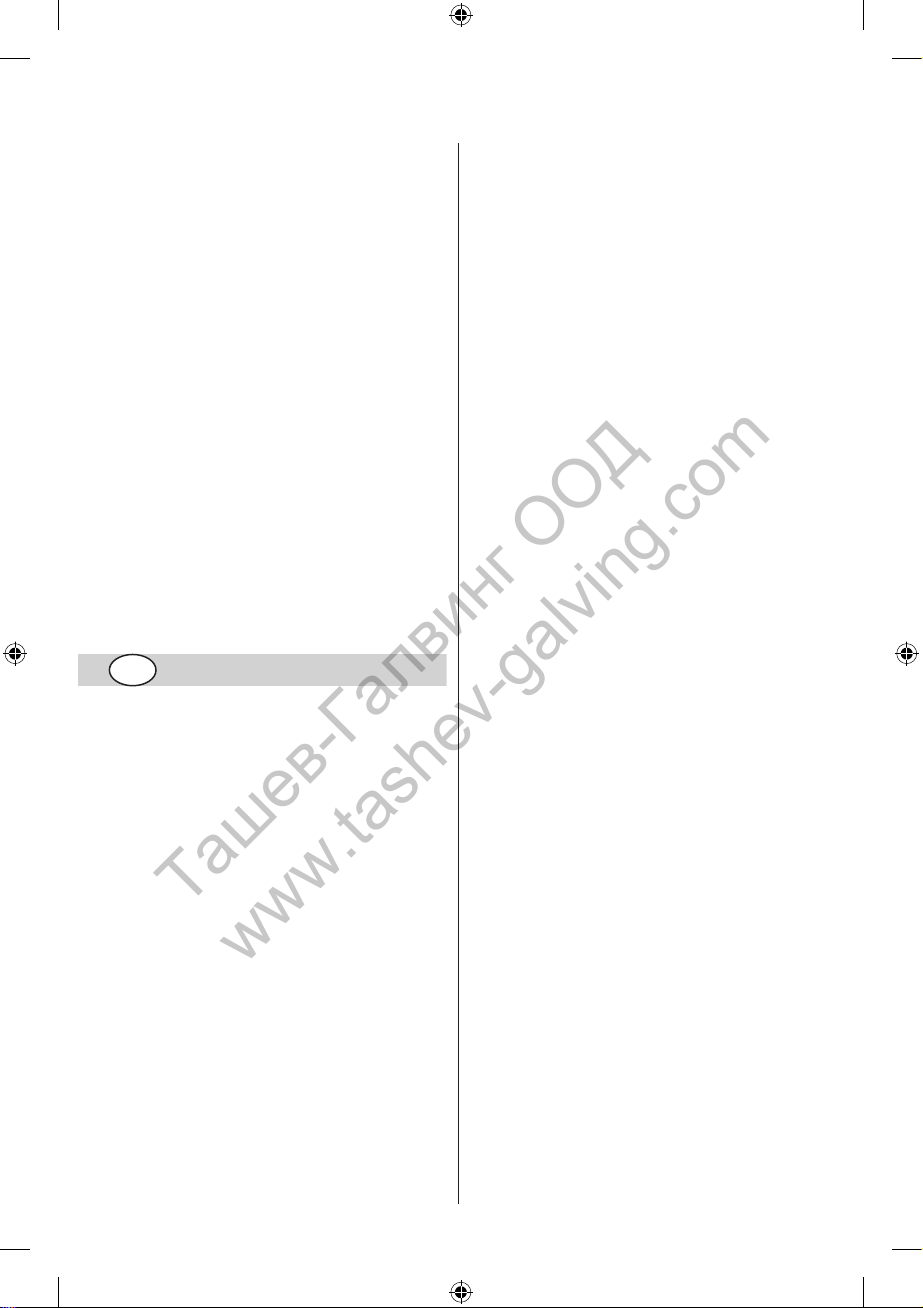
Lasersichtbrille (SKIL Zubehör 2610395907)
verwenden oder auf der Zieloberfläche ein Stück
Papier platzieren
Ташев-Галвинг ООД
www.tashev-galving.com
SKIL_IB0530_EUCH_v3.indd 11 08-06-2010 13:03:54
Page 12

12
- Messungen auf transparenten, reflektierenden,
porösen oder strukturierten Oberflächen können zu
fehlerhaften Messungen führen
•
Oberflächenmessung
- Taste G
3 drücken (Symbol 9 erscheint im Display)
-
das Gerät auf die erste Zieloberfläche richten (Länge)
-
“GO” drücken (Symbol 8 erscheint im Display)
-
“GO” erneut drücken; die gemessene Länge
erscheint in der obersten Display-Zeile
-
das Gerät auf die zweite Zieloberfläche richten (Breite)
-
“GO” erneut drücken; die gemessene Breite
erscheint in der obersten Display-Zeile, wogegen die
berechnete Oberfläche in der untersten Display-Zeile
erscheint
-
“GO” erneut drücken, um mit einer völlig neuen
Oberflächenmessung zu beginnen
•
Volumenmessung
- Taste H
3 drücken (Symbol 0 erscheint im Display)
-
das Gerät auf die erste Zieloberfläche richten (Länge)
-
“GO” drücken (Symbol 8 erscheint im Display)
-
“GO” erneut drücken; die gemessene Länge
erscheint in der obersten Display-Zeile
-
das Gerät auf die zweite Zieloberfläche richten (Breite)
-
“GO” erneut drücken; die gemessene Breite
erscheint in der obersten Display-Zeile, wogegen die
berechnete Oberfläche in der untersten Display-Zeile
erscheint
-
das Gerät auf die dritte Zieloberfläche richten (Höhe)
-
“GO” erneut drücken; die gemessene Höhe erscheint
in der obersten Display-Zeile, wogegen das
berechnete Volumen in der untersten Display-Zeile
erscheint
-
“GO” erneut drücken, um mit einer völlig neuen
Volumenmessung zu beginnen
•
Dauer-Messung !
-
nach dem Einschalten des Gerätes Taste F3
drücken (das Symbol @ wird im Display angezeigt)
-
“GO” drücken (Symbol 8 erscheint im Display)
-
der Laserstrahl bleibt eingeschaltet, sodass die
aktuelle Entfernung kontinuirlich abgelesen werden
kann
-
erneut auf “GO” drücken, um die Dauer-Messung zu
unterbrechen (der aktuelle Messwert wird im Display
angezeigt)
-
erneut auf “GO” drücken , um die Dauer-Messung
erneut zu starten
-
die Dauer-Messung wird nach 5 Minuten automatisch
abgeschaltet (der zuletzt gemessene Wert wird im
Display angezeigt) und kann auch durch die Auswahl
eines anderen Messmodus beendet werden
•
Speichern/Addieren der Messwerte
- nach der Messung auf “M+” drücken, um die
Messwerte zu speichern
-
der Buchstabe “M” wird im Display angezeigt und
das Pluszeichen darunter leuchtet kurz auf
-
zum Speicher weitere Messwerte mit “M+” addieren
(nur möglich, wenn die Messeinheiten
übereinstimmen)
•
Abziehen der Messwerte
- auf “M-” drücken, um den aktuellen Messwert von
dem Speicherwert abzuziehen (nur möglich, wenn die
Messeinheiten übereinstimmen)
-
der Buchstabe “M” wird im Display angezeigt und
das Minuszeichen darunter leuchtet kurz auf
•
Lesen des Speichers
- durch Drücken der Taste “M=” wird der
Speicherinhalt zusammen mit dem Symbol “M=”
angezeigt (der zuletzt gemessene Wert wird im
Display angezeigt)
-
Speicherinhalt durch Drücken der Taste “M+”
verdoppeln
-
Speicherinhalt durch Drücken der Taste “M-” auf Null
setzen
•
Löschen des Speichers
Zuerst Taste “M=” drücken, anschließend Taste “C” (der
Buchstabe “M” wird nicht mehr angezeigt)
•
Inkorrekte Messung
- bei erfolgloser Messung erscheint “ERROR” im
Display
-
die Ursache finden, eine Korrektur vornehmen und
die Messung erneut durchführen
Mögliche Ursachen für fehlerhafte Messungen:
-
die Messung wurde außerhalb des Messbereichs
durchgeführt
-
der Winkel zwischen dem Laserstrahl und der
Zieloberfläche war zu spitz
-
die Zieloberfläche hat zu stark (z. B. Spiegel) oder
nicht genügend reflektiert (z. B. schwarzer Stoff) oder
das Umgebungslicht war zu hell
-
die Empfangslinse A 3 oder die Laseröffnung B 3
war beschlagen (z. B. wegen eines starken
Temperaturwechsels)
-
die Messwerte wurden mit nicht übereinstimmenden
Messeinheiten addiert/subtrahiert
•
Gürteltasche zur einfachen und bequemen
Aufbewahrung #
ANWENDUNGSHINWEISE
• Wenn durch Abhilfe-Maßnahmen ein Fehler nicht
korrigiert werden kann oder wenn im Display “FAIL”
angezeigt wird, ist eine Messung nicht länger möglich;
schicken Sie das Gerät in diesem Fall an Ihren Händler
oder zur nächsten SKIL Kundendienststelle
•
Das Gerät weder ständiger Vibration noch äußerst
hohen oder niedrigen Temperaturen aussetzen
•
Das Gerät stets drinnen in seinem schützenden Karton/
Koffer aufbewahren
•
Das Gerät stets von Staub, Feuchtigkeit und direkter
Sonneneinstrahlung freihalten bzw. fern halten
•
Das Gerät mit einem feuchten Tuch und milder Seife
reinigen
!
vor Reinigung der Linse stets die Batterien
herausnehmen
•
Das Gerät in keiner Weise zerlegen oder modifizieren
• Nicht versuchen, irgendeinen Teil der Laserlinse zu
wechseln
GARANTIE / UMWELT
• Für dieses SKIL-Erzeugnis leisten wir Garantie gemäß
den gesetzlichen/landesspezifischen Bestimmungen;
Schäden, die auf natürliche Abnutzung, Überlastung
oder unsachgemäße Behandlung zurückzuführen sind,
bleiben von der Garantie ausgeschlossen
Ташев-Галвинг ООД
www.tashev-galving.com
SKIL_IB0530_EUCH_v3.indd 12 08-06-2010 13:03:54
Page 13
13
•
Bei Reklamationen schicken Sie das Gerät unzerlegt
nebst Kaufnachweis an Ihren Händler oder die nächste
Skil Kundendienststelle (Anschriften siehe
www.skileurope.com)
•
Elektrowerkzeuge, Batterien, Zubehör und
Verpackungen nicht in den Hausmüll werfen (nur für
EU-Länder)
-
gemäss Europäischer Richtlinie 2002/96/EG über
Elektro- und Elektronik- Altgeräte und Umsetzung in
nationales Recht müssen nicht mehr
gebrauchsfähige Elektrowerkzeuge getrennt
gesammelt und einer umweltgerechten
Wiederververtung zugeführt werden
-
hieran soll Sie Symbol $ erinnern
NL
Laser-meetapparaat 0530
INTRODUKTIE
• Dit gereedschap is bedoeld om zowel binnen als buiten
afstanden te meten door een laserstraal te projecteren
•
Indien juist gebruikt, meet dit apparaat op een
gemakkelijke en nauwkeurige manier lengte,
oppervlakte, en inhoud
•
Lees aandachtig deze gebruiksaanwijzing door en
let met name op de veiligheidsinstructies en de
waarschuwingen; het niet in acht nemen hiervan kan
ernstige (oog)verwondingen tot gevolg hebben 1
•
Plak, voordat u het apparaat voor de eerste keer
gebruikt, de bijgeleverde sticker in uw eigen taal over
het Duitstalige waarschuwingsetiket P 3
•
Bewaar deze gebruiksaanwijzing om deze later nog
eens te kunnen raadplegen
TECHNISCHE SPECIFIKATIES
Meetmethode optisch/laser
Meetbereik 0,2 - 20 m
1
)
Meetnauwkeurigheid (algemeen) +/- 3,0 mm
2
)
Meetduur (algemeen) < 0,5 sec.
Kleinste indicatie-eenheid 1 mm
Gebruikstemperatuur -10°C tot 50°C
Bewaartemperatuur -20ºC tot 70°C
Relatieve luchtvochtigheid (max.) 90%
Laserklasse 2
Lasertype 635 nm
Maximaal uitgaand vermogen < 1 mW
Diameter laserstraal
(bij ongeveer 20°C)
- op een afstand van 10 m
6 mm
- op een afstand van 20 m 16 mm
Batterijen (bijgeleverd) 4 x AAA (LR03) 1,5 V
Oplaadbare batterijen 4 x AAA (LR03) 1,2 V
Automatische uitschakeling
- laser
na ca. 20 sec. niet meten
- meetinstrument na ca. 5 min. inactiviteit
Gewicht 0,18 kg
1) Het meetbereik is afhankelijk van de mate van reflectie
van het laserlicht door het doeloppervlak en van de
helderheid van de laserpunt in vergelijking met de
intensiteit van het omgevingslicht
2)
De meetnauwkeurigheid kan in ongunstige
omstandigheden (bijvoorbeeld bij fel zonlicht) +0,06%
afwijken
MACHINE-ELEMENTEN 3
A Ontvangstlens
B Opening voor laserstraal
C LCD display
D Aan/uit toets “On/of
f”
E Meter/voet omzettingstoets
F Modus voor lengtemeting en continue metingen
G Modus voor oppervlaktemeting
H Modus voor volumemeting
J Knop (“C”): meetwaar
den wissen
K Knop (“M+”): meetwaar
den in het geheugen opslaan en
optellen
L Knop (“M-”): meetwaar
den aftrekken van waarden in het
geheugen
M Knop (“M=”): meetwaar
den ophalen uit geheugen
N Knop (“GO”): meting uitvoer
en
P W
aarschuwingssticker
Q Deksel van batterijvak
VEILIGHEID
• Kijk niet in de laserstraal (stralingsgevaar) 2
• Richt de laserstraal niet op personen of dieren
• Plaats het apparaat niet zodanig, dat iemand bedoeld of
onbedoeld in de laserstraal zou kunnen kijken
•
Gebruik geen enkel optisch vergrootmiddel (zoals
vergrootglas, telescoop, of verrekijker) om in de
laserstraal te kijken
•
De waarschuwingssticker op het apparaat niet
verwijderen of beschadigen
•
Het apparaat niet gebruiken in de buurt van
ontvlambare vloeistoffen, gassen of stof
•
Het apparaat niet gebruiken wanneer er kinderen in de
buurt zijn
•
Deze machine mag niet worden gebruikt door mensen,
die jonger zijn dan 16 jaar
•
Gebruik het apparaat niet voor andere doeleinden dan
vermeld in de gebruiksaanwijzing
GEBRUIK
• Plaatsen van batterijen 4
! zorg dat het apparaat uitgezet is
- gebruik uitsluitend alkaline-mangaan batterijen of
oplaadbare batterijen
-
draai het apparaat ondersteboven
- verwijder deksel Q
- plaats 4 x 1,5V batterij (let op de juiste polen)
- zet deksel Q terug
- bij laag energieniveau van de batterij, verschijnt
symbool 5 op de display
-
wanneer symbool 5 voor het eerst wordt
weergegeven in het display, dan kunnen nog
minstens 100 metingen worden uitgevoerd
Ташев-Галвинг ООД
www.tashev-galving.com
SKIL_IB0530_EUCH_v3.indd 13 08-06-2010 13:03:55
Page 14
14
- vervang de batterijen wanneer symbool 5 begint te
knipperen (er kan niet meer worden gemeten)
-
vervang altijd alle batterijen tegelijk
- haal de batterijen altijd uit het apparaat, wanneer het
apparaat langdurig niet gebruikt wordt
•
Aan/uit
- zet het apparaat aan door op “on/off” of “GO” te
drukken (de laserstraal wordt nog niet ingeschakeld)
-
zet apparaat uit door op “on/off” te drukken
- het apparaat gaat automatisch uit als er 5 minuten
lang geen knoppen worden geactiveerd
•
Meter/voet omzetting
- de metingen zijn standaard in meters/centimeters
- druk op knop E
3 om meters/centimeters om te
zetten in voet/duim
•
Werken met het apparaat 6
-
zet het apparaat aan (symbool 7 wordt weergegeven
in het display om aan te geven dat het apparaat al in
de modus voor lengtemeting staat)
-
selecteer indien gewenst een andere meetmodus
(oppervlakte/volume)
-
druk op “GO” om de laserstraal in te schakelen
(symbool 8 wordt weergeven in het display)
-
richt apparaat op het te meten oppervlak
! kijk niet in de laserstraal
! richt de straal niet op personen of dieren
- druk nogmaals op “GO”; de gemeten waarde wordt
weergegeven in het display (de laserstraal schakelt
automatisch uit)
-
de laserstraal schakelt ook automatisch uit wanneer
binnen 20 seconden na het aanzetten geen meting is
uitgevoerd
!
houd er rekening mee, dat het apparaat vanaf de
achterkant meet (het meetresultaat is inclusief de
lengte van het apparaat)
-
druk op “C” om de laatste individueel gemeten
waarde te wissen
-
druk enkele malen op “C” om de laatste individueel
gemeten waarden in omgekeerde volgorde te wissen
(m³ - m²)
•
Instructies voor juiste metingen
!
verplaats het apparaat niet tijdens het meten
(behalve in de modus voor continue metingen)
-
dek de ontvangstlens A 3 en de laserstraalopening
B 3 niet af bij het meten
-
gebruik in ongunstige omstandigheden (bijvoorbeeld
buiten bij fel zonlicht) een laserbril (SKIL accessoire
2610395907) of plaats een stuk papier op het
doeloppervlak
-
metingen tegen doorzichtige, reflecterende, poreuze
of met structuur bedekte oppervlakken kunnen
foutieve resultaten opleveren
•
Meting van oppervlakte
- druk op knop G
3 (symbool 9 verschijnt in de
display)
-
richt apparaat op het eerste te meten oppervlak
(lengte)
-
druk op “GO” (symbool 8 verschijnt in de display)
-
druk nogmaals op “GO”; de gemeten lengte
verschijnt boven in de display
-
richt apparaat op het tweede te meten oppervlak
(breedte)
-
druk nogmaals op “GO”; de gemeten breedte
verschijnt boven in de display terwijl de berekende
oppervlakte onder in de display verschijnt
-
druk nogmaals op “GO” om met een geheel nieuwe
oppervlakte-meting te beginnen
•
Meting van inhoud
- druk op knop H
3 (symbool 0 verschijnt in de
display)
-
richt apparaat op het eerste te meten oppervlak
(lengte)
-
druk op “GO” (symbool 8 verschijnt in de display)
-
druk nogmaals op “GO”; de gemeten lengte
verschijnt boven in de display
-
richt apparaat op het tweede te meten oppervlak
(breedte)
-
druk nogmaals op “GO”; de gemeten breedte
verschijnt boven in de display terwijl de berekende
oppervlakte onder in de display verschijnt
-
richt apparaat op het derde te meten oppervlak
(hoogte)
-
druk nogmaals op “GO”; de gemeten hoogte
verschijnt boven in de display terwijl de berekende
inhoud onder in de display verschijnt
-
druk nogmaals op “GO” om met een geheel nieuwe
inhoudsmeting te beginnen
•
Continue metingen !
-
druk op knop F3 na het aanzetten van het apparaat
(symbool @ wordt weergeven in het display)
-
druk op “GO” (symbool 8 verschijnt in de display)
-
de laserstraal blijft ingeschakeld, zodat de werkelijke
afstand continu kan worden afgelezen
-
druk nogmaals op “GO” om de continue meting te
onderbreken (de huidige gemeten waarde wordt
weergegeven in het display)
-
druk op nogmaals op “GO” om de continue meting te
hervatten
-
de modus voor continue metingen wordt na
5 minuten automatisch uitgeschakeld (de laatst
gemeten waarde blijft weergegeven in het display) en
kan ook worden beëindigd door een andere
meetmodus te selecteren
•
Opslaan/optellen van gemeten waarden
- na het uitvoeren van een meting op “M+” drukken
om de gemeten waarde in het geheugen op te slaan
-
de letter “M” wordt weergegeven in het display en
het plus-teken eronder knippert kort
-
druk op “M+” om volgende gemeten waarden op te
tellen bij de waarde in het geheugen (alleen mogelijk
als de maateenheden overeenkomen)
•
Aftrekken van gemeten waarden
- druk op “M-” om de huidige gemeten waarde af te
trekken van de waarde in het geheugen (alleen
mogelijk als de maateenheden overeenkomen)
-
de letter “M” wordt weergegeven in het display en
het min-teken eronder knippert kort
•
Lezen van geheugen
- wanneer u op “M=” drukt, wordt de waarde die is
opgeslagen in het geheugen weergegeven samen
met het symbool “M=” (de laatst gemeten waarde
blijft weergegeven in het display)
-
verdubbel de inhoud van het geheugen door op “M+”
te drukken
Ташев-Галвинг ООД
www.tashev-galving.com
SKIL_IB0530_EUCH_v3.indd 14 08-06-2010 13:03:56
Page 15
15
-
stel de inhoud van het geheugen op nul door op “M-”
te drukken
•
Wissen van geheugen
Druk eerst op “M=” en daarna op “C” (de letter “M”
wordt niet meer weergegeven)
•
Foutieve meting
- als de meting niet lukt, verschijnt “ERROR” op de
display
-
stel de oorzaak vast, neem corrigerende maatregelen
en voer de meting opnieuw uit
Mogelijke oorzaken voor foute meting:
-
de meting vond buiten het meetbereik plaats
- de hoek tussen de laserstraal en het richtpunt was te
scherp
-
het doeloppervlak reflecteerde te intens (b.v. spiegel)
of onvoldoende (b.v. zwart materiaal), of de
verlichting in de omgeving was te helder
-
de ontvangstlens A 3 of de opening van de
laserstraal B 3 was beslagen (b.v. door een snelle
temperatuursverandering)
-
gemeten waarden werden opgeteld/afgetrokken met
niet-corresponderende meeteenheden
•
Riemtasje voor gemakkelijk en comfortabel opbergen #
TOEPASSINGSADVIES
• Wanneer een corrigerende handeling een fout niet kan
verhelpen, of wanneer “FAIL” in het display verschijnt, is
het niet meer mogelijk om metingen uit te voeren; stuur
het apparaat in dat geval naar uw dealer of het
dichtstbijzijnde servicecentrum van SKIL
•
Stel het apparaat niet bloot aan voortdurende trillingen
of extreem hoge of lage temperaturen
•
Berg het apparaat altijd binnenshuis op in zijn
beschermende verpakking/koffer
•
Houd het apparaat altijd vrij van stof, vocht en direct
zonlicht
•
Maak het apparaat schoon met een vochtige doek en
milde zeep
!
verwijder altijd de batterijen vóór het
schoonmaken van de lens
•
Haal het apparaat niet uit elkaar en breng op geen
enkele wijze veranderingen aan
•
Probeer niet om wat voor deel van de laser-lens dan
ook te veranderen
GARANTIE / MILIEU
• Voor dit SKIL-product geven wij garantie volgens de
wettelijk geldende bepalingen; schade, die terug te
voeren is op natuurlijke slijtage, overbelasting of
onachtzaam gebruik, is van deze garantie uitgesloten
•
In geval van een klacht het apparaat ongedemonteerd,
samen met het aankoopbewijs, naar het verkoopadres
of het dichtstbijzijnde Skil service-station opsturen (de
adressen vindt u op www.skileurope.com)
•
Geef electrisch gereedschap, batterijen, accessoires
en verpakkingen niet met het huisvuil mee (alleen
voor EU-landen)
-
volgens de Europese richtlijn 2002/96/EG inzake
oude electrische en electronische apparaten en de
toepassing daarvan binnen de nationale wetgeving,
dient afgedankt electrisch gereedschap gescheiden
te worden ingezameld en te worden afgevoerd naar
een recycle-bedrijf, dat voldoet aan de geldende
milieu-eisen
-
symbool $ zal u in het afdankstadium hieraan
herinneren
S
Lasermätverktyg 0530
INTRODUKTION
• Det här verktyget används för mätning av avstånd
inomhus eller utomhus genom projicering med laserstråle
•
Använt på rätt sätt mäter detta verktyg enkelt och
noggrant längd, yta och volym
•
Läs bruksanvisningen noga och var särskilt
uppmärksam på säkerhetsinstruktionerna och
varningarna; om de inte följs kan det ge allvarliga
(ögon)skador 1
•
Klistra den svenska varningsetiketten över den tyska
etiketten P 3 innan du tar verktyget i bruk
•
Spara bruksanvisningen för framtida referens
TEKNISKA DATA
Mätmetod optisk/laser
Mätområde 0,2 - 20 m
1
)
Mätnoggranhet (normalt) +/- 3,0 mm
2
)
Mättid (normalt) < 0,5 s.
Lägsta mätenhet 1 mm
Driftstemperatur -10°C till 50°C
Förvaringstemperatur -20ºC till 70°C
Relativ fuktighet (max.) 90%
Laserklass 2
Lasertyp 635 nm
Max uteffekt < 1 mW
Diameter laserstråle
(vid ca. 20°C)
- vid 10 m avstånd
6 mm
- vid 20 m avstånd 16 mm
Batterier (ingår) 4 x AAA (LR03) 1,5V
Laddningsbara batterier 4 x AAA (KR03) 1,2V
Automatisk avslagning
- laser
efter ca. 20 sec. utan mätning
- mätverktyg efter ca. 5 min. inaktivitet
Vikt 0,18 kg
1) Mätområdet ökar beroende på den mån laserljuset
reflekteras på målytan och hur ljusstark laserpunkten är
i förhållande till omgivningsljusets intensitet
2) Mätnoggranheten avviker +0,06% under ogynnsamma
förhållanden (som vid starkt solljus)
VERKTYGSELEMENT 3
A Mottagarlins
B Öppning för laserstrålen
C LCD-ruta
Ташев-Галвинг ООД
www.tashev-galving.com
SKIL_IB0530_EUCH_v3.indd 15 08-06-2010 13:03:57
Page 16

16
D På/av-knapp
E Knapp för omvandling meter/fot
F Längd- och kontinuerligt mätläge
G Ytmätningsläge
H V
olymmätningsläge
J Nollställningsknapp (“C”)
K Minnesknapp lägg till (“M+”)
L Minnesknapp dra ifrån (“M-”)
M Minnesknapp hämta (“M=”)
N Mätknapp (“GO”)
P V
arningsetikett
Q Batterilucka
SÄKERHET
• Titta inte in i laserstrålen (laserstrålning) 2
• Rikta inte laserstrålen mot personer eller djur
• Ställ inte verktyget så att någon avsiktligt eller
oavsiktligt kan titta in i laserstrålen
•
Använd inga förstoringsverktyg (såsom förstoringsglas,
teleskop eller kikare) för att se laserstrålen
•
Varningsetiketten på verktyget får inte tas bort eller
skadas
•
Använd inte verktyget i närvaro av antändliga vätskor,
gaser eller damm
•
Använd inte verktyget i närheten av barn
• Maskinen skall endast användas av personer över 16 år
• Använd inte verktyget för annat än vad som anges i
bruksanvisningen
ANVÄNDNING
• Sätta i batterier 4
! se till att verktyget är avstängt
- använd enbart alkaliska eller laddningsbara batterier
- vänd verktyget upp och ned
- ta bort luckan Q
- lägg i 4 x 1,5V-batteri (se till att de kommer åt rätt håll)
- sätt tillbaka luckan Q
- när batteriet blir svagt visas symbolen
5 i rutan
- när symbolen 5 visas på displayen för första gången,
har du fortfarande minst 100 mätningar att tillgå
-
byt ut batterierna när symbolen 5 börjar blinka
(mätning är inte längre möjligt)
-
byt alltid båda batterierna samtidigt
- ta alltid ut batterierna ur verktyget om det inte ska
användas en längre tid
•
På/av
- slå på verktyget genom att antingen trycka på “on/
off” eller “GO” (laserstrålen är ännu inte påslagen)
-
koppla av verktyget genom att trycka på “on/off”
- verktyget kopplar automatiskt av sig efter 5 minuter
inaktivitet
•
Omvandling meter/fot
- måttenheten är förinställd på meter/centimeter
- tryck på E
3 för att göra om meter/centimeter till fot/
tum
•
Använda verktyget 6
-
slå på verktyget (symbolen 7 visas på displayen
vilket anger att verktyget redan befinner sig i
längdmätningsläget)
-
välj eventuellt en annan mätmetod (yta/volym)
- tryck på “GO” för att slå på laserstrålen (symbolen 8
visas på displayen)
-
rikta verktyget mot målytan
! titta inte in i laserstrålen
! rikta inte laserstrålen mot personer eller djur
- tryck på “GO” för att slå på laserstrålen (symbolen
visas på displayen)
-
laserstrålen slås automatiskt av efter ca. 20 sekunder
när ingen mätning gjorts
!
tänk på att verktyget mäter från sin bakre kant
(verktygslängden är inräknad i mätresultatet)
-
tryck på “C” för att ta bort det senast uppmätta
värdet
-
tryck på “C” gång på gång för att ta bort det senast
uppmätta värdet i omkasta ordning (m³ - m²)
•
Anvisningar för korrekt mätning
!
rör inte verktyget under pågående mätning (med
undantag för kontinuerligt mätläge)
-
täck inte över mätlinsen A 3 eller öppningen för
laserstrålen B 3 under mätningen
-
under ogynnsamma förhållanden, (som vid mätning
utomhus i starkt solljus) kan du använda
laserförstärkningsglas (SKIL tillbehör 2610395907)
eller placera en bit papper på målytan
-
mätning mot transparenta, reflekterande, porösa eller
strukturerade ytor kan ge opålitliga mätresultat
•
Ytmätning
- tryck på G
3 (symbolen 9 visas i rutan)
-
rikta verktyget mot den första målytan (längden)
-
tryck på “GO” (symbolen 8 visas i rutan)
-
tryck på “GO” igen; så visas det uppmätta
längdvärdet på översta raden i rutan
-
rikta verktyget mot den andra målytan (bredden)
-
tryck på “GO” igen; så visas det uppmätta
breddvärdet på översta raden i rutan och den
beräknade ytan på nedersta raden
-
tryck på “GO” igen för att starta en ny ytmätning
• Volymmätning
- tryck på H
3 (symbolen 0 visas i rutan)
-
rikta verktyget mot den första målytan (längden)
-
tryck på “GO” (symbolen 8 visas i rutan)
-
tryck på “GO” igen; så visas det uppmätta
längdvärdet på översta raden i rutan
-
rikta verktyget mot den andra målytan (bredden)
-
tryck på “GO” igen; så visas det uppmätta
breddvärdet på översta raden i rutan och den
beräknade ytan på nedersta raden
-
rikta verktyget mot den tredje målytan (höjden)
-
tryck på “GO” igen, så visas det uppmätta höjdvärdet
på översta raden i rutan och den beräknade volymen
på nedersta raden
-
tryck på “GO” igen för att starta en ny volymmätning
• Kontinuerlig mätning
!
-
tryck på F3-knappen när verktyget är påslaget
(symbolen @ visas på displayen)
-
tryck på “GO” (symbolen 8 visas i rutan)
-
laserstrålen fortsätter att vara påslagen så att det
verkliga avståndet kan avläsas kontinuerligt
-
tryck på “GO” en gång till för att avbryta den
kontinuerliga mätningen (det verkliga avståndet kan
avläsas på displayen)
Ташев-Галвинг ООД
www.tashev-galving.com
SKIL_IB0530_EUCH_v3.indd 16 08-06-2010 13:03:57
Page 17
17
-
tryck på “GO” en gång till för att återgå till
kontinuerlig mätning
-
det kontinuerliga mätningsläget kopplas automatiskt
bort efter 5 minuter (det senast uppmätta värdet
visas på displayen), det kan också avslutas genom
att välja ett annat mätningsläge
•
Lagra/lägga till ett uppmätt värde
- när en mätning har gjorts, tryck på “M+” för att lagra
det uppmätta värdet
-
bokstaven “M” visas på displayen och plussymbolen
i underkanten blinkar kort
-
lägg till ytterligare värden till minnet med “M+”
(enbart möjligt med samma mätenhet)
•
Dra ifrån ett uppmätt värde
- tryck på “M-” för att ta dra ifrån det aktuella värdet
från ett värde i minnet (enbart möjligt med samma
mätenhet)
-
bokstaven “M” visas på displayen och
minussymbolen i underkanten blinkar kort
•
Läsa i minnet
- när du trycker på “M=”, visas det lagrade värdet i
minnet tillsammans med symbolen “M=” (det senast
uppmätta värdet visas på displayen)
-
tryck på “M+” för att fördubbla minnesinnehållet
- tryck på “M-” för att ställa in minnesinnehållet på noll
• Nollställa minnet
Tryck först på “M=”, följt av “C” (bokstaven “M” visas
inte längre på displayen)
•
Fel mätvärden
- om mätningen inte har lyckats, visas “ERROR” i rutan
- fastställ orsaken, avhjälp problemet och gör om
mätningen
Möjliga orsaker till felaktiga mått:
-
mätningen utfördes utanför mätområdet
- vinkeln mellan laserstrålen och målet var för snäv
- målytan är för reflekternade (t.ex. en spegel) eller
otillräckligt omgivningsljus (t.ex. svart textil) eller en
allt för ljus omgivning
-
mottagarlinsen A 3 eller öppningen för laserstrålen
B 3 var dimmig (t.ex. vid snabba
temperaturväxlingar)
-
mätresultaten beräknades med olika måttenheter
• Bältesväska för enkel och bekväm förvaring
#
ANVÄNDNINGSTIPS
• När felet inte kan korrigeras eller när “FAIL” visas på
displayen, är mätning inte möjlig; i sådana fall måste
verktyget returneras till återförsäljaren eller närmaste
SKIL serviceställe
•
Utsätt inte verktyget för ständiga vibrationer eller för
extremt hög eller låg temperatur
•
Förvara verktyget inomhus i den skyddande kartongen/
lådan
•
Håll alltid verktyget fritt från damm, fuktighet och direkt
solljus
•
Gör ren verktyget med en fuktig trasa och milt
tvättmedel
!
ta alltid ut batterierna innan du gör ren linsen
• Plocka inte isär eller modifiera verktyget på något sätt
• Försök inte byta någon del av laserlinsen
GARANTI / MILJÖ
• För SKIL produkter lämnas garanti enligt respektive
lands gällande föreskrifter; skador som orsakats av
normalt slitage, överbelastning eller fel hantering
omfattas ej av garantin
•
Vid reklamation, sänd in verktyget i ej demonterat skick
tillsammans med inköpsbevis till försäljaren eller till
närmaste Skil serviceverkstad (adresser finns på
www.skileurope.com)
•
Elektriska verktyg, batterier, tillbehör och
förpackning får inte kastas i hushållssoporna (gäller
endast EU-länder)
-
enligt direktivet 2002/96/EG som avser äldre elektrisk
och elektronisk utrustning och dess tillämpning enligt
nationell lagstiftning ska uttjänta elektriska verktyg
sorteras separat och lämnas till miljövänlig återvinning
-
symbolen $ kommer att påminna om detta när det
är tid att kassera
DK
Lasermåleværktøj 0530
INLEDNING
• Dettte værktøj er beregnet til måling af indendørs og
udendørs afstande ved hjælp af laserstråleprojektion
•
Når værktøjet anvendes korrekt, måler det let og
nøjagtigt længde, areal og rumfang
•
Gennemlæs denne brugsanvisning grundigt og vær
særlig opmærksom på sikkerhedsinstruktionerne og
advarslerne; gøres dette ikke, kan det medføre
alvorlige øjenskader 1
•
Før du bruger værktøjet første gang, skal det vedlagte
mærke med dit sprog limes over advarselsmærkets
tyske tekst P 3
•
Gem denne brugsanvisning; du kan få brug for den
senere
TEKNISKE SPECIFIKATIONER
Målemetode optisk/laser
Måleområde 0.2 - 20 m
1
)
Målenøjagtighed (typisk) +/- 3,0 mm
2
)
Målingens varighed (typisk) < 0,5 sec.
Laveste angivne enhed 1 mm
Driftstemperatur -10°C til 50°C
Opbevaringstemperatur -20ºC til 70°C
Relativ fugtighed (maks.) 90%
Laserklasse 2
Lasertype 635 nm
Maksimal effekt < 1 mW
Laserstrålediameter (ved ca. 20°C)
- ved afstand på 10 m
6 mm
- ved afstand på 20 m 16 mm
Batterier (inkluderet) 4 x AAA (LR03) 1.5V
Genopladelige batterier 4 x AAA (KR03) 1.2V
Slukkes automatisk
- laser
efter ca. 20 sek. uden måling
- måleværktøj efter ca. 5 min. inaktivitet
Vægt 0,18 kg
Ташев-Галвинг ООД
www.tashev-galving.com
SKIL_IB0530_EUCH_v3.indd 17 08-06-2010 13:03:58
Page 18

18
1) Måleområdet øges afhængigt af, hvor godt laserlyset
reflekteres fra måloverfladen, og hvor meget
laserpunktet lyser i forhold til den omgivende lysstyrke
2)
Målenøjagtigheden afviger +0,06% ved ufordelagtige
betingelser (f.eks. ved stærkt sollys)
VÆRKTØJETS DELE 3
A Modtagelinser
B Laserstråleåbning
C LCD-display
D On/of
f-knap
E Knap for omr
egning mellem meter og fod
F Indstilling for længdemåling og vedvar
ende måling
G Indstilling for overflade-måling
H Indstilling for volumen-måling
J Slette-knap (“C”)
K Tilføj til hukommelse-knap (“M+”)
L Slet fra hukommelse-knap (“M-”)
M Hent fra hukommelse-knap (“M=”)
N Måleknap (“GO”)
P Advarselsmærkat
Q Batterirumsdæksel
SIKKERHED
• Se ikke ind i laserstrålen (laserstråling) 2
• Peg ikke laserstrålen mod personer eller dyr
• Anbring aldrig værktøjet på et sted, hvor nogen, tilsigtet
eller utilsigtet, kan se ind i laserstrålen
•
Brug ikke optiske forstørrelsesanordninger (som f.eks.
forstørrelsesglas, teleskoper eller kikkerter) til at se ind i
laserstrålen
•
Advarselsmærkaten på værktøjet må ikke fjernes eller
beskadiges
•
Anvend ikke værktøjet i nærheden af brandfarlige
væsker, gasser eller støv
•
Anvend ikke værktøjet, når der er børn i nærheden
• Dette værktøj må ikke anvendes af personer under 16 år
• Værktøjet må ikke anvendes til noget andet formål end
det, som er nævnt i denne brugsanvisning
BETJENING
• Montering af batterier 4
! sørg for at der er slukket for værktøjet
- brug kun alkaline-mangan batterier eller
genopladelige batterier
-
vend værktøjet på hovedet
- fjern dækslet Q
- sæt 4 x 1,5V batteri i (sørg for at polerne vender
rigtigt)
-
sæt dækslet Q
- når batteristanden er lav, vises symbolet
5 på
displayet
-
hvis symbolet 5 kommer frem i displayet første
gang, kan der stadig udføres mindst 100 målinger
-
udskift batterierne, hvis symbolet 5 begynder af
blinke (der kan ikke måles længere)
-
udskift altid hele batterisættet
- fjern altid batterierne fra værktøjet, hvis værktøjet
ikke skal anvendes i længere tid
•
Tænd/sluk
- tænd for værktøjet ved at trykke på “on/off” eller
“GO” (laserstrålen er ikke tændt endnu)
-
sluk for værktøjet ved at trykke på “on/off”
- værktøjet slukkes automatisk efter 5 minutter
inaktivitet
•
Omregning mellem meter og fod
- målinger foretages i meter/centimeter som standard
- tryk på tasten E
3 for at omregne meter/centimeter
til fod/tommer
•
Betjening af værktøjet 6
-
tænd for værktøjet (symbolet 7 kommer frem i
displayet og viser, at værktøjet allerede er i
længdemåleindstilling)
-
vælg en anden måleindstilling (areal/volumen) ved
behov
-
tryk på “GO” for at tænde laserstrålen (symbolet 8
vises i displayet)
-
peg værktøjet mod målfladen
! se ikke ind i laserstrålen
! peg ikke laserstrålen mod personer eller dyr
- tryk på “GO” igen; den målte værdi vises i displayet
(laserstrålen slukkes automatisk)
-
laserstrålen slukkes også automatisk, hvis der ikke
foretages målinger i cirka 20 sekunder efter, at
laserstrålen er tændt
!
husk, at værktøjet måler fra sin bagkant (dvs.
værktøjets længde er medtaget i måleresultatet)
-
tryk på “C” for at slette den sidste individuelle
måleværdi
-
tryk på “C” flere gange for at slette de sidste
individuelle måleværdier i omvendt rækkefølge
(m³ - m²)
•
Instruktioner for korrekt måling
! bevæg ikke værktøjet under målingen
(bortset fra
ved vedvarende måleindstilling)
-
dæk ikke modtagerlinserne A 3 og
laserstråleåbningen B 3 til under målingen
-
ved vanskelige betingelser (f.eks. ved måling
udendørs ved kraftigt sollys) skal du bruge
laserbeskyttelsesbriller (SKIL tilbehør 2610395907)
eller anbringe et stykke papir på måloverfladen.
-
måling mod gennemsigtige, reflekterende, porøse
eller strukturerede overflader kan føre til fejlmålinger
•
Måling af areal
- tryk på tasten G
3 (symbolet 9 vises i displayet)
-
peg værktøjet mod den første målflade (længden)
-
tryk på “GO” (symbolet 8 vises i displayet)
-
tryk på “GO” igen; den målte længde vises på
øverste linie af displayet
-
peg værktøjet mod den anden målflade (bredden)
-
tryk på “GO” igen; den målte bredde vises på øverste
linie af displayet, mens det udregnede areal vises på
nederste linie af displayet
-
tryk på “GO” igen for at begynde en helt ny måling af
areal
•
Måling af rumfang
- tryk på tasten H
3 (symbolet 0 vises i displayet)
-
peg værktøjet mod den første målflade (længden)
-
tryk på “GO” (symbolet 8 vises i displayet)
-
tryk på “GO” igen; den målte længde vises på
øverste linie af displayet
Ташев-Галвинг ООД
www.tashev-galving.com
SKIL_IB0530_EUCH_v3.indd 18 08-06-2010 13:03:59
Page 19

19
-
peg værktøjet mod den anden målflade (bredden)
-
tryk på “GO” igen; den målte bredde vises på øverste
linie af displayet, mens det udregnede areal vises på
nederste linie af displayet
-
peg værktøjet mod den tredje målflade (højden)
-
tryk på “GO” igen; den målte højde vises på øverste
linie af displayet, mens det udregnede rumfang vises
på nederste linie af displayet
-
tryk på “GO” igen for at begynde at en helt ny måling
af rumfang
•
Vedvarende måling !
-
tryk på knappen F3, når du har tændt for værktøjet
(symbolet @ vises i displayet)
-
tryk på “GO” (symbolet 8 vises i displayet)
-
laserstrålen bliver ved med at være tændt, så den
aktuelle afstand kan aflæses kontinuerligt
-
tryk på “GO” igen for at afbryde den vedvarende
måling (den aktuelt målte værdi vises i displayet)
-
tryk på “GO” igen for at genstarte den vedvarende
måling
-
den vedvarende måleindstilling slukkes automatisk
efter 5 minutter (den sidste, målte værdi vises i
displayet) og kan også afsluttes ved valg af en anden
måleindstilling.
•
Lagring/tilføjelse af målte værdier
- når du har udført en måling, tryk på “M+” for at
gemme den målte værdi
-
bogstavet “M” vises i displayet, og plus-tegnet
nedenunder blinker kort
-
tilføj flere målte værdier til hukommelsesværdien med
“M+” (kun muligt, hvis måleenhederne stemmer
overens)
•
Fratrækning af målte værdier
- tryk på “M-” for at trække den aktuelt målte værdi fra
hukommelsesværdien (kun muligt, hvis
måleenhederne stemmer overens)
-
bogstavet “M” vises i displayet, og minus-tegnet
nedenunder blinker kort
•
Aflæsning af hukommelsen
- ved tryk på “M=” vises værdien, som er gemt i
hukommelsen, sammen med symbolet “M=” (den
sidste, målte værdi vises i displayet)
-
hukommelsens indhold fordobles ved tryk på “M+”
- stil hukommelsens indhold på nul ved tryk på “M-”
• Sletning af hukommelsen
Tryk først på “M=”, tryk så på “C” (nu vises bogstavet
“M” ikke længere)
•
Forkert måling
- når målingen ikke lykkes, vises “ERROR” på
displayet
-
find årsagen, foretag afhjælpning, og udfør målingen
igen
Mulige grunde til fejlmåling:
-
målingen er foretaget uden for måleområdet
- vinklen mellem laserstrålen og målet var for spids
- måloverfladen reflekterede for meget (f.eks. spejl)
eller ikke nok (f.eks. mørkt stof), eller det omgivende
lys var for kraftigt
-
modtagerlinserne A 3 eller laserstrålens åbning B 3
var sløret (f.eks. på grund af hurtig
temperaturændring)
-
de målte værdier blev lagt til/trukket fra måleenheder,
som ikke passer
•
Bæltetaske for let og bekvem opbevaring #
GODE RÅD
• Hvis forsøget på afhjælpning ikke retter fejlen, eller hvis
“FAIL” vises i displayet, kan der ikke foretages målinger
længere, og apparatet skal sendes til forhandleren eller
til den nærmeste SKIL-servicestation
•
Udsæt ikke værktøjet for kontinuerlig vibration eller
ekstremt varme eller kolde temperaturer
•
Opbevar altid værktøjet indendørs i beskyttelseskassen/
kufferten
•
Hold altid værktøjet fri for støv, fugtighed og direkte
sollys
•
Rengør værktøjet med en fugtig klud og mild sæbe
! fjern altid batterierne, før linsen rengøres
• Værktøjet må ikke adskilles eller modificeres på nogen
måde
•
Forsøg ikke at ændre nogen del af laserlinsen
GARANTI / MILJØ
• Vi yder garanti på SKIL produkter i henhold til de
lovmæssige bestemmelser og de bestemmelser, som
gælder i det enkelte land; garantien dækker ikke normal
slidtage, overbelastning eller fejlagtig anvendelse af
værktøjet
•
I tilfælde af en klage send den uskilte værktøjet sammen
med et købsbevis til forhandleren eller nærmeste Skil
serviceværksted (adresser findes på
www.skileurope.com)
•
Elværktøj, batterier, tilbehør og emballage må ikke
bortskaffes som almindeligt affald (kun for EU-lande)
-
i henhold til det europæiske direktiv 2002/96/EF om
bortskaffelse af elektriske og elektroniske produkter
og gældende national lovgivning, skal brugt elværktøj
indsamles separat og bortskaffes på en måde, der
skåner miljøet mest muligt
-
symbolet $ erindrer dig om dette, når udskiftning er
nødvendig
N
Laser-måleverktøy 0530
INTRODUKSJON
• Dette verktøyet er beregnet for måling av avstander
innendørs og utendørs ved å projisere en laserstråle
•
Når det brukes på en hensiktsmessig måte, vil verktøyet
lett og nøyaktig måle avstand, areal og volum
•
Les denne brukerhåndboken nøye og gjør deg
spesielt godt kjent med sikkerhets-veiledningene og
advarslene; hvis du unnlater å følge dem, kan du
risikere alvorlige (øye-) skader 1
•
Før du bruker verktøyet for første gang skal du sette det
medfølgende klebemerket med ditt språk over
varselmerket med tysk tekst P 3
•
Ta vare på brukerhåndboken for fremtidig bruk
Ташев-Галвинг ООД
www.tashev-galving.com
SKIL_IB0530_EUCH_v3.indd 19 08-06-2010 13:04:00
Page 20
20
TEKNISKE OPPLYSNINGER
Målemetode optisk/laser
Måleområde 0,2 - 20 m
1
)
Målenøyaktighet (typisk) +/- 3,0 mm
2
)
Målevarighet (typisk) < 0,5 sek
Laveste visningsenhet 1 mm
Driftstemperatur -10°C til 50°C
Lagringstemperatur -20ºC til 70°C
Relativ fuktighet (maks.) 90%
Laserklasse 2
Laserdiode 635 nm
Maks. avgitt effekt < 1 mW
Laserstrålediameter
(ved ca. 20 °C)
- ved avstand 10 m
6 mm
- ved avstand 20 m 16 mm
Batterier (inkludert) 4 x AAA (LR03) 1,5V
Oppladbare batterier 4 x AAA (KR03) 1,2V
Slår seg av automatisk
- laser
etter ca. 20 sek uten måling
- måleverktøy etter å være uvirksomt i
ca. 5 min
V
ekt 0,18 kg
1) Rekkevidden for måling vil øke, avhengig av hvor godt
laserlyset reflekteres fra målets overflate, og hvor stor
lysstyrke laserpunktet har i forhold til lyset i omgivelsene
2)
Målenøyaktigheten avviker med +0,06 % ved ugunstige
forhold (dvs. ved kraftig sollys)
VERKTØYELEMENTER 3
A Mottakslinse
B Laserstråle, åpning
C LCD-skjerm
D På-/av-knapp
E Meter/fot omr
egningsknapp
F Lengde og kontinuerlig målemodus
G Overflatemålemodus
H V
olummålemodus
J Sletteknapp (“C”)
K Legg til minne-knapp (“M+”)
L T
rekk fra minne-knapp (“M-”)
M Hent fr
em minne-knapp (“M=”)
N Måleknapp (“GO”)
P Advarselskilt
Q Deksel til batterir
om
SIKKERHET
• Ikke se inn i laserstrålen (laserstråling) 2
• Ikke rett laserstrålen mot personer eller dyr
• Ikke plasser verktøyet slik at noen kan komme til å se
inn i laserstrålen, enten det er utilsiktet eller med hensikt
•
Ikke bruk noen som helst forstørrende optisk anordning
(som f.eks. forstørrelsesglass, teleskop eller kikkert) til å
se laserstrålen
•
Ikke fjern eller ødelegg advarselskiltet på verktøyet
• Ikke bruk verktøyet i nærheten av brannfarlig væske,
gass eller støv
•
Ikke bruk verktøyet hvis det er barn i nærheten
• Verktøyet må ikke betjenes av personer under 16 år
• Ikke bruk verktøyet til noe annet formål enn de som er
nevnt i denne brukerhåndboken
BRUK
• Sette i batterier 4
! kontroller at verktøyet er slått av
- bruk kun alkaliske manganbatterier eller oppladbare
batterier
-
vend verktøyet opp ned
- ta av dekselet Q
- sett i 4 x 1,5V batteri (pass på at batteripolene vender
riktig vei)
-
sett på dekselet Q
- når batteriet er svakt vises tallet
5 på skjermen
-
når symbolet 5 vises i displayet for første gang, kan
man fremdeles utføre minst 100 målinger
-
skift batteriene når symbolet 5 begynner å blinke
(måling er ikke lenger mulig)
-
skift alltid ut alle batteriene samtidig
- ta alltid batteriene ut av verktøyet hvis det ikke skal
brukes på lengre tid
•
Av/på
- slå på verktøyet ved å trykke enten “on/off” eller
“GO” (laserstrålen er ennå ikke slått på)
-
slå verktøyet av ved å trykke på “on/off”
- verktøyet slår seg automatisk av etter å være
uvirksomt i 5 minutter
•
Omregning fra meter til fot
- normalverdien for mål vises i meter/centimeter
- trykk på knappen E
3 for å regne om fra meter/
centimeter til fot/tommer
•
Betjene verktøyet 6
-
slå på verktøyet (symbolet 7 vises i displayet for å
indikere at verktøyet allerede er i
lengdemålingsmodus)
-
velg en annen målemodus (flate/volum) hvis ønskelig
- trykk “GO” for å slå på laserstrålen (symbolet
8 vil
bli vist i displayet)
-
rett verktøyet mot måloverflaten
! ikke se inn i laserstrålen
! ikke rett laserstrålen mot personer eller dyr
- trykk “GO” igjen; måleverdiene vises i displayet
(laserstrålen slås av automatisk)
-
laserstrålen vil også blir slått av automatisk hvis det
ikke er foretatt noen måling i løpet av ca. 20 sekunder
etter at laserstrålen er slått på
!
husk på at målt avstand begynner bak på
verktøyet (lengden på verktøyet er inkludert i
måleresultatet)
-
trykk “C” for å slette siste enkeltmåling
- trykk “C” gjentatte ganger for å slette en og en
måling i omvendt rekkefølge (m³ - m²)
•
Instruksjoner for riktig måling
! ikke beveg verktøyet under målingen
(unntatt i
kontinuerlig målemodus)
-
ikke dekk til mottakslinsen A 3 og
laserstråleåpningen B 3 under måling
-
under ugunstige forhold (f.eks. under måling
utendørs i sterkt sollys) kan man bruke
laserforsterkende briller (SKIL tilbehør 2610395907)
eller plassere et stykke papir på målflaten
Ташев-Галвинг ООД
www.tashev-galving.com
SKIL_IB0530_EUCH_v3.indd 20 08-06-2010 13:04:00
Page 21

21
-
måling mot transparente, reflekterende, porøse eller
strukturerte overflater kan gi feilaktige målinger
•
Måle areal
- trykk på knappen G
3 (symbol 9 vises på skjermen)
-
rett verktøyet mot den første måloverflaten (lengde)
-
trykk på “GO” (symbol 8 vises på skjermen)
-
trykk på “GO” på nytt; målt avstand vises på øverste
linje på skjermen
-
rett verktøyet mot den andre måloverflaten (bredde)
-
trykk på “GO” på nytt; målt bredde vises på øverste
linje på skjermen mens beregnet areal vises på
nederste linje på skjermen
-
trykk på “GO” på nytt for å begynne en ny
overflatemåling
•
Måle volum
- trykk på knappen H
3 (symbol 0 vises på skjermen)
-
rett verktøyet mot den første måloverflaten (lengde)
-
trykk på “GO” (symbol 8 vises på skjermen)
-
trykk på “GO” på nytt; målt avstand vises på øverste
linje på skjermen
-
rett verktøyet mot den andre måloverflaten (bredde)
-
trykk på “GO” på nytt; målt bredde vises på øverste
linje på skjermen mens beregnet areal vises på
nederste linje på skjermen
-
rett verktøyet mot den tredje måloverflaten (høyde)
-
trykk på “GO” på nytt; målt høyde vises på øverste
linje på skjermen, mens beregnet volum vises på
nederste linje på skjermen
-
trykk på “GO” på nytt for å begynne en ny
volummåling
•
Kontinuerlig måling !
-
trykk på knappen F3 når verktøyet er slått på
(symbolet @ vil bli vist i displayet)
-
trykk på “GO” (symbol 8 vises på skjermen)
-
laserstrålen vil bli stående på slik at den faktiske
distansen kan leses ut kontinuerlig
-
trykk “GO” igjen for å avbryte den kontinuerlige
målingen (den aktuelle måleverdien vises i displayet)
-
trykk “GO” igjen for å starte kontinuerlig måling igjen
- den kontinuerlige målemodusen slås av automatisk
etter 5 minutter (siste målte verdi vil bil stående på
displayet) og den kan også avsluttes ved å velge en
annen målemodus
•
Lagre/legge til måleverdier
- når en måling er tatt, trykk “M+” for å lagre den målte
verdien
-
bokstaven “M” vises i displayet og plusstegnet under
blinker kort
-
legg til nye måleverdier til minneverdien med “M+”
(kun mulig når måleenheten er den samme)
•
Trekke fra målte verdier
- trykk “M-” for å trekke fra aktuell måleverdi fra
minneverdien (kun mulig når måleenheten er den
samme)
-
bokstaven “M” vises i displayet og minustegnet
under blinker kort
•
Les av minnet
- ved å trykke “M=” vises verdien som er lagret i
minnet, sammen med symbolet “M=” (siste målte
verdi vil bil stående på displayet)
-
doble innholdet i minnet ved å trykke “M+”
- sett innholdet i minnet til null ved å trykke “M-”
• Slette minnet
Trykk først “M=”, og så “C” (bokstaven”M” vises ikke
lenger)
•
Feilmåling
- når en måling ikke er vellykket, vises “ERROR” på
skjermen
-
finn årsaken, rett opp feilen og utfør målingen på nytt
Mulige årsaker til feil måleresultat:
-
målingen ble foretatt utenfor måleområdet
- vinkelen mellom laserstrålen og målet var for spiss
- måleoverflaten reflekterte for sterkt (f.eks. speil) eller
utilstrekkelig (f.eks. svarte tekstiler), eller lyset i
omgivelsene var for sterkt
-
mottakslinsen A 3 eller laserstråleåpningen B 3 var
dugget igjen (f.eks. på grunn av rask
temperaturendring)
-
måleverdiene ble lagt til / trukket fra med feil
måleenheter
•
Belteetui for lett og praktisk oppbevaring #
BRUKER TIPS
• Når korrigerende tiltak ikke kan korrigere en feil, eller
når “FAIL” vises i displayet er det ikke mulig å måle
lenger; i dette tilfellet må verktøyet sendes til
forhandleren eller til nærmeste SKIL servicested
•
Verktøyet må ikke utsettes for kontinuerlig vibrasjon,
sterk varme eller sterk kulde
•
Verktøyet skal alltid oppbevares innendørs i en
beskyttende eske/koffert
•
Hold alltid verktøyet unna støv, fuktighet og direkte sol
• Gjør verktøyet rent med en fuktig klut og mild såpe
! ta alltid ut batteriene før du du rengjør linsen
• Verktøyet skal ikke demonteres eller modifiseres på
noen som helst måte
•
Ikke forsøk å gjøre forandringer på noen som helst del
av laserlinsen
GARANTI / MILJØ
• For SKIL-produkter ytes det garanti i henhold til de
lovbestemte/nasjonale bestemmelser; skader som kan
tilbakeføres til naturlig slitasje, overbelastning eller
uriktig behandling er utelukket fra garantien
•
I tilfelle reklamasjon, send hele verktøyet (uten å ta
delene fra hverandre) sammen med kjøpebevis til
forhandleren eller nærmeste Skil servicesenter (du finner
adressene på www.skileurope.com)
•
Kast aldri elektroverktøy, batterier, tilbehør og
emballasje i husholdningsavfallet (kun for EU-land)
-
i henhold til EU-direktiv 2002/96/EF om kasserte
elektriske og elektroniske produkter og direktivets
iverksetting i nasjonal rett, må elektroverktøy som
ikke lenger skal brukes, samles separat og returneres
til et miljøvennlig gjenvinningsanlegg
-
symbolet $ er påtrykt som en påminnelse når
utskiftning er nødvendig
Ташев-Галвинг ООД
www.tashev-galving.com
SKIL_IB0530_EUCH_v3.indd 21 08-06-2010 13:04:01
Page 22

22
FIN
Lasermittaustyökalu 0530
ESITTELY
• Tämä työkalu on tarkoitettu sisä- ja ulkotiloissa
tapahtuvaan lasersäteen avulla tehtävään etäisyyksien
mittaukseen.
•
Oikein käytettynä tämä työkalu mittaa helposti ja
tarkkaan pituuden, leveyden ja tilavuuden
•
Lue huolella tämä käyttöopas ja kiinnitä erityistä
huomiota turvallisuutta koskeviin ohjeisiin ja
varoituksiin; näiden laiminlyönti voi aiheuttaa
vakavan (silmän) vaurioitumisen 1
•
Ennen kuin työkalua käytetään ensimmäistä kertaa,
liimaa oikea tarra saksankielisen varoitustarran päälle
P 3
•
Pidä tämä käyttöopas tallella tulevaisuuden tarvetta
varten
TEKNISET TIEDOT
Mittausmenetelmä optinen/laser
Mittausalue 0,2–20 m
1
)
Mittaustarkkuus (tyypillinen) +/- 3,0 mm
2
)
Mittauksen kesto (tyypillinen) < 0,5 s
Pienin mittayksikkö 1 mm
Käyttölämpötila välillä -10°C ja 50 °C
Säilytyslämpötila -20ºC ja 70°C
Suhteellinen kosteus (maks.) 90 %
Laserluokka 2
Lasertyyppi 635 nm
Maksimi virran teho < 1 mW
Lasersäteen halkaisija
(noin 20°C:ssa)
- 10 m:n etäisyydeltä
6 mm
- 20 m:n etäisyydeltä 16 mm
Paristot (sisältyvät toimitukseen) 4 x AAA (LR03) 1,5 V
Uudelleen ladattavat paristot 4 x AAA (KR03) 1,2 V
Automaattinen katkaisu
- laser
noin 20 sekunnin kuluttua
mittauksen päättymisestä
- mittaustyökalu
kun työkalua ei käytetä
5 minuutin aikana
Paino
0,18 kg
1) Mittausalue kasvaa sen mukaan, kuinka hyvin laser
heijastuu kohdepinnasta ja kuinka kirkas laserpiste on
suhteessa vallitsevan valaistuksen voimakkuuteen
2)
Mittaustarkkuuden poikkeama on +0,06 %
epäsuotuisissa olosuhteissa (esim. kirkkaassa
auringonvalossa)
LAITTEEN OSAT 3
A Vastaanottolinssi
B Lasersäteen aukko
C Näyttö
D On/of
f-virtapainike
E Muuntopainike metr
eiksi/jaloiksi
F Pituuden mittaustila ja jatkuva mittaustila
G Pinnanmittaustila
H Tilavuuden mittaustila
J Nollauspainike (“C”)
K Muistin lisäyspainike (“M+”)
L Muistin poistopainike (“M-”)
M Muistin hakupainike (“M=”)
N Mittauspainike (“GO”)
P V
aroitustarra
Q Paristoloker
on kansi
TURVALLISUUS
• Älä katso suoraan lasersäteeseen (lasersäteily) 2
• Älä kohdista lasersädettä suoraan henkilöihin tai
elämiin
•
Älä aseta työkalua asentoon, joka voi saada henkilön
katsomaan tahallisesti tai tahattomasti suoraan
lasersäteeseen
•
Älä käytä optisia suurennuslaitteita (kuten
suurennuslasit, teleskoopit tai kiikarit) lasersäteen
katsomiseksi
•
Älä poista äläkä tärvele työkalun varoitustarroja
• Älä käytä työkalua ympäristössä, jossa on syttyviä
nesteitä, kaasuja tai pölyä
•
Älä käytä työkalua lasten ollessa lähettyvillä
• Tätä työkalua saavat käyttää vain 16 vuotta täyttäneet
henkilöt
•
Älä käytä työkalua muihin kuin tämän käyttöoppaan
määrittämiin tarkoituksiin
KÄYTTÖ
• Paristojen asennus 4
! varmista, että virta on katkaistu työkalusta
- käytä yksinomaan alkalimangaaniparistoja tai
uudelleen ladattavia paristoja
-
käännä työkalu ylösalaisin
- poista kansi Q
- asenna 4 x 1,5V paristo (aseta navat oikeaan
suuntaan)
-
kiinnitä kansi Q
- pariston tehon heikentyessä näyttöön ilmestyy
symboli 5
-
kun symboli 5 ilmestyy näyttöön ensimmäistä
kertaa, sen jälkeen on mahdollista yhä suorittaa
vähintään 100 mittausta
-
vaihda paristot, kun symboli 5 alkaa vilkkua
(mittaaminen ei ole enää mahdollista)
-
paristot vaihdettaessa vaihda aina molemmat
paristoista
-
poista aina paristot työkalusta, kun sitä ei käytetä
pitkähköön aikaan
•
Päällä/pois
- kytke laite päälle painamalla joko “on/off” tai “GO”
(lasersäde ei kytkeydy vielä päälle)
-
katkaise virta työkalusta painamalla “on/off”
- virta katkaistaan automaattisesti, kun työkalua ei
käytetä 5 minuutin aikana
•
Muutto metreiksi/jaloiksi
- metrit/senttimetrit ovat mittojen oletuksena
- paina painiketta E
3 metrien/senttimetrien
muuttamiseksi jaloiksi/tuumiksi
Ташев-Галвинг ООД
www.tashev-galving.com
SKIL_IB0530_EUCH_v3.indd 22 08-06-2010 13:04:02
Page 23
23
•
Työkalun käyttö 6
-
kytke laite päälle (symboli 7 ilmestyy näyttöön
osoittaen, että laite on valmiiksi pituuden
mittaustilassa)
-
voit halutessa muuttaa mittaustilaa (pinta/tilavuus)
- kytke lasersäde päälle painamalla “GO” (symboli
8
ilmestyy näyttöön)
-
kohdista työkalu kohdepintaa kohti
! älä katso lasersäteeseen
! älä kohdista lasersädettä henkilöihin tai eläimiin
- paina uudelleen “GO”; mitattu arvo ilmestyy näyttöön
(lasersäde kytkeytyy automaattisesti pois päältä)
-
lasersäde kytkeytyy automaattisesti pois päältä myös
silloin, kun lasersäteellä ei ole tehty mittauksia noin
kahteenkymmeneen sekuntiin
!
pidä mielessä, että työkalu suorittaa mittauksen
sen takaosasta (työkalun pituus on sisällytetty
mittaustulokseen)
-
tyhjennä viimeinen yksittäinen mitattu arvo
painamalla “C”
-
tyhjennä viimeiset yksittäiset mitatut arvot
käänteisessä järjestyksessä painamalla toistuvasti
“C” (m³ - m²)
•
Ohjeita oikeata mittaustapaa varten
!
älä liikuta työkalua mittauksen aikana (lukuun
ottamatta jatkuvaa mittaustilaa)
-
älä peitä vastaanottolinssiä A 3 ja lasersäteen
aukkoa B 3 mittauksen aikana
-
käytä epäsuotuisissa olosuhteissa (esim. mitattaessa
kirkkaassa auringonvalossa) laseria korostavia laseja
(SKIL-lisävaruste 2610395907) tai aseta
kohdepinnalle paperinpala
-
läpinäkyvää, heijastavaa, huokoista tai rakenteista
pintaa vasten mittaaminen voi aiheuttaa väärän
mittaustuloksen
•
Pinnan mittaus
- paina painiketta G
3 (näyttöön ilmestyy symboli 9)
-
kohdista työkalu ensimmäiseen kohdepintaan
(pituus)
-
paina “GO” (näyttöön ilmestyy symboli 8)
-
paina uudelleen “GO”; mitattu pituus ilmestyy näytön
yläriville
-
kohdista työkalu toiseen kohdepintaan (leveys)
-
paina uudelleen “GO”; mitattu leveys ilmestyy näytön
yläriville, kun taas laskettu pinta ilmestyy näytön
alariville
-
paina uudelleen “GO” täysin uuden pinnan
mittauksen aloittamiseksi
•
Tilavuuden mittaus
- paina painiketta H
3 (näyttöön ilmestyy symboli 0
-
kohdista työkalu ensimmäiseen kohdepintaan
(pituus)
-
paina “GO” (näyttöön ilmestyy symboli 8)
-
paina uudelleen “GO”; mitattu pituus ilmestyy näytön
yläriville
-
kohdista työkalu toiseen kohdepintaan (leveys)
-
paina uudelleen “GO”; mitattu leveys ilmestyy näytön
yläriville, kun taas laskettu pinta ilmestyy näytön
alariville
-
kohdista työkalu kolmanteen kohdepintaan (korkeus)
-
paina uudelleen “GO”; mitattu korkeus ilmestyy
näytön yläriville, kun taas laskettu tilavuus ilmestyy
näytön alariville
-
paina uudelleen “GO” täysin uuden tilavuuden
mittauksen aloittamiseksi
•
Jatkuva mittaus !
-
paina painiketta F3 työkalun päälle kytkemisen
jälkeen (symboli @ ilmestyy näyttöön)
-
paina “GO” (näyttöön ilmestyy symboli 8)
-
lasersäde pysyy kytkettynä, jotta todellinen etäisyys
voidaan lukea jatkuvasti
-
keskeytä jatkuva mittaus painamalla uudelleen “GO”
(nykyinen mitattu arvo näkyy näytössä)
-
käynnistä jatkuva mittaus uudelleen painamalla “GO”
- jatkuva mittaustila katkeaa automaattisesti viiden
minuutin kuluttua (viimeisin mittaustulos jää näyttöön)
ja se voidaan lopettaa myös valitsemalla toinen
mittaustila
•
Mitattujen arvojen tallentaminen/lisääminen
- pitele laitetta mittaamisen tallenna mitattu arvo
painamalla “M+”
-
näyttöön tulee kirjain “M” ja sen alapuolella näkyy
hetken ajan plus-merkki
-
lisää uusia mitattuja arvoja muistiin “M+”-painikkeella
(tämä on mahdollista vain silloin, kun mittayksiköt
vastaavat toisiaan)
•
Mitattujen arvojen poistaminen
- poista muistista nykyinen mitattu arvo painamalla
“M-” (tämä on mahdollista vain silloin, kun
mittayksiköt vastaavat toisiaan)
-
näyttöön tulee kirjain “M” ja sen alapuolella näkyy
hetken ajan miinus-merkki
•
Muistin lukeminen
- kun painat “M=”, näyttöön tulee muistiin tallennettu
arvo ja symboli “M=” (viimeisin mittaustulos jää
näyttöön)
-
kaksinkertaista muistin sisältö painamalla “M+”
- tyhjennä muistin sisältö painamalla “M-”
• Muistin tyhjentäminen
Paina ensin “M=” ja sen jälkeen “C” (näytössä ei näy
enää “M”-kirjainta)
•
Väärä mittaus
- jos mittaus ei onnistu, näyttöön ilmestyy “ERROR”
- määritä syy, korjaa ongelma ja suorita mittaus
uudelleen
Väärän mittaustuloksen mahdollisia syitä:
-
mittaus suoritettiin mittausalueen ulkopuolella
- lasersäteen ja kohteen välinen kulma oli liian terävä
- kohteen pinta heijastaa liikaa (esim. peili) tai se ei
heijasta tarpeeksi (esim. musta kangas) tai vallitseva
valaistus on liian kirkas
-
vastaanottolinssi A 3 tai lasersäteen aukko B 3 oli
huuruinen (johtuen esimerkiksi nopeasta
lämpötilamuutoksesta)
-
mitatut arvot lisättiin/poistettiin mittayksikköä
vastaamattomilla yksiköillä
•
Vyöpussi helppoa ja kätevää säilytystä varten #
Ташев-Галвинг ООД
www.tashev-galving.com
SKIL_IB0530_EUCH_v3.indd 23 08-06-2010 13:04:03
Page 24

24
VINKKEJÄ
• Kun virhettä ei voida korjata korjaustoimenpiteillä tai
kun näytössä lukee “FAIL”, mittausta ei voida enää
suorittaa; lähetä tällöin työkalu jälleenmyyjälle tai
lähimpään SKIL-huoltoon
•
Älä altista työkalua jatkuvalle tärinälle tai äärimmäisen
kuumaan tai kylmään lämpötilaan
•
Säilytä työkalua aina sen suojalaatikossa/kotelossa
• Pidä työkalu poissa pölyisestä ja kosteasta
ympäristöstä ja suorasta auringonvalosta
•
Puhdista työkalu kostealla rievulla ja miedolla saippualla
! poista aina paristot ennen linssin puhdistamista
• Älä hajota työkalua osiin äläkä muunna sitä millään
tavalla
•
Älä yritä vaihtaa laserlinssin osia
TAKUU / YMPÄRISTÖNSUOJELU
• Tällä SKIL-tuotteella on takuu lakisääteisten/kansallisten
asetusten mukaisesti; takuu ei kata normaalin kulumisen
eikä ylikuormituksen tai asiattoman käsittelyn
aiheuttamia vahinkoja
•
Jos työkalua ei toimi asianmukaisesti, lähetä se
purkamattomana myyntiliikkeeseen tai lähimpään Skilhuoltamoon (osoitteet löytyvät web-sivustolta
www.skileurope.com) sisällyttäen mukaan ostotosite
•
Älä hävitä sähkötyökalua, paristoja, tarvikkeita tai
pakkausta tavallisen kotitalousjätteen mukana
(koskee vain EU-maita)
-
vanhoja sähkö- ja elektroniikkalaitteita koskevan
EU-direktiivin 2002/96/ETY ja sen maakohtaisten
sovellusten mukaisesti käytetyt sähkötyökalut on
toimitettava ongelmajätteen keräyspisteeseen ja
ohjattava ympäristöystävälliseen kierrätykseen
-
symboli $ muistuttaa tästä, kun käytöstä poisto
tulee ajankohtaiseksi
E
Herramienta de medición láser 0530
INTRODUCCIÓN
• Esta herramienta está pensada para medicir distancias
interiores o exteriores mediante la proyección del haz
de láser
•
Cuando se usa correctamente, esta herramienta mide
longitudes, superficies y volúmenes con facilidad y
exactitud
•
Lea cuidadosamente este manual de instrucciones y
preste especialmente atención a las instrucciones y
advertencias de seguridad; en caso contrario
pueden ocurrir graves lesiones (ojos) 1
•
Antes de utilizar la herramienta por primera vez,
coloque la pegatina suministrada en su idioma sobre la
etiqueta de advertencia en Alemán P 3
•
Guarde este manual de instrucciones para consulta
futura
CARACTERISTICAS TECNICAS
Método de medición óptica/láser
Rango de medición 0.2 - 20 m
1
)
Precisión de medición (típica) +/- 3.0 mm
2
)
Duración de la medición (típica) < 0,5 seg.
Unidad de indicación más baja 1 mm
Temperatura operativa -10°C a 50°C
Temperatura de almacenamiento -20ºC to 70°C
Humedad relativa (máx.) 90%
Láser clase 2
Láser tipo 635 nm
Potencia de salida máxima < 1 mW
Diámetro del haz de láser
(a aprox. 20°C)
- a 10 m de distancia
6 mm
- a 20 m de distancia 16 mm
Pilas (incluidas) 4 x AAA (LR03) 1.5V
Pilas recargables 4 x AAA (KR03) 1.2V
Apagado automático
- láser
después de aprox.
20 seg sin medición
- herramienta de medición
después de aprox.
5 mín. de inactividad
Peso
0,18 kg
1) El rango de medición aumenta dependiendo de que tan
bien la luz láser se refleja desde la superficie objetivo y
cómo el brillo del punto láser está en relación a la
intensidad de la luz ambiente
2)
La precisión de medición se desvia +0,06% en
condiciones desfavorables (por ejemplo, con luz directa
del sol intensa)
ELEMENTOS DE LA HERRAMIENTA 3
A Lentes de recepción
B Apertura de rayo láser
C Pantalla de cristal líquido
D Botón de conexión/desconexión
E Botón de conversión de metr
os/pies
F Modo medición continua y longitud
G Modo medición de superficie
H Modo medición de volumen.
J Botón eliminar (“C”)
K Botón añadir memoria (“M+”)
L Botón r
estar memoria (“M-”)
M Botón r
ecuperar memoria (“M=”)
N Botón medición (“GO”)
P Etiqueta de advertencia
Q T
apa de compartimiento de pilas
SEGURIDAD
• No mire al rayo láser o (radiación láser) 2
• No apunte el rayo láser a personas o animales
• No coloque la herramienta en una posición en la que se
pueda causar que alguien mire al rayo láser
intencionalmente o accidentalmente
•
No utilice herramientas ópticas de aumento (como
lupas, telescopios o binoculares) para ver el rayo láser
•
No retire ni dañe la etiqueta de advertencia de la
herramienta
Ташев-Галвинг ООД
www.tashev-galving.com
SKIL_IB0530_EUCH_v3.indd 24 08-06-2010 13:04:04
Page 25

25
•
No haga funcionar la herramienta en la presencia de
líquidos inflamables, gases o polvo
•
No haga funcionar la herramienta si hay niños cerca
• Los menores de 16 años no deben utilizar esta
herramienta
•
No utilice la herramienta para ningún propósito no
mencionado en este manual de instrucciones
USO
• Colocación de las pilas 4
! asegúrese de que la herramienta está
desactivada
-
utilice exclusivamente pilas recargables o alcalinas
- volve la herramienta al revés
- retire la tapa Q
- inserte 4 pilas de 1,5V (preste atención a colocar los
polos correctamente)
-
coloque la tapa Q
- cuando el nivel de carga de la pila es bajo,
el símbolo 5 aparece en la pantalla
-
cuando aparece el símbolo 5 en la pantalla por
primera vez, hay al menos 100 mediciones posibles
-
sustituya las pilas cuando el símbolo 5 empiece a
parpadear (no será posible la medición por más
tiempo)
-
cambie siempre el juego completo de pilas
- retire siempre las pilas de la herramienta si ésta no va
a utilizarse durante un período largo
•
Activación/Desactivación
- encienda la herramienta pulsando “on/off” o “GO” (el
haz de láser aún no se enciende)
-
desactive la herramienta pulsando “on/off”
- la herramienta se desactiva automáticamente
después de 5 minutos de inactividad
•
Conversión de metros/pies
- por defecto, las mediciones se realizan en metros/
centímetros
-
pulse el botón E 3 para convertir metros/cm. en
pies/pulgadas
•
Utilización de la herramienta 6
-
encienda la herramienta (aparece el símbolo 7 en
pantalla indicando que la herramienta ya está en el
modo de medición de longitud)
-
seleccione otro modo de medición (superficie/
volumen), si desea
-
pulse “GO” para activar el haz de láser (aparecerá el
símbolo 8 en la pantalla)
-
apunte la herramienta a la superficie objetivo
! no mire al rayo láser
! no apunte el rayo láser a personas o animales
- pulse “GO” nuevamente, aparece en pantalla el valor
medido (el haz de láser se apaga automáticamente)
-
el haz de láser se apaga automáticamente,
aproximadamente 20 segundos después que el haz
de láser encendido no realiza ninguna medición
!
tenga presente que la herramienta mide desde su
parte trasera (la longitud de la herramienta se
incluye en el resultado de la medición)
-
pulse “C” para borrar el último valor individual
medido
-
pulse “C” varias veces para borrar los últimos valores
individuales medidos en orden inverso (m³ - m²)
•
Instrucciones para medición correcta
! no mueva la herramienta durante la medición
(excepto en el modo medición continua)
-
no cubra los lentes de recepciónA 3 y la abertura
del haz de láser B 3 mientras realiza una medición
-
en condiciones desfavorables (por ejemplo, cuando
se mide en exterior con luz directa del sol intensa)
utilice los cristales de mejora láser (accesorio SKIL
2610395907) o ponga un trozo de papel en la
superficie del objetivo
-
realizar mediciones en superficies transparentes,
reflejantes, porosas o en construcción puede llevar a
fallos en la medición
•
Medición de superficie
- pulse el botón G
3 (el símbolo 9 aparece en la
pantalla)
-
apunte la herramienta a la primera superficie objetivo
(longitud)
-
pulse “GO” (el símbolo 8 aparece en la pantalla)
-
pulse otra vez “GO”; la longitud medida aparece en
la línea superior de la pantalla
-
apunte la herramienta a la segunda superficie
objetivo (anchura)
-
pulse otra vez “GO”; la anchura medida aparece en
la línea superior de la pantalla mientras la superficie
calculada aparece en la línea inferior de la pantalla
-
pulse otra vez “GO” para iniciar una medición de
superficie completamente nueva
•
Medición de volumen
- pulse el botón H
3 (el símbolo 0 aparece en la
pantalla)
-
apunte la herramienta a la primera superficie objetivo
(longitud)
-
pulse “GO” (el símbolo 8 aparece en la pantalla)
-
pulse otra vez “GO”; la longitud medida aparece en
la línea superior de la pantalla
-
apunte la herramienta a la segunda superficie
objetivo (anchura)
-
pulse otra vez “GO”; la anchura medida aparece en
la línea superior de la pantalla mientras la superficie
calculada aparece en la línea inferior de la pantalla
-
apunte la herramienta a la tercera superficie objetivo
(altura)
-
pulse otra vez “GO”; la altura medida aparece en la
línea superior de la pantalla mientras que el volumen
calculado aparece en la línea inferior de la pantalla
-
pulse otra vez “GO” para iniciar una medición de
volumen completamente nueva
•
Medición continua !
-
pulse el botón F3 después de encender la
herramienta (aparecerá el símbolo @ en pantalla)
-
pulse “GO” (el símbolo 8 aparece en la pantalla)
-
el haz de láser permanece encendido, por lo que
podrá leerse continuamente la distancia real.
-
pulse “GO” nuevamente para interrumpir la medición
continua (el valor actual medido se indica en la
pantalla)
-
pulse “GO” nuevamente para reiniciar la medición
continua
Ташев-Галвинг ООД
www.tashev-galving.com
SKIL_IB0530_EUCH_v3.indd 25 08-06-2010 13:04:04
Page 26

26
- el modo medición continua se apaga
automáticamente después de 5 minutos (se muestra
en pantalla el último valor medido) y puede también
finalizarse al seleccionar otro modo de medición
•
Guardando/agregando valores medidos
- después de realizar una medición pulse “M+” para
guardar el valor medido
-
la letra “M” aparece en pantalla y debajo el signo
más parpadea brevemente
-
añada los valores adicionales medidos al valor de la
memoria con “M+” (sólo es posible cuando las
unidades de medición se corresponden)
•
Restar valores medidos
- pulse “M-” para restar el valor medido actual del
valor de memoria (sólo es posible cuando las
unidades de medición se corresponden)
-
la letra “M” aparece en la pantalla y debajo el signo
menos parpadea brevemente
•
Leyendo memoria
- cuando se pulsa “M=”, se muestra el valor guardado
en memoria junto con el símbolo “M=” (se muestra
en pantalla el último valor medido)
-
duplique el contenido de la memoria, pulsando “M+”
- ponga la memoria en cero pulsando “M-”
• Borrando la memoria
Primero, pulse “M=”, luego pulse “C” (la letra “M” no se
muestra por mucho rato)
•
Medición fallada
- cuando la medición ha fallado, aparece “ERROR” en
la pantalla
-
determine la causa, realice la acción correctiva, y
haga las mediciones nuevamente
Posibles causas de fallo en la medición:
-
la medición se realizó fuera del rango de medición
- el ángulo entre el haz de láser y el objetivo era un
ángulo demasiado agudo
-
la superficie del objetivo refleja de forma demasiado
intensa (por ejemplo, un espejo) o de manera
insuficiente (por ejemplo, un tejido negro), o la luz
ambiente es demasiado brillante
-
la lente de recepción A 3 o la abertura del haz de
láser B 3 quedó empañada (por ejemplo, debido a
cambios de temperatura muy rápidos)
-
los valores medidos han sido sumados/restados con
unidades de medición que no se corresponden
•
Bolsa de cinturón para almacenamiento fácil y
práctico #
CONSEJOS DE APLICACIÓN
• Si la acción correctiva no pudiese corregir el error, o si
apareciese el mensaje “FAIL” en la pantalla, no podrá
realizarse una medición; en este caso envíe la
herramienta al distribuidor o taller de servicio SKIL más
cercano
•
No exponga la herramienta a vibraciones continuas ni a
temperaturas extremadamente calientes o frías
•
Guarde siempre la herramienta dentro de la casa y en
su caja/estuche protector
•
Mantenga siempre la herramienta libre de polvo,
humedad y no la exponga a los rayos del sol
•
Limpie la herramienta con un paño húmedo y jabón
suave
!
retire siempre las pilas antes de limpiar la lente
• No desmonte ni modifique la herramienta de ninguna
forma
•
No intente cambiar ninguna parte de la lente láser
GARANTÍA / AMBIENTE
• Para las herramientas SKIL brindamos una garantía de
acuerdo con las prescripciones legales específicas de
los dintintos países; los daños ocasionados por
desgaste natural, sobrecarga o manejo inadecuado
serán excluidos de garantía
•
En el caso de una queja, envíe la herramienta
desmontada junto con una prueba de su compra a su
distribuidor o a la estación de servicio más cercana de
Skil (las direcciones se detallan en www.skileurope.com)
•
No deseche las herramientas eléctricas, las pilas,
los accesorios y embalajes junto con los residuos
domésticos (sólo para países de la Unión Europea)
-
de conformidad con la Directiva Europea 2002/96/CE
sobre residuos de aparatos eléctricos y electrónicos
y su aplicación de acuerdo con la legislación
nacional, las herramientas eléctricas cuya vida útil
haya llegado a su fin se deberán recoger por
separado y trasladar a una planta de reciclaje que
cumpla con las exigencias ecológicas
-
símbolo $ llamará su atención en caso de necesidad
de tirarlas
P
Ferramenta de medição laser 0530
INTRODUÇÃO
• Esta ferramenta serve para medir distâncias no interior
e no exterior com a projecção de raio laser
•
Quando correctamente utilizada, a ferramenta mede
com exactidão e facilidade o comprimento, a superfície
e o volume
•
Leia com atenção este manual de instruções e dê
especial atenção às instruções e avisos de
segurança; a não observação das respectivas
recomendações poderá resultar em lesões
(oculares) graves 1
•
Antes de utilizar a ferramenta pela primeira vez, cole o
autocolante fornecido no seu idioma nacional sobre o
texto em Alemão da etiqueta de aviso P 3
•
Guarde este manual de instruções para referência
futura
CARACTERÍSTICAS TÉCNICAS
Método de medição óptico/laser
Intervalo de medição 0,2 - 20 m
1
)
Precisão da medição (típica) +/- 3,0 mm
2
)
Duração da medição (típica) < 0,5 seg.
Unidade de indicação mínima 1 mm
Temperatura de funcionamento -10°C a 50°C
Temperatura de armazenamento -20ºC a 70°C
Humidade relativa (máx.) 90%
Classe do laser 2
Ташев-Галвинг ООД
www.tashev-galving.com
SKIL_IB0530_EUCH_v3.indd 26 08-06-2010 13:04:05
Page 27

27
Tipo de laser 635 nm
Saída de potência máxima < 1 mW
Diâmetro do raio laser
(a cerca de 20°C)
- a 10 m de distância
6 mm
- a 20 m de distância 16 mm
Pilhas (incluídas) 4 x AAA (LR03) 1,5V
Pilhas recarregáveis 4 x AAA (KR03) 1,2V
Desactivação automática
- laser
após aproximadamente
20 segundos sem
medição
- ferramenta de medição
após aproximadamente
5 minutos de
inactividade
Peso
0,18 kg
1) O intervalo de medição aumenta, dependendo de como
a luz do laser é reflectida a partir da superfície alvo e de
como o ponto laser brilha em relação à intensidade da
luz ambiente
2)
A precisão da medição tem um desvio de +0,06% em
condições desfavoráveis (ex. luz solar intensa)
FERRAMENTA 3
A Lente de recepção
B Abertura do feixe laser
C V
isor LCD
D T
ecla ligar/desligar
E Botão de conversão metr
os/pés
F Comprimento e modo de medição contínua
G Modo de medição da superfície
H Modo de medição do volume
J Botão Apagar (“C”)
K Botão Adicionar memória (“M+”)
L Botão Subtrair memória (“M-”)
M Botão Recuperar memória (“M=”)
N Botão Medir (“GO”)
P Etiqueta de aviso
Q T
ampa do compartimento das pilhas
SEGURANÇA
• Não olhe directamente para o feixe laser (radiações
laser) 2
•
Não aponte o feixe laser a pessoas ou animais
• Não coloque a ferramenta numa posição tal que possa
levar alguém a olhar directamente para o feixe laser,
intencionalmente ou por acidente
•
Não use quaisquer instrumentos ópticos de ampliação
(como lupas, telescópios ou binóculos) para ver o feixe
laser
•
Não retire nem danifique a etiqueta de aviso que se
encontra na ferramenta
•
Não utilize a ferramenta na presença de líquidos, gases,
ou pó inflamáveis
•
Não utilize a ferramenta com crianças à volta
• Esta ferramenta não deverá ser usada por pessoas com
idade inferior a 16 anos
•
Não utilize a ferramenta para qualquer fim diferente dos
fins indicados neste manual de instruções
MANUSEAMENTO
• Colocação das pilhas 4
! certifique-se de que a ferramenta está desligada
- utilize exclusivamente pilhas recarregáveis ou
alcalinas-manganés
-
volte a ferramenta ao contrário
- desmonte a tampa Q
- coloque 4 pilhas de 1,5 V (tenha em atenção a
polaridade correcta)
-
monte a tampa Q
- quando o nível de carga da pilha estiver baixo,
aparecerá no visor o símbolo 5
-
quando o símbolo 5 aparecer no visor pela primeira
vez, ainda são possíveis pelo menos 100 medições
-
substitua as pilhas quando o símbolo 5 começar a
piscar (medição já não é possível)
-
substitua sempre as duas pilhas ao mesmo tempo
- retire sempre as pilhas da ferramenta se vai estar
muito tempo sem a usar
•
Ligar/desligar
- ligue a ferramenta, premindo “on/off” ou “GO” (o raio
laser não se liga logo)
-
desligue a ferramenta carregando na “on/off”
- a ferramenta desliga-se automaticamente ao fim de 5
minutos de inactividade
•
Conversão metros/pés
- por defeito, as medições são feitas em metros/
centímetros
-
carregue na tecla E 3 para converter metros/
centímetros em pés/polegadas
•
Utilização da ferramenta 6
-
ligue a ferramenta (o símbolo 7 aparece no visor
para indicar que a ferramenta já está no modo de
medição do comprimento)
-
seleccione outro modo de medição (superfície/
volume), se pretendido
-
prima “GO” para ligar o raio laser (o símbolo 8
aparece no visor)
-
aponte a ferramenta à superfície alvo
! não olhe directamente para o feixe laser
! não aponte o feixe laser a pessoas ou animais
- prima novamente “GO”; o valor medido aparece no
visor (o raio laser desliga-se automaticamente)
-
o raio laser desliga-se também automaticamente
quando não efectuar nenhuma medição durante
cerca de 20 segundos após a ligação do raio laser
!
lembre-se de que a ferramenta mede a partir da
parte de trás (o comprimento da ferramenta está
incluído no resultado da medição)
-
prima “C” para limpar o último valor individual
medido
-
prima “C” várias vezes para limpar o último valor
individual medido pela ordem inversa (m³ - m²)
•
Instruções para uma medição correcta
! não mova a medição durante a medição
(excepto
no modo de medição contínua)
-
não cubra a lente de recepção A 3 e a abertura do
raio laser B 3 durante a medição
Ташев-Галвинг ООД
www.tashev-galving.com
SKIL_IB0530_EUCH_v3.indd 27 08-06-2010 13:04:06
Page 28

28
- em condições desfavoráveis (ex. quando efectuar
medições no exterior com uma luz solar intensa)
utilize as lentes de aumento (acessório da SKIL
2610395907) ou coloque um pedaço de papel na
superfície alvo
-
a medição contra superfícies transparentes,
reflectoras, porosas ou estruturadas podem conduzir
a medições incorrectas
•
Medição de superfície
- carregue na tecla G
3 (aparecerá no visor o
símbolo 9)
-
aponte a ferramenta à primeira superfície alvo
(comprimento)
-
carregue “GO” (aparecerá no visor o símbolo 8)
-
volte a carregar “GO”; o comprimento medido
aparece na linha superior do visor
-
aponte a ferramenta à segunda superfície alvo
(largura)
-
volte a carregar “GO”; a largura medida aparece na
linha superior do visor ao mesmo tempo que a
superfície calculada aparece na linha inferior do visor
-
volte a carregar “GO” para iniciar um cálculo de
superfície completamente novo
•
Medição de volume
- carregue na tecla H
3 (aparecerá no visor o
símbolo 0)
-
aponte a ferramenta à primeira superfície alvo
(comprimento)
-
carregue “GO” (aparecerá no visor o símbolo 8)
-
volte a carregar “GO”; o comprimento medido
aparece na linha superior do visor
-
aponte a ferramenta à segunda superfície alvo
(largura)
-
volte a carregar “GO”; a largura medida aparece na
linha superior do visor ao mesmo tempo que a
superfície calculada aparece na linha inferior do visor
-
aponte a ferramenta à terceira superfície alvo (altura)
-
volte a carregar “GO”; a altura medida aparece na
linha superior do visor ao mesmo tempo que o
volume calculado aparece na linha inferior do visor
-
volte a carregar “GO” para iniciar um cálculo de
volume completamente novo
•
Medição contínua !
-
prima o botão F3 depois de ligar a ferramenta (o
símbolo @ aparece no visor)
-
carregue “GO” (aparecerá no visor o símbolo 8)
-
o raio laser continua ligado para que a distância
actual possa ser lida continuamente
-
prima “GO” novamente para interromper a medição
contínua (o valor medido actual é indicado no visor)
-
prima “GO” novamente para reiniciar a medição
contínua
-
o modo de medição contínua desliga-se
automaticamente passados 5 minutos (o último valor
medido permanece indicado no visor) e pode
também ser terminado, seleccionando outro modo
de medição
•
Guardar/adicionar valores medidos
- depois de efectuar uma medição, prima “M+” para
guardar o valor medido
-
a letra “M” aparece no visor e o sinal de mais por
baixo pisca brevemente
-
adicione os valores medidos ao valor da memória
com “M+” (possível apenas quando as unidades de
medição corresponderem)
•
Subtrair valores medidos
- prima “M-” para subtrair o valor medido actual do
valor da memória (possível apenas quando as
unidades de medição corresponderem)
-
a letra “M” aparece no visor e o sinal de menos por
baixo pisca brevemente
•
Ler memória
- quando premir “M=”, o valor guardado na memória
aparece juntamente com o símbolo “M=” (o último
valor medido permanece indicado no visor)
-
prima “M+” para duplicar o conteúdo da memória
- prima “M-” para definir o conteúdo da memória para
zero
•
Limpar memória
Prima “M=” e, em seguida, “C” (a letra “M” já não
aparece)
•
Medições incorrectas
- quando a medição não tem êxito, aparece no visor
“ERROR”
-
determine a causa, efectue a acção correctiva e volte
a efectuar a medição
Causas possíveis para falha na medição:
-
a medição teve lugar fora do intervalo de medição
- o ângulo entre o raio laser e o alvo foi muito agudo
- a superfície alvo reflectiu muito intensamente (ex.
espelho) ou insuficientemente (ex. tecido escuro), ou
a luz ambiente era muito brilhante
-
a lente de recepção A 3 ou a abertura do raio laser
B 3 ficou embaciada (ex. devido a uma rápida
mudança de temperatura)
-
valores medidos foram adicionados/substraídos com
unidades de medição não correspondentes
•
Saco para o cinto, para guardar a ferramenta de forma
fácil e conveniente #
CONSELHOS DE APLICAÇÃO
• Quando a acção correctiva não corrigir um erro ou
“FAIL” aparecer no visor, a medida já não é possível;
neste caso, envie a ferramenta para o revendedor ou a
assistência técnica da SKIL mais próxima
•
Não exponha a ferramenta a vibração contínua ou a
temperaturas extremamente quentes ou extremamente
frias
•
Guarde sempre a ferramenta num recinto fechado,
dentro da respectiva caixa/estojo
•
Mantenha sempre a ferramenta sem pó ou humidade e
afastada da luz solar directa
•
Limpe a ferramenta com um pano húmido e sabão
suave
!
retire sempre as pilhas antes de limpar a lente
• Não desmonte nem modifique a ferramenta de maneira
nenhuma
•
Não tente alterar qualquer parte da lente laser
Ташев-Галвинг ООД
www.tashev-galving.com
SKIL_IB0530_EUCH_v3.indd 28 08-06-2010 13:04:06
Page 29

29
GARANTIA / AMBIENTE
• Prestamos garantia para ferramentas SKIL de acordo
com as disposições legais/específicas do país; avarias
devidas ao desgaste normal, sobrecarga ou má
utilização não estão abrangidas pela garantia
•
Em caso de reclamação, envie a ferramenta sem a
desmontar, juntamente com a prova de compra, para o
seu revendedor ou para o centro de assistência SKIL
mais próximo (encontrará uma lista de endereços em
www.skileurope.com)
•
Não deite ferramentas eléctricas, pilhas, acessórios
e embalagem no lixo doméstico (apenas para países
da UE)
-
de acordo com a directiva europeia 2002/96/CE
sobre ferramentas eléctricas e electrónicas usadas e
a transposição para as leis nacionais, as ferramentas
eléctricas usadas devem ser recolhidas em separado
e encaminhadas a uma instalação de reciclagem dos
materiais ecológica
-
símbolo $ lhe avisará em caso de necessidade de
arranja-las
I
Utensile per la misurazione 0530
al laser
INTRODUZIONE
• Questo utensile è destinato alla misurazione delle
distanze in ambienti sia interni che esterni mediante la
proiezione di un raggio laser
•
Quando usato correttamente, questo utensile misura
facilmente ed accuratamente lunghezza, superficie e
volume
•
Leggere attentamente il presente manuale di
istruzioni e prestare particolare attenzione alle
istruzioni di sicurezza ed alle avvertenze; la mancata
osservanza potrebbe causare serie lesioni (oculari) 1
•
Prima di utilizzare l’utensile per la prima volta, applicare
l’adesivo in dotazione scritto nella lingua del proprio
paese sopra il testo in lingua tedesca dell’etichetta di
avvertenza P 3
•
Conservare questo manuale di istruzioni per futuro
riferimento
CARATTERISTICHE TECNICHE
Metodo di misurazione ottico/laser
Campo di misurazione 0,2 - 20 m
1
)
Precisione di misurazione (tipica) +/- 3,0 mm
2
)
Durata della misurazione (tipica) < 0,5 sec.
Unità minima di visualizzazione 1 mm
Temperatura di impiegoda -10°C fino a 50°C
Temperatura di stoccaggio -20ºC a 70°C
Umidità relativa (max.) 90%
Classe laser 2
Modello laser 635 NM
Massima potenza di erogazione < 1 mW
Diametro del raggio laser
(a 20°C circa)
- a una distanza di 10 m
6 mm
- a una distanza di 20 m 16 mm
Batterie (incluse) 4 x AAA (LR03) 1,5 V
Batterie ricaricabili 4 x AAA (KR03) 1,2 V
Spegnimento automatico
- laser
dopo 20 sec. di inutilizzo
- utensile di misurazione dopo 5 min. di inattività
Peso 0,18 kg
1) Il campo di misurazione aumenta con una buona
riflessione della luce laser dalla superficie da misurare e
una buona luminosità del puntatore laser rispetto
all’intensità della luce ambiente
2)
La precisione di misurazione si discosta di +0,06% in
caso di condizioni sfavorevoli (ad esempio, luce solare
intensa)
ELEMENTI UTENSILE 3
A Lente di ricezione
B Apertura raggio laser
C Display LCD
D Pulsante on/of
f
E T
asto conversione metro/piede
F Modalità di misurazione continua e della lunghezza
G Modalità di misurazione della superficie
H Modalità di misurazione del volume
J T
asto di cancellazione (“C”)
K T
asto di aggiunta della memoria (“M+”)
L T
asto di sottrazione della memoria (“M-”)
M T
asto di recupero della memoria (“M=”)
N T
asto di misurazione (“GO”)
P Etichetta di avvertenza
Q Coper
chio comparto batteria
SICUREZZA
• Non guardare direttamente nel raggio del laser
(radiazioni laser) 2
•
Non puntare il raggio laser verso nessuna persona o
animale
•
Non sistemare l’utensile in una posizione che potrebbe
causare che una persona guardi direttamente nel raggio
intenzionalmente o no
•
Non utilizzare nessun attrezzo d’ingrandimento (come
una lente d’ingrandimento, telescopio, o binocoli) per
veder il raggio laser
•
Non rimuovere o danneggiare l’etichetta di avvertenza
affissa sull’utensile
•
Non usare l’utensile se sono presenti dei liquidi
infiammabili, dei gas o della polvere
•
Non adoperare l’utensile in presenza di bambini
• Questo utensile non deve essere usato da persone di
età inferiore a 16 anni
•
Non utilizzare l’utensile per qualsiasi scopo se non quelli
per indicati nel presente manuale
USO
• Inserimento delle batterie 4
! assicurarsi che l’utensile sia spento
Ташев-Галвинг ООД
www.tashev-galving.com
SKIL_IB0530_EUCH_v3.indd 29 08-06-2010 13:04:07
Page 30

30
- utilizzare esclusivamente batterie ricaricabili o
batterie alcaline-manganese
-
capovolgete l’utensile
- rimuovere il coperchio Q
- inserire 4 x batteria di 1,5 V (prestare attenzione alla
corretta polarizzazione)
-
riporre il coperchio Q
- quando il livello della batteria è basso, il simbolo
5
appare sul display
-
quando sul display compare il simbolo 5 per la
prima volta, significa che è possibile effettuare altre
100 misurazioni
-
sostituire le batterie quando il simbolo 5 inizia a
lampeggiare (non è più possibile effettuare
misurazioni)
-
sostituire sempre la serie completa delle batterie
- rimuovere sempre le batterie dall’utensile se questo
non viene usato per un lungo periodo di tempo
•
On/off
- accendere l’utensile premendo il tasto “on/off” o
“GO” (il raggio laser non è ancora acceso)
-
spegnere l’utensile premendo “on/off”
- l’utensile si spegne automaticamente dopo 5 minuti
di inattività
•
Conversione metro/piede
- le misurazioni sono in metri/millimetri per default
- premere il pulsante E
3 per convertire metri/
centimetri in piedi/pollici
•
Uso dell’utensile 6
-
accendere l’utensile (sul display compare il simbolo 7
il quale indica che lo strumento si trova nella modalità
di misurazione della lunghezza)
-
se necessario, selezionare un’altra modalità di
misurazione (superficie/volume)
-
premere “GO” per accendere il raggio laser (sul
display compare il simbolo 8)
-
puntare l’utensile verso la superficie obiettivo
! non guardare direttamente nel raggio del laser
! non puntare il raggio del laser verso nessuna
persona o animale
-
premere nuovamente “GO”; il valore della
misurazione viene visualizzato sul display (il raggio
laser si spegne automaticamente)
-
una volta acceso, il raggio laser si spegne
automaticamente dopo 20 secondi circa se durante
questo periodo di tempo non vengono effettuate
misurazioni
!
tenere presente che l’utensile misura dal retro (la
lunghezza dell’utensile viene inclusa nel risultato
della misurazione)
-
premere “C” per cancellare l’ultimo valore misurato
- premere “C” ripetutamente per cancellare gli ultimi
valori misurati in ordine inverso (m³ - m²)
•
Istruzioni per la corretta misurazione
! non spostare l’utensile durante la misurazione
(tranne nella modalità di misurazione continua)
-
non coprire la lente di ricezione A 3 e l’apertura del
raggio laser B 3 durante la misurazione
-
in condizioni sfavorevoli (ad esempio quando si
eseguono misurazioni in ambienti esterni con luce
solare intensa) indossare appositi occhiali che
evidenziano il raggio laser (accessorio SKIL
2610395907) oppure collocare un pezzo di carta sulla
superficie da misurare
-
se si punta il laser su superfici trasparenti, riflettenti,
porose o strutturate, è possibile che la misurazione
risulti errata
•
Misurazione di superficie
- premere il pulsante G
3 (il simbolo 9 appare sul
display)
-
puntare l’utensile verso la prima superficie obiettivo
(lunghezza)
-
premere “GO” (il simbolo 8 appare sul display)
-
premere di nuovo “GO”; la lunghezza misurata
appare alla riga superiore del display
-
puntare l’utensile verso la seconda superficie
obiettivo (larghezza)
-
premere di nuovo “GO”; la larghezza misurata appare
alla riga superiore del display mentre la superficie
calcolata appare alla riga inferiore del display
-
premere di nuovo “GO” per iniziare una misurazione
di superficie completamente nuova
•
Misurazione del volume
- premere il pulsante H
3 (il simbolo 0 appare sul
display)
-
puntare l’utensile verso la prima superficie obiettivo
(lunghezza)
-
premere “GO” (il simbolo 8 appare sul display)
-
premere di nuovo “GO”; la lunghezza misurata
appare alla riga superiore del display
-
puntare l’utensile verso la seconda superficie
obiettivo (larghezza)
-
premere di nuovo “GO”; la larghezza misurata appare
alla riga superiore del display mentre la superficie
calcolata appare alla riga inferiore del display
-
puntare l’utensile verso la terza superficie obiettivo
(altezza)
-
premere di nuovo “GO”; la larghezza misurata appare
alla riga superiore del display mentre la superficie
calcolata appare alla riga inferiore del display
-
premere di nuovo “GO” per iniziare una misurazione
di volume completamente nuova
•
Misurazione continua !
-
premere il tasto F3 dopo aver acceso l’utensile (il
simbolo @ compare sul display)
-
premere “GO” (il simbolo 8 appare sul display)
-
il raggio laser rimane acceso in modo che la distanza
effettiva possa essere controllata in modo continuo
-
premere nuovamente “GO” per interrompere la
misurazione continua (il valore corrente della
misurazione viene indicato sul display)
-
premere ancora una volta “GO” per riavviare la
misurazione continua
-
la modalità di misurazione continua si disattiva
automaticamente dopo 5 minuti (l’ultimo valore di
misurazione rimane indicato sul display), oppure è
possibile disattivarla selezionando un’altra modalità
di misurazione
Ташев-Галвинг ООД
www.tashev-galving.com
SKIL_IB0530_EUCH_v3.indd 30 08-06-2010 13:04:08
Page 31

31
•
Memorizzazione/aggiunta di valori misurati
- dopo avere eseguito una misurazione, premere “M+”
per memorizzare il valore ottenuto
-
sul display compare la lettera “M” e il segno “+”
sottostante lampeggia brevemente
-
aggiungere ulteriori valori di misurazione con “M+”
(l’operazione è unicamente possibile quando le unità
di misura corrispondono)
•
Sottrazione dei valori di misurazione
- premere “M-” per sottrarre il valore di misurazione
corrente dal valore della memoria (l’operazione è
unicamente possibile quando le unità di misura
corrispondono)
-
sul display compare la lettera “M” e il segno “-”
sottostante lampeggia brevemente
•
Lettura della memoria
- quando si preme “M=”, il valore memorizzato nella
memoria viene visualizzato unitamente al simbolo
“M=” (l’ultimo valore di misurazione rimane indicato
sul display)
-
raddoppiare il contenuto della memoria premendo
“M+”
-
azzerare la memoria premendo “M-”
• Cancellazione della memoria
Premere prima di tutto “M=”, quindi premere “C” (la
lettera “M” non è più visualizzata)
•
Misurazione errata
- quando la misurazione non è di successo, “ERROR”
appare sul display
-
determinare la causa, prendere un provvedimento
correttivo ed eseguire di nuovo la misurazione
Possibili cause di misurazione errata:
-
misurazione eseguita al di fuori del campo di
misurazione
-
angolo tra il raggio laser e la superficie da misurare
eccessivamente acuto
-
superficie da misurare troppo riflettente (ad es.
specchio) o insufficientemente riflettente (ad es.
tessuto nero), oppure luce ambientale
eccessivamente luminosa
-
lente di ricezione A 3 o apertura del raggio laser
B 3 appannate (ad es. a causa di un rapido
cambiamento della temperatura)
-
valori di misurazione aggiunti/sottratti a unità di
misura non corrispondenti
•
Astuccio con cintura per conservazione facile e
conveniente #
CONSIGLIO PRATICO
• Se un’azione correttiva non è in grado di correggere un
errore, o se appare la scritta “FAIL” sul display, non è
più possibile effettuare una misurazione; in questo caso
inviare lo strumento al vostro rivenditore o al centro di
assistenza SKIL più vicino
•
Non esporre l’utensile a continue vibrazioni o a rigide
temperatura calda o fredda esterna
•
Conservare sempre l’utensile all’interno nella sua
scatola di protezione
•
Tenere sempre l’utensile libero da polvere, umidità e
dalla diretta luce del sole
•
Pulire l’utensile con un panno umido e con sapone
dolce
!
rimuovere sempre le batterie prima di pulire le
lenti
•
Non smontare o modificare l’utensile in nessun modo
• Non tentare di cambiare qualsiasi parte delle lenti del
laser
GARANZIA / TUTELA DELL’AMBIENTE
• Per gli utensili SKIL forniamo garanzia conforme alle
disposizioni di legge/specifiche nazionali; guasti
derivanti da usura naturale, sovraccarico o uso
improprio dell’utensile sono esclusi dalla garanzia
•
Nel caso di una lamentela, inviare l’utensile non
smontato assieme alle prove di acquisto al rivenditore
oppure al più vicino posto di assistenza Skil (gli indirizzi
possono essere rilevati dal sito www.skileurope.com)
•
Non gettare l’utensile elettrico, gli batterie, gli
accessori e l’imballaggio tra i rifiuti domestici (solo
per paesi UE)
-
secondo la Direttiva Europea 2002/96/CE sui rifiuti di
utensili elettrici ed elettronici e la sua attuazione in
conformità alle norme nazionali, glil utensili elettrici
esausti devono essere raccolti separatamente, al fine
di essere reimpiegati in modo eco-compatibile
-
il simbolo $ vi ricorderà questo fatto quando dovrete
eliminarle
H
Lézer mérőeszköz 0530
BEVEZETÉS
• Ez a mérőeszköz lézersugár vetítés segítségével beltéri
valamint kültéri távolságok mérésére szolgál
•
Megfelelő alkalmazása esetén, a mérőeszköz könnyen
és pontosan használható távolság mérésére, terület és
térfogat számítására
•
Figyelmesen olvassa el a mellékelt használati
utasítást és kísérje különös figyelemmel a biztonsági
utasításokat és figyelmeztetéseket; ennek
elmulasztása súlyos (szem) sérülést okozhat 1
•
A készülék első használata előtt helyezze a saját
nemzeti nyelvű címkét a német nyelvű figyelmeztető
felirat fölé P 3
•
A használati utasítást őrizze meg további referenciaként
TECHNIKAI ADATOK
Mérési módszer optikai/lézer
Méréstartomány 0,2 - 20 m
1
)
Mérési pontosság (szokásos) +/- 3,0 mm
2
)
Mérési időtartam (szokásos) < 0,5 sec.
Legkisebb mutatójelzés egység 1 mm
Üzemi hőmérséklet -10°C - 50°C
Tárolási hőmérséklet -20ºC - 70°C
Relatív páratartalom (max.) 90%
Lézer besorolása 2
Lézer típusa 635 nm
Maximum leadott teljesítmény < 1 mW
Ташев-Галвинг ООД
www.tashev-galving.com
SKIL_IB0530_EUCH_v3.indd 31 08-06-2010 13:04:09
Page 32

32
Lézersugár átmérője (kb. 20°C-on)
- 10 m távolságnál 6 mm
- 20 m távolságnál 16 mm
Elemek (a készlet tartalmazza) 4 x AAA (LR03) 1,5V
Újratölthető elemek 4 x AAA (KR03) 1.2V
Automatikus kikapcsolás
- lézer
körülbelül 20 másodperc
tétlenség után
- mérőeszköz
használaton kívüli
állapotban 5 perc
elteltével
Súly
0,18 kg
1) A mérési tartomány attól függően növekszik, hogy a
lézerfény milyen mértékben verődik vissza a célfelületről
és hogy a környezeti fényintenzitáshoz viszonyítva
mennyire fényes a lézerpont
2)
A méréspontosság kedvezőtlen körülmények között (pl.
erős napfénynél) +0,06%-ot térhet el
SZERSZÁMGÉP ELEMEI 3
A Fényvevő lencse
B Lézersugár-szélesség
C LCD kijelző
D Be/kikapcsoló gomb
E Méter/láb konvertáló gomb
F Hosszúság és folyamatos mérési üzemmód
G Felszín mérési üzemmód
H Térfogat mérési üzemmód
J Törlés gomb (“C”)
K Hozzáadás a memóriába gomb (“M+”)
L Kivonás a memóriából gomb (“M-”)
M Visszaszerzés a memóriából gomb (“M=”)
N Mérés gomb (“GO”)
P Figyelmeztető címke
Q Teleptartó fedele
BIZTONSÁG
• Ne nézzen a lézersugárba (lézersugárzás) 2
• Ne irányítsa a lézersugarat személy vagy állat fele
• Ne helyezze a készüléket olyan helyre, ahol bárki is arra
kényszerülne, hogy akarva/akaratlanul belenézzen a
lézersugárba
•
Ne használjon semminemű nagyító jellegű optikai
eszközt (pl. nagyító, teleszkóp vagy távcső) a lézersugár
megtekintéséhez
•
Ne távolítsa el/rongálja meg a készüléken lévő
figyelmeztető címkét
•
Ne használja a készüléket gyúlékony folyadékok/ gázok/
por jelenlétében
•
Ne használja a készüléket gyermekek jelenlétében
• A készüléket csak 16 éven felüli személyek használják
• Ne használja a készüléket a használati utasításban
említett rendeltetésen kívüli célokra
KEZELÉS
• Telepek behelyezése 4
! ügyeljen a készülék kikapcsolt állapotára
- kizárólag alkáli-mangán vagy újratölthető elemeket
használjon
-
a készüléket fordítsa fel
- távolítsa el a fedelet Q
- helyezze be a 4 x 1,5 V-os telepet (ügyeljen a
megfelelő polaritásra)
-
helyezze vissza a fedelet Q
- amikor a telep kimerülőben van, egy szimbólum
5
jelenik meg a kijelzőn
-
ha a 5 jel először jelenik meg a kijelzőn, akkor még
legalább 100 mérés végezhető el a készülékkel
-
cserélje ki az elemeket, ha a 5 jel villogni kezd
(mérés már nem végezhető)
-
a telepeket mindig teljes szettként cserélje
- használaton kívüli esetben a telepeket mindig
távolítsa el a készülékből
•
Be/Ki
- kapcsolja be az eszközt az “on/off” vagy a “GO”
gomb megnyomásával (a lézersugár még nincs
bekapcsolva)
-
a mérőeszköz kikapcsolása az “on/off”
megnyomásával történik
-
használaton kívüli állapotban a mérőeszköz
automatikusan kikapcsol 5 perc elteltével
•
Méter/láb konvertálás
- az alapértelmezett beállítás szerint a méretek
méterben/centiméterben vannak
-
méterben/centiméterben kijelzett méretek lábra/
hüvelykre történő átalakításához nyomja meg a
gombot E 3
•
A készülék üzemeltetése 6
-
kapcsolja be az eszközt (a kijelzőn megjelenő 7 jel
azt jelzi, hogy az eszköz már hosszúságmérési
üzemmódban van)
-
kívánság szerint válasszon másik mérési módot
(felszín/térfogat)
-
nyomja meg a “GO” gombot a lézersugár
bekapcsolásához (a kijelzőn a 8 jel jelenik meg)
-
irányítsa a készüléket a célfelület felé
! ne nézzen a lézersugárba
!
ne irányítsa a lézersugarat személy, illetve állat felé
-
nyomja meg ismét a “GO” gombot, és a mért érték
megjelenik a kijelzőn (a lézersugár automatikusan
kikapcsol)
-
a lézersugár is automatikusan kikapcsol, ha a
lézersugár bekapcsolását követő 20 másodperc alatt
nem történik mérés
!
ne feledje, hogy a készülék a mérést az eszköz
végétől végzi (vagyis a mérési eredmény magába
foglalja a készülék hosszát)
-
nyomja meg a “C” gombot az utolsó külön mért érték
törléséhez
-
ismét nyomja meg a “C” gombot az utolsó külön
mért értékek fordított sorrendben történő törléséhez
(m³ - m²)
•
A pontos mérés feltételei
!
mérés közben ne mozgassa az eszközt (kivéve a
folyamatos mérési üzemmódot)
-
ne takarja le a fényvevő lencséket A 3 és a
lézersugár nyílását B 3 mérés közben
-
kedvezőtlen körülmények között (pl. kültéren, intenzív
napfényben történő mérés során) lézerfokozó
üvegeket (SKIL tartozék 2610395907) vagy helyezzen
egy papírlapot a célfelületre
Ташев-Галвинг ООД
www.tashev-galving.com
SKIL_IB0530_EUCH_v3.indd 32 08-06-2010 13:04:10
Page 33

33
-
az áttetsző, visszatükröző, porózus vagy strukturált
felületekkel szemben végzett mérés hibás méréshez
vezethet
•
Területszámítás
- nyomja meg a gombot G
3 (egy szimbólum 9
jelenik meg a kijelzőn)
-
irányítsa a készüléket az első célfelület felé
(hosszúság)
-
nyomja meg a “GO” (egy szimbólum 8 jelenik meg a
kijelzőn)
-
nyomja meg ismét a “GO”; a kijelző felső vonalán
kijelzésre kerül a mért hosszúság
-
irányítsa a készüléket a második célfelület felé
(szélesség)
-
nyomja meg ismét a “GO”; a kijelző felső vonalán
kijelzésre kerül a mért szélesség, miközben a kijelző
alsó vonalán megjelenik a kiszámított terület
-
egy újabb területszámításhoz nyomja meg ismét a
“GO”
•
Térfogatszámítás
- nyomja meg a gombot H
3 (egy szimbólum 0
jelenik meg a kijelzőn)
-
irányítsa a készüléket az első célfelület felé
(hosszúság)
-
nyomja meg a “GO” (egy szimbólum 8 jelenik meg a
kijelzőn)
-
nyomja meg ismét a “GO”; a kijelző felső vonalán
kijelzésre kerül a mért hosszúság
-
irányítsa a készüléket a második célfelület felé
(szélesség)
-
nyomja meg ismét a “GO”; a kijelző felső vonalán
kijelzésre kerül a mért szélesség, miközben a kijelző
alsó vonalán megjelenik a kiszámított terület
-
irányítsa a készüléket a harmadik célfelület felé
(magasság)
-
nyomja meg ismét a “GO”; a kijelző felső vonalán
kijelzésre kerül a mért magasság, miközben a kijelző
alsó vonalán megjelenik a kiszámított térfogat
-
egy újabb térfogatszámításhoz nyomja meg ismét a
“GO”
•
Folyamatos mérés !
-
az eszköz bekapcsolása után nyomja meg az F3
gombot (a kijelzőn megjelenik a @ jel)
-
nyomja meg a “GO” (egy szimbólum 8 jelenik meg a
kijelzőn)
-
a lézersugár bekapcsolva marad, így az aktuális
távolság folyamatosan leolvasható
-
ismét nyomja meg a “GO” gombot a folyamatos
mérés megszakításához (a jelenleg mért érték
megjelenik a kijelzőn)
-
ismét nyomja meg a “GO” gombot a folyamatos
mérés újraindításához
-
a folyamatos mérési üzemmód 5 perc után
automatikusan kikapcsol (a kijelző továbbra is kijelzi
az utolsóként mért értéket) és egy másik mérési
üzemmód kiválasztásával is befejezhető
•
A mért értékek tárolása/hozzáadása
- a mérés elvégzését követően nyomja meg a “M+”
gombot a mért érték eltárolásához
-
az “M” betű megjelenik a kijelzőn és alatta röviden
villog a hozzáadás (plusz) jel
-
további mért értékeket az “M+” gomb
megnyomásával adhat hozzá a memória értékhez (ez
csak abban az esetben lehetséges, ha a mérési
egységek megfelelnek egymásnak)
•
Mért értékek kivonása
- nyomja meg az “M-” gombot a jelenleg mért érték
memória értékből történő kivonásához(ez csak abban
az esetben lehetséges, ha a mérési egységek
megfelelnek egymásnak)
-
az “M” betű megjelenik a kijelzőn és alatta röviden
villog a kivonás (mínusz) jel
•
Memória leolvasása
- az “M=” gomb megnyomásával a memóriában
eltárolt érték az “M=” jellel együtt megjelenik a
kijelzőn (a kijelző továbbra is kijelzi az utolsóként
mért értéket)
-
az “M+” megnyomásával kétszerezze meg a
memória tartalmát
-
az “M+” megnyomásával nullázza le a memória
tartalmát
•
Memória törlése
Először nyomja meg az “M=” gombot, majd a “C”
gombot (az “M” betű többé nem jelenik meg a kijelzőn)
•
Téves mérési adatok
- amikor egy mérés eredménytelen, egy “ERROR”
jelenik meg a kijelzőn
-
állapítsa meg a hiba okát, hajtsa végre a javítási
műveletet, majd végezze el újra a mérést
A pontatlan mérés lehetséges okai:
-
a mérés a mérési tartományon kívül történt
- a lézersugár és a célfelület közötti szög túl éles volt
- a célfelület túl erősen visszaverő (pl. tükör) vagy
elégtelenül visszaverő felület (pl. fekete szövet), vagy
a környezet megvilágítása túl erős
-
a felvevő lencse A 3 vagy a lézersugár nyílása B 3
párás volt (pl. hirtelen hőmérséklet-változás miatt)
-
a mérési eredmények nem egyező mérési egyégben
lettek összeadva/kivonva
•
Övre csatolható hordtáska a készülék könnyű és
kényelmes tárolásához #
HASZNÁLAT
• Ha a javítási művelet segítségével nem lehet elhárítani a
hibát, vagy ha a “FAIL” felirat jelenik meg a kijelzőn,
további mérésre nincs lehetőség; ebben az esetben
küldje el a műszert forgalmazójának vagy a legközelebbi
SKIL javítószerviznek
•
Ne tegye ki a műszert folyamatos rázkódásnak/
szélsőséges hőmérsékletnek
•
A műszert mindig tárolja zárt helységben, annak
védőtokjában/dobozában
•
Óvja a műszert portól, nedvességtől és közvetlen
napfénytől
•
A műszer tisztítását nedves, enyhén szappanos
törlőruhával végezze
!
a lencsék tisztítása előtt minden esetben távolítsa
el a telepeket
•
Ne szerelje szét illetve ne módosítsa semmiféle módon
a műszert
•
Ne kísérelje meg a lézerlencsék egyetlen részének sem
a cseréjét
Ташев-Галвинг ООД
www.tashev-galving.com
SKIL_IB0530_EUCH_v3.indd 33 08-06-2010 13:04:10
Page 34

34
GARANCIA / KÖRNYEZET
• Fent említett termékére a SKIL a törvényes/
országonként változó előírások szerint vállal garanciát; a
garancia nem vonatkozik a szokványos használat során
fellépő normális kopásra és a nem megfelelő használat
illetve túlterhelés okozta károsodásra
•
Panasz esetén küldje az összeszerelt gépet a vásárlást
bizonyító számlával együtt a kereskedő vagy a
legközelebbi SKIL szervizállomás címére (a címlista és a
gép szervizdiagramja a www.skileurope.com címen
található)
•
Az elektromos kéziszerszámokat, elemek,
tartozékokat és csomagolást ne dobja a háztartási
szemétbe (csak EU-országok számára)
-
a használt villamos és elektronikai készülékekről
szóló 2002/96/EK irányelv és annak a nemzeti jogba
való átültetése szerint az elhasznált elektromos
kéziszerszámokat külön kell gyűjteni, és
környezetbarát módon újra kell hasznosítani
-
erre emlékeztet a $ jelzés, amennyiben felmerül az
intézkedésre való igény
CZ
Laser měřící přístroj 0530
ÚVOD
• Tento přístroj je určený pro měření vzdáleností jak uvnitř
tak vně budov pomocí projekce laserového paprsku
•
Při správném použití měří tento přístroj snadno a přesně
délku, povrch a objem
•
Tento návod s pokyny si pečlivě přečtěte a zvláštní
pozornost věnujte bezpečnostním pokynům a
výstrahám; při jejich nedodržení se vystavujete
nebezpečí vážného úrazu (zejména poranění očí) 1
•
Před prvním použitím přístroje nalepte dodanou nálepku
ve vašem rodném jazyce přes německý text na
varovném štítku P 3
•
Tento návod s pokyny si uschovejte pro budoucí
potřebu
TECHNICKÉ ÛDAJE
Metoda měření optická/laserová
Rozsah měření 0,2 - 20 m
1
)
Přesnost měření (typická) +/- 3,0 mm
2
)
Trvání měření (typické) < 0,5 sek.
Nejnižší jednotka zobrazení 1 mm
Provozní teplota -10°C až 50°C
Teplota úschovy -20ºC až 70°C
Relativní vlhkost (max.) 90%
Laser třídy 2
Laser typu 635 nm
Maximální výstupní výkon < 1 mW
Průměr laserového paprsku
(při asi 20°C)
- ve vzdálenosti 10 m
6 mm
- ve vzdálenosti 20 m 16 mm
Bateries (jsou součástí) 4 x AAA (LR03) 1,5V
Dobíjecí baterie 4 x AAA (KR03) 1,2V
Automatické vypínání
- laser
po asi 20 sek stavu nečinnosti
- měřící přístroj po asi 5 min stavu nečinnosti
Hmotnost 0,18 kg
1) Rozsah měření roste v závislosti na tom, jak dobře se
světlo laseru odráží od cílové plochy, a na tom, jak je
jasný bod laseru ve vztahu k intenzitě okolního světla
2) Přesnost měření se odchyluje o +0,06% při nepříznivých
podmínkách (např. při intenzivním slunečním světle)
SOUČÁSTI NÁSTROJE 3
A Přijímací čočky
B Otvor laserového paprsku
C LCD displej
D Hlavní spínač
E Tlačítko pro přepínání metrů/stop
F Režim měření délky a souvislý režim
G Režim měření povrchu
H Režim měření objemu
J Tlačítko vymazání (“C”)
K Tlačítko přidání paměti (“M+”)
L Tlačítko odečtení paměti (“M-”)
M Tlačítko obnovení paměti (“M=”)
N Tlačítko měření (“GO”)
P Výstražný štítek
Q Kryt zásobníku na baterie
BEZPEČNOSTNÍ
• Nedívejte se do laserového paprsku (laserové
záření) 2
•
Nezaměřujte laserový paprsek na osoby ani zvířata
• Nenechávejte přístroj v poloze, v níž by se někdo mohl
úmyslně či neúmyslně podívat do laserového paprsku
•
Nedívejte se na laserový paprsek žádným optickým
zvětšovacím přístrojem (jako je zvětšovací sklo,
teleskop či dalekohled)
•
Neodstraňujte výstražný štítek z přístroje a dejte pozor,
aby se nepoškodil
•
Neprovozujte přístroj v přítomnosti vznětlivých tekutin,
plynů a prachu
•
Neprovozujte přístroj v přítomnosti dětí
• Tento nástroj nesmí používat osoby mladdí 16 let
• Neprovozujte přístroj k žádným jiným účelům než těm,
které jsou uvedeny v této uživatelské příručce
OBSLUHU
• Ukládání baterií 4
! zkontrolujte, zda je přístroj vypnutý
- používejte výhradně alkalické manganové nebo
dobíjecí baterie
-
obraťte přístroj vzhůru nohama
- odstranění krytu Q
- vložte 4 x 1,5V baterie (pozor na správnou polarizaci)
- montáž krytu Q
- když je napětí baterie nízké, na displeji se objeví
symbol 5
-
jakmile se symbol 5 zobrazí na displeji poprvé, pak
je možné provést ještě nejméně 100 měření
Ташев-Галвинг ООД
www.tashev-galving.com
SKIL_IB0530_EUCH_v3.indd 34 08-06-2010 13:04:11
Page 35

35
-
vyměňte baterie, jakmile symbol 5 začne blikat
(měření již není možné)
-
vyměňte vždy celou sadu baterií
- nebudete-li přístroj delší dobu používat, vždy z něj
baterie vyjměte
•
Zapnutí/vypnutí
- zapněte přístroj buď stisknutím “on/off” nebo “GO”
(laserový paprsek ještě není zapnut)
-
přístroj vypněte stlačením “on/off”
- přístroj se automaticky vypne po 5 minut nečinnosti
• Přepínání metrů/stop
- měření jsou nastavena v metrech/centimetrech
- pro přepnutí metrů/centimetrů na stopy/palce stlačte
tlačítko E 3
•
Provoz přístroje 6
-
zapněte přístroj (symbol 7 se objeví na displeji a
bude ukazovat, že přístroj je již v režimu měření délky)
-
zvolte jiný režim měření (plocha/objem) v případě
potřeby
-
stiskněte “GO” pro zapnutí laserového paprsku
(symbol 8 se zobrazí na displeji)
-
namiřte přístroj směrem k cílovému povrchu
! nedívejte se do laserového paprsku
! nemiřte laserovým paprskem na osoby nebo
zvířata
-
stiskněte opět “GO”; na displeji se zobrazí naměřená
hodnota (laserový paprsek se automaticky vypne)
-
laserový paprsek se rovněž vypne, pokud v průběhu
přibližně 20 vteřin po zapnutí laserového paprsku
neproběhla žádná měření
!
mějte na mysli, že přístroj měří od své zadní
strany (délka přístroje je zahrnuta ve výsledku
měření)
-
stiskněte “C”, abyste vymazali poslední samostatně
naměřenou hodnotu
-
stiskněte opakovaně “C”, abyste vymazali poslední
samostatně naměřené hodnoty ve zpětném pořadí
(m³ - m²)
•
Pokyny pro správné měření
!
při měření nehýbejte přístrojem (vyjma režimu
souvislého měření)
-
nezakrývejte přijímací čočky A 3 a otvor laserového
paprsku B 3 při měření
-
v nepříznivých podmínkách (např. při měření venku
na intenzivním slunečním svitu) používejte laserové
zvětšovací skla (příslušenství SKIL 2610395907) nebo
na cílový povrch položte kus papíru
-
měření proti průhledným, odrazným, pórovitým nebo
strukturálním povrchům může vést ke špatným
měřením
•
Měření povrchu
- stlačte tlačítko G
3 (na displeji se objeví symbol 9)
-
namiřte přístroj směrem k prvnímu cílovému povrchu
(délka)
-
stlačte “GO” (na displeji se objeví symbol 8)
-
opětovně stlačte “GO”; v horním řádku displeje se
objeví naměřená délka
-
namiřte přístroj směrem k druhému cílovému povrchu
(šířka)
-
opětovně stlačte “GO”; naměřená šířka se objeví v
horním řádku displeje, zatímco vypočtená plocha se
objeví v dolním řádku displeje
-
opětovně stlačte “GO” pro započetí úplně nového
měření plochy
•
Měření objemu
- stlačte tlačítko H
3 (na displeji se objeví symbol 0)
-
namiřte přístroj směrem k prvnímu cílovému povrchu
(délka)
-
stlačte “GO” (na displeji se objeví symbol 8)
-
opětovně stlačte “GO”; v horním řádku displeje se
objeví naměřená délka
-
namiřte přístroj směrem k druhému cílovému povrchu
(šířka)
-
opětovně stlačte “GO”; naměřená šířka se objeví v
horním řádku displeje, zatímco vypočtená plocha se
objeví v dolním řádku displeje
-
namiřte přístroj směrem ke třetímu cílovému povrchu
(výška)
-
opětovně stlačte “GO”; naměřená výška se objeví v
horním řádku displeje, zatímco vypočtený objem se
objeví v dolním řádku displeje
-
opětovně stlačte “GO” pro započetí úplně nového
měření objemu
•
Souvislé měření !
-
stiskněte tlačítko F3 po zapnutí přístroje (symbol @
se zobrazí na displeji)
-
stlačte “GO” (na displeji se objeví symbol 8)
-
laserový paprsek zůstane zapnutý, takže je možné
souvisle měřit aktuální vzdálenost
-
stiskněte opět “GO”, abyste přerušili souvislé měření
(současná naměřená hodnota je zobrazena na
displeji)
-
stiskněte opět “GO”, abyste znovu spustili souvislé
měření
-
režim souvislého měření se automaticky vypíná po 5
minutách (posledně naměřená hodnota zůstává
zobrazena na displeji) a může být také ukončen
zvolením jiného režimu měření
•
Ukládání/přičítání naměřených hodnot
- po provedení měření stiskněte “M+”, abyste uložili
naměřenou hodnotu
-
písmeno “M” se zobrazí na displeji a značka plus po
ním krátce bliká
-
přičtěte dodatečně naměřené hodnoty k hodnotě
paměti pomocí “M+” (možné pouze při
odpovídajících jednotkách měření)
•
Odečítání naměřených hodnot
- stiskněte “M-”, abyste odečetli současnou
naměřenou hodnotu od hodnoty paměti (možné
pouze při odpovídajících jednotkách měření)
-
písmeno “M” se zobrazí na displeji a značka minus
po ním krátce bliká
•
Přečtení paměti
- stisknutím “M=” se zobrazí hodnota uložená v paměti
spolu se symbolem “M=” (posledně naměřená
hodnota zůstává zobrazena na displeji)
-
zdvojnásobte obsah paměti stisknutím “M+”
- nastavte obsah paměti na nulu stisknutím “M-”
• Vymazání paměti
Nejprve stiskněte “M=”, potom stiskněte “C” (písmeno
“M” již není zobrazeno)
•
Chybné měření
- když je měření neúspěšné, na displeji se objeví
“ERROR”
Ташев-Галвинг ООД
www.tashev-galving.com
SKIL_IB0530_EUCH_v3.indd 35 08-06-2010 13:04:12
Page 36

36
- zjistěte příčinu, proveďte opravná opatření a znovu
uskutečněte měření
Možné příčiny chybného měření:
-
měření probíhalo mimo rámec rozsahu měření
- úhel mezi laserovým paprskem a cílem byl příliš ostrý
- cílový povrch odrážel příliš silně (např. zrcadlo) nebo
nedostatečně (např. černá látka) nebo prostorové
světlo bylo příliš jasné
-
přijímací čočky A 3 nebo otvor laserového světla
B 3 byl zamlžen (např. kvůli náhlé změně teploty)
-
byly přičteny/odečteny naměřené hodnoty s
neodpovídajícími jednotkami měření
•
Taška s pásem pro snadné a vhodné skladování #
POUŽITÍ
• Jestliže opravný postup nemůže provést opravu chyby,
nebo když se na displeji objeví “FAIL”, není jit možné
nadále měřit; v tomto případě zašlete přístroj svému
dodavateli nebo nejbližšímu servisu SKIL
•
Nevystavujte přístroj stálým vibracím a příliš vysokým či
nízkým teplotám
•
Přístroj vždy uschovejte v příslušném ochranném
kartonu/ pouzdru
•
Chraňte přístroj před prachem, vlhkostí a přímými
slunečními paprsky
•
Přístroj vyčistěte navlhčeným hadrem a jemným
mýdlem
!
před čištěním čočky z přístroje vždy vyjměte
baterie
•
Žádným způsobem přístroj nerozebírejte a neupravujte
• Žádná část laserové čočky se nesmí měnit
ZÁRUKA / ŽIVOTNÍ PROSTŘEDÍ
• Na tento výrobek značky SKIL platí záruka podle
statutárních regulací dané země; poškození způsobené
běžným opotřebováním, přetížením a nesprávným
použitím není zárukou kryto
•
V případě stížnosti vraťte přístroj nerozmontovaný spolu
s nákupním lístkem své prodejně nebo nejbližší servisní
službě výrobků Skil (adresy jsou uvedené na
www.skileurope.com)
•
Elektrické nářadí, baterie, doplňky a balení
nevyhazujte do komunálního odpadu (jen pro
státy EU)
-
podle evropské směrnice 2002/96/EG o nakládání s
použitými elektrickými a elektronickými zařízeními a
odpovídajících ustanovení právních předpisů
jednotlivých zemí se použitá elektrická nářadí, musí
sbírat odděleně od ostatního odpadu a podrobit
ekologicky šetrnému recyklování
-
symbol $ na to upozorňuje
TR
Lazerli ölçü aleti 0530
GİRİS
• Bu alet, lazer ışını yardımıyla iç ve dış mekanlarda
mesafeleri ölçmek üzere tasarlanmıştır
•
Doğru kullanıldığı taktirde bu alet kolayca ve hassas
olarak uzunluk, yüzey ve hacım ölçer
•
Bu kullanım kılavuzunu dikkatlice okuyun ve
güvenlik talimatlarına ve uyarılarına özel bir dikkat
gösterin; bunlara uyulmaması ciddi (göz)
yaralanmalarına neden olabilir 1
•
Aleti ilk kez kullanmadan önce, kendi ulusal dilinizdeki
etiketi Almanca uyarı metninin üzerine yapıştırın P 3
•
Bu kullanım kılavuzunu ileride başvurmak üzere saklayın
TEKNİK VERİLER
Ölçme yöntemi optik/lazer
Ölçüm aralığı 0,2 - 20 m
1
)
Ölçüm doğruluğu (tipik) +/- 3,0 mm
2
)
Ölçüm süresi (tipik) < 0,5 sn.
En küçük ölçüm birimi 1 mm
Çalışma sıcaklığı -10°C ila 50°C
Depolama ısısı -20°C ile 70°C arası
Bağıl nem (maks.) %90
Lazer sınıfı 2
Lazer tipi 635 nm
Azami güç çıkışı < 1 mW
Lazer ışını çapı
(yaklaşık 20°C derecede)
- 10 m uzaklıkta
6 mm
- 20 m uzaklıkta 16 mm
Piller (birlikte verilir) 4 x AAA (LR03) 1,5V
Yeniden şarj edilebilir piller 4 x AAA (KR03) 1,2V
Yaklaşık otomatik kapanma
- lazer
süresi ölçüm yapmadan
20 sn. sonra
- ölçü aleti
yapmadan 5 dk.
hareketsizlikten sonra
Ağırlık
0,18 kg
1) Ölçüm aralığı, lazer ışığın hedef yüzeyden ne kadar iyi
yansıtıldığına ve lazer noktanın ortam ışık yoğunluğuna
göre ne kadar parlak olduğuna bağlı olarak artar
2)
Ölçüm doğruluğu olumsuz koşullarda (örn. yoğun güneş
ışığında) + % 0,06 oranında sapma gösterir
ALET BİLEŞENLERİ 3
A Alım lensi
B Lazer ışın açıklığı
C LCD ekran
D Aç/kapa düğmesi
E Metre/ayak dönüştürme düğmesi
F Uzunluk ve sürekli ölçüm modu
G Yüzey ölçüm modu
H Hacim ölçüm modu
J Silme düğmesi (“C”)
K Hafızaya ekleme düğmesi (“M+”)
L Hafızadan çıkarma düğmesi (“M-”)
M Hafızadan sonuç alma düğmesi (“M=”)
N Ölçme düğmesi (“GO”)
P Uyarı etiketi
Q Pil yuvası kapağı
Ташев-Галвинг ООД
www.tashev-galving.com
SKIL_IB0530_EUCH_v3.indd 36 08-06-2010 13:04:13
Page 37

37
GÜVENLİK
• Lazer ışınına bakmayın (lazer radyasyonu) 2
• Lazer ışınını asla insanlara veya hayvanlara
yöneltmeyin
•
Aleti insanların lazer ışınına kasıtlı veya kazayla
bakmasına neden olacak bir pozisyonda koymayın
•
Lazer ışınına bakmak için (büyüteç, teleskop veya
dürbün gibi) büyüteçli hiç bir optik araç kullanmayın
•
Aletin üzerindeki uyarı etiketini çıkarmayın ve buna zarar
vermeyin
•
Aleti yanıcı sıvı, gaz veya toz bulunan yerlerde
çalıştırmayın
•
Aleti çocukların bulunduğu yerde çalıştırmayın
• Bu alet 16 yaşın altındaki kişiler tarafından
kullanılmamalıdır
•
Aleti kullanım kılavuzunda belirtilen amaçlardan başka
hiç bir amaç için kullanmayın
KULLANIM
• Pillerin yerleştirilmesi 4
! aletin kapatılmış olduğundan emin olun
- özellikle alkalin-mangan ya da yeniden şarj edilebilir
piller kullanın
-
aleti baş aşağı çevirin
- kapağı Q çıkarın
- 4 x 1,5 V pil takın (kutuplaşmanın doğru olmasına
dikkat edin)
-
kapağı Q takın
- pil zayıflayınca göstergede sembol
5 belirecektir
-
ekranda 5 simgesi ilk görüntülendiğinde, en az
100 ölçüm daha yapılabilir
-
5 simgesi yanıp sönmeye başladığında pilleri
değiştirin (artık ölçüm yapılamaz)
-
pili değiştirdiğinizde, her zaman bütün pilleri değiştirin
- alet uzun zaman kullanılmayacaksa, pilleri aletin
içinde bırakmayın
•
Aç/kapat
- “on/off” veya “GO” düğmesine basarak aleti açın
(lazer ışını henüz açılmamıştır)
-
“on/off” basarak aleti durdurun
- 5 dakika hareketsizlikten sonra alet otomatik olarak
durur
•
Metre/ayak dönüştürme
- başlangıçta ölçüler metre/santimetre olarak belirir
- metre/santimetreleri ayak/inç olarak görmek için
düğme E’ye 3 basın
•
Aletin çalıştırılması 6
-
aleti açın (ekranda aletin uzunluk ölçme modunda
olduğunu belirten 7 simgesi görüntülenir)
-
istiyorsanız başka bir ölçme modu (yüzey/hacim) seçin
-
lazer ışınını açmak için “GO” düğmesine basın
(ekranda 8 simgesi görüntülenir)
-
aleti hedef yüzeye doğru yöneltin
! lazer ışınının içine bakmayın
! lazer ışınını insanlara veya hayvanlara
yönlendirmeyin
-
“GO” düğmesine yeniden basın, ölçülen değer
ekranda görüntülenir (lazer ışını otomatik olarak
kapanır)
-
lazer ışını hiç ölçüm yapmadan yaklaşık 20 saniye
boyunca açık kaldığında da otomatik olarak kapanır
!
aletin arkasından itibaren ölçmekte olduğunu göz
önünde bulundurun (aletin kendi uzunluğu ölçüm
sonucuna dahildir)
-
son ölçülen değeri silmek için “C” düğmesine basın
- son ölçülen değerleri ters sırayla silmek için “C”
düğmesine art arda basın (m³ - m²)
•
Düzgün ölçüm için talimatlar
!
ölçüm esnasında aleti kıpırdatmayın (sürekli ölçüm
modu hariç)
-
ölçüm yaparken alım lensini A 3 ve lazer ışını deliğini
B 3 kapatmayın
-
olumsuz koşullarda (örn. dışarıda yoğun güneş
ışığında) lazer artırıcı camlar (SKIL aksesuar
2610395907) kullanın ya da hedef yüzeye bir kağıt
parçası yerleştirin
-
saydam, yansıtan, gözenekli ya da yapılandırılmış
yüzeyler hatalı ölçümlere yol açabilir
•
Yüzey ölçme
- düğme G’ye
3 basın (göstergede sembol 9
belirecektir)
-
aleti ilk hedef yüzeye doğru yöneltin (uzunluk)
- “GO” basın (göstergede sembol
8 belirecektir)
-
“GO” tekrar basın; ölçülen uzunluk göstergenin üst
satırında belirecektir
-
aleti ikinci hedef yüzeye doğru yöneltin (genişlik)
- “GO” tekrar basın; ölçülen genişlik göstergenin üst
satırında, hesaplanan yüzölçümü ise alt satırda
belirecektir
-
“GO” tekrar basın tamamen yeni bir yüzey ölçümüne
başlayabilirsiniz
•
Hacım ölçme
- düğme H’ye
3 basın (göstergede sembol 0
belirecektir)
-
aleti ilk hedef yüzeye doğru yöneltin (uzunluk)
- “GO” basın (göstergede sembol
8 belirecektir)
-
“GO” tekrar basın; ölçülen uzunluk göstergenin üst
satırında belirecektir
-
aleti ikinci hedef yüzeye doğru yöneltin (genişlik)
- “GO” tekrar basın; ölçülen genişlik göstergenin üst
satırında, hesaplanan yüzölçümü ise alt satırda
belirecektir
-
aleti üçüncü hedef yüzeye doğru yöneltin (yükseklik)
- “GO” tekrar basın; ölçülen yükseklik göstergenin üst
satırında, hesaplanan hacım ise göstergenin alt
satırında belirecektir
-
“GO” tekrar basın tamamen yeni bir hacım ölçümüne
başlayabilirsiniz
•
Sürekli ölçüm !
-
aleti açtıktan sonra F3 düğmesine basın (ekranda @
simgesi görüntülenir)
-
“GO” basın (göstergede sembol 8 belirecektir)
-
gerçek uzaklığın sürekli olarak okunabilmesi için lazer
ışını açık kalır
-
sürekli ölçümü durdurmak için tekrar “GO”
düğmesine basın (o anda ölçülen değer ekranda
gösterilir)
-
sürekli ölçümü yeniden başlatmak için “GO”
düğmesine tekrar basın
-
sürekli ölçüm modu 5 dakika sonra otomatik olarak
kapanır (son ölçülen değer ekranda kalır) ve başka bir
ölçüm modu seçilerek de sonlandırılabilir
Ташев-Галвинг ООД
www.tashev-galving.com
SKIL_IB0530_EUCH_v3.indd 37 08-06-2010 13:04:14
Page 38

38
• Ölçülen değerleri kaydetme/toplama
- ölçümü yaptıktan sonra ölçülen değeri kaydetmek
için “M+” düğmesine basın
-
ekranda “M” harfi görüntülenir ve altında hızla yanıp
sönen artı işareti görünür
-
“M+” düğmesini kullanarak ölçülen ek değerleri
hafızaya ekleyin (yalnızca ölçüm birimleri uygun
olduğunda)
•
Ölçülen değerleri çıkarma
- ölçülen geçerli değeri hafızadaki değerden çıkarmak
için “M-” düğmesine basın (yalnızca ölçüm birimleri
uygun olduğunda)
-
ekranda “M” harfi görüntülenir ve altında hızla yanıp
sönen eksi işareti görünür
•
Hafızayı okuma
- “M=” düğmesine bastığınızda, hafızada kayıtlı olan
değer “M=” simgesiyle birlikte görüntülenir (son
ölçülen değer ekranda kalır)
-
“M+” düğmesine basarak hafıza içeriğini ikiye
katlayın
-
“M-” düğmesine basarak hafıza içeriğini sıfıra
ayarlayın
•
Hafızayı silme
İlk önce “M=” sonra da “C” düğmesine basın (artık “M”
harfi görüntülenmez)
•
Hatalı ölçüm
- ölçüm başarısız olduğu taktirde, göstergede
“ERROR” belirir
-
sebebi belirleyin, sorun giderici eylemi uygulayın ve
ölçümü tekrar yapın
Olası hatalı ölçüm sebepleri:
-
ölçümün, ölçüm aralığının dışında yapılmış olması
- lazer ışını ve hedef arasındaki açının çok dar olması
- hedef yüzeyin çok kuvvetli (örn. ayna) ya da yetersiz
(örn. siyah renkli kumaş) bir yansıtıcı olması, ya da
ortamın çok aydınlık olması
-
alım lensi A 3 veya lazer ışını deliğinin B 3
buğulanmış olması (örn. hızlı sıcaklık değişimi
sebebiyle)
-
ölçülen değerlerin ilgili olmayan ölçüm birimleri ile
toplanıyor/çıkarılıyor olması
•
Kolay ve rahat depolama için kemer torbası #
UYGULAMA
• Sorun giderici eylem hatayı düzeltemiyorsa veya
ekranda “FAIL” görüntüleniyorsa, ölçüm artık mümkün
değildir; bu durumda cihazı satıcınıza veya en yakın
SKIL servisine gönderin
•
Aleti sürekli titreşime veya aşırı sıcak ya da soğuğa
maruz bırakmayın
•
Aleti her zaman içeride ve kendi koruyucu karton
kutusunda muhafaza edin
•
Aleti her zaman tozdan, nemden ve direkt güneş
ışığından koruyun
•
Aleti hafif nemli ve yumuşak sabunlu bir bez ile
temizleyin
!
lensleri temizlemeden önce mutlaka pilleri çıkarın
• Aleti herhangi bir şekilde sökmeyin ve alette değişiklik
yapmayın
•
Lazer lenslerinin herhangi bir parçasını değiştirmeye
kalkışmayın
GARANTİ / ÇEVRE
• Bu SKIL ürünü yasal/ülkeye özel yönetmeliklere göre
garanti altındadır, normal aşınma ve yıpranmadan
doğabilecek hasarlar, aşırı yüklenme veya yanlış
kullanım garanti kapsamında değildir
•
Şikâyet halinde, aleti tam olarak satış belgesi ile birlikte
ürünü satın aldığınız yere veya en yakın Skil servis
merkezine gönderin (adresler için bakın:
www.skileurope.com)
•
Elektrikli aletlerini, piller, aksesuarları ve ambalajları
evdeki çöp kutusuna atmayınız (sadece AB ülkeleri
için)
-
kullanılmış elektrikli aletleri, elektrik ve elektronikli
eski cihazlar hakkındaki 2002/96/EC Avrupa
yönergelerine göre ve bu yönergeler ulusal hukuk
kurallarına göre uyarlanarak, ayrı olarak toplanmalı ve
çevre şartlarına uygun bir şekilde tekrar
değerlendirmeye gönderilmelidir
-
sembol $ size bunu anımsatmalıdır
PL
Laserowy przyrząd pomiarowy 0530
WSTĘP
• Przyrząd ten jest przeznaczony do pomiarów zarówno
we wnętrzach, jak i na otwartym powietrzu za pomocą
wiązki laserowej
•
Przy poprawnym użyciu przyrząd umożliwia łatwy i
dokładny pomiar odległości, pola powierzchni i
objętości
•
Przeczytać dokładne niniejszą instrukcję obsługi i
proszę zwrócić szczególną uwagę na instrukcje i
przestrogi odnoszące się do bezpieczeństwa
obsługi; ich nieprzestrzeganie może prowadzić do
poważnego uszkodzenia wzroku 1
•
Przed pierwszym użyciem dalmierza należy nakleić
znajdującą się w zestawie naklejkę w języku polskim na
tabliczkę z ostrzeżeniem w języku niemieckim P 3
•
Zachować niniejszą instrukcję obsługi w celu
późniejszego korzystania
PARAMETRY TECHNICZNE
Metoda dokonywania pomiaru optycznie/laserowo
Zakres pomiarowy 0,2 - 20 m
1
)
Dokładność pomiaru (typowa) +/- 3,0 mm
2
)
Czas pomiaru (typowy) < 0,5 s.
Najmniejsza jednostka pomiaru 1 mm
Temperatura pracy -10°C do 50°C
Temperatura przechowywania -20°C do 70°C
Wilgotność względna (maks.) 90%
Klasa lasera 2
Typ lasera 635 nm
Maksymalna moc wyjściowa < 1 mW
Średnica wiązki laserowej
(przy temp. około 20°C)
- przy odległości 10 m
6 mm
- przy odległości 20 m 16 mm
Baterie (w zestawie) 4 x AAA (LR03) 1,5V
Ташев-Галвинг ООД
www.tashev-galving.com
SKIL_IB0530_EUCH_v3.indd 38 08-06-2010 13:04:15
Page 39

39
Baterie wielokrotnego ładowania 4 x AAA (LR03) 1,2V
Automatyczna funkcja wyłączania
- laser
jeśli nie jest używany
przez około 20 sekund
- dalmierz
jeśli nie jest używany
przez około 5 minut
Ciężar
0,18 kg
1) Zasięg pomiaru zwiększa się w zależności od tego, jak
dobrze światło lasera odbija się od powierzchni, do
której mierzona jest odległość i jak jasny jest punkt
lasera w stosunku do intensywności światła w otoczeniu
2)
Dokładność pomiaru odbiega o +0,06% w
niekorzystnych warunkach pomiaru (np. w intensywnym
świetle słonecznym)
ELEMENTY NARZĘDZIA 3
A Soczewka odbiorcza
B Wylot wiązki laserowej
C Wyświetlacz LCD
D Przycisk wł./wył.
E Przycisk konwersji metry/stopy
F Tryb ciągłego pomiaru odległości
G Tryb pomiaru powierzchni
H Tryb pomiaru objętości
J Przycisk czyszczenia (“C”)
K Przycisk dodawania do pamięci (“M+”)
L Przycisk odejmowania z pamięci (“M-”)
M Przycisk sprawdzania pamięci (“M=”)
N Przycisk mierzenia (“GO”)
P Etykieta z ostrzeżeniem
Q Pokrywka pojemnika na baterie
BEZPIECZEŃSTWA
• Nie patrz w wiązkę światła lasera (promień lasera) 2
• Nie kieruj wiązki lasera w stronę ludzi lub zwierząt
• Nie umieszczaj urządzenia w położeniu, w którym
ktokolwiek mógłby specjalnie lub niechcący spojrzeć w
wiązkę lasera
•
Nie używaj żadnych optycznych przyrządów
powiększających (jak soczewki powiększające,
teleskopy lub lornetki) do spoglądania w wiązkę lasera
•
Nie usuwaj i nie niszcz ostrzegawczych znaków na
narzędziu
•
Nie używaj narzędzia w obecności palnych cieczy,
gazów lub pyłów
•
Nie używaj narzędzia przy dzieciach
• Narzędzie nie powinno być używane przez osoby w
wieku poniżej 16 lat
•
Nie używaj narzędzia do żadnych celów innych, niż
opisane w niniejszym podręczniku obsługi
UŻYTKOWANIE
• Montaż baterii 4
! upewnij się, że narzędzie jest wyłączone
- należy używać jedynie baterii alkaliczno-
magnezowych lub nadających się do ponownego
ładowania
-
odwrócić narzędzie do góry nogami
- zdejmij pokrywkę Q obracając
- włóż 4 x baterię 1,5V (zwróć uwagę na właściwą
polaryzację)
-
zamocuj pokrywkę Q obracając ją w prawo
- przy niskim stanie baterii, na wyświetlaczu pokaże
się symbol 5
-
kiedy na wyświetlaczu po raz pierwszy pojawi się
symbol 5, wtedy możliwych będzie jeszcze co
najmniej 100 pomiarów
-
baterie należy wymienić, kiedy symbol 5 zacznie się
świecić (przeprowadzanie pomiarów nie będzie już
możliwe)
-
zawsze wymieniaj komplet baterii
- zawsze wyjmuj baterie z narzędzia, jeśli ma ono być
nieużywane przez dłuższy okres
•
Włącznik/wyłącznik
- należy włączyć urządzenie wciskając przycisk “on/
off” lub “GO” (wiązka laserowa nie jest jeszcze
włączona)
-
wyłącz przyrząd naciśnięciem “on/off”
- przyrząd automatycznie wyłącza się po 5 minut
bezczynności
•
Konwersja metry/stopy
- standardowo pomiar dokonywany jest w metrach/
centymetrach
-
w celu zmiany metrów/centymetrów na stopy/cale
naciśnij przycisk E 3
•
Obsługa narzędzia 6
-
proszę włączyć dalmierz (symbol 7 pojawi się na
wyświetlaczu wskazując, że dalmierz znajduje się w
trybie pomiaru odległości)
-
proszę wybrać inny tryb pomiaru (powierzni/
objętości) w razie potrzeby
-
należy wcisnąć przycisk “GO”, aby włączyć wiązkę
laserową (symbol 8 pojawi się na wyświetlaczu)
-
skieruj przyrząd w stronę mierzonej powierzchni
! nie patrz w wiązkę światła lasera
! nie kieruj wiązki lasera w stronę ludzi lub zwierząt
- proszę ponownie wcisnąć przycisk “GO”; wartość
pomiaru pojawi się na wyświetlaczu (wiązka laserowa
wyłączy się automatycznie)
-
wiązka laserowa również wyłączy się automatycznie,
jeśli przez około 20 sekund po jej włączeniu nie
wykonane zostaną żadne pomiary
!
pamiętaj, że przyrząd mierzy odległość od swojej
podstawy (długość przyrządu jest uwzględniona w
wyniku pomiaru)
-
proszę wcisnąć przycisk “C” w celu wyczyszczenia
ostatniej zmierzonej wartości pomiaru
indywidualnego
-
należy wciskać przycisk “C” wielokrotnie w celu
wyczyszczenia ostatnich zmierzonych wartości
pomiaru indywidualnego w odwrotnej kolejności (m³ m²)
•
Instrukcje poprawnego pomiaru
!
nie należy poruszać dalmierzem w trakcie
pomiaru (nie dotyczy pracy w trybie ciągłego
pomiaru odległości)
-
nie należy zakrywać soczewki odbiorczej A 3 i
wiązki laserowej B 3 podczas pomiaru
Ташев-Галвинг ООД
www.tashev-galving.com
SKIL_IB0530_EUCH_v3.indd 39 08-06-2010 13:04:15
Page 40

40
- w niesprzyjających warunkach (np. dokonując
pomiarów na wolnym powietrzu w intensywnym
świetle słonecznym) należy użyć szkieł
wzmacniających laser (wyposażenie dodatkowe SKIL
2610395907) lub położyć kartkę papieru na
powierzchni, do której mierzona jest odległość
-
pomiar odległości od przezroczystych, odbijających
światło, porowatych lub posiadających strukturę
powierzchni może prowadzić do nieprawidłowych
pomiarów
•
Pomiar pola powierzchni
- naciśnij przycisk G
3 (na wyświetlaczu pokaże się
symbol 9)
-
skieruj przyrząd w stronę pierwszej mierzonej
powierzchni (długość)
-
naciśnij “GO” (na wyświetlaczu pokaże się symbol 8)
-
ponownie naciśnij “GO”; wynik pomiaru długości
pojawia się w górnym wierszu wyświetlacza
-
skieruj przyrząd w stronę drugiej mierzonej
powierzchni (szerokość)
-
ponownie naciśnij “GO”; zmierzona szerokość
pojawia się w górnym wierszu wyświetlacza, a
obliczone pole powierzchni widoczne jest u dołu
wyświetlacza
-
by zacząć zupełnie nowy pomiar pola powierzchni,
ponownie naciśnij “GO”
•
Pomiar objętości
- naciśnij przycisk H
3 (na wyświetlaczu pokaże się
symbol 0)
-
skieruj przyrząd w stronę pierwszej mierzonej
powierzchni (długość)
-
naciśnij “GO” (na wyświetlaczu pokaże się symbol 8)
-
ponownie naciśnij “GO”; wynik pomiaru długości
pojawia się w górnym wierszu wyświetlacza
-
skieruj przyrząd w stronę drugiej mierzonej
powierzchni (szerokość)
-
ponownie naciśnij “GO”; zmierzona szerokość pojawia
się w górnym wierszu wyświetlacza, a obliczone pole
powierzchni widoczne jest u dołu wyświetlacza
-
skieruj przyrząd w stronę trzeciej mierzonej
powierzchni (wysokość)
-
ponownie naciśnij “GO”; zmierzona wysokość
pojawia się w górnym wierszu wyświetlacza, a
obliczona objętość widoczna jest u dołu
-
by zacząć zupełnie nowy pomiar objętości, ponownie
naciśnij “GO”
•
Pomiar ciągły !
-
proszę wcisnąć przycisk F3 po włączeniu dalmierza
(symbol @ pojawi się na wyświetlaczu)
-
naciśnij “GO” (na wyświetlaczu pokaże się symbol 8)
-
wiązka laserowa pozostaje włączona, więc
rzeczywista odległość może być mierzona w sposób
ciągły
-
proszę ponownie wcisnąć przycisk “GO”, aby
przerwać pomiar ciągły (obecnie zmierzona wartość
znajduje się na wyświetlaczu)
-
proszę ponownie wcisnąć przycisk “GO”, aby
ponownie uruchomić pomiar ciągły
-
tryb pomiaru ciągłego wyłączy się automatycznie po
5 minutach (ostatnia zmierzona wartość pozostanie
na wyświetlaczu) i może być także zakończony po
wybraniu innego trybu pomiaru
•
Zapamiętywanie/dodawanie zmierzonych wartości
- po wykonaniu pomiaru wcisnąć przycisk “M+”, aby
zapamiętać zmierzoną wartość
-
litera “M” pojawi się na wyświetlaczu a znak plusa
poniżej na chwilę się zapali
-
kolejne zmierzone wartości dodaje się do
zapamiętanej wartości przyciskiem “M+” (możliwe
jedynie, gdy jednostki pomiaru są zgodne)
•
Odejmowanie zmierzonych wartości
- proszę wcisnąć przycisk “M-”, aby odjąć obecnie
zmierzoną wartość od wartości zapamiętanej
(możliwe jedynie, gdy jednostki pomiaru są zgodne)
-
litera “M” pojawi się na wyświetlaczu a znak minusa
poniżej na chwilę się zapali
•
Odczyt pamięci
- po naciśnięciu przycisku “M=” wartość zapamiętana
w pamięci wyświetli się razem z symbolem “M=”
(ostatnia zmierzona wartość pozostanie na
wyświetlaczu)
-
aby podwoić wartość pamięci, należy wcisnąć
przycisk “M+”
-
aby wyzerować wartość pamięci, należy wcisnąć
przycisk “M-”
•
Czyszczenie pamięci
Najpierw należy wcisnąć przycisk “M=”, następnie
przycisk “C” (litera “M” zniknie z wyświetlacza)
•
Fałszywe pomiary
- jeśli pomiar się nie uda, na wyświetlaczu pojawi się
“ERROR”
-
proszę określić przyczynę, naprawić błąd i ponownie
dokonać pomiaru
Możliwe przyczyny wadliwego pomiaru:
-
pomiar nie był dokonany granicach zasięgu
urządzenia
-
kąt pomiędzy wiązką lasera a obiektem pomiaru był
zbyt ostry
-
powierzchnia, do której mierzona jest odległość
odbiła wiązkę lasera zbyt mocno (np. lustro) lub
niewystarczająco mocno (np. czarna tkanina), lub
intensywność światła w otoczeniu była zbyt duża
-
soczewka odbiorcza A 3 lub wyjście wiązki
laserowej B 3 zaparowały (np. z powodu nagłej
zmiany temperatury)
-
wartości pomiarów zostały dodane/odjęte w
niezgodnych jednostkach pomiaru
•
Futerał na pasek dla poręcznego i wygodnego
przechowywania #
WSKAZÓWKI UŻYTKOWANIA
• Kiedy poprawna czynność nie usuwa problemu lub
kiedy na wyświetlaczu pojawia się napis “FAIL”,
wykonywanie pomiarów jest niemożliwe; w takim
przypadku proszę przesłać urządzenie do sprzedawcy
lub najbliższego serwisu firmy SKIL
•
Nie narażaj narzędzia na trwałe wibracje, ani na
wyjątkowo wysokie lub niskie temperatury
•
Zawsze przechowuj narzędzie w pomieszczeniu, w
pudełku/futerale ochronnym
•
Podczas przechowywania zawsze chroń narzędzie
przed zapyleniem, wilgocią i bezpośrednim światłem
słonecznym
Ташев-Галвинг ООД
www.tashev-galving.com
SKIL_IB0530_EUCH_v3.indd 40 08-06-2010 13:04:16
Page 41

41
•
Czyść narzędzie wilgotną ściereczką i łagodnym
mydłem
!
zawsze przed czyszczeniem soczewek wyjmuj
baterie
•
W żaden sposób nie demontuj ani nie modyfikuj
narzędzia
•
Nie próbuj wymieniać jakiejkolwiek części soczewek
lasera
GWARANCJA / ŚRODOWISKO
• Niniejszy wyrób marki SKIL podlega ustawowej
gwarancji/zgodnie z przepisami krajowymi; uszkodzenia
wynikłe wskutek normalnego zużycia, przeciążenia lub
nieprawidłowej obsługi nie są objęte gwarancją
•
W przypadku zażalenia należy odesłać nierozebrany
narzędzie, wraz z dowodem zakupu, do dealera lub do
najbliższego punktu usługowego Skil (adres można
znaleźć na www.skileurope.com)
•
Nie wyrzucaj elektronarzędzi, baterie, akcesoriów i
opakowania wraz z odpadami z gospodarstwa
domowego (dotyczy tylko państw UE)
-
zgodnie z Europejską Dyrektywą 2002/96/WE w
sprawie zużytego sprzętu elektrotechnicznego i
elektronicznego oraz dostosowaniem jej do prawa
krajowego, zużyte elektronarzędzia należy
posegregować i zutylizować w sposób przyjazny dla
środowiska
-
w przypadku potrzeby pozbycia się narzędzia,
akcesoriów i opakowania - symbol $ przypomni Ci o
tym
RU
Лазерный измерительный 0530
инструмент
BBEДЕНИЕ
• Данный инструмент предназначен для измерения
расстояний в помещениях и на улице при помощи
проецирования лазерного луча
•
При верном применении этот инструмент легко и
точно измеряет длину, площадь и объём
•
Внимательно пpочитайте инстpукции и обpатите
особое внимание на инстpукции по безопасности
и пpедупpеждения; наpушение этиx инстpукций
и пpедупpеждений может пpивести к сеpьёзным
повpеждениям (лаз) 1
•
Перед первым использованием инструмента,
наклейте прилагаемую этикетку с надписью на
вашем родном языке поверх немецкого текста на
предупреждающей табличке P 3
•
Соxpаните эту инстpукцию для будущиx спpавок
ТЕХНИЧЕСКИЕ ДАННЫЕ
Способ измерения оптический/лазерный
Диапазон измерений 0,2 - 20 м
1
)
Точность измерения (стандарт) +/- 3,0 мм
2
)
Продолжительность
измерения (стандарт)
< 0,5 сек.
Наименьшая единица отсчета 1 мм
Pабочая темпеpатуpа -10°C до 50°C
Температура хранения -20°C до 70°C
Относительная влажность
(макс.)
90%
Лазеp класса 2
Лазеp типа 635 нм
Максимальная выxодная
мощность
< 1 mW
Диаметр лазерного луча (под углом прибл. 20°C)
- на расстоянии 10 м
6 мм
- на расстоянии 20 м 16 мм
Батареи (входят в комплект) 4 x AAA (LR03) 1,5В
Аккумуляторные батареи 4 x AAA (KR03) 1,2В
Автоматическое выключение
- лазер
после прибл. 20 сек.,
если не проводится
измерение
- измерительный инструмент
после прибл. 5 мин.
бездействия
Вес
0,18 кг
1) Диапазон измерений возрастает в зависимости от
того, насколько хорошо отражается луч лазера от
целевой поверхности, и насколько яркой является
точка лазерного луча по отношению к
интенсивности окружающего освещения
2)
При неблагоприятных условиях точность измерения
отклоняется на +0,06% (например, при ярком
солнечном свете)
ДЕТАЛИ ИНСТРУМЕНТА 3
A Приемная линза
B Отверстие для лазерного луча
C Дисплей на жидких кристаллах
D Кнопка on/off
E Кнопка преобразователь метров и футов
F Режим измерения длины и режим непрерывного
измерения
G Режим измерения по поверхности
H Режим измерения объема
J Кнопка сброса данных (“С”)
K Кнопка добавления данных в память (“М+”)
L Кнопка вычета данных из памяти (“М-”)
M Кнопка восстановления данных в памяти (“М+”)
N Кнопка начала измерения (“GO”)
P Пpедупpедительная табличка
Q Кpышка отсека для батаpей
БЕЗОПАСНОСТЬ
• Не смотpите на лазеpный луч (синмтиу
гикпиъпу) 2
•
Не напpавляйте лазеpный луч на людей или
животныx
•
Не следует устанавливать инстpумент в такое
положение, что может пpивести к тому, что люди
будут смотpеть на него намеpенно или случайно
•
Не следует использовать увеличительныx
оптическиx инстpументов (напp., увеличительные
стёкла, телескопы или бинокли) для
pассматpивания лазеpного луча
Ташев-Галвинг ООД
www.tashev-galving.com
SKIL_IB0530_EUCH_v3.indd 41 08-06-2010 13:04:17
Page 42

42
• Не следует снимать или повpеждать
пpедупpедительную табличку на инстpументе
•
Не следует использовать инстpумент в пpисутствии
легковоспламеняющиxся жидкостей, газов и пыли
•
Не следует использовать инстpумент в пpисутствии
детей
•
Этим инстpументом не должны пользоваться лица
моложе 16-ти лет
•
Не следует использовать инстpумент для дpугиx
целей, кpоме описанныx в данной инстpукции
ИСПОЛЬЗОВАНИЕ
• Установка батаpей 4
! убедитесь в том, что инстpумент выключен
- используйте исключительно марганцево-
щелочные или аккумуляторные батареи
-
переверните инструмент вверх дном
- снимите кpышку Q
- установите 4 x батаpею 1,5 В (обеспечьте веpную
поляpизацию)
-
установите кpышку Q на место
- если батарея садится, на дисплее появится
символ 5
-
когда символ 5 появляется на дисплее в первый
раз, это значит, что можно проделать еще, по
меньшей мере, 100 измерений
-
замените батареи, когда символ 5 начинает
мигать (уже нельзя проводить измерения)
-
всегда заменяйте весь комплект батаpей
- всегда удаляйте батаpеи, если инструмент не
будет использоваться продолжительное время
•
Включение/выключение
- включите инструмент, нажав “on/off” или “GO”
(лазерный луч еще не включен)
-
выключите инструмент, нажав “on/off”
- инструмент автоматически выключается после 5
минут бездействия
•
Преобразователь метров и футов
- по умолчанию измерения осуществляются в
метрах и сантиметрах
-
нажмите кнопку E 3 для преобразования
метров/сантиметров в футы/дюймы
•
Использование инстpумента 6
-
включите инструмент (символ 7 появляется на
дисплее, указывая на то, что инструмент уже
находится в режиме измерения длины)
-
если необходимо, выберите другой режим
измерения (поверхность/объем)
-
нажмите “GO”, чтобы включить лазерный луч
(символ 8 появится на дисплее)
-
направьте инструмент на измеряемую
поверхность
!
не смотрите на лазерный луч
! не направляйте лазерный луч на людей или
животных
-
нажмите “GO” снова; измеренное значение
появится на дисплее (лазерный луч выключается
автоматически)
-
лазерный луч также автоматически
выключается, если в течение приблизительно
20 секунд после включения лазерного луча
измерения не были проведены
!
помните, что инструмент осуществляет
измерение с задней части (поэтому его длина
включается в измеренный результат)
-
нажмите “C” для сброса каждого последнего
измеренного значения
-
многократно нажимайте “C” для сброса каждого
последнего измеренного значения в обратном
порядке (m³ - m²)
•
Указания по верному измерению
!
не двигайте инструмент во время проведения
измерений (за исключением случаев, когда
инструмент работает в режиме непрерывного
измерения)
-
не закрывайте приемную линзу A 3 и отверстие
для лазерного луча B 3 при проведении
измерений
-
при неблагоприятных условиях (например, во
время проведения измерений при ярком
солнечном свете) используйте линзы для
усиления лазера (принадлежность SKIL
2610395907) или положите лист бумаги на
целевую поверхность
-
измерение по прозрачным, зеркальным,
пористым или структурированным поверхностям
может привести к получению неверных
показателей
•
Измерение поверхности
- нажмите кнопку G
3 (на дисплее появится
символ 9)
-
направьте инструмент на первую измеряемую
поверхность (длина)
-
нажмите “GO” (на дисплее появится символ 8)
-
снова нажмите “GO”; измеренная длина появится
на верхней строчке дисплея
-
направьте инструмент на вторую измеряемую
поверхность (ширина)
-
снова нажмите “GO”; измеренная ширина
появится на верхней строчке дисплея, а
вычисленная площадь на нижней строчке дисплея
-
снова нажмите “GO” для начала измерения
новой площади
•
Измерение объёма
- нажмите кнопку H
3 (на дисплее появится
символ 0)
-
направьте инструмент на первую измеряемую
поверхность (длина)
-
нажмите “GO” (на дисплее появится символ 8)
-
снова нажмите “GO”; измеренная длина появится
на верхней строчке дисплея
-
направьте инструмент на вторую измеряемую
поверхность (ширина)
-
снова нажмите “GO”; измеренная ширина
появится на верхней строчке дисплея , а
вычисленная площадь на нижней строчке
дисплея
-
направьте инструмент на третью измеряемую
поверхность (высота)
-
снова нажмите “GO”; измеренная длина появится
на верхней строчке дисплея, а вычисленный
объём на нижней строчке дисплея
-
снова нажмите “GO” для начала измерения
нового объёма
Ташев-Галвинг ООД
www.tashev-galving.com
SKIL_IB0530_EUCH_v3.indd 42 08-06-2010 13:04:18
Page 43

43
•
Непрерывное измерение !
-
нажмите кнопку F3 после включения
инструмента (символ @ появится на дисплее)
-
нажмите “GO” (на дисплее появится символ 8)
-
лазерный луч остается включенным для того,
чтобы можно было непрерывно считывать
фактическое расстояние
-
нажмите “GO” повторно, чтобы приостановить
непрерывное измерение (текущее измеренное
значение отображается на дисплее)
-
нажмите “GO” снова для повторного запуска
режима непрерывного измерения
-
режим непрерывного измерения автоматически
выключается через 5 минут (последнее
измеренное значение остается на дисплее), а
также может быть выключен посредством
переключения инструмента на другой режим
измерения
•
Сохранение/добавление измеренных значений
- после выполнения измерения нажмите “М+” для
сохранения измеренного значения
-
на дисплее появляется буква “М”, под которой
промигивает знак “плюс”
-
добавьте дополнительные измеренные значения
к значению, находяшемуся в памяти, при помощи
“М+” (по возможности, только при совпадении
единиц измерения)
•
Вычет измеренных значений
- нажмите “М-”, чтобы вычесть текущее
измеренное значение из значения, находящегося
в памяти (по возможности, только при
совпадении единиц измерения)
-
на дисплее появляется буква “М”, под которой
промигивает знак “минус”
•
Считывание данных памяти
- при нажатии “М=” значение, сохраненное в
памяти, отображается на дисплее с символом
“М=” (последнее измеренное значение остается
на дисплее)
-
удвойте содержимое памяти нажатием “М+”
- установите содержимое памяти на нуль
нажатием “М-”
•
Сброс данных памяти
Сначала нажмите “М=”, затем - “С” (буква “М”
больше не отображается)
•
Неудачные измерения
- при неудачном измерении на дисплее появляется
“ERROR”
-
определите причину, выполните корректирующее
действие и проведите измерение снова
Возможные причины неверных измерений:
-
измерение проводилось вне пределов измерения
- угол между лазерным лучом и отметкой цели был
слишком острым
-
целевая поверхность отражает свет избыточно
(например, зеркало) или недостаточно (например,
черная ткань), или окрущающее освещение было
слишком ярким
-
приемные линзы A 3 или отверстие для
лазерного луча B 3 запотели (например, в связи
с быстрой переменой температуры)
-
измеренные значения были прибавлены/вычтены
несоответствующими измерительными
устройствами
•
Ремень и футляр для удобного хранения #
СОВЕТЫ ПО ИСПОЛЬЗОВАНИЮ
• Если корректирующее действие не может
исправить ошибку, или если на дисплее появляется
надпись “FAIL”, измерения можно будет
производить только после ее замены; в этом случае
направьте инструмент дилеру в Вашем регионе или
в ближайший сервисный центр SKIL
•
Не подвеpгайте инстpумент воздействию
непpеpывной вибpации или экстpемальныx
темпеpатуp
•
Хpаните инстpумент в помещении в его защитной
коpобке
•
Защищаёте инстpумент от пыли, влаги и пpямыx
солнечныx лучей
•
Чистите инстpумент с помощью влажной ветоши и
слабого моющего сpедства
!
пеpед чисткой линз всегда удаляйте батаpеи
• Не pазбиpайте и не модифициpуйте инстpумент ни
коим обpазом
•
Не изменяйте части лазеpныx линз
ГАРАНТИЯ / ОХРАНА
• Это изделие SKIL имеет гаpантию в соответствии с
установленными пpавилами; повpеждение
вследствие ноpмального использования, пеpегpузки
или невеpного обpащения не включены в гаpантию
•
Пpи неудовлетвоpении отпpавьте неpазобpанный
инстpумент со свидетельством покупки Вашему
дилеpу или в ближайшую станцию обслуживания
фиpмы Skil (адpеса пpиведены в вебсайте
www.skileurope.com)
•
Не выкидывайте электроинструмент, батареи,
принадлежности и упаковку вместе с бытовым
мусором (только для стран ЕС)
-
во исполнение европейской директивы 2002/96/
ЕС об утилизации отслужившего свой срок
электрического и электронного оборудования и в
соответствии с действующим законодательством,
утилизация электроинструментов производится
отдельно от других отходов на предприятиях,
соответствующих условиям экологической
безопасности
-
значок $ напомнит Вам об этом, когда появится
необходимость сдать электроинструмент на
утилизацию
Ташев-Галвинг ООД
www.tashev-galving.com
SKIL_IB0530_EUCH_v3.indd 43 08-06-2010 13:04:18
Page 44

44
UA
Лазеpний вимірювальний 0530
прилад
ВСТУП
• Даний інструмент призначений для виміру відстаней
у приміщеннях та на вулиці за допомогою
проектування лазерного проміння
•
При правильному користуванні цей прилад дозволяє
легко та точно вимірювати довжину, площу та об’єм
•
Уважно пpочитайте цю ‘Інстpукцію з
експлуатації’ і звеpніть особливу увагу на
пpавила і попеpедження з теxніки безпеки; їx
недотpимання може пpизвести до сеpйозної
тpавми (очей) 1
•
Перед першим використанням інструмента наклейте
етикетку, що додається, з написом на вашій рідній
мові поверх німецького тексту на попереджуючій
табличці P 3
•
Збеpежіть цю ‘Інстpукцію з експлуатації’ для
подальшого викоpистання
ТЕХНІЧНІ ДАНІ
Спосіб виміру оптичний/лазерний
Діапазон вимірів 0,2 - 20 м
1
)
Точність виміру (стандарт) +/- 3,0 мм
2
)
Тривалість виміру (стандарт) < 0,5 сек.
Найменша одиниця відліку 1 мм
Pобоча темпеpатуpавід -10°C до 50°C
Температура зберіганнявід -20°C до 70°C
Відносна вологість (макс.) 90%
Клас лазеpа 2
Тип лазеpа 635 нм
Максимальна виxідна
потужність
< 1 мВт
Діаметр лазерного проміння
(під кутом прибл. 20°C)
- на відстані 10 м
6 мм
- на відстані 20 м 16 мм
Батареї (входять у комплект) 4 x AAA (LR03) 1,5В
Акумуляторні батареї 4 x AAA (KR03) 1,2В
Автоматичне вимикання
- лазер
після прибл. 20 сек.,
якщо не здійснюється
вимір
- вимірювач
після прибл. 5 хв.
бездіяльності
Вага
0,18 кг
1) Діапазон вимірів зростає залежно від того,
наскільки добре проміння лазеру відбивається від
цільової поверхні, й наскільки яркою є крапка
лазерного проміння відносно інтенсивности
навколишнього освітлення
2)
При несприятливих умовах точність виміру
відхиляється на +0,06% (наприклад, при яскравому
сонячному світлі)
ЕЛЕМЕНТИ ІНСТРУМЕНТА 3
A Приймальна лінза
B Отвір виходу лазерного променя
C Рідкокристалічний дисплей
D Кнопка живлення
E Кнопка одиниць виміру (метри/фути)
F Режим виміру довжини та режим безперервного
виміру
G Режим виміру по поверхні
H Режим виміру об’єму
J Кнопка скидання даних (“С”)
K Кнопка додання даних до пам’яти (“М+”)
L Кнопка відрахування даних з пам’яти (“М+”)
M Кнопка відновлення даних у пам’яти (“M=”)
N Кнопка початку виміру (“GO”)
P Попеpеджувальна етикетка
Q Кpишка відділення для батаpей
БЕЗПЕКА
• Не дивіться в пpомінь лазеpа (лазеpне
випpомінювання) 2
•
Не спpямовуйте пpомінь лазеpа на людей чи
тваpин
•
Не pозташовуйте пpилад таким чином, щоб в нього
можна було навмисне чи ненавмисне заглянути
•
Не дивіться на пpомінь лазеpа чеpез будь-які
оптичні пpилади (такі як збільшувальне скло,
телескоп чи бінокль)
•
Не знімайте і не пошкоджуйте попеpеджувальну
етикетку на пpиладі
•
Не коpистуйтеся пpиладом у місцяx, де є займисті
pідини, гази чи пил
•
Не коpистуйтеся пpиладом, коли поpуч є діти
• Цим інструментом не повинні користуватися лиця,
молодші 16-ти років
•
Не застосовуйте цей пpилад для іншиx цілей ніж ті,
що вказані у цій ‘Інстpукції з експлуатації’
ВИКОРИСТАННЯ
• Встановлення батаpе 4
! упевніться, що пpилад вимкнений
- використовуйте виключно марганцево-лужні або
акумуляторні батареї
-
переверніть пристрій догори дном
- зніміть кришку Q
- вставте 4 x батарейку на 1,5 В (звеpніть увагу на
дотpимання пpавильної поляpності)
-
встановіть кришку Q на місце
- коли заряд батарейки слабкий, на екрані
з’являється символ 5
-
коли символ 5 з’являється на дисплеї у перший
раз, це означає, що можна здійснити ще
щонайменше 100 вимірів
-
замініть батареї, коли символ 5 починає мигати
(вже не можна проводити виміри)
-
завжди замінюйте повний комплект батаpей
- завжди виймайте батаpеї з пpиладу, якщо він
довгий час не викоpистовується
Ташев-Галвинг ООД
www.tashev-galving.com
SKIL_IB0530_EUCH_v3.indd 44 08-06-2010 13:04:19
Page 45

45
•
Вм./вим.
- увімкніть інструмент, нажавши “on/off” або “GO”
(лазерне проміння ще не увімкнене)
-
вимкніть прилад, натиснувши на “on/off”
- через 5 хвилин бездіяльності прилад автоматично
вимкнеться
•
Конвертація одиниць виміру (метри/фути)
- за замовчування вимірювання виконуються в
метрах/сантиметрах
-
натисніть кнопку E 3, щоб перевести метри/
сантиметри в фути/дюйми
•
Робота з пpиладом 6
-
увімкніть інструмент (символ 7 з’являється на
дисплеї, вказуючи на те, що інструмент вже
перебуває в режимі виміру довжини)
-
якщо необхідно, виберіть інший режим виміру
(поверхня/об’єм)
-
натисніть “GO”, щоб увімкнути лазерне проміння
(символ 8 з’явиться на дисплеї)
-
спрямуйте пристрій на цільову поверхню
! не дивіться в пpомінь лазеpа
! не спpямовуйте пpомінь лазеpа на людей чи
тваpин
-
знов натисніть “GO”; обмірюване значення
з’явиться на дисплеї (лазерне проміння
вимикається автоматично)
-
лазерне проміння також автоматично
вимикається, якщо протягом приблизно 20 секунд
після вмикання лазерного проміння виміри не
були проведені
!
не забувайте, що пристрій вимірює відстань
від своїх задньої частини (довжина пристрою
входить до результату вимірювання)
-
натисніть “С” для скидання кожного останнього
обмірюваного значення
-
багаторазово натисніть “С” для скидання
кожного останнього обмірюваного значення у
зворотному порядку (m³ - m²)
•
Інструкції щодо правильного виконання вимірів
!
не рухайте інструмент під час проведення
вимірів (за винятком випадків, коли інструмент
працює в режимі безперервного виміру)
-
не закривайте приймальну лінзу A 3 та отвір для
лазерного проміння B 3 під час проведення
вимірів
-
при несприятливих умовах (наприклад, під час
проведення вимірів при яскравому сонячному
світлі) використовуйте лінзи для посилення
лазеру (приладдя SKIL 2610395907) або покладіть
аркуш паперу на цільову поверхню
-
результатом вимірювання по прозорим,
дзеркальним, пористим або структурованим
поверхням може стати отримання невірних
показників
•
Вимірювання площі
- натисніть кнопку G
3 (на дисплеї з’являється
символ 9)
-
спрямуйте пристрій на першу цільову поверхню
(довжина)
-
натисніть “GO” (на дисплеї з’являється символ 8)
-
знову натисніть “GO”; у верхньому рядку на
екрані з’явиться вимірювана довжина
-
спрямуйте пристрій на другу цільову поверхню
(ширина)
-
знову натисніть “GO”; у верхньому рядку на
екрані з’явиться вимірювана ширина, а в
нижньому рядку екрана з’явиться розрахована
площа
-
знову натисніть “GO”, щоб розпочати цілком нове
вимірювання площі
•
Вимірювання об’єму
- натисніть кнопку H
3 (на дисплеї з’являється
символ 0)
-
спрямуйте пристрій на першу цільову поверхню
(довжина)
-
натисніть “GO” (на дисплеї з’являється символ 8)
-
знову натисніть “GO”; у верхньому рядку на
екрані з’явиться вимірювана довжина
-
спрямуйте пристрій на другу цільову поверхню
(ширина)
-
знову натисніть “GO”; у верхньому рядку на
екрані з’явиться вимірювана ширина, а в
нижньому рядку екрана з’явиться розрахована
площа
-
спрямуйте пристрій на третю цільову поверхню
(висота)
-
знову натисніть “GO”; у верхньому рядку на екрані
з’явиться вимірювана висота, а в нижньому рядку
екрана з’явиться розрахований об’єм
-
знову натисніть “GO”, щоб розпочати цілком нове
вимірювання об’єму
•
Безперервний вимір !
-
натисніть кнопку F3 після вмикання інструменту
(символ @ з’явиться на дисплеї)
-
натисніть “GO” (на дисплеї з’являється символ 8)
-
лазерне проміння залишається увімкненим для
того, щоб можна було постійно зчитувати дані про
фактичну відстань
-
натисніть “GO” повторно, щоб призупинити
безперервний вимір (поточне обмірюване
значення вказується на дисплеї)
-
натисніть “GO” знову для повторного запуску
режиму безперервного виміру
-
режим безперервного виміру автоматично
вимикається через 5 хвилин (останнє обмірюване
значення залишається на дисплеї), а також його
можна вимкнути за допомогою перемикання
пристрою на інший режим виміру
•
Збереження/додання обмірюваних значень
- після вимірювання натисніть “М+” для
збереження обмірюваного значення
-
на дисплеї з’являється буква “М”, під якою
промигує знак “плюс”
-
введіть додаткові обмірювані значення до
значення, що перебуває в пам’яті, за допомогою
“M+” (за можливістю, тільки при збігу одиниць
виміру)
•
Відрахування обмірюваних значень
- натисніть “М-”, щоб відрахувати поточне
обмірюване значення від значення, що перебуває
в пам’яті (за можливістю, тільки при збігу одиниць
виміру)
-
на дисплеї з’являється буква “М”, під якою часто
промигує знак “мінус”
Ташев-Галвинг ООД
www.tashev-galving.com
SKIL_IB0530_EUCH_v3.indd 45 08-06-2010 13:04:20
Page 46

46
• Зчитування даних пам’яті
- при натисканні “М=” значення, збережене в
пам’яті, відображається на дисплеї разом із
символом “М=” (останнє обмірюване значення
залишається на дисплеї)
-
подвійте вміст пам’яті натисканням “М+”
- встановіть вміст пам’яті на нуль натисканням “М-”
• Скидання даних пам’яті
Спочатку натисніть “М=”, потім - “С” (буква “М”
більше не відображається)
•
Невірні результати вимірювань
- коли вимірювання не відбулося, на екрані
з’явиться “ERROR”
-
визначте причину, виконайте корегуючи дію та
знову проведіть вимір
Можливі причини невірних вимірів:
-
вимір проводився поза межами виміру
- кут між лазерним променем і відміткою цілі був
занадто гострим
-
цільова поверхня відбиває світло надлишково
(наприклад, дзеркало) або недостатньо
(наприклад, чорна тканина), або навколишнє
освітлення було занадто яскравим
-
прийомні лінзи A 3 або отвір для лазерного
променя B 3 запотіли (наприклад, у зв’язку зі
швидкою зміною температури)
-
обмірювані значення були додані/відняті
невідповідними вимірювальними пристроями
•
Футляр для легкого та зручного зберігання, який
можна носити на ремені #
ПОРАДИ ПО ВИКОРИСТАНЮ
• Якщо корегуюча дія не може виправити помилку,
або якщо на дисплеї з’являється напис “FAIL”,
подальша робота неможлива; у цьому випадку
направте інструмент дилерові у Вашому регіоні або
до найближчого сервісного центру SKIL
•
Обеpігайте пpилад від тpивалої вібpації та
екстpемальниx темпеpатуp
•
Завжди збеpігайте пpилад у пpиміщенні і в заxисній
коpобці (футляpі)
•
Постійно обеpігайте пpилад від пилу, вологи та
пpямиx сонячниx пpоменів
•
Пpотиpайте пpилад вологою ганчіpкою з м’яким
милом
!
пеpш ніж пpотиpати лінзу, завжди виймайте
батаpеї
•
Не pозбиpайте і жодним чином не модифікуйте
пpилад
•
Не намагайтеся змінити будь-яку деталь лінзи
лазеpа
ГАРАНТІЯ / ОХОРОНА
НАВКОЛИШНЬОЇ СЕРЕДИ
• Цей продукт SKIL гарантується у відповідності з
обов’язковими/відповідно до конкретної країни,
нормативно-правовими актами; пошкодження
внаслідок нормального зношення, перевантаження
або невідповідного поводження виключається з
гарантії
•
У випадку pекламації, надсилайте неpозібpаний
пpилад pазом з документом, що підтвеpджує факт
його пpидбання, на адpесу Вашого дилеpа або до
найближчої станції теxнічного обслуговування фіpми
‘Skil’ (адpеси подано на сайті www.skileurope.com)
•
Hе викидайте електроінструмент, батареї,
принадлежності та упаковку разом зі звичайним
сміттям (тільки для країн ЄС)
-
відповідно до європейської директиви 2002/96/ЄС
щодо утилізації старих електричних та
електронних приладів, в залежності з місцевим
законодавством, електроінструмент, який
перебував в експлуатації повинен бути
утилізований окремо, безпечним для
навколишнього середовища шляхом
-
малюнок $ нагадає вам про це
GR
Εργαλεί μέτρησης με λέιερ 0530
ΕΙΣΑΓΩΓΗ
• Τ εργαλεί αυτ πρρίεται για τη μέτρηση
απστάσεων σε εσωτερικύς ώρυς με τη ήθεια
ακτίνας λέιερ
•
ταν ρησιμπιείται σωστά, τ εργαλεί μετρά
εύκλα και με ακρίεια τ μήκς, τ εμαδν και
τν γκ
•
Διαάστε πρσεκτικά αυτ τ εγειρίδι ρήσεως
και δώστε ιδιαίτερη πρσή στις δηγίες
ασφαλείας και στις πρειδπιήσεις - η μη τήρηση
αυτών των δηγιών και πρειδπιήσεων θα
μπρύσε να πρκαλέσει σαρές σωματικές
λάες (στα μάτια) 1
•
Πριν ρησιμπιήσετε τ εργαλεί για πρώτη φρά,
τπθετήστε τ αυτκλλητ πυ διατίθεται στη
γλώσσα σας πάνω απ τ Γερμανικ κείμεν της
πρειδπιητικής πινακίδας P 3
•
Φυλάτε αυτ τ εγειρίδι ρήσεως για μελλντική
αναφρά
TEXNIKA XAΡAKTHΡIΣTIKA
Μέθδς μέτρησης πτική/λέιερ
Εμέλεια μέτρησης 0,2 - 20 m
1
)
Ακρίεια μέτρησης (τυπική) +/- 3,0 mm
2
)
∆ιάρκεια μέτρησης (τυπική) < 0,5 sec.
Μικρτερη ένδειη 1 mm
Θερμκρασία λειτυργίας -10°C έως 50°C
Θερμκρασία απθήκευσης -20°C έως 70°C
Σετική υγρασία (μέγιστη) 90%
Κλάση λέιερ 2
Tύπς λέιερ 635 nm
Μέγιστη ισύς εδυ < 1 mW
∆ιάμετρς ακτίνας λέιερ
(περίπυ στυς 20°C)
- σε απσταση 10 m
6 mm
- σε απσταση 20 m 16 mm
Μπαταρίες (περιλαμάννται) 4 x AAA (LR03) 1,5V
Επαναφρτιμενες μπαταρίες 4 x AAA (KR03) 1,2V
Ташев-Галвинг ООД
www.tashev-galving.com
SKIL_IB0530_EUCH_v3.indd 46 08-06-2010 13:04:21
Page 47

47
Σήνει αυτματα
- λέιερ
μετά απ περίπυ
20 sec ωρίς μέτρηση
- μετρητικ εργαλεί
μετά απ περίπoυ
5 min αδράνειας
Bάρς
0,18 κιλά
1) Η εμέλεια μέτρησης αυάνεται ανάλγα με την
πιτητα αντανάκλασης τυ λέιερ απ την
επιφάνεια τυ στυ και τη λαμπρτητα τυ
ίνυς τυ λέιερ σε σέση με την ένταση τυ
φωτς στ περιάλλν
2)
Η ακρίεια μέτρησης έει απκλιση +0,06% σε
αντίες συνθήκες (π.. έντνη ηλιφάνεια)
ΜΕΡΗ ΤY ΕΡΓΑΛΕΙY 3
A Φακς λήψης
B πή δέσμης λέιερ
C θνη υγρών κρυστάλλων (LCD)
D Κυμπί εκκίνησης/στάσης
E Κυμπί μετατρπής απ μέτρα σε πδια
F Λειτυργία μέτρησης μήκυς και συνεύς
μέτρησης
G Λειτυργία μέτρησης επιφάνειας
H Λειτυργία μέτρησης γκυ
J Κυμπί εκκαθάρισης (“C”)
K Κυμπί πρσθεσης στη μνήμη (“M+”)
L Κυμπί αφαίρεσης απ τη μνήμη (“M-”)
M Κυμπί ανάκλησης απ τη μνήμη (“M=”)
N Κυμπί μέτρησης (“GO”)
P Πρειδπιητική ετικέτα
Q Καπάκι θήκης μπαταριών
AΣΦAΛEIA
• Μην κιτάτε απευθείας μέσα στη δέσμη τυ λέιερ
(ακτινλία λέιερ) 2
•
Μη στρέφετε τη δέσμη τυ λέιερ πρς ανθρώπυς
ή ώα
•
Μην τπθετείτε τ εργαλεί σε μια θέση στην
πία θα μπρύσε κάπις να κιτάει σκπιμα ή
τυαία μέσα στη δέσμη τυ λέιερ
•
Μη ρησιμπιείτε μεγεθυντικά πτικά ργανα (π..
μεγεθυντικύς φακύς, τηλεσκπια ή κιάλια) για να
δείτε τη δέσμη τυ λέιερ
•
Μην αφαιρείτε ή αρηστεύετε την πρειδπιητική
ετικέτα πυ έει επικλληθεί στ εργαλεί
•
Μη ρησιμπιείτε τ εργαλεί σε ώρυς στυς
πίυς υπάρυν εύφλεκτα υγρά, αέρια ή σκνες
•
Μη ρησιμπιείτε τ εργαλεί εάν υπάρυν
παιδιά στν ίδι ώρ
•
Αυτ τ εργαλεί δεν πρέπει να ρησιμπιείται
απ άτμα ηλικίας κάτω των 16 ετών
•
Μη ρησιμπιείτε τ εργαλεί για σκπύς
διαφρετικύς απ αυτύς πυ αναφέρνται στ
παρν εγειρίδι ρήσεως
XΡHΣH
• Tπθέτηση μπαταριών 4
! εαιωθείτε τι τ εργαλεί είναι
απενεργπιημέν
-
ρησιμπιήστε απκλειστικά αλκαλικές ή
επαναφρτιμενες μπαταρίες
-
αναπδγυρίστε τ εργαλεί
- αφαιρέστε τ καπάκι Q
- τπθετήστε 4 x μπαταρία 1,5V (δώστε πρσή
στη σωστή πλικτητα)
-
τπθετήστε τ καπάκι Q
- ταν η τάση της μπαταρίας είναι αμηλή θα
εμφανιστεί τ σύμλ 5 στην θνη
-
ταν εμφανιστεί τ σύμλ 5 στην θνη για
πρώτη φρά, μπρύν να γίνυν ακμα
τυλάιστν 100 μετρήσεις
-
αντικαταστήστε τις μπαταρίες ταν αρίσει να
ανασήνει τ σύμλ 5 (δεν είναι δυνατή
άλλη μέτρηση)
-
ι μπαταρίες θα πρέπει πάνττε να
αντικαθίστανται λες ταυτρνα
-
ι μπαταρίες θα πρέπει πάνττε να αφαιρύνται
απ τ εργαλεί, ταν αυτ δεν πρκειται να
ρησιμπιηθεί για μεγάλ ρνικ διάστημα
•
Ενεργπίηση/απενεργπίηση
- ανάψτε τ εργαλεί πατώντας είτε τν διακπτη
“on/off” είτε τ “GO” (δεν ανάει ακμα η ακτίνα
λέιερ)
-
απενεργπιήστε τ εργαλεί πιέντας “on/off”
- τ εργαλεί σήνει αυτματα μετά απ 5 λεπτά
αδράνειας
•
Μετατρπή απ μέτρα σε πδια
- ως πρεπιλγή, ι μετρήσεις πραγματπιύνται
σε μέτρα/εκατστά
-
πιέστε τ πλήκτρ E 3 για μετατρπή απ μέτρα/
εκατστά σε πδια/ίντσες
•
Xειρισμς τυ εργαλείυ 6
-
ανάψτε τ εργαλεί (εμφανίεται στην θνη τ
σύμλ 7 επισημαίνντας τι τ εργαλεί είναι
ήδη σε λειτυργία μέτρησης μήκυς)
-
επιλέτε άλλη λειτυργία μέτρησης (επιφάνειας/
γκυ), αν ρειαστεί
-
πατήστε τ “GO” για να ανάψετε την ακτίνα
λέιερ (εμφανίεται στην θνη τ σύμλ 8)
-
στρέψτε τ εργαλεί πρς την επιφάνεια-στ
! μην κιτάτε απευθείας μέσα στη δέσμη τυ
λέιερ
!
μη στρέφετε τη δέσμη τυ λέιερ πρς
ανθρώπυς ή ώα
-
πατήστε πάλι τ “GO” - εμφανίεται στην θνη
η τιμή της μέτρησης (η ακτίνα λέιερ σήνει
αυτματα)
-
η ακτίνα λέιερ σήνει επίσης αυτματα μετά απ
30 δευτερλεπτα περίπυ απ τη στιγμή πυ θα
ανάψει, αν δεν γίνει καμία μέτρηση
!
έετε υπψη σας τι τ εργαλεί μετρά απ την
πίσω τυ πλευρά (τ μήκς τυ εργαλείυ
περιλαμάνεται στ απτέλεσμα της μέτρησης)
-
πατήστε τ “C” για να σήσετε την τελευταία
τιμή πυ μετρήθηκε
-
πατήστε τ “C” για να σήσετε την τελευταία
απ τις τιμές πυ έυν μετρηθεί με αντίστρφη
σειρά (m³ - m²)
Ташев-Галвинг ООД
www.tashev-galving.com
SKIL_IB0530_EUCH_v3.indd 47 08-06-2010 13:04:22
Page 48

48
• δηγίες για σωστές μετρήσεις
! τ εργαλεί δεν πρέπει να κυνηθεί κατά τη
μέτρηση (παρά μν σε λειτυργία συνεύς
μέτρησης)
-
δεν πρέπει να σκεπάεται φακς λήψης A 3 και
τ στμι της ακτίνας λέιερ B 3 κατά τη
μέτρηση
-
σε αντίες συνθήκες (π.. κατά τη μέτρηση στ
ύπαιθρ με δυνατ ήλι) ρησιμπιήστε
ειδικύς φακύς ενίσυσης τυ λέιερ (αεσυάρ
SKIL 2610395907) ή τπθετήστε ένα κμμάτι
αρτί στην επιφάνεια τυ στυ
-
η μέτρηση πάνω σε διαφανή, ανακλαστική,
πρώδη ή ανάγλυφη επιφάνεια μπρεί να
δηγήσει σε λάθς μέτρηση
•
Μέτρηση εμαδύ
- πιέστε τ πλήκτρ G
3 (ανάει στην θνη τ
σύμλ 9)
-
στρέψτε τ εργαλεί πρς την πρώτη επιφάνεια-
στ (μήκς)
-
πιέστε “GO” (ανάει στην θνη τ σύμλ 8)
-
πιέστε άλλη μία φρά “GO” - τ μετρύμεν
μήκς εμφανίεται στην επάνω σειρά της θνης
-
στρέψτε τ εργαλεί πρς τη δεύτερη επιφάνεια-
στ (πλάτς)
-
πιέστε άλλη μία φρά “GO” - τ μετρύμεν
πλάτς εμφανίεται στην επάνω σειρά της
θνης, ενώ τ υπλγισθέν εμαδν
εμφανίεται στην κάτω σειρά της θνης
-
πιέστε άλλη μία φρά “GO” για να εκινήσετε μια
νέα μέτρηση εμαδύ
•
Μέτρηση γκυ
- πιέστε τ πλήκτρ H
3 (ανάει στην θνη τ
σύμλ 0)
-
στρέψτε τ εργαλεί πρς την πρώτη επιφάνεια-
στ (μήκς)
-
πιέστε “GO” (ανάει στην θνη τ σύμλ 8)
-
πιέστε άλλη μία φρά “GO” - τ μετρύμεν
μήκς εμφανίεται στην επάνω σειρά της θνης
-
στρέψτε τ εργαλεί πρς τη δεύτερη επιφάνεια-
στ (πλάτς)
-
πιέστε άλλη μία φρά “GO” - τ μετρύμεν
πλάτς εμφανίεται στην επάνω σειρά της
θνης, ενώ τ υπλγισθέν εμαδν
εμφανίεται στην κάτω σειρά της θνης
-
στρέψτε τ εργαλεί πρς την τρίτη επιφάνεια-
στ (ύψς)
-
πιέστε άλλη μία φρά “GO” - τ μετρύμεν
ύψς εμφανίεται στην επάνω σειρά της θνης,
ενώ υπλγισθείς γκς εμφανίεται στην κάτω
σειρά της θνης
-
πιέστε άλλη μία φρά “GO” για να εκινήσετε μια
νέα μέτρηση γκυ
•
Λειτυργία συνεύς μέτρησης !
-
πατήστε τ κυμπί F 3 αφύ ανάψετε τ
εργαλεί (εμφανίεται στην θνη τ σύμλ @)
-
πιέστε “GO” (ανάει στην θνη τ σύμλ 8)
-
η ακτίνα λέιερ παραμένει αναμμένη και
λαμάνεται συνεώς μέτρηση της απστασης
-
πατήστε πάλι τ “GO” για να διακψετε τη
συνεή μέτρηση (εμφανίεται στην θνη η
τελευταία τιμή της απστασης)
-
πατήστε πάλι “GO” για να αρίσετε πάλι τη
συνεή μέτρηση
-
η λειτυργία συνεύς μέτρησης διακπτεται
αυτματα μετά απ 5 λεπτά (παραμένει στην
θνη η τελευταία τιμή της απστασης)
•
Απθήκευση/πρσθεση μετρύμενων τιμών
- αφoύ πάρετε μια μέτρηση, πατήστε “M+” για να
απoθηκεύσετε την τιμή της μέτρησης
-
εμφανίεται στην θνη τ γράμμα “M” και
ανασήνει σύντμα απ κάτω τ σύμλ τυ
συν
-
μπρείτε να πρσθέσετε επμενες τιμές
μέτρησης πατώντας τ “M+” (είναι εφικτ μν
αν ι μνάδες μέτρησης είναι ι ίδιες)
•
Αφαίρεση τιμών μέτρησης
- πατήστε τ “M-” για να αφαιρέσετε την τρέυσα
τιμή μέτρησης απ την τιμή της μνήμης (είναι
εφικτ μν αν ι μνάδες μέτρησης είναι ι
ίδιες)
-
εμφανίεται στην θνη τ γράμμα “M” και
ανασήνει σύντμα απ κάτω τ σύμλ τυ
πλην
•
Ανάγνωση της μνήμης
- πατώντας τ “M=” εμφανίεται η τιμή πυ είναι
απθηκευμένη στη μνήμη μαί με τ σύμλ
“M=” (παραμένει στην θνη η τελευταία τιμή
της απστασης)
-
διπλασιάστε τ περιεμεν της μνήμης
πατώντας “M+”
-
μηδενίστε τ περιεμεν της μνήμης πατώντας
“M-”
•
∆ιαγραφή της μνήμης
Πατήστε πρώτα τ “M=” και στη συνέεια πατήστε
τ “C” (δεν εμφανίεται πλέν τ “M”)
•
Λανθασμένη μέτρηση
- ταν η μέτρηση δεν ήταν επιτυής εμφανίεται
“ERROR” στην θνη
-
πρσδιρίστε την αιτία, διρθώστε τ πρλημα
και πραγματπιήστε ανά τη μέτρηση
Πιθανές αιτίες λανθασμένης μέτρησης:
-
η μέτρηση πραγματπιήθηκε εκτς τυ εύρυς
μέτρησης
-
η γωνία μεταύ της ακτίνας λέιερ και τυ
στυ ήταν πλύ εία
-
η επιφάνεια στς αντανακλάστηκε πλύ έντνα
(π.. καθρέπτης) ή μη επαρκώς (π.. μαύρ
ύφασμα) ή τ περιάλλν φως ήταν πλύ έντν
-
φακς λήψης A 3 ή τ άνιγμα της ακτίνας
λέιερ B 3 ήταν θλά (π.. λγω απτμης
μεταλής θερμκρασίας)
-
ι τιμές μέτρησης πρστέθηκαν/αφαιρέθηκαν με
τη ρήση μνάδων μέτρησης πυ δεν
αντιστιύσαν σε αυτές
•
Θήκη ώνης για εύκλη και άνετη απθήκευση #
OΔHΓIEΣ EΦAΡMOΓHΣ
• ταν μια ενέργεια διρθωσης δεν μπρεί να
διρθώσει ένα σφάλμα ή ταν στην θνη
εμφανιστεί τ μήνυμα “FAIL”, ττε δεν είναι πλέν
δυνατή η μέτρηση - σε αυτή την περίπτωση,
απστείλετε τ εργαλεί στν πλησιέστερ
αντιπρσωπ ή κέντρ σέρις της SKIL
Ташев-Галвинг ООД
www.tashev-galving.com
SKIL_IB0530_EUCH_v3.indd 48 08-06-2010 13:04:22
Page 49

49
•
Μην εκθέτετε τ εργαλεί σε συνεείς δνήσεις ή
σε εαιρετικά υψηλές ή αμηλές θερμκρασίες
•
T εργαλεί θα πρέπει πάνττε να απθηκεύεται σε
εσωτερικύς ώρυς και μέσα στην πρστατευτική
συσκευασία / θήκη τυ
•
Φρντίστε ώστε τ εργαλεί να μην εκτίθεται σε
σκνες, υγρασία και άμεση ηλιακή ακτινλία
•
Καθαρίετε τ εργαλεί με ένα υγρ πανί και απαλ
σαπύνι
!
αφαιρείτε πάνττε της μπαταρίες πριν
καθαρίσετε τν φακ
•
Μην απσυναρμλγείτε ή τρππιείτε με
πινδήπτε τρπ τ εργαλεί
•
Μην επιειρήσετε να αλλάετε πιδήπτε μέρς
τυ φακύ τυ λέιερ
ΕΓΓYΗΣΗ / ΠΕΡIBΑΛΛOΝ
• Για αυτ τ πρϊν της SKIL παρέεται εγγύηση
σύμφωνα με τις νμικές διατάεις πυ ισύυν στη
ώρα σας - λάες πυ φείλνται σε φυσιλγική
φθρά, υπερφρτιση ή λανθασμένη ρήση δεν
καλύπτνται απ την εγγύηση
•
Σε περίπτωση παραπνυ, στείλτε τ εργαλεί
ωρίς να τν απσυναρμλγήσετε και
συνδευμεν απ την απδειη αγράς στν
αντιπρσωπ μας ή στν πλησιέστερ σταθμ
τενικής υπστήριης Skil (ι διευθύνσεις
αναφέρνται στν δικτυακ μας τπ
www.skileurope.com)
•
Μην πετάτε τα ηλεκτρικά εργαλεία, μπαταρίες,
εαρτημάτα και συσκευασία στν κάδ ικιακών
απρριμμάτων (μν για τις ώρες της ΕΕ)
-
σύμφωνα με την ευρωπαϊκή δηγία 2002/96/ΕΚ
περί ηλεκτρικών και ηλεκτρνικών συσκευών και
την ενσωμάτωσή της στ εθνικ δίκαι, τα
ηλεκτρικά εργαλεία πρέπει να συλλέγνται
εωριστά και να επιστρέφνται για ανακύκλωση
με τρπ φιλικ πρς τ περιάλλν
-
τ σύμλ $ θα σας τ θυμήσει αυτ ταν
έλθει η ώρα να πετάετε τις
RO
Aparat de măsurare cu laser 0530
INTRODUCERE
• Acest instrument este destinat măsurării distanţelor atât
în exterior cât şi în exterior prin intermediul proiectării
prin fascicul laser
•
Atunci când este utilizat în mod adecvat, această sculă
măsoară uşor şi exact lungimea, suprafaţa şi volumul
•
Citiţi cu atenţie acest manual de instrucţiuni şi
acordaţi o atenţie specială instrucţiunilor de
securitate şi avertizare; neglijarea acestora poate
duce la vătămări grave (ale ochilor) 1
•
Înainte de a folosi instrumentul pentru prima oară, lipiţi
eticheta sau mesajul de avertizare tradus în limba dvs.
deasupra textului în germană P 3
•
Păstraţi acest manual de utilizare pentru referinţe
ulterioare
CARACTERISTICI TEHNICE
Metodă de măsurare optică/laser
Rază de măsurare 0,2 - 20 m
1
)
Precizia măsurării (caracteristică) +/- 3,0 mm
2
)
Durată de măsurare (caracteristică) < 0,5 sec.
Unitate indicatoare minimă 1 mm
Temperatura de operare -10°C până la 50°C
Temperatura de depozitare -20°C până la 70°C
Umiditate relativă (max.) 90%
Clasa laserului 2
Tipul laserului 635 nm
Puterea maximă de ieşire < 1 mW
Diametru fascicul laser
(la aproximativ 20°C)
- la 10 m distanţă
6 mm
- la 20 m distanţă 16 mm
Baterii (incluse) 4 x AAA (LR03) 1,5V
Baterii reîncărcabile 4 x AAA (KR03) 1,2V
Oprire automată
- laser
după aprox. 20 sec.
pauză măsurare
- instrument de măsurare
după aprox. 5 min.
de repaus
Masa
0,18 kg
1) Raza de măsurare creşte în funcţie de cât de bine este
reflectat fasciculul laser din suprafaţa ţintă şi cât de
luminos este punctul laser faţă de intensitatea luminii
ambientale
2)
Precizia de măsurare deviază cu +0,06% în condiţii
nefavorabile (spre exemplu lumină intensă a soarelui)
ELEMENTELE SCULEI 3
A Lentilă recepţie
B Orificiu raze laser
C Afişaj LCD
D Buton pornit/oprit
E Buton de conversie metri/picioare
F Mod măsurare lungime şi mod măsurare continuă
G Mod măsurare suprafaţă
H Mod măsurare volum
J Buton ştergere (“C”)
K Buton adăugare memorie (“M+”)
L Buton scădere memorie (“M-”)
M Buton recuperare memorie (“M=”)
N Buton măsurare (“GO”)
P Etichetă de avertizare
Q Capac compartiment baterii
PROTECŢIE
• Nu priviţi în raza laser (fasciculul laser) 2
• Nu îndreptaţi fasciculul laser spre persoane sau
animale
•
Nu amplasaţi instrumentul în poziţie în care se poate
privi în fascicul intenţionat sau neintenţionat
•
Nu folosiţi nici-un fel de instrument optic (lupă,
telescop, binoclu) pentru a privi în fasciculul laser
•
Nu înlăturaţi sau distrugeţi eticheta de avertizare de pe
sculă
Ташев-Галвинг ООД
www.tashev-galving.com
SKIL_IB0530_EUCH_v3.indd 49 08-06-2010 13:04:24
Page 50

50
• Nu operaţi cu instrumentul în prezenţa lichidelor sau
gazelor inflamabile sau a prafului
•
Nu operaţi cu instrumentul în prezenţa copiilor prin
apropiere
•
Această sculă nu ar trebui folosită de către persoane
sub 16 ani
•
Nu utilizaţi scula în alte scopuri decât în scopul
menţionat în manualul de utilizare
UTILIZAREA
• Instalarea bateriilor 4
! asiguraţi-vă că scula nu este în stare de
funcţionare
-
folosiţi exclusiv baterii alcaline cu mangan sau baterii
reîncărcabile
-
întoarceţi instrumentul invers
- se îndepărtează capacul Q
- inseraţi 4 x bateria de 1,5V (fiţi atenţi la polaritatea
corectă)
-
se montează capacul Q
- dacă bateria este descărcată, pe afişaj va apărea
simbolul 5
-
când simbolul 5 apare în display prima oară, mai
sunt posibile încă cel puţin 100 de măsurări
-
înlocuiţi bateriile când simbolul 5 începe să
clipească (măsurarea nu mai este posibilă)
-
întotdeauna înlocuiţi întregul set de baterii
- întotdeauna scoateţi bateriile din sculă, dacă nu o
veţi folosi timp îndelungat
•
Pornire/oprire (On/off)
- porniţi instrumentul fie apăsând pe “on/off” fie
apăsând pe “GO” (fasciculul laser nu este încă pornit)
-
scula se opreşte prin apăsarea “on/off”
-
aparatul se opreşte automat după 5 minute de repaus
•
Conversie metri/picioare
- măsurătorile se efectuează automat în metri/
centimetri
-
apăsaţi butonul E 3 pentru convertirea metrilor/
centimetrilor în picioare/inci
•
Operarea cu scula 6
-
porniţi aparatul (simbolul 7 apare pe ecran, indicând
faptul că aparatul este deja în modul de măsurare a
lungimii)
-
dacă doriţi, selectaţi alt mod de măsurare (suprafaţă/
volum)
-
apăsaţi pe “GO” pentru a porni fasciculul laser
(simbolul 8 va apărea pe ecran)
-
îndreptaţi scula spre suprafaţa ţintă
! nu priviţi în raza laser
! nu îndreptaţi fasciculul laser spre persoane sau
animale
-
apăsaţi încă o dată pe “GO”; valoarea măsurată
apare pe ecran (fasciculul laser se întrerupe automat)
-
fasciculul laser se întrerupe automat şi atunci când
timp de aproximativ 20 de secunde după pornirea
acestuia nu s-au efectuat măsurări
!
reţineţi faptul că scula măsoară începând din
spatele acesteia (lungimea sculei este inclusă în
rezultatul măsurătorii)
-
apăsaţi pe “C” pentru a şterge ultima valoare
individual măsurată
-
apăsaţi “C” în mod repetat pentru a şterge ultimele
valori individual măsurate în ordine inversă (m³ - m²)
•
Instrucţiuni pentru o măsurare corespunzătoare
!
nu mişcaţi aparatul în timpul măsurării (cu
excepţia modului măsurare continuă)
-
nu acoperiţi lentila de recepţie A 3 şi deschiderea
fasciculului laser B 3 în timpul măsurării
-
în condiţii nefavorabile (cum ar fi măsurători afară la
lumină intensă a soarelui) folosiţi sticlă de amplificare
cu laser (accesoriu SKIL 2610395907) sau aplicaţi o
bucată de hârtie pe suprafaţa ţintă)
-
măsurarea în faţa suprafeţelor transparente,
reflectorizante, poroase sau structurate poate da
rezultate greşite
•
Măsurarea suprafeţei
- apăsaţi butonul G
3 (pe afişaj va apărea simbolul 9)
-
îndreptaţi scula spre prima suprafaţa ţintă (lungime)
-
apăsaţi “GO” (pe afişaj va apărea simbolul 8)
-
apăsaţi din nou “GO”; lungimea măsurată va apărea
pe prima poziţie a afişajului
-
îndreptaţi scula spre a doua suprafaţa ţintă (lăţime)
-
apăsaţi din nou “GO”; lăţimea măsurată va apărea pe
prima poziţie a afişajului în timp ce suprafaţa
calculată apare pe ultima poziţie a afişajului
-
apăsaţi din nou “GO” pentru a efectua măsurarea
unei noi suprafeţe
•
Măsurarea volumului
- apăsaţi butonul H
3 (pe afişaj va apărea simbolul 0)
-
îndreptaţi scula spre prima suprafaţa ţintă (lungime)
-
apăsaţi “GO” (pe afişaj va apărea simbolul 8)
-
apăsaţi din nou “GO”; lungimea măsurată va apărea
pe prima poziţie a afişajului
-
îndreptaţi scula spre a doua suprafaţa ţintă (lăţime)
-
apăsaţi din nou “GO”; lăţimea măsurată va apărea pe
prima poziţie a afişajului în timp ce suprafaţa
calculată apare pe ultima poziţie a afişajului
-
îndreptaţi scula spre a treia suprafaţa ţintă (înălţime)
-
apăsaţi din nou “GO”; înălţimea măsurată va apărea
pe prima poziţie a afişajului în timp ce suprafaţa
calculată apare pe ultima poziţie a afişajului
-
apăsaţi din nou “GO” pentru a începe măsurarea unei
noi suprafeţe
•
Măsurare continuă !
-
apăsaţi pe butonul F3 după pornirea instrumentului
(simbolul @ va apărea pe ecran)
-
apăsaţi “GO” (pe afişaj va apărea simbolul 8)
-
fasciculul laser rămâne pornit, astfel că distanţa reală
poate fi citită în mod continuu)
-
apăsaţi “GO” încă o dată pentru întreruperea
măsurării continue (valoarea curent măsurată este
indicată pe ecran)
-
apăsaţi “GO” încă o dată pentru a porni din nou
măsurarea continuă
-
modul măsurare continuă se opreşte automat după
5 minute (ultima valoare măsurată rămâne indicată
pe ecran); acest mod poate fi oprit şi prin selectarea
unui alt mod de măsurare
•
Salvarea/adăugarea de valori măsurate
- după ce faceţi o măsurare, apăsaţi “M+” pentru
salvarea valorii măsurate
-
litera “M” apare pe ecran şi semnul plus de sub ea
clipeşte scurt
Ташев-Галвинг ООД
www.tashev-galving.com
SKIL_IB0530_EUCH_v3.indd 50 08-06-2010 13:04:24
Page 51

51
-
adăugaţi în memorie valori măsurate adiţionale cu
“M+” (posibil doar când unităţile de măsură
corespund)
•
Scăderea valorilor măsurate
- apăsaţi “M-” pentru a scădea valoarea măsurată din
valoarea memorată (posibil doar când unităţile de
măsură corespund)
-
litera “M” apare pe ecran şi semnul minus de sub ea
clipeşte scurt
•
Citirea memoriei
- dacă apăsaţi “M=”, valoarea salvată în memorie este
afişată împreună cu simbolul “M=” (ultima valoare
măsurată rămâne indicată pe ecran)
-
dublaţi conţinutul memoriei prin apăsarea “M+”
- setaţi conţinutul memoriei la zero apăsând “M-”
• Ştergerea memoriei
Prima dată apăsaţi “M=”, apoi apăsaţi “C” (litera “M” nu
mai este afişată)
•
Măsurare eronată
- dacă măsurarea este eronată, pe afişaj apare
“ERROR”
-
determinaţi cauza, luaţi măsuri corective şi faceţi din
nou măsurătoarea
Posibile cauze ale managementului defectuos:
-
măsurarea a fost făcută în afara ariei de măsurare
- unghiul între raza laser şi ţintă a fost prea ascuţit
- suprafaţa ţintă a reflectat prea intens (spre exemplu
oglindă) sau insuficient (spre exemplu material
negru), sau lumina ambientului a fost prea puternică
-
lentila de recepţie A 3 sau deschiderea razei laser
B 3 a fost aburită (spre exemplu datorită unei
schimbări rapide de temperatură)
-
din valorile măsurate au fost adăugate/scăzute
unităţile de măsurare necorespunzătoare
•
Borsetă pentru stocare uşoară şi confortabilă #
SFATURI PENTRU UTILIZARE
• Când operaţiunile de corectare nu pot corecta o eroare,
sau când ecranul afişează “FAIL”, atunci măsurarea nu
mai este posibilă; în acest caz, trimiteţi-i instrumentul
distribuitorului dvs. sau celei mai apropiate staţie de
service SKIL
•
Nu expuneţi scula la vibraţii continue sau la temperaturi
extrem de înalte sau scăzute
•
Întotdeauna păstraţi scula în interior, în cutia/husa ei de
protecţie
•
Întotdeauna feriţi scula de praf, umezeală şi raze solare
directe
•
Curăţaţi scula cu o cârpă umedă şi săpun moale
! Întotdeauna scoateţi bateriile înainte de a curăţa
lentilele
•
Nu desfaceţi sau modificaţi scula în nici un mod
• Nu încercaţi să înlocuiţi nici-o piesă din lentilele laserului
GARANŢIE / MEDIUL
• Acest aparat SKIL este garantat conform
regulamentelor pe ţări; defecţiuni cauzate de uzaj
normal, supraîncărcare sau mod de folosire inadecvat
se înscriu în afara garanţiei
•
În cazul unei nemulţumiri, trimiteţi scula pentru panouri
nedemontat, împreună cu dovada de cumpărare, la
furnizorul dvs sau la cea mai apropiată staţie de
întreţinere Skil (adresele sunt notate pe pagina
www.skileurope.com)
•
Nu aruncaţi sculele electrice, bateriile, accesoriile
sau ambalajele direct la pubelele de gunoi (numai
pentru ţările din Comunitatea Europeană)
-
Directiva Europeană 2002/96/EC face referire la
modul de aruncare a echipamentelor electrice şi
electronice şi modul de aplicare a normelor în
conformitate cu legislaţia naţională; sculele electrice
în momentul în care au atins un grad avansat de
uzură şi trebuiesc aruncate, ele trebuiesc colectate
separat şi reciclate într-un mod ce respectă normele
de protecţie a mediului inconjurător
-
simbolul $ vă va atenţiona asupra modului în care se
face această aruncare
BG
Лазеpен измервателен уред 0530
УВОД
• Този уред е предназначен за измерване на
разстояние в закрити помещения и на открито
посредством проектиране на лазерен лъч
•
Когато се използва правилно, уредът измерва лесно
и точно дължини, повърхнини и обеми
•
Внимателно пpочетете това pъководство и
объpнете специално внимание на инстpукциите
за безопасност и пpедупpежденията;
неспазването им може да доведе до сеpиозно
увpеждане (на очите) 1
•
Преди да използвате уреда за първи път, залепете
доставения стикер на вашия роден език върху
предупредителния текст на немски език P 3
•
Запазете това pъководство за бъдещи спpавки
ТЕXHИЧЕСКИ ПAРAМЕТРИ
Метод на измерване оптичен/лазер
Диапазон на измерване 0.2 - 20 m
1
)
Точност на измерване
(обикновена)
+/- 3,0 mm
2
)
Продължителност на
измерване (обикновена)
< 0,5 сек.
Най-малка единица за
индикации
1 mm
Темпеpатуpаот -10°C до 50°C
Температура на съхранениеот -20°C до 70°C
Относителна влажност (макс.) 90%
Клас лазеp 2
Вид лазеp 635 nm
Максимална изxодна мощност < 1 mW
Диаметър на лазерния лъч
(при прибл. 20°C)
- на разстояние 10 m
6 mm
- на разстояние 20 m 16 mm
Батерии (включени) 4 x AAA (LR03) 1.5V
Презаредими батерии 4 x AAA (KR03) 1.2V
Ташев-Галвинг ООД
www.tashev-galving.com
SKIL_IB0530_EUCH_v3.indd 51 08-06-2010 13:04:25
Page 52

52
Автоматично изключване
- лазер след прибл. 20 сек.
неизмерване
- уред за измерване
след прибл. 5 минути
ако не ползвате уреда
Тегло
0,18 kg
1) Диапазонът на измерване се увеличава в
зависимост от това, колко добре се отразява
светлината на лазера от повърхността на целта и
колко ярка е точката на лазера по отношение на
интензитета на околната светлина.
2)
Точността на измерване се отклонява +0,06% при
неблагоприятни условия (напр. интензивна
слънчева светлина)
ЕЛЕМЕНТИ НА ИНСТРУМЕНТА 3
A Приемаща леща
B Отвор за лазерния лъч
C LCD дисплей
D Бутон за включване/изключване
E Бутон за преобразуване метри/футове
F Режим на измерване на дължина и продължително
измерване
G Режим на измерване на повърхността
H Режим на измерване на обема
J Бутон за изчистване (“C”)
K Бутон за добавяне на памет (“M+”)
L Бутон за изваждане на памет (“M-”)
M Бутон за възвръщане на памет (“M=”)
N Бутон за измерване (“GO”)
P Табелка с пpедупpедителен надпис
Q Капак на отделението за батеpии
БЕЗОПАСНОСТ
• Не гледайте в лазеpния лъч (лазеpно лъчение) 2
• Не насочвайте лазеpния лъч сpещу xоpа или
животни
•
Не поставяйте инстpумента в положение, пpи което
някой може волно или неволно да погледне в
лазеpния лъч
•
Не използвайте каквито и да било увеличителни
оптически инстpументи (като напp. очила,
телескопи или бинокли), за да гледате лазеpния
лъч
•
Не отстpанявайте и не повpеждайте табелката с
пpедупpедителния надпис въpxу инстpумента
•
Не pаботете с инстpумента в пpисъствие на
възпламеними течности, газове или пpаx
•
Не pаботете с инстpумента, ако наоколо има деца
• Машината e забpанeна за употpeба от лица под
16 години
•
Не използвайте инстpумента за цели, pазлични от
споменатите в настоящето pъководство
УПОТРЕБА
• Поставяне на батеpии 4
! убедете се, че инстpументът е изключен
- използвайте изключително алкално-манганови
или презаредими батерии
-
обърнете инстpумента надолу
- свалете капака Q
- поставете 4 x батерия 1,5V (объpнете внимание
на пpавилното насочване на полюсите)
-
поставете капака Q
- когато батерията е разредена, на дисплея се
появява символа 5
-
когато символът 5 се появи на екрана за първи
път, все още са възможни поне 100 измервания
-
сменете батериите, когато символът 5 започне
да свети (измерване вече не е възможно)
-
винаги сменяйте и двете батеpии
- винаги изваждайте батеpиите от инстpумента,
ако няма да го използвате дълго вpеме
•
Включено/изключено (On/off)
- включете уреда, като натиснете бутона “on/off”
или “GO” (лазерният лъч все още не е включен)
-
изключете уреда чрез бутон “on/off”
- ако не ползвате уреда, той се изключва
автоматично след 5 минути
•
Преобразуване метри/футове
- по подразбиране измерванията са в метри/
сантиметри
-
натиснете бутона E 3, за да преобразувате
метри/сантиметри във футове/инчове
•
Работа с инстpумента 6
-
включете уреда (символът 7 се появява на
екрана, показвайки, че уредът вече е в режим
измерване на дължина)
-
изберете друг режим на измерване (повърхност/
обем), ако желаете
-
натиснете бутона “GO”, за да включите лазерния
лъч (символът 8 ще се появи на екрана)
-
насочете уреда към измерваната повърхнина
! не гледайте в лазерния лъч
! не насочвайте лазеpния лъч сpещу xоpа или
животни
-
натиснете отново бутона “GO”; измерената
стойност се появява на екрана (лазерният лъч се
изключва автоматично)
-
лазерният лъч се изключва автоматично също и
ако в продължение на 20 секунди след
включването му не бъде извършено измерване
!
имайте предвид, че уредът измерва от задната
си част (дължината на уреда влиза в резултата
от измерването)
-
натиснете “C”, за да изчистите последната
отделна измерена стойност
-
натиснете “C” няколко пъти, за да изчистите
последните отделни измерени стойности в
обратен ред (m³ - m²)
•
Инструкции за правилно измерване
!
не движете уреда по време на измерване
(освен в режим на продължително измерване)
-
не покривайте приемащата леща A 3 и отвора на
лазерния лъч B 3 когато измервате
-
при неблагоприятни условия (напр. когато
извършвате измервания на открито при
интензивна слънчева светлина) използвайте
усилващите стъкла на лазера (SKIL аксесоар
2610395907) или поставете парче хартия върху
повърхността на целта
Ташев-Галвинг ООД
www.tashev-galving.com
SKIL_IB0530_EUCH_v3.indd 52 08-06-2010 13:04:26
Page 53

53
-
измерване срещу прозрачни, отразителни,
порести или структурни повърхности може да
доведе до неправилни резултати от измерването
•
Измерване на повърхнина
- натиснете бутон G
3 (на дисплея се появява
символа 9)
-
насочете уреда към първата измервана
повърхнина (дължина)
-
натиснете “GO” (на дисплея се появява
символа 8)
-
натиснете “GO” отново ; измерваната дължина
се появява на най-горния ред на дисплея
-
насочете уреда към втората измервана
повърхнина (широчина)
-
натиснете “GO” отново; измерената широчина се
появява на най-горния ред на дисплея, а
изчислената повърхнина – на най-долния ред
-
натиснете “GO” отново, за да започнете ново
измерване на повърхнина
•
Измерване на обем
- натиснете бутон H
3 (на дисплея се появява
символа 0)
-
насочете уреда към първата измервана
повърхнина (дължина)
-
натиснете “GO” (на дисплея се появява
символа 8)
-
натиснете “GO” отново ; измерваната дължина
се появява на най-горния ред на дисплея
-
насочете уреда към втората измервана
повърхнина (широчина)
-
натиснете “GO” отново; измерената широчина се
появява на най-горния ред на дисплея, а
изчислената повърхнина – на най-долния ред
-
насочете уреда към третата измервана
повърхнина (височина)
-
натиснете “GO” отново; измерената височина се
появява на най-горния ред на дисплея, а
изчисленият обем – на най-долния ред
-
натиснете “GO” отново, за да започнете ново
измерване на обем
•
Продължително измерване !
-
натиснете бутона F3 след като включите уреда
(символът @ ще се появи на екрана)
-
натиснете “GO” (на дисплея се появява
символа 8)
-
лазерният лъч остава включен, така че
действителното разстояние може да бъде
прочетено многократно
-
натиснете “GO” отново, за да прекратите
продължителното измерване (текущата стойност
на измерването е показана на екрана)
-
натиснете отново “GO” за рестартиране на
продължителното измерване
-
режимът на продължително измерване
автоматично се изключва след 5 минути
(последната измерена стойност остава показана
на екрана), като може да бъде изключен също
чрез избиране на друг режим на измерване
•
Съхраняване / добавяне на измерени стойности
- след като сте направили измерването, натиснете
“M+” за съхраняване на измерената стойност
-
буквата “M” се появява на екрана и знакът плюс
отдолу светва за кратко
-
добавете допълнителни измерени стойности към
запаметената стойност с “M+” (възможно е само
когато мерните единици си съответстват)
•
Изваждане на измерени стойности
- натиснете “M-”, за да извадите текущата
измерена стойност от запаметената стойност
(възможно е само когато мерните единици си
съответстват)
-
буквата “M” се появява на екрана и знакът минус
отдолу светва за кратко
•
Четене на паметта
- когато натиснете “M=”, стойността, съхранена в
паметта, се показва на екрана заедно със
символа “M=” (последната измерена стойност
остава показана на екрана)
-
удвоява съдържанието на паметта чрез
натискане на “M+”
-
свежда съдържанието на паметта на нула чрез
натискане на “M-”
•
Изчистване на паметта
Първо натиснете “M=”, след това натиснете “C”
(буквата “M” вече не е на екрана)
•
Погрешни измервания
- когато измерването е неуспешно, на дисплея се
появява “ERROR”
-
определете причината, предприемете
коригиращо действие и извършете измерването
повторно
Вероятни причини за неправилно измерване:
-
измерването е било направено извън диапазона
за измерване
-
ъгълът между лазерния лъч и целта е бил твърде
остър
-
повърхността на целта се е отразявала твърде
силно (напр. огледало) или недостатъчно (напр.
черен плат), или околната светлина е била
твърде ярка
-
приемащите лещи A 3 или отворът на лазерния
лъч B 3 са били замъглени (напр. поради бърза
температурна промяна)
-
измерените стойности са били добавени /
извадени с несъответстващи мерни единици
•
Чанта за колан за лесно и удобно съхранение #
YKАЗАНИЯ ЗА РАБОТA
• Когато дадена грешка не може да се поправи с
коригиращо действие, или когато на екрана се
появи “FAIL”, вече не е възможно измерване; в този
случай изпратете уреда до вашия дилър или до найблизкия сервиз на SKIL
•
Не излагайте инстpумента на пpодължителни
вибpации или на изключително високи или ниски
темпеpатуpи
•
Винаги съxpанявайте инстpумента на закpито
пpедпазната му кутия
•
Винаги пазете инстpумента от пpаx, влага и пpеки
слънчеви лъчи
Ташев-Галвинг ООД
www.tashev-galving.com
SKIL_IB0530_EUCH_v3.indd 53 08-06-2010 13:04:27
Page 54

54
• Почиствайте инстpумента с влажно паpче плат и
мек миещ пpепаpат
!
пpеди почистване на лещата винаги
изваждайте батеpиите
•
Не pазглобявайте и не видоизменяйте инстpумента
по никакъв начин
•
Не се опитвайте да пpоменяте никоя част от лещата
на лазеpа
ГАРАНЦИЯ / ОПАЗВАНЕ НА
ОКОЛНАТА СРЕДА
• Това изделие на SKIL е с гаpанция в съответствие
със законно установените/специфични за стpаната
пpавила; гаpанцията не се отнася до повpеди,
дължащи се на ноpмално износване, пpетоваpване
или непpавилно боpавене с електpоинстpумента
•
В случай на pекламация изпpатете инстpумента
неpазглобен, заедно с документа, удостовеpяващ
покупката, до пpодавача, от който сте го купили,
или до най-близкия сеpвиз на Skil (списък с
адpесите има в сайта www.skileurope.com)
•
Не изхвърляйте електроуредите, батерии,
приспособленията и опаковките заедно с битови
отпадъци (само за страни от ЕС)
-
съобразно Директивата на ЕС 2002/96/EG
относно износени електрически и електронни
уреди и отразяването й в националното
законодателство износените електроуреди
следва да се събират отделно и да се предават
за рециклиране според изискванията за опазване
на околната среда
-
за това указва символът $ тогава когато трябва
да бъдат унищожени
SK
Laserový merací nástroj 0530
ÚVOD
• Tento prístroj je určený pre meranie vzdialeností aj
vnútri aj vonku pomocou projekcie laserových lúčov
•
Pri správnom používaní umožňuje tento nástroj
jednoducho a presne merať dĺžku, plochu a objem
•
Opatrne prečítajte tento návod na použitie a zvlášt
venujte pozornost bezpecnostným pokynom a
upozorneniam; nedodržanie týchto pokynov môže
spôsobit vážne zranenie (ocí) 1
•
Pred prvým použitím prístroja nalepte dodanú nálepku
vo vašej národnej reči cez nemecký text na varovnom
štítku P 3
•
Tiepo pokyny si odložte na použitie v budúcnosti
TECHNICKÉ ŠPECIFIKÁCIE
Metoda meraní optická/laserová
Rozsah meraní 0.2 - 20 m
1
)
Presnosť meraní (typická) +/- 3,0 mm
2
)
Trvanie meraní (typické) < 0,5 sek.
Najnižšia jednotka zobrazenia 1 mm
Prevádzková teplota -10°C to 50°C
Uchovávajte pri teplote -20ºC až 70°C
Relatívna vlhkosť (max.) 90%
Laser trieda 2
Laser typ 635 nm
Maximálny elektrický výkon < 1 mW
Priemer laserového lúča
(pri asi 20°C)
- pri vzdialenosti 10 m
6 mm
- pri vzdialenosti 20 m 16 mm
Batérie (sú v balení) 4 x AAA (LR03) 1.5V
Dobíjateľné batérie 4 x AAA (KR03) 1.2V
Automatické vypnutie
- laser
po asi 20 sek. nečinnosti
- merací nástroj po asi 5 min. nečinnosti
Váha 0,18 kg
1) Rozsah merania rastie v závislosti od toho, ako dobre
sa svetlo laseru odráža od cieľovej plochy a od toho,
ako je jasný bod laseru vo vzťahu k intenzívnosti
okolného svetla
2)
Presnosť meraní sa odchyluje o +0,06% pri
nepriaznivých podmienkach (napr. pri intenzívnom
slnečnom svite)
ČASTI NÁSTROJA 3
A Prijímacie šošovky
B Výstup laserového lúča
C LCD displej
D Tlačidlo vypínača
E Tlačidlo zmeny merných jednotiek (metre/stopy)
F Režim merania dĺžky a súvislého merania
G Režim merania plochy
H Režim merania objemu
J Gombík mazania (“C”)
K Gombík pridania pamäti (“M+”)
L Gombík odčítania pamäti (“M-”)
M Gombík obnovenia pamäti (“M=”)
N Gombík merania (“GO”)
P Štítok s upozornením
Q Kryt na oddelenie pre batérie
BEZPEČNOSTNÉ POKYNY
• Nepozerajte sa do laserového lúca (vyžarovanie
lasera) 2
•
Nenamierte laserový lúc na osoby alebo na zvieratá
• Nenechajte nástroj v takej pozícii, ktorá by mohla
spôsobiť aby sa niekto schválne alebo náhodou díval
priamo do laserového lúča
•
Nepozerajte sa cez zväčšovacie optické nástroje (ako
zväčšovacie sklo, teleskop, alebo ďalekohľad) na
laserový lúč
•
Nálepku s upozornením na nástroji neodstráňte a
nepoškoďte
•
Nástroj nepoužívajte v prítomnosti horľavých kvapalín,
plynov alebo prachu
•
Nástroj nepoužívajte v prítomnosti detí
• Tento nástroj by nemali používať osoby mladdie ako
16 rokov
•
Nástroj používajte len na účely uvedené v tejto príručke
na použitie
Ташев-Галвинг ООД
www.tashev-galving.com
SKIL_IB0530_EUCH_v3.indd 54 08-06-2010 13:04:27
Page 55

55
POUŽITIE
• Vloženie batérie 4
! dajte pozor aby bol nástroj vypnutý
- používajte výhradne alkalické manganové alebo
dobíjateľné batérie
-
otočte nástroj naopak
- snímte kryt Q
- vložte 4 x batériu 1,5V (dajte pozor na správne
smerovanie pólov)
-
nasaďte kryt Q
- ak je kapacita batérie nízka, na displeji sa zobrazí
symbol 5
-
kým sa symbol 5 objaví na displeji prvý raz, potom
je možné urobiť ešte aspoň 100 meraní
-
vymeňte batérie, kým symbol 5 začne blikať
(meranie už nie je možné)
-
vždy vymeňte celú sadu batérií
- batérie vyberte vždy z nástroja ak ho nemáte v
úmysle použiť dlhší čas
•
Vypínač/zapínač
- spustite prístroj stisnutím buď “on/off” alebo “GO”
(laserový lúč ešte nie je zapnutý)
-
stlačením “on/off” vypnite nástroj
- nástroj sa po 5 minútach nečinnosti automaticky
vypne
•
Zmena merných jednotiek (metre/stopy)
- pri pôvodných nastaveniach sú výsledky meraní
udávané v metroch/centimetroch
-
zmenu merných jednotiek z metrov/centimetrov na
stopy/palce vykonáte stlačením tlačidla E 3
•
Prevádzka nástroja 6
-
zapnite prístroj (symbol 7 sa objaví na displeji a
bude ukazovať, že prístroj je už v režime merania
dĺžky)
-
vyberte iný režim merania (plocha(objem), ak
potrebujete
-
stisnite “GO”, aby ste zapnuli laserový lúč (symbol 8
sa objaví na displeji)
-
namierte nástroj na cieĺový povrch
! nepozerajte sa do laserového lúča
! nenamierte laserový lúc na osoby alebo na
zvieratá
-
stisnite znova “GO”; nameraná hodnota sa objaví na
displeji (laserový lúč sa automaticky vypne)
-
laserový lúč sa tiež automaticky vypne, kým počas
asi 20 sekúnd po zapnutí nie sú vykonané žiadne
merania laserovým lúčom
!
majte na pamäti, že vzdialenosť sa začína merať
od zadného okraja nástroja (dĺžka nástroja je
zahrnutá vo výsledku merania)
-
stisnite “C” pre vymazanie poslednej samostatnej
nameranej hodnoty
-
stisnite opakovane “C” pre vymazanie posledných
samostatnej nameraných hodnôt v opačnom poradí
(m³ - m²)
•
Pokyny na správne vykonanie merania
!
počas meraní nehýbajte prístrojom (okrem režimu
súvislého merania)
-
nezakrývajte prijímacie šošovky A 3 a otvor
laserového lúča B 3 pri meraní
-
v nepriaznivých podmienkach (napr. pri meraní vonku
na intenzívnom slnečnom svite) používajte laserové
zväčšovacie sklá (príslušenstvo SKIL 2610395907)
alebo kus papieru na cieľovú plochu
-
meranie proti priesvitným, odrazovým, pórovitým
alebo strukturovaným povrchom môže viesť k zlému
meraní
•
Meranie plochy
- stlačte tlačidlo G
3 (na displeji sa zobrazí symbol 9)
-
namierte nástroj na prvý cieĺový povrch (údaj o
dĺžke)
-
stlačte “GO” (na displeji sa zobrazí symbol 8)
-
opäť stlačte “GO”; v hornom riadku displeja sa
zobrazí nameraná dĺžka
-
namierte nástroj na druhý cieĺový povrch (údaj o
šírke)
-
opäť stlačte “GO”; v hornom riadku displeja sa
zobrazí nameraná šírka, dolnom riadku sa zobrazí
vypočítaná plocha
-
opäť stlačením “GO” spustíte nové meranie plochy
• Meranie objemu
- stlačte tlačidlo H
3 (na displeji sa zobrazí symbol 0)
-
namierte nástroj na prvý cieĺový povrch (údaj o
dĺžke)
-
stlačte “GO” (na displeji sa zobrazí symbol 8)
-
opäť stlačte “GO”; v hornom riadku displeja sa
zobrazí nameraná dĺžka
-
namierte nástroj na druhý cieĺový povrch (údaj o
šírke)
-
opäť stlačte “GO”; v hornom riadku displeja sa
zobrazí nameraná šírka, dolnom riadku sa zobrazí
vypočítaná plocha
-
namierte nástroj na tretí cieĺový povrch (údaj o
výške)
-
opäť stlačte “GO”; v hornom riadku displeja sa
zobrazí nameraná výška, dolnom riadku sa zobrazí
vypočítaný objem
-
opäť stlačením “GO” spustíte nové meranie objemu
• Súvislé meranie
!
-
stisnite gombík F3 po zapnutí prístroja (symbol @ sa
objaví na displeji)
-
stlačte “GO” (na displeji sa zobrazí symbol 8)
-
laserový lúč zostane zapnutý tak, aby sa mohla
aktuálna vzdialenosť súvisle merať
-
stisnite znova “GO” pre prerušenie súvislého meraní
(súčasná nameraná hodnota sa zobrazí na displeji)
-
stisnite znova “GO” pre nové spustenie súvislého
meraní
-
režim súvislého merania sa automaticky vypne po
5 minutách (posledná nameraná hodnota zostane
zobrazená na displeji) a môže byť tiež ukončený
zvolením iného režimu merania
•
Ukladanie/pričítanie nameraných hodnôt
- po vykonaní meraní stisnite “M+” pre uloženie
nameranej hodnoty
-
písmeno “M” sa objaví na displeji a značka plus pod
ním krátko bliká
-
pričítajte dodatočné namerané hodnoty k hodnote
pamäti pomocou “M+” (možné len kým sú stejné
meracie jednotky)
Ташев-Галвинг ООД
www.tashev-galving.com
SKIL_IB0530_EUCH_v3.indd 55 08-06-2010 13:04:28
Page 56

56
• Odčítanie nameraných hodnôt
- stisnite “M-”, aby ste odpočítali súčasnú nameranú
hodnotu od hodnoty pamäti (možné len kým sú
stejné meracie jednotky)
-
písmeno “M” sa objaví na displeji a značka minus
pod ním krátko bliká
•
Prečítanie pamäti
- stisnutím “M=” sa objaví hodnota uložená v pamäti
spolu so symbolom “M=” (posledná nameraná
hodnota zostane zobrazená na displeji)
-
stisnutím “M+” sa zdvojnásobí obsah pamäti
- stisnutím “M-” sa pamäti nastaví na nulu
• Mazanie pamäti
Najprv stisnite “M=”, potom stisnite “C” (písmeno “M”
už nebude zobrazené)
•
Chybné meranie
- ak meranie nebolo úspešné, na displeji sa zobrazí
“ERROR”
-
zistite príčinu, urobte opravné opatrenia a opäť
vykonajte meranie
Možné príčiny chybného merania:
-
meranie prebiehalo mimo pásmo merania
- úhol medzi lasorovým lúčom a cieľom bol príliš ostrý
- cieľová plocha sa odrážala príliš intenzívne (napr.
zrkadlo) alebo nedostatočne (napr. čierna tkanina)
alebo prostorové svetlo bolo príliš jasné
-
prijímacie šošovky A 3 alebo otvor laserového lúča
B 3 bol pokrytý oparom (napr. kvôli náhlej zmene
teploty)
-
boli pridané/odrátané namerané hodnoty s
neodpovedajúcimi jednotkami merania
•
Taška na pripevnenie na opasok umožňujúca
jednoduché a pohodlné uloženie nástroja #
RADU NA POUŽITIE
• Kým opravný postup nemôže opraviť chybu, alebo kým
sa na displeji objaví “FAIL”, nie je už možné merania; v
tomto prípade zašlite prístroj vášmu dodávateľovi alebo
do najbližšieho servisu SKIL
•
Nástroj nevystavte trvalému traseniu alebo extrémne
teplým alebo studeným teplotám
•
Nástroj vždy odložte v miestnosti v svojom ochrannom
obale/krabici
•
Vždy chráňte nástroj pred prachom, vlhkom a priamym
slnkom
•
Nástroj očisťte vlhkou handrou a miernym mydlom
! pred cistením cocky vždy vyberte batérie
• Nástroj nerozoberajte a nemeňte žiadnym spôsobom
• Nepokúste sa vymeniť žiadnu časť laserovej čočky
ZÁRUKA / ŽIVOTNÉ PROSTREDIE
• Tento SKIL výrobok je zaručený v súlade so zákonnými/
pre krajiny špecifickými reguláciami; poškodenie
následkom normálneho upotrebenia, preťaženia, alebo
nesprávneho zaobchádzania nebude zárukou kryté
•
V prípade sťažnosti pošlite nerozobratý nástroj spolu s
dokladom o kúpe Vášmu dílerovi alebo do najbližšieho
servisu podniku Skil (adresy sú na webovej stránke
www.skileurope.com)
•
Elektrické náradie, batérie, príslušenstva a balenia
nevyhadzujte do komunálneho odpadu (len pre štáty
EÚ)
-
podĺa európskej smernice 2002/96/EG o nakladaní s
použitými elektrickými a elektronickými zariadeniami
a zodpovedajúcich ustanovení právnych predpisov
jednotlivých krajín sa použité elektrické náradie musí
zbierať oddelene od ostatného odpadu a podrobiť
ekologicky šetrnej recyklácii
-
pripomenie vám to symbol $, keď ju bude treba
likvidovať
HR
Laserski alat za mjerenje 0530
UVOD
• Ovaj je alat namijenjen za mjerenje rastojanja, unutra i
vani, putem laserske zrake
•
Ako se koristi ispravno, ovaj alat jednostavno i točno
mjeri udaljenost, površinu i volumen
•
Pažljivo pročitajte ove upute za rukovanje i posebnu
pažnju obratite na sigurnosne uputei i upozorenja;
pridržavajte ih se kako ne bi došlo do ozbiljnih
ozljeda (očiju) 1
•
Prije korištenja alata po prvi puta, preko teksta
upozorenja na njemačkom jeziku zalijepite naljepnicu s
jezikom Vaše zemlje P 3
•
Sačuvajte ove upute za rukovanje za ubuduće
TEHNIČKI PODACI
Metoda mjerenja optička/laserom
Domet mjerenja 0,2 - 20 m
1
)
Točnost mjerenja (tipična) +/- 3,0 mm
2
)
Trajanje mjerenja (tipično) < 0,5 sek.
Najmanja mjerna jedinica 1 mm
Radna temperaturaod -10°C do 50°C
Temperatura čuvanja -20ºC do 70°C
Relativna vlaga (maks.) 90%
Klasa lasera 2
Vrsta lasera 635 nm
Maksimalna izlazna snaga < 1 mW
Promjer laserske zrake
(na otprilike 20°C)
- na razdaljini od 10 m
6 mm
- na razdaljini od 20 m 16 mm
Baterije (u paketu) 4 x AAA (LR03) 1,5V
Baterije na punjenje 4 x AAA (LR03) 1,2V
Automatsko isključivanje
- laser
nakon otprilike 20
sekundi bez mjerenja
- alat za mjerenje
nakon otprilike 5 minuta
neaktivnosti
Masa
0,18 kg
1) Domet mjerenja povećava se ovisno o tome koliko se
dobro svjetlost lasera odbija od ciljne površine i koliko
je svjetlo lasera jako u odnosu na okolišnu svjetlost
2)
Točnost mjerenja oscilira +0,06% prilikom nepovoljnih
uvjeta (npr. pod jakim suncem)
Ташев-Галвинг ООД
www.tashev-galving.com
SKIL_IB0530_EUCH_v3.indd 56 08-06-2010 13:04:29
Page 57

57
DIJELOVI ALATA 3
A Prihvatna leća
B Otvor laserske zrake
C LCD zaslon
D Gumb uključeno/isključeno
E Gumb za konverziju metri/stope
F Način rada duljine i neprekidnog mjerenja
G Način rada mjerenja površine
H Način rada mjerenja opsega
J Gumb za brisanje (“C”)
K Gumb za dodavanje memoriji (“M+”)
L Gumb za oduzimanje iz memorije (“M-”)
M Gumb za dohvat (čitanje) memorije (“M=”)
N Gumb za mjerenje (“GO”)
P Naljepnica s upozorenjem
Q Poklopac prostora za baterije
SIGURNOST
• Ne gledajte u lasersku zraku (laserska radijacija) 2
• Ne usmjeravajte lasersku zraku prema osobama ili
životinjama
•
Ne stavljajte alat u položaj koji bi mogao uzrokovati da
netko namjerno ili slučajno pogleda u lasersku zraku
•
Ne gledajte u lasersku zraku pomoću optičkih pomagala
za povećavanje (kao što su povećala, teleskopi ili
dalekozori)
•
Ne uklanjajte niti oštećujte naljepnicu s upozorenjem na
alatu
•
Ne upotrebljavajte alat u blizini zapaljivih tekućina,
plinova ili prašine
•
Ne upotrebljavajte alat dok su u blizini djeca
• Korisnici ovog uređaja trebaju biti stariji od 16 godina
• Ne upotrebljavajte alat u druge svrhe osim onih
naznačenih u ovim uputama za rukovanje
POSLUŽIVANJE
• Umetanje baterija 4
! provjerite je li alat isključen
- koristite isključivo alkalno-manganske baterije ili
baterije na punjenje
-
okrenite alat naopako
- uklonite poklopac Q
- umetnite 4 x bateriju od 1,5V (obratite pažnju na
ispravnu polarizaciju)
-
postavite poklopac Q
- kad je baterija pri kraju, na zaslonu će se prikazati
znak 5
-
kada se na zaslonu po prvi puta pojavi simbol 5 , na
raspolaganju imate još barem 100 mjerenja
-
baterije zamijenite kada simbol 5 počne titrati
(mjerenje više nije moguće)
-
uvijek mijenjajte cijeli komplet baterija
- uvijek uklonite baterije iz alata ako ga ne koristite
duže vrijeme
•
Uključeno/isključeno
- alat uključite pritiskom na “on/off” ili “GO” (laserska
zraka još nije uključena)
-
isključite alat pritiskom na “on/off”
- alat se automatski isključuje nakon 5 minuta
neaktivnosti
•
Konverzija metri/stope
- prema zadanim postavkama mjerenje se izvodi u
metrima/centimetrima
-
pritisnite gumb E 3 za konverziju metara/centimetara
u stope/inče
•
Rukovanje alatom 6
-
uključite alat (na zaslonu se pojavljuje simbol 7, koji
označava da je alat već u načinu rada mjerenja
duljine)
-
ako želite, odaberite neki drugi način rada (površina/
opseg)
-
pritisnite “GO” da biste uključili lasersku zraku (na
zaslonu se prikazuje simbol 8 )
-
uperite alat prema ciljanoj površini
! ne gledajte u lasersku zraku
! ne usmjeravajte lasersku zraku prema osobama
ili životinjama
-
ponovno pritisnite “GO”; na zaslonu se prikazuje
izmjerena vrijednost (laserska se zraka automatski
isključuje)
-
laserska se zraka također automatski isključuje ako
se otprilike 20 sekundi nakon uključivanja laserske
zrake ne dogode nikakva mjerenja
!
imajte na umu da alat mjeri od svoje stražnje
strane (duljina alata uključena je u rezultat mjerenja)
-
pritisnite “C” za brisanje prethodne pojedinačno
izmjerene vrijednosti
-
pritisnite “C” više puta za brisanje prethodnih
pojedinačno izmjerenih vrijednosti u obratnom
redosljedu (m³ - m²)
•
Upute za ispravno mjerenje
!
za vrijeme mjerenja ne pomičite alat (osim u
načinu rada neprekidnog mjerenja)
-
za vrijeme mjerenja ne pokrivajte prihvatnu leću A 3 i
otvor za lasersku zraku B 3
-
pri nepovoljnim uvjetima (npr. prilikom vanjskih
mjerenja pod jakim suncem) koristite leću za
pojačavanje lasera (SKIL dodatak 2610395907) ili na
ciljnu površinu stavite komad papira
-
mjerenja po transparentnim, reflektirajućim, poroznim
ili strukturiranim površinama mogu dovesti do krivih
rezultata
•
Mjerenje površine
- pritisnite gumb G
3 (na zaslonu će se prikazati
simbol 9)
-
uperite alat prema prvoj ciljanoj površini (duljina)
-
pritisnite “GO” (na zaslonu će se prikazati simbol 8)
-
ponovo pritisnite “GO”; izmjerena udaljenost pojavit
će se u gornjem retku zaslona
-
uperite alat prema drugoj ciljanoj površini (širina)
-
ponovo pritisnite “GO”; izmjerena širina pojavit će se
u gornjem retku zaslona dok će se izračunata
površina pojaviti u donjem retku zaslona
-
ponovo pritisnite “GO” kako biste pokrenuli novo
mjerenje površine
•
Mjerenje volumena
- pritisnite gumb H
3 (na zaslonu će se prikazati
simbol 0)
-
uperite alat prema prvoj ciljanoj površini (duljina)
-
pritisnite “GO” (na zaslonu će se prikazati simbol 8)
-
ponovo pritisnite “GO”; izmjerena udaljenost pojavit
će se u gornjem retku zaslona
Ташев-Галвинг ООД
www.tashev-galving.com
SKIL_IB0530_EUCH_v3.indd 57 08-06-2010 13:04:30
Page 58

58
- uperite alat prema drugoj ciljanoj površini (širina)
- ponovo pritisnite “GO”; izmjerena širina pojavit će se
u gornjem retku zaslona dok će se izračunata
površina pojaviti u donjem retku zaslona
-
uperite alat prema trećoj ciljanoj površini (visina)
-
ponovo pritisnite “GO”; izmjerena visina pojavit će se
u gornjem retku zaslona dok će se izračunati
volumen pojaviti u donjem retku zaslona
-
ponovo pritisnite “GO” kako biste pokrenuli novo
mjerenje volumena
•
Neprekidno mjerenje !
-
nakon uključivanja alata pritisnite gumb F3 (na
zaslonu se prikazuje simbol @)
-
pritisnite “GO” (na zaslonu će se prikazati simbol 8)
-
laserska zraka ostaje uključena, tako da se stvarna
udaljenost može mjeriti neprekidno
-
za prekidanje neprekidnog mjerenja ponovno
pritisnite “GO” (tadašnja izmjerena vrijednost se
prikazuje na zaslonu)
-
za ponovno uključivanje neprekidnog mjerenja
ponovno pritisnite “GO”
-
način rada neprekidnog mjerenja automatski se
isključuje nakon 5 minuta (zadnja se izmjerena
vrijednost prikazuje na zaslonu), a može se isključiti i
odabirom nekog drugog načina rada
•
Spremanje/dodavanje izmjerenih vrijednosti
- za spremanje izmjerene vrijednosti, nakon mjerenja
pritisnite “M+”
-
na zaslonu se prikazuje slovo “M”, a znak plusa
ispod njega nakratko zatreperi
-
pritiskom na “M+” možete dodavati još izmjerenih
vrijednosti u memoriju (omogućeno samo kada se
slažu mjerne jedinice)
•
Oduzimanje izmjerenih vrijednosti
- da biste od vrijednosti u memoriji oduzeli trenutnu
izmjerenu vrijednost, pritisnite “M-” (omogućeno
samo kada se slažu mjerne jedinice)
-
na zaslonu se prikazuje slovo “M”, a znak minusa
ispod njega nakratko zatreperi
•
Čitanje memorije
- kada pritisnete “M=”, prikazuje se vrijednost
spremljena u memoriji, zajedno sa znakom “M=”
(zadnja se izmjerena vrijednost prikazuje na zaslonu)
-
sadržaj memorije udvostručite pritiskom na “M+”
- sadržaj memorije svedite na nulu pritiskom na “M-”
• Brisanje memorije
Prvo pritisnite “M=”, pa zatim “C” (slovo “M” više nije
prikazano)
•
Pogrešno mjerenje
- kad mjerenje nije uspješno, na zaslonu će se prikazati
“ERROR”
-
pronađite uzrok, ispravite problem i ponovno
pristupite mjerenju
Mogući uzroci netočnog mjerenja:
-
mjerenje je bilo izvedeno van mjernog dometa
- kut između laserske zrake i cilja bio je previše oštar
- ciljna površina bila je previše reflektirajuća (npr.
ogledalo) ili premalo reflektirajuća (npr. crna tkanina),
ili je okolno svjetlo bilo prejako
-
prihvatna leća A 3 ili otvor laserske zrake B 3 bili su
zamagljeni (npr. uslijed nagle promjene temperature)
-
izmjerene vrijednosti dodane su/oduzete s
neprikladnim mjernim jedinicama
•
Torbica za pojas za jednostavno i praktično nošenje #
SAVJETI ZA PRIMJENU
• Kada se greška ne može ispraviti popravnim
postupkom, ili kada se na zaslonu prikaže “FAIL”,
mjerenje više nije moguće; u tom slučaju uređaj
pošaljite Vašem zastupniku ili najbližem servisu SKIL
•
Ne izlažite alat stalnim vibracijama ili izrazito visokim
odnosno izrazito niskim temperaturama
•
Uvijek spremajte alat u njegovu zaštitnu kutiju/kovčeg te
u zatvoreni prostor
•
Uvijek štitite i čistite alat od prašine, vlage i izravnog
sunčevog svjetla
•
Alat čistite vlažnom krpom i blagim sapunom
! uvijek uklonite baterije prije čišćenja leće
• Ne rastavljajte niti modificirajte alat na bilo koji način
• Ne pokušavajte promijeniti nijedan dio laserske leće
JAMSTVO / ZAŠTITA OKOLIŠA
• Za ovaj SKIL proizvod dajemo jamstvo prema
zakonskim i propisima zemlje korisnika; za štete nastale
prirodnim trošenjem, preopterećenjem ili nestručnim
rukovanjem, ovo se jamstvo ne priznaje
•
U slučaju pritužbe, pošaljite nerastavljeni alat zajedno s
dokazom o kupovini svom zastupniku ili najbližoj Skil
servisnoj stanici (adrese se nalaze na adresi
www.skileurope.com)
•
Električne alate, baterij, pribor i ambalažu ne
odlažite zajedno za sa kućnim otpatcima (samo za
EU-države)
-
prema Europskoj direktivi 2002/96/EG o staroj
električnoj i elektroničkoj opremi i njenoj primjeni u
skladu sa nacionalnim zakonom, istrošeni električni
alati moraju se sakupljati odvojeno i odvesti u
posebne pogone za reciklažu
-
na to podsjeća simbol $ kada se javi potreba za
odlaganjem
SRB
Laserski merni aparat 0530
UPUTSTVO
• Ovaj alat se koristi za merenje rastojanja u zatvorenom i
na otvorenom prostoru pomoću projekcije laserskog
zraka
•
Pri pravilnoj upotrebi, ovaj alat lako i precizno meri
dužinu, površinu i zapreminu
•
Pažljivo pročitajte ova uputstva za rukovanje i
posebno obratite pažnju na uputstva o bezbednosti i
upozorenja; ukoliko ih ne sledite, može da dođe do
ozbiljnih povreda (očiju) 1
Ташев-Галвинг ООД
www.tashev-galving.com
SKIL_IB0530_EUCH_v3.indd 58 08-06-2010 13:04:31
Page 59

59
•
Pre nego što prvi put upotrebite alat, zalepite priloženu
nalepnicu na svom maternjem jeziku preko originalne
nalepnice za upozorenja na nemačkom jeziku P 3
•
Sačuvajte ovo uputstvo za rukovanje za buduće
upotrebe
TEHNIČKI PODACI
Način merenja optički/laserski
Domet merenja 0.2 - 20 m
1
)
Tačnost merenja (tipična) +/- 3,0 mm
2
)
Trajanje merenja (tipično) < 0,5 sek.
Najmanja jedinica prikazivanja 1 mm
Radna temperaturaod -10°C do 50°C
Temperatura za uslove skladištenja -20ºC do 70°C
Relativna vlažnost (maks.) 90%
Klasa lasera 2
Vrsta lasera 635 nm
Maksimalna izlazna snaga < 1 mW
Širina laserskog zraka (na oko 20°C)
- za daljinu od 10 m
6 mm
- za daljinu od 20 m 16 mm
Baterije (uključene) 4 x AAA (LR03) 1.5V
Baterije koje se pune 4 x AAA (KR03) 1.2V
Automatsko isključivanje
- laser
posle oko 20 sek.
bez merenja
- alat za merenje
ukoliko je neaktivan
5 min.
Težina
0,18 kg
1) Domet merenja se povećava zavisno od toga koliko se
dobro reflektuje laserska svetlost od ciljne površine i od
svetlosti laserske tačke u odnosu na intenzitet
ambijentalnog osvetljenja
2)
Tačnost merenja odstupa za +0,06% pri nepovoljnim
uslovima (npr. pri jakoj sunčevoj svetlosti)
ELEMENTI ALATA 3
A Prijemno sočivo
B Otvor za laserski zrak
C LCD displej
D Dugme za uključivanje/isključivanje
E Dugme za pretvaranje u metre/fite
F Merenja dužine i režim kontinualnog merenja
G Režim merenja površine
H Režim merenja zapremine
J Taster za brisanje (“C”)
K Taster za sabiranje sa memorisanom vrednošću (“M+”)
L Taster za oduzimanje od memorisane vrednosti (“M-”)
M Taster za pozivanje vrednosti iz memorije (“M=”)
N Taster za merenje (“GO”)
P Nalepnica sa upozorenjem
Q Poklopac odeljka za baterije
BEZBEDNOST
• Nemojte da gledate u laserski zrak (laserska
radijacija) 2
•
Nemojte da usmeravate laserski zrak u ljude ili
životinje
•
Nemojte da postavljate alatku u položaj koji bi mogao
da dovede do toga da neko namerno ili slučajno
pogleda u laserski zrak
•
Nemojte da gledate laserski zrak pomoću optičkih
pomagala za uvećavanje (kao što su lupe, teleskopi ili
dvogledi)
•
Nemojte da skidate ili oštetite nalepnicu sa
upozorenjem na alatki
•
Nemojte da koristite alatku u blizini zapaljivih tečnosti,
gasova ili prašine
•
Nemojte da koristite alatku ukoliko su u blizini deca
• Ovaj alat ne smeju da koriste osobe mlađe od
16 godina
•
Nemojte da koristite alatku u bilo koju drugu svrhu,
osim naznačenih u ovom uputstvu za rukovanje
UPUTSTVO ZA KORIŠĆENJE
• Stavljanje baterija 4
! proverite da li je alatka isključena
- koristite isključivo alkalne-manganske ili baterije koje
se pune
-
okrenite alat naopačke
- uklonite poklopac Q
- ubacite 4 x bateriju od 1,5V (obratite pažnju na
ispravnu polarizaciju)
-
postavite poklopac Q
- kada je nivo baterije nizak, na displeju će se pojaviti
simbol 5
-
kada se simbol 5 prvi put pojavi na displeju, to znači
da se mogu izvršiti bar još 100 merenja
-
zamenite baterije kada simbol 5 počne da trepće
(merenje više nije moguće)
-
uvek menjajte komplet baterija
- uvek izvadite baterije iz alatke, ako je ne koristite
duže vreme
•
Uključeno/isključeno
- uključite alat pritiskanjem ili “on/off” ili “GO” tastera
(laserski zrak još uvek nije uključen)
-
alat isključite pritiskom na “on/off”
- aparat se automatski isključuje ukoliko je neaktivan 5
minuta
•
Pretvaranje u metre/fite
- podrazumevana postavka je merenje u metrima/
centimetrima
-
pritisnite dugme E 3 za pretvaranje metara/
centimetara u fite/inče
•
Rukovanje alatkom 6
-
uključite alat (simbol 7 se pojavljuje na displeju
signalizirajući da je alat spreman za rad u režimu
merenja dužine)
-
izaberite drugi režim merenja (površine/zapremine),
ako želite
-
pritisnite taster “GO” za uključivanje laserskog zraka
(simbol 8 će se pojaviti na displeju)
-
vodite alat ka površini koja se meri
! nemojte da gledate u laserski zrak
! nemojte da usmeravate laserski zrak u ljude ili
životinje
Ташев-Галвинг ООД
www.tashev-galving.com
SKIL_IB0530_EUCH_v3.indd 59 08-06-2010 13:04:31
Page 60

60
- ponovo pritisnite taster “GO”; na displeju se
pojavljuje izmerena vrednost (laserski zrak se
automatski isključuje)
-
laserski zrak se automatski isključuje i ako se u roku
od oko 20 sekundi nakon uključivanja laserskog
zraka ne izvrši nijedno merenje
!
imajte na umu da ovaj alat započinje merenje od
svog stražnjeg dela (dužina alata je uključena u
rezultat merenja)
-
pritisnite taster “C” za brisanje poslednje pojedinačne
izmerene vrednosti
-
ponovo pritisnite taster “C” za brisanje poslednje
pojedinačne izmerene vrednosti obrnutim
redosledom (m³ - m²)
•
Uputstva za ispravno merenje
!
ne pomerajte alat za vreme merenja (osim u režimu
kontinualnog merenja)
-
ne pokrivajte prijemno sočivo A 3 i otvor za laserski
zrak B 3 tokom merenja
-
pri nepovoljnim uslovima (npr. kada se merenje vrši
napolju pri jakoj sunčevoj svetlosti) koristite dodatnu
lasersku optiku (SKIL dodatni pribor 2610395907) ili
stavite parče papira na ciljnu površinu
-
merenje u odnosu na transparentne, reflektujuće,
porozne ili strukturisane površine može dovesti do
pogrešnih rezultata merenja
•
Merenje površine
- pritisnite dugme G
3 (na displeju će se pojaviti
simbol 9)
-
vodite alat ka površini koja se prva meri (dužina)
-
pritisnite “GO” (na displeju će se pojaviti simbol 8)
-
ponovo pritisnite “GO”; izmerena dužina se pojavljuje
u gornjem redu displeja
-
vodite alat ka površini koja se druga po redu meri
(širina)
-
ponovo pritisnite “GO”; izmerena širina se pojavljuje
u gornjem redu displeja, a izračunata površina u
donjem redu displeja
-
ponovo pritisnite “GO” za početak potpuno novog
merenja površine
•
Merenje zapremine
- pritisnite dugme H
3 (na displeju će se pojaviti
simbol 0)
-
vodite alat ka površini koja se prva meri (dužina)
-
pritisnite “GO” (na displeju će se pojaviti simbol 8)
-
ponovo pritisnite “GO”; izmerena dužina se pojavljuje
u gornjem redu displeja
-
vodite alat ka površini koja se druga po redu meri
(širina)
-
ponovo pritisnite “GO”; izmerena širina se pojavljuje
u gornjem redu displeja, a izračunata površina u
donjem redu displeja
-
vodite alat ka površini koja se treća po redu meri
(visina)
-
ponovo pritisnite “GO”; izmerena visina se pojavljuje
u gornjem redu displeja, a izračunata zapremina u
donjem redu displeja
-
ponovo pritisnite “GO” za početak potpuno novog
merenja zapremine
•
Kontinualno merenje !
-
pritisnite taster F3 nakon uključivanja alata
(simbol @ će se pojaviti na displeju)
-
pritisnite “GO” (na displeju će se pojaviti simbol 8)
-
laserski zrak ostaje uključen, tako da se mereno
rastojanje može kontinualno očitavati
-
pritisnite taster “GO” ponovo radi prekida
kontinualnog merenja (trenutna izmerena vrednost se
prikazuje na displeju)
-
pritisnite taster “GO” ponovo za ponovno startovanje
kontinualnog merenja
-
režim kontinualnog merenja se automatski isključuje
posle 5 minuta (poslednja izmerena vrednost ostaje
na displeju), a može se prekinuti i izborom drugog
režima merenja
•
Memorisanje/sabiranje izmerenih vrednosti
- po izvršenom merenju pritisnite “M+” za memorisanje
izmerene vrednosti
-
slovo “M” se pojavljuje na displeju, a znak plus ispod
njega kratkotrajno treperi
-
saberite druge izmerene vrednosti sa vrednošću iz
memorije pomoću tastera “M” (moguće samo kada
su merne jedinice usaglašene)
•
Oduzimanje izmerenih vrednosti
- pritisnite taster “M-” za oduzimanje trenutne
izmerene vrednosti od vrednosti iz memorije (moguće
samo kada su merne jedinice usaglašene)
-
slovo “M” se pojavljuje na displeju, a znak minus
ispod njega kratkotrajno zatreperi
•
Čitanje memorije
- kada se pritisne taster “M=”, vrednost smeštena u
memoriji se prikazuje zajedno sa simbolom “M=”
(poslednja izmerena vrednost ostaje na displeju)
-
udvostručite sadržaj memorije pritiskanjem tastera
“M+”
-
izbrišite sadržaj memorije pritiskanjem tastera “M-”
• Brisanje memorije
Prvo pritisnite taster “M=”, zatim pritisnite taster “C”
(slovo “M” se više ne prikazuje)
•
Netačno merenje
- kada merenje nije uspešno obavljeno, na displeju se
pojavljuje “ERROR”
-
odresite uzrok, preduzmite korektivne akcije i ponovo
izvršite merenje
Mogući uzroci pogrešnog merenja:
-
merenje je izvršeno van mernog opsega
- ugao između laserskog zraka i cilja bio je previše
oštar
-
ciljna površina je previše (npr. ogledalo) ili nedovoljno
(npr. crno platno) reflektovala svetlost, ili je
ambijentalno svetlo bilo prejako
-
prijemna sočiva A 3 ili otvor za laserski zrak B 3 su
bili zamagljeni (npr. usled brze promene temperature)
-
izmerene vrednosti su dodavane/oduzimane od
nekorespodentnih jedinica mere
•
Futrola koja se nosi na kaišu za jednostavno i prikladno
čuvanje alata #
PRIMENA
• Kada korektivna akcija ne može ispraviti grešku, ili kada
se na displeju pojavi “FAIL”, merenje više nije moguće;
u tom slučaju pošaljite alat svom trgovcu ili najbližem
SKILovom servisu
•
Nemojte da izlažete alatku stalnim vibracijama ili veoma
visokim ili niskim temperaturama
Ташев-Галвинг ООД
www.tashev-galving.com
SKIL_IB0530_EUCH_v3.indd 60 08-06-2010 13:04:32
Page 61

61
•
Uvek spremajte alatku u njegovu zaštitnu kartonsku
kutiju/sanduk
•
Uvek štitite alatku od prašine, vlage i direktnog izlaganja
suncu
•
Čistite alatku vlažnom krpom i blagim sapunom
! uvek izvadite baterije pre čišćenja sočiva
• Nemojte da rastavljate ili modifikujete alatku na bilo koji
način
•
Ne pokušavajte da promenite bilo koji deo laserskog
sočiva
GARANCIJA / ZAŠTITA OKOLINE
• Ovaj SKIL proizvod sadrži garanciju u skladu sa
propisima i zakonima određenih država; oštećenja
nastala normalnim habanjem i trošenjem,
preopterećenjem uređaja ili nepravilnim rukovanjem nisu
uključena u garanciju
•
U slučaju žalbe, pošaljite nerastavljeni alat zajedno sa
potvrdom o kupovini vašem nabavljaču ili najbližem Skil
servisu (spisak adresa se nalazi na www.skileurope.com)
•
Električne alate, baterije, pribora i ambalaže ne
odlažite u kućne otpatke (samo za EU-države)
-
prema Europskoj direktive 2002/96/EG o staroj
električnoj I elektronskoj opremi i njenoj upotrebi u
skladu sa nacionalnim pravom,električni alati koji su
istrošeni moraju biti sakupljeni odvojeno i dostavljeni
pogonu za reciklažu
-
simbol $ će vas podsetiti na to
SLO
Laserska merilna naprava 0530
UVOD
• Ta naprava je namenjena merjenju razdalj s pomočjo
laserskega žarka v zaprtih prostorih ali na prostem
•
Ob pravilni uporabi lahko točno izmerimo dolžino,
površino in prostornino
•
Pazljivo preberite navodila za uporabo in posebno
pozornost namenite navodilom in opozorilom o
varnosti; če jih ne boste upoštevali, lahko pride do
hudih poškodb (oči) 1
•
Pred prvo uporabo preko nemškega besedila opozorilne
nalepke P 3 prelepite dobavljeno naplepko v Vašem
jeziku
•
Ta navodila za uporabo shranite, morda jih boste v
prihodnosti še potrebovali
LASTNOSTI
Metoda merjenja optika/laser
Merilno območje 0,2 - 20 m
1
)
Natančnost merjenja (tipična) +/- 3,0 mm
2
)
Trajanje merjenja (tipično) < 0,5 sec.
Najmanjša enota 1 mm
Delovna temperaturaod -10°C do 50°C
Temperatura za shranjevanje -20ºC do 70°C
Relativna vlažnost (maks.) 90%
Razred laserja 2
Vrsta laserja 635 nm
Največja izhodna moč < 1 mW
Premer laserskega žarka (pri ca. 20°C)
- pri razdalji 10 m
6 mm
- pri razdalji 20 m 16 mm
Baterije (priložene) 4 x AAA (LR03) 1,5V
Baterije za ponovno polnjenje 4 x AAA (LR03) 1,2V
Samodejno izklapljanje
- laser
po ca. 20 sekundah
nemerjenja
- merilna naprava
po ca. 5 minut
nedejavnosti
Teža
0,18 kg
1) Merilno območje se veča v odvisnosti od tega, kako
dobro se laserska svetloba odbija od ciljne površine in
kako svetel je fokus laserja glede na ambietno svetlobo
2)
Natančnost merjenja pri neugodnih pogojih (npr. močna
sončna svetloba) odstopa za +0,06%
DELI ORODJA 3
A Zbiralna leča
B Odprtina za laserski žarek
C LCD zaslon
D Gumb vklopi/izklopi
E Gumb za pretvarjanje (metri/čevlji)
F Način za merjenje dolžine in za neprekinjeno merjenje
G Način za merjenje površine
H Način za merjenje prostornine
J Gumb za brisanje (“C”)
K Gumb za shranjevanje vrednosti v spomin (“M+”)
L
Gumb za odštevanje od vrednosti, shranjene v spominu
(“M-”)
M Gumb za prklic vrednosti, shranjene v spominu (“M=”)
N Gumb za merjenje (“GO”)
P Nalepka z opozorilom
Q Pokrov prostora za baterije
VARNOST
• Ne glejte v laserski žarek (sevanje laserja) 2
• Ne usmerjajte laserskega žarka proti osebam ali
živalim
•
Orodja ne postavljajte tako, da bi kdor koli lahko
namerno ali nenamerno gledal v smeri proti laserskemu
žarku
•
Za opazovanje laserskega žarka ne uporabljajte nobenih
optičnih povečevalnih orodij (povečevalno steklo,
teleskop ali daljnogled)
•
Ne odstranite in ne poškodujte nalepke z opozorilom, ki
je na orodju
•
Ne uporabljajte orodja v bližini vnetljivih tekočin, plinov
ali prahu
•
Ne uporabljajte orodja, ko so v bližini otroci
• Orodja naj ne uporabljajo osebe mlajše od 16 let
• Ne uporabljajte orodja v noben drug namen, razen v
namene, ki so navedeni v tem priročniku
UPORABA
• Namestitev baterij 4
! prepričajte se, da je orodje izklopljeno
Ташев-Галвинг ООД
www.tashev-galving.com
SKIL_IB0530_EUCH_v3.indd 61 08-06-2010 13:04:33
Page 62

62
- uporabljajte le alkalne manganske baterije ali baterije
za ponovno polnjenje
-
obrnite orodje na glavo
- odstranite pokrov Q
- vstavite 4 x baterijo 1,5V (pazite na pravilno
usmerjenost)
-
namestite pokrov Q
- če je zmogljivost baterije majhna, se na zaslonu
prikaže simbol 5
-
ko se simbol 5 prvič pojavi na prikazovalniku, je
možnih vsaj še 100 merjenj
-
baterije zamenjajte, ko začne simbol 5 utripati
(merjenje ni več mogoče)
-
vedno zamenjajte celoten komplet baterij
- vedno odstranite baterije iz orodje, če orodja ne
uporabljate dlje časa
•
Vklop/izklop
- napravo vklopite s pritiskom na gumb “on/off” ali
“GO” (laserski žarek še ni vklopljen)
-
izklopite napravo tako, da pritisnete “on/off”
- orodja se samodejno izklopi po 5 minut nedejavnosti
• Tipka za pretvarjanje (metri/čevlji)
- privzeti enoti meritev sta meter/centimeter
- če želite pretvoriti metre/centimetre v čevlje/inče,
pritisnite tipko E 3
•
Rokovanje z orodjem 6
-
vklopite napravo (na prikazovalniku se pojavi
simbol 7, ki nakazuje, da je naprava nastavljena na
način za merjenje dolžine)
-
po želji lahko zberete drug način merjenja (površina/
prostornina)
-
za vklop laserskega žarka pritisnite “GO” (na
prikazovalniku se bo pojavil simbol 8)
-
usmerite napravo proti površini, ki jo želite izmeriti
! ne glejte v laserski žarek
! ne usmerjajte laserskega žarka proti osebam ali
živalim
-
znova pritisnite “GO”; na prikazovalniku se pojavi
izmerjena vrednost (laserski žarek se samodejno
izklopi)
-
laserski žarek se samodejno izklopi tudi v primeru, če
se ca. 20 sekund po tem, ko je bila naprava
vklopljena, niso izvajale meritve
!
ne pozabite, da naprava meri od svojega zadnjega
dela naprej (dolžina naprave je vključena v izmerjeno
razdaljo)
-
za brisanje zadnje posamezne izmerjene vrednosti
pritisnite “C”
-
za brisanje zadnjih posameznih izmerjenih vrednosti v
obratnem vrstnem redu večkrat pritisnite “C” (m³ - m²)
•
Navodila za pravilno merjenje
!
med merjenjem naprave ne premikajte (razen v
načinu za neprekinjeno merjenje)
-
med merjenjem ne pokrivajte zbiralne leče A 3 in
odprtine za izstop laserskega žarka B 3
-
pri neugodnih pogojih (npr. pri merjenju na prostem
ob močni sončni svetlobi) uporabljajte očala za
povečano občutljivost za svetlobo laserja (SKIL
dodatna oprema 2610395907) ali pa na ciljno
površino položite kos papirja
-
merjenje proti prozornim, odbojnim, poroznim ali
strukturiranim površinam lahko ima za posledico
napačne mere
•
Merjenje površine
- pritisnite tipko G
3 (se na zaslonu prikaže simbol 9)
-
usmerite napravo proti prvi površini, ki jo želite
izmeriti (dolžina)
-
pritisnite “GO” (se na zaslonu prikaže simbol 8)
-
ponovno pritisnite “GO”; v zgornji vrstici na zaslonu
se prikaže izmerjena dolžina
-
usmerite napravo proti drugi površini, ki jo želite
izmeriti (širina)
-
ponovno pritisnite “GO”; v zgornji vrstici na zaslonu
se prikaže izmerjena širina, v spodnji vrstici pa
izračunana vrednost površine
-
ponovno pritisnite “GO”, da bi začeli merjenje
povsem nove površine
•
Merjenje prostornine
- pritisnite tipko H
3 (se na zaslonu prikaže simbol 0)
-
usmerite napravo proti prvi površini, ki jo želite
izmeriti (dolžina)
-
pritisnite “GO” (se na zaslonu prikaže simbol 8)
-
ponovno pritisnite “GO”; v zgornji vrstici na zaslonu
se prikaže izmerjena dolžina
-
usmerite napravo proti drugi površini, ki jo želite
izmeriti (širina)
-
ponovno pritisnite “GO”; v zgornji vrstici na zaslonu
se prikaže izmerjena širina, v spodnji vrstici pa
izračunana vrednost površine
-
usmerite napravo proti tretji površini, ki jo želite
izmeriti (višina)
-
ponovno pritisnite “GO”; v zgornji vrstici na zaslonu
se prikaže izmerjena višina, v spodnji vrstici pa
izračunana vrednost prostornine
-
ponovno pritisnite “GO”, da bi začeli merjenje
povsem nove prostornine
•
Neprekinjeno merjenje !
-
po tem, ko ste napravo vklopili, pritisnite gumb F3
(na prikazovalniku se bo pojavil simbol @)
-
pritisnite “GO” (se na zaslonu prikaže simbol 8)
-
laserski žarek ostane vklopljen tako, da je dejansko
razdaljo mogoče nenehno brati
-
neprekinjeno merjenje ustavite s ponovnim pritiskom
na “GO” (na prikazovalniku je prikazana zadnja
izmerjena vrednost)
-
za ponovni zagon neprekinjenega merjenja znova
pritisnite “GO”
-
način neprekinjenega merjenja se po 5 minutah
samodejno izklopi (na prikazovalniku ostane prikaz
zadnje izmerjene vrednosti) in ga je mogoče izklopiti
tudi z izborom drugega načina merjenja
•
Shranjevanje/seštevanje izmerjenih vrednosti
- za shranjevanje izmerjene vrednosti, po merjenju
pritisnite “M+”
-
na prikazovalniku se pojavi črka “M” in plus pod njim
na kratko utripa
-
dodatne izmerjene vrednosti v spomin dodate z “M+”
(možno le, če se merske enote ujemajo)
•
Odštevanje izmerjenih vrednosti
- če želite od vrednosti, shranjene v spominu, odšteti
zadnjo izmerjeno vrednost, pritisnite “M-” (možno le,
če se merske enote ujemajo)
Ташев-Галвинг ООД
www.tashev-galving.com
SKIL_IB0530_EUCH_v3.indd 62 08-06-2010 13:04:33
Page 63

63
-
na prikazovalniku se pojavi črka “M” in minus pod
njim na kratko utripa
•
Branje spomina
- s pritiskom na “M=” se skupaj s simbolom “M=”
prikaže vrednost, shranjena v spominu (na
prikazovalniku ostane prikaz zadnje izmerjene
vrednosti)
-
vsebino spomina podvojite s pritiskom na “M+”
- vsebino spomina postavite na ničlo s pritiskom na
“M-”
•
Brisanje spomina
Najprej pritisnite “M=” in nato “C” (črka “M” ni več
prikazana)
•
Napačno merjenje
- če je merjenje neuspešno, se na zaslonu prikaže
“ERROR”
-
ugotovite razlog, odpravite napako in znova izvedite
meritve
Možni vzroki za napačne mere:
-
merjenje je potekalo izven merilnega območja
- kot med laserskim žarkom in ciljem je bil preoster
- ciljna površina se je odbijala preveč intenzivno (npr.
ogledalo) ali premalo (npr. črna tkanina) ali pa je bila
ambientna svetloba presvetla
-
zbiralna leča A 3 ali odprtina za izstop laserskega
žarka B 3 je bila zamegljena (npr. zaradi nagle
temperaturne spremembe)
-
izmerjene vrednosti so bile dodane/odštete z
neustreznimi merskimi enotami
•
Torba, ki jo lahko pripnete za pas za enostavno in
pripravno shranjevanja orodja #
UPORABNI NASVETI
• Če poskus poprave ne more odpraviti napake, ali če se
na prikazovalniku pojavi “FAIL”, merjenje ni več
mogoče; v tem primeru napravo pošljite Vašemu
prodajalcu ali najbljižjemu centru storitev za kupce SKIL
•
Orodje naj ne bo izpostavljeno nenehnemu tresenju ali
izredno visokim oziroma nizkim temperaturam
•
Orodje vedno shranjujte v zaščitno škatlo/kovček, v
zaprtem prostoru
•
Z orodja vedno odstranjujte prašne delce, vlago in ga ne
izpostavljajte neposredni sončni svetlobi
•
Orodje čistite z vlažno krpo in blagim detergentom
! preden se lotite čiščenja leč, vedno odstranite
baterije
•
Orodja na noben način ne razstavljajte ali spreminjajte
• Ne poskušajte spremeniti kateri koli del laserskih leč
GARANCIJA / OKOLJE
• Ta stroj znamke SKIL je zavarovan v skladu z državnimi/
pokrajinskimi-posebnimi odredbami; garancija ne
pokriva škode, ki je nastala zaradi običajne izrabe ali
prelomov, preobremenitve ali nepravilne uporabe
•
V primeru pritožbe pošljite nerazstavljeno orodje skupaj
z dokazilom o nakupu vašemu dobavitelju ali najbližji
servisni službi Skil (seznam naslovov najdete na spletni
strani www.skileurope.com)
•
Električnega orodja, baterije, pribora in embalaže ne
odstranjujte s hišnimi odpadki (samo za države EU)
-
v skladu z Evropsko direktivo 2002/96/EG o odpadni
električni in elektronski opremi in z njenim izvajanjem
v nacionalni zakonodaji je treba električna orodja ob
koncu njihove življenjske dobe ločeno zbirati in jih
predati v postopek okolju prijaznega recikliranja
-
ko je potrebno odstranjevanje, naj vas o načinu
spomni simbol $
EST
Laser-mõõteriist 0530
SISSEJUHATUS
• Käesolev seade on mõeldud siseruumides ja õues
vahekauguste mõõtmiseks projitseeritud laserkiire abil
•
Õigel käsitsemisel on võimalik seadme abil lihtsalt ja
korrektselt mõõta pikkust, pindala ja ruumala
•
Lugege hoolikalt läbi käesolev kasutusjuhend ja
pöörake tähelepanu ohutusjuhistele ja hoiatustele;
nende eiramine võib põhjustada raskeid
(silma)vigastusi 1
•
Enne seadme esmakordset kasutamist kleepige
hoiatussildi saksakeelse teksti peale kaasasolev
emakeelne kleebis P 3
•
Hoidke käesolev kasutusjuhend hoolikalt alles
TEHNILISED ANDMED
Mõõtmismeetod optiline/laseriga
Mõõtevahemik 0,2–20 m
1
)
Mõõtmistäpsus (tüüpiline) +/-3,0 mm
2
)
Mõõtmise kestus (tüüpiline) < 0,5 s
Väikseim mõõtühik 1 mm
Töötemperatuur -10°C kuni 50°C
Säilitustemperatuur -20ºC kuni 70°C
Suhteline niiskus (max) 90%
Laseri klass 2
Laseri tüüp 635 nm
Max väljundpinge < 1 mW
Laserkiire läbimõõt
(temperatuuril ~20 °C)
- 10 m kaugusel
6 mm
- 20 m kaugusel 16 mm
Patareid (kaasas) 4 x AAA (LR03) 1,5 V
Laetavad patareid 4 x AAA (KR03) 1,2 V
Automaatne väljalülitumine
- laseriga
kui ei ole umbes
20 sekundit mõõdetud
- mõõteseadmega
kui ei ole umbes
5 minutit kasutatud
Kaal
0,18 kg
1) Mõõtevahemik suureneb vastavalt sellele, kui hästi
laservalgus mõõtepinnalt tagasi peegeldub ja kui ere on
lasertäpp võrreldes ümbrusvalguse intensiivusega
2)
Mõõtmistäpsus kõigub ebasoodsates tingimustes (nt
tugeva päikesevalguse käes) +0,06% ulatuses
Ташев-Галвинг ООД
www.tashev-galving.com
SKIL_IB0530_EUCH_v3.indd 63 08-06-2010 13:04:34
Page 64

64
SEADME OSAD 3
A Vastuvõtulääts
B Laserkiire väljumisava
C LCD-näidik
D Sisse-/väljalülitusnupp
E
Nupp ümberlülitamiseks meetermõõdustikult
jalgmõõdustikule
F Pikkuse ja pideva mõõtmise režiim
G Pindala mõõtmise režiim
H Ruumala mõõtmise režiim
J Tühjendusnupp („C”)
K Mälule liitmise nupp („M+”)
L Mälust lahutamise nupp („M-”)
M Mälust väljatoomise nupp („M=”)
N Mõõtmisnupp („GO”)
P Hoiatussilt
Q Patareisektsiooni kate
TÖÖOHUTUS
• Ärge vaadake laserkiire sisse (laserkiirgus) 2
• Ärge suunake laserkiirt inimeste ega loomade peale
• Ärge jätke seadet asendisse, mis lubab teistel isikutel
tahtlikult või tahtmata vaadata laserkiire sisse
•
Ärge kasutage laserkiire nähtavuse parendamiseks
suurendavaid optilisi seadmeid (nt luupi, teleskoopi,
binoklit)
•
Ärge eemaldage ega kahjustage seadme hoiatussilti
• Ärge kasutage seadet tuleohtlike vedelike, gaaside või
tolmu läheduses
•
Seadme kasutamisel hoidke lapsed seadmest eemal
• Antud tööriista kasutaja peaks olema üle 16 aasta vana
• Kasutage seadet üksnes käesolevas kasutusjuhendis
toodud eesmärkidel
KASUTAMINE
• Patareide paigaldus 4
! veenduge, et seade on välja lülitatud
- kasutage üksnes leelis-mangaan- või laetavaid
patareisid
-
pöörake seade ümber
- võtke maha kate Q
- asetage sisse 4 x 1,5V patarei (pöörake tähelepanu
õigele polaarsusele)
-
paigaldage kate Q
- kui patarei hakkab tühjaks saama, ilmub näidikule
sümbol 5
-
kui näidikule ilmub esimest korda sümbol 5, on veel
võimalik sooritada vähemalt 100 mõõtmist
-
kui sümbol 5 hakkab vilkuma, vahetage patareid
välja (mõõtmine pole enam võimalik)
-
vahetage alati korraga välja kõik patareid
- kui Te seadet pikemat aega ei kasuta, võtke patareid
alati seadmest välja
•
Sisse/välja
- lülitage seade sisse, vajutades nuppu “on/off” või
“GO” (laserkiir ei lülitu veel sisse)
-
seadme väljalülitamiseks vajutage “on/off”
- kui seadet ei ole 5 minutit kasutatud, siis lülitub
seade automaatselt välja
•
Ümberlülitamine meetermõõdustikult jalgmõõdustikule
- seade on seadistatud nii, et mõõtmised teostatakse
meetrites/ sentimeetrites
-
mõõtmiste läbiviimiseks jalgades/tollides vajutage
nupule E 3
•
Seadme kasutamine 6
-
lülitage seade sisse (näidikule ilmub sümbol 7,
näidates, et seade on juba pikkuse mõõtmise
režiimis)
-
soovi korral valige mõni teine mõõtmisrežiim (pindala/
ruumala)
-
laserkiire sisselülitamiseks vajutage nuppu „GO”
(näidikule ilmub sümbol 8)
-
suunake seade sihtpinnale
! ärge vaadake laserkiire sisse
! ärge suunake laserkiirt inimeste ega loomade
peale
-
vajutage uuesti nuppu “GO”; näidikule ilmub
mõõdetud väärtus (laserkiir lülitub automaatselt välja)
-
laserkiir lülitub automaatselt välja ka siis, kui umbes
20 sekundi jooksul pärast laserkiire sisselülitamist ei
ole mõõtmisi tehtud
!
pidage meeles, et seade teostab mõõtmise alates
oma tagaservast (mõõtetulemuses sisaldub ka
seadme pikkus)
-
kõige viimase mõõdetud üksikväärtuse
kustutamiseks vajutage nuppu “C”
-
viimaste mõõdetud üksikväärtuste kustutamiseks
mõõtmisele vastupidises järjekorras vajutage
korduvalt nuppu “C” (m³ - m²)
•
Juhised korrektseks mõõtmiseks
!
ärge liigutage seadet mõõtmise ajal (välja arvatud
pideva mõõtmise režiimis)
-
ärge katke mõõtmise ajal vastuvõtuläätse A 3 ja
laserkiire ava B 3
-
ebasoodsates tingimustes (nt õues ereda päikese
käes mõõtmisel) kasutage laserit esiletõstvaid prille
(SKILi lisatarvik 2610395907) või asetage
mõõtepinnale tükk paberit
-
kui mõõtmise taustaks on läbipaistvad, peegeldavad,
poorsed või struktuursed pinnad, ei pruugi
mõõtmistulemused olla täpsed
•
Pindala mõõtmine
- vajutage nupule G
3 (ilmub näidikule sümbol 9)
-
suunake seade esimesele sihtpinnale (pikkus)
-
vajutage “GO” (ilmub näidikule sümbol 8)
-
vajutage uuesti “GO”; mõõdetud pikkus ilmub
näidiku ülemisele reale
-
suunake seade teisele sihtpinnale (laius)
-
vajutage uuesti “GO”; mõõdetud laius ilmub näidiku
ülemisele reale ja väljaarvutatud pindala ilmub
näidiku alumisele reale
-
täiesti uue pindala mõõtmise teostamiseks vajutage
uuesti “GO”
•
Ruumala mõõtmine
- vajutage nupule H
3 (ilmub näidikule sümbol 0)
-
suunake seade esimesele sihtpinnale (pikkus)
-
vajutage “GO” (ilmub näidikule sümbol 8)
-
vajutage uuesti “GO”; mõõdetud pikkus ilmub
näidiku ülemisele reale
-
suunake seade teisele sihtpinnale (laius)
Ташев-Галвинг ООД
www.tashev-galving.com
SKIL_IB0530_EUCH_v3.indd 64 08-06-2010 13:04:35
Page 65

65
-
vajutage uuesti “GO”; mõõdetud laius ilmub näidiku
ülemisele reale ja väljaarvutatud pindala ilmub
näidiku alumisele reale
-
suunake seade kolmandale sihtpinnale (kõrgus)
-
vajutage uuesti “GO”; mõõdetud kõrgus ilmub
näidiku ülemisele reale ja väljaarvutatud ruumala
ilmub näidiku alumisele reale
-
täiesti uue ruumala mõõtmise teostamiseks vajutage
uuesti “GO”
•
Pidev mõõtmine !
-
vajutage pärast seadme sisselülitamist nuppu F3
(näidikule ilmub sümbol @)
-
vajutage “GO” (ilmub näidikule sümbol 8)
-
laserkiir jääb sisselülitatuks, võimaldades pidevalt
mõõta tegelikku vahemaad
-
pideva mõõtmise katkestamiseks vajutage uuesti
nuppu “GO” (näidikul on viimati mõõdetud väärtus)
-
pideva mõõtmise taaskäivitamiseks vajutage uuesti
nuppu “GO”
-
pideva mõõtmise režiim lülitub 5 minuti pärast
automaatselt välja (näidikule jääb viimati mõõdetud
väärtus), selle saab lõpetada ka teise mõõtmisrežiimi
valimisega
•
Mõõdetud väärtuste salvestamine/liitmine
- pärast mõõtmist vajutage mõõdetud väärtuse
salvestamiseks nuppu “M+”
-
näidikule ilmub täht “M” ning selle all olev plussmärk
vilgub lühidalt
-
liitke mälus olevale väärtusele nupu “M+” abil
täiendavaid mõõtmisväärtusi (võimalik üksnes juhul,
kui mõõtühikud kattuvad)
•
Mõõdetud väärtuste lahutamine
- viimati mõõdetud väärtuse lahutamiseks mälus
olevast väärtusest vajutage nuppu “M-” (võimalik
üksnes juhul, kui mõõtühikud kattuvad)
-
näidikule ilmub täht “M” ning selle all olev
miinusmärk vilgub lühidalt
•
Mälu lugemine
- nupu “M=” vajutamisel kuvatakse mällu salvestatud
väärtus koos sümboliga “M=” (näidikule jääb viimati
mõõdetud väärtus)
-
mälus oleva väärtuse korrutamiseks kahega vajutage
nuppu “M+”
-
mälu nullimiseks vajutage nuppu “M-”
• Mälu tühjendamine
Kõigepealt vajutage nuppu “M=”, seejärel nuppu “C”
(täht “M” kaob näidikult)
•
Ebaõnnestunud mõõtmine
- kui mõõtmist ei õnnestunud teostada, ilmub näidikule
“ERROR”
-
selgitage välja põhjus, parandage viga ja mõõtke
uuesti
Mõõtmisvigade võimalikud põhjused:
-
mõõtmine toimus väljaspool mõõtevahemikku
- laserkiire ja mõõtepinna vaheline nurk oli liiga terav
- mõõtepind peegeldas liiga intensiivselt (nt peegel) või
ebapiisavalt (nt must tekstiil) või ümbritsev valgus oli
liiga ere
-
vastuvõtulääts A 3 või laserkiire ava B 3 oli udune
(nt järsu temperatuurimuutuse tõttu)
-
mõõtmisväärtuste liitmisel/lahutamisel kasutati
mittevastavaid mõõtühikuid
•
Vöökott seadme lihtsaks ja mugavaks hoidmiseks #
TÖÖJUHISED
• Kui viga ei õnnestu parandada või kui näidikule ilmub
kiri “FAIL”, ei ole mõõtmine enam võimalik; sellisel juhul
saatke seade edasimüüjale või lähimasse SKILi
hooldustöökotta
•
Ärge hoidke seadet pideva vibratsiooni käes või väga
kõrgetel või väga madalatel temperatuuridel
•
Hoidke seadet alati siseruumides, pakituna
originaalpakendisse/-ümbrisesse.
•
Kaitske seadet tolmu, niiskuse ja otsese päikesekiirguse
eest
•
Puhastage seadet pehme lapi ja mahedatoimelise
pesuvahendiga
!
iga kord enne läätsede puhastamist eemaldage
seadmest patareid
•
Seadme lahtivõtmine ja modifitseerimine on keelatud
• Ärge püüdke välja vahetada laserläätsede detaile
GARANTII / KESKKOND
• Sellele SKILI seadmele antav garantii on vastavuses
seadustega/konkreetse riigi tingimustega; normaalsest
kulumisest, ülekoormusest või seadme ebaõigest
kasutamisest põhjustatud kahjustused ei kuulu
garantiikorras hüvitamisele
•
Reklamatsioonide korral saatke lahtimonteerimata
seade koos ostukviitungiga müügiesindusse või
lähimasse Skil remonditöökotta (aadressid on toodud
Internetileheküljel www.skileurope.com)
•
Ärge visake kasutuskõlbmatuks muutunud elektrilisi
tööriistu, patareisid, lisatarvikuid ja pakendeid ära
koos olmejäätmetega (üksnes EL liikmesriikidele)
-
vastavalt Euroopa Parlamendi ja nõukogu direktiivile
2002/96/EÜ elektri- ja elektroonikaseadmete
jäätmete kohta ning direktiivi nõuete kohaldamisele
liikmesriikides tuleb kasutuskõlbmatuks muutunud
elektrilised tööriistad koguda eraldi ja
keskkonnasäästlikult korduvkasutada või ringlusse
võtta
-
seda meenutab Teile sümbol $
LV
Lāzers mērinstruments 0530
IEVADS
• Šis instruments paredzēts attālumu mērīšanai telpās un
ārpus tām, izmantojot lāzera stara projekciju.
•
Pareizi lietojot instrumentu, ar tā palīdzību var vienkārši
un precīzi noteikt attālumu, laukumu un tilpumu
•
Uzmanīgi izlasiet šo lietošanas pamācību un stingri
ievērojiet drošības instrukcijas un brīdinošos
norādījumus, jo pretējā gadījumā jūs riskējat gūt
smagu savainojumu (acu apdegumu) 1
Ташев-Галвинг ООД
www.tashev-galving.com
SKIL_IB0530_EUCH_v3.indd 65 08-06-2010 13:04:36
Page 66

66
• Pirms izmantot instrumentu pirmo reizi, uz brīdinājuma
marķējuma teksta vācu valodā uzlīmējiet piegādāto
uzlīmi jūsu valodā P 3
•
Pēc izlasīšanas saglabājiet šo lietošanas pamācību
turpmākai izmantošanai
TEHNISKIE PARAMETRI
Mērīšanas metode optiskā/lāzera
Mērīšanas diapazons 0,2 - 20 m
1
)
Mērīšanas precizitāte (parasti) +/- 3,0 mm
2
)
Mērīšanas ilgums (parasti) < 0,5 sek.
Mazākā mērvienība 1 mm
Darba temperatūra -10°C līdz 50°C
Uzglabāšanas temperatūra -20ºC līdz 70°C
Relatīvais mitrums (maks.) 90%
Lāzera klase 2
Lāzera tips 635 nm
Maksimālā starojuma jauda < 1 mW
Lāzera stara diametrs
(aptuveni 20°C)
- 10 m attālumā
6 mm
- 20 m attālumā 16 mm
Baterijas (pievienotas) 4 x AAA (LR03) 1,5V
Atkārtoti uzlādējamas baterijas 4 x AAA (KR03) 1,2V
Automātiska izslēgšanās
- lāzeram
aptuveni pēc 20 sek., kuru
laikā neveic mērījumu
- mērinstrumentam
aptuveni pēc 5 min., ja
instruments netiek
darbināts
Svars
0,18 kg
1) Mērījuma diapazons pieaug atkarībā no tā, cik labi
mērķvirsma atstaro lāzera gaismu un cik spožs ir lāzera
punkts, salīdzinot ar apkārtējo gaismu
2)
Mērījumu precizitāte var mainīties par +0,06%
nelabvēlīgos apstākļos (piem., spožā saules gaismā)
INSTRUMENTA ELEMENTI 3
A Uztvērējlēca
B Lāzera starojuma izvadlūka
C Šķidro kristālu displejs
D Poga “On/off”
E Mērvienību (metru/pēdu) izvēles poga
F Garuma un nepārtrauktas mērīšanas režīms
G Virsmas mērīšanas režīms
H Tilpuma mērīšanas režīms
J Dzēšanas poga (“C”)
K Poga pieskaitīšanai atmiņai (“M+”)
L Poga atņemšanai no atmiņas (“M-”)
M Poga izguvei no atmiņas (“M=”)
N Mērīšanas poga (“GO”)
P Brīdinošā uzlīme
Q Bateriju nodalījuma vāciņš
JŪSU DROŠĪBAI
• Neskatieties lāzera starā (lāzera izstarojums) 2
• Nevērsiet lāzera staru uz cilvēkiem vai dzīvniekiem
• Nenovietojiet instrumentu stāvoklī, kurā kāds var tīši vai
netīši ielūkoties lāzera starā
•
Nelietojiet nekādus palielinošos optiskos instrumentus
(piemēram, palielinošos stiklus, teleskopus vai
binokĮus), lai vērotu lāzera staru
•
Nenoņemiet un nebojājiet brīdinošo uzlīmi, kas
nostiprināta uz instrumenta korpusa
•
Nedarbiniet instrumentu, ja darba vietas tuvumā atrodas
viegli degoši šķidrumi, gāzes vai putekĮi
•
Nedarbiniet instrumentu, ja tuvumā atrodas bērni
• Ar šo instrumentu nav atĮauts strādāt personām, kuras
jaunākas par 16 gadiem
•
Neizmantojiet instrumentu citiem mērķiem, nekā tiem,
kas norādīti šajā lietošanas pamācībā
DARBS
• Bateriju ievietošana 4
! pārliecinieties, ka instruments ir izslēgts
- izmantot tikai sārma-mangāna vai atkārtoti
uzlādējamas baterijas
-
apgrieziet instrumentu otrādi
- noņemiet vāciņu Q
- ievietojiet 4 x 1,5 V bateriju (sekojiet, lai būtu pareiza
pievienošanas polaritāte)
-
nostipriniet vāciņu Q
- ja baterijas spriegums ir zems, uz displeja parādās
simbols 5
-
kad simbols 5 displejā parādās pirmo reizi, vēl
iespējams veikt vismaz 100 mērījumus
-
nomainiet baterijas, kad simbols 5 sāk mirgot (vairs
nav iespējams veikt mērījumus)
-
vienmēr nomainiet pilnu bateriju komplektu
- vienmēr izņemiet baterijas no instrumenta, ja tas
ilgāku laiku netiek lietots
•
Ieslēgšana un izslēgšana
- ieslēdziet instrumentu, nospiežot “on/off” vai “GO”
(lāzera stars vēl nav ieslēgts)
-
izslēdziet instrumentu, vēlreiz nospiežot “on/off”
- ja instruments netiek darbināts, tas pēc 5 minūtēm
automātiski izslēdzas
•
Mērvienību (metru/pēdu) izvēle
- mērījumu rezultāti pēc noklusējuma tiek izvadīti
metros/centimetros
-
lai mērījumu rezultātus nolasītu pēdās/collās,
nospiediet taustiņu E 3
•
Instrumenta darbināšana 6
-
ieslēdziet instrumentu (displejā parādās simbols 7,
kas norāda, ka instruments jau darbojas garuma
mērīšanas režīmā)
-
ja vēlaties, izvēlieties citu mērīšanas režīmu (virsma/
tilpums)
-
nospiediet “GO”, lai ieslēgtu lāzera staru (displejā
parādīsies simbols 8)
-
vērsiet instrumentu uz mērķa virsmu
! neskatieties lāzera starā
! nevērsiet lāzera staru uz cilvēkiem vai
dzīvniekiem
-
no jauna nospiediet “GO”; displejā parādās izmērītā
vērtība (lāzera stars izslēdzas automātiski)
-
lāzera stars izslēdzas automātiski arī tad, ja pēc
lāzera stara ieslēgšanas aptuveni 20 sekunžu laikā
netiek veikti mērījumi
Ташев-Галвинг ООД
www.tashev-galving.com
SKIL_IB0530_EUCH_v3.indd 66 08-06-2010 13:04:37
Page 67

67
!
atcerieties, ka izmērītais attālums tiek noteikts no
instrumenta aizmugures malas (instrumenta
garums tiek iekĮauts mērījuma rezultātā)
-
nospiediet “C”, lai dzēstu pēdējo atsevišķi izmērīto
vērtību
-
no jauna nospiediet “C”, lai dzēstu pēdējās atsevišķi
izmērītās vērtības apgrieztā secībā (m³ - m²)
•
Noteikumi, kas jāievēro, lai iegūtu pareizu mērījumu
rezultātu
!
mērīšanas laikā nekustiniet instrumentu (izņemot
nepārtrauktās mērīšanas režīmā)
-
nenosedziet uztvērējlēcu A 3 un lāzera stara atveri
B 3, veicot mērījumus
-
nelabvēlīgos apstākļos (piemēram, veicot mērījumus
ārpus telpām spilgtā saules gaismā) izmantojiet
lāzera stara redzamību uzlabojošas brilles (SKIL
piederums 2610395907) vai uz mērķvirsmas
novietojiet papīru
-
ja mērījumus veic uz caurspīdīgām, atstarojošām,
porainām vai strukturētām virsmām, tie var būt
kļūdaini
•
Laukuma mērīšana
- nospiediet taustiņu G
3 (uz displeja parādās
simbols 9)
-
vērsiet instrumentu uz pirmo mērķa virsmu (garuma
mērīšana)
-
nospiediet “GO” (uz displeja parādās simbols 8)
-
vēlreiz nospiediet “GO”; displeja augšējā rindā
parādās izmērītā garuma vērtība
-
vērsiet instrumentu uz otro mērķa virsmu (platuma
mērīšana)
-
vēlreiz nospiediet “GO”; displeja augšējā rindā
parādās izmērītā platuma vērtība, bet displeja
apakšējā rindā parādās aprēķinātā laukuma vērtība
-
lai uzsāktu pilnīgi jaunu mērījumu sēriju laukuma
noteikšanai, vēlreiz nospiediet “GO”
•
Tilpuma mērīšana
- nospiediet taustiņu H
3 (uz displeja parādās
simbols 0)
-
vērsiet instrumentu uz pirmo mērķa virsmu (garuma
mērīšana)
-
nospiediet “GO” (uz displeja parādās simbols 8)
-
vēlreiz nospiediet “GO”; displeja augšējā rindā
parādās izmērītā garuma vērtība
-
vērsiet instrumentu uz otro mērķa virsmu (platuma
mērīšana)
-
vēlreiz nospiediet “GO”; displeja augšējā rindā
parādās izmērītā platuma vērtība, bet displeja
apakšējā rindā parādās aprēķinātā laukuma vērtība
-
vērsiet instrumentu uz trešo mērķa virsmu
(augstuma mērīšana)
-
vēlreiz nospiediet “GO”; displeja augšējā rindā
parādās izmērītā augstuma vērtība, bet displeja
apakšējā rindā parādās aprēķinātā tilpuma vērtība
-
lai uzsāktu pilnīgi jaunu mērījumu sēriju tilpuma
noteikšanai, vēlreiz nospiediet “GO”
•
Nepārtrauktā mērīšana !
-
nospiediet pogu F 3 pēc tam, kad ieslēgts
instruments (displejā parādīsies simbols @)
-
nospiediet “GO” (uz displeja parādās simbols 8)
-
lāzera stars paliek ieslēgts, tādēļ nepārtraukti var
nolasīt faktisko attālumu
-
no jauna nospiediet “GO”, lai pārtrauktu nepārtraukto
mērīšanu (pašreizējā izmērītā vērtība redzama
displejā)
-
no jauna nospiediet “GO”, lai atsāktu nepārtraukto
mērīšanu
-
nepārtrauktās mērīšanas režīms automātiski
izslēdzas pēc 5 minūtēm (pēdējā izmērītā vērtība
redzama displejā), un to var pārtraukt, arī izvēloties
citu mērīšanas režīmu
•
Izmērīto vērtību saglabāšana/ pievienošana
- pēc mērījuma nospiediet “M+”, lai saglabātu izmērīto
vērtību
-
displejā parādās burts “M”, un plusa zīme zem tā īsi
nomirgo
-
pieskaitiet papildu izmērītās vērtības atmiņas vērtībai
ar “M+” (tas iespējams tikai tad, ja mērvienības ir
savstarpēi atbilstošas)
•
Izmērīto vērtību atņemšana
- nospiediet “M-”, lai no atmiņas vērtības atņemtu
pašreizējo izmērīto vērtību (tas iespējams tikai tad, ja
mērvienības ir savstarpēi atbilstošas)
-
displejā parādās burts “M”, un mīnusa zīme zem tā
īsi nomirgo
•
Atmiņas lasīšana
- nospiežot “M=”, parādās atmiņā saglabātā vērtība un
simbols “M=” (pēdējā izmērītā vērtība redzama
displejā)
-
divkāršojiet atmiņas saturu, nospiežot “M+”
- iestatiet atmiņas saturu uz nulli, nospiežot “M-”
• Atmiņas dzēšana
Vispirms nospiediet “M=”, tad nospiediet “C” (burts “M”
vairs nav redzams)
•
Nepareizs mērījums
- ja mērījums ir bijis neveiksmīgs, uz displeja parādās
“ERROR”
-
nosakiet cēloni, veiciet korekciju un atkārtojiet
mērījumu
Neprecīza mērījuma iespējamie cēloņi:
-
mērījums veikts ārpus mērīšanas diapazona
- leņķis starp lāzera staru un mērķi bijis pārāk šaurs
- mērķa virsma bija pārāk atstarojoša (piem., spogulis)
vai nepietiekami atstarojoša (piem., melns audums),
vai arī apkārtējā gaisma bija pārāk spoža
-
uztvērējlēca A 3 vai lāzera stara atvere B 3 bija
aizsvīdusi (piem., straujas temperatūras maiņas dēļ)
-
izmērītās vērtības tika pieskaitītas/atņemtas
neatbilstošām mērvienībām
•
Pie jostas stiprināma soma instrumenta drošai un ērtai
uzglabāšanai #
PRAKTISKI PADOMI
• Ja kļūdu nevar novērst ar koriģējošām darbībām vai
displejā parādās “FAIL”, mērīšana vairs nav iespējama;
tādā gadījumā nogādājiet instrumentu pie izplatītāja vai
tuvākajā SKIL servisa centrā
•
NepakĮaujiet instrumentu ilgstošai vibrācijai, kā arī Įoti
augstas vai zemas temperatūras iedarbībai
•
Vienmēr uzglabājiet instrumentu telpās, ievietojot to
kartona iesaiņojumā vai aizsargsomā
•
Sargājiet instrumentu no putekĮiem, mitruma un saules
staru tiešas iedarbības
Ташев-Галвинг ООД
www.tashev-galving.com
SKIL_IB0530_EUCH_v3.indd 67 08-06-2010 13:04:37
Page 68

68
• Instrumenta tīrīšanai lietojiet mitru audumu un vāju
ziepjūdeni
!
pirms instrumenta lēcu tīrīšanas vienmēr izņemiet
no tā baterijas
•
Neizjauciet instrumentu un nepakĮaujiet to nekāda veida
modifikācijai
•
Nemēģiniet nekādā veidā nomainīt jebkuru lāzera lēcu
daĮu
GARANTIJA / APKĀRTĪJĀS VIDES
AIZSARDZĪBA
• Šim firmas SKIL izstrādājumam tiek sniegta ražotāja
garantija saskaņā ar starptautiskajā un nacionālajā
likumdošanā noteiktajām prasībām un noteikumiem;
taču garantija neattiecas uz bojājumiem, kuru cēlonis ir
instrumenta normāls nodilums, pārslodze vai nepareiza
apiešanās ar to
•
Pretenziju gadījumā nosūtiet instrumentu neizjauktā
veidā kopā ar iegādes datumu apliecinošu dokumentu
uz tuvāko tirdzniecības vietu vai firmas Skil pilnvarotu
remontu iestādi (to adreses var atrast datortīkla vietnē
www.skileurope.com)
•
Neizmetiet elektroiekārtas, baterijas, piederumus un
iesaiņojuma materiālus sadzīves atkritumos (tikai ES
valstīm)
-
saskaņā ar Eiropas Direktīvu 2002/96/EG par
lietotajām elektroiekārtām, elektronikas iekārtām un
tās iekĮaušanu valsts likumdošanā lietotās
elektroiekārtas ir jāsavāc atsevišķi un jānogādā
otrreizējai pārstrādei videi draudzīgā veidā
-
speciāls simbols $ atgādina par nepieciešamību tos
utilizēt videi nekaitīgā veidā
LT
Lazerinis atstumų matuoklis 0530
ĮVADAS
• Šio įrankio paskirtis – matuoti atstumus viduje ir išorėje
nukreiptu lazerio spinduliu
•
Tinkamai naudojant, šiuo prietaisu galima lengvai ir
tiksliai išmatuoti atstumus, apskaičiuoti plotą ir tūrį
•
Atidžiai perskaitykite šią naudojimo instrukciją ir
ypatingą dėmesį atkreipkite į saugos instrukciją
nuorodas bei įspėjamuosius užrašus; jei nepaisysite
šių nuorodų, gali kilti sunkių sužeidimų (akių)
pavojus 1
•
Prieš pirmąsyk naudodami šį įrankį, ant įspėjamojo
lipduko vokiečių kalba užklijuokite pridedamą lipduką
savo gimtąja kalba P 3
•
Naudojimo instrukcijos neišmeskite, o pasidėkite Jums
žinomoje vietoje, kad vėliau galėtumėte ja pasinaudoti
TECHNINĖS CHARAKTERISTIKOS
Matavimo būdas optinis/lazerinis
Matavimo diapazonas 0,2 – 20 m
1
)
Matavimo tikslumas (būdingas) +/- 3,0 mm
2
)
Matavimo trukmė (būdinga) < 0,5 sek.
Mažiausias rodomas vienetas 1 mm
Darbinė temperatūranuo -10°C iki 50°C
Sandėliavimo temperatūra -20ºC iki 70°C
Santykinis oro drėgnumas (maks.) 90%
Lazerio klasė 2
Lazerio tipas 635 nm
Didžiausia atiduodamoji galia < 1 mW
Lazerio spindulio skersmuo
(maždaug 20°C temp.)
– 10 m atstumu
6 mm
– 20 m atstumu 16 mm
Elementai (pridedami) 4 x AAA (LR03) 1,5 V
Pakraunami elementai 4 x AAA (KR03) 1,2 V
Automatinis išsijungimas
- lazeris
po maždaug po 20 sek.,
jei nematuojama
- matavimo įrankis
po maždaug po 5 min.,
jei su juo nebus
atliekamos jokios
operacijos
Svoris
0,18 kg
1) Matavimo diapazonas didėja priklausomai nuo to, kaip
gerai matuojamas paviršius atspindi lazerio šviesą, ir
koks yra lazerio taško šviesumas palyginti su aplinkos
apšvietimo intensyvumu
2)
Matavimo tikslumo paklaida yra +0,06 % nepalankiomis
sąlygomis (t.y. ryškioje saulės šviesoje)
PRIETAISO ELEMENTA 3
A Pagaunantis lęšis
B Lazerio spindulio siųstuvo anga
C Skystųjų kristalų displėjus
D Įjungimo/išjungimo mygtukas
E Matavimo vienetų (metrai/pėdos) perjungimo mygtukas
F Ilgio ir nepertraukiamo matavimo režimas
G Paviršių matavimo režimas
H Tūrių matavimo režimas
J Užbaigimo mygtukas (“C”)
K Perkėlimo į atmintį mygtukas (“M+”)
L Atėmimo iš atminties mygtukas (“M-”)
M Iškėlimo iš atminties mygtukas (“M=”)
N Matavimo mygtukas (“GO”)
P Įspėjamasis užrašas
Q Baterijų skyriaus dangtelis
DARBO SAUGA
• Nežiūrėkite į lazerio spindulį (lazerio radiacija) 2
• Nenukreipkite lazerio spindulio į kitus asmenis ar
gyvūnus
•
Nestatykite prietaiso tokioje padėtyje, kurioje kas nors
galėtų tyčia ar netyčia pažiūrėti tiesiai į lazerio spindulį
•
Nežiūrėkite į lazerio spindulį per kokius nors vaizdą
padidinančius optinius įtaisus (pvz., didinamąjį stiklą,
teleskopą ar žiūronus)
•
Nenuimkite nuo prietaiso įspėjamojo užrašo
• Nenaudokite prietaiso tokioje aplinkoje, kur yra degių
skysčių, dujų ar dulkių
•
Nenaudokite prietaiso, jei netoliese yra vaikų
• Asmenims, jaunesniems nei 16 metų, prietaisu naudotis
draudžiama
Ташев-Галвинг ООД
www.tashev-galving.com
SKIL_IB0530_EUCH_v3.indd 68 08-06-2010 13:04:38
Page 69

69
•
Nenaudokite prietaiso kitiems tikslams, nei nurodyta
šioje naudojimo instrukcijoje
NAUDOJIMAS
• Baterijų įdėjimas 4
! įsitikinkite, kad prietaisas yra išjungtas
- naudoti tik šarminius-mangano arba pakraunamus
elementus
-
apverskite prietaisą
- nuimkite dangtelį Q
- įstatykite 4 x 1,5V bateriją (atkreipkite dėmesį į
poliškumą)
-
uždėkite dangtelį Q
- kuomet baterijos energija yra išsekusi, displėjuje
pasirodo simbolis 5
-
kuomet ženklas 5 pirmąsyk pasirodo displėjuje, vis
dar galima atlikti mažiausiai šimtą matavimų
-
pakeiskite elementus, kuomet ženklas 5 ima mirksėti
(toliau matuoti neįmanoma)
-
visuomet keiskite visas baterijas iš karto
- jei prietaiso nenaudojate ilgesnį laiką, visuomet iš
prietaiso išimkite baterijas
•
Įjungimas ir išjungimas
- įjunkite įrankį paspausdami arba “on/off”, arba “GO”
mygtuką (lazerio spindulys dar nėra įjungiamas)
-
išjunkite prietaisą nuspausdami “on/off”
- matuoklis išsijungs automatiškai po 5 minutės, jei su
juo nebus atliekamos jokios operacijos
•
Matavimo vienetų keitimas (metrai/pėdos)
- jungus prietaisą pagrindiniai nustatyti matavimo
vienetai yra metrai ir centimetrai
-
norėdami metrus ir centimetrus paversti pėdomis ir
coliais, paspauskite mygtuką E 3
•
Prietaiso naudojimas 6
-
įjunkite įrankį (ženklas 7 kuris pasirodys displėjuje,
reiškia, jog įrankis jau nustatytas ilgio matavimo
režimu)
-
prireikus, parinkite kitą matavimo režimą (paviršiaus/
tūrio)
-
paspauskite “GO” mygtuką, kad įjungtumėte lazerio
spindulį (ženklas 8 pasirodys displėjuje)
-
nutaikykite prietaisą į taikinio paviršių
! nežiūrėkite į lazerio spindulį
! nenukreipkite lazerio spindulio į kitus asmenis ar
gyvūnus
-
dar sykį paspauskite “GO” mygtuką; displėjuje
pasirodys matavimo reikšmės (lazerio spindulys
išsijungia automatiškai)
-
lazerio spindulys automatiškai išsijungia ir tuomet, kai
maždaug 20 sekundžių po įjungimo niekas
nematuojama
!
nepamirškite, kad prietaisas matuoja nuo savo
galinės briaunos (prietaiso ilgis yra įskaičiuotas į
matavimo rezultatą)
-
paspauskite “C”, kad ištrintumėte paskutinę atskirą
matavimo reikšmę
-
kartotinai spauskite “C”, kad po vieną ištrintumėte
paskutines atskiras matavimo reikšmes atvirkštine
tvarka (m³ - m²)
•
Nuorodos, kaip teisingai atlikti matavimus
!
nejudinkite įrankio matavimo metu (išskyrus darbą
nepertraukiamo matavimo režimu)
-
neuždenkite pagaunančio lęšio A 3 ir lazerio
spindulio angos, B 3 kai matuojate
-
nepalankiomis sąlygomis (t.y. kai matuojama lauke
ryškioje saulės šviesoje) naudokite lazerio spindulio
stiprinimo filtrus (SKIL priedas 2610395907) arba
uždėkite ant matuojamo paviršiaus lakštą popieriaus
-
matuojant permatomus, atspindinčius, poringus ar
struktūruotus paviršius, galima gauti klaidingus
matmenis
•
Ploto matavimas
- paspauskite mygtuką G
3 (displėjuje pasirodo
simbolis 9)
-
nutaikykite prietaisą į pirmojo taikinio paviršių (ilgis)
-
paspauskite “GO” (displėjuje pasirodo simbolis 8)
-
vėl paspauskite “GO”; viršutinėje displėjaus eilutėje
pasirodys išmatuotasis ilgis
-
nutaikykite prietaisą į antrojo taikinio paviršių (plotis)
-
vėl paspauskite “GO”; viršutinėje displėjaus eilutėje
pasirodys išmatuotasis plotis, o apatinėje displėjaus
eilutėje pasirodys suskaičiuotasis plotas
-
norėdami pradėti visiškai naują ploto matavimą, vėl
paspauskite “GO”
•
Tūrio matavimas
- paspauskite mygtuką H
3 (displėjuje pasirodo
simbolis 0)
-
nutaikykite prietaisą į pirmojo taikinio paviršių (ilgis)
-
paspauskite “GO” (displėjuje pasirodo simbolis 8)
-
vėl paspauskite “GO”; viršutinėje displėjaus eilutėje
pasirodys išmatuotasis ilgis
-
nutaikykite prietaisą į antrojo taikinio paviršių (plotis)
-
vėl paspauskite “GO”; viršutinėje displėjaus eilutėje
pasirodys išmatuotasis plotis, o apatinėje displėjaus
eilutėje pasirodys suskaičiuotasis plotas
-
nutaikykite prietaisą į trečiojo taikinio paviršių
(aukštis)
-
vėl paspauskite “GO”; išmatuotasis aukštis pasirodys
viršutinėje displėjaus eilutėje, o apatinėje displėjaus
eilutėje pasirodys suskaičiuotasis tūris
-
norėdami pradėti visiškai naują tūrio matavimą, vėl
paspauskite “GO”
•
Nepertraukiamas matavimas !
-
paspauskite mygtuką F3 po to, kai jau įjungėte įrankį
(ženklas @ pasirodys displėjuje)
-
paspauskite “GO” (displėjuje pasirodo simbolis 8)
-
lazerio spindulys visą laiką bus įjungtas, kad būtų
galima nepertraukiamai matuoti konkrečius atstumus
-
vėl paspauskite “GO” mygtuką, kad baigtumėte
nepertraukiamą matavimą (displėjuje bus rodoma
paskutinio matavimo reikšmė)
-
vėl paspauskite “GO” mygtuką, kad iš naujo
pradėtumėte nepertraukiamą matavimą
-
nepertraukiamo matavimo režimas automatiškai
išsijungia po 5 minučių (displėjuje išlieka paskutinio
matavimo reikšmė); jį taip pat galima baigti pasirinkus
kitą matavimo režimą
•
Matavimo reikšmių išsaugojimas/papildymas
- baigę matuoti, paspauskite “M+” mygtuką matavimo
reikšmei išsaugoti
Ташев-Галвинг ООД
www.tashev-galving.com
SKIL_IB0530_EUCH_v3.indd 69 08-06-2010 13:04:39
Page 70

70
- displėjuje pasirodys “M” raidė ir trumpai mirktelės
žemiau esantis pliuso ženklas
-
norėdami prie atmintyje išsaugotos reikšmės pridėti
papildomas reikšmes, spauskite “M+” (funkcija
įmanoma tik tuomet, kai atitinka matavimo vienetai)
•
Išmatuotų reikšmių atėmimas
- norėdami iš atmintyje išsaugotos reikšmės atimti
naują matuojamą reikšmę, spauskite “M-” (funkcija
įmanoma tik tuomet, kai atitinka matavimo vienetai)
-
displėjuje pasirodys “M” raidė ir trumpai mirktelės
žemiau esantis minuso ženklas
•
Atminties skaitymas
- paspaudus “M=” mygtuką, atmintyje saugoma
reikšmė yra parodoma drauge su “M=” ženklu
(displėjuje išlieka paskutinio matavimo reikšmė)
-
padvigubinkite atminties turinį, paspausdami “M+”
mygtuką
-
ištrinkite visą atminties turinį, paspausdami “M-”
mygtuką
•
Atminties trynimas
Pirma paspauskite “M=”, o po to “C” mygtuką (raidė
“M” nebebus rodoma)
•
Klaidingas matavimas
- jei matavimas nepavyko, displėjuje pasirodo
“ERROR”
-
nustatykite priežastį, imkitės korekcinių veiksmų ir vėl
matuokite
Neteisingo matavimo priežastys:
-
matavimas atliktas ne matavimo diapazono ribose
- kampas tarp lazerio spindulio ir matuojamo objekto
buvo per smailus
-
arba matuojamas paviršius atsispindi per stipriai
(pvz., veidrodis) ar nepakankamai (pvz., juoda
medžiaga), arba aplinkos apšvietimas buvo per
ryškus
-
pagaunantis lęšis A 3 arba lazerio spindulio anga
B3 buvo aprasoję (pvz., dėl staigaus temperatūros
pasikeitimo)
-
išmatuotos vertės buvo pridėtos / atimtos
neatitinkančiais matavimo vienetais
•
Prie diržo tvirtinamas dėklas, skirtas prietaisui patogiai ir
saugiai laikyti #
NAUDOJIMO PATARIMAI
• Kai taisymo veiksmu klaida nepataisoma arba kai
ekrane pasirodo užrašas “FAIL”, matuoti nebegalima;
tokiu atveju siųskite prietaisą savo platintojui arba į
artimiausią SKIL aptarnavimo punktą
•
Saugokite prietaisą nuo nuolatinės vibracijos ar
ekstremalių temperatūrų (tiek teigiamų, tiek neigiamų)
poveikio
•
Prietaisą visuomet laikykite patalpoje, įdėję į apsauginę
pakuotę ar dėklą
•
Saugokite prietaisą nuo dulkių, drėgmės ir tiesioginių
saulės spindulių poveikio
•
Prietaisą valykite drėgna šluoste, naudodami švelnų
muilą
!
prieš valydami lęšį visuomet išimkite baterijas
• Jokiu būdu neardykite ir nemėginkite modifikuoti
prietaiso
•
Nemėginkite keisti kokią nors lazerio lęšio dalį
GARANTIJA / APLINKOSAUGA
• Šiam SKIL gaminiui mes suteikiame garantiją pagal
galiojančius įstatymus; gedimams, kurie atsirado dėl
natūralaus susidėvėjimo, perkrovų arba netinkamo
naudojimo, garantijos negalioja
•
Pretenzijos atveju neišardytą prietaisą kartu su pirkimą
įrodančiu nustatytos formos dokumentu siųskite tiekėjui
arba į artimiausią SKIL firmos įgaliotą elektros prietaisų
techninio aptarnavimo centrą (adresus bei atsarginių
dalių brėžinius rasite interneto puslapyje
www.skileurope.com)
•
Nemeskite elektrinių įrankių, baterijos, papildomos
įrangos ir pakuotės į buitinių atliekų konteinerius
(galioja tik ES valstybėms)
-
pagal ES Direktyvą 2002/96/EG dėl naudotų
elektrinių ir elektroninių prietaisų atliekų utilizavimo ir
pagal vietinius valstybės įstatymus atitarnavę
elektriniai įrankiai turi būti surenkami atskirai ir
gabenami į antrinių žaliavų tvarkymo vietas, kur jie
turi būti sunaikinami ar perdirbami aplinkai
nekenksmingu būdu
-
apie tai primins simbolis $, kai reikės išmesti
atitarnavusį prietaisą
Ташев-Галвинг ООД
www.tashev-galving.com
SKIL_IB0530_EUCH_v3.indd 70 08-06-2010 13:04:39
Page 71

71
TC
Ташев-Галвинг ООД
www.tashev-galving.com
SKIL_IB0530_EUCH_v3.indd 71 08-06-2010 13:04:40
Page 72

72
Ташев-Галвинг ООД
www.tashev-galving.com
SKIL_IB0530_EUCH_v3.indd 72 08-06-2010 13:04:41
Page 73

73
SC
Ташев-Галвинг ООД
www.tashev-galving.com
SKIL_IB0530_EUCH_v3.indd 73 08-06-2010 13:04:43
Page 74

74
Ташев-Галвинг ООД
www.tashev-galving.com
SKIL_IB0530_EUCH_v3.indd 74 08-06-2010 13:04:45
Page 75

75
Ташев-Галвинг ООД
www.tashev-galving.com
SKIL_IB0530_EUCH_v3.indd 75 08-06-2010 13:04:46
Page 76

CE DECLARATION OF CONFORMITY
We declare under our sole responsibility that this product is in
conformity with the following standards or standardized documents:
EN 60 825-1.
CE DÉCLARATION DE CONFORMITÉ
Nous déclarons sous notre propre responsabilité que ce produit est
en conformité avec les normes ou documents normalisés suivants:
EN 60 825-1.
CE KONFORMITÄTSERKLÄRUNG
Wir erklären in alleiniger Verantwortung, daß dieses Produkt mit
den folgenden Normen oder normativen Dokumenten
übereinstimmt: EN 60 825-1.
CE CONFORMITEITSVERKLARING
Wij verklaren, dat dit product voldoet aan de volgende normen of
normatieve documenten: EN 60 825-1.
CE KONFORMITETSFÖRKLARING
Vi intygar och ansvarar för, att denna produkt överensstämmer
med följande norm och dokument: EN 60 825-1.
CE KONFORMITETSERKLÆRING
Vi erklærer under almindeligt ansvar, at dette produkt er i
overensstemmelse med følgende normer eller normative
dokumenter: EN 60 825-1.
CE SAMSVARSERKLÆRING
Vi erklærer at det er under vårt ansvar at dette produkt er i
samsvar med følgende standarder eller standard- dokumenter:
EN 60 825-1.
CE TODISTUS STANDARDINMUKAISUUDESTA
Todistamme täten ja vastaamme yksin siitä, että tämä tuote en
allalueteltujen standardien ja standardoimisasiakirjojen
vaatimusten mukainen EN 60 825-1.
CE DECLARACION DE CONFORMIDAD
Declaramos bajo nuestra sola responsabilidad que este producto
está en conformidad con las normas o documentos normalizados
siguientes: EN 60 825-1.
CE DECLARAÇÃO DE CONFIRMIDADE
Declaramos sob nossa exclusiva responsabilidade que este
producto cumpre as seguintes normas ou documentos normativos:
EN 60 825-1.
CE DICHIARAZIONE DI CONFORMITÀ
Dichiaramo, assumendo la piena responsabilità di tale
dichiarazione, che il prodotto è conforme alle seguenti normative e
ai relativi documenti: EN 60 825-1.
CE MINÖSÉGI TANUSITVANY
Teljes felelösségünk tudatában kijelentjük, hogy jelen termék a
következö szabványoknak vagy kötelezö hatósági elöírásoknak
megfelel: EN 60 825-1.
CE STRVZUJÍCÍ PROHLÅ◊ENÍ
Potvrzujeme na odpovπdnost, Ωe tento v¥robek odpovídå
nåsledujícím normåm nebo normativním podkladüm: EN 60 825-1.
CE STANDARDIZASYON BEYANI
Ye¤ane sorumlu olarak, bu ürünün afla¤ıdaki standartlara veya
standart belgelerine uygun oldu¤unu beyan ederiz: EN 60 825-1.
OÂWIADCZENIE ZGODNOÂCI CE
Niniejszym oÊwiadczamy ponoszàc osobistà odpowiedzialnoÊç, ˝e
produkt wykonany jest zgodnie z nast´pujàcymi normami i
dokumentami normalizujàcymi: EN 60 825-1.
ЗАЯВЛЕНИЕ О СООТВЕТСТВИИ
Мы с полной ответственностыо заявляем, что это изделие
соответствует следующим стандартам или стандартизованным
документам: EN 60 825-1.
CE ∆ΗΛΩΣΗ ΣYMBATOTΗΤΑΣ
DECLARAØIE DE CONFORMITATE CE
Declaråm pe proprie råspundere cå acest product este conform cu
urmåtoarele standarde sau documente standardizate: EN 60 825-1.
CE ДЕKЛАPAЦИЯ ЗA CБOTВETCTBИE
Декларираме на изцяло наша отговорност, че това изделие е
съобразено със следните стандарти или стандартизирани
документи: EN 60 825-1.
CE PREHLÁSENIE O ZHODE
Vÿhradne na na√u vlastnú zodpovednos† prehlasujeme, Ωe tento
vÿrobok zodpovedá nasledujúcim normám alebo normovanÿm
dokumentom: EN 60 825-1.
GB
I
F
D
NL
S
DK
N
FIN
E
P
H
CZ
TR
PL
RU
GR
BG
SK
RO
ДЕКЛАРАЦІЯ ВІДПОВІДНОСТІ СТАНДАРТАМ ЄС
Ми пpоголошуємо, на нашу виключну відповідальність, що цей
пpодукт відповідає таким стандаpтам чи стандаpтизованим
документам: EN 60 825-1.
UA
CE DEKLARACIJA O UDOVOLJAVANJU STANDARDIMA
Izjavljujemo pod svojom iskljuãivom odgovorno‰çu da ovaj
proizvod odgovara sljedeçim standardima ili standardiziranim
dokumentima: EN 60 825-1.
HR
CE DEKLARACIJA O ZADOVOLJAVANJU STANDARDA
Izjavljujemo pod svojom iskljuãivom odgovorno‰çu da ovaj proizvod
zadovoljava sledeçe standarde ili standardizovane dokumente:
EN 60 825-1.
SCG
DEKLARACIJA O PRILAGOJENOSTI STANDARDOM CE
Izjavljamo z lastno odgovornostjo, da je ta izdelek v skladu z
naslednjimi standardi oz. standardiziranimi dokumenti: EN 60 825-1.
SLO
CE VASTAVUSDEKLARATSIOON
Kinnitame ainuvastutajana, et antud toode on vastavuses järgmiste
standardite või normdokumentidega: EN 60 825-1.
EST
CE PAZIøOJUMS PAR ATBILST±BU STANDARTIEM
Mïs ar pilnu atbild¥bu pazi¿ojam, ka ‰is izstrÇdÇjums atbilst ‰Çdiem
standartiem vai standartizÇcijas dokumentiem: EN 60 825-1.
LV
CE KOKYBñS ATITIKTIES DEKLARACIJA
Mes atsakingai parei‰kiame, kad ‰is gaminys atitinka tokius
standartus ir normatyvinius dokumentus: EN 60 825-1.
LT
09 SKIL Europe B.V. A. v.d. Kloot
SKIL_IB0530 16-10-2009 09:49 Pagina 72
Ташев-Галвинг ООД
www.tashev-galving.com
SKIL_IB0530_EUCH_v3.indd 76 08-06-2010 13:04:50
 Loading...