

Page 1
ULTRASONIC
MEASURING TOOL
0520 (F0150520 . . )
SKIL Europe BV - Konijnenberg 60 01/09 2610394131
4825 BD Breda - The Netherlands
www.skileurope.com
ORIGINAL INSTRUCTIONS . . . . . . . . . . . . . 5
NOTICE ORIGINALE . . . . . . . . . . . . . . . . . . 7
ORIGINALBETRIEBSANLEITUNG . . . . . . . .
9
ORIGINELE GEBRUIKSAANWIJZING. . . . 11
BRUKSANVISNING I ORIGINAL . . . . . . . . 14
ORIGINAL BRUGSANVISNING . . . . . . . . . 16
ORIGINAL DRIFTSINSTRUKS. . . . . . . . . .
18
ALKUPERÄISET OHJEET . . . . . . . . . . . . . 20
MANUAL ORIGINAL . . . . . . . . . . . . . . . . . 22
MANUAL ORIGINAL. . . . . . . . . . . . . . . . . . 24
ISTRUZIONI ORIGINALI . . . . . . . . . . . . . . 26
EREDETI HASZNÁLATI UTASÍTÁS. . . . . . 29
PÒVODNÍM NÁVODEM K POUÎÍVÁNÍ . . . 31
OR‹J‹NAL ‹fiLETME TAL‹MATI . . . . . . . . . 33
INSTRUKCJÑ ORYGINALNÑ. . . . . . . . . . . 35
ОРИГИНАЛНЬОЕ РУКОВОДСТВО
ПО ЭКСПЛУАТАЦИИ . . . . . . . . . . . . . . . .
38
ОРИГІНАЛЬНА ІНСТРУКЦІЯ
З ЕКСПЛУАТАЦІЇ . . . . . . . . . . . . . . . . . . .
40
ΠΡΩΤΟΤΥΠΟ Ο∆ΗΓΙΩΝ ΧΡΗΣΗΣ . . . . . . 43
INSTRUCØIUNI DE FOLOSIRE
ORIGINALE . . . . . . . . . . . . . . . . . . . . . . . .
45
ОРИГИНАЛНО РЪКОВОДСТВО
ЗА ЕКСПЛОАТАЦИЯ . . . . . . . . . . . . . . . .
47
PÔVODN¯ NÁVOD NA POUÎITIE. . . . . . . 50
ORIGINALNE UPUTE ZA RAD . . . . . . . . . 52
ORIGINALNO UPUTSTVO ZA RAD. . . . . . 54
IZVIRNA NAVODILA. . . . . . . . . . . . . . . . . . 56
ALGUPÄRANE KASUTUSJUHEND. . . . . . 59
ORI˛INÅLÅ LIETO·ANAS PAMÅC±BA . . . 61
ORIGINALI INSTRUKCIJA . . . . . . . . . . . . . 63
GB
F
D
NL
S
DK
N
FIN
E
P
I
H
CZ
TR
PL
RU
UA
GR
RO
BG
SK
HR
SRB
SLO
EST
LV
LT
ME77
Page 2
2
1
3
2
4 5
AB
C
E
F
L
H
D
G
J
K
M
N
P
_
+
Page 3
3
90
o
MIN. 0,5 m
MAX. 15 m
12m - 15m
MIN ø 3m
647
Page 4

8
9
0
!
@
#
$
Page 5

Ultrasonic measuring tool 0520
INTRODUCTION
● This tool is intended for measuring distances indoors by
means of ultrasonic waves
● When used properly, this tool easily and accurately
measures length, surface and volume
● Carefully read this instruction manual as well as the
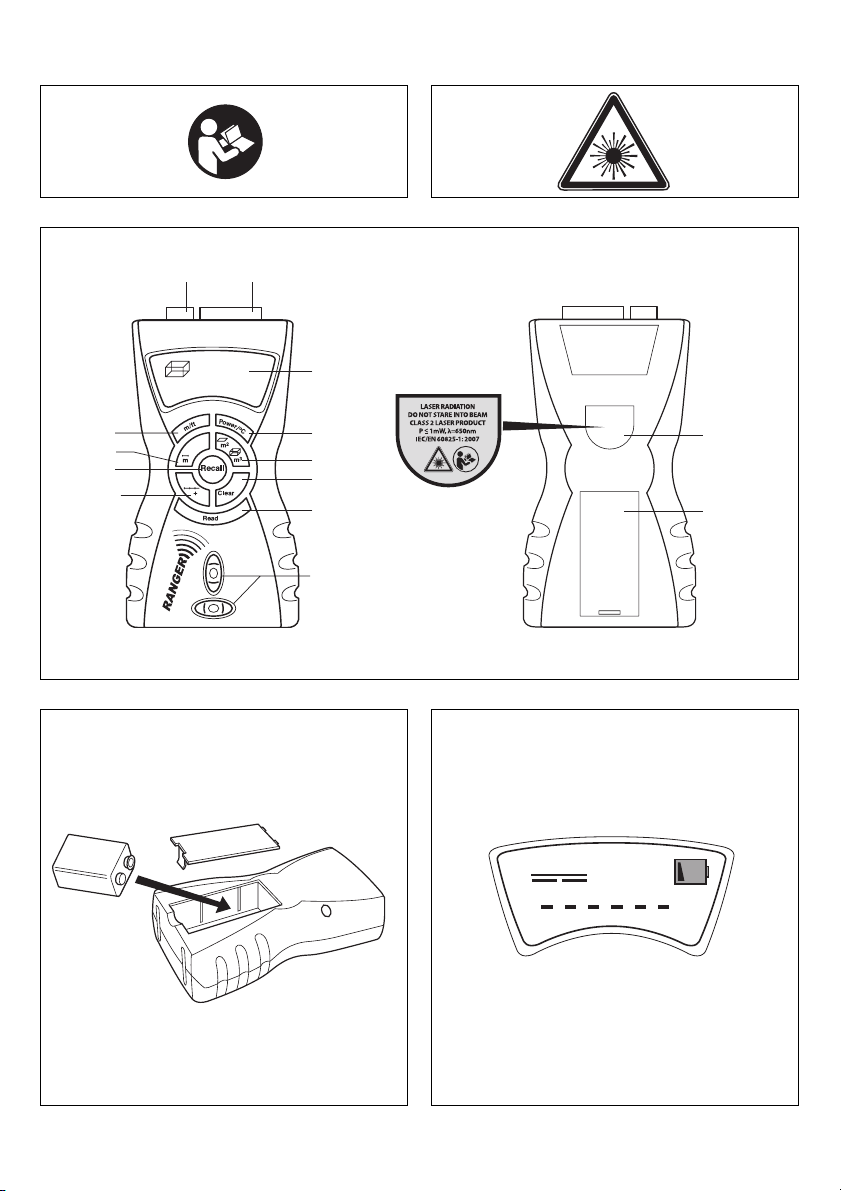
warning label on the tool, before you use the tool 1
● Pay special attention to the safety instructions and
warnings; failure to follow these may result in
serious (eye) injury
● Save this instruction manual for future reference
TECHNICAL SPECIFICATIONS
Measurement range 0,5 to 15 m
Emergence angle of
ultrasonic signal +/- 5°
Laser type 650 nm
Laser class 2
Maximum power output ≤ 1 mW
Power supply 1x 6LR61/9V battery
Optimum operating
temperature 0 to 40°C
Weight 0,2 kg
Accuracy maximum deviation of
+/- 0,5% / +/- 1 digit
SAFETY
● Do not look into the laser beam (laser radiation) 2
● Do not point the laser beam at persons or animals
● Do not place the tool in a position that may cause
anyone to look into the laser beam intentionally or
unintentionally
● Do not use any magnifying optical tools (such as
magnifying glasses, telescopes, or binoculars) to view
the laser beam
● Do not remove or damage the warning label on the tool
● Do not operate the tool in the presence of flammable
liquids, gases or dust
● Do not operate the tool with children around
● This tool should not be used by people under the age of
16 years
● Do not use the tool for any purpose other than those
mentioned in this instruction manual
TOOL ELEMENTS 3
A Ultrasound opening
B Laser beam opening
C LCD display
D "Power" (on/off) key
E Metre/feet conversion key
F Single measurement mode
G Surface/volume computation mode
H Multiple measurement mode
J "Clear" (deletion) key
K "Read" (measurement) key
L "Recall" (review) key
M Bubble levels
N Warning label
P Battery compartment cover
USE
● On/off
- switch on the tool by pressing "Power" button
- ambient temperature in °C is shown on display
- switch off the tool by pressing "Power" button again
- the tool automatically switches off after 30 seconds of
inactivity
● Mounting of battery 4
! ensure that the tool is switched off
- remove cover P
- insert 9V battery (pay attention to correct polarisation)
- mount cover P
- when battery level is low, symbol 5 will appear in
display
! change battery in time, otherwise faulty
measurements may occur
- always remove the battery from the tool, if the tool is
not used for a long period
● Metre/feet conversion
- measurements are in metres/centimetres by default
- press button E 3 for converting metres/centimetres
into feet/inches
- setting will not change as long as battery is not
removed from tool
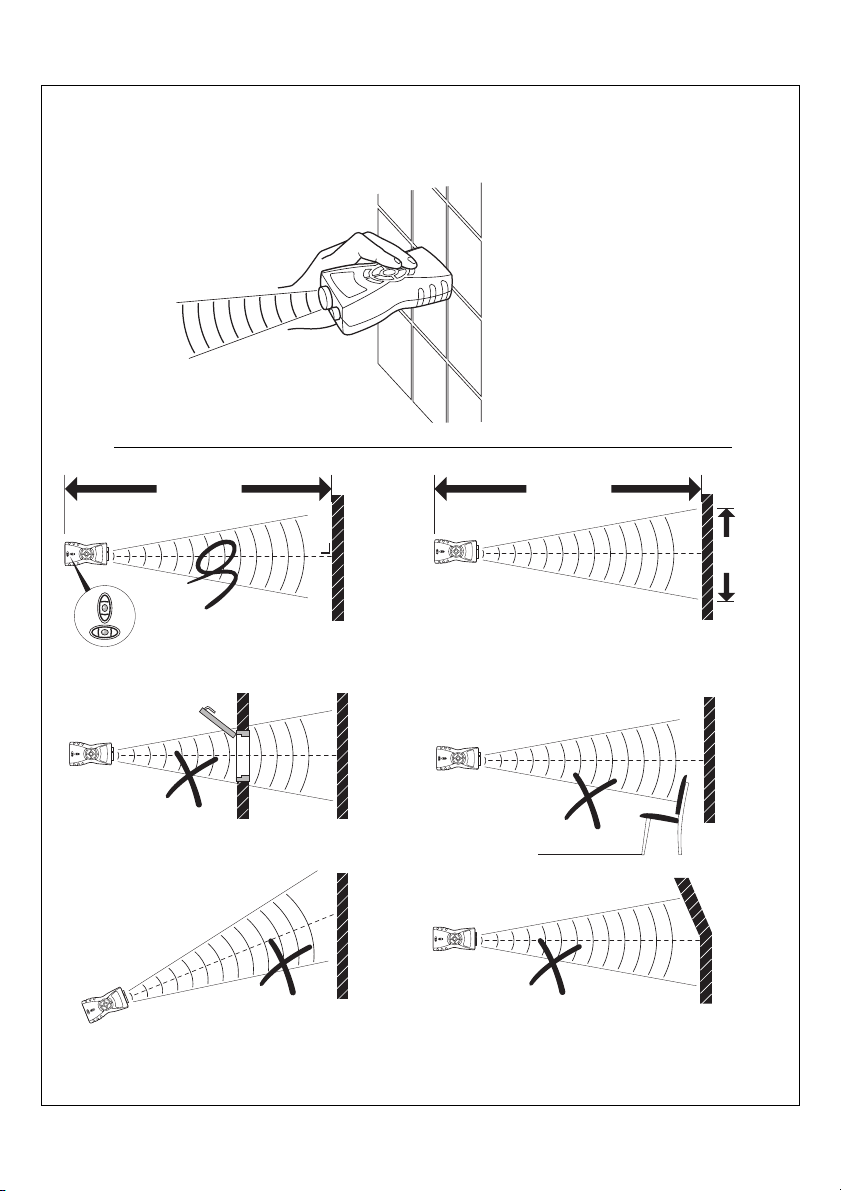
● Operating the tool 6
- press "Power" button
- select measurement mode (button F, G, or H)
- place rear edge of the tool on the starting-point of the
measurement
! aim the tool towards the target surface at a right
angle (use bubble levels M 3)
- a laser "target" 7 is projected on the target surface
as an indication of where the ultrasonic signal is
reflected by the measured object
! do not look into the laser beam
! do not point the laser beam at persons or animals
- press "Read" button; measured distance appears on
top line of display
! keep in mind that the tool measures from its rear
(the tool length is included in the measuring result)
● Instructions for proper measurement 6
! do not move the tool during measuring
! do not measure beyond the specified
measurement range (0,5 - 15 m)
! ensure that there are no obstructions within the
conical expanding sound range
- large, hard and flat surfaces give the most accurate
results
- place a piece of cardboard in front of the target
surface, when measuring small, soft or irregular
surfaces (such as carpets, curtains, coarse wallpaper,
etc.)
GB
5
Page 6

- use a target surface of at least 3 x 3 m, when
measuring long distances (12 - 15 m)
- ensure that no other ultrasonic sources are in the
vicinity
- when measuring through door en window openings,
ensure a correct result by measuring from two or
three different positions and compare the results
- the ultrasonic waves do not penetrate glass/windows
- in case of severe temperature changes, allow the tool
to adjust to the ambient temperature for half an hour
before starting new measurements
- fluctuations in air pressure and humidity, wind noise
and other sources of noise may lead to faulty
measurements
● Single measurement 8
- press button F 3
- aim the tool towards the target surface
- press "Read" button; measurement appears on top
line of display
- measurement is repeated continuously until "Read"
button is released (ticking sound)
- each new single measurement erases the previous
one
● Multiple measurement 9
- press button H 3
- aim the tool towards the first target surface
- press "Read" button; first measurement appears on
top line of display
- aim the tool towards the second target surface
- press "Read" button; second measurement appears
on top line of display (small figure 2 appears in upper
right corner of display and sum of two measurements
appears on bottom line of display)
- in the multiple measuring mode a maximum of
10 measurements can be added
- the small figure in upper right corner of display
indicates the measurement number (1 - 10)
- press button H 3 again for starting a completely new
multiple measurement
● Surface measurement 0
- press button G 3 once
- aim the tool towards the first target surface (length)
- press "Read" button; measured length appears on top
line of display
- aim the tool towards the second target surface
(width)
- press "Read" button again; measured width appears
on top line of display while calculated surface
appears on bottom line of display
- press button G 3 twice for starting a completely new
surface measurement
● Volume measurement !
- press button G 3 twice
- aim the tool towards the first target surface (length)
- press "Read" button; measured length appears on top
line of display
- aim the tool towards the second target surface
(width)
- press "Read" button again; measured width appears
on top line of display while calculated surface
appears on bottom line of display
- aim the tool towards the third target surface (height)
- press "Read" button again; measured height appears
on top line of display while calculated volume appears
on bottom line of display
- press button G 3 twice for starting a completely new
volume measurement
● Recall of previous measurements
Press "Recall" button for reviewing previous
measurements, starting with the last measured distance
(10 at the maximum)
● Correction of multiple measurement
- press "Recall" button; last measurement and
corresponding small figure starts to blink
- press "Recall" more often until measurement to be
corrected is found
- press "Clear" button; measurement is replaced by 0
and sum of remaining values appears on bottom line
of display
- aim the tool towards target surface for new
measurement
- press "Read" button; new measurement replaces 0
and new value is added to the sum
- for continuing multiple measurement, press "Read"
button again and small figure jumps to next empty
memory place
- corrections are possible for 10 previous
measurements at the maximum
● Correction of surface/volume measurement
- press "Recall" button; last measurement and
corresponding line of length/width/height starts to
blink
- press "Recall" more often until measurement to be
corrected is found
- press "Clear" button; measurement is replaced by 0
and recalculated value appears on bottom line of
display
- aim the tool towards target surface for new
measurement
- press "Read" button; new measurement replaces 0
and value on bottom line of display is recalculated
again
- press "Read" button again for continuing
surface/volume measurement
● Faulty measurement
- when the measurement is unsuccessful, symbol @
appears on display
- press "Read" button or restart the tool
● Belt bag for easy and convenient storage #
MAINTENANCE
● Do not expose the tool to continuous vibration or
extremely hot or cold temperatures
● Always store the tool indoors in its protective
carton/case
● Always keep the tool free of dust, moisture and direct
sunlight
6
Page 7

● Clean the tool with a damp cloth and mild soap
! always remove the battery before cleaning the
lens
● Do not disassemble or modify the tool in any way
● Do not attempt to change any part of the laser lens
GUARANTEE / ENVIRONMENT
● This Skil product is guaranteed in accordance with
statutory/country-specific regulations; damage due to
normal wear and tear, overload or improper handling will
be excluded from the guarantee
● In case of a complaint, send the tool undismantled
together with proof of purchase to your dealer or the
nearest Skil service-station (addresses are listed on
www.skileurope.com)
● Dispose of the tool by sorting housing and battery for
environment-friendly recycling; symbol $ will remind
you of this when the need for disposing occurs
Outil de mesure à ultrasons 0520
INTRODUCTION
● Cet outil a été conçu pour mesurer les distances à
l’intérieur par ondes ultrasoniques
● Lorsqu’il est utilisé correctement, il mesure
facilement et avec exactitude les longueurs, les surfaces
et les volumes
● Lisez soigneusement ce mode d'emploi ainsi que
l'étiquette d'avertissement située sur l'outil avant
d'utiliser l'outil 1
● Prêtez attention aux consignes de sécurité et aux
avertissements; sinon, vous risquez d'endommager
gravement vos yeux
● Conservez ce mode d'emploi pour vous y reporter à
l'avenir
SPECIFICATIONS TECHNIQUES
Portée de mesure de 0,5 à 15 m
Angle d’émergence du
signal ultrasonique +/- 5°
Type de laser 650 nm
Catégorie de laser 2
Puissance de sortie maximale ≤ 1 mW
Alimentation 1 pile 6LR61/9 V
Température de
fonctionnement optimale de 0 à 40°C
Poids 0,2 kg
Exactitude déviation maximale de
+/- 0,5% / +/- 1 chiffre
SECURITE
● Ne projetez pas le rayon laser dans vos yeux
(rayonnement laser) 2
● Ne dirigez pas le rayon laser vers des personnes ou
des animaux
● Ne placez pas cet outil dans une position où le rayon
laser pourrait atteindre l'œil d'une personne,
volontairement ou non
● N'utilisez pas d'outils optiques grossissants (loupes,
télescopes ou jumelles) pour voir le rayon laser
● Veillez à ne pas enlever l'étiquette d'avertissement de
l'outil ni à l'endommager
● N'utilisez pas cet outil en la présence de liquides
inflammables, de gaz ou de poussière
● N'utilisez pas cet outil en la présence d'enfants
● Cet outil ne doit pas être utilisé par des personnes de
moins de 16 ans
● N'utilisez pas cet outil dans un but autre que ceux
mentionnés dans ce mode d'emploi
ELEMENTS DE L'OUTIL 3
A Ouverture ultrasons
B Ouverture du rayon laser
C Écran à cristaux liquides
D Touche marche/arrêt "Power"
E Touche de conversion mètres/pieds
F Mode de mesure simple
G Mode de calcul de surface/volume
H Mode de mesure multiple
J Touche d'effacement "Clear"
K Touche de mesure "Read"
L Touche de vérification "Recall"
M Niveaux à bulle
N Étiquette d’avertissement
P Couvercle du compartiment de la pile
UTILISATION
● Marche/arrêt
- allumez l’outil en appuyant sur le bouton "Power"
- la température ambiante est affichée en °C
- éteignez l’outil en appuyant à nouveau sur le bouton
"Power"
- l’outil s’éteint automatiquement après 30 secondes
d’inactivité
● Installation de la pile 4
! veillez à ce que l'outil soit hors tension
- retirez le couvercle P
- insérez la pile de 9 V (respectez les polarités)
- replacez le couvercle P
- quand le niveau de la pile est bas, le symbole 5
s’affiche
! changez la pile à temps pour éviter les mesures
inexactes
- si vous n’utilisez pas l'outil pendant une longue
période, retirez toujours la pile
● Conversion mètres/pieds
- par défaut, les mesures sont en mètres/centimètres
- pour convertir les mètres/centimètres en pieds/
pouces, appuyez sur le bouton E 3
- le réglage sera conservé tant que la pile restera dans
l’outil
● Utilisation de l'outil 6
- appuyez sur le bouton "Power"
- sélectionnez le mode de mesure (bouton F, G ou H)
F
7
Page 8

CE DECLARATION OF CONFORMITY
We declare under our sole responsibility that this product is in
conformity with the following standards or standardized documents:
EN 60 825-1.
CE DÉCLARATION DE CONFORMITÉ
Nous déclarons sous notre propre responsabilité que ce produit est
en conformité avec les normes ou documents normalisés suivants:
EN 60 825-1.
CE KONFORMITÄTSERKLÄRUNG
Wir erklären in alleiniger Verantwortung, daß dieses Produkt mit
den folgenden Normen oder normativen Dokumenten
übereinstimmt: EN 60 825-1.
CE CONFORMITEITSVERKLARING
Wij verklaren, dat dit product voldoet aan de volgende normen of
normatieve documenten: EN 60 825-1.
CE KONFORMITETSFÖRKLARING
Vi intygar och ansvarar för, att denna produkt överensstämmer
med följande norm och dokument: EN 60 825-1.
CE KONFORMITETSERKLÆRING
Vi erklærer under almindeligt ansvar, at dette produkt er i
overensstemmelse med følgende normer eller normative
dokumenter: EN 60 825-1.
CE SAMSVARSERKLÆRING
Vi erklærer at det er under vårt ansvar at dette produkt er i
samsvar med følgende standarder eller standard- dokumenter:
EN 60 825-1.
CE TODISTUS STANDARDINMUKAISUUDESTA
Todistamme täten ja vastaamme yksin siitä, että tämä tuote en
allalueteltujen standardien ja standardoimisasiakirjojen
vaatimusten mukainen EN 60 825-1.
CE DECLARACION DE CONFORMIDAD
Declaramos bajo nuestra sola responsabilidad que este producto
está en conformidad con las normas o documentos normalizados
siguientes: EN 60 825-1.
CE DECLARAÇÃO DE CONFIRMIDADE
Declaramos sob nossa exclusiva responsabilidade que este
producto cumpre as seguintes normas ou documentos normativos:
EN 60 825-1.
CE DICHIARAZIONE DI CONFORMITÀ
Dichiaramo, assumendo la piena responsabilità di tale
dichiarazione, che il prodotto è conforme alle seguenti normative e
ai relativi documenti: EN 60 825-1.
CE MINÖSÉGI TANUSITVANY
Teljes felelösségünk tudatában kijelentjük, hogy jelen termék a
következö szabványoknak vagy kötelezö hatósági elöírásoknak
megfelel: EN 60 825-1.
CE STRVZUJÍCÍ PROHLÅ◊ENÍ
Potvrzujeme na odpovπdnost, Ωe tento v¥robek odpovídå
nåsledujícím normåm nebo normativním podkladüm: EN 60 825-1.
CE STANDARDIZASYON BEYANI
Ye¤ane sorumlu olarak, bu ürünün afla¤ıdaki standartlara veya
standart belgelerine uygun oldu¤unu beyan ederiz: EN 60 825-1.
OÂWIADCZENIE ZGODNOÂCI CE
Niniejszym oÊwiadczamy ponoszàc osobistà odpowiedzialnoÊç, ˝e
produkt wykonany jest zgodnie z nast´pujàcymi normami i
dokumentami normalizujàcymi: EN 60 825-1.
ЗАЯВЛЕНИЕ О СООТВЕТСТВИИ
Мы с полной ответственностыо заявляем, что это изделие
соответствует следующим стандартам или стандартизованным
документам: EN 60 825-1.
CE ∆ΗΛΩΣΗ ΣYMBATOTΗΤΑΣ
∆ηλούµε υπευθύνως τι το προϊν αυτ είναι
κατασκευασµένο σύµφωνα µε τους εξής κανονισµούς ή
κατασκευαστικές συστάσεις: EN 60 825-1.
DECLARAØIE DE CONFORMITATE CE
Declaråm pe proprie råspundere cå acest product este conform cu
urmåtoarele standarde sau documente standardizate: EN 60 825-1.
CE ДЕKЛАPAЦИЯ ЗA CБOTВETCTBИE
Декларираме на изцяло наша отговорност, че това изделие е
съобразено със следните стандарти или стандартизирани
документи: EN 60 825-1.
CE PREHLÁSENIE O ZHODE
Vÿhradne na na√u vlastnú zodpovednos† prehlasujeme, Ωe tento
vÿrobok zodpovedá nasledujúcim normám alebo normovanÿm
dokumentom: EN 60 825-1.
ДЕКЛАРАЦІЯ ВІДПОВІДНОСТІ СТАНДАРТАМ ЄС
Ми пpоголошуємо, на нашу виключну відповідальність, що цей
пpодукт відповідає таким стандаpтам чи стандаpтизованим
документам: EN 60 825-1.
CE DEKLARACIJA O UDOVOLJAVANJU STANDARDIMA
Izjavljujemo pod svojom iskljuãivom odgovorno‰çu da ovaj
proizvod odgovara sljedeçim standardima ili standardiziranim
dokumentima: EN 60 825-1.
CE DEKLARACIJA O ZADOVOLJAVANJU STANDARDA
Izjavljujemo pod svojom iskljuãivom odgovorno‰çu da ovaj proizvod
zadovoljava sledeçe standarde ili standardizovane dokumente:
EN 60 825-1.
DEKLARACIJA O PRILAGOJENOSTI STANDARDOM CE
Izjavljamo z lastno odgovornostjo, da je ta izdelek v skladu z
naslednjimi standardi oz. standardiziranimi dokumenti: EN 60 825-1.
CE VASTAVUSDEKLARATSIOON
Kinnitame ainuvastutajana, et antud toode on vastavuses järgmiste
standardite või normdokumentidega: EN 60 825-1.
CE PAZIøOJUMS PAR ATBILST±BU STANDARTIEM
Mïs ar pilnu atbild¥bu pazi¿ojam, ka ‰is izstrÇdÇjums atbilst ‰Çdiem
standartiem vai standartizÇcijas dokumentiem: EN 60 825-1.
CE KOKYBñS ATITIKTIES DEKLARACIJA
Mes atsakingai parei‰kiame, kad ‰is gaminys atitinka tokius
standartus ir normatyvinius dokumentus: EN 60 825-1.
09 SKIL Europe B.V. A. v.d. Kloot
GB
F
D
NL
S
DK
N
FIN
E
P
I
H
CZ
TR
RU
UA
GR
RO
BG
HR
SRB
SLO
EST
LV
LT
SK
PL
 Loading...