

Page 1
SKIL Europe BV - Konijnenberg 60 01/08 2610398360
4825 BD Breda - The Netherlands
www.skileurope.com
www.skileurope.com
INSTRUCTIONS page 9
INSTRUCTIONS page 10
HINWEISE Seite 12
INSTRUCTIES bladz. 13
INSTRUKTIONER sida 15
INSTRUKTION side 17
ANVISNING side 18
OHJEET sivu 20
INSTRUCCIONES pág. 21
INSTRUÇÕES pág. 23
ISTRUZIONI pag. 25
LEÍRÁS oldal 29
POKYNY strana 28
KILAVUZ sayfa 30
INSTRUKCJA strona 31
ИНСТРУКЦИИ страница 33
ІНСТРУКЦІЯ страница 35
O∆ΗΓΙΕΣ σελίδα 37
INSTRUCØIUNI pagina 39
УKA3AНИЕ страница 40
POKYNY strana 42
UPUTE stranica 44
UPUTSTVA stranica 45
NAVODILA stran 47
KASUTUSJUHEND lehekülg 49
INSTRUKCIJA lappuse 50
INSTRUKCIJA puslapis 52
GB
F
D
NL
S
DK
N
FIN
E
P
I
H
CZ
TR
PL
RU
UA
GR
RO
BG
SK
HR
SRB
SLO
EST
LV
LT
LEVELING LASER
504 (F0150504 . . )
ME77
Page 2
2
3
1 2
4
A
J
C
F
B
D
K
H
L
E
G
Page 3
3
5
o
6
7
B
F
C
90
H
Page 4

4
8
9 0
F
K
K
KJ
D=
H
Page 5

5
!
@
#
o
90
J
K
H
L
Page 6

6
^
$
%
L
Q
S
T
V
N
P
R
M
M
M
M
Page 7

7
ACCESSORIES SKIL Nr.
2610398078
1,80 m
Page 8

8
ACCESSORIES SKIL Nr.
2610395906
2610395907
1,20 m
Page 9

GB
Leveling laser 504
INTRODUCTION
• This tool is intended for the defi ning and checking of
exact horizontal and vertical lines and all angles in
between by means of leaser beam projection
• Carefully read this instruction manual as well as the
warning label on the tool, before you use the tool 1
• Pay special attention to the safety instructions and
warnings; failure to follow these may result in
serious (eye) injury
• Save this instruction manual for future reference
TECHNICAL SPECIFICATIONS
Laser type 650 nm
Laser class 2
Power output < 1 mW
Power supply 2x AA (LR6) / 1,5V battery
Estimated battery life 40 hours
Operating temperature 0ºC to 40°C
Storage temperature -10ºC to 50°C
Accuracy +/- 1 mm/m
Weight 0,37 kg
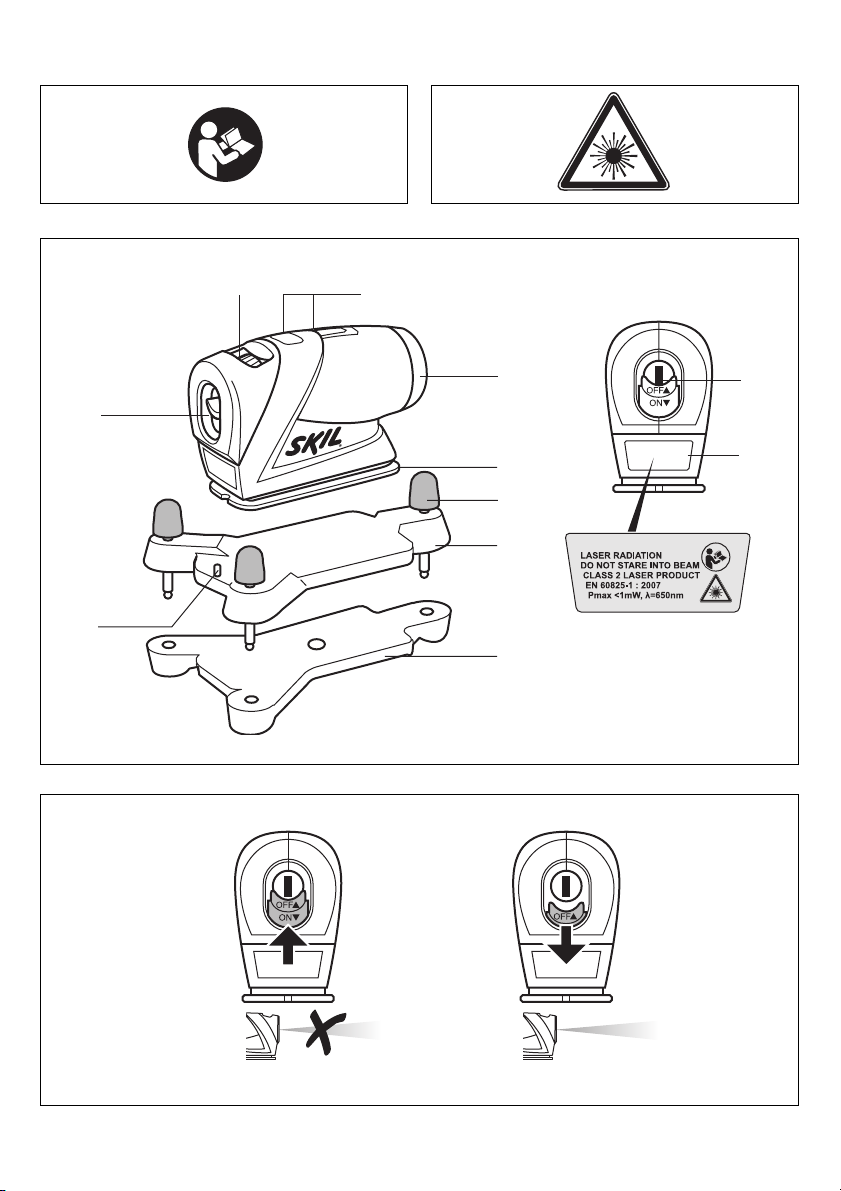
TOOL ELEMENTS 3
A On/off switch
B Battery compartment cover
C Scrolling wheel
D Magnetic base
E Laser light opening
F Bubble levels
G Warning label
H Leveling plate
J Alignment pin
K Adjustment knobs
L Tripod base
SAFETY
• Do not look into the laser beam (laser radiation) 2
• Do not point the laser beam at persons or animals
• Do not place the tool in a position that may cause
anyone to look into the laser beam intentionally or
unintentionally
• Do not use any magnifying optical tools (such as
magnifying glasses, telescopes, or binoculars) to view
the laser beam
• Do not remove or damage the warning label on the tool
• Do not operate the tool in the presence of fl ammable
liquids, gases or dust
• Do not operate the tool with children around
• This tool should not be used by people under the age of
16 years
• Do not use the tool for any purpose other than those
mentioned in this instruction manual
• Only use the original accessories which are intended for
this tool
• Always switch off the tool when not in use
USE
• On/off 4
- switch on/off the tool on by pushing switch A
downwards/upwards
! do not look into the laser beam
! do not point the laser beam at persons or animals
! always switch off the tool after use
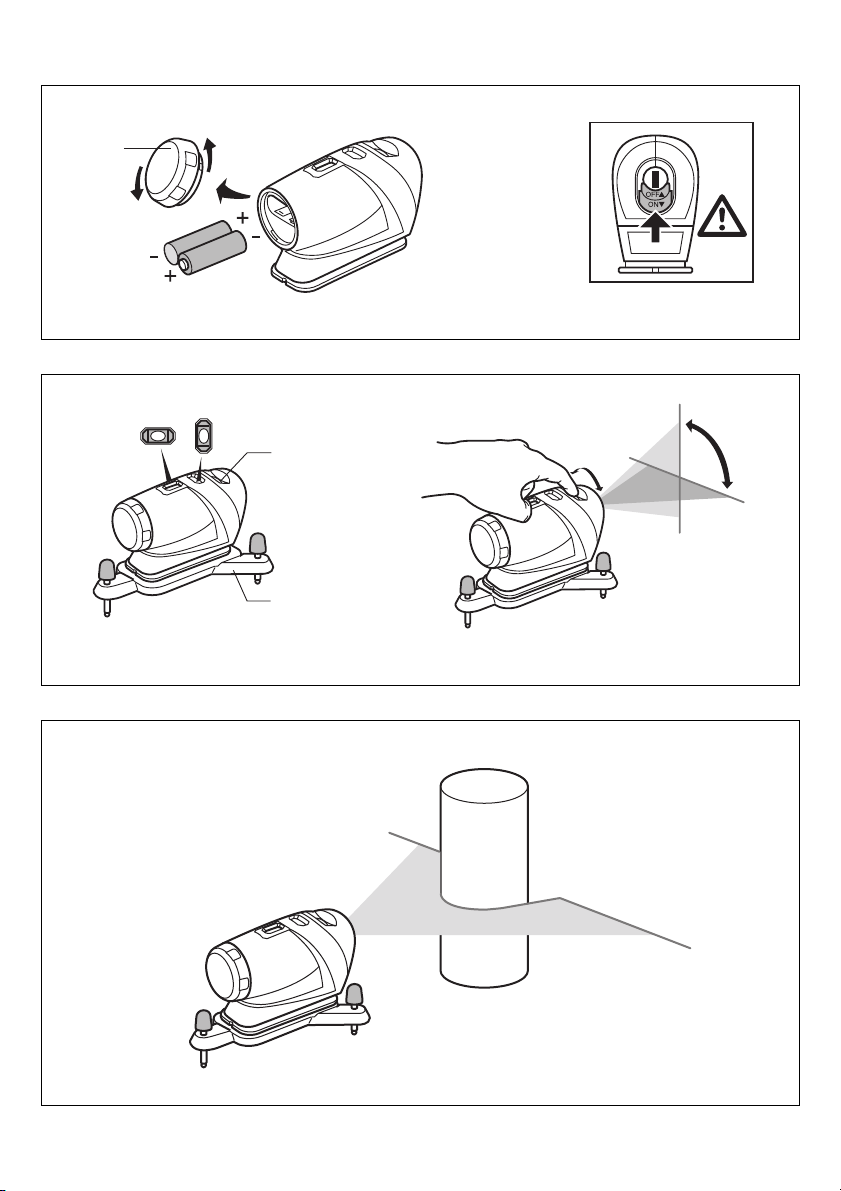
• Mounting of batteries 5
! ensure that the tool is switched off
- remove cover B by turning it counter-clockwise
- insert 2 x AA (LR6) / 1,5V batteries (pay attention to
correct polarisation)
- mount cover B by turning it clockwise
- always remove the batteries from the tool, if the tool
is not used for a long period
- always replace the complete set of batteries
• Operating the tool 6
- project a horizontal/vertical line by moving wheel C
completely to the right/left (ensure that the bubbles in
both levels F are centered)
- project a line under an angle from 0° to 90° by
moving wheel C in either direction until the laser line
has reached the desired angle
- obstructions in front of the tool will not affect the line
projection 7
- use the tool manually for quick reference of a straight
line or alignment of two points of reference 8
- use leveling plate H for leveling the tool when placed
on a surface
• Projecting lines using leveling plate H 9
- mount the tool on leveling plate H by using alignment
pin J
- position the tool with plate on any fl at surface in such
a way that a horizontal or vertical line is projected on
the object in front of you (= reference line)
- level the tool by turning adjustment knobs K in such
a way that the bubbles in both levels F are centered
! check the leveling after each movement of the
tool
- make measurements using the projected line as
reference 0
- vertical lines will be projected from any angle as long
as the bubbles in both levels are centered
- horizontal lines will be projected from any desired
height as long as the bubbles in both levels are
centered
• Magnetic base D 9
- for easy mounting the tool on leveling plate H
- for mounting the tool on any ferrous metal surface or
profi le
• Aligning objects horizontally on adjacent walls !
• Aligning objects vertically on adjacent surfaces @
9
Page 10

• Tripod base L #
For using the tool in combination with a tripod
- mount the tool on leveling plate H by using alignment
pin J
- screw tripod base L onto a tripod with a standard
threading of 1/4-20 UNC
- place tool with leveling plate onto tripod base L
! ensure that the tool is firmly fixed to the tripod
base
• Laser viewing glasses (in +SET execution only; also
available as SKIL accessory 2610395907) $
- for improving the view of the laser line
! these glasses will not protect your eyes against
laser radiation
• Tripod (in +SET execution only; also available as SKIL
accessory 2610395906 (1,20 m) / 2610398078
(1,80 m)) %
- unfold the tripod
- adjust length of 3 legs with clips M
- adjust length of rod N with knob P
- fi rst mount adapter Q to tripod base L, before
mounting it to tripod
- ensure that the tripod base is firmly fixed to the
tripod
- fi rst level the tripod with handle R, knob S and level
T, before leveling the tool itself
- use knob V for rotating the tripod base around its axis
MAINTENANCE / SERVICE
• Do not expose the tool to continuous vibration or
extremely hot or cold temperatures
• Always store the tool indoors in its protective carton/
case
• Always keep the tool free of dust, moisture and direct
sunlight
• Clean the tool with a damp cloth
! always remove the batteries before cleaning the
lens
• Do not disassemble or modify the tool in any way
• Do not attempt to change any part of the laser lens
• If the tool should fail despite the care taken in
manufacturing and testing procedures, repair should be
carried out by an after-sales service centre for SKIL
power tools
- send the tool undismantled together with proof of
purchase to your dealer or the nearest SKIL servicestation (addresses are listed on www.skileurope.com)
ENVIRONMENT
• Do not dispose of electric tools, accessories and
packaging together with household waste material
(only for EU countries)
- in observance of European Directive 2002/96/EC on
waste of electric and electronic equipment and its
implementation in accordance with national law,
electric tools that have reached the end of their life
must be collected separately and returned to an
environmentally compatible recycling facility
- symbol ^ will remind you of this when the need for
disposing occurs
F
Niveau laser 504
INTRODUCTION
• Cet outil sert à défi nir et à vérifi er la précision de lignes
horizontales ou verticales et de tous les angles
intermédiaires en projetant un rayon laser
• Lisez soigneusement ce mode d’emploi ainsi que
l’étiquette d’avertissement située sur l’outil avant
d’utiliser l’outil 1
• Prêtez attention aux consignes de sécurité et aux
avertissements; sinon, vous risquez d’endommager
gravement vos yeux
• Conservez ce mode d’emploi pour vous y reporter à
l’avenir
SPECIFICATIONS TECHNIQUES
Type de laser 650 nm
Catégorie de laser 2
Puissance de sortie < 1 mW
Alimentation 2 piles AA (LR6) / 1,5 V
Durée estimée des piles 40 heures
Température de fonctionnement 0ºC à 40°C
Température de stockage -10ºC à 50°C
Exactitude +/- 1 mm/m
Poids 0,37 kg
ELEMENTS DE L’OUTIL 3
A Interrupteur marche/arrêt
B Couvercle du compartiment des piles
C Molette de déplacement
D Base magnétique
E Ouverture du rayon laser
F Niveaux à bulle
G Etiquette d’avertissement
H Plaque de mise à niveau
J Ergot d’alignement
K Boutons d’ajustage
L Base du trépied
SECURITE
• Ne projetez pas le rayon laser dans vos yeux
(rayonnement laser) 2
• Ne dirigez pas le rayon laser vers des personnes ou
des animaux
• Ne placez pas cet outil dans une position où le rayon
laser pourrait atteindre l’œil d’une personne,
volontairement ou non
• N’utilisez pas d’outils optiques grossissants (loupes,
télescopes ou jumelles) pour voir le rayon laser
• Veillez à ne pas enlever l’étiquette d’avertissement de
l’outil ni à l’endommager
• N’utilisez pas cet outil en la présence de liquides
infl ammables, de gaz ou de poussière
10
 Loading...