


SAFETY WARNING
Disregarding any of the safety precautions and instructions contained in this
Operator’s Guide, SAFETY VIDEO or on-product warnings may result in injury,
including the possibility of death.
This Operator’s Guide and SAFETY VIDEO should remain with the snowmobile
at time of resale.
In USA, products are distributed by BRP US Inc.
In Canada, products are distributed by Bombardier Recreational Products Inc.
The following are trademarks of Bombardier Recreational Products Inc. or its
subsidiaries.
DESS
TM
RAVE™
HPG™ RER
MX Z
GSX
mmo2008-003 DR
®™ and the BRP logo are trademarks of Bombardier Recreational Products Inc. or its affiliates.
©2007 Bombardier Recreational Products Inc. and BRP US Inc. All rights reserved.
®
®
Renegade™
TM
ROTAX
TM
SUMMIT
SC™ TRA™
SKI-DOO
®
X™
®

FOREWORD
Congratulations on your purchase of a
new SKI-DOO®snowmobile. Whatever model you have chosen, it is
backed by the Bombardier Recreational Products Inc. (BRP) warranty
and a network of authorized SKI-DOO
snowmobile dealers ready to provide
the parts, service or accessories you
may require.
The Operator's Guide has been prepared to acquaint the owner/operator
and passenger with this new snowmobile and its various controls, maintenance and safe riding instructions.
This guide is indispensable for the
proper use of the product and should
be kept with this snowmobile at all
times.
Make sure you read and understand
the content of this Operator's Guide.
After reading, please keep this Operator's Guide with the snowmobile. If
the snowmobile is resold, please give
the guide to the new owner for his
awareness.
For all other countries, please contact your respective distributor (his
coordinates are on www.brp.com)
or our North American office:
+ 1 819 566-3366
This guide uses the following safety
alert symbol in conjunction with signal
words to indicate a potential personal
injury hazard.
WARNING
Indicates a potentially hazardous
situation which, if not avoided,
could result in death or serious
injury.
CAUTION
Indicates a potentially hazardous
situation which, if not avoided,
may result in minor or moderate
injury. When used without the
safety alert symbol , potential
hazard exists for property damage
only.
If you want to view and/or print an
extra copy of your Operator's Guide,
simply visit the following website
www.operatorsguide.brp.com.Also note that the guide is available in
several languages.
If you have any question regarding
topic whether or not it is covered in
this Operator's Guide, please call BRP
at the number below and we will b
happy to assist you:
In USA:
715 848-4957
In Canada:
819 566-3366
For Russia, CIS and the
+ 32 9 218 26 00
For Scandinavian and
countries:
+ 358 16 3208 111
middle east:
European
any
e
NOTE: Indicates supplementary information needed to fully complete an instruction.
Although the mere reading of such information does not eliminate the hazard, the understanding and application
of the information will promote the
correct use of the vehicle.
Your dealer is committed to your satisfaction. He has taken training to perform the initial set-up and inspection
of your snowmobile as well as completed the final adjustment required
to suit your specific weight and riding
environment before you took possession. At delivery, your dealer would
have explained the snowmobile controls and provided you with a brief
explanation of the various suspension
adjustments. We trust you have taken full advantage of this!
______________________
1

At delivery, you were also informed
of the warranty coverage and have
completed the Warranty Registration
process.
The information and components/
system descriptions contained in this
guide are correct at time of publication. BRP, however maintains a
policy of continuous improvement of
its products without imposing upon
itself any obligation to install them on
products previously manufactured.
Because of its ongoing commitment
to product quality and innovation, BRP
reserves the right at any time to discontinue or change specifications, designs, features, models or equipment
without incurring obligation.
The illustrations in this document
show the typical construction of the
different assemblies and, in all cases,
may not reproduce the full detail or
exact shape of the parts shown, however, they represent parts which have
the same or a similar function.
For any questions pertaining to the
warranty and its application, consult
the WARRANTY section in this guide,
and/or an authorized SKI-DOO dealer.
It is understood that this guide may
be translated into another language.
In the event of any discrepancy, the
English version shall prevail.
Specifications are given in the SI metric system with the SAE U.S. equivalent in parentheses. Where precise
accuracy is not required, some conversions are rounded off for easier use.
Most components of this snowmobile
are built with parts dimensioned in the
metric system. Most fasteners are
metric and must not be replaced by
customary fasteners or vice versa.
We recommend genuine BRP products for replacement parts and accessories. They've been specially
designed for your vehicle and manufactured to meet BRP's demanding
standards.
A SHOP MANUAL can be obtained for
complete service, maintenance and
more repair information.
_______________________
2

TABLE OF CONTENTS
SAFETY INFORMATION
INTRODUCTION..................................................................... 8
IMPORTANT BASIC SAFETY MEASURES....................................... 9
LAWS AND REGULATIONS....................................................... 13
RIDING THE VEHICLE.............................................................. 14
TRACTION ENHANCING PRODUCTS........................................... 23
LOCATION OF THE IMPORTANT LABELS...................................... 27
ENVIRONMENT INFORMATION
GENERAL............................................................................ 34
JUST WHAT IS LIGHT TREADING? ............................................. 35
WHY IS LIGHT TREADING SMART.............................................. 36
VEHICLE INFORMATION
HOW TO IDENTIFY YOUR SNOWMOBILE..................................... 38
CONTROLS/INSTRUMENTS/EQUIPMENT.................................... 40
1) Speedometer................................................................. 44
2) Tachometer (RPM)........................................................... 44
3) Gauge Digital Display........................................................ 44
4) Gauge Multifunction DigitalDisplay ....................................... 45
5) Gauge Pilot Lamps........................................................... 56
6) Gauge MODE (M) Button................................................... 58
7) Gauge SET (S) Button....................................................... 58
8) Throttle Lever ................................................................ 58
9) Brake Lever................................................................... 58
10) Parking Brake Lever........................................................ 58
11) Multi-Switch Housing...................................................... 59
12) Handlebar ................................................................... 61
13) Holding Strap ............................................................... 61
14) Tether Cut-OutSwitch ..................................................... 61
15) Engine Cut-Out Switch .................................................... 63
16) Rewind Starter Handle..................................................... 63
17) Choke Lever ................................................................ 63
18) Fuel Tank Cap............................................................... 64
19) Heated Carburetor Valve................................................... 64
20) Hood andSide Panels...................................................... 65
21) Fuses ........................................................................ 65
22) Grab Handle/Bumper....................................................... 67
23) Storage Compartment..................................................... 67
______________________
3

24) Tool Kit....................................................................... 67
25) Spark Plug Storage......................................................... 67
26) Spare Drive Belt Holder.................................................... 68
27) Shields and Guards......................................................... 68
28) Track ......................................................................... 68
29) Seat Latch................................................................... 69
30) 1+1 Seat..................................................................... 71
31) Rear Passenger Heating Grip Switch..................................... 72
32) Rear Grab Handles ......................................................... 72
33) Electric Visor Jack Connector ............................................. 72
34) Adjustable Mirrors.......................................................... 72
35) Integrated Bag.............................................................. 72
36) Rear Rack ................................................................... 73
37) 12-VoltPower Outlet....................................................... 73
38) C-Type Hitch ................................................................ 73
RECOMMENDED FUEL AND OIL ................................................ 75
BREAK-IN PERIOD.................................................................. 77
OPERATING INSTRUCTIONS..................................................... 78
Pre-Operation Check ........................................................... 78
SDI Engine Starting Procedure ................................................ 79
Carburetor Engine Starting Procedure ........................................ 80
Vehicle Warm-Up ............................................................... 81
Shifting in Reverse.............................................................. 81
Shutting Off the Engine........................................................ 82
Post-Operation Care............................................................ 82
SPECIAL OPERATING INSTRUCTIONS......................................... 83
Riding at High Altitudes or Sea Level ......................................... 83
Riding in Cold Weather......................................................... 83
Emergency Starting............................................................. 83
Towingan Accessory........................................................... 84
TowingAnother Snowmobile.................................................. 84
Transporting the Vehicle........................................................ 85
SUSPENSION ADJUSTMENTS.................................................. 86
Rear Springs — Comfort....................................................... 87
Center Spring — Steering Behavior........................................... 88
Stopper Strap — Weight Transfer............................................. 89
Coupling Blocks — Handling................................................... 90
Rear Shock Motion Ratio — Damping Strength ............................. 90
Front Springs — Handling...................................................... 91
Front Suspension Shock Damping............................................ 92
Suspension Troubleshooting Chart............................................ 93
Deep Snow Riding.............................................................. 93
TROUBLESHOOTING.............................................................. 94
Beeper Codes ................................................................... 94
General........................................................................... 94
_______________________
4

SPECIFICATIONS ................................................................... 97
MAINTENANCE INFORMATION
PERIODIC MAINTENANCE CHART............................................ 108
ENGINE SYSTEM................................................................. 112
Air IntakeSilencer Prefilter Verification..................................... 112
Cooling System ............................................................... 112
Exhaust System............................................................... 112
EPA Certified Engines........................................................ 112
DRIVE SYSTEM................................................................... 114
Belt Guard Removal and Installation........................................ 114
Brake Fluid Level.............................................................. 114
Brake Condition ............................................................... 115
Brake Adjustment............................................................. 115
Chaincase Oil.................................................................. 115
Drive Chain Tension .......................................................... 115
Drive Belt Inspection ......................................................... 116
Drive Belt Removal........................................................... 116
Drive Belt Installation/Adjustment .......................................... 117
Drive Pulley Adjustment ..................................................... 120
Track Condition................................................................ 121
Track Tension and Alignment ................................................ 122
REAR SUSPENSION ............................................................. 125
STEERING AND FRONT SUSPENSION....................................... 126
ELECTRICAL SYSTEM........................................................... 127
Fuse Removal/Inspection.................................................... 127
BODY/FRAME..................................................................... 130
Vehicle Cleaning and Protection............................................. 130
Bulb Replacement............................................................ 130
Headlamp BeamAiming ..................................................... 131
STORAGEAND PRESEASON PREPARATION............................... 132
WARRANTY
BRP LIMITED WARRANTY NORTH AMERICA: 2008 SKI-DOO
®
SNOWMOBILES .................................................................. 134
BRP INTERNATIONAL LIMITED WARRANTY: 2008 SKI-DOO
®
SNOWMOBILES .................................................................. 139
BRP EUROPEAN UNION MEMBER STATES LIMITED WARRANTY: 2008
SKI-DOO
®
SNOWMOBILES..................................................... 143
PRIVACY OBLIGATIONS/DISCLAIMER....................................... 147
CHANGE OF ADDRESS/OWNERSHIP ........................................ 148
______________________
5

_______________________
6

SAFETY
INFORMATION
____________
SAFETY INFORMATION
____________
7

INTRODUCTION
Everyone is a beginner the first time
he sits behind the controls of a snowmobile regardless of previous experience in driving an automobile, a
motorcycle or a motorboat. The safe
use of your snowmobile is dependent
on many conditions such as visibility,
speed, weather, environment, traffic,
vehicle condition and the condition of
the driver.
Each operator has a responsibility to
ensure the safety of his/her passenger, if any, and of other recreationists
or bystanders.
You are responsible for proper operation of your vehicle as well as training
thosewhomyouallowtorideordrive.
There may be noticeable handling and
performance differences from one
snowmobile to the other.
A snowmobile is relatively simple to
operate but like any other vehicle
or mechanical equipment, it can be
hazardous if you or a passenger are
reckless, thoughtless or inattentive.
We encourage you to have an Annual
Safety Inspection of your snowmobile. Please contact an authorized
SKI-DOO dealer for further details.
Finally, we urge you to visit an authorized SKI-DOO dealer periodically for
regular and safety maintenance, as
well as snowmobile accessories you
may require.
____________
8
SAFETY INFORMATION
___________

IMPORTANT BASIC SAFETY MEASURES
Training
Basic training is required for the
safe operation of any snowmobile.
Study your Operator's Guide paying
particular attention to cautions and
warnings. Join your local snowmobile club: its social activities
and trail systems are planned for
both fun and safety. Obtain basic
instructions from your snowmobile
dealer, friend, fellow club member
or enroll in your state or provincial
safety training program.
Always show a new operator how
to start and stop the vehicle. Indicate the correct riding positions
and, above all else, only allow him
to operate the snowmobile in a restricted flat area — at least until he
is completely familiar with its operation. If there is a local snowmobile
operator's training course existing,
have him enroll.
Performance
The performance of some snow-
mobiles may significantly exceed
that of other snowmobiles you have
operated. Therefore, use by novice
or inexperienced operators is not
recommended.
Snowmobiles are used in many ar-
eas and in many snow conditions.
Not all models perform the sam
similar conditions. Always consult
your snowmobile dealer when selecting the snowmobile mo
your particular needs and uses.
Injury or death may resu
snowmobile operator, passenger
or bystander if the snowmobile is
used in risky condi
beyond the driver's, passenger's
or snowmobile's capabilities or intended use.
tions which are
lt to the
ein
del for
Age
BRP recommends the operator has
at least 16 years old of age.
Speed
Speeding can be fatal. In many
cases, you cannot react or respond
quickly enough to the unexpected.
Always ride at a speed which is
suitable to the trail, weather conditions and your own ability. Know
your local rules. Speed limit may
be in effect and meant to be observed.
Riding
Always keep right hand side of the
trail.
Always keep a safe distance
from other snowmobiles and bystanders.
Remember, promotional material
may show risky maneuvers performed by professional riders under
ideal and/or controlled conditions.
You should never attempt any such
risky maneuvers if they are beyond
your level of riding ability.
Never ride after consuming drugs or
alcohol or if you feel tired or ill. Operate your snowmobile prudently.
Your snowmobile is not designed to
be operated on public streets, roads
or highways.
Snowmobiling at night can be a de-
lightful experience but because of
reduced visibility, be extra cautious.
Avoid unfamiliar terrain and be sure
your lights are working. Always carry a flashlight and spare light bulbs.
____________
SAFETY INFORMATION
___________
9

Nature is wonderful but don't let it
distract your attention from driving.
If you want to truly appreciate winter's scenery, stop your snowmobile on the side of the trail so that
you don't become a hazard to others.
Fences represent a very serious
threat for both you and your snowmobile. Give a wide berth to telephone poles or posts.
Hidden wires unseen from a dis-
tance can cause serious accidents.
Always wear an approved safety
helmet, eye protection and a face
shield. This also applies to your
passenger.
Be aware of inherent risks associ-
ated with riding off trails, such as
avalanche and other natural or man
made hazards or obstacles.
Avoid road traveling. If you must
do so, and it is permitted, reduce
speed. The snowmobile is not designed to operate or turn on paving.
When crossing a road, make a full
stop, then look carefully in both directions before crossing at a 90° angle. Be wary of parked vehicles.
Tailgating another snowmobile
should be avoided. If the snowmobile in front of you slows for any
reason, its driver and passenger
could be harmed through your neglect. Maintain a safe stopping
distance between you and the
snowmobile in front of you. Depending on the terrain condition,
stopping may require a little more
space than you think. Play it safe.
Be prepared to use evasive driving.
Venturing out alone with your snow-
mobile could also be hazardous.
You could run out of fuel, have an
accident, or damage your snowmobile. Remember, your snowmobile
is capable of traveling further in half
an hour than you may be able to
walk in a day. Use the “buddy system”. Always ride with a friend or
member of your snowmobile club.
Even then, tell someone where you
are going and the approximate time
you plan to return.
Meadows sometimes have low ar-
eas where water accumulate and
freezes over in winter. This ice is
usually glare ice. Attempting to
turn or brake on this surface could
cause your vehicle to spin out of
control. Never brake or attempt
speeding or turning on glare ice. If
you do happen to travel over such
a condition, reduce speed by carefully releasing the throttle.
Never “jump” with your snowmo-
bile. This should be left to professional stunt men. Don't show off.
Be responsible.
While on safari, do not “gun” the
throttle. Snow and ice can be
thrown back into the path of a
following snowmobile. In addition,
when “gunning” the throttle, the
vehicle digs into and leaves an irregular snow surface for others.
Safaris are both fun and enjoyable
but don't show off or overtake
others in the group. A less experienced operator might try to do the
same as you and fail. When riding
with others, limit your abilities to
the experience of others.
___________
10
SAFETY INFORMATION
___________

Operation
Maintenance
Always make a pre-start inspection
BEFORE you start the engine.
In an emergency, the snowmobile
engine can be stopped by pressing
down on the engine cut-out switch
or by pulling the tether cord cap
(DESS™ key).
Throttle mechanism should be
checked for free movement and
return to idle position before starting engine.
Always engage parking brake when
vehicle is not in use.
Never run the engine in a non-
ventilated area and/or if vehicle is
left unattended.
Never operate the engine without
belt guard securely installed or, with
hood or side panels opened or removed. Never run the engine without drive belt installed. Running an
unloaded engine such as without
drive belt or with track raised, can
be dangerous.
Electric start models only: Never
charge or boost a battery while installed on snowmobile.
Ensure the path behind is clear of
obstacles or bystanders before proceeding in reverse.
Always remove the tether cord cap
(DESS key) when vehicle is not in
operation in order to prevent accidental engine starting, to avoid
unauthorized use by children or others or theft.
Raising the rearof your snowmobile
while the engine is running could
cause snow, ice or debris to be
thrown back at an observer. Never raise the rear of the vehicle while
the engine is running. To clear or inspect the track, stop the engine, tilt
the vehicle on its side and remove
blockage with a piece of wood or
branch. Never allow anyone near a
rotating snowmobile track.
Know your snowmobile and treat
it with the respect and care due of
any power driven machine. Common sense, proper handling and
routine maintenance will result in
safer and enjoyable use.
Only perform procedures as de-
tailed in this guide. Unless otherwise specified, engine should be
turned OFF and cold for all lubrication, adjustment and maintenance
procedures.
Never have the engine running
while the hood or side panels are
opened. Even at idle, a snowmobile engine is turning around 1800
revolutions per minute. Always
turn off the engine before opening
the hood and/or side panels for any
reason.
Never remove any original equip-
ment from your snowmobile. Each
vehicle has many built in safety features. Such features include various guards and consoles, plus reflective materials and warning labels.
A poorly maintained snowmobile
itself can be a potential hazard. Excessively worn components could
render the vehicle completely inoperative. Keep the snowmobile
in good working condition at all
times. Follow your pre-operation
check, weekly, monthly and annually routine maintenance and
lubrication procedures as detailed
in this guide. Consult a snowmobile dealer or acquire a shop manual
and proper tools and equipment if
other repairs or service is required.
____________
SAFETY INFORMATION
___________
11

Do not stud the track unless it has
been approved for studs. At speed,
a studded track that has not been
approved for studs could tear and
separate from vehicle posing a risk
of severe injury or death. See an
authorized SKI-DOO dealer for current specific studding availability
and applications.
You may stud the track on this ve-
hicle model. However, you MUST
only use the BRP approved type
stud for use on Ski-Doo snowmobiles. DO NOT EVER use conventional studs because the track
thickness is thinner then our standard tracks. The stud could tear off
of track and separate from vehicle
posing a potential risk of severe
injury or death.
Fuel
Always wear a DOT approved hel-
met and follow the same dressing
guidelines as those recommended
for the operator and described in
this guide.
Make sure that you are able to
achieve a stable stance, both feet
resting positively on the footboards
of footrests with good grip, and
that you are able to hold on firmly
to the handholds.
Once underway, if you feel uncom-
fortable or insecure for any reason,
don't wait, tell the driver to slow
down or stop.
Always stop the engine before
refueling. Fuel is flammable and
explosive under certain conditions.
Always work in a well-ventilated
area. Do not smoke or allow open
flames or sparks in the vicinity.
Open cap slowly. If a differential pressure condition is noticed
(whistling sound heard when loosening fuel tank cap) have vehicle
inspected and/or repaired before
further operation. Do not overfill
or top off the fuel tank before placing the vehicle in a warm area.
As temperature increases, fuel expands and might overflow. Always
wipe off any fuel spillage from the
vehicle. Periodically verify fuel system.
Basics for Passenger
Never ride as a passenger unless
the snowmobile is equipped with a
passenger seat, and sit only on the
designated passenger seat.
___________
12
SAFETY INFORMATION
___________

LAWS AND REGULATIONS
Know your local laws.
Federal, state, provincial and local gov-
ernment agencies have enacted laws
and regulations pertaining to the safe
use and operation of snowmobiles. It
is your responsibility as a snowmobiler
to learn and obey these laws and regulations. Respect and observance will
result in safer snowmobiling for all.
Be aware of the liability property damages and insurance laws regarding
your equipment.
____________
SAFETY INFORMATION
___________
13

RIDING THE VEHICLE
Before venturing on the trails, operate
the snowmobile in a restricted flat area
until you are completely familiar with
its operation and feel comfortable that
you can safely tackle a more demanding task. Have an enjoyable and safe
ride.
Principle of Operation
Propulsion
Depressing throttle lever increases
engine RPM causing the drive pulley
to engage. Depending on models, engine RPM must be between 2500 and
4200 before drive pulley engagement
will occur.
Outer sheave of drive pulley moves
toward inner sheave, forcing the drive
belt to move upward on the drive
pulley and simultaneously forcing the
sheaves apart on the driven pulley.
The driven pulley senses the load on
the track and limits the belt movement. The result is an optimized
speed ratio between engine RPM and
the speed of the vehicle at any time.
WARNING
Never operate engine without belt
guard securely installed or, with
hood or side panels opened or removed.
Power is transferred to the track
through the chaincase and drive axle.
WARNING
Always use a wide-base snowmobile mechanical stand to properly
support vehicle durin
verification. Slowly accelerate
engine in order to rotate track at
very low speed when
ground.
ganytrack
it is not on
Turning
Handlebar allows the steering of the
vehicle. As the handlebar is rotated to
right or left, the skis are turned right or
left to steer the snowmobile.
Stopping
Before riding your snowmobile, you
should understand how to stop it.
This is done by releasing the throttle
and gradually depressing the brake
lever on the left side of the handlebar.
In an emergency, you may stop your
vehicle by pressing the engine cut-out
switch located near the throttle control
and applying the brake. Remember, a
snowmobile cannot “stop on a dime”.
Braking characteristics vary with deep
snow, packed snow or ice. If the track
is locked during hard braking, skidding
may result.
How to Ride
How to Dress
Proper snowmobile clothing should
be worn. It should be comfortable
and not too tight. Always check the
weather forecast before going on a
ride. Dress for the coldest weather
expected. Thermal underwear next
to the skin also provides a good insulation.
DOT approved helmets are recommended at all times. They provide
both warmth and reduce injury. A
stocking type cap, balaclava a
mask should always be carried or
worn. Goggles or a face shield that
attach to the helmet are ind
able.
Hands should be protec
of snowmobile gloves or mitts which
have sufficient insulation and allow
use of thumbs and fin
tion of controls.
tedbyapair
gers for opera-
nd face
ispens-
___________
14
SAFETY INFORMATION
___________

Rubber bottom boots with either a nylon or a leather top, with removable
felt liners are best suited for snowmobiling.
You should keep yourself as dry as
possible when snowmobiling. When
you come indoors, take your snowmobile suit and boots off and make certain they dry properly.
Do not wear long scarfs and loose apparels that could get caught in moving
parts.
What to Bring
Generally, the riding position for best
balance and control is sitting. However, the posting, kneeling or standing
positions are also used under certain
conditions.
The novice driver should become familiar with the snowmobile through
practice on a level area at slow speeds
before venturing afield.
WARNING
Do not attempt any maneuvers if
they are beyond your abilities.
Every snowmobiler should carry at
least the following basic parts and
tools that can help him and others in
an emergency:
– this Operator's Guide
– spare spark plugs and wrench
– friction tape
– spare drive belt
– spare starter rope
– spare light bulbs
– tool kit (including at least pliers,
screwdriver, adjustable wrench)
–knife
– flashlight.
Include other items depending on the
length and time of your ride.
Riding Position
Your riding position and balance are
the two basic principles of making
your snowmobile go where you want
it to. When turning on the side of a
hill, you and your passenger must be
ready to shift body weight to help it
turn in the desired direction. Driver
and passenger(s) must never attempt
this maneuvering by placing feet outside of the vehicle. Experience will
teach you how much lean to put into turns at different speeds and how
much you will have to lean into a slope
to maintain proper balance.
Sitting
Feet on the running boards, body midway back on seat is an ideal position
when operating the snowmobile over
familiar, smooth terrain. Knees and
hips should remain flexible to absorb
shocks.
mmo2008-003-001
____________
SAFETY INFORMATION
___________
15

Posting
Standing
A semi-sitting position with the body
off the seat and the feet under the
body in a sort of squatting posture,
thus allowing the legs to absorb the
shocks when traveling over uneven
terrain. Avoid abrupt stops.
mmo2008-003-002
Kneeling
This position is achieved by placing
one foot firmly on the running board
and the opposite knee on the seat.
Avoid abrupt stops.
Place both feet on the running boards.
Knees should be flexed to absorb the
shock from surface bumps. This is
an effective position to see better and
to shift weight as conditions dictate.
Avoid abrupt stop.
mmo2008-003-004
Carrying a Passenger
Certain snowmobiles are designed for
an operator only, others can allow one
passenger only, and others can allow
up to two passengers. Refer to the
indications on the vehicles to know if
any particular snowmobile can accommodate passengers or not, and if so,
how many. Always respect those indications. Overloading is dangerous because snowmobiles are not designed
for it.
mmo2008-003-003
___________
16
Even when passengers are allowed,
you must make sure that the persons
who would like to become passengers
are physically fit for snowmobiling.
Any passenger must be able to
firmly lay his feet on the footrests
and keep his hands on the grab
handles or seat strap at all times
when seated. Respecting those
physical criteria is important to
ensure that the passenger is stable
and to reduce the risks of ejection.
SAFETY INFORMATION
WARNING
___________

On snowmobiles allowing two passengers, if you have an adult and a
child for passenger, BRP recommends
that the child sits in the center location. This allows an adult sitting in the
rear seat to keep a visual contact with
the child and hold him if necessary.
In addition, the child is best protected
against the wind and cold temperature
if seated in the center location.
Each operator has a responsibility to
ensure the safety of his passengers
and should inform them of snowmobiling basics.
WARNING
– Passengers must only sit on
designated passenger seats.
Never allow anyone to sit between the handlebar and the
operator.
– Each passenger seat must have
a strap or grab handles and
meet SSCC standards.
– Passengers and operators must
always wear DOT approved helmets and warm clothing appropriate for snowmobiling. Make
sure that no skin is exposed.
– Once underway, if a passenger
feels uncomfortable or insecure
for any reason, he must not
wait, and tell the driver to slowdown or stop.
Riding with passengers on board is
different than riding alone. The operator has the benefit of knowing what
will be the next maneuver and is able
to prepare himself accordingly. The
operator also benefits from the support of his grip on the handlebar. In
contrast, the passengers have to rely on the operator’s careful and safe
operation of the vehicle. In addition,
“body english” is limited with passengers, and the operator can sometimes
see more of the trail ahead than the
passengers. Therefore, smooth starting and stopping are required with
passengers, and the operator must
slow down. The operator must also
warn passengers of side hills, bumps,
branches, etc. An unforeseen bump
can leave you passenger-less. Remind your passengers to lean into
the turn with you, without causing
the vehicle to topple. Be extremely
careful, go more slowly and check the
passengers frequently.
WARNING
When riding with a passenger:
– Braking ability and steering
control are reduced. Decrease
speed and allow extra space to
maneuver.
– Adjust suspension according to
weight.
____________
For complete information on how
to adjust the suspension, please refer to the section of this Operator’s
Guide entitled SUSPENSION ADJUST-
MENTS.
Use extra caution and go even more
slowly with young passengers. Check
frequently to make certain the child
has a firm grip and is properly positioned with his feet on the running
boards.
SAFETY INFORMATION
___________
17

Terrain/Riding Variations
Deep Snow
Groomed Trail
On a maintained trail, sitting is the
most preferred riding position. Do not
race and, above all, keep to the right
hand side of the trail. Be prepared
for the unexpected. Observe all trail
signs. Do not zigzag from one side of
the trail to the other.
Ungroomed Trail
Unless there has been a fresh snowfall you can expect “washboard” and
snowdrift conditions. Taken at excessive speeds, such conditions can be
physically harmful. Slow down. Hold
on the handlebar and assume a posting position. Feet should be under the
body assuming a crouched position to
absorb any jarring effect. On longer
stretches of “washboard” trails, the
kneeling position of one knee on the
seat can be adopted. This provides
a certain amount of comfort, while at
the same time keeps the body loose
and capable of vehicle control. Beware of hidden rocks or tree stumps
partially hidden by a recent snowfall.
In deep “powder” snow, your vehicle
could begin to “bog” down. If this occurs, turn in as wide an arc as possible and look for a firmer base. If you
do get “bogged”, and it happens to
everyone, do not spin your track as
this makes the vehicle sink deeper. Instead, turn the engine off, get off and
move the back of the vehicle onto new
snow. Then tramp a clear path ahead
of the vehicle. A few feet will generally suffice. Restart the engine. Assume the standing position and rock
the vehicle gently as you steadily and
slowly apply the throttle. Depending
on whether the front or rear end of
the vehicle is sinking, your feet should
be placed on the opposing end of the
running boards. Never place foreign
material beneath the track for support.
Do not allow anyone to stand in front
of, or to the rear of, the snowmobile
with the engine running. Stay away
from the track. Personal injury will result if contact is made with the revolving track.
___________
18
SAFETY INFORMATION
___________

Frozen Water
Traveling frozen lakes and rivers can
be fatal. Avoid waterways. If you
areinanunfamiliararea,askthelocal authorities or residents about the
ice condition, inlets, outlets, springs,
fast moving currents or other hazards. Never attempt to operate your
snowmobile on ice that may be too
weak to support you and the vehicle.
Operating a snowmobile on ice or icy
surfaces can be very dangerous if you
do not observe certain precautions.
The very nature of ice is foreign to
good control of a snowmobile or any
vehicle. Traction for starting, turning
or stopping is much less than that
on snow. Thus, these distances can
be multiplied manyfold. Steering is
minimal, and uncontrolled spins are
an ever present danger. When operating on ice, drive slowly with caution.
Allow yourself plenty of room for
stopping and turning. This is especially true at night.
Hard Packed Snow
Don't underestimate hard packed
snow. It can be difficult to negotiate
as both skis and track do not have as
much traction. Best advice is to slow
down and avoid rapid acceleration,
turning or braking.
Uphill
There are two types of hills you can encounter — the open hill on which there
are few trees, cliffs or other obstacles,
and a hill that can only be climbed directly. On an open hill, the approach
is to climb it by side hilling or slaloming. Approach at an angle. Adopt a
kneeling position. Keep your weight
on the uphill side at all times. Maintain a steady, safe speed. Continue
as far as you can in this direction, then
switch to an opposite hill angle and riding position.
A direct climb could present problems.
Choose the standing position, accelerate before you start the climb and
then reduce throttle pressure to prevent track slippage.
In either case, vehicle speed should
be as fast as the incline demands.
Always slow down as you reach the
crest. If you cannot proceed further,
don't spin your track. Turn the engine off, free the skis by pulling them
out and downhill, place the rear of the
snowmobile uphill restart the engine
and ease it out with slow even throttle
pressure. Position yourself to avoid
tipping over, then descend.
Downhill
Downhill driving requires that you
have full control of your vehicle at all
times. On steeper hills, keep your
center of gravity low and both hands
on the handlebar. Maintain slight
throttle pressure and allow the machine to run downhill with the engine
operating. If a higher than safe speed
is reached, slow down by braking but
apply the brake with frequent light
pressure. Never jam the brake and
lock the track.
Side Hill
When crossing a side hill or traversing up or downhill, certain procedures
must be followed. All riders should
lean towards the slope as required
for stability. The preferred operating
positions are the kneeling position,
with the knee of the down hill leg
on the seat and the foot of the uphill leg on the running board, or the
posting position. Be prepared to shift
your weight quickly as needed. Side
hills and steep slopes are not recommended for a beginner or a novice
snowmobiler.
____________
SAFETY INFORMATION
___________
19

Slush
Unseen Obstruction
Slush should be avoided at all times.
Always check for slush before starting across any lake or river. If dark
spots appear in your tracks, get off the
ice immediately. Ice and water can be
thrown rearward into the path of a following snowmobile. Getting a vehicle
out of a slush area is strenuous and in
some cases, impossible.
Fog or Whiteouts
On land or water, fog or visibilitylimiting snow can form. If you have
to proceed into the fog or heavy snow,
do so slowly with your lights on and
watch intently for hazards. If you are
not sure of your way, do not proceed.
Keep a safe distance behind other
snowmobilers to improve visibility
and reaction time.
Unfamiliar Territory
Whenever you enter an area that is
new to you, drive with extreme caution. Go slow enough to recognize
potential hazards such as fences or
fence posts, brooks crossing your
path, rocks, sudden dips, guy wires
and countless other obstacles which
couldresultinaterminationofyour
snowmobile ride. Even when following existing tracks, be cautious.
Travel at a speed so you can see what
is around the next bend or over the
top of the hill.
Bright Sunshine
Bright sunny days can considerably reduce your vision. The glare from sun
and snow may blind you to the extent that you cannot easily distinguish
ravines, ditches or other obstacles.
Goggles with colored lenses should
always be worn under these conditions.
There may be obstructions hidden
beneath the snow. Driving off established trails and in the woods requires
reduced speed and increased vigilance. Driving too fast in an area can
make even minor obstacles very hazardous. Even hitting a small rock or
stump could throw your snowmobile out of control and cause injury to
its riders. Stay on established trails
to reduce your exposure to hazards.
Be safe, slow down and enjoy the
scenery.
Hidden Wires
Always be on the lookout for hidden
wires, especially in areas that may
have been farmed at one time or another. Too many accidents have been
caused by running into wires in the
fields, guy wires next to poles and
roads, and into chains and wires used
as road closures. Slow speeds are a
must.
Obstacles and Jumping
Unplanned jumps of snowdrifts,
snowplow ridges, culverts or indistinguishable objects can be dangerous.
You can avoid them by wearing the
proper color lenses or face shields and
by operating at a lower speed.
Jumping a snowmobile is an unsafe
and dangerous practice. However, if
the trail does suddenly drop away from
you, crouch (stand) towards the rear
of the vehicle and keep the skis up
and straight ahead. Apply partial throttle and brace yourself for the impact.
Knees must be flexed to act as shock
absorbers.
___________
20
SAFETY INFORMATION
___________

Turning
Railroad Crossing
Depending on terrain conditions, there
are two preferred ways to turn or corner a snowmobile. For most snow
surfaces, “body english” is the key to
turning. Leaning towards the inside of
the turn and positioning body weight
on the inside foot will create a “banking” condition beneath the track. By
adopting this position and positioning
yourself as far forward as possible,
weight will be transferred to the inside
ski.
On occasion, you will find that the only way to turn the vehicle about in
deep snow is to pull the snowmobile
around. Do not over-exert yourself.
Get assistance. Remember to always
lift using your legs as opposed to your
back.
Never ride on railroad tracks. It is illegal. Railroad tracks and railroad rightsof-way are private property. A snowmobile is no match for a train. When
crossing a railroad track, stop, look and
listen.
Night Rides
The amount of natural and artificial
light at a given time can effect your
abilitytoseeortobeseen. Nighttime
snowmobiling is delightful. It can be
a unique experience if you acknowledge your reduced visibility. Before
you start, make certain your lights
are clean and work properly. Drive
at speeds that will allow you to stop
in time when you see an unknown
or dangerous object ahead. Stay on
established trails and never operate in
unfamiliar territory. Avoid rivers and
lakes. Guy wires, barbed wire fences,
cabled road entrances and other objects such as tree limbs are difficult
to see at night. Never drive alone.
Always carry a flashlight. Keep away
from residential areas and respect the
right of others to sleep.
mmo2008-003-005
Road Crossing
In some cases, you will be approaching the road from a ditch or snowb
Choose a place where you know you
can climb without difficulty. Use the
standing position and proce
ly as much speed needed to crest the
bank. Stop completely at the top of
the bank and wait for al
Judge the drop to the roadway. Cross
the road at a 90° angle. If you encounter another sno
posite side, position your feet near the
rear of the vehicle. Remember, your
snowmobile is not
ate on bare pavement and steering on
this type of surface is more difficult.
wbank on the op-
designed to oper-
ed with on-
l traffic to clear.
ank.
Safari Riding
Before starting out, designate a “trail
boss” to lead the party and another
person to follow-up at the end of the
party. Ensure that all members of the
party are aware of the proposed route
and destination. Make certain that
you are carrying all necessary tools
and equipment and that you have
sufficient fuel to complete the trip.
Never overtake the trail boss or, for
that matter, any other snowmobile.
Use down-the-line hand signals to indicate hazards or intent of direction
change. Assist others whenever necessary.
____________
SAFETY INFORMATION
___________
21

It is always IMPORTANT to keep a
safe distance between each snowmobile. Always maintain a safe interval
and allow sufficient stopping distance.
Don't be a tailgater. Know theposition
of the machine ahead.
Signals
If you intend to stop, raise either hand
straight above your head. A left turn is
indicated by extending your left hand
straight out in the proper direction.
For right turns, extend the left arm and
raise the hand to a vertical position so
it forms a right angle at the elbow. Every snowmobiler should relay any signal to the ones behind.
Trail Stops
Whenever possible, pull off the trail
when you stop. This will reduce the
hazard to other snowmobilers using
the trail.
Trails and Signs
Trail signs are used to control, direct
or regulate the use of snowmobiles on
trails. Become familiar with all signs
used in the area where you are snowmobiling.
Transporting and Towing
Follow transporting and towing instructions explained further in this
guide.
___________
22
SAFETY INFORMATION
___________

TRACTION ENHANCING PRODUCTS
NOTE: This section is applicable to
snowmobiles equipped with a factory
installed track that has been approved
by BRP for special studs installation.
WARNING
Never stud a track that has not
been approved for studs. Installing studs on an unapproved
track could increase the risk of the
track tearing or severing, possibly
resulting in serious injury or death.
WARNING
You may stud the track on this vehicle model. However, you MUST
only use the BRP approved type
stud for use on these Ski-Doo
snowmobiles. DO NOT EVER use
conventional studs as the track
thickness is thinner then other
standard tracks. The stud could
tear off of track and separate from
vehicle posing a potential risk of
severe injury or death. See an
authorized SKI-DOO dealer for
current specific studding availability and applications.
Using traction enhancing products
such as, more aggressive ski carbide
runners and/or studs on your snowmobile will change its behavior, particularly in terms of manoeuvrability,
acceleration, and braking.
Also, always check local regulations
concerning the use of traction enhancing products on snowmobiles.
Always drive your snowmobile in a
responsible manner, respecting the
environment and other people’s property.
Manoeuvrability
Using traction enhancing products
such as, more aggressive ski carbide
runners and/or studs makes the snowmobile grip the ground better at both
the front and at the rear. The use of
carbide runners is therefore required
to give the skis a better grip, so that
the front and rear of the snowmobile
are in balance. While off-the-shelf
carbide ski runners are adequate,
they don’t necessarily give you optimal control, since that depends on
your personal preferences, your riding
style, and how your suspension is
adjusted.
WARNING
If the front and rear of the snowmobile are out of balance due to an
incorrect combination of traction
enhancing products, the snowmobile may tend to oversteer or understeer,whichcouldleadtoaloss
of control.
Using traction enhancing products
gives a better grip on packed snow
and ice, but has no noticeable effect
on soft snow. For this reason, driving
a snowmobile equipped with traction
enhancing products requires a certain
adaptation period. If your snowmobile
is equipped with traction enhancing
products, be sure to take plenty of
time to get used to the way it handles
when turning, accelerating, and braking.
____________
SAFETY INFORMATION
___________
23
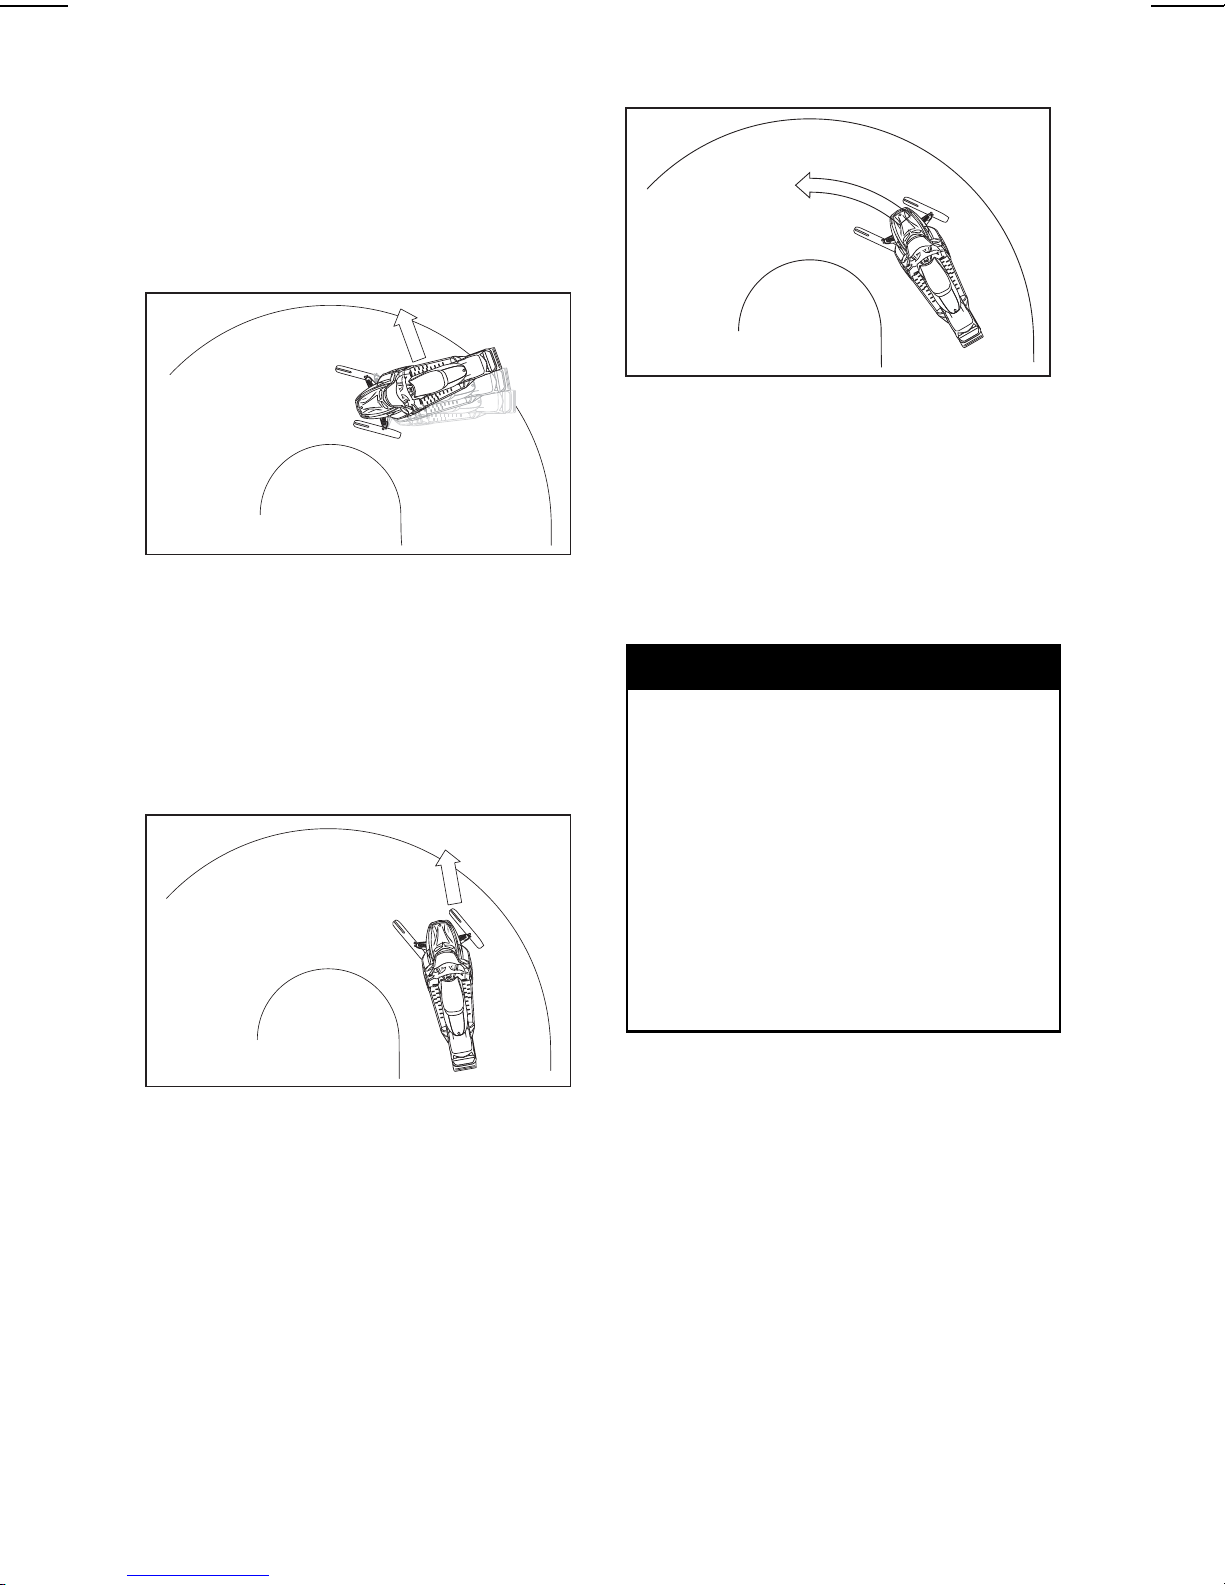
Oversteering
In certain conditions, using more aggressive ski carbide runners without
studs on the rear track could make
the snowmobile prone to oversteering, see illustration.
A33A31A
OVERSTEERING
Understeering
A33A34A
CONTROLLED DRIVING
Acceleration
Using studs on the track will allow your
sled to accelerate better on packed
snow and ice but will have no noticeable effect on soft snow. This can
cause sudden variations in traction under certain conditions.
In certain conditions, the use of studs
on the track could make the snowmobile prone to understeering if the skis
are not equipped with more aggressive ski carbide runners, see illustration.
A33A33A
UNDERSTEERING
Controlled Driving
A balanced combination of carbide ski
runners and studs on the track ensures adequate control and better handling, see illustration.
WARNING
To prevent surprises that could
lead to a loss of control of the
snowmobile, possibly resulting in
serious injury or death:
– Always go easy on the throttle.
– NEVER try to spin the track to
make the rear of the snowmo-
bile skid.
This could cause debris or ice to be
thrown violently backwards, possibly injuring others nearby or on
snowmobiles behind you.
Braking
As in the case of acceleration, us
studs on the track will give you better
braking capacity on packed snow or
ice but will have no noticeabl
on soft snow. Braking may thus vary
suddenly under certain conditions.
Be sure to use restraint
in braking to
keep from blocking the track in order
to avoid surprises that could lead to a
loss of control.
ing
e effect
___________
24
SAFETY INFORMATION
___________

Important Safety Rules
WARNING
WARNING
To prevent serious injury to individuals near the snowmobile:
– NEVER stand behind or near a
moving track.
– Always use a wide-base snow-
mobile stand with a rear deflector panel.
– When the track is raised off the
ground, only run it at the lowest
possible speed.
Centrifugal force could cause debris, damaged or loose studs,
pieces of torn track, or an entire severed track to be violently
thrown backwards out of the tunnel with tremendous force, possibly resulting in the loss of a leg or
other serious injury.
Effects of Having a
Studded Track on the Life
of the Snowmobile
The use of traction enhancing products can increase the load and the
stress on certain snowmobile components, as well as the vibration level. This can cause premature wear on
parts such as belts, brake linings, bearings, chain, chaincase sprocket, and
on approved studded tracks, shorten
track life. Always proceed with a visual inspection of your track before each
use. For more information, ref
TRACK CONDITION section further in
this guide.
Studs on the track can also cause serious damage to your snowmobile if it
is not equipped with the tu
tors designed for your particular model. Damage to the electrical wiring or
perforation of the h
potential hazards, that could cause the
engine to overheat and be severely
damaged.
eat exchangers are
nnel protec-
er to
If tunnel protectors are excessively
worn or not installed, the gas tank
could be punctured, causing a fire.
CAUTION: Ask your dealer for the
appropriate tunnel protectors model and kit number required for your
snowmobile.
NOTE: Consult the BRP limited war-
ranty to find out what warranty limitations are related to the use of studs.
Installation of Studs on
BRP Approved Tracks
WARNING
Never stud a track that has not
been approved for studs. Approved tracks can be identified by
astudsymbol(seeillustrationbelow) molded into the track surface.
Installing studs on an unapproved
track could increase the risk of the
track tearing or severing, possibly
resulting in serious injury or death.
A33A35A
APPROVED TRACKS CAN BE IDENTIFIED
BY THIS SYMBOL
To ensure safe and proper installation,
BRP recommends to have the studs
installed by your dealer.
– Use only the BRP approved special
studs.
– Never use studs that exceed the
height of your snowmobile’s track
profile by more than 9.5 mm (3/8 in).
____________
SAFETY INFORMATION
___________
25
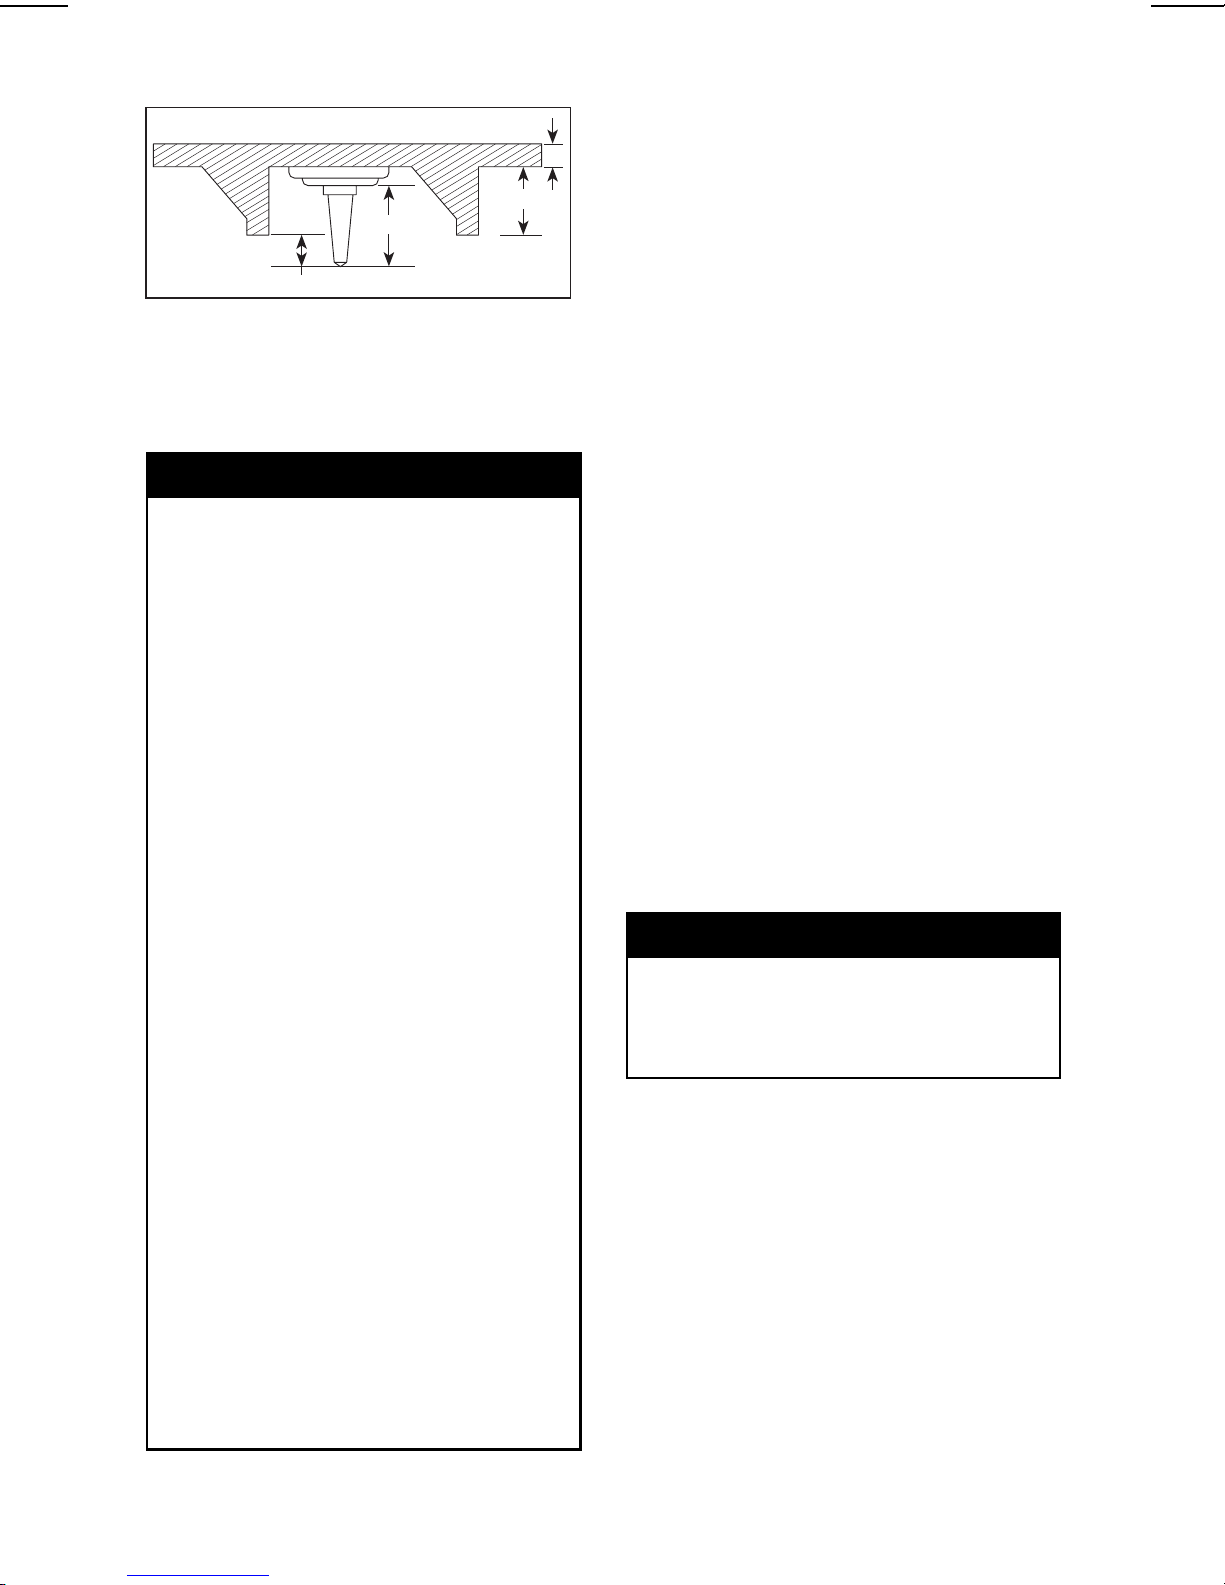
3
1
A33A32A
INSTALLATION OF STUDS
1. Stud size
2. Penetration range 6.4 to 9.5 mm
(1/4 to 3/8 in)
3. Track lug height
4. Track belt thickness
– See an authorized SKI-DOO
dealer for current specific studding availability and applications.
– DO NOT EVER use convention-
al stud because, the track thickness is thinner then our standard tracks and the stud could
tear off of track and separate
from vehicle posing a potential
risk of severe injury or death.
– Studs should only be installedin
the locations indicated by molded bulges in the track surface.
– Never stud a track with a profile
of 35 mm (1.375 in) or more.
– The number of studs installed
must always perfectly match the
pattern of molded bulges in the
track.
– Always consult the traction
product manufacturer’s installation instructions and recommendations before having your
dealer install studs and runners.
It is very important to follow
the torque specifications for the
stud bolts.
INSTALLING AN INCORRECT
NUMBER OF STUDS OR AN IMPROPER INSTALLATION CAN INCREASE THE RISK OF THE TRACK
TEARING OR SEVERING, POSSIBLY RESULTING IN SERIOUS
INJURY OR DEATH.
2
WARNING
Maintenance/Replacement
PROCEED WITH A VISUAL INSPEC-
4
TION OF YOUR TRACK BEFORE
EACH USE.
Look for any defects, such as:
– perforations in the track
– tears in the track (particularly
around traction holes on studded
tracks)
– lugs that are broken or torn off, ex-
posing portions of rods
– delamination of the rubber
– broken rods
– broken studs (studded tracks)
– bent studs (studded tracks)
– missing studs
– studs that are torn off the track
– missing track guide(s)
– also, ensure that studs nut are tight-
en to the recommended torque.
On approved studded tracks, replace
broken or damaged studs immediately. If your track shows signs of deterioration, it must be replaced immediately. When in doubt, ask your dealer.
Always proceed with a visual inspection of your track before each use.
WARNING
Riding with a damaged track or
studs could lead to loss of control,
resulting in a risk of serious injury
or death.
___________
26
SAFETY INFORMATION
___________

LOCATION OF THE IMPORTANT LABELS
Safety standards for snowmobiles
have been adopted by the Snowmobile Safety and Certification Committee (SSCC) of which BRP is a proud
participating member. Assurance that
your snowmobile meets these standards is easily checked by locating the
Certification Label on a right vertical
portion of the vehicle.
This label shows that an independent
testing laboratory has verified compliance with the SSCC safety standards.
mmo2008-003-015_c
PRINTED IN U.S.A.
CERTIFIED
CERTIFIÉ
THIS MODEL HAS BEEN
EVALUATED BY AN INDEPENDENT TESTING LABORATORY AND IT MEETS ALL
SSCC SAFETY STANDARDS
IN EFFECT ON THE DATE OF
ITS MANUFACTURE.
SPONSORED BY THE SNOWMOBILE SAFETY AND CERTIFICATION COMMITTEE, INC.
CE MODÈLE A ÉTÉ ÉVALUÉ
PAR UN LABORATOIRE
D'ESSAIS INDÉPENDANT
ET SATISFAIT TOUTES LES
NORMES DE SÉCURITÉ DU
SSCC EN VIGUEUR À LA
DATE DE FABRICATION.
PARRAINÉ PAR LE COMITÉ DE
SÉCURITÉ DE CERTIFICATION
DE LA MOTONEIGE, INC.
A00A1MA
Other important labels on the vehicle
are WARNING or CAUTION labels relating to safety, maintenance and/or
snowmobile operation. Ensure all
such labeling is retained on the vehicle and its content is followed by
vehicle operator and passenger.
If missing or damaged, the decals can
be replaced free of charge. See an
authorized SKI-DOO dealer.
Please read the following instructions
carefully before operating this snowmobile.
mmo2008-003-067_a
mmo2008-003-068_a
mmo2008-003-064_a
____________
mmo2008-003-017_b
SAFETY INFORMATION
___________
27

mmo2007-009-051
Instruction 2
Instruction 3
mmo2008-003-065_a
mmo2008-003-069_a
Read and understand all warning labels and
operators guide before operation. Operator's
guide is located in the under seat base. Pull
latch located under front lip of seat and slide it
to the rear to have access. If guide is missing,
ask your dealer for a new one.
Get familiar with your vehicle. Inexperienced
riders may overlook risks and be surprised by
vehicles specific behavior and terrain
conditions.Ride slowly.
Excessive speed and reckless driving can kill !
ALWAYS adjust your speed according to snow
conditions and circumstances.
Steering control and braking ability may be
reduced on hard-pack snow, ice or roads.
Reduce speed & allow more space to stop
or turn.
Respect laws on minimum operator age.
Manufacturer recommends a minimum
operating age of 16 years old.
Never open side panels or hood while engine
is running or if vehicle is in motion. Ensure to
remove DESS key before opening those.
BEFORE STARTING :
1. Attach tether cord to your clothing.
2. Check proper operation of the throttle and
brake levers each time before starting.
They must return to their initial position
when released.
3. Apply parking brake.
4. Turn handlebars all the way in both
directions
insure free operation.
AFTER STARTING :
1. Pull-out tether cord to check if engine
shuts off.
2. Re-start and push in engine cut-off switch
to check if engine shuts off.
3.
Disengage parking brake before riding to
avoid fading.
This guard must ALWAYS be in place when engine is running.
WARNING
Beware of rotating parts _ they could cause injuries or
catch your clothing.
AVERTISSEMENT
Ce garde-courroie doit TOUJOURS être en place lorsque le
moteur fonctionne. Attention aux pièces en rotation _ elles
peuvent vous blesser ou capter vos vêtements.
516 002 670
A33A2FA
Instruction 4
Beware of HOT parts!
Instruction 1
Attention aux pièces CHAUDES!
516002664
A33A2GA
Instruction 5
to check for interference and
mmo2008-003-007
mmo2007-009-050_en
___________
28
SAFETY INFORMATION
___________
 Loading...