


model
V.I.N.
purchase date _
warranty expiry date
To be completed by dealer at time of sale
DEALER IMPRINT AREA
MOTO-SKI
FUTURA
SPIRIT
NUVIK
MIRAGE
SUPER SONIC
ULTRA SONIC
TECHNICAL PUBLICATION
AFTER SALES SERVICE
BOMBARDIER
L1MITEE
VALCOURT, QUEBEC
CANADA,
J02 2LO
The following are trademarks of Bombardier Lirnitee.
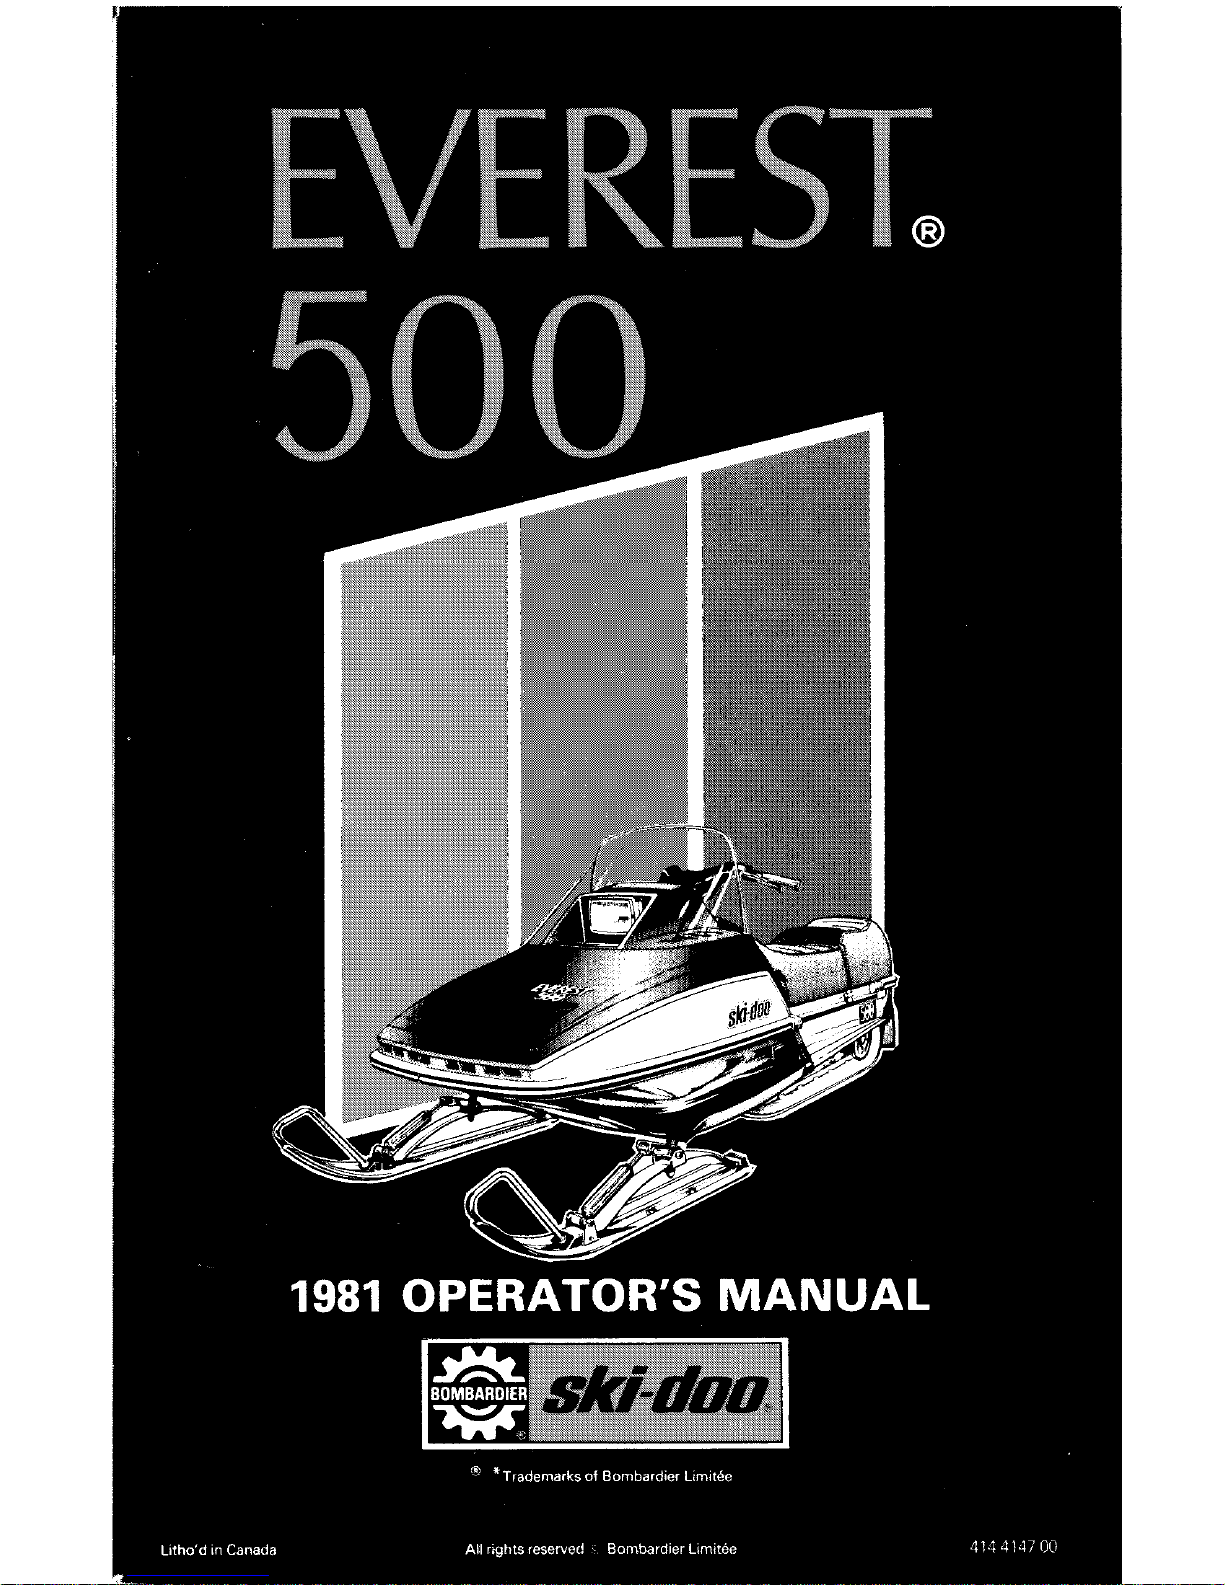
BOMBARDIER EVEREST
SKI-DOO CITATION
ALPINE OLYMPIQUE
BLIZZARD
T'NT
CARRY-BOOSE
ELAN
ELITE
GRAND PRIX SPECIAL
.10
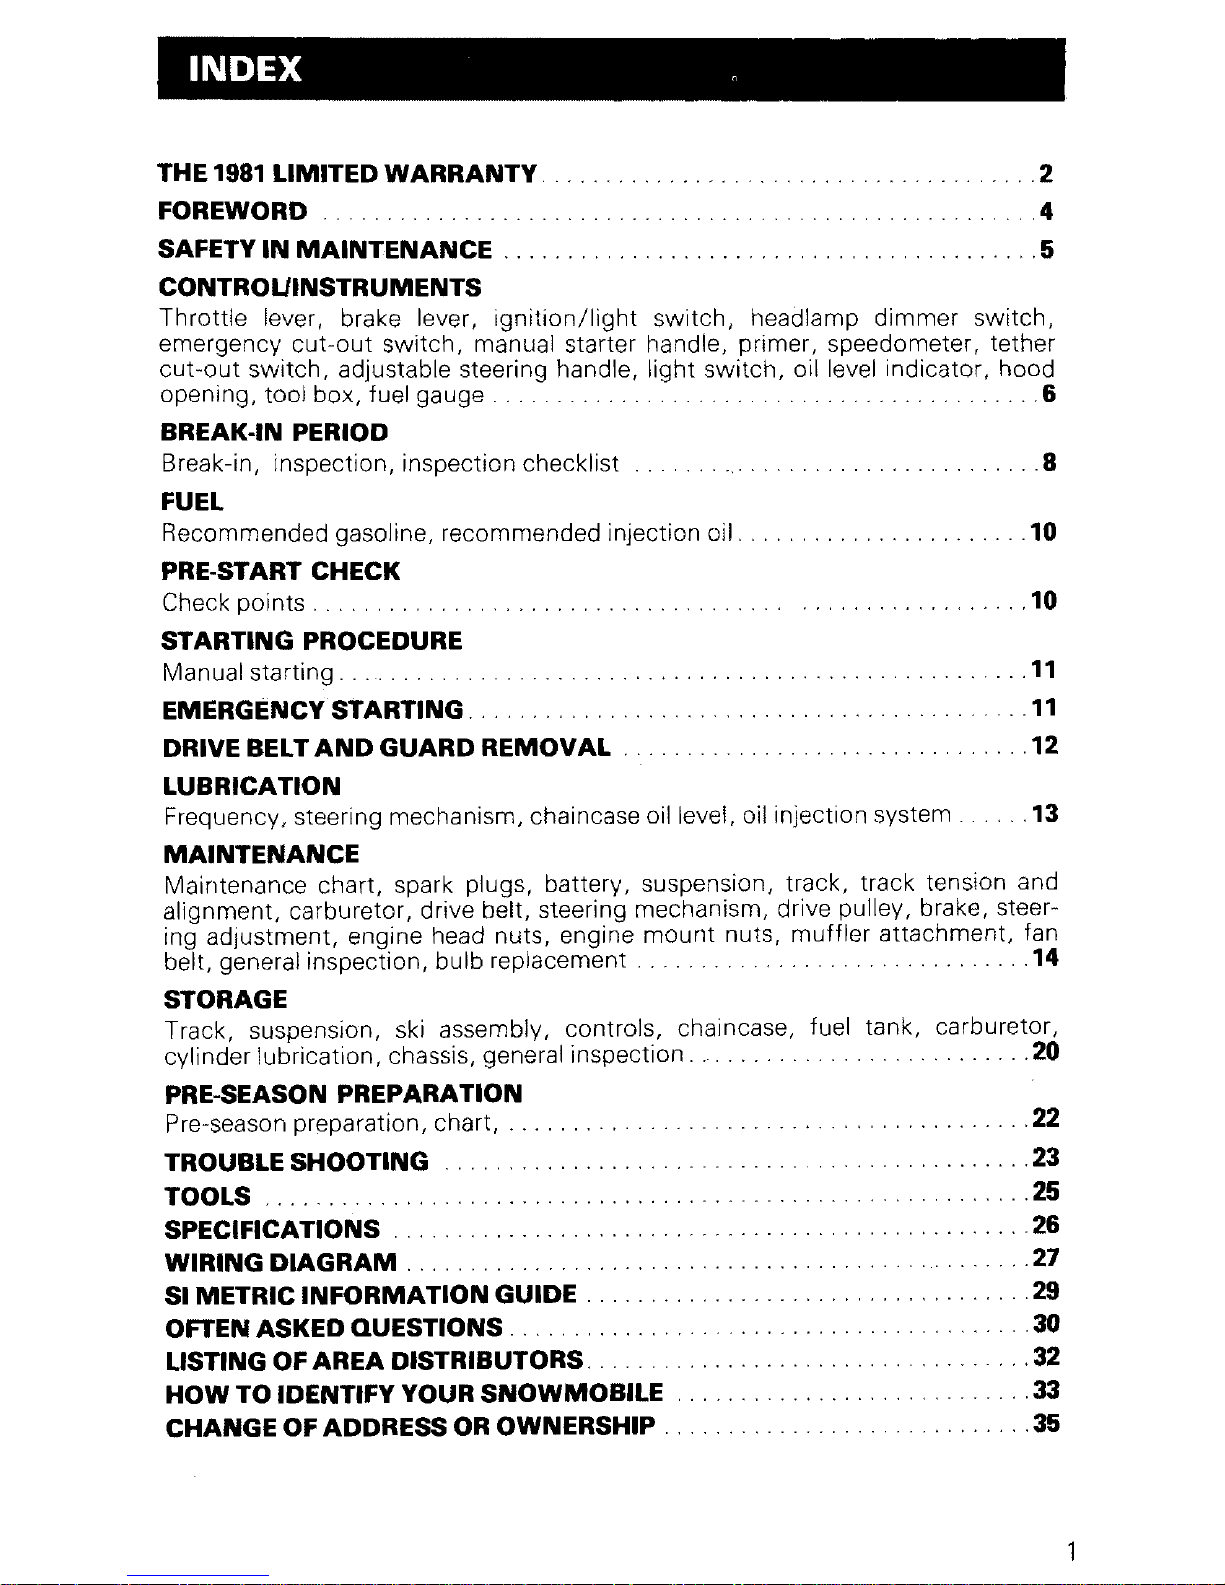
INDEX
0
THE 1981LIMITED WARRANTY.
..
. 2
FOREWORD 4
SAFETY IN MAINTENANCE ,.. , , ,
5
CONTROUINSTRUMENTS
Throttle lever, brake lever,
ignition/light
switch, headlamp dimmer switch,
emergency
cut-out
switch, manual starter handle, primer, speedometer, tether
cut-out
switch, adjustable steering handle, light switch, oil level indicator, hood
opening, tool box, fuel
gauge.
. . . . . . . .. . . . . . . . . . . .. . . . . . . . . . . .. . 6
BREAK-IN PERIOD
Break-in, inspection, inspection checklist 8
FUEL
Recommended gasoline, recommended injection oil. . . . . . . . . . . . . . . . . . . .. .10
PRE-START CHECK
Check
points.
. .
STARTING PROCEDURE
Manual
starting..
. . . . . . . .. . . . . . . . . . . .. . . . . . . . . . . . . 11
EMERGENCY STARTING. . . . .. . . . ... . 11
DRIVE BELT
AND
GUARD REMOVAL . . . . .. . . .. . . ... . . .. . . .. .. . 12
LUBRICATION
Frequency, steering mechanism, chaincase oil level, oil injection system . . .13
MAINTENANCE
Maintenance chart, spark plugs, battery, suspension, track, track tension and
alignment, carburetor, drive belt, steering mechanism, drive pulley, brake, steer-
ing adjustment, engine head nuts, engine
mount
nuts, muffler attachment, fan
belt, general inspection, bulb replacement . .
..
. 14
STORAGE
Track, suspension, ski assembly, controls, chaincase. fuel tank, carburetor,
cylinder lubrication, chassis, general inspection. .
20
PRE-SEASON PREPARATION
Pre-season preparation, chart, , 22
TROUBLE SHOOTING . 23
TOOLS....
. 25
SPECIFICATIONS 26
WIRING
DIAGRAM.
... . . .. . . . .. . . . .. . .. . .. . 27
SI METRIC INFORMATION
GUIDE.
. ... . . .. . . .. . . 29
OFTEN ASKED
QUESTIONS..
. 30
LISTING OFAREA DISTRIBUTORS. . .. . . .. . . .. . . . .. .. . . 32
HOW
TO IDENTIFY YOUR SNOWMOBILE . . . .. . . .. . . . . .. . . .. .. . 33
CHANGE OF ADDRESS OR OWNERSHIP , 35
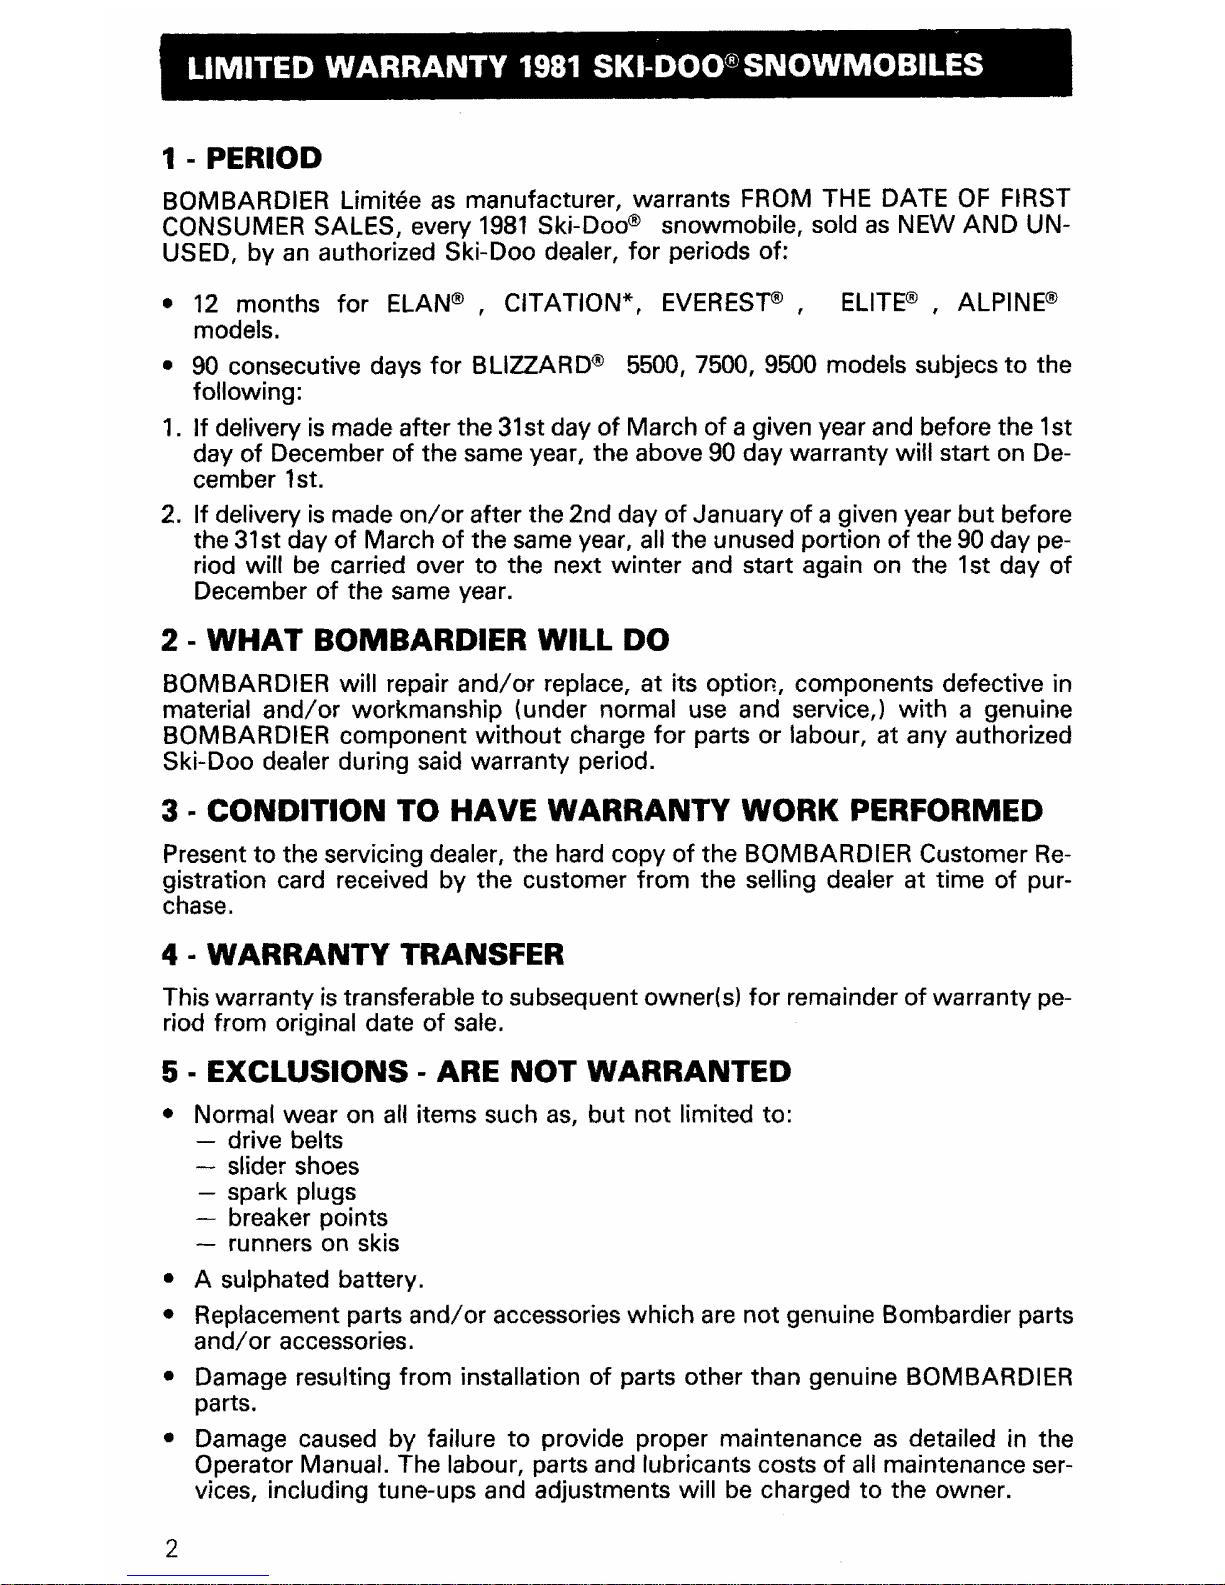
LIMITED WARRANTY
1981
SKI..DOO®SNOWMOBILES
1 - PERIOD
BOMBARDIER Lirnitee as manufacturer, warrants FROM THE DATE OF FIRST
CONSUMER SALES, every
1981
Ski-Doo® snowmobile, sold as NEW AND UN-
USED, by an authorized Ski-Doo dealer,
for
periods of:
• 12 months
for
ELAN® , CITATION*, EVEREST®, ELlTE®,
ALPINE®
models.
• 90 consecutive days for BLiZZARD® 5500,7500, 9500 models subjecsto the
following:
1. If delivery is made afterthe
31
st day of March of a given year and before the 1st
day of December of the same year, the above 90 day warranty will start on December 1st.
2. If delivery is made
on/or
after the 2nd day of January of a given year but before
the 31st day of March of the same year, all the unused portion of the 90day period will be carried over to the next winter and start again on the 1st day of
December of the same year.
2 -
WHAT
BOMBARDIER WILL DO
BOMBARDIER will repair
and/or
replace, at its option, components defective in
material
and/or
workmanship (under normal use and service.)
with
a genuine
BOMBARDIER component
without
charge for parts or labour, at any authorized
Ski-Doo dealer during said warranty period.
3·
CONDITION TO HAVE WARRANTY WORK PERFORMED
Presentto the servicing dealer, the hard copy of the BOMBARDIER Customer Registration card received by the customer from the selling dealer at time of purchase.
4 - WARRANTY TRANSFER
This warranty istransferable to subsequent owner(s) for remainder of warranty period from original date of sale.
5 • EXCLUSIONS
..
ARE NOT WARRANTED
• Normal wear on all items such as,
but
not limited to:
- drive belts
- slider shoes
- spark plugs
breaker points
- runners on skis
• A sulphated battery.
• Replacement parts
and/or
accessorieswhich are not genuine Bombardier parts
and/or
accessories.
• Damage resulting from installation of parts other than genuine BOMBARDIER
parts.
• Damage caused by failure to provide proper maintenance as detailed in the
Operator Manual. The labour, parts and lubricants costs of all maintenance ser-
vices, including tune-ups and adjustments will be charged to the owner.
2
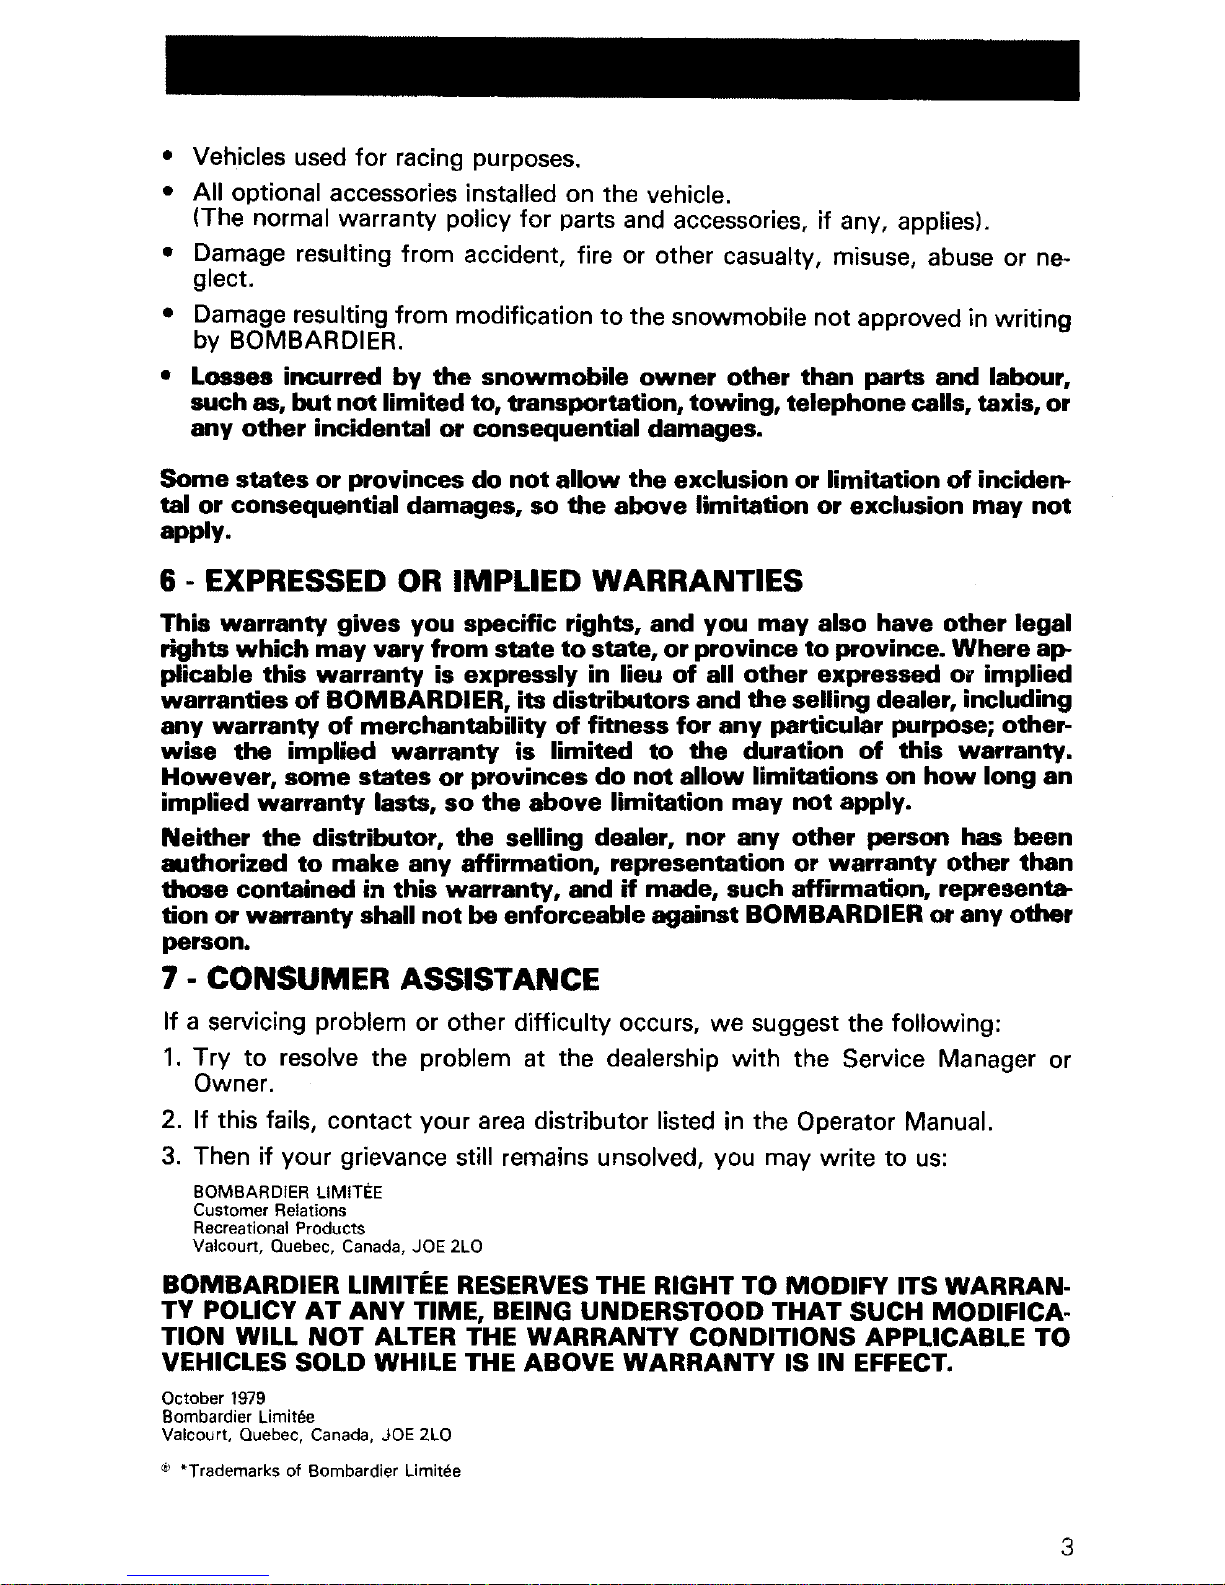
• Vehicles used
for
racing purposes.
• All optional accessories installed on the vehicle.
(The normal warranty policy
for
parts and accessories, if any, applies).
• Damage resulting from accident, fire or other casualty, misuse, abuse or neglect.
• Damage resulting from modification to the snowmobile
not
approved in writing
by BOMBARDIER.
• Losses
incurred
by
the
snowmobile
owner
other
than
parts
and
labour,
such
as,
but
not
limited
to,
transportation,
towing,
telephone
calls, taxis,
or
any
other
incidental
or
consequential damages.
Some
statesorprovinces
do
not
allow
the
exclusionorlimitation
of
inciden-
tal
or
consequential
damages, so
the
above
limitation
or
exclusion
may
not
apply.
I - EXPRESSED OR IMPLIED WARRANTIES
This
warranty
gives
you
specific
rights,
and
you
may
also
have
other
legal
rights
which
may
vary
from
statetostate,orprovincetoprovince.
Where
ap-
plicable
this
warranty
is
expressly
in lieu
of
all
other
expressed
or
implied
warranties
of
BOMBARDIER,
its
distributors
and
the
selling
dealer,
including
any
warranty
of
merchantability
of
fitness
for
any
particular
purpose; other-
wise
the
implied
warranty
is
limited
to
the
duration
of
this
warranty.
However,
some
statesorprovinces
do
not
allow
limitations
on
how
long
an
implied
warranty
lasts,
so
the
above
limitation
may
not
apply.
Neither
the
distributor,
the
selling
dealer,
nor
any
other
person
has
been
authorized
to
make
any
affirmation,
representation
or
warranty
other
than
those
contained
in
this
warranty,
andifmade,
such
affirmation,
representa-
tionorwarranty
shall
not
be
enforceable
against
BOMBARDIERorany
other
person.
7·
CONSUMER ASSISTANCE
If a servicing problem or other difficulty occurs, we suggest the following:
1. Try to resolve the problem at the dealership
with
the Service Manager or
Owner.
2. If this fails, contact your area distributor listed in the Operator Manual.
3. Then if your grievance
still remains unsolved, you may write to us:
BOMBARDIER
llMITEE
Customer Relations
Recreational Products
Valcourt, Quebec, Canada, JOE 2LO
BOMBARDIER
LIMITEE RESERVESTHE RIGHT TO
MODIFY
ITS
WARRAN-
TY POLICY
AT
ANY
TIME,
BEING UNDERSTOOD
THAT
SUCH
MODIFICA-
TION
WILL
NOT
ALTER THE
WARRANTY
CONDITIONS
APPLICABLE TO
VEHICLES SOLD WHILE THE
ABOVE
WARRANTY
IS IN EFFECT.
October 1979
Bombardier Limitae
Valcourt, Quebec, Canada, JOE 2LO
® "Trademarks of Bombardier Lirnitee
3
FOREWORD
The operator manual and the Snowmobile Safety handbook have been
prepared to acquaint the owner / operator of a new snowmobile with the various vehicle controls, maintenance and
safe operating instructions. Each is indispensable for the proper use of the
product
and should be kept with the
vehicle at all times.
Should you have any questions pertaining to the warranty and its application, please consult the
"Often
Asked
Question" section of this manual
I or
your selling dealer.
4
This manual uses the following symbols.
....
WARNING:
Identifies-en lnstruc-
~
tion which, if not followed, could
cause personal injury.
...
CAUTION: Denotes an instruc-
• tion which, if not followed, could
severely damage vehicle components.
O
NOTE: Indicates- supplementary
information needed to fu!ly com-
plete an instruction.
Although the mere reading of such
information does not eliminate the hazard, your understanding of the information will promote its correct use.

SAFETY
IN
MAINTENANCE
Observe the following
pr~.,;tions:
• Throttle mechanism should be
checked
'f'or
treernovement
before
startinq engine..
• Engine should be running only when
pUII~y
guard is secured in
.pla?~.
!_
~,el'e_r!u,nengine
without
drive belt
installed_.Running an unloaded engine can prove to be dangerous.
- • Never run engine when the track of
- - .the.vehicle is raised
off
the ground.
• It can be dangerous to run
engine
withthe
cab"
removed.
• Gasoline is flammable and explosive
'under certain conditions. Always
manipulate in a well ventilated area.
Do not smoke or allow open flames
or sparks in the vicinity. If gasoline
fumes are noticed while drivinq.rths
cause should be determined and
corrected without'delay.
• Maintain your vehicle in top mechanical condition,
at all times.
• Your snowmobile is not designed to
be driven
or
operated on black top,
bare earth,
or
oiher
abrasive surfaces. On such surfaces abnormal
and excessive wear of critical parts
is inevitable.
.,
• Installation of other than standard
equipment, including ski-spreaders,
bumpers, pack
racks,
etc"
could
severely affect the stability
arid safety of your vehicle. Avoid adding on
accessories that alter the basic vehicle configuration.
• The snowmobile engine can be
stopped
by activating the emergen-
cy
cut-out
switch,
tether
switch
or
~y
turning
off
the key.
• Whenever the vehicle is parked outdoors, overnight or for a long
period, it is suggested to protect it
against the inclemency of the
wheather with a
snowmobilecover.
• Do not lubricate throttle
and/or
brake cables and housings.
Please read and understand all other
warnings contained elsewhere.
THIS
MANUAL
SHOULD REMAIN WITH THE VEHICLE AT
TltE
,TIME,OF,RESALE.
'-,
5

CONTROLS/INSTRUMENTS
AJ Throttle Control Lever
B) Brake Control Lever
CJ
Ignition/Light
Switch
DJ
Head/amp
Dimmer
Switch
EJ
High Beam Indicator
F) Emergency Cut-Out
Switch
G) Manual Starter Handle
HJ
Primer
/) Speedometer
J) Tether Cut-Out Switch
KJ
Adjustable steering handle
U
Light
switch (Electric Model)
MJ Oil Level Indicator
A) Throttle Lever
Located on right side of handlebar,
When compressed, it controls the
en-
gine speed
and the engagement of the
transmission.
When released,
returns to
idle.
B) Brake Control Lever
Located on the left side of handlebar.
When compressed
I the brake is
plied. When it
returns to its original
"',,",C"T,r\Y,
effect is proportionate to the pressure
applied on the lever.
O
NOTE: On electric start models
('tllrYlnrnC:Clrlf1
the brake lever
will light up the oil indicator bulb.
If bulb does
not
up, replace
with
a
new one.
6
C) Ignition/Light
Switch
(Manual Start Models)
OFF
f1i':\--ON
~-"TEST"
3 switch. To
turn key clockwise to
ON .
To stop engine, turn key
counter-clockwise to OFF
The lights are automatically ON
when-
ever the engine is running.
To test oil level indicator bulb,
with
engine running, turn key to test position.
If bulb does
not
(Electric
Start
Models)
OFF
f1i':\_ON
\..9-
START
Key operated, 3 position switch. To
start engine, turn key fully clockwise to
START
position and hold. Return
to ON position
immediately when en-
gine has started.
To stop engine, turn
key counter-clockwise to OFFposition.

D) Headlamp Dimmer
Switch
Located on left side of handlebar, flick
switch to high or
low
beam.
E) High Beam Indicator
Lights up when headlamp is on high
beam.
A Emergency Cut-Out Switch
A 3 position switch located on the right
side of the handlebar. To stop the engine in an emergency, flick the lever to
either upper or lower
"OFF'
position.
To start engine, lever must be
in mid-
dle
"ON"
position.
The driver of this vehicle should
familiarize himself
with
the function of
this device by using it several
times on
first outing, thereby being mentally
prepared for emergency situations requiring its use.
•
WARNING:
If the switch has
been used in an emergency situation the source of malfunction should
be determined and corrected before restarting the engine.
G) Manual Starter Handle
Auto
rewind type located on right hand
side of vehicle. To engage mechanism,
pull handle.
H) Primer
A push-pull button. Pull and push but-
ton (2-3 times) to activate primer. The
primer should always be used for cold
engine starts.
After
engine is warm
however, it is not necessary to use
primer when starting.
I) Speedometer
The speedometer is linked directly to
the drive axle. Direct-reading dial indi-
cates the speed of the vehicle. Odometer records the total number of dis-
tance travelled.
J)
Tether Cut-Out Switch
Attach tether cord to wrist or other
convenient location then snap tether
cut-out
cap over receptacle before
starting engine.
If emergency engine
"shut-off" is re-
quired completely pull cap from safety
switch and engine power will be autornaticaIly shut
fI
off"
.
O
NOTE: The cap must be installed
on the safety switch at all times
in order to the vehicle.
...
WARNING:
If the switch is used
"y
in an emergency situation the
source of malfunction should be determined and corrected before restarting
engine.
K) Adjustable steering handle
Loosen the four retainer screws.
Adjust the steering handle to the de-
sired position.
Lock the steering handle in place by
tightening the four (4) screws to
26
N.m
(19ft-lbs).
•
WARNING:
Do not adjust the
handlebar to high to avoid interference when turning, between the
brake lever and windshield.
L) Light
Switch
A push purl switch type, to illuminate
headlamp and taillight, pull switch
knob. (Ignition switch must be turned
to ON
position).
M} Oil Level Indicator
Will light up when injection oil level is
low. Check level and replenish as soon
as possible.
~
CAUTION: Do not run engine out
Y of oil. Serious engine damage will
occur.
To test oil level indicator bulb: on man-
ual start models, turn ignition key
(en-
gine running) to
"test"
position. On
electric start models, indicator light will
glow
each time brake lever is used. If
light does not glow, replace bulb.
7
Hood Opening
Pull down the latch to unhook the hood
from the anchor.
O
NOTE: Always lift hood gently up
until stopped by restraining
de-
vice.
•
WARNING: It is dangerous to
run an engine
with
the hood open
or removed. Personal injury could result.
...
CAUTION: Prior to re-securing
..
the hood latch, position the bottom edge of the hood into the hood
guide located on each side of the
frame.
ToolBox
Located under the hood. To gain ac-
cess, tilt hood.
Ideal location for spare
plugs, belt, rope, etc.
Fuel
Gauge
The fuel gauge is located on the left
side of the fuel tank. The gauge functions on the principle of communicating vessels, so the fuel level inside the
tank is directly related with the level indicated on the gauge.
+
WARNING: Never use a lite
match or open flame to check
fuel level.
8
BREAK-IN PERIOD
With Bombardier-Rotax snowmobile
engines, a break-in period
is required
before running the vehicle at full throttle. Engine's
manufacturer recommen-
dation is
10 to 15 operating hours. Dur-
ing this period, a richer mixture is
needed (i.e. 40 parts
of
gas for 1 part of
50/1 Bombardier oil). Maximum throt-
tle should not exceed
3/4,
however,
brief full acceleration and speed varia-
tions contribute to a good break-in.
Continued wide open throttle accelera-
tions, prolonged cruising speeds, and
lugging are detrimental during the
break-in period.
O
NOTE: A new drive belt requires
a break-in period of
15-25 km (10-
15
miles).
1O-Hour
Inspection
As with any precision piece of mechan-
ical equipement, we suggest that after
the first 10hours of operation or 30days
after the purchase, whichever comes
first,' your vehicle
be'
checked by your
dealer. This inspection will give you the
opportunity.to
.discuss the unanswered
questions you may
have encountered
during the first hours
of
operation.
Remember that it
is to remedy at
this
time than
to
allow the snowmobile
to operate until a possible failure occurs.
The 10 hours inspection is at the expense of the vehicle owner.

10·HOUR INSPECTION CHECK LIST
./
Engine timing
Fan belt tension
Spark plugs condition
.
Carburetor adjustment
Oil injection
pump
adjustment
Engine
head
nuts
Engine
mount
nuts
Muffler
attachment
Chaincase
oil level
Brake operation and lining condition
--~/
Ski alignment (runner condition)
Pulley alignment and drive belt condition
Track condition, tension and alignment
Lubrication (steering, suspension)
Electrical wiring (loose connections, stripped wires, damaged insula-
tionl,
tighten all loose bolts, nuts and linkage
Operation of lighting system (HI / LO beam, brake light, etc.I, testoperation of emergency
cut-out
switch, tether switch
We recommend that you have your dealer sign this inspection.
Date of 10
hourinspection
Dealer signature
9
FUEL
PRE-START CHECK
Recommended Gasoline
Use regular leaded gasoline available
from
ali service stations.
..,
CAUTION:
Never experiment
• with different fuel or fuel ratios.
Never use naphtha, methanol or similar
products.
O
NOTE: For the break-in period
only, 1 (16 oz) can of Bombardier
snowmobile oil should be added to the
first full fuel tank filling, at a 70/1 ratio.
This
will assure additional protection
during the initial break-in.
•
WARNING:
Never
"top
up" the
gas tank before placing the vehi-
cle in a warm area. At certain temper-
tures, gasoline will expand and ove-
flow.
Recommended Injection Oil
Use concentrated Bombardier
snow-
mobile oil available
from
your
dealer.
10
Check Points
•
Activate
the
throttle
control
lever
several times to
check
that
it
ates and
smoothly.
The
tie lever
must
return to idle
position
when
released.
• Check fuel level.
• Check
that
the skis and the track are
not
frozen to the
ground
or
snow
surface and
that
the
oper-
ates freely.
•
Activate
the brake
control
lever and
make sure the brake
fully
be-
fore the brake
control
lever touches
the handlebar grip.
• Verify
that
thepath
ahead of the vehicle is clear of and obstacles.
.....
WARNING:
Onlystartyoursnow-
T mobile once all components are
checked and functioning properly.
 Loading...