

Page 1
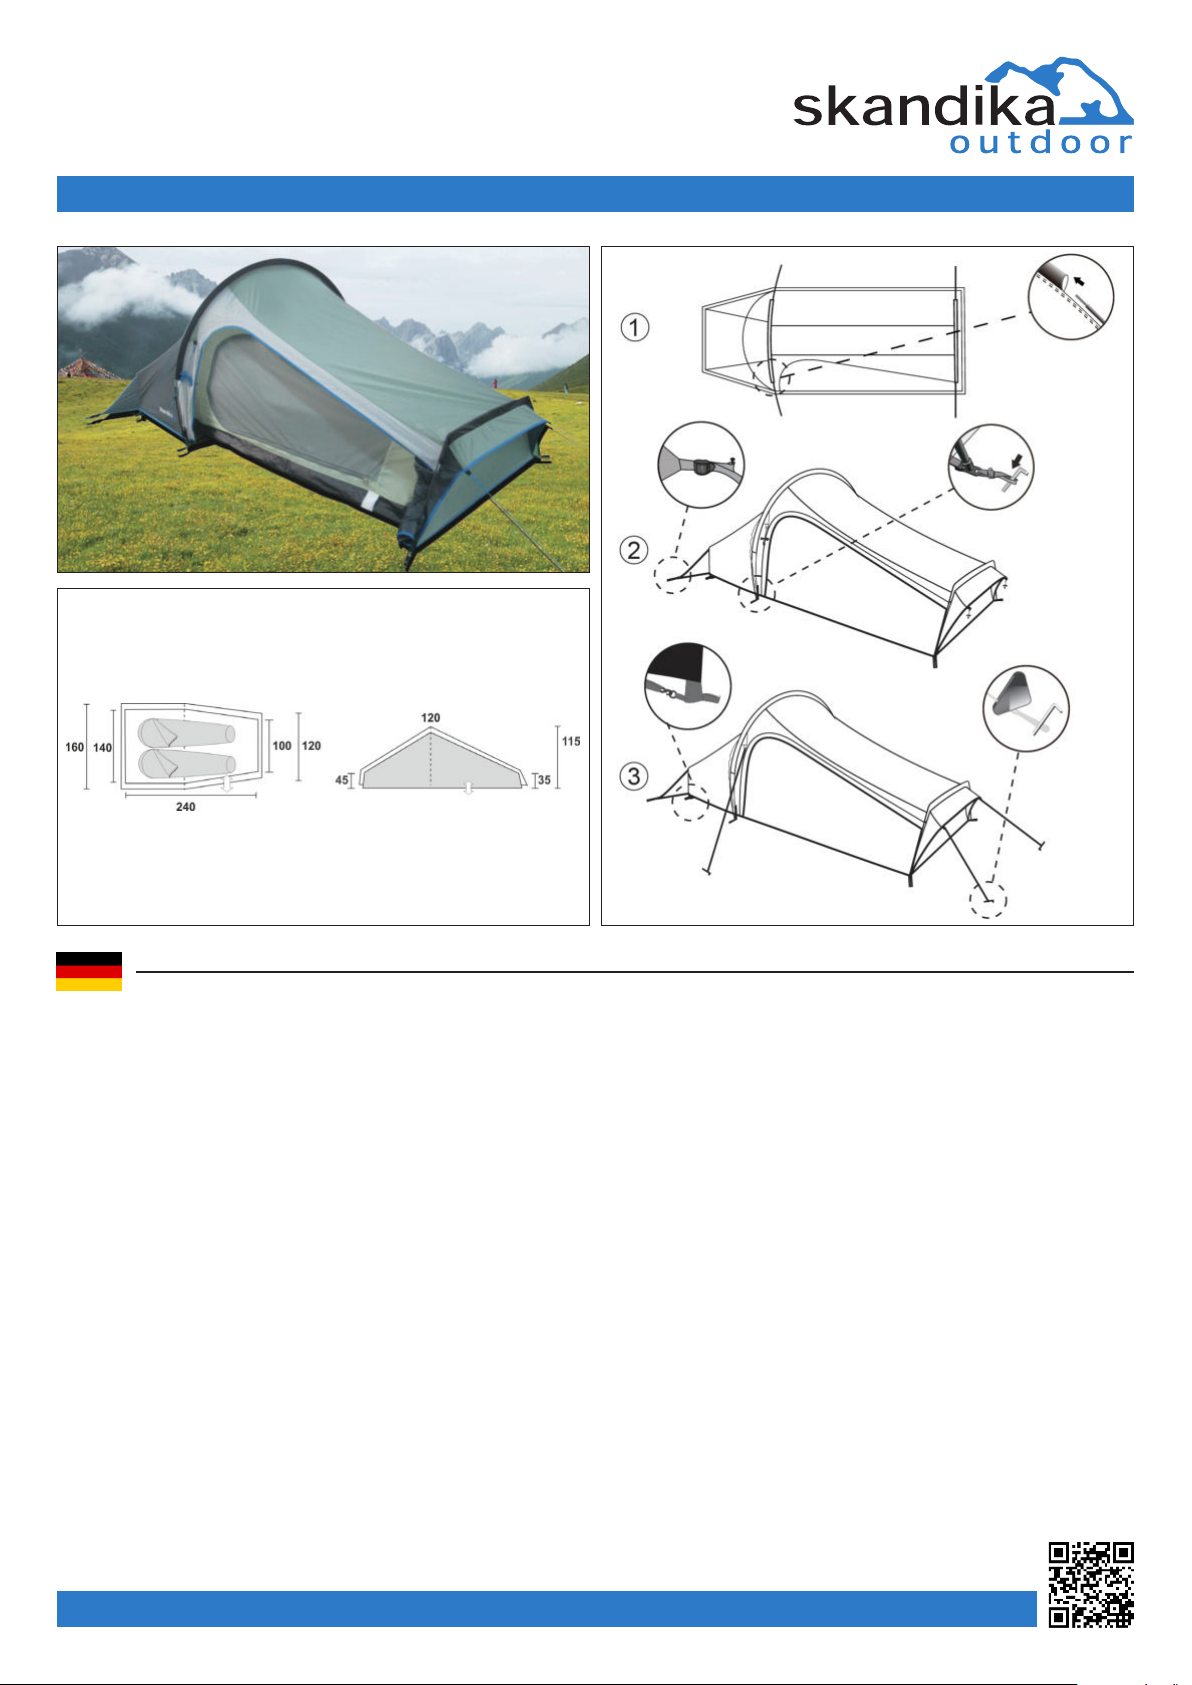
KALIX 2
ART.-NR. 3014
AUFBAUANLEITUNG · SET UP INSTRUCTION - INSTRUCTIONS DE MONTAGE
Wir freuen uns, dass Sie sich für ein Skandika-Zelt entschieden haben.
Es bietet Ihnen viel Platz und Komfort in bekannt hoher Skandika-Qualität.
Bauen Sie das Zelt sicherheitshalber vor dem Urlaub einmal zu Hause auf.
Aufbauanleitung
Bitte gehen Sie Punkt für Punkt vor, die Reihenfolge ist wichtig.
• Gestänge und Zubehör: Entfernen Sie den kompletten Inhalt aus der ZeltTasche.
• Stecken Sie alle Zeltstangen vorsichtig zusammen.
• Breiten Sie die Zeltbodenunterlage und das Außenzelt auf einem möglichst
glatten und sauberen Untergrund aus.
Außenzelt
• Breiten Sie das Außenzelt auf einen ebenen und sauberen Untergrund aus.
Achten Sie bitte darauf, dass sich keine spitzen Gegenstände (Steine, Aste,
usw.) unter dem Zelt benden.
• Schieben Sie die Gestänge durch die dafür vorgesehenen Gestängekanäle
am Außenzelt. Beachten Sie bitte die unterschiedlichen Längen der Gestängebögen. Die farblichen Markierungen am Gestänge, sowie am Gestängekanal dienen als Hilfe bei der Wahl des Gestängebogens für den entsprechenden
Gestängekanal.
• Nachdem alle Gestänge durchgeschoben worden sind, richten Sie das Zelt
bitte auf, indem Sie die Gestängeenden in die Ösen des Außenzeltes stecken.
• Nachdem Sie das Zelt aufgerichtet haben, xieren Sie es bitte mit den dazuge-
hörigen Heringen im Boden.
Innenzelte
• Hängen Sie jetzt die Innenzelte ein, indem Sie die Kunststoffstifte mit den
Kunststoffringen verbinden.
• Wenn die Innenzelte komplett eingehängt wurden, müssen Sie diese mit den
entsprechenden Heringen im Boden xieren, so dass Sie einen ebenen Schlafuntergrund vornden.
• Sie können nun die Stahlaufstellstangen für das Aufrichten des Einganges benutzen. Bitte achten Sie darauf, dass diese Stahlaufstellstangen sofort abgespannt werden müssen, da sie sonst keinen Halt haben.
• Zum Schluss müssen Sie noch die Abspannleinen nach Bedarf befestigen und
abspannen.
Achtung
Skandika-Zelte zeichnen sich durch einen leichten Aufbau aus. Empnden Sie
einen Aufbauschritt als schwergängig, wenden Sie keine Gewalt an, sondern ma-
chen Sie den Fehler ausndig.
Pege
• Das Zelt muss beim Aufbau und Zusammenfalten völlig trocken sein. Ansonsten besteht Verschimmelungs- und Verrottungsgefahr.
• Heringe und Nägel sollten immer getrennt von Außen- und Innenzelt verpackt
werden.
• Die Bodenwanne des Innenzeltes sollte vor dem Zusammenfalten gereinigt
werden.
• Schmutz an der Zeltwand entfernen Sie bitte ausschließlich mit einem weichen
Schwamm und klarem Wasser. Verwenden Sie keine Reinigungsmitte, da diese der Imprägnierung schaden können.
• Ziehen Sie Heringe und Nägel nicht an den Ringen bzw. Abspannleinen aus
dem Boden.
WWW.SKANDIKA.COM
Page 2
KALIX 2
ART.-NR. 3014
AUFBAUANLEITUNG · SET UP INSTRUCTION - INSTRUCTIONS DE MONTAGE
Thank you for choosing your new tent from the Skandika range. It provides
you with a lot of room and high level of comfort in the well-known superior
quality of Skandika.
Before you go on holiday with the new tent, please built it once.
Assembly instructions
Please follow these instructions point by point in the given order.
• Poles and components: Remove all contents from tent bag
• Extent all tent poles carefully. Do not let the shock cords snap the poles
together.
• Unfold inner tent and rain y and lay on ground
Rain Fly
• Each tent pole is colour coded to match a corresponding tent pole sleeve
to aid in assembling the tent
• Insert each pole into one sleeve of the y from one end to the other
• At the end of each tent pole, insert the metal pins (found along the bottom
edge of the rain y) into both ends of each tent pole
• The rain y is now standing up by itself, which can be secured by anchoring down with steel stakes at the PP webbings, located at the edges of
the y
• Tension of the y can be adjusted by the guy ropes and buckles on the PP
webbings joining both sides of the y
Inner tents
• Take the inner tents inside the assembled rain y to its appropriate location
• Starting from the rear of the inner tent, stake down the corners along the
bottom edge of the rain y
• Hook the inner tent to the underside of the rain y starting from the bottom
rear and work your way forward to the top using the toggles on the outer
wall of the inner tent and loops running along the underside of the rain y
• Repeat the above steps for the rest of the inner tents - you can leave
some of the inner tents out to increase the living or storage capacity and
to reduce the travel weight of the whole tent
Attention
Skandika tents are very easy to pitch. If one step of the assembly seems
difcult, don‘t use force, but locate the error.
Care
• When packing the tent make sure that it is completely dry, otherwise there
is a danger of mildew and rotting.
• Always pack poles and tent pegs separately from inner and outer tent.
• Prior to folding, clean the basement of the inner tent.
• Use a soft sponge and clear water only to clean the outer tent canvas.
Don‘t use any cleaning agent, for they may be harmful to the impregnation.
• Never pull tent pegs out by means of rings or tensioning ropes.
Nous nous réjouissons que vous ayez choisi une tente SKANDIKA. Ces
tentes offrent beaucoup d’espace et de confort et ceci en qualité supérieure
marque Skandika.
Pour ne pas courir de risques nous vous conseillons de faire un essai
de montage de la tente avant de partir en vacances.
Montage
Veuillez procéder point par point, l’ordre des différentes étapes est important.
• Système de tiges et accessoires: Veuillez sortir le contenu complet de la
tente du sac
• Assembler prudemment toutes les barres de tente
• Ètalez le tapis de sol de tente et le tapis de l’extérieur sur un sol lisse et
autant que possible propre
Tente extérieure
• Libérer l’emplacement prévu de tout objet pointu, déplier et étaler le tapis
de sol sur cette surface plate et propre, étendre la tente extérieure dessus. Trier et assembler les arceaux, introduire les
• Arceaux dans les fourreaux de la tente extérieure prévus à cet effet en
faisant glisser doucement le tissu sur l’arceau
• Courber les arceaux des montures et insérer les goupilles des points
d’ancrage dans les bouts creux de ces arceaux an de les mettre sous
tension
• Accrocher la toile de tente intérieure à la tente extérieure par les petits
crochets prévus à cet effet
• Une fois les arceaux tendus, xer les points d’ancrage dans le sol avec les
sardines et tendre les cordons d’ancrage
Tentes intérieures / Cabines
• Accrochez maintenant la tente à l‘intérieur, en liant les goupilles de matière plastique aux anneaux plastiques
• Si la tente à l‘intérieur est accrochées complètement, xez le au sol avec
les harengs correspondants
• Vous peuvez maintenant utiliser les barres d‘établissement sidérurgiques
pour redresser l‘entrée. Les barres d‘établissement sidérurgiques doivent
être enlevées immédiatement, puisqu‘ils n‘ont d‘ailleurs pas d‘arrêt
• Vous devez encore au besoin attacher les lignes d‘élimination
Attention
Les tentes Skandika sont très faciles à monter. En cas de difculté ne forcez
pas mais cherchez la raison possible et la solution à la difculté avant de
continuer.
Entretien
• Lors du démontage et pliage, prendre le temps de sécher chaque élément
an d’éviter toute moisissure et décomposition.
• Toujours ranger les pointes et sardines séparément des toiles intérieures
et extérieures.
• Nettoyer le fond de la tente intérieure avant de la plier.
• Nettoyer d’éventuelles salissures sur la tente à l’aide d’un linge doux et
de l’eau claire. Ne pas utiliser de détergent car ceci pourrait détériorer
l’enduction protectrice.
• Ne pas tirer sur les cordes d’ancrage pour extraire les sardines et pointes
du sol.
WWW.SKANDIKA.COM
 Loading...