

Page 1
1956
Casablanca
1
2 3 4
5 6 7
BRAUCHEN SIE HILFE?
Sehen Sie sich unsere Aufbau-Videos mit einer
visuellen Schritt-für-Schritt-Präsentation an,
die sie beim Aufbau begleiten.
www.skandika.com/zeltaufbau
Wenn Sie weitere Fragen haben, kontaktieren
Sie uns bitte unter [email protected]
NEED HELP?
See our set-up videos with a step by step
visual presentation to guide you along.
www.skandika.com/tentsetup
If you have any further questions, please
contact us at [email protected]
BESOIN D‘AIDE ?
Visionnez nos vidéos d‘installation avec une
présentation visuelle étape par étape pour vous
guider.
www.skandika.com/montagetente
Si vous avez d‘autres questions, n‘hésitez pas à
nous contacter à [email protected]
Page 2

1956
Casablanca
AUFBAU & PFLEGE SET UP & MAINTENANCE
Wir freuen uns, dass Sie sich für ein Skandika-Zelt
entschieden haben. Es bietet Ihnen viel Platz und
Komfort in bekannt hoher Skandika-Qualität.
Bauen Sie das Zelt sicherheitshalber vor dem Urlaub
einmal zu Hause auf.
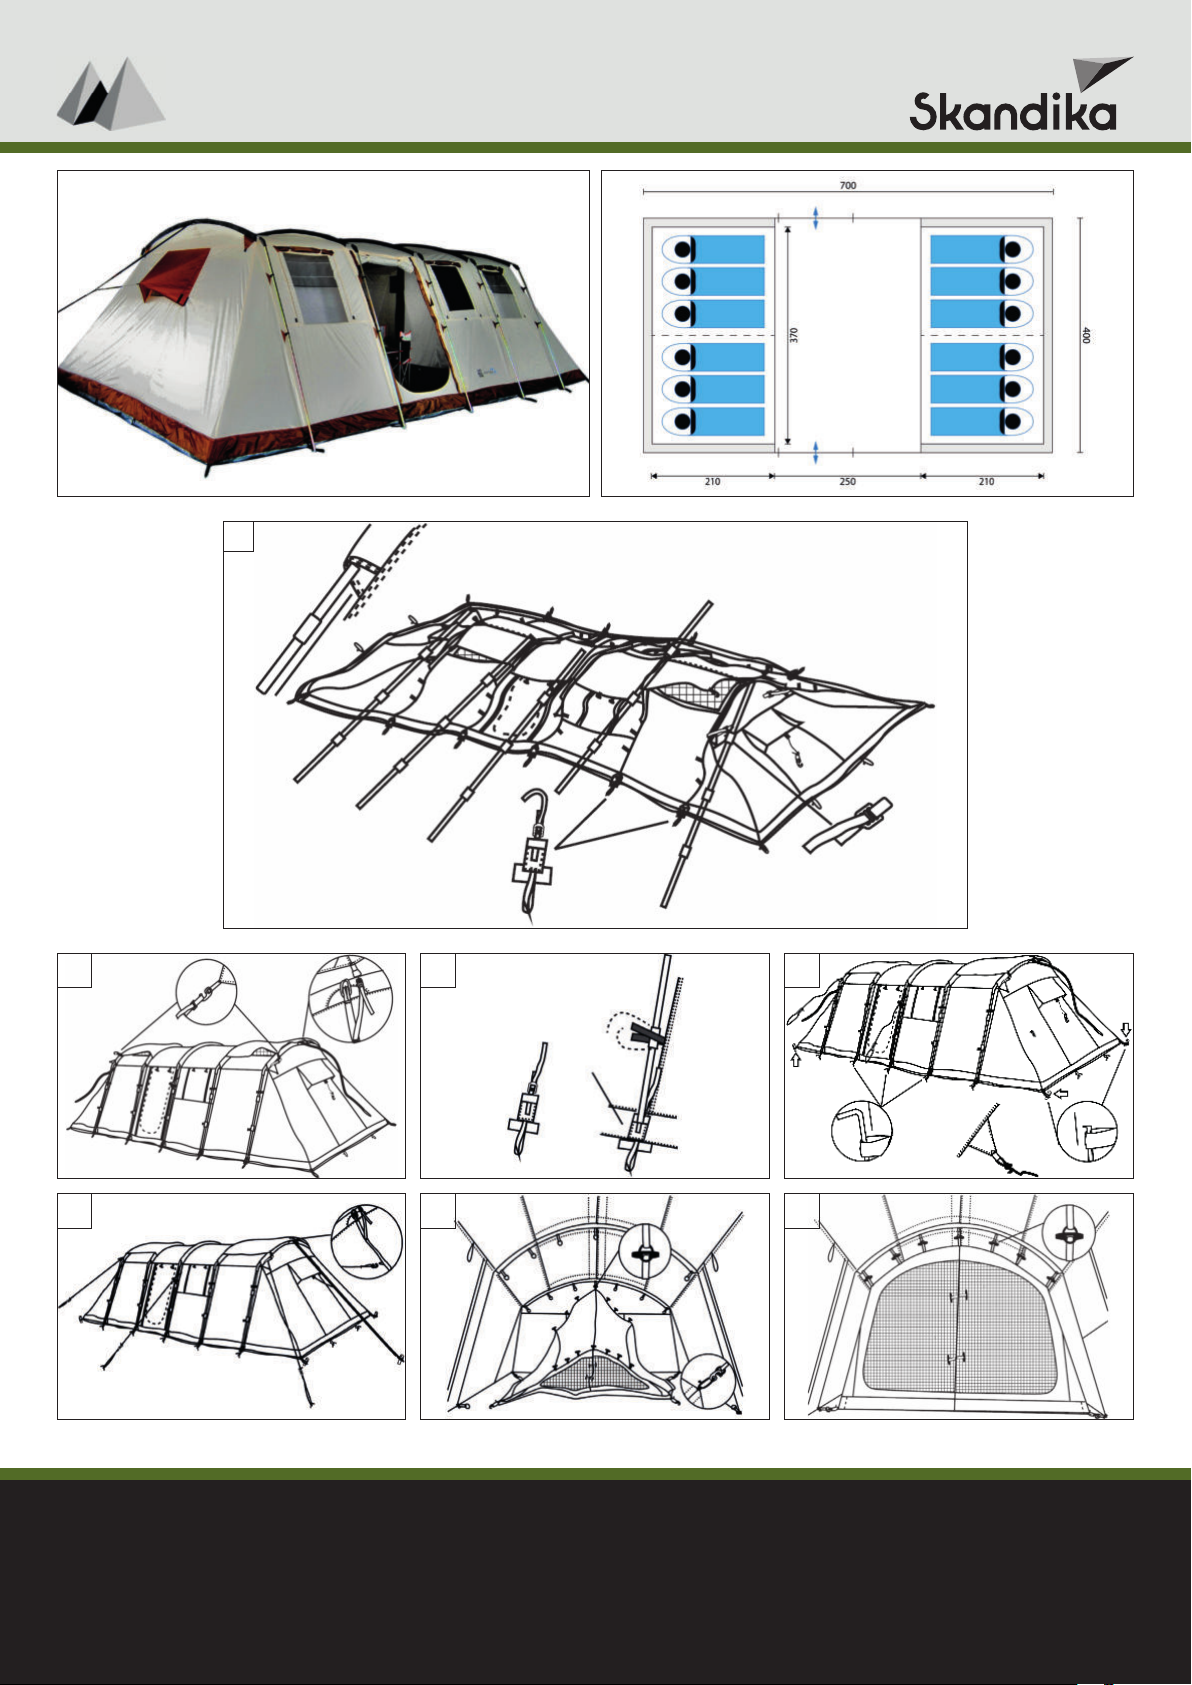
AUFBAUANLEITUNG
Bitte gehen Sie Punkt für Punkt vor, die Reihenfolge
ist wichtig.
1. a) Stecken Sie die Segmente der Stangen
zusammen. Achten Sie darauf, dass die
Segmente bis zum Anschlag jeweils fest
eingesteckt werden.
b) Führen Sie die Stangen in die jeweiligen
Stangenkanäle am Außenzelt.
2. a) Befestigen Sie oben links die Hutze, wie
abgebildet.
b) Befestigen Sie die Webbänder an den oberen
Kanten des Außenzeltes, wie abgebildet.
3. Führen Sie die Enden der Stangen in die dafür
vorgesehenen schwarzen Stangentaschen am
unteren Rand des Außenzeltes.
Spannen Sie die Taschen indem Sie die daran
befestigten Webbänder nach oben ziehen. Ihr
Zelt steht nun aufrecht.
4. Befestigen Sie das Außenzelt und die Abspannseile mit den mitgelieferten Nägeln und
Heringen.
5. a) Befestigen Sie die Hutzen an den Webbänder
an beiden Enden des Außenzeltes. Die Bänder
müssen dann gespannt und befestigt werden
mit den mitgelieferten Heringen.
b) Spannen Sie die Abspannseile mit Hilfe der
grauen Spannungsversteller.
6. Hängen Sie die Innenkabine ein. Sie wird mit
Knebeln/Ringen bzw. Haken/Schlaufen wie
abgebildet am Außenzelt befestigt.
WICHTIG
Wenn Sie Schwierigkeiten bei einem der Schritte haben, besuchen Sie bitte unsere Zeltaufbau-Video Seite, die Bilder und Tipps für jeden Schritt bereit hält.
Sollte noch etwas unklar sein, kontaktieren Sie uns
bitte unter [email protected].
PFLEGE
• Das Zelt muss beim Aufbau und Zusammenfalten
völlig trocken sein. Ansonsten besteht Verschimmelungs- und Verrottungsgefahr.
• Heringe und Nägel sollten immer getrennt von
Außen- und Innenzelt verpackt werden.
• Die Bodenwanne des Innenzeltes sollte vor dem
Zusammenfalten gereinigt werden.
• Schmutz an der Zeltwand entfernen Sie bitte
ausschließlich mit einem weichen Schwamm und
klarem Wasser. Verwenden Sie keine Reinigungsmitte, da diese der Imprägnierung schaden können.
• Ziehen Sie Heringe und Nägel nicht an den Ringen bzw. Abspannleinen aus dem Boden.
Thank you for choosing your new tent from the
Skandika range. It provides you with a lot of room
and high level of comfort in the well-known superior
quality of Skandika.
Before you go on holiday with the new tent, please
do a test set-up.
ASSEMBLY INSTRUCTIONS
Please follow these instructions point by point in the
given order.
1. a) Assemble the poles, making sure the sections
are pushed fi rmly into the connecting joints.
b) Insert the poles in the pole sleeves on the
outer fl ysheet.
2. a) Attach the hood on the top left corner, as
shown.
b) Attach the webbing straps to the top edges of
the outer fl ysheet, as shown.
3. Insert the ends of the poles in the black pole pockets on the bottom edge of the outer fl ysheet,
as shown. Tighten the pockets by pulling the
webbing straps upwards. Your tent now stands
upright.
4. Peg down the outer fl ysheet and the guy ropes
using the tent pegs and anchors included.
5. a) Attach the hoods to the webbing straps on
the top edges of the fl ysheet. The straps must
be tightened and pegged down with the tent
pegs included.
b) The guy ropes can be tightened using the grey
tension adjusters.
6. Hang the inner cabin into the tent. It is fi xed to
the outer fl ysheet by means of toggles/rings and
hooks/loops.
IMPORTANT
If you have diffi culty with any step, please visit our
tent set-up video page below which gives imagery and
tips for each step.
If anything is still not clear then please feel free to
contact us at [email protected].
CARE
• When packing the tent make sure that it is completely dry, otherwise there is a danger of mildew
and rotting.
• Always pack poles and tent pegs separately from
inner and outer tent.
• Prior to folding, clean the basement of the inner
tent.
• Use a soft sponge and clear water only to clean
the outer tent canvas. Don‘t use any cleaning
agent, for they may be harmful to the impregnation.
• Never pull tent pegs out by means of rings or tensioning ropes.
MONTAGE & ENTRETIEN
Nous nous réjouissons que vous ayez choisi une
tente SKANDIKA. Ces tentes off rent beaucoup
d’espace et de confort et ceci en qualité supérieure
marque Skandika.
Pour ne pas courir de risques nous vous conseillons
de faire un essai de montage de la tente avant de partir en vacances.
MONTAGE
Veuillez procéder point par point, l’ordre des diff érentes étapes est important.
1. a) Assemblez les arceaux en les connectant les
uns aux autres, segment par segment.
b) Faites glisser chaque arceau dans les
manchons correspondants. Répétez la même
opération pour les 4 autres manchons.
2. a) Attachez le toit de la tente au coin gauche
comme montré sur le dessin.
b) Arrimez la tente en fi xant les sangles
d´arrimage des deux côtés de la tente
extérieure.
3. Insérez les extrémités des arceaux dans les poches noires comme indiqué sur le dessin. Serrez
les poches en tirant les sangles vers le haut.
Votre tente est désormais montée.
4. Fixez la tente au sol à l´aide des cordes d´ancrage
et des sardines et cornières recues.
5. a) Fixez les protections de ventilations du toit sur
chaque côté de la tente extérieure à l´aide des
sangles. Les sangles doivent être tendues et
fi xées avec les cornières.
b) Ajustez et tendre les cordes d´ancrage en
s´aidant du régleur de tension gris.
6. Suspendre la cabine avec les crochets de fi xation
et l´accrocher à la tente extérieure.
IMPORTANT
Si vous avez des diffi cultés à n‘importe quelle étape,
veuillez consulter notre page vidéo de montage de
tente ci-dessous qui donne des images et des conseils
pour chaque étape. Si toutefois quelque chose n‘est
toujours pas clair, n‘hésitez pas à nous contacter à
[email protected].
ENTRETIEN
• Lors du démontage et pliage, prendre le temps de
sécher chaque élément afi n d’éviter toute moisissure et décomposition.
• Toujours ranger les pointes et sardines séparément des toiles intérieures et extérieures.
• Nettoyer le fond de la tente intérieure avant de
la plier.
• Nettoyer d’éventuelles salissures sur la tente à
l’aide d’un linge doux et de l’eau claire. Ne pas
utiliser de détergent car ceci pourrait détériorer
l’enduction protectrice.
• Ne pas tirer sur les cordes d’ancrage pour extraire
les sardines et pointes du sol.
BRAUCHEN SIE HILFE?
Sehen Sie sich unsere Aufbau-Videos mit einer
visuellen Schritt-für-Schritt-Präsentation an,
die sie beim Aufbau begleiten.
www.skandika.com/zeltaufbau
Wenn Sie weitere Fragen haben, kontaktieren
Sie uns bitte unter [email protected]
NEED HELP?
See our set-up videos with a step by step
visual presentation to guide you along.
www.skandika.com/tentsetup
If you have any further questions, please
contact us at [email protected]
BESOIN D‘AIDE ?
Visionnez nos vidéos d‘installation avec une
présentation visuelle étape par étape pour vous
guider.
www.skandika.com/montagetente
Si vous avez d‘autres questions, n‘hésitez pas à
nous contacter à [email protected]
 Loading...