

Page 1

INSTRUCTIONS AND CARE
Page 2

WATCH CARE
Skagen suggests the following solutions for cleaning metal and crystal surfaces:
3:1 solution of ammonia based window cleaner to water
4:1 solution of rubbing alcohol to water.
*Do not use soap products, soap will leave residue behind when dry.
These suggested solutions will evaporate cleanly from metal and glass surfaces.
To clean the case and crystal:
Moisten a soft cloth with one of the above solutions. Gently wipe the case and
crystal clean. Be careful not to put too much stress on the crystal as you clean. Avoid
immersing or soaking the case or crystal portion of the watch, regardless of water
resistance rating.
To clean the band or strap:
Metal: Dip a cotton swab into the above solution and gently rub it on the unclean
area of the band. For more intricate mesh bands, you may want to use a soft bristle
toothbrush or nailbrush. Be sure to cover the case of the watch during this process so
as not to soak it. For stubborn dirt, you may want to take your watch in to the nearest
Skagen location.
Silicon, Felt and Ceramic: Simply wipe the strap down with a damp, soft cloth. Avoid
soaps and solvents as they may damage the material.
Leather: Simply wipe it clean with a damp cloth, using water only. You may want to
use leather conditioner or a small amount of hand lotion to keep the leather supple
over time. Top grain leather may develop a milky “haze” if left alone for extended
periods. This can simply be wiped away or removed with leather conditioner. A
product called “nubuck eraser” can be used to remove light stains and debris from the
inside of the strap.
Page 3
1
2 3
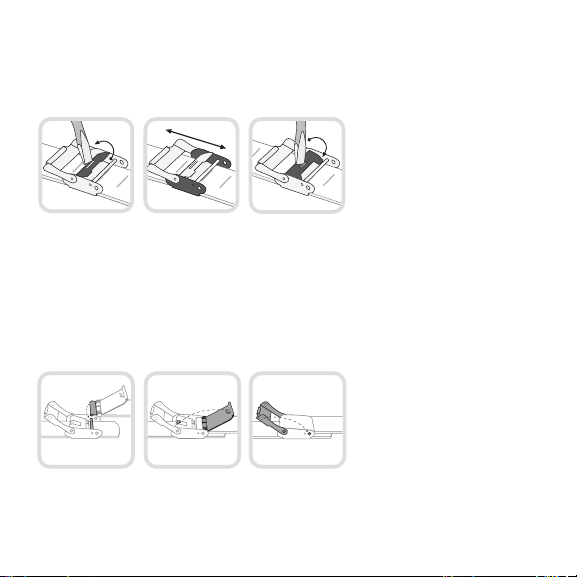
MESH BAND ADJUSTMENT
INSTRUCTIONS
1
TO ADJUST THE BAND: LIFT – SHIFT - PRESS
1. Position a athead screwdriver or other adjustment tool in the slot on the clasp.
Lift the bar in the direction facing away from the straight pin.
IMPORTANT: Ensure that the tool handle points toward the watch case.
Pressing the adjustment tool against the straight pin may bend and destroy the pin.
2. Shift the adjustable buckle to the desired position. Clasp must be placed in one of the
adjustment indentations on the back of the band.
3. Press the slotted clasp closed.
1 2 3
TO SECURE THE BAND: HOOK – SNAP - CLASP
Pull the hook over the pin, snap the at clasp closed, then close the
security clasp.
2 3
ShiftLift Press
SnapHook Clasp
Page 4
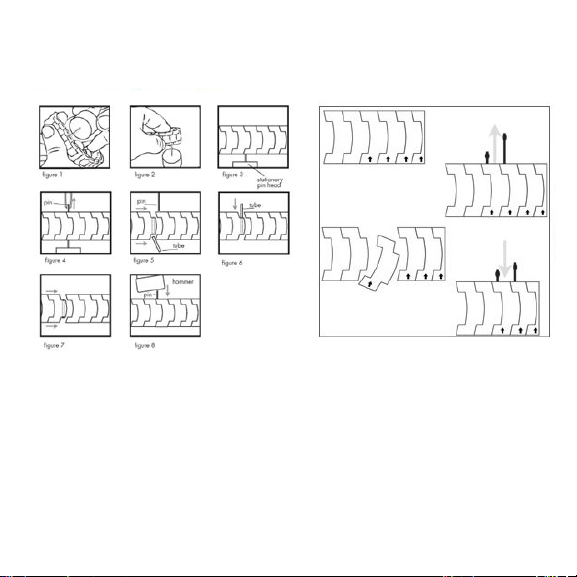
SIZING A LINK STRAP
Using a small pointed tool, insert tip into hole on underside of band and push the
pin out. Grasp the pin and pull out. Arrows on the band indicate the direction that
the links are to be removed. In order to remove one link, two pins must be removed.
If removing more than one link, remove an equal number of links from both sides to
keep the symmetry of the wrist band. After removing the necessary number of links,
tap the remaining pins back into places using a small hammer.
Page 5
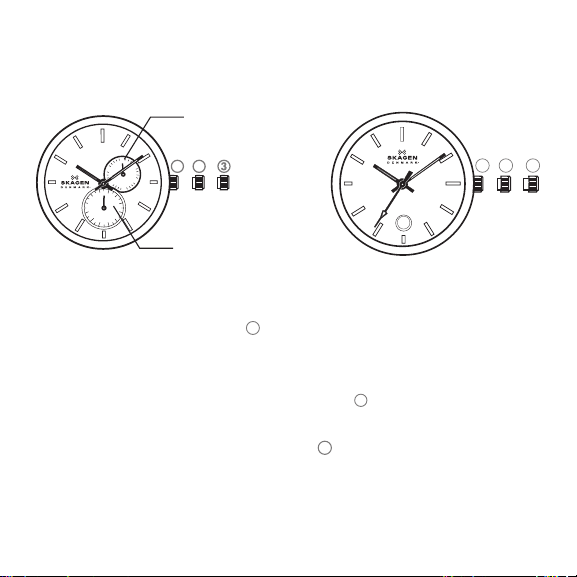
STANDARD DIAL INSTRUCTIONS
Date
31
5
25
20
60
55
5
50
45
40
25
35
30
1 2
0
1
15
10
15
20
Second Hand
A. Pull the crown out to the 2 position.
B. Rotate the crown to set the date.
(Either clock wise or counter-clockwise depending on the model)
C. Pull the crown out to the fully extended
3
position
and rotate to set the desired time.
D. Push the crown back to its normal
1
position
and the date and time are now set.
1 2 3
Page 6
MULTIFUNCTION
24 Hours
Day
Day
Date
•
S
U
N
T
•
A
S
M
•
O
I
N
R
F
•
•
T
U
S
E
R
S
U
H
•
T
W
E
D
•
•
0
2
•
8
1
•
6
1
•
1 2 3
•
•
3
1
•
1
1
9
•
2
•
3
7
5
•
2
•
7
•
5
2
9
•
•
3
1
1
2
•
•
1
1
2
2
•
•
9
1
1
3
7
1
•
1
4
•
5
1
•
•
•
•
2
4
2
2
2
•
4
•
6
•
8
•
1
0
•
1
4
2
1
1
3
•
•
•
S
U
N
T
•
A
S
M
•
O
I
N
R
F
•
•
T
U
S
E
R
S
U
H
•
T
W
E
D
•
24 Hours
Date
•
•
3
1
•
1
1
9
•
2
•
3
7
5
•
2
•
7
•
5
2
9
•
•
3
1
1
2
•
•
1
1
2
2
•
•
9
1
1
3
7
1
•
1
4
•
5
1
•
•
1 2 3
•
•
2
4
2
•
2
2
•
0
4
•
2
•
6
8
•
8
1
•
•
1
6
0
1
•
•
1
4
2
1
1
3
•
•
24 Hours
•
S
U
N
T
•
A
S
M
•
O
I
N
R
F
•
•
T
U
S
E
R
S
U
H
•
T
W
E
D
•
•
•
2
4
2
•
2
2
•
0
4
•
2
•
6
8
•
8
1
•
•
1
6
0
1
•
•
1
4
2
1
1
3
•
•
•
•
3
1
•
1
1
9
•
2
•
3
7
5
•
2
•
7
•
5
2
9
•
•
3
1
1
2
•
•
1
1
2
2
•
•
9
1
1
3
7
1
•
1
4
•
5
1
•
•
Date
A. Pull the crown out to the middle 2 and rotate crown to set
the date. (Either clockwise or counter-clockwise depending
on the model)
B. Pull the crown out to the fully extended
3
position and rotate
clockwise cycling through hours to set day. Then set time.
C. Push the crown back to its normal
1
position and the day,
date and time are now set.
Day
1 2 3
Page 7
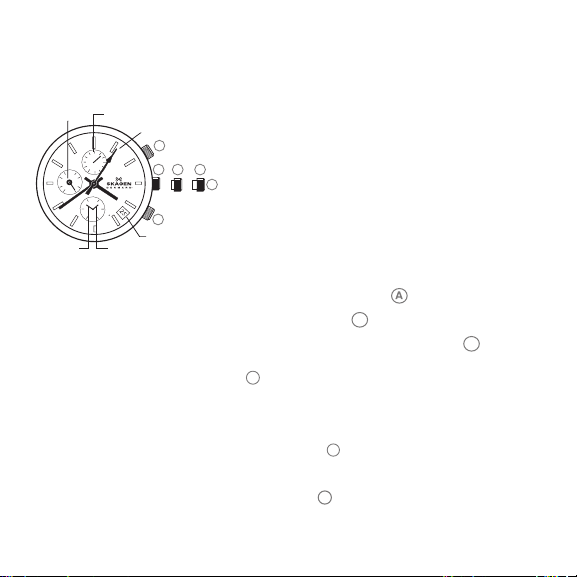
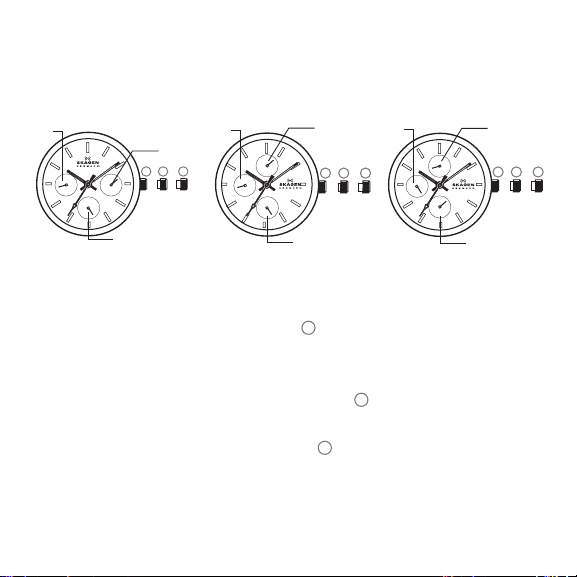
CHRONOGRAPH
Small
Second
Hand
1/20-Second Hand
Stopwatch Second Hand
A
Date
2 31
B
C
B
C
3
position and rotate
1
position and the date
60
15
45
SEC.
30
60
50
10
40
MIN.
20
30
Stopwatch
Minute Hand
Stopwatch
Hour Hand
1. Press down to start and stop the stopwatch.
2. Controls day, date and time functions.
3. Press down to stop, continue, and to reset stopwatch.
A. Pull the crown out to the 2 position and rotate crown to
set date. (Either clockwise or counter-clockwise depending
on the model)
B. Pull the crown out to fully extended
to set desired time.
C. Push the crown back to its normal
and time are now set.
Page 8
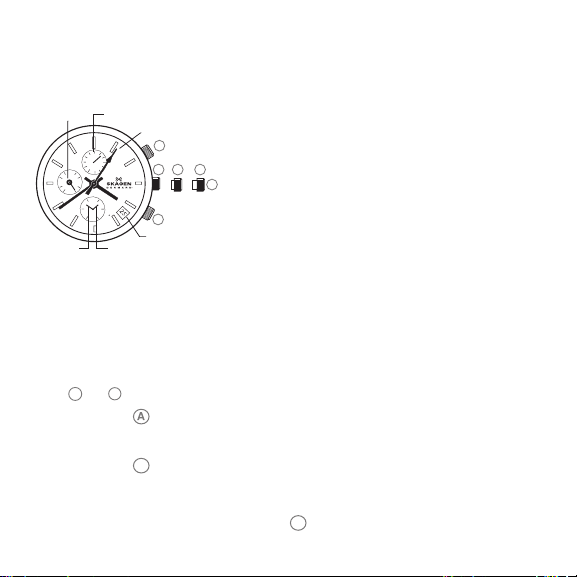
Small
Second
Hand
1/20-Second Hand
Stopwatch Second Hand
A
Date
2 31
B
C
60
45
SEC.
30
Stopwatch
Minute Hand
15
60
50
10
40
MIN.
20
30
Stopwatch
Hour Hand
ChroNograph rESEt
This should only be performed when second hand does not return
to 0 second position.
A. Pull the crown out to the middle or full extended position.
(
or 3 depending on the model)
2
B. Press the
for 2 seconds to select the stopwatch hand(s)
that need to be adjusted.
C. Press the
B
repeatedly to place the selected stopwatch
hand(s) at zero second position.
The hand(s) move(s) quicker if the
is kept pressed.
B
Page 9
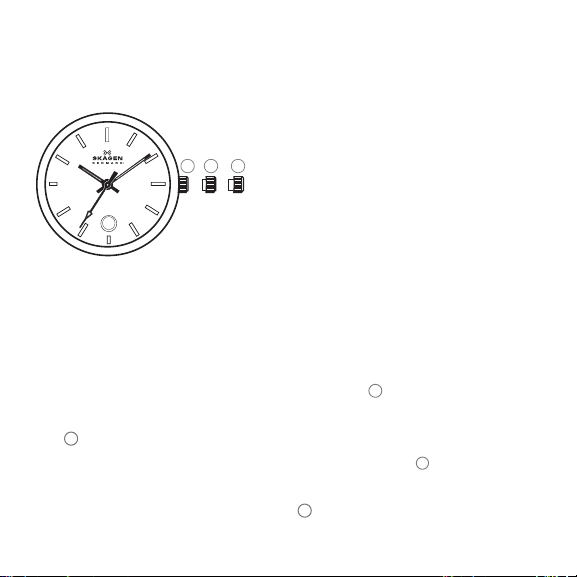
BIG DATE
1
2 3
A. On the first day of a new month the date has to be manually
set from 31 over 39 to 1 by the user. The date change
(e.g. from 21 to 22) has a long changing time. (2-3 hours)
instead of the normal 1 hour changing time.
B. To set second digit: Pull crown out to the
counter-clockwise to set. To set first digit: Pull crown out to the
1
position and rotate clockwise to set.
C. To set time: Pull crown out to the fully extended
and set to desired date.
D. Push the crown back to normal
1
and time are now set.
2
position and rotate
3
position
position and the date
Page 10
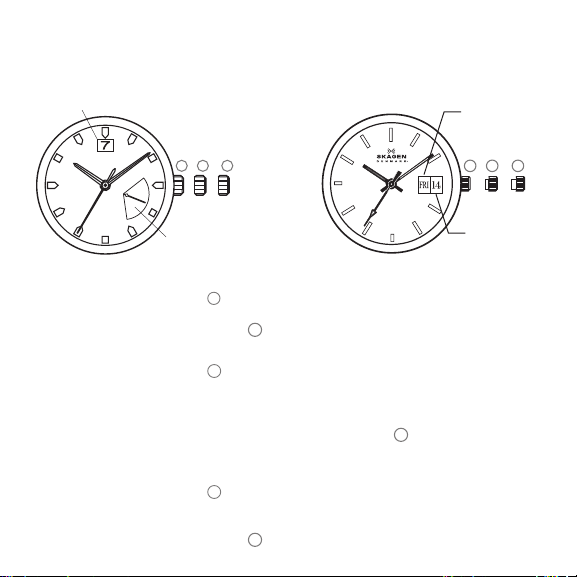
3 HAND DAY AND DATE
Date
1 2 3
Day
SEttINg thE tIME
A. Pull the crown out to the
B. Rotate the crown to desired time.
C. Push the crown back to normal
SEttINg thE DatE
A. Pull the crown out to the
B. Rotate the crown counter-clockwise to set date. *If the date is set
3
position.
1
position and the time is set.
2
position.
Day of the Week
1
3
2
Date
between the hours of around 9:00 PM and 1:00 AM,
the date may not change on the following day.
C. After date has been set, push the crown back to normal
and your date is set.
SEttINg thE DaY oF thE WEEK
A. Pull the crown out to the
B. Rotate the crown clockwise to set the day. *If the day is set between the hours of
around 9:00 PM and 1:00 AM, the day may not change on the following day.
C. Push the crown back to normal
2
position.
1
position and the day of the week is set.
1
position
Page 11
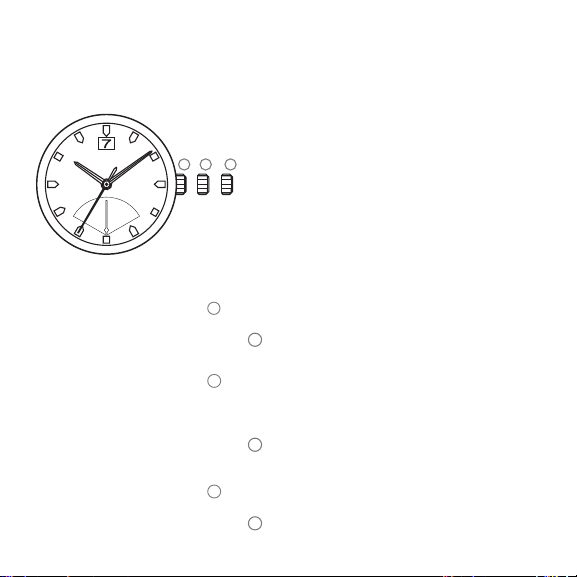
RETROGRADE DUAL TIME
1 2 3
SEttINg thE tIME
A. Pull the crown out to the
B. Rotate the crown to desired time.
C. Push the crown back to normal
SEttINg thE DatE
A. Pull the crown out to the
B. Rotate the crown clockwise to set the date.
3
position.
1
position and the time is set.
2
position.
*If the day is set between the hours of around 9:00 PM and 2:00 AM,
the date may not change on the following day.
C. Push the crown back to normal
SEttINg thE 2ND tIME (24 hourS)
A. Pull the crown out to the
B. Rotate the crown counter-clockwise to set the 2nd time.
C. Push the crown back to normal
1
position and the date is set.
2
position.
1
position and the 2nd time is set.
Page 12
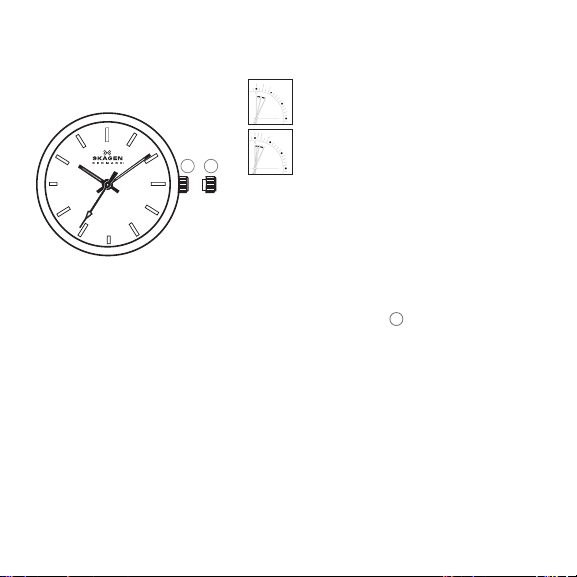
SOLAR POWERED
WarNINgS / NotIFICatIoNS For ChargINg:
Recharge warning function: Second hand moves at 2-second intervals.
The second hand changes to a two second interval movement to indicate
insufficient recharging. After exposing the watch to light, recharging takes
place and the watch returns to one second interval movement.
Time setting notification: Second hand moves irregularly /
When the second hand moves irregularly (1sec - 1sec - 2sec), it tells that
the time setting was not done after the watch stopped (due to insufficient
1
2
charge), and will continue to do so until the time is set. It is advised to set
the time after each sufficient charge.
approxIMatE tIME rEquIrED For ChargINg:
Charging Source For Full Charge For 1 Day Operation
20cm (8in.) under
a flourescent light 484 hours 2.8 hours
Outside, Cloudy conditions 31 hours 11.4 minutes
Outside, Sunny conditions 16.9 hours 6.0 minutes
SEttINg thE tIME
A. Pull the crown out to fully extended position
2
and rotate crown
to set desired time. Push the crown back to its normal position.
· This watch has a rechargeable cell which is charged by exposing the watch dial
to light such as direct sunlight or fluorescent lamps.
· Expose the watch dial towards direct sunlight for several hours at least
once a month.
· Do not charge watch at a high temperature (about 60°C/140°F or higher).
· After taking off the watch, put it in a position so that the dial is exposed to bright light,
such as by a window.
· Before storing the watch in a dark place for an extended period of time,
be sure to charge it fully.
1sec-1sec - 2sec.
Page 13
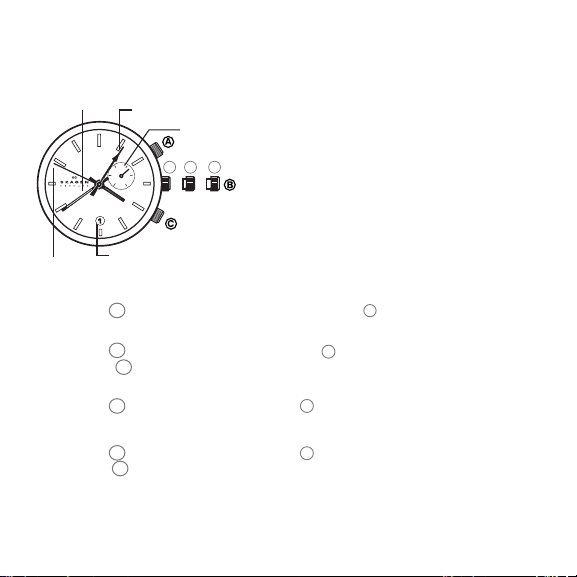
GMT/ALARM
Minute Hand
Duel Time
SEttINg thE tIME
A. Pull the
SEttINg thE DatE
A. Pull the
B. Push the
SEttINg thE SECoND tIME zoNE
A. Pull the
to set the hour hand.
SEttINg thE aLarM
A. Pull the
B. Use the
Alarm Hand
Second
Hand
24
1 2 3
20
4
16
8
12
Calendar
B
crown out to the fully extended position 3 and rotate the crown.
B
crown out to the middle position 2 and rotate the crown clockwise.
B
crown back to its normal position. The date and time are now set.
crown out to middle position 2 push and hold down A push-button
B
B
crown out to middle position 2 and rotate crown counter clockwise.
C
push-button to turn the alarm on and off, one beep means alarm is
off, two beeps means it is on.
*SETTING THE DATE CAUTION: NEVER CORRECT DATE BETWEEN 9 PM AND 12.30 AM
Page 14
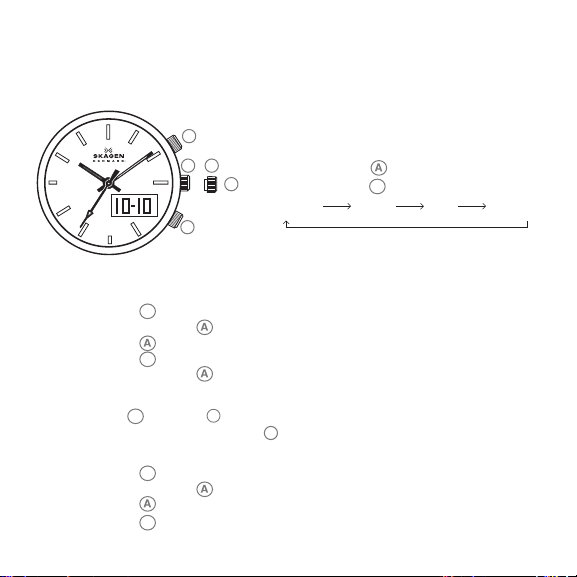
ANA-DIGI
A
C
NorMaL tIME DISpLaY
· In regular time display mode,
21
press pusher
B
· Press pusher
REAL TIME ALARM DAT E SECOND
tIME aND CaLENDar SEttINg - aNa-DIgI
1. Press pusher
2. Press and hold pusher
3. Press pusher
4. Press pusher
5. Press and hold pusher
tIME aND CaLENDar SEttINg - aNaLog
6. Pull crown
7. Push the crown back to its normal
aLarM SEttINg
1. Press pusher
2. Press and hold pusher
3. Press pusher
4. Press pusher
until REAL TIME mode is selected.
C
for 3 seconds to enter setting mode.
to select second, hour, month, date.
to adjust digit.
C
out to the 2 position and rotate to set the desired time.
B
C
for 3 seconds to exit setting mode.
position and the time is now set.
1
until ALARM mode is selected.
for 3 seconds to enter alarm time.
to select hour, minute, chime/alarm on/off.
to adjust digit.
C
to light up LCD light.
C
to select between modes:
 Loading...