

Page 1

Wearable Multi-Purpose Camera | Многофункциональная мини Камера
Tragbare Multifunktionskamera | SJCAM 便攜式記錄儀
Page 2

----------------------------------------------------------------------------01
----------------------------------------------------------------------------11
----------------------------------------------------------------------------22
----------------------------------------------------------------------------33
Page 3

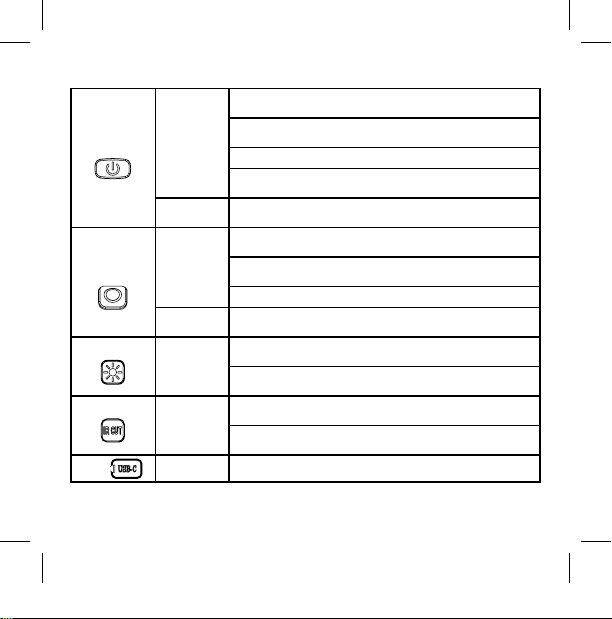
Buttons:
Shooting/Ok
Laser light/Up
Power Infrared/Down
.1 .
Page 4

nction keys overview:
Fu
1. Standby status,single press to call out the mode menu.
Power button
Shooting button
Laser light button
In frared button
USB Connection Data transmission,charging port.
.2 .
Single press
Long press Long press for 2s to power on/o.
Single press
Long press Menu settings,long press to start one-key recording.
Single press
Single press
2. Menu settings,single press to re.
3. REC mode,single press to playback.
4.While recording,single press this button to lock the video.
1.Recoring mode,single press to start/stop recording .
2.Photo mode,single press to take photo.
3.Menu settings, single press to conrm.
1.tandby or recording mode,single press to turn on/o laser
light.
2.Menu setting,single press to go up.
1.Manual infrared mode,to turn on/o infrared mode.
2.Menu setting, single press to go down.
Page 5

Touching gestures:
Click
Standby,Show/hide the status bar.
Menu state,Open/select the
corresponding settings.
Slide down
Standby state,Turn on WiFi / Remote
/ Lock screen / Power off / Shortcut /
Menu state.
Sliding options box.
Slide left&right
Standby state,Switch the shooting
mode.
Playback,Page turning.
Slide up
Standby state,Turn on mode menu.
Menu state,Sliding options box.
.3 .
Page 6
Basic operation:
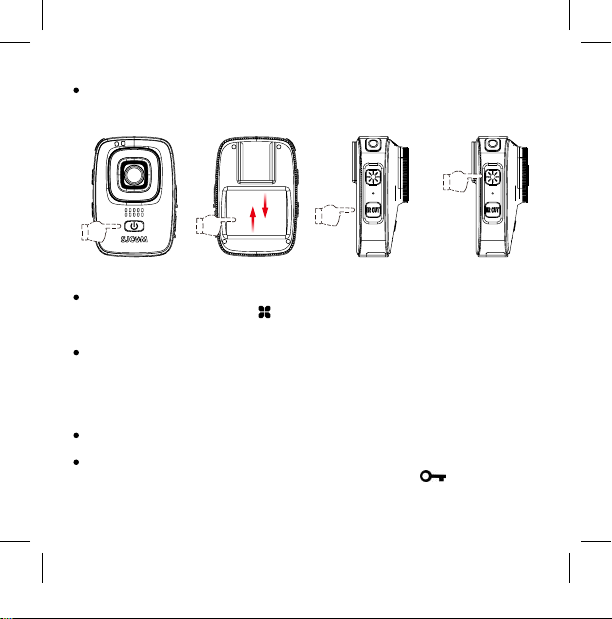
Power on/o(fIGURE 1)
Long press the power button for 2s to boot into the standby interface.
Long press power button to turn o.
(FIGURE 1) (FIGURE 2) (FIGURE 3) (FIGURE 4)
Mode switch(FIGURE 2)
Standby state,slide up or click the " "icon to call out the mode menu,then slide up/down
to browse the options.
Select the shooting mode icon,click and get into this mode.
Infrared night vision light(FIGURE 3)
Turn on to meet the demand of shooting in darkness,select the IR CUT to choose the
automatic/manual infrared night vision light state.
Auto mode, equipment will automatically turn on/o the infrared night vision light by ligh &
dark conditions.
Manual setting, single press the button to turn on/o infrared mode.
Laser light(FIGURE 4)
Standby state or recording state,single press to turn on/o the laser light.
Video lock
While recording,single press the power button and there will be a " " icon on screen,it
means this video been locked and cannot be deleted with this device,only to format the
card or connect computer to delete it.
.4 .
Page 7

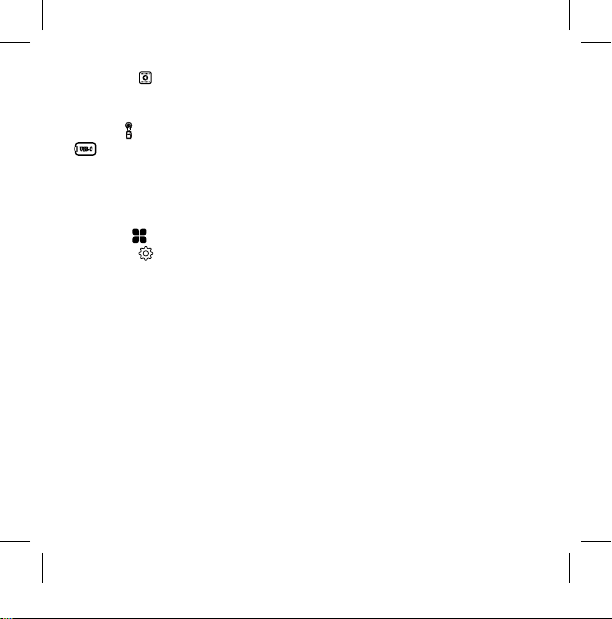
Shooting mode:
Recording
Switch to recording mode,single press the shooting
button(FIGURE 5) ,while see red dots ashing on screen then
camera recording well. Re-click the shooting button to
stop recording.
Photo
Switch to photo mode,single press the shooting button
(FIGURE 5) ,there is a "click" voice that is taking pictures and
save the photo.
Burst mode
Switch to burst mode,single press the shooting button
(FIGURE 5) ,there is several "click" voices and continuous
taking photos. (FIGURE 5)
Voice recording
Switch to Voice recording mode,single press the shooting button,the microphone icon
on screen will becomes red then voice recording runs well,re-click the shooting button to
stop voice recording.
Playback
Select the Playback in Menu settings to enter the play back interface of photos and
videos.
View photo/video: Use buttons/touching gestures to view the selected le at Playback
interface.
View the voice recording: Single press power button(Voice recording mode) to enter
Playback, use buttons/touching gestures to play the selected le.
.5 .
Page 8
Video Lapse
Switch to Video Lapse,single press the shooting button,red dot ashing on screen then
videorecording well,reclick to stop recording.
Car Mode
Switch to car mode,turn on it before power o,device will automatically power on &
recording while connect to charger.
Menu settings:
Click the " "icon or sliding upwards at standby state to call out mode menu, slide it
and select " "icon then enter the menu interface.
(Also can set the model parameters by entering the Settings menu in dierent shooting
mode)
Sliding to select the parameter options which need to be modied, click and choose the
appropriate parameters.
Click Return key to back to standby interface after setting over.
1.deo Resolution
Video resolution include four options - "1080P 30fps, 720P 30fps, WVGA 30fps, VGA
640* 480". The larger the value, the larger the resolution, and the larger the le size,
recording time will be shorter with the same size of storage and electricity; smaller
number will get opposite result.
2.Photo Size
Photo size include five options: "12M, 10M, 8M, 5M, 3M",respectively representing
12Megapixels to 3Megapixels. The larger the value, the larger the resolution, and the
larger the le size; smaller number will get opposite result.
3.Voice recording time
Voice recording time include three options--"3mins,5mins and 10mins",dierent option to
dierent voice recording time.
.6 .
Page 9

4.urst Mode
Burst mode include two options--"3 photos and 5 photos",single press the shooting
button to get multiple photos.
5.Video Lapse
Video lapse include six options--"1s, 2s, 5s, 10s, 30s, 1min", choose different time
interval to creat video.
6. Loop Recording
Loop Recording include four options--" O, 3mins, 5mins, 10mins",select this option, the
device will continuously record video segmentally until the memory card is full, and then
cover the contents of the previous record.
7.Motion Detection
Motion detection include two options: "O, On". While the device been placed stationary,
power on and start video recording, the device will be recording standby state if there is
no moving objects in front of lens.Device will automatically start recording with moving
objects and stop recording&save the le once the object stop moving.
8.Date
To turn on/o the shooting time watermark.
9.WDR
To turn on/o the WDR.
10. Photo Lapse
Photo lapse include ve options: "O, 3s, 5s, 10s, 20s". Turn on and press shooting
button,device will automatically taking photos with certain interval time at photo mode,repress the shooting button then it will be stopped.
11. Image quality
Image quality include three options: " Fine, Standard, Economy".
12.ISO
ISO,also been called sensitivity,include seven options: "Auto, 100, 200, 400, 800, 1600, 3200".
13. Language
To set the language of device.
.7 .
Page 10

14. Date/Time
To set the time,device will update the date/time automartically while it connect to WiFi
and APP.
15. Format
It will clear up all of your storage les,we suggest that you can export the le in advance.
16.Fast Record.
Turn on this function,camera will start recording automatically while switching to Record
mode from any status(Include power on).
17. Auto Power O
Auto Power O include four options: "O, 3mins, 5mins,10mins". It means that device
will power o automatically if no operation after power on.
18.Keypad Tone
To choose the sound volume of camera button output, the menu can be set to "On, O".
19.Screensaver
Screensaver has five options: "30s, 1min,3mins,5mins,Off".Screensaver means that
device will be screen o automatically and enter sleep mode after no operation after
power on.
20. Frequency
To choose "50Hz , 60Hz" depends on the region and requirement.
21. LOGO
To turn on/o logo watermark.
22. Device ID
To change the device ID.
23.WIFI
To change the WiFi SSID and password.
24.Default
Select this option to set all the settings to default.
25.Firmware version
To check the current version information of device.
.8 .
Page 11
Micro SD Card
To take video/photo,you need to use microSD card,please choose the card which can
meet the demand of requirments.
While recording,if the storage of card been used out,then camera will stop recording and
it will shows that the memory card is full on screen.
Attention: Please be careful while taking the memory card.Please avoid liquid,dust and
fractionlet. To be on the safe side,please power o the camera before insert/take out
the card.Please check the memory card manufacturer's instructions for use it within the
proper temperature range.
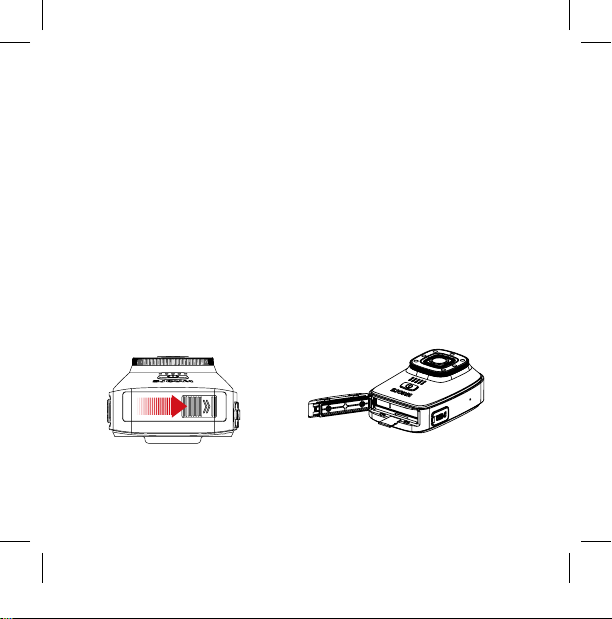
Insert microSD car:
Slide to open the battery cover.(FIGURE 6)
The label side of microSD card towards to battery direction,(FIGURE 7)insert it and close
the battery cover.
Attention: To take out the card,please press the card with your nger nail then it will pop-
up .
Reformat the microSD card.
(FIGURE 6) (FIGURE 7)
.9 .
Page 12

In order to get optimum performance,please format the card before rst using. To keep
the card intact,please reformat the card regularly.
Attention: Reformat the card will clear up all of the storage files,please export the
photo&videos in advance.
To reformat the card,please slide upwards and click "Settings"->"Format"->"Ok".
PRODUCT SPECIFICATIONS AND OTHER DETAILS
Product:SJCAM Portable Camera
Model:A10
Chipset :Novatek 96658
Sensor:Sony IMX323
View angle:140°
Aperture:F2.5
Lens:6G
Screen Size:2.0"
Input Voltage:3.8V
Input Current:1.3A
Wi-Fi Standard:Wi-Fi 802.11b/g/n 2.4GHz
Operating System:Support Android 4.1 and newer or iOS8.0
above smart phone or tablet with WiFi Function
For after-sales support service, you may contact our customer service through:
SJCAM after-sales ocial support at WWW.SJCAM.COM or call SJCAM
at: +86-0755-28314339
Manufacturer: SZ Hongfeng Century Technology CO,LTD
Address:4/F Building C, NO.2 Road 1, Shangxue lndustyialArea Bantian, Longgang
District, Shenzhen, China
.10.
Page 13

Tasten:
Aufnahme/Ok
Laserlicht/Up
Leistung Infrarot/Down
.11.
Page 14
Funktionstastenübersicht:
1. Standby-Status, drücken Sie einmal, um das Modusmenü
aufzurufen.
2. Menü-Einstellungen, einmaliges Drücken zum
Netzschalter
Aufnahmetaste
Laserlichttaste
Infrarot-Taste
USB Anschluss Datenübertragung, Ladeanschluss.
.12.
Einzeldruck
Langer Druck
Einzeldruck
Langer Druck
Einzeldruck
Einzeldruck
Wiederherstellen.
3. REC-Modus, drücken Sie einmal auf die Wiedergabe.
4. während der Aufnahme, drücken Sie einfach diese Taste,
um das Video zu sperren.
Langer Druck für 2 Sekunden zum Ein-/Ausschalten der
Geräts.
1. Aufnahmemodus, einmal drücken, um die Aufnahme zu
starten/stoppen.
2. Fotomodus, drücken Sie einmal, um ein Foto
aufzunehmen.
3. Menüeinstellungen, einmaliges Drücken zum Bestätigen.
Menü-Einstellungen, lange drücken, um die Aufnahme mit
einer Taste zu starten.
1. Standby oder Aufnahmemodus, einmal drücken, um das
Laserlicht ein- / auszuschalten.
2. Menüeinstellung, einmal drücken, um nach oben zu gehen.
1. Manueller Infrarot-Modus, um den Infrarot-Modus ein- und
auszuschalten.
2. Menüeinstellung, einmal drücken, um nach unten zu
gelangen.
Page 15

Berührungs Gesten:
Klick
Standby, Statusleiste ein-/ausblenden.
Menüzustand, Öffnen/Auswahl der
entsprechenden Einstellungen.
Nach unten wischen
Standby-Status, WiFi einschalten /
Fernbedienung / Bildschirm sperren /
Ausschalten / Tastenkürzel / Menüstatus.
Schiebe-Optionen-Box.
Schieber links & rechts
Standby-Modus, Schalten Sie den
Aufnahmemodus um.
Wiedergabe, Seitenwechsel.
Nach oben wischen
Standby-Status, Menü Modus
einschalten.
Menü-Status, Schiebe-Optionen-Box.
.13.
Page 16

Grundlegende Funktionsweise:
Ein-/Ausschalten(Abbildung 1)
Drücken Sie den Power-Knopf für 2 Sekunden lang, um in die Betriebsbereitschaft zu
gelangen.
Drücken Sie den Netzschalter lange, zum ausschalten.
(Abbildung 1) (Abbildung 2) (Abbildung 3) (Abbildung 4)
Betriebsartenschalter(Abbildung 2)
Standby-Status, nach oben schieben oder auf das Symbol klicken, um das
Modusmenü aufzurufen, dann nach oben/unten schieben, um die Optionen zu
durchsuchen.
Wählen Sie das Symbol für den Aufnahmemodus, klicken Sie darauf und wechseln Sie
in diesen Modus.
Infrarot-Nachtsichtlicht(Abbildung 3)
Schalten Sie die Kamera ein, wählen Sie IR CUT, um den automatischen/manuellen
Modus des Infrarot-Nachtsichtlichts zu wählen.
Im Automatikmodus schaltet das Gerät das Infrarot-Nachtsichtlicht bei hellen und
dunklen Lichtverhältnissen automatisch ein/aus.
Manuelle Einstellung, einmaliges Drücken der Taste schaltet den Infrarot-Modus ein/aus.
.14.
Page 17

Laserlicht(Abbildung 4)
Standby-Status oder Aufnahmestatus, einmaliges Drücken zum Ein- und Ausschalten
des Laserlichts.
Video-Sperre
Während der Aufnahme, drücken Sie einfach den Netzschalter und es wird ein
Schlüsselsymbol auf dem Bildschirm angezeigt, es bedeutet, dass dieses Video gesperrt
wurde und nicht mit diesem Gerät gelöscht werden kann. Nur durch die formatierung der
Karte oder den Anschluss an den Computer können Sie es löschen.
Aufnahmemodus:
Aufnahme
Schalten Sie in den Aufnahmemodus, drücken Sie einmal
die Aufnahmetaste, während rote Punkte auf dem
Bildschirm blinken. Klicken Sie erneut auf die
Aufnahmetaste, um die Aufnahme zu beenden.
(Abbildung 5)
Foto
Wechseln Sie in den Fotomodus, drücken Sie einmal die
Aufnahmetaste, es gibt einen "Klick"-Ton, speichern Sie
das Foto. (Abbildung 5)
Serienbildmodus
Wechseln Sie in den Serienbildmodus, drücken Sie einmal
auf die Aufnahmetaste, es gibt mehrere "Click"-Töne und (Abbildung 5)
fortlaufende Aufnahmen. (Abbildung 5)
.15.
Page 18

Sprachaufzeichnung
Wechseln Sie in den Sprachaufzeichnungsmodus, drücken Sie einmal die
Aufnahmetaste, das Mikrofonsymbol auf dem Bildschirm wird rot, dann startet
die Sprachaufzeichnung, klicken Sie erneut auf die Aufnahmetaste, um die
Sprachaufzeichnung zu beenden.
Wiedergabe
Wählen Sie die Option Wiedergabe in den Menüeinstellungen, um die Wiedergabe für
Fotos und Videos aufzurufen.
Foto/Video ansehen: Verwenden Sie die Tasten/Berührungsgesten, um die ausgewählte
Datei auf dem Bildschirm anzuzeigen.
Sprachaufzeichnung abhören: Drücken Sie einmal die Power-Taste
(Sprachaufzeichnungsmodus), um die Wiedergabe zu starten, verwenden Sie Tasten/
Berührungsgesten, um die ausgewählte Datei abzuspielen.
Video Zeitraer
Wechseln Sie zu Video Lapse, drücken Sie einmal die Aufnahmetaste, der rote Punkt
blinkt auf dem Bildschirm, dann wird die Videoaufzeichnung gestartet, klicken Sie erneut,
um die Aufnahme zu stoppen.
Auto-Modus
Schalten Sie in den Auto-Modus, schalten Sie ihn vor dem Ausschalten ein, das
Gerät schaltet sich automatisch ein und zeichnet auf, während Sie es mit dem Ladegerät
verbunden ist.
Menü-Einstellungen:
Klicken Sie auf das Symbol im Standby-Modus nach oben schieben, um das Modus-
Menü aufzurufen, und dann die Menü-Oberäche aufzurufen.
(Sie können die Modellparameter auch einstellen, indem Sie das Einstellungsmenü
in einem anderen Aufnahmemodus aufrufen.)
Wenn Sie die zu ändernden Optionen auswählen möchten, klicken Sie auf die
.16.
Page 19

entsprechenden Parameter und wählen Sie diese aus.
Klicken Sie auf die Eingabetaste, um nach der Einstellung auf die Bereitschaft
zurückzukehren.
1. Video Auösung
Die Videoauösung umfasst vier Optionen - "1080P 30fps, 720P 30fps, WVGA 30fps,
VGA 640* 480".
Je größer der Wert, desto größer die Auflösung und je größer die Dateigröße, desto
kürzer wird die Aufnahmedauer bei gleichem Speicher und Stromverbrauch. Eine
kleinere Auösung führt zu einem entgegengesetztem Ergebnis.
2.Fotogröße
Die Fotogröße umfasst fünf Optionen: "12M, 10M, 8M, 5M, 5M, 3M", die jeweils
12Megapixel bis 3Megapixel repräsentieren. Je größer der Wert, desto größer
die Auflösung und desto größer die Dateigröße, eine kleinere Zahl führt zu einem
gegenteiligen Ergebnis.
3. Dauer der Sprachaufzeichnung
Die Sprachaufzeichnungszeit umfasst drei Optionen -"3 Min, 5 Min. Und 10 Min".
verschiedene Optionen für unterschiedliche Sprachaufzeichnungszeiten.
4. Serienbild-Modus
Der Serienbildmodus umfasst zwei Optionen, „“3 Fotos und 5 Fotos“, drücken Sie die
Aufnahmetaste einmal für Serienbilder.
5.Video Zeitraer
Video Lapse umfassen sechs Optionen -"1 sek., 2 sek., 5 sek., 10 sek., 30 sek., 1 Min.",
wählen Sie verschiedene Zeitintervalle, um Videos zu erstellen.
6. Schleifenaufzeichnung
Loop Recording umfassen vier Optionen -"O, 3mins, 5mins, 10mins", wählen Sie diese
Option, wird das Gerät kontinuierlich Video-Segmente aufnehmen, bis die Speicherkarte
voll ist, und dann den Inhalt der vorherigen Aufzeichnung überschreiben.
7. Bewegungserkennung
Die Bewegungserkennung umfasst zwei Optionen: "Aus, Ein". Während das Gerät
im Standby-Modus arbeitet, wird das Gerät automatisch die Aufnahme von sich
bewegenden Objekten starten und die Aufnahme stoppen, sobald sich das Objekt nicht
mehr bewegt.
.17.
Page 20

8. Datum
Zum Ein- und Ausschalten des Wasserzeichens für die Aufnahmezeit.
9. WDR
Zum Ein- und Ausschalten des WDR.
10. Foto Zeitraer
Der Foto Zeitraer umfasst fünf Optionen: "Aus, 3s, 5s, 5s, 10s, 20s". Schalten Sie die
Kamera ein und drücken Sie die Aufnahmetaste, das Gerät nimmt automatisch Fotos mit
einer bestimmten Intervallzeit im Fotomodus auf, drücken Sie die Aufnahmetaste erneut,
dann wird die Aufnahme gestoppt.
11. Bildqualität
Die Bildqualität umfasst drei Optionen: " Fein, Standard, Economy".
12. ISO
ISO, auch Empndlichkeit genannt, umfasst sieben Optionen: "Auto, 100, 200, 400, 800,
1600, 1600, 3200".
13. Sprache
Zum Einstellen der Sprache des Geräts.
14. Datum/Uhrzeit
Um die Uhrzeit einzustellen, aktualisiert das Gerät das Datum/Uhrzeit automatisch,
während es sich mit WiFi und APP verbindet.
15. Format
Wird alle Ihre gespeicherten Dateien löschen, wir empfehlen Ihnen, die Dateien vorab zu
sichern.
16. Schnelle Aufnahme
Wenn Sie diese Funktion einschalten, beginnt die Kamera automatisch mit der
Aufnahme, während sie in den Aufnahmemodus wechselt (Einschalten einschließen).
17. Automatische Abschaltung
Die automatische Abschaltung umfasst vier Optionen: "Aus, 3min, 5min, 5min, 10min".
Das bedeutet, dass sich das Gerät automatisch ausschaltet, wenn es nach dem
Einschalten nicht benutzt wird.
.18.
Page 21

18. Tastenfeld-Ton
Um die Lautstärke der Kameratastenausgabe zu wählen, kann das Menü auf "Ein, Aus"
gestellt werden.
19. Bildschirmschoner
Bildschirmschoner hat fünf Optionen: "30s, 1min, 3min, 3min, 5min, 5min, aus"
Bildschirmschoner bedeutet, dass das Gerät automatisch abgeschaltet wird und nach
dem Einschalten in den Ruhemodus wechselt.
20. Frequenz
Die Wahl von "50Hz, 60Hz" hängt von der Region und den Bedingungen ab.
21. LOGO
Zum Ein-/Ausschalten des Logo-Wasserzeichens.
22. Geräte-ID
Um die Geräte-ID zu ändern.
23. WIFI
So ändern Sie die WiFi-SSID und das Passwort.
24. Werkseinstellung
Wählen Sie diese Option, um alle Einstellungen auf die Werkseinstellung zu setzen.
25. Firmware-Version
Um die aktuellen Versionsinformationen des Geräts zu überprüfen.
Micro SD Karte
Um Video/Fotos, aufzunehmen benötigen Sie eine MicroSD-Karte.
Wählen Sie bitte eine Karte, die den Anforderungen der Aufnahmen gerecht wird.
Während der Aufnahme, wenn die Speicherkarte voll ist, stoppt die Kamera die
Aufnahme und zeigt auf dem Bildschirm an, dass die Speicherkarte voll ist.
Achtung: Bitte seien Sie vorsichtig bei der Entnahme der Speicherkarte und vermeiden
Sie Flüssigkeit, Staub und Verunreinigungen. Zur Sicherheit, schalten Sie die Kamera
aus, bevor Sie die Karte einsetzen/entnehmen, und lesen Sie die Gebrauchsanweisung
des Speicherkartenherstellers.
.19.
Page 22

Setzen Sie die MicroSD-Karte ein:
Schieben, um den Batteriefachdeckel zu önen.
Die Etikettenseite der MicroSD-Karte in Richtung der Batterie, einlegen und die
Batterieabdeckung schließen.
Achtung: Um die Karte herauszunehmen, drücken Sie bitte mit dem Fingernagel auf die
Karte, dann springt sie nach oben.
(Abbildung 6) (Abbildung 7)
Formatieren Sie die MicroSD-Karte neu.
Um eine optimale Leistung zu erzielen, formatieren Sie die Karte bitte vor dem ersten
Gebrauch.
Um die Karte intakt zu halten, formatieren Sie die Karte bitte regelmäßig neu.
Achtung: Wenn Sie die Karte neu formatieren, werden alle Dateien gelöscht, bitte
sichern Sie Ihre Fotos und Videos vorher.
Um die Karte neu zu formatieren, wischen Sie sie bitte nach oben und klicken Sie auf
"Einstellungen"->"Format"->"Ok".
.20.
Page 23

PRODUKTSPEZIFIKATIONEN UND ANDERE DETAILS
Produkt: SJCAM Tragbare Multifunktionskamera
Baureihe: A10
Chipsatz: Novatek 96658
Sensor: Sony IMX323
Sichtfeld: 140°
Blende: F2.5
Objektiv: 6G
Bildschirmgröße: 2.0"
Eingangsspannung: 3.8V
Eingangsstrom: 1.3A
Wi-Fi-Standard: Wi-Fi 802.11b/g/n 2,4GHz
Betriebssystem-Unterstützung Android 4.1 und neuer oder
iOS8.0 und neuer Smartphone oder Tablett mit WiFi-Funktion
Für den After-Sales-Support können Sie sich auch einen Kundendienst geben:
SJCAM After-Sales-Support bei WWW.SJCAM.COM oder SJCAM anrufen
unter: + 86-0755-28314339
Hersteller: SZ Hongfeng Century Technology CO, LTD
Adresse: 4 / F Gebäude C, NO.2 Straße 1, Shangxue lndustyialArea Bantian, Longgang
Bezirk, Shenzhen, China
.21.
Page 24

Кнопки:
Съемка / Ок
Лазер / Вверх
Питание Инфракрасный / вниз
.22.
Page 25

Обзор функциональных клавиш:
1. Режим ожидания, один раз нажмите, чтобы перейти в
режим.
Кнопка питания
Кнопка съемки
Кнопка лазера
Инфракрасная
кнопка
USB Соединение Передача данных, зарядка.
Разовое
нажатие
Длительное
нажатие
Разовое
нажатие
Длительное
нажатие
Разовое
нажатие
Разовое
нажатие
2. Настройки меню, одно нажатие .
3. Режим записи, один раз нажмите для воспроизведения.
4. während der Aufnahme, drücken Sie einmal diese Taste,
um das Video zu sperren.
Длительное нажатие в течение 2 секунд для включения /
выключения.
1. Режим записи, одно нажатие для начала / остановки
записи.
2. Режим фото, одно нажатие для фотосъемки.
3. Настройки меню, одно нажатие для подтверждения.
Настройки меню, длительное нажатие для начала
записи.
1. Режим ожидания или записи, одно нажатие для
включения / выключения лазера.
2. Настройки меню, одно нажатие для перехода вверх.
1. Ручной инфракрасный режим, чтобы включить /
выключить инфракрасный режим.
2. Настройка меню, одно нажатие для перехода вниз.
.23.
Page 26

Сенсорное управление:
Нажатие
Режим ожидания, Показать/скрыть
строку состояния.
Состояние меню, Открыть/выбрать
соответствующие настройки.
Листнуть вниз
Состояние ожидания, включение WiFi /
Удаленное управление/ Заблокировать
экран/ Выключение питания / Быстрый
вызов/ Состояние меню.
Раздвижные опции.
.24.
Листнуть влево и вправо
Режим ожидания, Переключение
режима съемки.
Воспроизведение, поворот страницы.
Листнуть вверх
Режим ожидания, Включение
режимов.
Состояние меню, Сенсорные опции.
Page 27

Основные операции:
Включение / выключение питания(РИСУНОК 1)
Длинное нажатие кнопки питания в течение 2 секунд для перехода в режим
ожидания.
Длительное нажатие кнопки питания для выключения.
(РИСУНОК 1) (РИСУНОК 2) (РИСУНОК 3) (РИСУНОК 4)
Переключение режима(РИСУНОК 2)
Режим ожидания, листните вверх или нажмите на значок, чтобы вызвать
режимы, затем листните вверх / вниз, чтобы просмотреть параметры.
Выберите значок режима съемки, щелкните и перейдите в этот режим.
Инфракрасный свет для ночного видения(РИСУНОК 3)
Включите, чтобы выполнить требование съемки в темноте, выберите IR CUT, чтобы
выбрать режим автоматического/ручного инфракрасного света ночного видения.
Автоматический режим, оборудование автоматически включит/выключит
инфракрасный свет ночного видения в зависимости от освещения.
Ручная настройка, один раз нажмите кнопку, чтобы включить / выключить
инфракрасный режим.
Режим лазера(РИСУНОК 4)
Режим ожидания или состояние записи, однократное нажатие для включения /
выключения лазерного света.
.25.
Page 28

Блокировка видео
Во время записи нажмите на кнопку питания и на экране появится значок
«Ключ». Это означит, что видео было заблокировано и не будет удалено. Видео
можно удлать форматированием или подключить к компьютеру и удалить.
Режим съемки:
Запись
Переключитесь в режим записи, одним нажатием кнопки
съемки, пока красные точки мигают на экране, камера
записывает. Повторно нажмите кнопку съемки, чтобы
остановить запись.( РИСУНОК 5)
Фото
Переключитесь в режим фотосъемки, нажмите кнопку
съемки, ест кнопка, которая снимает и сохраняет
фотографию.( РИСУНОК 5)
В режиме серийной съемки
Переключитесь в режим серийной съемки, одним нажатием
кнопки съемки, есть несколько кнопок для непрерывного
фотографирования.( РИСУНОК 5) ( РИСУНОК 5)
Запись голоса
Переключитесь в режим голосовой записи, нажмите один раз кнопку съемки, если
значок микрофона на экране станет красным, то голос записывается хорошо,
нажмите кнопку съемки, чтобы остановить запись голоса.
Воспроизведение
Выберите Воспроизведение в Настройках меню, чтобы войти в интерфейс
воспроизведения фотографий и видео.
.26.
Page 29

Просмотр фото / видео: используйте кнопки/сенсор, чтобы просмотреть выбранный
файл в интерфейсе воспроизведения.
Запись голоса: кнопка однократного нажатия (режим записи голоса) для входа в
режим воспроизведения, использование кнопок / сенсора для воспроизведения
выбранного файла.
Video Lapse
Переключитесь на Video Lapse, нажмите один раз кнопку съемки, если красная
точка начнет мигать на экране, то видеозапись записывается, нажмите еще раз,
чтобы остановить запись.
Режим авторегистратора
Переключитесь в авторегистратора, включите его перед выключением
питания, устройство автоматически включится и начнет запись при подключении к
зарядному устройству.
Настройки меню:
значок или перейдите вверх в режиме ожидания, чтобы вызвать режимы,
пролистайте их и выберите, затем введите интерфейс меню.
(Также можно установить параметры модели, введя меню «Настройки» в
разных режимах съемки)
Листайте, чтобы выбрать параметры, которые необходимо изменить, щелкните и
выберите соответствующие параметры.
Нажмите кнопку «Назад», чтобы вернуться в начальный интерфейс после
завершения настройки.
1.deo Разрешение
Разрешение видео включает в себя четыре варианта: «1080P 30 кадров в секунду,
720P 30 кадров в секунду, WVGA 30 кадров в секунду, VGA 640 * 480». Чем больше
значение, тем больше разрешение и чем больше размер файла, время записи
будет короче с тем же размером памяти и расходом электричества; меньшее число
будет иметь противоположный результат.
.27.
Page 30

2. Размер фото
Размер фотографии включает пять вариантов: «12M, 10M, 8M, 5M, 3M»,
соответственно, от 12 мегапикселей до 3 мегапикселей. Чем больше значение, тем
больше разрешение, и тем больше размер файла; меньшее число будет иметь
противоположный результат.
3. Время аудиозаписи
Время аудиозаписи включает три варианта: «3 минуты, 5 минут и 10 минут»,
различная опция для различного времени записи голоса.
4. Режим серийной съемки
Режим серийной съемки включает в себя два варианта: «3 фотографии и 5
фотографий», один раз нажмите кнопку съемки, чтобы получить несколько
фотографий.
5. Video Lapse
Video lapse включает шесть опций - «1 сек, 2 сек, 5 сек, 10 сек, 30 сек, 1 мин»,
выбор разного временного интервала для создания видео.
6. Цикличная запись
Цикличная запись включает четыре варианта: «Выкл, 3мин, 5мин, 10мин»,
выберите эту опцию, устройство будет непрерывно записывать видео
сегментировано до тех пор, пока карта памяти не будет заполнена, а затем не
закроется содержимое предыдущей записи.
7. Обнаружение движения
Обнаружение движения включает в себя два варианта: «Выкл., Вкл.». В то
время как устройство было размещено неподвижно, включилось и запустило
видеозапись, устройство будет записывать в состоянии ожидания, если перед
объективом нет движущихся объектов. Устройство начнет запись с движущихся
объектов и остановит запись и сохранит файл после остановки объекта.
8.Дата
Включение и отключение значка времени съемки.
9.WDR
Включение / выключение WDR.
.28.
Page 31

10. Photo Lapse
Photo lapse включает пять вариантов: «Выкл, 3с, 5с, 10с, 20с». Включите и нажмите
кнопку съемки, устройство будет автоматически фотографировать с определенным
интервалом времени в режиме фото, повторно нажать кнопку съемки, после чего
он будет остановлен.
11. Качество изображения
Качество изображения включает три варианта: «Хорошее, Стандартное,
Экономное».
12.ISO
ISO, также называемое чувствительностью, включает в себя семь вариантов:
«Авто, 100, 200, 400, 800, 1600, 3200».
13. Язык
Чтобы установить язык устройства.
14. Дата / время
Чтобы установить время, устройство автоматически обновит дату / время, когда
оно подключится к WiFi и APP.
15. Форматирование
Оно очистит все ваши файлы, мы предлагаем вам экспортировать файлы заранее.
16. Быстрая запись
Включите эту функцию, камера начнет запись автоматически при переключении в
режим записи из любого состояния (включите питание).
17. Автоматическое отключение питания
Автоотключение включает четыре варианта: «Выкл., 3 минуты, 5 минут, 10 минут».
Это означает, что устройство автоматически отключится, если после включения
питания работать не будет.
18.Звук кнопок
Для выбора громкости звука кнопки камеры, меню можно установить на «Вкл.,
Выкл.»
19.Скрытый экран
Скрытый экран имеет пять вариантов: «30 с, 1 мин, 3 минуты, 5 минут, выкл».
Скрытый экран означает, что устройство автоматически отключится и переходит в
спящий режим, если не будет включения питания.
.29.
Page 32

20. Частота
Выбор «50 Гц, 60 Гц» зависит от региона и требования.
21. Лого
Включение и выключение знака логотипа.
22. Идентификатор устройства
Чтобы изменить идентификатор устройства.
23.WIFI
Чтобы изменить SSID и пароль WiFi.
24.По умолчанию
Выберите этот параметр, чтобы установить все настройки по умолчанию.
25. Версия для смартфонов
Чтобы проверить текущую информацию о версии устройства.
Карта Micro SD
Чтобы снять видео / фото, вам нужно использовать карту microSD, пожалуйста,
выберите карту, которая подходит под требования.
Во время записи, если память карты была использована, камера прекратит запись,
и она покажет, что карта памяти заполнена на экране.
Внимание: будьте осторожны, беря карту памяти. Пожалуйста, избегайте пыли
жидкости, пыли и частичек чего-либо. Чтобы быть в безопасности, пожалуйста,
выключите камеру, прежде чем вставлять / извлекать карту. Пожалуйста,
ознакомьтесь с инструкциями производителя карты памяти, чтобы использовать ее
при правильной температуре.
Вставьте карту microSD:
Сдвиньте крышку батарейного отсека
Вставьте карту microSD стороной с подписью в направлении батареи и закройте
крышку отсека.
Внимание: Чтобы вынуть карту, нажмите на неё пальцем.
Переформатируйте карту microSD.
.30.
Page 33

Для оптимальной производительности, отформатируйте карту перед первым
использованием. Чтобы карта оставалась в хорошем состоянии, регулярно
переформатируйте ее.
Внимание: При переформатировании карты удалятся все файлы с памяти
устройства, поэтому заранее экспортируйте фотографии и видео.
Чтобы переформатировать карту, перейдите вверх и нажмите «Настройки» ->
«Форматировать» -> «Ок».
( РИСУНОК 6) ( РИСУНОК 7)
.31.
Page 34

ТЕХНИЧЕСКИЕ ХАРАКТЕРИСТИКИ ПРОДУК ТА И ДРУГИЕ ДЕТАЛИ
Товар: Многофункциональная мини Камера SJCAM
Модель: A10
Чипсет: Novatek 96658
Сенсор: Sony IMX323
Угол обзора: 140°
Диафрагма: F2.5
Объектив: 6G
Размер экрана: 2.0"
Входное напряжение: 3.8 V
Входной ток: 1.3A
Wi-Fi: Wi-Fi 802.11b/g/n 2.4GHz
Операционная система: поддержка Android 4.1 и выше или iOS8.0 выше
смартфон или планшет с поддержкой Wi-Fi
Для послепродажной службы поддержки вы можете обратиться в нашу службу
поддержки через:
Послепродажная официальная поддержка SJCAM на WWW.SJCAM.COM или
вызов SJCAM
по адресу: + 86-0755-28314339
Производитель: SZ Hongfeng Century Technology CO, LTD
Адрес: 4 / F Building C, NO.2 Road 1, Shangxue lndustyialArea Bantian, Район
Лонгган, Шэньчжэнь, Китай
.32.
Page 35

按鍵標註:
拍攝 / 確定
激光燈 / 向上
電源開關 紅外 / 向下
.33.
Page 36

功能鍵概述:
1. 待機狀態下,短按此按鈕為呼出模式菜單。
2. 菜單設置下,短按此按鈕返回。
短按
電源鍵
拍攝鍵
激光燈鍵 短按
紅外鍵 短按
USB 連接 數據傳輸接口,充電接口。
.34.
3. 錄音模式下,短按此按鈕進入錄音文件回放。
4. 錄製狀態下,短按此按鈕進行鎖定。
長按 長按 2 秒可以開 / 關機。
1. 錄像狀態下,短按後開啟 / 關閉錄像功能。
短按
2. 拍照狀態下,短按後拍攝照片。
3. 菜單設置下,短按此按鈕為確定。
長按 菜單設置下,長按此按鈕進入一鍵錄像。
1. 待機或錄製狀態下,短按此按鈕打開 / 關閉激光燈。
2. 菜單設置下,短按此按鈕為向上。
1. 手動紅外模式下,打開 / 關閉紅外模式。
2. 菜單設置下,短按此按鈕為向下。
Page 37

觸屏手勢:
點擊
待機狀態,打開 / 隱藏狀態欄。 待機狀態,切換拍攝模式。
菜單狀態,打開 / 選中相應的設置。 回放模式,翻頁。
待機狀態,打開 WIFI、遙控器、鎖屏、關機、快捷欄 待機狀態,打開模式。
菜單狀態,滑動選項框。 菜單狀態,滑動選項框。
向下滑動
左右滑動
向上滑動
.35.
Page 38

基本操作:
開關機(圖 1)
關機狀態長按電源鍵 2 秒開機進入待機界面。
開機中任何狀態下長按電源鍵 2 秒後關機。
(圖 1) (圖 2) (圖 3) (圖 4)
模式切換(圖 2)
待機狀態下向上滑動屏幕或者點擊“ ”圖標呼出模式菜單,上下滑動可以進行瀏覽,選
擇需要的拍攝模式圖標點擊後進入該模式。
紅外夜視燈(圖 3)
紅外夜視燈開啟後可滿足夜間黑暗環境下拍攝需求,在模式菜單中選擇 IR CUT 自動 / 手
動兩种。
红外夜視燈狀態:
自動設置下可根據光暗情況自動開啟或關閉。
手動設置下短按紅外燈鍵,打開 / 關閉紅外模式。
激光燈(圖 4)
待機狀態或錄製狀態下,短按激光燈鍵,打開 / 關閉激光燈。
視頻鎖定
錄製狀態下, 短按電源鍵, 屏幕上出現“ ”圖標,則表示這段視頻鎖定,無法通過
.36.
Page 39

本機進行刪除,只能通過格式化存儲卡或者連接電腦進行刪除。
拍攝模式:
錄像
切換至錄像模式,短按拍攝鍵(圖 5),屏幕上有紅色圓點在閃動,
則機器錄像正常,再次按下拍攝鍵關閉錄像。
拍照
切換至拍照模式,短按拍攝鍵(圖 5),有“咔”的聲音即拍照並
保存照片。
連拍
切換至連拍模式,短按拍攝鍵(圖 5),有多次“咔”的聲音,按
一次拍攝鍵機器能夠連續拍攝多張照片。
錄音
切換至錄音模式,短按拍攝鍵,屏幕上麥克風圖標變為紅色,則機
器錄音正常,再次按下拍攝鍵關閉錄音。
(圖 5)
回放
模式菜單中選擇回放進入照片和視頻的回放界面。
查看照片 / 視頻:在回放界面通過按鍵或者觸屏手勢選擇需要的文件進行查看。
查看錄音:在錄音模式下短按電源鍵進入錄音回放,通過按鍵或者觸屏手勢選擇需要的文
件播放。
間隔錄影
切換至間隔錄影模式,短按拍攝鍵,屏幕上有紅色圓點在閃動,則機器錄像正常,再次按
下拍攝鍵關閉錄像。
車載模式
切換至車載模式,開啟車載模式關機後,機器連接充電器 會自動開機並開始錄像。
.37.
Page 40

菜單設置:
待機狀態點擊“ ”圖標或者向上滑動屏幕呼出模式菜單,滑動界面選擇“ ”進入菜
單界面。(不同拍攝模式下進入設置菜單可設置該項模式參數)
觸摸滑動選擇需要修改的參數選項,點擊進入該選項選擇合適的參數,設置完成後點擊返
回可返回待機界面。
1. 視頻分辨率
視 頻 分 辨 率 有“1296P 30fps 1080P 30fps、720P 30fps、WVGA 30fps、VGA
640*480”四種選項,數值越大,分辨率越大,文件也越大,同內存同電量錄製時間越短,
數值小者則相反。
2. 照片尺寸
照片尺寸有“12M、10M、8M、5M、3M”五種選項,分別代表 1200 萬到 300 萬像素,
數值越大,分辨率越大,文件也越大,數值小者則相反。
3. 錄音時間
錄音時間有“3 分鐘、5分鐘、10 分鐘”三種選項,不同的選項對應不同的錄音文件時間。
4. 連拍
連拍有“3 張、5 張”兩種選項,開啟連拍後,在連拍模式按一次拍攝鍵機器能夠連續拍
攝多張照片。
5. 間隔錄影
間隔錄影有“1 秒、2 秒、5 秒、10 秒、30 秒、1 分鐘”六種選項,通過選項中的時間間
隔拍攝畫面來創建視頻。
6. 循環錄影
循環錄影有“關、3 分鐘、5 分鐘、10 分鐘”四種選項,選擇該選項,機器會分段持續錄
像到存儲卡滿,然後覆蓋前面錄的內容。
7. 移動偵測
移動偵測有“關、開”兩種選項,是指機器放置不動時,開機並開啟錄像鍵,鏡頭前方無
物體移動時,機器為待錄像狀態,有移動物體時,自動開始錄像,靜止時自動停止錄像並
保存。
8. 日期標籤
.38.
Page 41

可以選擇開啟或者關閉拍攝時間水印。
9.WDR
可以選擇開啟或者關閉寬動態範圍。
10. 間隔拍照時間
間隔拍照有“關、3秒、5 秒、10 秒、20 秒”五種選項,開啟後按下一次拍攝鍵,機器
在拍照模式下間隔一定的時間會自動拍攝一張照片,再次按下拍攝鍵後停止。
11. 圖像質量
圖像質量有“優質、標準、經濟”三種選項。
12.ISO
ISO 即是感光度,有“自動、100、200、400、800、1600、3200”七種選項。
13. 語言設置
可以設置機器的語言。
14. 日期 / 時間
可以更改機器的時間,開啟 WIFI 連接 APP 機器會自動更新日期和時間。
15. 格式化
格式化會清除您所有的儲存內容,因此建議您先行導出攝錄文件。
16. 快速錄像
開啟該功能後相機從任何狀態下(包括開機)切換至錄像模式,機器都會自動開始錄像。
17. 自動關機
自動關機有“關、3 分鐘、5 分鐘、10 分鐘”四種選項。自動關機是指機器開機無任何操
作後機器自動關機。
18. 按鍵聲音
用於選擇當前機器的按鍵輸出的聲音,菜單可設置為”開、關”。
19. 屏保
屏保有“30 秒鐘、1 分鐘、3 分鐘、5 分鐘、關”五種選項,屏保是指機器開機無任何操
作後自動關閉屏幕進入休眠狀態。
20. 光源頻率
可以根據地區和需要進行選擇“50Hz、60Hz”兩種光源頻率。
21.LOGO 水印
可以選擇開啟或者關閉 LOGO 水印。
.39.
Page 42

22. 設備 ID
可以修改機器的 ID 號碼。
23.WIFI
可以修改機器的 WIFI 名稱和密碼。
24. 默認設置
選擇該選項會將機器的所有設置重置為默認設置。
25. 固件版本
可查看當前設備的版本信息。
MICROSD 卡
要拍攝視頻和照片,您需要使用 microSD 卡,請使用符合規格的存儲卡。
在錄像過程中,如果存儲卡的容量全部用完,攝像機將停止錄像,觸屏上也將顯示存儲卡
已滿。
注意事項:拿取存儲卡時請務必小心。避免接觸液體、灰塵和小碎片。為謹慎起見,插入
或取出存儲卡前請關閉攝像機。查看存儲卡製造商有關在適宜溫度範圍內使用的指導信息。
插入 microSD 卡:
滑開護蓋,(圖 6)將 microSD 卡的標籤朝向電池,插入,然後關閉電池護蓋。(圖 7)
注意:要取出存儲卡,用手指甲向卡槽內按壓存儲卡,存儲卡即會彈出。
(圖 6) (圖 7)
.40.
Page 43

重新格式化 microSD 卡
以獲得最佳性能。第一次使用 microSD 卡之前,請務必對其進行格式化。要保持存儲卡
完好無損,請定期重新格式化存儲卡。
注意:重新格式化會清除您的所有存儲內容,因此一定要先導出照片和視頻。
要重新格式化存儲卡,請向上輕掃,然後依次點擊“設置”>“格式化”>“確定”。
產品參數特性 :
產品名稱:SJCAM 便携記錄儀
產品型號:A10
主控芯片:Novatek 96658
鏡頭芯片:Sony IMX323
廣 角:140°
光 圈:F2.5
鏡 頭:6G 玻璃
屏幕尺寸:2.0 英寸
輸入電壓:3.8V
輸入電流:1.3A
無線連接:Wi-Fi 802.11b/g/n 2.4GHz
設備要求:系統為 Android 4.1 或 iOS8.0 及以上版本支持 Wi-Fi 的智能手機
若有售後服務需求,請聯繫 SJCAM 客服
歡迎訪問 SJCAM 售後服務網頁 WWW.SJCAM.COM 或撥打 SJCAM 服務電話:
+086-0755-28314339
製造商:深圳市弘豐世紀科技有限公司
地 址:深圳市龍崗區坂田街道上雪科技園科技一路 2 號 C 棟 3 樓
.41.
Page 44

.42.
V1.4
 Loading...