

Page 1
Operating Instructions
FS200+ Food Safety Thermometer
The FS200+ Food Safety Thermometer is two
thermometers in one: A non-contact infrared
thermometer for scanning surface temperatures
and a contact probe thermometer (type K
thermocouple) to precisely measure internal
temperatures. Users can switch between
infrared and probe measurements quickly and
easily.
Special Features:
* HACCP Zone Display
* IP65 protection from water and dust intrusion
_______________________________________________________________________________________
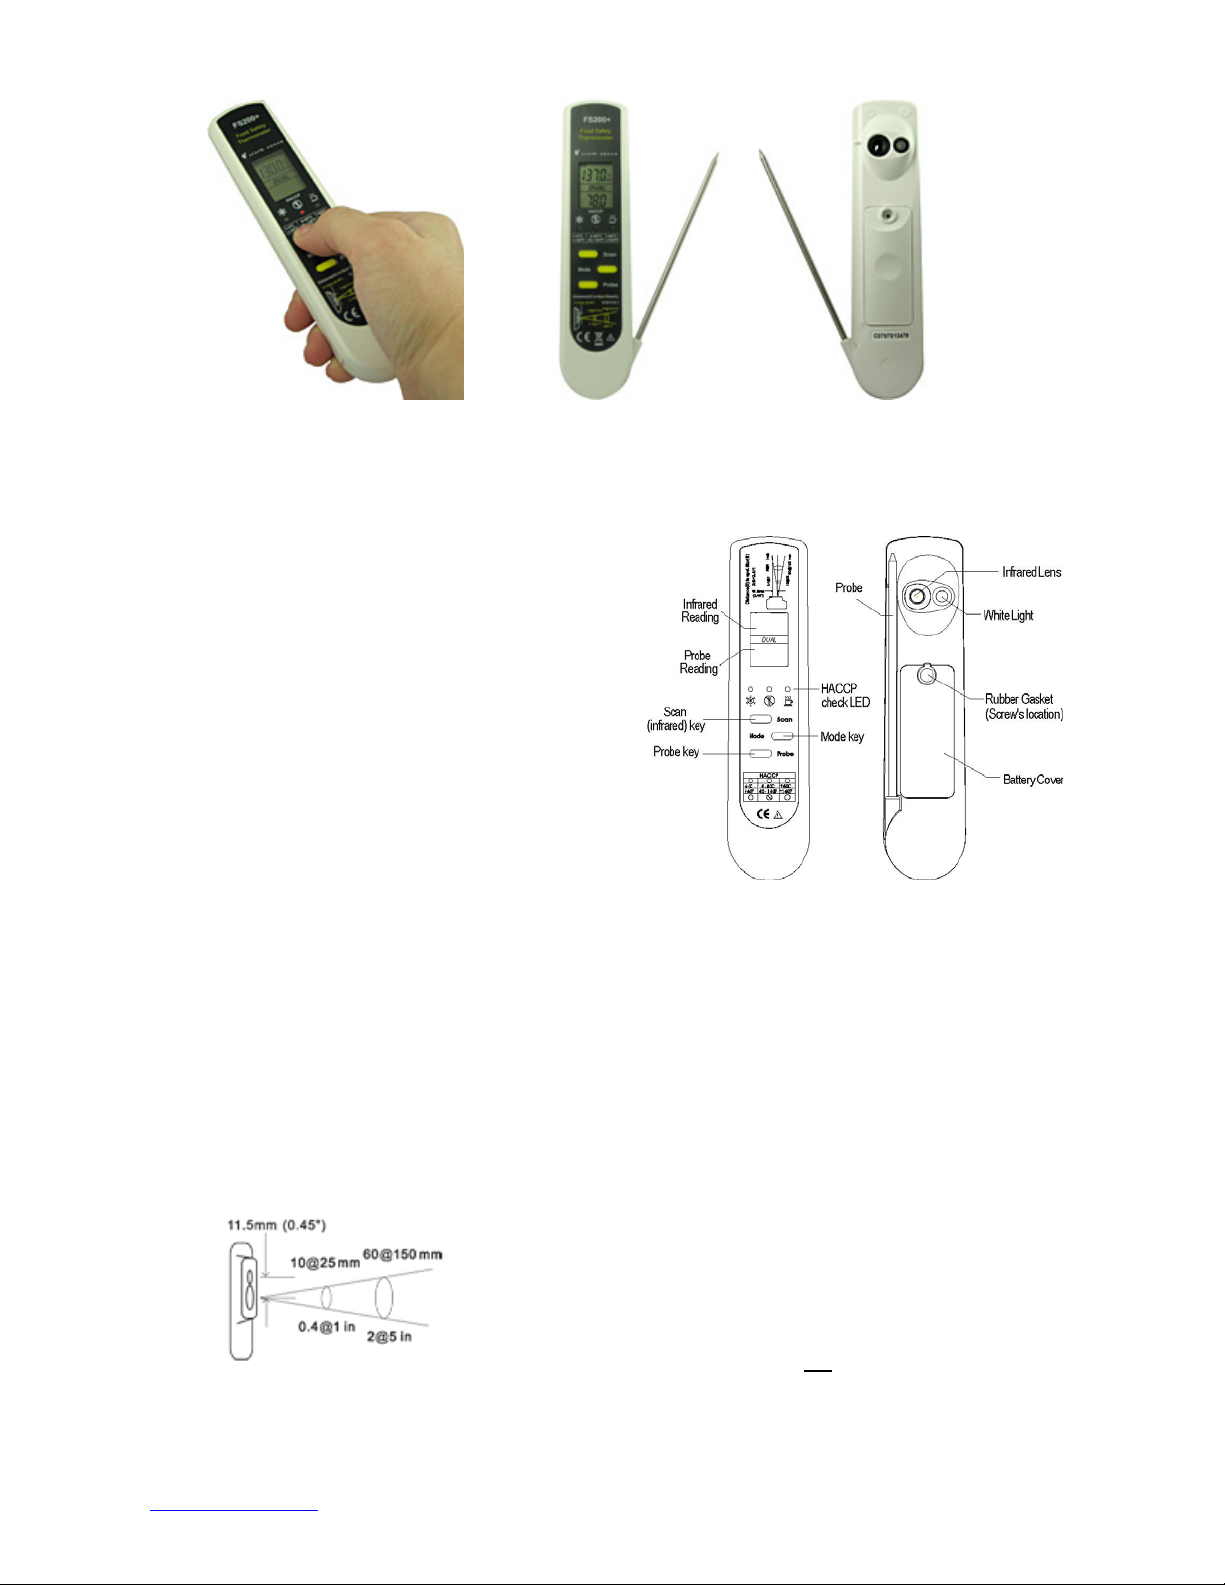
Non-Contact Infrared Thermometer Function
Distance to Spot Ratio
(D:S) = 2.5:1
Field of View
0.4” diameter circle at distance of 1 inch
1" diameter circle at distance of 2.5 inches
2" diameter circle at distance of 5 inches
3" diameter circle at distance of 7.5 inches
4" diameter circle at distance of 10 inches
_______________________________________________________________________________________
To use infrared thermometer function: Simply aim
the thermometer at the target and press the Scan
button to display the surface temperature. The LED
target light shows the approximate target area to be
measured. For best results, hold the thermometer
between 1 and 10 inches from the target and be
sure your target is larger than the thermometer's
field of view. The infrared thermometer will continuously measure and display updated surface
temperatures as long as the Scan key is depressed.
When the Scan key is released, the LCD display will
“Hold”, and the last measurement will remain visible
for 15 seconds then automatically turn off.
APPLICATION NOTE: The infrared thermometer
function measures the surface temperature of food
and other items - not
designed to be a screening tool only. Use the
attached thermocouple probe to verify internal
temperature.
internal temperature - and is
Page 2

_______________________________________________________________________________________
Mode Selection (MIN, MAX, LOCK, °C, °F, EMIS)
Minimum or Maximum Mode
The infrared thermometer will display the
minimum or maximum reading during the
measurement period until the Mode key is
pressed or the display auto powers off.
To activate Minimum (MIN) mode: Press the
Scan button until the temperature appears on
the display, then press the Mode button once.
You will see "MIN" appear above the
temperature reading. Immediately press and
hold the Scan button again to scan for minimum
temperature.
To activate Maximum (MAX) mode: Press the
Scan button until the temperature appears on
the display, then press the Mode button twice.
You will see "MAX" appear above the
temperature reading. Immediately press and
hold the Scan button again to scan for maximum
temperature.
Lock Mode
The lock mode is particularly useful for
continuous monitoring of temperatures. When in
lock mode, the infrared thermometer will
continuously measure and display the
temperature for up to 60 minutes.
_______________________________________________________________________________________
To activate Lock mode: Press the Scan button until
the temperature appears on the display, then press
the Mode button three times. You will see "LOCK"
appear above the temperature reading. Immediately
press and release the Scan button. The
thermometer will now continously measure and
display the temperature for up to 60 minutes or until
the Scan button is pressed again.
°C/°F Mode
To change °C/°F: Press Scan button until the
temperature appears on the display, then press the
Mode button four times. The °C or °F icon will blink.
Immediately press the Scan button to change from
°C to °F or °F to °C.
Emissivity
The infrared thermometer is supplied with a default
emissivity of 0.95. The emissivity can be changed
from 0.10 (10E on display) to 1 (100E on display).
For information relating to the emissivity of specific
materials, please contact Customer Service. To
change emissivity: Press the Scan button until the
temperature appears on the display, then press the
Mode button five times. You will see the current
emissivity setting (10E-100E). Press the Scan button
once for each 0.01 (1E) adjustment until the desired
emissivity is displayed. Press the Mode button once
to save the new emissivity.
Contact Thermocouple Probe Function
To use the Thermocouple Probe: Carefully
rotate probe 180 degrees from its storage
position against the FS200+ body. Press the
Probe button and insert the probe tip into the
item being measured. The thermometer will
continuously measure and display the
temperature for up to 4 minutes. Press the
Probe button again to "Hold" the current
temperature. To begin scanning again, press the
Probe button again.
CAUTION: Over-rotating, over-stressing or
forcing the probe outside the range of the hinge
will cause damage – please use care.
CAUTION: The probe is sharp and can be
dangerous in the fully extended position. Fold
the probe back against the unit when not in use.
CAUTION: The probe may remain hot after
measuring a high-temperature item. Allow it to
cool for a few minutes before touching.
CAUTION: The probe must be washed before
and after each use. Carefully hand wash - do not
submerge or wash in an automatic dishwasher.
CAUTION: Do not use this thermometer to
measure body temperature.
_______________________________________________________________________________________
Page 3

_______________________________________________________________________________________
HACCP Check
The FS200+ Food Safety Thermometer
incorporates the “HACCP CHECK” feature to
graphically indicate the critical temperature
zones. The icons and LED indicators indicate if
the food temperature is safe, or in the unsafe
HACCP “Danger Zone”. Note: The green and
red LED lights will always be lit before power off.
• A Green LED appearing above the snowflake
icon indicates a safe cool or frozen food
condition (below 4°C/40°F)
• A Green LED appearing above the steaming
mug icon indicates a safe hot food condition
(above 60°C/140°F)
_______________________________________________________________________________________
• A Red LED appearing above the fork icon
indicates that food is in an unsafe temperature
condition - the HACCP "Danger Zone" (between 460°C/40-140°F)
LCD Error Messages
The thermometer incorporates visual diagnostic
messages as follows:
‘Hi’ or ’Lo’ is displayed when the temperature
being measured is outside of the range of the
instrument:
‘Hi’ when measured temperature is higher than
+250°C (482°F)
‘Lo’ when measured temperature is lower than 55°C (-67 °F)
_______________________________________________________________________________________
‘Er2’ is displayed when the themometer is exposed
to rapid changes in the ambient temperature.
‘Er3’ is displayed when the ambient temperature is
lower than 0°C (32°F) or higher than +50°C (122°F).
The thermometer should be allowed plenty of time
(minimum 30 minutes) to stabilize to the
working/room temperature.
For all error messages it is necessary to reset the
thermometer. To reset the thermometer, wait for
auto power off, remove the battery, wait for at least
one minute, reinsert the battery, and turn on. If the
error message remains, please contact Customer
Service for further assistance.
Batteries
When the ‘Low Battery’ icon appears, the battery
should be replaced immediately with two new
1.5V AAA batteries. Please note: It is important
to turn the instrument off before replacing the
battery otherwise the thermometer may
malfunction.
The thermometer incorporates visual low battery
indication as follows:
‘Battery OK’: Thermometer will take
measurements
‘Battery Low’: Measurements are still
possible, but battery needs to be replaced
soon
‘Battery Exhausted’: Measurements are
not possible, replace battery before using
_______________________________________________________________________________________
Page 4

To Change Batteries
1. Remove small rubber gasket from the battery
cover with a fingernail or straightened end of a
paperclip, and use a small philips head
screwdriver to remove the screw.
2. Remove the battery cover.
_______________________________________________________________________________________
3. Remove the old batteries and replace with new
ones (two 1.5V AAA batteries). Note: Please
dispose of used batteries properly.
4. Reinstall the battery cover.
5. Insert screw and tighten using small philips head
screwdriver. Use fingertip to reinstall rubber
gasket over screw head.
Specifications
Infrared Thermometer Thermocouple Probe (K type, Grounded)
Measurement Range
Accuracy Tobj=15-35°C, Tamb=25°C +/-1°C at below -5
-55 to 250°C (-67 to 482°F) -55 to 330°C (-67 to 626°F)
+/-0.6°C (1.1 °F) +/-0.5°C at -5 to 65°C
+/-1% of reading at above 65°C
Tamb=23+/-3°C
+/-1°C + 0.1/degree at -33 to 0°C
+/-1°C at 0 to 65°C
+/-1.5% of reading at 65 to 250°C
Operating Range 32 to 122°F (0 to 50°C)
Emissivity Range 0.95 (default) – adjustable from 0.10 to 1.00, step 0.01
Wave Length 8µm to 14µm
Resolution (-9.9 to 199.9°C) 0.2°C/0.5°F
Distance to Spot 2.5:1
Dimensions 0.87 x 1.50 x 6.3 in (22.18 x 38 x 160 mm)
Weight (with battery) 3.5oz (98.1g)
Battery Life 18 hours continuous use (auto power off after 15 seconds)
EMC/RFI: Readings may be affected if the unit is operated within a radio frequency electromagnetic field
strength of approximately 3 volts per meter, but the performance of the instrument will not be permanently
affected.
Warnings
Keep away from children
Please dispose of used batteries properly
To avoid electric shock and thermometer damage, never place probe in contact with electricit y
Do not use this thermometer to measure body temperature
SALES & CUSTOMER SERVICE
_______________________________________________________________________________________
 Loading...