

SIX Payment Services xentissimo mobile GPRS/WLAN User Manual
User guide
xentissimo mobile GPRS/WLAN

2
1 Security requirements 3
1.1 Electromagnetic compatibility 3
1.2 Where wireless technologies are used 3
1.3 CE declaration of conformity 4
2 Product info 5
2.1 Terminal overview 5
2.2 Display symbols 6
2.3 Loading station: table/wall installation and clip holder 8
2.4 Changing the rechargeable battery/Installing SIM cards 9
2.5 Abbreviations/Information 10
2.6 GSM/GPRS 11
2.7 WLAN 12
2.8 Stand-by operation 12
2.9 Payment procedure with ep2 13
2.10 Technical information 13
3 Start-up 14
3.1 Installation 14
3.2 Setup 15
4 Menu tree (illustration) 16
4.1 Main menu 16
4.2 Transactions 17
5 Functions 18
5.1 Cashier: purchase 18
5.2 Cashier: manual recording of the card data 19
5.3 Customer handling: card without PIN 20
5.4 Customer handling: card with PIN 21
6 Methods of payment 22
6.1 Purchase authorised per telephone 22
6.2 Reversal 23
6.3 Credit 24
6.4 Reservation/Purchase reservation 25
6.5 Tip/Cash advance 26
6.6 Mail order/Other transactions 27
7 Balances 28
7.1 Start user shift/end user shift, daily closing, data transmission 28
8 Queries (totals), settings 29
9 Maintenance and handling 30
9.1 Printer settings 30
9.2 Care and maintenance 31
9.3 Services 32
9.4 Identifying and solving errors 33
9.5 Changing the paper roll 34
Table of contents

3
1 Security requirements
1.1 Electromagnetic compatibility
When connecting additional or other components the “Electromagnetic Compatibility Directive” (EMC) must be adhered to.
Hearing aids
Under certain circumstances, terminals can
cause some hearing aids to malfunction. Contact the dealer/manufacturer of your hearing aid.
Other medical equipment
If you use a medical device, please contact the
manufacturer to determine whether it is sufciently protected against electromagnetic
waves. If necessary, your attending physician
could be helpful in obtaining this information.
Equipment is often used in hospitals, medical
ofces and other facilities which is highly sensitive to external electromagnetic waves. Do not
use the terminal in such locations.
Aeroplanes
To avoid interfering with the communication
systems, do not use the terminal during the
ight. Only activate the terminal on the ground
with permission from the ground personnel.
Potentially explosive areas
Do not use the terminal in explosive zones or
areas bearing signs with “Switch off sending/
receiving devices”. Do not use the terminal in
such potentially explosive locations.
Appropriately marked locations
Follow instructions and do not use the terminal
in locations with obvious signs and instructions
prohibiting such use.
While driving
Radio frequencies can interfere with electronic
systems in vehicles, such as car radios or security devices, etc.
Vehicles equipped with airbags
An enormous force is released when airbags are
activated. Therefore, do not place the terminal in
the area above the airbag or in the space in which
the airbag could deploy. Terminals that are
improperly installed can cause serious injury
upon deployment of an airbag.
Electronic devices
Most morn electronic devices, such as those
used in hospitals and vehicles, are protected
against radio frequencies. However, this is not
the case with all electronic devices. Do not use
your terminal in the proximity of medical equipment without obtaining prior permission.
Heart pacemaker/other medical devices
Terminals can affect the functioning of implanted
heart pacemakers and other medically implanted
devices. Patients with a heart pacemaker should
be informed that the use of terminals in the
immediate vicinity of a pacemaker can lead to
malfunctions. Do not pass the terminal over the
pacemaker. The risk of a malfunction however, is
minor if a minimum distance of 15 cm between
the terminal and the pacemaker is maintained. If
you suspect that malfunctions are occurring, put
the terminal aside. If necessary, consult your cardiologist. If other medical devices are used in or
on the body, then the equipment manufacturer
should be consulted as to whether such devices
are suf ciently protected against radio frequency
signals. Do not use the terminal where the devices
are implanted.
1.2 Where wireless technologies are used

4
The CE declaration of conformity is found on the
SIX Payment Services homepage at:
www.six-payment-services.com
Ever y effort has been made to ensure that the information in
this document is complete and exact at the date of printing.
Further developments in the eld of electronic payment trafc
and technological progress could result in changes that might
deviate from the description in this user guide.
Consequently, SIX Payment Services Ltd accepts no responsibility for the information provided in the operating instructions
being current, complete or correct. Further more, to the extent
permitted under the relevant legal provisions, SIXPayment
Services Ltd accepts no responsibility in connection with the
operating instructions.
The menu navigation on the terminal has been designed to
be self-explanatory, making this document necessary only in
case of emergency.
The latest version o f the user guide, toge ther with any updat es,
can be found on our homepage at:
www.six-payment-services.com
1.3 CE declaration of conformity
5
2 Product info
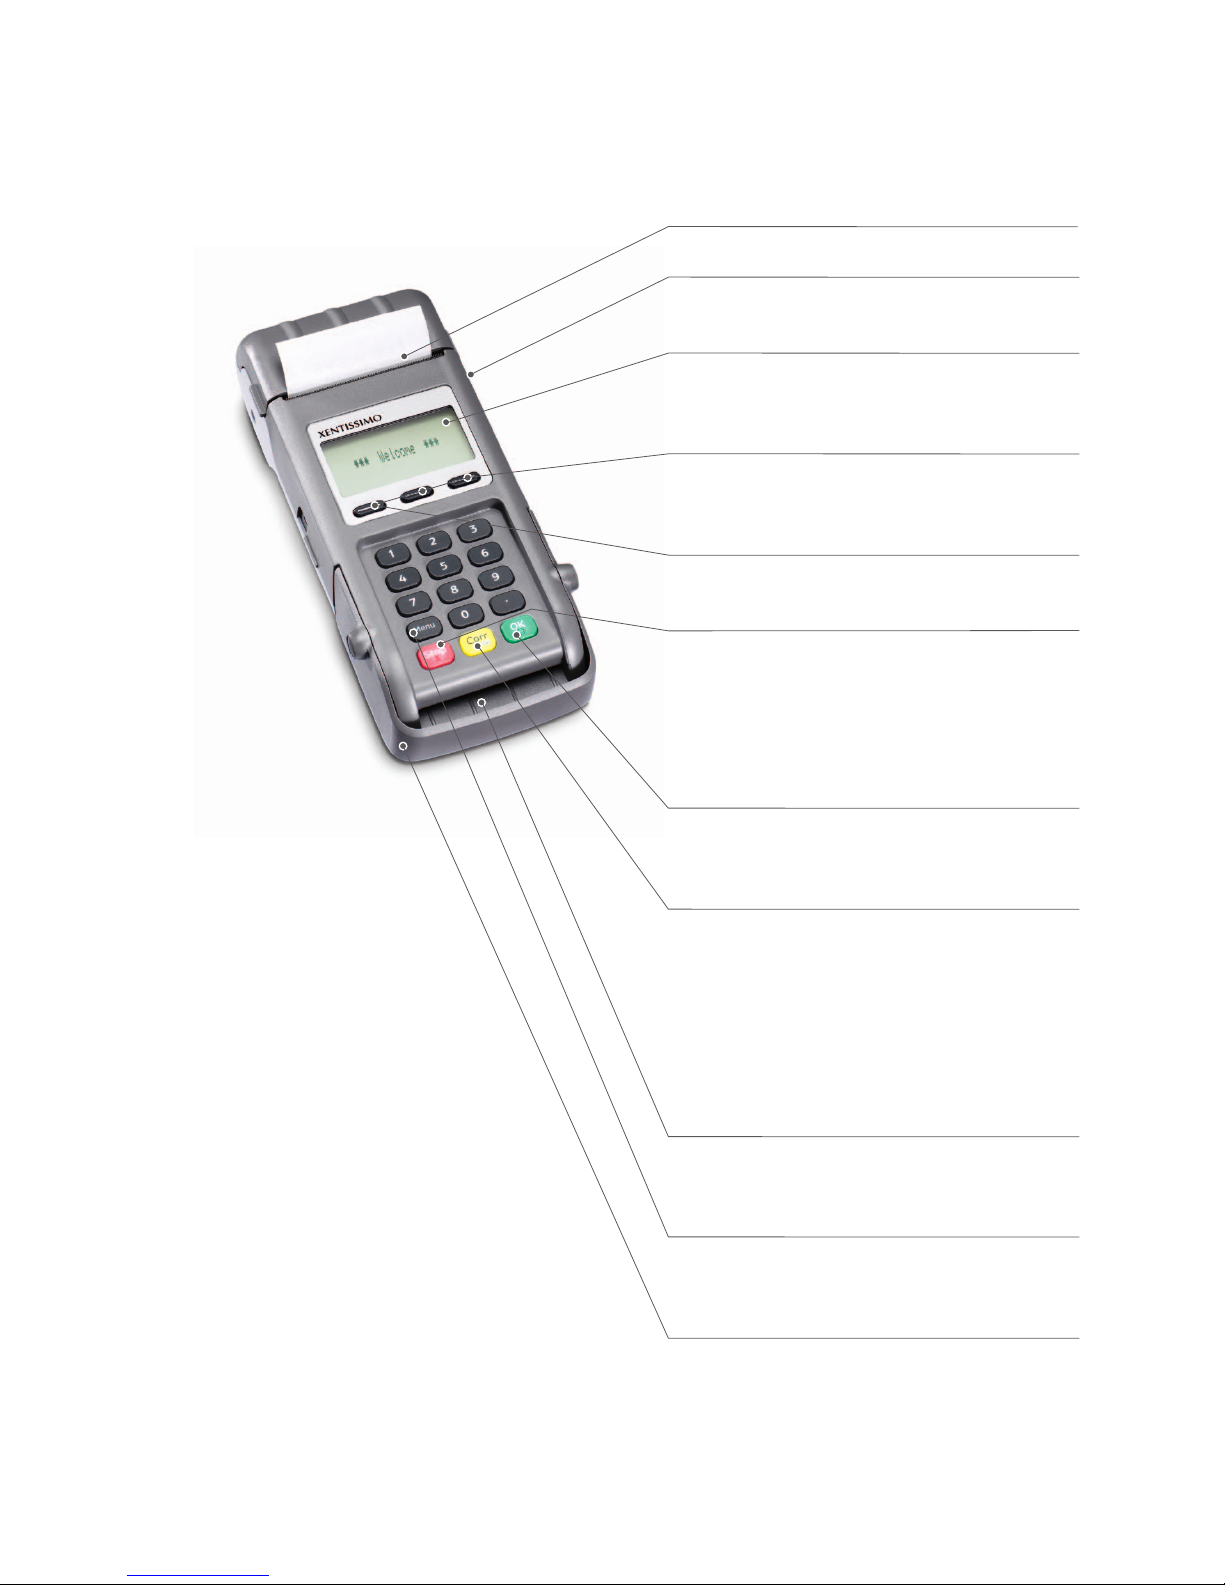
2.1 Terminal overview
Thermal printer
Magnetic strip reader (on the side)
For cards with magnetic strips.
Display
The next step to be taken is always shown on
the di splay.
Navigation buttons
You can use these three buttons to navigate
through the menu (up/down/conrm).
Special case
<Conrmation special signalization>.
<STOP> button
Active procedures can be stopped using this
button. The terminal can also be switched off
completely by pressing the button for more than
5 seconds (to do so, the terminal must not be
connected to the power supply).
<OK> button
All entries must be conrmed using the <OK>
button.
<Corr/On> button
– Incorrect entries can be corrected using the
<Corr> button.
– Press the button to activate the terminal from
stand-by mode.
– The terminal will restart if the button is
pressed for more than 5 seconds. All data will
be retained.
Chip reader
For chip cards (EMV-capable cards and postcards).
<Menu> button
Activates battery charging, displays reception
strength.
View protection
The swipe and chip reader can only be used
when the view protector is raised.
The view protection cannot be removed!

6
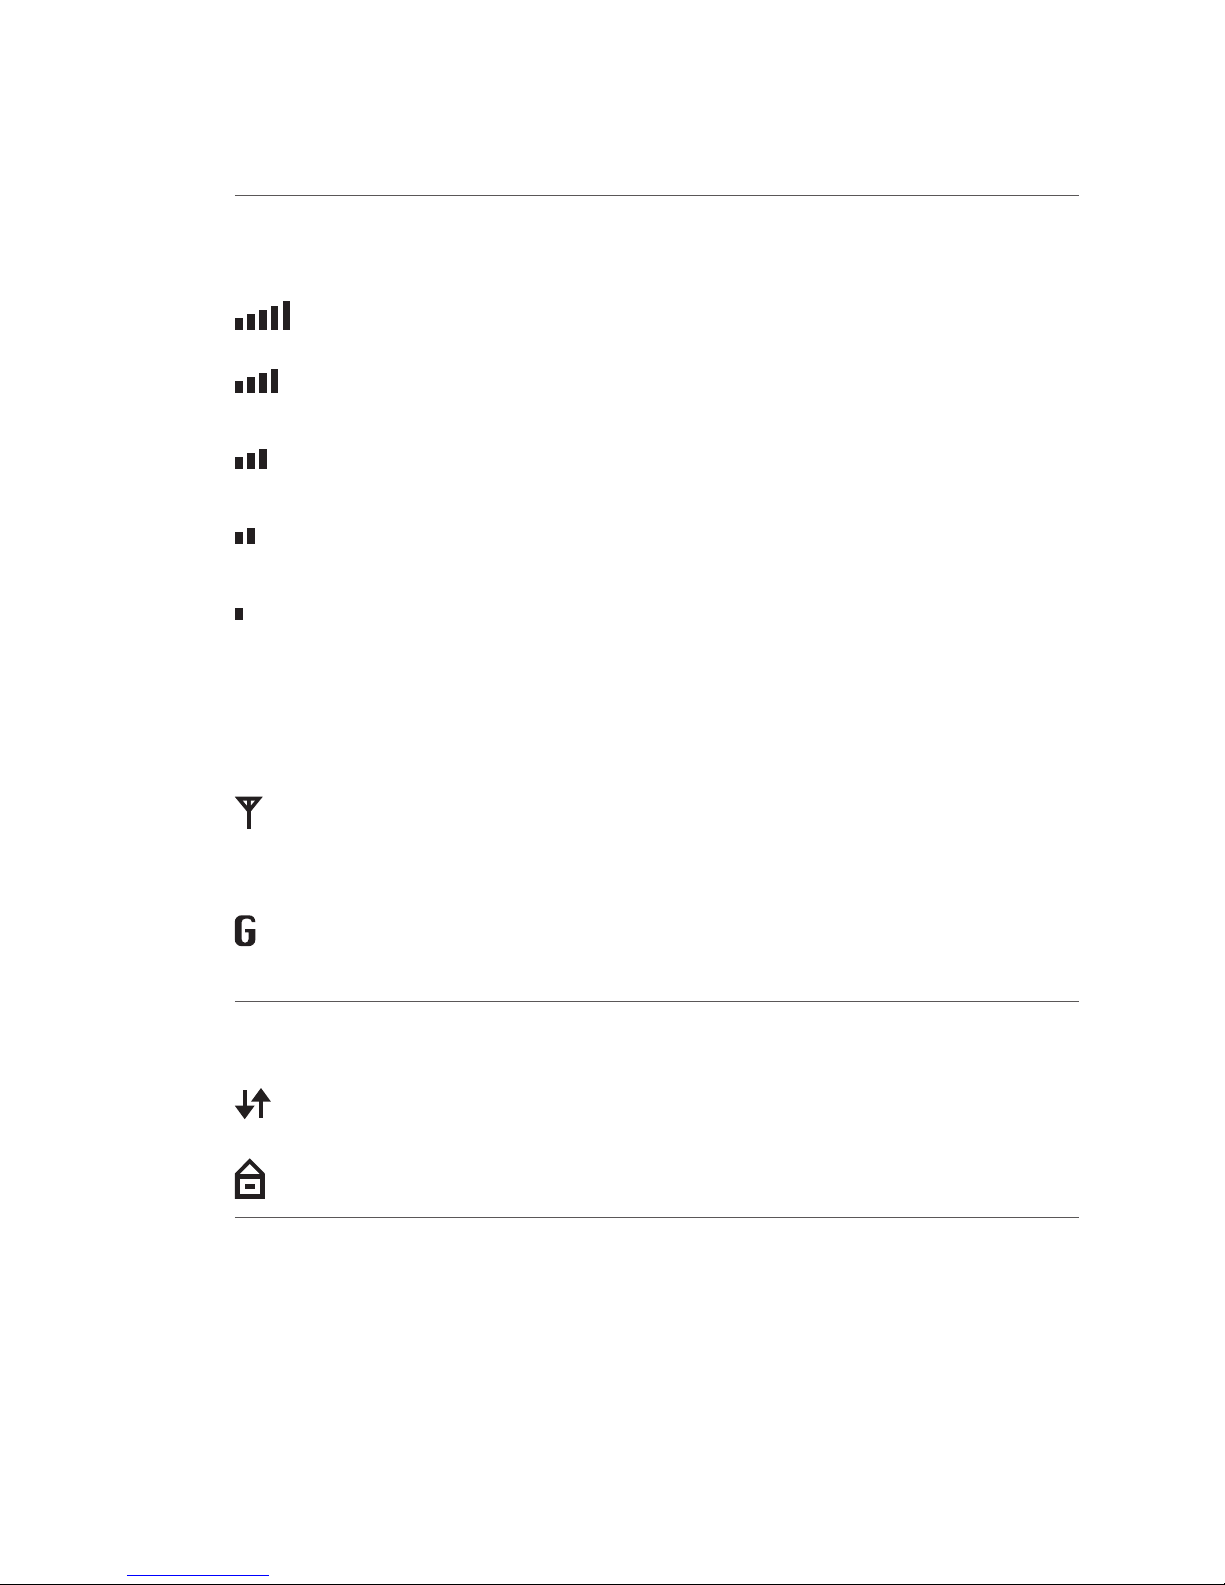
2.2 Display symbols
Battery
Bat tery l evel 95 – 100 %
Bat tery l evel 66 – 9 5%
Bat tery l evel 33 – 6 6%
Bat tery l evel 10 – 33%
Bat tery l evel 0 – 10%
! If the battery symbol does not appear, the battery is empty.
Recharging: The symbols are shown in the following order when the battery is recharging:
WLAN Only appears when WLAN communication is used.
WLAN is connected to an access point, the IP address is valid, and the reception
strength is 100%.
WLAN is connected to an access point, the IP address is valid, and the reception
strength is greater than 66%.
WLAN is connected to an access point, the IP address is valid, and the reception
strength is greater than 33%.
WLAN is connected to an access point, the IP address is valid, but reception is
poor.
! If the WLAN symbol ashes, there is a connection to the access point, but the IP address is
invalid.
! If the WL AN symbol does not appear, either WLAN is not available or there is no connection to
the access point.
7
GSM/GPRS
Reception
strength
Only appears when GPRS communication is used.
There is a connection to the network and the reception strength is 100%.
There is a connection to the network and the reception strength is greater than
80%.
There is a connection to the network and the reception strength is greater than
60%.
There is a connection to the network and the reception strength is greater than
40%.
There is a connection to the network and the reception strength is greater than
20%.
! If the GSM/GPRS symbol does not appear, GSM/GPRS is not assigned to a network or reception
is too poor to set up a connection.
The reception strength is supplemented by one of the two symbols shown below.
GSM is in use, GPRS is not available/in use.
! If the GSM/GPRS symbol ashes, it is in use but of ine.
GSM/GPRS is in use (GPRS mode).
! If no supplementary symbol appears, GSM/GPRS is not available.
GSM/GPRS
Data transmission
This symbol always appears together with a communication symbol. It shows
that a transaction is running.
This symbol appears with either the Ethernet or the WLAN symbol. It shows that
a secure connection is active.
8
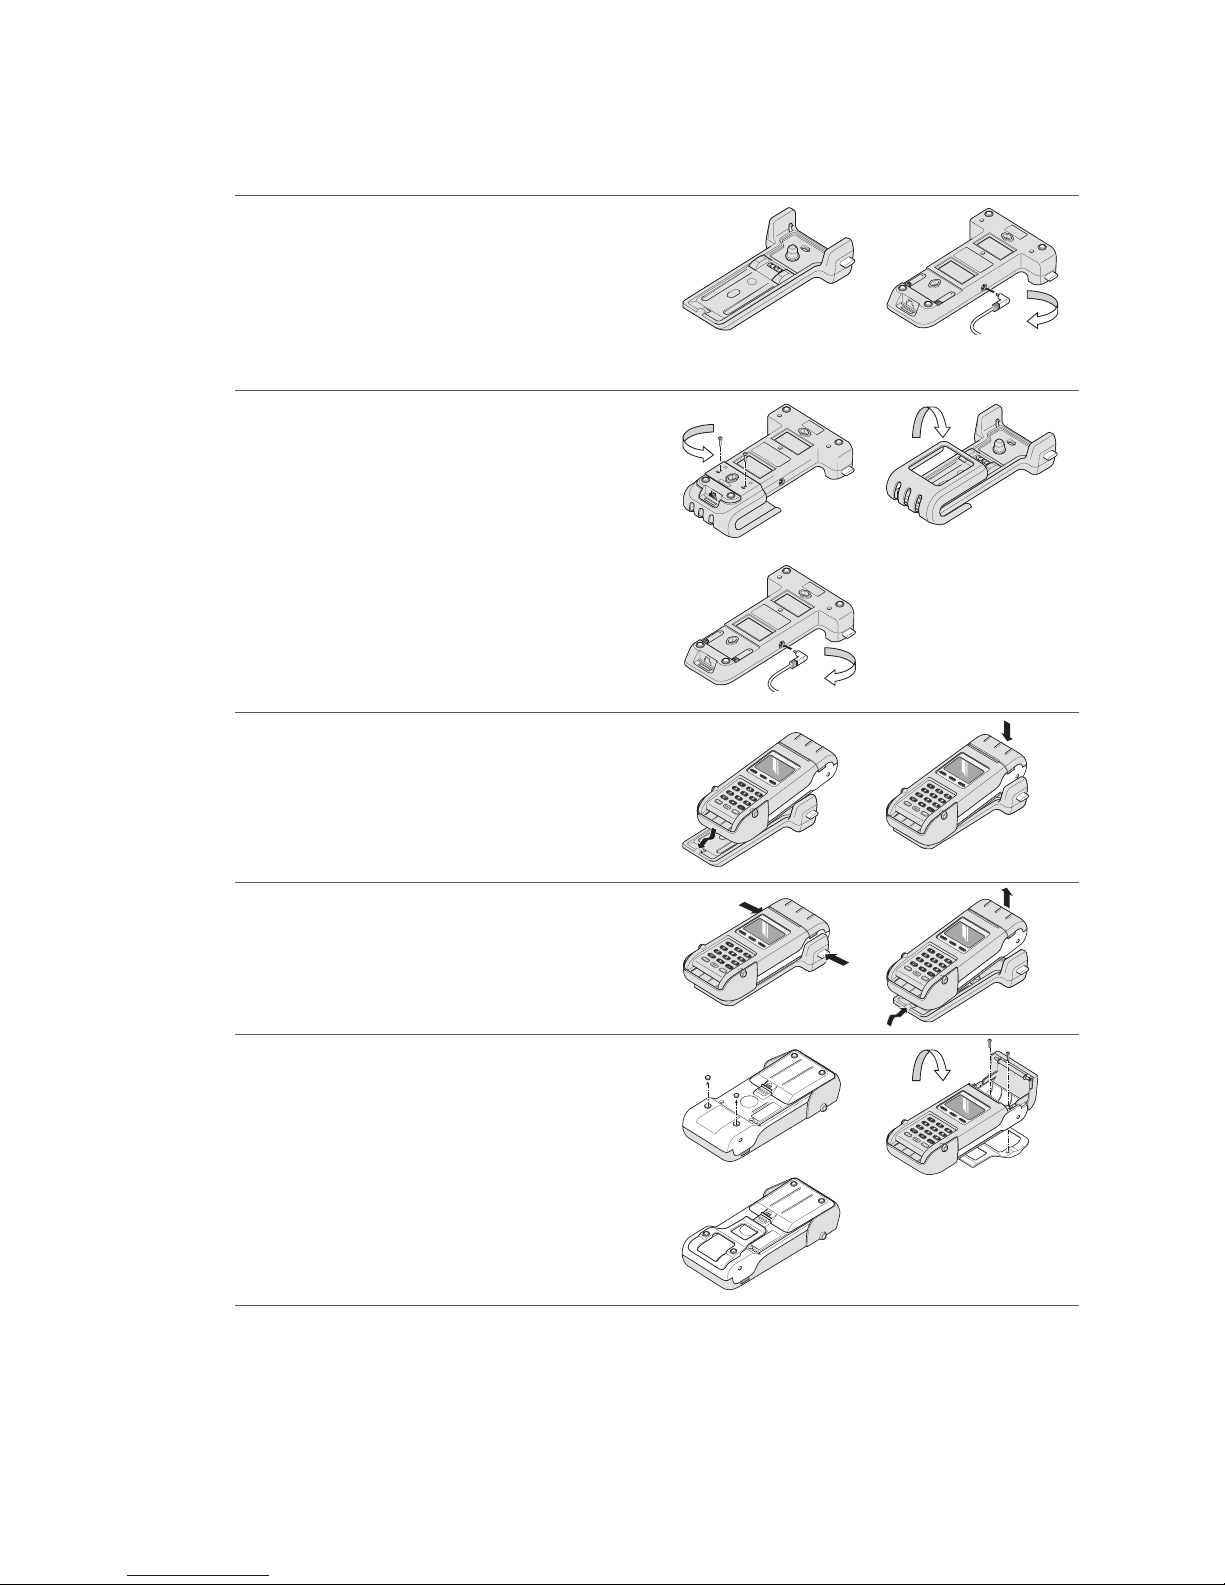
Table loading station installation
1. Loading station with power supply.
2. The electrical current is supplied through
the cable that connects directly with the
loading station.
1 2
Wall mount installation
1. The loading station is screwed to the wall
mounting component (screw holes
provided, see back of loading station).
2. Wall mounting (screw holes provided).
3. After the loading station has been positioned
on the wall, connect it to the power supply
using the cable provided.
1
3
2
Placing the xentissimo in the loading station
1. Insert the xentissimo from top to bottom.
2. Snap into the side clamps.
1 2
Removing the xentissimo
1. Press the two side buttons simultaneously.
2. Slide back and upwards to remove the unit.
1 2
Clip holder
1. Remove the plastic nub from the rear of the
xentissimo and put to one side.
2. Open the printer and remove the paper.
Slide the clip underneath. Tighten with a
Phillips head screwdriver. Reinsert the paper.
3. xentissimo with clip!
1
3
2
2.3 Loading station: table/wall installation and clip holder

9
The lifespan of the rechargeable battery is three
years. Replacement batteries can be obtained
from SIX Payment Services Ltd.
The rechargeable battery can be replaced in
four steps:
1. Press the tag with your thumb and remove
th e cove r.
2. Remove the rechargeable battery
(using a coin helps).
3. Insert the new rechargeable battery and
press it into place.
4. Slide the cover back into position.
1
2
3
4
Installing SIM cards
(generally performed by SIX Payment Services Ltd,
see point 2.5 GSM/GPRS).
1. Remove the rechargeable battery
(using a coin helps).
2. Remove the SIM card (to the left!) and insert
the new card. Replace the cover and close.
! Be sure to insert SIM card with the oblique
corner facing in the right direction!
If you do not intend to use the device for an
extended period of time, remove the rechargeable battery and store it separately.
2.4 Changing the rechargeable battery/Installing SIM cards

10
Cards with a chip Cards which store the information needed for electronic payment on a chip
must be inserted in the chip reader.
Cards with a
magnetic strip
Cards which store the information needed for electronic payment on a
magnetic strip must be pulled through the swipe reader.
CC Computer centre
CCC Credit card company
CrC Credit cards
CVC/CVV Card Verication Code /Card Verication Value number used to identify the
card.
EFT/POS Electronic fund transfer at the point of sale.
EMV Global specications from Eurocard, MasterCard and VISA based on a chip
card.
ep2 <EFT/POS 2000>, Swiss standard based on the EMV standard in electronic
payment trafc.
GPRS General Packet Radio Service (GPRS) is a packet-oriented transmission
ser vice that is used in the eld of mobile telephone systems.
GSM Global Standard for Mobile Communications
Online transaction An online transaction is always directly authorised at the CCC.
Ofine transaction An ofine transaction is authorised in interdependence with the card and
terminal risk management (e.g. if the amount of the previous transactions is
less than the card limit or if the amount is less than the terminal oor limit
on the card, etc.).
PF PostFinance (Switzerland)
PIN Personal Identication Number
PIN-based
transaction
For a PIN-based transaction, the customer must enter his/her PIN at the
point of sale during the payment process.
PSW Password
PUK Personal Unblocking Key
Tip Tip
TRM Terminal
TRX Transaction
WLAN A Wireless Local Area Network is a “wireless” local radio network, which
generally refers to a standard within the IEEE 802.11 family.
2.5 Abbreviations/Information

11
This function requires a GSM subscription
with data functionality.
The PIN/PUK must usually only be entered once.
This is done during the production phase of the
terminal. Keep your PIN and PUK for your GSM
subscription handy in case of a malfunction.
– The reception signal can vary greatly,
depending on the GSM provider and usage
environment. It is possible that the signal
may be weakened to the point that communications are impossible in cellars, houses
with thick walls or steel walls. If there is no
reception, you must change your location.
The battery charge level can be checked by
pressing the <Menu> button. The terminal
must be switched on to do so.
– Communications while in motion (in trains,
cars, boats, etc.) can become instable and
lead to a broken connection.
2.6 GSM/GPRS
 Loading...